Samsung Electronics Co SCX4200 Multi Function Printer User Manual 4200 EN
Samsung Electronics Co Ltd Multi Function Printer 4200 EN
Contents
- 1. Users Manual 1
- 2. Users Manual 2
Users Manual 2
Specifications
10.
1
10
Specifications
This chapter includes:
• General specifications
• Scanner and copier specifications
• Printer specifications
General specifications
Item Description
Model name EG42MFC (SCX-4200)
Paper input capacity Tray with multi-pages: 250 multi-pages for plain
paper (20 lb bond, 75 g/m
2
)
Tray with single page and manual tray: 1 single page
for plain paper, transparencies, labels, Post Card and
envelopes (16 ~43 lb bond, 60 ~ 165 g/m
2
)
Paper output capacity Face down: 50 sheets
Face up: 1 sheet
Consumables 1-piece toner cartridge system
Power rating 110 - 127 VAC, 50/60 Hz, 4.0 A (USA, Canada)
220 - 240 VAC, 50/60 Hz, 2.5 A (Others)
Power consumption Average: 350 W
Power save mode: Less than 10 W
Noise level
a
Standby mode: Less than 38 dBA
Scanning / Printing mode: Less than 53 dBA
Warm-up: Less than 53 dBA
Warm-up time Less than 42 seconds
First print out time Standby mode: less than 11 seconds
Cold status: less than 53 seconds
Operating
environment
Temperature: 50° F to 89° F (10° C to 32° C)
Humidity: 20% to 80% RH
Display 16 characters x 2 lines
Toner cartridge life
b
3,000 pages at ISO 19752 5% coverage
(Ships with 1,000 pages toner cartridge)
Memory 8 MB (Non-extendable)
External dimension
(W x D x H)
409 x 362 x 232 mm (16.1 x 14.3 x 9.1 inches)
Weight 9.3 Kg (including consumables)
Package weight Paper: 1.8 Kg, Plastic: 0.4 Kg
Scanner and copier specifications
Duty cycle Monthly print: Up to 4,000 pages
a Sound Pressure Level, ISO7779
b The number of pages may be affected by operating environment, printing interval,
media type, and media size.
Item Description
Compatibility TWAIN standard/ WIA standard
Scanning method Color CIS
Resolution Optical: Max. 600 x 2400 dpi (Mono and color)
Enhanced: 4,800 x 4,800 dpi
Effective scanning length Max. 297 mm (11.7 inches)
Effective scanning width Max. 216 mm (8.5 inches)
Effective: 208 mm (8.2 inches)
Color bit depth 24 bit
Mono bit depth 1 bit for Black & White mode
8 bit for Gray mode
Copy speed
a
a Copy Speed is based on Single Document Multiple Copy.
Up to 18 ppm in A4 (19 ppm in Letter)
Copy resolution Scan: up to 600 x 300 dpi (Text, Text/Photo)
up to 600 x 600 dpi (Photo)
Print: up to 600 x 600 dpi (Text, Text/Photo,
Photo)
Zoom rate 50 ~ 200%
Multiple copies 1-99 pages
Gray scale 256 levels
Item Description

Specifications
10.
2
Printer specifications
Item Description
Printing method Laser Beam Printing
Printing speed
a
a Print speed will be affected by operating system used, computing performance, applica-
tion software, connecting method, media type, media size, and job complexity.
Up to 18 ppm in A4 (19 ppm in Letter)
First print out time 11 seconds (From Ready)
Print resolution Up to 600 x 600 dpi
Printer language SPL (Samsung Printer Language)
OS Compatibility
b
b Please visit www.samsungprinter.com to download the latest software version.
Windows 98/Me/2000/XP, Various Linux OS (USB
only), Macintosh 10.3/10.4
Inteface USB 2.0
1
INDEX
Numerics
2-up, special copy
/4.3
A
auto fit, sepcial copy
/4.2
C
cleaning
drum
/8.2
inside
/8.1
LSU
/8.2
outside
/8.1
scan unit
/8.2
clone, special copy
/4.2
component location
/1.2
connection
power cord
/2.5
USB
/2.5
consumables
/8.5
contrast, copy
/4.1
control panel
/1.3
copying
2-up
/4.3
auto fit
/4.2
clone
/4.2
darkness
/4.1
default setting, change
/4.2
ID card
/4.2
original type
/4.1
poster
/4.3
reduce/enlarge
/4.1
time out, set
/4.3
D
display language, change
/2.6
document glass
cleaning
/8.2
loading document
/3.1
document, loading
/3.1
drum, clean
/8.2
E
error messages
/9.4
I
ID card, special copy
/4.2
installing, toner cartridge
/2.2
J
jam, clear
/9.1
L
Linux problems
/9.10
loading documents
document galss
/3.1
loading, paper
in the manual feeder
/3.5
in the paper input tray
/2.3
M
Macintosh problems
/9.11
manual feeder
/3.5
memory, clear
/8.1
O
order information, toner cartridges
/7.1
output location, select
/3.6
output tray
/3.6
P
paper guidelines
/3.3
paper jam, clear
/9.1
paper load
in paper input tray
/2.3
in the manual feeder
/3.5
paper size
setting
/3.6
specifications
/3.2
paper type
setting
/3.6
specifications
/3.2
poster, special copy
/4.3
power save mode, use
/2.6
power, connecting
/2.5
print quality problems, solve
/9.6
printing, reports
/8.1
problem, solve
copying
/9.8
error messages
/9.4
Linux
/9.10
Macintosh
/9.11
paper feeding
/9.4
printing
/9.5
printing quality
/9.6
scanning
/9.9
Windows
/9.9
R
rear cover, use
/3.7
replacing, toner cartridge
/8.4
reports, print
/8.1
S
scanning
/6.1
software overview
/2.7
special materials, guidelines
/3.4
specifications

Samsung Printer
Software section
1
SOFTWARE SECTION
CONTENTS
Chapter 1:
INSTALLING PRINTER SOFTWARE IN WINDOWS
Installing Printer Software ........................................................................................................ 4
Reinstalling Printer Software ..................................................................................................... 6
Removing Printer Software ....................................................................................................... 6
Chapter 2:
BASIC PRINTING
Printing a Document ................................................................................................................ 7
Printer Settings ....................................................................................................................... 8
Layout Tab .................................................................................................................... 8
Paper Tab ...................................................................................................................... 9
Graphics Tab ............................................................................................................... 10
Extras Tab ................................................................................................................... 11
About Tab ................................................................................................................... 11
Printer Tab .................................................................................................................. 11
Using a Favorite Setting ................................................................................................ 12
Using Help ................................................................................................................... 12
Chapter 3:
ADVANCED PRINTING
Printing Multiple Pages on One Sheet of Paper (N-Up Printing) ..................................................... 13
Printing Posters ..................................................................................................................... 14
Printing a Reduced or Enlarged Document ................................................................................ 14
Fitting Your Document to a Selected Paper Size ......................................................................... 14
Using Watermarks ................................................................................................................. 15
Using an Existing Watermark ......................................................................................... 15
Creating a Watermark ................................................................................................... 15
Editing a Watermark ..................................................................................................... 15
Deleting a Watermark ................................................................................................... 15
2
Using Overlays ...................................................................................................................... 16
What is an Overlay? ...................................................................................................... 16
Creating a New Page Overlay ......................................................................................... 16
Using a Page Overlay .................................................................................................... 16
Deleting a Page Overlay ................................................................................................ 16
Chapter 4:
SHARING THE PRINTER LOCALLY
Setting Up a Host Computer ................................................................................................... 17
Setting Up a Client Computer .................................................................................................. 17
Chapter 5:
USING SMART PANEL
Understanding Smart Panel .................................................................................................... 18
Opening the Troubleshooting Guide ......................................................................................... 18
Changing the Smart Panel Program Settings ............................................................................. 19
Chapter 6:
SCANNING
Scanning Using Samsung SmarThru ......................................................................................... 20
Uninstalling Samsung SmarThru ..................................................................................... 20
Using Samsung SmarThru ............................................................................................. 21
Using Onscreen Help File ............................................................................................... 22
Scanning Process with TWAIN-enabled Software ........................................................................ 22
Scanning Using the WIA Driver ................................................................................................ 22
Chapter 7:
USING YOUR PRINTER IN LINUX
Getting Started ..................................................................................................................... 23
Installing the MFP Driver ........................................................................................................ 23
System Requirements ................................................................................................... 23
Installing the MFP Driver ............................................................................................... 24
Uninstalling the MFP Driver ............................................................................................ 25
Using the MFP Configurator ..................................................................................................... 25
Opening the MFP Configurator ........................................................................................ 25
Printers Configuration ................................................................................................... 26
Scanners Configuration ................................................................................................. 26
MFP Ports Configuration ................................................................................................ 27
3
Configuring Printer Properties ................................................................................................. 27
Printing a Document .............................................................................................................. 28
Printing from Applications .............................................................................................. 28
Printing Files ................................................................................................................ 28
Scanning a Document ............................................................................................................ 29
Using the Image Editor ................................................................................................. 30
Chapter 8:
USING YOUR PRINTER WITH A MACINTOSH
Installing Software for Macintosh ............................................................................................. 31
Setting Up the Printer ............................................................................................................ 32
For a Network-connected Macintosh ................................................................................ 32
For a USB-connected Macintosh ..................................................................................... 32
Printing ................................................................................................................................ 33
Printing a Document ..................................................................................................... 33
Changing Printer Settings .............................................................................................. 33
Printing Multiple Pages on One Sheet of Paper .................................................................. 34
Scanning .............................................................................................................................. 35
Installing Printer Software in Windows
4
1Installing Printer
Software in Windows
This chapter includes:
• Installing Printer Software
• Reinstalling Printer Software
• Removing Printer Software
Installing Printer Software
You can install the printer software for local printing. To install
the printer software on the computer, perform the appropriate
installation procedure depending on the printer in use.
A printer driver is software that lets your computer
communicate with your printer. The procedure to install drivers
may differ depending on the operating system you are using.
All applications should be closed on your PC before beginning
installation.
A local printer is a printer directly attached to your computer
using the printer cable supplied with your printer, such as a USB
or parallel cable.
You can install the printer software using the typical or custom
method.
NOTE
: If the “New Hardware Wizard” window appears during
the installation procedure, click in the upper right corner of
the box to close the window, or click
Cancel
.
This is recommended for most users. All components necessary
for printer operations will be installed.
1
Make sure that the printer is connected to your computer
and powered on.
2
Insert the supplied CD-ROM into your CD-ROM drive.
The CD-ROM should automatically run, and an installation
window appears.
If the installation window does not appear, click
Start
and
then
Run
. Type
X:\Setup.exe
, replacing “
X
” with the
letter which represents your drive and click
OK
.
3
Click
Next
.
• If necessary, select a language from the drop-down list.
•
View User’s Guide
: Allows you to view the User’s
Guide. If your computer doesn’t have Adobe Acrobat,
click on this option and it will automatically install Adobe
Acrobat Reader for you.
4
Choose the type of installation. Click
Next
.
•
Typical
: Installs the most common software for your
printer. This is recommended for most users.
•
Custom
: Allows you to choose the individual
components you want to install.
Installing Printer Software in Windows
5
NOTE
: If your printer is not already connected to the
computer, the following window will appear.
• After connecting the printer, click
Next
.
• If you don’t want to connect the printer at this time, click
Next
, and
No
on the following screen. Then the installation
will start and a test page will not be printed at the end of the
installation.
• The installation window that appears in this User’s
Guide may differ depending on the printer and
interface in use.
5
After the installation is finished, a window asking you to
print a test page appears. If you choose to print a test
page, select the checkbox and click
Next
.
Otherwise, just click
Next
and skip to step 7.
6
If the test page prints out correctly, click
Yes
.
If not, click
No
to reprint it.
7
To register yourself as a user of Samsung Printers in order
to receive information from Samsung, select the checkbox
and click
Finish
. You are now sent to the Samsung web
site.
Otherwise, just click
Finish
.
NOTE
: After setup is complete, if your printer driver doesn’t
work properly, reinstall the printer driver. See “Reinstalling
Printer Software” on page 6.

Installing Printer Software in Windows
6
Reinstalling Printer Software
You can reinstall the software if installation fails.
1
Start Windows.
2
From the
Start
menu select
Programs
or
All Programs
→
your printer driver name
→
Maintenance
.
3
Select
Repair
and click
Next
.
You will see a component list so that you can reinstall any
item individually.
NOTE
: If your printer is not already connected to the
computer, the following window will appear.
• After connecting the printer, click
Next
.
• If you don’t want to connect the printer at this time, click
Next
, and
No
on the following screen. Then the installation
will start and a test page will not be printed at the end of the
installation.
• The reinstallation window that appears in this User’s
Guide may differ depending on the printer and
interface in use.
4
Select the components you want to reinstall and click
Next
.
If you
you select
your printer driver name
and reinstall
the printer software for local printing
, the window asking
you to print a test page appears. Do as follows:
a. To print a test page, select the check box and click
Next
.
b. If the test page prints out correctly, click
Yes
.
If it doesn’t, click
No
to reprint it.
5
When the reinstallation is done, click
Finish
.
Removing Printer Software
1
Start Windows.
2
From the
Start
menu select
Programs
or
All Programs
→
your printer driver name
→
Maintenance
.
3
Select
Remove
and click
Next
.
You will see a component list so that you can remove any
item individually.
4
Select the components you want to remove and then click
Next
.
5
When your computer asks you to confirm your selection,
click
Yes
.
The selected driver and all of its components are removed
from your computer.
6
After the software is removed, click
Finish
.
Basic Printing
7
2Basic Printing
This chapter explains the printing options and common printing
tasks in Windows.
This chapter includes:
• Printing a Document
• Printer Settings
- Layout Tab
- Paper Tab
- Graphics Tab
- Extras Tab
- About Tab
- Printer Tab
- Using a Favorite Setting
- Using Help
Printing a Document
N
OTE
:
• Your printer driver
Properties
window that appears in this
User’s Guide may differ depending on the printer in use.
However the composition of the printer properties window is
similar.
• Check the Operating System(s) that are compatible
with your printer. Please refer to the OS Compatibility
section of Printer Specifications in your Printer User’s
Guide.
• If you need to know the exact name of your printer, you can
check the supplied CD-ROM.
The following procedure describes the general steps required
for printing from various Windows applications. The exact steps
for printing a document may vary depending on the application
program you are using. Refer to the User’s Guide of your
software application for the exact printing procedure.
1
Open the document you want to print.
2
Select
Print
from the
File
menu. The Print window is
displayed. It may look slightly different depending on your
application.
The basic print settings are selected within the Print
window. These settings include the number of copies and
print range.
3
Select
your printer driver
from the
Name
drop-down
list.
4
To take advantage of the printer features provided by your
printer driver, click
Properties
or
Preferences
in the
application’s Print window. For details, see “Printer
Settings” on page 8.
If you see
Setup
,
Printer
, or
Options
in your Print
window, click it instead. Then click
Properties
on the next
screen.
5
Click
OK
to close the printer properties window.
6
To start the print job, click
OK
or
Print
in the Print
window.
Make sure that your
printer is selected.

Basic Printing
8
Printer Settings
You can use the printer properties window, which allows you to
access all of the printer options you need when using your
printer. When the printer properties are displayed, you can
review and change the settings needed for your print job.
Your printer properties window may differ, depending on your
operating system. This Software User’s Guide shows the
Properties window for Windows 98.
Your printer driver
Properties
window that appears in this
User’s Guide may differ depending on the printer in use.
If you access printer properties through the Printers folder, you
can view additional Windows-based tabs (refer to your
Windows User’s Guide) and the Printer tab (see “Printer Tab” on
page 11).
N
OTES
:
• Most Windows applications will override settings you specify
in the printer driver. Change all print settings available in the
software application first, and change any remaining settings
using the printer driver.
• The settings you change remain in effect only while you are
using the current program.
To make your changes
permanent
, make them in the Printers folder.
• The following procedure is for Windows XP. For other
Windows OS, refer to the corresponding Windows User's
Guide or online help.
1. Click the Windows
Start
button.
2. Select
Printers and Faxes
.
3. Select your printer driver icon.
4. Right-click on the printer driver icon and select
Printing Preferences
.
5. Change the settings on each tab, click OK.
Layout Tab
The
Layout
tab provides options to adjust how the document
appears on the printed page. The
Layout Options
includes
Multiple Pages per Side
and
Poster Printing
. See “Printing
a Document” on page 7 for more information on accessing
printer properties.
Paper Orientation
Paper Orientation
allows you to select the direction in which
information is printed on a page.
•
Portrait
prints across the width of the page, letter style.
•
Landscape
prints across the length of the page, spreadsheet
style.
•
Rotate
allows you to rotate the page the selected degrees.
Layout Options
Layout Options
allows you to select advanced printing options.
You can choose
Multiple Pages per Side
and
Poster Printing
.
•
For details, see
“Printing Multiple Pages on One Sheet of Paper
(N-Up Printing)” on page 13.
•
For details, see
“Printing Posters” on page 14
1
2
1
Landscape
Portrait
2
Basic Printing
9
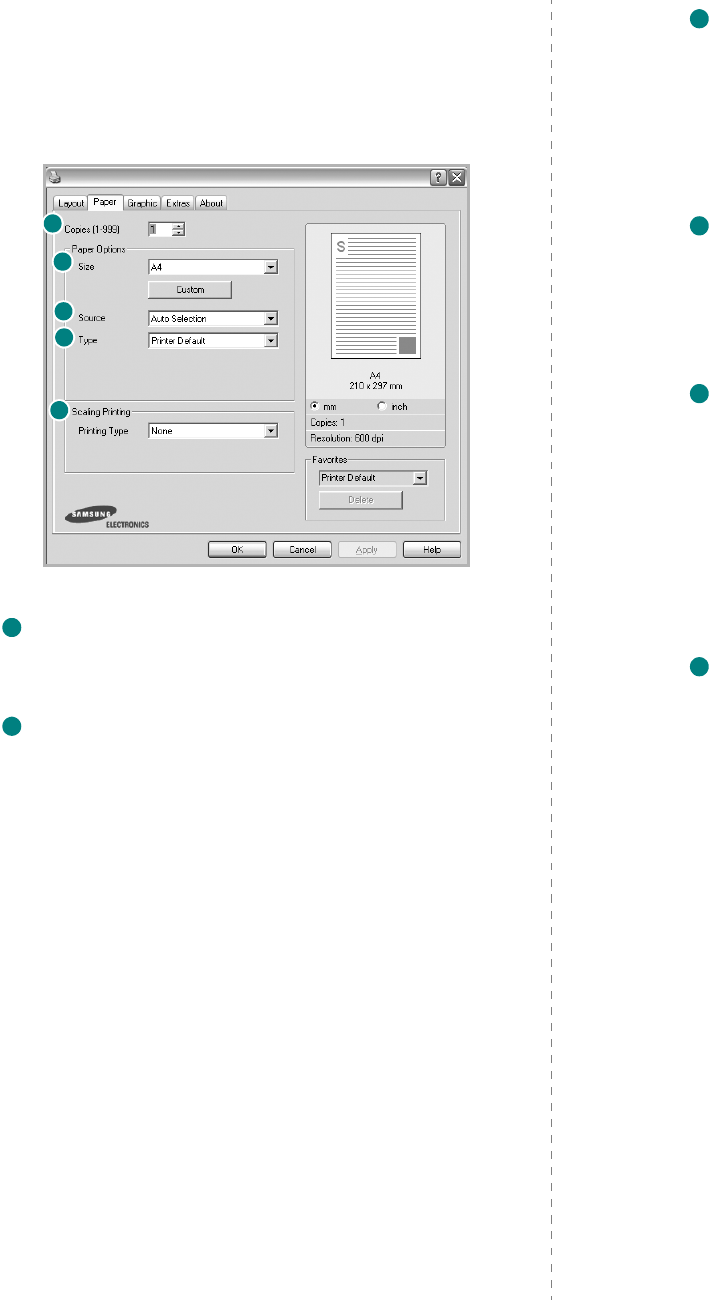
Paper Tab
Use the following options to set the basic paper handling
specifications when you access the printer properties. See
“Printing a Document” on page 7 for more information on
accessing printer properties.
Click the
Paper
tab to access various paper properties.
Copies
Copies
allows you to choose the number of copies to be printed.
You can select 1 to 999 copies.
Size
Size
allows you to set the size of paper you loaded in the tray.
If the required size is not listed in the
Size
box, click
Custom
.
When the
Custom Paper Setting
window appears, set the paper
size and click
OK
. The setting appears in the list so that you can
select it.
1
2
3
4
5
1
2
Source
Make sure that
Source
is set to the corresponding paper tray.
Use
Manual Feed
when printing on special materials like
envelopes and transparencies. You have to load one sheet at a
time into the Manual Tray or Multi-Purpose Tray.
If the paper source is set to
Auto Select
, the printer
automatically picks up print material in the following tray order:
Manual Tray or Multi-Purpose Tray, Tray1, Optional Tray2
Type
Make sure that
Type
is set to
Printer Default
. If you load a
different type of print material, select the corresponding paper
type. If you use cotton paper, set the paper type to
Thick
for best
printing. To use recycled paper, with weighs from 20lb to 24lb
(75~90g/m
2
), or colored paper, select
Color Paper
.
Type
Set
Type
to correspond to the paper loaded in the tray from
which you want to print. This will let you get the best quality
printout. If not, print quality may not be acheived as you want.
Cotton
: 20 lb to 24 lb (75~90 g/m2) cotton paper such as Gilbert
25 % and Gilbert 100 %.
Plain Paper
: Normal plain paper. Select this type if your printer is
monochrome and printing on the 16 lb (60 g/m2) cotton paper.
Recycled
: 20 lb to 24 lb (75~90 g/m2) recycled paper.
Color Paper
: 20 lb to 24 lb (75~90 g/m2) color-backgrounded
paper.
Scaling Printing
Scaling Printing
allows you to automatically or manually scale
your print job on a page. You can choose from
None
,
Reduce/
Enlarge
, and
Fit to Page
.
•
For details, see
“Printing a Reduced or Enlarged Document” on
page 14.
•
For details, see
“Fitting Your Document to a Selected Paper
Size” on page 14.
3
4
4
5

Basic Printing
10
Graphics Tab
Use the following Graphic options to adjust the print quality for
your specific printing needs. See “Printing a Document” on
page 7 for more information on accessing printer properties.
Click the
Graphic
tab to display the properties shown below..
Resolution
The Resolution options you can select may vary
depending on your printer model.
The higher the setting,
the sharper the clarity of printed characters and graphics. The
higher setting also may increase the time it takes to print a
document.
Toner Save Mode
Selecting this option extends the life of your toner cartridge and
reduces your cost per page without a significant reduction in print
quality.
Some printers do not support this feature.
•
Printer Setting
: If you select this option, this feature is
determined by the setting you’ve made on the control panel of
the printer.
•
On
: Select this option to allow the printer to use less toner on
each page.
•
Off
: If you don’t need to save toner when printing a document,
select this option.
Advanced Options
You can set advanced settings by clicking the
Advanced
Options
button.
•
TrueType Options
:
This option determines what the driver
tells the printer about how to image the text in your document.
Select the appropriate setting according to the status of your
document.
This option may be available only in
Windows 9x/Me, depending on your particular printer
model.
-
Download as Bitmap
: When this option is selected, the
driver will download the font data as bitmap images.
Documents with complicated fonts, such as Korean or
Chinese, or various other fonts, will print faster in this setting.
-
Print as Graphics
:
When this option is selected, the driver
will download any fonts as graphics. When printing documents
with high graphic content and relatively few TrueType fonts,
printing performance (speed) may be enhanced in this
setting.
•
Print All Text To Black
:
When the
Print All Text To Black
option
is checked, all text in your document prints solid black,
regardless of the color it appears on the screen.
•
Print All Text To Darken
:
When the
Print All Text To Darken
option is checked, all text in your document is allowed to print
darker than on a normal document.
Some printers do not
support this feature.
Basic Printing
11
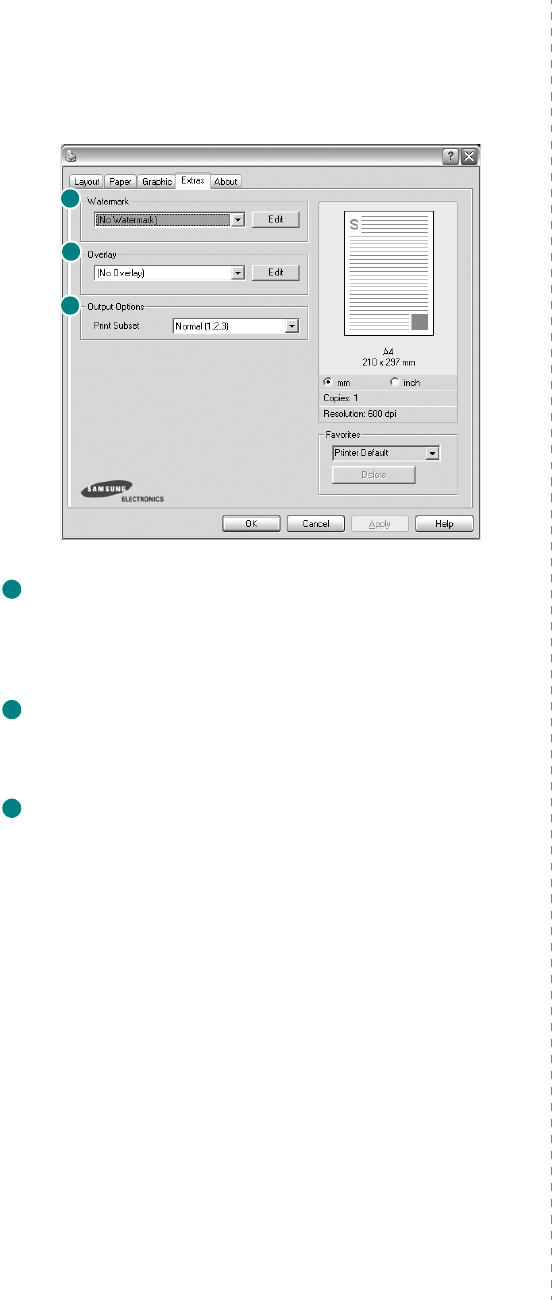
Extras Tab
You can select output options for your document. See “Printing
a Document” on page 7 for more information about accessing
the printer properties.
Click the
Extras
tab to access the following feature:
Watermark
You can create a background text image to be printed on each
page of your document.
For details, see
“Using Watermarks” on
page 15.
Overlay
Overlays are often used to take the place of preprinted forms and
letterhead paper.
For details, see
“Using Overlays” on page 16.
Output Options
•
Print Subset
: You can set the sequence in which the pages
print. Select the print order from the drop-down list.
-
Normal(1,2,3)
: Your printer prints all pages from the first
page to the last page.
-
Reverse All Pages(3,2,1)
: Your printer prints all pages from
the last page to the first page.
-
Print Odd Pages
: Your printer prints only the odd numbered
pages of the document.
-
Print Even Pages
: Your printer prints only the even
numbered pages of the document.
1
2
3
1
2
3
About Tab
Use the
About
tab to display the copyright notice and the
version number of the driver. If you have an Internet browser,
you can connect to the Internet by clicking on the web site icon.
See “Printing a Document” on page 7 for more information
about accessing printer properties.
Printer Tab
If you access printer properties through the
Printers
folder,
you can view the
Printer
tab. You can set the printer
configuration.
The following procedure is for Windows XP. For other Windows
OS, refer to the corresponding Windows User's Guide or online
help.
1
Click the Windows
Start
menu.
2
Select
Printers and Faxes
.
3
Select
your printer driver
icon.
4
Right-click on the printer driver icon and select
Properties
.
5
Click the
Printer
tab and set the options.
Basic Printing
12
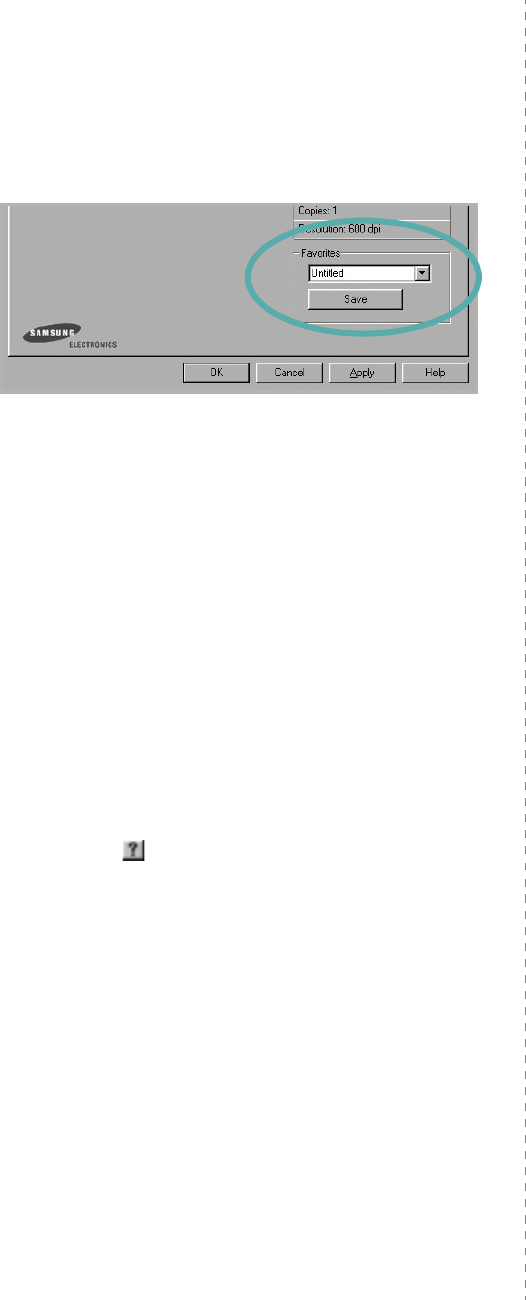
Using a Favorite Setting
The
Favorites
option, which is visible on each properties tab,
allows you to save the current properties settings for future
use.
To save a
Favorites
item:
1
Change the settings as needed on each tab.
2
Enter a name for the item in the
Favorites
input box.
3
Click
Save
.
When you save
Favorites
, all current driver settings are
saved.
To use a saved setting, select the item from the
Favorites
drop
down list. The printer is now set to print according to the
Favorites setting you selected.
To delete a Favorites item, select it from the list and click
Delete
.
You can also restore the printer driver’s default settings by
selecting
Printer Default
from the list.
Using Help
Your printer has a help screen that can be activated by clicking
the
Help
button in the printer properties window. These help
screens give detailed information about the printer features
provided by the printer driver.
You can also click from the upper right corner of the window,
and then click on any setting.
Advanced Printing
13
3Advanced Printing
This chapter explains printing options and advanced printing
tasks.
N
OTE
:
• Your printer driver
Properties
window that appears in this
User’s Guide may differ depending on the printer in use.
However the composition of the printer properties window is
similar.
• If you need to know the exact name of your printer, you can
check the supplied CD-ROM.
This chapter includes:
• Printing Multiple Pages on One Sheet of Paper (N-Up
Printing)
•Printing Posters
• Printing a Reduced or Enlarged Document
• Fitting Your Document to a Selected Paper Size
•Using Watermarks
•Using Overlays
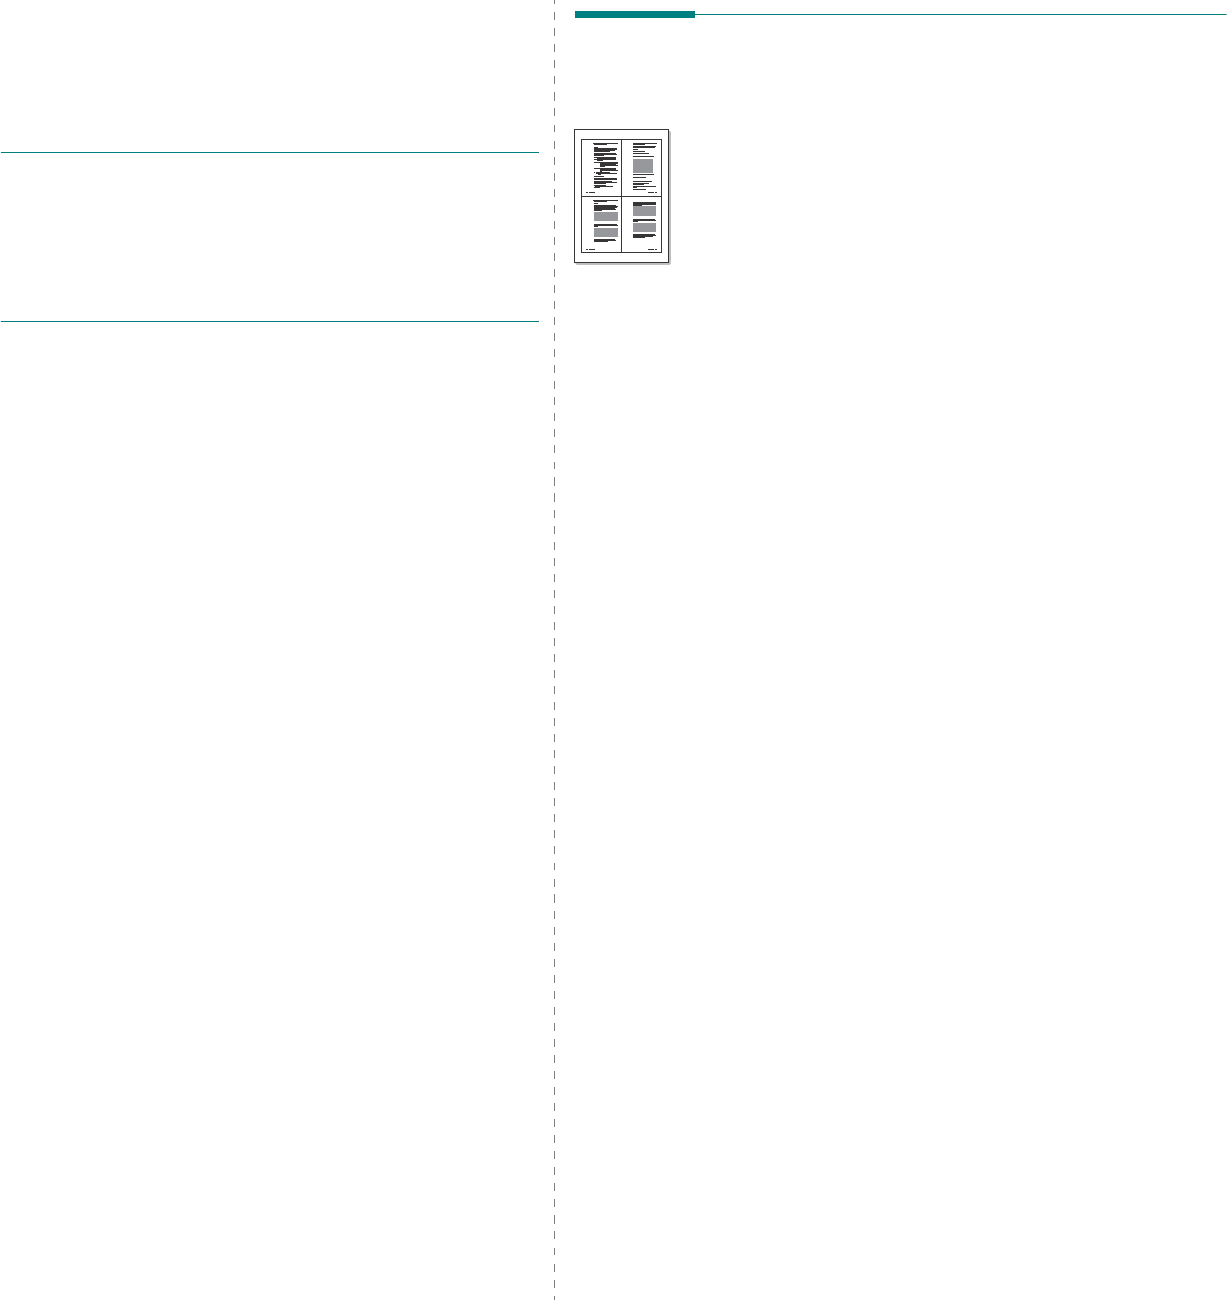
Printing Multiple Pages on One
Sheet of Paper (N-Up Printing)
You can select the number of pages to print on a single sheet
of paper. To print more than one page per sheet, the pages will
be reduced in size and arranged in the order you specify. You
can print up to 16 pages on one sheet.
1
To change the print settings from your software
application, access printer properties. See “Printing a
Document” on page 7.
2
From the
Layout
tab, choose
Multiple Pages per Side
in
the
Layout Type
drop-down list.
3
Select the number of pages you want to print per sheet
(1, 2, 4, 6, 9, or 16) in the
Pages per Side
drop-down
list.
4
Select the page order from the
Page Order
drop-down
list, if necessary.
Check
Print Page Border
to print a border around each
page on the sheet.
5
Click the
Paper
tab, select the paper source, size, and
type.
6
Click
OK
and print the document.
1 2
3 4
Advanced Printing
14
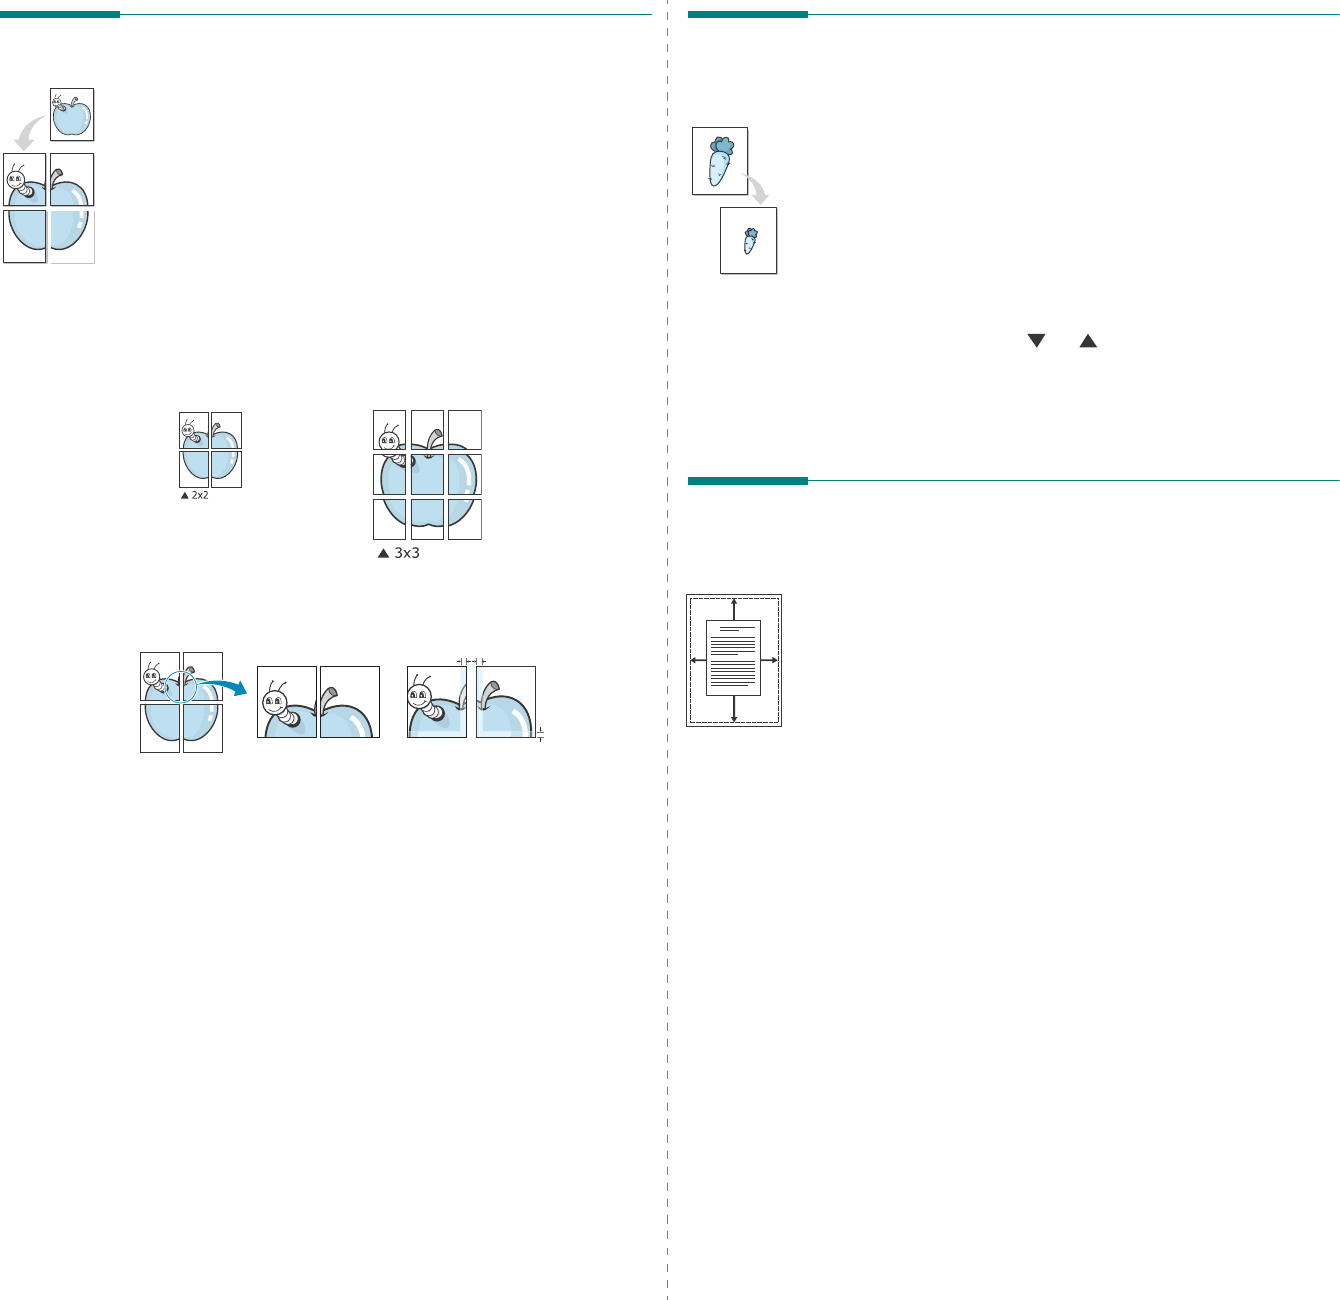
Printing Posters
This feature allows you to print a single-page document onto 4,
9, or 16 sheets of paper, for the purpose of pasting the sheets
together to form one poster-size document.
1
To change the print settings from your software
application, access printer properties. See “Printing a
Document” on page 7.
2
Click the
Layout
tab, select
Poster Printing
in the
Layout Type
drop-down list.
3
Configure the poster option:
You can select the page layout from
Poster<2x2>
,
Poster<3x3>
, or
Poster<4x4>
. If you select
Poster<2x2>
, the output will be automatically stretched
to cover 4 physical pages.
Specify an overlap in millimeters or inches to make it
easier to pasting the sheets together.
4
Click the
Paper
tab, select the paper source, size, and
type.
5
Click
OK
and print the document. You can complete the
poster by pasting the sheets together.
0.15 inches
0.15 inches
Printing a Reduced or Enlarged
Document
You can change the size of a page’s content to appear larger or
smaller on the printed page.
1
To change the print settings from your software
application, access printer properties. See “Printing a
Document” on page 7.
2
From the
Paper
tab, select
Reduce/Enlarge
in the
Printing Type
drop-down list.
3
Enter the scaling rate in the
Percentage
input box.
You can also click the or button.
4
Select the paper source, size, and type in
Paper Options
.
5
Click
OK
and print the document.
Fitting Your Document to a
Selected Paper Size
This printer feature allows you to scale your print job to any
selected paper size regardless of the digital document size. This
can be useful when you want to check fine details on a small
document.
1
To change the print settings from your software
application, access printer properties. See “Printing a
Document” on page 7.
2
From the
Paper
tab, select
Fit to Page
in the
Printing
Type
drop-down list.
3
Select the correct size from the
Target Page
drop-down
list.
4
Select the paper source, size, and type in
Paper Options
.
5
Click
OK
and print the document.
A

Advanced Printing
15
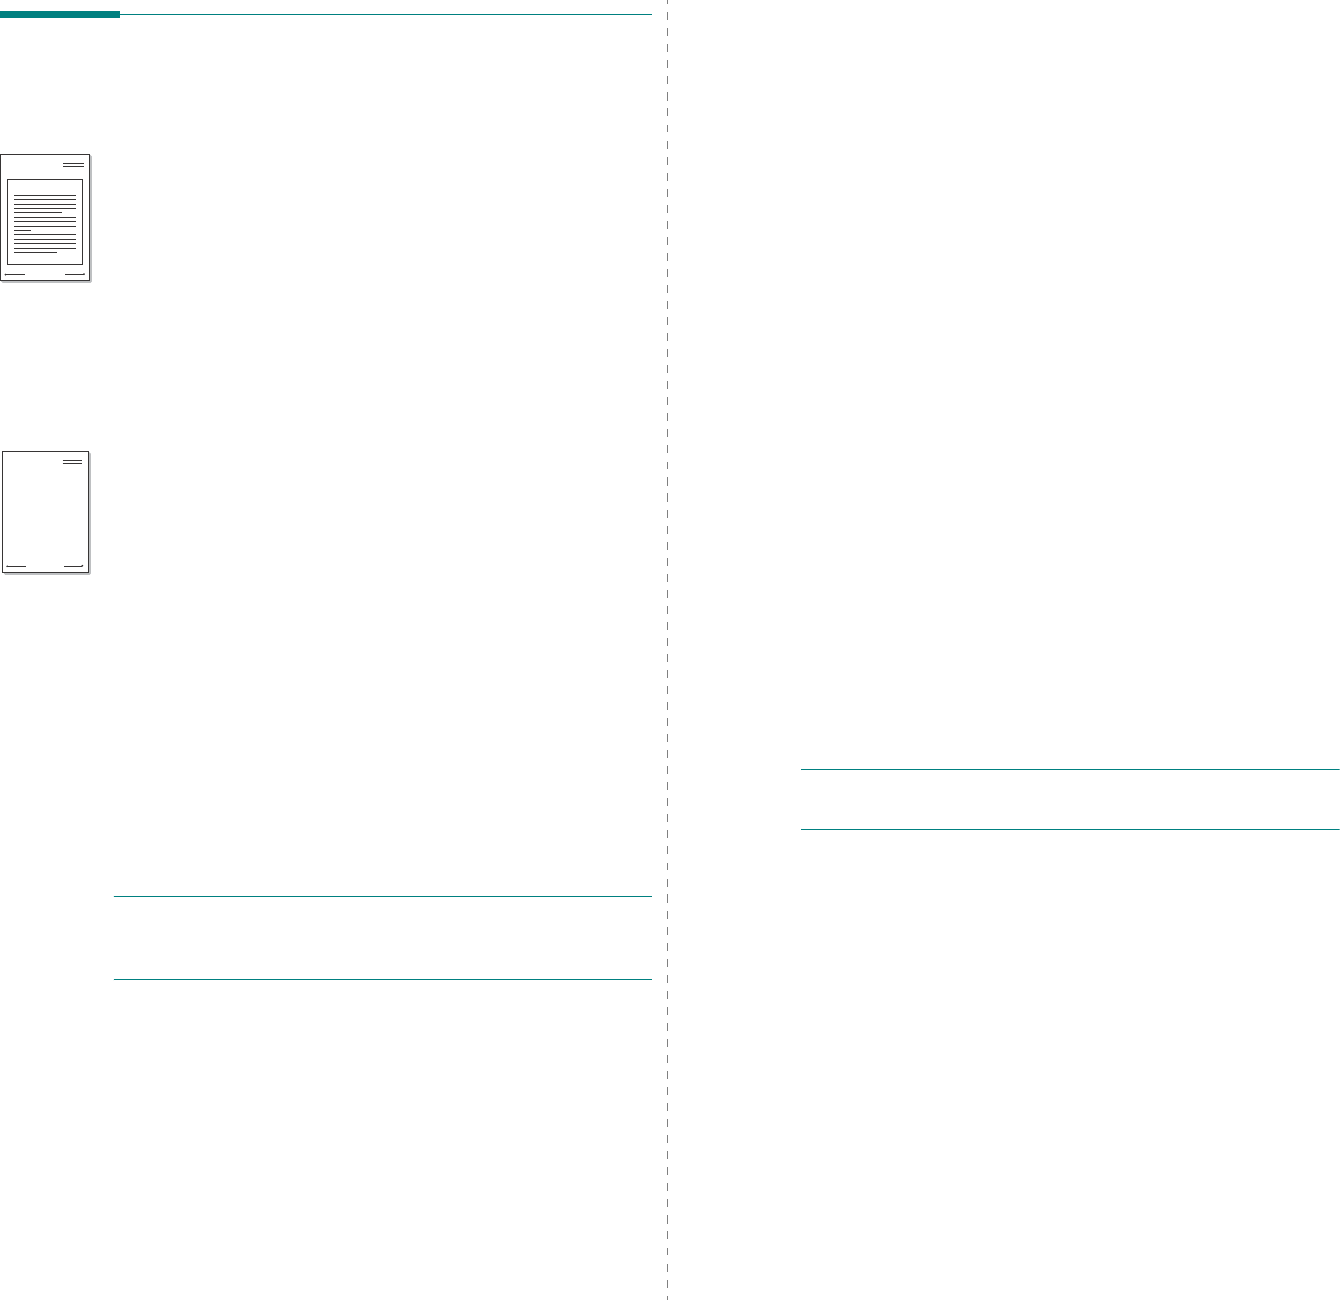
Using Watermarks
The Watermark option allows you to print text over an existing
document. For example, you may want to have large gray
letters reading “DRAFT” or “CONFIDENTIAL” printed diagonally
across the first page or all pages of a document.
There are several predefined watermarks that come with the
printer, and they can be modified, or you can add new ones to
the list.
Using an Existing Watermark
1
To change the print settings from your software
application, access printer properties. See “Printing a
Document” on page 7.
2
Click the
Extras
tab, and select the desired watermark
from the
Watermark
drop-down list. You will see the
selected watermark in the preview image.
3
Click
OK
and start printing.
N
OTE
: The preview image shows how the page will look when
it is printed.
Creating a Watermark
1
To change the print settings from your software
application, access printer properties. See “Printing a
Document” on page 7.
2
Click the
Extras
tab, and click the
Edit
button in the
Watermark
section. The
Edit Watermark
window
appears.
3
Enter a text message in the
Watermark Message
box.
You can enter up to 40 characters. The message displays
in the preview window.
When the
First Page Only
box is checked, the watermark
prints on the first page only.
4
Select watermark options.
You can select the font name, style, size, or grayscale level
from the
Font Attributes
section and set the angle of the
watermark from the
Message Angle
section.
5
Click
Add
to add a new watermark to the list.
6
When you have finished editing, click
OK
and start
printing.
To stop printing the watermark, select
<No Watermark>
from
the
Watermark
drop-down list.
Editing a Watermark
1
To change the print settings from your software
application, access printer properties. See “Printing a
Document” on page 7.
2
Click the
Extras
tab and click the
Edit
button in the
Watermark
section. The
Edit Watermark
window
appears.
3
Select the watermark you want to edit from the
Current
Watermarks
list and change the watermark message and
options.
4
Click
Update
to save the changes.
5
Click
OK
until you exit the Print window.
Deleting a Watermark
1
To change the print settings from your software
application, access printer properties. See “Printing a
Document” on page 7.
2
From the
Extras
tab, click the
Edit
button in the
Watermark section. The
Edit Watermark
window
appears.
3
Select the watermark you want to delete from the
Current
Watermarks
list and click
Delete
.
4
Click
OK
until you exit the Print window.
Advanced Printing
16
Using Overlays
What is an Overlay?
An overlay is text and/or images stored in the computer hard
disk drive (HDD) as a special file format that can be printed on
any document. Overlays are often used to take the place of
preprinted forms and letterhead paper. Rather than using
preprinted letterhead, you can create an overlay containing the
exact same information that is currently on your letterhead. To
print a letter with your company’s letterhead, you do not need
to load preprinted letterhead paper in the printer. You need only
tell the printer to print the letterhead overlay on your
document.
Creating a New Page Overlay
To use a page overlay, you must create a new page overlay
containing your logo or image.
1
Create or open a document containing text or an image for
use in a new page overlay. Position the items exactly as
you wish them to appear when printed as an overlay.
2
To save the document as an overlay, access printer
properties. See “Printing a Document” on page 7.
3
Click the
Extras
tab, and click
Edit
button in the
Overlay
section.
4
In the Edit Overlay window, click
Create Overlay
.
5
In the Create Overlay window, type a name of up to eight
characters in the
File name
box. Select the destination
path, if necessary. (The default is C:\Formover).
6
Click
Save
. The name appears on the
Overlay List
box.
7
Click
OK
or
Yes
to finish creating.
The file is not printed. Instead it is stored on your
computer hard disk drive.
N
OTE
: The overlay document size must be the same as the
documents you print with the overlay. Do not create an overlay
with a watermark.
WORLD BEST
Dear ABC
Regards
WORLD BEST
Using a Page Overlay
After an overlay has been created, it is ready to be printed with
your document. To print an overlay with a document:
1
Create or open the document you want to print.
2
To change the print settings from your software
application, access printer properties. See “Printing a
Document” on page 7.
3
Click the
Extras
tab.
4
Select the desired overlay from the
Overlay
drop-down
list box.
5
If the overlay file you want does not appear in the
Overlay
list, click
Edit
button and
Load Overlay
, and
select the overlay file.
If you have stored the overlay file you want to use in an
external source, you can also load the file when you access
the
Load Overlay
window.
After you select the file, click
Open
. The file appears in the
Overlay List
box and is available for printing. Select the
overlay from the
Overlay List
box.
6
If necessary, click
Confirm Page Overlay When
Printing
. If this box is checked, a message window
appears each time you submit a document for printing,
asking you to confirm your wish to print an overlay on your
document.
If this box is not checked and an overlay has been
selected, the overlay automatically prints with your
document.
7
Click
OK
or
Yes
until printing begins.
The selected overlay downloads with your print job and
prints on your document.
N
OTE
: The resolution of the overlay document must be the
same as that of the document you will print with the overlay.
Deleting a Page Overlay
You can delete page overlays that you no longer use.
1
In the printer properties window, click the
Extras
tab.
2
Click the
Edit
button in the
Overlay
section.
3
Select the overlay you want to delete from the
Overlay
List
box.
4
Click
Delete Overlay
.
5
When a confirming message window appears, click
Yes
.
6
Click
OK
until you exit the Print window.

Sharing the Printer Locally
17
4Sharing the Printer
Locally
You can connect the printer directly to a selected computer,
which is called “host computer,” on the network.
The following procedure is for Windows XP. For other Windows
OS, refer to the corresponding Windows User's Guide or online
help.
N
OTES
:
• Check the Operating System(s) that are compatible with
your printer. Please refer to the OS Compatibility section of
Printer Specifications in your Printer User’s Guide.
• If you need to know the exact name of your printer, you can
check the supplied CD-ROM.
Setting Up a Host Computer
1
Start Windows.
2
From the
Start
menu select
Printers and Faxes
.
3
Double-click
your printer driver icon
.
4
From the
Printer
menu, select
Sharing
.
5
Check the
Share this printer
box.
6
Fill in the
Shared Name
field, and then click
OK
.
Setting Up a Client Computer
1
Right-click the Windows
Start
button and select
Explorer
.
2
Open your network folder in the left column.
3
Click the shared name.
4
From the
Start
menu select
Printers and Faxes
.
5
Double-click
your printer driver icon
.
6
From the
Printer
menu, select
Properties
.
7
From the
Ports
tab, click
Add Port
.
8
Select
Local Port
and click
New Port
.
9
Fill in the
Enter a port name
field with the shared name.
10
Click
OK
and click
Close
.
11
Click
Apply
and click
OK
.
Using Smart Panel
18
5Using Smart Panel
Smart Panel is a program that monitors and informs you of the
status of the printer, and allows you to customize the printer’s
settings.
Smart Panel
is installed automatically when you
install the printer software.
N
OTES
:
• To use the this program, you need:
- Windows 98 or higher (Windows NT 4.0 can be used only
for network-supported printers.) To check for Operating
System(s) that are compatible with your printer, refer to
Printer Specifications in your Printer User’s Guide.
- Internet Explorer version 5.0 or higher for flash animation
in HTML Help.
• If you need to know the exact name of your printer, you can
check the supplied CD-ROM.
Understanding Smart Panel
If an error occurs while printing, Smart Panel appears
automatically, showing the error. You can also launch Smart
Panel manually from the Windows task bar. Double-click the
Smart Panel icon on the Windows task bar.
Or, from the
Start
menu, select
Programs
or
All Programs
→
your printer driver name
→
Smart Panel
.
N
OTES
:
• If you have already installed more than one Samsung
printer, first select the printer model you want in order to
use the corresponding Smart Panel. Right-click the Smart
Panel icon on the Windows task bar and select
your printer
name
.
• The Smart Panel window and its contents shown in this
Software User’s Guide may differ depending on the printer in
use.
Double click this icon.
The Smart Panel program displays the current status of the
printer, various information, lets you change settings and the
level of toner remaining in the toner cartridge(s).
Toner Level
You can view the level of toner remaining in the toner
cartridge(s). The printer and the number of the toner cartridge(s)
shown above window may differ depending on the printer in use.
Buy Now
You can order replacement toner cartridge online.
Troubleshooting Guide
You can view Help to solve problems.
Driver Setting
You can use the printer properties window, which allows you to
access all of the printer options you need for using your
printer.
For details,
See “Printer Settings” on page 8.
Opening the Troubleshooting
Guide
Using the troubleshooting guide, you can view solutions for
error status problems.
Right-click the Smart Panel icon on the Windows task bar and
select
Troubleshooting Guide
.
1
1
Using Smart Panel
19
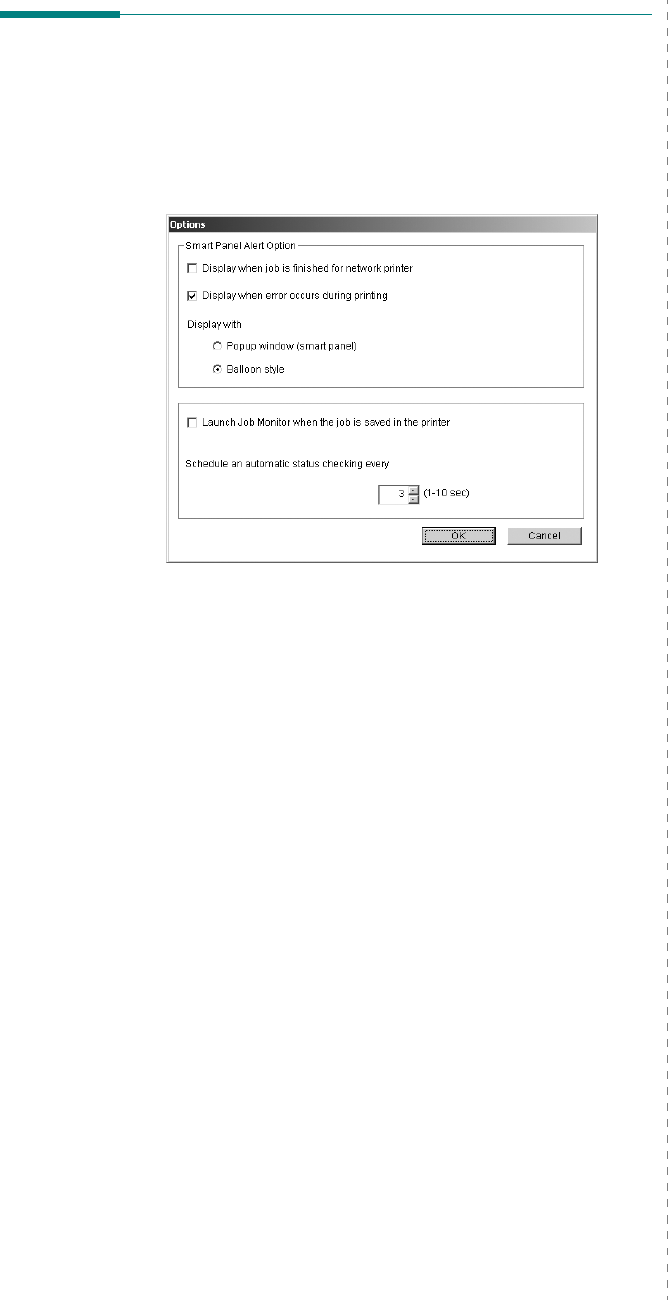
Changing the Smart Panel
Program Settings
Right-click the Smart Panel icon on the Windows task bar and
select
Options
.
The following window opens.
•
Display when job is finished for network printer
: The
computer shows the Smart Panel popup window or
balloon when your job is complete.
(Only for a network
supported printer.)
•
Display when error occurs during printing
: The
computer shows the Smart Panel popup window or
balloon when an error occurs during printing.
•
Display with
:
You can select how the computer shows
you a message. If you select
Popup window (smart
panel)
, the message appears in the Smart Panel pop
window.
•
Launch Job Monitor when the job is saved in the
printer
: If you store print jobs on the printer’s hard disk,
the computer opens the Job Monitor window.
(Only for a
network supported printer with a built-in hard disk.)
•
Schedule an automatic status checking every
: The
computer updates the printer status regularly. Setting the
value close to 1 second causes the computer to check the
printer status more frequently, thereby allowing a faster
response to any printer error.

Scanning
20
6Scanning
Scanning with your machine lets you turn pictures and text into
digital files on your computer. Then you can fax or e-mail the
files, display them on your web site or use them to create
projects that you can print using Samsung SmarThru software
or the WIA driver.
This chapter includes:
• Scanning Using Samsung SmarThru
• Scanning Process with TWAIN-enabled Software
• Scanning Using the WIA Driver
N
OTES
:
• Check the Operating System(s) that are compatible
with your printer. Please refer to the OS Compatibility
section of Printer Specifications in your Printer User’s
Guide.
• You can check your printer name in the supplied CD-
ROM.
• The maximum resolution that can be achieved
depends upon various factors, including computer
speed, available disk space, memory, the size of the
image being scanned, and bit depth settings. Thus,
depending on your system and what you are scanning,
you may not be able to scan at certain resolutions,
especially using enhanced dpi.
Scanning Using Samsung
SmarThru
Samsung SmarThru is the accompanying software for your
machine. With SmarThru, scanning is the proverbial piece of
cake.
N
OTE
: You can use SmarThru 4 in Windows 98 or higher.
Uninstalling Samsung SmarThru
N
OTE
: Before beginning uninstallation, ensure that all
applications are closed on your computer.
1
From the
Start
menu, select
Programs
.
2
Select
SmarThru 4
, and then select
Uninstall SmarThru
4
.
3
When your computer asks you to confirm, click
OK
.
4
Click
Finish
.
You may be prompted to restart your computer. In this
case you must shut the computer down and then restart it
before the changes will be saved.
Scanning
21
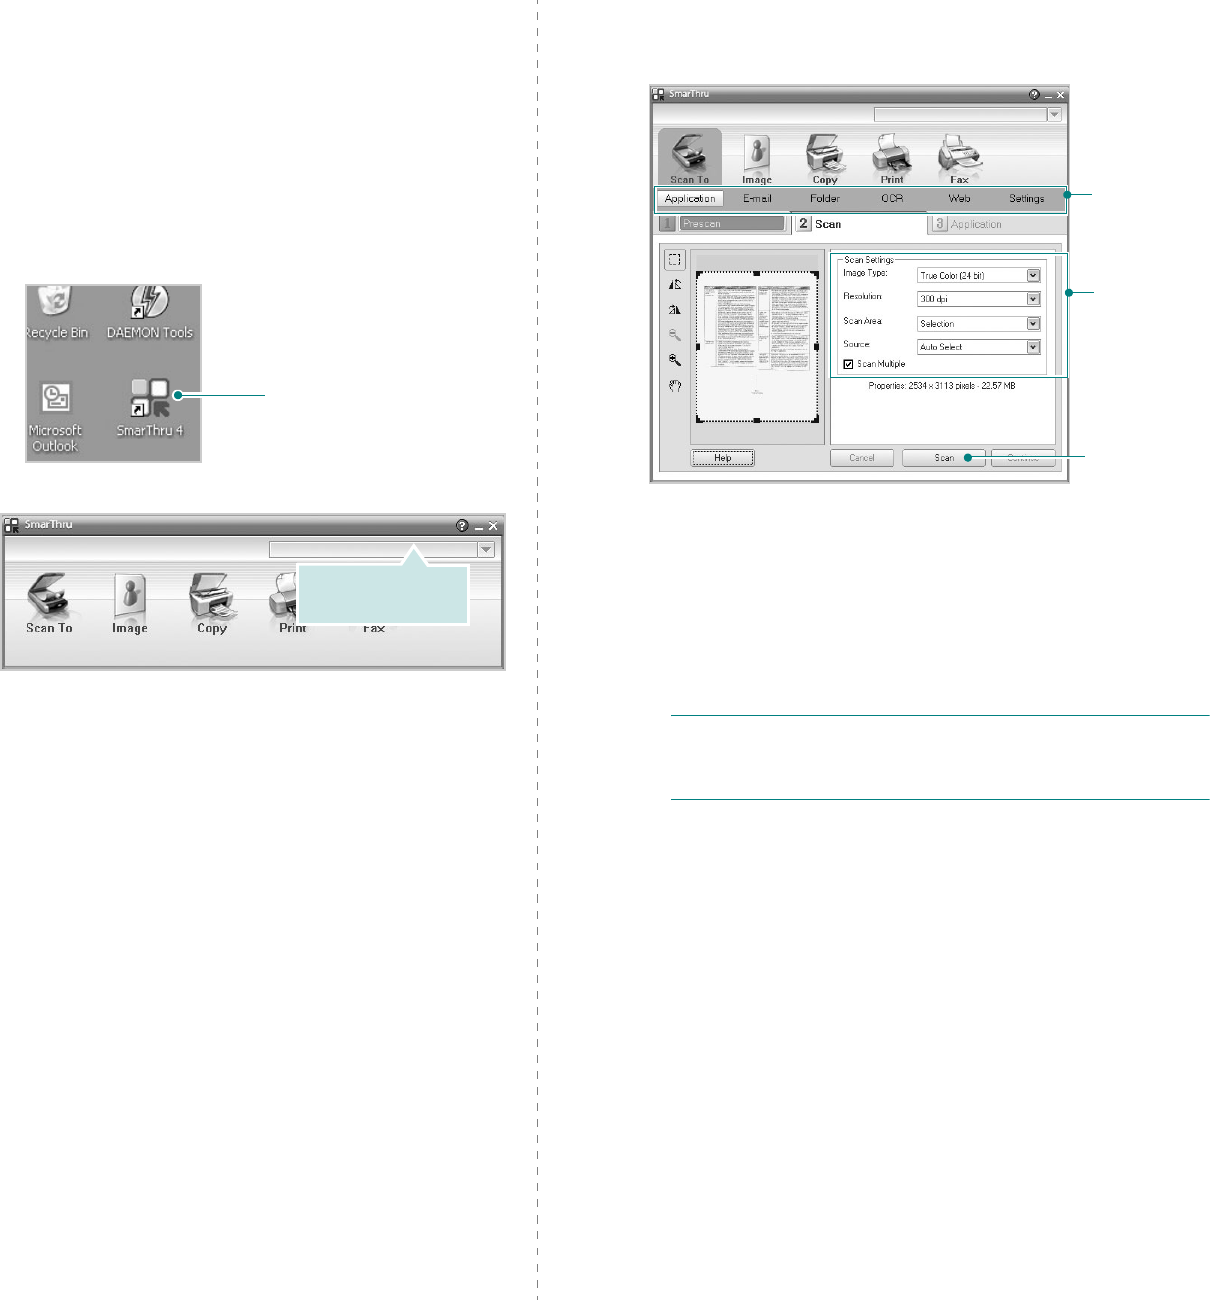
Using Samsung SmarThru
Follow these steps to start scanning using the SmarThru:
1
Make sure that your machine and computer are turned on
and properly connected to each other.
2
Place your photograph or page on the document glass
or ADF.
3
Once you have installed Samsung SmarThru, you will see
the
SmarThru 4
icon on your desktop. Double-click the
SmarThru 4
icon.
The SmarThru 4 window opens.
•Scan To
Allows you to scan an image and save it to an application
or folder, email it, or publish it on a web site.
•Image
Allows you to edit an image you have saved as a graphic
file and send it to a selected application or folder, email it,
or publish it on a web site.
•Copy
Allows you to produce professional quality copies. You can
make black and white or color copies of an image if your
machine supports it, and customize the copy settings.
•Print
Allows you to print images you have saved. You can print
images in black and white or color mode if your machine
supports it.
•Fax
Allows you to fax images or files you have saved on your
computer. This is available when your machine supports
the fax feature.
Double-click this icon.
Make sure that your
printer is selected.
4
Click
Scan To
. The
Scan To
menu bar appears on the
SmarThru 4 window.
Scan To
lets you use the following services:
•Application
Scanning an image and placing it in an image editor
application, such as Paint or Adobe Photoshop.
•E-mail
Scanning an image and emailing it. Allows you to scan an
image, preview it, and email it.
N
OTE
: To send an image by e-mail, you must have a mail
client program, like Outlook Express, which has been set up
with your e-mail account.
•Folder
Scanning an image and saving it to a folder. Allows you to
scan an image, preview it, and save it to the folder of your
choice.
•OCR
Scanning an image and performing text recognition.
Allows you to scan an image, preview it, and send it to the
OCR program for text recognition.
- Recommended Scan Option for OCR
- Resolution: 200 or 300 dpi
- Image Type: Grayscale or Black & White
•Web
Scanning an image, previewing it, and publishing it on a
web site, using the specified file format for the image you
want to publish.
•
Settings
Customizing settings of
Scan To
basic functions. Allows
you to customize settings for
Application
,
E-mail
,
OCR
,
and
Web
functions.
Adjust the
scan settings.
Scan To
menu bar
Click to start
scanning.
Scanning
22
5
Click the service icon according to your job.
6
SmarThru 4
opens for the selected service. Adjust the
scan settings.
7
To start scanning, click
Scan
.
N
OTE
: If you want to cancel the scan job, click
Cancel
.
Using Onscreen Help File
For more information about SmarThru, click at the top right
corner of the window. The SmarThru Help window opens and
allows you to view onscreen help supplied on the SmarThru
program.
Scanning Process with TWAIN-
enabled Software
If you want to scan documents using other software, you will
need to use TWAIN-compliant software, such as Adobe
PhotoDeluxe or Adobe Photoshop. The first time you scan with
your machine, select it as your TWAIN source in the application
you use.
The basic scanning process involves a number of steps:
1
Make sure that your machine and computer are turned on
and properly connected to each other.
2
Load the document(s) face up into the ADF.
OR
Place a single document face down on the document
glass.
3
Open an application, such as PhotoDeluxe or Photoshop.
4
Open the TWAIN window and set the scan options.
5
Scan and save your scanned image.
N
OTE
: You need to follow the program’s instructions for
acquiring an image. Please refer to the user’s guide of the
application.
Scanning Using the WIA Driver
Your machine also supports the Windows Image Acquisition
(WIA) driver for scanning images. WIA is one of the standard
components provided by Microsoft
Windows
XP and works
with digital cameras and scanners. Unlike the TWAIN driver, the
WIA driver allows you to scan and easily manipulate images
without using additional software.
N
OTE
: The WIA driver works only on Windows XP with USB
port.
1
Load the document(s) face up into the ADF.
OR
Place a single document face down on the document
glass.
2
From the
Start
menu on your desktop window, select
Settings
,
Control Panel
, and then
Scanners and
Cameras
.
3
Double click
your scanner driver
icon. The Scanner and
Camera Wizard launches.
4
Choose your scanning preferences and click
Preview
to
see how your preferences affect the picture.
5
Click
Next
.
6
Enter a picture name, and select a file format and
destination to save the picture.
7
Follow the on-screen instructions to edit the picture after it
is copied to your computer.
N
OTE
: If you want to cancel the scan job, press the Cancel
button on the Scanner and Camera Wizard.

Using Your Printer in Linux
23
7Using Your Printer in
Linux
You can use your machine in a Linux environment.
This chapter includes:
• Getting Started
• Installing the MFP Driver
• Using the MFP Configurator
• Configuring Printer Properties
• Printing a Document
• Scanning a Document
Getting Started
The supplied CD-ROM provides you with Samsung’s MFP driver
package for using your machine with a Linux computer.
Samsung’s MFP driver package contains printer and scanner
drivers, providing the ability to print documents and scan
images. The package also delivers powerful applications for
configuring your machine and further processing of the scanned
documents.
After the driver is installed on your Linux system, the driver
package allows you to monitor a number of MFP devices via fast
ECP parallel ports and USB simultaneously. The acquired
documents can then be edited, printed on the same local MFP
or network printers, sent by e-mail, uploaded to an FTP site, or
transferred to an external OCR system.
The MFP driver package is supplied with a smart and flexible
installation program. You don't need to search for additional
components that might be necessary for the MFP software: all
required packages will be carried onto your system and
installed automatically; this is possible on a wide set of the
most popular Linux clones.
Installing the MFP Driver
System Requirements
Supported OS
• Redhat 7.1 and above
• Linux Mandrake 8.0 and above
• SuSE 7.1 and above
• Caldera OpenLinux 3.1 and above
• Turbo Linux 7.0 and above
• Slackware 8.1 and above
Recommended Hardware Requirements
• Pentium IV 1 GHz or higher
• RAM 256 MB or higher
• HDD 1 GB or higher
N
OTES
:
• It’s also necessary to claim swap partition of 300 MB or
larger for working with large scanned images.
• The Linux scanner driver supports the optical resolution at
maximum. Please refer to the scanner and copy section of
Specifications in your Printer User’s Guide.
• You can check your printer name in the supplied CD-
ROM.
Software
• Linux Kernel 2.4 or higher
• Glibc 2.2 or higher
•CUPS
•SANE
Using Your Printer in Linux
24
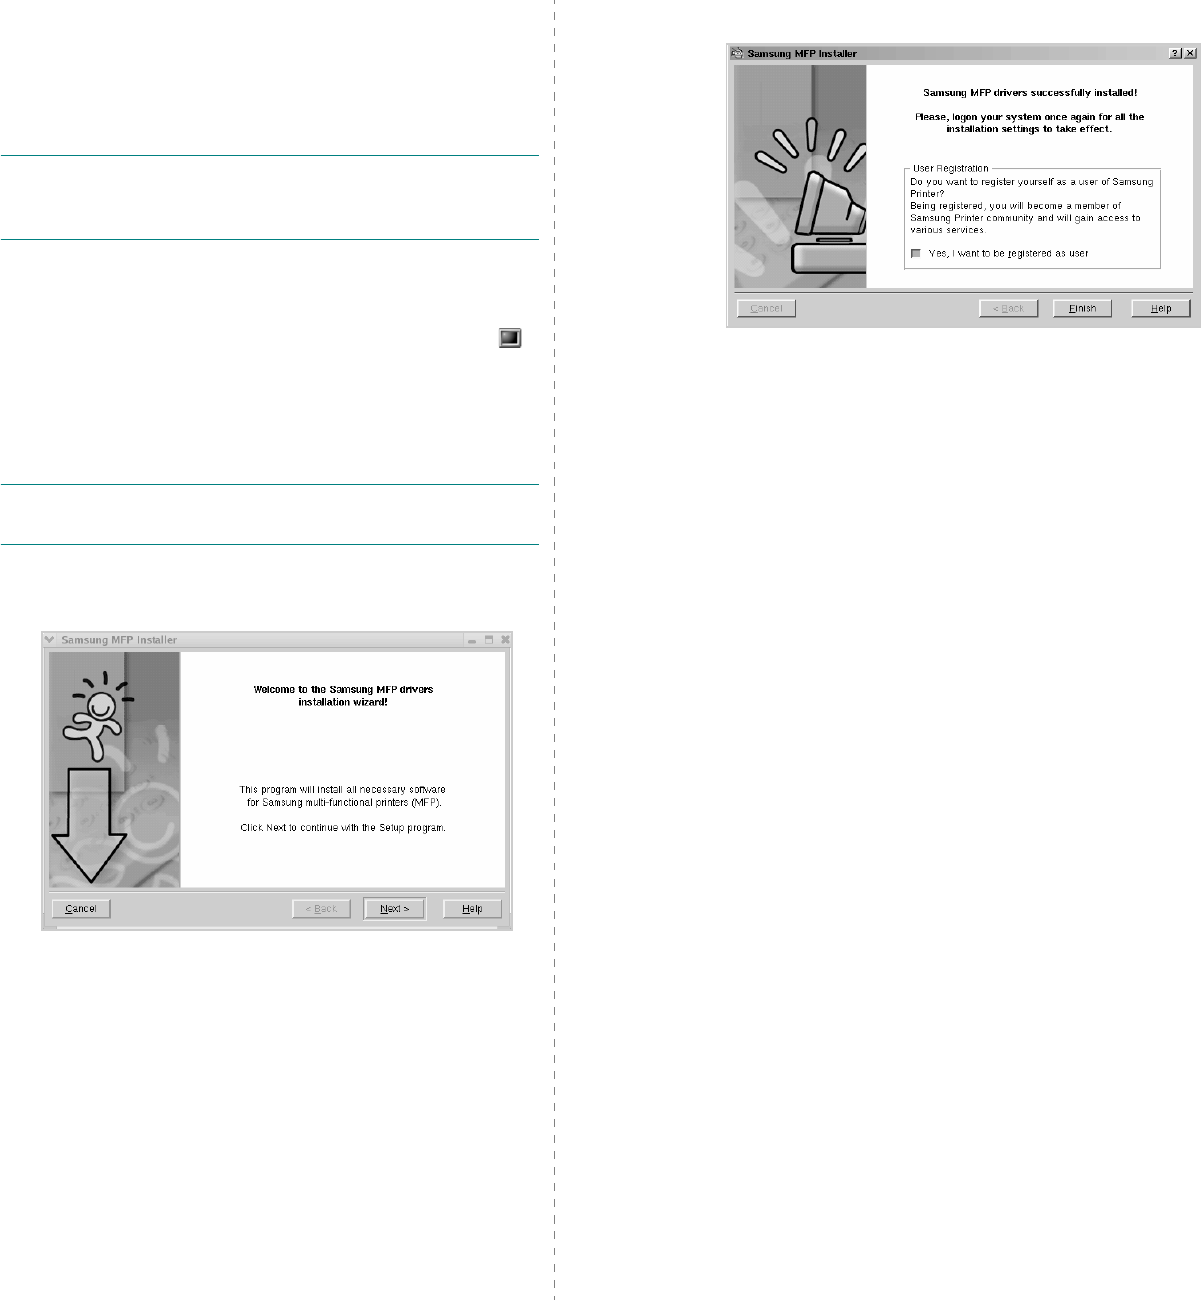
Installing the MFP Driver
1
Make sure that you connect your machine to your
computer. Turn both the computer and the machine on.
2
When the Administrator Login window appears, type in
root
in the Login field and enter the system password.
N
OTE
: You must log in as a super user (root) to install the
printer software. If you are not a super user, ask your system
administrator.
3
Insert the printer software CD-ROM. The CD-ROM will
automatically run.
If the CD-ROM does not automatically run, click the
icon at the bottom of the desktop. When the Terminal
screen appears, type in:
[root@localhost root]#cd /mnt/cdrom/Linux
[root@localhost root]#./install.sh
N
OTE
: The installation program runs automatically if you
have an autorun software package installed and configured.
4
Click
Install
.
5
When the welcome screen appears, click
Next
.
6
When the installation is complete, click
Finish
.
The installation program has added the MFP Configurator
desktop icon and Samsung MFP group to the system
menu for your convenience. If you have any difficulties,
consult the onscreen help that is available through your
system menu or can otherwise be called from the driver
package windows applications, such as MFP Configurator
or Image Editor.
Using Your Printer in Linux
25
Uninstalling the MFP Driver
1
When the Administrator Login window appears, type in
root
in the Login field and enter the system password.
N
OTE
: You must log in as a super user (root) to install the
printer software. If you are not a super user, ask your system
administrator.
2
Insert the printer software CD-ROM. The CD-ROM will
automatically run.
If the CD-ROM does not automatically run, click the
icon at the bottom of the desktop. When the Terminal
screen appears, type in:
[root@localhost root]#cd /mnt/cdrom/Linux
[root@localhost root]#./install.sh
N
OTE
: The installation program runs automatically if you
have an autorun software package installed and configured.
3
Click
Uninstall
.
4
Click
Next
.
5
Click
Finish
.
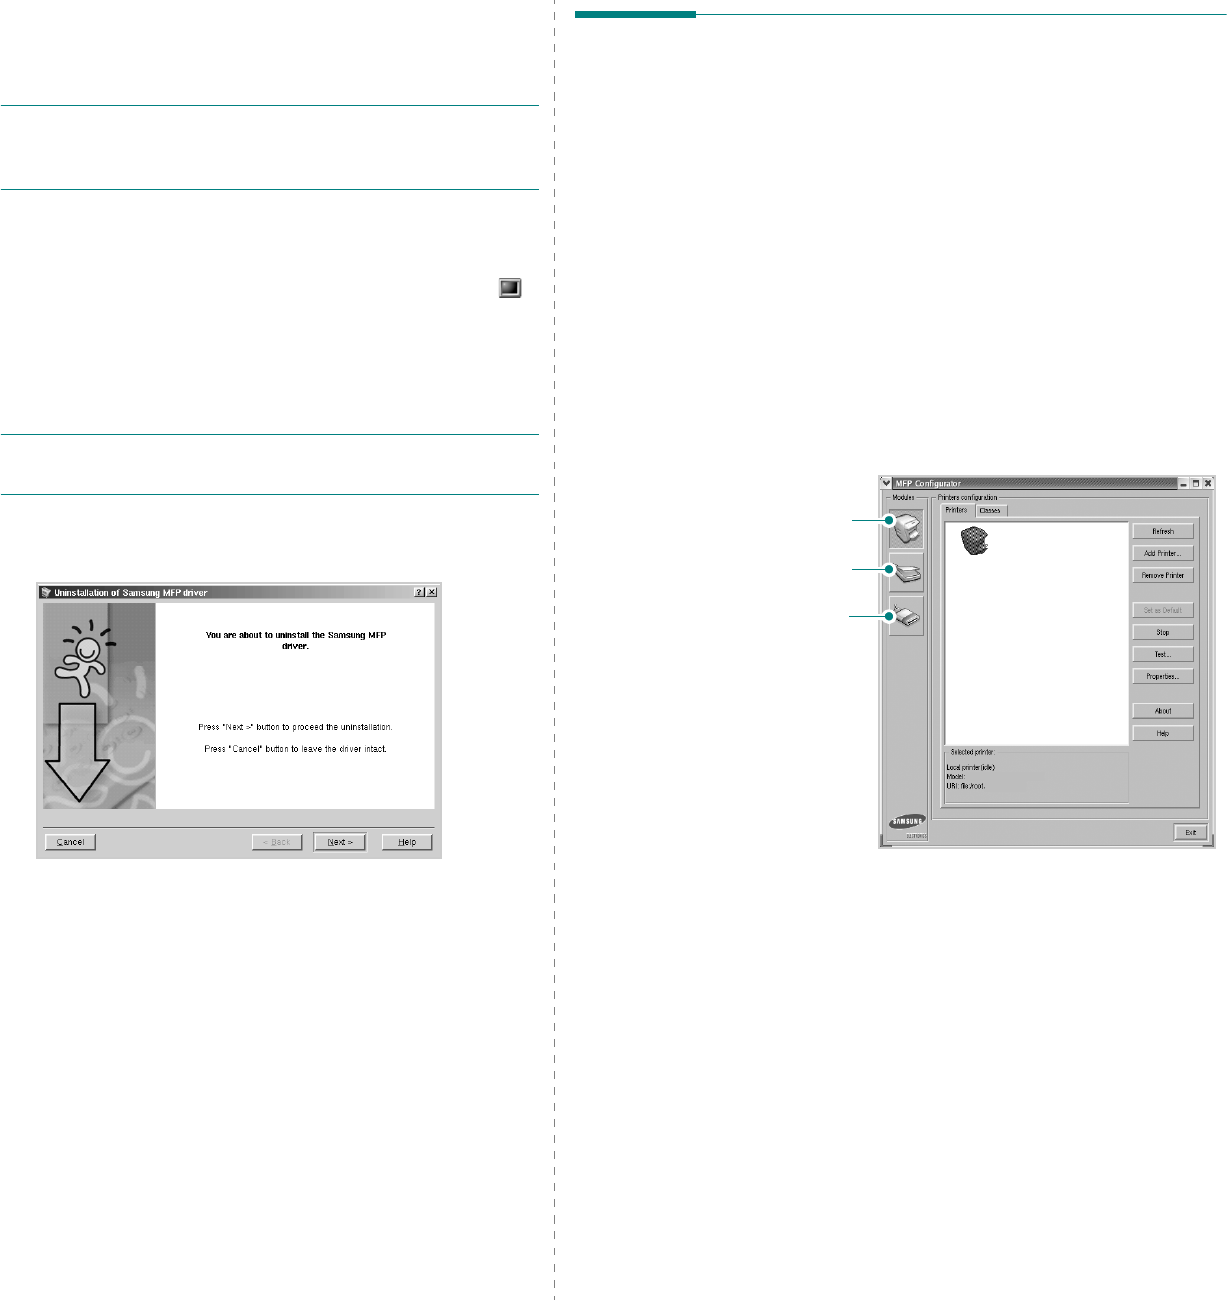
Using the MFP Configurator
MFP Configurator is a tool primarily intended for configuring
MFP devices. Since an MFP device combines the printer and
scanner, the MFP Configurator provides options logically
grouped for printer and scanner functions. There is also a
special MFP port option responsible for the regulation of access
to an MFP printer and scanner via a single I/O channel.
After installing the MFP driver (see page 23), the MFP
Configurator icon will automatically be created on your desktop.
Opening the MFP Configurator
1
Double-click
MFP Configurator
on the desktop.
You can also click the Startup Menu icon and select
Samsung MFP
and then
MFP Configurator
.
2
Press each button on the Modules pane to switch to the
corresponding configuration window.
You can use the onscreen help by clicking
Help
.
3
After changing the configurations, click
Exit
to close the
MFP Configurator.
Printers Configuration button
Scanners Configuration button
MFP Ports Configuration button
Using Your Printer in Linux
26
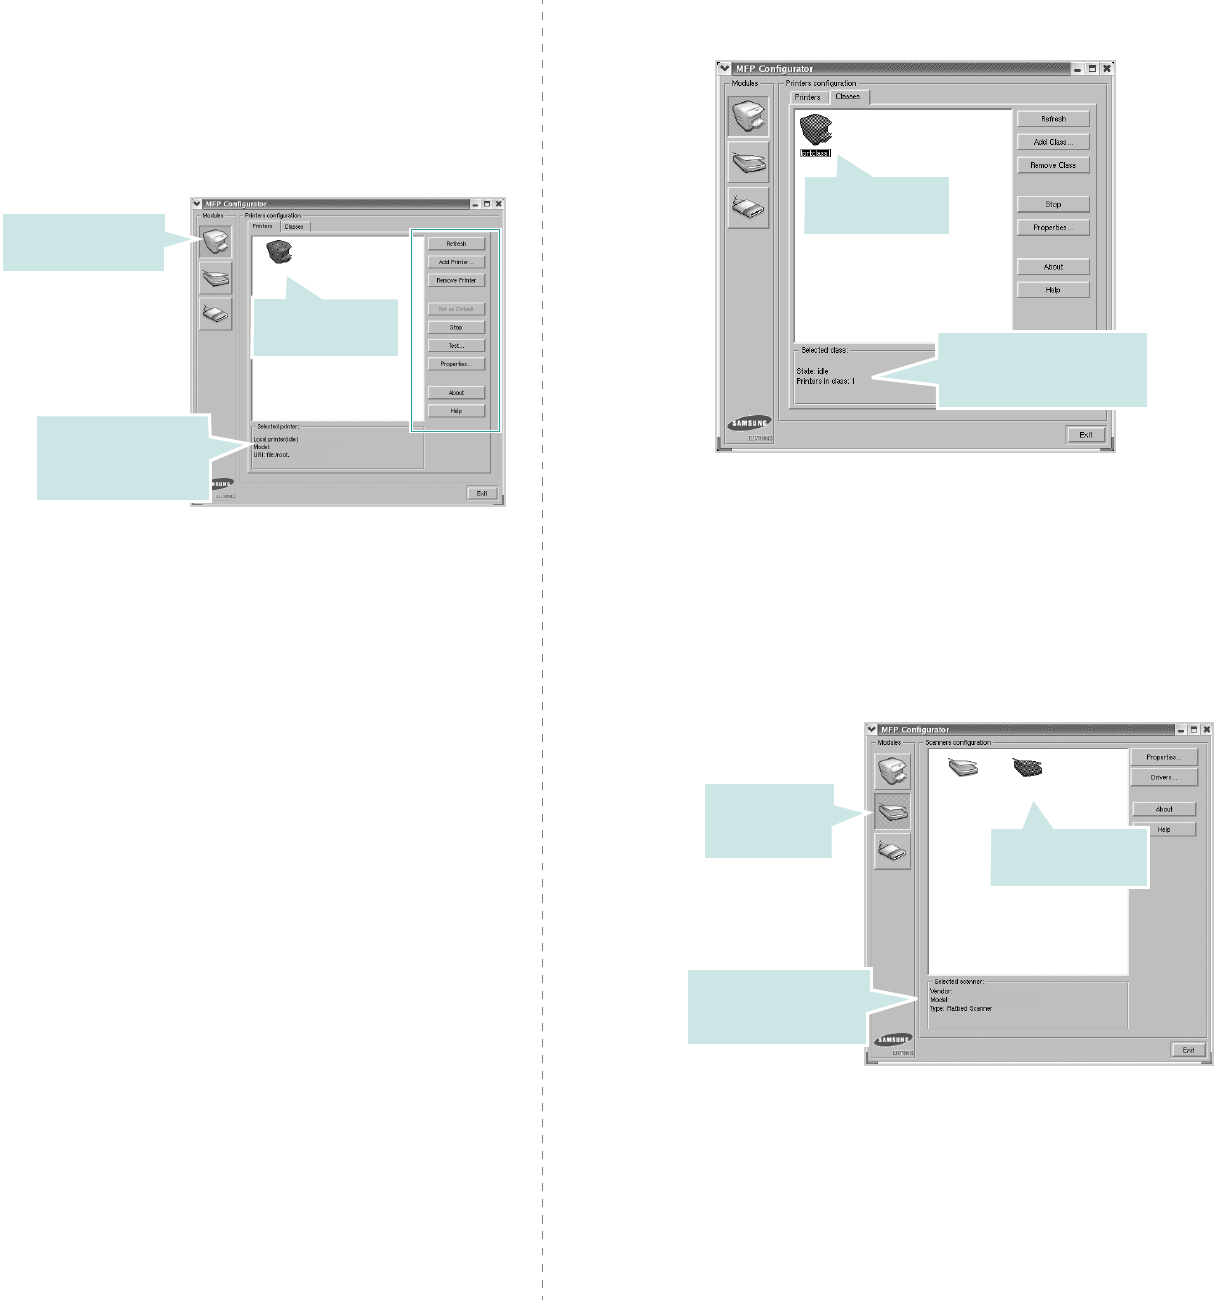
Printers Configuration
Printers configuration has the two tabs;
Printers
and
Classes
.
Printers Tab
You can see the current system’s printer configuration by
clicking on the printer icon button on the left side of the MFP
Configurator window.
You can use the following printer control buttons:
•
Refresh
: renews the available printers list.
•
Add Printer
: allows you to add a new printer.
•
Remove Printer
: removes the selected printer.
•
Set as Default
: sets the current printer as a default
printer.
•
Stop
/
Start
: stops/starts the printer.
•
Test
: allows you to print a test page to check if the
machine is working properly.
•
Properties
: allows you to view and change the printer
properties. For details, see page 27.
Shows all of the
installed printer.
Switches to Printer
configuration.
Shows the status,
model name and
URI of your printer.
Classes Tab
The Classes tab shows a list of available printer classes.
•
Refresh
: Renews the classes list.
•
Add Class... :
Allows you to add a new printer class.
•
Remove Class :
Removes the selected printer class.
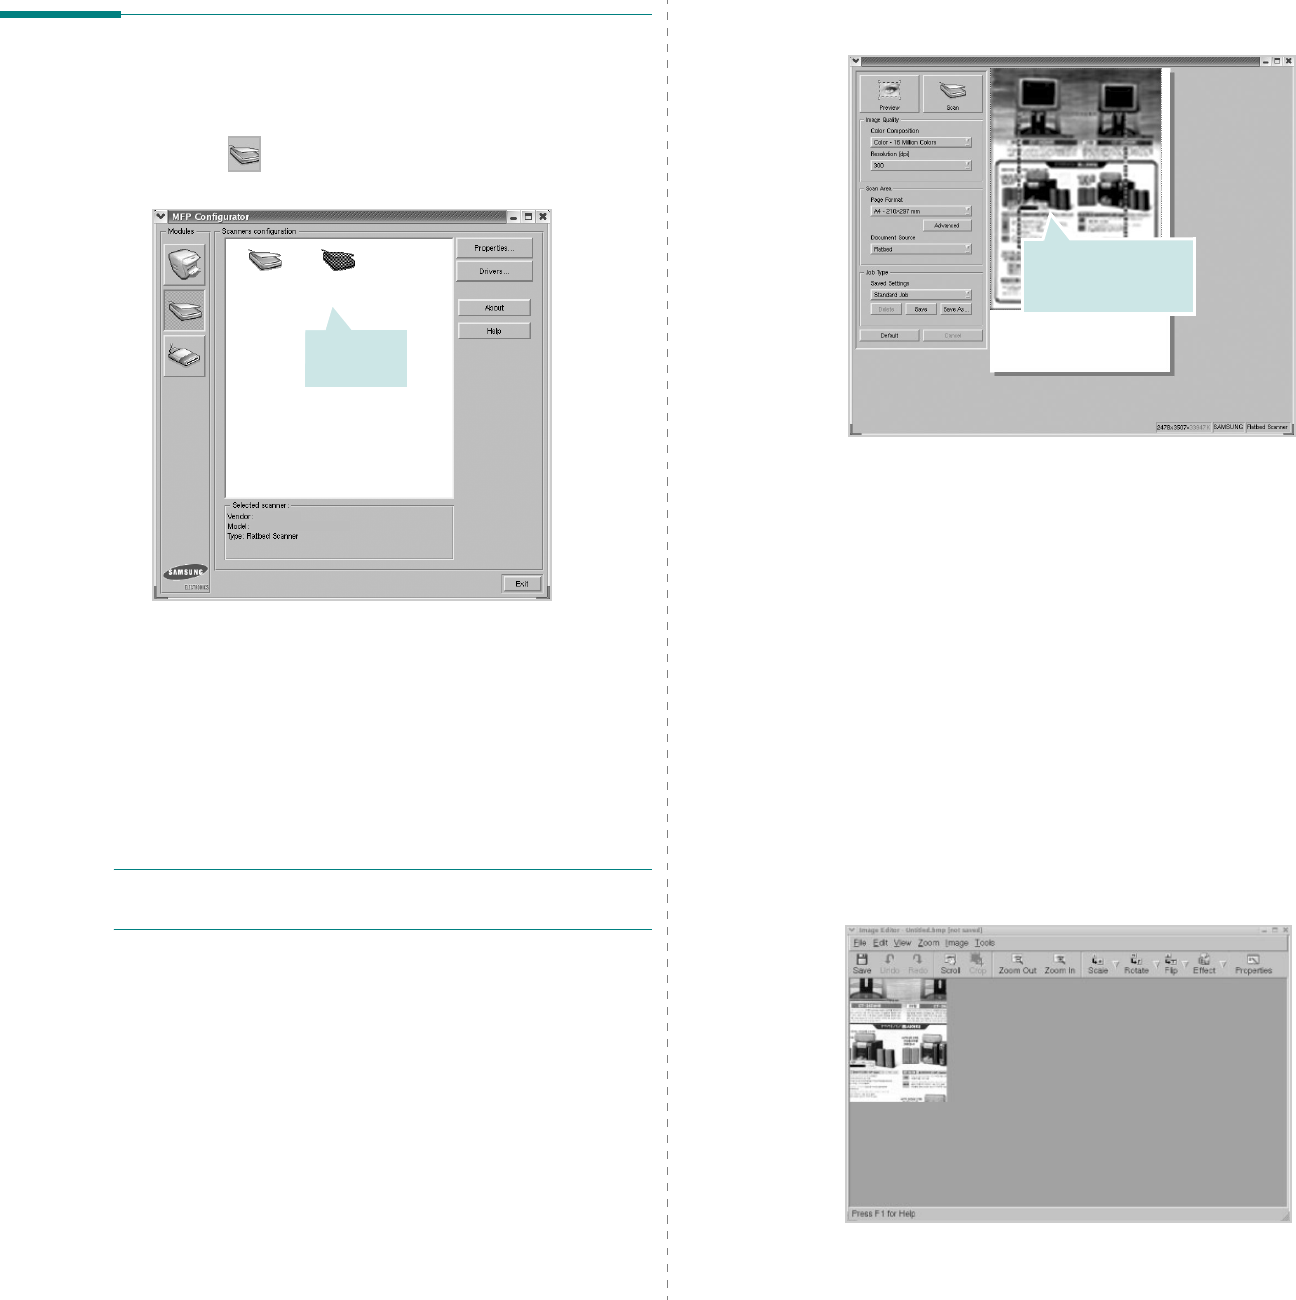
Scanners Configuration
In this window, you can monitor the activity of scanner devices,
view a list of installed Samsung MFP devices, change device
properties, and scan images.
•
Properties...
: Allows you to change the scan properties
and scan a document. See page 29.
•
Drivers... :
Allows you to monitor the activity of the scan drivers.
Shows the status of the
class and the number of
printers in the class.
Shows all of the
printer classes.
Switches to
Scanners
configuration. Shows all of the
installed scanners.
Shows the vendor,
model name and type
of your scanner.
Using Your Printer in Linux
27
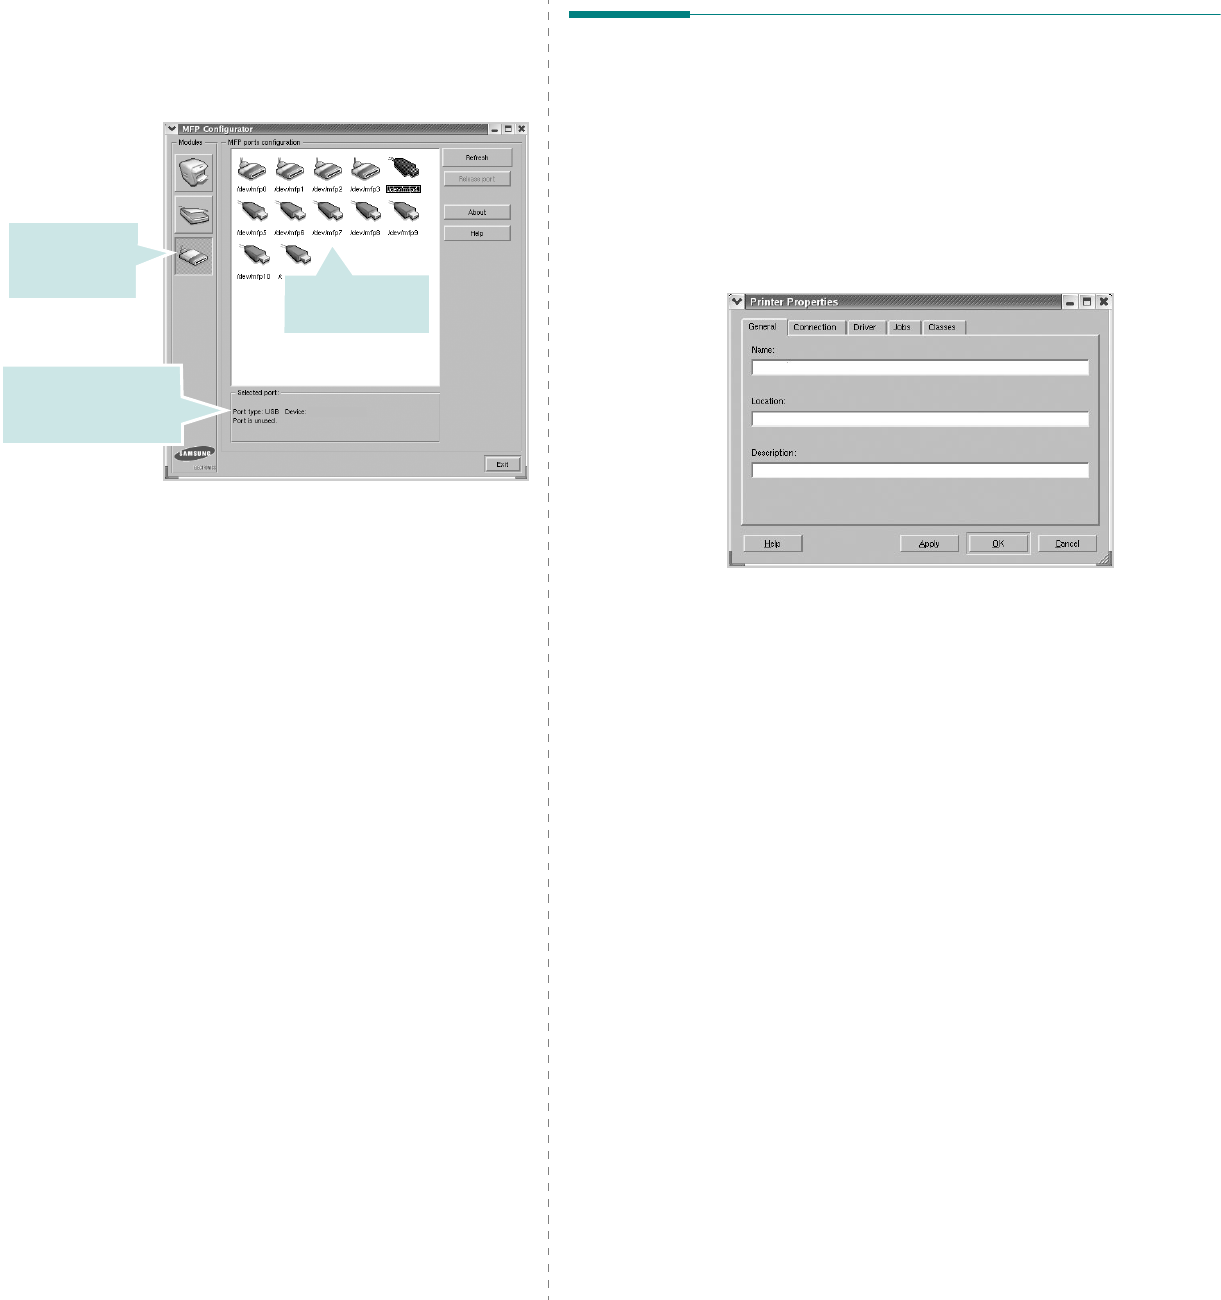
MFP Ports Configuration
In this window, you can view the list of available MFP ports,
check the status of each port and release a port that is stalled
in busy state when its owner is terminated for any reason.
•
Refresh
: Renews the available ports list.
•
Release port :
Releases the selected port.
Sharing Ports Between Printers and Scanners
Your machine may be connected to a host computer via the
parallel port or USB port. Since the MFP device contains more
than one device (printer and scanner), it is necessary to
organize proper access of “consumer” applications to these
devices via the single I/O port.
The Samsung MFP driver package provides an appropriate port
sharing mechanism that is used by Samsung printer and
scanner drivers. The drivers address their devices via so-called
MFP ports. The current status of any MFP port can be viewed
via the MFP Ports Configuration. The port sharing prevents you
from accessing one functional block of the MFP device, while
another block is in use.
When you install a new MFP printer onto your system, it is
strongly recommended you do this with the assistance of an
MFP Configurator. In this case you will be asked to choose I/O
port for the new device. This choice will provide the most
suitable configuration for MFP’s functionality. For MFP scanners
I/O ports are being chosen by scanner drivers automatically, so
proper settings are applied by default.
Switches to
MPF ports
configuration.
Shows the port type,
device connected to
the port and status
Shows all of the
available ports.
Configuring Printer Properties
Using the properties window provided by the Printers
configuration, you can change the various properties for your
machine as a printer.
1
Open the MFP Configurator.
If necessary, switch to Printers configuration.
2
Select your machine on the available printers list and click
Properties
.
3
The Printer Properties window opens.
The following five tabs display at the top of the window:
•
General
: allows you to change the printer location and
name. The name entered in this tab displays on the
printer list in Printers configuration.
•
Connection
: allows you to view or select another port. If
you change the printer port from USB to parallel or vice
versa while in use, you must re-configure the printer port
in this tab.
•
Driver
: allows you to view or select another printer
driver. By clicking
Options
, you can set the default
device options.
•
Jobs
: shows the list of print jobs. Click
Cancel job
to
cancel the selected job and select the
Show completed
jobs
check box to see previous jobs on the job list.
•
Classes
: shows the class that your printer is in. Click
Add to Class
to add your printer to a specific class or
click
Remove from Class
to remove the printer from the
selected class.
4
Click
OK
to apply the changes and close the Printer
Properties Window.
Using Your Printer in Linux
28
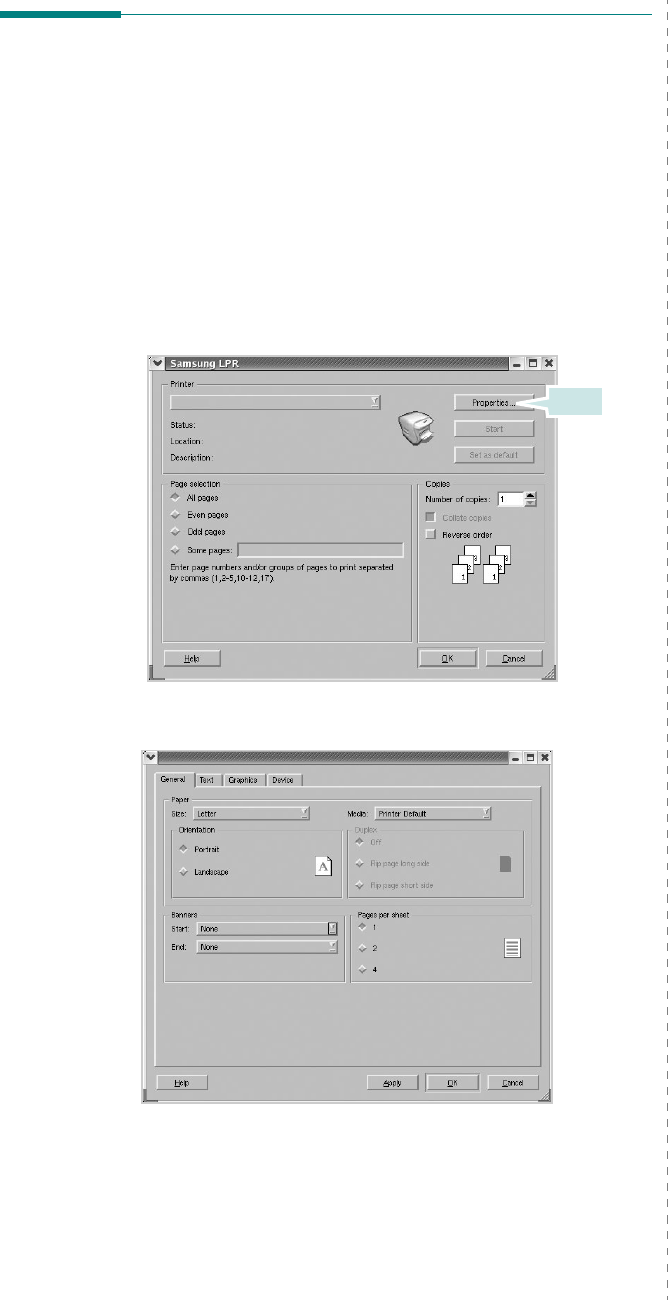
Printing a Document
Printing from Applications
There are a lot of Linux applications that you are allowed to
print from using Common UNIX Printing System (CUPS). You
can print on your machine from any such application.
1
From the application you are using, select
Print
from the
File
menu.
2
Select
Print
directly using
lpr
.
3
In the Samsung LPR window, select the model name of
your machine from the Printer list and click
Properties
.
4
Change the printer and print job properties.
Click.
The following four tabs display at the top of the window.
•
General
- allows you to change the paper size, the paper
type, and the orientation of the documents, enables the
duplex feature, adds start and end banners, and changes
the number of pages per sheet.
•
Text
- allows you to specify the page margins and set the
text options, such as spacing or columns.
•
Graphics
- allows you to set image options that are used
when printing images/files, such as color options, image
size, or image position.
•
Device
: allows you to set the print resolution, paper
source, and destination.
5
Click
OK
to apply the changes and close the scx6x20
Properties window.
6
Click
OK
in the Samsung LPR window to start printing.
7
The Printing window appears, allowing you to monitor the
status of your print job.
To abort the current job, click
Cancel
.
Printing Files
You can print many different types of files on the Samsung MFP
device using the standard CUPS way - directly from the
command line interface. The CUPS lpr utility allows you do that.
But the drivers package replaces the standard lpr tool by a
much more user-friendly Samsung LPR program.
To print any document file:
1
Type
lpr <file_name>
from the Linux shell command
line and press
Enter
. The Samsung LPR window appears.
When you type only
lpr
and press
Enter
, the Select
file(s) to print window appears first. Just select any files
you want to print and click
Open
.
2
In the Samsung LPR window, select your printer from the
list, and change the printer and print job properties.
For details about the properties window, see page 28.
3
Click
OK
to start printing.
Using Your Printer in Linux
29
Scanning a Document
You can scan a document using the MFP Configurator window.
1
Double-click the MFP Configurator on your desktop.
2
Click the button to switch to Scanners Configuration.
3
Select the scanner on the list.
When you have only one MFP device and it is connected
to the computer and turned on, your scanner appears on
the list and is automatically selected.
If you have two or more scanners attached to your
computer, you can select any scanner to work at any
time. For example, while acquisition is in progress on the
first scanner, you may select the second scanner, set the
device options and start the image acquisition
simultaneously.
N
OTE
: The scanner name shown in Scanners configuration
can be different from the device name.
4
Click
Properties
.
5
Load the document to be scanned
face up into the ADF
(Automatic Document Feeder) or face down on the
document glass.
6
Click
Preview
in the Scanner Properties window.
Click your
scanner.
The document is scanned and the image preview appears
in the Preview Pane.
7
Change the scan options in the Image Quality and Scan
Area sections.
•
Image Quality
: allows you to select the color
composition and the scan resolution for the image.
•
Scan Area
: allows you to select the page size. The
Advanced
button enables you to set the page size
manually.
If you want to use one of the preset scan option settings,
select from the Job Type drop-down list. For details about
the preset Job Type settings, see page 30.
You can restore the default setting for the scan options
by clicking
Default
.
8
When you have finished, click
Scan
to start scanning.
The status bar appears on the bottom left of the window
to show you the progress of the scan. To cancel scanning,
click
Cancel
.
9
The scanned image appears in the new Image Editor
window.
If you want to edit the scanned image, use the toolbar.
For further details about editing an image, see page 30.
Drag the pointer to
set the image area
to be scanned.
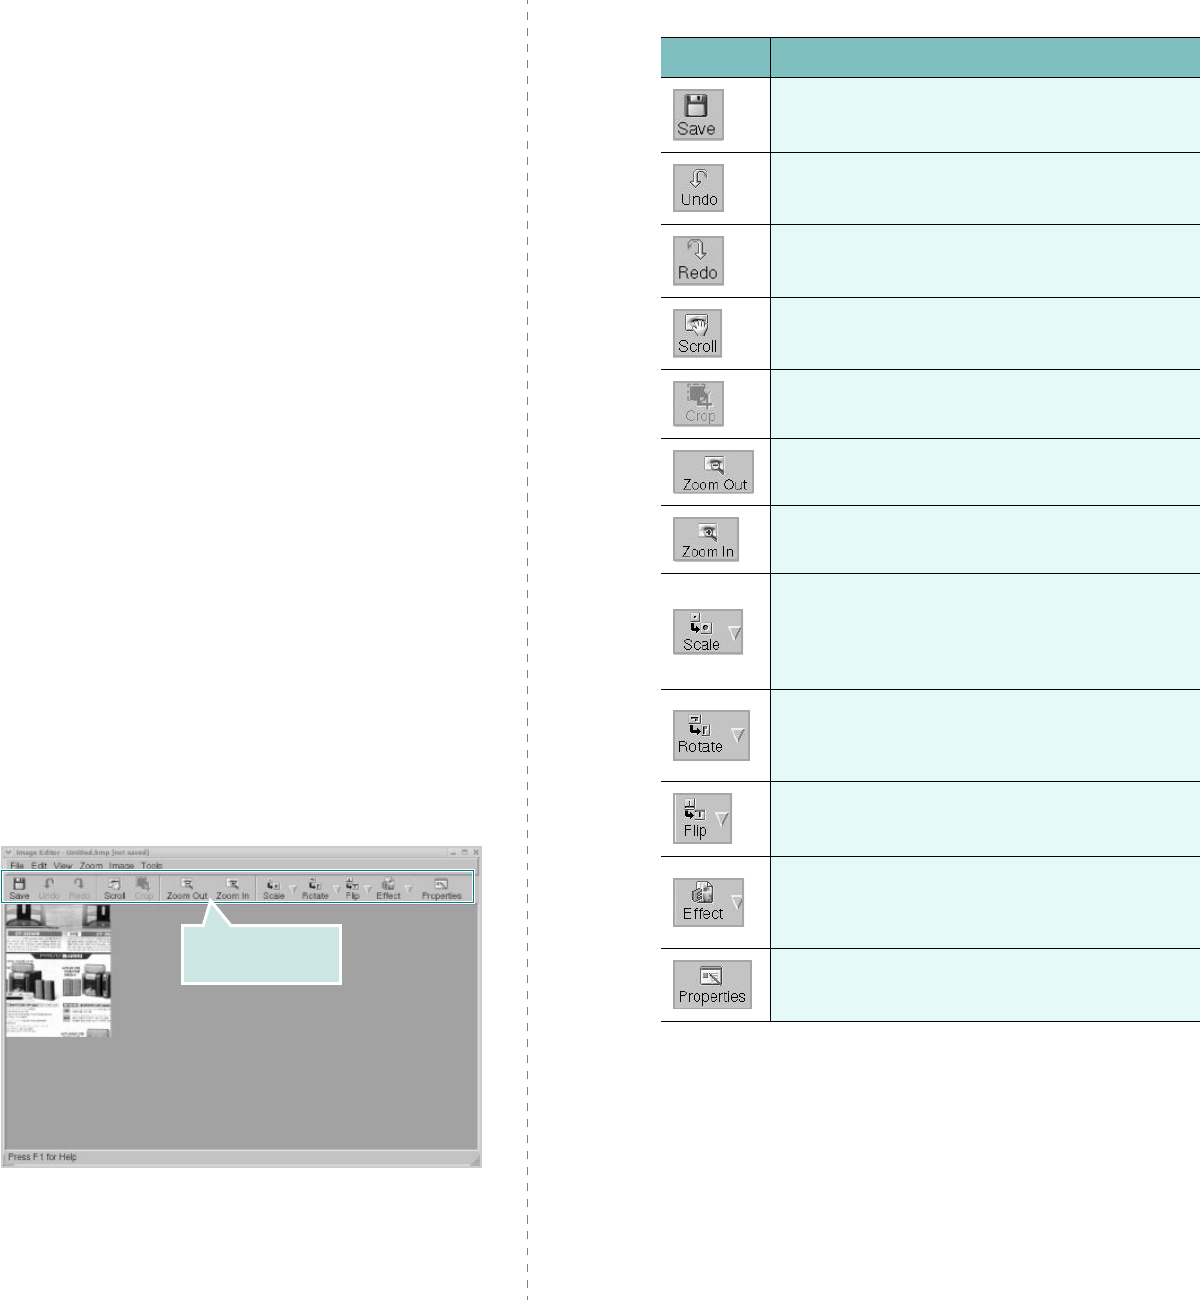
Using Your Printer in Linux
30
10
When you are finished, click
Save
on the toolbar.
11
Select the file directory where you want to save the image
and enter the file name.
12
Click
Save
.
Adding Job Type Settings
You can save your scan option settings to retrieve for a later
scanning.
To save a new Job Type setting:
1
Change the options from the Scanner Properties window.
2
Click
Save As
.
3
Enter the name for your setting.
4
Click
OK
.
Your setting is added to the Saved Settings drop-down
list.
To save a Job Type setting for the next scan job:
1
Select the setting you want to use from the Job Type drop-
down list.
2
Click
Save
.
The next time you open the Scanner Properties window,
the saved setting is automatically selected for the scan
job.
To delete a Job Type setting:
1
Select the setting you want to delete from the Job Type
drop-down list.
2
Click
Delete
.
The setting is deleted from the list
Using the Image Editor
The Image Editor window provides you with menu commands
and tools to edit your scanned image.
Use these tools to
edit the image.
You can use the following tools to edit the image:
For further details about the Image Editor program, refer to the
onscreen help.
Tools Function
Saves the image.
Cancels your last action.
Restores the action you canceled.
Allows you to scroll through the image.
Crops the selected image area.
Zooms the image out.
Zooms the image in.
Allows you to scale the image size; you can
enter the size manually, or set the rate to
scale proportionally, vertically, or
horizontally.
Allows you to rotate the image; you can
select the number of degrees from the drop-
down list.
Allows you to flip the image vertically or
horizontally.
Allows you to adjust the brightness or
contrast of the image, or to invert the
image.
Shows the properties of the image.

Using Your Printer with a Macintosh
31
8Using Your Printer with
a Macintosh
Your printer supports Macintosh systems with a built-in USB
interface or 10/100 Base-TX network interface card. When you
print a file from a Macintosh computer, you can use the CUPS driver
by installing the PPD file.
N
OTE
:
Some printers do not support a network
interface. Make sure that your printer supports a
network interface by referring to Printer Specifications
in your Printer User’s Guide.
This chapter includes:
• Installing Software for Macintosh
• Setting Up the Printer
•Printing
•Scanning
Installing Software for
Macintosh
The CD-ROM that came with your printer provides you with the
PPD file that allows you to use the CUPS driver or Apple
LaserWriter driver
(only available when you use a printer
which supports the PostScript driver)
, for printing on a
Macintosh computer.
Also, it provides you with the Twain driver for scanning on a
Macintosh computer.
Verify the following before you install the printer software:
Item Requirements
Operating System Mac OS 10.3.x or higher
RAM 128 MB
Free Disk Space 200 MB
Install the Printer driver
1
Make sure that you connect your printer to the computer.
Turn on your computer and printer.
2
Insert the CD-ROM which came with your printer into the
CD-ROM drive.
3
Double-click
CD-ROM icon
that appears on your
Macintosh desktop.
4
Double-click the
MAC_Installer
folder.
5
Double-click the
MAC_Printer
folder.
6
Double-click the
Samsung SPL2 Installer
icon.
7
Enter the password and click
OK
.
8
The Samsung SPL Installer window opens. Click
Continue
and then click
Continue
.
9
Select
Easy Install
and click
Install
.
10
After the installation is finished, click
Quit
.
Uninstalling the Printer driver
Uninstall is required if you are upgrading the software, or if
installation fails.
1
Insert the CD-ROM which came with your printer into the
CD-ROM drive.
2
Double-click
CD-ROM icon
that appears on your
Macintosh desktop.
3
Double-click the
MAC_Installer
folder.
4
Double-click the
MAC_Printer
folder.
5
Double-click the
Samsung SPL2 Installer
icon.
6
Enter the password and click
OK
.
7
The Samsung SPL Installer window opens. Click
Continue
and then click
Continue
.
8
Select
Uninstall
and then click
Uninstall
.
9
When the uninstallation is done, click
Quit
.

Using Your Printer with a Macintosh
32
Install the Scan driver
1
Make sure that you connect your printer to the computer.
Turn on your computer and printer.
2
Insert the CD-ROM which came with your printer into the
CD-ROM drive.
3
Double-click
CD-ROM icon
that appears on your
Macintosh desktop.
4
Double-click the
MAC_Installer
folder.
5
Double-click the
MAC_Twain
folder.
6
Double-click the
Samsung ScanThru Installer
icon.
7
Enter the password and click
OK
.
8
Click
Continue
.
9
Click
Install
.
10
After the installation is finished, click
Quit
.
Uninstalling the Scan driver
1
Insert the CD-ROM which came with your printer into the
CD-ROM drive.
2
Double-click
CD-ROM icon
that appears on your
Macintosh desktop.
3
Double-click the
MAC_Installer
folder.
4
Double-click the
MAC_Twain
folder.
5
Double-click the
Samsung ScanThru Installer
icon.
6
Enter the password and click
OK
.
7
Click
Continue
.
8
Select
Uninstall
from the Installation Type and then Click
Uninstall
.
9
When the uninstallation is done, click
Quit
.
Setting Up the Printer
Set up for your printer will be different depending on which
cable you use to connect the printer to your computer—the
network cable or the USB cable.
For a Network-connected Macintosh
N
OTE
:
Some printers do not support a network
interface. Before connecting your printer, make sure
that your printer supports a network interface by
referring to Printer Specifications in your Printer User’s
Guide.
1
Follow the instructions on “Installing Software for
Macintosh” on page 31 to install the PPD and Filter files on
your computer.
2
Open
Print Setup Utility
from the
Utilities
folder.
3
Click
Add
on the
Printer List
.
4
Select the
IP Printing
tab.
5
Enter the printer’s IP address in the
Printer Address
field.
6
Enter the queue name in the
Queue Name
field. If you
cannot determine the queue name for your printer server,
try using the default queue first.
7
Select
Samsung
in
Printer Model
and your printer
in
Model Name
.
8
Click
Add
.
9
Your printer’s IP address appears on the
Printer List
, and
is set as the default printer.
For a USB-connected Macintosh
1
Follow the instructions on “Installing Software for
Macintosh” on page 31 to install the PPD and Filter files on
your computer.
2
Open
Print Setup Utility
from the
Utilities
folder.
3
Click
Add
on the
Printer List
.
4
Select the
USB
tab.
5
Select
Samsung
in
Printer Model
and your printer in
Model Name
.
6
Click
Add
.
Your printer appears on the
Printer List
, and is set as the
default printer.
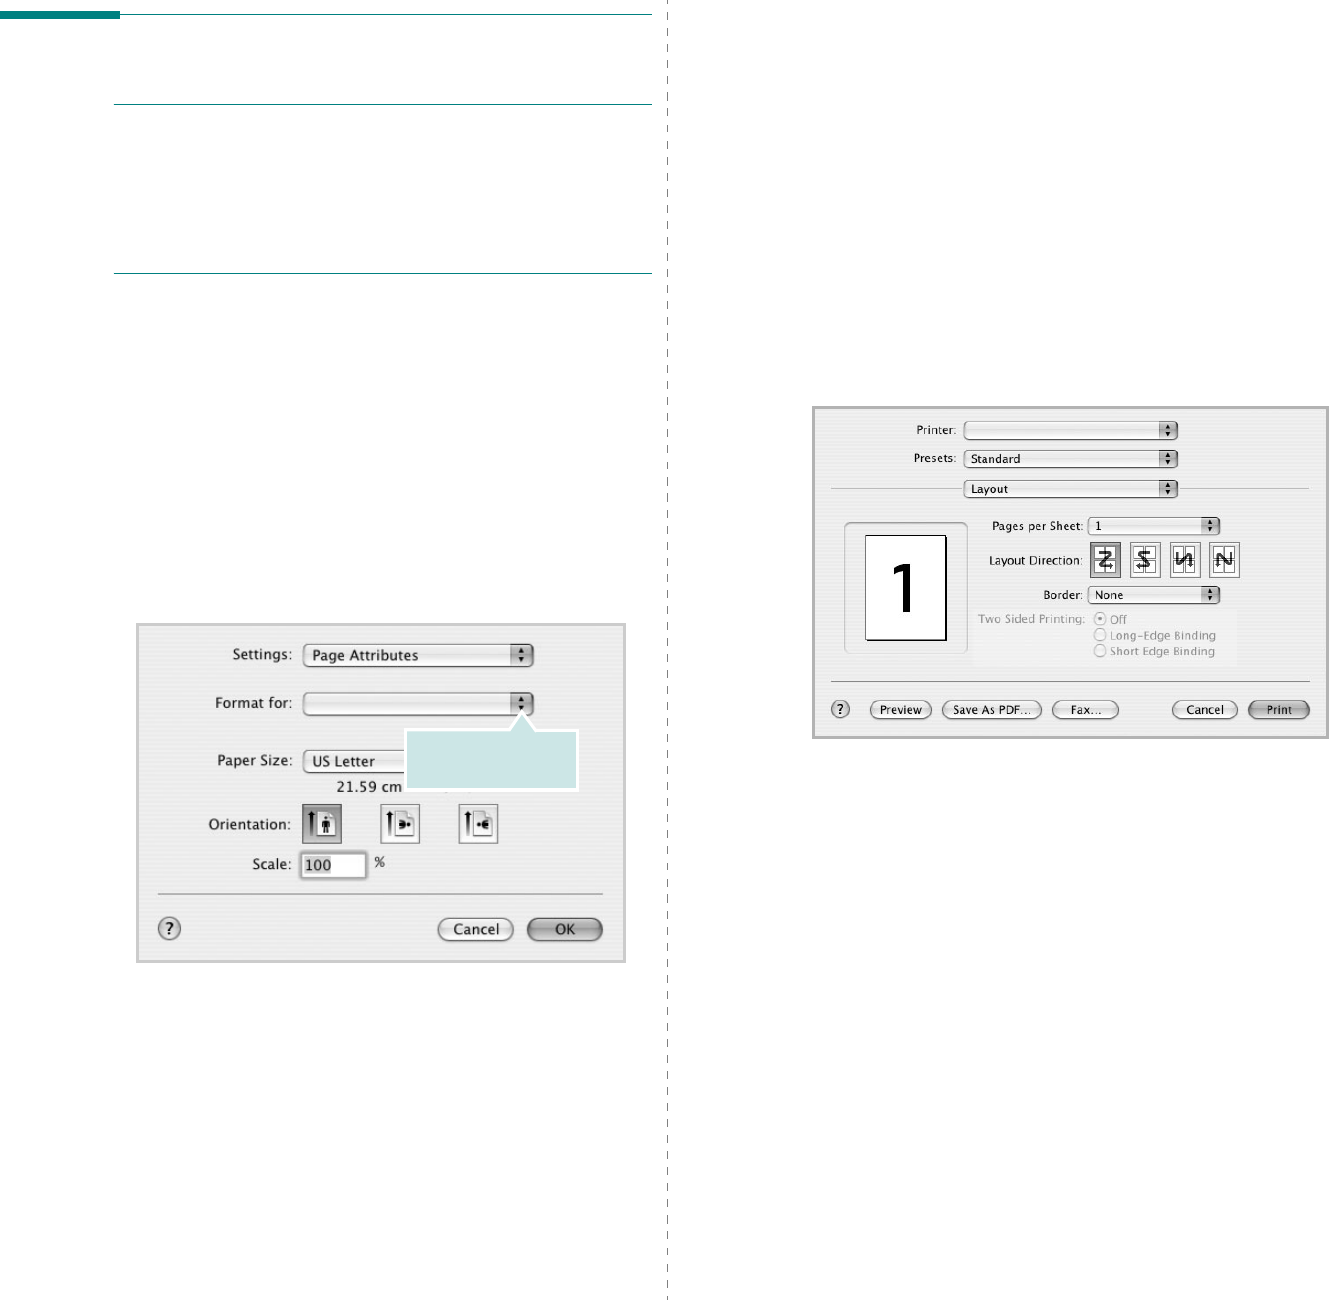
33
Printing
N
OTES
:
• The Macintosh printer’s properties window that appears in
this User’s Guide may differ depending on the printer in use.
However the composition of the printer properties window is
similar.
• You can check your printer name in the supplied CD-
ROM.
Printing a Document
When you print with a Macintosh, you need to check the printer
software setting in each application you use. Follow these steps
to print from a Macintosh.
1
Open a Macintosh application and select the file you want
to print.
2
Open the
File
menu and click
Page Setup
(
Document
Setup
in some applications).
3
Choose your paper size, orientation, scaling, and other
options and click
OK
.
4
Open the
File
menu and click
Print
.
5
Choose the number of copies you want and indicate which
pages you want to print.
6
Click
Print
when you finish setting the options.
▲
Mac OS 10.3
Make sure that your
printer is selected.
Changing Printer Settings
You can use advanced printing features when using your
printer.
From your Macintosh application, select
Print
from the
File
menu. The printer name which appears in the printer properties
window may differ depending on the printer in use. Except for
the name, the composition of the printer properties window is
similar.
Layout Setting
The
Layout
tab provides options to adjust how the document
appears on the printed page. You can print multiple pages on
one sheet of paper.
Select
Layout
from the
Presets
drop-down list to access the
following features. For details, see “Printing Multiple Pages on
One Sheet of Paper” on the next column.
▲
Mac OS 10.3
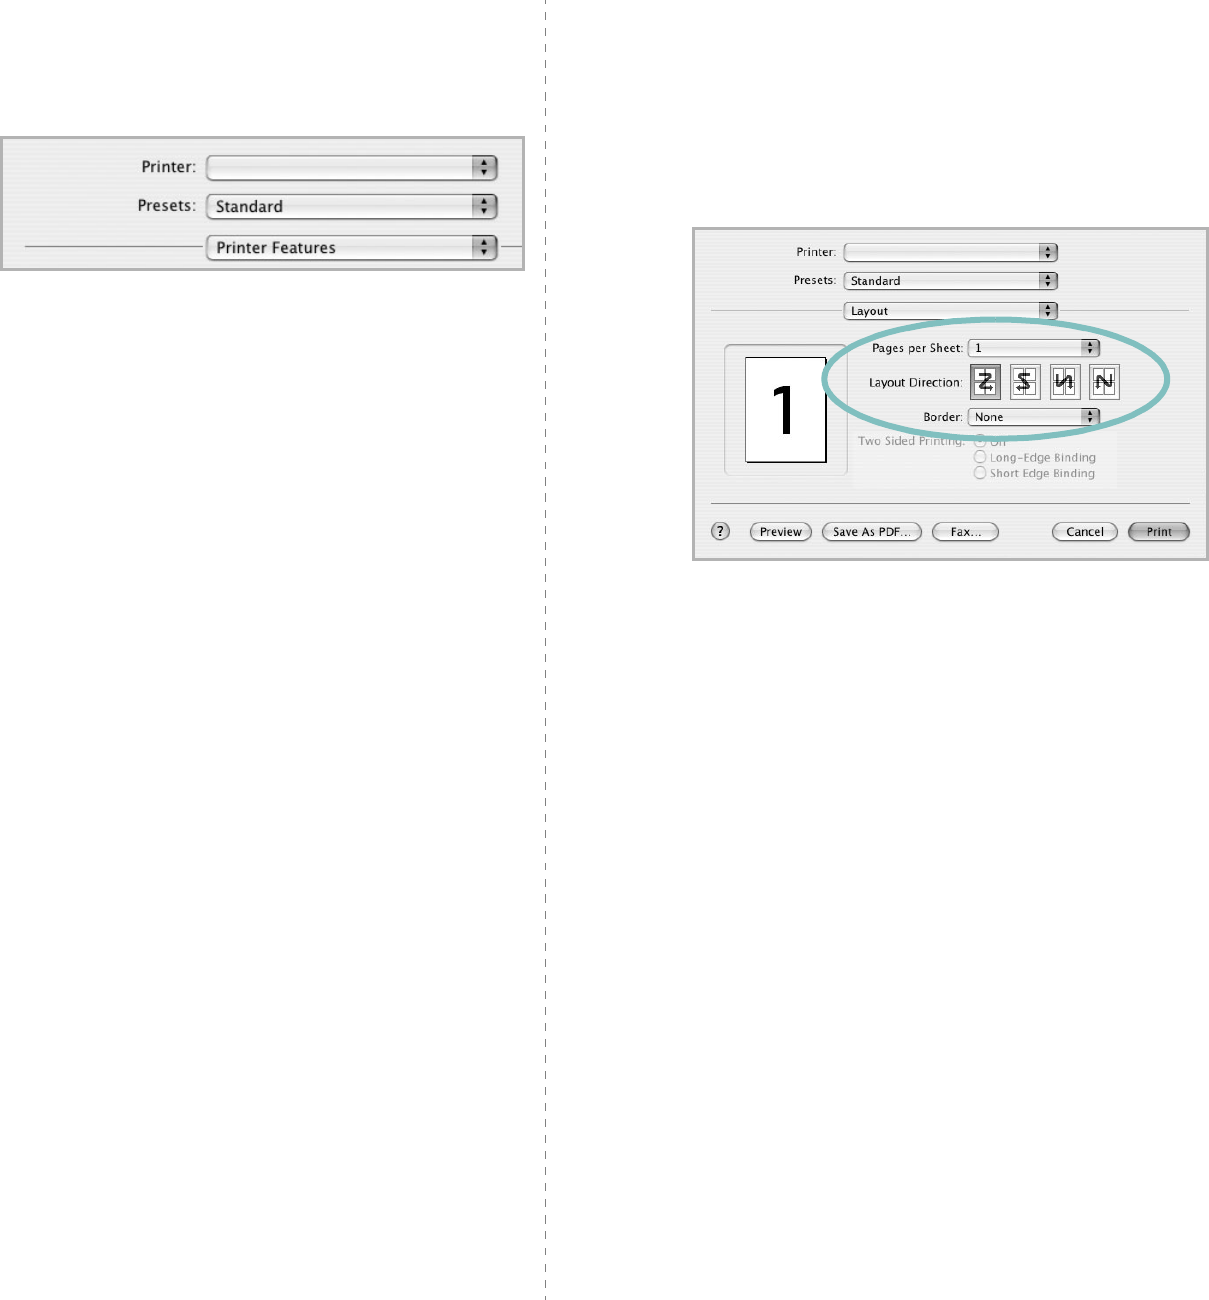
34
Printer Features Setting
The
Printer Features
tab provides options for selecting the
paper type and adjusting print quality.
Select
Printer Features
from the
Presets
drop-down list to
access the following features:
Paper Type
Make sure that
Paper Type
is set to
Printer Default
. If you
load a different type of print material, select the corresponding
paper type.
Resolution(Quality)
The Resolution options you can select may vary
depending on your printer model.
You can select the
printing resolution. The higher the setting, the sharper the clarity
of printed characters and graphics. The higher setting also may
increase the time it takes to print a document.
▲
Mac OS 10.3
Printing Multiple Pages on One Sheet
of Paper
You can print more than one page on a single sheet of paper.
This feature provides a cost-effective way to print draft pages.
1
From your Macintosh application, select
Print
from the
File
menu.
2
Select
Layout
.
3
Select the number of pages you want to print on one sheet
of paper on the
Pages per Sheet
drop-down list.
4
Select the page order from the
Layout Direction
option.
To print a border around each page on the sheet, select
the option you want from the
Border
drop-down list.
5
Click
Print
, and the printer prints the selected number of
pages on one side of each page.
▲
Mac OS 10.3

35
Scanning
If you want to scan documents using other software, you will
need to use TWAIN-compliant software, such as Adobe
PhotoDeluxe or Adobe Photoshop. The first time you scan with
your machine, select it as your TWAIN source in the application
you use.
The basic scanning process involves a number of steps:
• Place your photograph or page on the document glass or
ADF.
• Open an application, such as PhotoDeluxe or Photoshop.
• Open the TWAIN window and set the scan options.
• Scan and save your scanned image.
N
OTE
: You need to follow the program’s instructions for
acquiring an image. Please refer to the User’s Guide of the
application.
36
SOFTWARE SECTION
INDEX
A
advanced printing, use
13
C
canceling
scan
22
D
document, print
Macintosh
33
Windows
7
E
Extras properties, set
11
F
favorites settings, use
12
G
Graphics properties, set
10
H
help, use
12
I
install
printer driver
Macintosh
31
Windows
4
installing
Linux software
23
L
Layout properties, set
Macintosh
33
Windows
8
Linux
driver, install
24
printer properties
27
printing
28
scanning
29
M
Macintosh
driver
install
31
uninstall
31
printing
33
scanning
35
setting up the printer
32
MFP driver, install
Linux
24
N
n-up printing
Macintosh
34
Windows
13
O
orientation, print
28
Windows
8
overlay
create
16
delete
16
print
16
P
Paper properties, set
9
paper size, set
9
print
28
paper source, set
28
Windows
9
paper type, set
Macintosh
34
print
28
Windows
9
poster, print
14
print
document
7
fit to page
14
from Macintosh
33
from Windows
7
N-up
Macintosh
34
Windows
13
overlay
16
poster
15
scaling
14
watermark
15
print resolution
28
printer driver, install
Linux
24
printer properties
Linux
28
printer properties, set
Macintosh
33
Windows
8
printer resolution, set
Macintosh
34
Windows
10
printer software
install
Macintosh
31
Windows
4
uninstall
Macintosh
31
Windows
6
printing
from Linux
28
R
resolution
printing
28
37
S
scanning
Linux
29
SmarThru
20
TWAIN
22
WIA driver
22
scanning from Macintosh
35
setting
darkness
10
favorites
12
image mode
10
resolution
Macintosh
34
Windows
10
toner save
10
true-type option
10
software
install
Macintosh
31
Windows
4
reinstall
Windows
6
system requirements
Macintosh
31
uninstall
Macintosh
31
Windows
6
status monitor, use
18
system requirements
Linux
23
Macintosh
31
T
toner save, set
10
TWAIN, scan
22
U
uninstall, software
Macintosh
31
Windows
6
uninstalling
MFP driver
Linux
25
W
watermark
create
15
delete
15
edit
15
print
15
WIA, scan
22
