Samsung Electronics Co SGHD307 Dual-Band GSM Phone w/ BlueTooth User Manual D307
Samsung Electronics Co Ltd Dual-Band GSM Phone w/ BlueTooth D307
Contents
- 1. Users Manual
- 2. Users Manual 1
- 3. Users Manual 2
- 4. Users Manual 3
- 5. Users Manual 4
Users Manual 2

Section 4: Menu Navigation 65
Menus and Sub menus Outline
Section 4
2.7.3.3.2 On
2.7.3.4 Message Acceptance
2.7.3.5 Expiry Date
2.7.3.5.1 Maximum
2.7.3.5.2 1 Hour
2.7.3.5.3 12 Hours
2.7.3.5.4 1 Day
2.7.3.5.5 1 Week
2.7.3.6 Delivery Time
2.7.3.6.1 Immediately
2.7.3.6.2 1 Hour later
2.7.3.6.3 12 Hours later
2.7.3.6.4 1 Day later
2.7.3.6.5 1 Week later
2.7.3.7 Priority
2.7.3.7.1 High
2.7.3.7.2 Normal
2.7.3.7.3 Low
2.7.3.8 Report Allowed
2.7.3.8.1 Off
2.7.3.8.2 On
2.7.3.9 Page Duration
2.7.3.0 Profile
D307.book Page 65 Thursday, September 29, 2005 3:50 PM

Section 4
66
2.7.4 Push Message
2.7.4.1 Receive
2.7.4.1.1 Never
2.7.4.1.2 Always
2.7.4.1.3 Only White List
2.7.4.2 White List
2.7.5 Broadcast*
2.7.5.1 Receive
2.7.5.1.1 Disable
2.7.5.1.2 Enable
2.7.5.2 Channel List
2.7.5.2.1 Select
2.7.5.2.2 Add Channel
2.7.5.2.3 Delete
2.7.5.2.4 Edit
2.7.5.3 Language
2.7.6 Default Text Input Mode
2.7.6.1 VoiceMode
2.7.6.2 Predictive Text Mode
2.7.6.3 Alphabet Mode
2.8 Memory Status
3. Games & Apps
3.1 Games
D307.book Page 66 Thursday, September 29, 2005 3:50 PM

Section 4: Menu Navigation 67
Menus and Sub menus Outline
Section 4
3.2 Alarm
3.2.1 Wake-up Call
3.2.2 Single Use Alarm
3.2.3 Daily Alarm
3.2.4 Remove Alarm
3.2.5 Autopower
3.2.5.1 Disable
3.2.5.2 Enable
3.3 Calendar
3.4 To Do List
3.5 Calculator
3.6 Record Audio
3.6.1 Record
3.6.2 Audio List
3.6.3 Delete All
3.6.4 Memory Status
3.7 Currency Conversion
3.8 World Time
4. MEdia Mall
4.1 Shop Ringtones
4.2 Shop Games
4.3 Shop Graphics
4.4 Shop Multimedia
4.5 Shop Applications
D307.book Page 67 Thursday, September 29, 2005 3:50 PM

Section 4
68
4.6 MEdia Home
5. MEdia Net
5.1 MEdia Net Home
5.2 Favorites
5.3 http://
5.4 Settings
5.5 Clear Cache
6. IM **
7. My MEdia
7.1 Audio
7.2 Graphics
7.3 Video
7.4 Others
7.5 Delete All
7.6 Memory Status
8. Address Book
8.1 Search
8.2 New Entry
8.3 Group Search
8.4 Group Edit
8.5 Speed Dial
8.6 Delete All
8.7 Own Number
D307.book Page 68 Thursday, September 29, 2005 3:50 PM

Section 4: Menu Navigation 69
Menus and Sub menus Outline
Section 4
8.8 Memory Status
8.9 SDN*
9. Settings
9.1 Time & Date
9.1.1 Set Time
9.1.2 Set Date
9.1.3 Time Format
9.1.3.1 12 Hours
9.1.3.2 24 Hours
9.1.4 Auto Update
9.1.4.1 Off
9.1.4.2 On
9.1.4.3 Confirm First
9.2 Phone Settings
9.2.1 Language
9.2.2 Greeting Message
9.2.3 Short Cut
9.2.3.1 Up Key
9.2.3.2 Down Key
9.2.3.3 Right Key
9.2.3.4 Left Key
9.2.4 Extra Settings
9.3 Display Settings
D307.book Page 69 Thursday, September 29, 2005 3:50 PM

Section 4
70
9.3.1 Wallpaper
9.3.1.1 Shop Graphics
9.3.1.2 Default Wallpapers
9.3.1.3 Downloaded Graphics
9.3.2 Front LCD Display
9.3.2.1 Clock
9.3.2.1.1 Digital Clock
9.3.2.1.2 Analog Clock
9.3.2.2 LCD Brightness
9.3.3 Text Display
9.3.3.1Disable
9.3.3.2 Enable
9.3.4 Text Color
9.3.5 Dialing Font Color
9.3.5.1 Basic
9.3.5.2 Rainbow
9.3.6 Menu Style
9.3.6.1 Grid Style
9.3.6.2 Page Style
9.3.6.3 Bar Style
9.3.7 Back Light
9.3.7.1 On
9.3.7.1.1 15 Seconds
D307.book Page 70 Thursday, September 29, 2005 3:50 PM
Section 4: Menu Navigation 71
Menus and Sub menus Outline
Section 4
9.3.7.1.2 30 Seconds
9.3.7.1.3 1 Minute
9.3.7.1.4 3 Minutes
9.3.7.1.5 10 Minutes
9.3.7.2 Dim
9.3.7.2.1 Off
9.3.7.2.2 15 Seconds
9.3.7.2.3 30 Seconds
9.3.7.2.4 1 Minute
9.3.7.2.5 3 Minutes
9.3.8 Graphic Logo
9.3.8.1 Off
9.3.8.2 On
9.4 Sound Settings
9.4.1 Ring Tone
9.4.1.1 Shop Ringtones
9.4.1.2 Default Ringtones
9.4.1.3 Downloaded Ringtones
9.4.1.4 Ring Volume
9.4.1.5 Alert Type
9.4.1.5.1 Melody
9.4.1.5.2 Vibration
9.4.1.5.3 Vibration+Melody
D307.book Page 71 Thursday, September 29, 2005 3:50 PM
Section 4
72
9.4.2 Keypad Tone
9.4.2.1 Type
9.4.2.1.1 Off
9.4.2.1.2 Ping Pong
9.4.2.1.3 Raindrop
9.4.2.1.4 Tone
9.4.2.1.5 Beep
9.4.2.2 Volume
9.4.3 Message Tone
9.4.3.1 Text Messages
9.4.3.1.1 Tone
9.4.3.1.2 Mode
9.4.3.1.2.1 Off
9.4.3.1.2.2 Tone
9.4.3.1.2.3 Vibration
9.4.3.1.3 Repetition
9.4.3.1.3.1 Once
9.4.3.1.3.2 Periodic
9.4.3.2 Multimedia Messages
9.4.3.2.1 Tone
9.4.3.2.2 Mode
9.4.3.2.2.1 Off
9.4.3.2.2.2 Tone
9.4.3.2.2.3 Vibration
D307.book Page 72 Thursday, September 29, 2005 3:50 PM

Section 4: Menu Navigation 73
Menus and Sub menus Outline
Section 4
9.4.3.2.3 Repetition
9.4.3.2.3.1 Once
9.4.3.2.3.2 Periodic
9.4.4 Power On/Off
9.4.4.1 Off
9.4.4.2 Mystic
9.4.4.3 Exciting
9.4.5 Folder Tone
9.4.5.1 Off
9.4.5.1 Future
9.4.5.1 Crystal
9.4.6 Alerts on Call
9.4.6.1 Off
9.4.6.2 On
9.4.7 Quiet Mode
9.4.7.1 Vibration All
9.4.7.2 Silent All
9.4.8 Extra Tones
9.5 Network Services
9.5.1 Call Forwarding
9.5.1.1 Forward Always
9.5.1.2 Busy
9.5.1.3 No Reply
9.5.1.4 Unreachable
D307.book Page 73 Thursday, September 29, 2005 3:50 PM

Section 4
74
9.5.1.5 Cancel All
9.5.2 Call Barring*
9.5.2.1 All Outgoing
9.5.2.2 International
9.5.2.3 International Except to Home
9.5.2.4 All Receiving
9.5.2.5 Receiving While Abroad
9.5.2.6 Cancel All
9.5.2.7 Change Barring Password
9.5.3 Call Waiting
9.5.3.1 Voice Calls
9.5.3.2 Data Calls
9.5.3.3 Cancel All
9.5.4 Network Selection*
9.5.4.1 Automatic
9.5.4.2 Manual
9.5.5 Caller ID
9.5.5.1 Default
9.5.5.2 Hide Number
9.5.5.3 Send Number
9.5.6 Closed User Group*
9.5.6.1 Index List
9.5.6.2 Outside Access
D307.book Page 74 Thursday, September 29, 2005 3:50 PM

Section 4: Menu Navigation 75
Menus and Sub menus Outline
Section 4
9.5.6.2.1 Disable
9.5.6.2.2 Enable
9.5.6.3 Default Group
9.5.6.3.1 Disable
9.5.6.3.2 Enable
9.5.7 Band Selection
9.5.7.1 GSM 1800
9.5.7.2 GSM 850/1900
9.6 Bluetooth
9.6.1 Activation
9.6.2 My Devices
9.6.3 My Phone’s Visibility
9.6.4 My Phone’s Name
9.6.5 Secure Mode
9.6.6 Bluetooth Services
9.6.6.1 Headset
9.6.6.2 Handsfree
9.6.6.3 Serial Port
9.6.6.4 Dial-up
9.6.6.5 File Transfer
9.7 Voice Recognition
9.7.1 Choice Lists
9.7.2 Sensitivity
D307.book Page 75 Thursday, September 29, 2005 3:50 PM

Section 4
76
9.7.3 Digit Dialing
9.7.3.1 Select Location
9.7.3.2 Adapt Digits
9.7.3.3 Reset Digits
9.7.4 Sound
9.7.4.1 Prompts
9.7.4.2 Digits
9.7.4.3 Names
9.7.4.4 Name Settings
9.7.4.4.1 Speed
9.7.4.4.2 Volume
9.7.5 VoiceMode
9.7.5.1 Adapt VoiceMode
9.7.5.2 Tutorial
9.7.5.3 Reset VoiceMode
9.7.6 About
9.8 Security
9.8.1 PIN Check
9.8.1.1 Disable
9.8.1.2 Enable
9.8.2 Change PIN
9.8.3 Phone Lock
9.8.3.1 Disable
D307.book Page 76 Thursday, September 29, 2005 3:50 PM

Section 4: Menu Navigation 77
Menus and Sub menus Outline
Section 4
9.8.3.2 Enable
9.8.4 Change Password
9.8.5 Privacy
9.8.5.1 Disable
9.8.5.2 Enable
9.8.6 SIM Lock
9.8.6.1 Disable
9.8.6.2 Enable
9.8.7 FDN Mode*
9.8.7.1 Disable
9.8.7.2 Enable
9.8.8 Change PIN2*
9.9 Connection Settings
9.9.1 MEdia Net
9.9.2 Home
9.9.3 Roam
9.9.4 Cingular MMS
9.9.5 Cingular IM
9.9.6 Cingular Email
9.9.7 Cingular Syncml
9.9.8 Cingular JAVA
9.9.9 Profile 9
9.9.9.1 Profile Name
D307.book Page 77 Thursday, September 29, 2005 3:50 PM

Section 4
78
9.9.9.2 Homepage URL
9.9.9.3 Bearer
9.9.9.3.1 GPRS
9.9.9.3.2 DATA
9.9.9.4 Proxy Setting
9.9.9.5 User Name
9.9.9.6 Password
9.9.9.7 APN
9.9.9.8 Proxy Status
9.9.9.8.1 Deactivate
9.9.9.8.2 Activate
9.9.9.9 Primary DNS
9.9.9.0 Secondary DNS
9.9.0 Profile 10
9.9.0.1 Profile Name
9.9.0.2 Homepage URL
9.9.0.3 Bearer
9.9.0.3.1 GPRS
9.9.0.3.2 DATA
9.9.0.4 Proxy Setting
9.9.0.5 User Name
9.9.0.6 Password
9.9.0.7 APN
D307.book Page 78 Thursday, September 29, 2005 3:50 PM

Section 4: Menu Navigation 79
Menus and Sub menus Outline
Section 4
9.9.0.8 Proxy Status
9.9.0.8.1 Deactivate
9.9.2.8.2 Activate
9.9.0.9 Primary DNS
9.9.0.0 Secondary DNS
9.0 Reset Settings
* Shows only if supported by your SIM card.
**The IM menu settings are predicated by your Default Community
Setting
D307.book Page 79 Thursday, September 29, 2005 3:50 PM

Section 4
80
D307.book Page 80 Thursday, September 29, 2005 3:50 PM
Section 5: Entering Text 81
Section 5
Section 5: Entering Text
Topics Covered
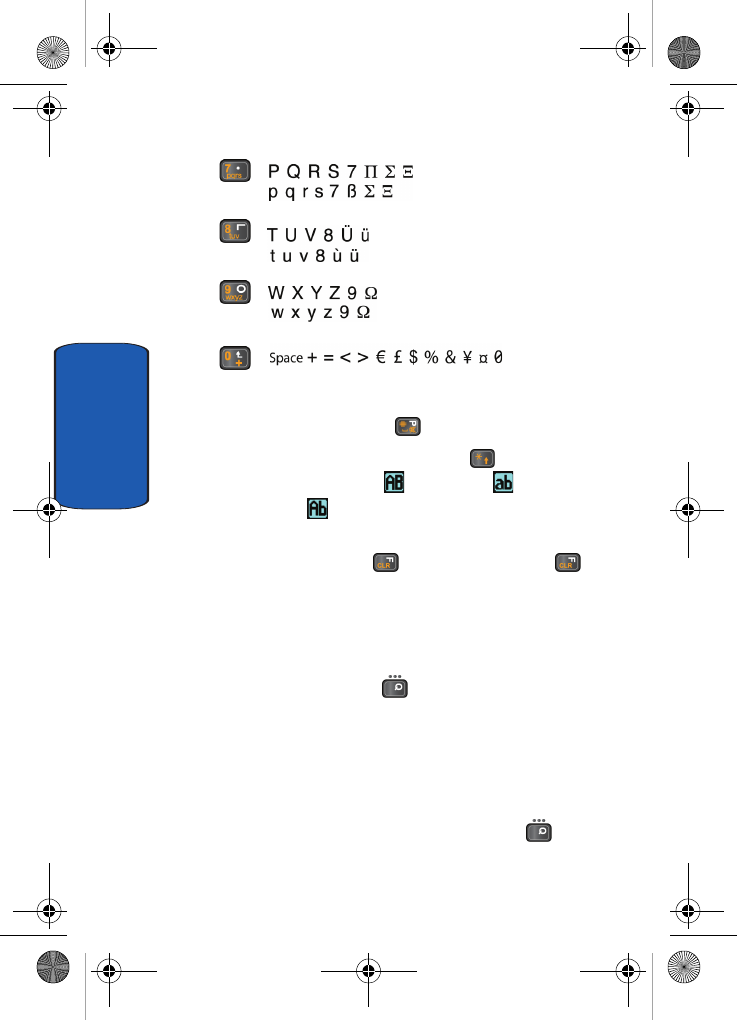
• Changing Text Entry Mode
• Using T9 (Predictive Text) Mode
• Using Alphabet Mode
• Using Number Mode
• Using Symbol Mode
•Voice Mode
• Using Voice Mode Advance Features
This section outlines how to select the desired text input
mode when entering characters into your phone. This
section also describes how to use the T9 predictive text
entry system to reduce the amount of key strokes
associated with entering text.
D307.book Page 81 Thursday, September 29, 2005 3:50 PM

82
Section 5
Changing Text Entry Mode
When you are in a field that allows characters to be
entered, you will notice the text input mode indicator on
the display.
For example, the following screen displays when writing
a text message.
1. To select T9 mode, press the key until displays.
2. To select Alphabet mode, press the key until
displays.
3. To select Number mode, press the key until
displays.
4. To select Symbol mode, press the key until
displays.
5. To select VoiceModeTM, press the key until
VoiceModeTM displays.
D307.book Page 82 Thursday, September 29, 2005 3:50 PM

Section 5: Entering Text 83
Using T9 (Predictive Text) Mode
Section 5
Using T9 (Predictive Text) Mode
Entering a Word in T9 Mode
1. When you are in T9 mode, start entering a word by
pressing the 2 to 9 keys. Press each key only once for
each letter.
Example: To enter “Hello”, press the 4,3,5,5, and 6
keys.:
The word you are typing appears in the display. It may
change with each key that you press.
2. Enter the whole word before editing or deleting the
keystrokes.
3. When the word displays correctly, go to step 4.
If the word doesn’t display correctly, press the 0 key or
the Up () or Down ( ) Navigation key to display
alternative word choices for the keys that you have
pressed.
For example, both “Of” and “Me” have the 6 and 3 keys.
The phone displays the most commonly used choice
first.
4. Insert a space by pressing the key and start entering
the next word.
HEL LO
D307.book Page 83 Thursday, September 29, 2005 3:50 PM

84
Section 5
Adding a New Word into the T9 Dictionary
If you cannot find the word you want, you can add the
word in the T9 dictionary for the next use.
1. After pressing the keys corresponding to the word you
want to add, press the key or the Up () or
Down ( ) Navigation key to display the alternative
words.
2. When there are no more alternative words, the display
shows Add on the bottom line. Press the Add soft key.
3. If necessary, clear the word using the key and enter
the word you want to add using Alphabet mode. See
"Using Alphabet Mode" on page 85.
4. Press the OK soft key or the key.
The word is added to the T9 dictionary and becomes the
first word for the associated keypress series.
Tips for Using T9 Mode
• To enter periods, hyphens, or apostrophes, press the 1 key. T9
mode applies grammar rules to ensure that correct punctuation
is used.
• To shift case in T9 mode, use the key. There are three
cases; Initial capital , Capital lock , and Lower case
.
• You can move the cursor by using the Left ( ) and
Right () Navigation keys. To delete letters, press the
key. Press and hold the key to clear the display.
D307.book Page 84 Thursday, September 29, 2005 3:50 PM
Section 5: Entering Text 85
Using Alphabet Mode
Section 5
Using Alphabet Mode
Alphabet mode allows you to enter letters by pressing the
numeric key associated with the letter you want to enter.
Press the key until the letter you want appears in the
display.
Entering a Word in Alphabet Mode
1. Press the key (1 to 0) labeled with the letter you want.
2. Select the other letters in the same way.
Note: When entering the same letter twice or a different letter on the same key,
just wait for a few seconds for the cursor to move to the right automatically,
and then select the next letter.
Keys
•
•
•
•
•
•
D307.book Page 85 Thursday, September 29, 2005 3:50 PM
86
Section 5
•
•
•
•
Tips for Using Alphabet Mode
• To insert a space, press the key.
• To shift case in Alphabet mode, use the key. There are
three cases: Capital Lock , Lower case , and
Initial Capital .
• You can move the cursor by using the Navigation keys. To
delete letters, press the key. Press and hold the key
to clear the display.
Using Number Mode
Number mode allows you to enter numbers by pressing
the key labeled with the number you want. When in a text
message screen, press the soft key to access the
Number mode.
Using Symbol Mode
Symbol mode allows you to enter symbols by pressing the
number key associated with the symbol you want.
When in a text message entry screen, press the soft key
to access Symbol mode. The Symbol screen displays the
D307.book Page 86 Thursday, September 29, 2005 3:50 PM
Section 5: Entering Text 87
VoiceModeTM
Section 5
available symbols for each key. Use the Up () or
Down ( ) Navigation key to cycle through all available
symbols.
You can enter up to 10 symbols at one time. When
finished, press the OK ( ) soft key or the key. The
VoiceMode screen appears in the display.
Press the Cancel ( ) soft key to return to text message
entry screen.
Your phone will now be in VoiceMode, press the soft
key to select a text entry mode.
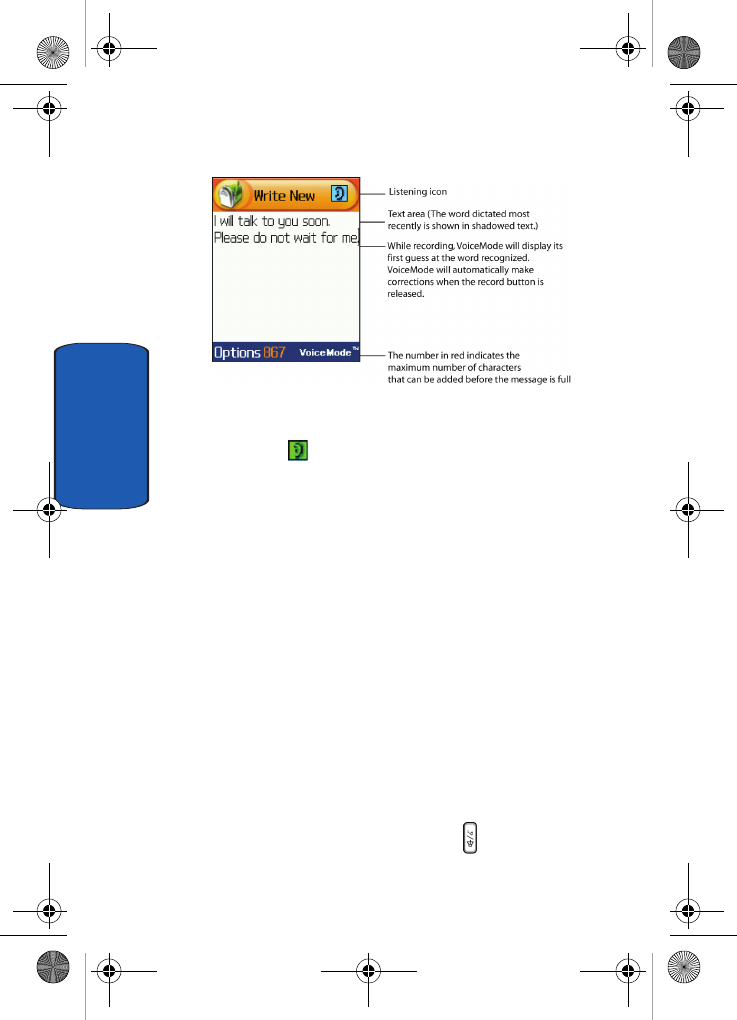
VoiceModeTM
VoiceMode™ from VoiceSignal Technologies is the
fastest, and most convenient way to compose text
messages on a mobile phone. VoiceMode lets you use
your voice to dictate words, names, punctuation, and
even abbreviations (like LOL and TTYL), instead of
keying them in by hand.
VoiceMode is seamlessly integrated into your phone's
text messaging application, so you can switch from
keypad text entry to voice dictation with a push of a
button.
D307.book Page 87 Thursday, September 29, 2005 3:50 PM
88
Section 5
To use VoiceMode when composing a text message, you
simply hold down the voice button of your phone. A
listening icon flashes to show that VoiceMode is
listening for your voice. Start dictating, pausing briefly
between each word. While you are dictating, you will see
the words recognized appear in your message. These
initial words that appear on the screen are VoiceMode's
first guess at what you dictated. When you release the
record button, VoiceMode automatically makes
corrections based on the context of the phrase, and
display its best guess of the words recognized.
Adapting VoiceMode
Before you can use VoiceMode, you must adapt it to
recognize the special characteristics of your voice. The
adaptation process takes a few minutes and involves
reading a list of 122 words, one word at a time.
To Adapt VoiceMode
1. Find a quiet place for adaptation.
2. Start VoiceSignal by pressing the key located on the
right side of your phone.
D307.book Page 88 Thursday, September 29, 2005 3:50 PM
Section 5: Entering Text 89
VoiceModeTM
Section 5
3. Press the Settings soft key or the key.
4. Select VoiceMode. Highlight Adapt VoiceMode and
press the Select soft key or the key.
The Adapt VoiceMode screen displays to verify the start
of the adaptation.
5. When you are ready to start adaptation, select OK.
(If you or someone else has completed adaptation
earlier, the phone will ask if you want to start from
scratch or continue adapting the existing models. Select
Yes to discard existing adaptation data and start from
scratch, or select No to continue adapting the existing
data.)
6. Wait for the beep and then say each word as it appears
on the screen. Speak each word clearly and distinctly,
using a normal tone and volume. If the adaptation
process doesn't detect a word, it will prompt you again
to speak the same word.
7. If you want to take a break, press the Pause soft key to
pause the adaptation process. When paused, continue
adaptation by pressing the Continue key.
8. After you say all 122 words, the phone will adapt
VoiceMode to your voice. This process will take about
one minute to complete.
Note: If you press Cancel during adaptation, the phone will ask if you want
to save the adaptation data. Press Yes to save the data, or No to exit
without saving. If you do not complete adaptation, be sure to go back and
finish adapting to improve dictation recognition.
D307.book Page 89 Thursday, September 29, 2005 3:50 PM
90
Section 5
If you ever need to reset adaptation to its original state, use
the following procedure.
To Reset Adaptation
1. Start VoiceSignal by pressing the key located on the
right side of your phone.
2. Press the Settings soft key or the key.
3. Select VoiceMode and highlight Reset VoiceMode.
Press the Select soft key or the key.
4. When prompted, press OK to reset adaptation, or Cancel
to exit without resetting the adaptation data.
Using VoiceMode
After adapting VoiceMode, you can start using it when
composing text messages.
To Start VoiceMode
1. In Idle mode press the Menu ( ) soft key to access
Menu Mode. Highlight Messaging and press the Select
soft key or the key.
2. Select Create New message and highlight Text
Message. Press the Select soft key or the key.
3. Press the key to select VoiceMode. A VoiceMode
Tutorial message appears. Press the View soft key to
proceed or Cancel to return.
4. To activate VoiceMode, press and hold the button on
the right side of the phone.
VoiceMode beeps and animates the Listening icon at the
top right of the screen to indicate that you can begin
speaking.
D307.book Page 90 Thursday, September 29, 2005 3:50 PM
Section 5: Entering Text 91
Using VoiceMode Advanced Features
Section 5
To dictate text using VoiceMode
1. Speak clearly and pause distinctly between each word.
(Double-click the audio link, below, to hear an example
of how to dictate text.)
"When… speaking… COMMA… pause… briefly…
between… each… word… PERIOD"
2. When you are done or want to pause, release the
button to stop the phone from listening. Although the
phone is not listening, the text message application will
remain in VoiceMode. To switch to another mode, press
the soft key.
Using VoiceMode Advanced Features
Using Choice Lists
Every time you dictate a word using VoiceMode, it
maintains a list of alternatives that closely resemble the
recognized word. These choice lists let you quickly
change a word that was not recognized correctly.
To use choice lists
1. Use the Left () or Right ( ) Navigation keys to
highlight a word you want to change, and then press the
key.
A choice list appears with possible matches for the word.
D307.book Page 91 Thursday, September 29, 2005 3:50 PM
92
Section 5
2. Use the Up () and Down ( ) Navigation key to
highlight a word, then press the Select soft key or the
key.
Spelling a Word
If a word is not recognized and does not appear in the
choice list, it might be because that word is not in the
dictation dictionary. In this case, you can spell out the
word manually. When you spell a word that is not part of
the dictation dictionary, the new word is added to the
dictionary. This enables VoiceMode to recognize the new
word the next time it is spoken.
To Spell a Word
1. Display the choice list for the word you want to spell out.
2. Select [Spell Word].
You will see an empty text box, where you can manually
spell the word using the keypad.
D307.book Page 92 Thursday, September 29, 2005 3:50 PM
Section 5: Entering Text 93
Using VoiceMode Advanced Features
Section 5
3. As you start typing letters, you will see words with
similar spellings appear below the text box. Use the up
and down Navigation keys to scroll the dictionary. While
scrolling the dictionary, the words will populate the text
box. Use the key to edit the entry in the text box.
Changing the Text Case
When using VoiceMode, you can specify the case (all
caps, initial caps, or lower case) for text that you dictate.
By default, VoiceMode formats text according to the
D307.book Page 93 Thursday, September 29, 2005 3:50 PM
94
Section 5
context of the words in the message. For example, words
following periods are capitalized.
To Specify the Case of the Next Dictated Word
1. In VoiceMode, press the key.
The VoiceMode icon changes to VOICEMODE (all caps).
Press the key again to change the text case icon to
Voicemode (initial caps), or voicemode (lower case).
2. Dictate the word you want to appear in the specified
case.
Changing the text case will apply to all the words spoken
directly after specifying the case. You must manually
change the case back to the default.
D307.book Page 94 Thursday, September 29, 2005 3:50 PM
Section 5: Entering Text 95
Using VoiceMode Advanced Features
Section 5
Entering Punctuation Characters
VoiceMode recognizes most punctuation characters by
name. The following is a complete list of the names of
punctuation characters you can dictate.
. period ( open-paren . dot
, comma ) close-paren . point
? question-mark [ open-bracket / slash
! exclamation-point ] close-bracket \ backslash
: colon { open-brace :-) happy-face
; semicolon { close-brace :-( sad-face
- hyphen < open-angle-bracket < less-than
-- em dash > close-angle-bracket > greater-than
... ellipsis | vertical-bar = equal
‘ apostrophe # pound-sign @ at-sign
‘s apostrophe-s $ dollar-sign ^ caret
“ open-quote % percent _ underscore
“ close-quote & ampersand ‘ back-quote
‘ open-single-quote * asterisk ~ tilde
‘ close-single-quote + plus
D307.book Page 95 Thursday, September 29, 2005 3:50 PM
96
Section 5
D307.book Page 96 Thursday, September 29, 2005 3:50 PM
Section 6: Understanding Your Address Book 97
Section 6
Section 6: Understanding Your Address
Book
Topics Covered
• Adding a New Address Book Entry
•Pauses
• Dialing a Number from the Address Book
• Speed Dialing
• Finding Address Book Entries
• Deleting Address Book Entries
• Checking Memory Status
This section allows you to manage your daily contacts by
storing their name and number in your Address Book.
Address Book entries can be sorted by name, entry, or
group.
D307.book Page 97 Thursday, September 29, 2005 3:50 PM

98
Section 6
Adding a New Address Book Entry
There are two ways to store a number:
• Entering the number in Idle mode and press the Save soft key
or the key.
• Use the New Entry option in the Address Book menu.
Storing a Number in Idle Mode
1. Enter the number you want to store.
Note: If you make a mistake while entering a number, correct it using the
key.
2. When you are sure that the number is correct, press the
Save soft key or the key.
3. Use the Left ( ) or Right ( ) Navigation key to
highlight an icon to identify the category in which the
number is to be stored and press the Select soft key or
the key.
The following categories are available:
•: Mobile phone number
•: Office number
• : Home number
4. Select a memory location, choose SIM Memory or
Phone Memory and press the Select soft key or the
key.
Note: When you change phones, any numbers stored in your SIM card
memory are automatically available with the new phone, whereas any
numbers stored in the phone’s memory will need to be re-entered.
D307.book Page 98 Thursday, September 29, 2005 3:50 PM

Section 6: Understanding Your Address Book 99
Adding a New Address Book Entry
Section 6
5. Enter a name. For further details about how to enter
characters, see "Section 5: Entering Text" on page 81.
6. Press the OK soft key or key to store the name and
number.
After storing, the phone displays the phone number and
name you just stored.
7. To dial the number, press the key or the key.
8. To use the entry options, press the Options soft key. For
further details see "Using Address Book Entry Options"
on page 107.
9. To return to the Idle screen, press the key.
Storing a Number Using the New Entry Option
1. In Idle mode, press the Menu ( ) soft key to access
the Menu mode and select Address Book.
2. Select New Entry. The New Entry Type screen appears
in the display. Select from the following entry types
•: Mobile phone number
•: Office number
• : Home number
•: Email Address
Note: Follow standard email address formats when entering an email
address. For example, someone@providersname.com. An error message
displays when an email address has been entered incorrectly.
3. Using the Left ( ) or Right ( ) Navigation key,
highlight an entry type for the number to be stored and
press the Select soft key or the key.
D307.book Page 99 Thursday, September 29, 2005 3:50 PM

100
Section 6
4. Select a memory location, either SIM Memory or Phone
Memory.
Note: When you are saving an Email address, SIM Memory is not available.
5. Enter a name and press the OK soft key.
For further details about how to enter characters, see
"Section 5: Entering Text" on page 81.
To add the number to an existing name, select the one
you want from the list.
6. Enter the number or address you want to store and press
the Save soft key or the key.
7. After storing, the phone displays the phone number and
name you just stored.
8. Press the key to dial the number.
Storing Your Phone Number
To store your own phone number(s), use the following
steps:
1. In Idle mode, press the Menu ( ) soft key to access
Menu mode and select Address Book.
2. Select Own Number and press the Select soft key or the
key.
3. Use the Up () or Down ( ) Navigation key to select
location Number 1 and press the Edit soft key or the
key.
4. Enter the number and press the OK soft key or the
key.
D307.book Page 100 Thursday, September 29, 2005 3:50 PM

Section 6: Understanding Your Address Book 101
Pauses
Section 6
5. Enter the name and press the OK soft key or the
key.
Pauses
When you call automated systems (like banking services
and voice mail) you are often required to enter a password
or account number. Instead of manually entering the
numbers each time you can store the numbers in your
Address Book along with special characters called
pauses.
Enter the number you want to store, press and hold the
key to insert a two-second pause. A “P” appears in the
display.
Note: You can enter multiple two-second pauses to extend the length of the
pause. For example two consecutive pauses equates to a pause time of
four seconds.
Dialing a Number from the Address Book
Once you have stored phone numbers in the Address
Book, you can dial them easily and quickly by using the
location numbers that were assigned to them in the
Address Book in the order they were saved.
Note: If you cannot remember a location number, you must go into the
Search option in the Address Book menu to search for the entry by name.
D307.book Page 101 Thursday, September 29, 2005 3:50 PM

102
Section 6
Dialing a Number from the SIM Card
1. In Idle mode, enter the location number for the phone
number you want to dial and press the key.
The number associated with the location number
displays.
2. You can press the Up () or Down () Navigation
key to view other numbers that have been saved on your
SIM card.
3. Press the Dial soft key or the when you have
selected the number you want.
Dialing a Number from the Phone’s Memory
1. In Idle mode, press and hold the key. A + appears.
2. Enter the location number of the phone number you want
and press the key.
The number associated with the location number
displays.
3. You can press the Up () or Down () Navigation
key to view other numbers that have been saved in your
Phone memory.
4. Press the Dial soft key or the key when you have
selected the number you want.
D307.book Page 102 Thursday, September 29, 2005 3:50 PM

Section 6: Understanding Your Address Book 103
Speed Dialing
Section 6
Speed Dialing
You can assign up to 8 phone numbers from the Address
Book that you use frequently to the number keys (2 to 9).
You can then dial them easily whenever you want, simply
by pressing and holding the associated number key.
Setting up Speed Dial Entries
1. In Idle mode, press the Menu ( ) soft key to access
Menu mode.
2. Select Address Book and press the Select soft key or
the key.
3. Use the Up () or Down ( ) Navigation key to
highlight Speed Dial and press the Select soft key or the
key.
4. Select the Speed Dial location you wish to assign a
number and press the OK soft key or the key.
Note: If you have already assigned a number to the speed dial location,
the Options soft key replaces the OK soft key.
Note: Memory location 1 is reserved for your Voice Mail server number.
5. Highlight a name from the Address Book list or enter the
first few letters of the name associated with the number
you would like to assign to the Speed Dial location and
press the Select soft key or the key.
6. Select a number, (if there is more than one number
associated with the address book entry) and press the
Select soft key.
D307.book Page 103 Thursday, September 29, 2005 3:50 PM
104
Section 6
7. The number displays in the speed dial list.
8. When you have finished, press the key.
Editing the Speed Dial List
You can edit the speed dial list by changing the number
assignment or deleting all of the entries on the speed dial
list.
Changing a Number Assigned to a Key
1. In Idle mode, press the Menu ( ) soft key to access
Menu mode.
2. Select Address Book and press the Select soft key or
the key.
3. Use the Up () or Down ( ) Navigation key to
highlight Speed Dial and press the Select soft key or the
key.
4. Select the Speed Dial location you want to change and
press the Options soft key or the key.
5. Select Change and press the key or the key.
Note: At this point press the key to return to the Speed Dial list.
6. Use the Up () or Down ( ) Navigation key to
highlight a name from the Address Book list or enter the
first few letters of the name associated with the number
you would like to assign to the Speed Dial location and
press the Select soft key or the key.
7. Press the Select soft key or the key to save number.
The new number or name displays in the Speed Dial
location.
D307.book Page 104 Thursday, September 29, 2005 3:50 PM

Section 6: Understanding Your Address Book 105
Speed Dialing
Section 6
8. When you have finished, press the key.
Deleting Speed Dial Entries
1. In Idle mode, press the Menu ( ) soft key to access
Menu mode.
2. Select Address Book and press the Select soft key or
the key.
3. Use the Up () or Down ( ) Navigation key to
highlight Speed Dial and press the Select soft key or the
key.
4. Select the number assigned to the Speed Dial location
you want to delete and press the Options soft key or the
key
5. Select Delete and press the key or the key.
Alternatively, if you want to delete all speed dial entries,
select Delete All and press the key or the key.
6. Press the Yes soft key to confirm the deletion.
7. When you have finished, press the key.
D307.book Page 105 Thursday, September 29, 2005 3:50 PM
106
Section 6
Finding Address Book Entries
After storing numbers in the Address Book, you can
search for them in two ways; by name and by caller group.
Finding a Number by Name
1. In Idle mode, press the Menu ( ) soft key to access
Menu mode.
2. Select Address Book and press the Select soft key or
the key.
3. Select Search and press the Select soft key or the
key. You are asked to enter a name.
4. Enter the first few letters of the name that you want to
find.
The Address Book entries are listed, highlighting the
entry that most closely matches your input.
5. To view the highlighted entry, press the Select soft key
or the key. Press the key to return to Address
Book entries.
6. To select a different entry, press the Up () or
Down ( ) Navigation key until the entry you want
highlights.
7. To look for a name starting with a different letter, press
the key labeled with the letter you want.
8. Once you have found the entry, press the key or the
key to dial the number.
Alternatively, press the Options soft key to access the
Address Book entry options.
D307.book Page 106 Thursday, September 29, 2005 3:50 PM

Section 6: Understanding Your Address Book 107
Finding Address Book Entries
Section 6
Using Address Book Entry Options
While accessing any Address Book entry, press the
Options soft key to access the options for the entry.
The following options are available:
• Edit: allows you to edit the name and/or number
One Entry: to change the name and/or phone number for the
selected entry. If you change the name, the number is saved
separately with the new name.
All Entry: to change only the name of the entry.
• Send Message: launches the Create New Message Screen.
You may create and send a text message or multimedia
message for the selected number.
• Paste: allows you to paste the number into the normal dialing
mode. Use this option to dial a number similar to one in the
Address Book, such as a different extension in the same office.
Use the key to change the number as required. When you
are ready to dial, press the key.
• Delete: allows you to delete the name and number for the
chosen number. You are asked to confirm that you wish to
delete the name and number by pressing the Yes soft key or
the key.
• Copy: allows you to copy the number to another location. You
can select the memory location, either SIM or Phone, and the
location number. If the number already exist in the selected
location an Overwrite popup appears in the display. Select Yes
to overwrite and replace the entry.
• Caller Group: allows you to organize your Address Book entries
in caller groups so that the phone alerts you in a specific way
when a person from one of your groups calls you. Select one of
the 10 groups available.
To remove an entry from a group, select the No Group option.
• Add Entry: allows you to add a new number to the currently
selected name.
D307.book Page 107 Thursday, September 29, 2005 3:50 PM

108
Section 6
Finding a Number by Caller Group
1. In Idle mode, press the Menu ( ) soft key to access
Menu mode.
2. Use the Up () or Down ( ) Navigation key to select
Address Book and press the Select soft key or the
key.
3. Highlight Group Search and press the Select soft key or
the key.
4. Use the Up () or Down ( ) Navigation key to
highlight a caller group or enter the first few letters of the
name associated with the caller group you want to find.
The caller groups are listed, starting with the group that
most closely matches your input.
Press the Select soft key or the key. The Address
Book entries in the caller group are listed.
5. To view the highlighted entry, press the View soft key or
the key.
6. To select a different entry, press the Up () or
Down ( ) Navigation key until the entry you want
highlights.
7. Once you have found the entry, press the key or the
key to dial the number.
Alternatively, press the Options soft key to access the
Address Book entry options.
D307.book Page 108 Thursday, September 29, 2005 3:50 PM
Section 6: Understanding Your Address Book 109
Deleting Address Book Entries
Section 6
Editing a Caller Group
1. In Idle mode, press the Menu ( ) soft key to access
Menu mode.
2. Select Address Book and press the Select soft key or
the key.
3. Select Group Edit and press the Select soft key or the
key. Use the Up () or Down () Navigation
key to highlight the group you want and press the
Options soft key or the key.
4. Select each option and change the settings accordingly.
The following options are available:
• Call Ring Tone: allows you to set a ring tone to be used
when you receive a voice call from a member of that group.
• SMS Tone: allows you to set a ring tone to be used when you
receive a message from a member of that group.
• Graphic: allows you to set a graphic icon to be displayed
when you receive a voice call from the member of that
group.
• Group Name: allows you to assign a name to the group.
5. When you have finished, press the key.
Deleting Address Book Entries
You can delete entries in the Address Book one by one, or
all of the entries in the selected memory or both memories.
Deleting an Address Book Entry
1. In Idle mode, press the Menu ( ) soft key to access
Menu mode.
2. Select Address Book and press the Select soft key or
the key.
D307.book Page 109 Thursday, September 29, 2005 3:50 PM
110
Section 6
3. Select Search and press the Select soft key or the
key.
4. Use the Up () or Down ( ) Navigation key to
highlight a name from the Address Book list or enter the
first few letters of the name associated with the number
you would like delete.
The Address Book entries are listed, highlighting the
entry that most closely matches your input.
5. Press the Select soft key or the key to select a
number.
6. Press the Options soft key, use the Up () or
Down ( ) Navigation key to highlight Delete and press
the key or the key.
7. Press the Yes soft key to confirm the deletion.
8. When you have finished, press the key.
Deleting all Entries
1. In Idle mode, press the Menu ( ) soft key to access
Menu mode.
2. Select Address Book and press the Select soft key or
the key.
3. Select Delete All and press the Select soft key or the
key.
4. To place a check mark by the memory you want to
empty, press the key or the key.
5. When you have finished, press the Delete soft key to
delete the entries in the selected memory location(s).
D307.book Page 110 Thursday, September 29, 2005 3:50 PM
Section 6: Understanding Your Address Book 111
Checking Memory Status
Section 6
6. Enter the phone password and press the OK soft key or
the key.
Note: The password is preset to “00000000”. To change this password,
see "Change Password" on page 160.
7. When the confirmation message appears, press the Yes
soft key or the key.
To cancel the deletion, press the No soft key.
8. When you have finished, press the key.
Checking Memory Status
Memory Status, allows you to check the capacity and how
many names and numbers are stored in the Address Book,
in both the SIM and the phone’s memory.
1. In Idle mode, press the Menu ( ) soft key to access
Menu mode.
2. Select Address Book and press the Select soft key or
the key.
3. Use the Up () or Down ( ) Navigation key to
highlight Memory Status and press the Select soft key
or the key, to display Memory Status.
4. When you have finished, press the key.
D307.book Page 111 Thursday, September 29, 2005 3:50 PM

112
Section 6
D307.book Page 112 Thursday, September 29, 2005 3:50 PM
Section 7: Messaging 113
Section 7
Section 7: Messaging
Topics Covered
• Using Instant Messenger
• Creating and Sending New Messages
• Creating a Long Text Message
• Creating and Sending a Multimedia Message
• Retrieving New Messages
• My Messages
• Viewing Messages
• Deleting Messages
• Changing Message Settings
• Checking Memory Status
This section allows you to send or receive different types
of messages. It also includes the features and functionality
associated with messaging.
D307.book Page 113 Thursday, September 29, 2005 3:50 PM
114
Section 7
Using Instant Messenger
Instant Messenger (IM) is a way of sending short, simple
messages that are delivered immediately to users online
at the moment.
Before using this feature, you need to subscribe to a
messenger service. For further details, contact your
service provider.
Note: Your phone is set to use your service provider’s messenger service
by default. You can change the configurations for Instant Messenger, such
as the default community or auto sign on.
Start Your Messenger
Note: The d307 handset supports the following Instant Messaging
Applications: AIM, ICQ, and YAHOO.
1. In Idle mode, press the IM soft key.
Alternatively, press the Menu ( ) soft key to access
Menu mode. Select Messaging, highlight IM and press
the Select soft key or the key.
2. Highlight your established IM application and press the
Select soft key or the key.
3. Select one of the following and press the Select soft key
or the key.
• Sign On for AIM
• Connect for ICQ
• Sign In for YAHOO
D307.book Page 114 Thursday, September 29, 2005 3:50 PM
Section 7: Messaging 115
Using Instant Messenger
Section 7
4. Enter your Login ID (this field title will change to reflect
the name used in each instant message application) and
your Password and press the OK soft key.
Note: Use the Down () Navigation key to select the Auto-Sign In option
and press the key. Press the OK soft key to continue.
5. Press the Options soft key and select Buddy List. The
subscribers of the messenger service displays.
6. Select the person you want to talk to and press the
key.
7. Start the conversation with the person as you would on a
normal messenger for a PC.
8. When you want to end the conversation, press the
Options soft key and select End Conversation.
9. Press the Options key and select Sign Out to log off IM.
Viewing the Conversation Log
You can view the log of your conversations in the Instant
messenger Conversation log.
Online or offline, press the Options soft key and select
Saved Convs.
D307.book Page 115 Thursday, September 29, 2005 3:50 PM
116
Section 7
Creating and Sending New Messages
This section guides you through the procedure to send
various types of messages.
Creating and Sending a Simple Text Message
1. In Idle mode, press the Menu ( ) soft key to access
Menu mode.
2. Select Messaging and press the Select soft key or the
key.
3. Use the Up () or Down () Navigation key to
highlight Create New Message and press the Select
soft key or the key.
4. Highlight Text Message and press the Select soft key or
the key. The Write New screen appears in the
display.
Note: Use the key to change text input settings. To changed letter case
in ABC mode press the key.
5. Create your message.
If you make a mistake, press the Clear ( ) key to
delete the character or press and hold the Clear ()
key to clear the display.
6. When you have finished writing the message, press the
Options soft key. Select one of the following options:
• Send to Number: allows you to send your message to a
specified number.
• Send to Email: allows you to send your message to a
specified email address.
D307.book Page 116 Thursday, September 29, 2005 3:50 PM
Section 7: Messaging 117
Creating and Sending New Messages
Section 7
The Destination screen appears in the display
Alternatively, press the key, to display the
Destination screen.
Note: For details about using other options, see the next page.
7. Enter your destination number or email address. If you
want to send the message to multiple destinations, press
the OK soft key after entering a number or email address
and repeat this step.
Alternatively, press the Options soft key, and select Add
Address Book to add an entries number or email
address from your Address Book. To add multiple
destination numbers or email addresses at one time,
select Add Group. All entries under the selected group
will be added.
8. When you have finished entering destination numbers,
press the key or the key to send message.
Creating and Sending an Enhanced Text Message
1. In Idle mode, press the Menu ( ) soft key to access
Menu mode.
2. Select Messaging and press the Select soft key or the
key.
3. Use the Up () or Down ( ) Navigation key to
highlight Create New Message and press the Select
soft key or the key.
4. Highlight Text Message and press the Select soft key
or the key. The Write New screen appears.
D307.book Page 117 Thursday, September 29, 2005 3:50 PM

118
Section 7
5. Create your message.
If you make a mistake, press the Clear ( ) key to
delete the character or press and hold the Clear ()
key to clear the display.
6. While entering the message text, press the Options soft
key to access the following options to enhance your
message:
Note: When you add media items to a message, the number of characters
you can enter decreases.
• Send to Number: allows you to select from Save and Send
or Send Only to the specified number.
• Send to Email: allows you to Save and Send or Send only to
the specified email address.
• Insert: allows you to add text from the Templates folder, an
entry in Address Book, or a URL address in the Favorites
folder.
• Add Media: allows you to add one from various default
media items, such as Animations, Melodies and Downloads.
• Attach: you can add entries from the Name Card (vCard) and
from the Calendar (vCalendar).
• Save Message to: allows you to save the message to Draft
or to My Folder.
• Language Select: allows you to change the language to be
used in T9 input mode.
• Text Style: allows you to allows you to format the style of the
text.
For the Size attribute, Medium, Large, and Small sizes are
available. For the Bold, Italic, Underline and Strike through
attributes, select Off or On.
D307.book Page 118 Thursday, September 29, 2005 3:50 PM
Section 7: Messaging 119
Creating a Long Text Message
Section 7
7. Complete the message, and send or save it by following
the procedure from "Creating and Sending a Simple Text
Message" on page 116.
Creating a Long Text Message
When you write a text message, the phone automatically
splits it into several messages if your message exceeds the
maximum number of characters allowed for sending. The
number of split messages to be sent is shown each time
your message is split. Depending on your service
provider, the maximum number of characters may vary.
Creating and Sending a Multimedia Message
1. In Idle mode, press the Menu ( ) soft key to access
Menu mode.
2. Select Messaging. Highlight Create New Message and
press the Select soft key or the key.
3. Use the Up () or Down ( ) Navigation key to
highlight Multimedia Message and press the Select
soft key or the key.
4. When Add Here highlights, press the Options soft key
and add the message contents using one of the following
options:
• Add Text: enter the message text and press the key.
While entering text, you can add a message template or an
entry in Address Book, or an URL address in the Favorites
folder, or change the input language by pressing the
Options soft key.
• Add Graphic: allows you to add an image.
D307.book Page 119 Thursday, September 29, 2005 3:50 PM
120
Section 7
• Add Video: allows you to add a video clip. You can add one
of video clips stored in the phone’s memory.
• Add Audio: allows you to add a sound file. You can record a
new audio clip or add an existing audio clip, or select one of
sound clips stored in the Audio folder.
Select Record Audio to record a new voice memo or Audio
List to add one of the voice memos or sound clips stored in
the phone’s memory. You can add Downloaded sounds if
they are in correct format and your service provider supports
them.
• Add Subject: allows you to enter text for the subject.
• Send: allows you to send the message.
• Save to: saves the message to Draft or My Folder.
• Settings: allows you to change the message settings. After
changing the settings, press the soft key or the key
to go back to the message screen.
• Add Destination: allows you to enter destination numbers or
addresses. After adding them, press the soft key or the
key to go back to the message screen.
• Preview: shows the message you created.
Note: You can add only one video, and one graphic file per page.
5. If you need to add another page for additional
information, use the Up () or Down () Navigation
key to highlight Page 1/x. Press the Options soft key
and select Add Page.
6. Repeat step 4 until you have finished creating your
message.
D307.book Page 120 Thursday, September 29, 2005 3:50 PM
Section 7: Messaging 121
Creating and Sending a Multimedia Message
Section 7
7. If you want to change the added items, scroll to the one
you want and press the Options soft key or key.
Select the option you would like to change and press the
key.
8. When you have finished creating the message, press the
Options soft key and choose Send.
9. Select a destination type, To, Cc, or Bcc and press the
Select soft key or the key.
10. Choose one of the following options and press the Select
soft key or the key:
• Phone Number: allows you to enter the phone number of the
recipient.
Enter a phone number or press the Names soft key to
display Address Book. Use the Up () or Down ()
Navigation key to highlight an entry or enter the first few
letters of the name associated with the number you would
like to send a message and press the OK soft key or the
key.
• Email Address: allows you to enter the email address of the
recipient.
Enter an Email Address and press the OK soft key.
• Address Book: allows you to retrieve a number from your
Address Book.
Use the Up () or Down () Navigation key to
highlight an entry or enter the first few letters of the name
associated with the number you would like to send a
message and press the OK soft key or the .
D307.book Page 121 Thursday, September 29, 2005 3:50 PM
122
Section 7
11. To add a destination, select Add Destination and repeat
from step 9.
If you want to edit the destinations, select the one you
want. You can change or delete it.
12. To enter additional numbers or addresses to the other
destination types, press the key or the soft key
and repeat steps 8 through 12.
You can enter up to 10 destination search to To, Cc, and
Bcc.
13. When you have finished entering the destinations, select
Send Message. Your phone sends the message.
Using Message Templates
Your phone has message templates to allow you to
retrieve them when creating a message. You can change
the templates as your preferences or send a message
immediately.
1. In Idle mode, press the Menu ( ) soft key to access
Menu mode.
2. Select Messaging and press the Select soft key or the
key.
3. Use the Up () or Down ( ) Navigation key to
highlight Templates and press the Select soft key or the
key.
4. Select a template and press the Options soft key to
access the following options:
• Edit: allows you to change the template.
Select Edit and press the key or the key
D307.book Page 122 Thursday, September 29, 2005 3:50 PM
Section 7: Messaging 123
Retrieving New Messages
Section 7
(to delete unwanted text, press the key).
Edit text and press the OK soft key to save.
Note: See "Section 5: Entering Text" on page 81 for detail information
about entering text.
• Send Message: allows you to send an SMS message using
the template.
Select Send Message, press the key or the key
and follow the steps in "Creating and Sending a Simple Text
Message" on page 116 to send message.
• Delete: deletes the template.
Select Delete, press the soft key or the key and
press the Yes soft key to confirm deletion.
• Add New: allows you to add a frequently used message to
the template list.
Select Add New and press the key or the key.
Enter new message and press the OK soft key.
Note: See "Section 5: Entering Text" on page 81 for detail informaton
about entering text.
5. When you have finished, press the key.
Retrieving New Messages
While text messages from other phones are delivered
directly to your phone, MMS messages and emails will be
stored in the Inbox of the message server and the server
will alert you to new messages. Therefore you need to
retrieve new messages to your phone and read them on
the phone.
D307.book Page 123 Thursday, September 29, 2005 3:50 PM
124
Section 7
Retrieving an MMS Message
When a new MMS message comes in, the display shows
the MMS Message icon ( ) and a text notification along
with the sender’s number.
1. Press the View soft key or the key to view brief
information about the message, such as the sender’s
number, the message size, and the subject.
To view the message later in the Inbox, press the Exit
soft key.
2. Press the Options soft key or the key to access the
following options:
• View: allows you to view the message received.
• Delete: deletes the message.
• Move to My Folder: allows you to move your messages to a
folder you have defined.
• Sort by: allows you to sort this message by Date, Name,
Subject, Size and Type.
• Protection: allows you to set the protection for a message.
3. Select View.
Your phone retrieves the message contents from the
server and displays it.
4. To scroll through the message, press the Up () or
Down () Navigation key.
5. When you have finished, press the key.
My Messages
• Inbox: stores incoming SMS, MMS, CB, and WAP message
• Note: stores notes.
D307.book Page 124 Thursday, September 29, 2005 3:50 PM
Section 7: Messaging 125
Viewing a Message
Section 7
• Sent: stores the messages your phone successfully have sent.
• Outbox: stores the messages and emails your phone is
attempting to send temporarily.
• Draft: stores the messages and emails you have saved without
sending or tried to send.
• My Folders: allows you to create a folder that is used to store
messages. You can create up to 5 message folders to manage
your messages and emails.
Viewing a Message
1. In Idle mode, press the Menu ( ) soft key to access
Menu mode.
2. Select Messaging and press the Select soft key or the
key, highlight My Messages and press the Select
soft key or the key. The My Messages screen
appears in the display.
Select Inbox, press the Options soft key, highlight
Select and press the key or the key. The
message list appears in the display.
Alternatively, select the message folder and press the
key to display the message list.
The icons on the left of the message indicates the
message type.
• : indicates SMS
• : indicates MMS
The icons on the right of the message subject indicate
the memory location and the lock status.
3. From the message list, press the Options soft key to
display the following options:
D307.book Page 125 Thursday, September 29, 2005 3:50 PM
126
Section 7
• View: allows you to view the message received.
• Delete: allows you to delete the selected message or all
messages in the message folder.
• Move to My Folder: allows you to move your messages to a
folder you have defined. See ‘Managing Your Own Message
Folders” on page 129 for detailed information.
• Sort by: allows you to sort this message by Date, Name,
Subject, Size and Type.
• Protection: allows you to set the protection for a message.
4. Select a message and press the key. The message
content displays.
Alternatively, press the Options soft key, highlight View
and press the key or the key. The message
content displays.
5. Press the Up () or Down ( ) Navigation key to
scroll through the contents of the message. When
viewing a Multimedia message, if the message has more
than one page, use the Up () or Down ()
Navigation key to scroll to other pages.
6. Press the key or the key to scroll to the
previous or next message.
7. When you have finished, press the key.
D307.book Page 126 Thursday, September 29, 2005 3:50 PM
Section 7: Messaging 127
Viewing a Message
Section 7
Viewing a Note
1. In Idle mode, press the Menu ( ) soft key to access
Menu mode.
2. Select Messaging and press the Select soft key or the
key, highlight My Messages and press the Select
soft key or the key. The My Messages screen
appears in the display.
3. Select Note, press the Options soft key, highlight Select
and press the key or the key. The message list
appears in the display.
Alternatively, select the message folder and press the
key to display the message list.
4. From the message list, press the Options soft key to
display the following option:
• View: allows you to view the message received.
5. Select a message and press the key. The message
content displays.
Alternatively, press the Options soft key, highlight View
and press the key or the key. The message
content displays.
6. Press the Up () or Down ( ) Navigation key to
scroll through the contents of the message.
7. Press the key or the key to scroll to the
previous or next message.
8. When you have finished, press the key.
D307.book Page 127 Thursday, September 29, 2005 3:50 PM
128
Section 7
Using Message Options
While viewing a message, press the Options soft key to
access the following options:
Options for SMS Messages
• Reply: allows you to reply to the message received
• Forward: allows you to forward the message to another
destination.
• Delete: deletes the currently selected message.
• Callback: allows you to dial the number that the message has
listed.
• Move to My Folder: allows you to move the message to a
specific folder. You must create a folder in the My Folders
option.
• Move to Phone/SIM: allows you to move the message to the
Phone or SIM card’s memory.
• Extract Address: allows you to save the address from which
the message originated.
• Save Media/Attach: allows you to move the attachment to a
specific folder.
• Protection: allows you to set the protection for the message.
Options for Multimedia Messages
• Reply: allows you to reply to the destination from which the
message originated. Choose from Reply via Text Message or
Reply via Multimedia Message.
• Reply All: allows you to reply to all addresses listed in the
recipient list.
• Forward: allows you to forward the message to another
destination. You may Add Subject or simply Send.
• Delete: deletes the message.
D307.book Page 128 Thursday, September 29, 2005 3:50 PM