Samsung Electronics Co SGHE635 Dual-Band GSM Phone User Manual 2
Samsung Electronics Co Ltd Dual-Band GSM Phone Users Manual 2
Contents
- 1. Users Manual 1
- 2. Users Manual 2
- 3. Users Manual 3
Users Manual 2
Section 6: Understanding Your Phonebook 57
Storing a Number in the Phone’s Memory
Section 6
•Send via infrared: allows you to send your phonebook data
to another number.
7. To return to the Idle screen, press the key.
Storing a Number in the Phone’s Memory
1. At the Idle screen, press the Ph.Book soft key.
2. Scroll to New entry by pressing the Up or Down key and
press the Select soft key or the key.
3. Select the Phone option by pressing the Up or Down key
and press the Select soft key or the key.
4. Select a number Type by pressing the Up or Down key,
and press the Select soft key or the key.
The following types are available:
•Mobile: assigns the number entered to the Mobile entry.
•Home: assigns the number entered to the Home entry.
•Office: assigns the number entered to the Office entry.
•Fax: assigns the number entered to the Fax entry.
•Other: allows you to enter more detailed information for the
entry.
•E-mail: allows you to enter an e-mail address for the number
entered.
5. Enter the number you want to store and press the Save
soft key or the key.
6. Enter a name and press the OK soft key or the key.
For further details about how to enter characters, see
"Using ABC Mode" on page 51.
After storing, the phone displays the Phonebook entry
and name you just created.
e635.book Page 57 Tuesday, May 17, 2005 4:55 PM

58
Section 6
7. To use the entry options, press the Options soft key. The
following options are available:
•Send message: allows you to send a text or picture
message for the selected Phonebook entry.
•Assign speed dial: allows you to assign a speed dial key
number to the selected Phonebook entry.
•Edit number: allows you to edit the number.
•Edit Name: allows you to edit the name.
•Delete entry: allows you to delete the name and number
from Phonebook. You are asked to confirm that you wish to
delete the name and number by pressing the Yes soft key.
•Copy to SIM: allows you to store the number on your SIM
card.
•Send via infrared: allows you to send your phonebook data
to another number.
8. To return to the Idle screen, press the key.
Finding a Phonebook Entry
You can store phone numbers and their corresponding
names in your SIM card and phone’s memories. They are
physically separate but are used as a single entity, called
Phonebook.
Depending on your particular SIM card, the maximum
number of phone numbers the SIM card can store may
differ.
1. When the idle screen displays, press the Ph.Book soft
key.
2. Highlight the Search option and press the Select soft
key or the key.
e635.book Page 58 Tuesday, May 17, 2005 4:55 PM

Section 6: Understanding Your Phonebook 59
Using Phonebook Entry Options
Section 6
3. Use the Up or Down Navigation key to highlight the entry
you want. Or, you may enter the first few letters of the
name in the text box.
The Phonebook entries are listed, starting with the first
entry matching your input.
4. To view the highlighted entry, press the View soft key.
5. To select a different entry, press the Up or Down
Navigation key until the enter you want is highlighted.
6. To look for a name starting with a different letter, press
the key labeled with the letter you want.
7. Once you have found the entry, press the key to dial
the number, or press the Options soft key to access the
Phonebook entry options.
Using Phonebook Entry Options
While accessing any Phonebook entry, press the Options
soft key to use the options for the entry. The following
options are available:
• Send message: allows you to create a message for the
selected Phonebook entry.
• Assign speed dial: allows you to assign a speed dial key
number to the selected Phonebook entry.
• Edit number: allows you to edit the number. Press the OK key
to save.
• Edit name: allows you to edit the number. Press the OK key to
save.
• Delete entry: allows you to delete the entry you have selected.
Press Yes to confirm delete action, or No to cancel.
e635.book Page 59 Tuesday, May 17, 2005 4:55 PM
60
Section 6
• Copy to SIM/Phone: allows you to copy the number to another
location. You can select the memory location, either SIM or
Phone, and the location number.
Dialing a Number from Phonebook
Once you have stored phone numbers in the Phonebook,
you can dial them easily and quickly by using the location
numbers that were assigned to them in the Phonebook.
Note: If you cannot remember a location number, you must go into the
Search menu in the Phonebook menu to search for the entry by name. For
details, see "Finding a Phonebook Entry" on page 58.
Speed Dialing
Once you have stored phone numbers in your
Phonebook, you can set up to 8 speed dial entries and then
dial them easily whenever you want, simply by pressing
the associated number key.
In Idle mode, to speed dial the numbers assigned to keys
(2 through 9), press and hold the appropriate key.
Setting Up Speed Dial Entries
1. When the Idle screen displays, press the Ph.Book soft
key.
2. Scroll to Speed dial by pressing the Up or Down key and
press the Select soft key or the key.
3. Select the key to which you wish to assign the speed-
dialing number, from the 2 to 9 keys, and press the
Select soft key or the key.
e635.book Page 60 Tuesday, May 17, 2005 4:55 PM

Section 6: Understanding Your Phonebook 61
Editing a caller group
Section 6
Note: Memory location 1 is reserved for your Voice mail server number.
4. Choose from the following options:
•Edit number: allows you to change the number you’ve
assigned to this speed dial number.
•Edit name: allows you to enter or change the name you
assigned to the speed dial number.
•Delete: allows you to delete the name and number you’ve
assigned to the speed dial number.
Editing a caller group
1. When the idle screen displays, press the Ph.Book soft
key.
2. Scroll to Group settings by pressing the Up or Down
key and press the Select soft key or the key.
3. Scroll through the group list by pressing the Up or Down
key.
4. Highlight the group you want and press the Select soft
key or the key.
5. Select each option and change the settings, as required.
The following options are available:
•Melody: allows you to set the ring tone to be used when you
receive a voice call from a member of that group.
•Edit name: allows you to change the name of the group.
•View image: allows you to view the image for that group.
6. When you are finished, press the C key or the key.
e635.book Page 61 Tuesday, May 17, 2005 4:55 PM

62
Section 6
Dialing a Number from the SIM Card
1. In Idle mode, enter the location number for the phone
number you want to dial and press the key.
The list of entries in the SIM card appears, with the
desired number highlighted.
2. You can press the Up or Down key to find other numbers
on the list.
3. Press the Dial soft key, the key, or the key when
you have selected the number you want.
Copying all SIM Phonebook Entries
You can copy all SIM entries to the Phone using this
option. When you copy entries to the phone, duplicate
entries are created.
Note: Options are available for phone entries that are not available when
stored to the SIM card. For details see "Storing a Number in the Phone’s
Memory" on page 57.
Deleting all Phonebook Entries
You can delete all your entries from your phone’s
memory, your SIM card, or both.
1. When the idle screen displays, press the Ph.Book soft
key.
2. Scroll to Delete all by pressing the Up or Down key and
press the Select soft key or the key.
3. To place a check mark by the memory location you want
to empty, All, SIM, or Phone, press the Select soft key
or the key.
e635.book Page 62 Tuesday, May 17, 2005 4:55 PM
Section 6: Understanding Your Phonebook 63
Finding My Own Phone Number
Section 6
You can remove the check mark by pressing the Select
soft key or the key.
4. Press the Delete soft key to delete the entries in the
selected memory location.
5. When the confirmation message appears, press the Yes
soft key or the key.
6. To cancel the deletion, press the No soft key.
7. When you are finished, press the C key or the key.
Finding My Own Phone Number
This function is a memory aid, which you can use to check
your own phone number if you need to do so.
You can assign a name to each of your own phone
numbers registered on your SIM card. You can also edit
the names and numbers. Any changes made here do not
in any way affect the actual subscriber numbers on your
SIM card.
1. At the Idle screen, press the Ph.Book soft key.
2. Select the Own number option by pressing the Up or
Down key and press the Select soft key or the key.
3. Highlight the Empty option and press the Select key or
the key.
4. To edit the number, highlight the Edit number option
and press the Select soft key or the key. Edit the
number and press the OK soft key or the key.
5. To edit the Name, highlight the Edit name option and
press the Select soft key or the key. Edit the name
and press the OK soft key or the key.
e635.book Page 63 Tuesday, May 17, 2005 4:55 PM
64
Section 6
6. To delete the number, highlight Delete and press the
Select soft key or the key. Select Yes to confirm
deletion or No to cancel.
Using the Service Dialing Numbers
You can view the list of Service Dialling Numbers (SDN)
assigned by your service provider. These numbers
include emergency numbers, directory enquiries and
voice mail numbers.
1. When the idle screen displays, press the Ph.book soft
key.
2. Select the SDN option by pressing the Up or Down key
and press the Select soft key or the key.
3. Scroll through the numbers by using the Up or Down
key.
4. To dial the number displayed, press the Dial soft key or
the key.
Note: This function is available only if it is supported by your service
provider.
Checking the Memory Status
You can check how many names and numbers are stored
in the Phonebook, in both SIM card and the phone
memory. You can also see the capacity of both memories.
1. When the idle screen displays, press the Ph.Book soft
key.
2. Select the Memory status option by pressing the Up or
Down key and press the Select soft key or the key.
e635.book Page 64 Tuesday, May 17, 2005 4:55 PM

Section 6: Understanding Your Phonebook 65
Checking the Memory Status
Section 6
3. When you are finished, press the soft key or the
key.
e635.book Page 65 Tuesday, May 17, 2005 4:55 PM

66
Section 6
e635.book Page 66 Tuesday, May 17, 2005 4:55 PM
Section 7: Messaging 67
Section 7
Section 7: Messaging
Topics Covered
• Types of Messages
• Voice Messages
• Text Messages
• Picture Messages
• Browser Messages
• Voice mail Messages
• Broadcast Messages
• Settings
• IM (Instant Messaging)
• Memory Status
This section allows you to send or receive different types
of messages. It also includes the features and functionality
associated with messaging.
e635.book Page 67 Tuesday, May 17, 2005 4:55 PM

68
Section 7
Types of Messages
Your phone provides the following message types:
• Voice Messages
• Text Messages
• Picture Messages
• Browser Messages
• Voice Mail Messages
• Broadcast Messages (SIM Dependent)
Voice Messages
In this menu, you can record a voice memo of up to one
minute long and then immediately send it by a Picture
Messaging message.
When you access this menu, a timer appears on the screen.
1. Press the Record soft key to start recording.
2. Record a memo by speaking into the microphone.
The display shows the elapsed time and the remaining
time at one time.
3. When you are finished, press the Stop soft key or the
key. Or, when the recording time is expired, the
display switches to the next screen.
4. Choose from the following options and press the Select
soft key or the key:
•Recent log: allows you to select a number or an address
from the 5 last destinations you entered for sending the last
messages.
e635.book Page 68 Tuesday, May 17, 2005 4:55 PM

Section 7: Messaging 69
Voice Messages
Section 7
•Phonebook: allows you to retrieve a number from your
Phonebook.
•Phone number: allows you to enter the phone number you
want.
•E-mail address: allows you to enter the e-mail address of
the recipient.
Note: You can access the following options by pressing the Options soft
key:
•Replay: plays back your voice memo.
•Re-record: discards the voice memo and enables you to
record another one.
•Send: allows you to send the voice memo.
•Default destination: allows you to send the voice message
directly without entering another destination. To select a default
destination, press the Select soft key and select from the
available options.
•Save: saves the voice message and continues to the send
options.
5. Enter a number or an e-mail address, or select a
destination from the Phonebook or Recent log list.
Press the Select soft key.
6. When the correct number or address displays, press the
Select soft key or the key.
7. To add a destination, select Empty and press the Select
soft key. Repeat from step 4. You can enter up to 10
destinations.
If you want to edit the destinations, select one and press
the Select soft key. You can change or delete it.
e635.book Page 69 Tuesday, May 17, 2005 4:55 PM
70
Section 7
8. When you have finished entering the destinations, press
the Send soft key or the key.
Your phone sends the message. After sending, the
message is saved in the Outbox in the Picture messages
menu.
Text Messages
Short Message Service (SMS) allows you to send and
receive short text messages to and from other mobile
phones. In addition, your phone supports the Enhanced
Messaging Service (EMS), which enables you to include
simple pictures, melodies, and animated images in your
messages. To use this feature, you must subscribe to your
service provider’s message service.
When the Message icon ( ) appears, you have received
new text messages. When the memory is full, an error
message displays and you cannot receive any new
messages. Use the Delete option in each message box to
delete obsolete messages.
Create
In this menu, you can write and send a text message.
Creating a Simple Text Message
1. Create your message.
You can create a message using standard Alphabet
characters or special Uni-code characters, depending on
the setting in the Character support menu.
Notes: For further details about entering characters, see "Using ABC
Mode" on page 51.
You can enter up to 160 standard Alphabet characters in your message.
e635.book Page 70 Tuesday, May 17, 2005 4:55 PM
Section 7: Messaging 71
Text Messages
Section 7
When you enter text using Uni-code characters, the maximum number of
characters that can be in a message is reduced to 70.
2. When you finish entering your message, press the
Options soft key. The following options are available:
•Send: allows you to send the message. The message is
deleted after sending.
•Text formatting: allows you to format the style of the text.
For the Size attribute, Normal, Large, and Small size are
available. Mode options are Normal, Underline, and
Strikethrough. The options for Bold and Italic are Off and On.
Alignment options are Left, Center, and Right.
•Add content: allows you to add a picture, melody, or
animation to your message. Select the category of the item to
be added. In each category, you can select from the various
factory-set items or choose an item received from other
sources, such as the Internet or other phones.
•Templates: allows you to apply one of the preset message
templates to the text. Select one of the 4 items stored in the
Templates menu.
•Save message: allows you to save a copy of the message
to the Phone or SIM card.
3. Select Send and press the Select soft key or the
key.
Note: When the phone fails to send the message, it asks you if you want to
retry. Press the Yes soft key to confirm. Otherwise, press the No soft key
to return to the message screen.
Inbox
This message box is used to store messages that you have
received.
e635.book Page 71 Tuesday, May 17, 2005 4:55 PM

72
Section 7
When you enter this menu, the list of messages in the box
displays with the sender’s phone numbers, or names, if
available in your Phonebook.
1. Select a text message from the list and press the
Options soft key or the key.
Options available are:
•View: read the text message.
•Text reply: create a new message to reply with.
•Call back: dials the number that sent the text message.
•Delete: deletes the text message.
2. Highlight the View option and press the Select soft key
or the key to read the message contents.
3. To scroll through the contents, press the Up or Down
key.
4. To scroll to the previous or next message, press the Left
or Right key.
While reading a message, you can choose the following
options by pressing the Options soft key:
• Text reply: allows you to send a reply to the sender by sending
a text message.
• Call back: allows you to call the sender.
• Delete: allows you to delete the message.
• Save address: allows you to extract the sender’s number and
URL, e-mail addresses or phone numbers from the message
text, so that you can save them in your phone’s memory.
• Forward: allows you to send/resend the message. For further
information about how to send a message, see "Create" on
page 70.
e635.book Page 72 Tuesday, May 17, 2005 4:55 PM

Section 7: Messaging 73
Text Messages
Section 7
• Select content: allows you to save media items, such as
sounds or images, from the message into your phone’s
memory. You can then use the items when writing a message.
• Move to Phone: allows you to move the message from the SIM
card to the phone’s memory. This option is only available for
messages stored in the SIM card.
• Move to SIM: allows you to move the message from the
phone’s memory to the SIM card. This option is only available
for messages stored in the phone’s memory.
Outbox
This message box is used to store messages that you have
sent or will send.
When you enter this menu, the list of messages in the box
displays with the recipients’ phone numbers or names, if
available in your Phonebook.
1. Select a text message from the list and press the Select
soft key or the key to read the message contents.
2. To scroll through the contents, press the Up or Down
Navigation key.
3. To scroll to the previous or next message, press the Left
or Right Navigation key.
While reading a message, you can choose the following
options by pressing the Options soft key:
• Delete: allows you to delete the message.
• Save address: allows you to extract the destination number
and URL, e-mail addresses or phone numbers from the
message text, so that you can save them in your phone’s
memory.
e635.book Page 73 Tuesday, May 17, 2005 4:55 PM

74
Section 7
• Send: allows you to send/resend the message. For further
information about how to send a message see "Create" on
page 70.
• Forward: allows you to send/resend the message. For further
information about how to send a message, see "Create" on
page 70.
• Move to phone: allows you to move the message from the SIM
card to the phone’s memory. This option is only available for
messages stored in the SIM card.
• Move to SIM: allows you to move the message from the
phone’s memory to the SIM card. This option is only available
for messages stored in the phone’s memory.
Delete All
This menu allows you to delete all of the text messages in
each message box. You can also delete all of your
messages at one time.
1. To select a text message box to clear, press the Up or
Down key. To delete all of your messages, select All
messages.
2. To place or remove a check mark, press the key.
3. Press the Delete soft key to delete the marked objects.
4. When the phone asks for confirmation again, press the
Yes soft key.
Picture Messages
This menu allows you to use the Multimedia Message
Service.
Picture Messaging is a messaging service that provides
delivery of personal multimedia messages from phone to
phone or from phone to e-mail.
e635.book Page 74 Tuesday, May 17, 2005 4:55 PM
Section 7: Messaging 75
Picture Messages
Section 7
In addition to the familiar text content of text messages,
multimedia messages can contain images, graphics,
voice, and audio clips. An Picture Messaging message is
a multimedia presentation in a single file. It is not a text file
with attachments.
Using the Picture Messaging feature, your phone can
receive and send messages that contain multimedia files,
such as photos, sounds and images you downloaded from
the Internet and voice memos you recorded. This function
is available only if it is supported by your service
provider. Only phones that offer multimedia messaging
features can receive and display multimedia messages.
Create
This menu allows you to create a new multimedia
message and send to one or multiple destinations.
Creating and Sending a Multimedia Message
1. When you highlight Subject, press the Add soft key or
the key.
2. Enter the subject of your message and press the OK soft
key or the key.
Note: For more information about entering characters, see "Using ABC
Mode" on page 51.
3. To add a picture, highlight the Picture option and press
the Add soft key or the key.
4. Highlight one of the following options and press the
Select soft key or the key.
e635.book Page 75 Tuesday, May 17, 2005 4:55 PM

76
Section 7
•New photo: take a picture with your camera to add to your
message.
•My photos: takes you to My photos to select a picture to
add.
•Images: allows you to select a picture from your Images
folder.
5. Select a photo or image and press the Add soft key or
the key to add the picture to your message.
6. To add a sound, highlight the Sound option and press
the Add soft key or the key.
7. Highlight one of the following options and press the
Select soft key or the key.
•Record new: allows you to record a new voice message.
•Voice memos: takes you to the Voice memos folder in your
Organizer to select a voice memo to add.
•Sounds: allows you to select a sound from your Sounds
folder.
8. Select a Sound or Voice memo and press the Add soft
key or the key to add the picture to your message.
9. To add a message, highlight Message, press the Add
soft key or the key.
10.Enter your message and press the Opt. soft key or the
key.
11. Highlight the Done option and press the Select soft key
or the key. You may select the Templates option to
add pre-defined phrases.
12.Press the Opt. soft key for the following options:
•Send: sends the Picture Messaging message.
e635.book Page 76 Tuesday, May 17, 2005 4:55 PM
Section 7: Messaging 77
Picture Messages
Section 7
•Preview: allows you to see the message before you send.
•Add page: allows you to add another page for the Picture
Messaging message.
•Page timing: page timing allows you to set how long each
page of the Picture Messaging is displayed. The default time is
5 seconds, maximum 99 seconds.
•Text effect: allows you to change the color, size, and style of
the Picture Messaging text.
•Clear picture: allows you to remove the selected picture.
•Delete page: allows you to delete the page selected.
•Save message: allows you to save the Picture Messaging
message
13.To change the text or replace the image or sound with
another one, select a category and press the Opt. soft
key. Depending on the category selected, highlight Clear
picture/sound/message/subject to remove the item.
14.When you have finished creating the message, press the
Opt. key and choose Send. Press the Select soft key or
the key.
15.Choose one of the following options and press the Select
soft key or the key:
•Recent log: allows you to select a number or an address
from the 5 last destinations you entered for sending the last
messages.
•Phonebook: allows you to enter the phone number you
want.
•Phone number: allows you enter a phone number or
choose one from the Ph.Book.
•E-mail address: allows you to enter the e-mail address of
the recipient.
e635.book Page 77 Tuesday, May 17, 2005 4:55 PM

78
Section 7
•My Album: allows you to send the message to the My Album
folder.
•My Journal: allows you to send the message to My Journal.
16.Press the Send soft key to send the message. Your
phone sends the message.
Inbox
Viewing a Message When You Receive It
When a new multimedia message comes in, the display
shows the Picture Messaging Message icon.
1. Press the View soft key to view the message.
Press the Exit soft key if you want to view the message
later in the Inbox.
2. Press the Opt. soft key or the key to access the
following options:
•Reply: allows you to create a message and reply to the
sender.
•Reply all: allows you to create a message and reply to the
sender and all numbers he originally sent the message to.
•Replay: if there are multiple screens to this message, allows
you to replay the message from the beginning.
•Delete: deletes the message.
•Forward: allows you to forward this message to another
destination.
•Call back: allows you to dial the number from which this
message was sent.
•Use content: allows you to use the contents of this message
(picture or sound) to send to another destination in a different
message.
e635.book Page 78 Tuesday, May 17, 2005 4:55 PM
Section 7: Messaging 79
Picture Messages
Section 7
•Save address: allows you to store the address from which
this message was sent. You can also reply to the message
from this option.
•Properties: shows you information about the message, such
as the sender’s e-mail address or phone number, message
size, recipient’s e-mail address or phone number, priority,
class, and the time and date the message was received.
3. When you are finished, press the key.
Viewing a Received Message in the Inbox
When you access the Inbox menu, a list of multimedia
messages you received displays along with the message
subjects. The icons on the left tell you the status of the
messages.
Picture Messaging notifications that have been opened.
Picture Messaging notifications that have not been opened.
1. Select a message on the list and press the Select soft
key or the key.
The message displays and scrolls to the next page, if it
has one, after a specified time.
2. To scroll through the message, press the Up or Down
Navigation key. If the message has more than one page,
you can scroll through the pages by using the Left and
Right Navigation keys.
While viewing a message, you can choose the message
options by pressing the Opt. soft key.
e635.book Page 79 Tuesday, May 17, 2005 4:55 PM

80
Section 7
Outbox
When you access this menu, the list of multimedia
messages that you have sent or saved displays. The icons
on the left tell you the status of each message:
Messages sent
Messages currently being sent
Messages your phone couldn’t send
Messages to be sent
Messages deferred
1. Select a message on the list and press the Select soft
key or the key.
The message displays and scrolls to the next page, if it
has one, after a specified time.
2. To scroll through the message, press the Up or Down
Navigation key. If the message has more than one page,
you can scroll through the pages by using the Left and
Right Navigation keys.
While viewing a message, you can choose the following
options by pressing the Opt. soft key:
• Delete: allows you to delete the message.
• Replay: allows you to replay the message from the beginning.
• Send: allows you to send/resend the message.
• Properties: shows you information about the message, such as
the time and date, to (recipient number), size, priority, and
class.
e635.book Page 80 Tuesday, May 17, 2005 4:55 PM
Section 7: Messaging 81
Browser Messages
Section 7
Draft
After creating a multimedia message, you can store it in
this message box to be sent at a later time.
For further details about viewing a message in the
Outbox, see "Outbox" on page 80.
Delete All
This menu allows you to delete all of the multimedia
messages in each message box separately. You can also
delete all of your messages at one time.
1. To select Picture messages to clear, press the Up or
Down key.
2. Highlight the message box. Press the Select soft key or
the key. To delete all of your messages, select All
messages.
3. To remove a check mark, press the key.
4. To delete the marked messages, press the Delete soft
key. When a confirmation message displays, press the
Yes soft key to confirm.
Browser Messages
This menu allows you to receive web messages from the
server, or to set the phone not to receive Web messages.
The following options are available:
• Inbox: allows you to read the messages received from the web
server.
• Receive: allows you to set whether or not your phone receives
web messages.
• Delete all: allows you to delete all of the web messages.
e635.book Page 81 Tuesday, May 17, 2005 4:55 PM

82
Section 7
Voice Mail Messages
This menu provides you with a way of accessing your
voice mailbox, if provided by your network.
The following options are available:
• Call voice mail: before using the Voice Mail feature, you must
enter the voice server number obtained from your service
provider. You can then select this option and press the Select
soft key or the key to listen to your messages.
You can connect to the voice server by pressing and holding the
1 key in Idle mode.
• Voice server number: allows you to change the voice mail
server number, if necessary.
Note: Voice mail is a network feature. Please contact your service provider
for further details.
Broadcast Messages (SIM Dependent)
This network service allows you to receive text messages
on various topics, such as the weather or traffic.
Please contact your service provider for further details.
Settings
In this menu, you can set up default text message and
picture message information. The last setting you
accessed is automatically activated for sending
subsequent messages.
Text Messages
• Service center: allows you to store or change the number of
your message center, which is required when sending
e635.book Page 82 Tuesday, May 17, 2005 4:55 PM

Section 7: Messaging 83
Settings
Section 7
messages. You must obtain this number from your service
provider.
• Validity period: allows you to set the length of time your text
messages are stored at the message center while attempts are
made to deliver them.
• Message type: allows you to view the type of message sent.
• Reply path: allows the recipient of your message to send you a
reply message using your message center, if your network
supports this service.
• Delivery report: allows you to activate or deactivate the report
function. When this function is activated, the network informs
you whether or not your message has been delivered.
• Character support: allows you to select a character encoding
type, either GSM-alphabet, Uni-code, or Automatic. If you
select Automatic, the phone automatically changes the
encoding type from GSM-alphabet to Uni-code when you enter
a Uni-code character.
When you select Uni-code, the maximum number of
characters which can be in a message is 70. If your
recipient’s phone does not support Uni-code characters,
he/she may not be able to read your message correctly.
Note: If your phone doesn’t have the Character support menu, the phone
provides the Automatic character encoding by default.
Picture Messages
The following options are used to set Send and Receive
settings for Picture messages.
Send Settings
• Priority: you can select the priority level of your messages.
e635.book Page 83 Tuesday, May 17, 2005 4:55 PM

84
Section 7
• Validity period: set the length of time your messages are
stored in the message center while the network attempts to
deliver them.
• Delivery after: you can set a delay time before the phone sends
your messages.
• Delivery report: when this option is enabled, the network
informs you whether or not your message has been delivered.
• Read reply: when this option is enabled, your phone sends a
request for a reply along with your message to the recipient.
Receive Settings
• Msg. reception: you can set your phone to automatically
receive incoming messages.
• Ads reject: you can set your phone to automatically reject or
receive advertising messages.
• Report allowed: you can set the option to receive a delivery
report.
IM (Instant Messaging)
Instant Messenger (IM) is a way of sending short, simple
messages that are delivered immediately to users online
at that moment.
Before using this feature, you need to subscribe to a
messenger service. For further details, contact your
service provider.
Starting your IM
1. Select the messenger service to which you subscribed
using the Left or Right key and press the Select soft key
or the key.
2. Enter your screen name. The name will be displayed on
other people’s phones or PCs.
e635.book Page 84 Tuesday, May 17, 2005 4:55 PM
Section 7: Messaging 85
Memory Status
Section 7
3. Press the Down key and enter your password in the
password textbox.
4. Press the Options soft key.
5. Highlight the Sign In option and press the Select soft
key or the key. You will be logged onto your IM
account.
Using the Instant Messenger Options
On the sign-on screen of the messenger, press the Options
soft key to access the following options:
• Sign On: allows you to login to your IM account.
• Saved Conversations: shows the records of your connections
to the messenger service.
Memory Status
You can check the amount of the memory being used and
the memory remaining for multimedia messages.
The display shows the total space including the used and
free space. You can also view how much space is currently
occupied by each message box.
e635.book Page 85 Tuesday, May 17, 2005 4:55 PM

86
Section 7
e635.book Page 86 Tuesday, May 17, 2005 4:55 PM

Section 8
Section 8: Changing Your Settings 87
Section 8: Changing Your Settings
Topics Covered
• Time & Date Settings
• Display Settings
• Sound Settings
•Get More Help
• Greeting Message Settings
• Language Settings
• Security Settings
• Slide Settings
• Infrared Activation Settings
• Extra Settings
• Reset Settings
• Network Services Settings
This section explains the sound and phone settings for
your phone. It includes display settings, security settings,
slide settings, infrared portal settings, and extra settings
associated with your phone.
e635.book Page 87 Tuesday, May 17, 2005 4:55 PM

Section 8
88
Time & Date
This menu allows you to change the current time and date
displayed. You can also find out what time it is in another
part of the word.
The following options are available:
Set date
The Set date option allows you to enter the month, day,
and year.
World time
The World time option allows you to set your time zone,
using the Left and Right Navigation keys.
The screen shows the:
• city name.
• current time and date.
• city selected as your time zone.
To select your time zone:
1. Select the city corresponding to your time zone by
pressing the Left or Right key one or more times. The
local time and date display.
2. Press the Set soft key or the key.
Set time
The Set time option allows you to enter the current time.
You can choose the time format in the Time format menu.
e635.book Page 88 Tuesday, May 17, 2005 4:55 PM
Section 8: Changing Your Settings 89
Display Settings
Section 8
Time format
This option allows you to set the time format to 12 hours
or 24 hours.
Auto update
The Auto update option allows you to receive time
information from your service provider’s network. Auto
update options are:
• Off: you need to manually set the time and date according to
the current time zone using the Time & Date menu.
• On: the phone automatically updates the time and date
according to the current time zone using the network service.
• Confirm first: the phone asks for a confirmation before the
update.
Note: Automatic updates of time and date do not change the time you have
set for alarm settings or calendar memos.
Display Settings
In this menu, you can change various settings for the
display or backlight.
Wallpaper
This menu allows you to change the background image or
the color of the text to be displayed in Idle mode.
The following options are available:
• Animations: you can select a background image to be
displayed on the idle screen.
e635.book Page 89 Tuesday, May 17, 2005 4:55 PM
Section 8
90
• Get More Wallpapers: You can also select any images
downloaded from the Internet, t-zonesSM and optional
EasyStudio 1.0 program, or received in messages.
• My photos: you can select a background from the photos you
have taken.
• Images: you can select a background from the phones
preloaded images.
• Text color: you can select the phone’s display text color and
shading.
To change the background image:
1. Scroll through the list by pressing the Navigation keys.
You have various preset images available.
2. Press the Select soft key or the key when the image
you want highlights.
Display
You can select the color of the menus displayed.
Backlight
In this menu, you can select the length of time the
backlight is on and the phone is in Dimming mode.
Settings available are: 15 seconds, 30 seconds, 1 minute, 3
minutes, and 10 minutes.
Brightness Control
You can adjust the brightness of your display to see it
better in different lighting conditions.
Press the Up or Down Navigation key or press the
Volume keys to adjust the brightness.
e635.book Page 90 Tuesday, May 17, 2005 4:55 PM

Section 8: Changing Your Settings 91
Sound Settings
Section 8
Dialing Font Color
This menu allows you to select the color of your dialing
font. You can choose a variety of colors. Highlight the
color you want and press the Select soft key or the key.
Sound Settings
You can customize various sound settings.
My MegaTones
This menu displays the different ringtones you have
downloaded from the Internet.
Get More MegaTones
This menu allows you to download different ringtone
melodies from the Internet. To enable a downloaded
ringtone, use the Ringtone option.
Ringtones
This menu allows you to select a ring melody.
You can choose between many different melodies. If you
have downloaded sounds from the Internet, you can use
them in this menu.
Ring Volume
This menu allows you to adjust the ring volume to one of
five levels.
Use the Up and Down keys or the Volume keys on the left
side of the phone to increase or decrease the volume.
e635.book Page 91 Tuesday, May 17, 2005 4:55 PM

Section 8
92
Alert Type
This menu allows you to specify how you are to be
informed of incoming calls.
The following options are available:
• Melody: the phone rings using the ring melody selected in the
Ringtone menu.
• Vibration: the phone vibrates but does not ring.
• Vibration then melody: the phone first vibrates 3 times and
then starts ringing.
Keypad Tone
This menu allows you to select the tone that the phone
sounds when you press a key.
To turn off the sound, select Off.
Message Tone
This menu allows you to set up the ringer for incoming
messages, text messages, and multimedia messages.
Power On/Off
This menu allows you to select the melody that the
phone sounds when it is switched on and off.
To turn off the sound, select Off.
Alerts on Call
This menu allows you to choose whether or not the phone
informs you when you receive a new message or when the
time for an alarm comes during a call.
The following options are available:
e635.book Page 92 Tuesday, May 17, 2005 4:55 PM
Section 8: Changing Your Settings 93
Get More Help
Section 8
• Off: the phone doesn’t actively alert you to incoming messages
or alarms. It only displays the corresponding notification.
• On: the phone alerts you with a beep and displays the
corresponding notification.
Silent Mode
This menu allows you to choose whether or not your
phone will vibrate when a call is received while in Silent
Mode. You may set your phone to Vibration or Mute.
Extra Tones
You can customize additional tones for the phone.
The following options are available:
• Indicative tones: sets whether or not the phone informs you
when you make a mistake.
• Minute minder: sets whether or not the phone beeps every
minute during an outgoing call to keep you informed of the
length of your call.
• Connect tone: sets whether or not the phone beeps when your
call is connected to the system.
Note: To turn a given tone on, press the Select soft key or the key. A
check mark displays in front of the option. To turn a given tone off, press
the Select soft key or the key. The check mark no longer displays in
front of the option.
Get More Help
This menu provides online help for your phone. You may
browse general help topics, or enter specific search topics.
Information located on this site is maintained by
T-Mobile.
e635.book Page 93 Tuesday, May 17, 2005 4:55 PM
Section 8
94
Greeting Message
This menu allows you to set a greeting to be displayed
briefly when the phone is switched on.
For details about entering characters, see "Using ABC
Mode" on page 51.
Language
This menu allows you to select a display language for Text
language and Input mode. Choose from English, French,
and Spanish.
Security
The Security feature enables you to restrict the use of
your phone by others and to restrict the types of calls.
Various codes and passwords are used to protect the
features of your phone.
PIN Check
When the PIN Check feature is enabled, you must enter
your PIN each time you switch on the phone.
Consequently, any person who does not have your PIN
cannot use your phone without your approval.
Note: Before disabling the PIN Check feature, you must enter your PIN.
The following options are available:
• Disable: the phone connects directly to the network when you
switch it on.
• Enable: you must enter the PIN each time the phone is
switched on.
e635.book Page 94 Tuesday, May 17, 2005 4:55 PM
Section 8: Changing Your Settings 95
Security
Section 8
Change PIN
This feature allows you to change your current PIN,
provided that the PIN Check feature is enabled. You must
enter the current PIN before you can specify a new one.
Once you have entered a new PIN, you are asked to
confirm it by entering it again.
Phone Lock
When the Phone lock feature is enabled, the phone is
locked and you must enter the 4- to 8-digit phone
password each time the phone is switched on.
The password is preset to “00000000” at the factory. To
change the phone password, see "Change Password" on
page 95.
Once the correct password has been entered, you can use
the phone until you switch it off.
The following options are available:
• Disable: you are not asked to enter the phone password when
you switch on the phone.
• Enable: you are required to enter the phone password when
you switch on the phone.
Change Password
The Change Password feature allows you to change your
current phone password to a new one. You must enter the
current password before you can specify a new one.
The password is preset to “00000000” at the factory. Once
you have entered a new password, you are asked to
confirm it by entering it again.
e635.book Page 95 Tuesday, May 17, 2005 4:55 PM

Section 8
96
Privacy
Using this menu, you can lock your media contents, such
as picture messages, Voice messages, Voice list, images,
and sounds. Once you have locked the contents, you must
enter the phone’s password to access the associated
menus.
1. To select an item to lock, press the Up or Down key. To
lock all of the contents, select All.
2. To place a check mark, press the Select soft key or the
key.
3. To remove a check mark, press the Select soft key or
the key.
4. To lock the marked items, press the OK soft key.
5. Enter a password and press the OK key.
When the phone asks for the password, enter the
password and press the OK soft key or the key.
Note: The password is preset to “00000000” at the factory.
To change this password, see "Change Password" on page
95.
FDN Mode
FDN (Fixed Dial Number) mode, if supported by your
SIM card, allows you to restrict your outgoing calls to a
limited set of phone numbers.
The following options are available:
• Disable: you can call any number.
• Enable: you can only call phone numbers stored in Phonebook.
You must enter your PIN2. The following options are available:
e635.book Page 96 Tuesday, May 17, 2005 4:55 PM

Section 8: Changing Your Settings 97
Slide Settings
Section 8
•Full length entries or wild cards can be entered in to the FDN
list.
•A full length number with a specific contact name can be
entered into the FDN list.
•Wildcard entries allow a range of numbers to be dialed with a
single entry: ex. 555 – All dialed numbers that begin with 555
will be allowed. Numbers that do not match the conditions in
the FDN list will be restricted. Note: Entering an asterisk (*) is
not required for wild card entries.
Change PIN2
Note: Not all SIM cards have a PIN2. If your SIM card does not, this menu
item does not display.
The Change PIN2 feature allows you to change your
current PIN2 to a new one. You must enter the current
PIN2 before you can specify a new one. Once you have
entered a new PIN2, you are asked to confirm it by
entering it again.
Slide Settings
You can set which features the slide performs when you
move it up or down.
• Up: allows you to set whether moving the slide up accepts a
call.
• Down: allows you to select whether moving the slide down
stops the current operation.
e635.book Page 97 Tuesday, May 17, 2005 4:55 PM
Section 8
98
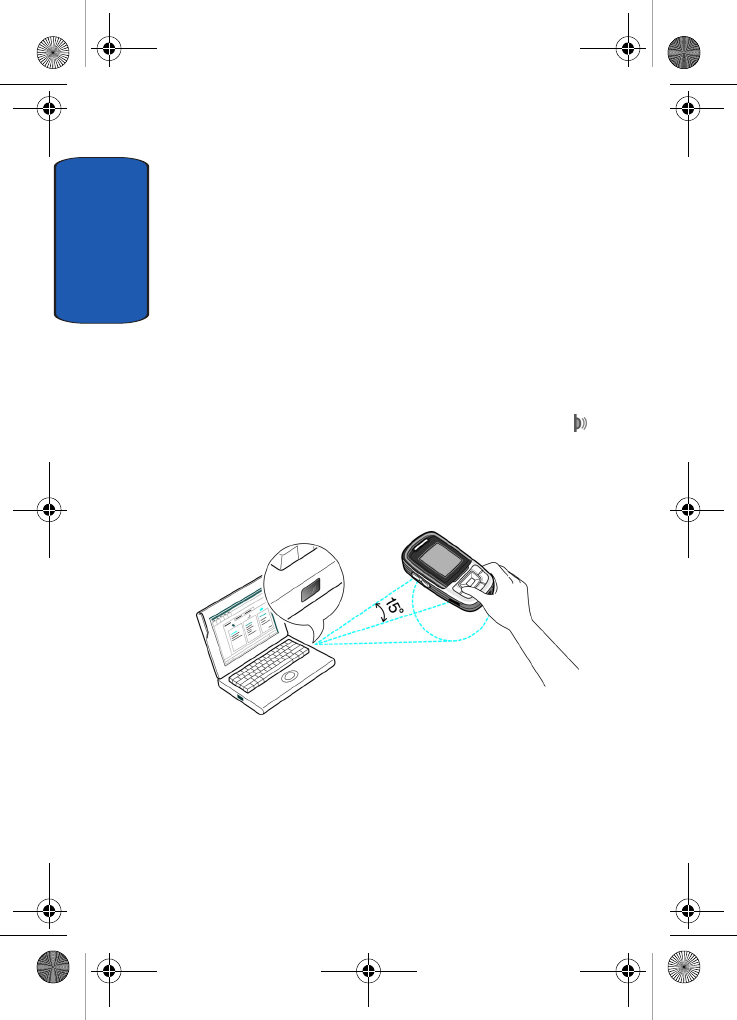
Infrared Activation
This feature allows you to send or receive data to or from
IrDA-compatible computers or phones through the
infrared port on your phone.
Sending or Receiving Data from a PC
To use an infrared connection with a computer, you must:
• Install EasyStudioTM software on your computer.
• Configure and activate an IrDA-compliant infrared port on your
computer.
• Activate the infrared feature on the phone; the IrDA icon
appears on the top line of the display.
• Align the IrDA port on the phone with the IrDA port on your
computer.
The connection is ready for data transmission.
If there is no communication between your phone and the
IrDA-compliant device within 30 seconds of activating
the feature, it is automatically deactivated.
e635.book Page 98 Tuesday, May 17, 2005 4:55 PM
Section 8: Changing Your Settings 99
Extra Settings
Section 8
Note: For optimal performance, use an optional data link cable. You can
purchase one from your local Samsung dealer.
Sending or Receiving Data from Another Phone
To send or receive Address Book entries and calendar
memos from another compliant phone using the infrared
connection, you need to activate the infrared port on your
phone.
Note: If you receive a call while sending or receiving data, you can either
answer or reject the call without interrupting the IrDA connection. But,
picking up your phone may break the connection between the phones, so
use the headset to answer the call.
1. Align the infrared ports on both phones with each other.
2. In Idle mode, press the Menu soft key and select
Settings. Highlight Infrared activation and press the
Select soft key or the key.
3. Highlight On and press the Select soft key or the
key.
4. If FDN (Fixed Dial Number) mode is enabled on your
phone, enter the PIN2 and press the OK soft key.
5. Press the Save soft key. The entries are saved.
Extra Settings
You can turn the automatic redialing or answering
features on or off.
1. To turn a feature on, press the Select soft key or the
key. A check mark displays in front of the option.
e635.book Page 99 Tuesday, May 17, 2005 4:55 PM

Section 8
100
2. To turn a feature off, press the Select soft key or the
key. The check mark no longer displays.
The following options are available:
Note: The interval between call attempts varies.
• Auto redial: when this option is checked, the phone makes up
to ten attempts to redial a phone number after an unsuccessful
call.
• Anykey answer: when this option is checked, you can answer
an incoming call by pressing any key, except the key or
the Reject soft key. To reject the call, press the key or the
Reject soft key.
When this option is unchecked, you must press the key or
Accept soft key to answer a call.
Reset Settings
From this menu you can reset your phone and sound
settings to the default settings.
To reset your phone:
Enter the 4- to 8-digit password and press the OK soft key
or the key.
The password is preset to “00000000.” To change this
password, see "Change Password" on page 95.
Network Services Settings
Call Forwarding
This network service enables incoming calls to be
rerouted to the number that you specify.
e635.book Page 100 Tuesday, May 17, 2005 4:55 PM
Section 8: Changing Your Settings 101
Network Services Settings
Section 8
Example: You may wish to forward your business calls to a colleague
while you are on holiday.
To set your call forwarding options:
1. Select a call forwarding option by pressing the Up or
Down key and then press the Select soft key or the
key.
The following options are available:
•Forward always: all calls are forwarded.
•Busy: calls are forwarded when you are already on another
call.
•No reply: calls are forwarded when you do not answer the
phone.
•Unreachable: calls are forwarded when you are not in an
area covered by your service provider or when your phone is
switched off.
•Cancel all: all call forwarding options are canceled.
2. Select the type of calls, voice or data, by pressing the Up
or Down key, and then press the Select soft key or the
key.
The current status displays. If the option has already
been set, the number to which the calls are forwarded
displays.
3. To activate call forwarding, press the Activate soft key.
Go to step 6.
4. To change the number to be called, press the Change
soft key. Go to step 6.
e635.book Page 101 Tuesday, May 17, 2005 4:55 PM
Section 8
102
5. To deactivate call forwarding, press the Remove soft
key.
6. Enter the number to which the calls are to be forwarded
and press the OK soft key or the key.
To enter an international code, press and hold the 0 key
until the + sign displays.
7. When you select No reply in step 1, select the length of
time the network waits before forwarding a call.
The phone sends your settings to the network and the
network’s acknowledgement displays.
Call Waiting
This network service informs you when someone is trying
to reach you during another call.
You can specify individual call waiting options for voice
calls and/or data calls.
To set your call waiting options:
1. Select the type of calls, voice or data, to which the call
waiting option is to be applied by pressing the Up or
Down key and then press the Select soft key or the
key.
The screen informs you whether call waiting is activated
or deactivated.
2. You can activate or deactivate the Call Waiting feature
using the Activate or Deactivate soft key respectively.
3. To return to the previous screen, press the Exit soft key.
e635.book Page 102 Tuesday, May 17, 2005 4:55 PM
Section 8: Changing Your Settings 103
Network Services Settings
Section 8
Network Selection
The Network Selection feature enables you to
automatically or manually select the network used when
roaming outside of your home area.
Note: You can select a network other than your home network only if there
is a valid roaming agreement between the two.
The following Network Selection options are available:
• Search now
• Default setup
To change network selection mode using the Search now
option:
1. Press the Up or Down key until the Search now option
is highlighted, then press the Select soft key or the
key.
2. Your phone will scan for available networks. Press the
Up or Down key until the network you want is
highlighted, and then press the Select soft key or the
key.
The phone will scan for that network and you will be
connected.
To change network selection mode using the Default
setup option:
1. Press the Up or Down key until the Default setup option
is highlighted, then press the Select soft key or the
key.
e635.book Page 103 Tuesday, May 17, 2005 4:55 PM
Section 8
104
Select either the Automatic or the Manual option. If you
select Automatic, you are connected to the first
available network when roaming.
If you select Manual, go to step 2.
2. Your phone will scan for available networks. Press the
Up or Down key until the network you want is
highlighted, and then press the Select soft key or the
key.
The phone will scan for that network and you will be
connected.
Caller ID
You can prevent your phone number from being
displayed on the phone of the person being called.
Note: Some networks do not allow you to change this setting.
The following options are available:
• Default: the default setting provided by the network is used.
• Hide number: your number does not display on the other
person’s phone.
• Send number: your number is sent each time you make a call.
Band Selection
This menu option provides the ability to set the band for
your phone. Choose from GSM 850/1900, GSM 1800, or
Automatic.
e635.book Page 104 Tuesday, May 17, 2005 4:55 PM
Section 9: Organizer 105
Section 9
Section 9: Organizer
Topics Covered
•Alarm
• Calendar
•Calculator
• To Do List
•Voice memo
•Conversion
•Timer
• Stopwatch
The topics covered in this section allow you to schedule
appointments, view the calendar, create To-Do lists, set an
alarm, and perform simple math calculations.
e635.book Page 105 Tuesday, May 17, 2005 4:55 PM

106
Section 9
Alarm
This feature allows you to:
• set the alarm to ring at a specific time.
• set the phone to switch on automatically and ring the alarm
even if the phone is switched off.
The following options are available:
• Wake-up Call: the alarm rings to wake you up in the morning.
• Alarm1: set the day, time, and tone for this alarm.
• Alarm2: set the day, time, and tone for this alarm.
• Auto power: alarm rings at the specified time even if the phone
is turned off. If the option is set to Off and the phone is
switched off at the specified time, the alarm does not ring.
To set the alarm:
1. From idle mode, select: Menu mode, Organizer, Alarm.
2. Choose the type of alarm to be set and press the Select
soft key or the key.
3. Press the Options soft key to choose from the following
options:
•Alarm day: select the days of the week for the alarm.
•Alarm time: enter the time for the alarm.
•Alarm tone: select an alarm melody.
•Remove alarm: removes the set alarm.
4. Highlight Alarm day and press Select soft key or the
key. Select the days you would like the alarm to sound.
Highlight the day and press the Select soft key or the
key. Press the OK soft key to save.
e635.book Page 106 Tuesday, May 17, 2005 4:55 PM
Section 9: Organizer 107
Calendar
Section 9
5. Enter the time for the alarm to sound and press the OK
soft key.
6. Select AM or PM and press the Select soft key or
key.
7. Press the Options soft key, highlight Alarm tone, and
press the Select soft key or the key. Highlight your
choice and press the Select soft key or the key.
8. Press the key to return to Idle mode.
Note: Your phone is preset to a 12-hour format. To change the time
format, see "Time & Date" on page 88.
9. To stop the alarm when it rings, open the phone and
press the Confirm soft key, Volume keys, C key, key,
or key.
Calendar
With the Calendar feature, you can:
• consult the calendar and check your memos.
• write memos to keep track of your schedule.
• set an alarm to act as a reminder, if necessary.
Consulting the Calendar
When you select the Calendar menu, the calendar
displays with today’s date highlighted. The following
options are available when you press the Options soft
key:
• Add memo: allows you to write a memo and save it to the
scheduler, to do list, call, or anniversary list.
e635.book Page 107 Tuesday, May 17, 2005 4:55 PM
108
Section 9
• Go to date: allows you to jump to a specific date.
• View all: displays all memos set, starting with the oldest,
regardless of the day. To scroll through the memos, press the
Up or Down key.
• Delete day: allows you to delete all memo’s for the specified
day.
• Delete all: allows you to delete all of the memos. You are asked
to confirm your action.
Writing a Memo
You can make up to 100 memos for the calendar. More
than one memo can be made for one day.
To write or edit a memo on a specific date:
1. Select a date on the calendar, using the Navigation keys.
Note: To skip to the previous or next month, press the Up or Down key 1 to
6 times.
2. Press the key.
An empty memo screen displays to allow you to enter
your memo.
3. Enter your memo and then press the OK soft key or the
key.
Note: For further details about how to enter characters, see "Using ABC
Mode" on page 51.
4. Choose from the following Save to options:
•Scheduler: saves the memo to the Scheduler.
•To do list: saves the memo to the To do list.
•Call: saves the memo to your Call list.
e635.book Page 108 Tuesday, May 17, 2005 4:55 PM
Section 9: Organizer 109
Calendar
Section 9
•Anniversary: saves the memo to your Anniversary list.
5. You are asked if you wish to set an alarm. If you want the
alarm to ring on the chosen day, press the Yes soft key or
the key.
Otherwise, press the No soft key. The memo is saved
and the display returns to the calendar.
6. If you pressed the Yes soft key or the key, set the
time for the alarm and press the OK soft key or the
key.
Notes: Your phone is preset to a 12-hour format. To change the time
format, see "Time & Date" on page 88.
When the alarm time you set occurs, the alarm rings. To view details about
the memo, press the Confirm soft key or the key. To stop the alarm,
press the key.
7. If applicable, select AM or PM and press the Select soft
key or the key.
8. Select a melody option for the alarm and press the
Select soft key.
The color of the date on the calendar changes to pink to
indicate that a memo exists for that date.
Viewing a Memo
When you select a day on which more than one memo
exists, the latest memo for the day displays.
In that case, press the Right or Left key to scroll to the
previous or next memo.
You can access the following options by pressing the
Options soft key:
e635.book Page 109 Tuesday, May 17, 2005 4:55 PM
110
Section 9
• Add: allows you to add a new memo for the day.
• Delete: deletes the memo.
• Edit: allows you to change the memo text.
• Move: allows you to change the time or date of the memo.
• Copy: allows you to copy the memo to another date or time.
Calculator
With this feature, you can use the phone as a calculator.
The calculator provides the basic arithmetic functions;
addition, subtraction, multiplication, and division.
1. Enter the first number using the numeric keys.
To enter a decimal point, press the key.
Note: To include a decimal point, press the key. To include a bracket,
repeatedly press the key until the symbol you want displays.
2. Enter the operation for your calculation by repeatedly
pressing the key until the operation you want displays.
3. Enter the second number.
4. To view the result, press the = soft key or the key.
Repeat steps 1 to 4 as many times as required.
To Do List
This feature allows you to:
• enter a list of tasks to be done.
Creating the To Do List
1. Press the Select soft key or the key.
2. Enter the first task.
e635.book Page 110 Tuesday, May 17, 2005 4:55 PM
Section 9: Organizer 111
To Do List
Section 9
Note: For further details about how to enter characters, see "Using ABC
Mode" on page 51.
3. Press the OK soft key or the key.
4. Select a date and press the Select soft key or the
key. Enter a time and press the OK soft key or the
key. Highlight AM or PM and press the Select soft key or
the key.
5. To edit the To Do List, use the following options.
Editing the To Do List
When you select the To do list menu, the current contents
display with a status mark, if the task has been done ,
or is undone .
1. To change the status of a task, highlight Mark and press
the Select soft key or key.
2. Use the Up or Down Navigation key to mark the task as
Done or Undo.
By pressing the Options soft key or the key on the list
or the task view, you can access the following options:
• Add: allows you to create a new task.
• Mark: allows you to change the status of the current task to
either Done or Undo.
• Edit: allows you to change the text for the current task.
• Move: allows you to move the task to another date.
• Copy: makes a copy of the current task.
• Delete: deletes the current task.
e635.book Page 111 Tuesday, May 17, 2005 4:55 PM
112
Section 9
• Delete all: allows you to delete all of the tasks.
Voice Memo
You can record voice memos. After recording, you can
send the memo to other people via the Multimedia
Message Service.
Record Voice
This menu allows you to record a new memo.
1. To start recording, press the Select soft key or the
key.
2. Record a memo by speaking into the microphone.
3. When the selection is on Stop, press the Select soft key
or the key, or if the recording time expires, the
following options display:
•Send: send the voice memo by Picture Messaging.
•Rename: change the name of the voice memo.
•Delete: delete the voice memo.
•Properties: view the properties of the voice memo.
4. To exit, press the soft key or the key.
Voice Memos
This menu shows a list of saved voice memos. Scroll to a
memo and press the Select soft key or the key. Then,
press the Options soft key. The following options are
available:
• Send: allows you to send the memo to other people by using
the Picture Messaging feature. See "Creating and Sending a
Multimedia Message" on page 75 for further details about
sending a message.
e635.book Page 112 Tuesday, May 17, 2005 4:55 PM

Section 9: Organizer 113
Voice Memo
Section 9
• Rename: allows you to change the memo’s name.
• Delete: allows you to delete the memo.
• Properties: displays information about the memo, such as the
name, size, and format.
Delete All
In this menu, you can delete all of your voice memos.
When the confirmation message appears, press the Yes
soft key. To cancel the deletion, press the No soft key.
Settings
In this menu, you can view and set the settings for your
voice memos. The following options are available:
• Recording time: allows you to set the recording time to
Normal or Limit size (for Picture Messaging).
• Volume: allows you to set the default volume for the recording.
• Default name: allows you to set the default name for the
recordings.
Memory Status
You can check the amount of memory being used and the
memory remaining for voice memos.
The display shows you the total, used, and free memory.
e635.book Page 113 Tuesday, May 17, 2005 4:55 PM
114
Section 9
Conversion
The conversion menu provides the following conversion
categories:
• Length
• Weight
• Volume
• Area
• Temperature
To convert a length, weight, volume, area, or temperature,
do the following:
1. Scroll to the conversion feature you wish to use and
press the Select soft key or the key.
2. Enter the quantity you want converted.
Note: To include a decimal point, press the key.
3. Use the Up, Down, Left, and Right keys to select the
From and To units of measure for the quantity you want
converted.
4. Press the OK soft key or the key.
Timer
You can use this menu to set a timer. To enable the Timer,
use the following options:
1. Press the Set soft key to enter the length of time.
2. Enter the time and press the OK soft key.
e635.book Page 114 Tuesday, May 17, 2005 4:55 PM
Section 9: Organizer 115
Stopwatch
Section 9
3. Press the Start soft key to start the timer. Press the Stop
soft key to stop the timer.
Stopwatch
You can use this menu to set a stop watch. Press the OK
soft key to start the stopwatch. Press the OK soft key at the
start of each succeeding event/lap to record the
completion time for the previous event/lap. Press the
Reset soft key to erase all stop watch (lap) times recorded.
e635.book Page 115 Tuesday, May 17, 2005 4:55 PM

116
Section 9
e635.book Page 116 Tuesday, May 17, 2005 4:55 PM

Section 10: Camera 117
Section 10
Section 10: Camera
Topics Covered
• Using the Camera
• Take and Send
• Accessing Pictures in My Photos
• Accessing Pictures in My Album
• My Journal
• Delete All
• Settings
• Memory Status
This section explains how to use the camera in your
phone. You can take a photo using the built-in camera.
e635.book Page 117 Tuesday, May 17, 2005 4:55 PM

118
Section 10
Using the Camera
Using the camera module in your phone, you can take
photos of people or events while on the move.
Additionally, you can send photos to other people in an
Picture Messaging message or set a wallpaper or caller ID
image.
Caution:
Do not take photos of people without their permission.
Do not take photos in places where cameras are not allowed.
Do not take photos in places where you may interfere with another
person’s privacy.
Take and Send
Your camera produces photos in JPEG format.
Note: When you take a photo in direct sunlight or in bright conditions,
shadows may appear on the photo.
1. In Idle mode, press the Up key or press and hold the
key on the right side of the phone to turn on the camera.
You can also press the Menu soft key to access Menu
mode. Highlight Camera and press the Select soft key or
press the key. Select Take and Send.
2. Adjust the image by aiming the camera at the subject.
Press the right soft key to access the camera
options. For details, see "Using Camera Options" on
page 119.
You can use the keypad to quickly change the camera
options.
e635.book Page 118 Tuesday, May 17, 2005 4:55 PM
Section 10: Camera 119
Take and Send
Section 10
3. Press the left soft key or the key to take the
photo. Send To: My Album? is displayed. Press the Yes
soft key.
4. To use the photo options, press the Options soft key or
the key.
5. To return to Capture mode, select New Photo.
6. To return to Idle mode, press the key.
Using Camera Options
In Capture mode, you can use various options for the
camera by pressing the soft key.
The following options are available:
Mode: allows you to take a photo in various modes. Once
you change the mode, the corresponding indicator
appears at the top right of the display.
• Normal shot: allows you to take a photo in the normal mode.
• Multi-shot: allows you to take a series of action stills. Select
the capture speed, High Speed or Normal Speed, and the
number of photos the camera will take. When you press the
key, the camera takes photos successively.
• Night mode: allows you to take photos in low (night time)
lighting.
• Capture only: allows you to take a photo and it automatically
saves and returns you to the capture screen.
Frame: allows you to select a decorative frame. Select a
frame from the list using the Navigation keys and press
the key to save your setting.
Effects: allows you to change the color tone or apply
special effects to the photo.
e635.book Page 119 Tuesday, May 17, 2005 4:55 PM
120
Section 10
Rotation: allows you to rotate the image vertically and
horizontally.
Timer: allows you to set a time delay before the camera
takes the photo. Select the length of delay you want. When
you press the or key, the camera takes the photo after
the specified time.
Settings: allows you to change the image settings.
• Photo size: allows you to set the image size to either 640x480,
320x240, 160x120, or 128x120. The icon for the selected
image size (640x480), (320x240), (160x120), (128x120)
displays on the capture screen.
• Shutter sound: allows you to select a tone for the shutter
sound.
• Flash light: allows you to set the flash for Manual or Automatic
operation. The built-in flash may enable you to take pictures in
low light. The flash is located on the rear of the phone, next to
the camera lens.
• Default name: allows you to change the default name assigned
to your photo.
Help: shows you how the Navigation keys and Volume
keys can adjust image brightness and zoom while in
capture mode.
adjusts the image brightness
zooms in or out
flips the image vertically
shows the mirror image
e635.book Page 120 Tuesday, May 17, 2005 4:55 PM

Section 10: Camera 121
Accessing Pictures in My Photos
Section 10
Camera Shortcuts
The following keys are camera shortcuts that can be used
during the capture mode.
zooms in and out.
changes the picture resolution.
displays the Help screen.
changes the camera shot mode
changes the color tone or applies a special effect to the photo.
opens the Settings options. See page 120 for details.
selects a decorative frame.
sets a time delay.
takes you to My Photos menu.
manually turns the flash on or off.
Accessing Pictures in My Photos
1. In Idle mode press the Menu soft key to access the
Menu mode.
2. Highlight Camera and press the Select soft key or the
key.
3. Select My photos and press the Select soft key or the
key.
When you access this menu, your phone displays the
e635.book Page 121 Tuesday, May 17, 2005 4:55 PM