Samsung Electronics Co SGHM919 Multi-band WCDMA/GSM/EDGE/LTE Phone with WLAN, Bluetooth and RFID User Manual T Mobile SGH M919 Samsung Galaxy S 4
Samsung Electronics Co Ltd Multi-band WCDMA/GSM/EDGE/LTE Phone with WLAN, Bluetooth and RFID T Mobile SGH M919 Samsung Galaxy S 4
Contents
Users Manual 3
DRAFT
Internal Use Only
Multimedia 191
Adding Songs to Playlists
1. From the Home screen, tap (
Apps
)
➔
(
Play Music
).
2. Tap an album or song list and play a song.
3. Tap ➔ adjacent to the song name and
select
Add to playlist
.
4. Select the desired target playlist.
Playing a Playlist
1. From the Home screen, tap (
Apps
)
➔
(
Play Music
).
2. Select the
PLAYLISTS
tab.
3. Tap next to a playlist title and tap
Play
.
Deleting a Playlist
1. From the Home screen, tap (
Apps
)
➔
(
Play Music
).
2. Display the
PLAYLISTS
library view.
3. Tap next to a playlist title and tap
Delete
.
Music Player XXX
The Music Player is an application that can play music files.
The music player supports files with extensions AAC, AAC+,
eAAC+, MP3, WMA, 3GP, MP4, and M4A. Launching the
Music Player allows you to navigate through your music
library, play songs, and create playlists (music files bigger
than 300 KB are displayed).
Playing Music
1. From the Home screen, tap (
Apps
)
➔
(
Music Player
).
2. Tap a library category tab to select the music category:
All
,
Playlists
,
Albums
,
Artists
,
Music square
, or
Folders
.
3. Scroll through the list and tap an entry to begin
playback.
Note:
The 5.1 channel sound effect works when earphones or
sound is connected through the headset jack only.
DRAFT
Internal Use Only
192
4. Use any of the following Music Player controls:
Making a Song a Phone Ringtone
1. From the Home screen, tap (
Apps
)
➔
(
Music Player
).
2. Tap the
All
tab.
3. Touch and hold a song from the list to reveal the
on-screen context menu.
4. Tap
Set as
➔
Phone ringtone.
Music Player Options
The Music Player Settings menu allows you to set
preferences for the music player such as whether you want
the music to play in the background, sound effects, and how
the music menu displays.
With the Music player application displayed and
playing a song, press and select one of the
following options:
• Add to quick list
: adds the current music file to the Quick list.
• Via Bluetooth
: scans for devices and pairs with a Bluetooth
headset.
•Share via
: allows you to share your music by using Bluetooth,
Dropbox, Email, Gmail, Messaging, or Wi-Fi Direct.
Pause the song.
Start the song after pausing.
Press and hold to rewind the song. Tap to go to
previous song.
Press and hold to fast-forward the song. Tap to
go to next song.
Volume control.
Plays the entire song list once.
Replays the current list when the list ends.
Repeats the currently playing song.
shuffles the current list of songs randomly.
songs play in order and are not shuffled.
provides access to the Music square.
lists the current playlist songs
displays the current song in the player window
provides access to the Equalizer

DRAFT
Internal Use Only
Multimedia 193
•Add to playlist:
allows you to add the current music file to a
selected playlist.
•Details
: allows you to view media info such as Artist, Title,
Album, Track length, Genre, Track number, Format, Size, and
Location.
•Set as
: allows you to set the current song as a Phone ringtone,
Caller ringtone, or Alarm tone.
• Scan for nearby devices
: allows you to look for DLNA -
compliant devices used to control streaming media.
•Settings
: allows you to change your music player settings.
•End
: closes the application.
Music Player Settings
The Music Player Settings menu allows you to set
preferences for the music player such as whether you want
the music to play in the background, sound effects, and how
the music menu displays.
1. From the Home screen, tap (
Apps
)
➔
(
Music Player
).
2. Press ➔
Settings
.
3. Select one of the following settings:
•SoundAlive
: set a type of equalization such as Normal, Pop,
Rock, Jazz, Dance, Classic, etc.
• Play speed
: set the play speed anywhere between 0.5X and
2.0X using the slider.
• Music menu
: this menu allows you to select which categories
you want to display. Choices are: Albums, Artists, Genres,
Music square, Folders, Composers, Years, Most played,
Recently played, or Recently added. Tap each item that you
want to display in the Music menu.
•Lyrics
: when activated, the lyrics of the song are displayed if
available.
• Music auto off
: when activated, music will automatically turn
off after a set interval.
DRAFT
Internal Use Only
194
Using Playlists
Playlists are used to assign music files into groups for
playback. These Playlists can be created using the Music
player on this device, or using a third-party application (such
as Windows Media Player) and downloading those files to an
SD card inserted into the device.
Creating a Playlist
1. From the Home screen, tap (
Apps
)
➔
(
Music Player
).
2. Tap the
Playlists
tab.
3. Press and then tap
Create playlist
.
4. Backspace over the default playlist title and type a new
name for this playlist, then tap
OK
.
Adding Music to a Playlist
1. From the Home screen, tap (
Apps
)
➔
(
Music Player
).
2. Tap the
Playlists
tab.
3. Tap the playlist name in which to add music.
4. Press and then tap
Add
.
– or –
Tap (
Add music
). This option is available within
user-created playlists.
Note:
If a playlist is empty, add a song by touching a holding a
song name from the main screen to open the context
menu. Select
Add to playlist
and choose the playlist.
5. Tap a music file, or tap
Select all
to add all the music
tracks to this playlist then tap
Done
.

DRAFT
Internal Use Only
Multimedia 195
Removing Music from a Playlist
1. From the Home screen, tap (
Apps
)
➔
(
Music Player
).
2. Tap the
Playlists
tab.
3. Tap the playlist name in which to delete music.
4. Touch and hold a song to reveal the on-screen context
menu.
5. Tap
Remove
.
Editing a Playlist
Besides adding and removing music files in a playlist, you
can also share, delete, or rename the playlist.
Note:
Only those playlist you have created can be edited.
Default playlists can not be renamed.
1. From the Home screen, tap (
Apps
)
➔
(
Music Player
).
2. Tap the
Playlists
tab.
3. Touch and hold a playlist entry to reveal the on-screen
context menu.
4. Tap
Edit title
.
5. Enter a new name for this playlist and tap
OK
.
Transferring Music Files
Music files can be downloaded to the phone using one of two
methods:
1. Downloaded to the device from the Play Store.
Music files are directly stored on your phone.
2. Downloaded to the phone via a direct USB connection.
Music files are stored into a Music folder on the SD
card.
For more information, refer to “Communicating with the SD
card” on page 68.
Removing Music Files
1. From the Home screen, tap (
Apps
)
➔
(
Music Player
).
2. Tap the
All
tab.
3. Touch and hold a song entry to reveal the on-screen
context menu.
4. Tap
Delete
➔
OK.
The music file(s) is deleted.
DRAFT
Internal Use Only
196
Samsung Link
This application wirelessly synchronizes your Samsung
device with your TV, streams content and even keeps tabs on
who calls or sends text messages with real-time, on-screen
monitoring. Samsung’s Link makes staying connected easy.
Allows users to share their in-device media content with
other external devices using DLNA certified™ (Digital Living
Network Alliance) Devices. These external devices must also
be DLNA-compliant. Wi-Fi capability can be provided to TVs
via a digital multimedia streamer.
Important!
You must first connect both of your communicating
devices to the same Wi-Fi and be using an
active/registered Samsung account prior to using
this application.
For more information, refer to “Wi-Fi settings” on
page 276.
For more information, refer to “Creating a
Samsung Account” on page 21.
Note:
For more information on defining the various features
definitions on page 241.
Important!
The Samsung account manages the access
information (username/password) to several
applications, such as Samsung Link, Chat On, and
Samsung Hub.
1. Confirm you have already logged in to your Samsung
account.
2. From the Home screen, tap (
Apps
)
➔
(
Samsung Link
).
3. If prompted, read the on-screen message about
network charges and tap
OK
to continue and return to
the main screen.
4. If prompted, tap
Sign in
to log into your Samsung
account.
Note:
If the main screen still shows a Sign in box, close the
application and restart it.
5. Follow the on-screen prompts.
6. Scroll across the application screen to view either
MY RECENT CONTENT
or
DEVICES & STORAGE
.
DRAFT
Internal Use Only
Multimedia 197
The DEVICES & STORAGE screen contains two separate
streaming media options:
•Registered storage
: allows you to receive and playback media
stored externally (server, laptop, etc.) directly on your device by
allowing you to add a Web storage service for streaming
content.
• Registered devices
allows you to stream/share selected
multimedia content from your device to DLNA compliant device
connected to the same Wireless Access Point.
Configuring Samsung Link Settings
The AllShare Play™ application must first be configured
prior to its initial use. You must setup parameters such as
connected Wi-Fi, Items to share, source server address, and
external device acceptance rights.
1. From the Home screen, tap (
Apps
)
➔
(
Samsung Link
) ➔
DEVICES & STORAGE
.
2. Press and then tap
Settings
and configure the
following settings as desired:
•Registered storage
: allows you to add a Web storage location.
Without a storage service/location added, you will not be able
to use AllShare Play.
• Registered devices
: defaults to your phone. This indicates the
source of the streaming images and videos. Use the main
screen to add more external devices.
• My device
: displays your device name as it is used with
Samsung Link. Tap to change the device name.
•Save to
: allows you to save your media to your internal phone
memory or to an SD card.
• Auto upload
: allows you to enable automatic upload of images
from your device to those storage locations specified within the
Web storage list. Move the slider to the on position to activate
the feature.
• Video quality settings
: allows you to setup the video quality for
streamed video content. Move the slider to the on position to
activate the feature.
•Password lock
: allows you to restrict access to Samsung Link
by requiring a user enter the currently active and associated
Samsung account password. Move the slider to the on position
to activate the feature.
•My account
: displays Samsung account information.
•Customer support
: allows you to contact the Samsung Link
team via a new email from an available email account.

DRAFT
Internal Use Only
198
• About this service
: displays application information.
Setting Up Web Storage
Web storage services allow you to use storage space to store
your files and share them on the “Cloud”.
Note:
If you are using another Web storage service, log into
that service first before using Samsung Link.
1. From the Home screen, tap (
Apps
)
➔
(
Samsung Link
).
Note:
When adding storage, an N Drive is added.
2. If not already signed into your Cloud storage, tap
(
Register storage
) ➔
Sign in
to to your desired service.
Choose from: SugarSync, Dropbox, or SkyDrive.
3. Follow the onscreen instructions to register or log into
your cloud service.
4. Once the process is successfully completed, the Web
storage icon or name appears in the Web storage area
of the main screen.
5. From the main screen, select a connected device and
then tap on the media that you would like to share.
•
A file with in the upper-left indicates it is stored remotely
on a Web storage location. Selecting this media causes your
device to access the file currently stored on your services’
servers.
Sharing files via Web Storage
Files can be uploaded to a Web storage location by either
login into the service and sharing a folder on your computer
with the storage location or sharing files, images, and videos
from your device.
To upload an image on your device to Web storage:
1. From the Home screen, tap (
Apps
)
➔
(
Gallery
).
2. Select a folder location (ex:
Camera
) and open an
image by tapping it once. This opens the image in the
preview window.
Note:
To select multiple images, touch and hold an image to
place a colored border around the selected images.
3. Select the remote storage location (ex: Dropbox).
DRAFT
Internal Use Only
Multimedia 199
4. Select the target folder location and select
Upload
. The
device then confirms the available storage locations
and begin the process of uploading the selected
images.
To upload a video on your device to Web storage:
1. From the Home screen, tap (
Apps
)
➔
(
Gallery
).
2. Select a folder location (ex:
Camera
) and touch and
hold a video to place a colored border around the
selected file.
3. Tap ➔
Dropbox
from the top of the Gallery
screen. The device then confirms the available storage
locations and begin the process of uploading the
selected video.
Sharing Media via Samsung Link to a Target
Device
Important!
Make sure all communicating devices are
connected to the same Wi-Fi.
1. Launch AllShare Play/Samsung Link on the target
device (such as an Internet TV, Samsung Tablet, etc..).
2. From the Home screen, tap (
Apps
)
➔
(
Samsung Link
).
Note:
You must be signed in to your Samsung Account before
you can use this feature.
3. Tap your device name from the
Devices
list.
4. Tap an available category tab (Pictures, Music, Movies,
Files, or Info) and select a file.
•
Touch and hold to select multiple files.
•
A file with in the upper-left indicates it is stored remotely
on a Web storage location. Selecting this media causes your
device to access the file currently stored on your services’
servers.
DRAFT
Internal Use Only
200
5. Tap an available on-screen file, image, or video to
place a green check mark alongside it.
6. Tap (
Stream to connected devices
) and select an
available target device to begin streaming.
7. On a target device (ex: Internet TV) select the
on-screen
Allow
button to continue.
Note:
At this stage your device is requesting access to share
media with the external source.
8. Confirm (
AllShare Controller enabled
) appears in
the Notification area at the top of the device to indicate
you are using your device as the media source.
AllShare Cast Hub
This hardware allows you to enjoy what’s currently on your
device directly on your TV.
Note:
There is no need to be connected to a Wi-Fi network or
to be logged into your Samsung Account to use this
feature.
AllShare Cast Hub establishes a WI-Fi Direct connection
between the device and the hub
Connecting AllShare Cast Hub
To connect your AllShare Cast Hub hardware:
1. Connect the AllShare Cast Hub to a power source via
the USB Travel Adapter.
Screen Mirroring
(with Hub
accessory)
This feature functions with an
external AllShareCast Hub to fully
mirror what is currently displayed on
your device to the external TV.
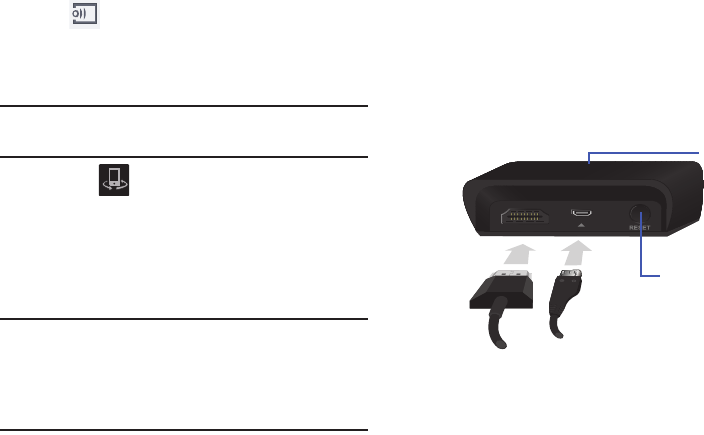
AllShare Cast Hub
HDMI Travel Adapter (Power)
Status LED
RESET button
DRAFT
Internal Use Only
Multimedia 201
Note:
The status LED begins to blink solid red to indicate
it has begun the start up process.
2. Connect your TV to the AllShare Cast Hub via an HDMI
cable (A-to-A cable) as shown above.
3. Change the source input on your TV to match the input
port used by the incoming HDMI cable.
Note:
The television screen should now display an on-screen
tutorial showing you how to configure your device’s
AllShare Cast Hub and device settings.
To activate Screen Mirroring on your device:
1. From the Home screen, press and then tap
Settings
➔ (
Connections
tab)
➔
Screen
Mirroring
.
2. If not already on, tap the
Screen Mirroring
and then
move the slider to the right to turn it on. The slider
color indicates the activation status.
Pairing AllShare Cast Hub
To pair your device and Hub for the 1st time:
1. Locate the AllShare Hub (dongle) name displayed at the
bottom of the TV (showing the tutorial).
Ex: Name:
Dongle - XXXXXX
.
2. Access your device’s
AllShare Cast
screen and locate
the same hub/dongle name in the list.
•
Tap
Scan
if your AllShare Cast Hub (dongle) does not appear in
the list.
3. Verify your AllShare Cast Hub is on (blinking red LED)
and the on-screen tutorial is displaying on the
connected TV.
4. Verify the previous (
Wi-Fi Direct Active
) is
displayed.
LED Color/Patterns Description
Red - Solid
Indicates the AllShare Cast Hub is
booting or processing.
Red - Blinking
Indicates the AllShare Cast Hub is in
standby mode (ready for connection).
Blue - Solid
Indicates the AllShare Cast Hub is
ready to be connected with a new
device.
DRAFT
Internal Use Only
202
Note:
The AllShare Cast Hub communicates with your paired
device via a Wi-Fi Direct connection.
5. For a first time connection:
•
Press the
RESET
button (located at the rear of the hub) once
and only for a second until the LED turns solid
BLUE
.
•
Quickly tap the hub name entry on your device’s AllShare Cast
screen.
6. Verify (
AllShare Cast Hub Communicating
) appears
at the top of the device’s screen.
7. Confirm the connection by making sure both your TV
and device show the same image/screen and
(
Wi-Fi Direct Communicating
) now displays on the
device.
Important!
The AllShare Cast Hub is a 1-to-1 connection. If a
previous device was paired to the Hub and is still
connected to the AllShare Cast Hub, you can not
pair a new device until the first connection is
stopped.
To disconnect your device from the hub:
1. Access your device’s
AllShare Cast
screen and locate
the current connection.
2. Tap the entry and select
End connection
.
To reconnect your device again to an existing hub:
1. Locate the AllShare Hub (dongle) name displayed at the
bottom of the TV (showing the tutorial).
Ex: Name:
Dongle - XXXXXX
.
Important!
Verify the LED is not a solid blue. This indicates
there is another device currently connected.
2. Access your device’s
Screen Mirroring
screen and tap
the same hub/dongle name in the list.
3. Confirm the connection by making sure both your TV
and device show the same image/screen.

DRAFT
Internal Use Only
Multimedia 203
AllShare Cast Hub - Troubleshooting
Connections
•
If this is the first time you are connecting your device to a hub
and the connection fails:
•
Press the
RESET
button for 1 second until it turns solid
BLUE
.
•
Quickly tap the dongle name from within your device’s Screen
Mirroring screen.
Note:
This process is similar to initially pairing a Bluetooth
device.
•
If you have already successfully paired another device and you
are trying to connect another device:
•
Only one device can be paired and in use at a time with the
hub.
•
From the previously connected device’s Screen Mirroring
screen, tap the connection and select
End connection
.
•
If you can’t find the previous device:
–
Press and hold the
RESET
button (on the back of the hub),
for about FOUR seconds until the LED begins to blink
RED
.
–
Access your new device’s
Screen Mirroring
screen and rescan
for the existing hub/dongle.
–
Press the
RESET
button on the hub for ONE second until the
LED turns
BLUE
.
–
Tap the entry from your device’s
Screen Mirroring
screen and
confirm connection.
Important!
The AllShare Cast Hub is a 1-to-1 connection. If a
previous device was paired to the Hub and is still
connected to the AllShare Cast Hub, you can not
pair a new device until the first connection is
stopped.
•
I have a new device and the hub is connected but it doesn’t show
up in my list:
•
Force the hub to disconnect from any previously paired
devices:
–
Press and hold the
RESET
button (on the back of the hub),
for about FOUR seconds until the LED begins to blink
RED
.
–
Access your new device’s
Screen Mirroring
screen and rescan
for the existing hub/dongle.
–
Press the
RESET
button on the hub for ONE second until the
LED turns
BLUE
.
DRAFT
Internal Use Only
204
–
Tap the entry from your device’s
Screen Mirroring
screen and
confirm connection.
AllShare Cast Hub - Streaming Videos XXXX
The hub supports streaming of purchased media content that
contains DRM (Digital Rights Management).
Note:
You can control the volume level of your playback file
being shown on your TV by using your device’s Volume
buttons. For additional volume, use your TV’s volume
controls.
To stream video content to your Tv via AllShare Cast Hub:
1. Connect your AllShare Cast Hub to your TV. For more
information, refer to “Connecting AllShare Cast Hub”
on page 200.
2. Verify your TV is set to the same source as your hub
and that you can see the on-screen connection and
configuration tutorials.
3. From the Home screen, press and then tap
Settings
➔ (
Connections
tab)
➔
Screen
Mirroring
.
4. If not already on, tap the
Screen Mirroring
and then
move the slider to the right to turn it on. The slider
color indicates the activation status. A list of available
hubs will appear on the screen.
5. Press the
RESET
button on the back of the hub once
(LED turns blue) and tap the dongle entry from your
device’s list.
– or –
If reconnecting, verify the hub’s LED is blinking red and
then tap the dongle entry from your device’s list.
6. Verify (
AllShare Cast Hub Communicating
) appears
at the top of the device’s screen.
7. Verify the previous (
Wi-Fi Direct On
) now displays
(
Wi-Fi Direct Communicating
).
8. To playback a user-created video:
•
From the Home screen, tap (
Apps
)
➔
(
Gallery
).
•
Locate your video and tap it to begin playback. Your TV now
shows the video
DRAFT
Internal Use Only
Multimedia 205
9. To playback a DRM purchased video:
•
From the Home screen, tap (
Apps
)
➔
(
Gallery
). Locate your video and tap it to begin playback.
•
From the Home screen, tap (
Apps
)
➔
(
Play Movies & TV
). Locate your purchased video and
tap it to begin playback.
•
From the Home screen, tap (
Apps
)
➔
(
Samsung Video
). Locate your video and tap it to begin
playback.
T-Mobile TV
T-Mobile TV is an application that allows you to get live TV
and Video on Demand.
1. From the Home screen, tap (
Apps
)
➔
(
T-Mobile TV
). The T-Mobile Terms and Conditions
page displays.
Note:
A data plan is required to use this feature. Charges may
apply. Please contact your service provider for further
details.
2. Tap
Accept
if you accept the Terms and Conditions.
– or –
Tap
Exit
to close the application.
Note:
T-Mobile TV must be initialized over a cellular network
before it can be used. During this initial registration
process, any Wi-Fi connections must be disabled.
3. Tap
Disable Wi-Fi
if you currently have an active Wi-Fi
connection.
DRAFT
Internal Use Only
206
4. Tap
Start Trial
to begin a free 30-day trial of the
service.
– or –
Tap
Continue
to keep viewing the free content or
Purchase Options
to buy the paid features.
5. Tap any of the following categories to begin viewing:
Home
,
Live TV
,
TV Shows
,
Favorites
,
Help
,
Search
,
More
Info
,
Browse
,
or
Live Channels
.
YouTube
YouTube is a video sharing website on which users can
upload and share videos, and view them in MPEG-4 format.
1. From the Home screen, tap (
Apps
)
➔
(
YouTube
).
2. When the screen loads you can begin searching and
viewing posted videos.
3. Press ➔
Settings
➔
General
➔
High quality on
mobile
if you prefer high quality output.
DRAFT
Internal Use Only
Applications and Development 207
Section 9: Applications and Development
This section contains a description of each application that is
available in the Applications Menu, its function, and how to
navigate through that particular application. If the application
is already described in another section of this user manual,
then a cross reference to that particular section is provided.
Note:
This manual only addresses applications that have been
loaded on your [device/computer/tablet] as of the date
of purchase. Information concerning third party
applications that you may choose to download from the
Google Play Store or otherwise should be obtained from
the application provider directly.
Tip:
To open applications quickly, add the icons of frequently-
used applications to one of the Home screens. For more
information, refer to “Customizing the Screens” on page
60.
You can also add an application icon as a Primary
Shortcut that will display on all Home screens. If you add
an application as a primary shortcut, the application icon
will not be displayed in the Applications menu.
Applications
The Applications list provides quick access to all the
available applications on the phone.
Calculator
Using this feature allows you to use your device as a
calculator. The calculator provides the basic arithmetic
functions; addition, subtraction, multiplication, and division.
You can also use this as a scientific calculator.
1. From the Home screen, tap (
Apps
)
➔
(
Calculator
).
2. Enter the first number using the numeric keys.
3. Enter the operation for your calculation by tapping the
Plus, Minus, Multiplication,
or
Division
key.
4. Enter the next number.
5. To view the result, tap the
= (equals)
key.
6. Repeat steps 1 to 4 as many times as required.
Note:
Place the screen in Landscape mode to reveal additional
scientific functions.
DRAFT
Internal Use Only
208
Calendar
With this feature, you can consult the calendar by day, week,
or month, create events, and set an alarm to act as a
reminder. Google Calendar is built into the phone and
synchronizes both new and existing entries between your
phone and your online Google account.
Important!
You should previously add an account (Facebook,
Microsoft Exchange ActiveSync, or Google) prior to
using the Calendar.
1. From the Home screen, tap (
Apps
)
➔
(
Calendar
). The following tabs are available on
the right side of the display:
•Year
: displays the Year view.
•Month
: displays the Month view.
• Week
: displays the Week view.
•Day
: displays the Day view.
•List
: displays the events in a List view.
•Task
: allows you to search for tasks.
2. Tap (
Create event
) to create a new Calendar
event.
– or –
Tap
Today
to display the current date indicated by a
blue box, then press and select one of the
following options:
•Go to
: displays a specific date.
•Delete
: allows you to delete All events, All events before today,
or an individual event.
•Search
: allows you to search within your current events.
•Sync
: synchronizes your current calendar events with your
available accounts (such as Gmail, Microsoft Exchange
ActiveSync, etc..).
• Settings
: displays a list of configurable settings.
DRAFT
Internal Use Only
Applications and Development 209
Creating a Calendar Event
1. From the Home screen, tap (
Apps
)
➔
(
Calendar
).
2. Within the Year, Month, Week, and Day tabs,
(
Create event
) to create a new Calendar event.
Calendar Settings
Using the Calendar settings you can select the day with
which you want the calendar to begin. You also select how
you want to view the calendar, by Month, Week, or Day or
determine how to manage events, notifications, sounds, and
defaults reminders.
1. From the Home screen, tap (
Apps
)
➔ .
2. Press ➔
Settings
.
3. Tap
View styles
and select an option.
•
Tap
Month view styles
and select an option.
•
Tap
Week view
and select a type.
4. Tap
First day of week
and select either
Local default,
Saturday, Sunday
or
Monday
.
5. Tap
Hide declined events
to activate this option. A check
mark indicates selection.
6. Tap
Lock time zone
(to lock event time based on your
current user-selected time zone). Select a time zone
from within the
Select time zone
field.
7. Tap
Show week number
to display the week numbers
along the side of the week entries.
8. Tap
Calendars
and select the type of general
synchronization settings you want. A check mark
indicates selection.
9. Tap
Set alerts & notifications
to adjust the event
notification method. Choose from:
Alert
,
Status bar
notification
, and
Off
.
10. Tap
Select ringtone
to assign a ringtone to a calendar
event notification.
11. Tap
Vibration
to assign a vibration notification to this
event.
12. Tap
Quick responses
to edit your default quick
responses for outbound emails. These are default
responses similar to those used by text templates.
DRAFT
Internal Use Only
210
Camera
Use your 13.0 megapixel camera feature to produce photos
in a JPEG format. The Camcorder shoots High Definition video in
an MP4 format.
Note:
A microSD card is no longer necessary before you take
pictures or shoot video.
It is recommended that you confirm your default storage
location for images and videos.
From the Home screen, tap (
Apps
)
➔
(
Camera
).
For more information, refer to “Using the Camera” on page 162.
ChatON
Provides a global mobile communication service where you
can chat with more than 2 buddies via a group chat, In this
service you can send pictures, videos, animation messages
(Scribbles), audio, Contacts, Calendar entries, and Location
information. Create special animated messages for your
friends using handwritten messages, text, photos,
background images and music.
1. From the Home screen, tap (
Apps
)
➔
(
ChatON
).
2. Log in to the service and follow the on-screen
instructions.
For more information, visit:
https://web.samsungchaton.com
.
For more information, refer to “ChatON” on page 158.
DRAFT
Internal Use Only
Applications and Development 211
Chrome
The Google Chrome app allows you to use the Google
Chrome Web browser on your device.
1. From the Home screen, tap (
Apps
)
➔
(
Chrome
).
2. Read the Google Chrome Terms of Service and tap
Accept and Continue
.
3. If you have an existing Chrome account, tap
Sign in
to
bring your open tabs, bookmarks, and omnibox data
from your computer to your phone, otherwise tap
No
thanks
.
4. Follow the on-screen instructions to use Google
Chrome.
Clock
Here you can set an Alarm, configure and view the World
clock, use a Stopwatch, set a Timer, or use a Desk Clock.
The applications display in a tabular format and quickly
accessed with the touch of a finger.
From the Home screen, tap (
Apps
)
➔
(
Clock
).
Setting an Alarm
1. From the Home screen, tap (
Apps
)
➔
(
Clock
).
2. From the
Alarm
tab, tap (
Create alarm
).
3. Use the arrow symbols to enter adjust the hour, and
minutes, then tap
AM
or
PM
(toggles depending on
which was last selected).
4. Tap the
Alarm repeat
field and touch the number of
times you want this alarm to repeat. Selections are:
day blocks or
Repeat Weekly
. Selected day blocks turn
blue when active.
5. Tap the
Alarm type
field and select one of the following:
Melody
,
Vibration
,
Vibration and melody
, or
Briefing
.
DRAFT
Internal Use Only
212
6. Tap
More
to configure additional alarm settings such as
volume slider, Alarm tone, Location alarm, Snooze,
Smart alarm, and assign a name.
To configure additional alarm settings:
1. Tap
More
to access additional alarm settings.
2. Slide the slider bar left or right in the
Alarm volume
field
to decrease or increase the alarm volume. A sample of
the volume level plays.
3. Tap the
Alarm tone
field and either select an available
tone or select
Add
to use locate a sound to use as an
alarm ringtone. Tap
OK
to activate the ringtone.
4. Move the
Location alarm
slider to the right to activate
the feature, then follow the on-screen instructions to
enter a location. When activated, the alarm only
sounds when you are at a specific location.
5. Move the
Snooze
slider to the right to activate the
feature. Tap the field to assign a
Interval
time
(3 minutes, 5 minutes, 10 minutes, 15 minutes, or
30 minutes) and
Repeat
(1 time, 2 times, 3 times,
5 times, and 10 times).
•Interval
indicates the length of time the alarm will remain silent
between alarm notifications (snooze time).
• Repeat
indicates the numbers of snooze sessions that are
assigned to this alarm. How many times will the snooze silence
the alarm.
6. Move the
Smart alarm
slider to the right to activate this
feature which slowly increases screen brightness and
the volume of nature tones to simulate dawn breaking.
Tap the field to assign a interval time (3 min, 5 min,
10 min, 15 min, or 30 min) and nature tone (Fairy
fountain, Birdsong by the lake, Sparkling mist, The
secret forest, Serenity, or Gentle spring rain).
•Interval
category describes the length of time the alarm will
remain silent between alarm notifications (snooze time).
•Tone
category provides one of several nature sounds that are
used as the alarm tone.
7. Tap the
Name
field and enter a name for this Alarm.
8. Tap
Save
to store the new alarm event.
DRAFT
Internal Use Only
Applications and Development 213
Turning Off an Alarm
To stop an alarm when it sounds, touch and slide
to any direction.
Setting the Snooze Feature
To activate the Snooze feature after an alarm sounds,
touch and slide to any direction. Snooze must
first be set in the alarm settings.
Deleting an Existing Alarm
1. From the Home screen, tap (
Apps
)
➔
(
Clock
).
2. Touch and hold an on-screen alarm event.
3. Tap
Delete
.
World Clock
This feature allows you to find out what time it is another part
of world.
1. From the Home screen, tap (
Apps
)
➔
(
Clock
).
2. Tap the
World clock
tab.
3. Tap
Add city
then scroll and select the desired city, or
tap in the search field to locate a city.
To assign DST settings:
1. Locate a desired city from the World clock list.
2. Touch and hold a city and select
DST settings
.
3. Select a DST setting (Automatic, Off, or 1 hour).
If Daylight Savings Time is selected, a sun symbol
appears next to the World Clock city listing.
Stopwatch
This feature allows you to capture elapsed time while letting the
stopwatch keep running.
1. From the Home screen, tap (
Apps
)
➔
(
Clock
) ➔
Stopwatch
tab.
2. Tap
Start
to start the stopwatch counter.
3. Tap
Lap
to begin the lap time counter.
4. Tap
Stop
to stop the counter.
5. Tap
Restart
to restart the lap counter. You can have
multiple lap times.
6. Tap
Reset
to reset the counter.
DRAFT
Internal Use Only
214
Setting a Timer
1. From the Home screen, tap (
Apps
)
➔
(
Clock
) ➔
Timer
tab.
2. Tap the
Hours
,
Minutes
, or
Seconds
field and use the
on-screen keypad to enter the hour, minute, or
seconds. The timer plays an alarm at the end of the
countdown.
3. Tap
Start
to start the timer.
4. Tap
Stop
to stop the timer or
Reset
to reset the timer
and start over.
5. Tap
Restart
to resume the timer counter.
Configuring a Desk Clock
This feature lets you activate an on-screen clock that can be
viewed when the device is docked.
From the Home screen, tap (
Apps
)
➔
(
Clock
) ➔
Desk clock
tab. The default Desk clock
is displayed.
Note:
You might have to scroll across the tabs to locate the
Desk clock tab at the far right.
6. Tap to display the Desk clock in full-screen mode.
7. To make changes, press
and then tap
Settings
.
8. The following options are displayed while in full-screen
mode:
•Calendar
: when this is checked, the calendar is displayed. Tap
to uncheck.
• Weather
: when this is activated, the location, temperature, and
weather condition is displayed. Touch and slide the slider to the
right to turn it on.
•Dock
: allows you to set your Dock settings such as Dock
sound, Audio output mode, Desk home screen display,
Automatic unlock, and Audio output. For more information,
refer to
“Accessory”
on page 315.
Contacts
The default storage location for saving phone numbers to
your Contacts List is your phone’s built-in memory.
From the Home screen, tap (
Apps
)
➔
(
Contacts
).
For more information, refer to “Contacts List” on page 109.
DRAFT
Internal Use Only
Applications and Development 215
Downloads
Provides quick access to tabs containing a list of your current
downloaded files (Internet and Other).
1. From the Home screen, tap (
Apps
)
➔
(
Downloads
).
2. Tap an available file category tab (
Internet downloads
or
Other downloads
) and select the desired file.
Dropbox
Works to provide access to your desktop files directly from
your device. This applications allows you to bring your files
with you when you're on the go, edit files in your Dropbox
from your device, upload photos and videos to Dropbox, and
share your selected files freely with family and friends.
The in-device application works in conjunction with a partner
program placed on a target computer using an active Internet
connection.
Dropbox creates a folder that automatically synchronizes its
contents across all of your connected devices on your
account. Update a file to your Dropbox on your computer, and
its automatically updated to the same folder on your other
devices.
Download the Desktop application
1. Use your computer’s browser to navigate to:
http://www.dropbox.com/
.
2. Follow the on-screen setup and installation instructions
on your target computer containing the desired files.
Important!
The computer application must be installed on the
computer containing the desired files. This
computer must have an active Internet connection.
Note:
It might be necessary to configure your router’s firewall
settings to allow this application to gain access to the
Internet.
Accessing Dropbox on your Device
1. From the Home screen, tap (
Apps
)
➔
(
Dropbox
) ➔
Start
.
2. Tap
I’m already a Dropbox user
, enter your current
account credentials, and tap
Log in
.
– or –
Tap
I’m new to Dropbox
and follow the on-screen
instructions to register for a new account.

DRAFT
Internal Use Only
216
3. Follow the on-screen instructions.
4. Initially, you will need to configure your
Camera Upload
parameters. Choose from Wi-Fi only or Wi-Fi or data
plan.
•
Tap
Turn on
after making your selection.
Caution!
Enabling this feature can incur data charges
(depending on your plan) if the Wi-FI or data plan is
selected.
5. Tap (
Access Dropbox
) at the top of the application
window to access the files and folders you area
currently sharing from your computer.
6. Tap an item to open it.
7. Tap the bottom of the image to reveal additional
options:
•Delete
to erase the current file.
• Group into album
to group the currently selected files into a
new album.
•Share
via applications such as: Copy link, Bluetooth, ChatON,
Email, Flipboard, Gmail, Google, Messaging, S Memo, or
Wi-Fi Direct.
•More
to choose from options such as:
–
Open with
to open the current file with the default in-device
application.
–
Export
to transfer the current file to another location via:
Save to SD card, Bluetooth, ChatON, Email, Flipboard, Gmail,
Group Play, Messaging, Picasa, S Memo, or Wi-Fi Direct.
8. Tap (
Up a Directory Level
) at the top of the
application window to navigate up a single level with
every tap.
9. Tap (
Camera Uploads/Albums
) at the top of the
application window to access your Uploads and
Alumns tabs.
10. Tap (
Tag as Favorite
) at the top of the application
window to assign favorite files.
11. Tap (
Search
) at the top of the application window
to search for files located in your Dropbox account.

DRAFT
Internal Use Only
Applications and Development 217
Manually uploading a Picture to Dropbox
1. From the Home screen, tap (
Apps
)
➔
(
Camera
).
2. After the image is taken, tap the Image Viewer box at
the bottom right. This previews the current image.
3. Tap the image to reveal the image options at the top of
the screen.
4. Tap ➔ (
Dropbox
) select a folder location
and tap
Upload
.
Note:
If your share folder is located on your computer, you will
momentarily receive an on-screen popup notifying you
that a new image was uploaded to your shared Dropbox
folder.
Email
Email enables you to review and create email using most
email services. The device alerts you when you receive an
email message.
From the Home screen, tap (
Apps
)
➔
(
Email
).
For more information, refer to “Using Email” on page 145.
Flipboard
This application creates a personalized digital magazine out
of everything being shared with you. Access news stories,
personal feeds and other related material. Flip through your
Facebook newsfeed, tweets from your Twitter account,
photos from friends and much more.
1. From the Home screen, tap (
Apps
)
➔
(
Flipboard
).
2. Tap
Get started
, select some on-screen categories and
tap
Done
to create a new profile.
– or –
Tap
Sign In
to log into your previously created profile.
3. Follow the on-screen instructions.
DRAFT
Internal Use Only
218
Gallery
The Gallery is where you view photos and play back videos.
For photos, you can also perform basic editing tasks, view a
slideshow, set photos as wallpaper or caller image, and
share as a picture message.
From the Home screen, tap (
Apps
)
➔
(
Gallery
).
For more information, refer to “The Gallery” on page 178.
Gmail
Google Mail (Gmail) is a web-based email service. Gmail is
configured when you first set up your phone. Depending on
your synchronization settings, Gmail can automatically
synchronize with your Gmail account on the Web.
From the Home screen, tap (
Apps
)
➔
(
Gmail
).
For more information, refer to “Using Google Mail” on page
155.
Google
Use Google Search to search the Web.
From the Home screen, tap (
Apps
)
➔
(
Google
) and enter the search text.
– or –
Tap on the Google Search bar and say the search
information.
DRAFT
Internal Use Only
Applications and Development 219
Group Play
This application lets you share documents, photos or music
in real-time with other connected friends.
Note:
Group play is not the same as Screen mirroring which
requires a connection to a Wi-Fi capable Samsung TV or
via the use of the AllShare Cast Hub.
For more information, refer to “AllShare Cast Hub” on
page 200.
Important!
To share a Group Play, all users must be connected
to the same Wi-Fi access point.
1. From the Home screen, tap (
Apps
)
➔
(
Group Play
).
2. Read the various on-screen information and tap
Next
to
continue.
3. Follow the on-screen tutorials.
Creating a group
If you have media you want to share, create a group for other
users to join to and then share/collaborate wiht what you are
sharing.
The creator of the group is the leader and it the source of the
shared file. All other joined members can then interact with
the file being shared.
1. Connect to an active Wireless Access Point and confirm
your other participants are also connected to this same
Wi-Fi.
2. From the Home screen, tap (
Apps
)
➔
(
Group Play
).
3. Tap
Create group
. Mobile AP is enabled.
4. Tap one of the media items listed under the
Sharing
content
heading.
5. Tap to select the items you want to share (indicated by
a checkmark), then tap
Done
or
OK
.
6. Have your friends sign onto Group Play from their
devices and they can view your media using you as a
Mobile AP.
7. Your recipients must then:
DRAFT
Internal Use Only
220
•
Connect to the same WAP.
•
Launch the Group Play feature on their device.
•
Tap
Join
to connect to your session (shown at the bottom of the
application screen).
Joining a group
A joiner is the participant of an already created group. You
can only view and interact with media shared by the leader
of an existing group.
1. Connect to an active Wireless Access Point and confirm
your connection is this same Wi-Fi as the group leader.
2. From the Home screen, tap (
Apps
)
➔
(
Group Play
).
3. Tap
Join
. Your device then scans for available groups
for you to join.
4. Select a group to join. Once connected, you can then
see and interact with your group’s shared media.
5. Press and select
Help
for additional information.
Help
Provides access to built-in Help information.
1. From the Home screen, tap (
Apps
)
➔
(
Help
).
2. Select an on-screen topics for more information:
•New features
: provides help on all of the new features and
applications such as Air gesture, Air view, Group Play, etc.
•Get started
: provides basic information on using your device.
• Learn to use this application
: provides information on how to
use basic applications like Contacts, Email, S Memo, Internet,
Camera, etc.
• Changing important settings
: provides information on
settings for Wi-Fi, Bluetooth, Ringtone, Power saving mode,
NFC, Air gesture, Air view, Smart screen, and Motion.
• Online help
: provides more detailed online help for additional
questions you may have.
• Available accessories
: provides informaton on accessories for
your phone that are available for purchase.
DRAFT
Internal Use Only
Applications and Development 221
Internet
Open the browser to start surfing the web. The browser is fully
optimized and comes with advanced functionality to enhance the
Internet browsing feature on your phone.
From the Home screen, tap (
Apps
)
➔
(
Internet
).
For more information, refer to “Internet” on page 254.
Local
Local (formerly known as Google Places) displays company
logos on a layer of Google Maps. When viewing an area you
can quickly locate a business or person, find out more
information about the business, see coupons, public
responses, and more.
1. From the Home screen, tap (
Apps
)
➔
(
Local
).
2. Tap (
Search
) and then use the
Search Maps
field
to manually enter a desired place or choose from
among the various categories. Matches are filtered by
those closest to your current location.
3. Locate and tap one of the listed places (Restaurants,
Cafes, Bars, Attractions, [user added searches],
RECOMMENDATIONS, or IN THIS AREA a list of places
within this category displays.
4. Tap the Maps icon to launch the related maps feature.
5. Press and then tap
Add a search
. The functions
adds additional search shortcuts to the places screen.
DRAFT
Internal Use Only
222
Lookout Security
Lookout Security™ provides mobile device-specific security
features that are coupled with a minimal performance hit.
Lookout Mobile Security provides key security options that
are unique to the mobile market. Along with the antivirus and
anti-malware tech, there's a lost and stolen phone locator
service, an application privacy adviser, and a backup service.
1. From the Home screen, tap (
Apps
)
➔
(
Lookout Security
).
2. Tap
Next
.
3. Read the on-screen descriptions and activate those
desired features. Tap
Next
to progress to the next
screen
4. Tap
Done
to complete the setup.
5. Create a Lookout account by entering an email address
and account password.
6. Re-enter the password and tap
Start Protecting
.
Maps
Google Maps allow you to track your current location, view
real-time traffic issues, and view detailed destination
directions. There is also a search tool included to help you
locate places of interest or a specific address. You can view
locations on a vector or aerial map, or you can view locations
at the street level.
Important!
Before using Google Maps you must have an active
data (3G/4G/LTE) or Wi-Fi connection. The Maps
application does not cover every country or city.
From the Home screen, tap (
Apps
)
➔
(
Maps
).
Important!
For best results, it is recommended that you enable
all of your location services. For more information,
refer to “Location Services” on page 334.
DRAFT
Internal Use Only
Applications and Development 223
Enabling a Location source
Before you use Google Maps and find your location or search
for places of interest, you must enable a location source. To
enable the location source you must enable the wireless
network, or enable the GPS satellites.
Important!
The more location determining functions are
enabled, the more accurate the determination will
be of your position.
1. From the Home screen, press and then tap
Settings
➔ (
More
tab) ➔
Location services
.
2. Tap
Use GPS satellites
to enable the GPS satellite.
3. Tap
Use wireless networks
to alllow apps to use data
from sources such as Wi-Fi and mobile networks to
provide a better approximation of your current location.
4. Tap
My places
to enable the storage of your favorite
locations.
To receive better GPS signals, avoid using your device in the
following conditions:
•
inside a building or between buildings
•
in a tunnel or underground passage
•
in poor weather
•
around high-voltage or electromagnetic fields
•
in a vehicle with tinted windows
Opening Maps
1. From the Home screen, tap (
Apps
)
➔
(
Maps
).
2. Tap the upper-right My location button to find your
location on the map with a blinking blue dot.
3. Locate the bottom row of the buttons to access
additional options:
•Search
: allows you to search for a place of interest.
• Directions
: displays navigation directions to a location from a
starting point.
•Local
: provides access to the places menu where you can
quickly locate a business or person, find out more information
about a business, see coupons, public responses, and more
(Local). Locate and tap one of the listed places (Restaurants,
Cafes, Bars, Attractions, or select from available categories
such as Entertainment, ATMs, Gas stations, Hotels, Post office,
or Taxi.)

DRAFT
Internal Use Only
224
•Layers
: allows you to switch map views:
–
Traffic
: (available only in selected areas) Real-time traffic
conditions are displayed over roads as color-coded lines. Each
color represents how fast the traffic is moving.
–
Satellite
: Maps uses the same satellite data as Google Earth.
Satellite images are not real-time. Google Earth acquires the
best imagery available, most of which is approximately one to
three years old.
–
Terrain
: combines a topographical view of the area’s terrain
with the current map location.
–
Transit Lines
: displays the overlapping transit lines on your
map.
–
Latitude
: allows you to see your friend's locations and share
your location with them.
–
My Maps
: displays a list of your preferred maps.
–
Bicycling
: displays the overlapping cycling trails on your map.
–
Wikipedia
: displays any Wikipedia markers and info on your
map.
4. Press and select one of the following options:
•Clear Map
: allows you to remove all markings and layers from
the map.
• Make available offline
: allows you to store map-related
information locally on your device and access it even when the
device is offline.
• Settings
: allows you to select the following additional options:
–
Display
: allows you to enable/disable the Zoom Buttons, Scale
Bar, and Bubble action.
–
Offline and cache
: allows you to set options to pre-fetch map
tiles when not using Wi-Fi and to clear the cache that holds the
map tiles. Choose from: Automatic caching, Clear all map titles,
or Clear My Places cache.
–
Location settings
: lets you access and configure the location
settings.
–
Sign in
: allows you to sign into your current Google account.
–
Labs
: this is a testing ground for experimental features that
aren’t ready for primetime. They may change, break or
disappear at any time. Click on a Lab to enable or disable it.
–
What’s New
: provides access to the Play Store from where you
can update the application manually.
DRAFT
Internal Use Only
Applications and Development 225
–
About
: displays general information about Google maps such
as Version, Platform, Locale, Total data sent, Total data received,
Free memory, etc.
–
Feedback
: allows you to provide application feedback.
–
Terms, Privacy & Notices
: displays the Terms and Conditions,
Privacy Policy, or Legal Notices information. Select the desired
information from the pop-up menu.
•Help
: provides help information.
Messaging
This application allows you to use the Short Message Service
(SMS) to send and receive short text messages to and from
other mobile phones.
You can also use the Multi Media Service (MMS) to create
multimedia messages to send and receive from other mobile
phones.
From the Home screen, tap (
Apps
)
➔
(
Messaging
).
For more information, refer to “Messages” on page 131.
Mobile HotSpot
Provides access to the Tethering and Mobile HotSpot menu
where you can use either the USB tethering or portable
HotSpot functionality.
1. From the Home screen, tap (
Apps
)
➔
(
Mobile HotSpot
).
2. Activate the desired connection method.
For more information see either"USB Tethering"on page 271
or "Mobile HotSpot"on page 272.
Music Player
This application allows you to play music files that you have
stored on your microSD card. You can also create playlists.
From the Home screen, tap (
Apps
)
➔
(
Music player
).
For more information, refer to “Music Player XXX” on page
191.
DRAFT
Internal Use Only
226
My Files
This application allows you to manage your sounds, images,
videos, bluetooth files, Android files, and other memory card
data in one convenient location. This application allows you
to launch a file if the associated application is already on
your phone (ex: MP4).
From the Home screen, tap (
Applications
)
➔
(
My files
).
Note:
Navigation in this viewer works on a hierarchy structure
with folders, subfolders, etc.
Note:
The application lets you view supported image files and
text files on both your internal storage and microSD
card.
Opening and Navigating within Files
DCIM is the default location for pictures or video taken by the
device. These files are actually stored in the DCIM folder
location.
To open files:
1. From the Home screen, tap (
Applications
)
➔
(
My files
).
2. Tap a folder and scroll down or up until you locate your
selected file.
•Home tab
allows you to back up to the root directory.
•Up tab
allows you to back up into a higher directory.
•
Press and then tap
View by
to change the way the files
are displayed on-screen. Choose from:
List
,
List and details
,
or
Thumbnail
.
•
Press
for these additional options:
Select all
,
Create folder
,
Delete
,
Search
,
View by
,
Sort by
, and
Settings
.

DRAFT
Internal Use Only
Applications and Development 227
To navigate:
1. Tap
All files
➔
SD memory
to see the contents of your
internal SD card.
2. The following folders may display:
• AllsharePlayLog
: displays the different files, agents, and
uploaders that are used with the optional AllShare Cast dongle.
•Alarms
: this folder contains any alarm files you may have.
•Android
: the Android folder stores files that are used in Android
applications.
•Application
: this folder contains app info for S Memo.
• Bluetooth
: this folder stores files sent via a Bluetooth device.
•DCIM
: this is the default location for pictures and videos taken
by the device. Tap
DCIM
➔
Camera
to view the picture or
video files.
• Download
: this folder contains downloads you have made.
•Movies
: this folder contains your Video and Movie files.
•Music
: this folder contains your Music files.
• Notifications
: this folder contains all of the notifications you
have received.
•Pictures
: this folder contains your photos.
•Podcasts
: this folder contains all of your podcasts.
•Ringtones
: this folder contains any ringtones you have
purchased.
•S Memo
: this folder contains all the the S Memos you have
written.
Note:
Different folders may appear depending on how your
phone is configured.
3. If you have an external SD card inserted, tap
SD
memory card
to see the contents of your external SD
card (memory card).
4. Once you have located your file, tap the file name to
launch the associated application.
DRAFT
Internal Use Only
228
Navigation
Google Maps Navigation (Beta) is an internet-connected
turn-by-turn, GPS navigation system with voice guidance.
Caution!
Traffic data is not real-time and directions may be
wrong, dangerous, prohibited, or involve ferries.
Important!
To receive better GPS signals, avoid using your
device in the following conditions:
- inside a building or between buildings
- in a tunnel or underground passage
- in poor weather
- around high-voltage or electromagnetic fields
- in a vehicle with tinted windows
1. From the Home screen, tap (
Apps
)
➔
(
Navigation
).
2. Read the on-screen disclaimer regarding the current
release status of the Navigation app and tap Accept.
Enabling Location
1. From the Home screen, press and then tap
Settings
➔ (
More
tab) ➔
Location services
.
2. Tap
Use GPS satellites
to enable the GPS satellite.
3. Tap
Use wireless networks
to alllow apps to use data
from sources such as Wi-Fi and mobile networks to
provide a better approximation of your current location.
4. Tap
My places
to enable the storage of your favorite
locations.
Navigation options
1. From the Home screen, tap (
Apps
)
➔
(
Navigation
). The navigation application can be
configured from the main screen.
2. If prompted, read the on-screen disclaimer and tap
Accept
.
3. Choose from the following on-screen options:
• Driving/Walking/Bicycling
: tap to configure the
method of travel. Selection of Walking would negate the need
to track traffic jams and obstructions.
• Speak destination
: allows you to use the voice recognition
feature to search for matching locations in your area.

DRAFT
Internal Use Only
Applications and Development 229
• Type destination
: allows you to manually enter a destination
address (via the on-screen keypad).
•Go home
: allows you to return to a designated “Home”
location.
–
When prompted initially to setup a home address, enter the
location into the
Enter an address
field and tap Save.
•Map
: enables the on-screen real-time map functionality.
Navigation Map options
Once on the map screen, you can access the following
features:
•
Destination
: returns you to the previous Navigation options
screen.
•
Search by voice
: Speak your destination instead of typing.
•
Layers
: allows you to switch map views:
• Traffic view
: (available only in selected areas) Real-time traffic
conditions are displayed over roads as color-coded lines. Each
color represents how fast the traffic is moving.
•Satellite
: Maps uses the same satellite data as Google Earth.
Satellite images are not real-time. Google Earth acquires the
best imagery available, most of which is approximately one to
three years old.
• Parking
: displays parking information relative to your current
location.
• Gas stations
: displays gas station location relative to your
current location.
•ATMs & banks
: displays ATM and Bank locations relative to
your current location.
• Restaurants
: displays restaurant and eatery locations relative
to your current location.
While on the map screen, press to access additional
options:
•
Set destination
: returns you to the navigation options screen
where you can access a destination by either Speaking, Typing, or
selecting from a Contacts entry or Starred Place.
•
Search
: manually search for a destination address, place, name
of business, or even a type of business.
•
Layers
: allows you to switch map views. See previous
description.
•
Settings
: provides access to both Power settings (Screen
dimming) and Information (Terms, privacy & notices).
•
Exit navigation
: terminates the application.
•
Help
: provides on-screen help.

DRAFT
Internal Use Only
230
Phone
This application provides the ability to make or answering
calls, access the Contacts list, which is used to store contact
information.
From the Home screen, tap (
Phone
).
For more information, refer to “Call Functions and Contacts
List” on page 71.
Photo Reader
The Photo reader allows you to use your camera to identify
text (via definitions) and extract useful information.
1. From the Home screen, tap (
Apps
)
➔
(
Photo Reader
).
2. ???? Presently having trouble with Photo Reader
???XXX
Play Books
Formerly known as Google Books, this application allows you
to read over 3 million ebooks on the go.
Build your ebooks library in the cloud with Play Books: jump
right into a bestseller or select from nearly 3 million free
ebooks. Personalize the reader to your liking, pick up reading
where you left off on your phone or computer, and settle
down with a great book on your Android phone!
Note:
You must logged into your Google account prior to using
this feature.
1. From the Home screen, tap (
Apps
)
➔
(
Play Books
).
2. If prompted, tap
Turn sync on
. This synchronizes your
books you have previously selected between your
Books account and your device.
3. Tap to begin searching for both free and paid
ebooks.
4. Follow the on-screen prompts to download the ebook
to your device.
DRAFT
Internal Use Only
Applications and Development 231
Play Magazines
With Google Play Magazines, you can subscribe to your
favorite magazines and have them available to read on your
device at any time or any place.
1. From the Home screen, tap (
Apps
)
➔
(
Play Magazines
).
2. Log on to your Google account if you have not already
done so. For more information, refer to “Signing into
Your Google Account” on page 19.
3. At the Welcome! display, tap the shop icon to
browse the full catalog.
4. Read the Google Play Terms of Service and tap
Accept
.
5. Sweep the screen to the left or right to view
Categories, Featured, Top Selling, and New Arrivals.
6. Tap a magazine to see more information and
subscribe.
7. Follow the on-screen instructions to subscribe to a
magazine.
Play Movies & TV
This application allows you to connect to the Play Store,
download a movie and then watch it instantly.
Note:
You must logged into your Google account prior to using
this feature.
Learn more about Google Play Movies at:
http://play.google.com/about/movies
.
From the Home screen, tap (
Apps
)
➔
(
Play Movies & TV
). A list of videos sorted on the
SD card displays in the Video list.
For more information, refer to “Play Movies & TV” on page
185.

DRAFT
Internal Use Only
232
Play Music
Also known as Google Music, allows you to browse, shop,
and playback songs purchased from the Play Store. The
music you choose is automatically stored in your Google
Music library and instantly ready to play or download.
From the Home screen, tap (
Apps
)
➔
(
Play Music
).
For more information, refer to “Play Music XXX” on page
186.
Play Store
Formerly known as the “Android Market”, this application
provides access to downloadable applications and games to
install on your phone. The Play Store also allows you to
provide feedback and comments about an application, or flag
an application that might be incompatible with your phone.
Before using the Play Store, you must have a Google
Account.
Accessing the Play Store
1. From the Home screen, tap (
Apps
)
➔
(
Play Store
).
2. If not already logged in with your Google account, tap
Next
.
3. Tap
Existing
and enter your Google account
information.
4. Tap
Accept
to agree to the Play Store terms of service.
Downloading a New Google
Application
To download a new application, you will need to use your
Google account to sign in to the Play Store. The home page
provides several ways to find applications. The home page
features applications and includes a list of item applications
by category, a list of games, a link to search, and a link to My
apps.
1. From the Home screen, tap (
Apps
)
➔
(
Play Store
).
2. Browse through the categories, find an application
you're interested in, and tap the name.
3. Read the application descriptions.

DRAFT
Internal Use Only
Applications and Development 233
Important!
If the selected application requires access to data
or control of a function on your device, the Play
Store displays the information the application will
access.
Tap
OK
if you agree to the conditions of the
application. Once you tap
OK
on this screen you are
responsible for using this application on the device
and the amount of data it uses. Use this feature
with caution.
4. Tap
Install
➔
Accept & download
.
Note:
Use caution with applications which request access to
any personal data, functions, or significant amounts of
data usage times.
5. If prompted, follow the on-screen instructions to pay
for the application.
6. Check the progress of the current download by
opening the Notifications panel. The content download
icon appears in the notification area of the status
bar.
7. On the main Play Store screen, press and then tap
My Apps
, tap an installed application in the list, and
then tap
Open
.
Tip:
The newly downloaded applications display in the
applications list and are shown in alphabetical order if the
View Type is set to Alphabetical grid or Alphabetical list, or
at the end of the list if View type is set to Customizable
grid.
Note:
A data plan is required to use this feature. Charges may
apply. Please contact your service provider for further
details.
DRAFT
Internal Use Only
234
Launching an Installed Google
Application
1. From the Home screen, tap (
Apps
).
2. Tap the newly installed application. This application is
typically located on the last Applications page.
Unknown sources
This feature can be used for Android application
development. The feature allows developers to install
non-Play Store applications.
From the Home screen, press and then tap
Settings
➔ (
More
tab) ➔
Security
➔
Unknown
sources
.
Unknown sources displays a check mark to indicate it
is active.
Note:
If Unknown sources is disabled, those applications
without a certificate will not be allowed to download to
your device.
Manage applications
This feature allows you to manage and remove installed
applications. You can also view the amount of memory or
resources used as well as the remaining memory and
resources for each of the applications on your device and
clear the data, cache, or defaults.
From the Home screen, press and then tap
Settings
➔ (
More
tab) ➔
Application manager
.
Clearing application cache and data
1. From the Home screen, press and then tap
Settings
➔
More
tab ➔
Application manager
.
2. Tap an application in which to clear the cache or data.
3. Tap
Force stop
,
Uninstall, Clear data
,
Clear cache
, or
Clear defaults
.
Uninstalling third-party applications
You can uninstall any application you downloaded and
installed from the Play Store.
1. From the Home screen, press and then tap
Settings
➔
More
tab ➔
Application manager
➔
ALL
.
2. Tap the third-party application, and from the
Application info
screen, tap
Uninstall
.

DRAFT
Internal Use Only
Applications and Development 235
Polaris Office 5.0
Polaris Office Mobile for Android is a Microsoft Office
compatible office suite. This application provides a central
place for managing your documents online or offline.
The application can also open Adobe PDF (Portable
Document Format) files.
1. From the Home screen, tap (
Apps
)
➔
(
Polaris Office 4.0
).
2. From the Registration screen, enter your Email
information (if desired) and tap
Register
to complete
the process.
– or –
Tap
Skip
to ignore this registration. The main Polaris
Office screen displays.
3. Follow the on-screen instructions to use Polaris Office.
4. On its initial launch, navigate the application to begin
use:
•Samples
: Provides access to sample Word, PowerPoint, and
Excel files.
•New
: creates a new office document.
• Recent documents
: provides a scrollable list of recently
accessed documents.
• File Browser
: allows you to search on your device and SD card
for compatible documents.
•Form type
: allows you to quickly access your documents
based on file type. Each type is separated into several available
tabs located at the bottom of the screen, such as: Word, Excel,
PowerPoint, Other, and PDF.
•Favorites
: allows you to list only those documents tagged as
Favorite.
•View Together
: once connected to the same Wi-Fi, you can
share or collaborate with other Polaris users.
DRAFT
Internal Use Only
236
S Health
S Health is a wellness application that allows you to better
manage your health by providing you with relavant
information.
1. From the Home screen, tap (
Apps
)
➔
(
S Health
).
2. Read the introduction and tap
Next
.
3. Read the Terms and conditions information, place a
checkmark in the
Agree
checkbox.
4. Tap
Next
.
5. Enter your personal information, then tap
Start
.
6. Follow the on-screen instructions to use S Health.
7. Tap ➔
Guide
for more detailed information.
S Memo
The S Memo application allows you to create memos using
the keypad, your finger, or both. You can add images, voice
recordings, and text all in one place.
Creating a New Memo
1. From the Home screen, tap (
Apps
)
➔
(
S Memo
). The S Memo screen is displayed.
2. Tap an existing Memo to open it then tap the screen to
enter edit mode.
– or –
Tap to start a new memo in text mode with the
keypad displayed or tap to start a new memo in
drawing mode using your finger or a compatible
on-screen writing tool. You can change back and forth
in a memo to add text with the keypad and the pen.
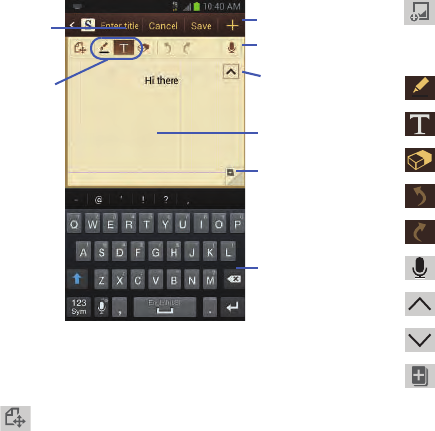
DRAFT
Internal Use Only
Applications and Development 237
The icons that you see displayed on the screen are described
in the following table:
SAVE
Saves the current memo and creates a new one.
Changes the view mode.
Toolbar
Secondary
Show/Hide
Add Page
Writing area
Secondary
Add Title
Writing
Modes
Keyboard
Toolbar
Toolbar
Provides access to a quick selection bar. Choose from:
Take picture, Images, Clipboard, Maps, Clip art. These
elements can be used within the memo.
Allows you to add free-format drawing.
Displays the keypad to you can add text.
Eraser tool allows you to erase marks and drawings.
Undo the last action.
Redo the last action that was undone.
Make a voice recording to add to the memo.
Hide the secondary toolbar.
Show the secondary toolbar.
Add an additional page to the memo.
DRAFT
Internal Use Only
238
3. Press to access the following options:
Note:
Depending on whether you have saved the memo, are in
keypad mode, or in handwriting mode, the options will
appear differently. The following is a list of the options
you may see.
•Share via
: allows you to share your memo as either an Image
file, PDF file or S Memo file (.snb) via Group Play, Wi-Fi Direct,
Bluetooth, ChatON, Dropbox, Flipboard, Picasa, Messaging,
Gmail, or Email.
•Delete
: allows you to delete the S Memo.
•Export
: allows you to save the memo to your Gallery as either
an Image file or PDF file.
•Save as
: allows you to save the memo with a different name.
•Add tag
: allows you to set tags to add in searches.
•Add as favorite
: allows you to tag the current memo as a
favorite.
• Change background
: allows you to set the background for
your memo. Swipe the screen to the left or right to select a
background and then tap
Done
.
• Create event
: allows you to link the memo to your Calendar
events.
•Set as
: allows you to set a memo as a Contact icon, Home
screen wallpaper, Lock screen wallpaper, or Home and Lock
screens.
•Print
: allows you to print the screen or web page on a
Samsung printer using Wi-Fi.
When you are finished creating your memo, tap
Save
on the
top menu bar.
DRAFT
Internal Use Only
Applications and Development 239
S Translator
Allows you can easily translate words and phrases (verbal or
text meesages) into many different languages.
Note:
Access to this feature requires that you already be
logged in to your Samsung account application. For
more information, refer to “Creating a Samsung
Account” on page 21.
1. From the Home screen, tap (
Apps
)
➔
(
S Translator
).
2. Sign in with your Samsung Account if you have not
already done so.
3. At the Translator screen, tap the top language bar to
select your language. Default is English (US).
4. Tap the language bar in the middle of the screen to
select the language that you would like to translate to.
5. Enter text into the top box and it will automatically be
translated into the lower box.
6. Tap the
Speak
button at the bottom of the screen to
translate using your voice.
7. Press for additional options.
S Voice
Launches your phone’s built-in voice recognition system that
allows you to initiate several common tasks without having
to touch the phone. Features include: Call, Text, Navigate,
Play music, Memo, and Driving mode.
From the Home screen, tap (
Apps
) ➔
(
S Voice
).
For more information, refer to “Using S Voice” on page 90.
DRAFT
Internal Use Only
240
Samsung Apps
Allows you to easily download an abundance of applications
that are directly compatible with your device. This includes
games, news, reference, social networking, navigation, and
more. Samsung Apps makes your Smartphone smarter.
Note:
Access to this feature requires that you already be
logged in to your Samsung account application. For
more information, refer to “Creating a Samsung
Account” on page 21.
1. Confirm you are currently signed into your Samsung
account.
2. From the Home screen, tap (
Apps
)
➔
(
Samsung Apps
).
3. If prompted, read the Disclaimer, Terms and conditions,
and Privacy policy and tap
Accept
.
4. Follow the on-screen instructions.
Samsung Hub
Samsung Hub is Samsung’s integrated store for media
content that offers a comprehensive and consistent media
service experience. You can browse and purchase all media
content within a single store front.
Note:
Access to this feature requires that you already be
logged in to your Samsung account application. For
more information, refer to “Creating a Samsung
Account” on page 21.
1. From the Home screen, tap (
Apps
)
➔
(
Samsung Hub
). For more information, refer to
“Samsung HubXXX” on page 182.
2. If a Wi-Fi connection is not detected, tap
Connect
to
use your current mobile network.
Note:
Using your mobile network may result in additinal
charges depending on your payment plan.

DRAFT
Internal Use Only
Applications and Development 241
3. Use your fingers to scroll across the available Samsung
Hub screen. You can select
Combined view
(Music,
Video, Books, and Games),
Music
,
Video
,
Books
, or
Games
.
4. Follow the on-screen instructions to browse, view, or
purchase media.
5. Press ➔
Help
for additional information.
Samsung Link
This application wirelessly synchronizes your Samsung
mobile phone with your TV, streams content and even keeps
tabs on who calls or sends text messages with real-time,
on-screen monitoring. Samsung’s AllShare makes staying
connected easy.
Allows users to share their in-device media content with
other external devices using DLNA certified™ (Digital Living
Network Alliance) Devices. These external devices must also
be DLNA-compliant. Wi-Fi capability can be provided to TVs
via a digital multimedia streamer.
AllShare Definitions:
Samsung Link/
AllShare Play
This new feature builds on the
previous AllShare Play functionality. It
includes features such as Web storage
integration and social networking
integration. This is a Web service
that requires using a Samsung account.
Group Play
A subset feature of Samsung Link, this
allows you to mirror photos and
multimedia presentations with other
members of your current Wi-Fi
group. Users must be on the same
Wi-Fi and provide an access code to
join the group.
AllShare Cast
(with Hub
accessory)
This feature functions with an
external AllShareCast Hub to fully
mirror what is currently displayed on
your device to the external TV.
DRAFT
Internal Use Only
242
Important!
You must first connect both of your communicating
devices to the same Wi-Fi and be using an
active/registered Samsung account prior to using
this application.
For more information, refer to “Wi-Fi settings” on
page 276.
For more information, refer to “Creating a
Samsung Account” on page 21.
Important!
The Samsung account manages the access
information (username/password) to several
applications, such as Samsung Link.
1. From the Home screen, tap (
Apps
)
➔
(
Samsung Link
).
2. If prompted, read the on-screen message about
network charges and tap
OK
to continue and return to
the main screen.
3. If prompted, tap
Sign in
to log into your Samsung
account.
Note:
If the main screen still shows a Sign in box, close the
application and restart it.
4. Tap
Start
and follow the on-screen prompts.
For more information, refer to “Samsung Link” on page 196.
Samsung Video
The Video player application plays video files stored on your
microSD card.
From the Home screen, tap (
Apps
)
➔
(
Samsung Video
).
For more information, refer to “Using Samsung Video” on
page 179.
DRAFT
Internal Use Only
Applications and Development 243
Samsung WatchON
With the Samsung WatchON application, you can use your
phone as a remote control for your TV.
Note:
Access to this feature requires that you already be
logged in to your Samsung account application. For
more information, refer to “Creating a Samsung
Account” on page 21.
5. From the Home screen, tap (
Apps
)
➔
(
Samsung WatchON
).
6. If prommpted, read the Terms of use and tap
Accept
.
7. The first time you use Samsung WatchON, tap
Set up
.
8. Follow the on-screen instructions to set up your
Samsung WatchON application.
9. Tap
Power
to turn on your TV set.
10. At the
Setup
prompt, tap
Yes
if your TV turned on
otherwise, tap
No
or
Retry
.
??XXX? Need more testing ?XXX??
Settings
This icon navigates to the sound and phone settings for your
phone. It includes such settings as: display, security,
memory, and any extra settings associated with your phone.
From the Home screen, tap (
Apps
)
➔
(
Settings
).
– or –
Press ➔ and then tap
Settings
.
For more information, refer to “Changing Your Settings” on
page 275.
Story Album
With Story Album, you can create a digital Album of your
story in media. Special moments will be on a timeline, and if
you wish, you can have your album published as a hard copy.
1. From the Home screen, tap (
Apps
)
➔
(
Story Album
).
2. Read the introductory information and tap
Next
.
3. Tap
Start
to begin your Story Album.
4. Follow the on-screen instructions.
5. Press and then tap
Help
for additional
information.
DRAFT
Internal Use Only
244
T-Mobile My Account
This application provides you online access to account
information such as your current activity, billing information,
service plans, downloads, and other information.
Note:
Wi-Fi connection must be disabled prior to use, this
application requires use of a T-Mobile network
connection.
1. From the Home screen, tap (
Apps
)
➔
(
T-Mobile My Account
).
2. If prompted, follow the on-screen information for
what’s new in the app.
Note:
Some features may require you to log into your account.
3. The application screen provides several available
options:
• Account Info
provides access to account-specific features
such as: Notifications.
• Device Support
provides details about your current billing
summary.
• Notifications
provides about both your current plan, other
available plans and other related services.
• MobileLife FamilyWhere
provides links to other T-Mobile
related information.
T-Mobile Name ID
Allows you to modify the on-screen Caller ID information.
Name ID identifies unknown callers by Name, City, and State.
1. From the Home screen, tap (
Apps
)
➔
(
T-Mobile Name ID
).
2. Choose an on-screen option.
T-Mobile TV
T-Mobile TV is an application that allows you to get live TV
and Video on Demand.
From the Home screen, tap (
Apps
)
➔
(
T-Mobile TV
).
For more information, refer to “T-Mobile TV” on page 205.
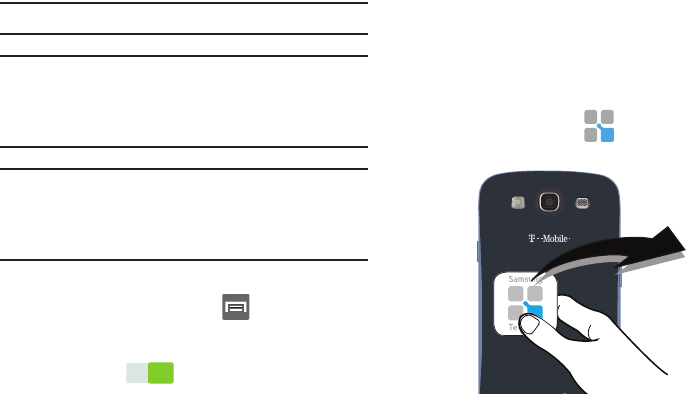
DRAFT
Internal Use Only
Applications and Development 245
TecTiles XXX
Although not installed by default, this application works with
TecTiles to automatically change settings, launch selected
applications, or many other useful features.
Note:
TecTiles are sold separately.
Important!
If the application is not already installed, and you
swipe a programmed TecTile, the device detects it
as a tag and initiates the action via the built-in
tectile command.
Important!
Although not installed by default, once you swipe
your first new (unprogrammed) TecTile, you are
taken to the Play Store where you can begin
installation of the app.
Turning on the NFC feature:
1. From the Home screen, press and then tap
Settings
➔
Connections
tab.
2. Tap the
NFC
field and verify the feature is active
(indicated by ).
Installing the TecTile application:
1. Tap the back of the device to a TecTile to automatically
be directed to the Play Store’s TecTile application and
select
Install
➔
Accept & download
. If you do not
already have it, follow the on-screen instructions to
download it from the Play Store.
– or –
Navigate to the Play Store, search for and install the
TecTile
application.
2. Verify the TecTile app ( ) appears within the
Applications screen.
ON
ON

DRAFT
Internal Use Only
246
Programming your TecTile
1. Ensure NFC feature is on and the TecTile app is loaded
on your device.
2. Launch the TecTile application ( ).
3. Read the on-screen information and tap
OK
.
4. Select the TecTile type and the action. Choose from:
• Settings & Apps
: creates a TecTile that will change device
settings or launch an application. Choose from: Change Phone
Settings, Switch Phone Profiles, Launch an App, Toggle Music
Playback, Join a WiFi Network, Show a Reminder Note, or Play
a Track.
• Phone & Text
: creates a TecTile that will either call or text a
designated recipient. The outgoing text message can also be
pre-programmed into the TecTile. Choose from: Make a Call,
Send a Text Message, Send an Email Message, Share a
Contact, Start a Google Talk Conversation, or Forward Calls.
•
Location & Web
: creates a TecTile that shares either a Web
page or address, or checks you in on a social network
application. Choose from: Show an Address or Location,
Foursquare Check In, Facebook Check In, Show a Google
Place, Send a Glympse, Open a Web Page, or Save a
Bookmark.
•Social
: creates a TecTile that updates your social network.
Choose from Update Facebook Status, Facebook Share, Tweet
a Status, Follow a Twitter User, Update Google+ Status, or
Connect on LinkedIn. XXXX????
5. Follow the on-screen programming instructions.
6. Once you have configured and programmed your
TecTile action, hold the device over your TecTile to
upload the new programming information.
7. Place the TecTile in a convenient location.
Note:
TecTiles do not work on metal surfaces.
For more information, visit us at:
www.samsung.com/us/tectile
.
DRAFT
Internal Use Only
Applications and Development 247
To program your TecTile to send a text message:
1. From the Home screen, tap (
Apps
)
➔
(
TecTile
).
2. Select
Phone & Text
➔
Send a Text Message
.
3. Fill in the
Recipient’s Number
and
Recipient’s Name
fields with your contact information.
•
This is used as the To address for the new outgoing text
message that is sent when a user swipes their device over the
TecTile.
4. Enter a text message into the
Message Content
field.
•
For example, if you wanted your child to send you a text
message when they get home, the TecTile would be
programmed to send you a new text message to your cell
number with the message string “ I’m Home”.
5. Tap
Next
➔
Program TecTile
.
Important!
You must tap
Program TecTile
to begin the
programming process before placing the device
over the TecTile.
6. Place the device over the TecTile to program the action
into the TecTile.
7. Confirm the TecTile is functioning properly and place it
on its new location.
To program your TecTile to join you to a Wi-Fi network:
1. From the Home screen, tap (
Apps
)
➔
(
TecTile
).
2. Select
Settings & Apps
➔
Join a WiFi Network
.
3. Tap (
Connect to Wi-Fi
) to locate the name of a
desired Wi-Fi Access Point.
4. Enter the SSID information (name of the Wi-Fi).
5. Select the Network security type and enter your
password.
6. Tap
Next
➔
Program TecTile
.
Important!
You must tap
Program TecTile
to begin the
programming process before placing the device
over the TecTile.
7. Place the device over the TecTile to program the action
into the TecTile.
8. Confirm the TecTile is functioning properly and place it
on its new location.

DRAFT
Internal Use Only
248
Talk
You can instant message with Google Talk. Google Talk
allows you to communicate with other people who are also
connected with Google Talk on the phone or on the web.
From the Home screen, tap (
Apps
)
➔
(
Talk
).
For more information, refer to “Google Talk” on page 157.
TripAdvisor
With the TripAdvisor, you can plan and have your perfect trip.
With over 75 million reviews and opinions by travelers, it is
easy to find the best hotels, restaurants, and fun things to do.
1. From the Home screen, tap (
Apps
)
➔
(
TripAdvisor
).
2. Sign in with your Samsung Account if you have not
already done so.
3. Follow the on-screen instructions to use TripAdvisor.
4. Press for additional options.
Task Manager
Sometimes your phone might seem to slow down over time, and
the biggest reason for this are background applications. These
are applications that were not properly closed or shutdown and
are still active but minimized. The Task Manager not only lets you
see which of these applications are still active in the background
but also easily lets you choose which applications are left running
and which are closed.
Shutting Down Applications
1. Press and hold (
Home
) and then tap (
Task
manager
). This screen contains the following tabs:
• Active applications
display those currently active applications
running on your phone.
•Downloaded
displays any installed packages or applications
from the Play Store that are taking up memory space. Tap
Uninstall
to remove them from your phone.
• RAM
, displays the amount of current RAM (Random Access
Memory) currently being used and allow you to
Clear memory
.
•Storage
displays a visual graph indicating the available and
used space within the
System storage
location or
SD card
location.
DRAFT
Internal Use Only
Applications and Development 249
•Help
provides additional battery saving and RAM management
techniques.
2. From the
Active applications
tab, tap
End
to close
selected applications or tap
End all
to close all
background running applications.
Visual Voicemail
Visual Voicemail enables users to view a list of people who
left a voicemail message, and listen to the any message they
want without being limited to chronological order.
From the Home screen, tap (
Apps
) ➔
(
Visual Voicemail
).
For more information, refer to “Visual Voicemail” on page
23.
Voice Recorder
The Voice Recorder allows you to record an audio file up to
one minute long and then immediately send it as a message.
1. From the Home screen, tap (
Apps
)
➔
(
Voice Recorder
).
2. Tap (
Record
) to record an audio file.
3. Tap (
Stop
) to stop recording. The file
automatically saves to the Voice list.
4. Tap (
Pause
) to pause the recording of an audio
file.
5. Tap (
Cancel
) to cancel the recording of an audio
file.
6. Tap (
List
) to display a list of current receordings.
7. From the Recorded files page, press and then
select one of the following:
•Share via
and select a method in which to share this audio file.
Selections are: Bluetooth, Dropbox, Email, Gmail, Messaging,
or Wi-Fi Direct. Refer to each specific section, depending on
the method you selected to send this voice recording.
DRAFT
Internal Use Only
250
•Delete
: allows you to delete 1 or more voice recordings. Tap
the recordings to delete and tap
Delete
.
• Settings
: the following settings are available:
–
Storage
: allows you to choose where your recordings will be
saved. Select between Phone or memory card.
–
Recording quality
: allows you to set the recording quality to
High or Normal.
–
Limit for MMS
: allows you to select On or Off. If you Limit for
MMS by selecting On, you will be assured that the recording can
be sent in a message.
–
Contextual filename
: (requires GPS tagging) allows you to
adjust the filename based on contextual information such as
your current GPS location.
–
Default name
: allows you to choose the name prefix for your
recordings. For example, if your Default name is Voice, your
recordings would be named Voice 001, Voice 002, Voice 003,
etc.
–
Noise reduction
: allows you to activate/deactivate background
noise supression.
–
Recording volume
: allows you to assign the ambient noise
quality of your current location so the device can better detect
audio. Choose from Auto, Quiet place, or Noisy place.
–
Channel
: allows you to assing recording mode to either Mono
or Stereo.
–
Skip interval
: allows you to assing a skip length.
•End
: allows you to exit the applciation.
DRAFT
Internal Use Only
Applications and Development 251
Voice Search
Launches the Google Now application that is used for voice
to text Internet searching.
1. From the Home screen, tap (
Applications
)
➔
(
Voice Search
).
2. When prompted, speak into the built-in microphone.
3. Use the on-screen options to find a matching search
term.
VPN Client
This is a full-featured VPN Client that provides support for the
latest IPSec VPN standards and provides interoperability with
support for all major VPN Gateways.
1. From the Home screen, tap (
Apps
)
➔
(
VPN Client
).
2. Follow the on-screen instructions to configure the VPN
Client.
•
Options include: Add VPN Connection or My VPN Connections.
YouTube
YouTube is a video sharing website on which users can
upload and share videos, and view them in MPEG-4 format.
1. From the Home screen, tap (
Apps
)
➔
(
YouTube
).
2. Tap the search field to search for specific videos,
scroll down to browse through the main page
thumbnails, or scroll to the bottom to explore additional
options.
3. To view a video, tap an available preview thumbnail or
tap the title link.
To configure YouTube Settings:
Press and then tap
Settings
and configure the
following parameters:
•General
–
High quality on mobile
, when enabled, allows you to start all
videos in high quality mode while you are connected to a mobile
network.
–
Caption font size
allows you to set the font size used by
on-screen captions. Choose from: Small, Medium, Large, or
Huge.

DRAFT
Internal Use Only
252
–
Uploads
specifies network preferences for uploads.
–
Content localization
allows you to prioritize channels and
videos from a specific country or region.
–
Improve YouTube
allows you to anonymously send YouTube
information to help improve the application.
• Channel Feed Content
–
Sets the content that you want to appear within your channel
feed. All activity is the default option.
•Search
–
Clear search history
allows you to clear previous YouTube
searches from showing up in the YouTube search box.
–
Never remember history
allows you to force YouTube to never
store search history information.
–
SafeSearch filtering
allows you to configure block settings for
videos containing restricted content. This option blocks these
videos from appearing within your search results. Choose from:
Don’t filter, Moderate, or Strict blocking.
•Preloading
–
Preload subscriptions
allows you to preload (or go get videos
while on Wi-Fi and charging) your subscription videos.
–
Preload watch later
allows you to enable the preload function
on selected videos so you can watch them later. Read the data
usage information and tap
OK
to accept the terms.
Note:
Preloading YouTube videos will use some of your
device’s storage space and may result in additional
charges if your Wi-Fi plan is not unlimited.
• About
–
Help
provides answers to most YouTube questions.
–
Feedback
allows you to provide user feedback to YouTube.
–
Google Mobile Terms of Service
–
YouTube Terms of Service
–
Google Mobile Privacy Policy
–
YouTube Privacy Policy
–
Open source licenses
–
App version
displays the software version for the current
YouTube application.

DRAFT
Internal Use Only
Applications and Development 253
To watch a high quality video:
Press and then tap
Settings
➔
General
➔
High
quality on mobile
.
DRAFT
Internal Use Only
254
Section 10: Connections
Your phone is equipped with features that allow you to
quickly connect to the Web.
Internet
Your device is equipped with a Google browser to navigate
the mobile Web. This section explains how to navigate the
browser and use the basic features.
Accessing the Internet
To access the Browser:
From the Home screen, tap (
Apps
)
➔
(
Internet
).
Note:
You must disable your Wi-Fi connection if you wish
to view the T-Mobile home page
(http://ml.t-mobile.com).
You may be prompted to allow your device to use your
current location.
Navigating with the Browser
1. Tap an entry to select an item.
2. Sweep the screen with your finger in an up or down
motion to scroll through a website.
3. To return to a previous page, tap .
4. To move forward to a Web page, tap .
Browser Options
1. From the top of the browser screen, select one of the
available options:
• Navigation
: use the forward and back buttons to navigate
through your browsing activity.
•Refresh
: reloads the current page.
•Windows
: displays a list of the windows you have open.
•Bookmarks
: provides access to the Bookmarks screen.
– or –
From the home page, press to access the
following options:
•Homepage
: displays the home Web page.

DRAFT
Internal Use Only
Connections 255
•New window
: launches a new browser window. By default,
this screen shows the web2go home page.
• Add bookmark
: allows you to add a URL to your bookmark list.
• Add shortcut
: allows you to add a shortcut to your Home
screen.
• Save page
: allows you to store the current page in memory so
that it can be read later even if you loose your Internet
connection. It is saved in your Saved pages folder.
•Share via
: allows you to share the page using Bluetooth,
ChatON, Dropbox, Email, Flipboard, Gmail, Google, Messaging,
S Memo, or Wi-Fi Direct.
• Find on page
: allows you to search in the current page.
• Incognito mode
: pages viewed in incognito mode won’t
appear within your browser history or search history, and no
traces (such as cookies) are left on your device. For more
information, refer to
“Going Incognito”
on page 257.
•Saved pages
: contains web pages you have saved using the
Save page option.
•History
: provides access to your History screen.
• Desktop view
: allows you to assign the browser to display the
current page in the desktop view (to closely mimic the display
as it would appear on a Desktop computer).
•Brightness
: allows you to assign a brightness level specifically
for the browser window. This is independent of the brightness
assigned within the device’s Settings menu.
•Print
: provides print access on compatible Samsung printers.
•Settings
: allows you to change the way you view your web
pages by changing these options. For more information, refer
to
“Browser Settings”
on page 260.
•Help
: allows you view additional information concerning the
Internet application
Entering a URL
You can access a website quickly by entering the URL.
Websites are optimized for viewing on your phone.
To enter a URL and go to a particular website:
From the homepage tap the URL field at the top of the
screen, enter the URL and tap .
DRAFT
Internal Use Only
256
Search the Internet
To perform an Internet search using keywords:
1. From within the Google search application, tap the
Google search field, enter the keyword(s) to search
using the on-screen keypad.
2. Tap the entry from the list of search results that are
displayed.
3. Tap a link to view the website.
Adding and Deleting Windows
You can have up to eight Internet windows open at one time.
To add a new window:
1. From your browser window, tap (
Windows
) ➔
(
New window
).
2. A new browser window displays.
Note:
The number of currently open windows is displayed at
the bottom of the Windows screen.
3. Scroll across the screen to view the currently active
windows and tap an entry to launch the selected
Internet window.
To delete an existing window:
1. From your browser window, tap (
Windows
).
2. Scroll across the available windows and locate your
target window.
3. Tap next to the listing to delete the window.
DRAFT
Internal Use Only
Connections 257
Going Incognito
The incognito feature allows you to view Internet sites
outside of the normal browsing. Pages viewed in this
incognito window won’t appear within your browser history
or search history, and no traces (such as cookies) are left on
your device.
Note:
Any downloaded files will be preserved and will stay on
your device after you exit the incognito mode.
To add a new incognito window:
1. From your browser window, press and select
Incognito mode
.
2. At the information prompt, tap
OK
.
3. A new browser window displays.
To exit from the incognito window:
1. From your browser window, tap (
Windows
).
2. Scroll across the available windows and locate the
incognito window. The incognito icon appears in
the upper-left of the new browser window while you
are in this mode.
3. Tap next to the incognito listing to delete this
window.
Using Bookmarks
While navigating a website, you can bookmark a site to
quickly and easily access it at a future time. The URLs
(website addresses) of the bookmarked sites display in the
Bookmarks page. From the Bookmarks page you can also
view your Most visited websites and view your History.
1. From the webpage, tap (
Bookmarks
).
The
Bookmarks
page displays. Additional pages
include
History
and
Saved pages
.
2. Press to display the following options:

DRAFT
Internal Use Only
258
• List/Thumbnail view
: Select
Thumbnail view
(default) to view
a thumbnail of the webpage with the name listed, or select
List view
to view a list of the bookmarks with Name and URL
listed.
• Create folder
: Creates a new folder in which to store new
bookmarks.
•Delete
: Erases selected bookmarks.
• Change order
: Rearranges the current bookmarks.
• Move to folder
: Selected bookmarks are moved to a selected
folder.
3. Tap a bookmark to view the webpage, or touch and
hold a bookmark for the following options:
• Open in new window
: Opens the webpage in a new window.
•Edit bookmark
: Allows you to edit the name or URL of the
bookmark. For more information, refer to
“Editing
Bookmarks”
on page 258.
•Add shortcut
: Adds a shortcut to the bookmarked webpage to
your phone’s Home screen.
• Share link
: Allows you to share a URL address via Bluetooth,
ChatON, Dropbox, Email, Flipboard, Gmail, Messaging,
S Memo, or Wi-Fi Direct.
• Delete bookmark
: Allows you to delete a bookmark. For more
information, refer to
“Deleting Bookmarks”
on page 259.
• Set as homepage
: Sets the bookmark to your new homepage.
Adding Bookmarks
1. From the webpage, tap ➔ (
Add
bookmark
).
2. Use the on-screen keypad to enter the name of the
bookmark and the URL.
3. Tap the
Location
field to assign a folder location.
Home
is the default.
4. Select a storage location for your new bookmark.
5. Tap
Save
. The new save page now appears on the
Bookmarks page.
Editing Bookmarks
1. From the Bookmarks page, touch and hold the
bookmark you want to edit.
2. Tap
Edit bookmark
.
3. Use the on-screen keypad to edit the name of the
bookmark or the URL.
4. Tap the
Location
field to assign a new folder location.
Home
is the default.
DRAFT
Internal Use Only
Connections 259
5. Tap
Save
or
Cancel
to exit the operation.
Deleting Bookmarks
1. From the Bookmarks page, touch and hold the
bookmark you want to delete.
2. Tap
Delete bookmark
.
3. At the confirmation window, tap
OK
.
Emptying the Cookies
A cookie is a small file placed on your phone by a website
during navigation. In addition to containing some site-
specific information, a cookie can also contain some
personal information (such as a username and password)
which might pose a security risk if not properly managed.
You can clear these cookies from your device at any time.
1. From an active Web page, press and then tap
Settings
➔
Privacy
➔
Delete personal data
.
2. Tap
Cookies and site data
to create a checkmark.
3. Tap
Done
.
Using Web History
The History list displays a list of the most recently viewed
websites. These entries can be used to return to previously
unmarked web pages.
1. From the webpage, tap ➔
History
tab.
2. Select a visited range category. Choose from:
Today
,
Last 7 days
,
or
Most visited
.
3. Tap an entry to display the webpage.
– or –
Press and then tap
Clear history
to delete the
current History list.
Saved Pages
The Saved pages list provides you with a list of the websites
that you have saved.
1. From an active Web page, press and then tap
Saved pages
.
A list of your saved webpages is displayed with their
Name. The webpages that have been visited the most
will appear at the top.
2. Tap any entry to display the webpage.

DRAFT
Internal Use Only
260
Browser Settings
To configure browser settings:
1. From the Home screen, tap (
Apps
)
➔
(
Internet
).
2. Press and then tap
Settings
.
3. Choose an option from the following categories:
Basics:
• Set home page
: Sets the current home page for the Web
browser.
• Auto-fill text
: Allows you to set the text used for the Web form
auto-fill feature.
Privacy:
• Search and URL suggestions
: displays predictions of related
queries and popular websites in the address bar as you type.
• Preload available links before opening
: allows you improve
performance when loading pages.
• Delete personal data
: allows you to delete all personal data
such as Browsing history, Cache, Cookies and site data,
Passwords, Auto-fill data, and Location access.
Accessibility:
•Text scaling
: allows you to preview the text size, scale the text
size using a slider bar, set the zoom amount on double tap, and
minimize the font size using a slider bar.
• Force zoom
: allows you to override the website’s request to
control zoom.
• Text encoding
: adjusts the current text encoding.
• Fullscreen
: allows you to use Fullscreen mode to hide the
status bar.
Content settings:
• Accept cookies
: Allows sites, that require cookies, to save and
read cookies from your device.
• Enable location
: Allows websites to request access to your
location.
• Enable JavaScript
: Enables Javascript for the current Web
page. Without this feature, some pages may not display
properly. Remove the checkmark to disable this function.
• Block pop-ups
: Prevents popup advertisement or windows
from appearing on-screen. Remove the checkmark to disable
this function.
DRAFT
Internal Use Only
Connections 261
• Remember form data
: Allows the device to store data from
any previously filled out forms. Remove the checkmark to
disable this function.
• Remember passwords
: Stores usernames and passwords for
visited sites. Remove the checkmark to disable this function.
•Default storage
: Allows you to set your default storage to
Phone or Memory Card.
• Website settings
: View advanced settings for individual
websites.
• Enable notifications
: Allows website notifications. Select
Always on, On demand, or Off.
• Clear notifications
: Deletes website notification access
information.
• Reset settings
: Restores all settings to default.
Bandwidth management:
• Preload search results
: Allows the browser to preload high
confidence search results in the background. If the device can
accurately guess your in progress search, it will preempt you by
beginning to load the matching Web page before you complete
the search request.
•Load images
: Allows web page images to load along with the
other text components of a loaded website.
• Open pages in overview
: Displays an overview of newly
opened web pages.
DRAFT
Internal Use Only
262
Bluetooth
About Bluetooth
Bluetooth is a short-range communications technology that
allows you to connect wirelessly to a number of Bluetooth
devices, such as headsets and hands-free car kits, and
Bluetooth-enabled handhelds, computers, printers, and
wireless devices. The Bluetooth communication range is
usually up to approximately 30 feet.
Turning Bluetooth On and Off
To turn Bluetooth on:
1. From the Home screen, press and then tap
Settings
➔ (
Connections
tab).
2. In a single motion touch and slide the
Bluetooth
slider
to the right to turn it on .
The slider color indicates the activation status. When
active, displays in the Status area.
To turn Bluetooth off:
1. From the Home screen, press and then tap
Settings
.
2. In a single motion touch and slide the
Bluetooth
slider
to the left to turn it off .
Note:
Bluetooth must be enabled prior to use.
Bluetooth Status Indicators
The following icons show your Bluetooth connection status
at a glance:
Displays when Bluetooth is active.
Displays when Bluetooth is connected (paired) and
communicating.
Bluetooth Settings
The Bluetooth settings menu allows you to set up many of
the characteristics of your device’s Bluetooth service,
including:
•
Entering or changing the name your device uses for Bluetooth
communication and description
•
Setting your device’s visibility (or “discoverability”) for other
Bluetooth devices
•
Displaying your device’s Bluetooth address
ON
ON
OFF
OFF
DRAFT
Internal Use Only
Connections 263
To access the Bluetooth Settings menu:
1. From the Home screen, press and then tap
Settings
➔
Connections
tab
➔
Bluetooth
.
2. Verify Bluetooth is active (indicated by ).
3. Press and tap the
Visibility timeout
,
Received files
,
and
Help
fields to set the options.
To change your Bluetooth name:
1. Verify Bluetooth is active.
2. From the Home screen, press and then tap
Settings
➔
More
tab
➔
About device
.
3. Tap the
Device name
field and use the on-screen
keyboard to edit the current device name.
4. Tap to erase the current device name and enter
a new name for this device using the keyboard.
5. Tap
OK
to confirm your setting.
To set visibility:
1. Verify your Bluetooth is active.
2. From the top of the Bluetooth settings page, toggle the
state of the visibility check mark. Activating this feature
enabled your device visible allows other devices to pair
and communicate.
Note:
Your device visibility is based on the time set within the
Visible time-out field (2 Minutes, 5 Minutes, 1 Hour, or
Never timeout). Press (
Menu
) ➔
Visibility timeout
.
This value appears as a countdown within this
Visibility
timeout
field.
To scan for Bluetooth devices:
1. Verify Bluetooth is active.
2. From the bottom of the Bluetooth settings page, tap
Scan
to search for visible external Bluetooth-
compatible devices such as headsets, devices,
printers, and computers.
To review your Bluetooth received files:
1. Verify Bluetooth is active.
2. From the Bluetooth settings page, press and then
tap
Received files
.
ON
ON

DRAFT
Internal Use Only
264
Pairing Bluetooth Devices
The Bluetooth pairing process allows you to establish trusted
connections between your device and another Bluetooth
device. When you pair devices, they share a passkey,
allowing for fast, secure connections while bypassing the
discovery and authentication process.
Note:
Pairing between two Bluetooth devices is a one-time
process. Once pairing is established the devices
continue to recognize their partnership and exchange
information without entering a passcode.
To pair your device with another Bluetooth device:
1. Verify Bluetooth is active.
2. From the Bluetooth settings page, tap the
Visibility
field
(shown by the device name).
Your device must be visible to successfully pair with an
external device. This is shown by a green check mark.
3. Tap
Scan
. Your device displays a list of discovered in-
range Bluetooth devices.
4. Tap a device from the list to initiate pairing.
5. Enter the passkey or PIN code, if needed, and tap
OK
.
6. The external device must accept the connection and
enter your device’s PIN code.
Once successfully paired to an external device,
displays in the Status area.
Note:
Due to different specifications and features of other
Bluetooth-compatible devices, display and operations
may be different, and functions such as transfer or
exchange may not be possible with all Bluetooth-
compatible devices.
Important!
If callers can not hear you during a call while using
a paired Bluetooth headset (with built-in
microphone), verify the
Call audio
option is enabled
within the entry’s Bluetooth Settings page.