Samsung Electronics Co SLM3015DW Printer User Manual Part 3
Samsung Electronics Co Ltd Printer Users Manual Part 3
Contents
Users Manual Part 3

46
3. Maintenance
Available maintenance parts
You need to replace the maintenance parts at specific intervals to keep the machine in the best condition and avoid print quality and paper feeding problems
resulting from the worn-out parts. Maintenance parts are mostly rollers, belts and pads. However, the replacement period and parts may differ depending on the
model. Replacing maintenance parts can be performed only by an authorized service provider, dealer, or the retailer where you bought the machine. To purchase
maintenance parts, contact the retailer where you bought the machine. The replacement period for the maintenance parts is informed by the "Samsung Printer
Status" program. Or if your machine supports display screen, a message is displayed in the display screen. The replacement period varies based on the operating
system used, computing performance, application software, connecting method, paper type, paper size, and job complexity.

47
3. Maintenance
Storing the toner cartridge
Toner cartridges contain components that are sensitive to light, temperature
and humidity. Samsung suggests users follow these recommendations to
ensure optimal performance, highest quality, and longest life from your new
Samsung toner cartridge.
Store this cartridge in the same environment in which the printer will be used.
This should be in controlled temperature and humidity conditions. The toner
cartridge should remain in its original and unopened package until installation
– if original packaging is not available, cover the top opening of the cartridge
with paper and store in a dark cabinet.
Opening the cartridge package prior to use dramatically shortens its useful shelf
and operating life. Do not store on the floor. If the toner cartridge is removed
from the printer, follow the instructions below to store the toner cartridge
properly.
• Store the cartridge inside the protective bag from the original package.
• Store lying flat (not standing on end) with the same side facing up as if it
were installed in the machine.
• Do not store consumables in any of the following conditions:
- Temperature greater than 40°C.
- Humidity range less than 20% and greater than 80%.
- An environment with extreme changes in humidity or temperature.
- Direct sunlight or room light.
- Dusty places.
- A car for a long period of time.
- An environment where corrosive gases are present.
- An environment with salty air.
1
Handling instructions
• Do not touch the surface of the photoconductive drum in the cartridge.
• Do not expose the cartridge to unnecessary vibrations or shock.
• Never manually rotate the drum, especially in the reverse direction; this can
cause internal damage and toner spillage.
2
Toner cartridge usage
Samsung Electronics does not recommend or approve the use of non-Samsung
brand toner cartridges in your printer including generic, store brand, refilled, or
remanufactured toner cartridges.
Samsung’s printer warranty does not cover damage to the machine caused
by the use of a refilled, remanufactured, or non-Samsung brand toner
cartridges.

Storing the toner cartridge
48
3. Maintenance
3
Estimated cartridge life
Estimated cartridge life the life of the toner cartridge (or imaging unit) yield
depends on the amount of toner that print jobs require. The actual print yield
may vary depending on the print density of the pages you print on, operating
environment, percentage of image area, printing interval, media type and/or
media size. For example, if you print a lot of graphics, the consumption of the
toner is higher and you may need to change the cartridge more often.
49
3. Maintenance
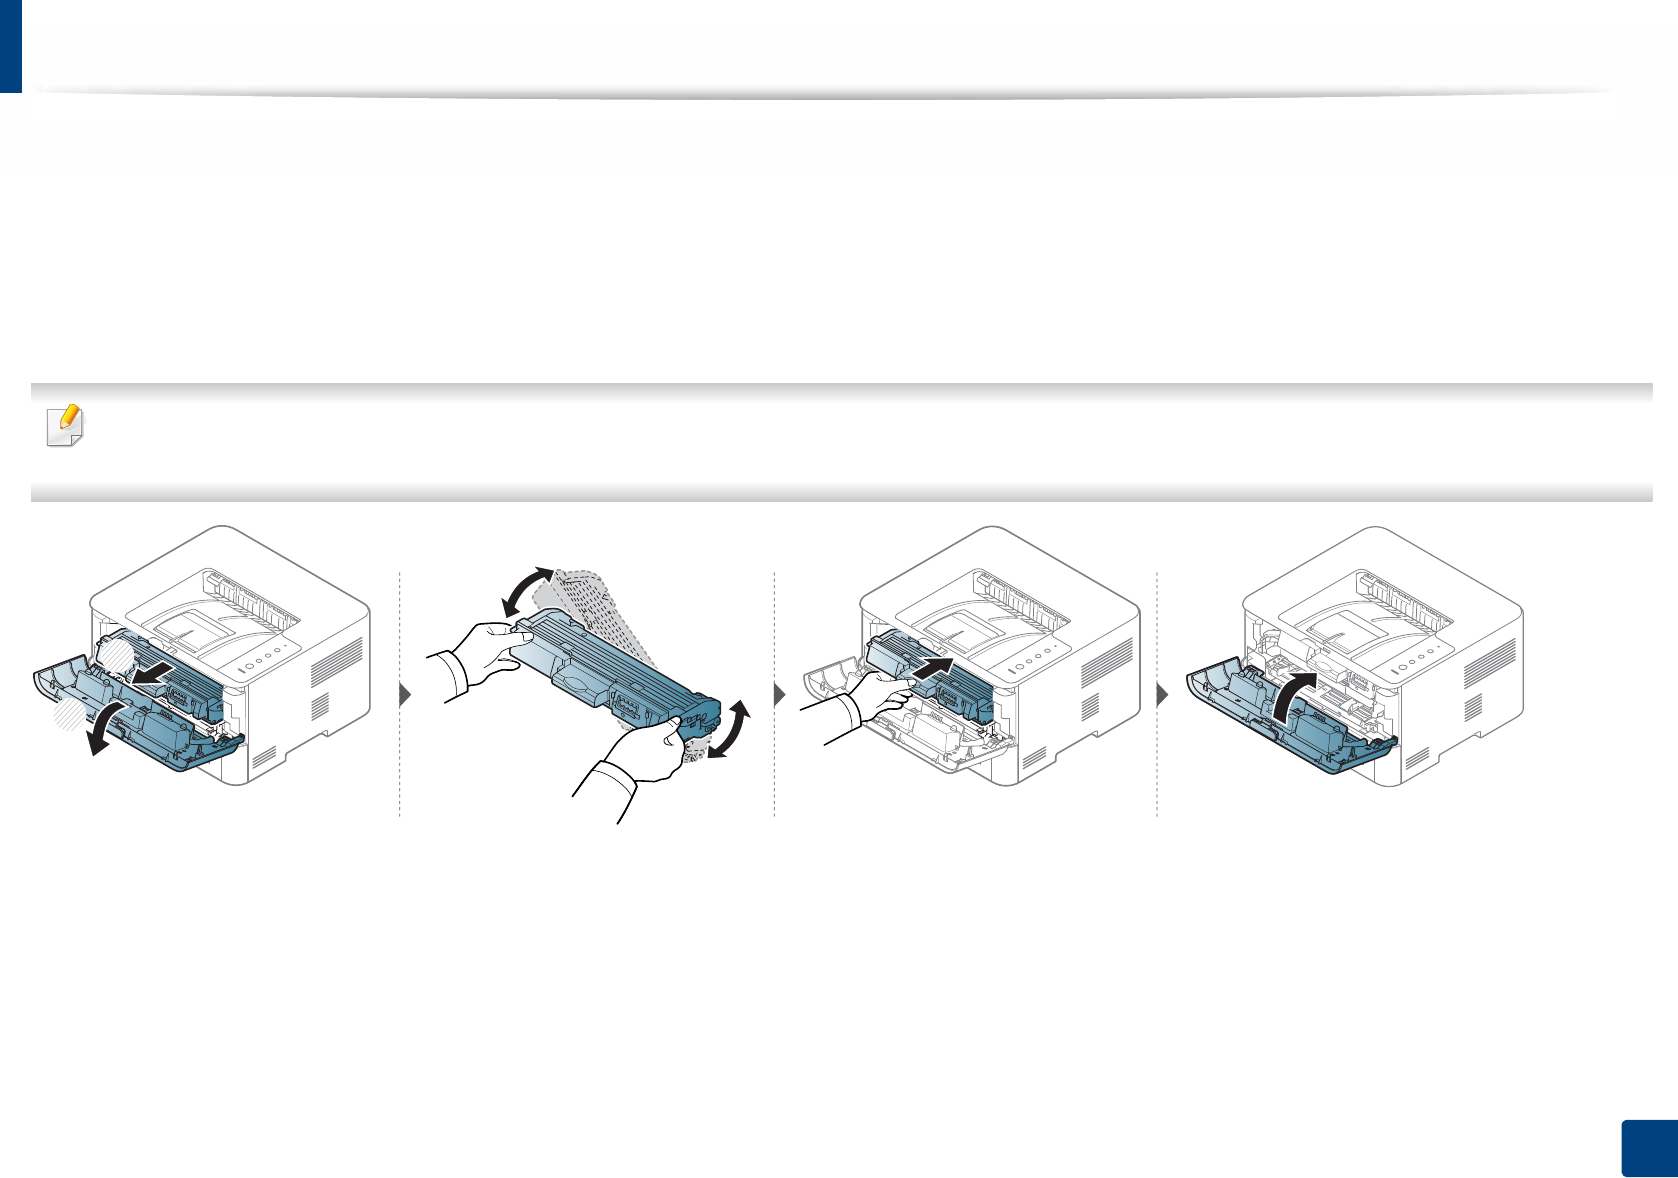
Redistributing toner
When the toner cartridge is near the end of its life:
• White streaks or light printing occurs and/or density variation side to side.
• The Toner LED blinks orange.
If this happens, you can temporarily improve print quality by redistributing the remaining toner in the cartridge. In some cases, white streaks or light printing will still
occur even after you have redistributed the toner.
• Before opening the front cover, close the output support first.
• If toner gets on your clothing, wipe it off with a dry cloth and wash clothing in cold water. Hot water sets toner into fabric.
1
2

50
3. Maintenance
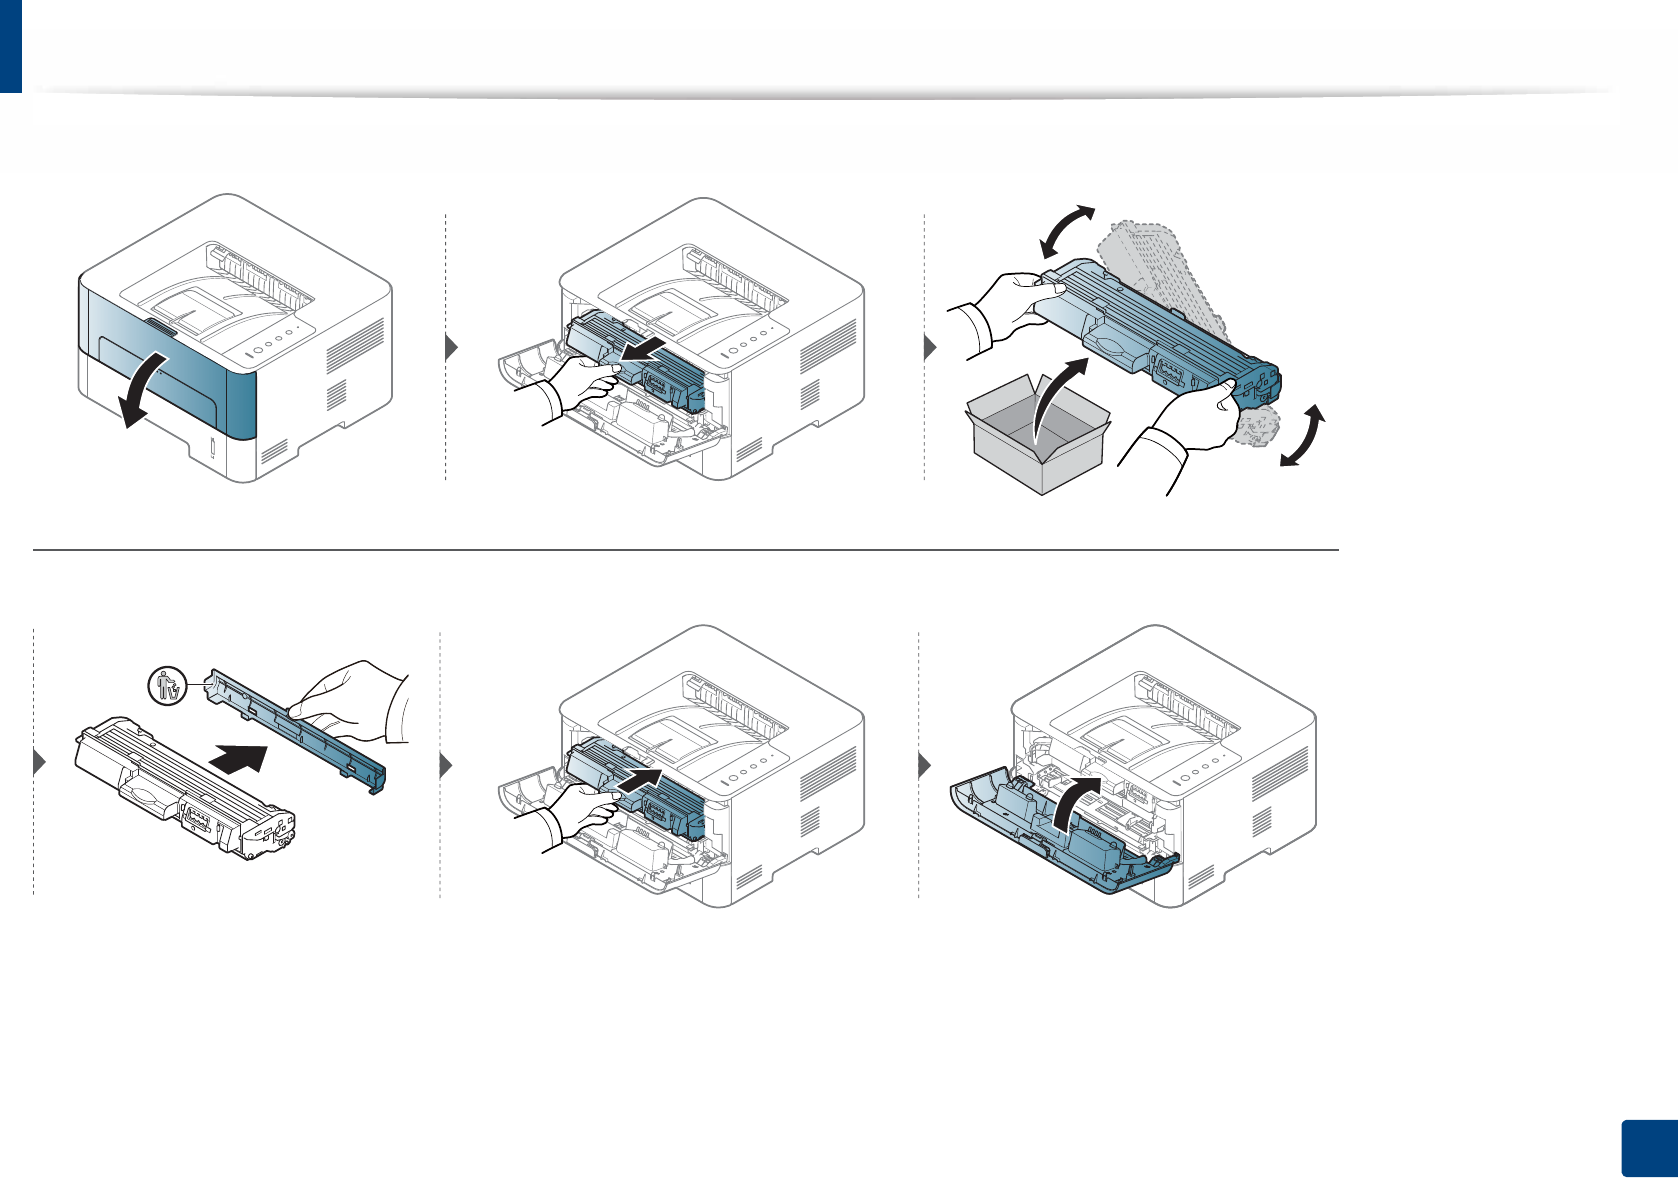
Replacing the toner cartridge
• Before opening the front cover, close the output support first.
• Do not use sharp objects such as a knife or scissors to open the toner cartridge package. They might scratch the drum of the cartridge.
• If toner gets on your clothing, wipe it off with a dry cloth and wash clothing in cold water. Hot water sets toner into fabric.
• Shake the toner cartridge thoroughly, it will increase the initial print quality.
• Do not touch the green underside of the toner cartridge. Use the handle on the cartridge to avoid touching this area.
Replacing the toner cartridge
51
3. Maintenance
When a toner cartridge has reached the end of life, the machine will stop printing.
52
3. Maintenance
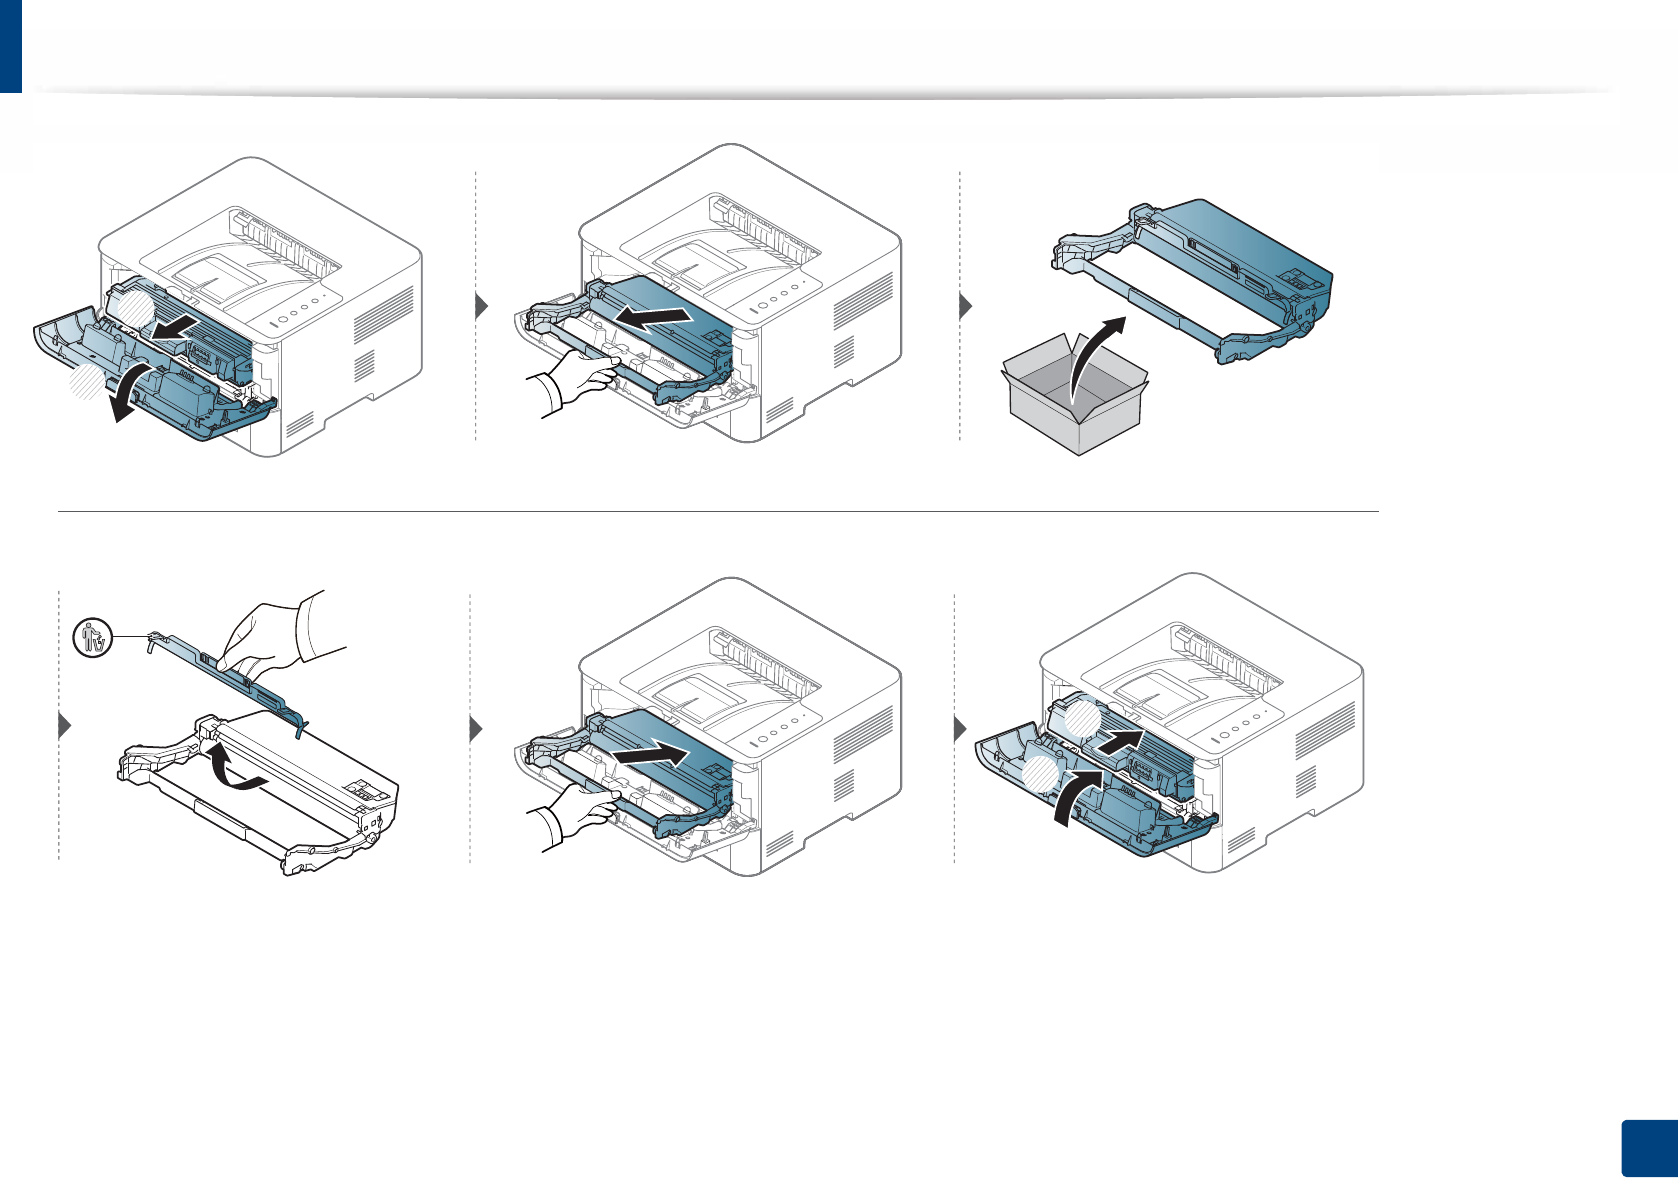
Replacing the imaging unit
1
2
1
2

53
3. Maintenance
Cleaning the machine
If printing quality problems occur or if you use your machine in a dusty environment, you need to clean your machine regularly to keep it in the best printing
condition and use your machine longer.
• Cleaning the cabinet of the machine with cleaning materials containing large amounts of alcohol, solvents, or other strong substances can discolor or distort the
cabinet.
• If your machine or the surrounding area is contaminated with toner, we recommend you use a cloth or tissue dampened with water to clean it. If you use a vacuum
cleaner, toner blows in the air and might be harmful to you.
4
Cleaning the outside
Clean the machine cabinet with a soft, lint-free cloth. Dampen the cloth slightly with water, but be careful not to let any water drip onto or into the machine.
5
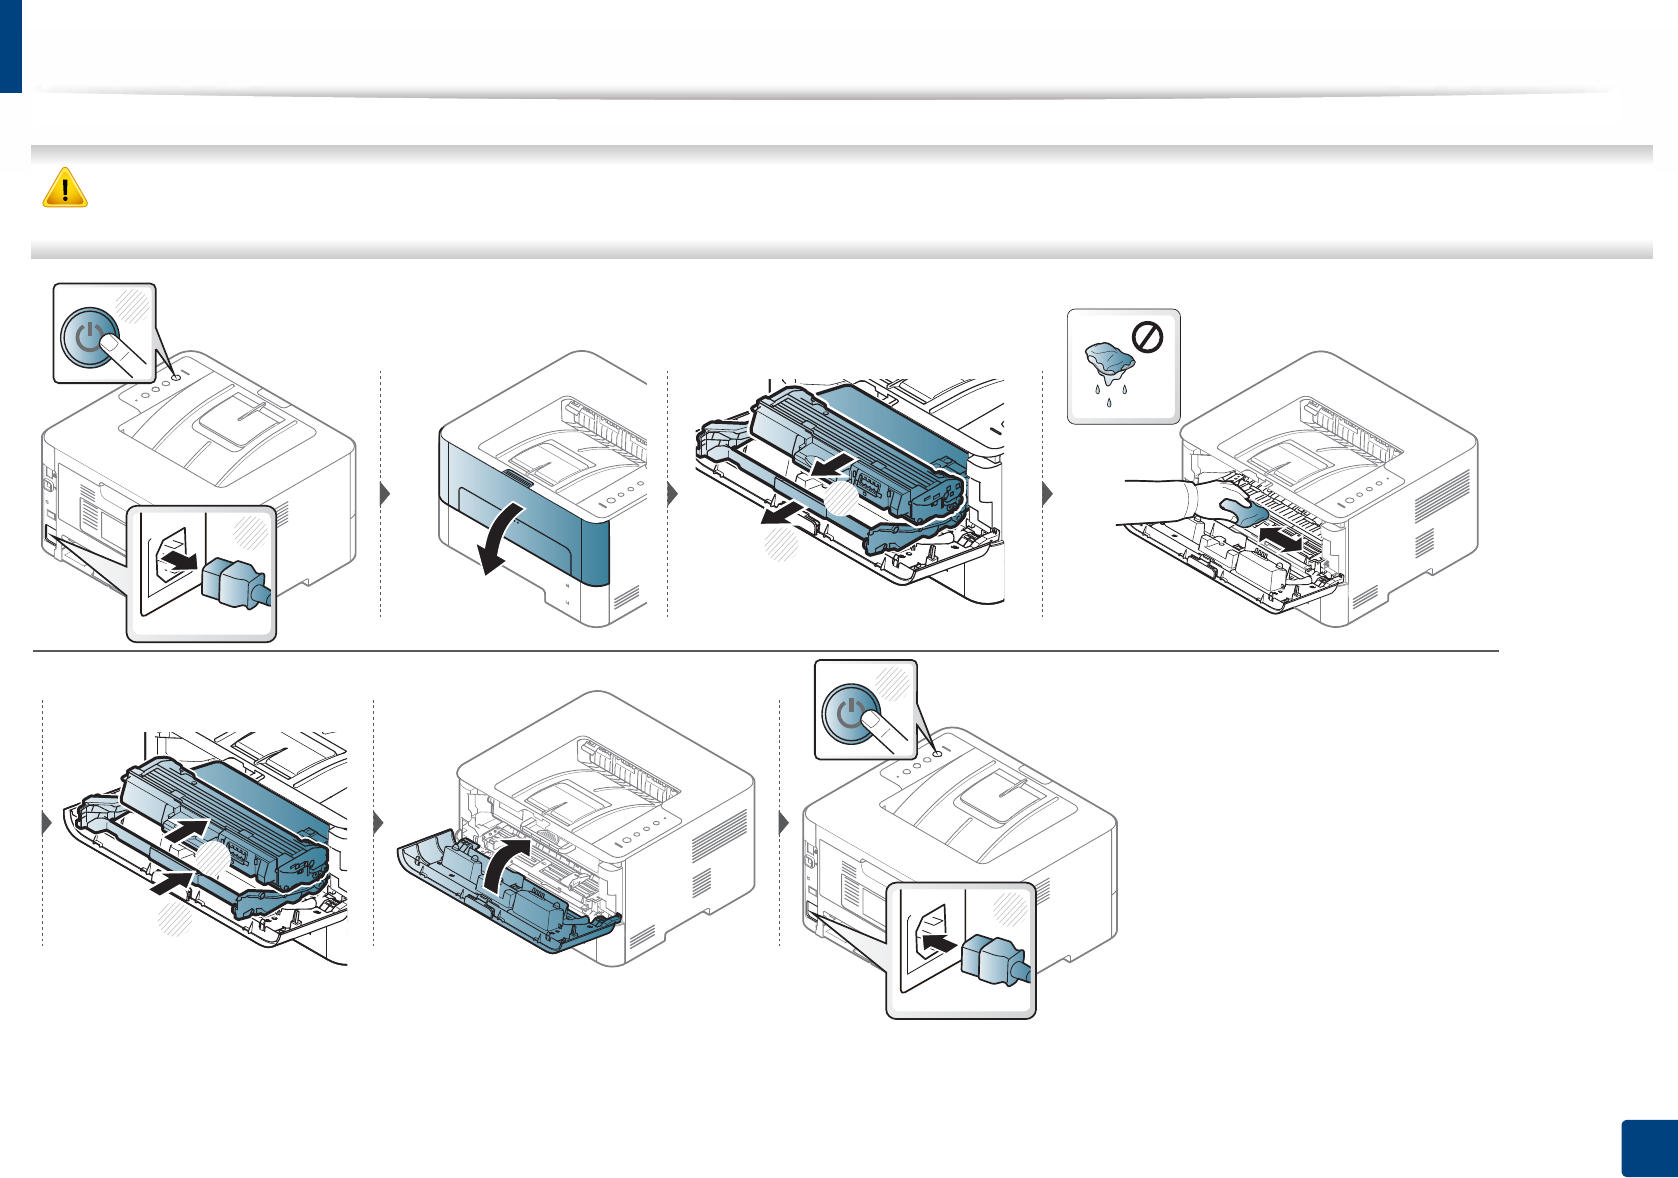
Cleaning the inside
During the printing process, paper, toner, and dust particles can accumulate inside the machine. This buildup can cause print quality problems, such as toner specks
or smearing. Cleaning the inside of the machine clears and reduces these problems.
• Use a dry lint-free cloth to clean the machine.
• If your machine has a power switch, turn the power switch off before cleaning the machine.
• Before opening the front cover, close the output support first.
Cleaning the machine
54
3. Maintenance
Use a dry lint free cloth when cleaning the inside of the machine, be careful not to damage the transfer roller or any other inside parts. Do not use solvents such as
benzene or thinner. Printing quality problems can occur and cause damage to the machine.
1
2
2
1
1
2
2
1
Cleaning the machine
55
3. Maintenance
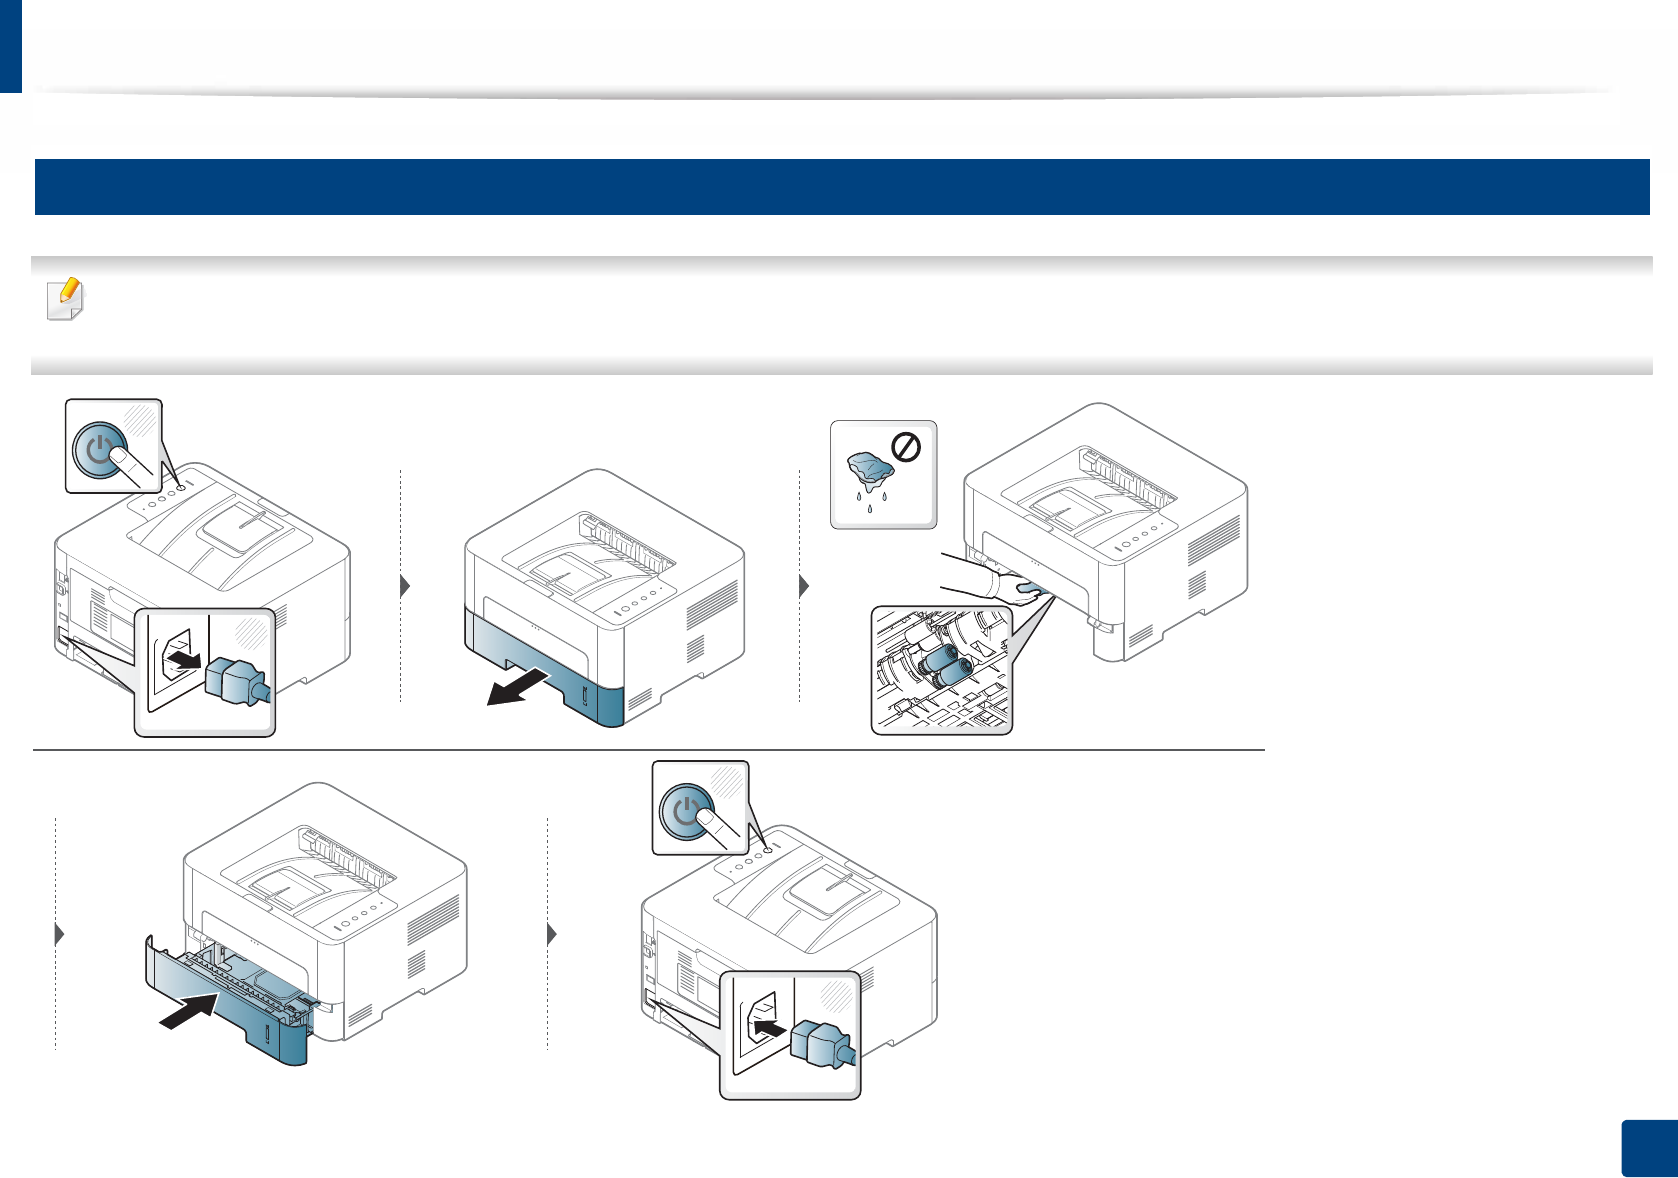
6
Cleaning the pickup roller
• Use a dry lint-free cloth to clean the machine.
• If your machine has a power switch, turn the power switch off before cleaning the machine.
1
2
1
2

56
3. Maintenance
Tips for moving & storing your machine
• When moving the machine, do not tilt or turn it upside down. Otherwise, the inside of the machine may be contaminated by toner, which can cause damage to
the machine or reduce print quality.
• When moving the machine, make sure at least two people are holding the machine securely.

4. Troubleshooting
This chapter gives helpful information for what to do if you encounter an error.
• Tips for avoiding paper jams 58
• Clearing paper jams 59
• Understanding the LED 65
This chapter gives helpful information for what to do if you encounter an error.
If your machine has a display screen, check the message on the display screen first to solve the
error. If you cannot find a solution to your problem in this chapter, refer to the Advanced Guide
(see "Troubleshooting" on page 195).
If you cannot find a solution in the User's Guide or the problem persists, call for service.

58
4. Troubleshooting
Tips for avoiding paper jams
By selecting the correct media types, most paper jams can be avoided. To avoid paper jams, refer to the following guidelines:
• Ensure that the adjustable guides are positioned correctly (see "Tray overview" on page 27).
• Do not overload the tray. Ensure that the paper level is below the paper capacity mark on the inside of the tray.
• Do not remove paper from the tray while your machine is printing.
• Flex, fan, and straighten paper before loading.
• Do not use creased, damp, or highly curled paper.
• Do not mix papers type in a tray.
• Use only recommended print media (see "Print media specifications" on page 71).
59
4. Troubleshooting
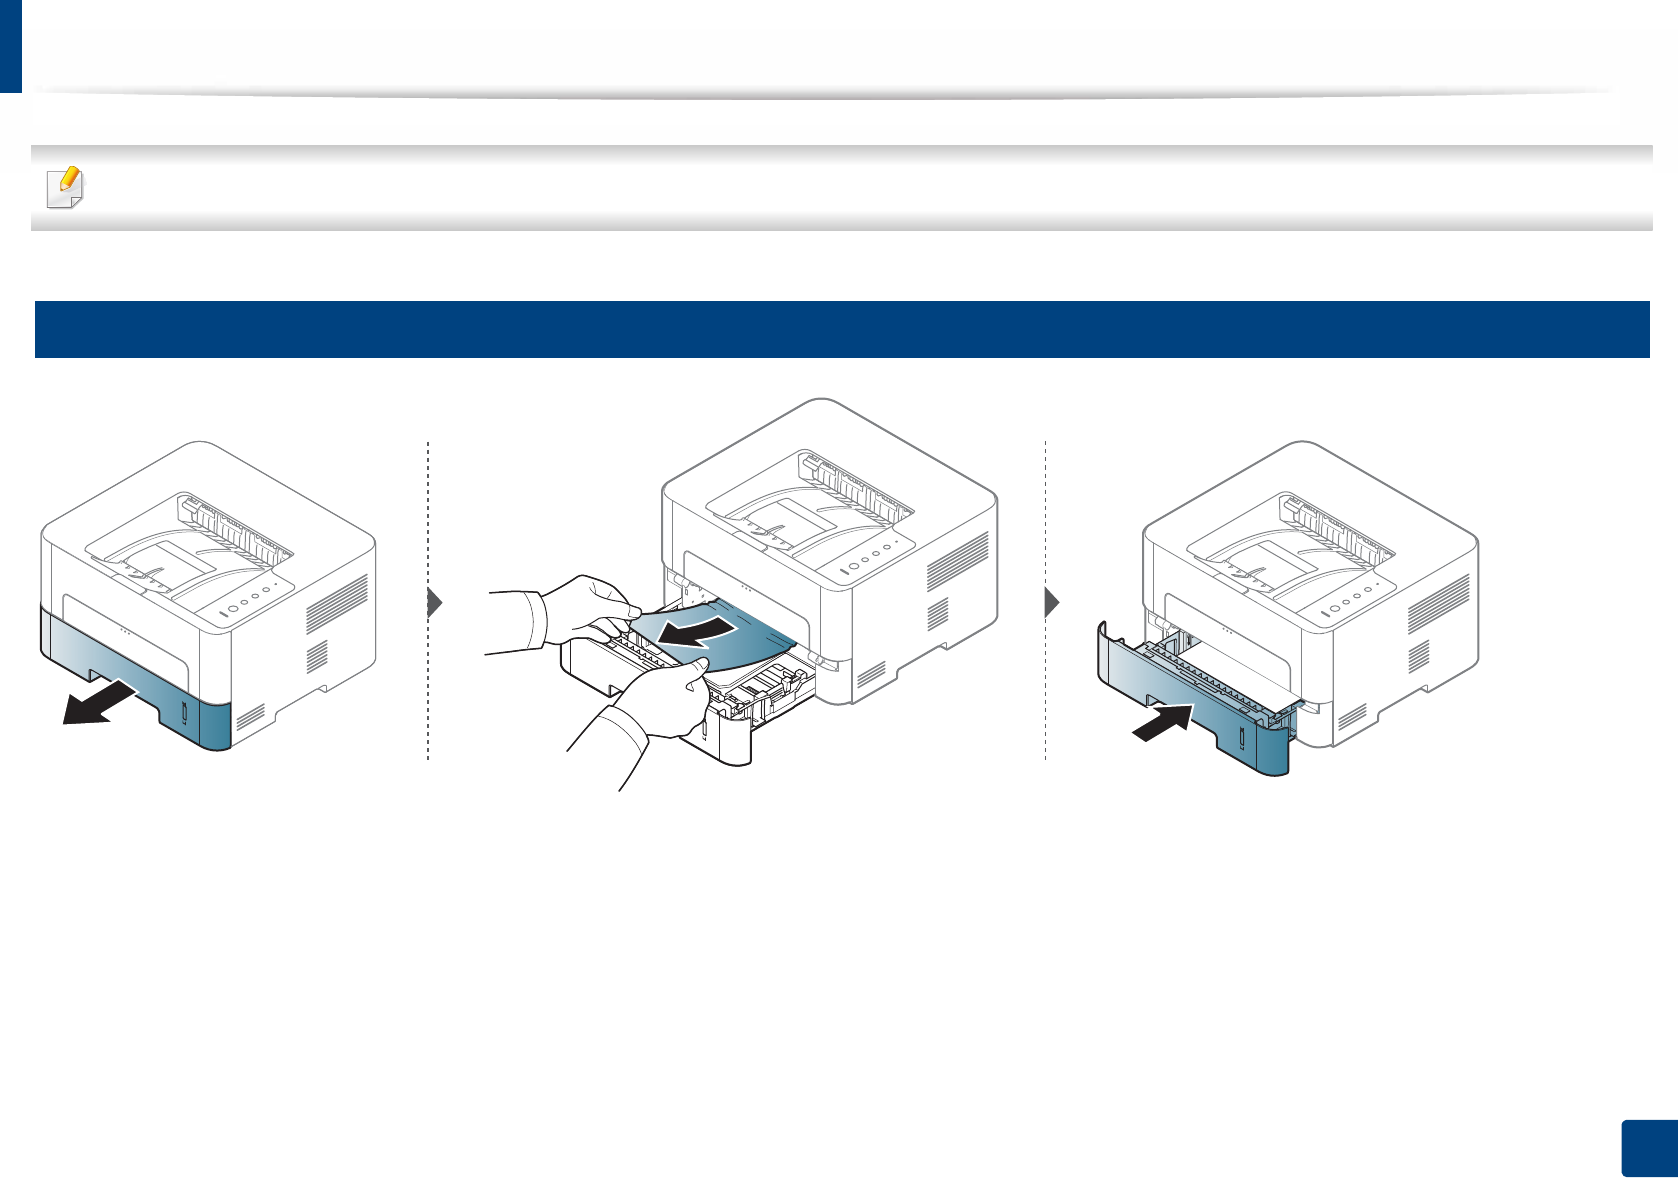
Clearing paper jams
To avoid tearing the paper, pull the jammed paper out slowly and gently.
1
In tray 1
Clearing paper jams
60
4. Troubleshooting
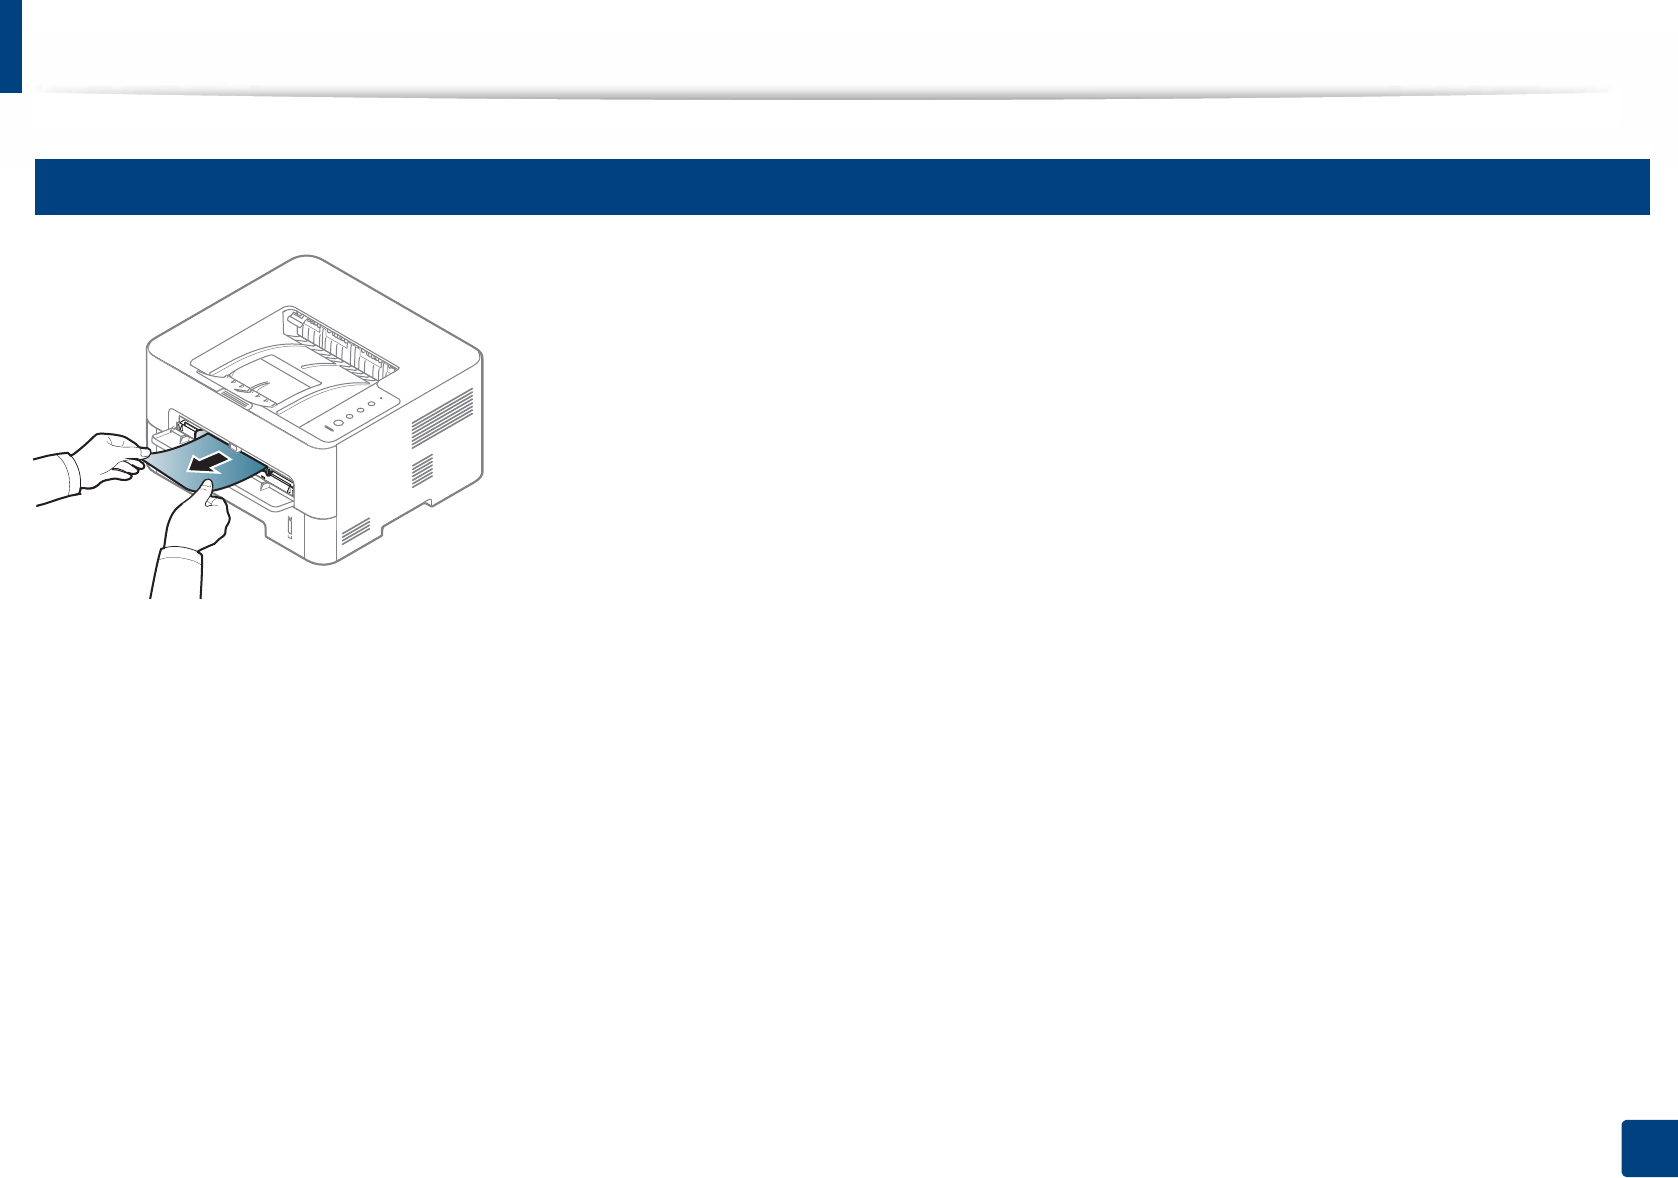
2
In the manual feeder