Samsung Electronics Co SLM4075FW Mono Laser Multifuction Printer User Manual
Samsung Electronics Co Ltd Mono Laser Multifuction Printer
Contents
- 1. Users Manual 1
- 2. Users Manual 2
- 3. Users Manual 3
- 4. Users Manual 4
Users Manual 2
Basic printing
56
2. Menu Overview and Basic Setup
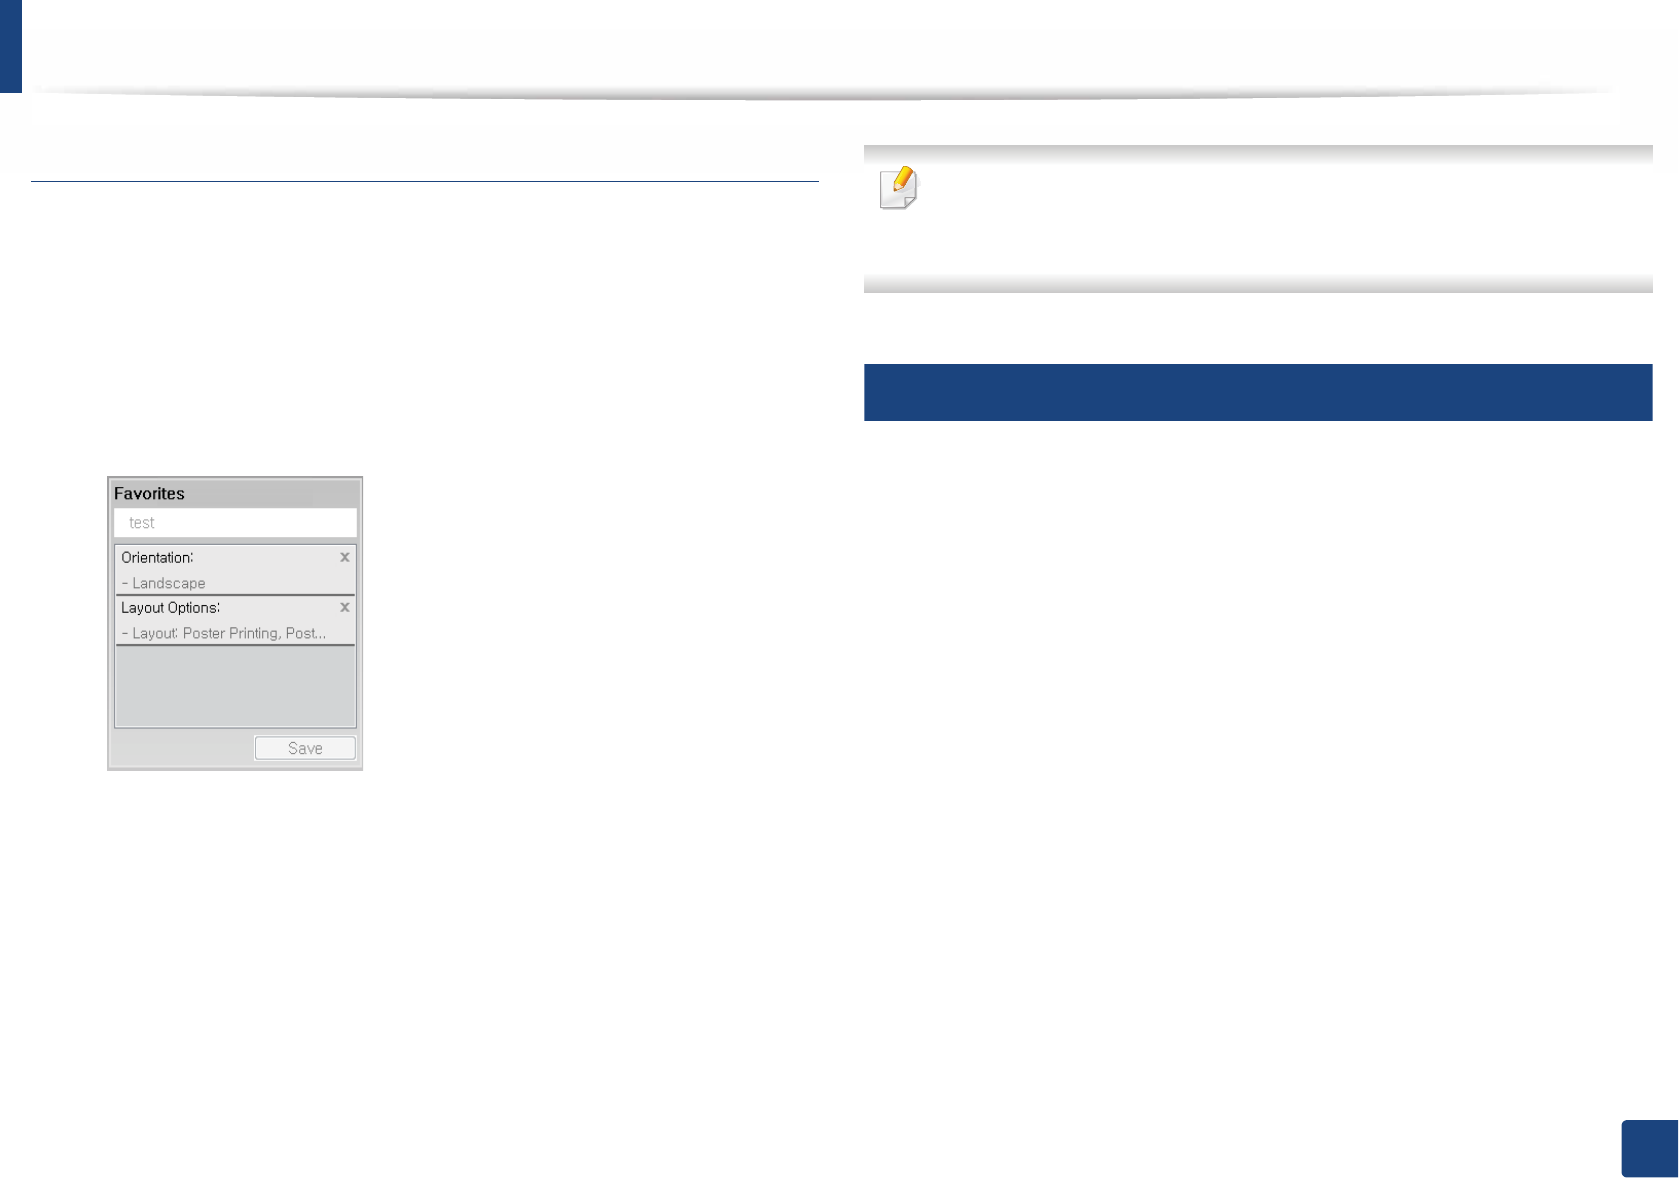
Using a favorite setting
The Favorites option, which is visible on each preferences tab except for the
Samsung tab, allows you to save the current preferences for future use.
To save a Favorites item, follow these steps:
1Change the settings as needed on each tab.
2 Enter a name for the item in the Favorites input box.
3 Click Save.
4 Enter name and description, and then select the desired icon.
5 Click OK. When you save Favorites, all current driver settings are saved.
To use a saved setting, select it in the Favorites tab. The machine is now set
to print according to the settings you have selected.To delete saved
settings, select it in the Favorites tab and click Delete.
12
Using help
Click the option you want to know on the Printing Preferences window and
press F1 on your keyboard.
Basic printing
57
2. Menu Overview and Basic Setup
13
Eco printing
The Eco function cuts toner consumption and paper usage. The Eco function
allows you to save print resources and lead you to eco-friendly printing.
If you press the Eco button from the control panel, Eco mode is enabled. The
default setting of Eco mode is duplex printing (long edge), multiple pages per
side (2-up), skip blank pages, and toner save. Some features may not be
available depending on model.
• Double-sided printing (long edge) feature is only available for duplex
models (see "Variety feature" on page 9).
• Depending on the printer driver you use, skip blank pages may not work
properly. If skip blank pages feature does not work properly, set the
feature from the Easy Eco Driver (see "Easy Eco Driver" on page 291).
You can set the eco value from Device Settings in Samsung Easy Printer
Manager program.
• For Windows and Mac users, you set from Samsung Easy Printer
Manager > (Switch to advanced mode) > Device Settings, see
"Device Settings" on page 298.
Setting Eco mode on the control panel
• The settings set from the machine’s driver override the settings on the
control panel.
• Accessing menus may differ from model to model (see "Accessing the
menu" on page 30 or "Control panel overview" on page 22).
• It may be necessary to press OK to navigate to lower-level menus for
some models.
1Select (Menu) > System Setup > Machine Setup > Eco Settings
on the control panel.
Or press Eco on the control panel.
2 Select the option you want and press OK.
•Default Mode: Select this to turn on or off the Eco mode.
-Off: Set the Eco mode off.
-On: Set the Eco mode on.
If you set the Eco mode on with a password from the SyncThru™ Web
Service (Settings tab > Machine Settings > System > Eco Settings) or
Samsung Easy Printer Manager (Device Settings > Eco), the On force
message appears. You have to enter the password to change the Eco mode
status.
Basic printing
58
2. Menu Overview and Basic Setup
•Change Template: Follow the settings from Syncthru™ Web Service
or Samsung Easy Printer Manager. Before you select this item, you
must set the eco function in SyncThru™ Web Service (Settings tab >
Machine Settings > System > Eco Settings) or Samsung Easy
Printer Manager (Device Settings > Eco).
-Select Template
ƒDefault Eco: The machine is set to Default Eco mode.
ƒCustom Eco: Change any necessary values.
3 Press OK to save the selection.
Setting Eco mode on the driver
To take advantage of the advanced printing features, click Properties or
Preferences from the Print window(see "Opening printing preferences" on
page 55).
Open the Eco tab to set Eco mode. When you see the eco image ( ), that
means the Eco mode is currently enabled.
Eco options
•Printer Default: Follows the settings from the machine's control panel.
•None: Disables Eco mode.
•Eco Printing: Enables Eco mode. Activate the various Eco items you want to
use.
•Password: If the administrator fixed to enable the Eco mode, you have to
enter the password to change the status.
Password button: You can set from SyncThru™ Web Service (Settings tab >
Machine Settings > System > Eco Settings) or Samsung Easy Printer
Manager (Device Settings > Eco), the password button is activated. To
change the print settings, click on this button, enter the password or need
to contact the administrator.
Result simulator
Result Simulator shows the results of reduced emission of carbon dioxide, used
electricity, and the amount of saved paper in accordance with the settings you
selected.
• The results are calculated on the basis that the total number of printed
paper is one hundred without a blank page when the Eco mode is disabled.
• Refers to the calculation coefficient about CO2, energy, and paper from IEA,
the index of Ministry of Internal Affairs and Communication of Japan and
www.remanufacturing.org.uk. Each model has a different index.
• The power consumption in printing mode refers to the average printing
power consumption of this machine.
Basic printing
59
2. Menu Overview and Basic Setup
• The actual amount displayed is only an estimate as the actual amount may
differ depending on the operating system used, computing performance,
application software, connection method, media type [thickness], media
size, job complexity, etc.
14
Secure printing
When you use a printing device in an office, school or other public place, you can
protect your personal documents or confidential information by using the
secure printing feature.
Starting secure printing on the driver
1From a computer, select a printer from the printer list > right-click the
printer > select Properties > Device Options > Properties > Storage
Options. Then check the RAM Disk option.
2 Open the Printing Preferences window (see "Opening printing
preferences" on page 55), and the select Advanced tab > Print Mode >
Confidential. Enter the job name, user ID, and password. Even though
you have started the secure printing job, the device will not print the
document until you enter your password on the printer.
This features may not appear on the display depending on options or
models. If so, it is not applicable to your machine.
Printing secure documents from the control panel
Accessing menus may differ from model to model (see "Accessing the
menu" on page 30 or "Control panel overview" on page 22).
1Select (Menu) > Job Management > Secured Job on the control
panel.
2 Select the document to print.
3 Enter the password that you set from the printer driver.
4 Print or delete the document.

60
2. Menu Overview and Basic Setup
Basic copying
• For special printing features, refer to the Advanced Guide (see "Copy" on
page 213).
• Accessing menus may differ from model to model (see "Accessing the
menu" on page 30 or "Control panel overview" on page 22).
15
Basic copy
1Select (copy) > (Menu) > Copy Feature on the control panel.
Or select (Menu) > Copy Feature on the control panel.
2 Place a single document face down on the document glass, or load the
documents face up into the document feeder (see "Loading originals" on
page 50).
3 If you want to customize the copy settings including Reduce/Enlarge,
Darkness, Original Type and more by using the control panel buttons
(see "Changing the settings for each copy" on page 60).
4 Enter the number of copies using the arrow or number keypad, if
necessary.
5 Press (Start).
If you need to cancel the copying job during the operation, press (Stop
or Stop/Clear) button and the copying will stop.
16
Changing the settings for each copy
Your machine provides default settings for copying so that you can quickly and
easily make a copy.
• If you press the (Stop or Stop/Clear) button twice while setting the
copy options, all of the options you have set for the current copy job will
be canceled and returned to their default status. Or, they will
automatically return to their default status after the machine completes
the copy in progress.
• Accessing menus may differ from model to model (see "Accessing the
menu" on page 30).
• It may be necessary to press OK to navigate to lower-level menus for
some models.
Darkness
If you have an original containing faint marking and dark images, you can adjust
the brightness to make a copy that is easier to read.
Basic copying
61
2. Menu Overview and Basic Setup
1Select (copy) > (Menu) > Copy Feature > Darkness on the
control panel.
Or press Darkness on the control panel.
2 Select the option you want and press OK.
For example, the Light+5 being the lightest, and the Dark+5 being the
darkest.
3 Press (Stop/Clear) button to return to ready mode.
Original Type
The original setting is used to improve the copy quality by selecting the
document for the current copy job.
1Select (copy) > (Menu) > Copy Feature > Original Type on
the control panel.
Or select (Menu) > Copy Feature > Original Type on the control
panel.
2 Select the option you want and press OK.
•Text: Use for originals containing mostly text.
•Text/Photo: Use for originals with mixed text and photographs.
If texts in the printout is blurry, select Text to get the clear texts.
•Photo: Use when the originals are photographs.
3 Press (Stop/Clear) button to return to ready mode.
Reduced or enlarged copy
You can reduce or enlarge the size of a copied image from 25% to 400% from the
document feeder or scanner glass.
• This feature may not be available depending on model or optional goods
(see "Variety feature" on page 9).
• If the machine set to Eco mode, reduce and enlarge features are not
available.
To select from the predefined copy sizes
1Select (copy) > (Menu) > Copy Feature > Reduce/Enlarge
on the control panel.
Or select (Menu) > Copy Feature > Reduce/Enlarge on the
control panel.
2 Select the option you want and press OK.

Basic copying
62
2. Menu Overview and Basic Setup
3 Press (Stop/Clear) button to return to ready mode.
To scale the copy by directly entering the scale rate
1Select (copy) > (Menu) > Copy Feature > Reduce/Enlarge >
Custom on the control panel.
Or select (Menu) > Copy Feature > Reduce/Enlarge> Custom on
the control panel.
2 Enter the copy size you want using the numeric keypad.
3 Press OK to save the selection.
4 Press (Stop/Clear) button to return to ready mode.
When you make a reduced copy, black lines may appear at the bottom of
your copy.
17
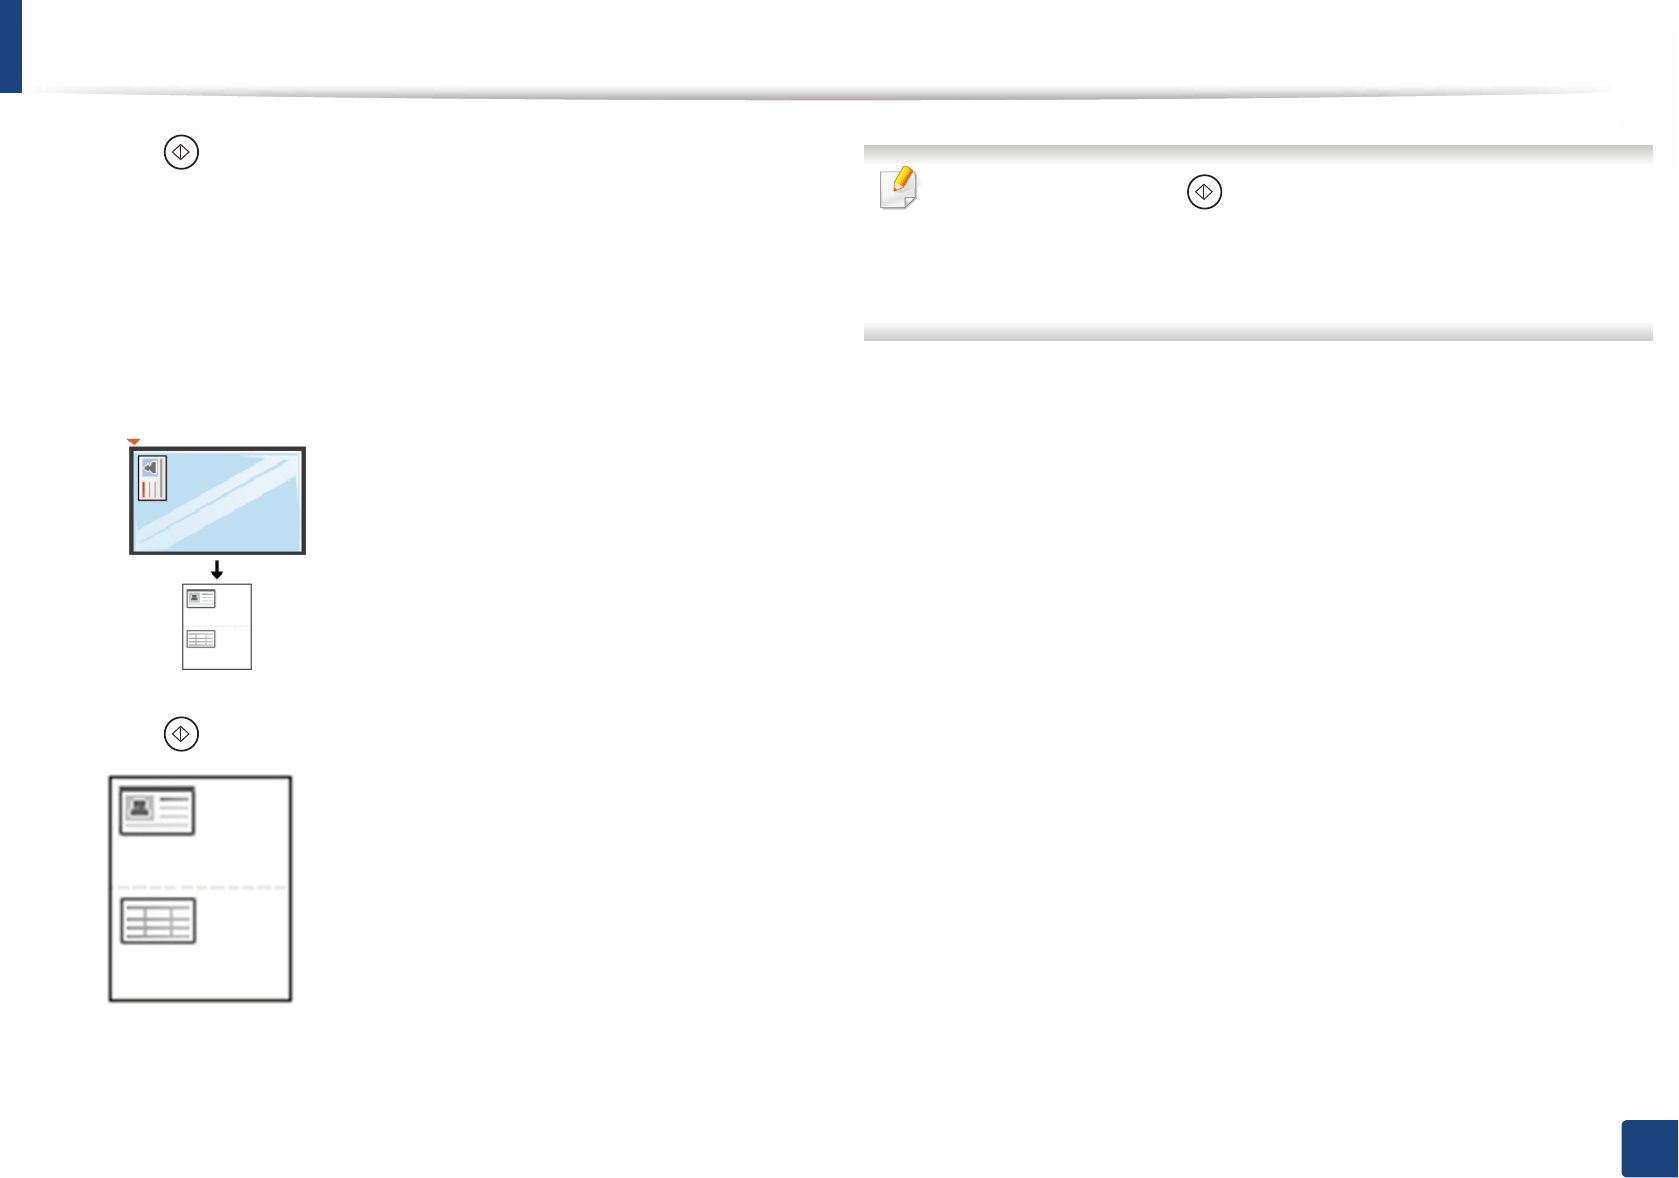
ID card copying
Your machine can print 2-sided originals on one sheet.
The machine prints one side of the original on the upper half of the paper and
the other side on the lower half without reducing the size of the original. This
feature is helpful for copying a small-sized item such as business card.
• The original must be placed on the scanner glass to use this feature.
• If the machine set to Eco mode, this feature is not available.
Depending on the model, the operating procedure may differ.
1Press ID Copy on the control panel.
Or select (Menu) > Copy Feature > Layout > ID Copy on the
control panel.
2 Place the front side of an original facing down on the scanner glass
where arrows indicate as shown. Then, close the scanner lid.
3 Place Front Side and Press [Start] appears on the display.
Basic copying
63
2. Menu Overview and Basic Setup
4 Press (Start).
Your machine begins scanning the front side and shows Place Back Side
and Press [Start].
5 Turn the original over and place it on the scanner glass where arrows
indicate as shown. Then, close the scanner lid.
6 Press (Start) button.
• If you do not press the (Start) button, only the front side will be
copied.
• If the original is larger than the printable area, some portions may not be
printed.
64
2. Menu Overview and Basic Setup
Basic scanning
For special scanning features, refer to the Advanced Guide (see "Scan
features" on page 265).
18
Basic Scanning
This is the normal and usual procedure for scanning originals.
This is a basic scanning method for USB-connected machine.
• Accessing menus may differ from model to model.
• It may be necessary to press OK to navigate to lower-level menus for
some models.
• If you want to scan using the network, refer to the Advanced Guide (see
"Scanning from network connected machine" on page 266).
1Place a single document face down on the document glass, or load the
documents face up into the document feeder (see "Loading originals" on
page 50).
2 Select (scan) > Scan To PC on the control panel.
If you see Not Available message, check the port connection, or select
Enable Scan from Device Panel in Samsung Easy Printer Manager >
Switch to advanced mode > Scan to PC Settings.
3 Select the scan destination you want and press OK.
Default setting is My Documents.
• You can create and save the frequently used settings as a profile list. Also
you can add and delete the profile and save each profile to a different
path.
• To change the Samsung Easy Printer Manager > Switch to
advanced mode > Scan to PC Settings.
4 Select the option you want and press OK.
5 Scanning begins.
Scanned image is saved in computer’s C:\Users\users name\My
Documents. The saved folder may differ, depending on your operating
system or the application you are using.
65
2. Menu Overview and Basic Setup
Basic faxing
• For special faxing features, refer to the Advanced Guide (see "Fax
features" on page 275).
• Accessing menus may differ from model to model (see "Accessing the
menu" on page 30 or "Control panel overview" on page 22).
• You cannot use this machine as a fax via the internet phone. For more
information ask your internet service provider.
• We recommend using traditional analog phone services (PSTN: Public
Switched Telephone Network) when connecting telephone lines to use
a fax machine. If you use other Internet services (DSL, ISDN, VolP), you can
improve the connection quality by using the Micro-filter. The Micro-filter
eliminates unnecessary noise signals and improves connection quality or
Internet quality. Since the DSL Micro-filter is not provided with the
machine, contact your Internet service provider for use on DSL Micro-
filter.
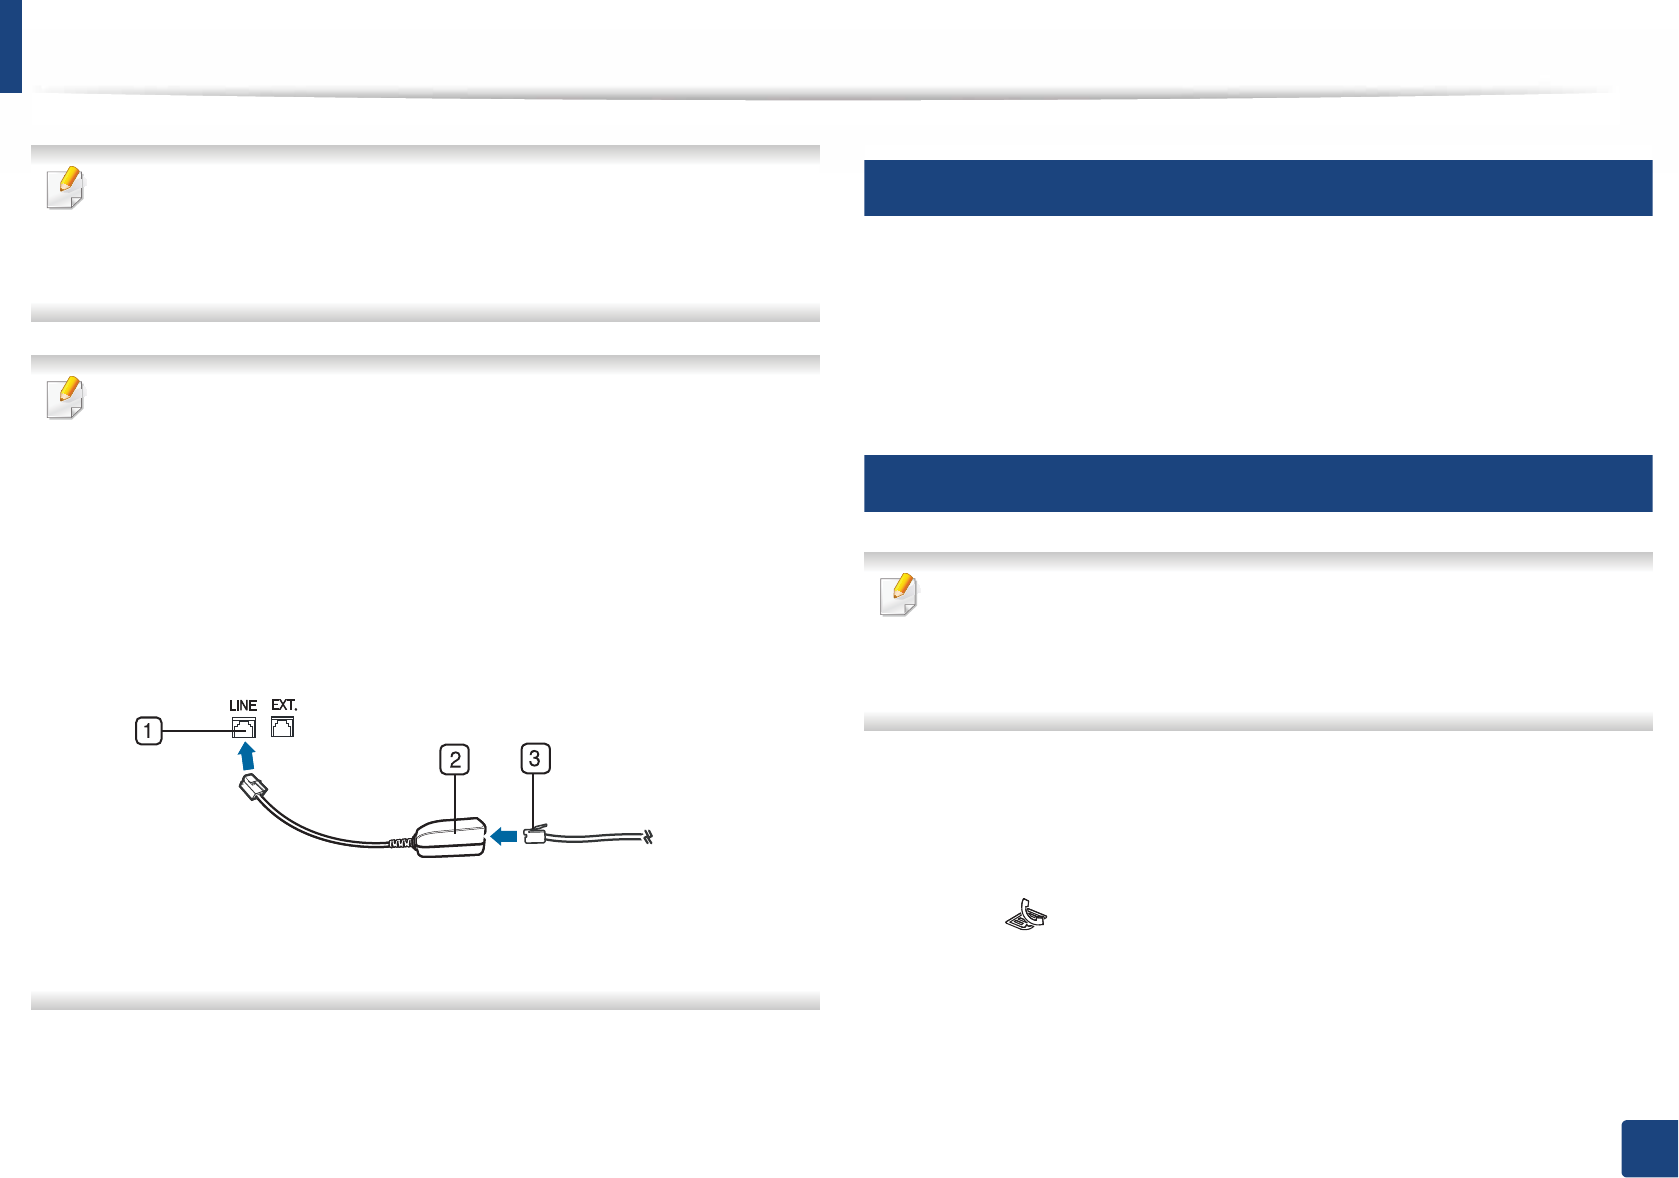
1Line port
2Micro filter
3DSL modem / Telephone line
(see "Rear view" on page 21).
19
Preparing to fax
Before you send or receive a fax, you need to connect the supplied line cord to
your telephone wall jack (see "Rear view" on page 21). Refer to the Quick
Installation Guide how to make a connection. The method of making a
telephone connection is different from one country to another.
20
Sending a fax
When you place the originals, you can use either the document feeder or
the scanner glass. If the originals are placed on both the document feeder
and the scanner glass, the machine will read the originals on the document
feeder first, which has higher priority in scanning.
1Place a single document face down on the document glass, or load the
documents face up into the document feeder (see "Loading originals" on
page 50).
2 Select (fax) on the control panel.
3 Adjust the resolution and the darkness to suit your fax needs (see
"Adjusting the document settings" on page 67).
Basic faxing
66
2. Menu Overview and Basic Setup
4 Enter the destination fax number (see "Keypad letters and numbers" on
page 243).
5 Press (Start) on the control panel. The machine starts to scan and
send the fax to the destinations.
• If you want to send a fax directly from your computer, use Samsung
Network PC Fax (see "Sending a fax in the computer" on page 276).
• When you want to cancel a fax job, press (Stop or Stop/Clear)
button before the machine starts transmission.
• If you used the scanner glass, the machine shows the message asking to
place another page.
Sending a fax manually
Perform the following to send a fax using (On Hook Dial) on the control
panel.
1Place a single document face down on the document glass, or load the
documents face up into the document feeder (see "Loading originals" on
page 50).
2 Select (fax) on the control panel.
3 Adjust the resolution and the darkness to suit your fax needs (see
"Adjusting the document settings" on page 67).
4 Press (On Hook Dial) on the control panel or lift the handset.
5 Enter a fax number using the number keypad on the control panel.
6 Press (Start) on the control panel when you hear a high-pitched fax
signal from the remote fax machine.
Sending a fax to multiple destinations
You can use the multiple send feature, which allows you to send a fax to multiple
locations. Originals are automatically stored in memory and sent to a remote
station. After transmission, the originals are automatically erased from memory.
You cannot send faxes with this feature if you have chosen super fine as an
option or if the fax is in color.
1Place a single document face down on the document glass, or load the
documents face up into the document feeder (see "Loading originals" on
page 50).
2 Select (fax) on the control panel.
3 Adjust the resolution and the darkness to suit your fax needs (see
"Adjusting the document settings" on page 67).
4 Select (Menu) > Fax Feature > Multi Send on the control panel.
Basic faxing
67
2. Menu Overview and Basic Setup
5 Enter the number of the first receiving fax machine and press OK.
You can press speed dial numbers or select a group dial number using
the (Address book) button.
6 Enter the second fax number and press OK.
The display asks you to enter another fax number to send the document.
7 To enter more fax numbers, press OK when Yes appears and repeat
steps 5 and 6.
• You can add up to 10 destinations.
• Once you have entered a group dial number, you cannot enter another
group dial number.
8 When you have finished entering fax numbers, select No at the Another
No.? prompt and press OK.
The machine begins sending the fax to the numbers you entered in the
order in which you entered them.
Multi send report is printed after sending faxes.
21
Receiving a fax
Your machine is preset Fax mode at the factory. When you receive a fax, the
machine answers the call on a specified number of rings and automatically
receives the fax.
22
Adjusting the document settings
Before starting a fax, change the following settings according to your original’s
status to get the best quality.
• Accessing menus may differ from model to model (see "Accessing the
menu" on page 30 or "Control panel overview" on page 22).
• It may be necessary to press OK to navigate to lower-level menus for
some models.
Resolution
The default document settings produce good results when using typical text-
based originals. However, if you send originals that are of poor quality, or
contain photographs, you can adjust the resolution to produce a higher quality
fax.

Basic faxing
68
2. Menu Overview and Basic Setup
The resolution setting is applied to the current fax job. To change the
default setting (see Advanced Guide).
1Select (fax) > (Menu) > Fax Feature > Resolution on the
control panel.
2 Select the option you want and press OK.
•Standard: Originals with normal sized characters.
•Fine: Originals containing small characters or thin lines or originals
printed using a dot-matrix printer.
•Super Fine: Originals containing extremely fine detail. Super Fine
mode is enabled only if the machine with which you are
communicating also supports the Super Fine resolution.
• For memory transmission, Super Fine mode is not available. The
resolution setting is automatically changed to Fine.
• When your machine is set to Super Fine resolution and the fax machine
with which you are communicating does not support Super Fine
resolution, the machine transmits using the highest resolution mode
supported by the other fax machine.
3 Press (Stop/Clear) button to return to ready mode.
Darkness
You can select the degree of darkness of the original document.
The darkness setting is applied to the current fax job. To change the default
setting (see "Fax" on page 217).
1Select (fax) > (Menu) > Fax Feature > Darkness on the
control panel.
2 Select a darkness level you want.
3 Press (Stop/Clear) button to return to ready mode.
69
2. Menu Overview and Basic Setup
Using USB memory device
This chapter explains how to use a USB memory device with your machine.
This USB memory device is supported for M387x/407x series (see "Variety
feature" on page 9).
23
About USB memory
USB memory devices are available with a variety of memory capacities to give
you more room for storing documents, presentations, downloaded music and
videos, high resolution photographs or whatever other files you want to store or
move.
You can do the following tasks on your machine by using a USB memory device.
• Scan documents and save them on a USB memory device
• Print data stored on a USB memory device
• Restore backup files to the machine’s memory
• Format the USB memory device
• Check the available memory space
24
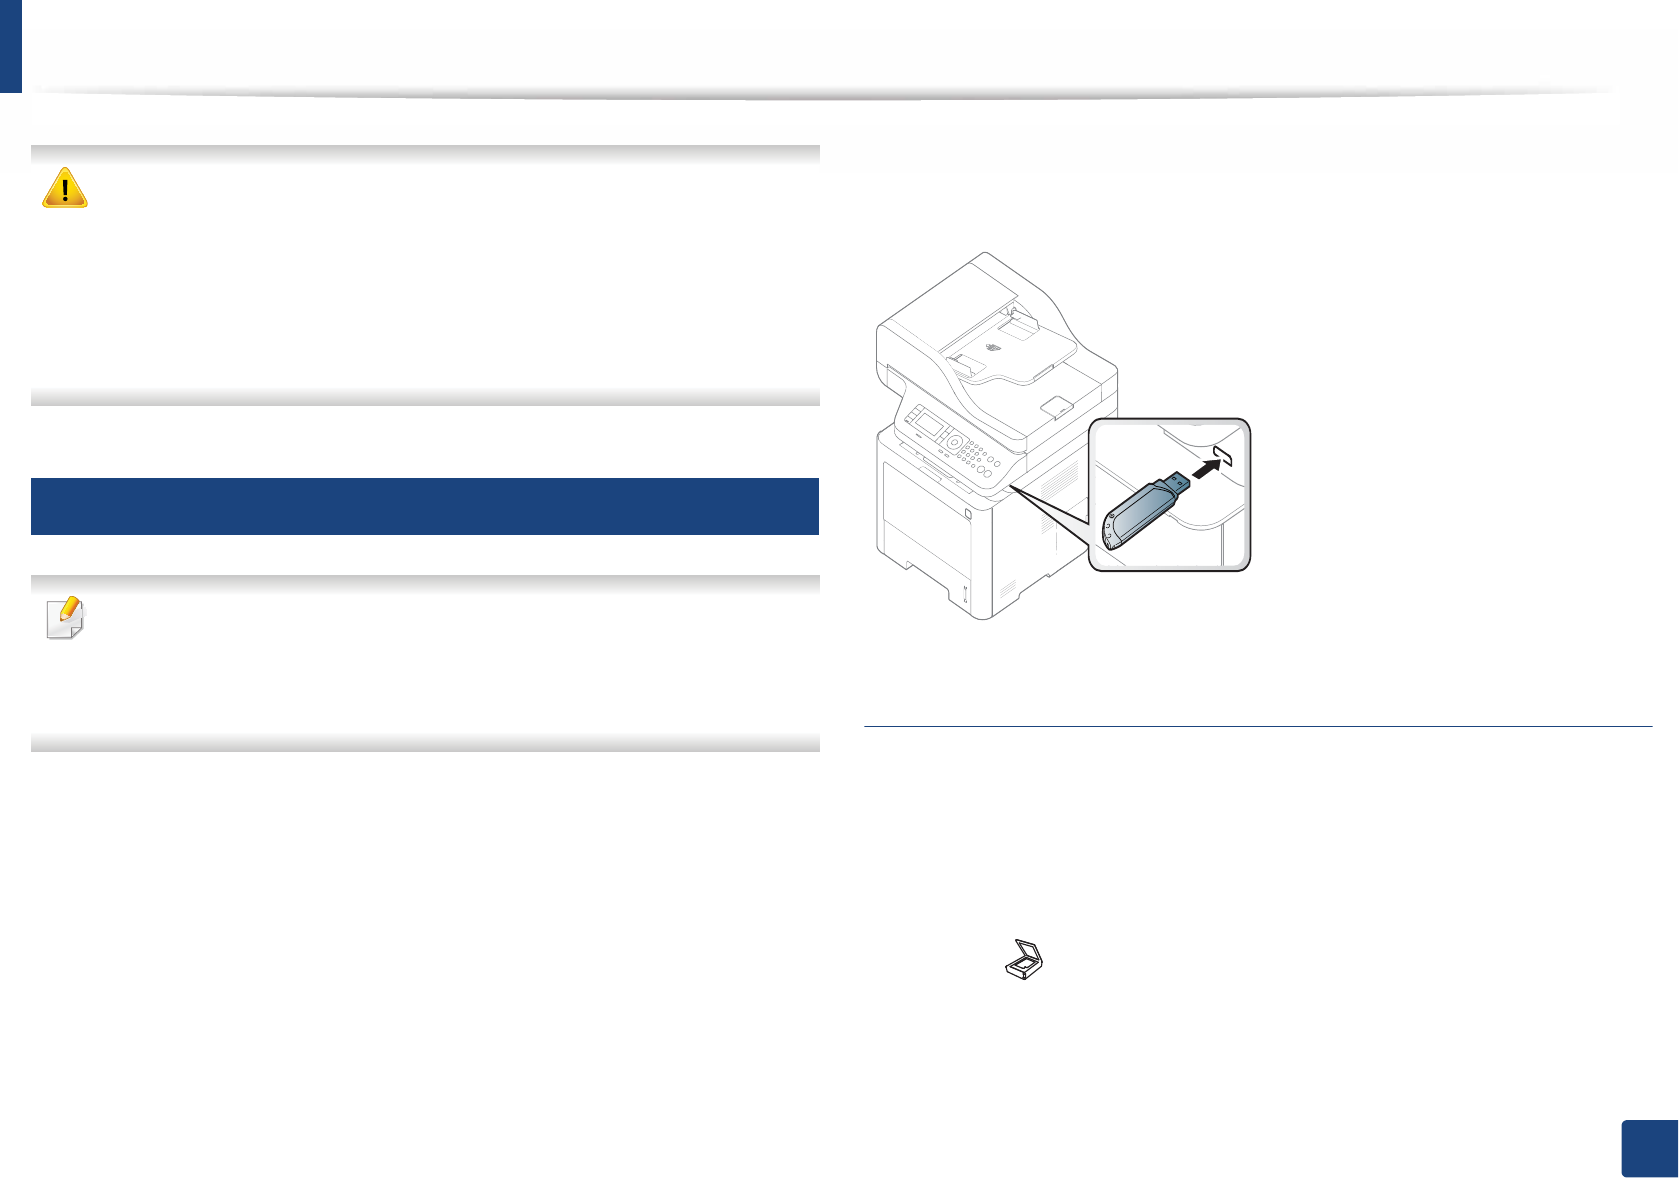
Plugging in a USB memory device
The USB memory port on the front of your machine is designed for USB V1.1 and
USB V2.0 memory devices. Your machine supports USB memory devices with
FAT16/FAT32 and a sector size of 512 bytes.
Check your USB memory device’s file system from your dealer.
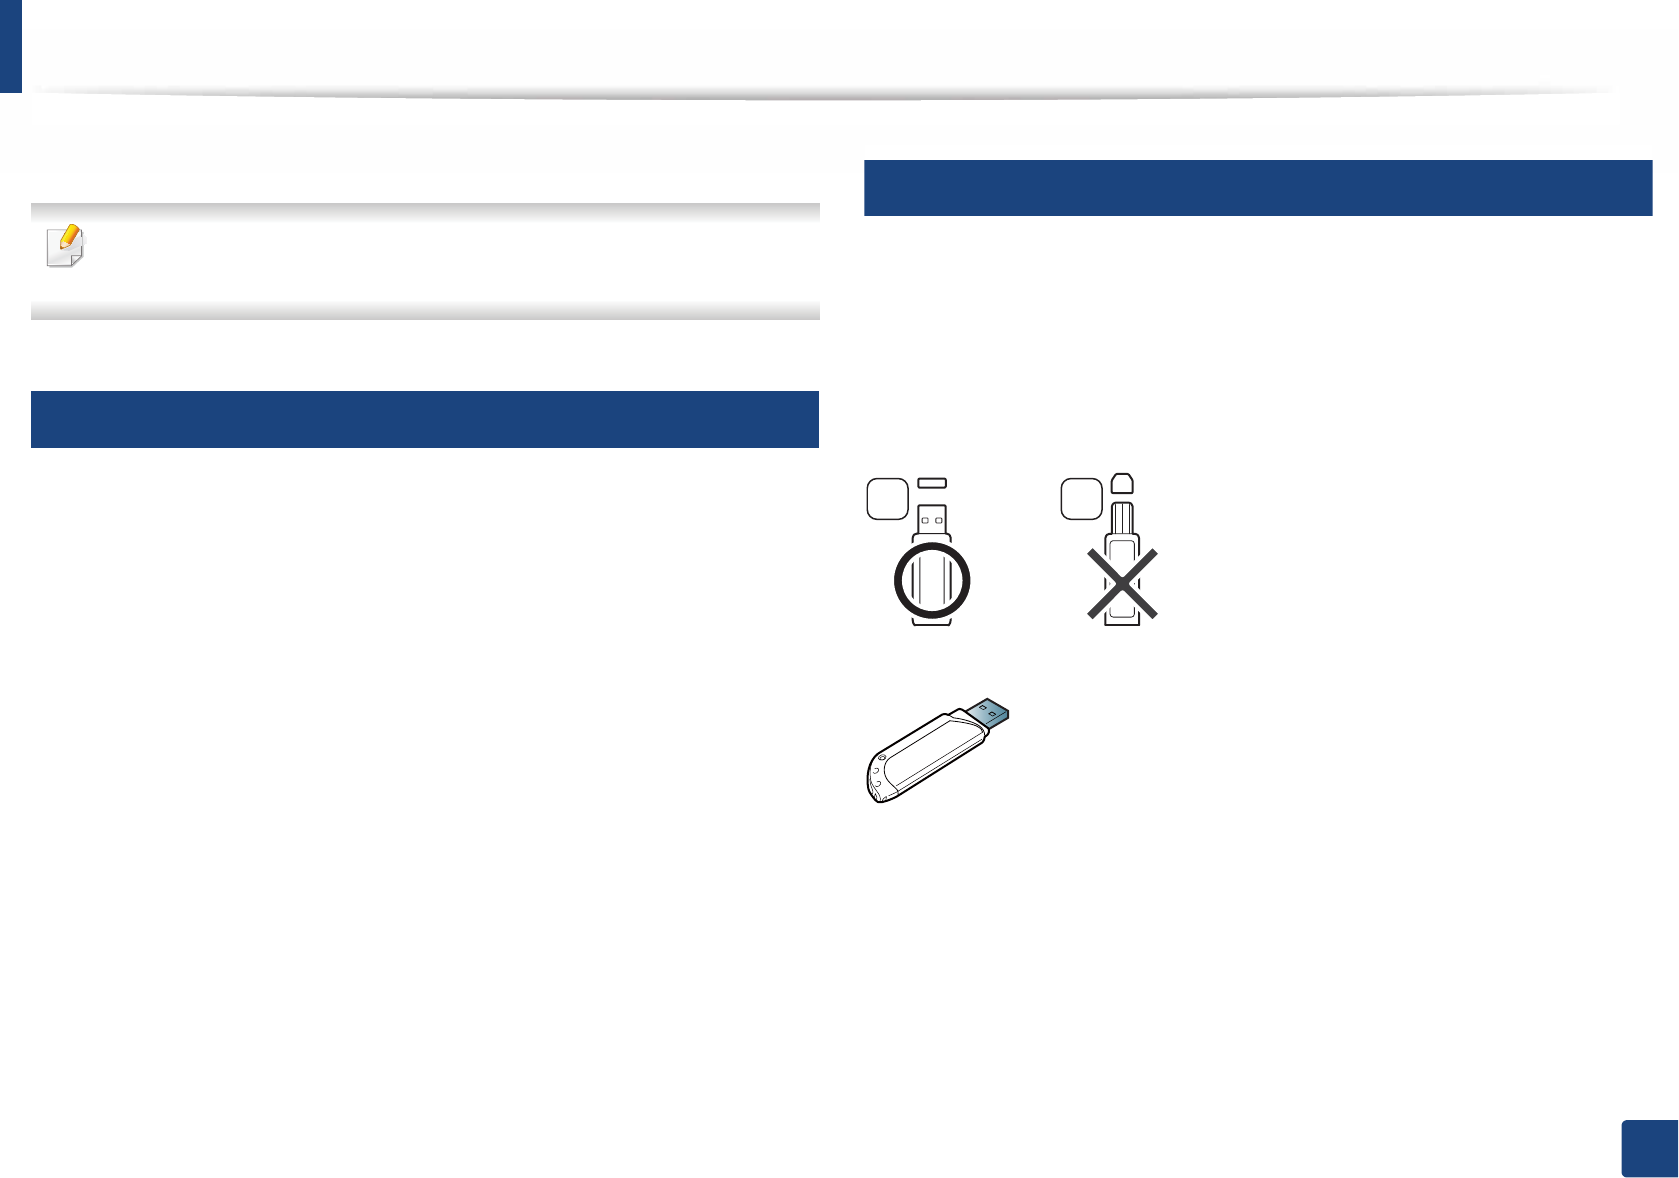
You must use only an authorized USB memory device with an A plug connector.
Use only a metal-shielded USB memory device.
Only use a USB memory device that has obtained compatibility certification;
otherwise, the machine might not recognize it.
A B
Using USB memory device
70
2. Menu Overview and Basic Setup
• Do not remove the USB memory device while the machine is in operation
or writing to or reading from USB memory. The machine warranty does
not cover damage caused by user’s misuse.
• If your USB memory device has certain features such as security settings
and password settings, your machine may not automatically detect it.
For details about these features, see the user’s guide of the USB memory
device.
25
Scanning to a USB memory device
• Accessing menus may differ from model to model (see "Accessing the
menu" on page 30 or "Control panel overview" on page 22).
• It may be necessary to press OK to navigate to lower-level menus for
some models.
You can scan a document and save the scanned image onto a USB memory
device.
Scanning
1Insert a USB memory device into the USB memory port on your machine.
2 Place a single document face down on the document glass, or load the
documents face up into the document feeder (see "Loading originals" on
page 50).
3 Select (scan) > Scan To USB > OK on the control panel.
The machine begins scanning.
Using USB memory device
71
2. Menu Overview and Basic Setup
After scanning is complete, you can remove the USB memory device from the
machine.
Customizing Scan to USB
You can specify image size, file format, or color mode for each scanning to USB
job.
1Select (scan) > (Menu) > Scan Feature > USB Feature on the
control panel.
Or select Scan to > (Menu) > Scan Feature > USB Feature on the
control panel.
2 Select the setting option you want appears.
Some features may not be available depending on model.
•Original Size: Sets the image size.
•Original Type: Sets the original document’s.
•Resolution: Sets the image resolution.
•Color Mode: Sets the color mode. If you select Mono in this option,
you cannot select JPEG in File Format.
•File Format: Sets the file format in which the image is to be saved.
When you select TIFF or PDF, you can select to scan multiple pages.
If you select JPEG in this option, you cannot select Mono in Color
Mode.
•Duplex: Sets the duplex mode.
•Darkness: Sets the brightness level to scan an original.
3 Select the desired status you want and press OK.
4 Repeat steps 2 and 3 to set other setting options.
5 Press (Stop/Clear) button to return to ready mode.
26
Printing from a USB memory device
You can directly print files stored on a USB memory device.
File is supported by Direct Print option.
• PRN: Only files created by provided driver with your machine are
compatible.
If you print PRN files created from other machine, the printout would be
different.
• TIFF: TIFF 6.0 Baseline

Using USB memory device
72
2. Menu Overview and Basic Setup
• JPEG: JPEG Baseline
• PDF: PDF 1.7 or lower version.
To print a document from a USB memory device
1Insert a USB memory device into the USB memory port on your machine,
and then press Direct USB.
2 Select USB Print.
3 Select the folder or file you want and press OK.
If you see [+] or [D] in the front of a folder name, there are one or more
files or folders in the selected folder.
4 Select the number of copies to be printed or enter the number.
5 Press OK, Start or Print to start printing the selected file.
After printing the file, the display asks if you want to print another job.
6 Press OK when Yes appears to print another job, and repeat from step 2.
Otherwise, press the left/right arrow to select No and press OK.
7 Press (Stop/Clear) button to return to ready mode.
27
Backing up data
Data in the machine’s memory can be accidentally erased due to power failure
or storage failure. Backup helps you protect the system settings by storing them
as backup files on a USB memory device.
Backing up data
1Insert the USB memory device into the USB memory port on your
machine.
2 Select (Menu) > System Setup > Machine Setup > Export Setting
on the control panel.
3 Select Setup Data, Address Book and press OK.
The data is backed up to the USB memory.
4 Press (Stop/Clear) button to return to ready mode.
Restoring data
1Insert the USB memory device on which the backup data is stored in to
the USB memory port.
2 Select (Menu) > System Setup > Machine Setup > Import
Setting on the control panel.
Using USB memory device
73
2. Menu Overview and Basic Setup
3 Select Setup Data, Address Book and press OK.
4 Select the file you want to restore and press OK.
5 Press OK when Yes appears to restore the backup file to the machine.
6 Press (Stop/Clear) button to return to ready mode.
28
Managing USB memory
You can delete image files stored on a USB memory device one by one or all at
once by reformatting the device.
If you see [+] or [D] in the front of a folder name, there are one or more files
or folders in the selected folder.
After deleting files or reformatting a USB memory device, files cannot be
restored. Therefore, confirm that you no longer need the data before
deleting it.
Deleting an image file
1Insert a USB memory device into the USB memory port on your machine,
and then press Direct USB.
2 Select File Manage > Delete and press OK.
3 Select the file you want to delete and press OK.
4 Select Yes.
5 Press (Stop/Clear) button to return to ready mode.
Formatting a USB memory device
1Insert a USB memory device into the USB memory port on your machine,
and then press Direct USB.
2 Select File Manage > Format and press OK.
3 Select Yes.
4 Press (Stop/Clear) button to return to ready mode.
Viewing the USB memory status
You can check the amount of memory space available for scanning and saving
documents.

Using USB memory device
74
2. Menu Overview and Basic Setup
1Insert a USB memory device into the USB memory port on your machine,
and then press Direct USB.
2 Select Check Space.
3 The available memory space appears on the display.
4 Press (Stop/Clear) button to return to ready mode.

3. Maintenance
This chapter provides information about purchasing supplies, accessories and maintenance parts available for your
machine.
• Ordering supplies and accessories 76
• Available consumables 77
• Available accessories 79
• Available maintenance parts 80
• Storing the toner cartridge 81
• Redistributing toner 83
• Replacing the toner cartridge 86
• Replacing the imaging unit 89
• Installing accessories 90
• Monitoring the supplies life 94
• Setting the toner low alert 95
• Cleaning the machine 96
• Tips for moving & storing your machine 102

76
3. Maintenance
Ordering supplies and accessories
Available accessories may differ from country to country. Contact your sales representatives to obtain the list of available supplies, and maintenance parts.
To order Samsung-authorized supplies, accessories, and maintenance parts, contact your local Samsung dealer or the retailer where you purchased your machine.
You can also visit www.samsung.com/supplies, and then select your country/region to obtain the contact information for service.
77
3. Maintenance
Available consumables
When supplies reach the end of their life spans, you can order the followings of supplies for your machine:
Depending on the options, percentage of image area and job mode used, the toner cartridge’s lifespan may differ.
When purchasing new toner cartridges or other supplies, these must be purchased in the same country as the machine you are using. Otherwise, new toner
cartridges or other supplies will be incompatible with your machine due to different configurations of toner cartridges and other supplies according to the specific
country conditions.
Type Average yielda
a. Declared yield value in accordance with ISO/IEC 19752.
Part name
Toner cartridge
Approx. 3,000 pages • M3370/ M3870/ M4070 series: MLT-D203S
•M3375/ M3875/ M4075 series: MLT-D204S
Approx. 5,000 pages • M3370/ M3870/ M4070 series: MLT-D203L
•M3375/ M3875/ M4075 series: MLT-D204L
Approx. 10,000 pages • M3870/ M4070 series: MLT-D203E
•M3875/ M4075 series: MLT-D204E
Approx. 15,000 pages • M4070 series: MLT-D203U
•M4075 series: MLT-D204U
Imaging unit
Approx. 30,000 pages
(Based on 3 average letter/A4 size pages
for print job)
•M3375/ M3875/ M4075 series: MLT-R204

Available consumables
78
3. Maintenance
Samsung does not recommend using non-genuine Samsung toner cartridge
such as refilled or remanufactured toner. Samsung cannot guarantee non-
genuine Samsung toner cartridge's quality. Service or repair required as a result
of using non-genuine Samsung toner cartridges will not be covered under the
machine’s warranty.
79
3. Maintenance
Available accessories
You can purchase and install accessories to enhance your machine’s performance and capacity.
Some features and optional goods may not be available depending on model or country (see "Features by models" on page 7).
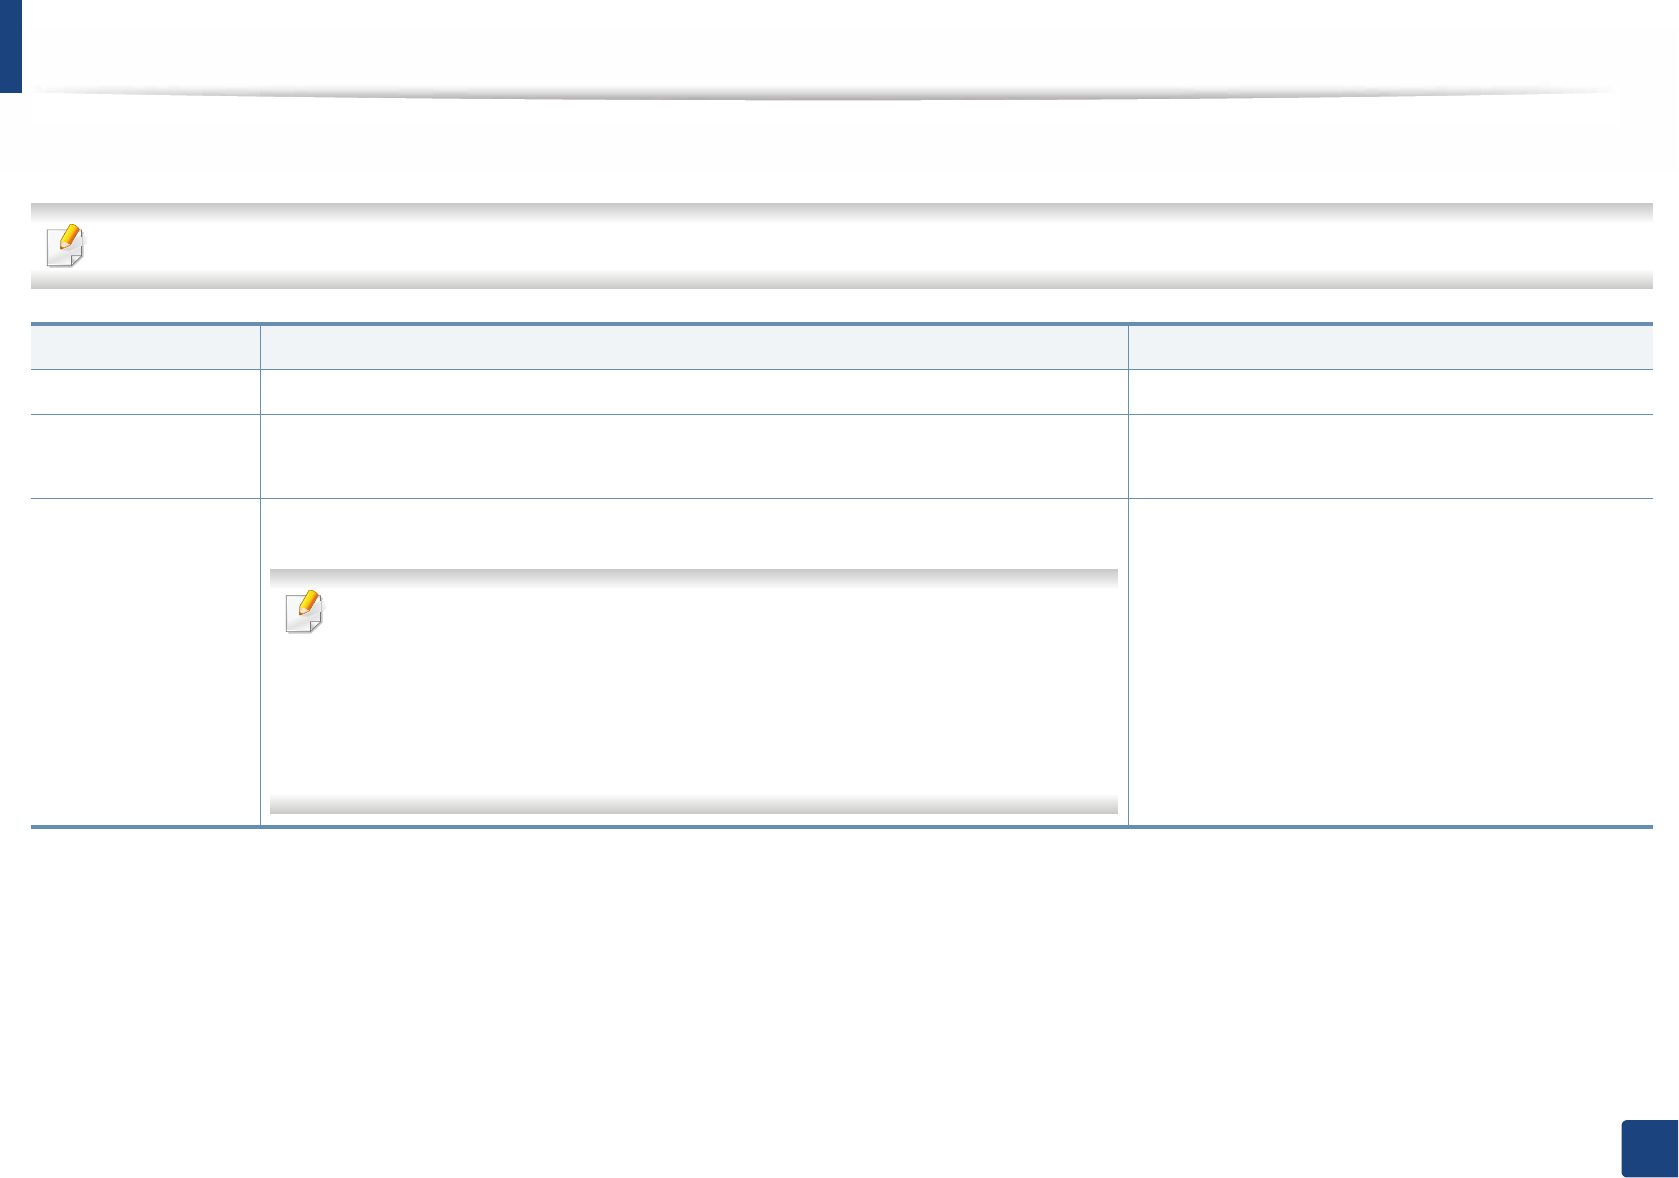
Accessory Function Part name
Memory module Extends your machine’s memory capacity. ML-MEM370: 512 MB
Optional tray If you are experiencing frequent paper supply problems, you can attach an additional 520a
sheet tray.
a. Plain paper 80 g/m2 (20 lb bond).
•M3370/ M3870/ M4070 series: SL-SCF3800
•M3375/ M3875/ M4075 series: SL-SCF3805
IEEE 1284B parallel
Connectorb
b. The optional IEEE 1284B parallel connector can be used by plugging in both the USB port and the 5V output port.
Allows you to use various interface.
• When installing the printer driver with an IEEE1284B parallel connector, the
machine might not be found and after installing the printer driver, only basic
printing features are available.
• If you want to check the machine's status or set the settings, connect the
machine to a computer with a USB cable or a network.
• If you use the IEEE 1284B parallel connector, you can not use the USB cable.
• ML-PAR100
80
3. Maintenance
Available maintenance parts
To purchase maintenance parts, contact the source where you bought the machine. Replacing maintenance parts can be performed only by an authorized service
provider, dealer, or the retailer where you bought the machine. The warranty does not cover the replacement of any maintenance parts once it has reached its
“Average yield”.
Maintenance parts are replaced at specific intervals to avoid print quality and paper feed problems resulting from worn parts, see table below. The purpose of which
is to maintain your machine in top working condition. The maintenance parts below should be replaced when the life span of each item has been met.
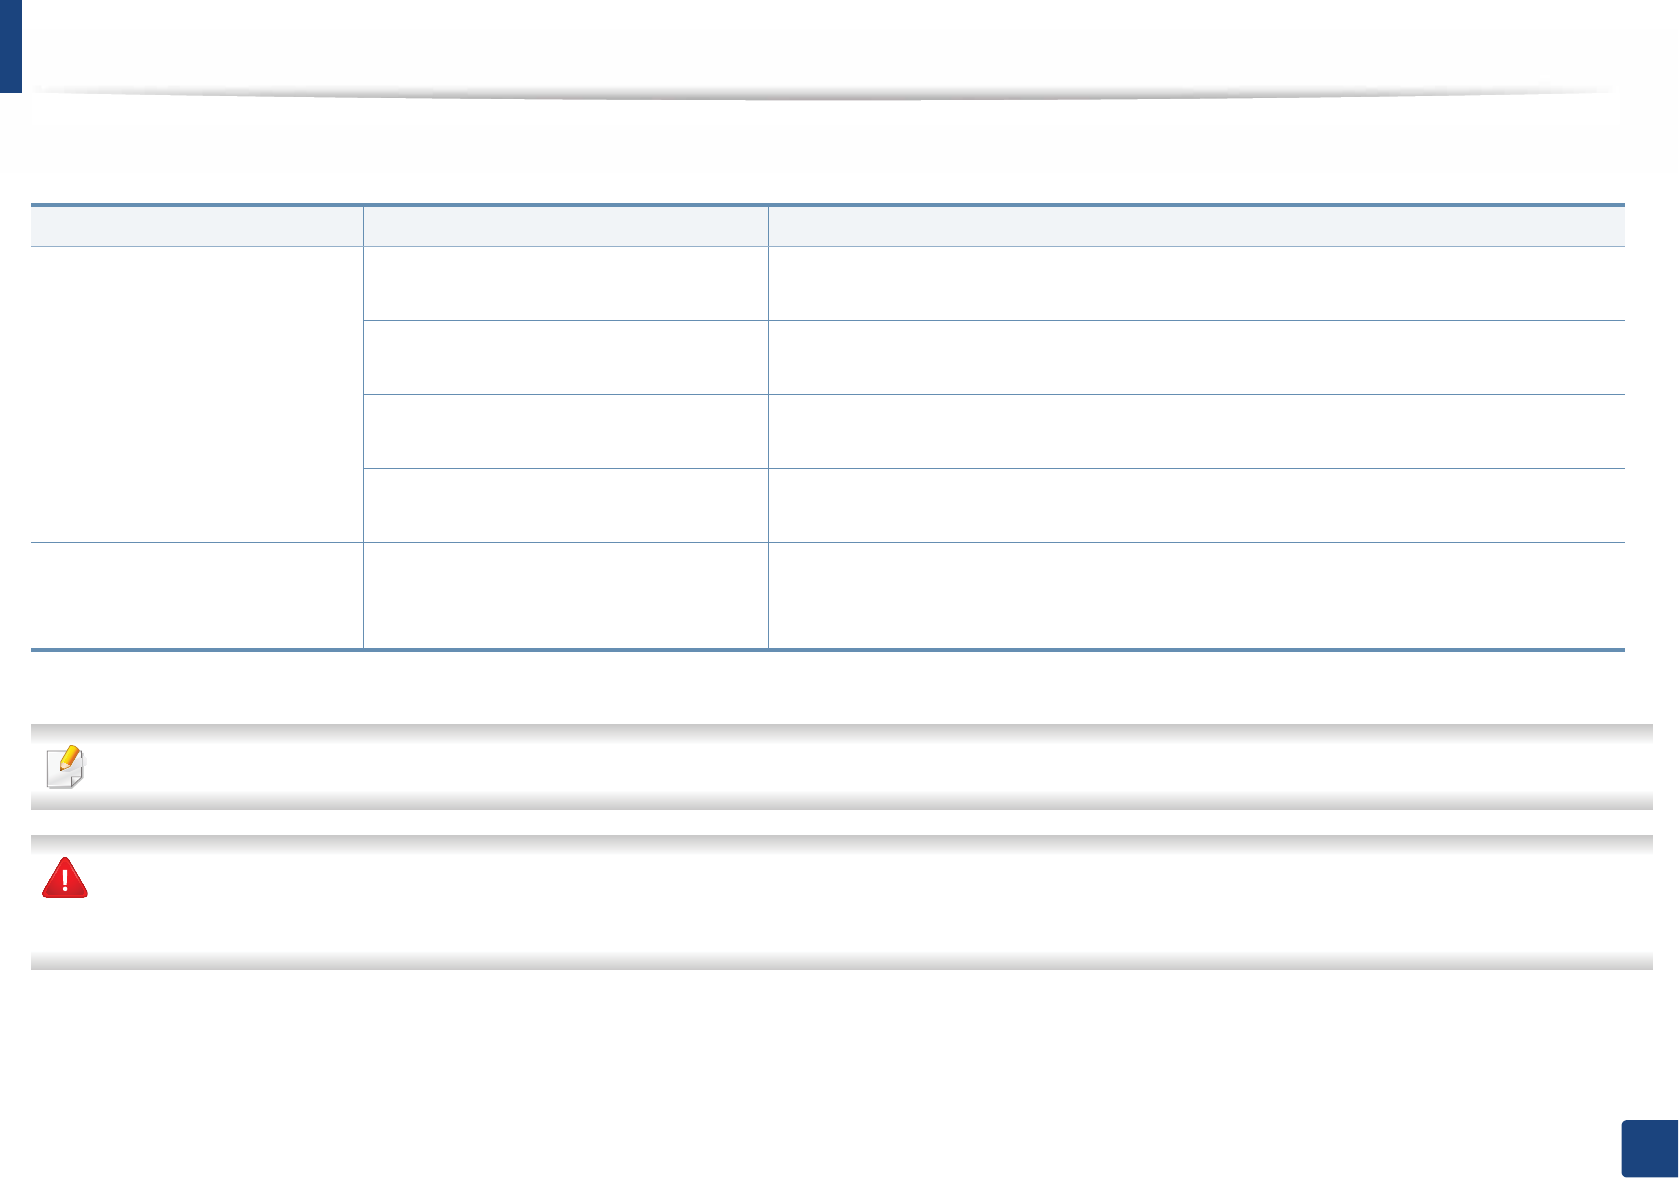
Parts Average yielda
a. It will be affected by the operating system used, computing performance, application software, connecting method, media, media size and job complexity.
Tray 1 roller Approx. 90,000 pages
Tray 1 reverse roller Approx. 60,000 pages
Tray 2 roller Approx. 200,000 pages
Tray 2 reverse roller Approx. 100,000 pages
MP roller Approx. 100,000 pages
MP reverse roller Approx. 80,000 pages
Document feeder (DADF) roller Approx. 70,000 pages
Document feeder (DADF) rubber pad Approx. 20,000 pages
Document feeder (ADF) roller Approx. 20,000 pages
Document feeder (ADF) rubber pad Approx. 20,000 pages
Fuser unit Approx. 90,000 pages
81
3. Maintenance
Storing the toner cartridge
Toner cartridges contain components that are sensitive to light, temperature
and humidity. Samsung suggests users follow these recommendations to
ensure optimal performance, highest quality, and longest life from your new
Samsung toner cartridge.
Store this cartridge in the same environment in which the printer will be used.
This should be in controlled temperature and humidity conditions. The toner
cartridge should remain in its original and unopened package until installation
– if original packaging is not available, cover the top opening of the cartridge
with paper and store in a dark cabinet.
Opening the cartridge package prior to use dramatically shortens its useful shelf
and operating life. Do not store on the floor. If the toner cartridge is removed
from the printer, follow the instructions below to store the toner cartridge
properly.
• Store the cartridge inside the protective bag from the original package.
• Store lying flat (not standing on end) with the same side facing up as if it
were installed in the machine.
• Do not store consumables in any of the following conditions:
- Temperature greater than 40°C (104°F).
- Humidity range less than 20% or greater than 80%.
- An environment with extreme changes in humidity or temperature.
- Direct sunlight or room light.
- Dusty places.
- A car for a long period of time.
- An environment where corrosive gases are present.
- An environment with salty air.
1
Handling instructions
• Do not touch the surface of the photoconductive drum in the cartridge.
• Do not expose the cartridge to unnecessary vibrations or shock.
• Never manually rotate the drum, especially in the reverse direction; this can
cause internal damage and toner spillage.
2
Toner cartridge usage
Samsung Electronics does not recommend or approve the use of non-Samsung
brand toner cartridges in your printer including generic, store brand, refilled, or
remanufactured toner cartridges.
Samsung’s printer warranty does not cover damage to the machine caused
by the use of a refilled, remanufactured, or non-Samsung brand toner
cartridges.

Storing the toner cartridge
82
3. Maintenance
3
Estimated cartridge life
Estimated cartridge life (the life of the toner cartridge yield) depends on the
amount of toner that print jobs require. The actual print yield may vary
depending on the print density of the pages you print on, operating
environment, percentage of image area, printing interval, media type and/or
media size. For example, if you print a lot of graphics, the consumption of the
toner is higher and you may need to change the cartridge more often.
83
3. Maintenance
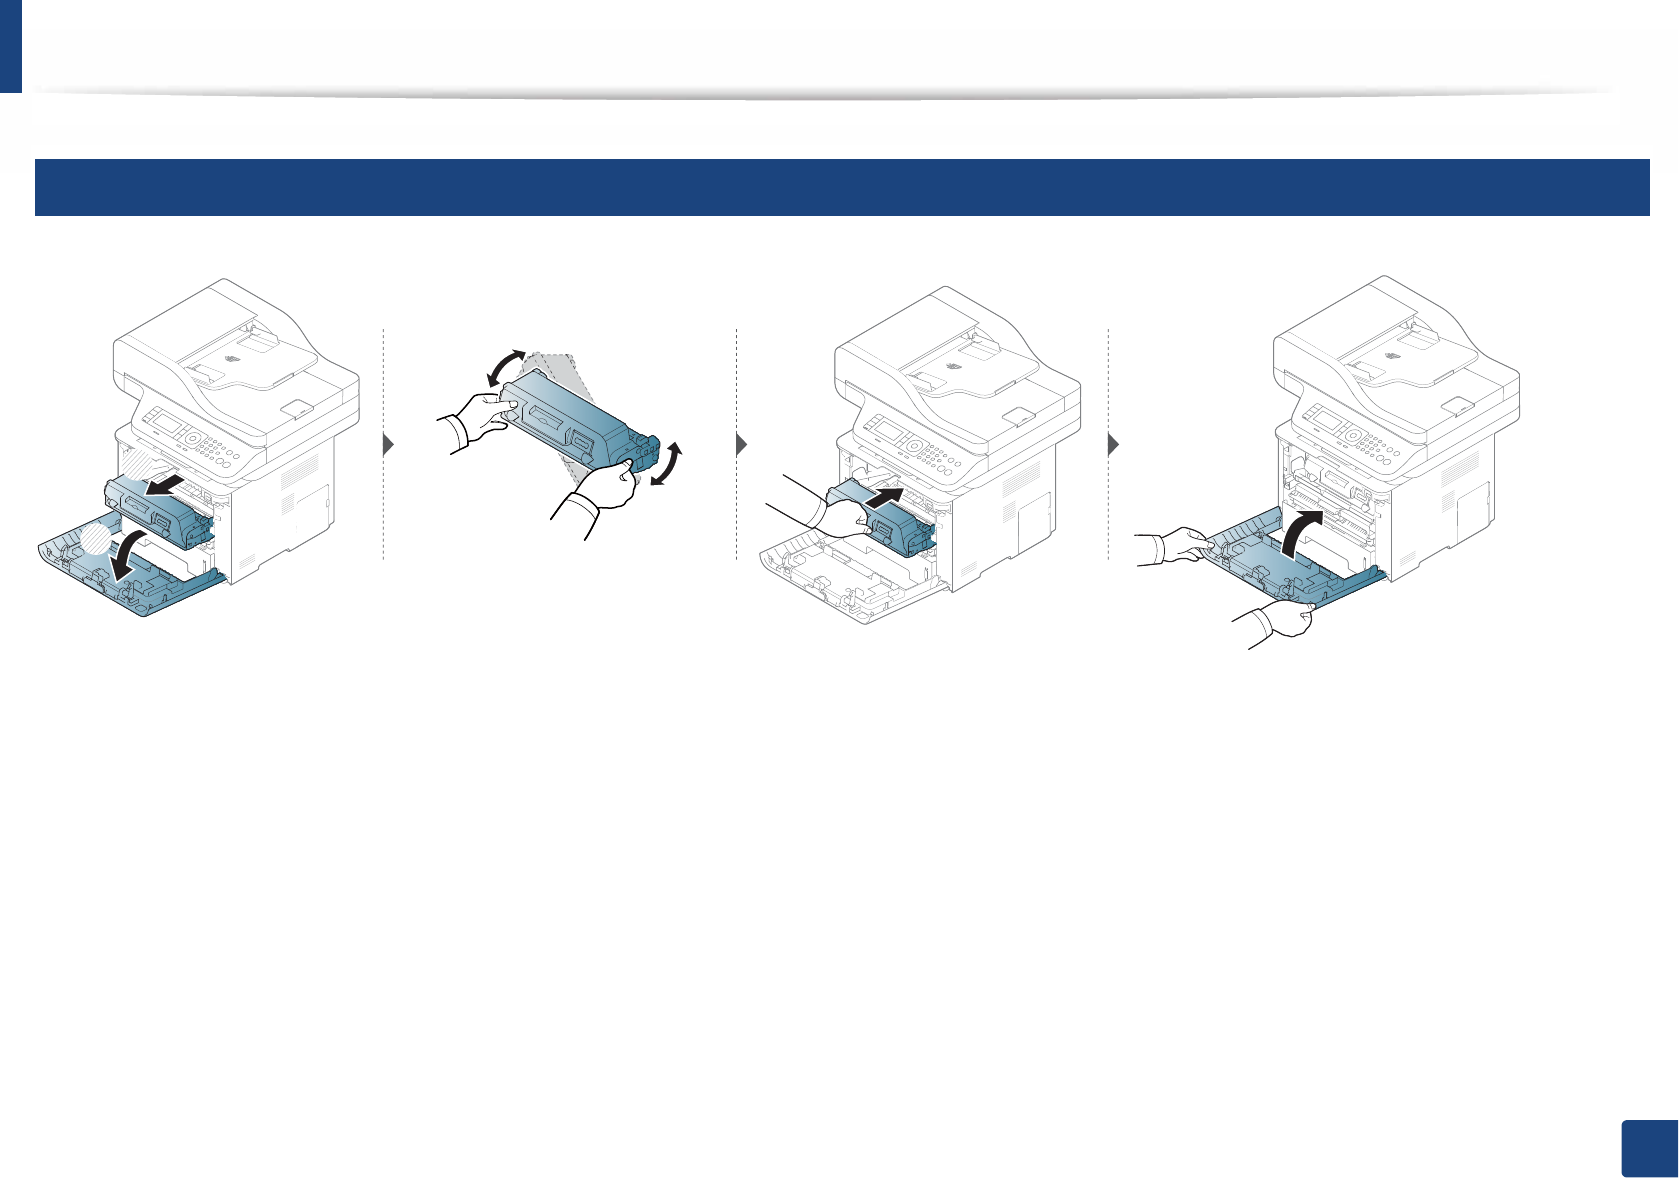
Redistributing toner
When the toner cartridge is near the end of its life:
• White streaks or light printing occurs and/or density variation side to side.
• The Status LED blinks red. The toner-related message saying that the toner is low may appear on the display.
• The computer’s Samsung Printing Status program window appears on the computer telling you which color cartridge is low on toner (see "Using Samsung Printer
Status" on page 299).
If this happens, you can temporarily improve print quality by redistributing the remaining toner in the cartridge. In some cases, white streaks or light printing will still
occur even after you have redistributed the toner.
Illustrations on this user’s guide may differ from your machine depending on its options or models. Check your machine type (see "Front view" on page 20).
• To prevent damage to the toner cartridge, do not expose it to light for more than a few minutes. Cover it with a piece of paper, if necessary.
• Do not touch the green area of the toner cartridge. Use the handle on the cartridge to avoid touching this area.
• Do not use sharp objects such as a knife or scissors to open the toner cartridge package. They might scratch the drum of the cartridge.
• If toner gets on your clothing, wipe it off with a dry cloth and wash clothing in cold water. Hot water sets toner into fabric.
Redistributing toner
84
3. Maintenance
4
M3370/ M3870/ M4070 series
1
2
Redistributing toner
85
3. Maintenance
5
M3375/ M3875/ M4075 series
1
2

86
3. Maintenance
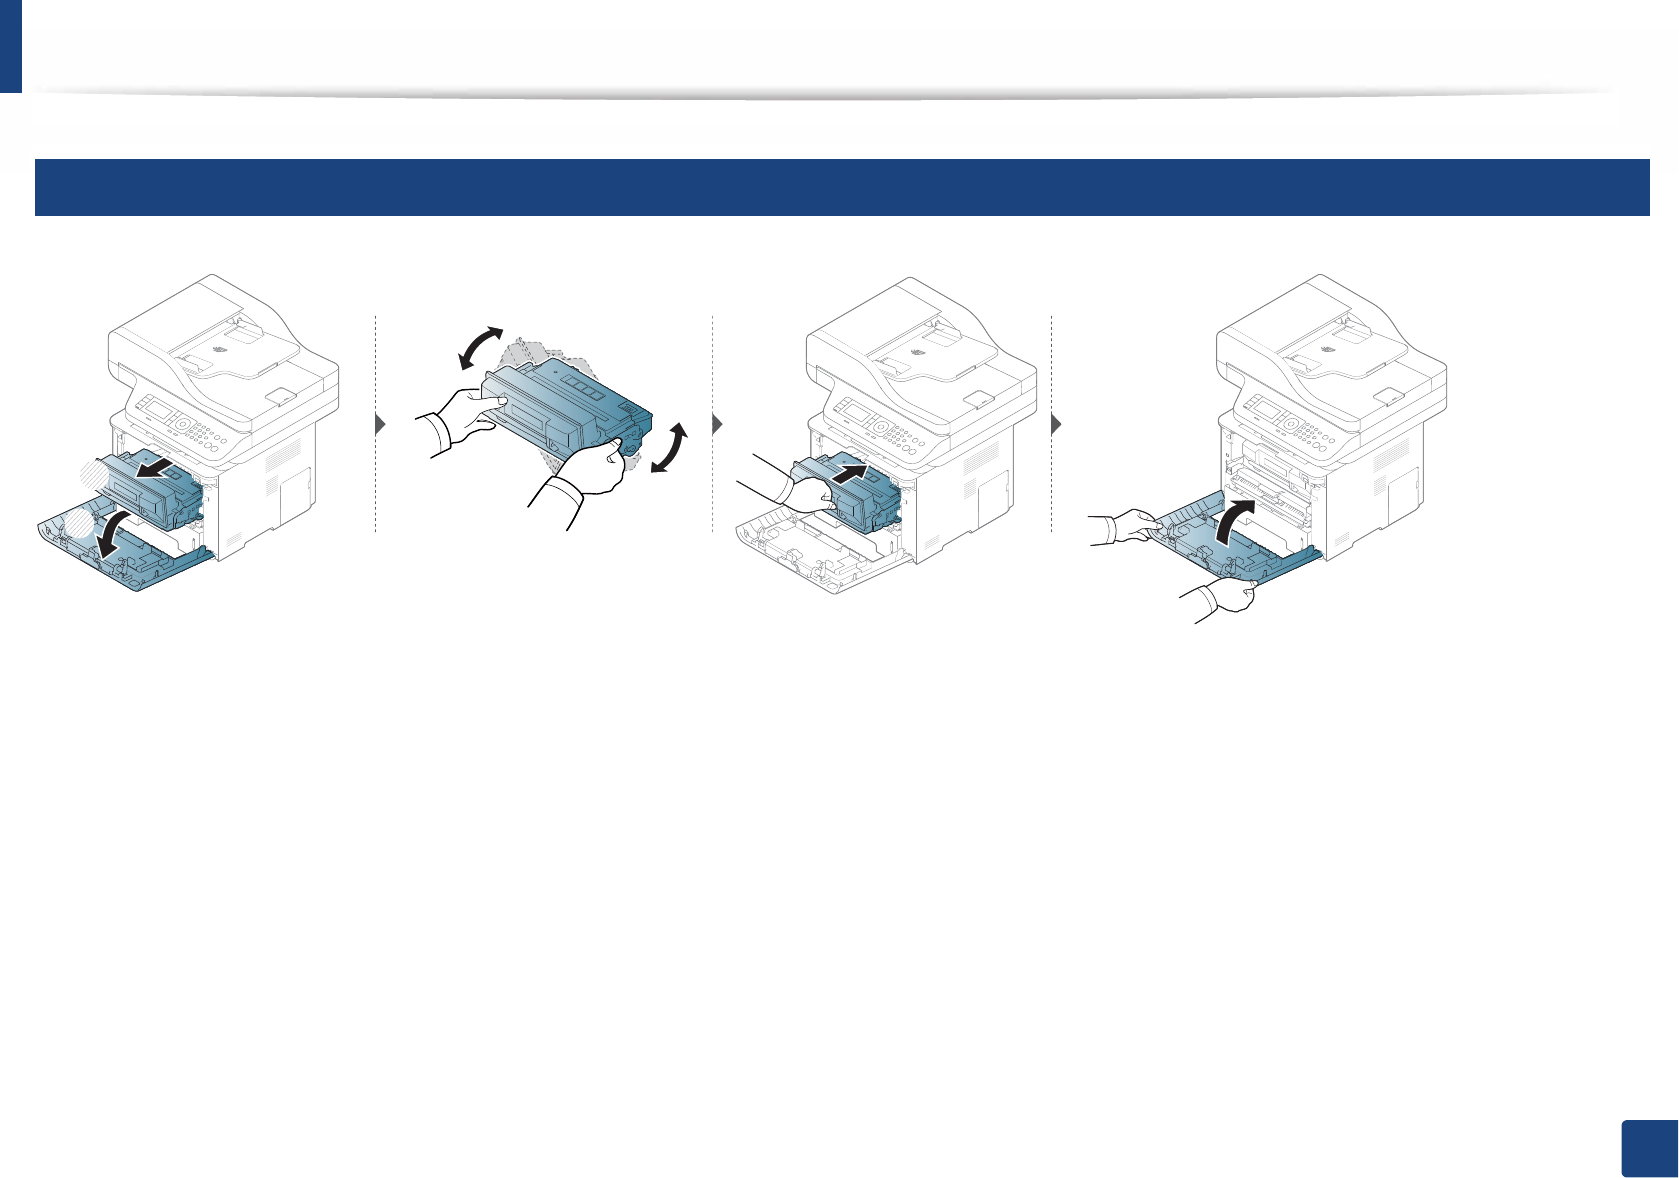
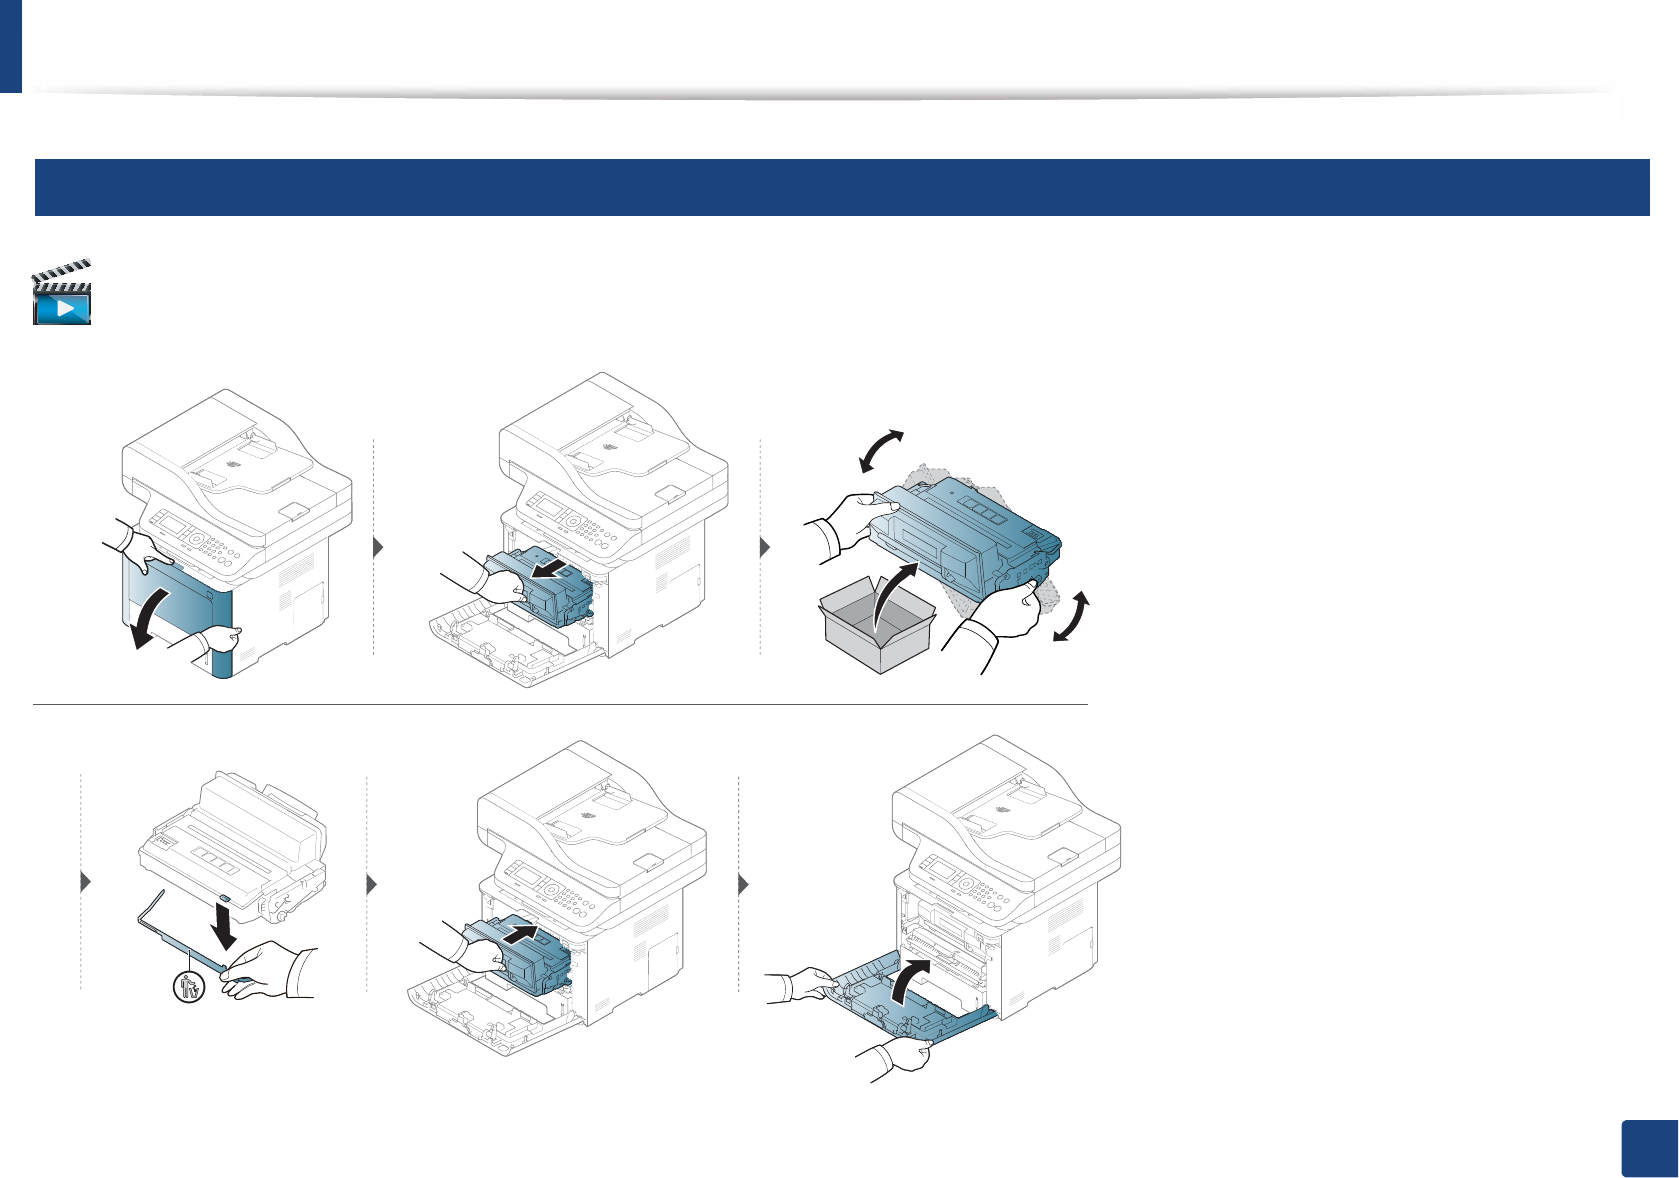
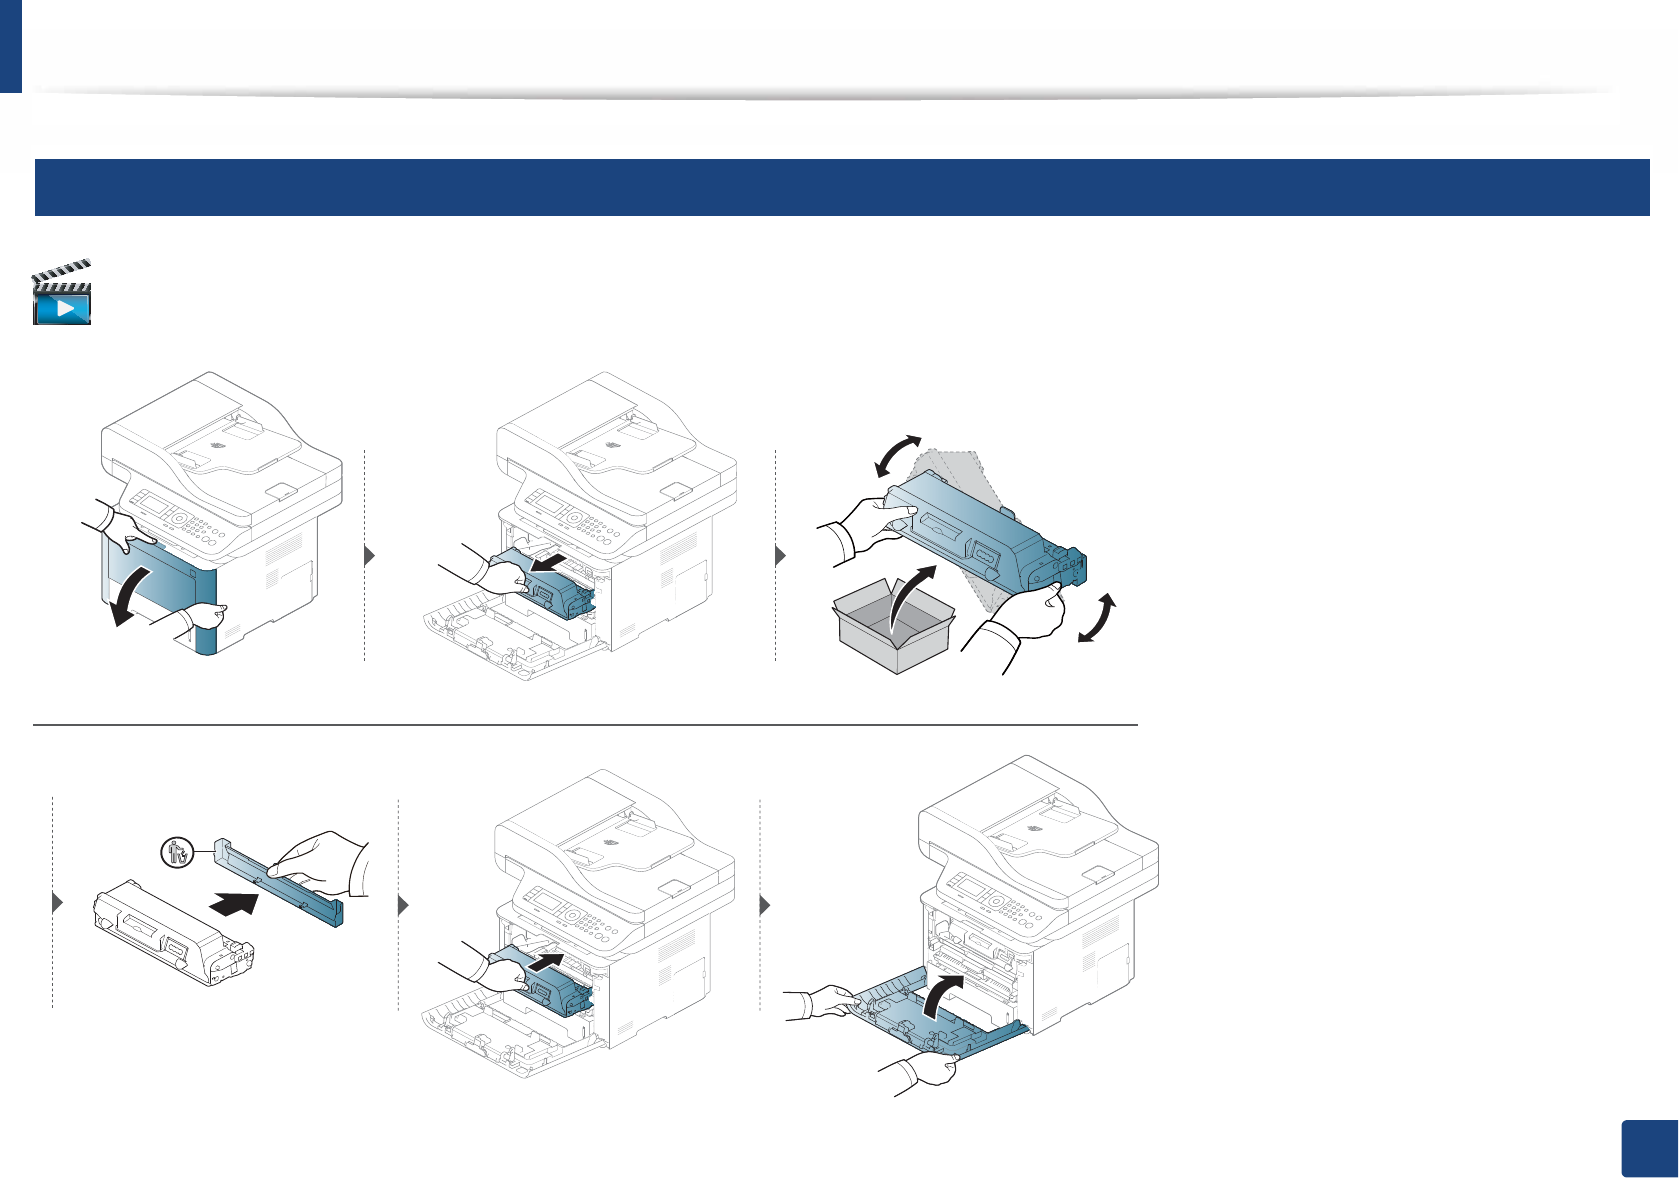
Replacing the toner cartridge
A toner cartridge has almost reached its estimated cartridge life:
• The status LED and the toner-related message on the display indicate when the toner cartridge should be replaced.
• The computer's Samsung Printing Status Program window appears on the computer telling you cartridge is empty on toner (see "Using Samsung Printer Status"
on page 299).
Check the type of the toner cartridge for your machine (see "Available consumables" on page 77).
• Shake the toner cartridge thoroughly, it will increase the initial print quality.
• Illustrations on this user’s guide may differ from your machine depending on its options or models. Check your machine type (see "Front view" on page 20).
• To prevent damage to the toner cartridge, do not expose it to light for more than a few minutes. Cover it with a piece of paper, if necessary.
• Do not touch the green area of the toner cartridge. Use the handle on the cartridge to avoid touching this area.
• Do not use sharp objects such as a knife or scissors to open the toner cartridge package. They might scratch the drum of the cartridge.
• If toner gets on your clothing, wipe it off with a dry cloth and wash clothing in cold water. Hot water sets toner into fabric.
Replacing the toner cartridge
87
3. Maintenance
6
M3370/ M3870/ M4070 series
Click this link to open an animation about replacing a toner cartridge.
Replacing the toner cartridge
88
3. Maintenance
7
M3375/ M3875/ M4075 series
Click this link to open an animation about replacing a toner cartridge.
89
3. Maintenance
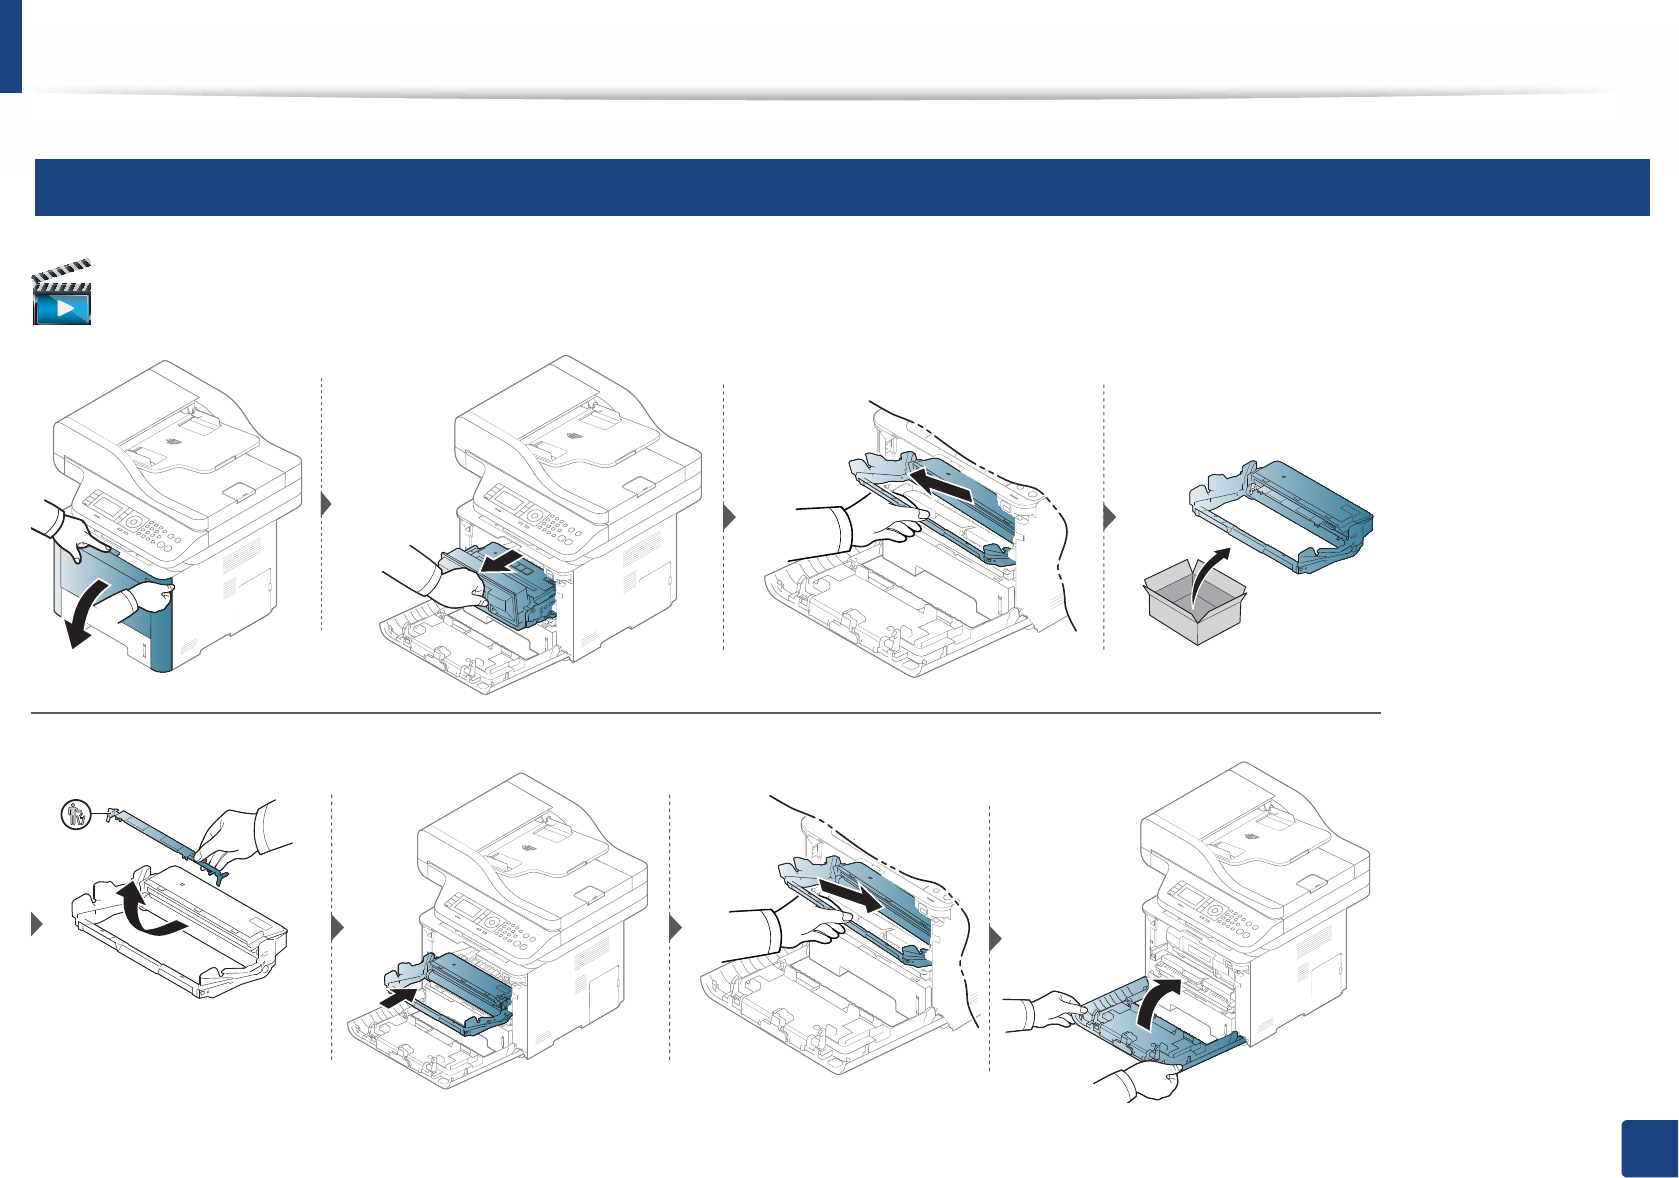
Replacing the imaging unit
8
M3375/ M3875/ M4075 series
Click this link to open an animation about replacing a imaging unit.

90
3. Maintenance
Installing accessories
9
Precautions
• Disconnect the power cord
Never remove the control board cover while the power is turned on.
To avoid the possibility of an electrical shock, always disconnect the power
cord when installing or removing ANY internal or external accessories.
• Discharge static electricity
The control board and internal accessories (network interface card or
memory module) are sensitive to static electricity. Before installing or
removing any internal accessories, discharge static electricity from your
body by touching something metal, such as the metal back plate on any
device plugged into a grounded power source. If you walk around before
finishing the installation, repeat this procedure to discharge any static
electricity again.
When installing accessories, the battery inside the machine is a service
component. Do not change it by yourself. There is a risk of an explosion if
battery is replaced by an incorrect type. Dispose used batteries according to
the instructions.
10
Setting Device Options
When you install the optional devices such as optional tray, memory, etc, this
machine automatically detects and sets the optional devices. If you cannot use
the optional devices you installed in this driver, you can set the optional devices
in Device Options.
1Click the Windows Start menu.
• For Windows 8, from the Charms, select Search > Settings.
2 For Windows XP/2003, select Printers and Faxes.
• For Windows 2008/Vista, select Control Panel > Hardware and
Sound > Printers.
• For Windows 7, select Control Panel > Hardware and Sound >
Devices and Printers.
• For Windows 8, search for Devices and Printers.
• For Windows Server 2008 R2, select Control Panel > Hardware >
Devices and Printers.
3 Right-click your machine.
4 For Windows XP/2003/2008/Vista, press Properties.
For Windows 7, Windows 8, and Windows Server 2008 R2, from context
menus, select the Printer properties.
Installing accessories
91
3. Maintenance
If Printer properties item has ൘ mark, you can select other printer drivers
connected with selected printer.
5 Select Device Options or Device Settings.
The Properties window may differ depending on the driver or operating
system you are using.
6 Select the appropriate option.
Some menus may not appear in the display depending on options or
models. if so, it is not applicable to your machine.
•Tray Options: Select the optional tray you installed. You can select
the tray.
•Storage Options: Select the optional memory you installed. If this
feature is checked, you can select the Print Mode.
•Printer Configuration: Select the printer language for the print job.
•Administrator Settings: You can select the Printer Status and EMF
Spooling.
•Admin Job Accounting: Allows you to associate user and account
identification information with each document you print.
-User permission: If you check this option, only users with user
permission can start a print job.
-Group permission: If you check this option, only groups with
group permission can start a print job.
If you want to encrypt job accounting password, check Job Accounting
Password Encryption.
•Custom Paper Size Settings: You can specify custom paper size.
7 Click OK until you exit the Properties or Printer properties window.
Installing accessories
92
3. Maintenance
11
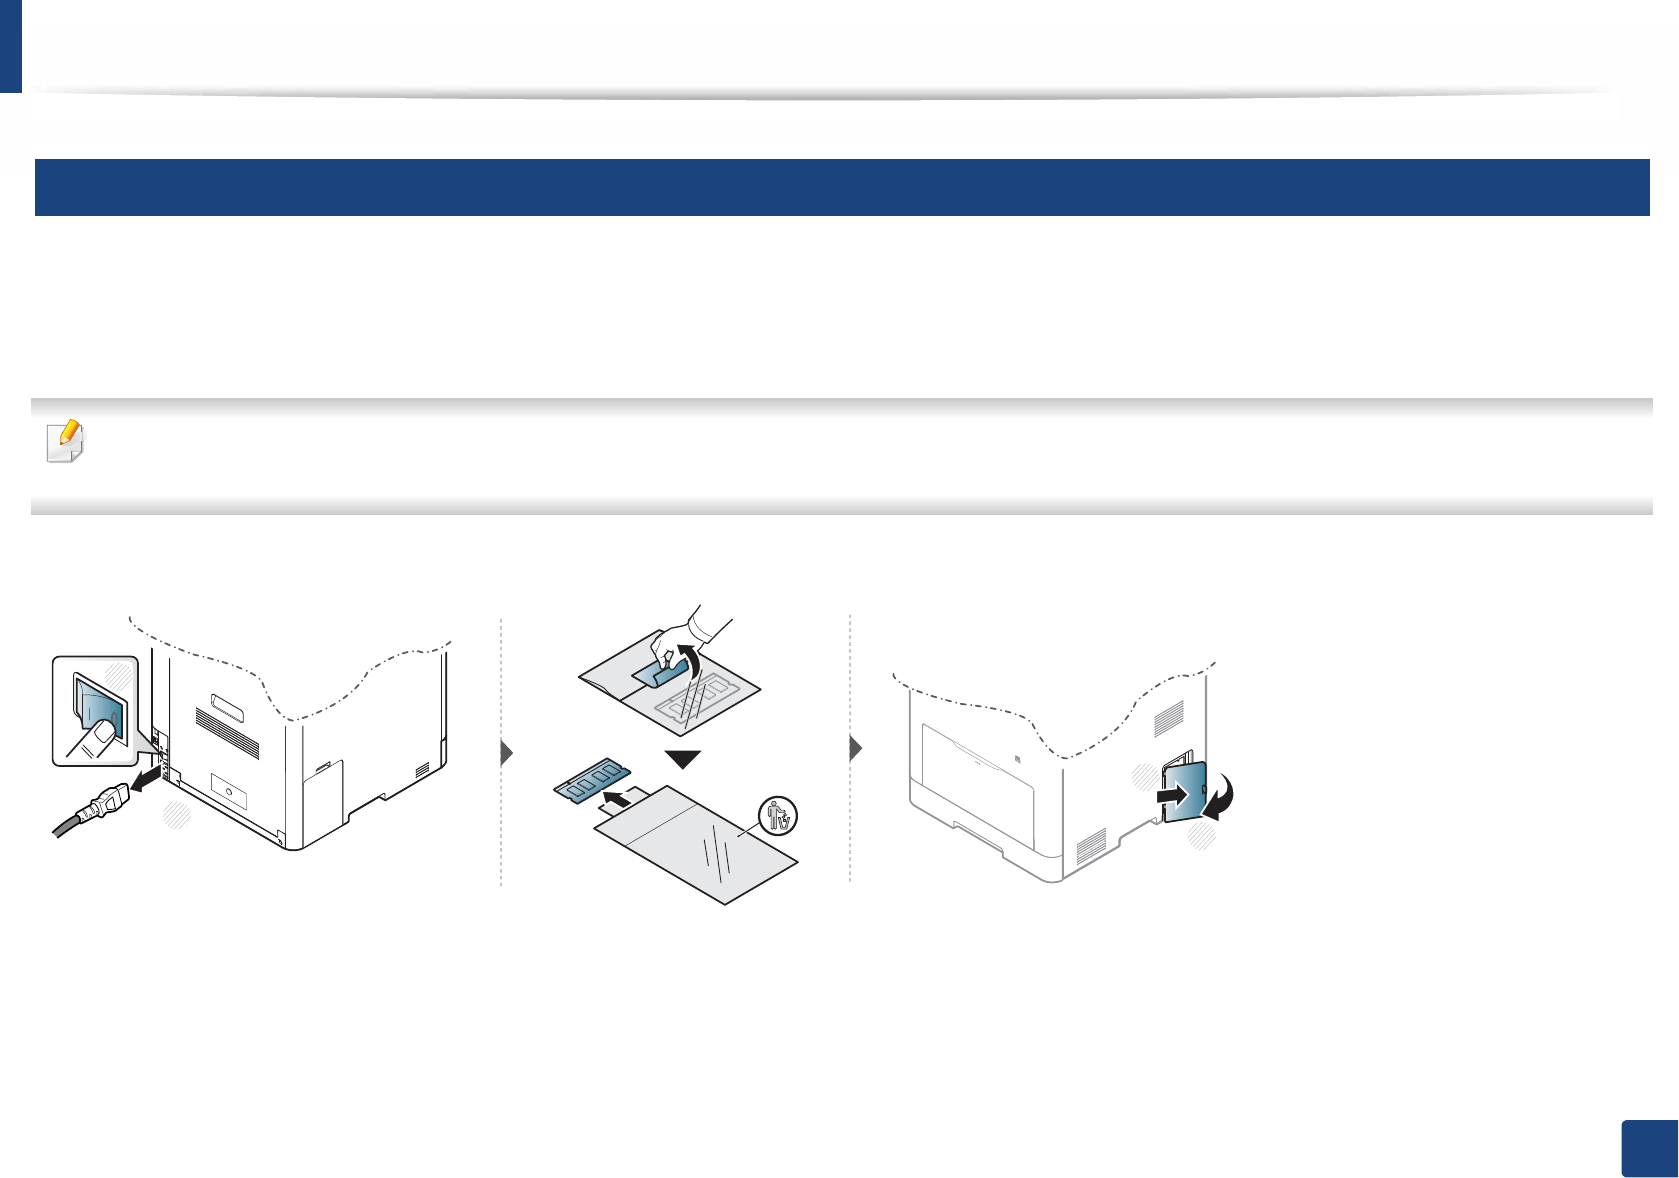
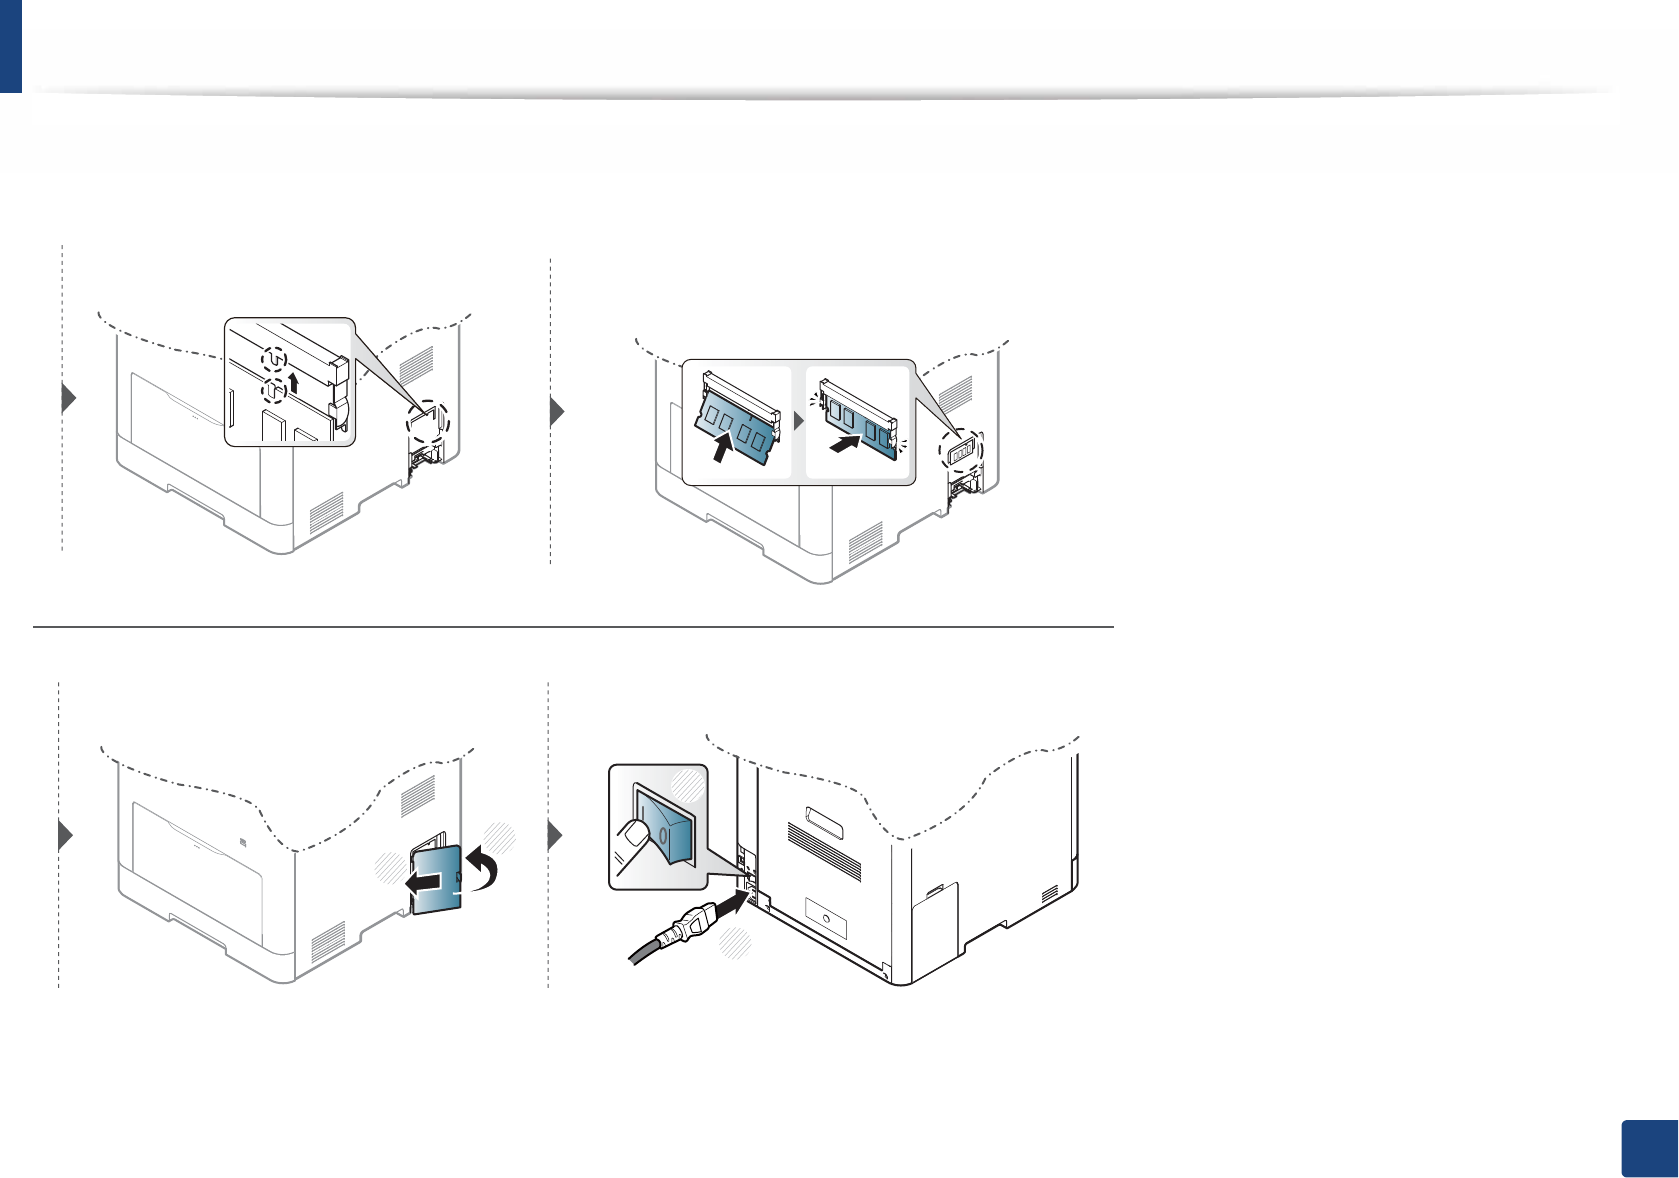
Upgrading a memory module
Your machine has a dual in-line memory module (DIMM). Use this memory module slot to install additional memory. We recommend the use of only genuine
Samsung DIMM's. You may void your warranty if it is determined that your machine problem is being caused by third party DIMM's.
The order information is provided for optional accessories (see "Available accessories" on page 79).
After installing the optional memory, you can use the advanced printing features, such as proofing a job and specifying of printing a secure print job in the printer
properties window. You can control the active job queue and file policy in Job Management menu (see "Using optional device features" on page 285).
1
2
1
2
Installing accessories
93
3. Maintenance
1
2
1
2

94
3. Maintenance
Monitoring the supplies life
If you experience frequent paper jams or printing problems, check the number of pages the machine has printed or scanned. Replace the corresponding parts, if
necessary.
• Accessing menus may differ from model to model (see "Accessing the menu" on page 30).
• Some menus may not appear in the display depending on options or models. If so, it is not applicable to your machine.
• It may be necessary to press OK to navigate to lower-level menus for some models.
1Select (Menu) > System Setup > Maintenance > Supplies Life on the control panel.
2 Select the option you want and press OK.
3 Press (Stop/Clear) button to return to ready mode.
95
3. Maintenance
Setting the toner low alert
If the amount of toner in the cartridge is low, a message or LED informing the user to change the toner cartridge appears. You can set the option for whether or not
this message or LED appears.
• Accessing menus may differ from model to model (see "Accessing the menu" on page 30).
• It may be necessary to press OK to navigate to lower-level menus for some models.
• You can set the machine’s settings by using the Device Settings in Samsung Easy Printer Manager program.
- For Windows and Mac users, you set from Samsung Easy Printer Manager > (Switch to advanced mode) > Device Settings, see "Device Settings" on
page 298.
1Select (Menu) > System Setup > Maintenance > Toner Low Alert on the control panel.
2 Select the option you want.
3 Press OK to save the selection.
96
3. Maintenance
Cleaning the machine
If printing quality problems occur or if you use your machine in a dusty environment, you need to clean your machine regularly to keep it in the best printing
condition and use your machine longer.
• Cleaning the cabinet of the machine with cleaning materials containing large amounts of alcohol, solvents, or other strong substances can discolor or distort the
cabinet.
• If your machine or the surrounding area is contaminated with toner, we recommend you use a cloth or tissue dampened with water to clean it. If you use a vacuum
cleaner, toner blows in the air and might be harmful to you.
12
Cleaning the outside
Clean the machine cabinet with a soft, lint-free cloth. Dampen the cloth slightly with water, but be careful not to let any water drip onto or into the machine.
Cleaning the machine
97
3. Maintenance
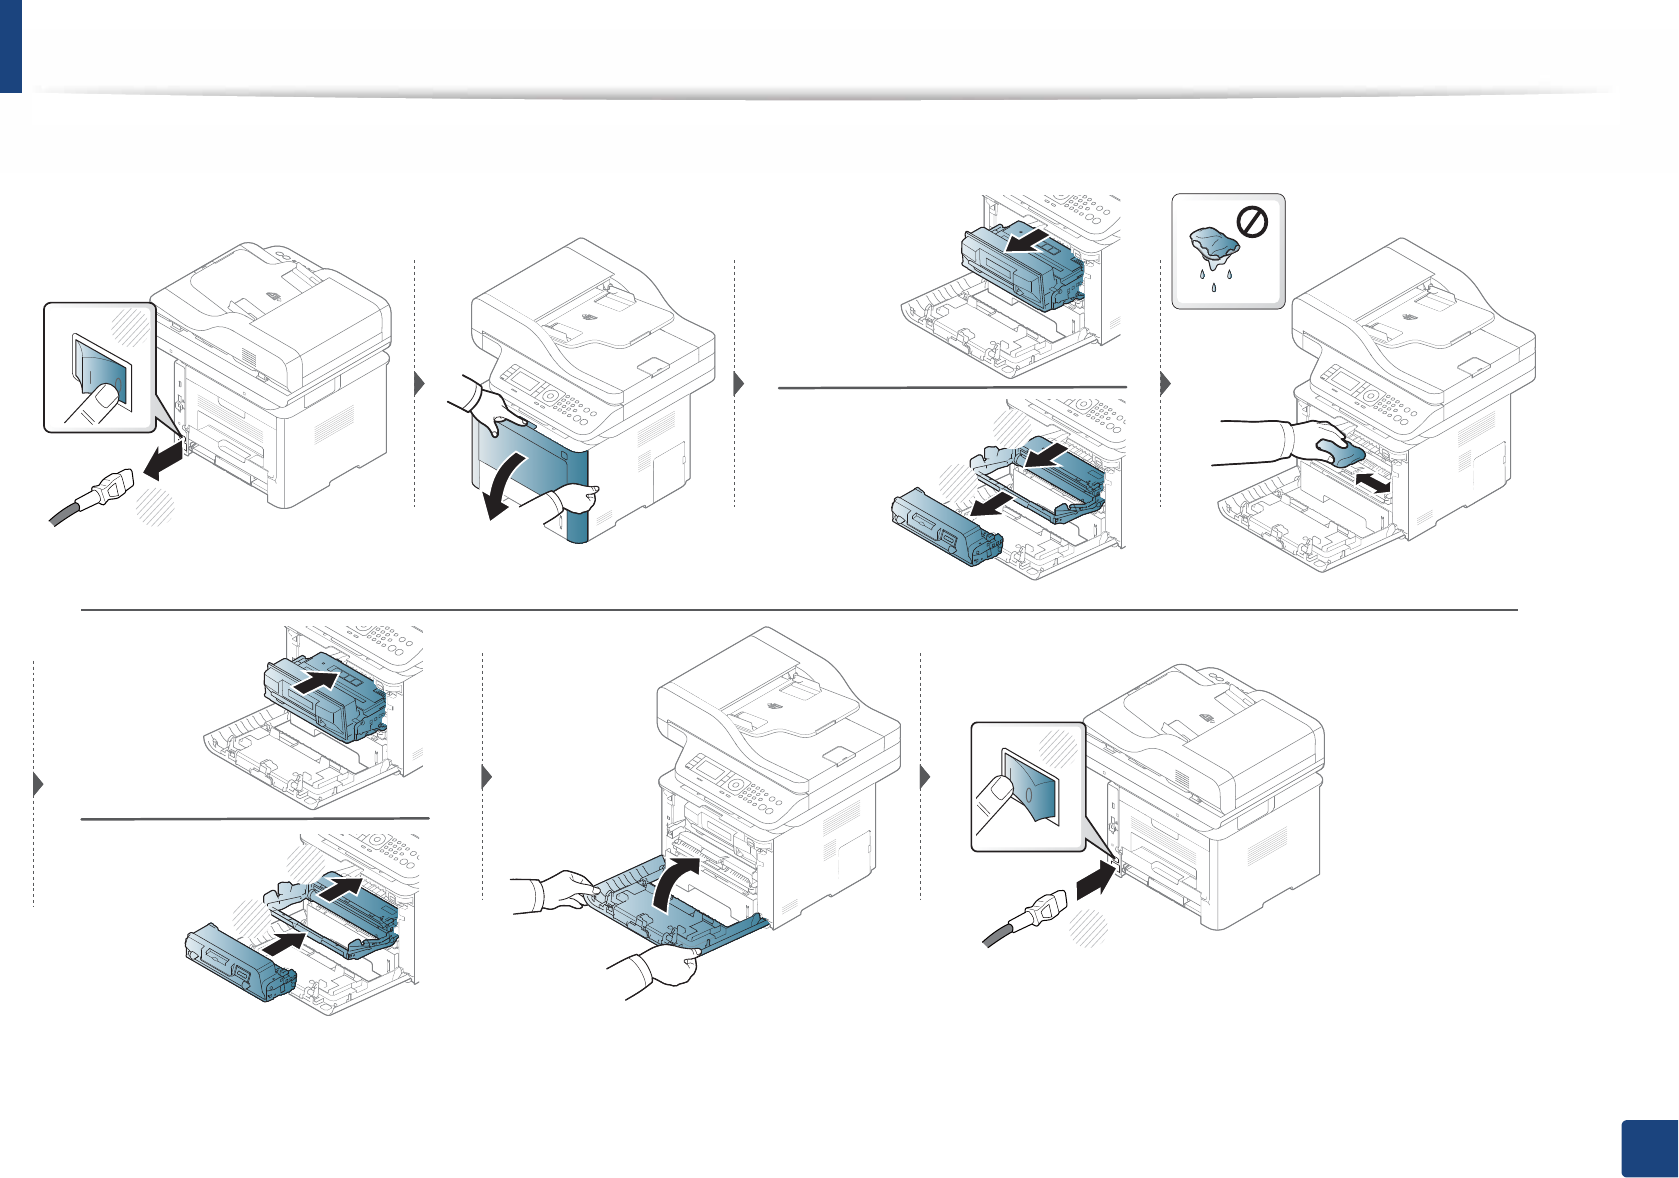
13
Cleaning the inside
During the printing process, paper, toner, and dust particles can accumulate inside the machine. This buildup can cause print quality problems, such as toner specks
or smearing. Cleaning the inside of the machine clears and reduces these problems.
• To prevent damage to the toner cartridge, do not expose it to light for more than a few minutes. Cover it with a piece of paper, if necessary.
• Do not touch the green area of the toner cartridge. Use the handle on the cartridge to avoid touching this area.
• Use a dry lint free cloth when cleaning the inside of the machine, be careful not to damage the transfer roller or any other inside parts. Do not use solvents such
as benzene or thinner. Printing quality problems can occur and cause damage to the machine.
• Use a dry lint-free cloth to clean the machine.
• Turn the machine off and unplug the power cord. Wait for the machine to cool down. If your machine has a power switch, turn the power switch off before
cleaning the machine.
• Illustrations on this user’s guide may differ from your machine depending on its options or models. Check your machine type (see "Front view" on page 20).
Cleaning the machine
98
3. Maintenance
1
2
1
2
M3370/ M3870/ M4070 series
M3375/ M3875/ M4075 series
2
1
M3370 M3870 M4070 series
M3375/ M3875/ M4075 series
1
2
Cleaning the machine
99
3. Maintenance
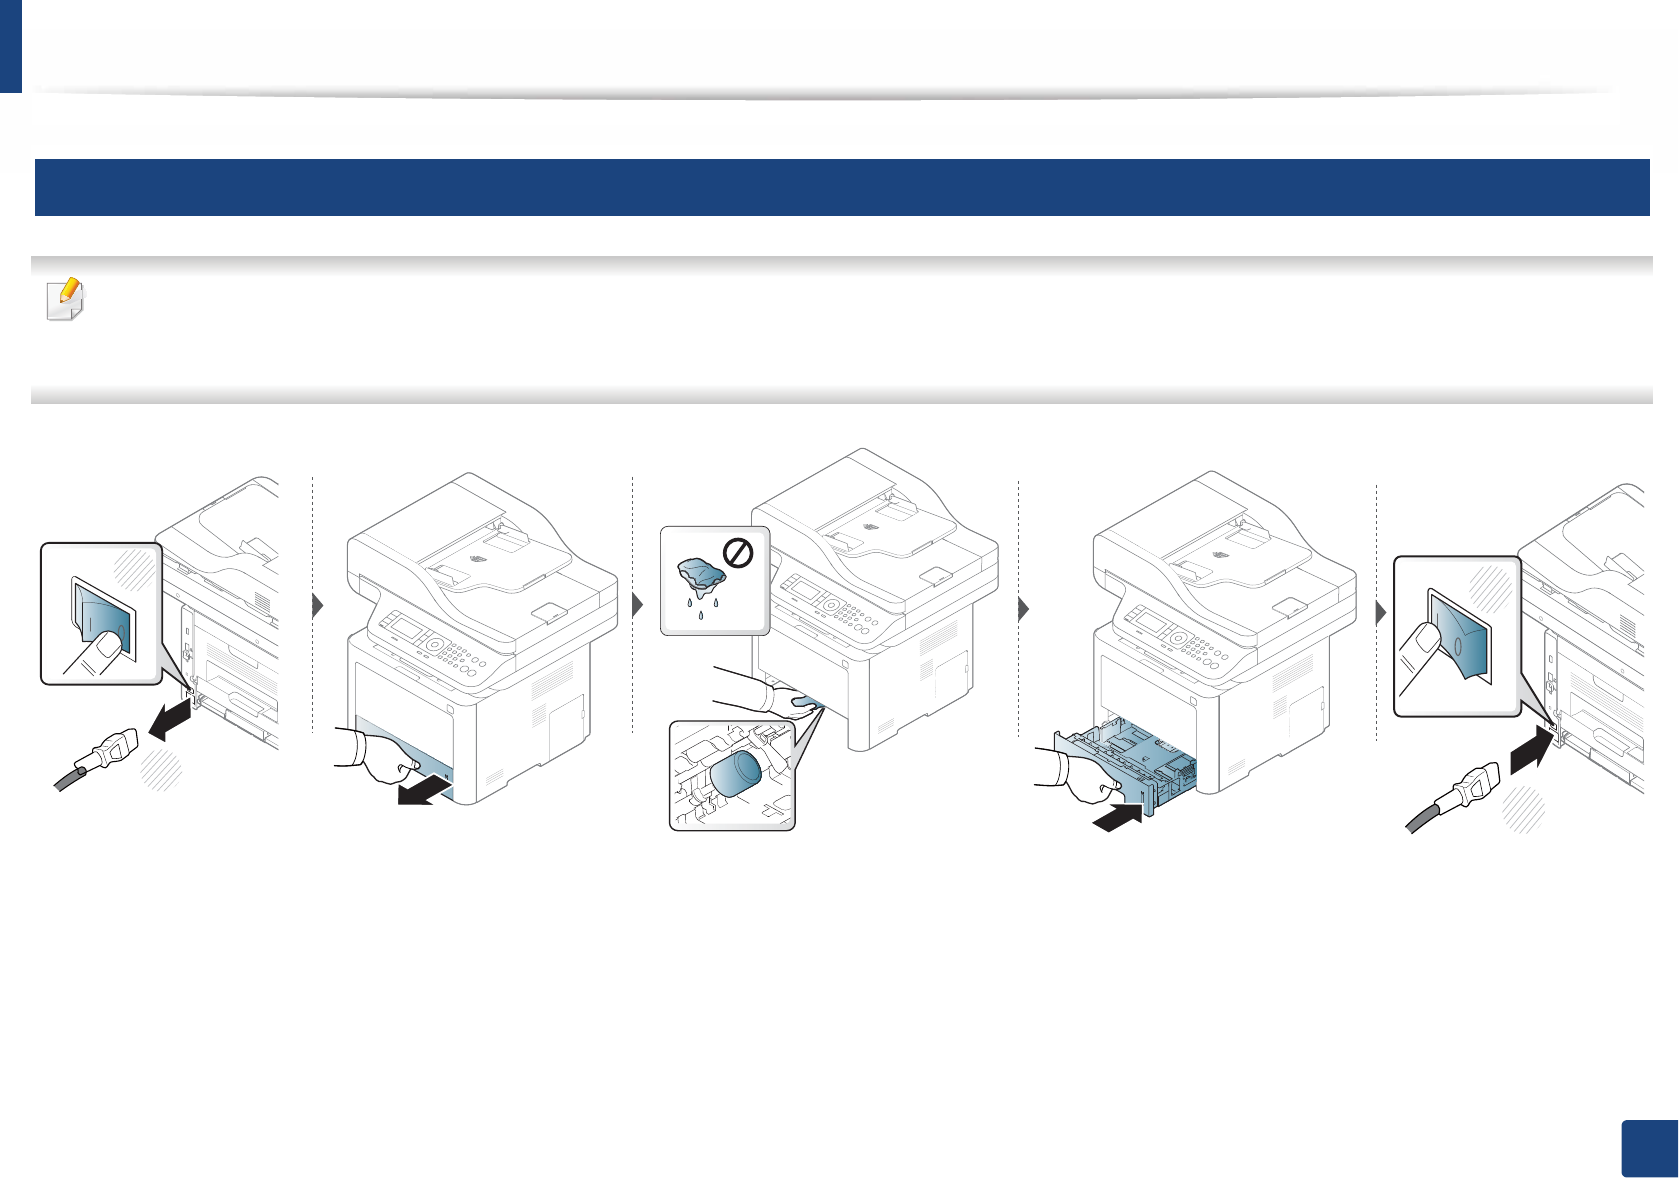
14
Cleaning the pickup roller
• Turn the machine off and unplug the power cord. Wait for the machine to cool down. If your machine has a power switch, turn the power switch off before
cleaning the machine.
• Illustrations on this user’s guide may differ from your machine depending on its options or models. Check your machine type (see "Front view" on page 20).
2
1
1
2
2

Cleaning the machine
100
3. Maintenance
15
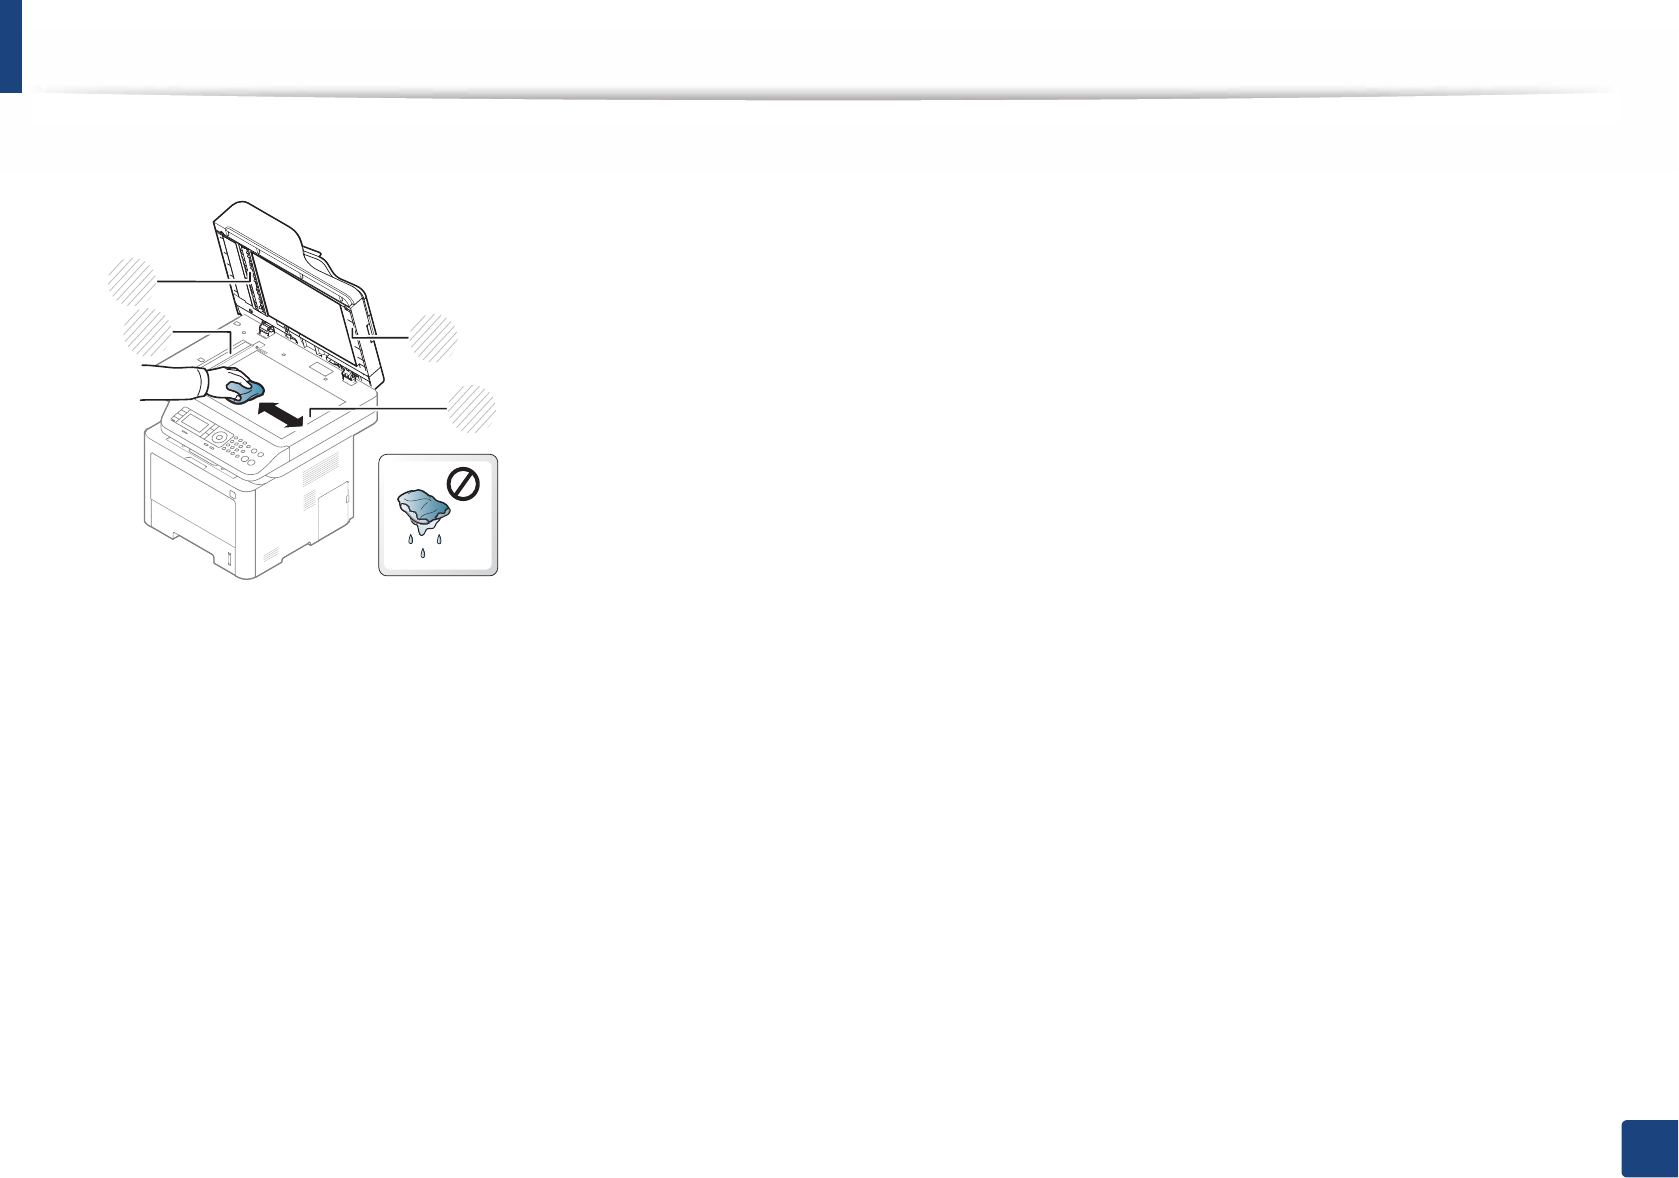
Cleaning the scan unit
Keeping the scan unit clean helps ensure the best possible copies. We suggest that you clean the scan unit at the start of each day and during the day as needed.
• Turn the machine off and unplug the power cord. Wait for the machine to cool down. If your machine has a power switch, turn the power switch off before
cleaning the machine.
• Illustrations on this user’s guide may differ from your machine depending on its options or models. Check your machine type (see "Front view" on page 20).
1Slightly dampen a soft, lint-free cloth or paper towel with water.
2 Lift and open the scanner lid.
Cleaning the machine
101
3. Maintenance
3 Wipe the surface of the scanner until it is clean and dry.
1Scanner lid
2Scanner glass
3Document feeder glass
4White bar
4 Close the scanner lid.
3
2
1
4

102
3. Maintenance
Tips for moving & storing your machine
• When moving the machine, do not tilt or turn it upside down. Otherwise, the inside of the machine may be contaminated by toner, which can cause damage to
the machine or reduce print quality.
• When moving the machine, make sure at least two people are holding the machine securely.
4. Troubleshooting
This chapter gives helpful information for what to do if you encounter an error.
• Tips for avoiding paper jams 104
• Clearing original document jams 105
• Clearing paper jams 111
• Understanding the status LED 122
• Understanding display messages 125
This chapter gives helpful information for what to do if you encounter an error. If your machine
has a display screen, check the message on the display screen first to solve the error.If you
cannot find a solution to your problem in this chapter, refer to the Troubleshooting chapter in
the Advanced Guide (see "Troubleshooting" on page 311).If you cannot find a solution in the
User's Guide or the problem persists, call for service.

104
4. Troubleshooting
Tips for avoiding paper jams
By selecting the correct medias, most paper jams can be avoided. To avoid paper jams, refer to the following guidelines:
• Ensure that the adjustable guides are positioned correctly (see "Tray overview" on page 37).
• Do not remove paper from the tray while your machine is printing.
• Flex, fan, and straighten paper before loading.
• Do not use creased, damp, or highly curled paper.
• Do not mix papers in a tray.
• Use only recommended print media (see "Print media specifications" on page 134).

105
4. Troubleshooting
Clearing original document jams
When an original document jams in the document feeder, a warning message appears on the display.
To avoid tearing the document, remove the jammed document slowly and carefully.
To prevent document jams, use the scanner glass for thick, thin or mixed paper- originals.