Samsung Electronics Co SLM4075FX Mono Laser Printer User Manual M337x M387x M407x LEGAL XOA english 0530 re
Samsung Electronics Co Ltd Mono Laser Printer M337x M387x M407x LEGAL XOA english 0530 re
Contents
- 1. Users Manual 1
- 2. Users Manaul 2
- 3. Users Manual 3
- 4. Users Manual 4
Users Manual 3
Cleaning the machine
108
3. Maintenance
12
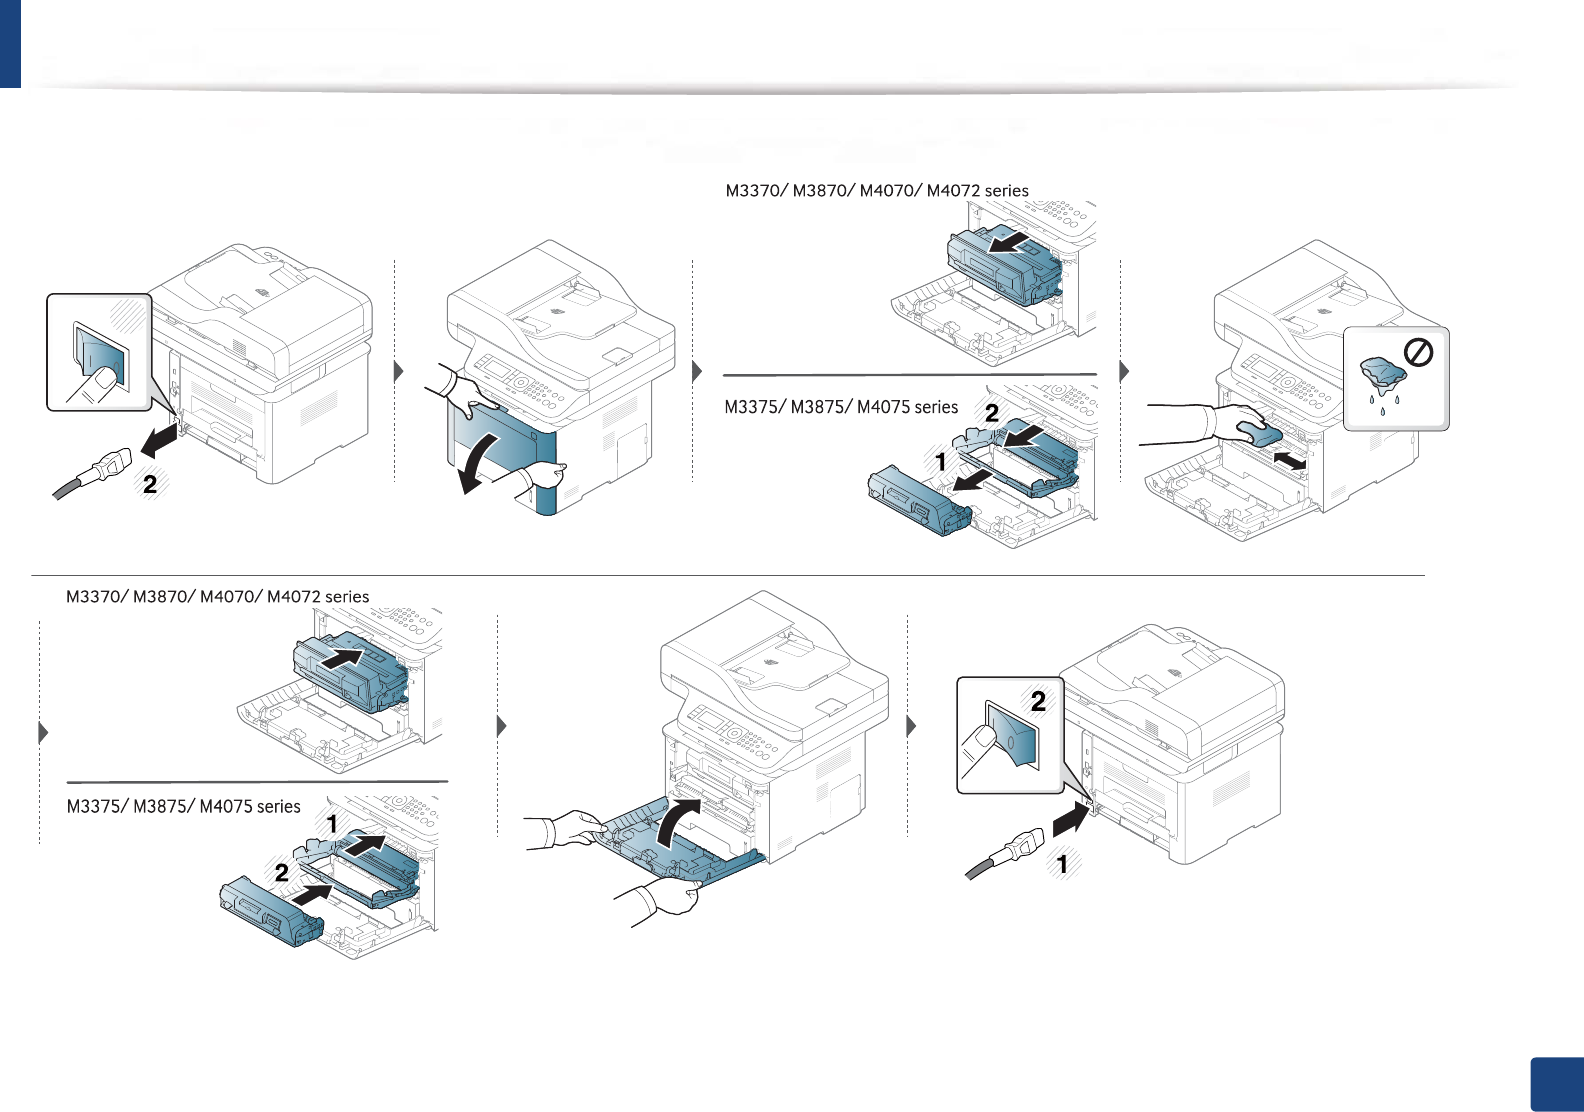
Cleaning the inside
During the printing process, paper, toner, and dust particles can accumulate inside the machine. This buildup can cause print quality problems, such as toner specks
or smearing. Cleaning the inside of the machine clears and reduces these problems.
• To prevent damage to the toner cartridge, do not expose it to light for more than a few minutes. Cover it with a piece of paper, if necessary.
• Do not touch the green area of the toner cartridge. Use the handle on the cartridge to avoid touching this area.
• Use a dry lint free cloth when cleaning the inside of the machine, be careful not to damage the transfer roller or any other inside parts. Do not use solvents such
as benzene or thinner. Printing quality problems can occur and cause damage to the machine.
• Use a dry lint-free cloth to clean the machine.
• Turn the machine off and unplug the power cord. Wait for the machine to cool down. If your machine has a power switch, turn the power switch off before
cleaning the machine.
• Illustrations on this user’s guide may differ from your machine depending on its options or models. Check your machine type (see "Front view" on page 22).
Cleaning the machine
109
3. Maintenance
1
Cleaning the machine
110
3. Maintenance
13
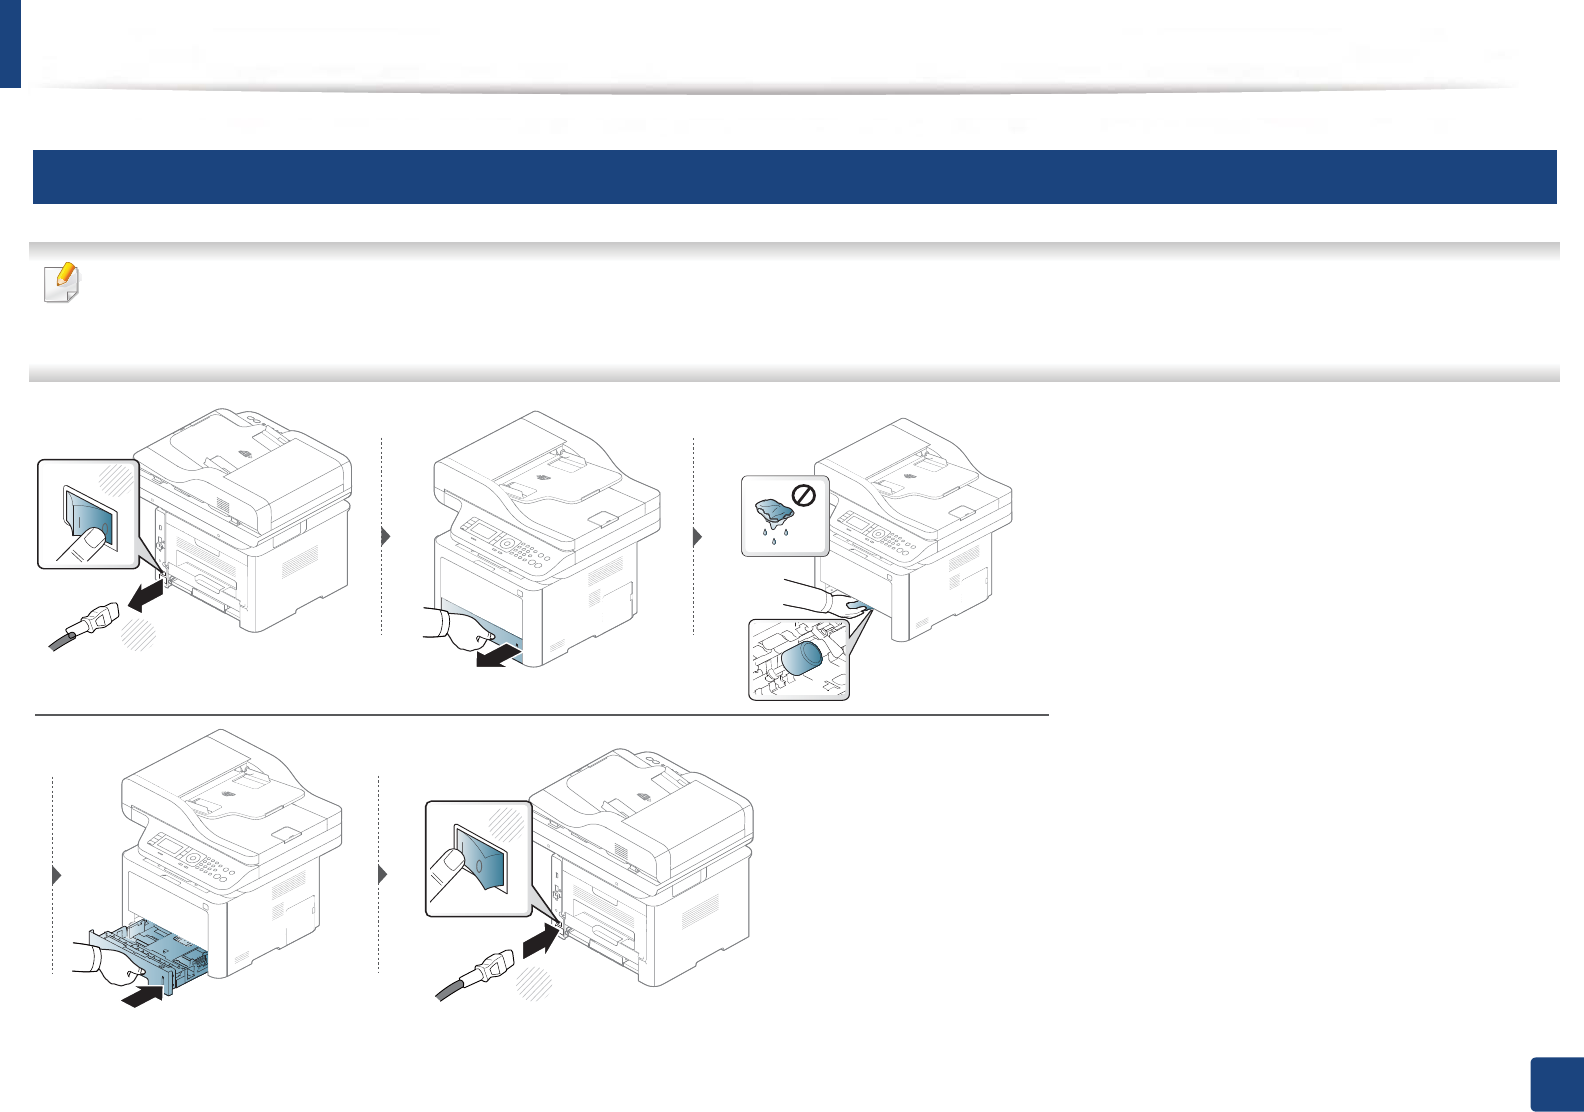
Cleaning the pickup roller
• Turn the machine off and unplug the power cord. Wait for the machine to cool down. If your machine has a power switch, turn the power switch off before
cleaning the machine.
• Illustrations on this user’s guide may differ from your machine depending on its options or models. Check your machine type (see "Front view" on page 22).
2
1
1
2
2
Cleaning the machine
111
3. Maintenance
14
Cleaning the scan unit
Keeping the scan unit clean helps ensure the best possible copies. We suggest that you clean the scan unit at the start of each day and during the day as needed.
• Turn the machine off and unplug the power cord. Wait for the machine to cool down. If your machine has a power switch, turn the power switch off before
cleaning the machine.
• Illustrations on this user’s guide may differ from your machine depending on its options or models. Check your machine type (see "Front view" on page 22).
1Slightly dampen a soft, lint-free cloth or paper towel with water.
2 Lift and open the scanner lid.

Cleaning the machine
112
3. Maintenance
3 Wipe the surface of the scanner until it is clean and dry.
1Scanner lid
2Scanner glass
3Document feeder glass
4White bar
4 Close the scanner lid.
3
2
1
4

113
3. Maintenance
Tips for moving & storing your machine
• When moving the machine, do not tilt or turn it upside down. Otherwise, the inside of the machine may be contaminated by toner, which can cause damage to
the machine or reduce print quality.
• When moving the machine, make sure at least two people are holding the machine securely.

4. Troubleshooting
This chapter gives helpful information for what to do if you encounter an error.
• Tips for avoiding paper jams 115
• Clearing jams 116
• Understanding the status LED 134
• Understanding display messages 137
This chapter gives helpful information for what to do if you encounter an error. If your machine
has a display screen, check the message on the display screen first to solve the error.If you
cannot find a solution to your problem in this chapter, refer to the Troubleshooting chapter in
the Advanced Guide (see "Troubleshooting" on page 167).If you cannot find a solution in the
User's Guide or the problem persists, call for service.

115
4. Troubleshooting
Tips for avoiding paper jams
By selecting the correct medias, most paper jams can be avoided. To avoid paper jams, refer to the following guidelines:
• Ensure that the adjustable guides are positioned correctly (see "Tray overview" on page 47).
• Do not remove paper from the tray while your machine is printing.
• Flex, fan, and straighten paper before loading.
• Do not use creased, damp, or highly curled paper.
• Do not mix papers in a tray.
• Use only recommended print media (see "Print media specifications" on page 146).
116
4. Troubleshooting
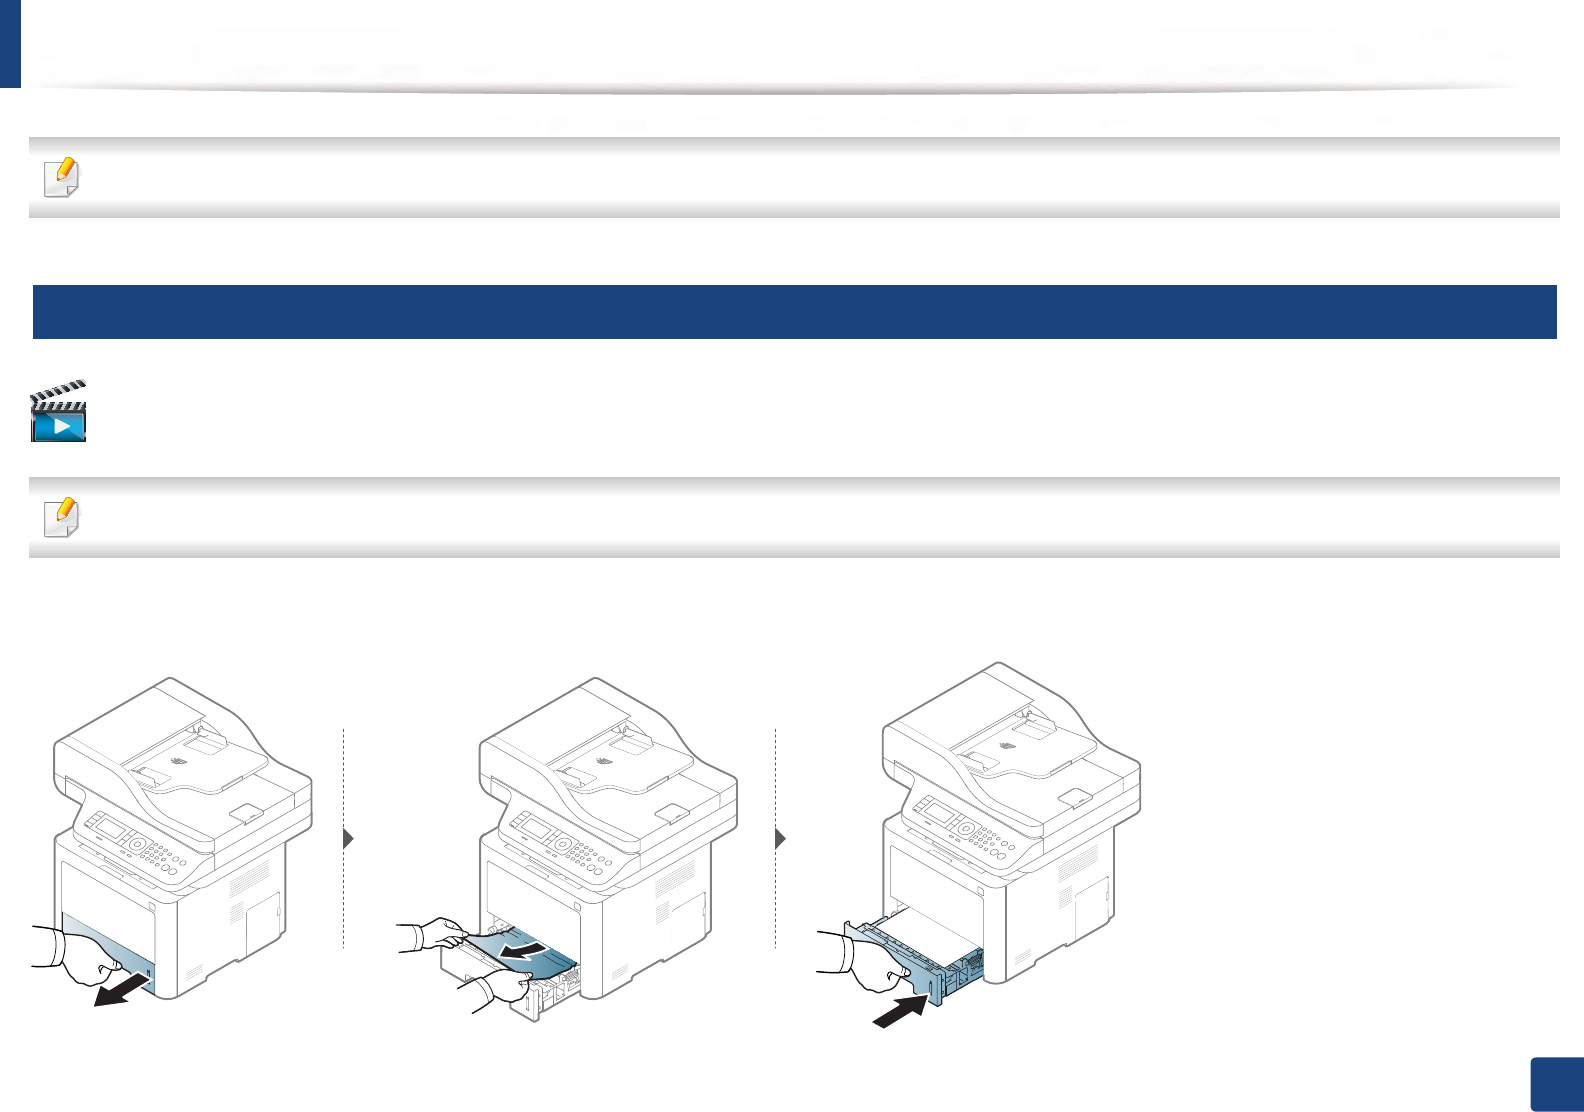
Clearing jams
To avoid tearing the paper, pull the jammed paper out slowly and gently.
1
In tray1
Click this link to open an animation about clearing a jam.
Illustrations on this user’s guide may differ from your machine depending on its model or optional goods. Check your machine type (see "Front view" on page 22).
Clearing jams
117
4. Troubleshooting
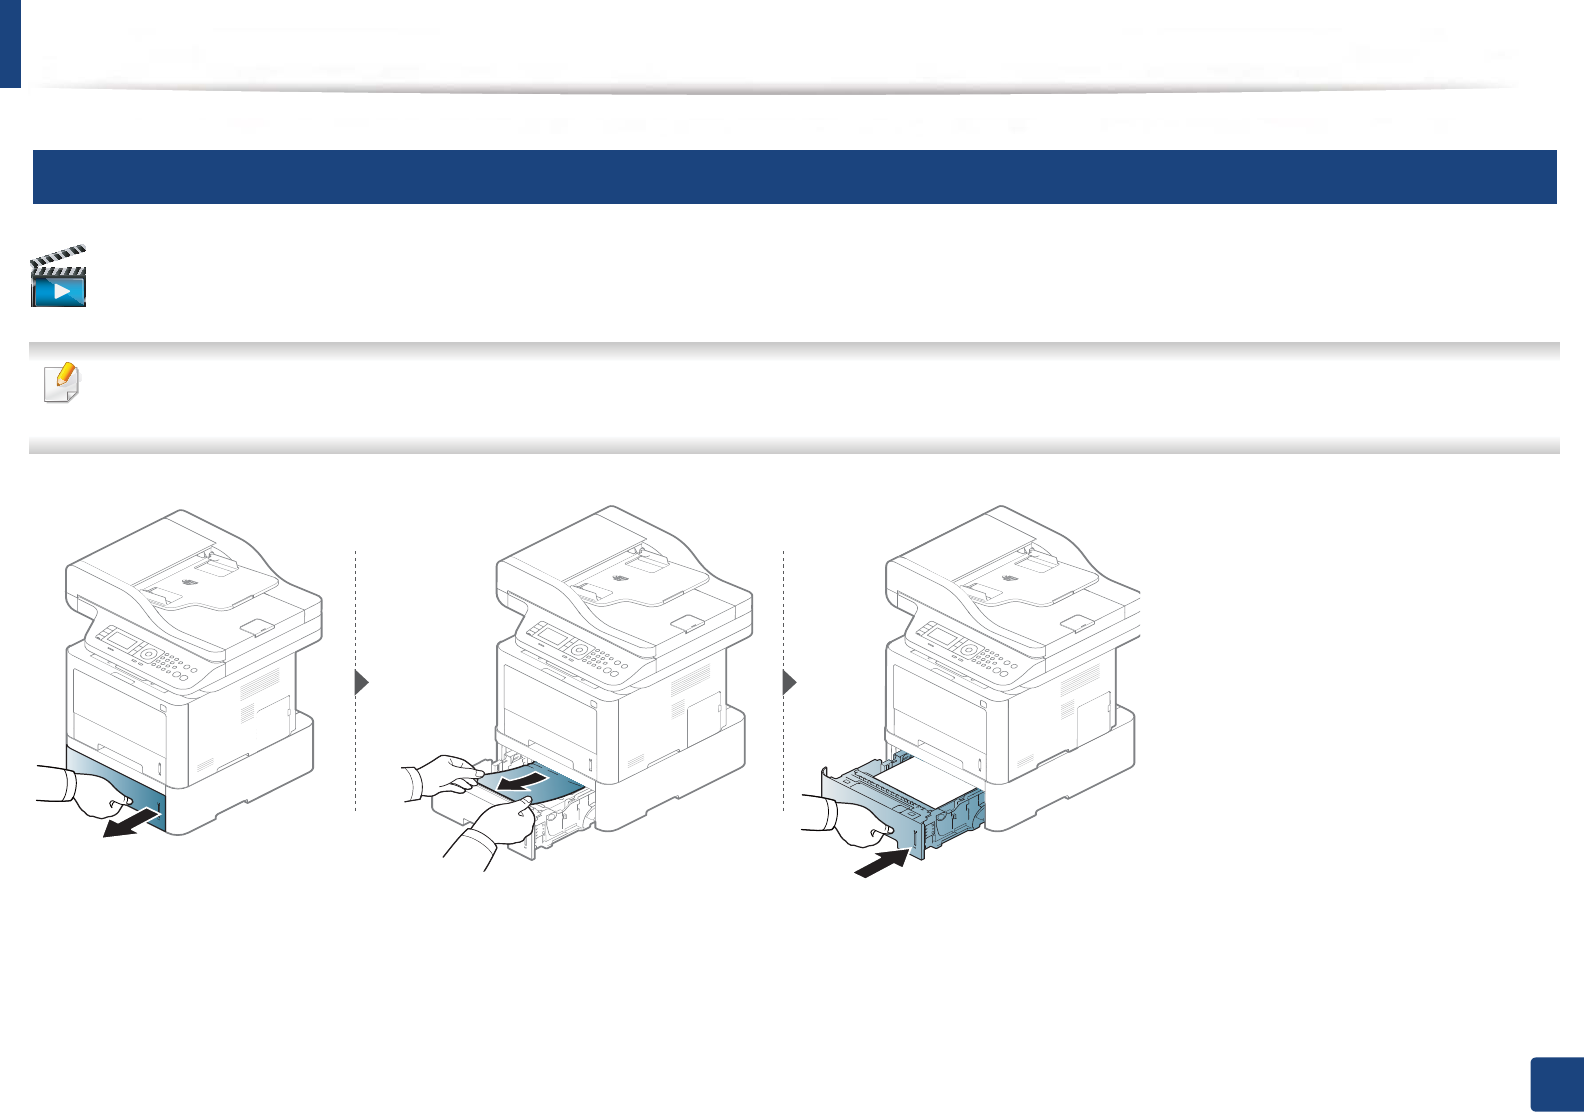
2
In optional tray
Click this link to open an animation about clearing a jam.
• Illustrations on this user’s guide may differ from your machine depending on its model or optional goods. Check your machine type (see "Front view" on page 22).
• This troubleshooting may not be available depending on model or optional goods (see "Various features" on page 11).
Clearing jams
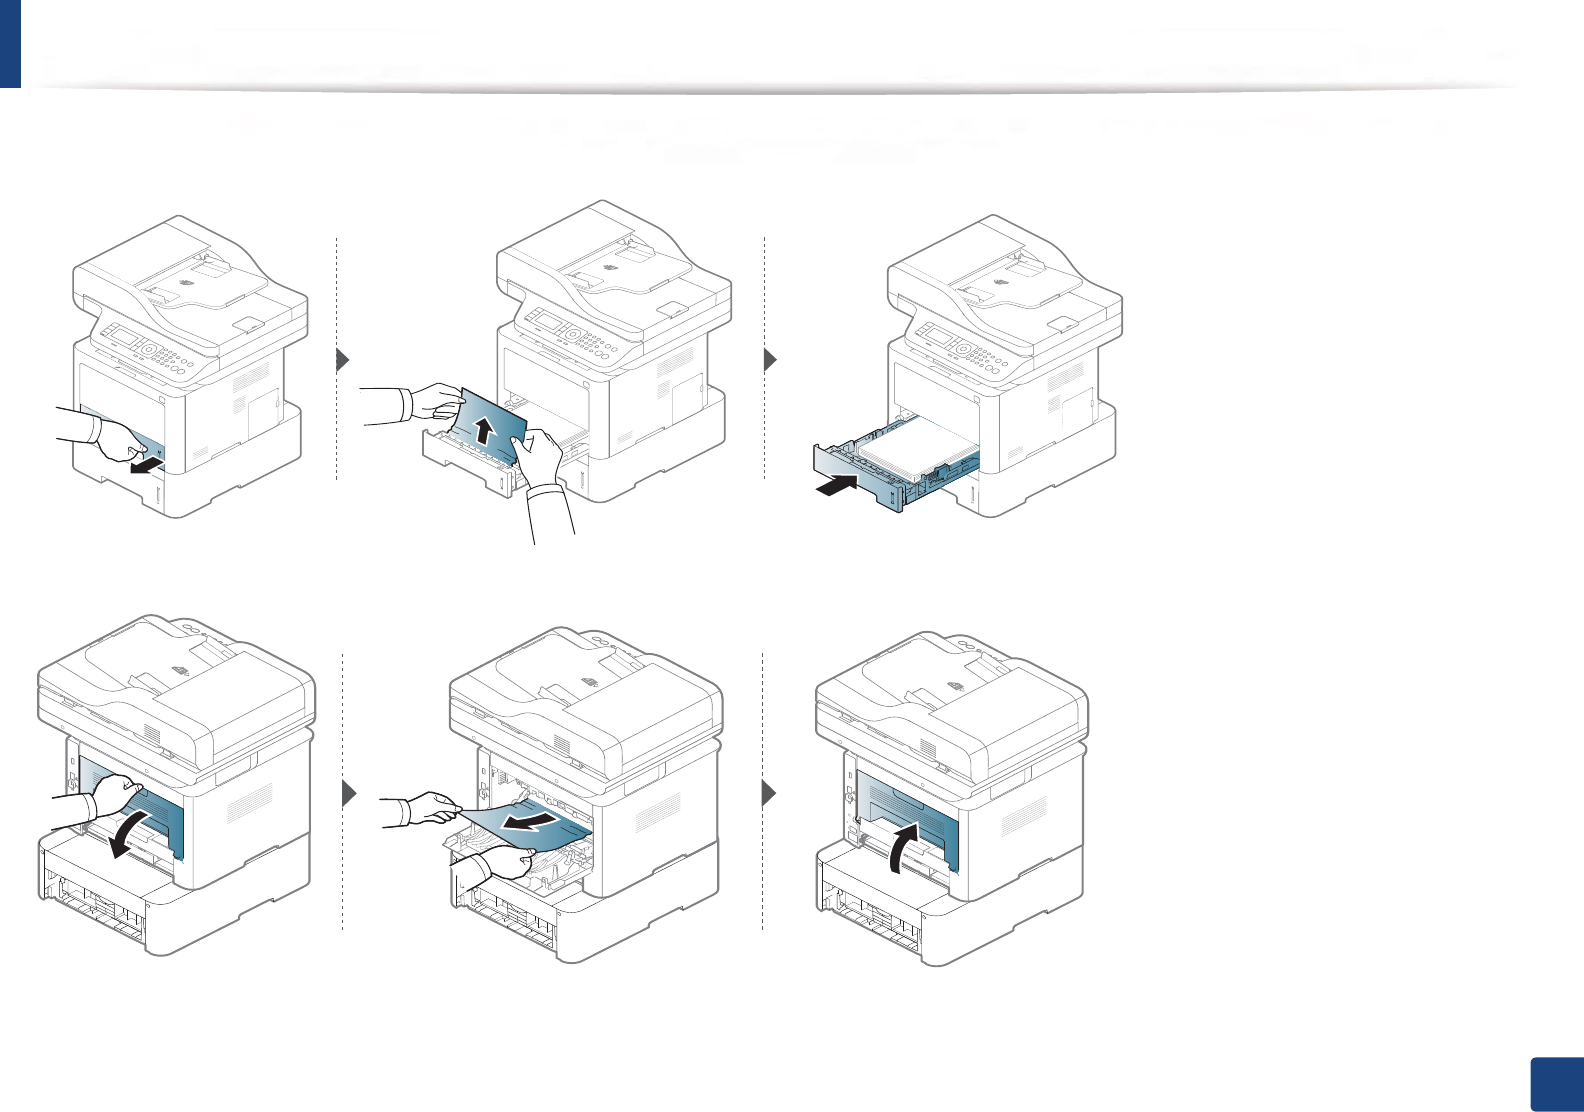
118
4. Troubleshooting
If you do not see the paper in this area, stop and go to next step:
If you do not see the paper in this area, stop and go to next step:
Clearing jams
119
4. Troubleshooting
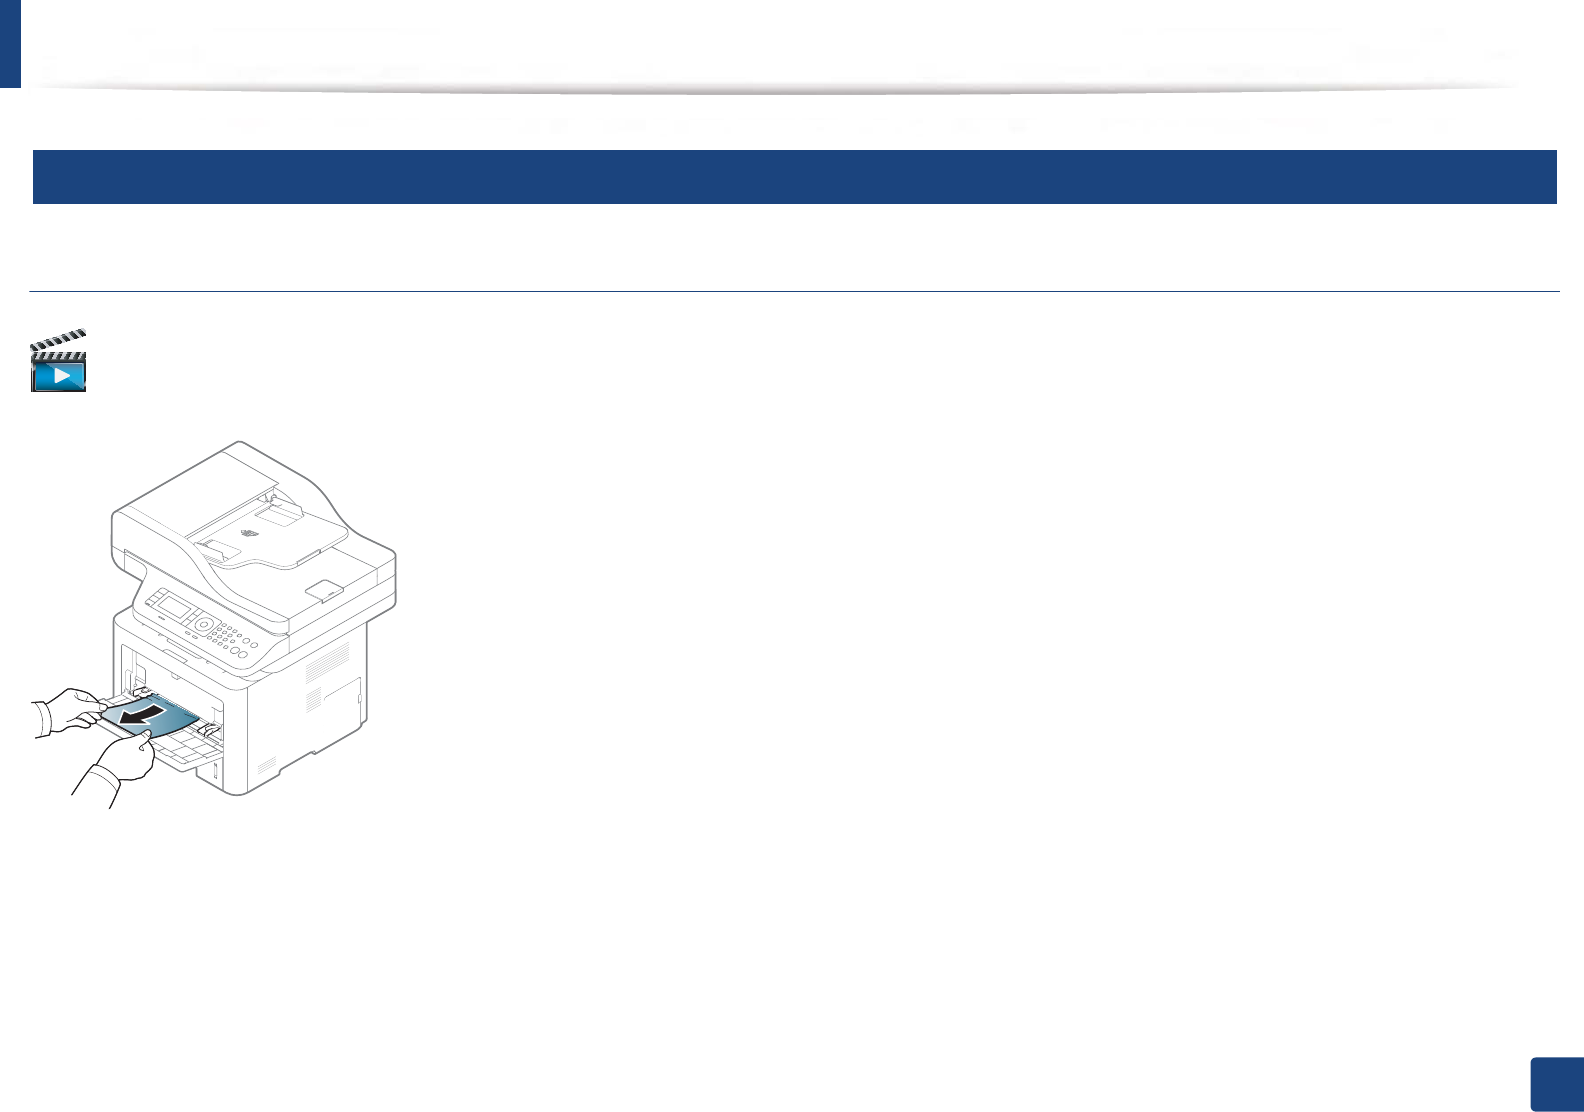
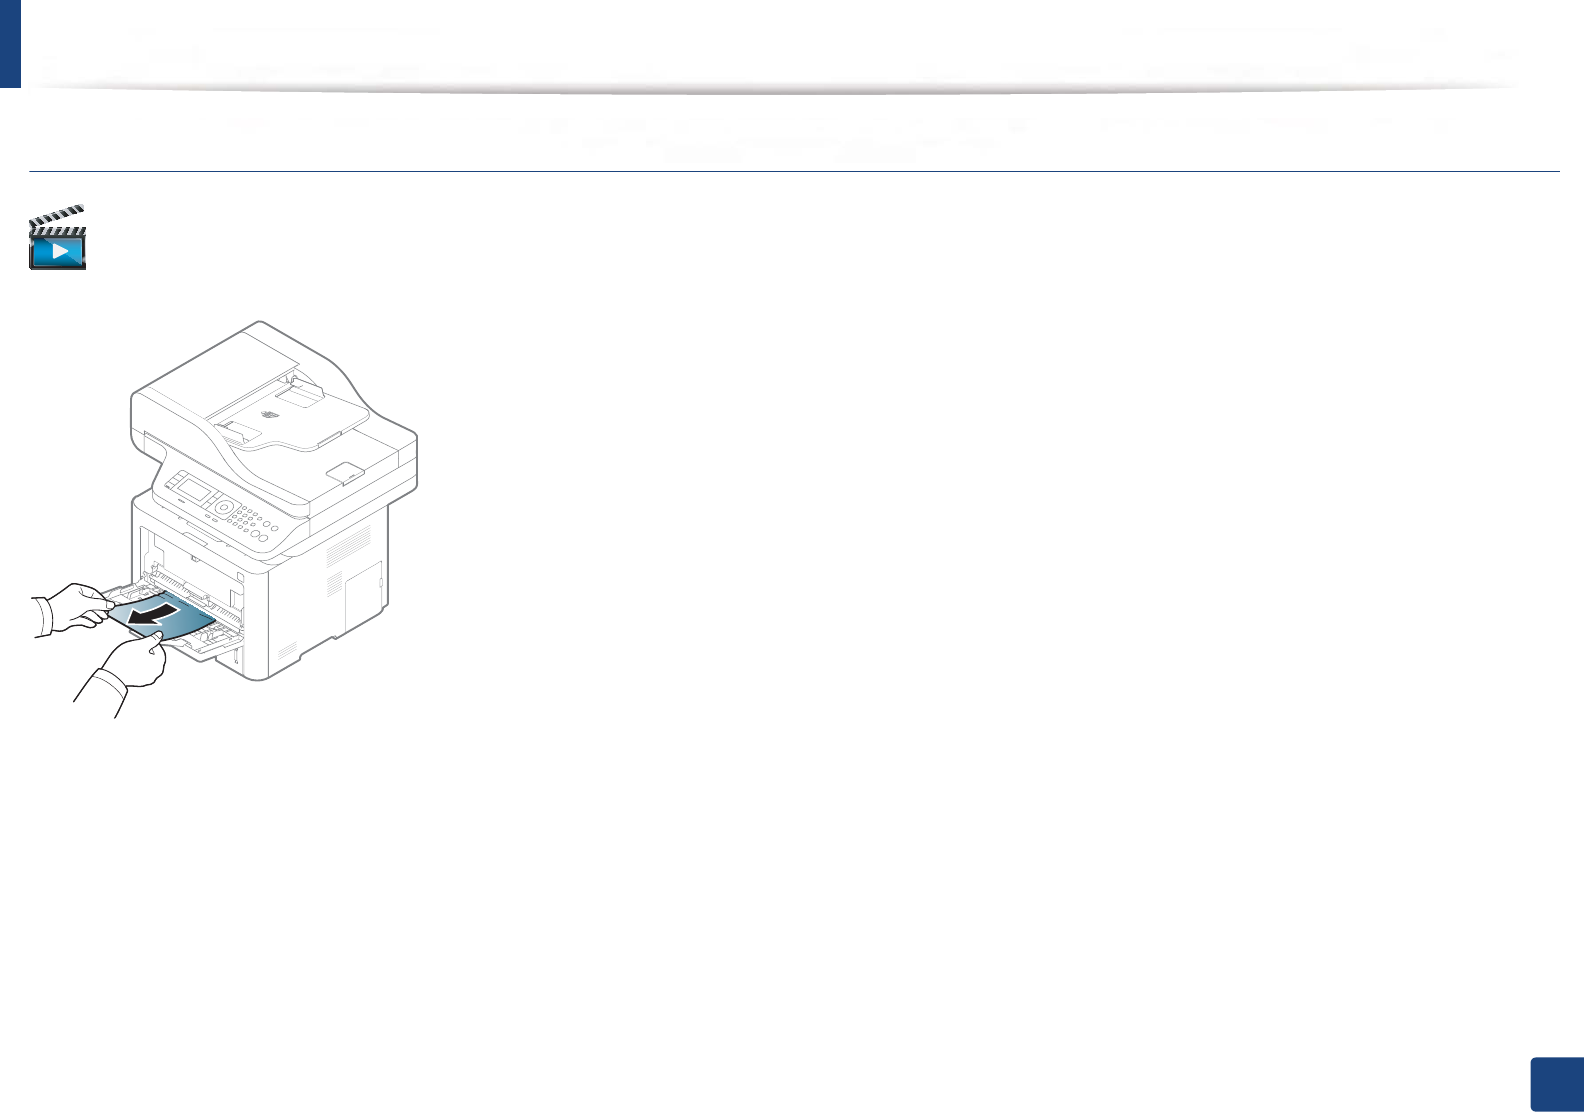
3
In the multi-purpose (or manual feeder) tray
M337x series
Click this link to open an animation about clearing a jam.
Clearing jams
120
4. Troubleshooting
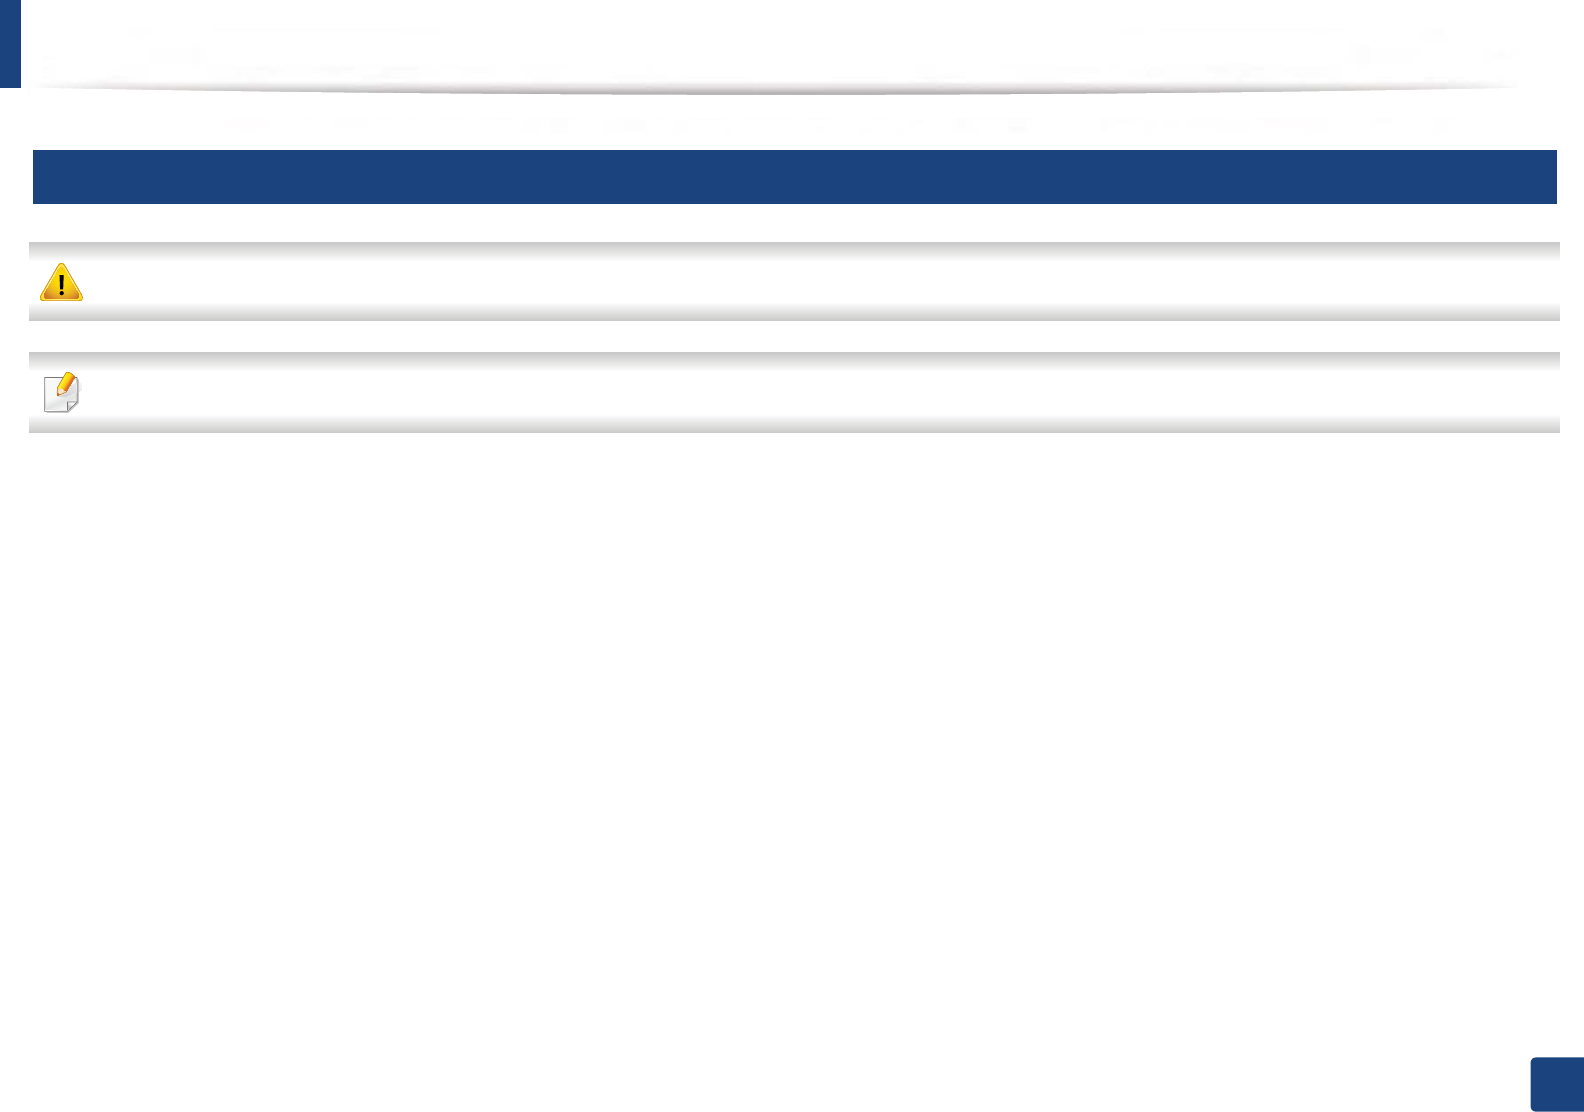
M387x/ M407x series
Click this link to open an animation about clearing a jam.
Clearing jams
121
4. Troubleshooting
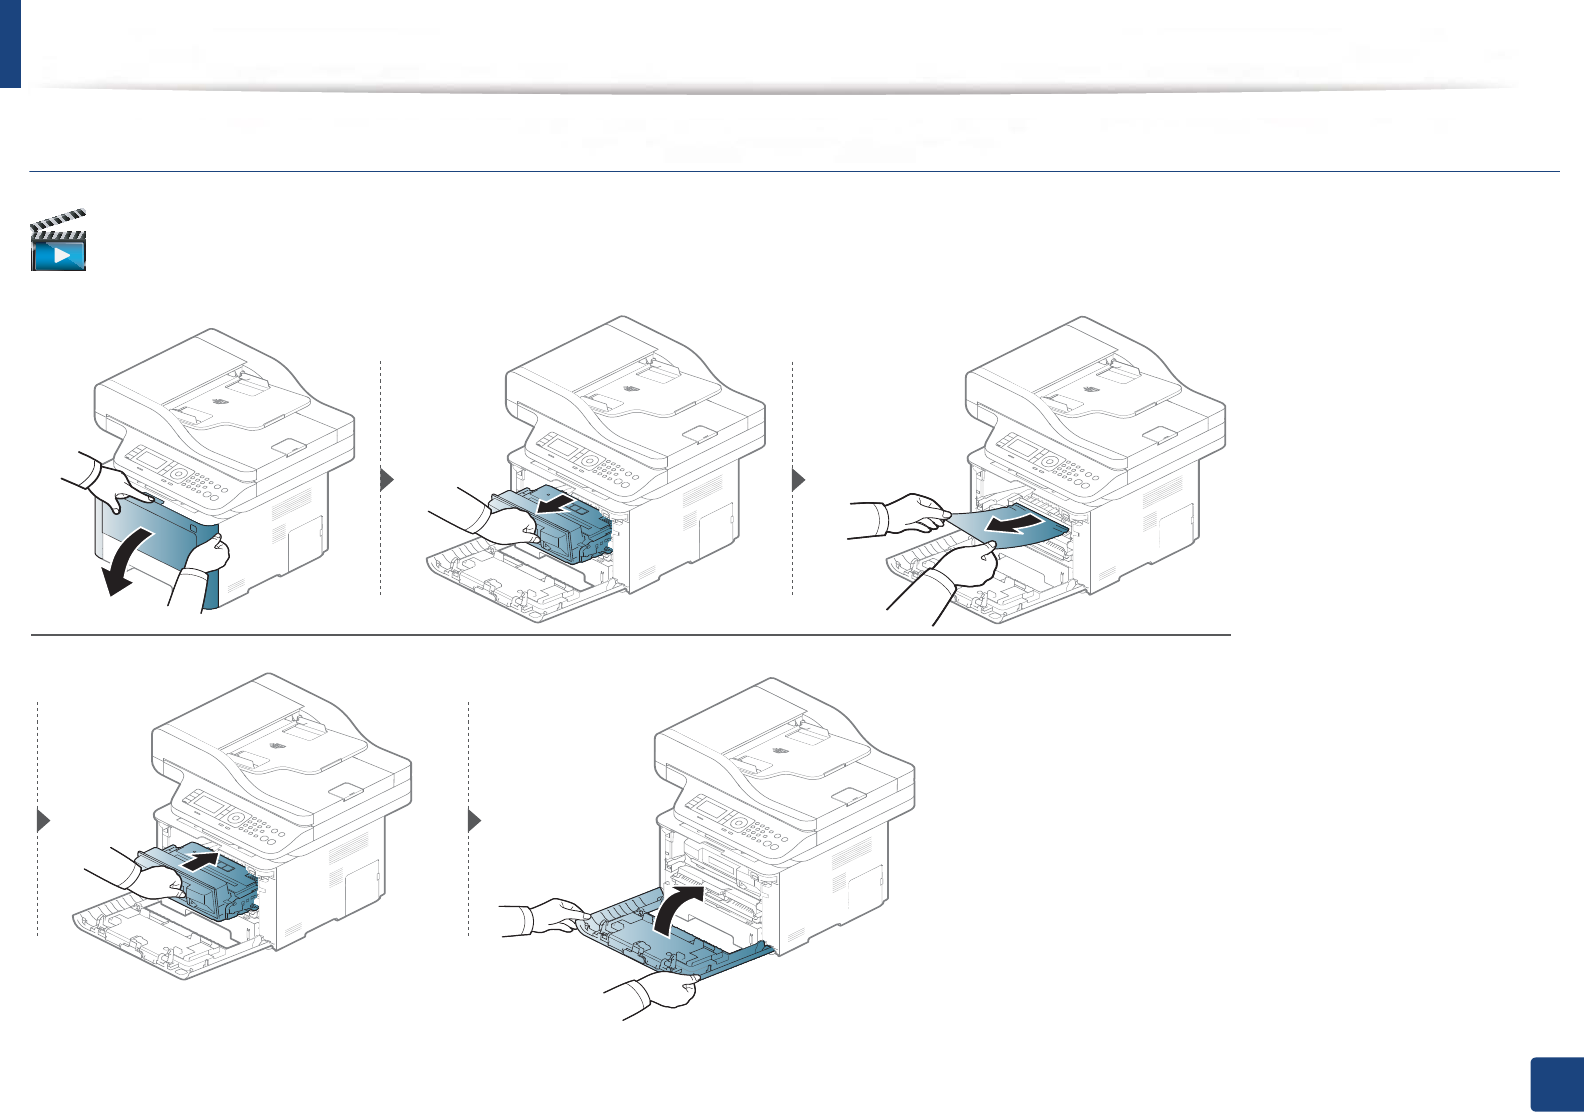
4
Inside the machine
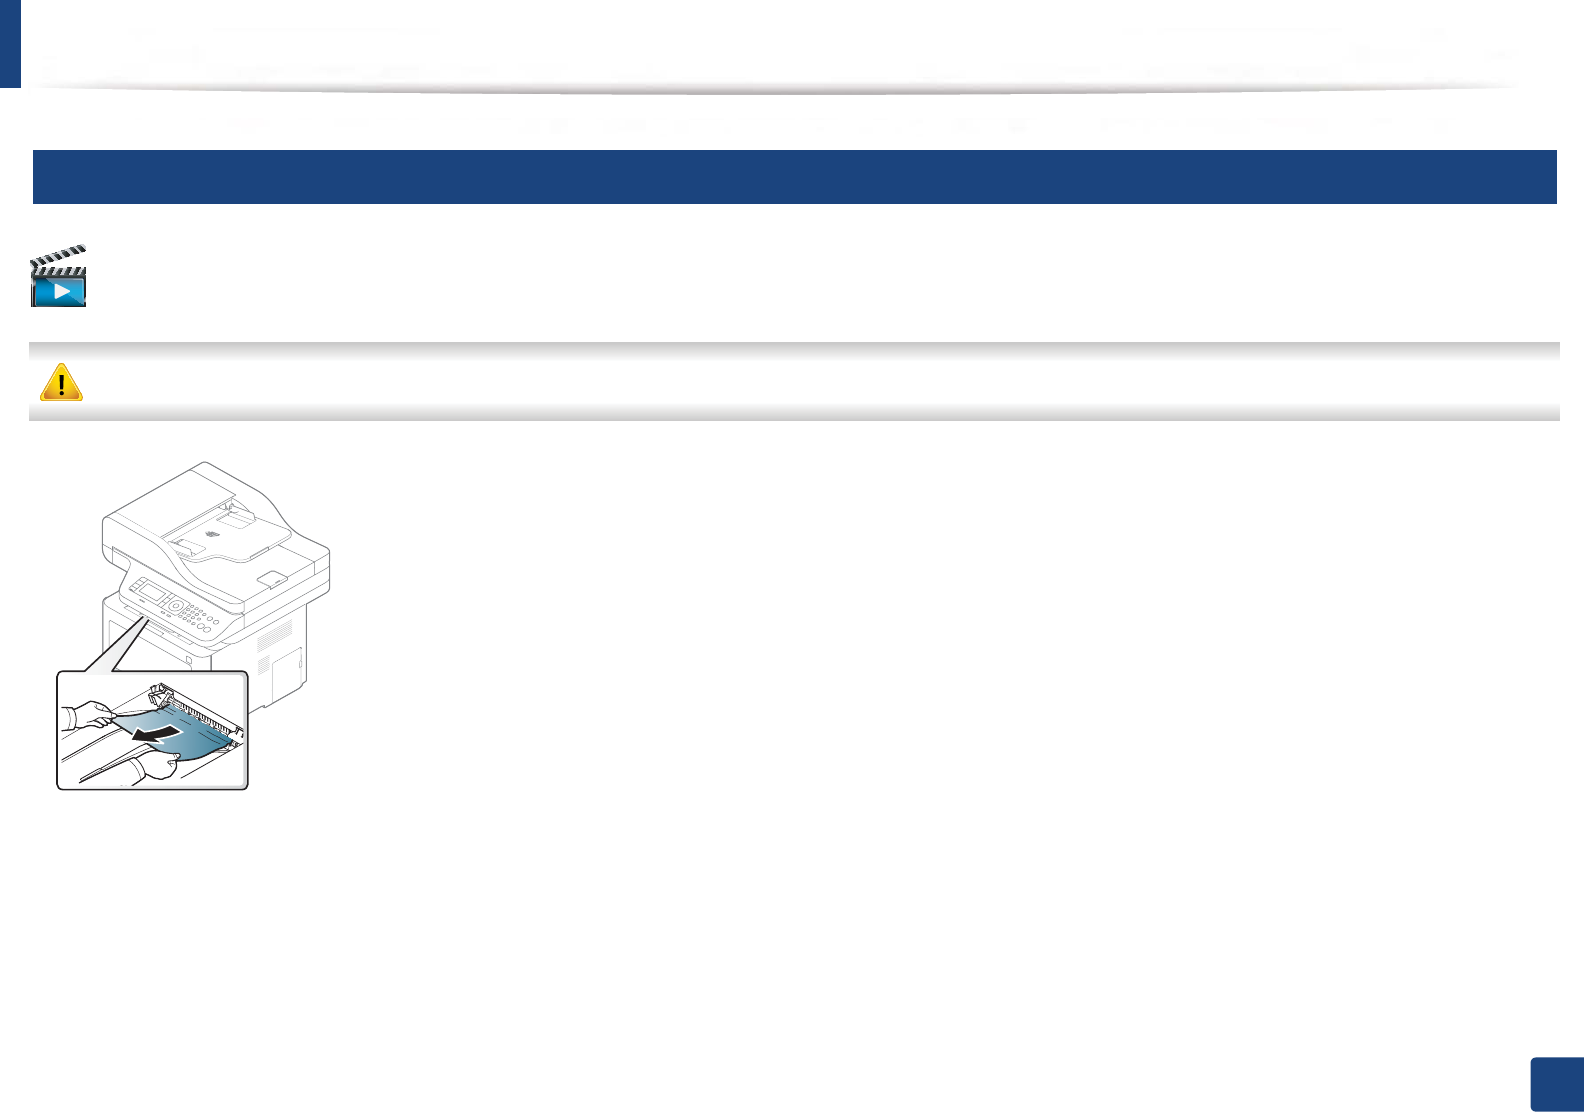
The fuser area is hot. Take care when removing paper from the machine.
Illustrations on this user’s guide may differ from your machine depending on its model or optional goods. Check your machine type (see "Front view" on page 22).
Clearing jams
122
4. Troubleshooting
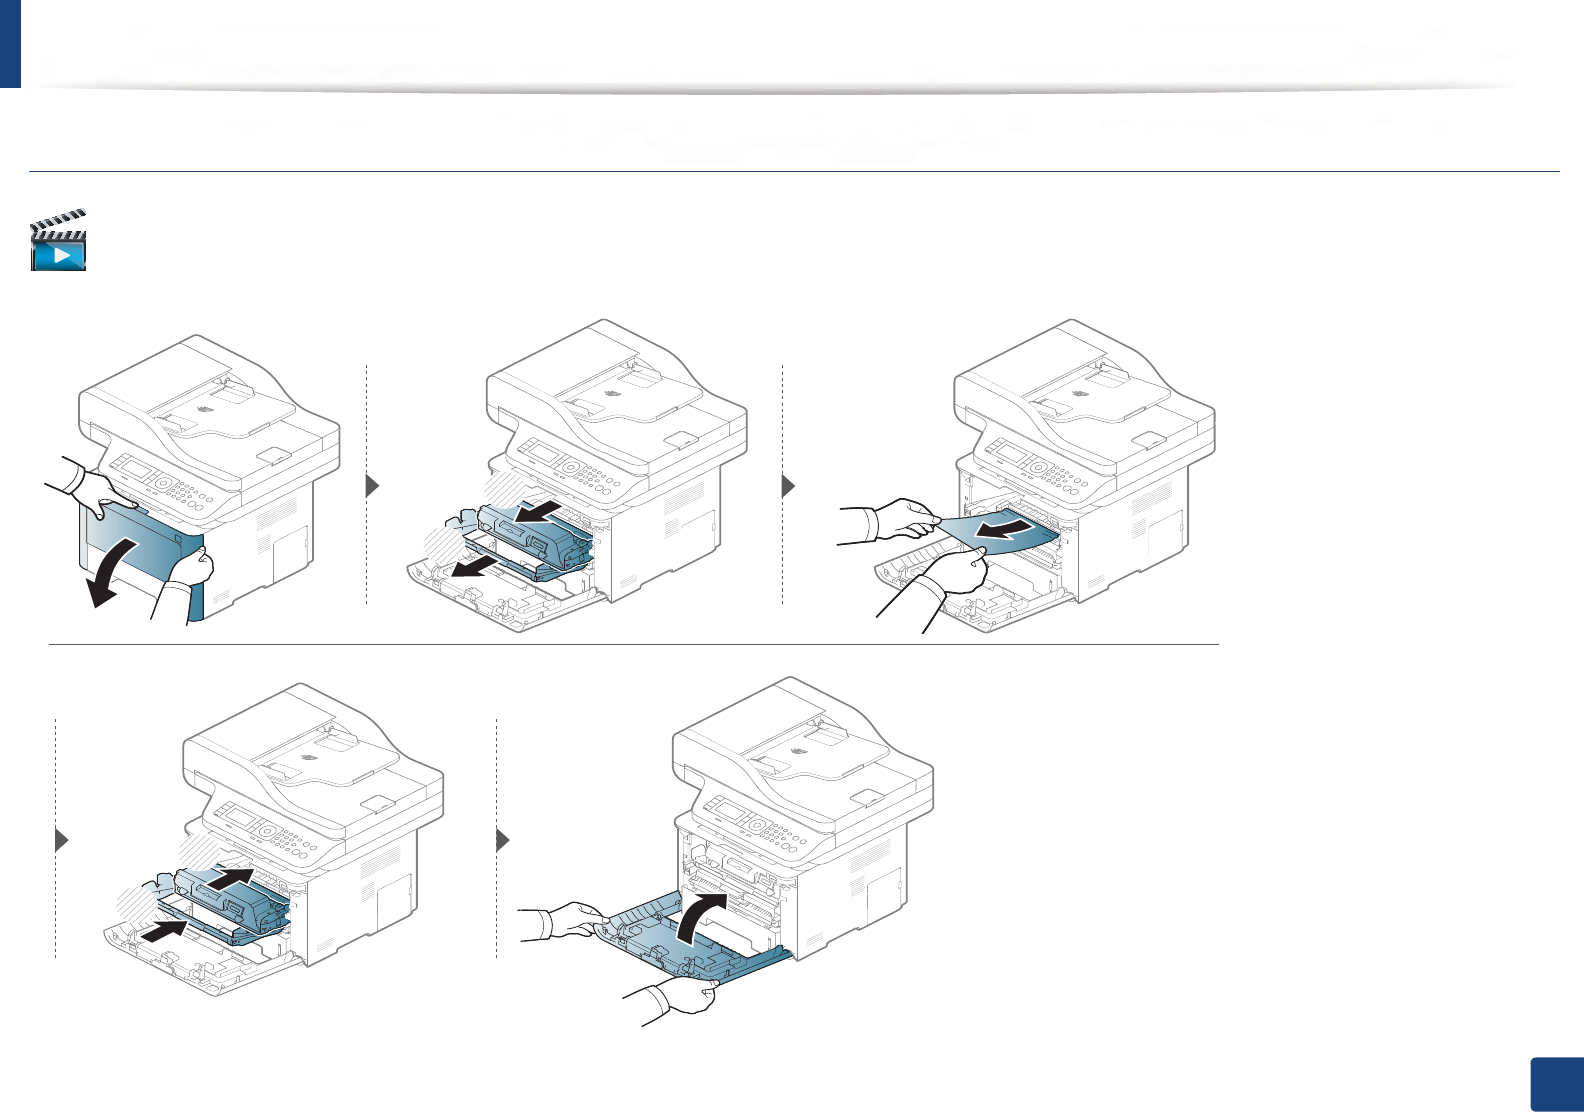
M3370/ M3870/ M4070/ M4072 series
Click this link to open an animation about clearing a jam.
Clearing jams
123
4. Troubleshooting
M3375/ M3875/ M4075 series
Click this link to open an animation about clearing a jam.
1
2
2
1
Clearing jams
124
4. Troubleshooting
5
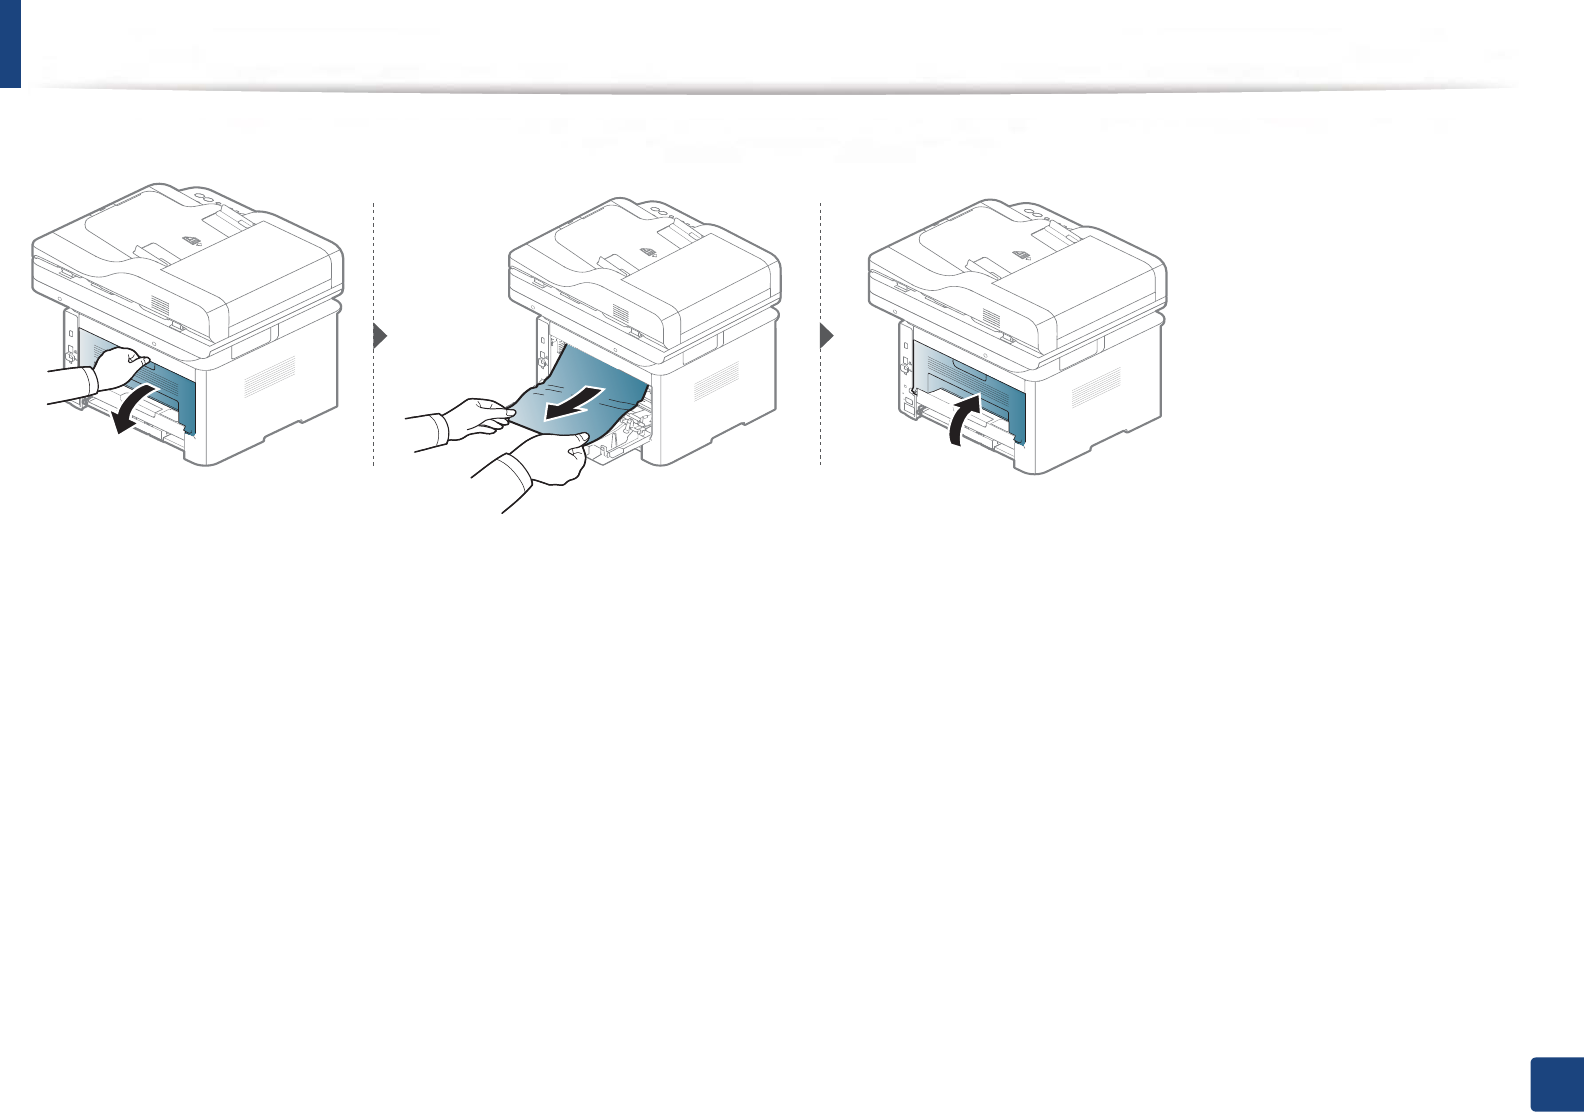
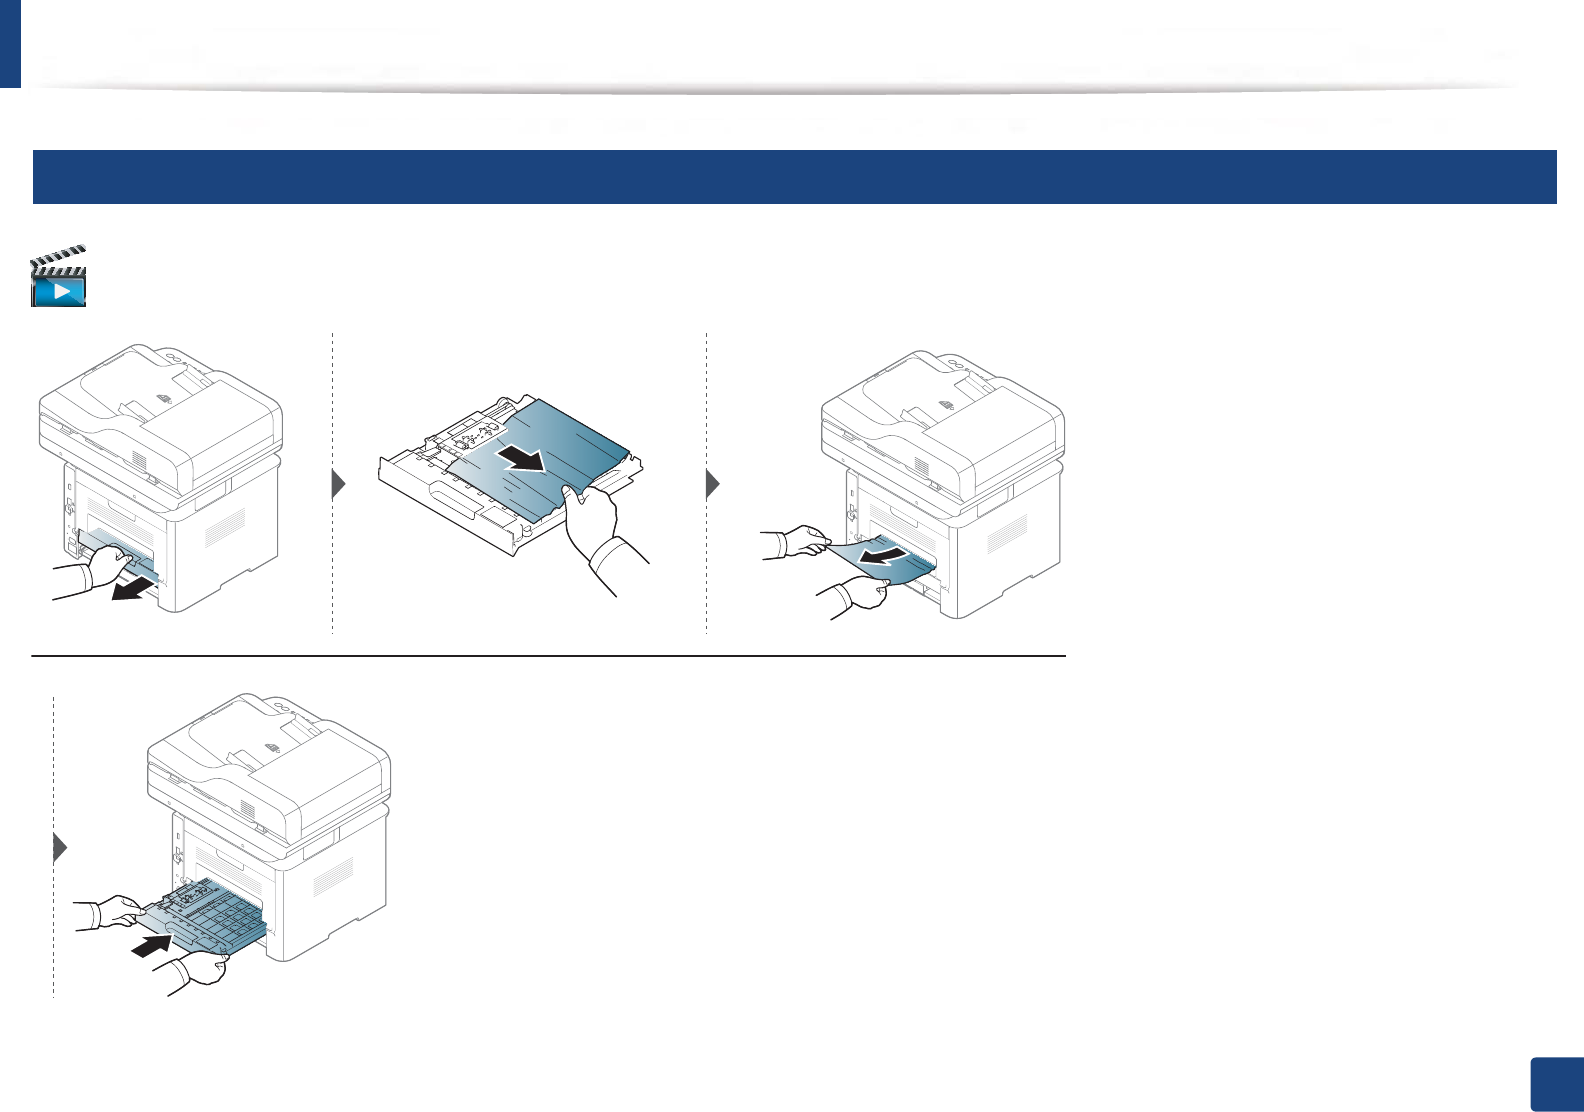
In the exit area
Click this link to open an animation about clearing a jam.
The fuser area is hot. Take care when removing paper from the machine.
Clearing jams
125
4. Troubleshooting
If you do not see the paper in this area, stop and go to next step:
Clearing jams
126
4. Troubleshooting
6
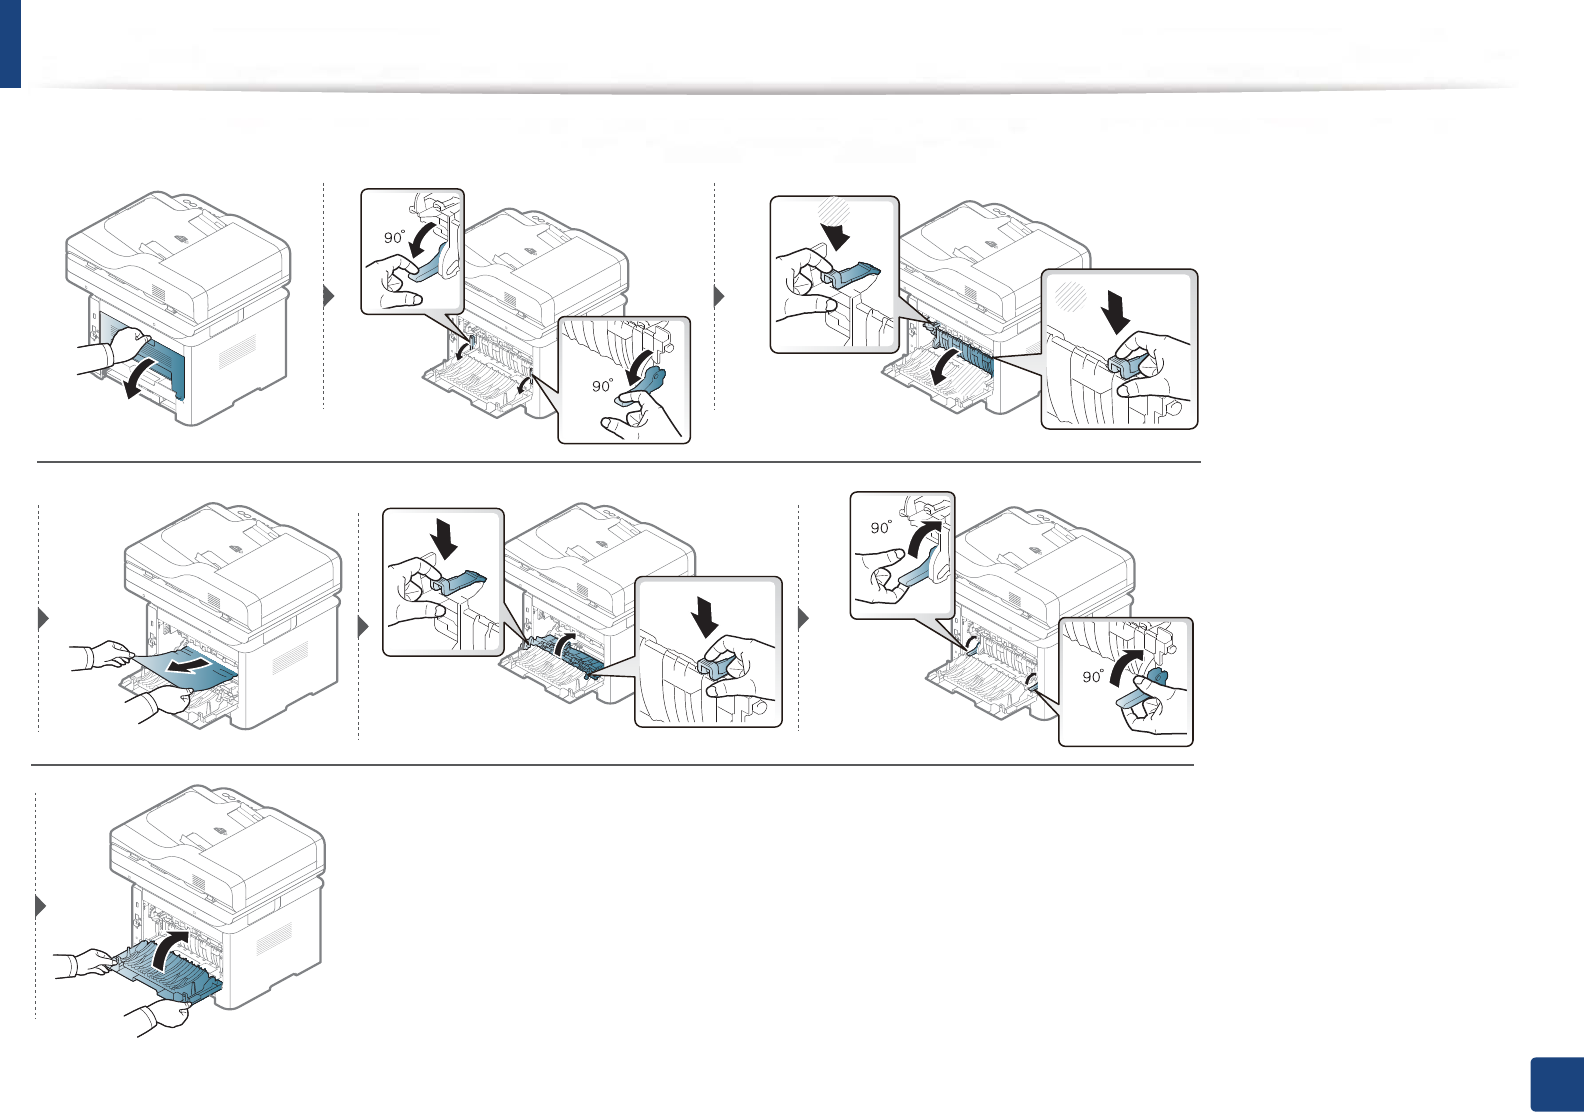
In the duplex unit area
Click this link to open an animation about clearing a jam.
Clearing jams
127
4. Troubleshooting
If you do not see the paper in this area, stop and go to next step:
2
1
1