Samsung Electronics Co SLM4075FX Mono Laser Printer User Manual M337x M387x M407x LEGAL XOA english 0530 re
Samsung Electronics Co Ltd Mono Laser Printer M337x M387x M407x LEGAL XOA english 0530 re
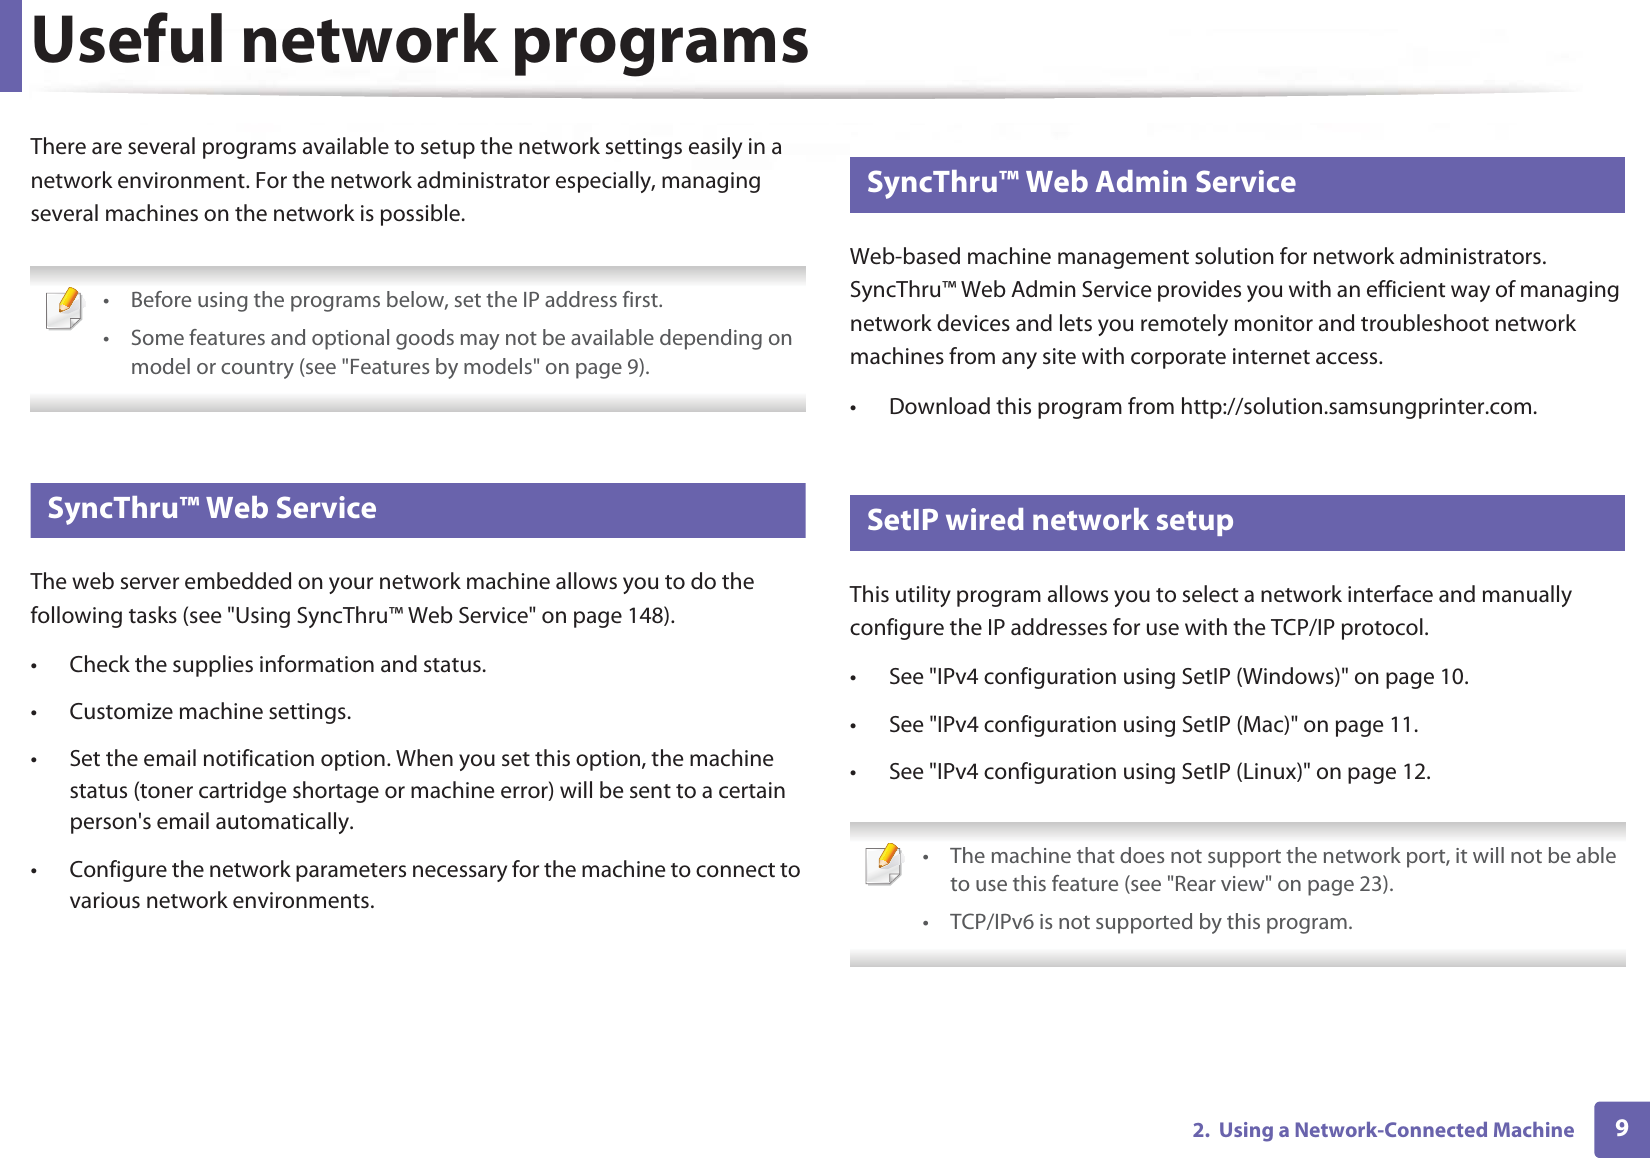
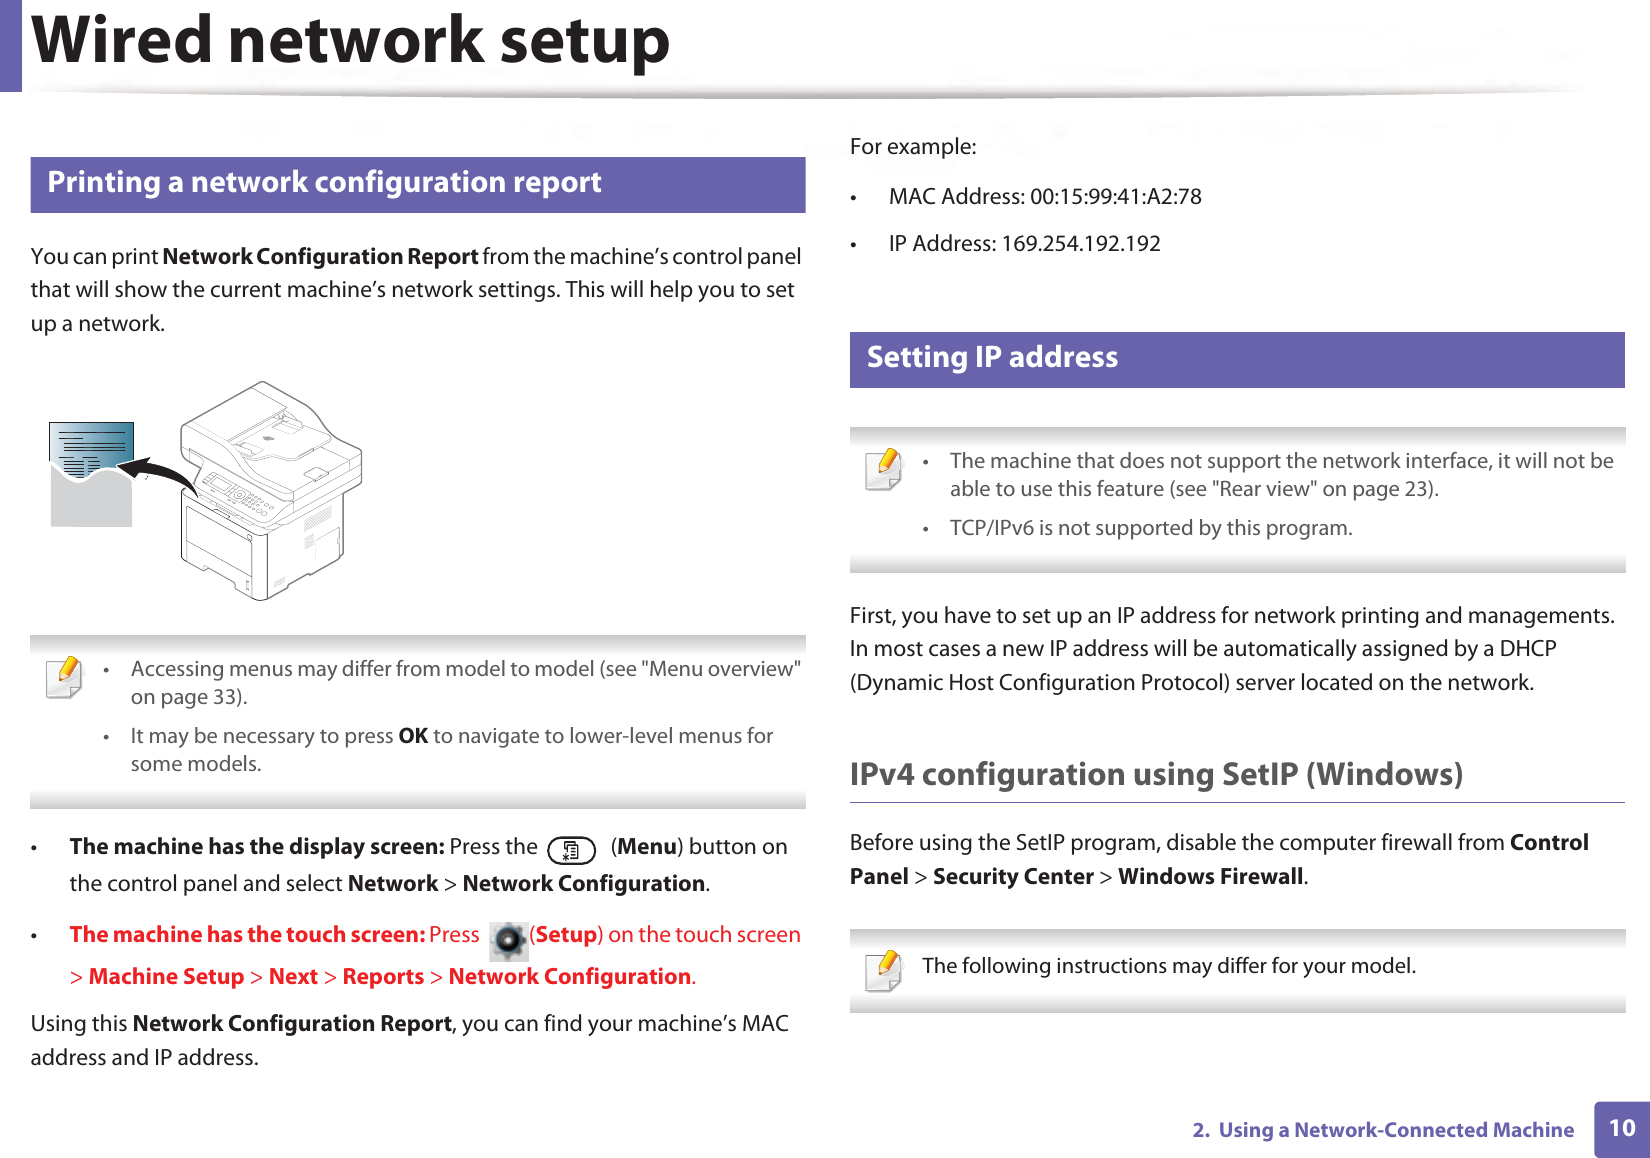
Contents
- 1. Users Manual 1
- 2. Users Manaul 2
- 3. Users Manual 3
- 4. Users Manual 4
Users Manual 4


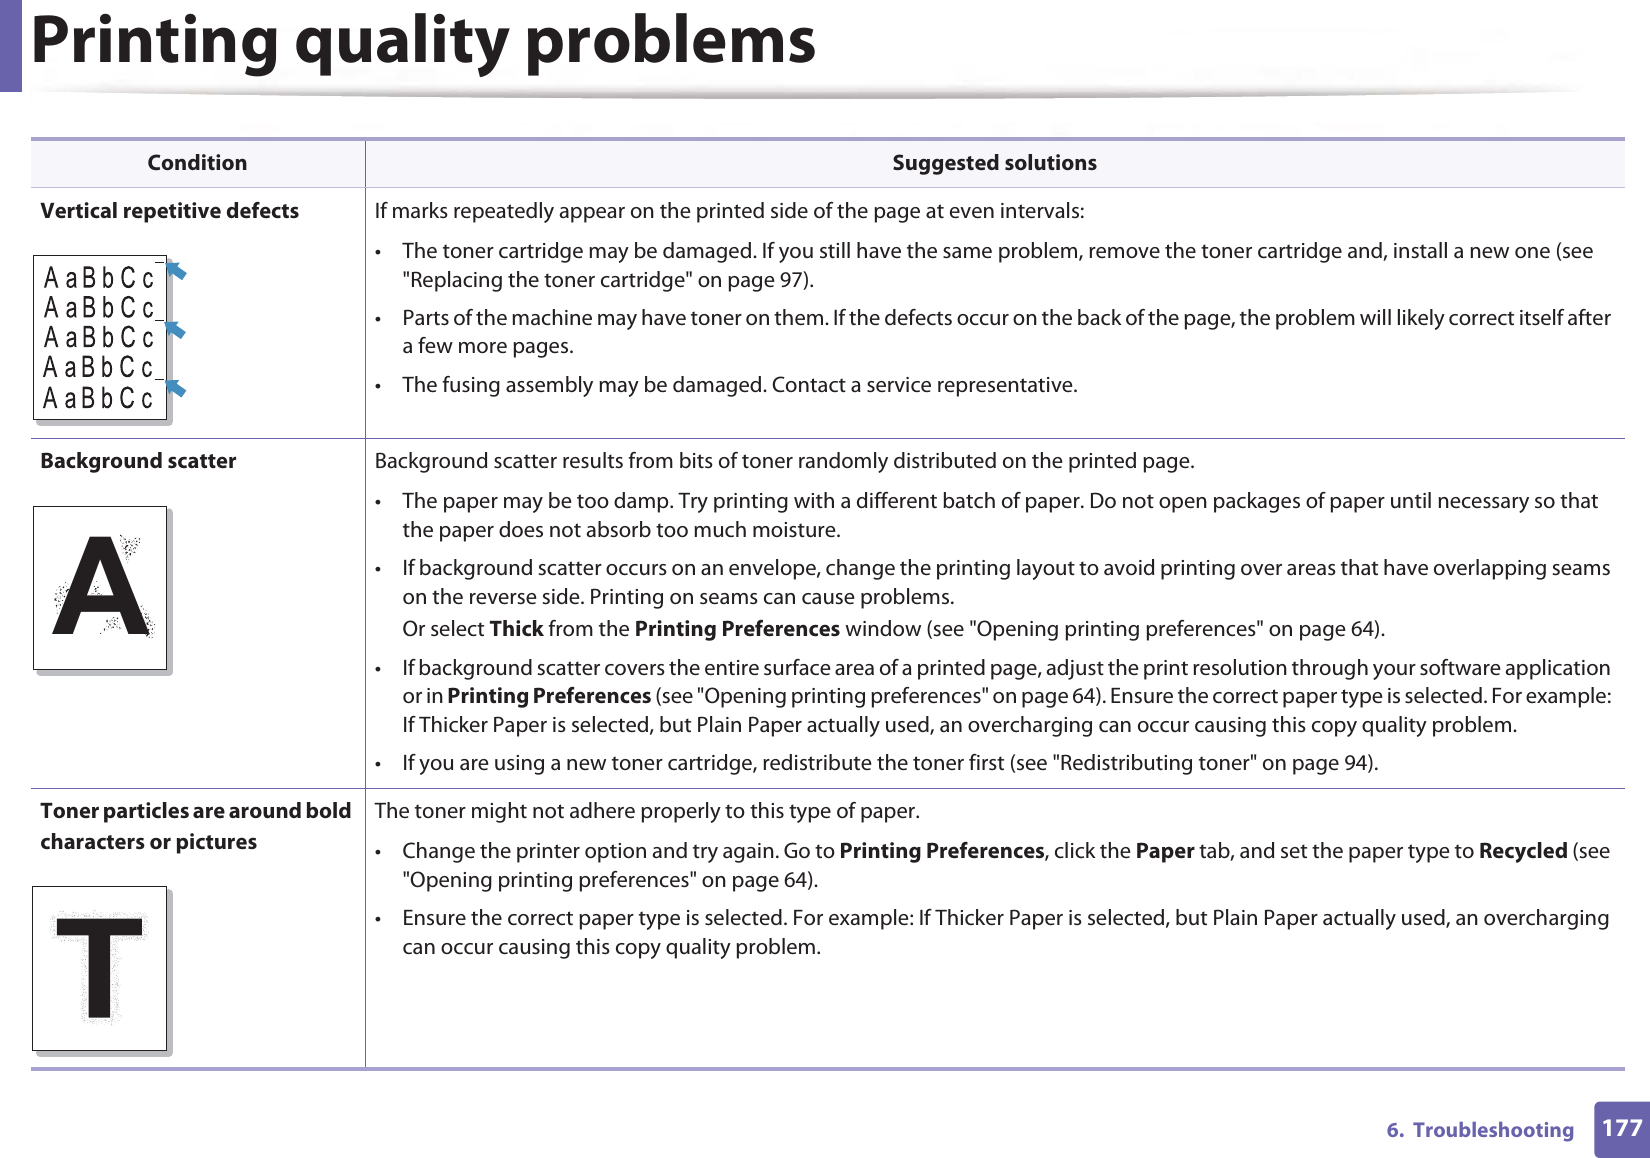
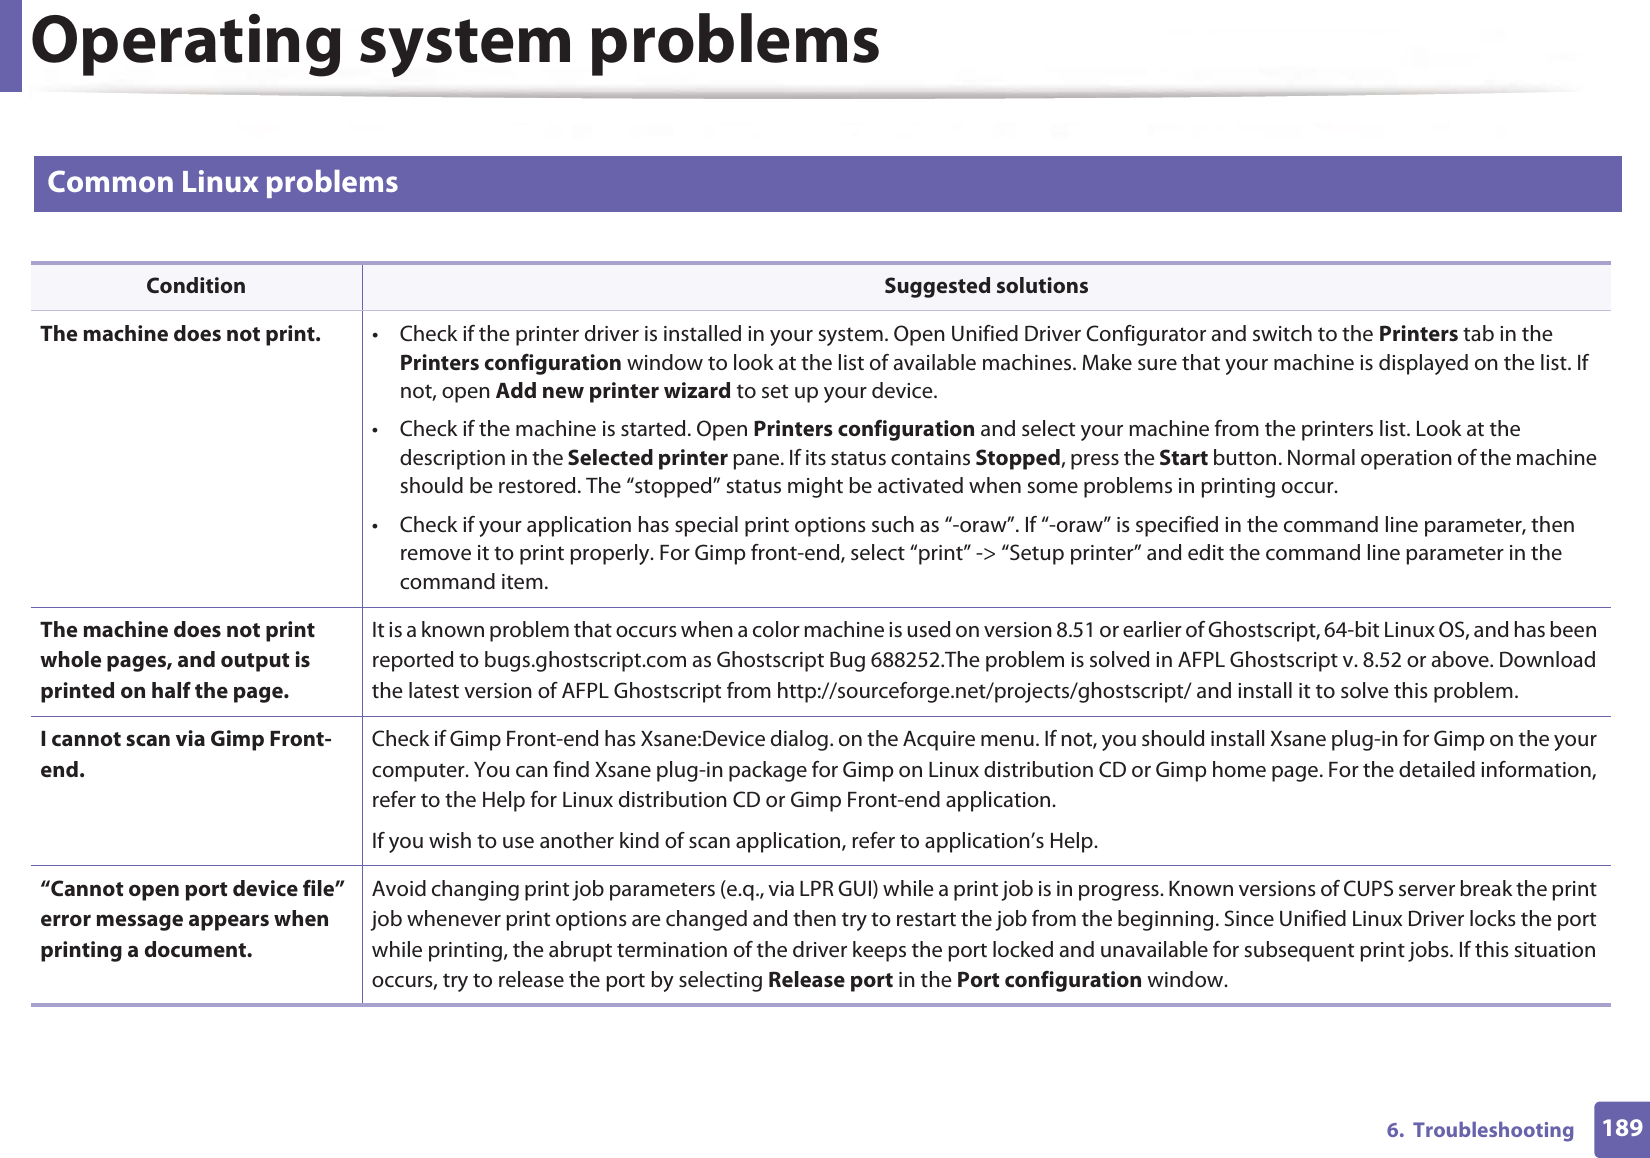
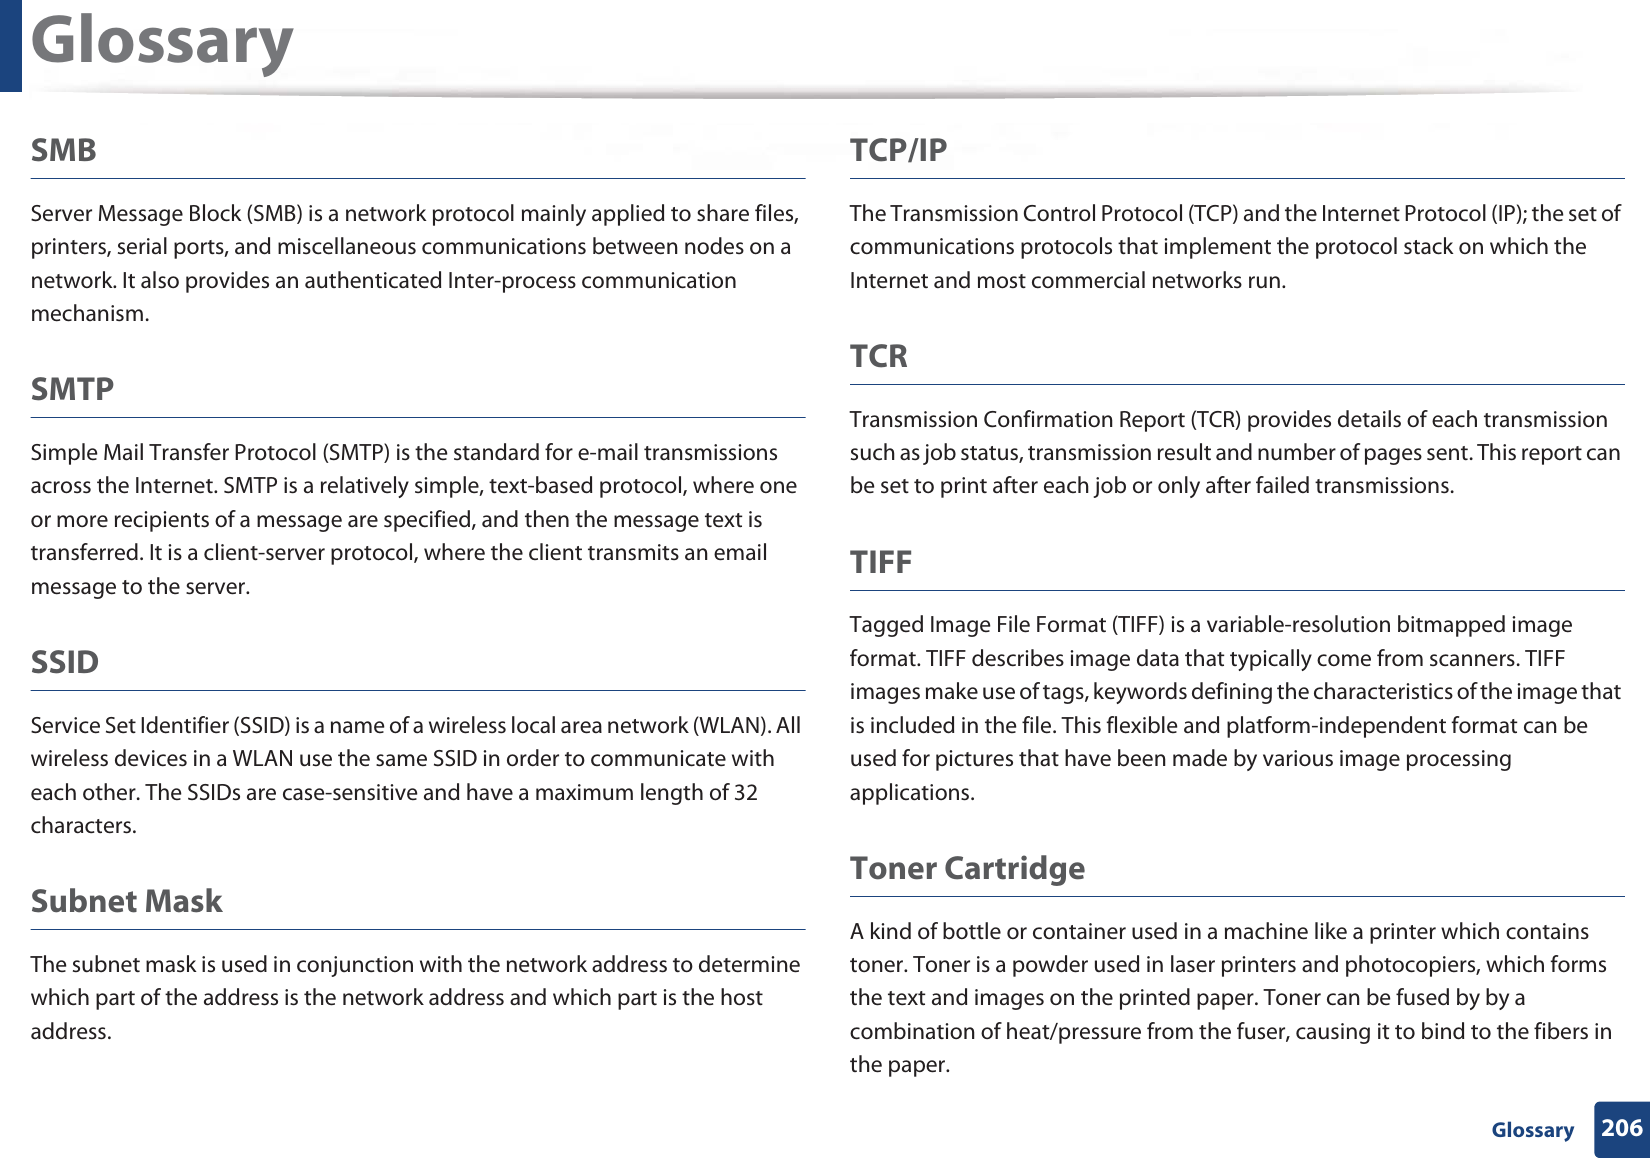
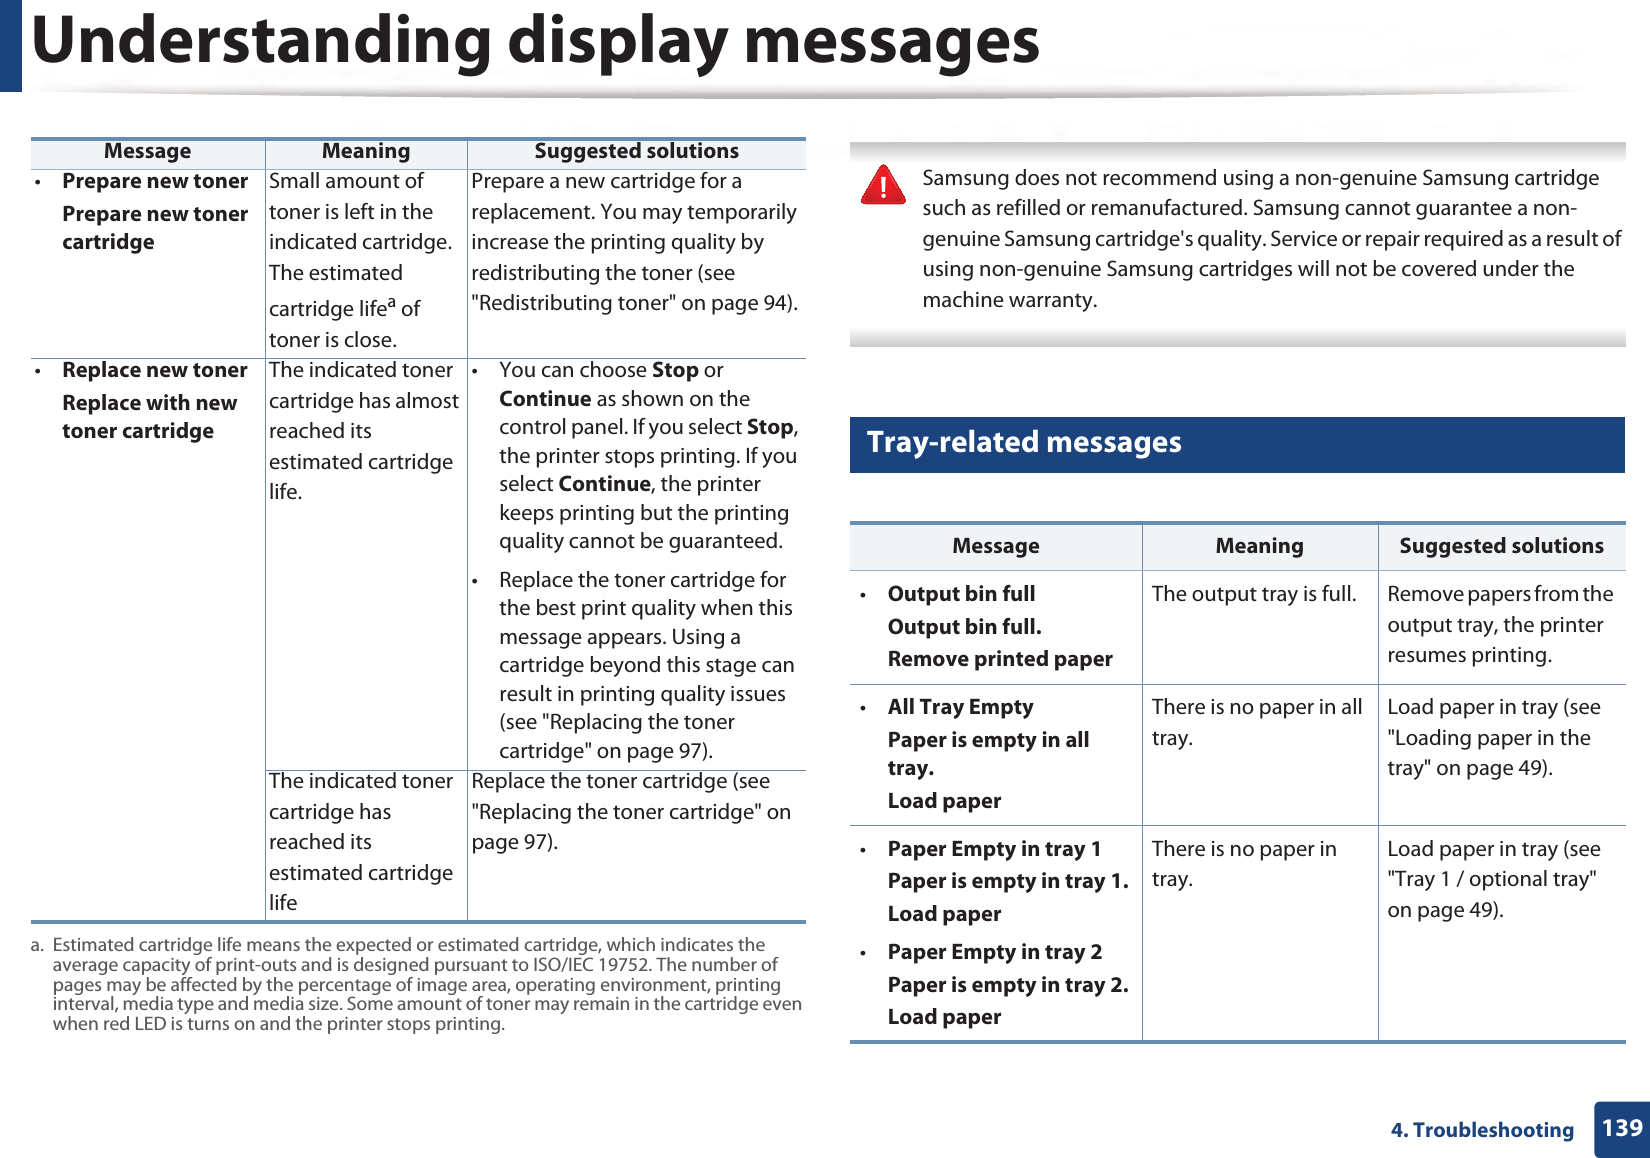
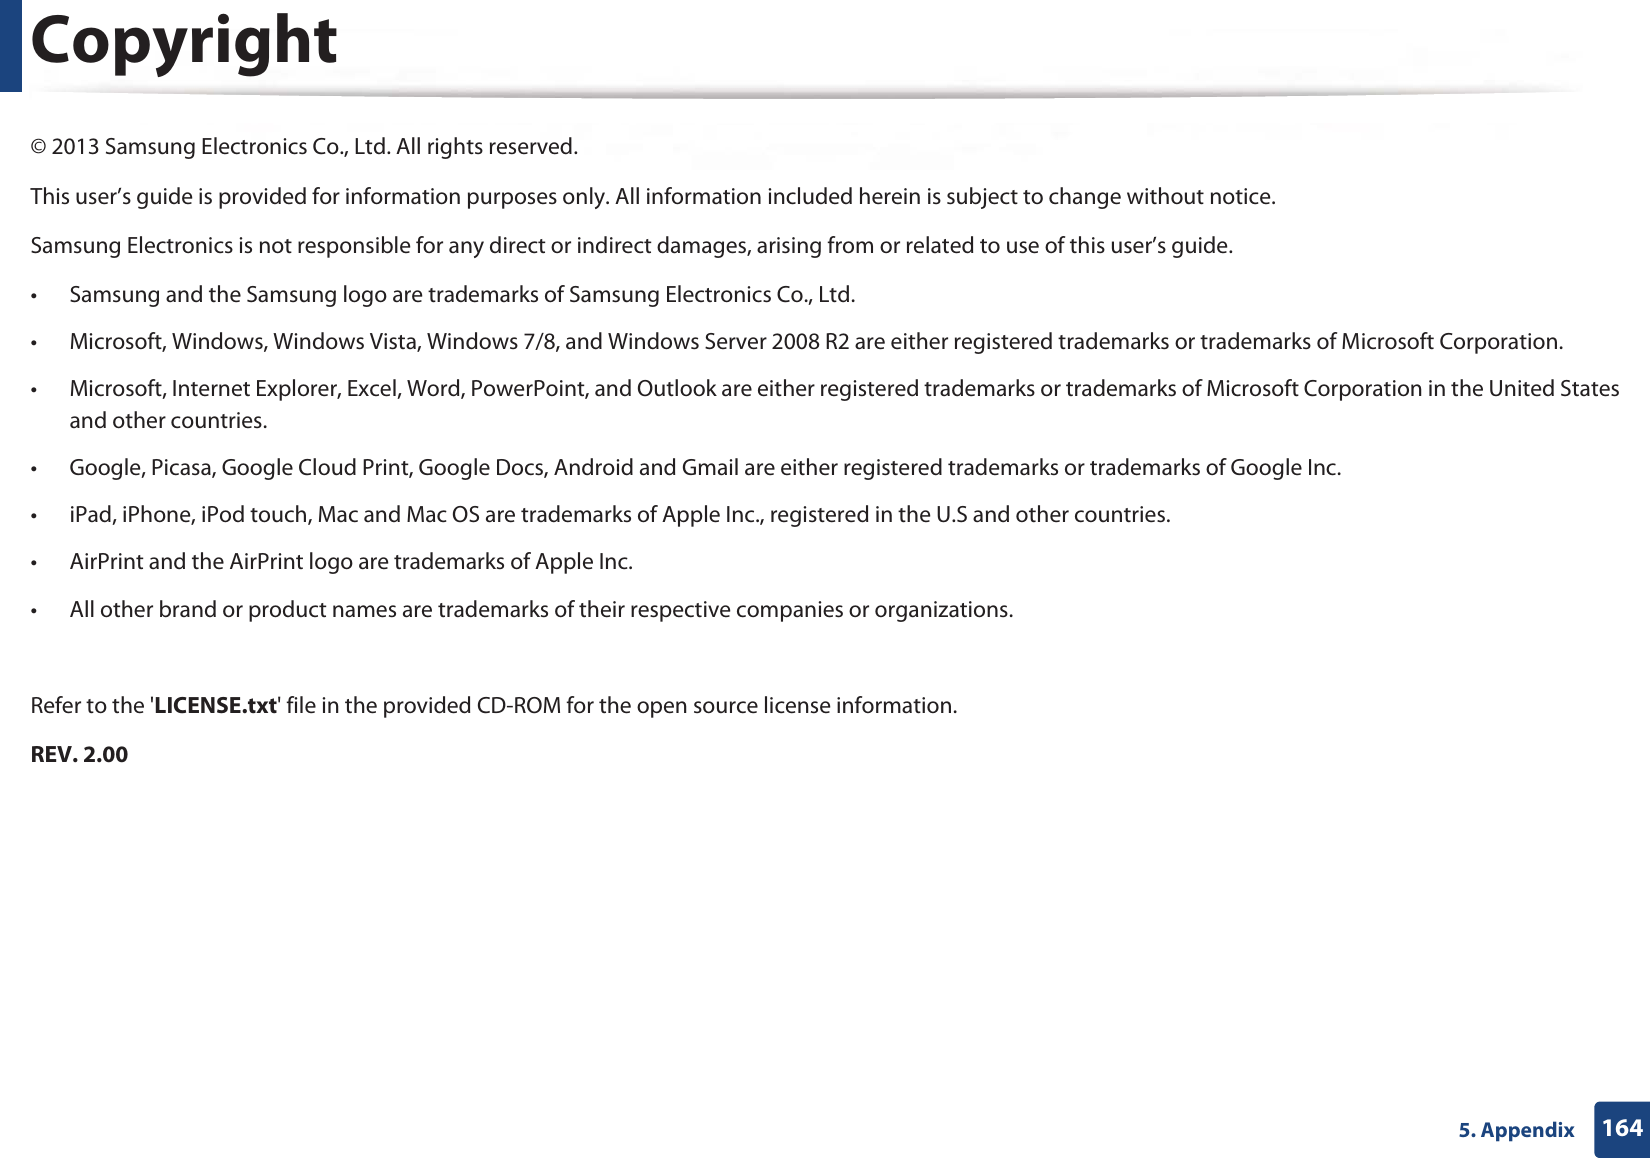
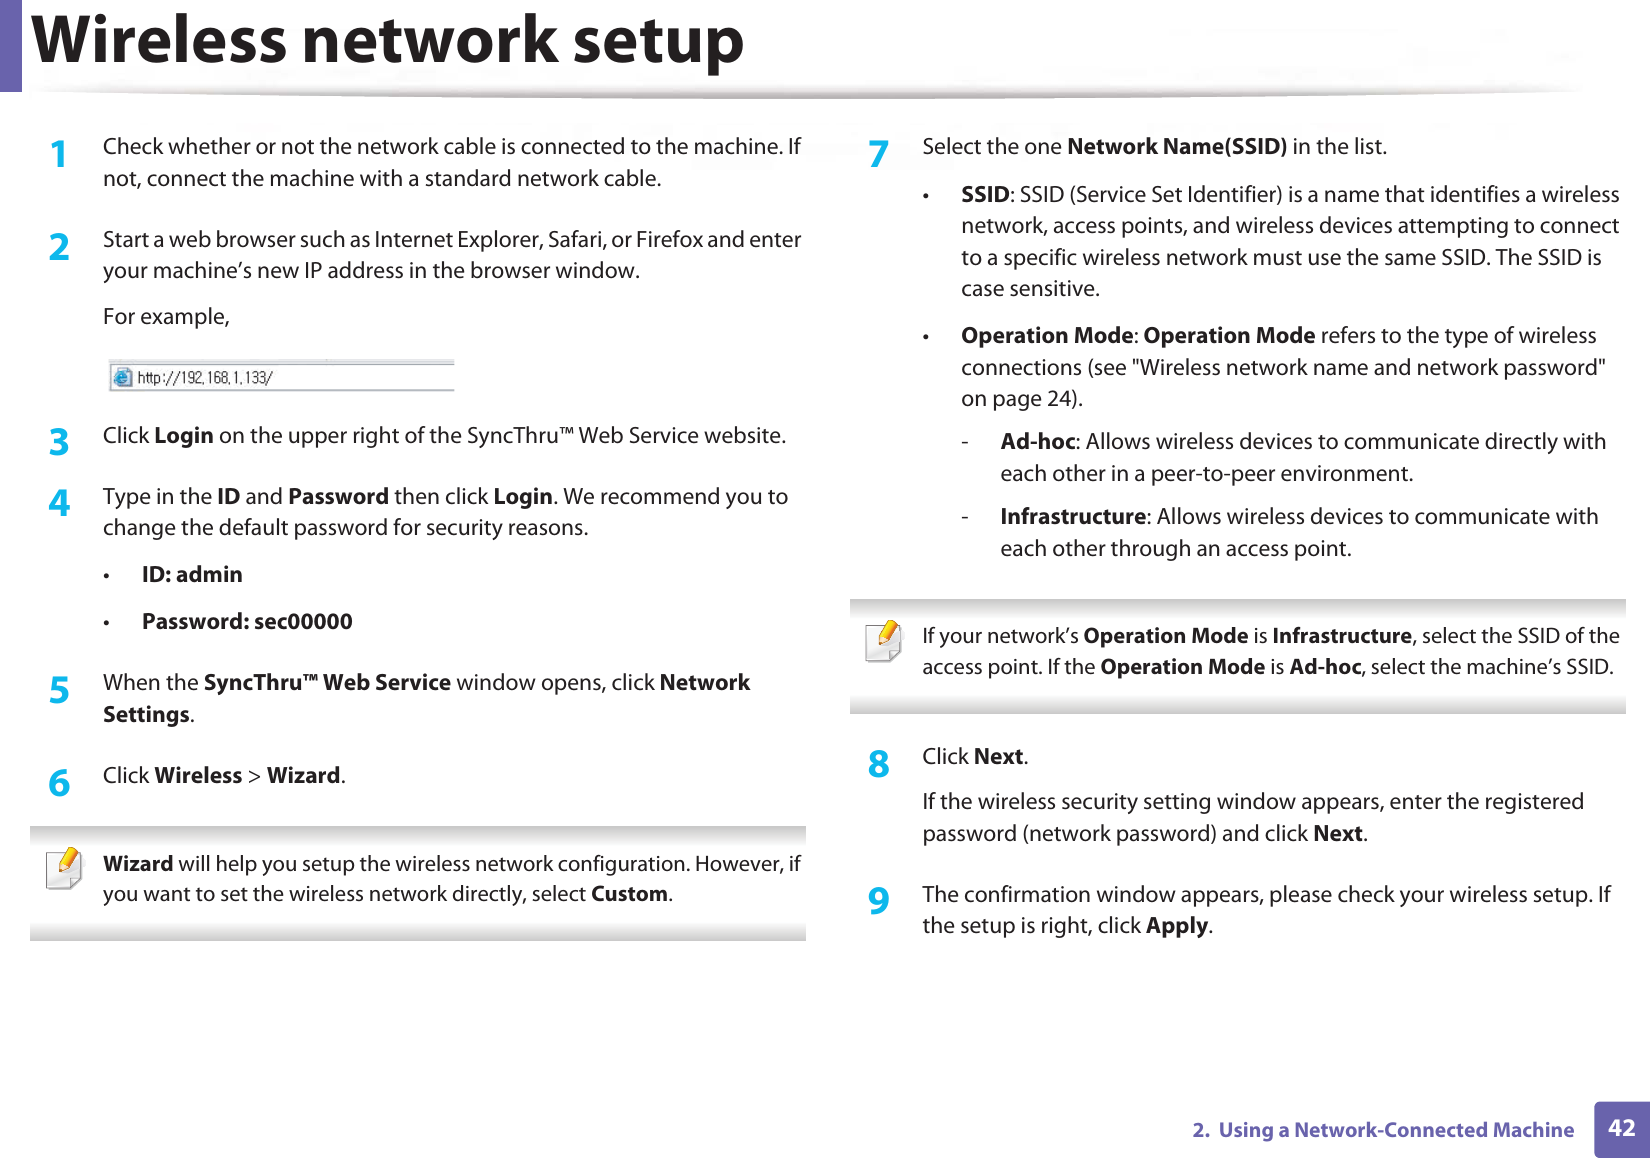
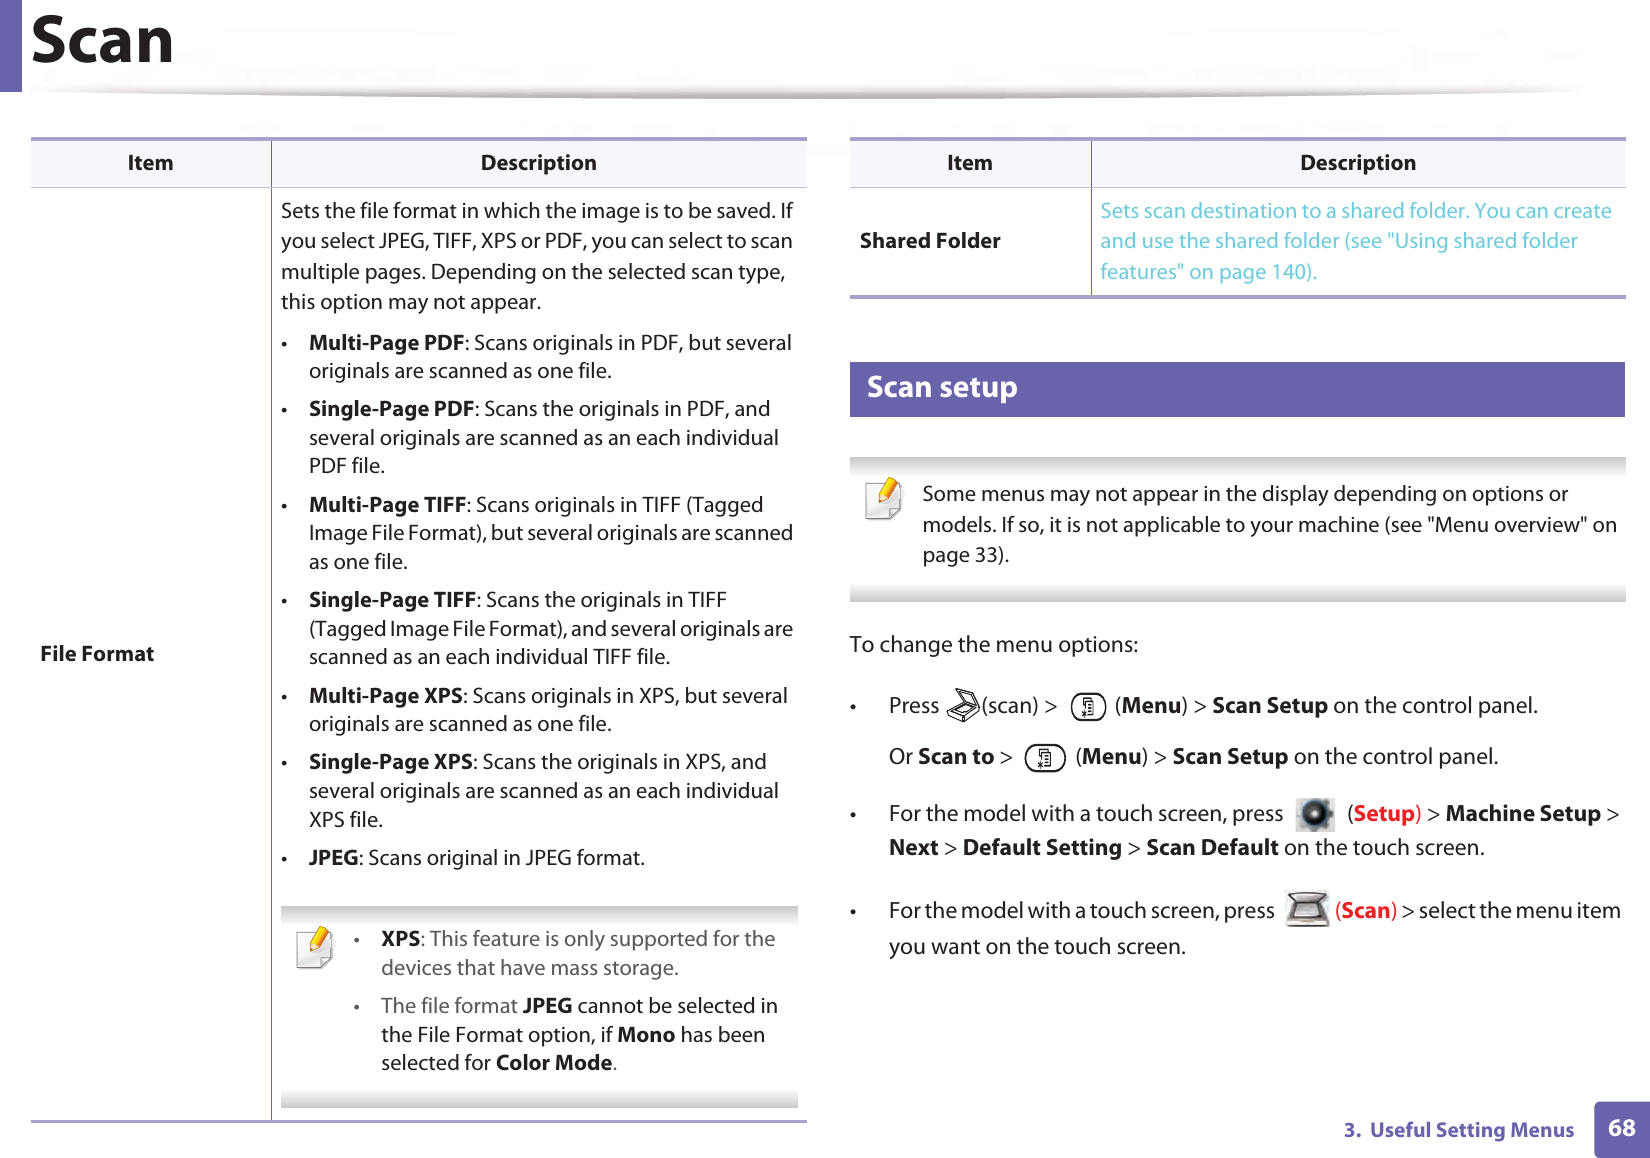
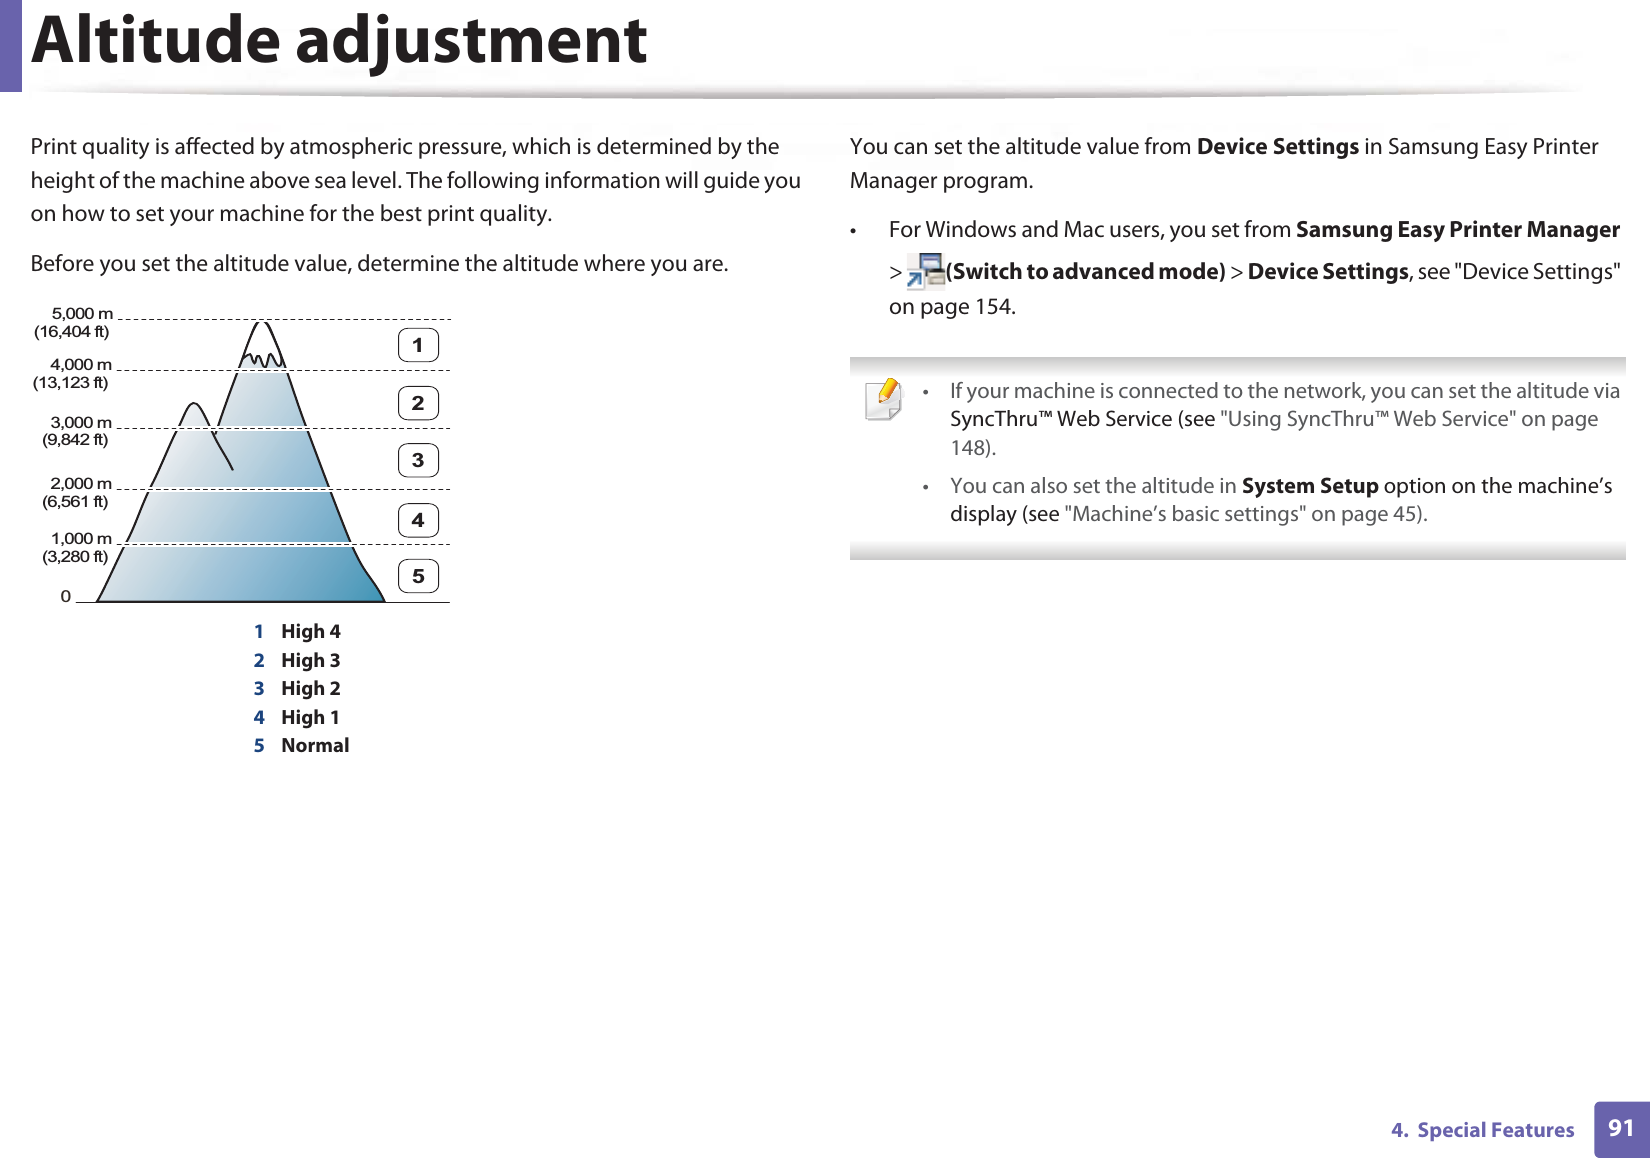
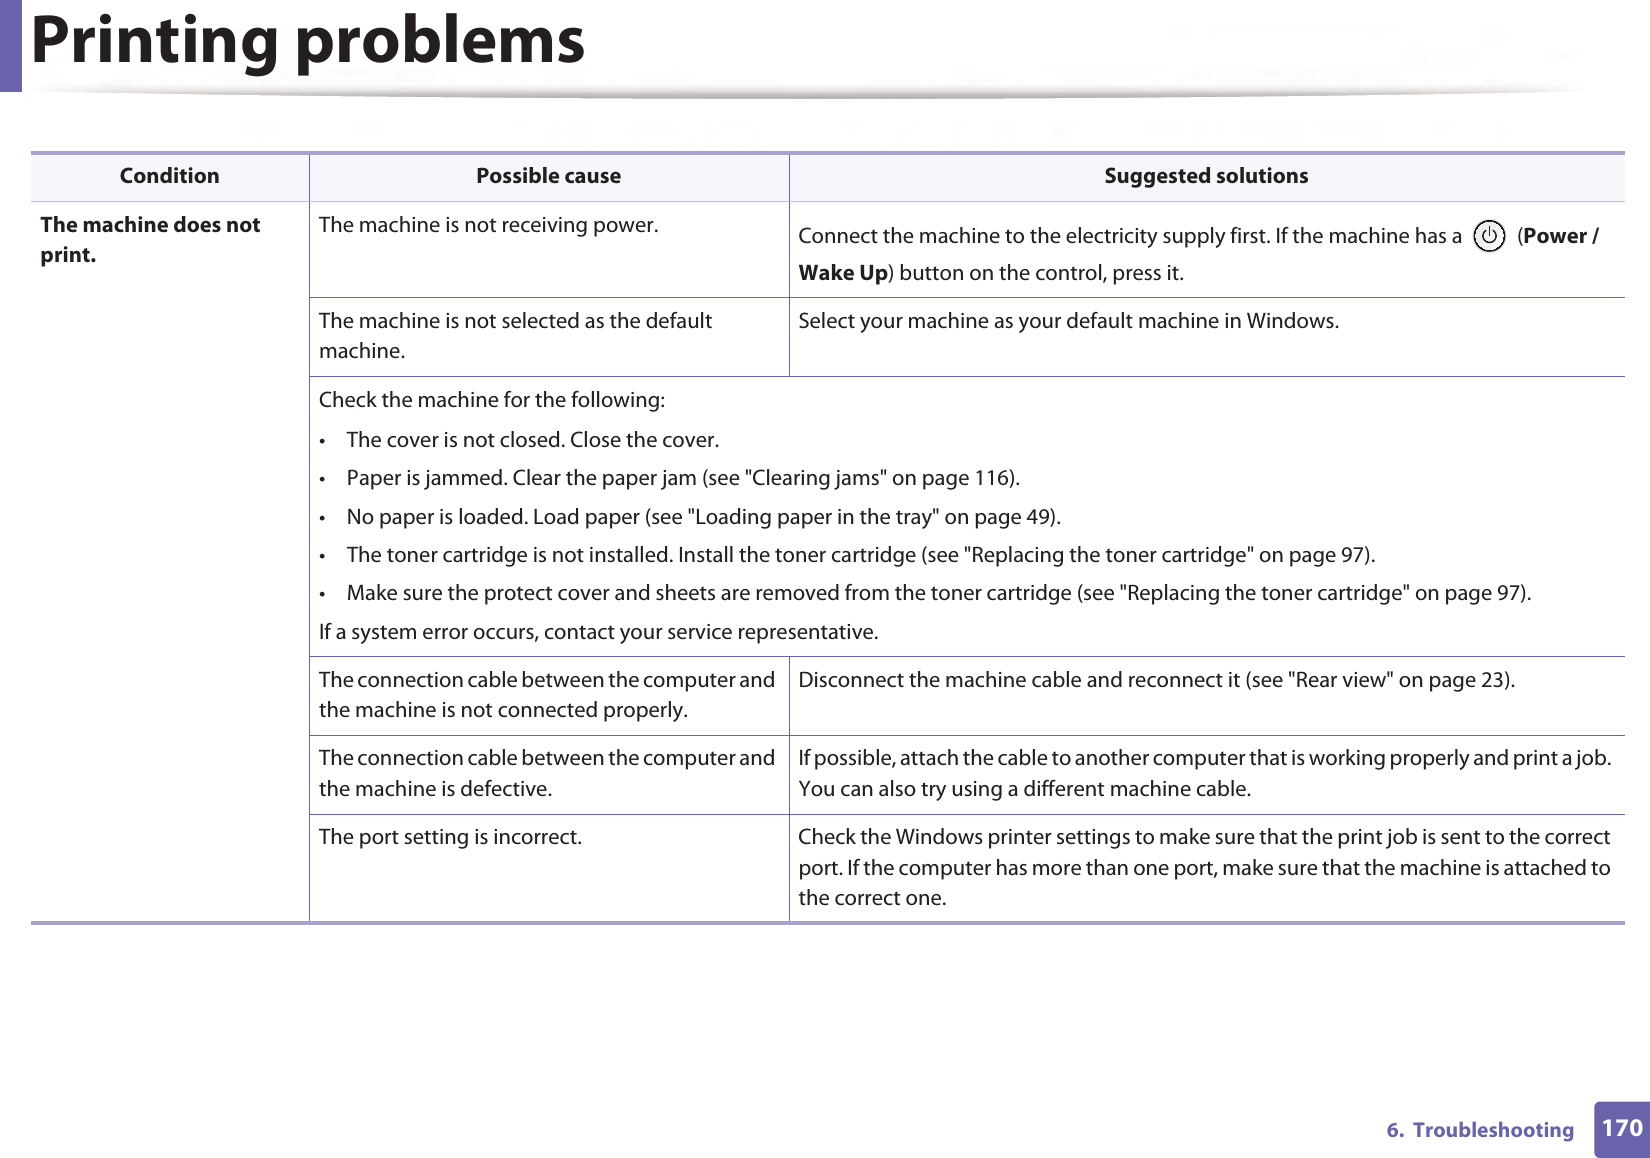
![1374. TroubleshootingUnderstanding display messagesMessages appear on the control panel display to indicate the machine’s status or errors. Refer to the tables below to understand the messages’ and their meaning, and correct the problem, if necessary. • You can resolve the error with the guideline from the computers’s Printing Status program window (see "Using Samsung Printer Status" on page 155).• If a message is not in the table, reboot the power and try the printing job again. If the problem persists, call a service representative.• When you call for service, provide the service representative with the contents of display message.• Some messages may not appear on the display depending on the model or optional goods• [error number] indicates the error number. • [tray type] indicates the tray number. • [media type] indicates the media type.• [media size] indicates the media size.• [unit type] indicates the unit type. 8 Paper Jam-related messagesMessage Meaning Suggested solutions•Original paper jam inside of scanner. Remove jamThe loaded original document has jammed in document feeder.Clear the jam (see "Clearing original document jams" on page 128).•Paper Jam in tray 1 Paper has jammed in the tray.Clear the jam (see "In tray1" on page 116).•Paper Jam in tray 2 Paper has jammed in the optional tray.Clear the jam (see "In optional tray" on page 117).•Paper Jam in MP tray Paper has jammed in the multi-purpose tray.Clear the jam (see "In the multi-purpose (or manual feeder) tray" on page 119).•Jam inside machine Paper has jammed in inside the machine.Clear the jam (see "Inside the machine" on page 121).•Jam inside of duplex Paper has jammed in inside the duplex.Clear the jam (see "In the duplex unit area" on page 126).•Jam in exit area Paper has jammed in the paper exit area.Clear the jam (see "In the exit area" on page 124).](https://usermanual.wiki/Samsung-Electronics-Co/SLM4075FX.Users-Manual-4/User-Guide-2020651-Page-10.png)
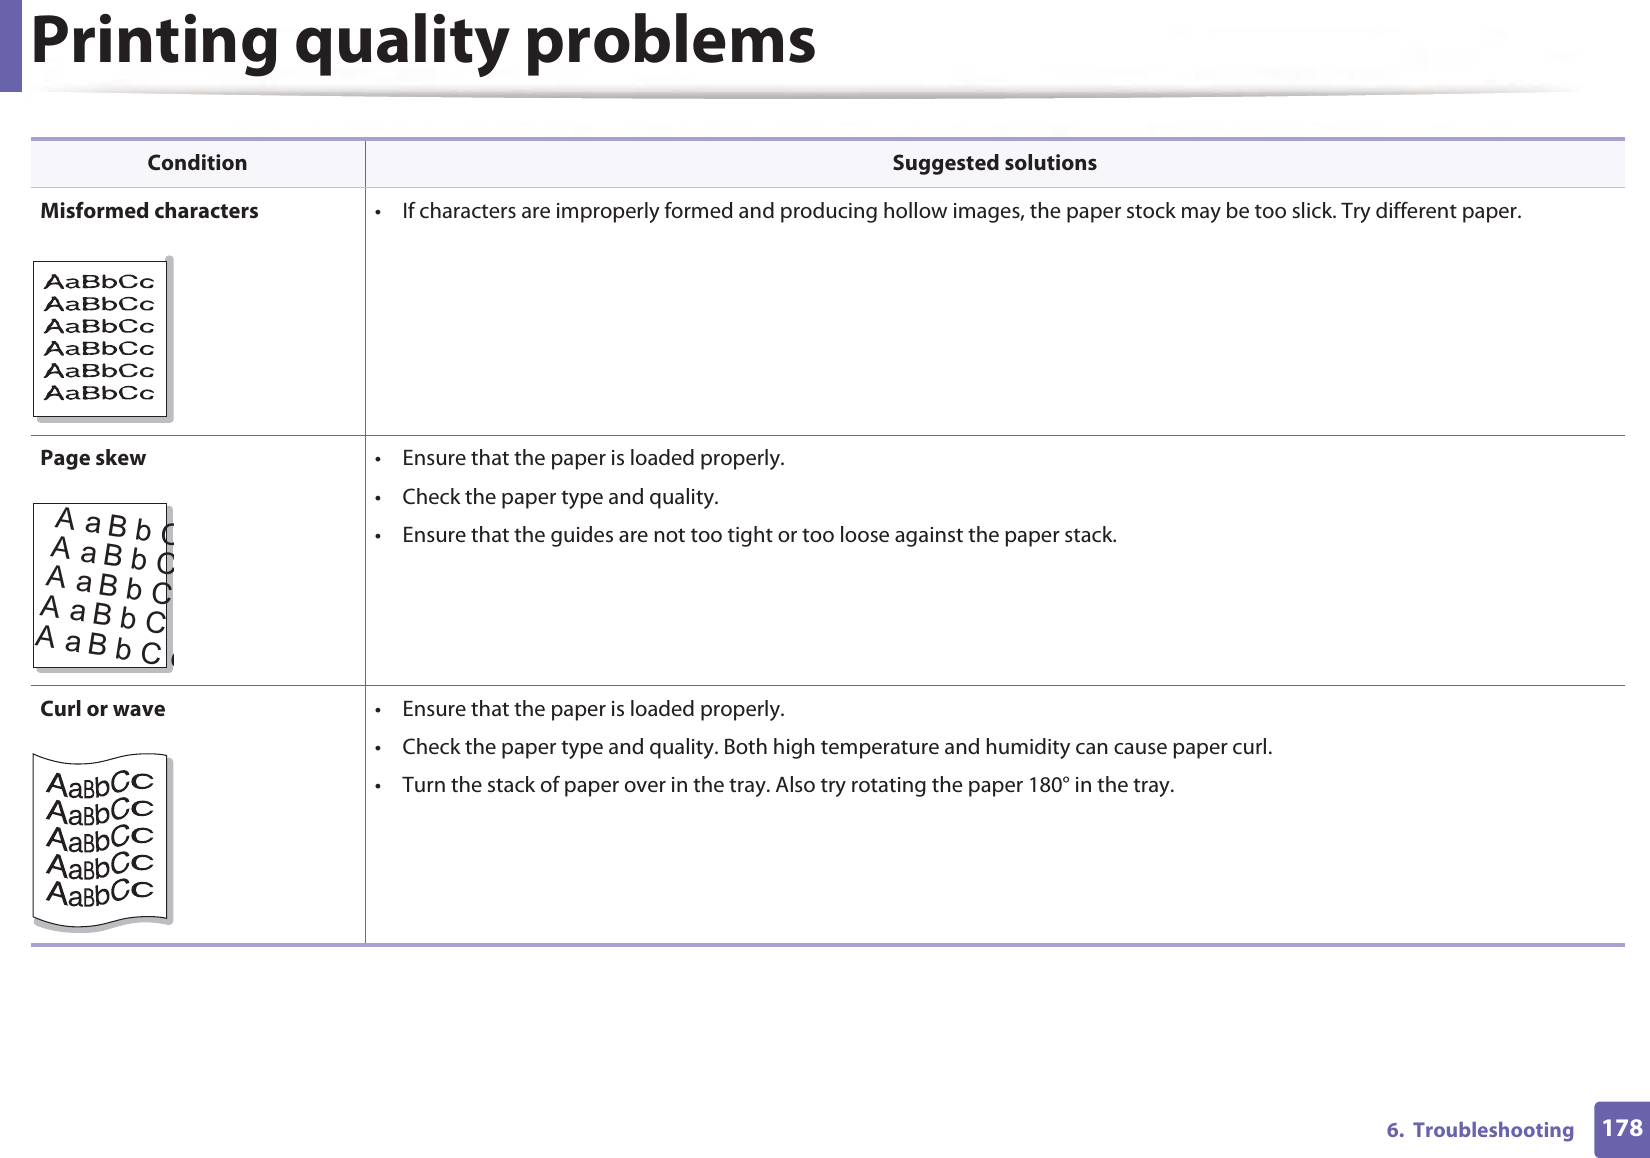
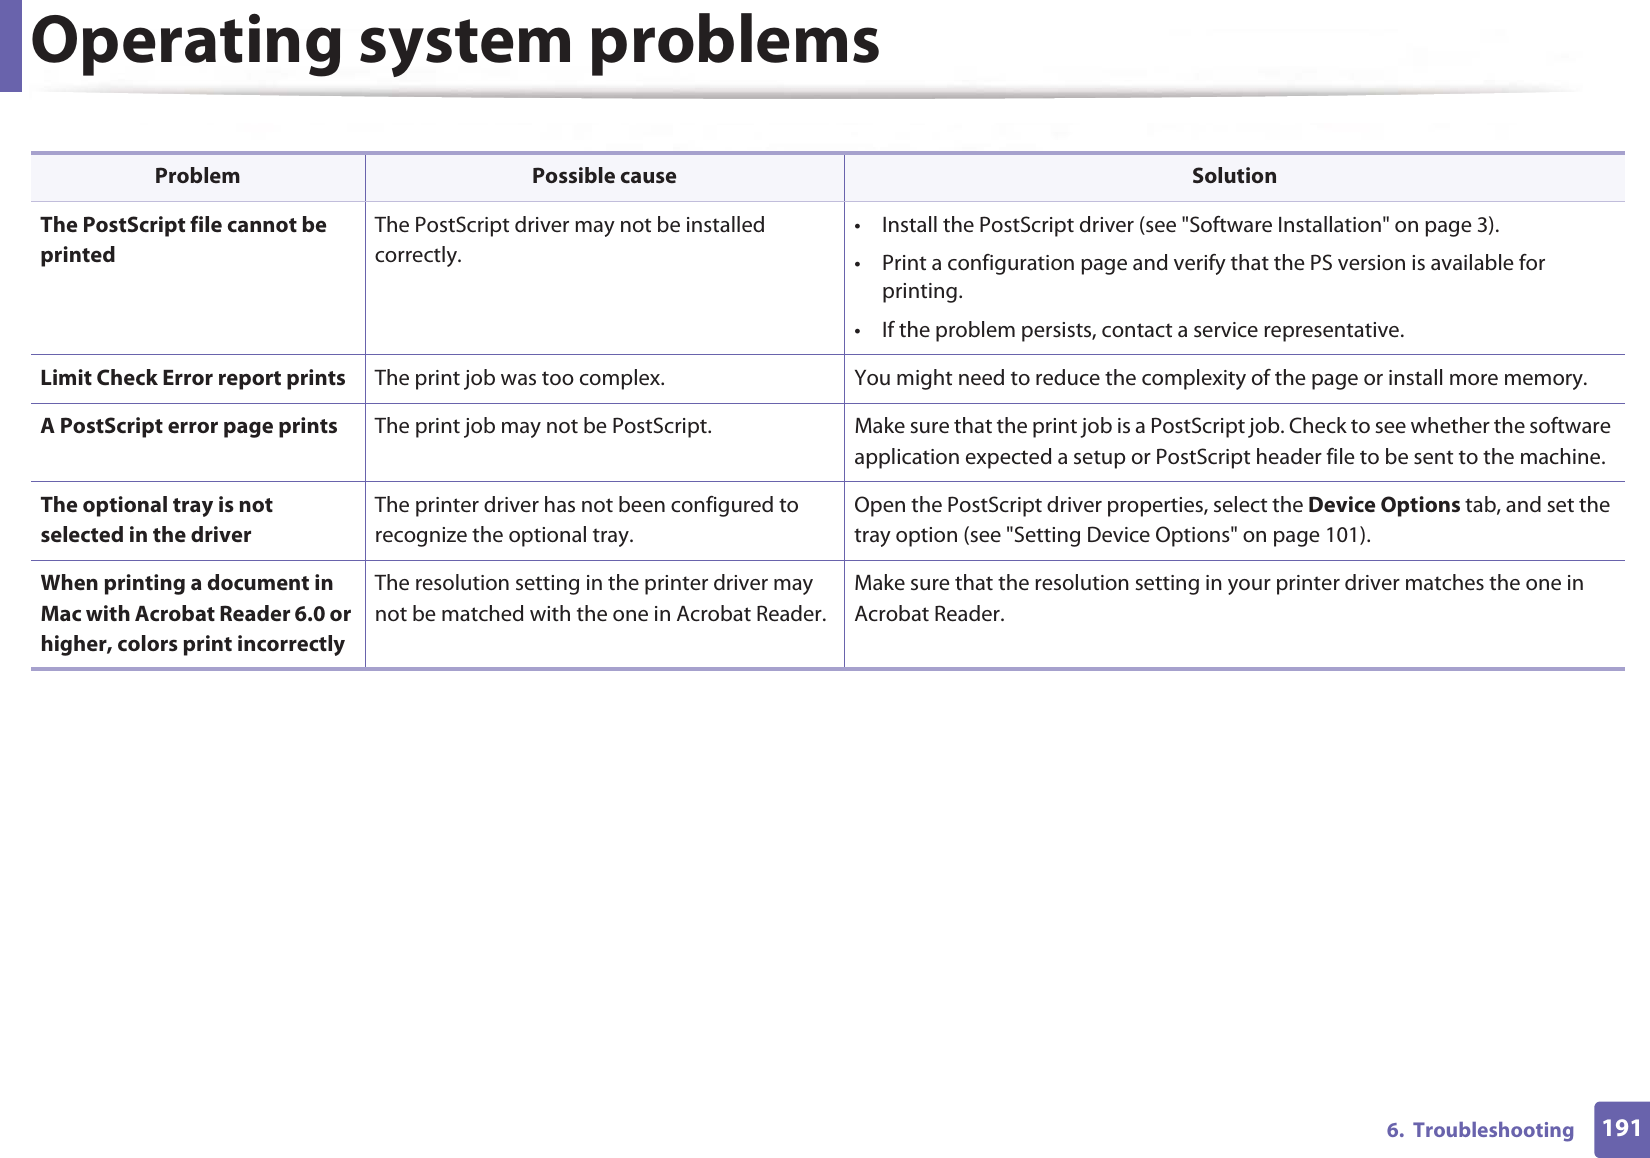
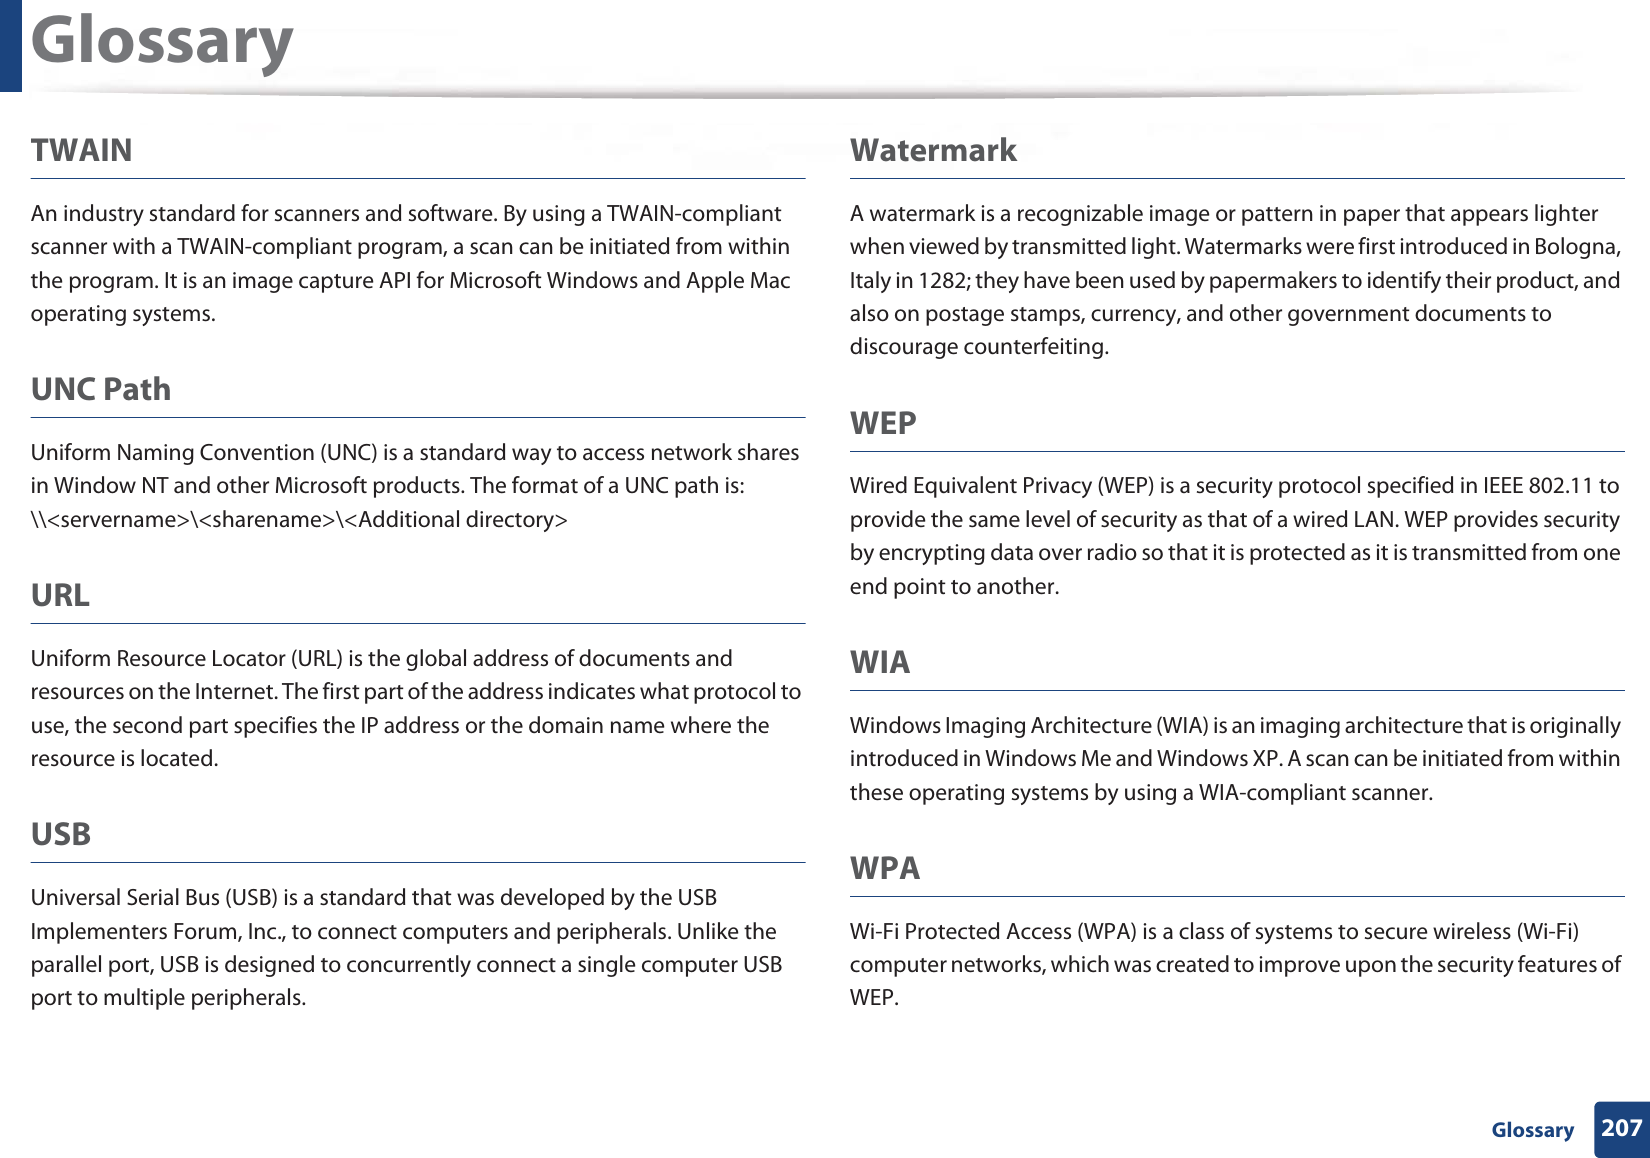
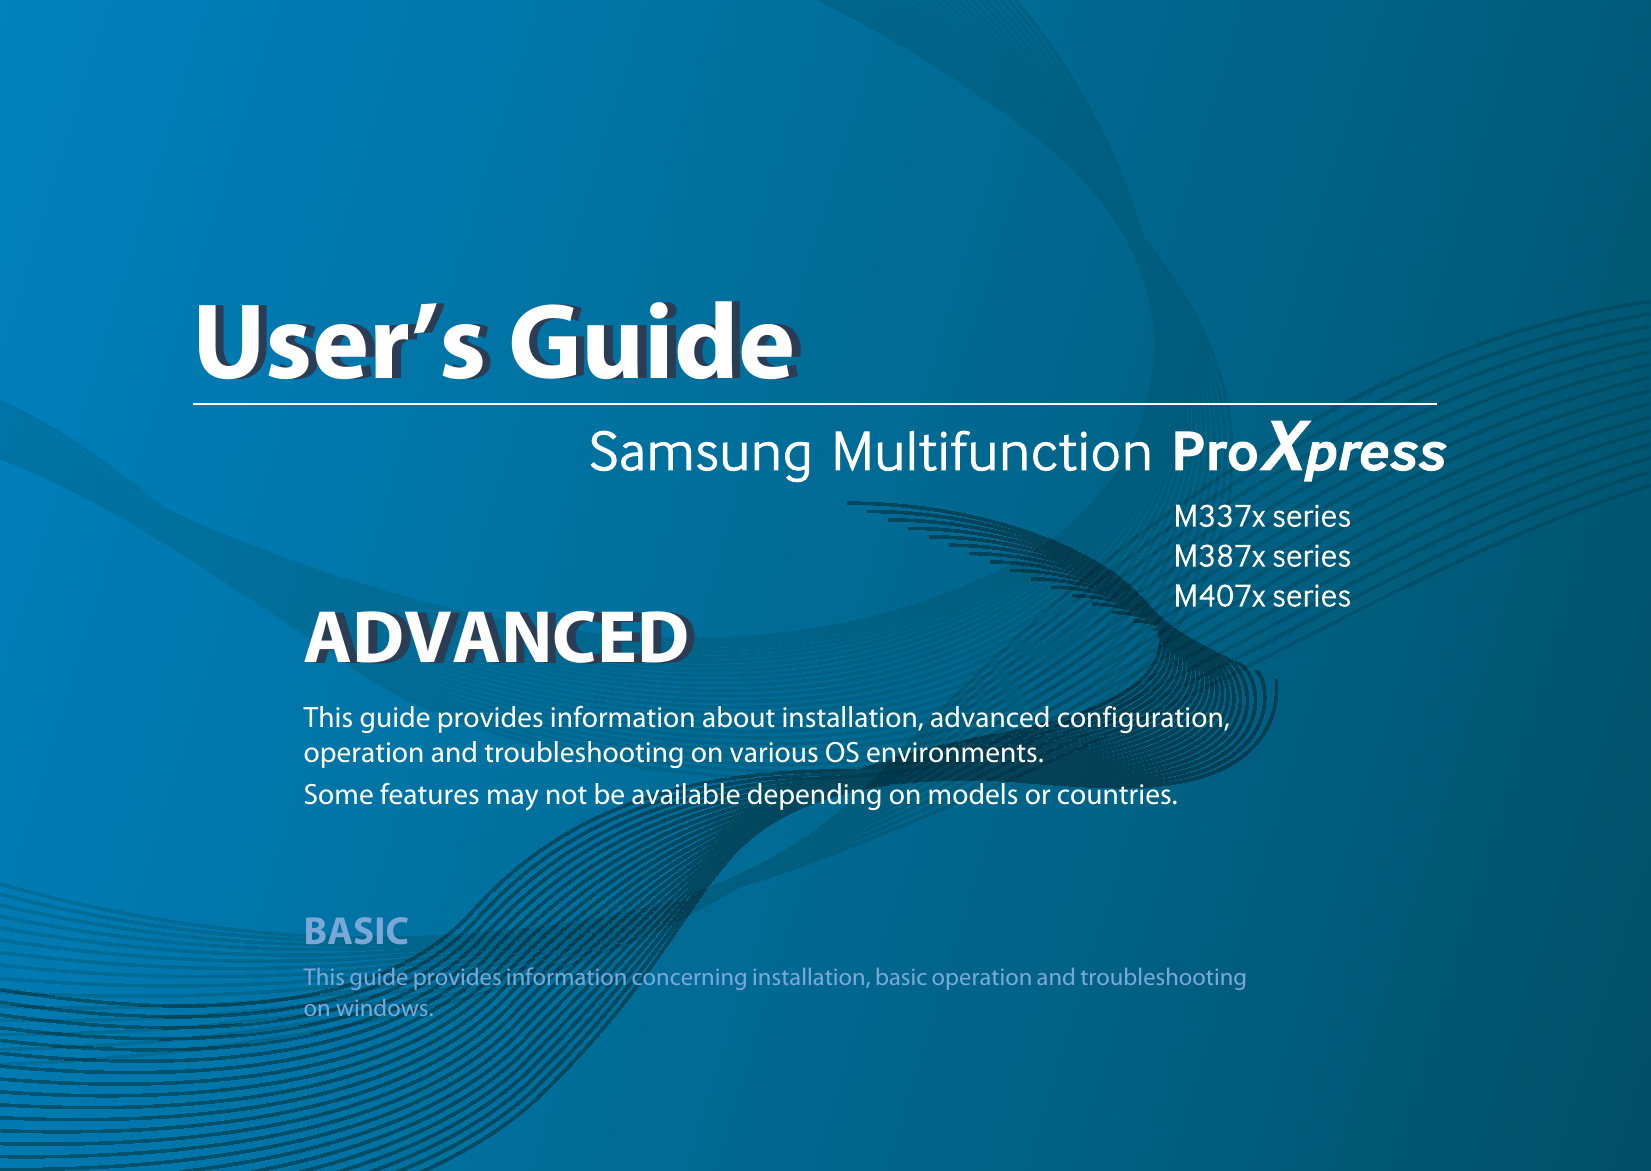
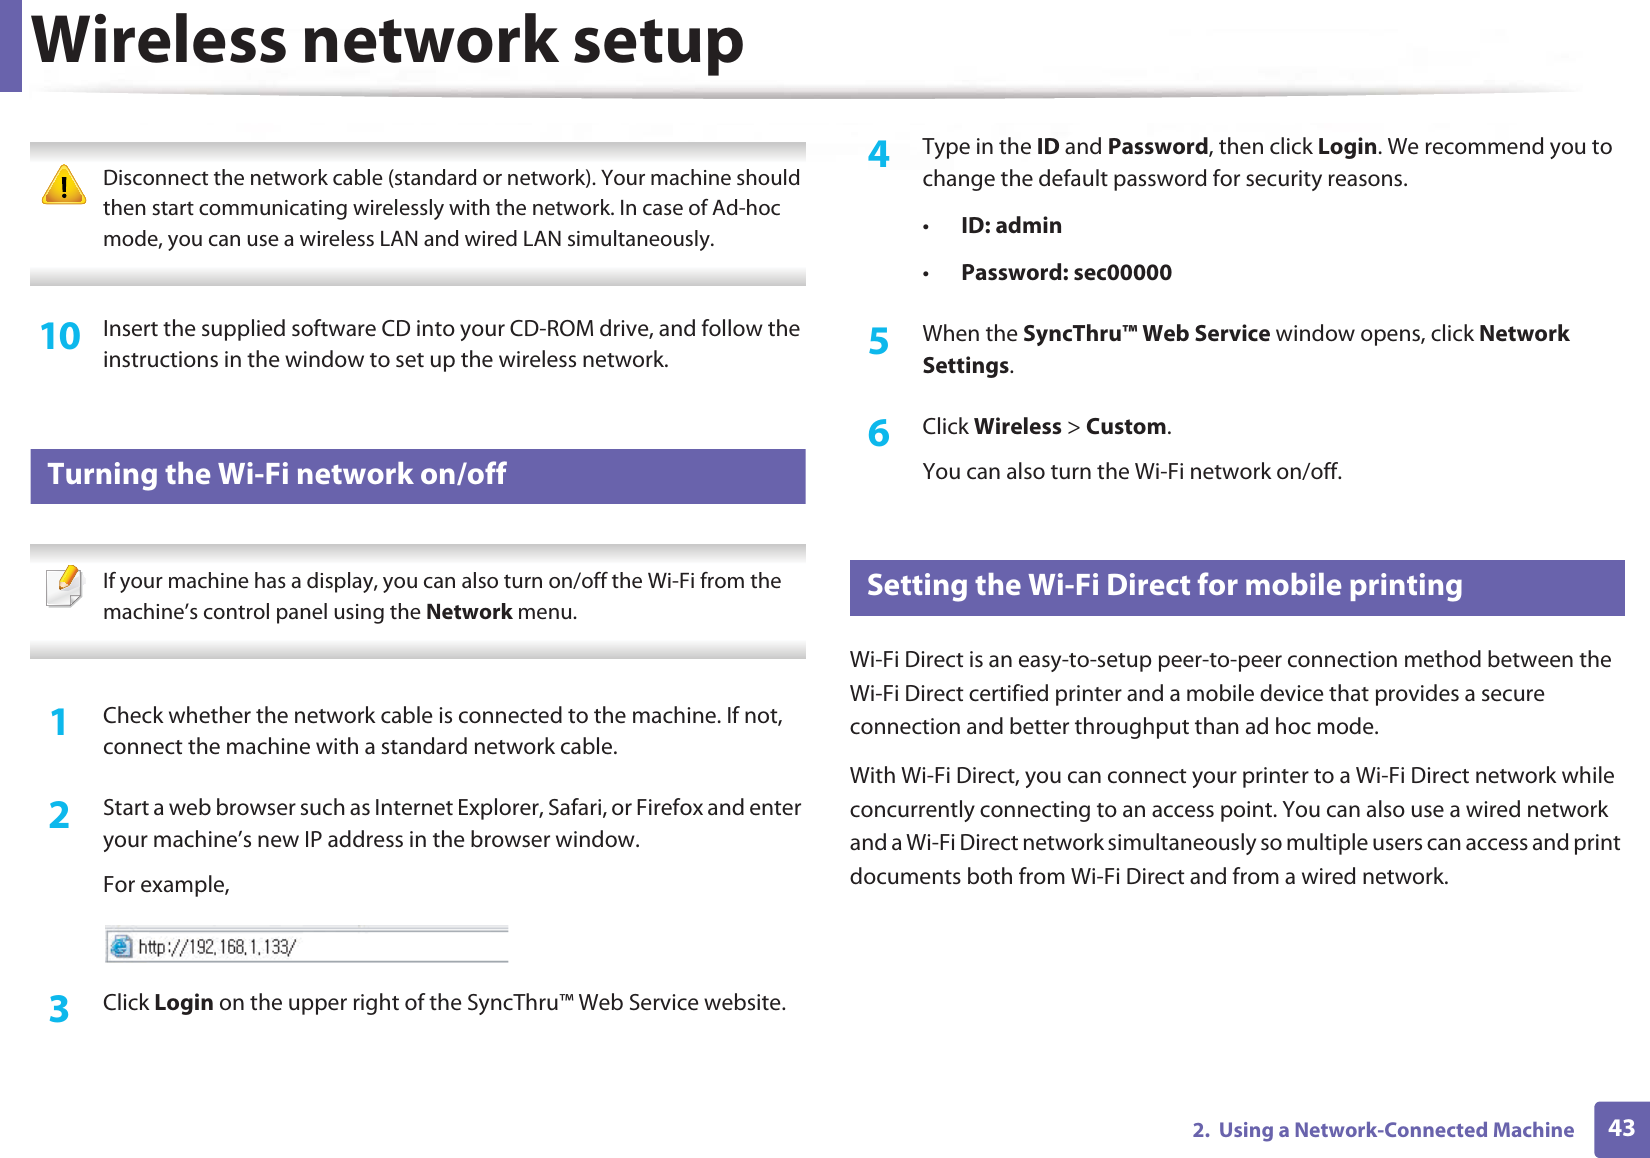
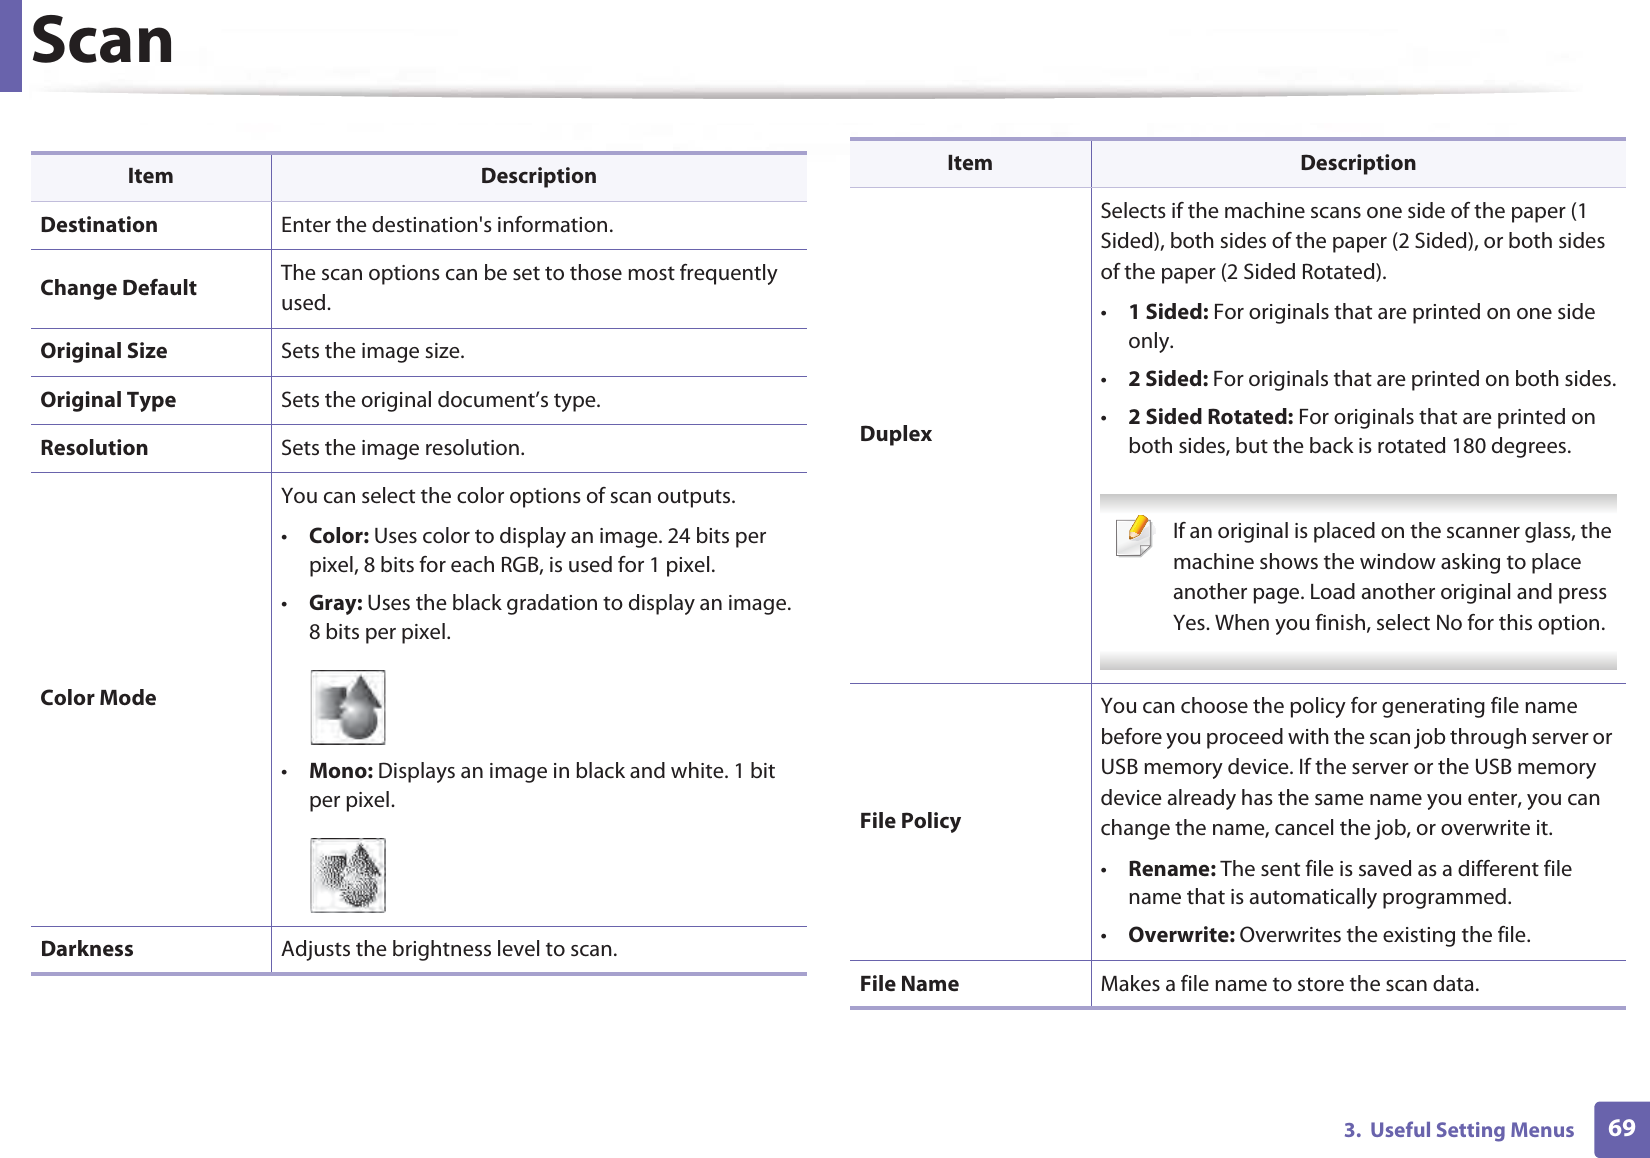
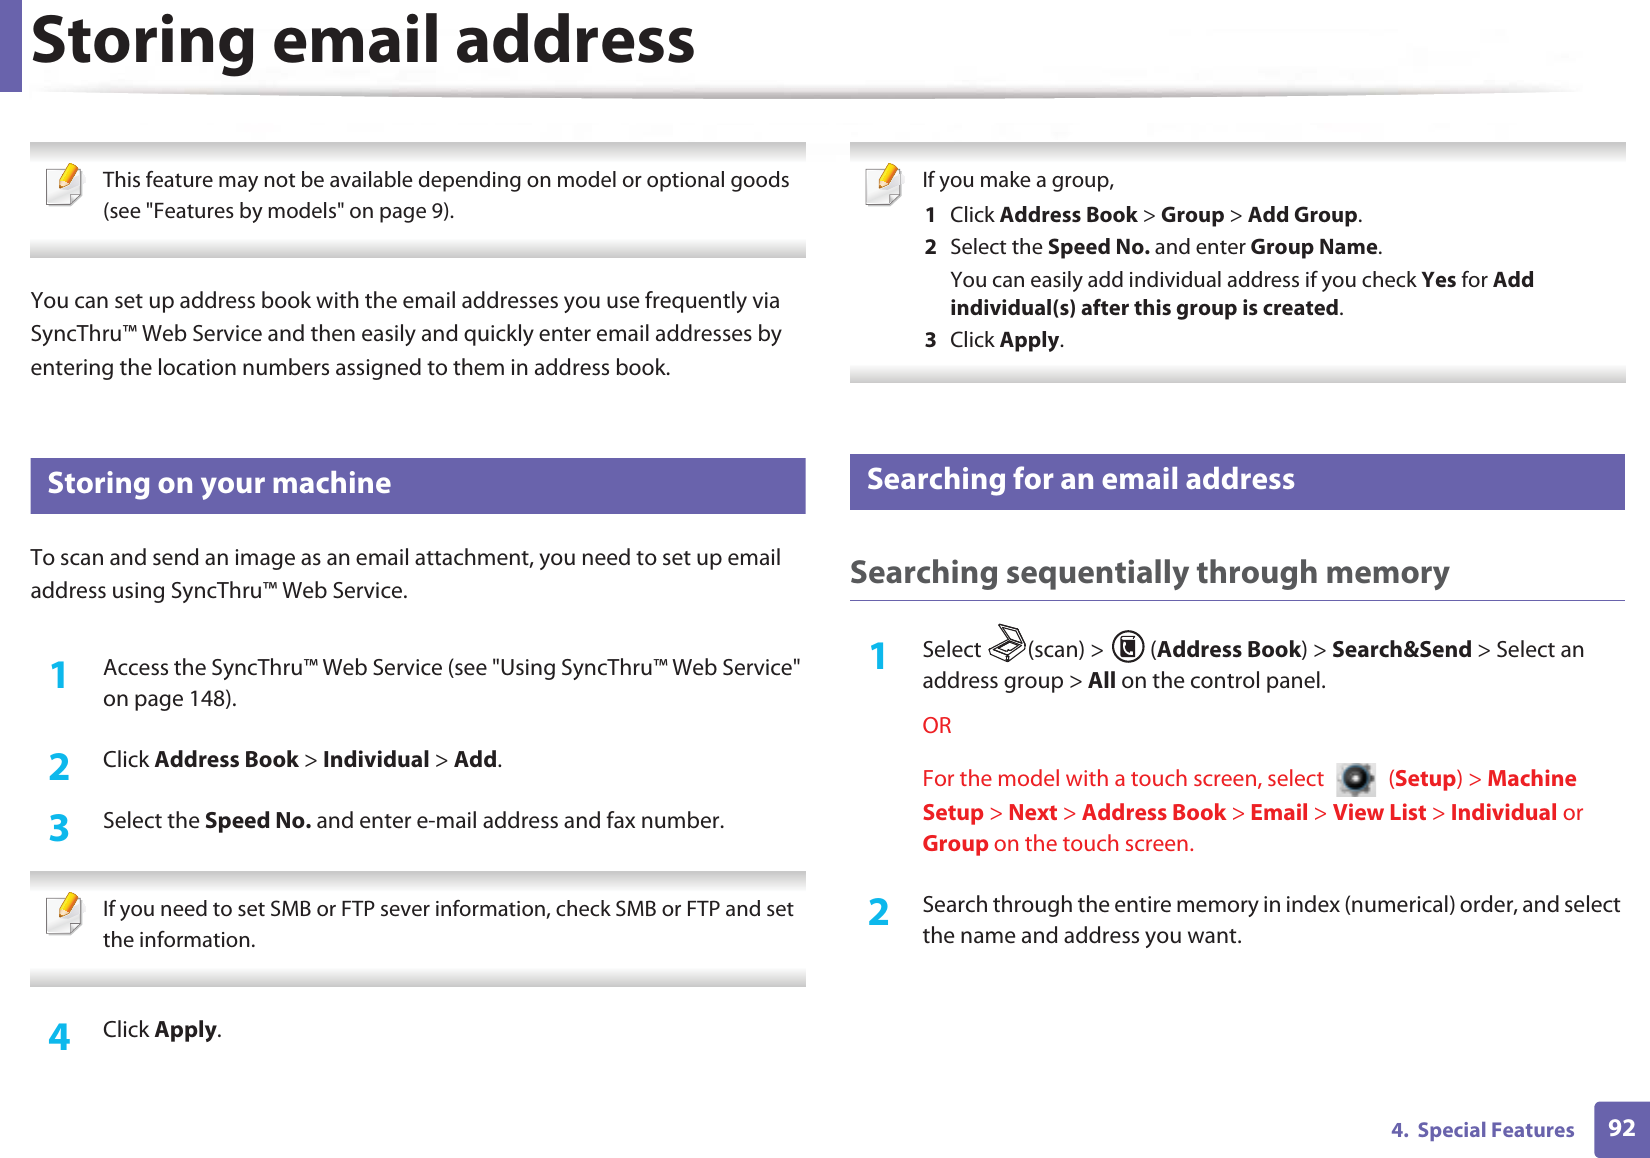
![Understanding display messages1384. Troubleshooting9 Toner-related messagesMessage Meaning Suggested solutions•Error [error number]Toner Cart Failure: [error number] Call for service•Error [error number]Toner Failure: [error number] Install toner again•Toner not installedToner cartridge is not installed.Install itA toner cartridge is not installed.Reinstall the toner cartridge.A toner cartridge is not being detectedReinstall the toner cartridge two or three times to confirm it is seated properly. If the problem persists, contact the service representatives.Not removed protective film from toner.Remove the protective film from the toner cartridge.•IMG. Not CompatibleImaging unit is not compatible.Check guideThe imaging unit you have installed is not for your machine.Install a Samsung-genuine imaging unit, designed for your machine.•IMG. Not InstalledImaging unit is not installed.Install the unit.The imaging unit is not installed.Reinstall the imaging unit two or three times. If the problem persists, call for service.•Prepare IMG. unitPrepare new imaging unit The estimated imaging unit life is close.Prepare a new imaging unit for replacement (see "Available consumables" on page 89).•Replace IMG. unitReplace with new imaging unitThe indicated imaging unit has almost reached its estimated imaging unit life.• You can choose Stop or Continue as shown on the control panel. If you select Stop, the printer stops printing and you cannot print any more without changing the imaging unit. If you select Continue, the printer keeps printing but the printing quality cannot be guaranteed.Replace the imaging unit for the best print quality when this message appears. Using a imaging unit beyond this stage can resultin printing quality issues (see "Replacing the imaging unit" on page 100).• If the machine stops printing, replace the imaging unit (see "Replacing the imaging unit" on page 100).•Toner Not compatibleToner cartridge is not compatible.Check guideThe indicated toner cartridge is not suitable for your machine.Install the corresponding toner cartridge with a Samsung-genuine cartridge (see "Replacing the toner cartridge" on page 97).Message Meaning Suggested solutions](https://usermanual.wiki/Samsung-Electronics-Co/SLM4075FX.Users-Manual-4/User-Guide-2020651-Page-11.png)

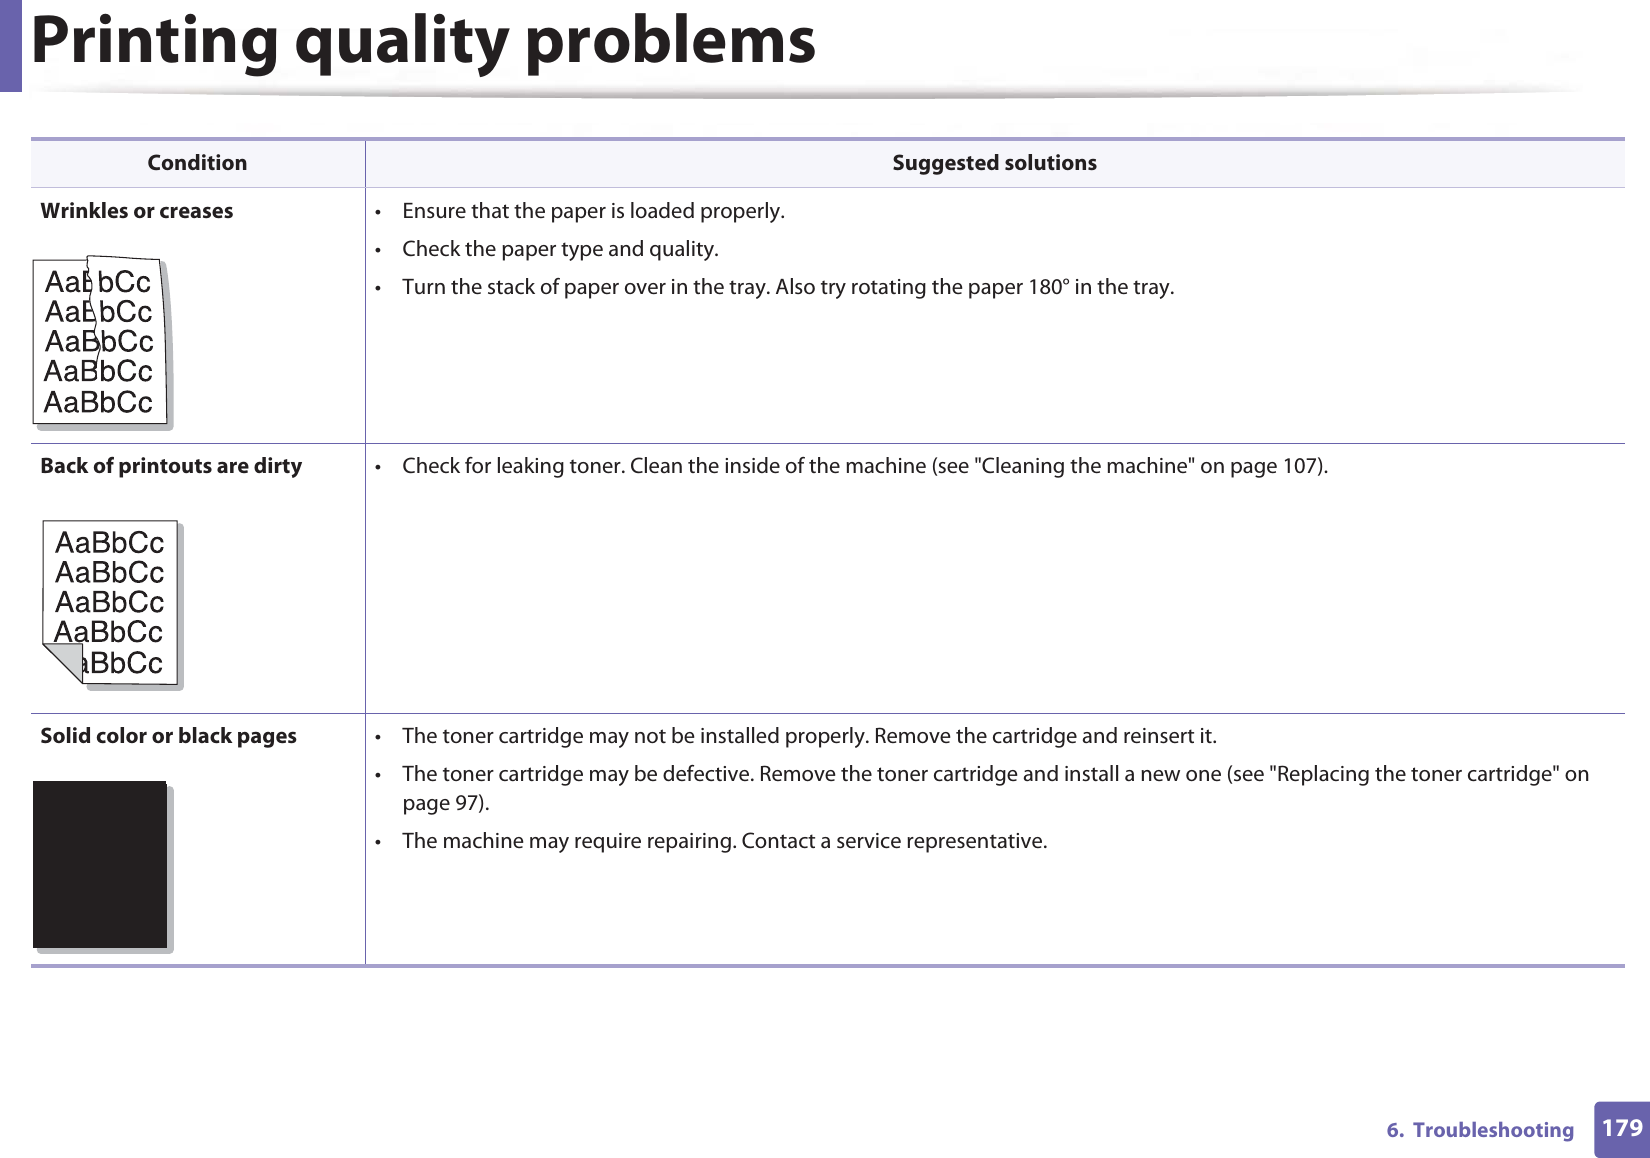
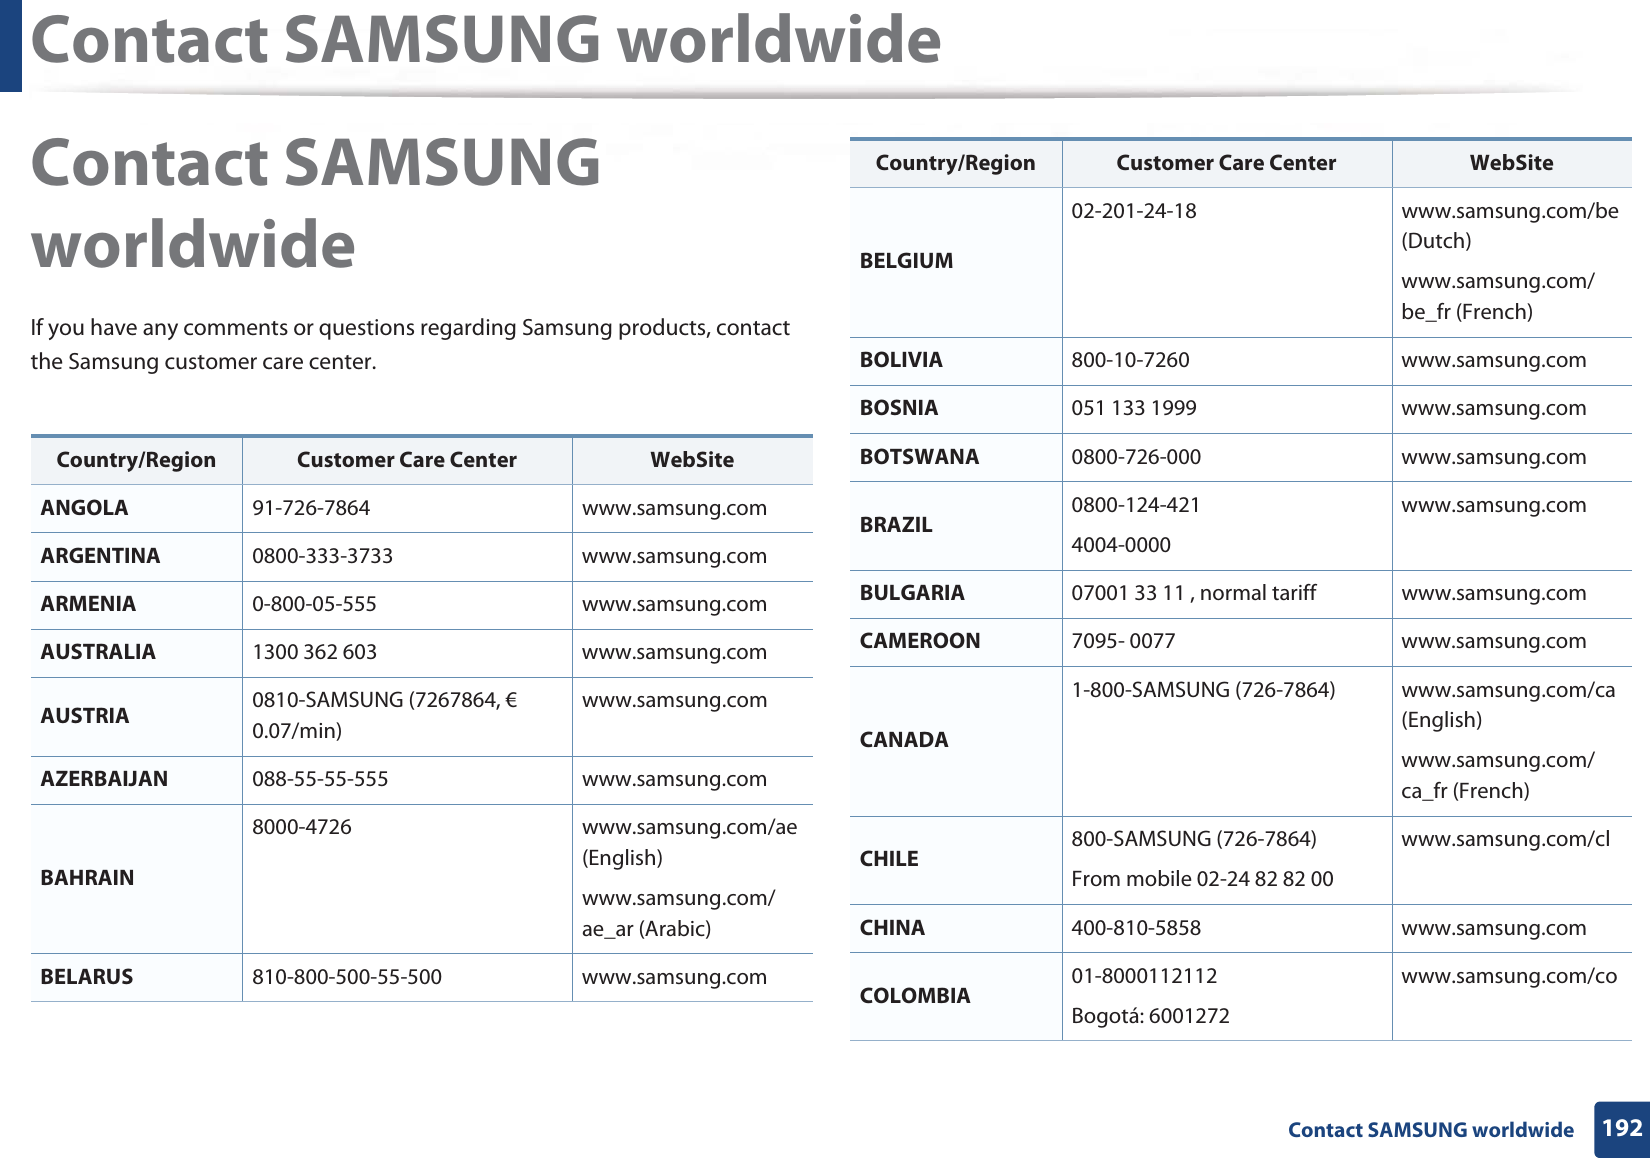
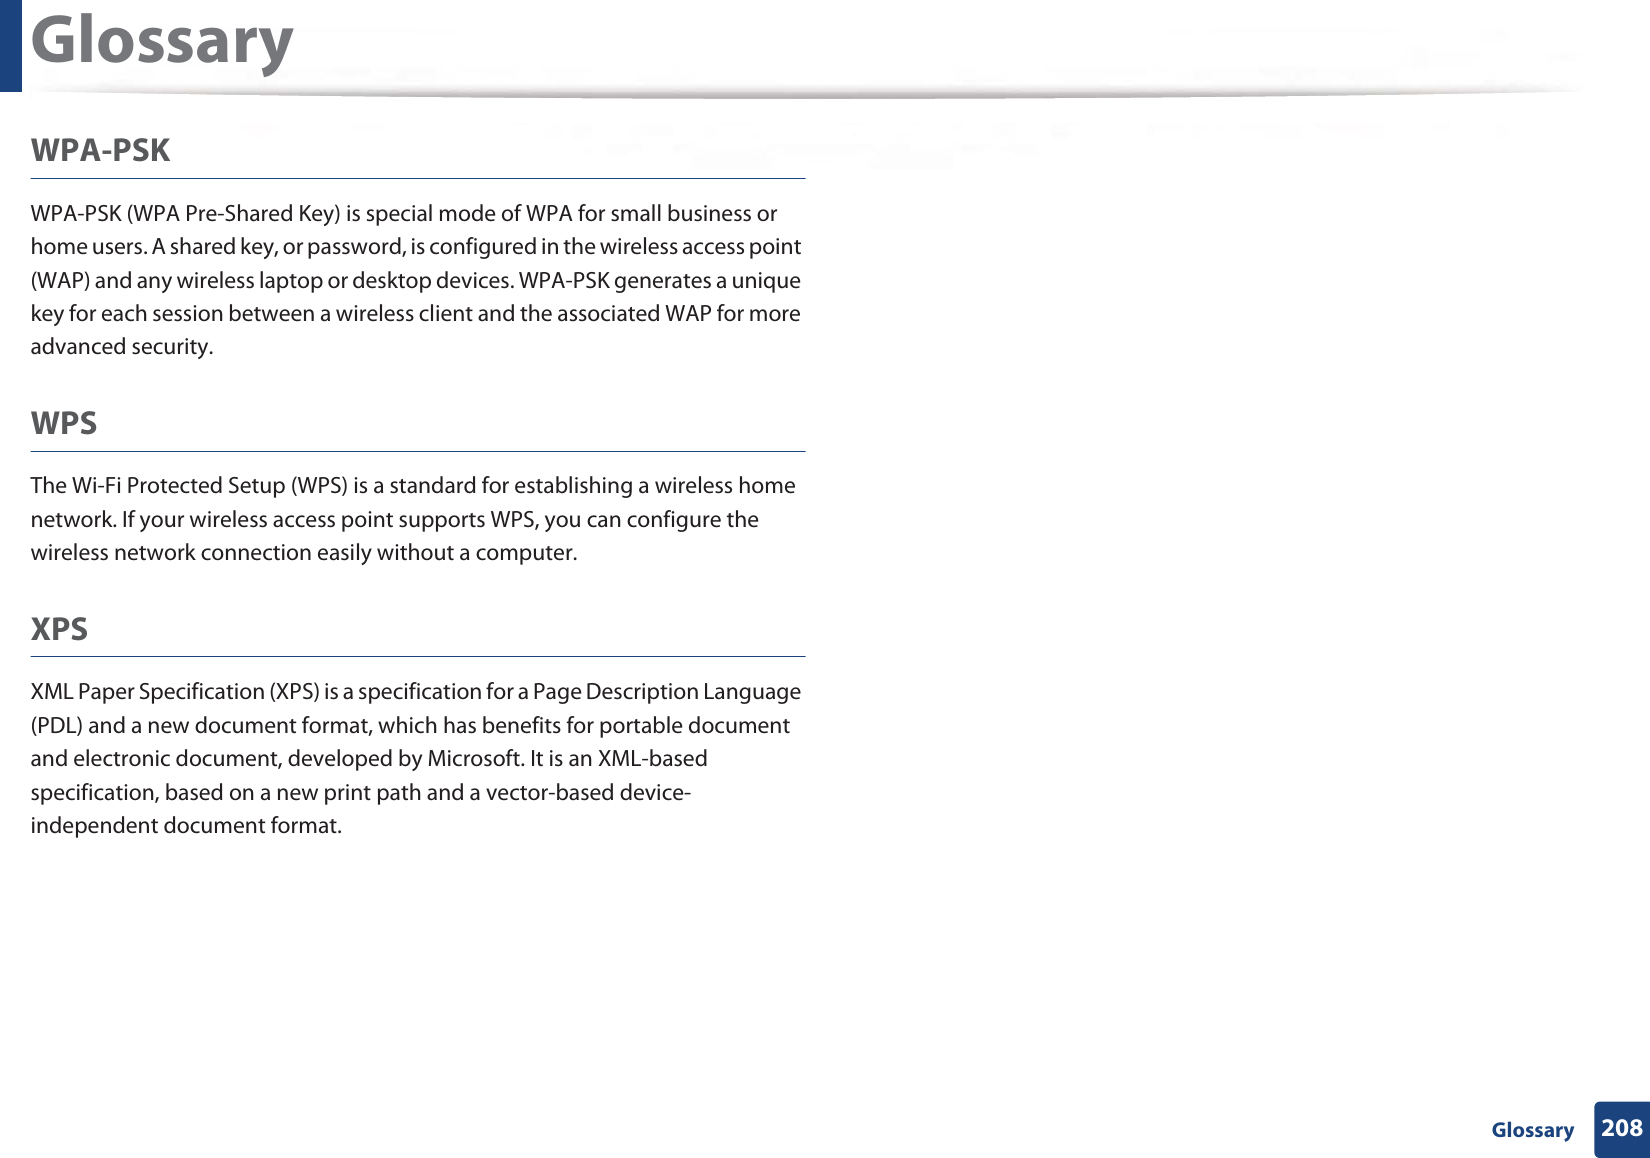
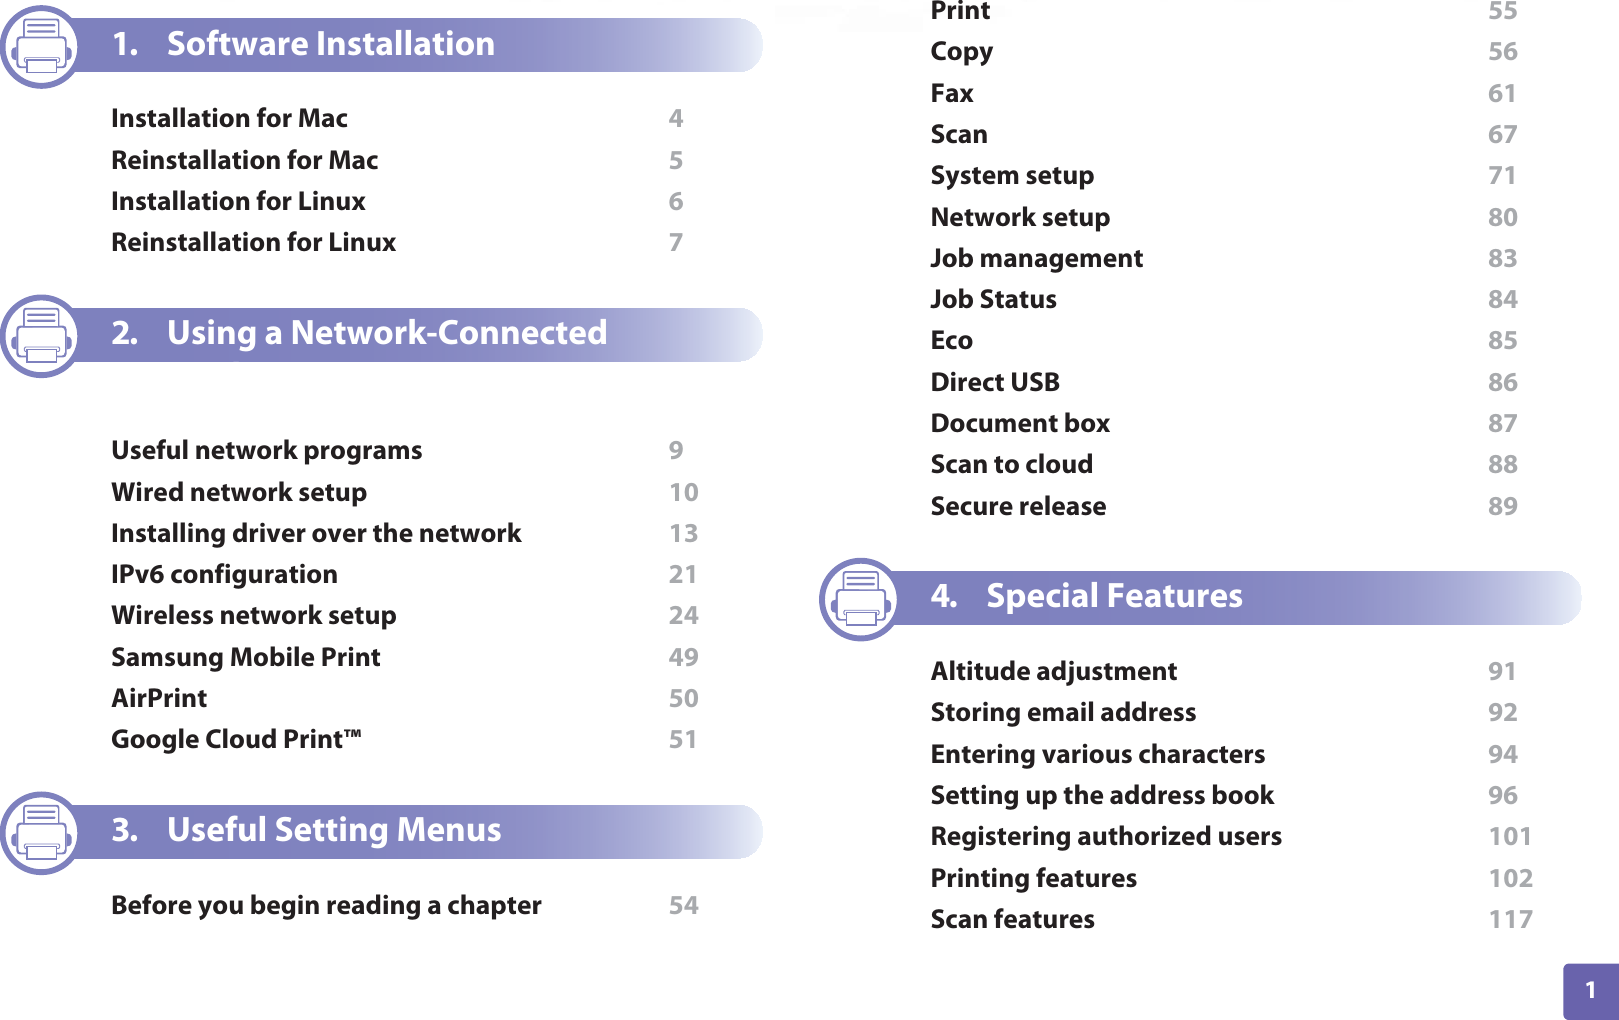
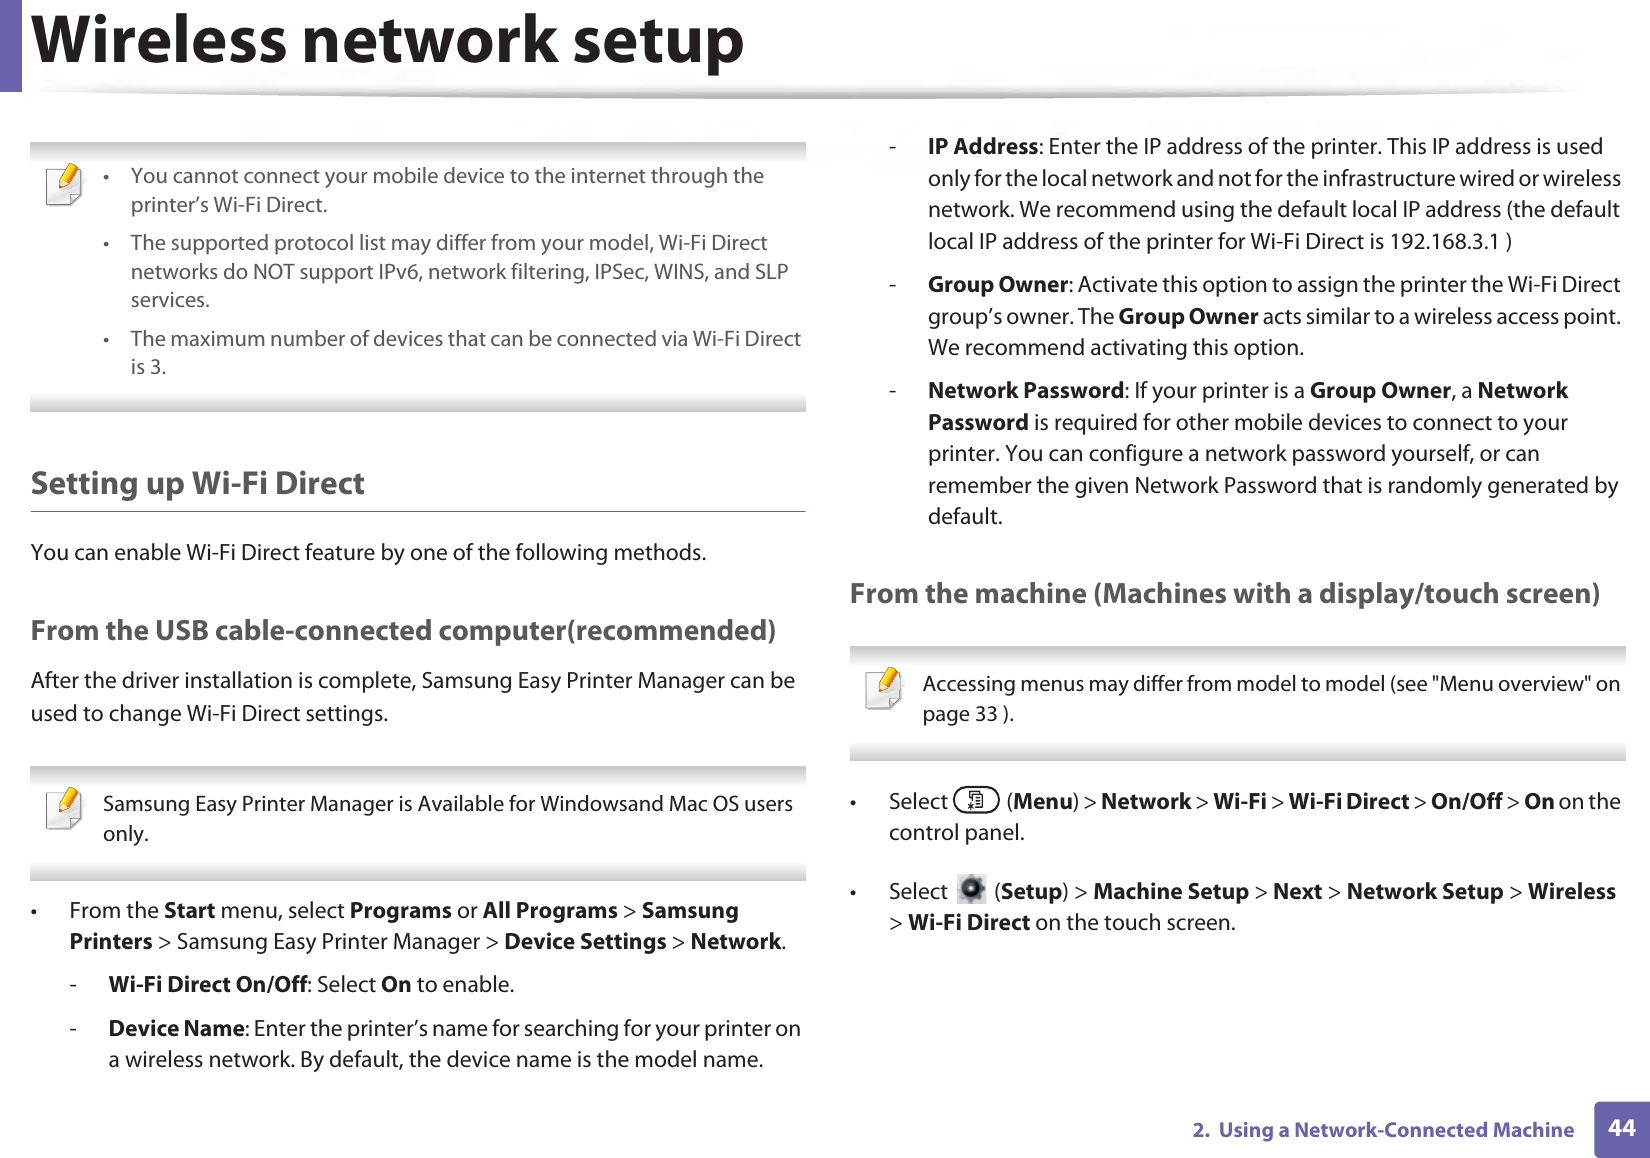
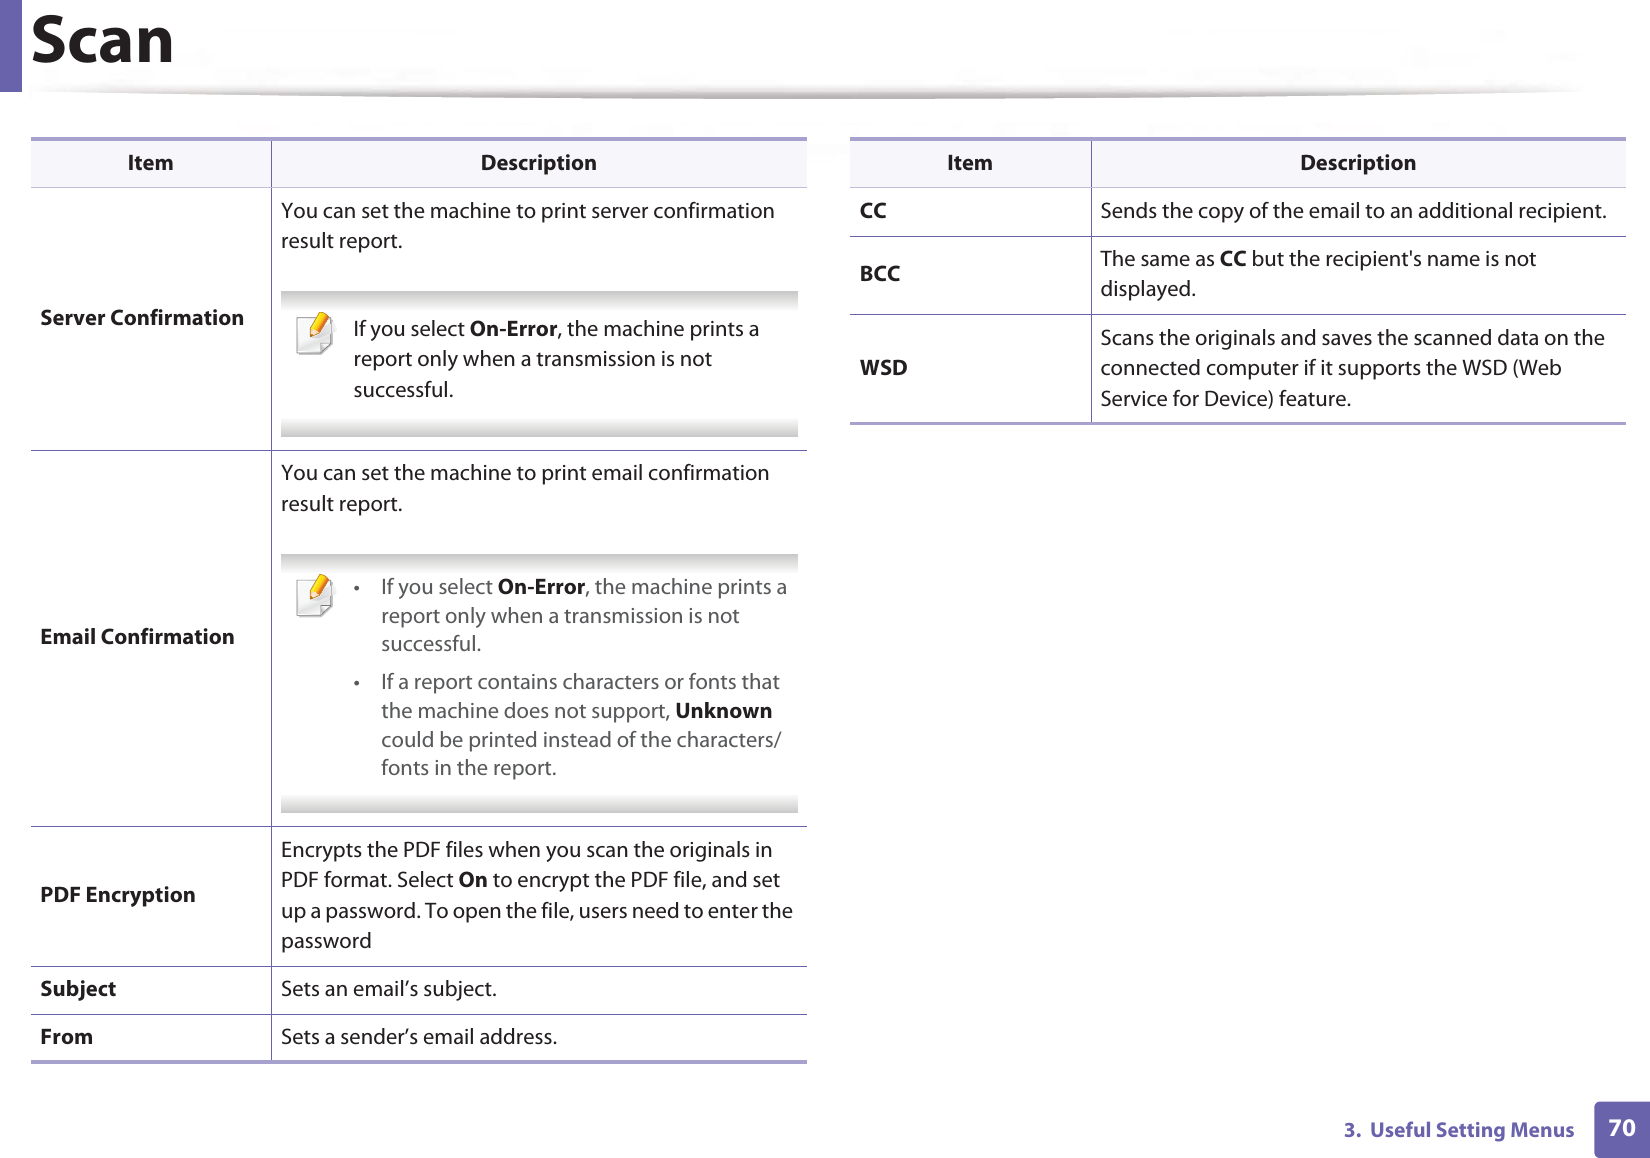
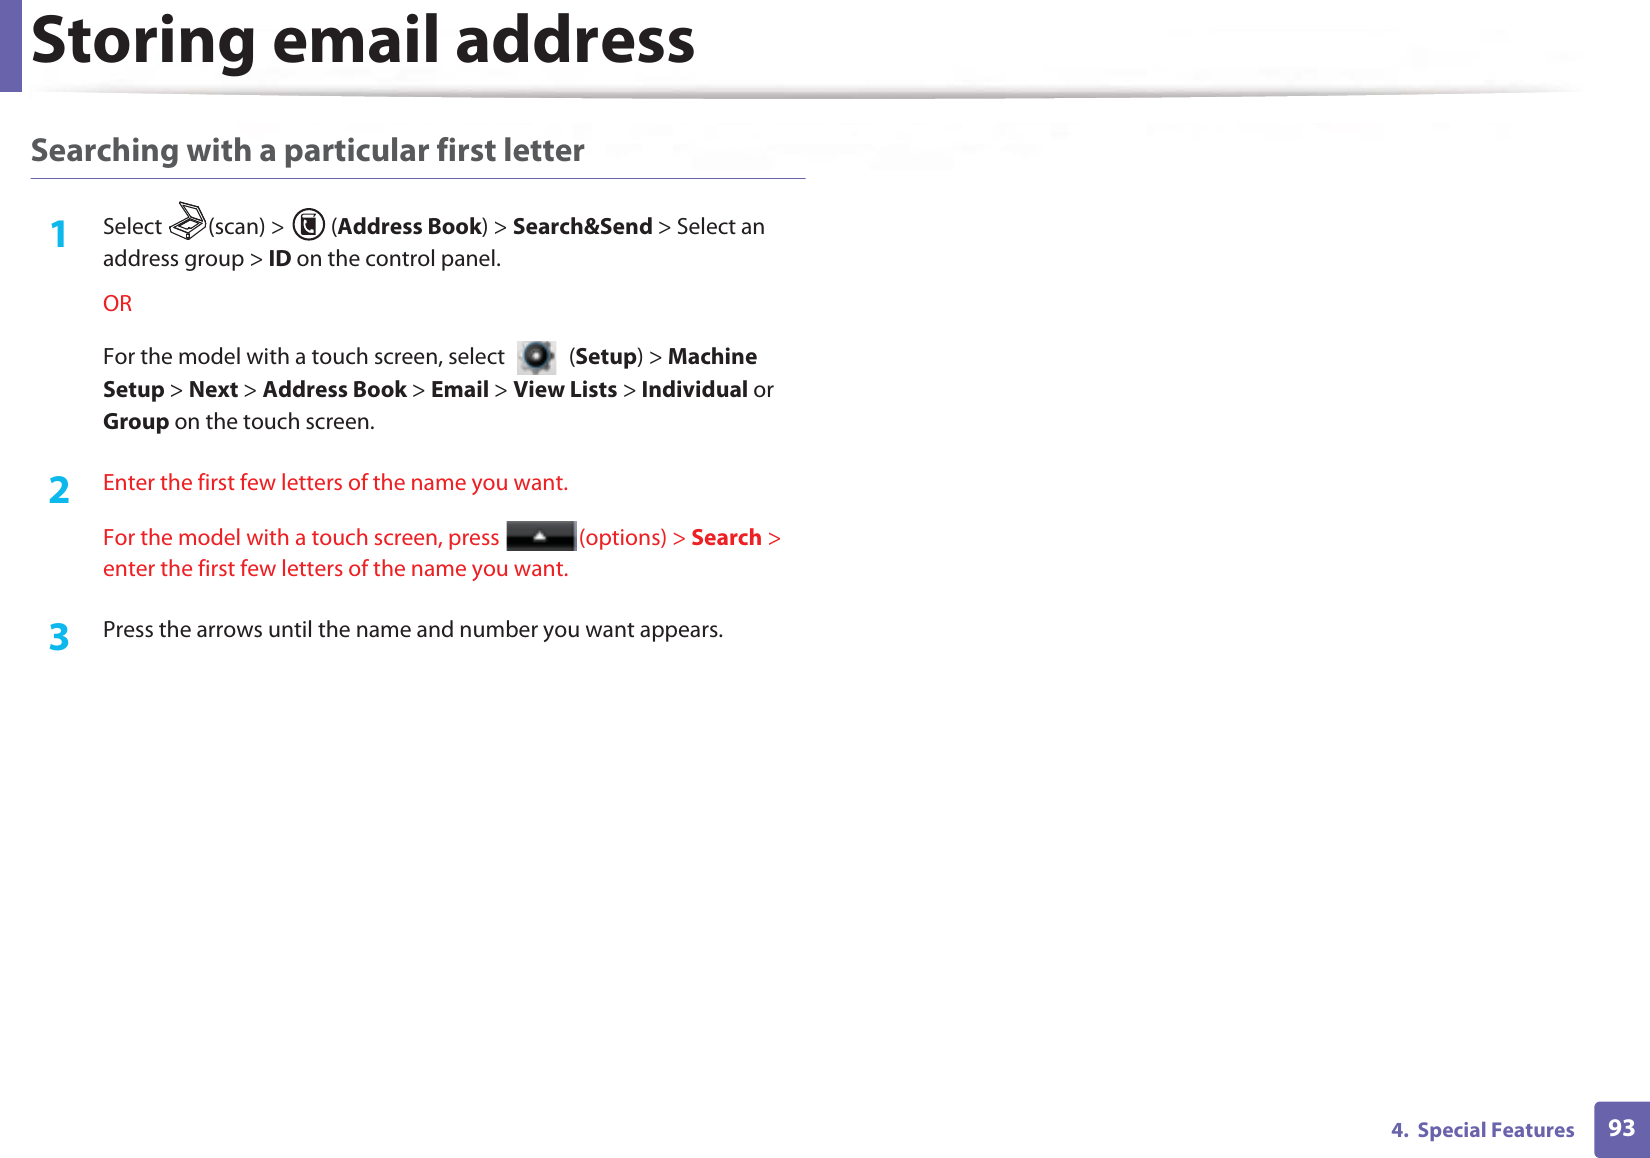
![Understanding display messages1414. Troubleshooting•Replace pickup rollerReplace with new [tray type] pickup rollerThe life of the tray1, tray2 or MP tray pick-up roller will expired soon.Replace the tray pick-up roller with a new one. Contact the service representatives.•Memory FullFax memory is almost full.Print or remove received fax jobThe memory is full. No more fax data can be received. Print or remove the received fax data in the memory.•Scanner LockedScanner is locked.Press Stop buttonThe scanner is locked. Reboot the power. If the problem persists, please call for service.•Scanner door openDoor of scanner is open.Close the doorThe document feeder cover is not securely latched.Close the cover until it locks into place. •Memory FullFax memory is almost full.Print or remove received fax jobThe fax memory is almost full.Print or remove the received fax job in Secure Receive.Message Meaning Suggested solutions•Error: [error number]Fuser Unit Failure: [error number] Turn off then on.Call for service if the problemThere is a problem in the fuser unit.Reboot the power. If the problem persists, please call for service.•Error: [error number]HDD System Failure: [error number] Turn off then on.Call for service if the problemThere is a problem in the HDD system.Reboot the power. If the problem persists, please call for service.•Error: [error number]Motor Failure: [error number] Turn off then on.Call for service if the problemThere is a problem in the Motor system.Reboot the power. If the problem persists, please call for service.•Error: [error number]LSU Failure: [error number] Turn off then on.Call for service if the problemThere is a problem in the LSU.Reboot the power. If the problem persists, please call for service.Message Meaning Suggested solutions](https://usermanual.wiki/Samsung-Electronics-Co/SLM4075FX.Users-Manual-4/User-Guide-2020651-Page-14.png)
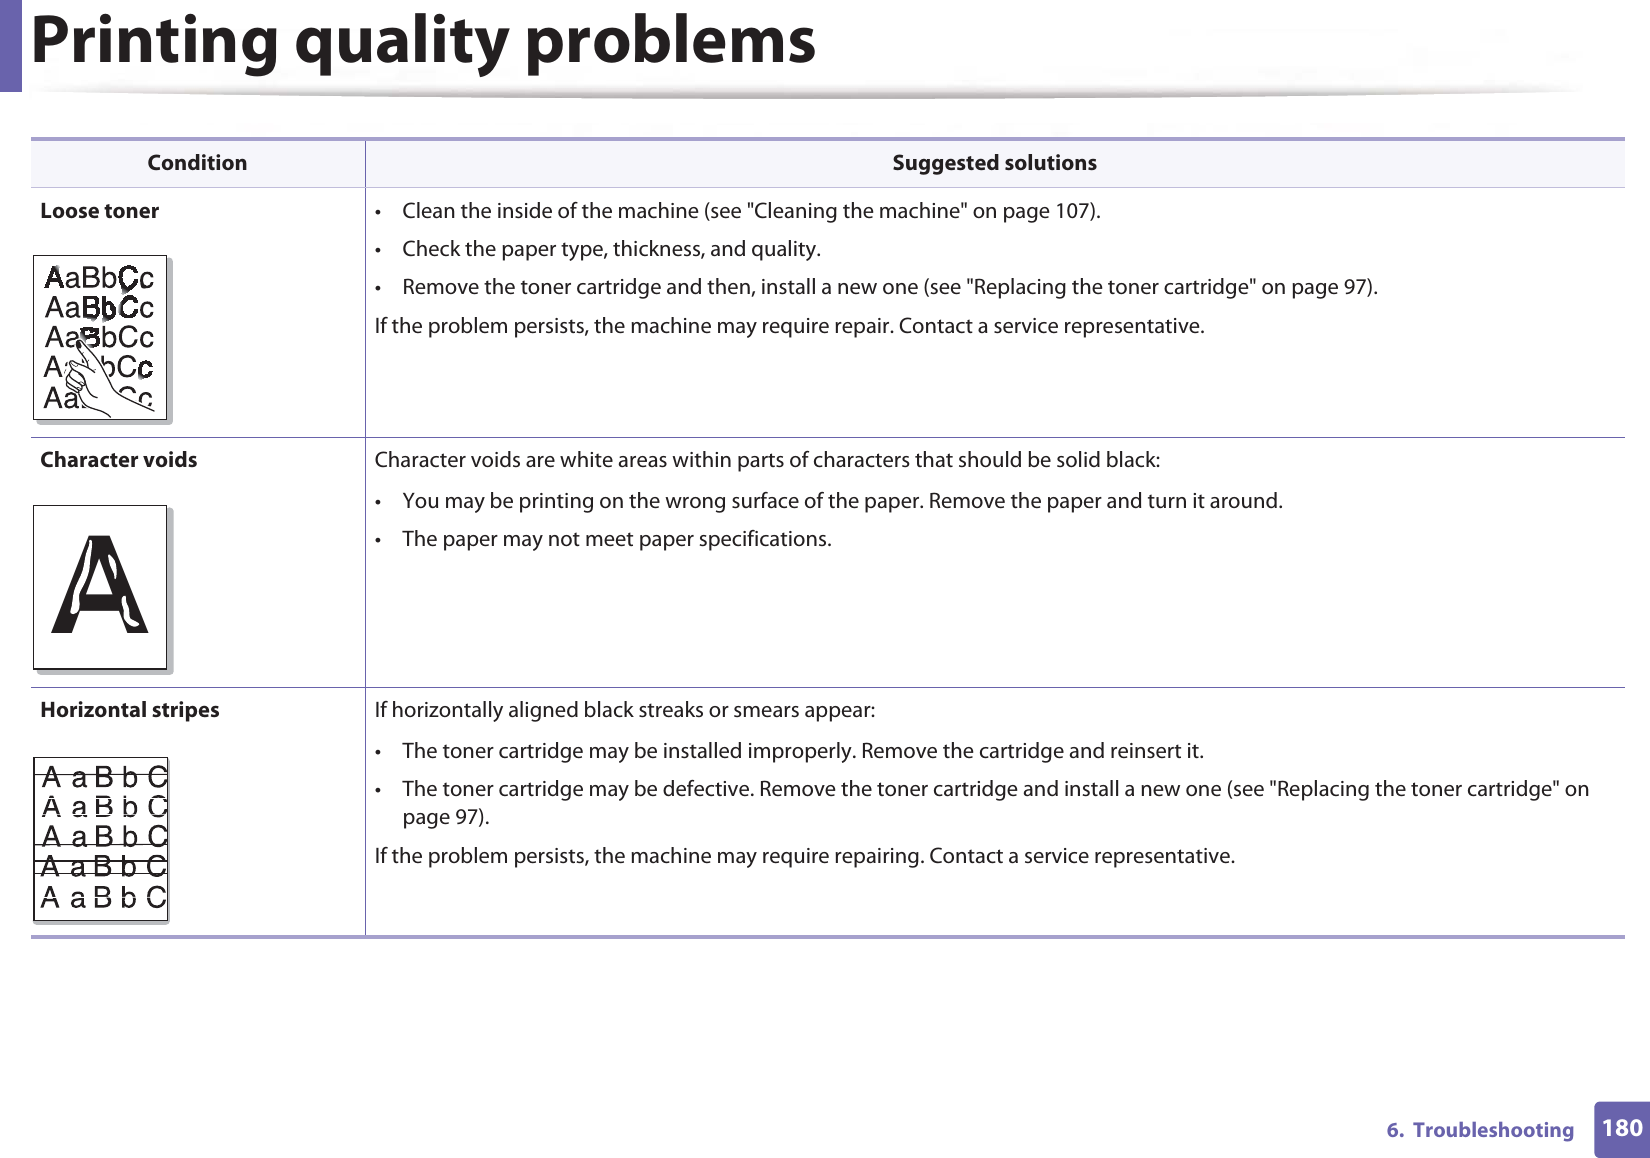
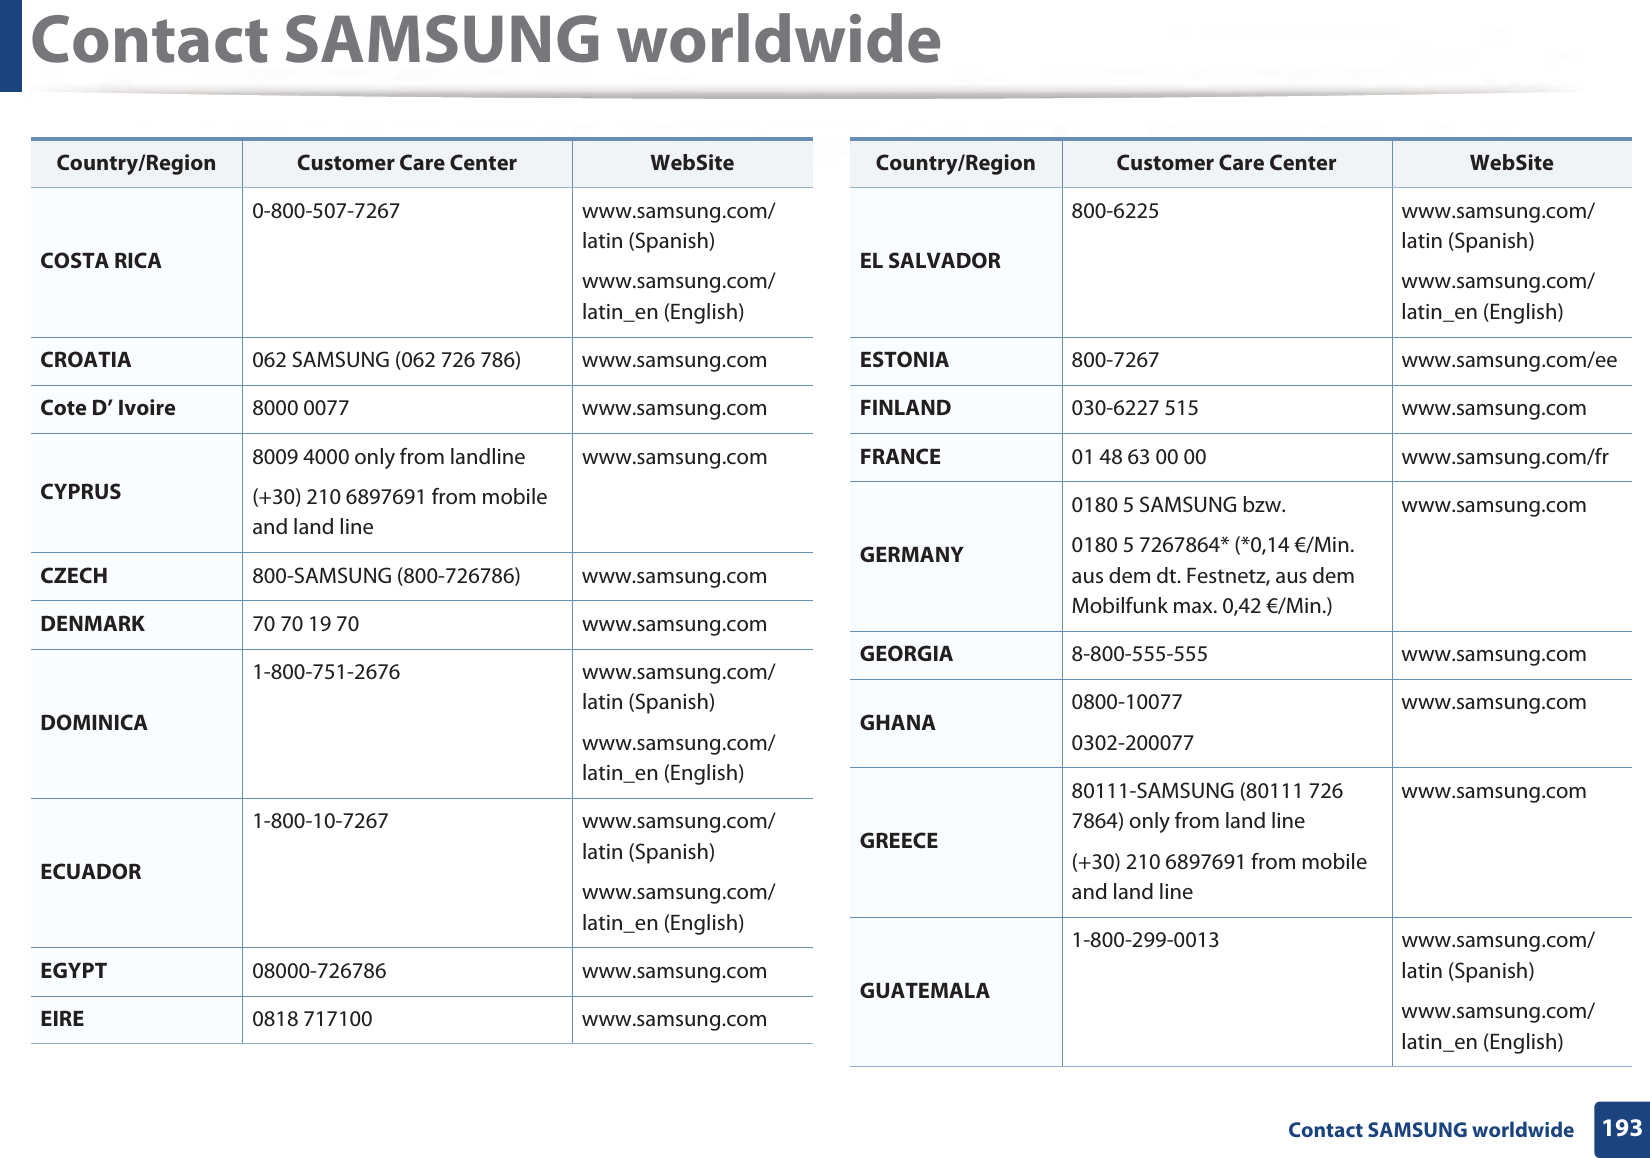
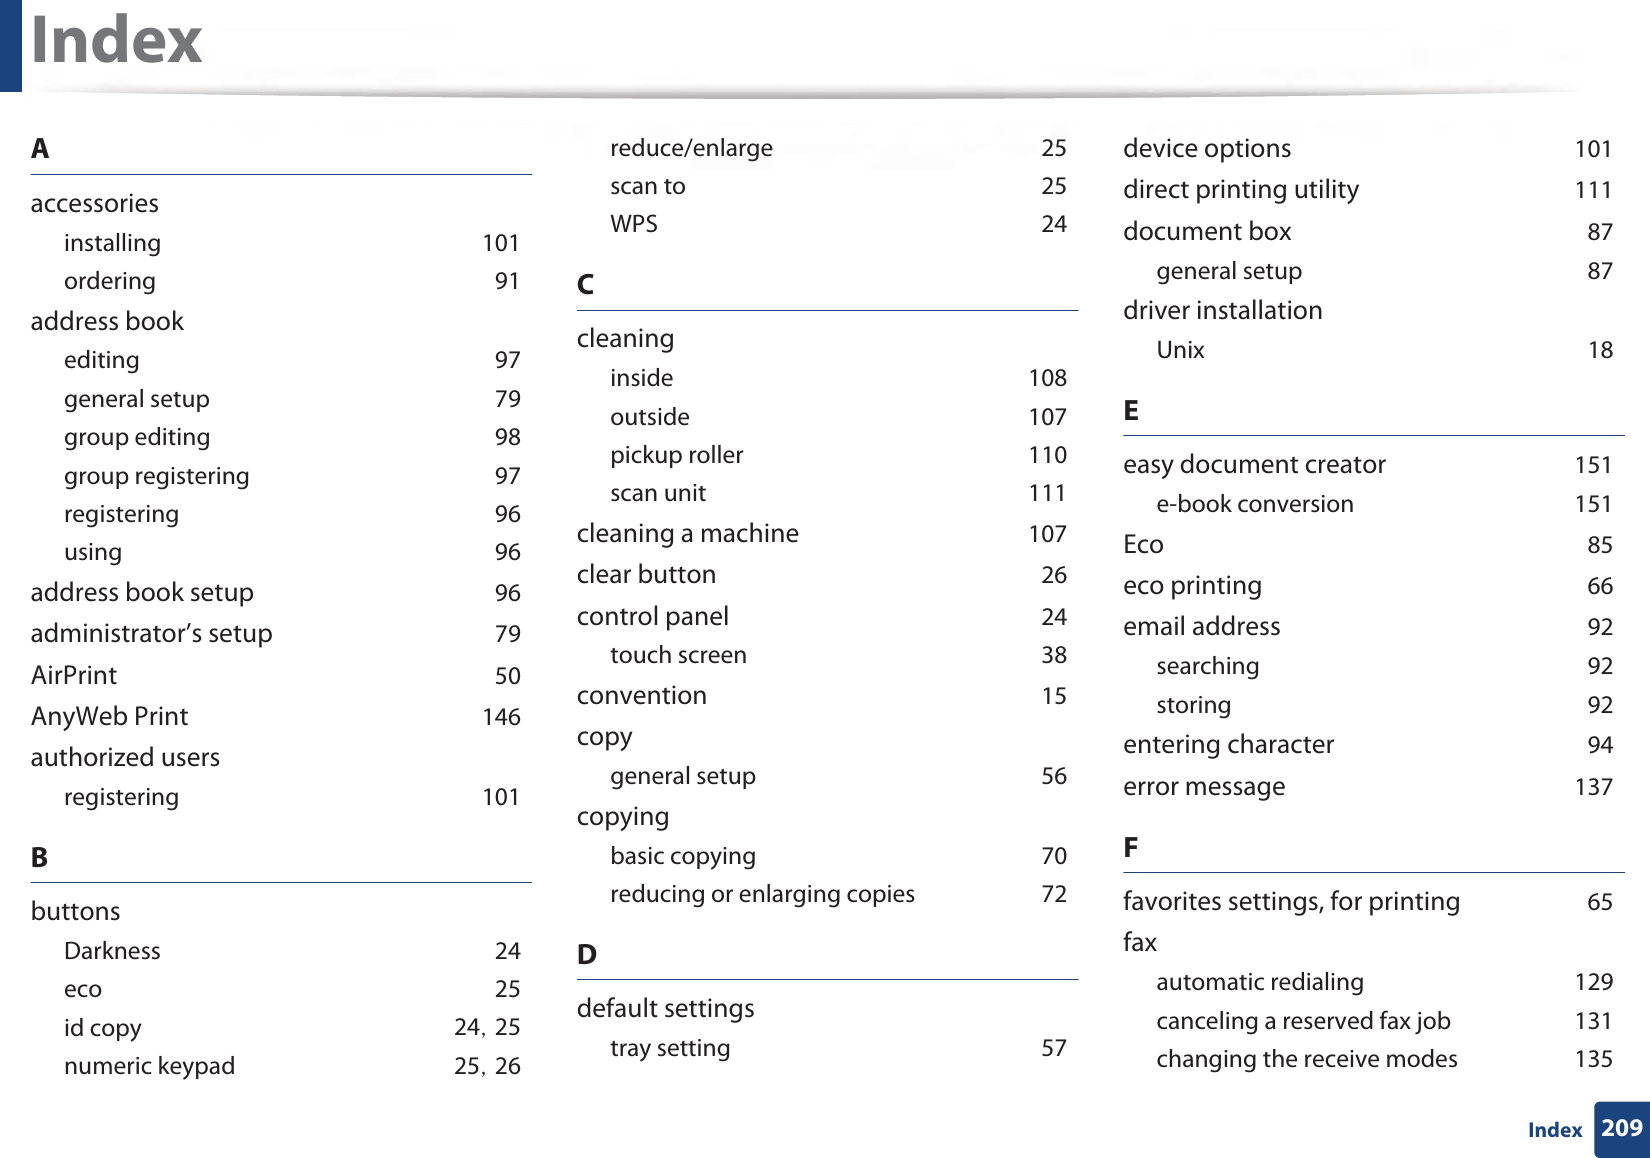
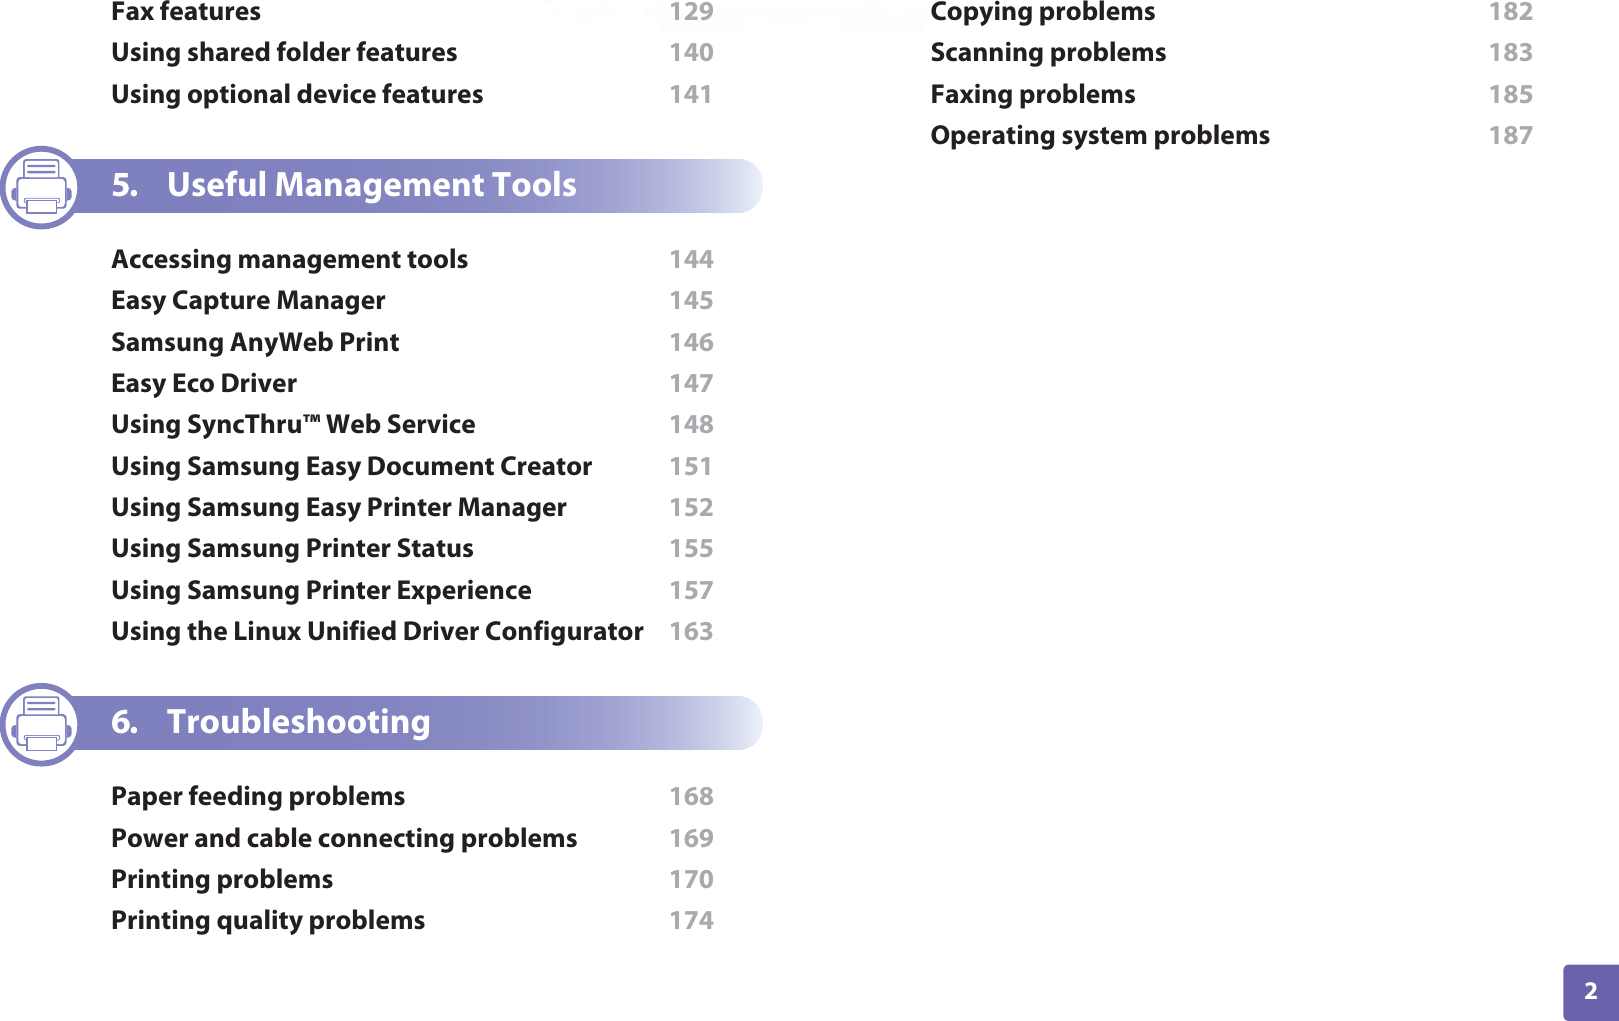
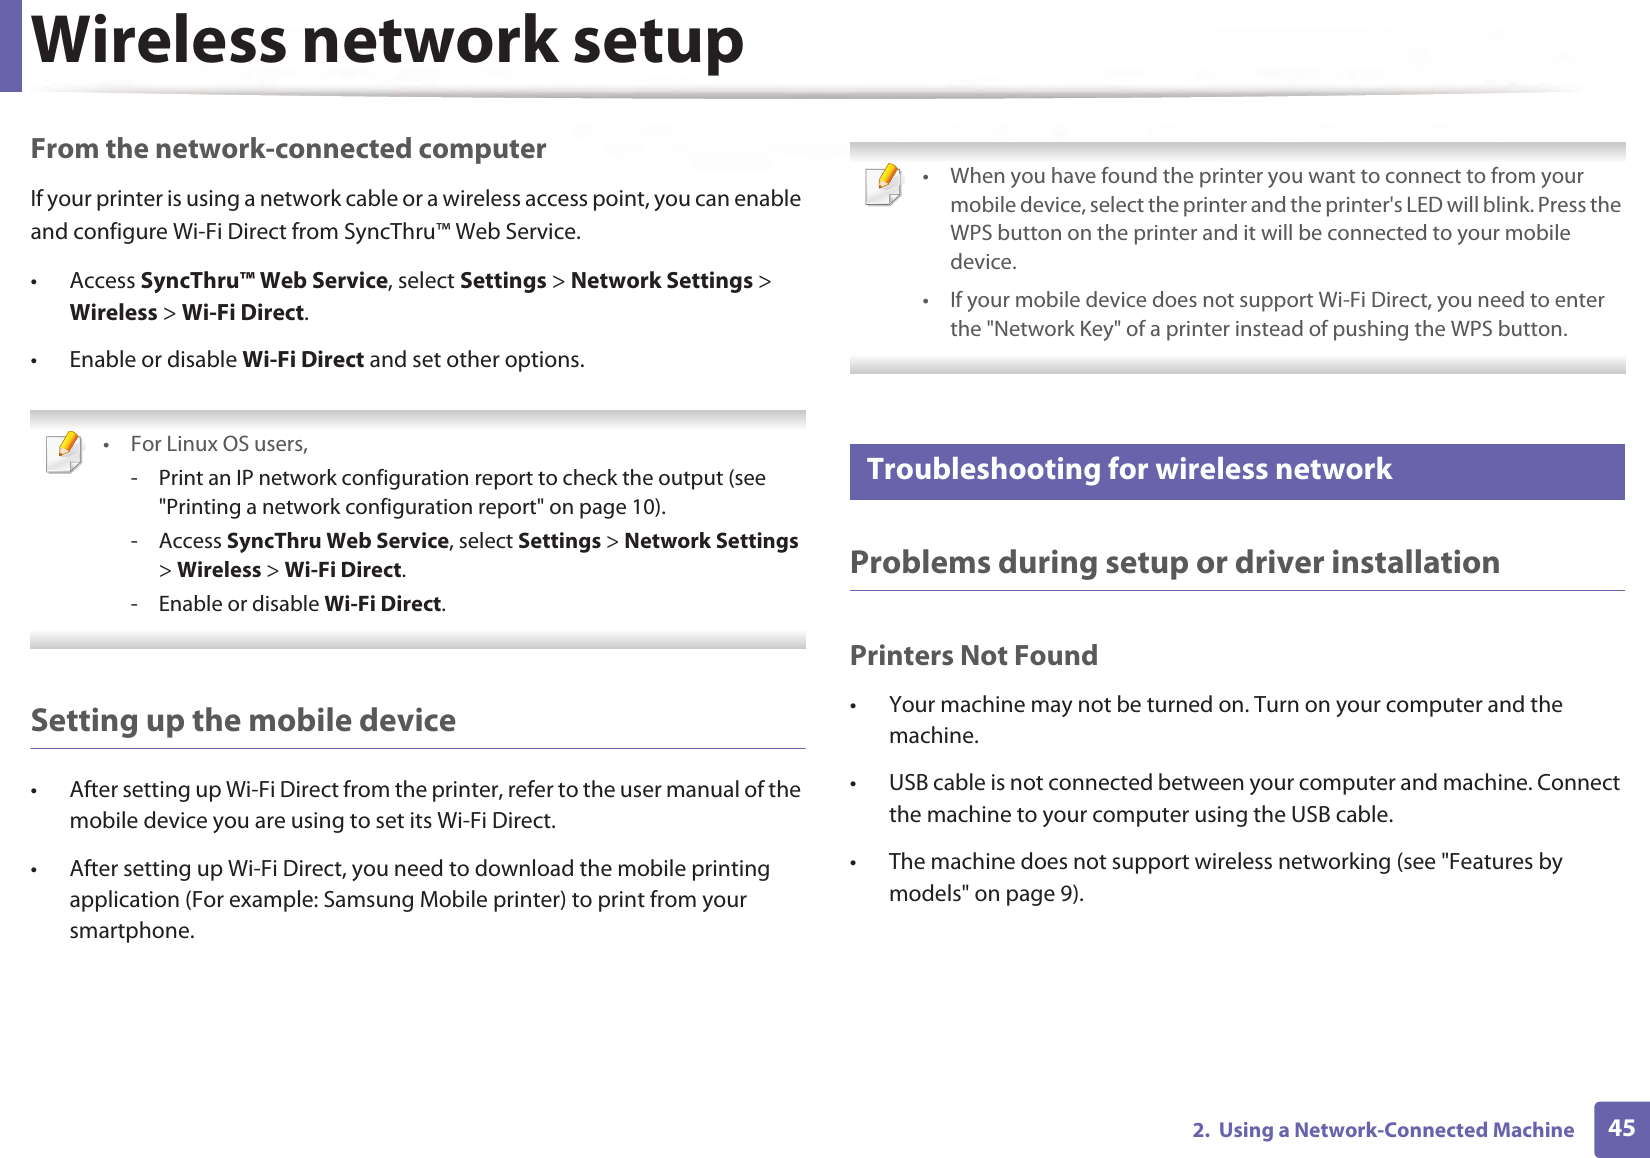
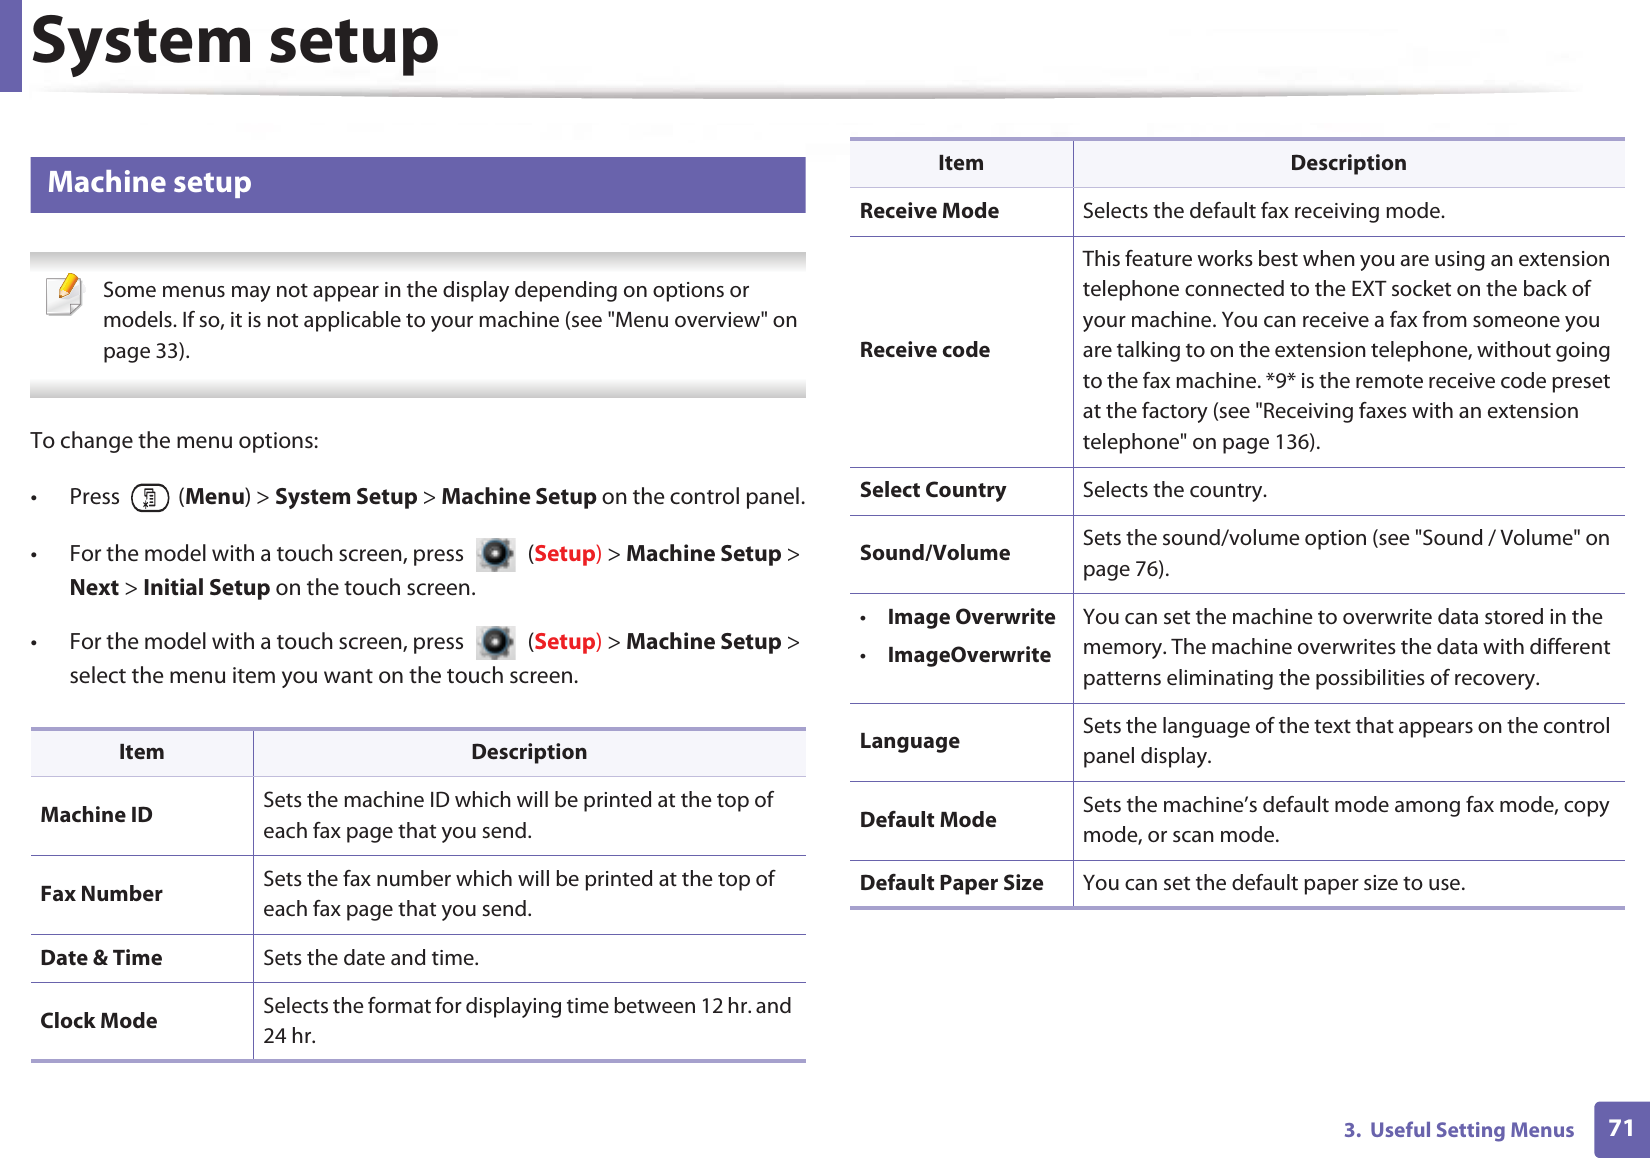
![Understanding display messages1424. Troubleshooting•Error: [error number]Input System Failure: [error number] Check tray 2 connectionThere is a problem in the tray 2.Check the tray2 connection.•Error: [error number]Video System Failure: [error number] Call for service if the problem persistsThere is a problem in the video system.Reboot the power. If the problem persists, please call for service.Message Meaning Suggested solutions](https://usermanual.wiki/Samsung-Electronics-Co/SLM4075FX.Users-Manual-4/User-Guide-2020651-Page-15.png)
![Regulatory information1605. AppendixYou must have a 13 amp fuse in the plug, adaptor, or at the distribution board.24 Declaration of conformity (European countries)Approvals and CertificationsJanuary 1, 1995: Council Directive 2006/95/EC Approximation of the laws of the member states related to low voltage equipment.January 1, 1996: Council Directive 2004/108/EC, approximation of the laws of the Member States related to electromagnetic compatibility.March 9, 1999: Council Directive 1999/5/EC on radio equipment and telecommunications terminal equipment and the mutual recognition of their conformity. A full declaration, defining the relevant Directives and referenced standards can be obtained from your Samsung Electronics Co., Ltd. representative.EC CertificationCertification to 1999/5/EC Radio Equipment & Telecommunications Terminal Equipment Directive (FAX)This Samsung product has been self-certified by Samsung for pan-European single terminal connection to the analogue public switched telephone network (PSTN) in accordance with Directive 1999/5/EC. The product has been designed to work with the national PSTNs and compatible PBXs of the European countries:In the event of problems, you should contact the Euro QA Lab of Samsung Electronics Co., Ltd. in the first instance.The product has been tested against TBR21. To assist in the use and application of terminal equipment which complies with this standard, the European Telecommunication Standards Institute (ETSI) has issued an advisory document (EG 201 121) which contains notes and additional requirements to ensure network compatibility of TBR21 terminals. The product has been designed against, and is fully compliant with, all of the relevant advisory notes contained in this document.Hereby, Samsung Electronics, declares that this [M337x/ M387x/ M407x series] is in compliance with the essential requirements and other relevant provisions of R&TTE Directive 1999/5/EC.The declaration of conformity may be consulted at www.samsung.com, go to Support > Download center and enter your printer (MFP) name to browse the EuDoC.](https://usermanual.wiki/Samsung-Electronics-Co/SLM4075FX.Users-Manual-4/User-Guide-2020651-Page-33.png)
![71. Software InstallationReinstallation for LinuxIf the printer driver does not work properly, uninstall the driver and reinstall it. 1Make sure that the machine is connected to your computer and powered on.2 When the Administrator Login window appears, type “root” in the Login field and enter the system password.You must log in as a super user (root) to uninstall the printer driver. If you are not a super user, ask your system administrator.3 Open the Terminal program. When the Terminal screen appears, type in the following.[root@localhost root]#cd /opt/Samsung/mfp/uninstall/[root@localhost uninstall]#./uninstall.sh4 Click Next. 5 Click Finish.](https://usermanual.wiki/Samsung-Electronics-Co/SLM4075FX.Users-Manual-4/User-Guide-2020651-Page-45.png)

![IPv6 configuration232. Using a Network-Connected Machine11 From the SyncThru™ Web ServiceActivating IPv61Access a web browser, such as Internet Explorer, from Windows. Enter the machine IP address (http://xxx.xxx.xxx.xxx) in the address field and press the Enter key or click Go.2 If it’s your first time logging into SyncThru™ Web Service you need to log-in as an administrator. Type in the below default ID and password. We recommend you to change the default password for security reasons.•ID: admin•Password: sec00000 3 When the SyncThru™ Web Service window opens, move the mouse cursor over the Settings of the top menu bar and then click Network Settings.4 Click TCP/IPv6 on the left pane of the website.5 Check the IPv6 Protocol check box to activate IPv6.6 Click the Apply button.7 Turn the machine off and turn it on again. • You can also set the DHCPv6.• To manually set the IPv6 address:Check the Manual Address check box. Then, the Address/Prefix text box is activated. Enter the rest of the address (e.g.,:3FFE:10:88:194::AAAA. “A” is the hexadecimal 0 through 9, A through F). IPv6 address configuration1Start a web browser, such as Internet Explorer, that supports IPv6 addressing as a URL.2 Select one of the IPv6 addresses (Link-local Address, Stateless Address, Stateful Address, Manual Address) from Network Configuration Report (see "Printing a network configuration report" on page 10).•Link-local Address: Self-configured local IPv6 address (Address starts with FE80).•Stateless Address: Automatically configured IPv6 address by a network router.•Stateful Address: IPv6 address configured by a DHCPv6 server.•Manual Address: Manually configured IPv6 address by a user.3 Enter the IPv6 addresses (e.g.,: http://[FE80::215:99FF:FE66:7701]). Address must be enclosed in '[ ]' brackets.](https://usermanual.wiki/Samsung-Electronics-Co/SLM4075FX.Users-Manual-4/User-Guide-2020651-Page-61.png)


# # = | ? " : { } < > ;(These symbols are available when you type for network authentication.)](https://usermanual.wiki/Samsung-Electronics-Co/SLM4075FX.Users-Manual-4/User-Guide-2020651-Page-132.png)

![1404. Special FeaturesUsing shared folder featuresThis feature allows you to use the machine’s memory as a shared folder. The advantage of this feature is that you can conveniently use the shared folder through your computer’s window. • This feature may not be available depending on model or optional goods (see "Features by models" on page 9).• You can use this feature in the models that have a mass storage device (see "Various features" on page 11).• The administrator can set the ID and password to restrict the user’ s access and also set the maximum number of simultaneous users. 50 Creating a shared folder1Open the Windows Explore window from the computer.2 Enter the printer’s \\[ip address] (example: \\169.254.133.42) in the address field, and press the Enter key or click Go.3 Create a new folder under nfsroot directory.51 Using the shared folderYou can use the shared folder in the same was as the normal computer. Create, edit and delete the folder or file as a normal Windows folder. You also store the scanned data in the shared folder. You can directly print files stored on a the shared folder. You can print TIFF, JPEG and PRN files.](https://usermanual.wiki/Samsung-Electronics-Co/SLM4075FX.Users-Manual-4/User-Guide-2020651-Page-178.png)


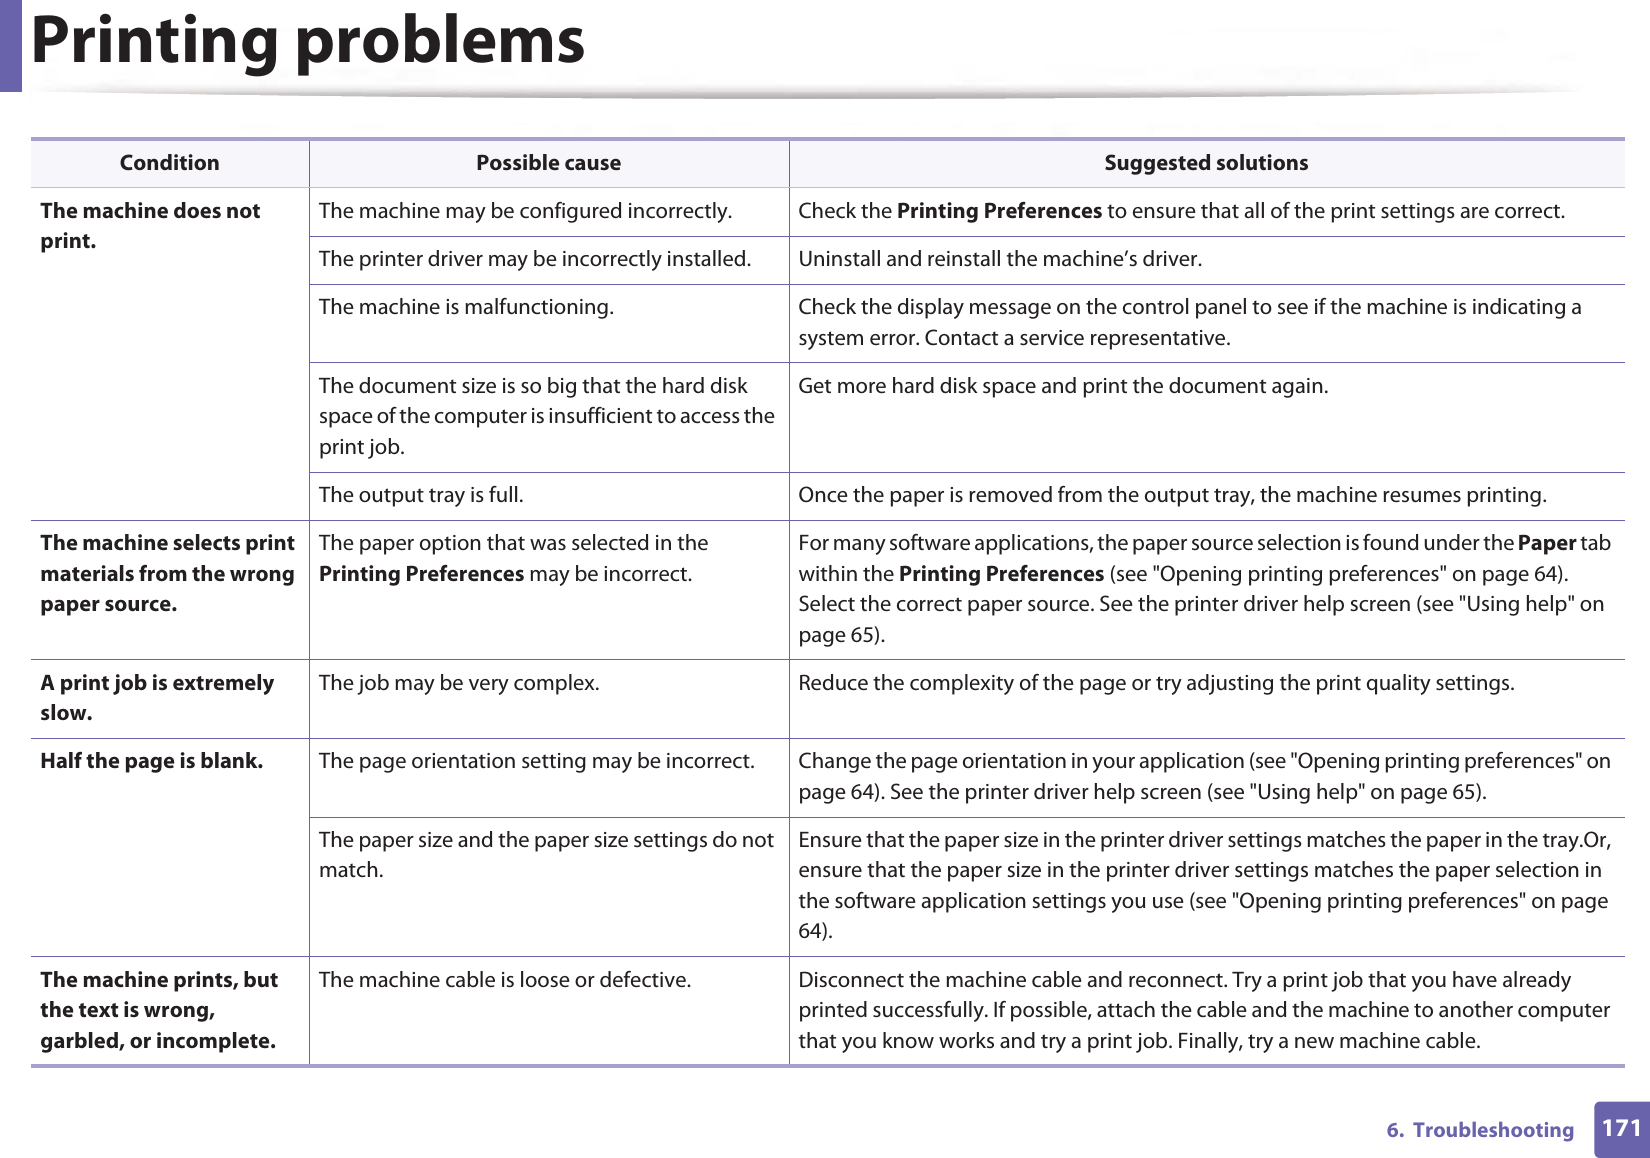
![Printing problems1726. TroubleshootingThe wrong printer driver was selected. Check the application’s printer selection menu to ensure that your machine is selected.The software application is malfunctioning. Try printing a job from another application.The operating system is malfunctioning. Exit Windows and reboot the computer. Turn the machine off and back on again.Pages print, but they are blank.The toner cartridge is defective or out of toner. Redistribute the toner, if necessary. If necessary, replace the toner cartridge.• See "Redistributing toner" on page 94.• See "Replacing the toner cartridge" on page 97.The file may have blank pages. Check the file to ensure that it does not contain blank pages.Some parts, such as the controller or the board, may be defective.Contact a service representative.The machine does not print PDF files correctly. Some parts of graphics, text, or illustrations are missing.Incompatibility between the PDF file and the Acrobat products.Printing the PDF file as an image may enable the file to print. Turn on Print As Image from the Acrobat printing options. It will take longer to print when you print a PDF file as an image. The print quality of photos is not good. Images are not clear.The resolution of the photo is very low. Reduce the photo size. If you increase the photo size in the software application, the resolution will be reduced. Before printing, the machine emits vapor near the output tray.Using damp/wet paper can cause vapor [white smoke] during printing.This is not a problem, just keep printing. If you are bothered by the smoke [vapor], then replace the paper with fresh paper from an unopened ream.Condition Possible cause Suggested solutions](https://usermanual.wiki/Samsung-Electronics-Co/SLM4075FX.Users-Manual-4/User-Guide-2020651-Page-210.png)