Samsung Electronics Co ST10WLR Notebook Computer with Integral Wireless LAN User Manual CERTIFICATE OF COMPLIANCE
Samsung Electronics Co Ltd Notebook Computer with Integral Wireless LAN CERTIFICATE OF COMPLIANCE
Part 4

Working with PC Cards 35
Working with PC Cards
When you install PC Cards, you can add a multitude of functions to your notebook
computer similar to those found on add-in boards for desktop computers. There are
many PC Cards on the market, the supported PC Cards are listed below:
•Input/output, such as modem, network, video capture, and SCSI cards.
•Storage, such as hard drive and flash memory cards.
Your computer includes the following PC Card support:
•Two PC-Card slots: You can install Type I, II, or III cards in the slots.
TYPE III Cards:
Type III cards are thicker than Types I and II. If you install a Type III card in the
bottom slot, you cannot install a card in the top slot.
•CardBus hardware and software: CardBus enables the computer to use 32-bit
PC Cards. Windows 2000 supports 32-bit and 16-bit PC Cards.
•Zoomed video: Both PC Card slots and the video chip on your computer
support zoomed video. When you install a zoom video PC Card in the upper or
lower slot, data can be transferred directly from the PC Card to video and audio
systems without going through the microprocessor. Video conferencing and
real-time multimedia devices, such as video cameras, are supported by zoomed
video.
Maintaining PC Cards
To maintain your PC Cards, follow these guidelines:
•Keep cards away from excessive heat, direct sunlight, and liquids.
•Do not drop, bend, flex, or crush cards when handling.
•Keep dust, magnets, and static electricity away from PC Cards.
•When a card is not in use, carry it in its protective carrying case.
•Some PC Cards include cables that extend from the back of the cards. Be
careful not to bend or put excessive strain on these cables.
Matrix 3 Plus (Windows 2000) - English.fm Page 35 Thursday, April 18, 2002 10:35 AM
36 Users Manual
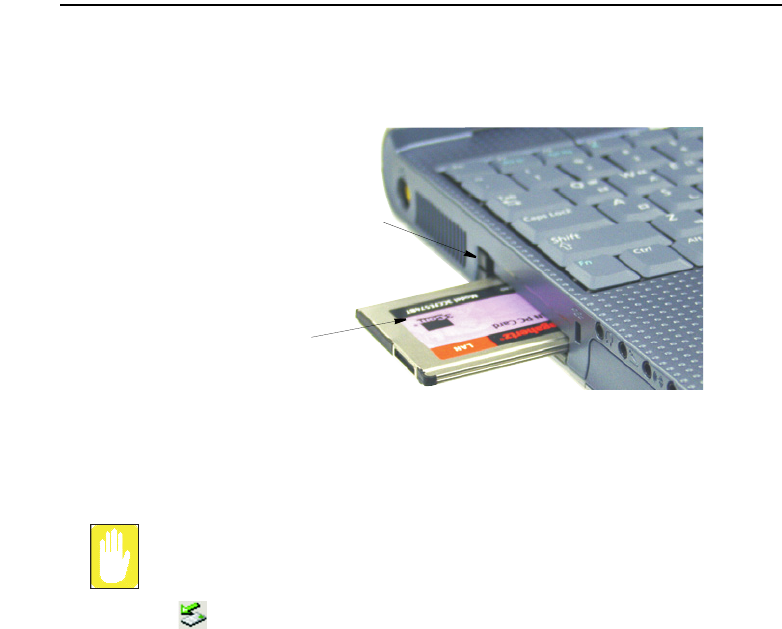
Using PC Cards
To insert a PC Card into a slot:
1. Push the slot door in with the PC Card.
2. Align the card with a slot and insert the card into the slot until it locks in place.
Windows automatically assigns computer resources (such as communication ports and
memory addresses) to a PC Card installed in your computer.
To remove a PC Card from your computer:
Use the following procedures to remove PC Cards, or you may lose data that
is being stored to a card.
1. Click icon on the taskbar.
2. Select the card currently in use, and click the Stop button.
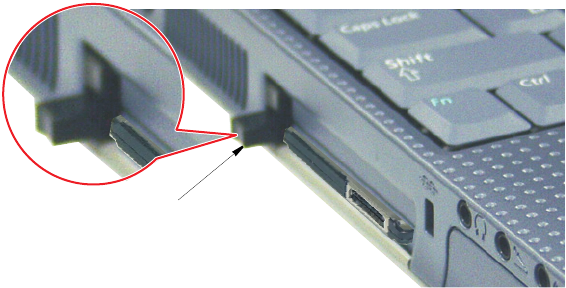
PC Card Eject Buttons
PC Card: (Example)
Insert PC Card with product
information facing up
Matrix 3 Plus (Windows 2000) - English.fm Page 36 Thursday, April 18, 2002 10:35 AM
Working with PC Cards 37
The eject button for the card slot operates in two steps, therefore to remove a PC
Card:
3. Push the eject button once to pop it outward then push the eject button again to
eject the card.
4. Pull the card out of the PC Card slot.
PC Card Eject Buttons
Matrix 3 Plus (Windows 2000) - English.fm Page 37 Thursday, April 18, 2002 10:35 AM

38 Users Manual
Multi Media Functions/Equipment
Media Player
You can play video and audio CD files with the Windows Media Player, as well as
watching TV, video and listening to the radio through internet. The on-board audio
hardware and software of your computer enable the computer to play audio/video
compact discs. The instructions to play a video CD-ROM are the same as the
instructions for the audio CD below. If you wish to do so, you can attach external
speakers to the Headphone jack.
Playing a Audio/Multimedia CD
To play an CD follow the instructions below:
1. Insert a compact disc into your CD-ROM drive.
2. Press the button on the CD-ROM drive to open the CD-ROM device.
3. Insert a CD, label side up.
4. Carefully push the tray in to close the drive tray. The Windows Media Player
button appears on the taskbar if not already there, and the music begins to play. If
the disk does not play click Start > Programs > Accessories > Entertainment >
Windows Media Player.
CD LED On:
A LED on the drive tray is on when the computer is reading from a CD. Do not
remove a disc when this LED is on.
Removing the Audio/Multimedia CD
To remove the CD follow the instructions below:
1. Click Start > Programs > Accessories > Entertainment > Windows Media
Player to open the Windows Media Player window, if not already open.
2. Click Stop in the Windows Media Player window or simply close the Windows
media player.
3. Press the button on your CD-ROM drive. The drive tray opens and you can remove
the CD from the CD-ROM drive.
4. For more information on playing compact discs, see the Help menu in the
Windows Media Player window.
Matrix 3 Plus (Windows 2000) - English.fm Page 38 Thursday, April 18, 2002 10:35 AM

Multi Media Functions/Equipment 39
Dolby Digital & Dolby Theater System
Your computer supports Dolby Digital & Dolby Theater System through a SPDIF
connector, located next to the volume control wheel on the left side of the computer.
You must have a 3.5 mm (mono)- to RCA cable to use this port.
Volume Control
Using the Wheel Volume Control
Simply turn the wheel located on the left side of the computer.
Using the Keyboard
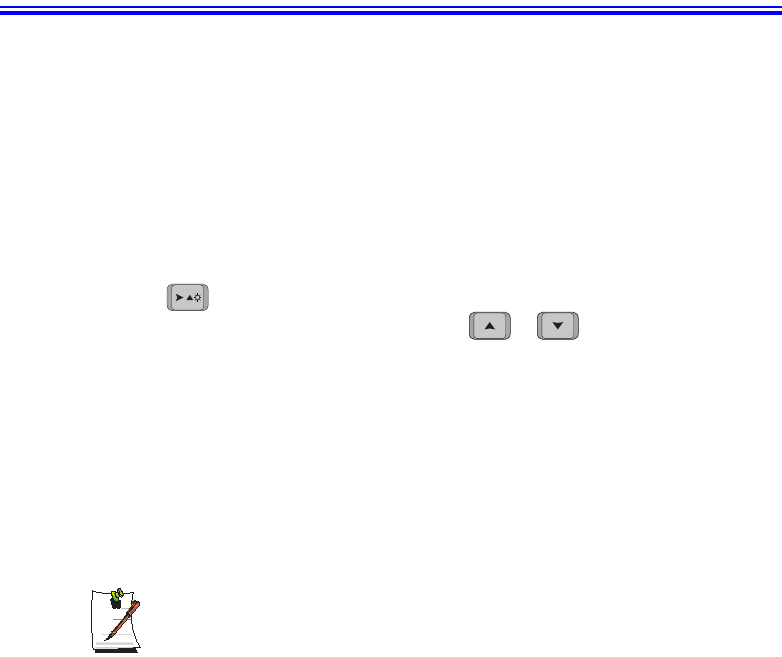
Changing the volume with your keyboard.
Use to decrease the volume or to increase the volume.
Using the Volume Control Icon
Double-Click icon in the active program tray. The Volume Control window pops
up. Use this window to adjust the volume. You can pop up a simple volume slider by
a single click icon.
Wheel Volume Control
+ +
Matrix 3 Plus (Windows 2000) - English.fm Page 39 Thursday, April 18, 2002 10:35 AM

40 Users Manual
Using the Battery
Your computer uses a smart rechargeable Lithium-ion (Li-ion) battery pack for power
when the AC adapter is not attached to an electrical outlet. The smart battery gives a
accurate measurement of the current battery capacity which helps extend operating
time by enabling effective power management in operating systems that take
advantage of the accurate information supplied by the battery.
Charging the Battery
Your computer’s battery starts charging automatically when you connect the power to
the computer and to an electrical outlet. If the computer is off, the battery charges faster
than if the computer’s power is on.
Approximate charging times for the Li-Ion battery are
•3 hours with the computer off.
•7 hours with the computer on.
While the battery is charging normally, the battery charge light on the computer is red.
When the battery is fully charged, the light changes to green.
When you use a new battery pack for the first time or use a battery after a long period
of storage, the initial battery life is shorter than normal. Normal battery life resumes
after a few discharge-recharge cycles.
Follow these rules for charging your battery:
•A battery normally discharges power when not used for long periods of time.
Be sure to recharge the battery every two months when it is not in use.
•Make it a practice to discharge your battery fully before recharging the battery.
This can help extend the life of the battery.
•Do not attempt to charge the battery in temperatures of under 5oC or over 35oC
All batteries eventually wear out and lose the ability to hold a charge. You may
need to replace your battery pack after a year of average usage.
Matrix 3 Plus (Windows 2000) - English.fm Page 40 Thursday, April 18, 2002 10:35 AM
Using the Battery 41
Safely Using the Battery
Follow these guidelines to safely use the battery:
•Turn off your computer and unplug it if you accidentally:
– Expose the equipment to liquid.
– Drop, jar, or damage the computer.
•Use only approved battery chargers.
•Do not disassemble the battery, heat it above 100°C, or burn it. The battery
used in this computer may cause a fire or chemical burn if mistreated.
•Your computer's rechargeable battery may be considered hazardous waste. If
you replace your battery with a new one:
– Keep the old battery out of the reach of children.
– Dispose of the old battery promptly.
– Make sure that you follow all local requirements when you dispose of the
old battery.
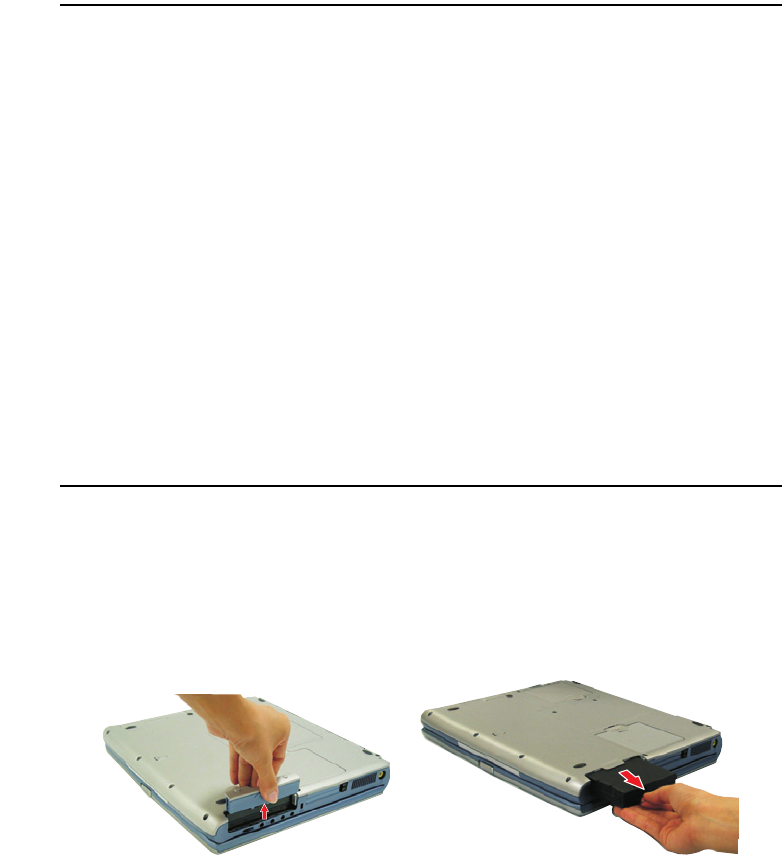
Removing the Battery
Your computer comes with the battery pack inserted in the computer.
To remove the battery from the computer:
1. Turn the computer’s power off.
2. Close the LCD panel, and turn the computer over so that the bottom of the unit
faces up.
3. Slide the battery compartment cover straight up and off the computer.
4. Grasp the tab on the battery and pull the battery out of the compartment.
Matrix 3 Plus (Windows 2000) - English.fm Page 41 Thursday, April 18, 2002 10:35 AM

42 Users Manual
Installing the Battery
To install the battery pack:
1. With the computer’s power off, close the LCD panel and turn the computer over
so the bottom of the unit faces up.
2. Slide the battery compartment cover straight up and off the computer.
Insert the battery into the battery compartment, ensuring the correct
orientation so that the battery fits in its slot properly.
3. Slide the battery pack into the compartment. Make sure the battery is fully inserted
into the compartment.
4. Align the tabs on the battery compartment cover with the slots on the battery
compartment.
5. Push the cover straight down until it snaps into place.
Matrix 3 Plus (Windows 2000) - English.fm Page 42 Thursday, April 18, 2002 10:35 AM
Using the Battery 43
Monitoring the Battery Charge
Battery life is affected by factors such as the power-management settings in System
Setup, the applications you use, and the brightness settings of the LCD. Under normal
usage, the battery charge lasts approximately 3 hours.
Battery life estimates are subject to variation. The actual life of your battery
may be less than the estimates given in the manual.
You can monitor the charge of the battery pack installed in your computer by using the
Power Meter or Battery Gauge.
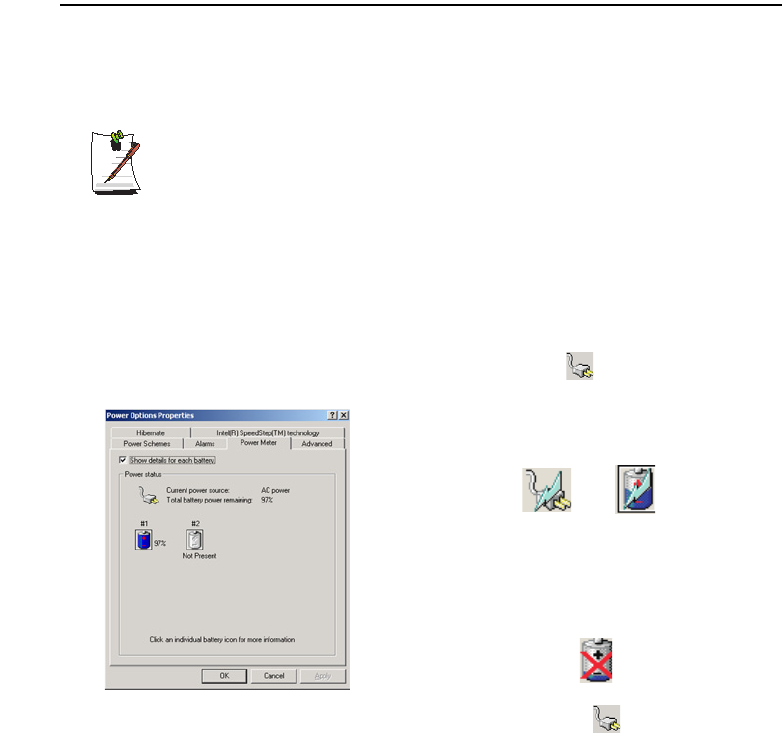
Power Meter
The Power Meter displays the charge of the batteries and the current source of
computer power, AC or batteries. You may monitor the battery charge or usage by
using the “Power Meter”. To access the power meter click icon on the task bar or
click Start > Settings > Control Panel > Power Options > Power Meter tab.
You may also check battery charge by moving the cursor to the icon, a small dialog
box will display the % of charge.
The Power Status icons shown below are displayed
during Battery Charging Operations
At ~15% and 10% remaining battery power the
current power source and the battery Icons
respectively change to the icon shown below and
you should follow the instructions in “Battery
Warnings” section below
Matrix 3 Plus (Windows 2000) - English.fm Page 43 Thursday, April 18, 2002 10:35 AM

44 Users Manual
Battery Gauge
You may display the battery gauge while you are in any program by pressing
<Fn+F6>. While the battery gauge is being displayed, all keys except <Esc> are
disabled. The battery gauge is only displayed for a few seconds.
Power Source:
•Indicates that the computer is powered by the AC adapter.
•Indicates that the computer is powered by the battery.
Battery Level:
•The top/right section indicates the approximate amount of the
primary battery charge remaining.
Matrix 3 Plus (Windows 2000) - English.fm Page 44 Thursday, April 18, 2002 10:35 AM

Using the Battery 45
Battery Warnings
If the battery charge is low (about 10%) you have approximately 5–10 minutes of
battery life left. You should:
•Save your work and,
•Connect the power cord to the computer or turn off the computer and install a
fully charged battery.
You can adjust the battery alarm features by using the operating systems power
management program (Start > Settings > Control Panel > Power Options in
Windows).
If you cannot run your computer from the battery and the battery will not charge when
you attach the power cord, the problem may be that:
•The battery temperature is below 10°C or over 32°C. If you think the battery
temperature is too hot or too cold, turn off the computer, remove the battery,
and let the battery reach room temperature. Then try charging the battery again.
•The battery is defective. Replace the battery with a new battery.
Battery Calibration
Calibrating your battery once a month is one of the recommended methods of
increasing your computer’s battery life. To calibrate the battery complete the following
steps:
Calibration Notes:
You should start the battery calibration process with a fully charged battery,
battery status LED is green. The power meter may not show 100%.
Before you commence the battery calibration process you should fully charge,
then fully discharge and finally fully recharge the battery again.
1. Disconnect the AC power adapter after turning off the system.
2. Restart your computer and press <F2> to enter BIOS setup.
3. Using the arrow keys, highlight Battery Calibration in the Power menu.
4. Press Enter to start calibration process. The calibration usually takes 2 to 3 hours
depending on the current battery charge.
5. When the calibration process is complete, recharge the battery fully.
Matrix 3 Plus (Windows 2000) - English.fm Page 45 Thursday, April 18, 2002 10:35 AM

46 Users Manual
Using System Setup
The System Setup (BIOS) program enables you to configure your computer hardware
and set security and power-savings options. The settings you choose are stored in
battery-maintained CMOS memory that saves the information even when the
computer’s power is turned off. When your computer is turned back on, it is configured
with the values found in this memory.
Run System Setup if you get a message prompting you to run the program. You may
also want to run System Setup, particularly the first time you use your computer, to set
the time and date, use security or power-management features, or alter the settings of
other features.
BIOS Caution:
If you are not familiar with BIOS setup and what the parameters mean, seek
help from a person who is knowledgeable. Incorrect settings may cause your
system to “Crash”.
Your computer’s version of System Setup may not include all the fields listed
here or may include additional fields. Field names and order of appearance
can vary according to the version of the BIOS (basic input/output system) on
your computer.
Starting System Setup
To start System Setup, turn on your computer and then press <F2> and hold until the
System Setup screen appears.
Table 5. System Setup Menus
To open the menu you need to use, use the left or right arrow keys to select the menu
name and then press <Enter>.
Menu Function
Main Changes the basic system.
Advanced Configures advanced features on your computer.
Security Enables security features, including passwords and backup
and virus-check reminders.
Power Configures power-management features.
Boot Specifies the order of boot devices and configures boot
features.
Exit Specifies how to exit System Setup.
Matrix 3 Plus (Windows 2000) - English.fm Page 46 Thursday, April 18, 2002 10:35 AM

Using System Setup 47
Table 6. System Setup Navigation Keys
Navigation Key Function
Displays the General Help window.
Exits the current menu.
Moves the cursor up and down between fields.
Selects different menus. Pressing the ESC key at the Main
menu brings you to the Exit menu.
Scrolls backwards through the options for the highlighted field.
Scrolls forward through the options for the highlighted field.
Sets the parameters for the current menu to their default
values.
Sets the parameters for the current menu to their previous
values.
Executes commands or opens a submenu.
or
or
Matrix 3 Plus (Windows 2000) - English.fm Page 47 Thursday, April 18, 2002 10:35 AM
48 Users Manual
Changing Booting Priority
The Boot menu in System Setup enables you to select the booting device and to set
booting options.
Boot Device Priority field enables:
You to select the order in which the computer attempts to boot from different devices.
The field has three (3) options: CD-ROM Drive, Removable Devices and Hard
Drive.
To change the booting device priority, choose the device positions by completing
the following:
1. At startup, press <F2> to open System Setup.
2. Use to select the Advanced CMOS Setup menu.
3. Highlight the 1st Boot Device option with keys.
4. Press <Shift+Plus> keys until the option moves up in the list to the desired
position or press <Minus> key until the option moves down in the list to the
desired position.
5. Press <Esc> to return to the Exit menu.
6. Press Enter or <F10> to exit and save your changes.
7. Press Enter again to restart the computer.
If you want to start the system using a bootable CD, change the CD-ROM
Drive to be the 1st Boot Device.
or
Matrix 3 Plus (Windows 2000) - English.fm Page 48 Thursday, April 18, 2002 10:35 AM

Using System Security 49
Using System Security
This section describes your computer security programs. The first is the standard BIOS
security which is standard on almost all computers. The second is a advanced factory
option Biometric security system that uses your fingerprint(s) to control access to your
computer and individual files if necessary. You no longer have to worry about
passwords being lost, stolen or forgotten.
BIOS Security
The BIOS security operations are explained below:
System Passwords
The computer provides (4) levels of password security: administrative-level
(supervisor), user-level (user), HDD access and Password on Boot. These passwords
prevent unauthorized access to the computer. The supervisor password enables full
access to all System Setup fields. The user password enables full access to only the Set
User Password and Password on boot security fields and read access to all other
System Setup fields. The HDD Password controls access to the hard drive.
You may also enable the biometric security at boot.
The (3) security boot time options are:
The Biometric Security software MUST be installed prior to setting the security
options to any of the fingerprint options.
•Disabled
•Text password
•Finger Print
If multiple users have access to the computer (such as in a network environment), a
supervisor password can prevent unauthorized access to certain security options.
Choose the type of password security that is appropriate for your work.
Matrix 3 Plus (Windows 2000) - English.fm Page 49 Thursday, April 18, 2002 10:35 AM

50 Users Manual
If You Forget Your Password
It is very important that you do not forget your password. If you do, you cannot access
your system. Write your password down and keep it in a safe place. If you do forget
and cannot find the written note, please contact the Samsung Helpline. Please have
your receipts available to verify the type and model of your computer. You may be
charged for password removal.
Creating a Password
To create a password follow the instructions below:
1. At startup, press to open System Setup.
2. Use to select the Security menu.
Precautions for Password Entry:
You can enter letters or numbers, but you cannot use the function keys, such
as the Shift key. Your computer does not distinguish between capitalized and
lowercase letters in your password. As you type the password, the cursor
moves but your password does not appear on the screen. Choose the type of
password security that is appropriate for your work. If you want to set a user
password, you must set a supervisor password first.
3. Use to select Set Supervisor Password or Set User Password.
4. Press <Enter>. The Set Password dialog box appears.
5. Press <Enter> after you have typed your password. The computer prompts you to
reenter your password for verification.
6. Type your password again and press <Enter>. A message appears telling you that
the changes have been saved.
7. Press <Enter> again to return to the Security menu.
8. Press to go to the Exit menu.
9. Press <Enter> or <F10> to exit and save your changes.
10. Press <Enter> again to restart the computer.
If password use is not desired:
Follow the creating a password procedure above except leave the password field empty in
step 5.
Matrix 3 Plus (Windows 2000) - English.fm Page 50 Thursday, April 18, 2002 10:35 AM

Using System Security 51
Biometric Security
Advantages of Biometric Security are:
•Very high level of security
•No password to remember, lose or have stolen.
•Streamlined logon process.
•Single fingerprint will access many programs, eliminating passwords.
If you purchased the Biometric Security option, please refer to the manual provided for
installation and use.
The factory optional fingerprint sensor provides unique
security access to your computer. You will no longer have to
worry about losing or forgetting your password. Since every
person has a unique set of fingerprints, only a biometrically
enrolled person may have access to your computer.
Matrix 3 Plus (Windows 2000) - English.fm Page 51 Thursday, April 18, 2002 10:35 AM

52 Users Manual
Using Power Management Options
Your computer includes Power Management options that can help the battery charge
last longer and extend the life of the battery. Power-management options will slow
down or shut off system components when the components are not being used.
Power management may slow down system performance. Your computer runs fastest
with the power cord attached, when power management is disabled.
In the next sections, basic and advanced methods of power management will be
discussed.
Intel® SpeedStep™
Intel SpeedStep will control the CPU speed on your system according to the kind of
power supply as part of power saving management.
To use this function, your system must meet the conditions below:
•Intel SpeedStep supporting CPU
•BIOS and OS Support
Matrix 3 Plus (Windows 2000) - English.fm Page 52 Thursday, April 18, 2002 10:35 AM
Using Power Management Options 53
Basic Power Management Schemes
This section discusses the basic schemes of power management when the computer is
operating on battery power or using AC power.
Standby vs. Hibernation
Standby unlike hibernation mode does not store unsaved information on your
hard disk; it's stored only in the computer memory. If there is an interruption in
power, the information is lost. So before putting your computer on standby,
you should save your files.
Changing Devices:
Do not change PC Cards while in standby or hibernate modes.
To enter the power management window complete the following:
1. Click Start > Settings > Control Panel.
2. Click Power Options icon to display the Power Options Properties window.
3. Click the Power Schemes tab to display the basic power management options.
4. Select the time that you wish each of the following actions to occur in Battery and
AC power mode.
•Turn off monitor:
•Turn off hard disks:
•System standby:
•System hibernates:
Power Schemes Tab
Matrix 3 Plus (Windows 2000) - English.fm Page 53 Thursday, April 18, 2002 10:35 AM
54 Users Manual
Turning off the monitor and HDDs will save a substantial battery power, therefore
when in battery only mode select the shortest time practical.
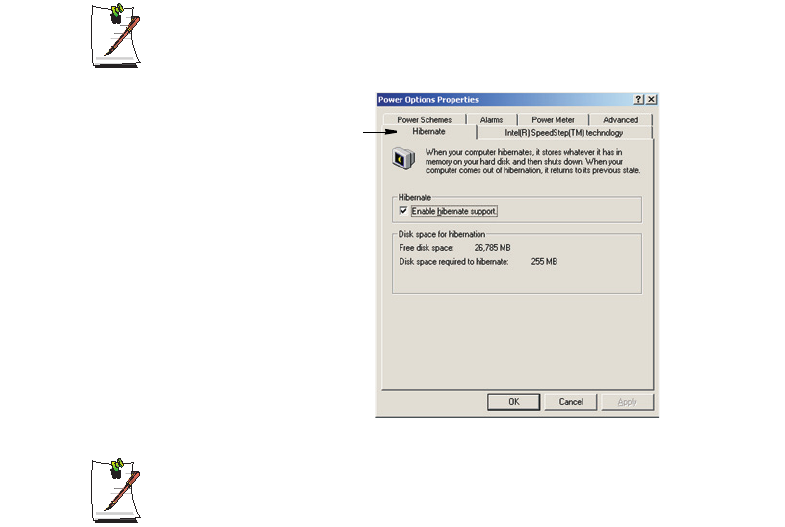
a Hibernate Mode (Power Management or Manual Method)
When hibernation is used, your computer turns off and when you power up again,
everything is restored exactly as you left it—including programs and documents
you may not have saved or closed. Everything in memory gets saved to the HDD,
and the monitor and hard disk get turned off.
If You Reinstall Windows:
You should re-establish hibernate in power options by opening Power
Options Properties window and click on the Hibernate tab then click
“Enable Hibernation”.
Frequent Interruptions:
If you experience frequent interruptions, you might also consider putting your
computer into automatic hibernation after a specified number of minutes using
the power management options.
a Standby Mode (Power Management or Manual Method)
Standby is used mainly for conserving battery power in your notebook computer. It
also gives you the benefit of getting right back to your work without waiting for the
computer to restart. Standby turns off your monitor and hard disks, placing your entire
system in a low-power state. When you return to your computer, restores your desktop
exactly as you left it. It is recommended that you do not enter standby mode with less
than 20% battery power.
5. Click OK to set your power management options and close the window.
Hibernate Tab
Matrix 3 Plus (Windows 2000) - English.fm Page 54 Thursday, April 18, 2002 10:35 AM
Using Power Management Options 55
Rest Key:
The manual <Fn+F11> key combination will not activate Standby
or Hibernate modes whilst you are playing a multimedia program or have an
active USB device connected.
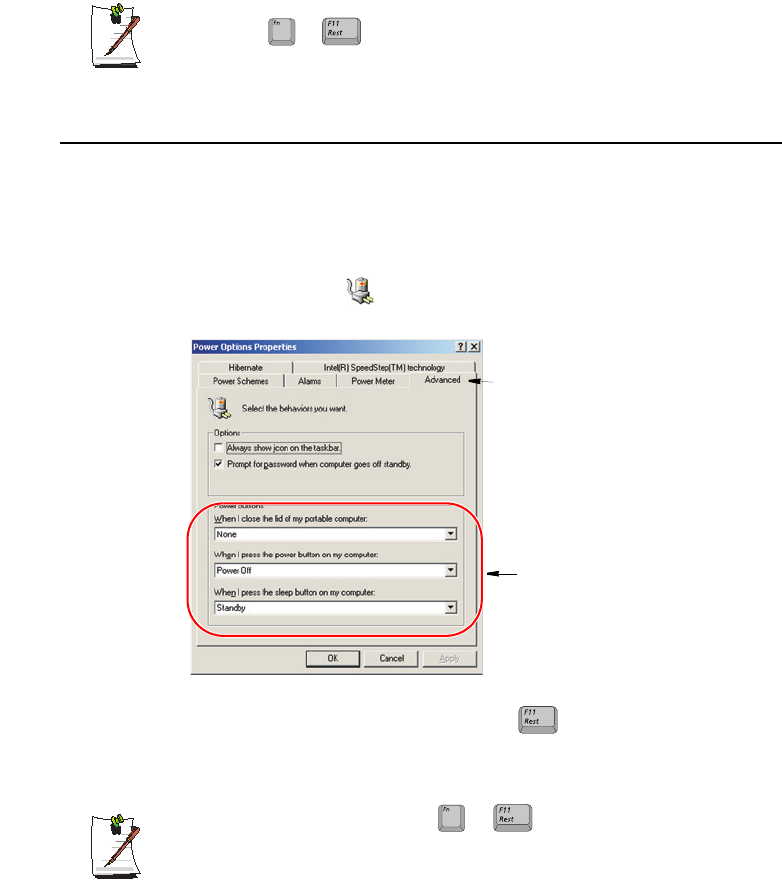
Advanced Power Management Schemes
This section discusses the advanced power management schemes. There are two
buttons that you can use to manually conserve power.
To enter the power management window complete the following:
1. Click Start > Settings > Control Panel.
2. Click Power Options icon to display the Power Options Properties window.
3. Click the Advanced tab to display the advanced power management options.
4. Select the mode (Do nothing/Ask me what to do/Standby/Hibernate/Shut
down) assigned to the Power button and/or Rest <F11> key. Also select the
action (Do nothing/Standby/Hibernate) associated with closing the computer
lid.
The “Rest” key is assigned to the <Fn+F11> key combination.
See ”Basic Power Management Schemes” on page 53 for a better
understanding of Standby and Hibernate modes.
5. Click OK to set your power management options and close the window.
You can return to normal operation after you have used one of the “Power
Management” buttons by quickly pushing and releasing the Power button.
+
Advanced Tab
Power & Sleep Button
Programming Windows
+
Matrix 3 Plus (Windows 2000) - English.fm Page 55 Thursday, April 18, 2002 10:35 AM
56 Users Manual
Using the Hard Drive
Your computer includes a removable IDE (integrated drive electronics) hard drive. The
IDE hard drive can store the data and programs your computer uses. The drive plugs
into a connector on the system board.
The hard drive that comes with your computer has already been formatted. Do
not format the hard drive. Doing so destroys all data contained on the drive. If
you need to format a new drive, or want to erase all data on your existing hard
drive, refer to the manual for your operating system.
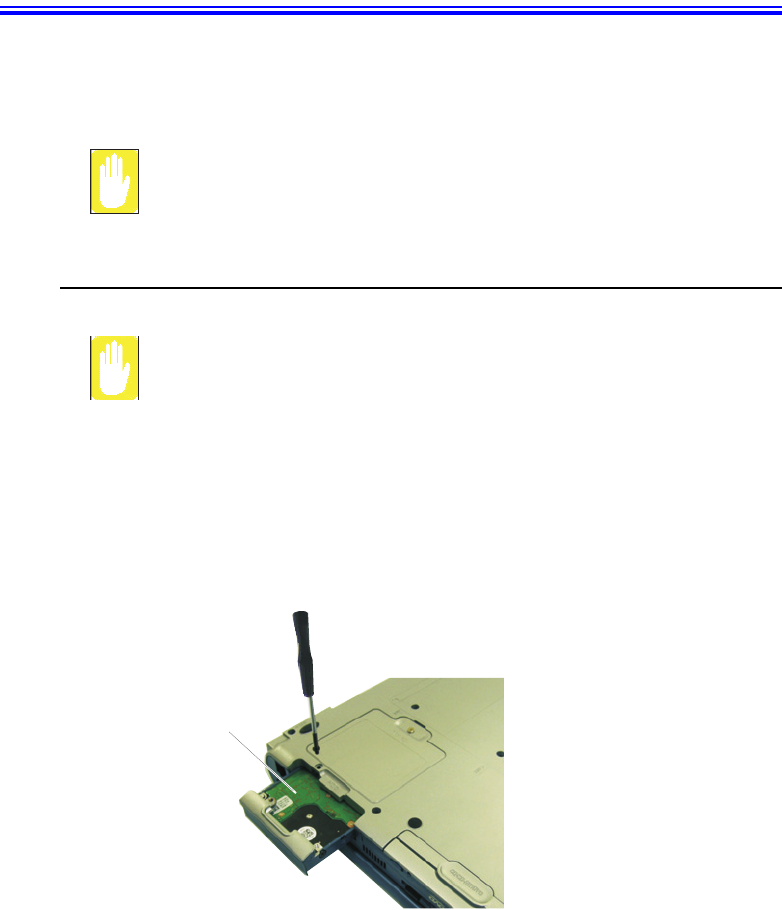
Removing the Hard Drive
To prevent loss of data and damage to the disk, do not remove the hard drive
while the computer’s power is on and do not drop or jar the hard drive.
To remove the hard drive from the computer:
1. If you are installing a new hard drive, backup the application and data files on the
old hard drive before removing it from the computer.
2. Turn the computer’s power off.
3. Close the LCD panel, and turn the computer over so that the bottom of the unit
faces up.
4. Remove the screw that holds the hard drive in place.
5. Pull the hard drive out of the computer.
Hard-drive
Bottom of computer
Matrix 3 Plus (Windows 2000) - English.fm Page 56 Thursday, April 18, 2002 10:35 AM

Using the Hard Drive 57
Installing a Hard Drive
To install a hard drive:
1. Remove the old hard drive from the computer as described in the previous section.
2. Slide the new drive into the hard drive compartment. Make sure the drive is pushed
back as far as it will go.
3. Install the screw that holds the hard drive in place.
4. If required install windows and appropriate device drivers according to the
instructions below.
(Re)Installing Windows and Device Drivers
Use System Recovery CD to (re)install OS and System Software CD to (re)install
device' drivers.
The System Recovery CD is used to (re)install the OS and System Software
to a new HDD or recover from a system crash.
Notebook computers that ship from the factory include a System Recovery
CD-ROM and a System Software CD-ROM, which contains a copy of the
applications and drivers needed for computer's operating system.
In the unlikely event that programs on the computer hard drive become
corrupted or are erased, you can use the System Recovery CD-ROM to
reinstall your operating system and then System Software CD-ROM to
reinstall your original applications and drivers.
Matrix 3 Plus (Windows 2000) - English.fm Page 57 Thursday, April 18, 2002 10:35 AM

58 Users Manual
Video Features and Configuration
All these video modes can be displayed on an external monitor. However, if you
disconnect an external monitor that was attached to your computer and then start the
computer, the LCD may revert to a different resolution than the one you chose for the
external monitor.
Resolution and Colour Depth
The resolution of the LCD is the sharpness of the image it can display. Resolution is
measured by the number of pixels (individual dots) displayed on the entire screen. In
general, the more pixels the LCD can display, the better the image.
The number of colours the LCD can display is measured by how many bits the LCD
uses to represent each pixel:
•16-bit colour can support 64 K (65,536) colours.
•32-bit colour can support 16 M (16.8 million) colours.
All these video modes can be displayed on an external monitor. However, if you
disconnect an external monitor that was attached to your computer and then start the
computer, the LCD may revert to a different resolution than the one you chose for the
external monitor.
Matrix 3 Plus (Windows 2000) - English.fm Page 58 Thursday, April 18, 2002 10:35 AM

Video Features and Configuration 59
Configuring Display Features
The following sections describe how to configure the display settings on your
computer.
Display Resolution Notes:
When Windows 2000 is initially installed it will automatically adjust the
resolution to maximum available.
Changing Colour Depth and Resolution
To change the colour depth and resolution of your LCD or external monitor:
1. Click Start > Settings > Control Panel.
2. Click Display icon . The Display Properties window appears.
3. Click the Settings tab. The Settings screen appears.
4. To change the colour depth, click the arrow next to the Colour quality palette and
select the available colour depth you want.
5. To change the resolution, click and drag the slider under the Screen resolution
until you select the available resolution you want.
6. Click OK.
7. Follow the prompts that appear on the screen.
Matrix 3 Plus (Windows 2000) - English.fm Page 59 Thursday, April 18, 2002 10:35 AM