Contents
- 1. Users Manual 1
- 2. Users Manual 2
- 3. Users Manual 3
Users Manual 2
35
e02_dv62_7e.fm
[35/56]
Before Using the Handset
1In the Custom menu, select [Settings]/[General
settings]/[TOUCH CRUISER set]/[Usage
settings].
2Select the setting/t.
1In the Custom menu, select [Settings]/[General
settings]/[TOUCH CRUISER set]/[Pointer
speed]/[Scroll speed].
2Select the speed/t.
Set, change or save functions from the menu screens.
For details on operations in the viewer position nP. 37
Set the start menu that displayed when t is pressed in stand-by.
1In stand-by, press t/[Settings]/[Disp/LED/
Power saver]/[Menu priority].
:In the Custom menu/Basic menu: Press C/[Menu priority].
2Select the start menu/t/[Yes].
Cautions when using the Optical TOUCH CRUISER
Do not operate the Optical TOUCH CRUISER using a pointed
metallic object such as a pen tip. May cause scratches or a failure
of the sensor.
Note that putting a sticker, etc. to the operating range may cause
a malfunction.
Because the Optical TOUCH CRUISER detects motions of the
fingerprint, it may not operate properly depending on the condition
of the finger (when foreign objects, such as dust, sand, etc. are
attached to the finger).
Setting whether to use Optical TOUCH CRUISER
<Usage settings>
Setting pointer speed/scroll speed
<Pointer speed/Scroll speed>
Setting and selecting menu
The explanations in this manual are based on how to retrieve a
function from the Custom menu.
Setting start menu <Menu priority>
Start menu Characteristics
Custom menu
The preset Kisekae Tool (nP. 113) can be selected
and set. Each Kisekae Tool consists of different
functions and designs. Kisekae Tools can be
downloaded from sites and used.
Preset Kisekae Tools
White Black Pink
拡大メニュー(Large) シンプル(Simple)
ダイレクトメニュー
※Preset Kisekae Tools differ depending on the
FOMA terminal handset color.
Basic menu Select the icon displayed on the menu to retrieve the
function. Also, input the function number, which is
assigned to each function, to quickly retrieve the
function to be used.
dv62_E.book 35 ページ 2008年11月3日 月曜日 午後8時18分
36
e02_dv62_7e.fm
[36/56]
Before Using the Handset
■Switching set start menu temporarily
Switch the start menu temporarily. When the stand-by display
reappears, the start menu returns to the one set in Menu priority.
Use the Shortcut menu to retrieve saved functions quickly. Other
functions can also be saved in the Shortcut menu (nP. 393).
For details on operating shortcut menu nP. 393
For details on the available functions nP. 454
Use w and the Optical TOUCH CRUISER in either menu.
Press the dial key corresponding to the menu item number (U, V,
W, etc.) to select a function. However, in the Custom menu, a
function may not be selected by using the menu item numbers.
The method for selecting functions may differ depending on the
Kisekae Tool set for the Custom menu.
Press c to re-select a function, and the previous screen
reappears. Press H to return to stand-by.
■Retrieving from the Custom menu
Stand-by
t
Shortcut menu
a
Basic menuCustom menu
p
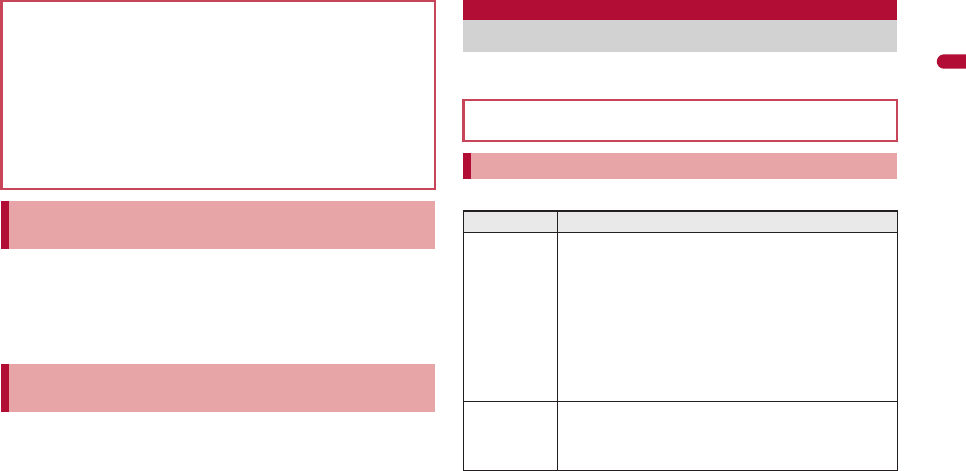
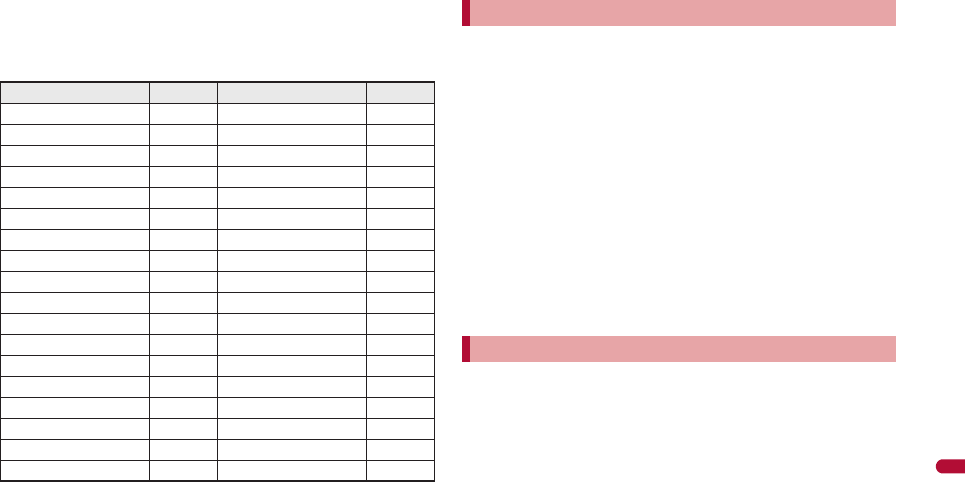
Retrieving a function from each menu
When a stock icon (nP. 32) appears in stand-by, select G to
show the each menu.
The way of activating 1Seg with Multi guide key or Optical TOUCH
CRUISER is explained as an example below.
For , (;), use the Optical TOUCH CRUISER to select an
item.
The following shows the screen operated with the Optical TOUCH
CRUISER.
,
(;)
t
Custom menu When [1Seg]
appears
When 1Seg is
activated
,
(;)
t
or
w
t
or
w
t
dv62_E.book 36 ページ 2008年11月3日 月曜日 午後8時18分
e02_dv62_7e.fm
[37/56]
37
Continued on next page
Before Using the Handset
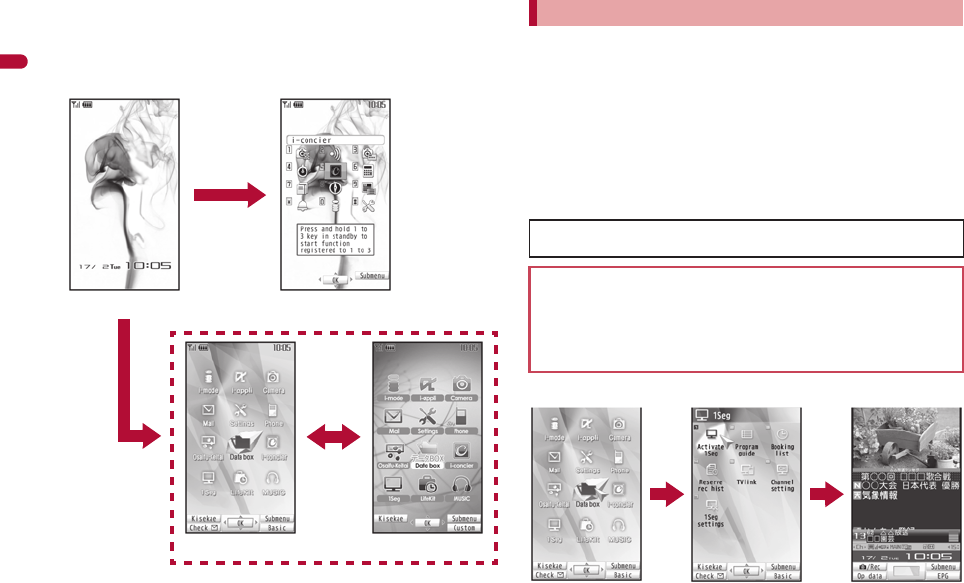
■Retrieving from the Basic menu
In the Basic menu, input the function number, which is assigned to
setting menu, to quickly retrieve the function to be used
(nP. 454).
When [Submenu] appears in the Operation
guidance, press C to display functions
(Submenu) that can be used in the screen. Select
the displayed Submenu with w or the Optical
TOUCH CRUISER. If there are multiple pages in
the Submenu, change pages with w or the
Optical TOUCH CRUISER.
Alternatively, press the dial key corresponding to
the menu item number (U, V, W, etc.) to select
a function. However, some Submenus do not
have item numbers.
In the viewer position, operate by putting the finger on the
touch panel (screen).
In other than the viewer position, the touch panel is available during
Videophone (nP. 78).
The operations differ depending on the function and screen in use.
In addition, the message stating that the operation is not available
appears when the touch panel cannot be used.
Operate the touch panel inside the following operating range of touch
panel. However, when a substitute image appears in the right side of the
screen, operate in the left side of the screen where functions are shown.
The notation of operation described in this manual and its meaning
are shown below.
Touch
Put the finger on the touch
panel and put it off.
Double-touch
Quickly touch the same point twice.
When the Custom menu image is changed by Kisekae Tool, the
operation may differ from the description in this manual. In this
case, switch the menu screen to the Basic menu (nP. 35) or
perform the Reset menu screen (nP. 115).
Selecting a function from Submenu
,
(;)
t
Basic menu When [1Seg]
appears
When 1Seg is
activated
,
(;)
t
or
w
t
or
u
t
Submenu screen
Touch panel
Operations in viewer position
Touch panel
Operating range of the touch panel
dv62_E.book 37 ページ 2008年11月3日 月曜日 午後8時18分
38
e02_dv62_7e.fm
[38/56]
Before Using the Handset
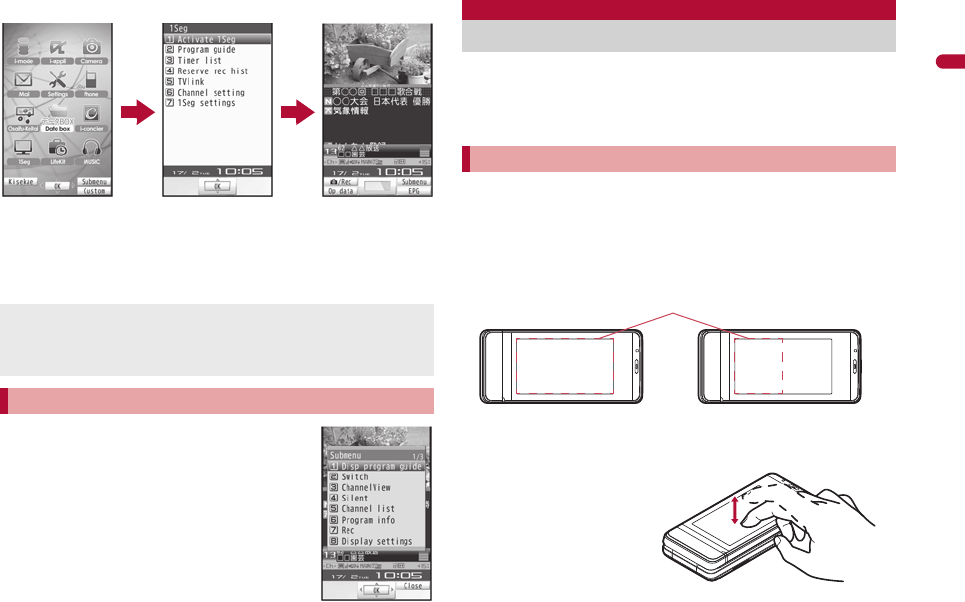
Slide
Keep the finger on the
touch panel and slide it.
Quick slide
Quickly slide the finger and
put it off.
Putting the distance between two fingers apart/closer
Put two fingers on the
touch panel and slide them
with putting the distance
between two fingers apart/
closer.
When putting the finger on the touch panel, the tone sounds and the
vibrator is activated (excluding while activating Touch menu and a camera).
•
The volume can be changed (
n
P. 104). The tone cannot be changed.
• The vibrator can be set to ON/OFF (nP. 105).
Retrieve functions such as Full Browser or 1Seg from the Touch menu.
Operating or changing settings with the Submemu or control key is
available while using each function (touch operation is also available).
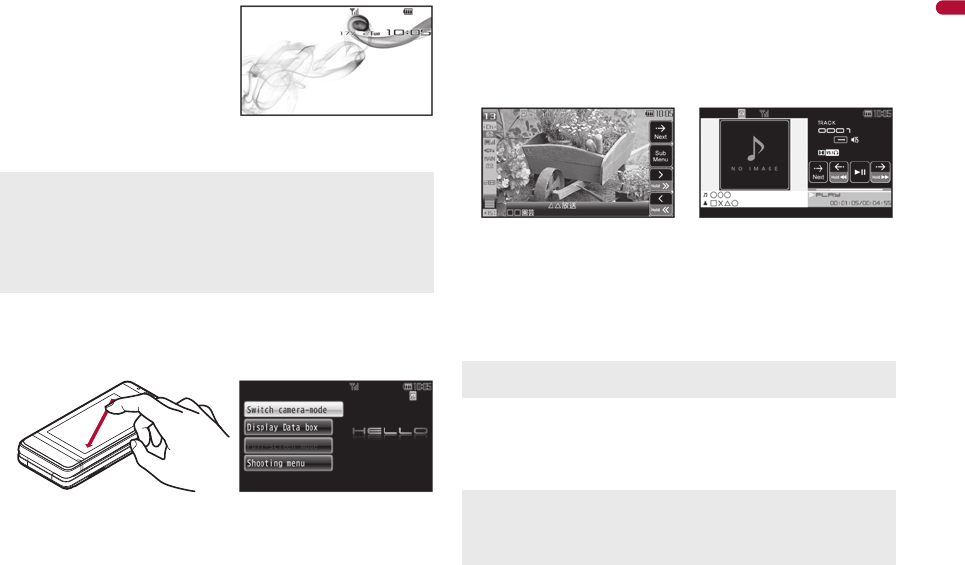
■Touch menu
If the screen is switched from the
normal position to the viewer
position in the stand-by display,
Custom menu, Basic menu or
others, Touch menu appears.
•
Functions to activate when
setting the handset to the viewer
position in the stand-by display can be changed (
n
P. 382).
Touch the touch panel while displaying Stand-by (W) in the viewer
position to display the Touch menu.
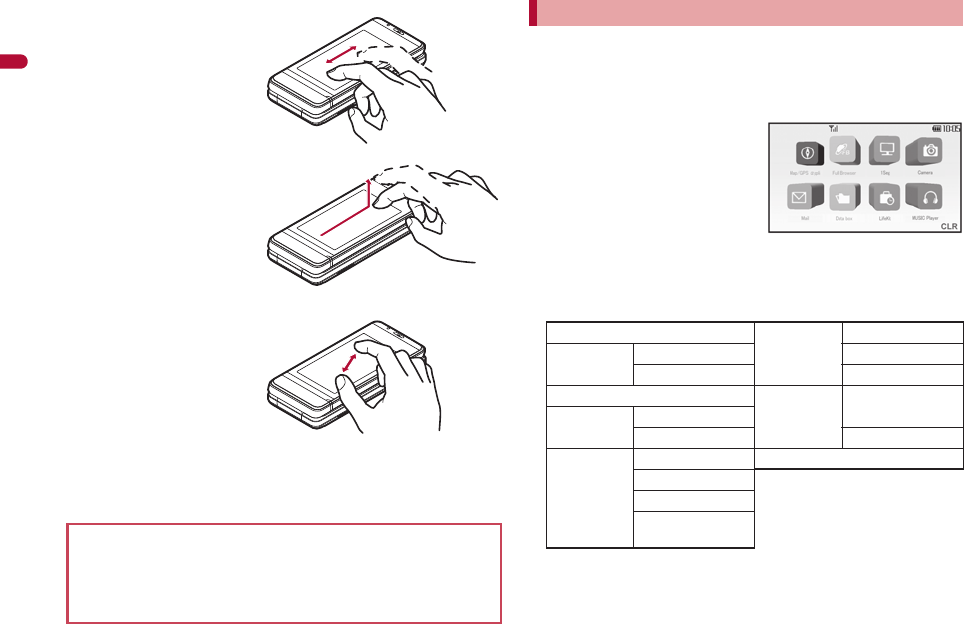
The following functions can be retrieved from the Touch menu.
*1 “Mapping appli” (nP. 312) is started. i-appli to start can be
changed from the Map setting (nP. 277, P. 311).
*2 The music is played from the spot where the playback stopped
previously.
When using the touch panel
The touch panel does not work when operated with a gloved
finger or with foreign objects placed on the operation pad.
Note that operating with a wet finger or putting a sticker to the
touch panel (display) may cause a malfunction.
Using menus or functions
Map/GPS appli*1 Data box My picture
Full Browser Home i-motion
Bookmark 1Seg
1Seg LifeKit Manga&Book
Reader
Camera Shoot still pic
Shoot movie Document Viewer
Mail Inbox MUSIC Player*2
Outbox
Unsent messages
Compose
message
dv62_E.book 38 ページ 2008年11月3日 月曜日 午後8時18分
39
e02_dv62_7e.fm
[39/56]
Before Using the Handset
To cancel/end a function, press & (q) while using the function.
The images and items in the Touch menu cannot be changed.
Stand-by (W)
Stand-by (W) appears when the
“CLR” key is touched or & (q) is
pressed in the Touch menu.
Stand-by (W) can be changed
(nP. 108).
Press & (q) while displaying
Stand-by (W) to activate the
camera.
Press & (q) for 1+ seconds to activate 1Seg.
■Submenu
While using the function, quickly slide the finger from the upper right
to the lower left (or from the upper left to the lower right) to display
the Submenu.
• Touch C of the control key or D on the upper part of the
screen to display the Submenu.
• Touch the area other than the Submenu to hide the Submenu.
The Submenu in the normal position and menu in the operation
guidance are displayed in the Submenu with the handset set to the
viewer position. Operate or change the settings by selecting the
Submenu in the same way as in the normal position (some menu
cannot be selected depending on the screen).
■Control key
While using a function, touch the touch panel to show the control keys.
• Touch the area other than the control keys to hide the control
keys (excluding 1Seg). Also, if no operations are performed for
approximately 7 seconds with the control keys shown, the control
keys disappear.
If there are extra keys other than those shown, touch F to show
the next key.
For details on control keys of each function nP. 41
■Touch operation
Easily operate with the finger without displaying the Submenu or
control keys.
For details on touch operation of each function nP. 41
i-appli that does not support the touch panel is not available in the
viewer position. Switch to the normal position and operate.
When the following items are displayed in Stand-by (W), touch the
displayed item and operate. Touch the area other than displayed
items to operate Stand-by (W).
Stock icon
Notice that 1Seg reservation recording is completed
The control keys always appear in the shooting screen or while the
music data is played.
For the touch operation, be careful not to touch a key shown in the
screen.
Perform touch operation after hiding control keys while e-books,
Word and Excel files, etc. are displayed.
Example: 1Seg Example: MUSIC Player
dv62_E.book 39 ページ 2008年11月3日 月曜日 午後8時18分
40
e02_dv62_7e.fm
[40/56]
Before Using the Handset
■Operations for menu and function
Touch the touch menu or control keys to execute the functions.
Example: Touch menu
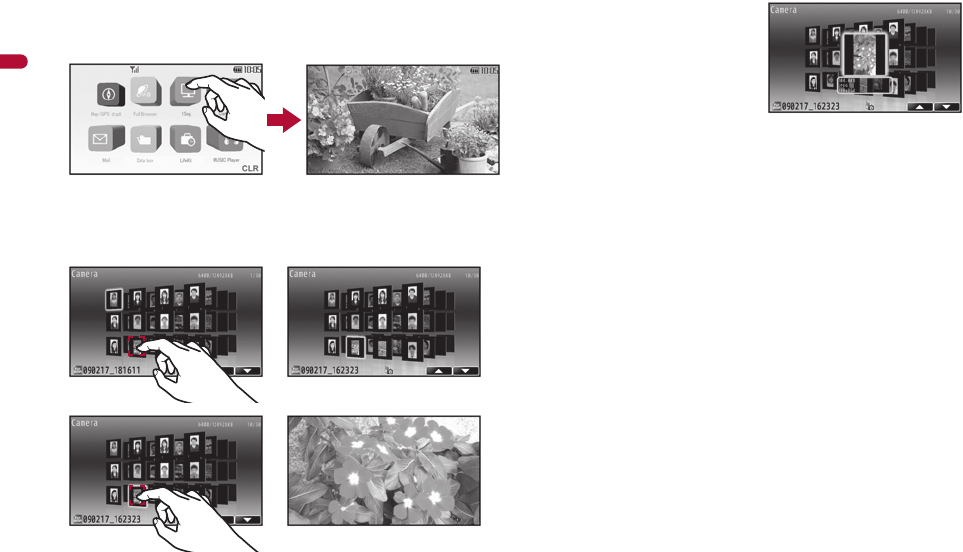
In the Submenu, list and data list screens, select the menu, items,
or data by touching, moving the cursor and re-touching them.
Example: [Camera] folder data list screen (Change theme: [Visual
menu 1])
• Keep the image with cursor
touched and the image
appears in the center of the
screen.
If there are multiple pages in the Submenu, list or data list screen,
use one of the following methods to switch the pages.
• Quickly slide the finger left/right.
• Touch A/B or $/#, etc. (when they appear).
• Touch an image behind the image currently shown (when Change
theme is set to [Visual menu 1]).
When scrolling the Submenu, slide the area in which the Submenu
is displayed up/down with the finger.
In the screen activated from the Submenu, operation guidance
menu in the normal position may appear as the control keys.
When having touched the data or item by mistake, slide the finger
away from it to cancel the selection.
Touch the “CLR” key or press & (q) to return to the previous
screen.
//
/
dv62_E.book 40 ページ 2008年11月3日 月曜日 午後8時18分
41
e02_dv62_7e.fm
[41/56]
Before Using the Handset
■While Full Browser is displayed
Control key
Control keys are not shown. Operate from the Submenu.
Touch operation
*1 Zoom bar can also be displayed from the Submenu. Slide the
slider of zoom bar left/right or touch +/- on the both ends of the
zoom bar to zoom up/down the screen.
*2 Not available when there is no history.
Touch the tab on the upper part of the screen to switch windows.
Touch a link to highlight and touch it again to view the linked site.
Quickly slide the finger left/right or touch $/# to move the cursor
to next/previous history in the Visual history screen.
• Quickly slide the finger up/down or touch %/& to switch
windows.
■While a PC movie is played back
Control key
*1 May not appear for the PC movies which have restrictions on the
operations such as the live distribution.
*2 Keep key touched to fast forward/fast reverse.
*3 Keep key touched to adjust the volume continuously.
Settings can be changed from the Submenu.
Touch operation
■While 1Seg is being watched
Control key
*1
Keep key touched to select a station by searching a frequency. Touch
[
to cancel the selection for station by searching a frequency.
*2 Keep key touched to record video. Touch f to end recording.
*3 Keep key touched to adjust the volume continuously.
Settings can be changed from the Submenu.
Touch operation
Control key/Touch operation list
Keep key touched To display a zoom bar*1
Slide the finger up/down/left/right To scroll a screen
Quickly slide the finger left/right To display next/previous page*2
hTo fast forward*1, 2 WTo turn down the volume*3
gTo pause/play*1 fTo stop
iTo fast reverse*1, 2 eTo switch to the Full-screen
mode
VTo turn up the volume*3
Quickly slide the finger up/down To adjust volume
YTo select a station with
UP*1 XTo record 1Seg programs
as a still picture*2
ZTo select a station with
DOWN*1
VTo turn up the volume*3
WTo turn down the volume*3
Quickly slide the finger up/down To adjust volume
Quickly slide the finger left/right
To select a station with UP/DOWN
dv62_E.book 41 ページ 2008年11月3日 月曜日 午後8時18分

42
e02_dv62_7e.fm
[42/56]
Before Using the Handset
■While camera is activated
Control key
*1 Appears in the still picture shooting screen.
*2 Touch P to return to the Normal shooting mode.
*3 Appears in the movie shooting screen.
*4 Appears while shooting a movie.
Settings can be changed from the Submenu.
In the preview screen after shooting still picture, the following keys
appear.
* Appears after shooting still pictures continuously.
Submenu appears after shooting movie.
Touch operation
* The range of zoom is changed depending on how far the finger is
slid left/right. When zooming up in a moment, double-touch the right
edge of the screen.
Focus and shoot as follows when the AF mode is set other than
[Center AF], [Standard] or [Closeup].
•
Select [Def (people first)]: Touch the face detection frame to focus.
• Select [Spot AF]: Touch a point to focus/touch the focus area.
•
Select [Manual focus]: Slide the finger left/right to focus
/
touch
G
.
■While a message details screen is displayed
Control key
Settings can be changed from the Submenu.
Touch operation
* Alternatively, touch A/B to scroll a screen up/down.
When touching during Decome-Anime playback screen display, a
message details screen is displayed.
Touch the highlighted data (nP. 187) or attached file to select it.
■While an image is displayed from My picture/1Seg
of Data box
Control key
* Appears for Flash movies.
Settings can be changed from the Submenu.
Touch operation
If the zoomed up image is displayed, slide the finger up/down/left/
right to change the display position.
GTo shoot with the normal shutter*1
HTo switch to the Egao focus shutter mode*1, 2
ITo switch to the Furimuki shutter mode*1, 2
JTo start shooting*3
fTo end shooting*4
KTo save NTo save all*
LTo clear OTo delete all*
Slide the finger up/down To adjust the brightness
Slide the finger left/right To adjust the zoom*
]To next mail/message ^To previous mail/message
Slide the finger up/down To scroll a screen up/down*
Slide the finger left/right
To next/previous mail or message
Switch the display method for message details screen (nP. 44).
gTo pause/play*]To next
^To previous
Slide the finger left/right To next/previous
Putting the distance between two
fingers apart/closer
To zoom up/down
dv62_E.book 42 ページ 2008年11月3日 月曜日 午後8時18分
43
e02_dv62_7e.fm
[43/56]
Before Using the Handset
■
While i-motion is displayed from i-motion of Data box
Control key
*1 Keep key touched to perform Fast reverse/Fast forward.
*2 Keep key touched to adjust the volume continuously.
*3 Appears when attaching is available.
Settings can be changed from the Submenu.
Touch operation
■While a video is played back from 1Seg of Data box
Control key
*1 Keep key touched to increase the speed to 6/2. Touch q
to play back a video while performing Fast reverse/Fast forward.
*2 Keep key touched to adjust the volume continuously.
While stopped/paused, the following control keys appear.
* Keep key touched to adjust the volume continuously.
Settings can be changed from the Submenu.
Touch operation
* Operation is not available while stopped/paused. Operate during
Fast reverse/Fast forward to increase the speed.
■While e-book, etc. is displayed
Control key
Settings can be changed from the Submenu.
Touch operation
Touch a link to highlight and touch it again to view the linked site.
■While Word or Excel files are displayed
Control key
Settings can be changed from the Submenu.
Touch operation
dTo previous*1 fTo stop
gTo pause/play eTo switch to the Full-screen
mode
cTo next*1
VTo turn up the volume*2 lTo compose a message
attached*3
WTo turn down the volume*2
Quickly slide the finger up/down To adjust volume
Quickly slide the finger left/right To next/previous
sTo fast reverse*1 fTo stop
rTo pause oTo return to a location of
approx. 10 seconds before
tTo fast forward*1
VTo turn up the volume*2 pTo skip to a location of
approx. 30 seconds after
WTo turn down the volume*2
qTo play WTo turn down the volume*
VTo turn up the volume*
Quickly slide the finger up/down To adjust volume
Quickly slide the finger left/right Fast reverse/Fast forward*
5To top dLine-by-line/
Frame-by-frame reverse
cLine-by-line/
Frame-by-frame forward
Quickly slide the finger up/down/
left/right
To move between lines/frames
]To next page ^To previous page
Slide the finger up/down/left/right To scroll a screen
Quickly slide the finger left/right To next/previous page
Double-touch To fit to screen
Putting the distance between two
fingers apart/closer
To zoom up/down
dv62_E.book 43 ページ 2008年11月3日 月曜日 午後8時18分

44
e02_dv62_7e.fm
[44/56]
Before Using the Handset
■While music data is played
Control key
*1 Keep key touched to perform Fast reverse/Fast forward.
*2 Keep key touched to adjust the volume continuously.
*3 Appears while viewing images/lyrics.
*4 Appears when multiple images/lyrics are saved.
Settings can be changed from the Submenu.
Touch operation
■Entering terminal security code
If the security code entry screen appears, enter the terminal security
code by touching the displayed numbers.
■Switching display method for message details
screen <Hori screen mode>
In the message details screen, touch [Hori screen mode] to display the
message details screen in the left side of the screen. Re-touch to
display in full-screen.
Selecting is not possible in the normal position. The setting is valid
only in the viewer position.
Use this function for unsure operations.
After the Support Book appears, check the
explanation and operation procedures of
each function. In addition, directly start
functions that were looked up in the
Support Book.
1In stand-by, press $/[Support Book].
2Select a menu or item/t.
:To start functions directly: Select the function to start/t/
[Yes].
A FOMA card is an IC card that records personal information,
such as phone numbers. A FOMA card can store phonebook
data and SMS. By switching FOMA cards, multiple FOMA
terminals can be used for different purposes as needed.
If a FOMA card is not inserted, transmission functions such as
voice/Videophone/PushTalk calls, i-mode, mail transmission and
packet transmission are not available on the FOMA terminal.
Before inserting or removing the FOMA card, turn off the power,
position the back facing upwards and remove the battery pack.
Close and hold the FOMA terminal firmly with your both hands.
dTo previous song/To return
to beginning of song*1 mTo view the list screen of
music data for playback
gTo pause/play nTo display the folder list
screen
cTo next*1
VTo turn up the volume*2 KTo save images/lyrics*3
WTo turn down the volume*2 .To view next images/
lyrics*3, 4
fTo stop
Quickly slide the finger up/down To adjust volume
Quickly slide the finger left/right To next/previous
Other operations
Support Book
Displaying Support Book
FOMA card
Using FOMA card
Inserting/Removing FOMA card
dv62_E.book 44 ページ 2008年11月3日 月曜日 午後8時18分
e02_dv62_7e.fm
[45/56]
45
Continued on next page
Before Using the Handset
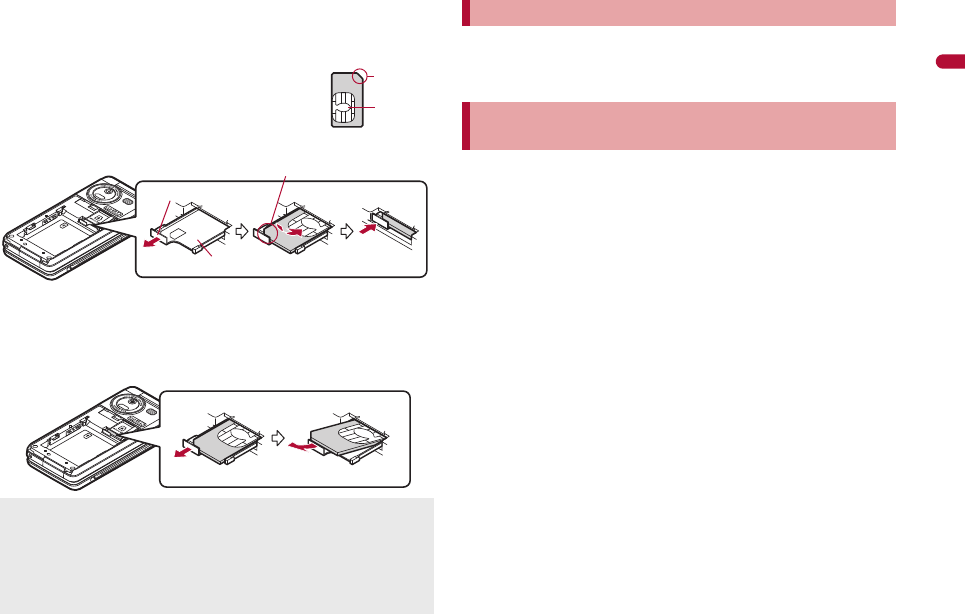
■Inserting FOMA card
1Hook a finger on the tab and pull the tray out (1).
:Pull out the tray straight until it stops.
2Hold the FOMA card with the IC
facing up and set on the tray (2).
3Push the tray all the way in (3).
■Removing FOMA card
1Hook a finger on the tab, pull the tray out (1) and
remove the FOMA card (2).
:Do not allow the FOMA card to fall when removing it.
The FOMA card has a “PIN1 code” and a “PIN2 code”.
Both are set to [0000] by default but can be changed to a four- to
eight-digit number by the user (nP. 125).
The FOMA terminal has built-in FOMA card security functions (FOMA
card restriction functions) as functions for protecting personal data and
files.
When data or files are retrieved using any of the following methods
or i-appli is running with the FOMA card inserted into the FOMA
terminal, FOMA card security functions are automatically set in the
retrieved data or files.
When a file such as an image, melody or PDF is downloaded
from a site or Internet web page
When a site or Internet web page is saved as a screen memo
When i-mode mail with a file attached is received
When i-appli is running
Data, files or software with FOMA card security functions run only
when in use with the FOMA card inserted at time of acquisition.
Display, play, attach to i-mode mail, run software, send data using Ir
communication function and iC communication function, and copy
to microSD Card can be executed. These operations cannot be
performed if a different FOMA card is inserted.
The following indicates the data for which FOMA card security is
set.
Melody
Image (including animation and Flash movie)
Screen memo Chaku-uta®/Chaku-uta full®
Chara-den File attached to Message R/F
i-motion ToruCa (details) image
PDF data Image inserted to Deco-mail or signature
Kisekae Tool Videophone picture memo
Inserting or removing the FOMA card forcibly may damage the
card or deform the tray. Use caution.
Refer to the FOMA card user’s guide for more information on the
FOMA card.
Do not misplace the FOMA card once it is taken out.
When the tray falls off, slide the tray in straight along the guide rail.
Notch
IC (gold)
2
Tray
3
Fit the notch of the FOMA card
to that of the tray.
1Tab
12
Security codes
FOMA card security functions
<FOMA card security functions>
dv62_E.book 45 ページ 2008年11月3日 月曜日 午後8時18分
46
e02_dv62_7e.fm
[46/56]
Before Using the Handset
Machi-chara i-appli (including i-appli stand-by)
Download dictionary
Download font
Contents transfer compatible data
Image in Message R/F
Music&Video Channel program
Deco-mail template with data which FOMA card security
functions are set
Decome-Anime Template
e-book/e-dictionary/e-comic saved in the [Comic] folder
File attached to i-mode mail other than the following
• ToruCa ・Phonebook ・Schedule
• Bookmark ・Documents
※“Chaku-uta” is a registered trademark of the Sony Music
Entertainment (Japan) Inc.
The following indicates the settings saved in the FOMA card.
Own number PIN setting
Select language SSL certificates
SMS center SMS expiry
SMS input character
The following explanation refers to the FOMA card inserted at time
of data/files retrieval as “one’s own FOMA card” and other FOMA
cards as “another’s FOMA card”.
When one’s own FOMA card is replaced with another’s FOMA
card, the data or files for which FOMA card security functions are
set cannot be set as stand-by displays or ring tones.
When a FOMA card is replaced with another’s FOMA card, FOMA
card security functions are activated and if data or file retrieved
from a site is set as the stand-by display or ring tone, the setting is
reset to the default. When one’s own FOMA card is re-inserted,
the setting returns.
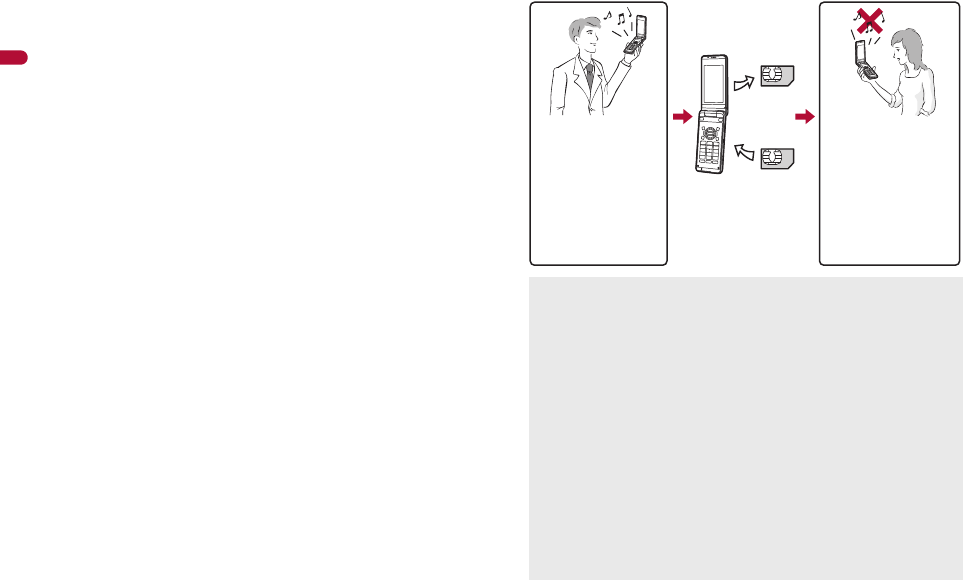
Example: When setting [Melody A], for which FOMA card
security functions are set, as a ring tone
When one’s own FOMA card is taken out or is replaced with
another’s FOMA card, ring tone returns to default setting. When
one’s own FOMA card is put back, the ring tone returns to [Melody
A].
FOMA card security functions cannot be set for data received
using Ir communication or data transmission functions, and still
pictures/movies, etc. shot with the FOMA terminal.
One’s own FOMA
card security
functions are set for
downloaded data,
files attached to
received mail and
i-
a
ppli that have been
run, allowing viewing
and playback of data.
When another’s
FOMA card is
inserted, data with
one’s own FOMA
card security
functions set cannot
be viewed or played
back.
One’s own
FOMA card
Another’s
FOMA card
Different FOMA card
inserted
dv62_E.book 46 ページ 2008年11月3日 月曜日 午後8時18分
e02_dv62_7e.fm
[47/56]
47
Continued on next page
Before Using the Handset
Note the following differences between “FOMA card (blue)” and
“FOMA card (green/white)” used on the FOMA terminal.
Use the battery pack SH20 exclusive to the FOMA terminal.
Turn off the power, close the FOMA terminal, and hold it in your
both hands before attaching or removing the battery pack.
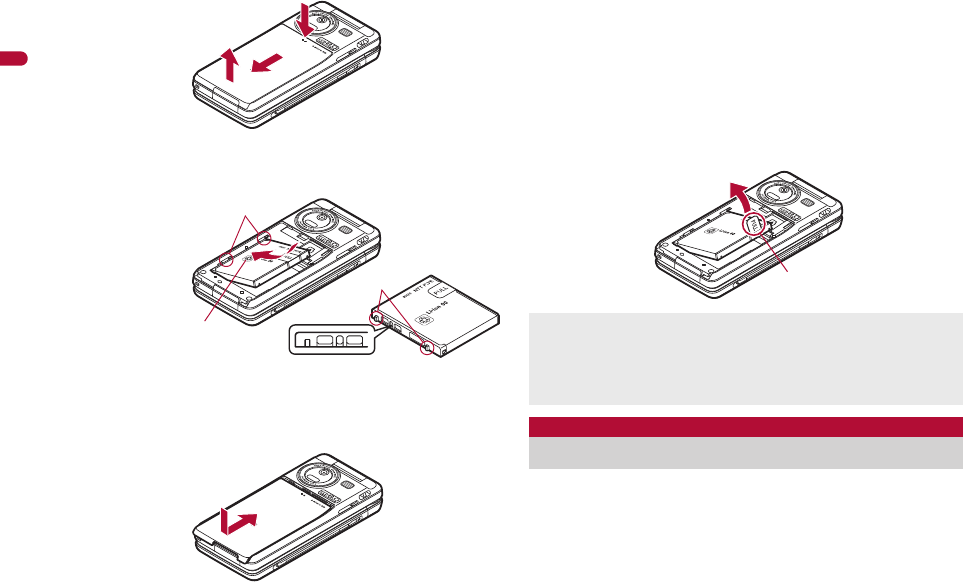
■Attaching battery pack
1Lightly push the back cover in the direction of the
arrow (1), slide approximately 3 mm (2) and
remove the back cover (3).
It is possible to move or delete data or files for which FOMA card
security functions are set even when another’s FOMA card is
inserted.
Running i-appli by selecting highlighted text in i-mode mail details
screen cannot be performed or retrieved when FOMA card
security functions are set.
If the FOMA card is replaced with another’s FOMA card after
i-appli stand-by is set, the set i-appli cannot be activated in
stand-by, and the image set in Stand-by display appears.
FOMA card type
Function FOMA card
(blue)
FOMA card
(green/white) Page
Number of phone number
digits available in the FOMA
card phonebook
Up to 20 digits Up to 26 digits P. 94
Client certificate operations
for FirstPass Not available Available P. 190
Use of WORLD WING Not available Available P. 438
Service Numbers Not available Available P. 429
About WORLD WING
WORLD WING is a DOCOMO’s FOMA international roaming
service that makes it possible to use the mobile phone number
registered in Japan to make and receive calls even overseas by the
FOMA card (green/white) and supported FOMA terminal.
If subscribed to the FOMA service after September 1, 2005,
subscription for “WORLD WING” is not required. However, if
subscription for “WORLD WING” is canceled at or after
subscription for the FOMA service, subscription for “WORLD
WING” is required again.
If subscribed to the FOMA service before August 31, 2005 but not
subscribed to “WORLD WING”, subscription for “WORLD WING”
is required.
Some payment plans are not available.
When the FOMA card (green/white) is lost or stolen overseas,
promptly contact DOCOMO and conduct a procedure for
canceling the use of service. Refer to General Inquiries on the
back of this manual for inquiries. Note that transmission/calling
charges after the FOMA card is lost or stolen are incurred to the
subscriber.
Attaching/Removing battery pack
dv62_E.book 47 ページ 2008年11月3日 月曜日 午後8時18分
48
e02_dv62_7e.fm
[48/56]
Before Using the Handset
2Attach the battery pack (4).
:The battery pack has tabs that make it easy to attach. Attach the
battery pack with a recycle mark side faced up.
3Attach the back cover (5).
:Attach the back cover as shown in the illustration and then push
the back cover and slide into place.
■Removing battery pack
1Follow step 1 of “Attaching battery pack” to
remove the back cover.
2Remove the battery pack.
:The battery pack has a “PULL” Tag that makes it easy to
remove. Hold the “PULL” Tag between the fingers and lift up it in
the direction of an arrow (45-degree from the FOMA terminal) to
remove the battery pack.
The battery pack is not fully charged at the time of purchase.
Be sure to charge the battery using the exclusive AC or DC
adapter (sold separately) before use.
1
32
Face the side with
a recycle mark up
4
Tabs
Battery pack
Battery pack connector terminal side
Tabs
5
Using unnecessary force when attaching or removing the battery
pack may damage the connector terminal for the battery pack
(charger terminal) on the FOMA terminal.
Firmly close the back cover. If not closed firmly, the back cover
may come off and the battery pack may fall out due to vibration.
Charging
“PULL” Tag
dv62_E.book 48 ページ 2008年11月3日 月曜日 午後8時18分
e02_dv62_7e.fm
[49/56]
49
Continued on next page
Before Using the Handset
■Cautions while charging
Do not charge for long periods of time with the power left on. If the
FOMA terminal is left on after charging is complete, the battery
pack charge decreases.
In such cases, the AC or DC adapter charges the battery again.
However, depending on when the FOMA terminal is disconnected
from the AC or DC adapter, the battery charge level may be low, the
battery alert tone may sound, or the battery may only be usable for
a short time.
When the battery is empty and terminal is recharging, charging LED
may not illuminate immediately.
If the battery empty alert is displayed, the alert tone sounds and the
power cannot be turned on, charge the battery for a while.
If the battery empty alert is displayed and charging begins within 60
seconds of the alert tone, the status returns to normal.
While charging, terminal may not turn on even when charging LED
is illuminated in red. Charge longer and try turning power on again.
Frequently recharging the battery when its power is still remaining
enough may shorten the life of the battery pack. It is recommended
to use the battery to a certain level before recharging.
The battery pack cannot be charged by itself.
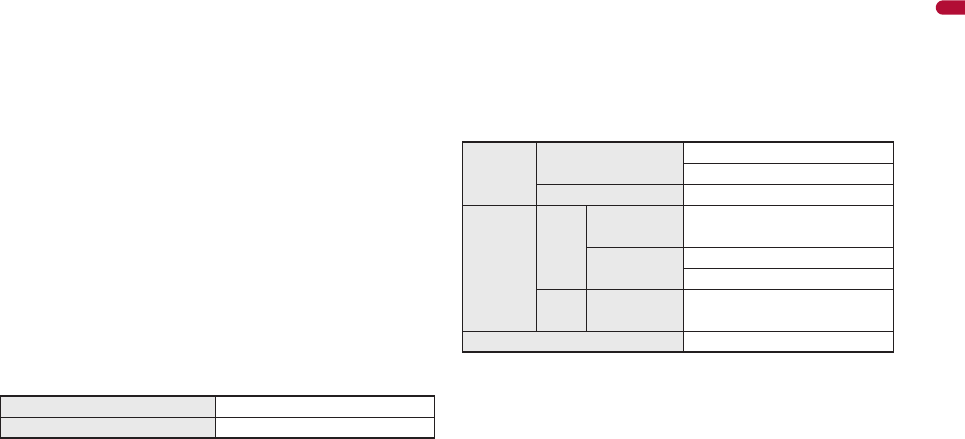
■Estimated charge times and LED display
The following figures are estimated times for charging an empty
battery pack with the FOMA terminal turned off.
Charging LED illuminates in red while charging, and it turns off
when charging is completed.
Check that the battery pack has been properly attached when
charging LED flashes red. The LED also flashes red when the
battery pack has reached the end of its service life.
The battery pack can also be charged with the FOMA terminal
turned on ({ on the display flashes during charging).
When charging is completed, charging LED turns off, and { on
the display changes to ".
When the battery becomes warm, charging may automatically stop
even if the battery has not been fully charged. Charging resumes
after the temperature lowers to an appropriate temperature. While
charging is stopped, charging LED turns off ({ on the display
flashes while stopped).
■Estimated times of use when fully charged
Continuous talk time is estimated as the usage time at normal transmission
signal strength, and continuous stand-by time is estimated as the usage
time while moving with the FOMA terminal folded at normal signal strength.
Using i-mode reduces talk (transmission)/stand-by time. When i-Channel is
subscribed, information is automatically received and updated, so talk
(transmission)/stand-by time will be reduced. In addition, when shooting or
editing an image, watching 1Seg, composing i-mode mail, activating the
downloaded i-
a
ppli or the i-
a
ppli stand-by, or using MUSIC Player, i-motion
player, Bluetooth function or data communication, the talk (transmission)/
stand-by time will be reduced even if calls or i-mode transmission are not
made. Some i-
a
ppli software may continue transmission even after
downloading. To avoid this, set not to connect in advance.
FOMA AC Adapter 01/02 Approx. $$ min
FOMA DC Adapter 01/02 Approx. $$ min
Continuous
talk time
FOMA/3G Voice call: Approx. $$ min
Videophone call: Approx. $$ min
GSM Voice call: Approx. $$ min
Continuous
stand-by
time
FOMA/
3G
3G/GSM
setting: 3G
When mobile: Approx. $$ hr
3G/GSM
setting: AUTO
When mobile: Approx. $$ hr
At rest: Approx. $$ hr
GSM 3G/GSM
setting: AUTO
At rest: Approx. $$ hr
1Seg watching time Approx. $$ min
dv62_E.book 49 ページ 2008年11月3日 月曜日 午後8時18分
50
e02_dv62_7e.fm
[50/56]
Before Using the Handset
The actual usage time is a combination of stand-by time and talk
time, and the longer the talk time, the shorter the stand-by time
becomes.
1Seg watching time is estimated as the watching time at normal
transmission signal strength with a flat-plug stereo earphone set
P01 (sold separately) used.
Talk (transmission)/stand-by time may be reduced by about half or
1Seg watching time may be shortened depending on battery pack
status, function used, temperature and other environmental
conditions, or signal strength (no signal or weak signal).
■Battery pack service life
Battery pack is a consumable product. Service time per charge is
gradually reduced every time the battery is charged.
When service time per charge is reduced to about half of the default
time, this means that the battery pack is approaching the end of its
service life. In such a case, it is recommended to replace the battery
pack as soon as possible. Depending on usage, the battery pack
may swell as it approaches the end of its service life but this will not
cause problems.
If i-appli, Videophone, or 1Seg is used while charging for a long
time, the service life of the battery pack may become shorter than
estimated.
To protect the environment, return used batteries to
NTT DOCOMO, any DOCOMO retailer, or a recycling
agency.
■About charging batteries
Refer to user’s guide of FOMA AC Adapter 01/02 (sold separately),
FOMA AC Adapter 01 for Global use (sold separately), or FOMA
DC Adapter 01/02 (sold separately).
FOMA AC Adapter 01 covers only 100V AC. FOMA AC Adapter 02/
FOMA AC Adapter 01 for Global use covers from 100 to 240V AC.
The shape of the plug for the AC adapter is for 100V AC (for
domestic use). To use the AC adapter of 100 to 240V AC overseas,
a conversion plug adapter that is compatible with the voltage of
your country of stay is required. Do not use a transformer for use
overseas to charge the battery.
[Read “FOMA AC adapter 01/02 (sold separately) and
FOMA DC adapter 01/02 (sold separately) user’s guide”
carefully.]
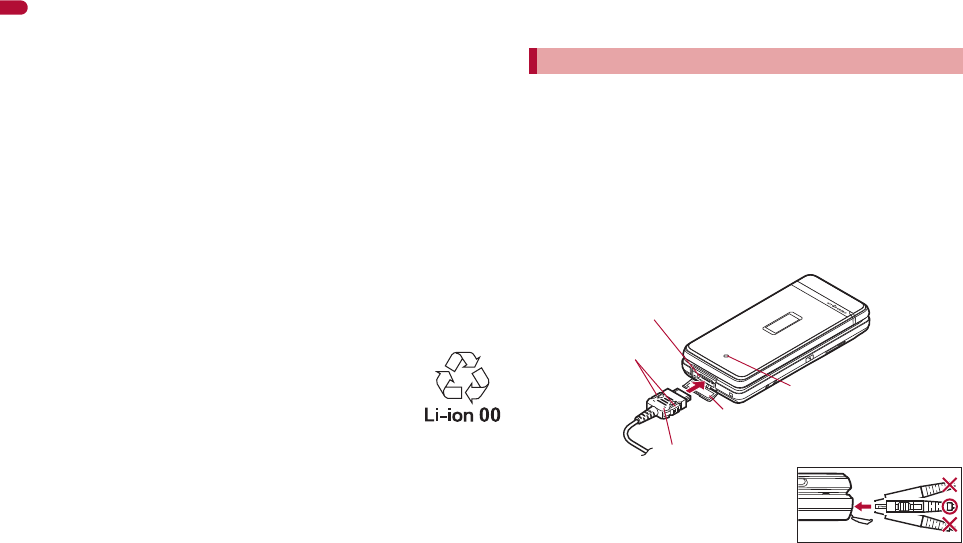
Battery pack can be charged even with the FOMA terminal opened
or in the viewer position.
1Open the external connector terminal cover (1)
and insert the AC or DC adapter connector
horizontally into the external connector terminal
(2).
:Check the direction (See diagram)
of the connector, keep it parallel
with the FOMA terminal and firmly
push all the way in until it clicks.
Charging by using AC adapter/DC adapter
Connector (Face the side with the arrows up)
Release buttons
External connector terminal cover
Charging LED
External
connector terminal
2
1
dv62_E.book 50 ページ 2008年11月3日 月曜日 午後8時18分
e02_dv62_7e.fm
[51/56]
51
Continued on next page
Before Using the Handset
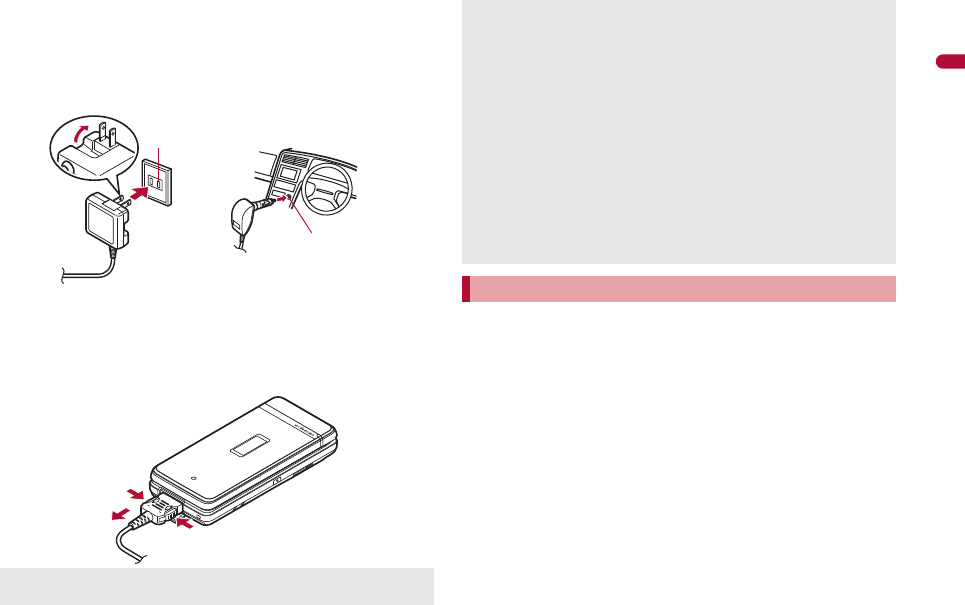
2When inserting the AC adapter power plug into an
outlet or inserting the DC adapter power plug into
a car cigarette lighter socket, Charge start sound is
heard, charging LED illuminates, and charging
starts.
3When Charge end sound is heard and charging
LED turns off, charging is complete.
:When removing the connector, always hold the release buttons
on both sides (1) and unplug it by pulling out horizontally (2).
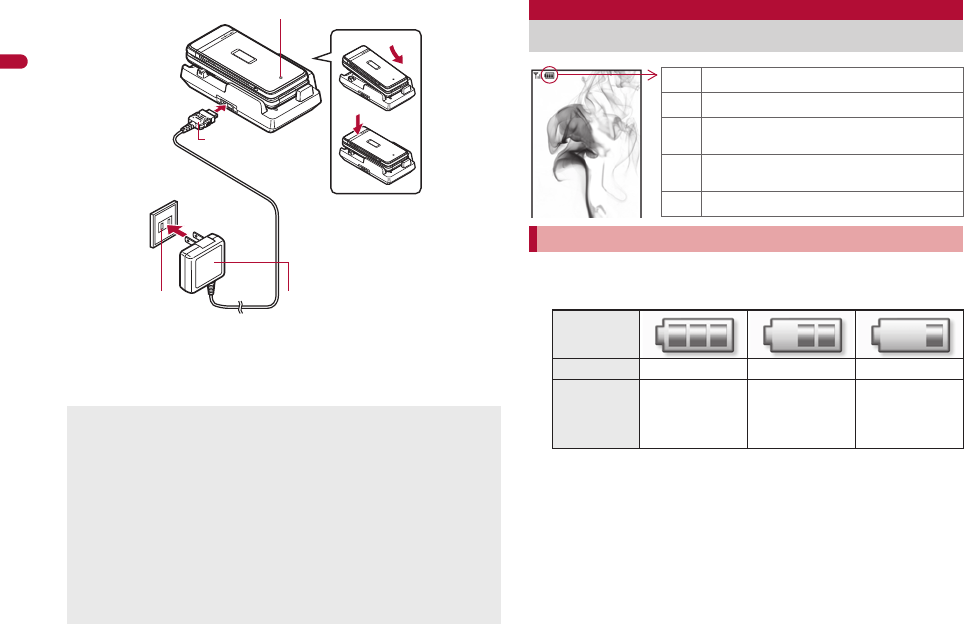
[Read “Desktop holder SH22 (sold separately) user’s
guide” carefully.]
Battery pack can be charged with the FOMA terminal opened or in
the viewer position.
1Face the side with the arrows of the AC adapter
connector up and insert it into the connector
terminal of the desktop holder (1).
:Keeping the connector parallel with the desktop holder, firmly
push it all the way in until it clicks.
2
Insert the AC adapter power plug into an outlet (
2
).
3When placing the FOMA terminal in the desktop
holder, Charge start sound is heard, Charging LED
illuminates, and charging starts.
:Place the FOMA terminal as the figure shows (3), and push it
in the direction of the arrow (4) until it clicks.
Do not forcibly insert or remove. May cause damage to the
external connector terminal and the connector.
100V AC
outlet
For AC adapter For DC adapter
Cigarette
lighter socket
1
2
1
Pull the adapter out of the outlet or cigarette lighter socket if it will
not be used for a long time.
Do not forcefully pull the external connector terminal cover. May
damage the cover.
Do not place objects near the FOMA terminal when charging. May
damage the FOMA terminal. In addition, a display may be
damaged when charged in the viewer position.
When using a DC adapter
The DC adapter should only be used in negative grounded
vehicles (12 and 24V DC).
Do not use with the car engine shut off. May drain the car battery.
The DC adapter fuse (2A) is a consumable. For replacement,
purchase a new fuse at a local automobile supply shop.
Refer to the FOMA DC Adapter 01/02 user’s guide for details.
Charging by using desktop holder
dv62_E.book 51 ページ 2008年11月3日 月曜日 午後8時18分
52
e02_dv62_7e.fm
[52/56]
Before Using the Handset
4When Charge end sound is heard and charging
LED turns off, charging is complete.
:Hold the desktop holder and lift the FOMA terminal out.
1In the Custom menu, select [Settings]/[General
settings]/[Check status]/[Battery level].
:Wait approximately 2 seconds and the display disappears.
:The battery level sound is heard at the volume set in Key/Touch
sound (nP. 104).
Pull the AC adapter out of the outlet when left unused for a long
period of time.
When Charge start sound is not heard or when charging LED does
not illuminate, check that the FOMA terminal is placed securely in
the desktop holder (except when terminal is turned off, Manner
mode is set or Charge start sound is Silent).
When placing the FOMA terminal in the desktop holder, be careful
that the strap is not caught in between the handset and the
desktop holder.
When the FOMA terminal placed in the desktop holder is set to the
viewer position, operate while holding it so as not to come off from
the desktop holder.
Connector
(Face the side with
the arrows up)
FOMA AC
Adapter 01/02
100V AC
outlet
3
4
Charging LED
1
2
Battery level
Checking battery level
Checking battery level with sound and display
Graphic
Sound Three beeps Two beeps One beep
Status
Battery is
sufficiently full.
Battery is
running low.
Battery is
almost empty.
Charge the
battery.
"Battery level is still sufficient.
#Battery level is low.
$Battery is almost empty. Charge the
battery.
%Battery is empty (Power will turn off
soon).
{Battery pack is being charged.
dv62_E.book 52 ページ 2008年11月3日 月曜日 午後8時18分
53
e02_dv62_7e.fm
[53/56]
Before Using the Handset
[Battery empty. Unsaved data will be lost. Ending
current operation] appears if battery starts to run out
(Press t to clear the message). After a while, an
alert tone sounds. The warning screen stating that the
battery runs out appears, handset operations are disabled and power
turns off after approximately 60 seconds.
During a voice/Videophone call, the alert tone sounds and [Battery
empty. Unsaved data will be lost. Ending current operation]
appears. The call is disconnected after approximately 20 seconds.
At the same time, the screen above appears and after
approximately 60 seconds, the power turns off.
Alert tone does not sound when Manner mode or Public mode
(Drive mode) is set (Alert tone sounds during a call).
1Press H (for 2+ seconds).
:It may take some time for the wakeup screen to appear.
:The wakeup screen appears followed by the initial settings
screen. Proceed to Initial setting (nP. 54).
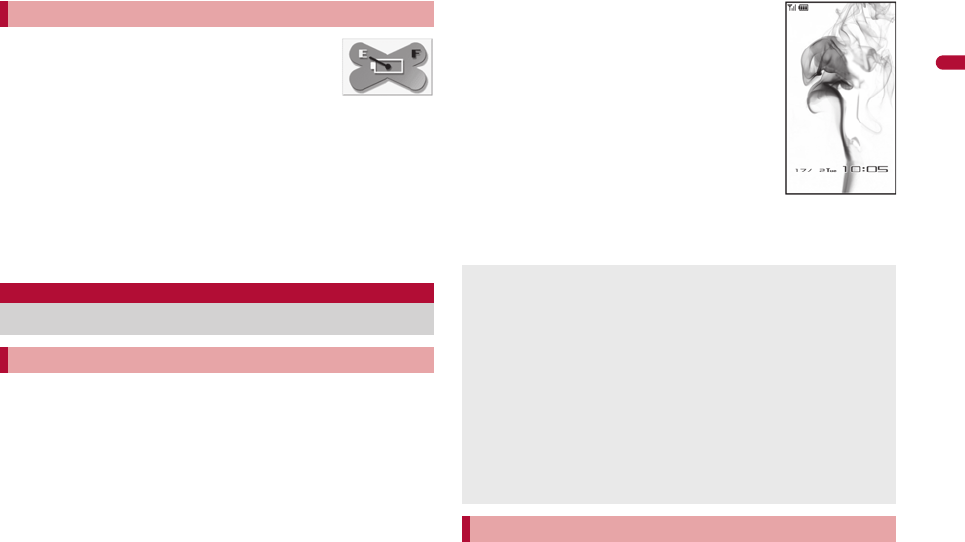
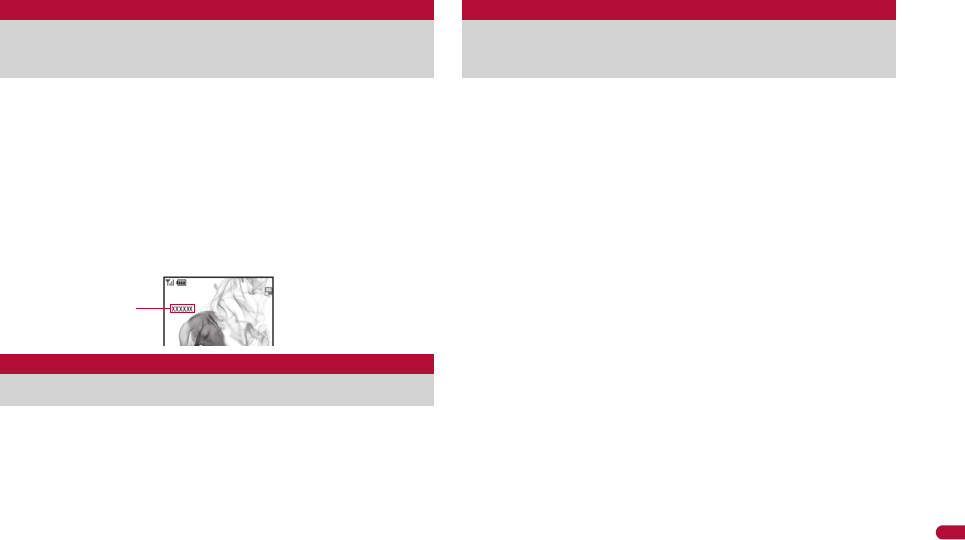
:If initial settings have been completed, the
screen shown on the right appears when
power is turned on. This screen is called the
“stand-by display”.
Welcome mail
:“Welcome$デコメアニメ%&”
(Welcome$Decome-Anime%&) and “緊
急速報「エリアメール」のご案内”
(Information of Early Warning “Area Mail”)
are saved by default.
:To check a welcome mail: In stand-by,
press t/select the stock icon C (mail
message)/t.
• For details on the following operations nP. 154
1Press H (for 2+ seconds).
:It may take some time for the power to be turned off (The end
screen appears on the display until the power is turned off).
If battery runs out
Power ON/OFF
Turning power ON/OFF
Turning power ON
If initial settings are not yet completed, the setting screen appears
every time the power is turned on.
If the FOMA card is not inserted, [Insert UIM] and a FOMA card
error appear (nP. 31).
When [Enter PIN1 code] appears, enter the PIN1 code (
n
P. 125).
When a FOMA card is replaced with a new card, the terminal
security code (four to eight digits) must be entered after turning on
the terminal. If a correct terminal security code is entered,
stand-by display appears. When a wrong terminal security code is
entered five times, the power is turned off. However, turning on the
power again is possible.
When A appears, the handset is outside the service area or in a
place with no signal. Move to a place where the icon disappears.
Turning power OFF
Stand-by display
dv62_E.book 53 ページ 2008年11月3日 月曜日 午後8時18分
54
e02_dv62_7e.fm
[54/56]
Before Using the Handset
1In the Custom menu, select [設定]/[一般設定]/
[Bilingual]/[English].
:To switch the display language from English to Japanese: In the
Custom menu, select [Settings]/[General settings]/[Select
language]/[日本語].
The initial settings screen appears automatically when the
power is turned on for the first time. Each setting item can
also be set from Menu (When the initial settings are
complete, the stand-by display appears).
When items that have not been set remain, the setting screen
appears every time the power is turned on.
1Set the date and time (nP. 54).
2Register a terminal security code (nP. 123).
3Set the Key/Touch sound (nP. 104).
4Set GPS Location provision ON/OFF (nP. 318).
5Set the font size (nP. 119).
:When the initial settings are complete, the software update
function confirmation screen appears. Read the description and
select [Agree] (When the initial settings are made from the
menu or the software update is set to other than [auto-update],
the confirmation screen does not appear).
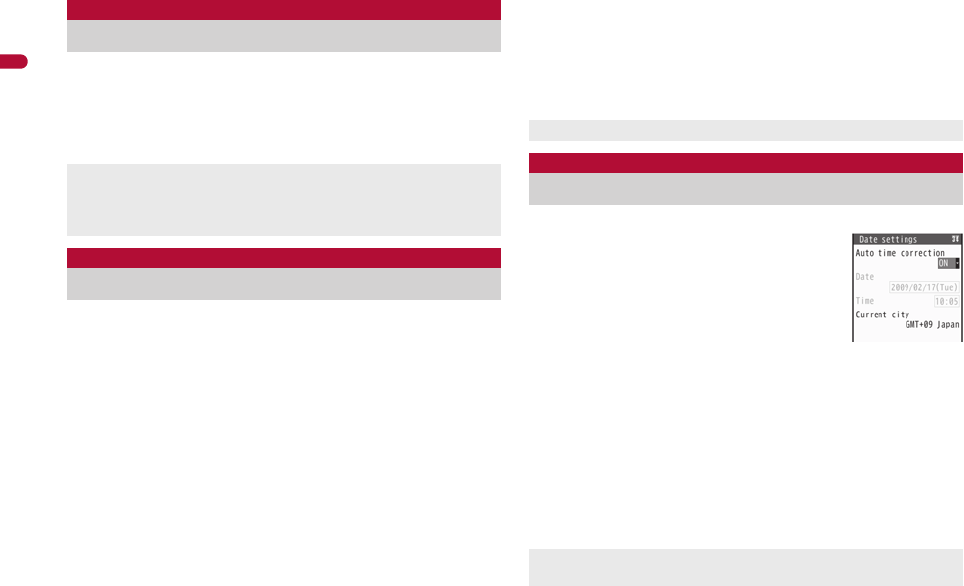
Set the date and time on the FOMA terminal.
1In the Custom menu, select
[Settings]/[General settings]/
[Date settings].
2Select the [Auto time correction] field/t/select
the setting.
;Select [ON]/i.
;Select [OFF]/select the [Date] field/t/enter the date/
t/select the [Time] field/t/enter the time (24-hour
format)/t/i.
• When entering month, day and time, add 0 before numbers
one through nine (example: 01, 02, 03, etc.).
• Set the date and time from 00:00 January 1, 2001 to 23:59
December 31, 2050.
Select language
Changing screen display to English
If a FOMA card is inserted, settings are saved to the FOMA card
as well. When the setting of the FOMA terminal handset and the
setting of the inserted FOMA card are different, the setting in the
FOMA card is prioritized.
Initial setting
Making initial setting
Date and time settings Change terminal security code
Key/Touch sound Location request menu
Font size settings
Press H to cancel the initial settings.
Date settings
Setting date and time
When Limit settings is set to [Enable], the terminal security code
must be entered in the Date settings.
dv62_E.book 54 ページ 2008年11月3日 月曜日 午後8時18分

55
e02_dv62_7e.fm
[55/56]
Before Using the Handset
■Changing time zone manually <City>
1In the Date settings screen, select the [Auto time
correction] field/t/[OFF]/C.
2Select a time zone/t.
3Select a city/t/i.
Display your number (caller ID) on the other party’s phone
(display) when making a voice/Videophone/PushTalk call.
Handset number (caller ID) is important personal information. Be
very careful about your caller ID setting.
The Notify caller ID function is available only on compatible phone
devices.
The date and time that are set are saved even if the battery pack is
removed, but if the battery pack remains removed for
approximately 30 seconds or more, the settings are reset. Also, if
the battery remains empty, the settings may be reset. When this
happens, set again after charging the battery.
If the date and time are not set correctly, the following functions
cannot be used properly.
Redial, Received calls Auto power ON/OFF
Alarm Schedule
SSL (authentication) i-appli Auto start
Starting i-appliDX Reception, Recording
Machi-chara Software update
Pattern definitions update
Record message (voice), Record message (Videophone calls)
Camera image titles/shooting date
Playback of i-motion or music data with expiration date/period
for replay.
View of e-books/e-dictionaries/e-comics with expiration date/
period for browse.
When Auto time correction is set to [ON]
When the power is turned on, the FOMA terminal adjusts the time
by connecting to the network’s time information.
If the FOMA terminal does not adjust the time even when the
power is turned on, turn off the power and restart.
Time may not be adjusted depending on the signal status.
Time may be off by a few seconds.
When time difference is adjusted overseas, the local time and date
and ! appear in Redial, Received calls, Received/Sent messages
history (SMS only), and Received/Sent messages list. The
received/sent messages are not displayed in order of the
displayed time and date but the mail reception/send.
! does not appear in the Unsent messages for mail messages. If
the date order display is set for the Unsent messages, unsent
messages are displayed in the order of the displayed time and
date.
Time correction may not be performed depending on the overseas
network.
During overseas use, Japan time and local time (or time set in
City) appear in the dual display except for the following cases.
When Auto time correction is set to [ON] and time correction
information is not being received from an overseas network
When Auto time correction is set to [OFF] and City is set to the
city in the same time zone as Japan
Notify caller ID
Notifying the other party of your
phone number
dv62_E.book 55 ページ 2008年11月3日 月曜日 午後8時18分

56
e02_dv62_7e.fm
[56/56]
Before Using the Handset
1In the Custom menu, select [Settings]/[NW
Services]/[Notify caller ID].
2Select [Activate/Deactivate].
:To check the setting: Select [Check setting].
3Select the setting.
:To notify caller ID: Select [Yes].
:To not notify caller ID: Select [No].
When checking your own phone number during a call nP. 59
1In the Custom menu, press 0.
:Alternatively, select [Phone]/[Owner Information].
:To switch between Number A and Number B (when 2in1 [Dual
mode] is used): Press i.
Setting Notify caller ID/No caller ID in advance
Notify caller ID setting cannot be set from outside the service area.
Own number
Checking your own phone number
When changing the Number B of 2in1, use any of the following
methods to obtain the correct Number B.
Set 2in1 function OFF and then perform 2in1 setting again to
set 2in1 function ON
Check the 2in1 subscription
When a FOMA card exchange (2in1 subscriber b 2in1
nonsubscriber) is performed, set 2in1 function OFF.
When a FOMA card exchange (2in1 subscriber b 2in1
subscriber) is performed, check the 2in1 subscription.
For details on Owner information nP. 395
dv62_E.book 56 ページ 2008年11月3日 月曜日 午後8時18分
438
e20_dv62_7e.fm
[438/446]
Overseas Use
~~~~~ ~~~~~ ~~~~~ ~~~
International roaming (WORLD WING) is a service that
enables you, using overseas telecommunications carrier’s
networks, to make calls and use i-mode.
Use this FOMA terminal for voice/Videophone calls, i-mode
and SMS with the phone number and mail address used in
Japan. Network services such as Voice Mail and Call
Forwarding Services can also be used.
This service is available in the 3G network and GSM/GPRS network
service areas. Refer to the DOCOMO “International Services
website” for details on the area.
By default, the FOMA terminal is set to automatically switch
networks (nP. 444).
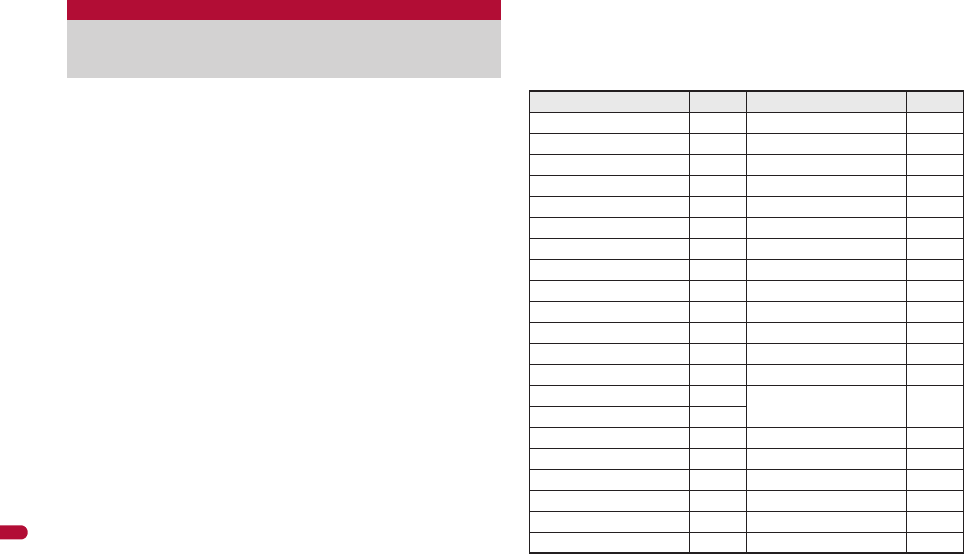
Country codes of major countries
The following shows “Country code” used when making international
calls (nP. 65) or setting International dial assist (nP. 66).
For other country codes and details, refer to the DOCOMO
“International Services website”.
Outline of international roaming
(WORLD WING)
Country/Region Code Country/Region Code
Australia 61 Maldives 960
Austria 43 Netherlands 31
Belgium 32 New Caledonia 687
Brazil 55 New Zealand 64
Canada 1 Norway 47
China 86 Peru 51
Czech 420 Philippines 63
Egypt 20 Russia 7
Fiji 679 Singapore 65
Finland 358 South Korea 82
France 33 Spain 34
Germany 49 Sweden 46
Greece 30 Switzerland 41
Hong Kong 852 Tahiti
(French Polynesia)
689
Hungary 36
India 91 Taiwan 886
Indonesia 62 Thailand 66
Italy 39 Turkey 90
Japan 81 U.K. 44
Macau 853 U.S.A. 1
Malaysia 60 Vietnam 84
dv62_E.book 438 ページ 2008年11月3日 月曜日 午後8時18分
e20_dv62_7e.fm
[439/446]
439
Continued on next page
Overseas Use
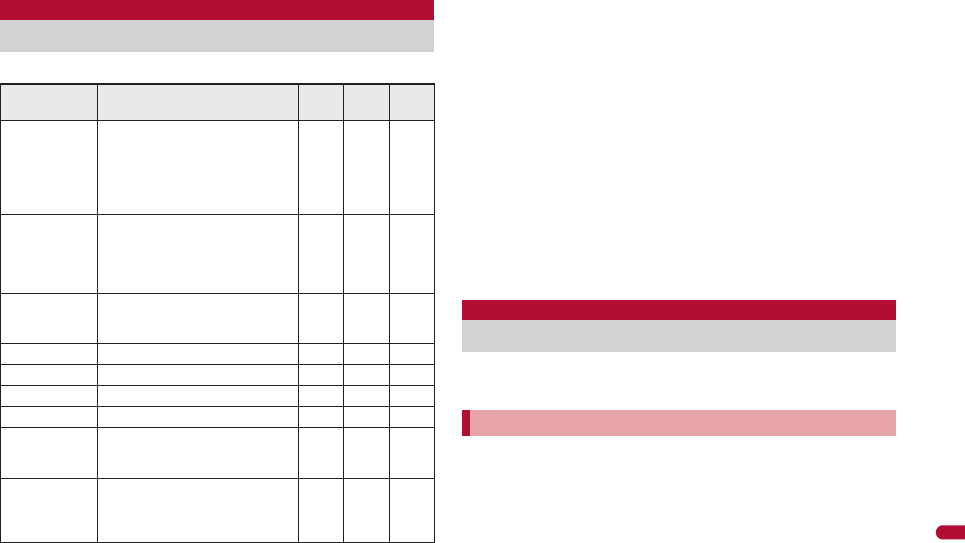
The available communication services overseas are as follows.
Some communication services are not available depending on the
network/carrier. Refer to the DOCOMO “International Services
website” for details.
Packet transmission charges are separately incurred for the transmission
included in monthly usage fees of i-Channel (
n
P. 194) overseas.
If Widget appli attempts transmission when the i-Widget screen
appears, packet transmission charges are incurred for each
transmission overseas.
Unable to use 64K data communication by connecting a PC, etc.
overseas.
日英版しゃべって翻訳 for SH (J-E Speech Translation for SH) is
available overseas (nP. 280).
GPS function is not available overseas. An error screen appears
and packet transmission charges are incurred when the site of GPS
Service settings is accessed overseas.
Overseas packet transmission charges differ from those in Japan.
When the 2in1 is used, calling from Number B is not available overseas.
When Multi Number is used, calling from Additional Number is not
available overseas.
The following items must be checked before departure, at
your country of stay, and after homecoming.
Prepare below in Japan before using the FOMA terminal overseas.
■About contract
If subscribed to the FOMA service after September 1, 2005, a
subscription for “WORLD WING” is not required. However, if a
subscription for “WORLD WING” is canceled at or after a subscription for
the FOMA service, a subscription for “WORLD WING” is required again.
If subscribed to the FOMA service before August 31, 2005 but not
subscribed to “WORLD WING”, a subscription for “WORLD WING”
is required. Some payment plans are not available.
Available services overseas
Communication
service
Explanation 3G GSM
GPRS
Voice call Make or receive calls in your
country of stay or make
international calls to Japan or
to other countries with the
same phone number as used
in Japan while abroad.
AAA
Videophone Make international Videophone
calls to users of the specified
3G telecommunications
carriers overseas and FOMA
users in Japan.
ABB
i-mode mail Send or receive i-mode mail
overseas with the same
address as used in Japan. ABA
i-mode Use i-mode overseas. ABA
i-Channel Use i-Channel overseas. ABA
i-concier Use i-concier overseas. ABA
i-Widget Use i-Widget overseas. ABA
SMS Send or receive SMS overseas
with the same phone number
as used in Japan. AAA
Data
communication
(packet
transmission)
Use packet transmission
overseas. ABA
Before use overseas
Preparation before departure
dv62_E.book 439 ページ 2008年11月3日 月曜日 午後8時18分

440
e20_dv62_7e.fm
[440/446]
Overseas Use
~~~~~ ~~~~~ ~~~~~ ~~~
Insert the WORLD WING compatible FOMA card (other than blue)
to the FOMA terminal (nP. 44).
■About charging batteries
Precautions for handling the AC adapter nP. 16
Methods for charging the AC adapter nP. 48
■About browsing i-mode sites
To browse i-mode site overseas, the settings for overseas use must
be made from iMenu in advance.
i-mode site: Select [iMenu]/[English]/[Options]/[International
Settings]/[i-mode services Settings].
Refer to “Mobile Phone User’s Guide [International Services]” and
“Mobile Phone User’s Guide [i-mode] FOMA version” for details.
■About setting network service
If subscribed to network services, Voice Mail Service, Call Forwarding
Service or other services can be used overseas.
Some network services may not be set or checked depending on
overseas telecommunications carrier. In addition, some network
services are available only in Japan. Refer to “Mobile Phone User’s
Guide [International Services]” and “Mobile Phone User’s Guide
[Network Services]” before departure.
To use network services overseas, set Remote Control (nP. 430,
P. 446) to “Activate”.
■About inquiries overseas
For lost, stolen, and cost settlement, or malfunction of the FOMA
terminal overseas, refer to “Loss or theft of FOMA terminal or payment
of cumulative cost overseas” or “Failures encountered overseas” on
the back of this manual. Note that any call or transmission charges
incurred after the FOMA terminal is lost or stolen are charged to the
subscriber.
Add the “International call access code (Table 1)” or “International
prefix number for the universal number (Table 2)” that is assigned to
your country of stay, to the head of your phone number for inquiries.
For the latest information of the international call access code and
the international prefix number for the universal number, refer to the
DOCOMO “International Services website”.
International call access codes of major countries
(Table 1)
The following shows the International call access codes of major countries.
Communication charges to Japan will apply.
Country/Region Code Country/Region Code
Australia 0011 Monaco 00
Belgium 00 Netherlands 00
Brazil 0021/
0014
New Zealand 00
Norway 00
Canada 011 Philippines 00
China 00 Poland 00
Czech 00 Portugal 00
Denmark 00 Russia 810
Finland 00 Singapore 001
France 00 South Korea 001
Germany 00 Spain 00
Greece 00 Sweden 00
Hong Kong 001 Switzerland 00
Hungary 00 Taiwan 002
India 00 Thailand 001
Indonesia 001 Turkey 00
Ireland 00 U.A.E. 00
Italy 00 U.K. 00
Luxemburg 00 U.S.A. 011
Macau 00 Vietnam 00
Malaysia 00
dv62_E.book 440 ページ 2008年11月3日 月曜日 午後8時18分
441
e20_dv62_7e.fm
[441/446]
Overseas Use
International prefix number for the universal number
(Table 2)
The following shows the International prefix number for the universal
number of each country.
Communication charges or other charges to your country of stay
will apply.
Communication charges to your country of stay will apply when
calling from the mobile phone.
Some codes may not be used.
Note that the universal number may not be used for calls from a
mobile phone, payphone or hotel.
The universal number can be used only for countries listed above.
Calling from a hotel may cost you extra call charges requested by
the hotel (You are responsible for the call charges). Confirm with
the hotel before making calls.
The service is available in the 3G network and GSM/GPRS network
service areas.
The FOMA terminal is set to automatically search for the network
when the power is turned on, and to be connected to the available
telecommunications carrier in your country of stay.
If the connected telecommunications carrier is changed when Auto
time correction (nP. 54) is set to [ON], a screen notifying that time
difference is adjusted may appear.
When Operator name display (nP. 445) is set to [Display on], the
telecommunications carrier connected appears in stand-by.
When Clock display (nP. 109) is set to [ON(Large)], the local time
and Japan time appear (excluding regions keeping the same
standard time as Japan time). The local time appears on the sub
display.
Talk time or stand-by time may be reduced to half the normal time
depending on the network condition of your country of stay.
By default, the FOMA terminal is set to automatically search for the
network and to be connected to the FOMA network when the power is
turned on after homecoming.
Reset the Network search mode to the FOMA network (DOCOMO).
If the Network search mode is set to [Manual], switch to the FOMA
network (DOCOMO) manually or change to [Auto].
Set the 3G/GSM setting to [AUTO] or [3G].
Country/Region Code Country/Region Code
Argentina 00 Luxemburg 00
Australia 0011 Malaysia 00
Austria 00 Netherlands 00
Belgium 00 New Zealand 00
Brazil 0021 Norway 00
Bulgaria 00 Peru 00
Canada 011 Philippines 00
China 00 Portugal 00
Columbia 009 Singapore 001
Denmark 00 South Africa 09
Finland 990 South Korea 001
France 00 Spain 00
Germany 00 Sweden 00
Hong Kong 001 Switzerland 00
Hungary 00 Taiwan 00
Ireland 00 Thailand 001
Israel 014 U.K. 00
Italy 00 U.S.A. 011
Using at your country of stay
Setting after homecoming
dv62_E.book 441 ページ 2008年11月3日 月曜日 午後8時18分

442
e20_dv62_7e.fm
[442/446]
Overseas Use
~~~~~ ~~~~~ ~~~~~ ~~~
Make a call from overseas using the international roaming
service.
Make a call from your country of stay to Japan or other countries.
1In stand-by, enter [+] (press 0 for 1+ seconds),
country code, area code (city code) and other
party’s phone number.
:When the area code (city code) begins with 0, omit the 0 when
dialing (However, include 0 when making a call to landline
phones in some countries or regions such as Italy).
2Press s (Phone)/i (V.phone).
■Making an international call outside your country
of stay using Country code conversion
Set Country code conversion (nP. 66) to [ON] and set the country
code frequently called to easily make an international call.
0 at the beginning of a phone number is automatically converted to
the country code set in Country code conversion.
Example: Make a call from phonebook
1In stand-by, press a/select the other party.
2Press s (Phone)/i (V.phone).
3Select [Call].
:To dial a phone number as stored in the phonebook: Select
[Original number].
■Making a call to the phone in country saved in Set
country code
Save a country code using Set country code (nP. 67) to select a
country code before making an international call.
The following operation is available overseas only.
1In stand-by, enter a phone number/C/[Add
prefix setting]/[International Call].
2Select the country code/t.
3Press s (Phone)/i (V.phone).
Make a domestic call at your country of stay in the same way as you
do in Japan.
1In stand-by, enter a phone number.
2Press s (Phone)/i (V.phone).
:Always dial the area code (city code), even when the number is
in the same area.
:When making a domestic call at your country of stay using the
phonebook, select [Original number] in step 3 of “Making an
international call outside your country of stay using Country
code conversion” on P. 442.
Making a call at your country of stay
Making a call outside your country of stay
(including Japan)
Making a call in your country of stay
Refer to the DOCOMO “International Services website” for details
on available countries, country codes and telecommunications
carriers.
Even when Notify caller ID of the network service (nP. 55) is set
to “Send ID”, [Unavailable] or [User unset] appears depending on
the telecommunications carrier, and the caller ID may not be
displayed correctly.
dv62_E.book 442 ページ 2008年11月3日 月曜日 午後8時18分

443
e20_dv62_7e.fm
[443/446]
Overseas Use
When making a call to a “WORLD WING” subscriber overseas, make
an international call to Japan regardless of your country of stay.
1In stand-by, enter [+] (press 0 for 1+ seconds),
country code 81 (Japan), the other party’s mobile
phone number excluding 0.
2Press s (Phone)/i (V.phone).
Receive a call overseas in the same way as you do in Japan.
1Press s to receive an incoming call.
:Speak to the caller.
■Having calls made to your FOMA terminal from
Japan
To receive an international call from Japan, have your phone number
dialed just as a domestic call in Japan.
090 (or 080)-XXXX-XXXX
Calling from Received calls may not be available since the phone
number may not be displayed correctly.
■Having calls made to your FOMA terminal from
countries other than Japan
Have the international call access code and 81 (Japan) added to the
beginning of your phone number, and 0 excluded as an international
call to Japan regardless of your country of stay.
International call access code of the country of the caller-81-90
(or 80)-XXXX-XXXX
Set the communication system supporting your area and
telecommunications carrier.
1In the Custom menu, select [Settings]/[Phone
settings]/[Other settings]/[International
Roam.]/[3G/GSM setting].
2Select the communication method/t.
Making a call to a WORLD WING subscriber
overseas
Receiving a call overseas
Even when a caller tried to notify of caller ID, it might not be
notified depending on the used telecommunications carrier.
When a call is received during international roaming, the call is
forwarded from Japan. Call charges to Japan are incurred by the
caller and receiving charges by the receiver.
Having calls to your FOMA terminal
3G/GSM setting
Setting network communication
system
dv62_E.book 443 ページ 2008年11月3日 月曜日 午後8時18分

444
e20_dv62_7e.fm
[444/446]
Overseas Use
~~~~~ ~~~~~ ~~~~~ ~~~
Set to manually select a telecommunications carrier.
Re-search a network to set another telecommunications carrier.
Check that the Network search mode is set to [Auto] when A
appears even after homecoming.
1In the Custom menu, select [Settings]/[Phone
settings]/[Other settings]/[International
Roam.]/[Network search mode].
2Select the setting.
;Select [Auto]/[Yes].
• When [Auto] is set: Select [Auto].
;Select [Manual]/select a telecommunications carrier/t.
• The telecommunications carrier is changed.
;Select [Network re-search].
• The host network is changed automatically if the Network
search mode is set to [Auto]. If set to [Manual], select a
telecommunications carrier and press t.
Check the status whether making a call, data transmission or packet
transmission is available.
1In the Custom menu, select [Settings]/[Phone
settings]/[Other settings]/[In-area status]/
[Agree].
Specify the priority order of telecommunications carriers
connected to when the Network search mode is set to [Auto].
Save up to 20.
1In the Custom menu, select [Settings]/[Phone
settings]/[Other settings]/[International
Roam.]/[Network search mode]/[PLMN setting].
:To check the saved telecommunications carrier’s detailed
information: Select the telecommunications carrier/t.
2Select the number of the priority order/C.
3Select the saving method.
;Select [PLMN manual select]/enter a country code
(MCC)/t/enter a network code (MNC)/t/select a
communication method/t.
;Select [UPLMN by list]/select a telecommunications
carrier/t/select a communication method/t.
• To search a telecommunications carrier from country name:
Select [UPLMN by list]/C/select a country name/t/
select a telecommunications carrier/t/select a
communication method/t.
;Select [Set VPLMN to PLMN].
• Save the telecommunications carrier currently connected to.
;Select [Change priority]/select a destination/t.
;Select [Delete]/[Delete one].
;Select [Delete]/[Delete all]/enter the terminal security
code/t.
4Select [Yes].
Network search mode
Setting a search method of
telecommunications carrier
Checking communication services available
<In-area status>
PLMN setting
Setting a telecommunications
carrier to preferentially connect to
dv62_E.book 444 ページ 2008年11月3日 月曜日 午後8時18分
445
e20_dv62_7e.fm
[445/446]
Overseas Use
Set whether to display a telecommunications carrier name
currently connected to in stand-by during international
roaming.
1In the Custom menu, select [Settings]/[Phone
settings]/[Other settings]/[International
Roam.]/[Operator name disp].
2Select the setting/t/[Yes].
■When displaying a telecommunications carrier
When a call is received during international roaming, the
caller hears the guidance stating that international roaming
is activated.
Make this setting while still in Japan.
1In the Custom menu, select [Settings]/[Other NW
Services]/[Roaming guidance].
2Select an item/t.
3Select [Yes].
Set the FOMA terminal to reject calls during roaming. Select
whether to bar all incoming calls or only the Videophone and
64K data communication calls.
Depending on the overseas telecommunications carrier, the setting
cannot be made.
Unable to use 64K data communication overseas.
1In the Custom menu, select [Settings]/[Phone
settings]/[Other settings]/[International
Roam.]/[Call barring].
2Select an item.
;Select [Activate]/[Yes]/select the barring method/t/
enter the network security code/t.
;Select [Deactivate]/[Yes]/enter the network security
code/t.
;Select [Check setting].
Operator name disp
Displaying a telecommunications
carrier during roaming
Roaming guidance
Activating roaming guidance
Telecommunications
carrier name
Call barring
Setting incoming call to reject
during roaming
dv62_E.book 445 ページ 2008年11月3日 月曜日 午後8時18分