Silex Technology SX10WAG SX-10WAG User Manual
Silex Technology, Inc. SX-10WAG
UserManual.wiki
>
Silex Technology
>
SX10WAG User Manual
>
Manual 8
Contents
1.
Manual
2.
Manual 1
3.
Manual 2
4.
Manual 3
5.
Manual 4
6.
Manual 5
7.
Manual 6
8.
Manual 7
9.
Manual 8
10.
Manual 9
11.
Manual 10
Manual 8
Navigation menu
Upload a User Manual
Namespaces
Wiki Guide
HTML
PDF
Info
Views
User Manual
Discussion / Help
Navigation
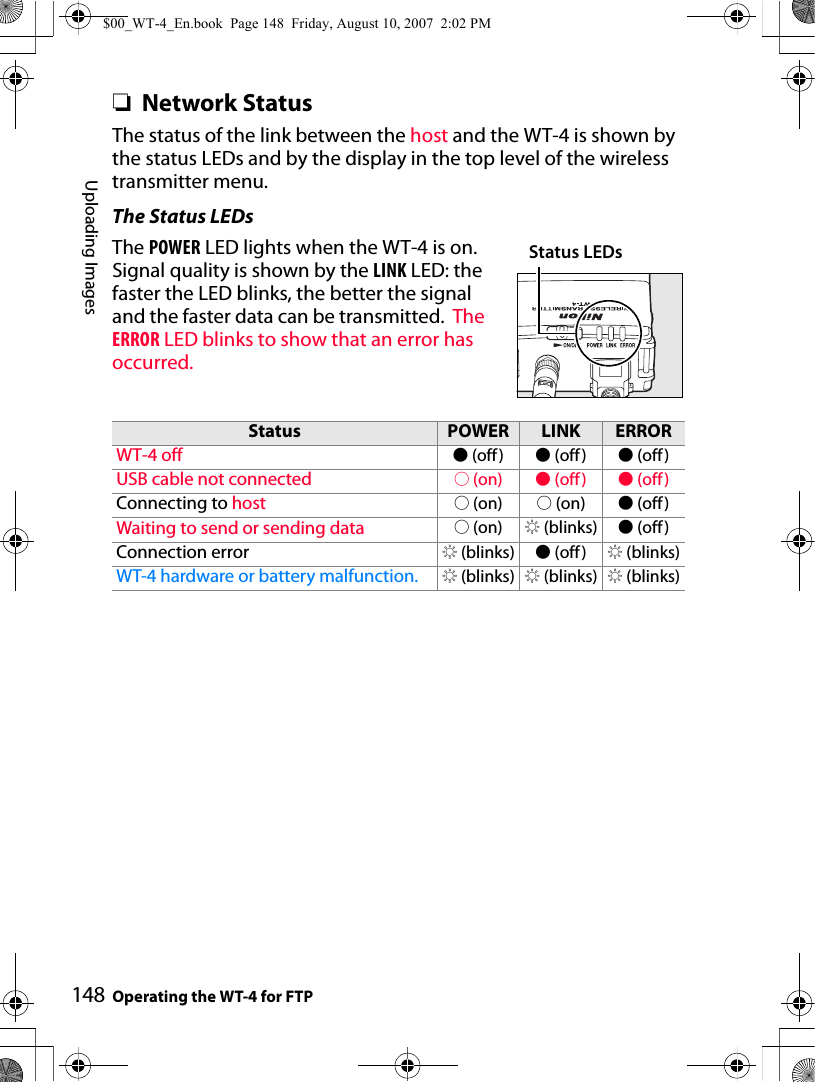
![Connecting to the FTP ServerOperating the WT-4 for FTP140Connecting to the FTP ServerBefore connecting the WT-4, select [MTP/PTP] for the [USB] option in the camera setup menu (pg.7) and confirm that the computer intended for network connection is started and the user is logged in.1Turn the camera off and insert the memory card containing the pictures to be sent.•If there are multiple card slots, insert the card into any slot.To access the network via Ethernet, connect the Ethernet cable (pg.2). Note that wireless transfer is disabled while an Ethernet cable is connected. Disconnect the Ethernet cable before accessing a wireless network. Turn the WT-4 off before connecting or disconnecting the Ethernet cable.2Open the WT-4 USB connector cover and connect the USB cable from the WT-4 to the camera USB connector.3Turn the camera on.DUMMYFrontUMMY$00_WT-4_En.book Page 140 Friday, August 10, 2007 2:02 PM](https://usermanual.wiki/Silex-Technology/SX10WAG.Manual-8/User-Guide-853228-Page-1.png)
![Connecting to the FTP ServerOperating the WT-4 for FTP 1414Select [Transfer mode] for the [Wireless transmitter] > [Mode] option in the camera setup menu (pg.152).5A list of available connection profiles will be displayed. Highlight the desired profile and press J.AViewing Profile InformationPress the camera L (?) button to view information on the selected profile.AEditing ftp Server ProfilesTo edit the ftp server profile, press the camera N button after turning on the WT-4. See the Menu Guide for more information (pg.153).6Select [Wireless transmitter] > [Transfer settings] and adjust settings as described on pages pp.169–170.7Turn on the WT-4. Power switch$00_WT-4_En.book Page 141 Friday, August 10, 2007 2:02 PM](https://usermanual.wiki/Silex-Technology/SX10WAG.Manual-8/User-Guide-853228-Page-2.png)
![Connecting to the FTP ServerOperating the WT-4 for FTP1428Confirm that the selected profile is displayed in green in the top level of the wireless transmitter menu. For information on what to do if an error is displayed, see “Troubleshooting” (pg.178).AUsing the Windows Vista Ad-hoc ConnectionTo use the Windows Vista ad-hoc connection, turn on the WT-4 and conduct the following steps on your computer.1Click the [Start] and select [Connect To].$00_WT-4_En.book Page 142 Friday, August 10, 2007 2:02 PM](https://usermanual.wiki/Silex-Technology/SX10WAG.Manual-8/User-Guide-853228-Page-3.png)
![Connecting to the FTP ServerOperating the WT-4 for FTP 1432Select a preset network name and click [Connet].3Enter the network security key and click [Connect].$00_WT-4_En.book Page 143 Friday, August 10, 2007 2:02 PM](https://usermanual.wiki/Silex-Technology/SX10WAG.Manual-8/User-Guide-853228-Page-4.png)
![Connecting to the FTP ServerOperating the WT-4 for FTP1444Click [Close].$00_WT-4_En.book Page 144 Friday, August 10, 2007 2:02 PM](https://usermanual.wiki/Silex-Technology/SX10WAG.Manual-8/User-Guide-853228-Page-5.png)
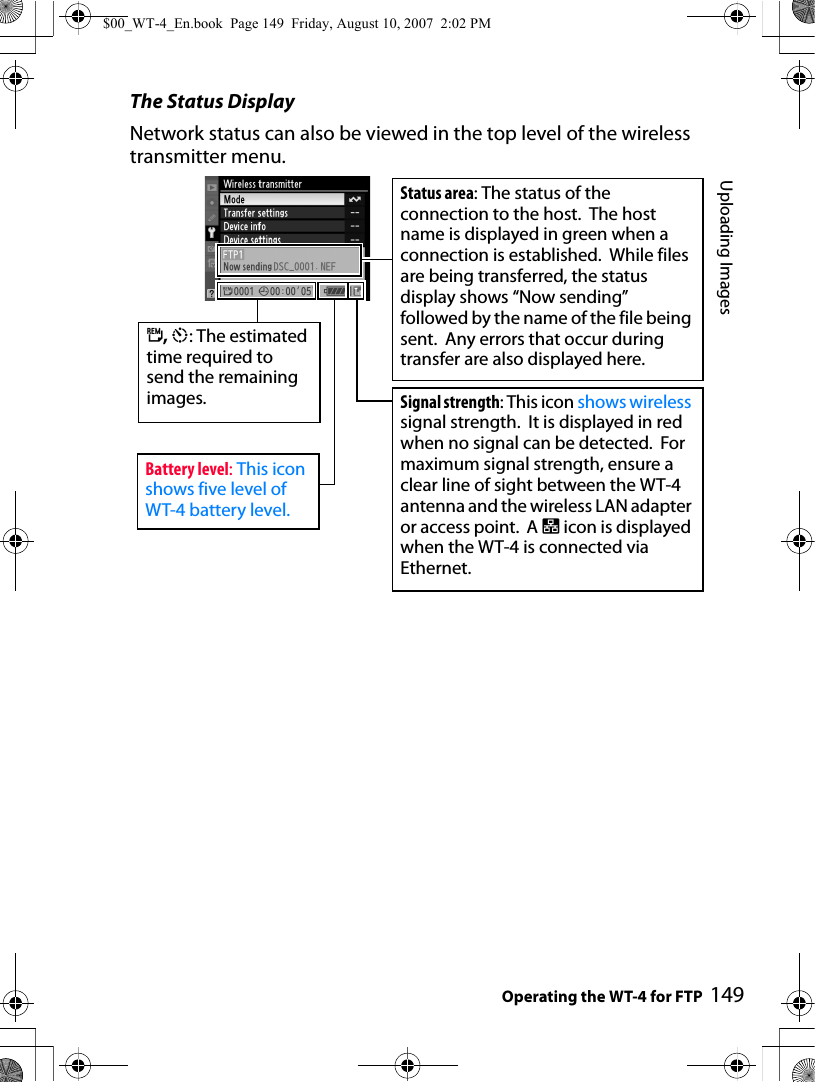
![Uploading ImagesOperating the WT-4 for FTP 145Uploading Images1Press the K button to view pictures on the memory card. Display the first picture to be sent in single-image playback or highlight it in the thumbnail list.2While pressing the N button, press the center of the multi selector (D3) or the J button (D300). The image will be marked with a white “send” icon and transmission will begin immediately. During upload, images are marked with a green “sending” icon. Repeat this process to send additional images (pictures will be sent in the order selected).Images that have been successfully uploaded are marked with a blue “sent” icon. Images can be resent by pressing the center of the multi selector while pressing the N button (D3) or the J button (D300) to change the blue “sent” icon to a white “send” icon.ARestrictions to the D300 Retouch MenuThe Nikon D300 transfers selected images when the J button is pressed during image playback (when the WT-4 is not connected, only transfer settings are configured). For this reason, retouch menus such as [Side-by-side comparison] operated by pressing the J button during image playback cannot be used. To use [Side-by-side comparison], configure [Mode] in [Wireless transmitter] to a setting other than [Transfer mode].$00_WT-4_En.book Page 145 Friday, August 10, 2007 2:02 PM](https://usermanual.wiki/Silex-Technology/SX10WAG.Manual-8/User-Guide-853228-Page-6.png)
![Uploading ImagesOperating the WT-4 for FTP1463Turn off the WT-4 power.When the POWER LED (pg.3) changes from green to yellow and then goes out, detach the USB cable.•To change the destination folder, use the Setup Utility (pg.50, 126).❏Interrupting TransmissionTo cancel transmission of images marked with a white “send” icon or green “sending” icon, select the images during playback and press the center of the multi selector while pressing the N button (D3) or the J button (D300). The icon will be removed. Any of the following actions will also interrupt transmission:•Turning the camera or WT-4 off•Selecting [Yes] for [Wireless transmitter] > [Transfer settings] > [Deselect all]DDuring UploadDo not remove the memory card or disconnect the Ethernet cable during upload.DFile Names•To prevent files from being overwritten during transfer, select [On] for the [File No. Sequence] option in the camera Custom Settings menu before shooting.•If the same FTP server is set as the transfer destination for multiple cameras, we recommend that separate storage folders be set for each camera. AVoice MemosVoice memos can not be uploaded separately, but will be included when associated pictures are transmitted. Voice recordings can not be selected for upload.$00_WT-4_En.book Page 146 Friday, August 10, 2007 2:02 PM](https://usermanual.wiki/Silex-Technology/SX10WAG.Manual-8/User-Guide-853228-Page-7.png)
![Uploading ImagesOperating the WT-4 for FTP 147❏Transfer StatusDuring playback, the status of images selected for uploaded is shown as follows:a: “Send”Images that have been selected for upload are marked with a white a icon.b: “Sending”A green b icon is displayed during upload.c: “Sent”Images that have been uploaded successfully are marked with a blue c icon.ALoss of SignalTransmission may be interrupted if the signal is lost (pg.148). Transmission can be resumed by turning the WT-4 off and then on again.ATurning the Camera Off“Send” marking will be saved if the camera or WT-4 is turned off while transmission is in progress. Transmission of images marked with a “send” icon will resume when the camera or WT-4 is turned on.ARemoving the “Send,” “Sending,” and “Sent” Icons“Send,” “sending,” and “sent” icons can be removed from all images by selecting [Yes] for [Wireless transmitter] > [Transfer settings] > [Deselect all?] (pg.170).$00_WT-4_En.book Page 147 Friday, August 10, 2007 2:02 PM](https://usermanual.wiki/Silex-Technology/SX10WAG.Manual-8/User-Guide-853228-Page-8.png)
![Menu Guide 151Menu GuideThis section describes the settings available for the [Wireless transmitter] option in the camera setup menu when the WT-4 is connected.Menu item Pg.Mode pg.152Choose Profile pg.152FTP Registration (for Connection to ftp Servers Only) pg.153Editing ftp Profiles pg.153Transfer settings (Transfer Mode Only) pg.169Auto Send pg.169Delete After Send? pg.169Send File As pg.170Send Folder pg.170Deselect All? pg.170Print (Print Mode Only) pg.171Device Info pg.172Battery Info pg.172Restrictions to Print Mode pg.171Firmware Version pg.172Device Settings pg.173Auto Power Off pg.173Format Transmitter’s Memory pg.173$00_WT-4_En.book Page 151 Friday, August 10, 2007 2:02 PM](https://usermanual.wiki/Silex-Technology/SX10WAG.Manual-8/User-Guide-853228-Page-12.png)