Sony Group DCRTRV50 Sony Handycam DCR-TRV50 User Manual DCR TRV40 50
Sony Corporation Sony Handycam DCR-TRV50 DCR TRV40 50
UserManual.wiki
>
Sony Group
>
DCRTRV50 User Manual
>
manual3
Contents
1.
manual1
2.
manual2
3.
manual3
4.
manual4
5.
manual5
6.
Network manual
7.
network manual
8.
manual insert
manual3
Navigation menu
Upload a User Manual
Namespaces
Wiki Guide
HTML
PDF
Info
Views
User Manual
Discussion / Help
Navigation
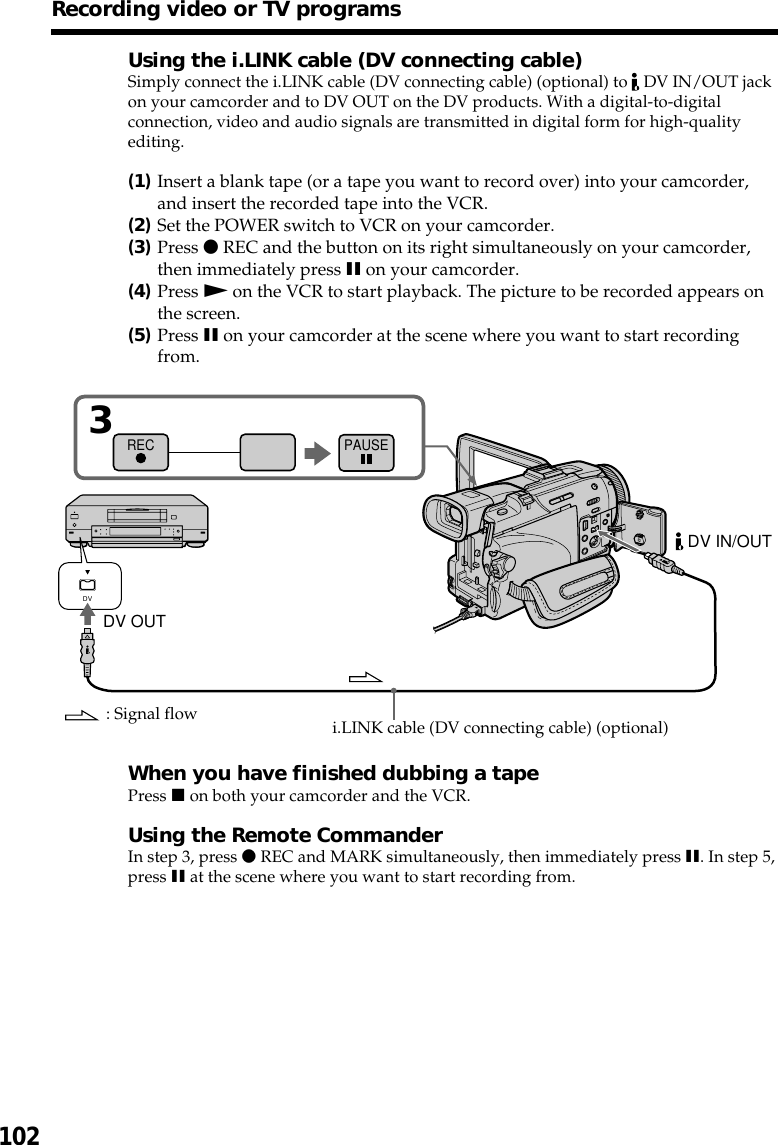
![104Inserting a scene from a VCR– Insert EditingYou can insert a new scene from a VCR onto your originally recorded tape byspecifying the insert start and end points. Use the Remote Commander for thisoperation. Connections are the same as on page 100 or 102.Insert a cassette containing the desired scene to insert into the VCR.[A]: A tape that contains the scene to be superimposed[B]: A tape before editing[C]: A tape after editing(1)Set the POWER switch to VCR on your camcorder.(2)On the connected VCR, locate just before the insert start point [a], then pressX to set the VCR to the playback pause.(3)On your camcorder, locate the insert end point [c]. Then press X to set yourcamcorder to the playback pause.(4)Press ZERO SET MEMORY on the Remote Commander. The ZERO SETMEMORY indicator flashes and the end point of the insert is stored inmemory. The tape counter shows “0:00:00.”(5)On your camcorder, locate the insert start point [b] by pressing m, then pressz REC and the button on its right simultaneously.(6)First press X on the VCR, and after a few seconds press X on your camcorderto start inserting the new scene.Inserting automatically stops near the zero point on the tape counter. Yourcamcorder automatically returns to the recording pause.[a][b][c][A][B][C]](https://usermanual.wiki/Sony-Group/DCRTRV50.manual3/User-Guide-230851-Page-4.png)
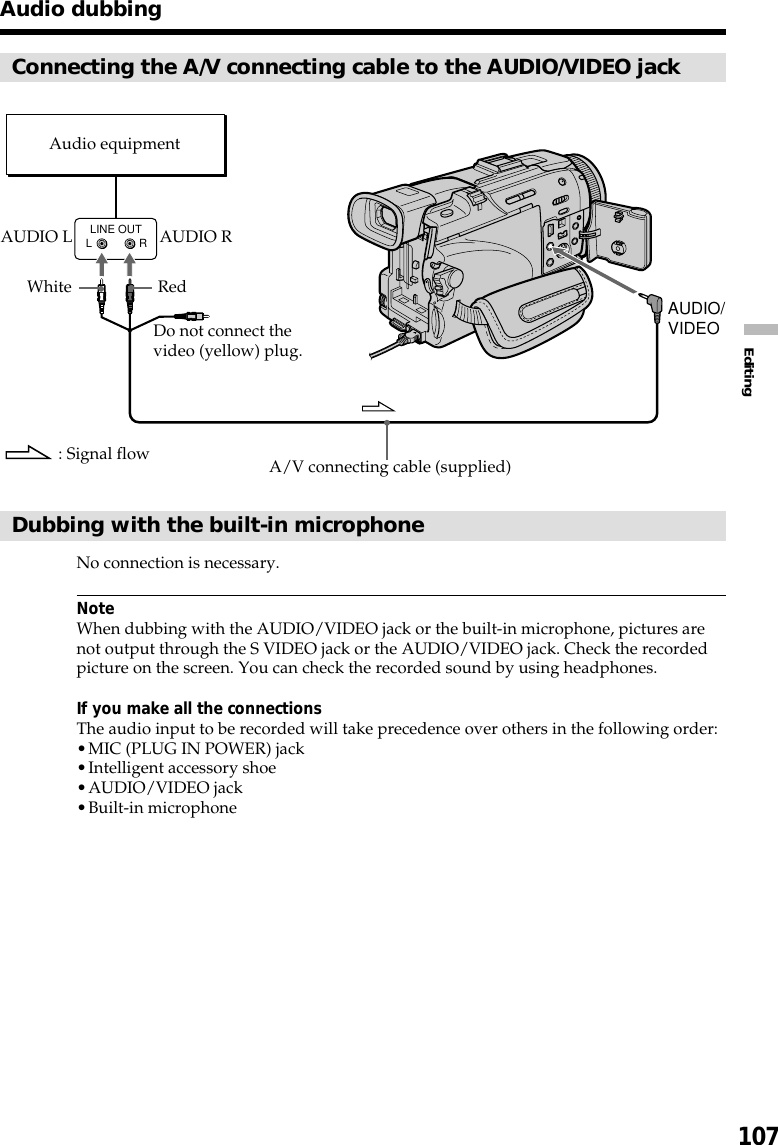
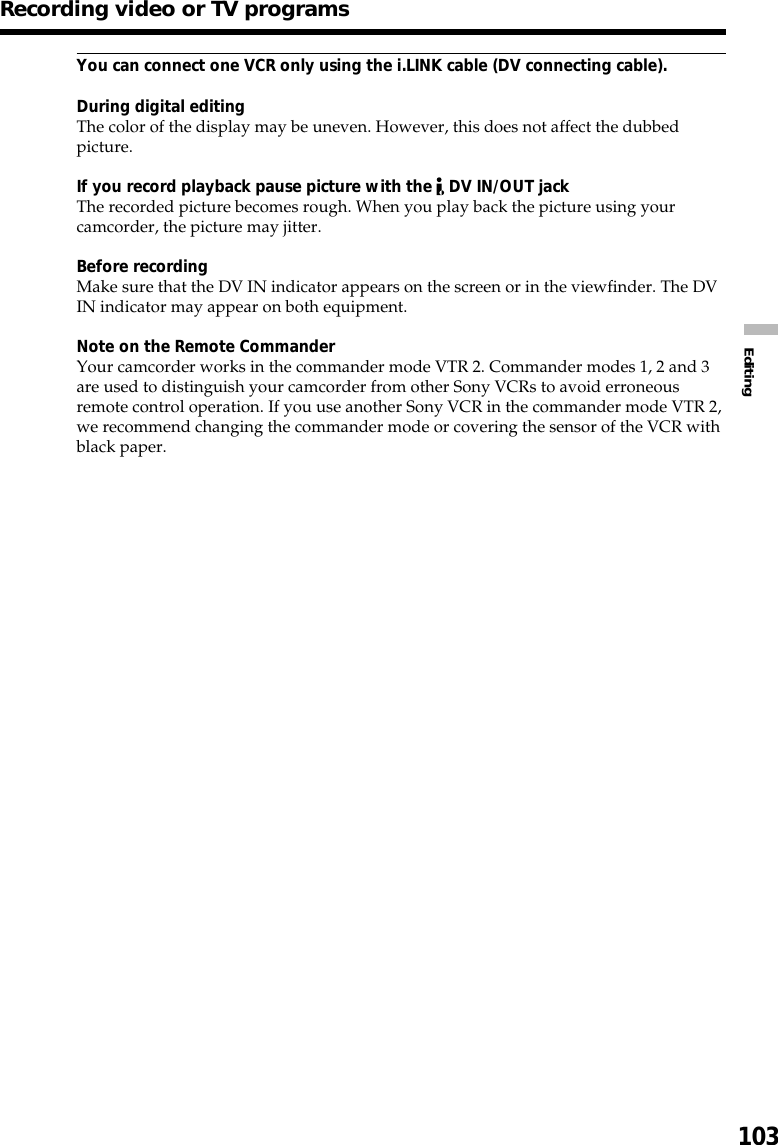
![109EditingAudio dubbingMonitoring the new recorded sound(1)Play back the tape on which you added audio.(2)Turn the SEL/PUSH EXEC dial to select AUDIO MIX in in the menusettings, then press the dial.(3)Turn the SEL/PUSH EXEC dial to adjust the balance between the originalsound (ST1) and the new sound (ST2), then press the dial.Five minutes after you disconnect the power supply or remove the batterypack, the AUDIO MIX setting returns to original sound (ST1) only. The defaultsetting is original sound only.Notes•New audio cannot be recorded on a tape already recorded in the 16-bit mode (32 kHz,44.1 kHz or 48 kHz).•New audio cannot be recorded on a tape already recorded in the LP mode.•You cannot add audio with the DV IN/OUT jack.•You cannot add audio on the blank portion of the tape.If an i.LINK cable (DV connecting cable) (optional) is connected to your camcorderYou cannot add audio to a recorded tape.We recommend that you add audio on a tape recorded with your camcorderIf you add audio on a tape recorded with another camcorder (including otherDCR-TRV40/TRV50), the sound quality may become worse.If you set the write-protect tab of the cassette to lockYou cannot record on a tape. Slide the write-protect tab to release the write protection.ST1 ST2VCR SET HiFi SOUND AUDIO MIX A/VcDV OUT RETURN[MENU] : END](https://usermanual.wiki/Sony-Group/DCRTRV50.manual3/User-Guide-230851-Page-9.png)
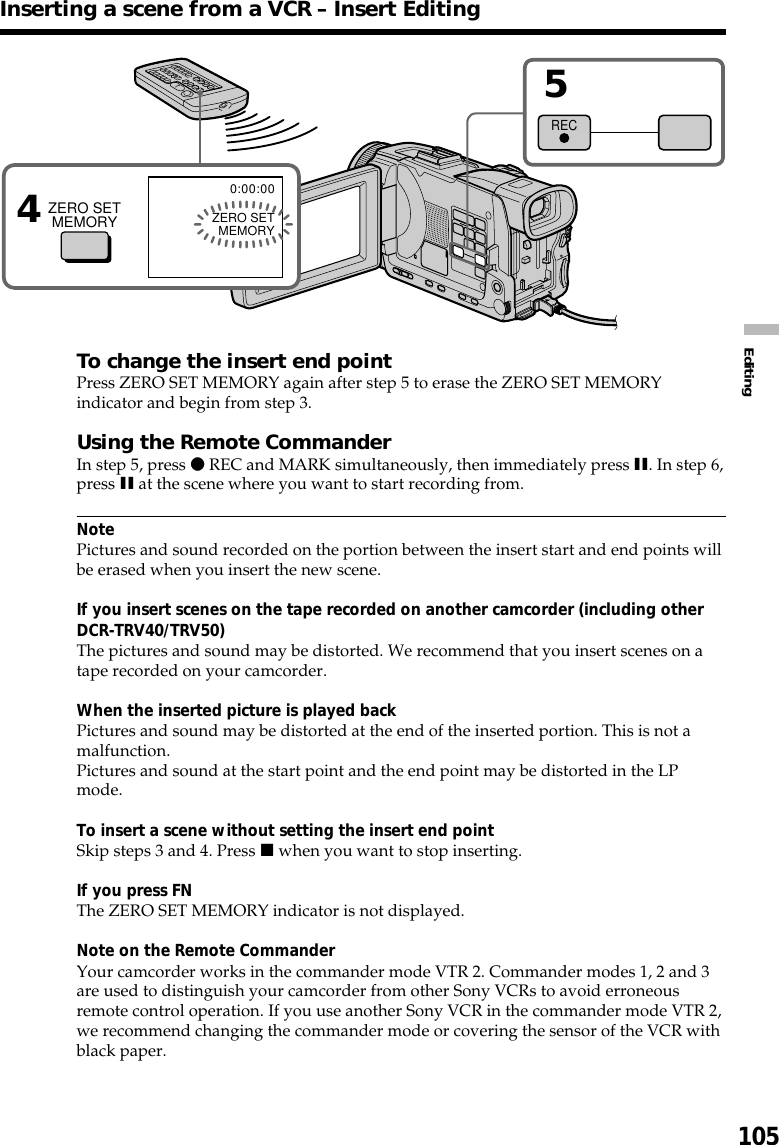
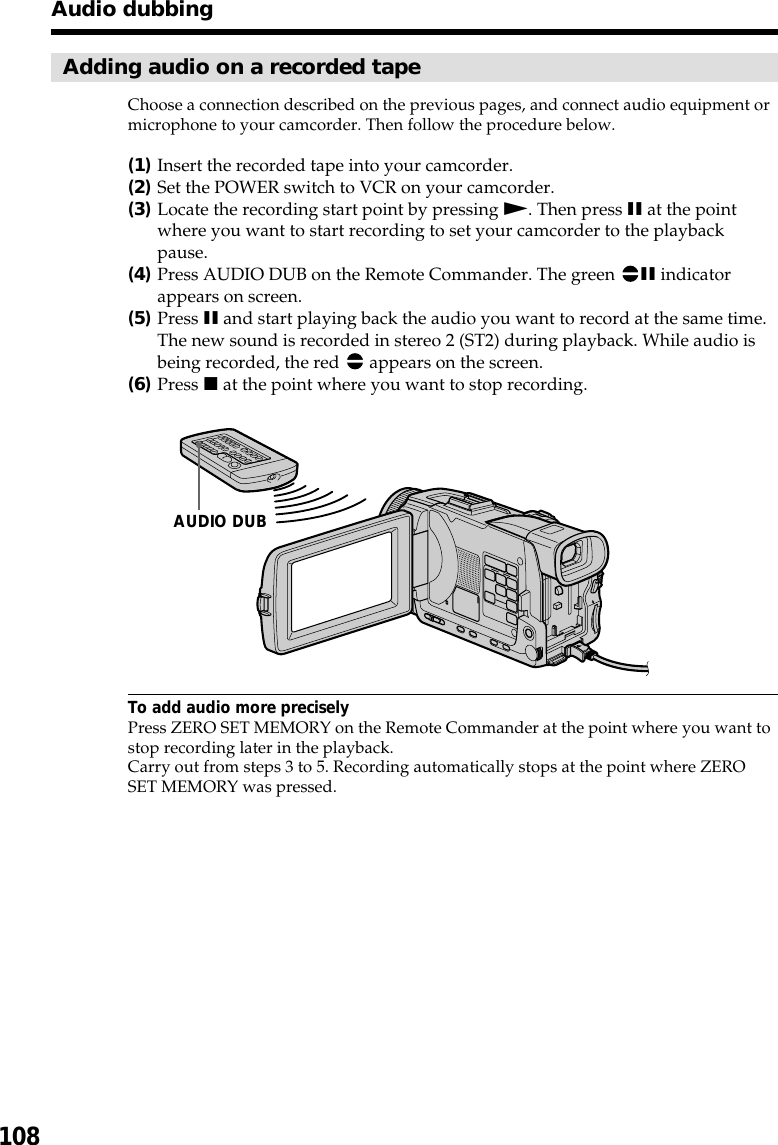
![110Superimposing a titleIf you use a tape with cassette memory, you can superimpose the title. Whenyou play back the tape, the title is displayed for five seconds from the pointwhere you superimposed it.(1)In the recording , recording standby, playback or playback pause, pressMENU, then select TITLE in with the SEL/PUSH EXEC dial (p. 205).(2)Turn the SEL/PUSH EXEC dial to select , then press the dial.(3)Turn the SEL/PUSH EXEC dial to select the desired title, then press the dial.The title flashes.(4)Change the color, size, or position, if necessary.1Turn the SEL/PUSH EXEC dial to select COLOR, SIZE or POSITION, thenpress the dial. The selected item appears.2Turn the SEL/PUSH EXEC dial to select the desired item, then press thedial.3Repeat steps 1 and 2 until the title is laid out as desired.(5)Press the SEL/PUSH EXEC dial again to complete the setting.In the recording, playback or playback pause:The TITLE SAVE indicator appears on the screen for five seconds and the titleis set.In the standby:The TITLE indicator appears. When you press START/STOP to startrecording, TITLE SAVE appears on the screen for five seconds, and the title isset.VACATION234VACATIONVACATIONVACATIONPRESET TITLE HELLO! HAPPY BIRTHDAY HAPPY HOLIDAYS CONGRATULATIONS! OUR SWEET BABY WEDDING VACATION THE END[MENU] : ENDPRESET TITLE HELLO! HAPPY BIRTHDAY HAPPY HOLIDAYS CONGRATULATIONS! OUR SWEET BABY WEDDING VACATION THE END RETURN[MENU] : ENDPRESET TITLE HELLO! HAPPY BIRTHDAY HAPPY HOLIDAYS CONGRATULATIONS! OUR SWEET BABY WEDDING VACATION THE END RETURN[MENU] : ENDTITLE[EXEC] : SAVE [MENU] : ENDTITLE[EXEC] : SAVE [MENU] : ENDSIZE SMALLSIZE LARGEMENU](https://usermanual.wiki/Sony-Group/DCRTRV50.manual3/User-Guide-230851-Page-10.png)
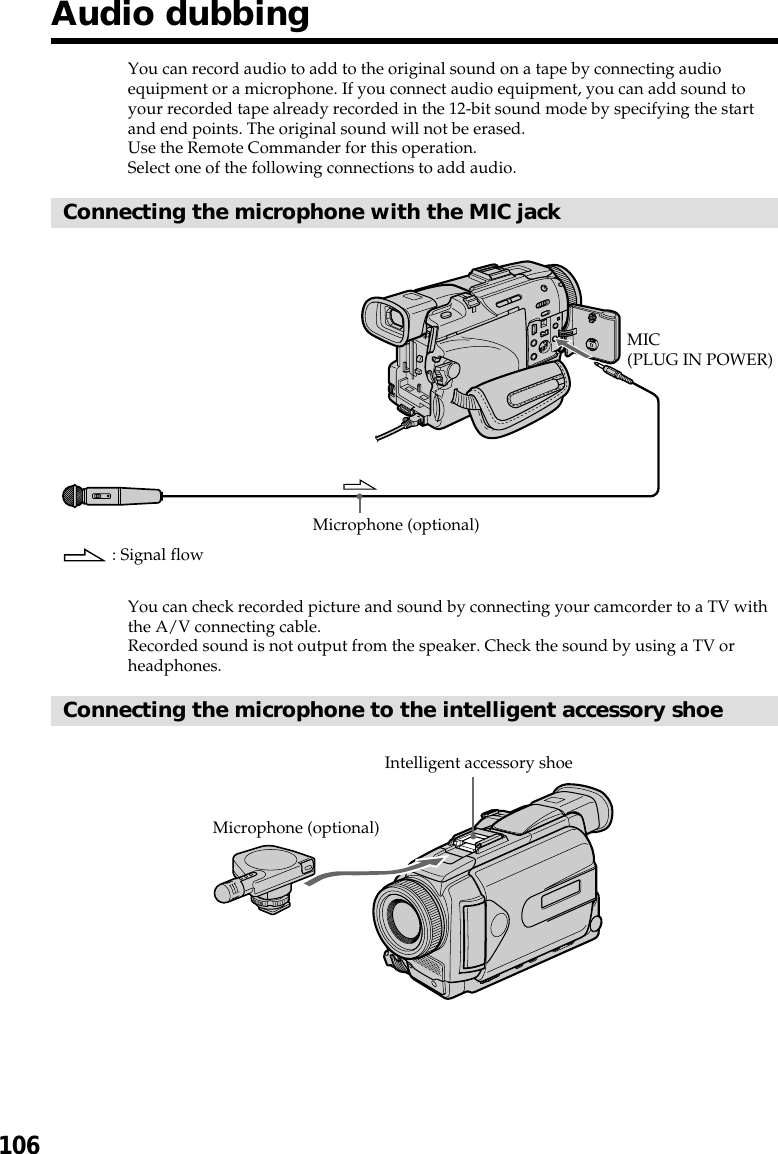
![112Erasing a title(1)Set the POWER switch to CAMERA or VCR.(2)Press MENU, then turn the SEL/PUSH EXEC dial to select TITLEERASE in, then press the dial (p. 205).(3)Turn the SEL/PUSH EXEC dial to select the title you want to erase, then pressthe dial. ERASE OK ? indicator appears.(4)Make sure that the title is the one you want to erase, and turn the SEL/PUSHEXEC dial to select OK, then press the dial. OK changes to EXECUTE.(5)Turn the SEL/PUSH EXEC dial to select EXECUTE, then press the dial.The ERASING flashes on the screen. When the title is erased, the COMPLETEis displayed.To cancel erasing a titleSelect RETURN in step 4 or 5.Superimposing a title234CM SET TITLE TITLEERASE TITLE DSPL CM SEARCH TAPE TITLE ERASE ALL RETURN[MENU] : ENDTITLE ERASE1 HELLO!2 CONGRATULATIONS!3 HAPPY NEW YEAR!4 PRESENT5 GOOD MORNING6 WEDDING[MENU] : ENDTITLE ERASE4 PRESENT ERASE OK?[MENU] : ENDTITLE ERASE4 PRESENT ERASE OK? RETURNEXECUTERETURNOK[MENU] : ENDMENU](https://usermanual.wiki/Sony-Group/DCRTRV50.manual3/User-Guide-230851-Page-12.png)
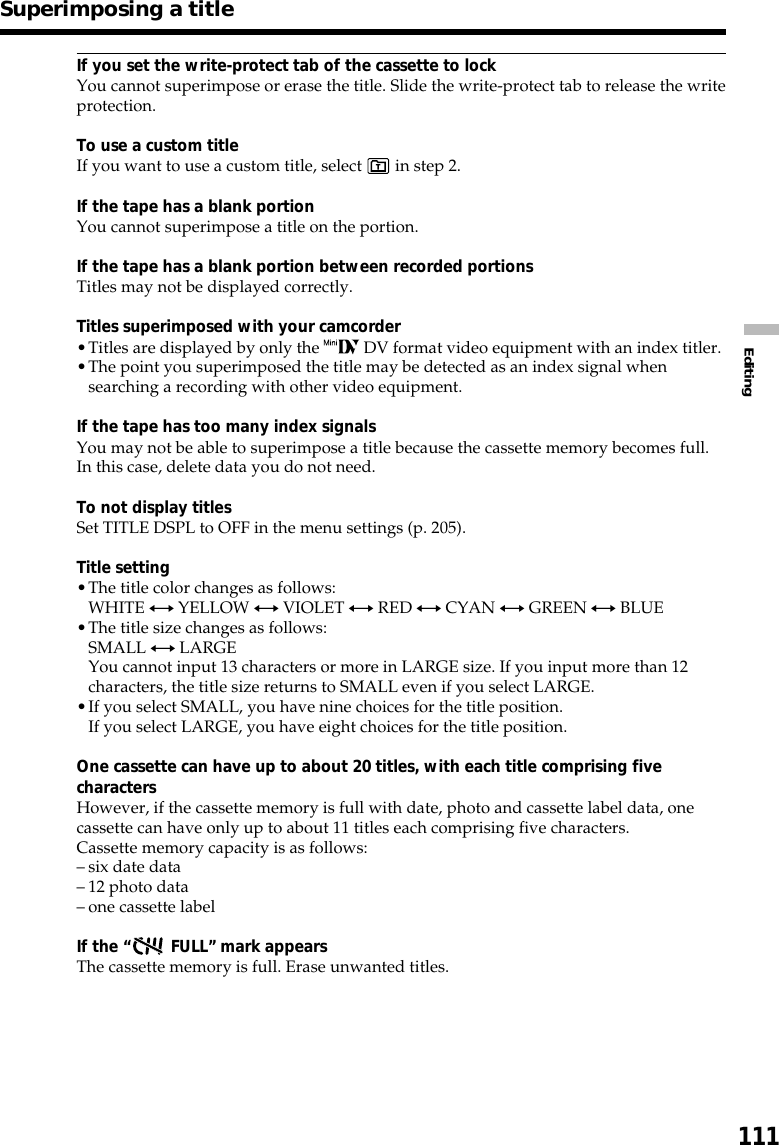
![113EditingYou can make up to two titles and store them in the memory of your camcorder. Eachtitle can have up to 20 characters.(1)Set the POWER switch to CAMERA or VCR.(2)Press MENU, then turn the SEL/PUSH EXEC dial to select TITLE in , thenpress the dial (p. 205).(3)Turn the SEL/PUSH EXEC dial to select , then press the dial.(4)Turn the SEL/PUSH EXEC dial to select CUSTOM1 SET or CUSTOM2 SET,then press the dial.(5)Turn the SEL/PUSH EXEC dial to select the column of the desired character,then press the dial.(6)Turn the SEL/PUSH EXEC dial to select the desired character, then press thedial.(7)Repeat steps 5 and 6 until you have selected all characters and completed thetitle.(8)To finish making your own titles, turn the SEL/PUSH EXEC dial to select[SET], then press the dial.Making your own titles34571234TITLE SET CUSTOM1 SET CUSTOM2 SET[MENU] : ENDTITLE SET CUSTOM1 SET CUSTOM2 SET RETURN[MENU] : ENDTITLE SET––––––––––––––––––––[MENU] : ENDTITLE SET––––––––––––––––––––[MENU] : END[MENU] : ENDTITLE SETS–––––––––––––––––––[MENU] : ENDTITLE SET CUSTOM1 SET CUSTOM2 SET RETURN[MENU] : END[MENU] : ENDTITLE SET––––––––––––––––––––TITLE SET––––––––––––––––––––MENU](https://usermanual.wiki/Sony-Group/DCRTRV50.manual3/User-Guide-230851-Page-13.png)
![114Making your own titlesTo change a title you have storedIn step 4, select CUSTOM1 SET or CUSTOM2 SET, depending on which title you wantto change, then press the SEL/PUSH EXEC dial. Turn the SEL/PUSH EXEC dial toselect [C], then press the dial to delete the title. The last character is erased. Enter thenew title as desired.If you take five minutes or longer to enter characters in the standby while acassette is in your camcorderThe power automatically goes off. The characters you have entered remain stored inmemory. Set the POWER switch to OFF (CHG) once and then to CAMERA again, thenproceed from step 1.We recommend setting the POWER switch to VCR or removing the cassette so thatyour camcorder does not automatically turn off while you are entering title characters.To delete the titleSelect [C]. The last character is erased.To enter a spaceSelect [ Z& ? ! ], then select the blank part.](https://usermanual.wiki/Sony-Group/DCRTRV50.manual3/User-Guide-230851-Page-14.png)
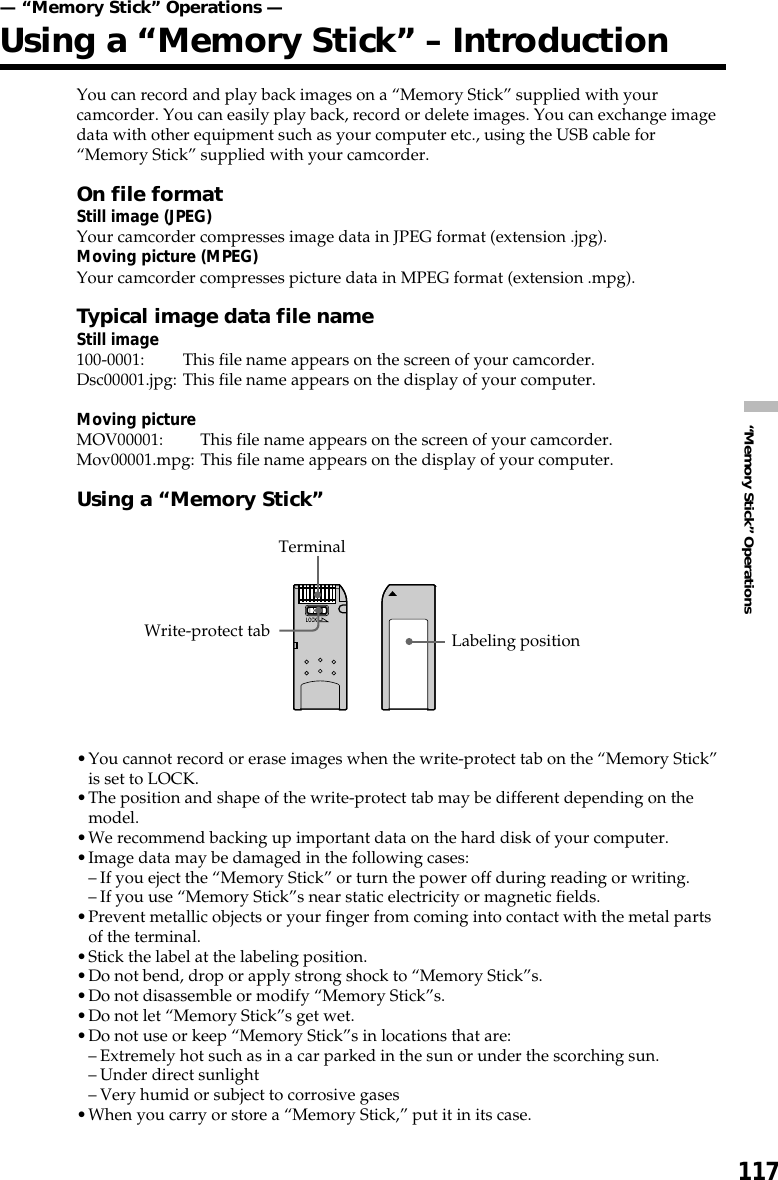
![115EditingIf you use a cassette with cassette memory, you can label a cassette. Labels canconsist of up to 10 characters and is stored in cassette memory. When you insertthe labeled cassette and when the POWER switch is set to CAMERA or VCR, thelabel is displayed for about five seconds.(1)Insert the cassette you want to label.(2)Set the POWER switch to CAMERA or VCR.(3)Press MENU, then turn the SEL/PUSH EXEC dial to select TAPE TITLE in ,then press the dial (p. 205). Tape title display appears.(4)Turn the SEL/PUSH EXEC dial to select the column of the desired character,then press the dial.(5)Turn the SEL/PUSH EXEC dial to select the desired character, then press thedial.(6)Repeat steps 4 and 5 until you finish the label.(7)Turn the SEL/PUSH EXEC dial to select [SET], then press the dial.The label is stored in memory.Labeling a cassette34~6[MENU] : ENDTAPE TITLE––––––––––[MENU] : ENDTAPE TITLE––––––––––[MENU] : ENDTAPE TITLE––––––––––[MENU] : ENDTAPE TITLEM–––––––––[MENU] : ENDCM SET TITLE TITLEERASE TITLE DSPL CM SEARCH TAPE TITLE ERASE ALL RETURNREADY––––––––––[MENU] : ENDCM SET TITLE TITLEERASE TITLE DSPL CM SEARCH TAPE TITLE ERASE ALL RETURN[MENU] : ENDTAPE TITLE––––––––––MENU](https://usermanual.wiki/Sony-Group/DCRTRV50.manual3/User-Guide-230851-Page-15.png)
![116To erase the label you have madeIn step 4 turn the SEL/PUSH EXEC dial to select [C], then press the dial. The lastcharacter is erased.To change the label you have madeInsert the cassette to change the label, and operate in the same way to make a new label.If you set the write-protect tab of the cassette to lockYou cannot label the tape. Slide the write-protect tab to release the write protection.If the tape has too many index signalYou may not be able to label a cassette because the cassette memory becomes full. Inthis case, delete data you do not need.If you have superimposed titles in the cassetteWhen the label is displayed, up to four titles also appear.When the “-----” indicator has fewer than 10 spacesThe cassette memory is full.The “-----” indicates the number of characters you can select for the label.To enter a spaceSelect [ Z& ? ! ], then select the blank part.Erasing all the data in cassette memoryYou can erase all the data in cassette memory at once.(1)Set the POWER switch to CAMERA or VCR.(2)Press MENU, then turn the SEL/PUSH EXEC dial to select ERASE ALL in ,then press the dial (p. 205).(3)Turn the SEL/PUSH EXEC dial to select OK, then press the dial. OK changesto EXECUTE.(4)Turn the SEL/PUSH EXEC dial to select EXECUTE, then press the dial.ERASING flashes on the screen. When all the data is erased, COMPLETE isdisplayed.To cancel deletingSelect RETURN with the SEL/PUSH EXEC dial in step 3 or 4.Labeling a cassette[MENU] : ENDCM SET TITLE TITLEERASE TITLE DSPL CM SEARCH TAPE TITLE ERASE ALL RETURN RETURNOK[MENU] : ENDCM SET TITLE TITLEERASE TITLE DSPL CM SEARCH TAPE TITLE ERASE ALL RETURN RETURNEXECUTE](https://usermanual.wiki/Sony-Group/DCRTRV50.manual3/User-Guide-230851-Page-16.png)
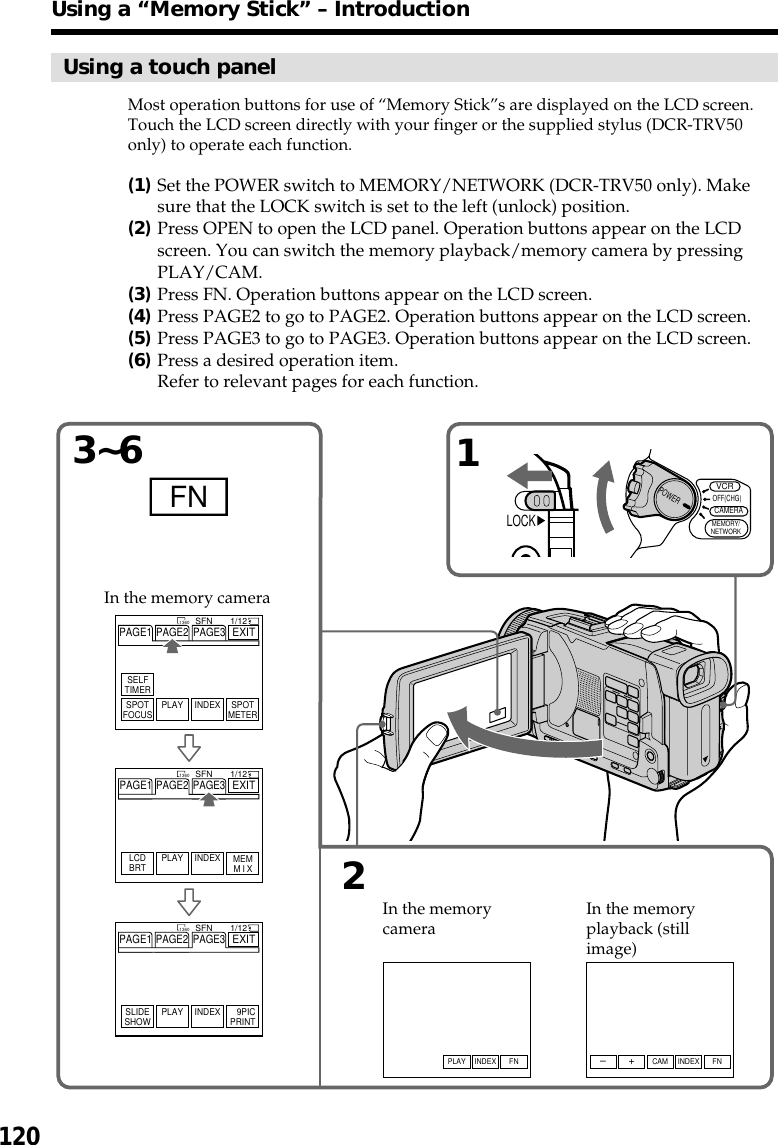
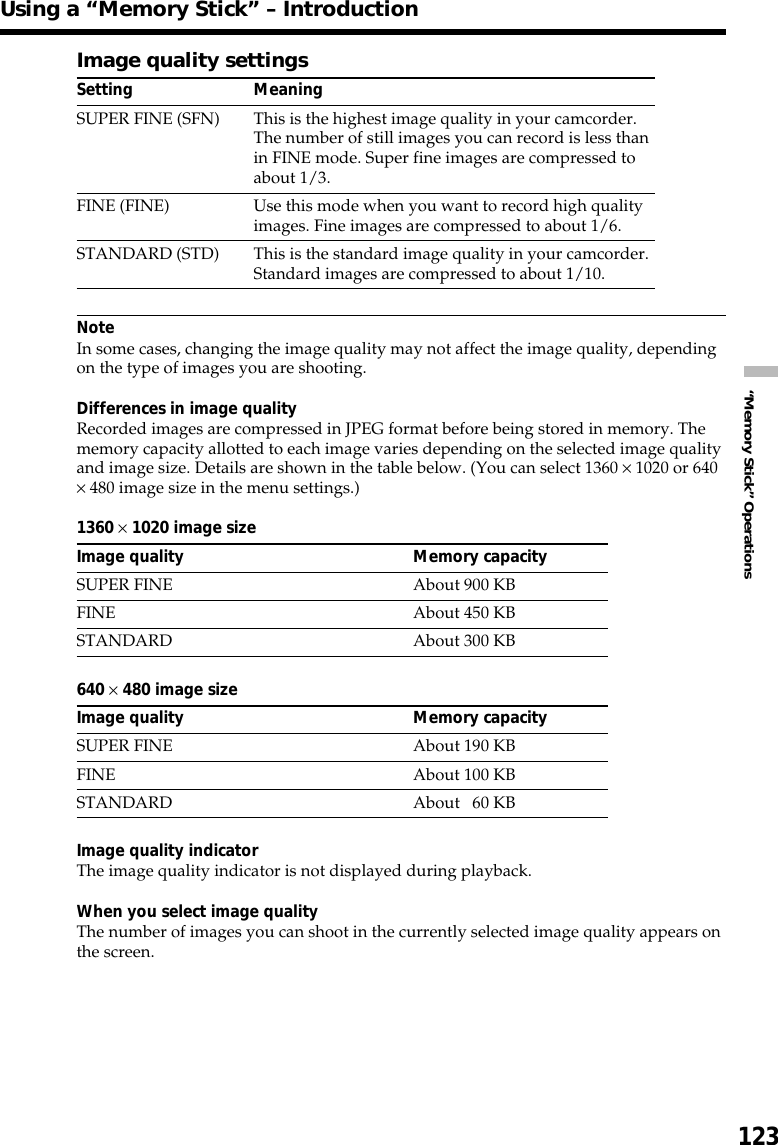
![122Selecting the still image qualityYou can select the image quality in still image recording. The default setting is SUPERFINE.(1)Set the POWER switch to MEMORY/NETWORK (DCR-TRV50 only) or VCR.Make sure that the LOCK switch is set to the left (unlock) position.(2)Press MENU, then select STILL SET in with the SEL/PUSH EXEC dial(p. 203).(3)Turn the SEL/PUSH EXEC dial to select QUALITY , then press the dial.(4)Turn the SEL/PUSH EXEC dial to select the desired image quality , then pressthe dial.Using a “Memory Stick” – Introduction134VCRMEMORY/NETWORKCAMERAOFF(CHG)POWERLOCKMEMORY SET STILL SET BURST QUALITY IMAGESIZE RETURNSUPER FINEFINESTANDARD[MENU] : ENDREMAIN 12MEMORY SET STILL SET BURST QUALITY IMAGESIZE RETURNSTANDARD[MENU] : ENDREMAIN 36MENU](https://usermanual.wiki/Sony-Group/DCRTRV50.manual3/User-Guide-230851-Page-22.png)
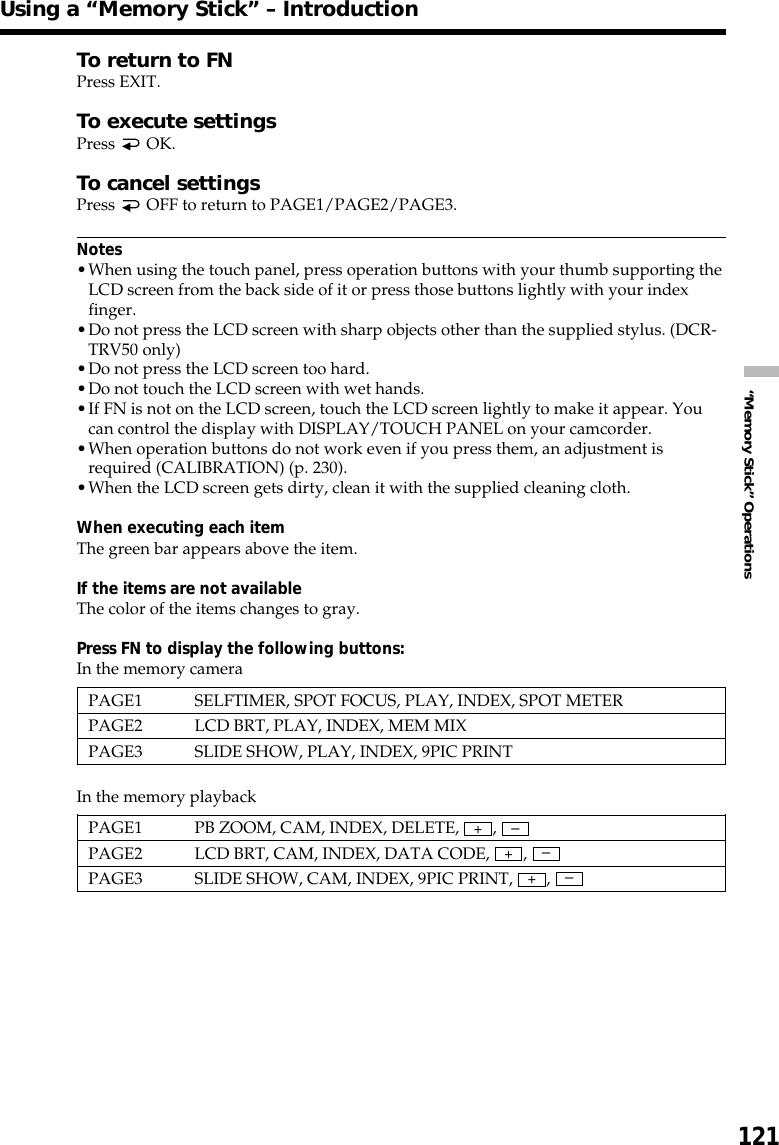
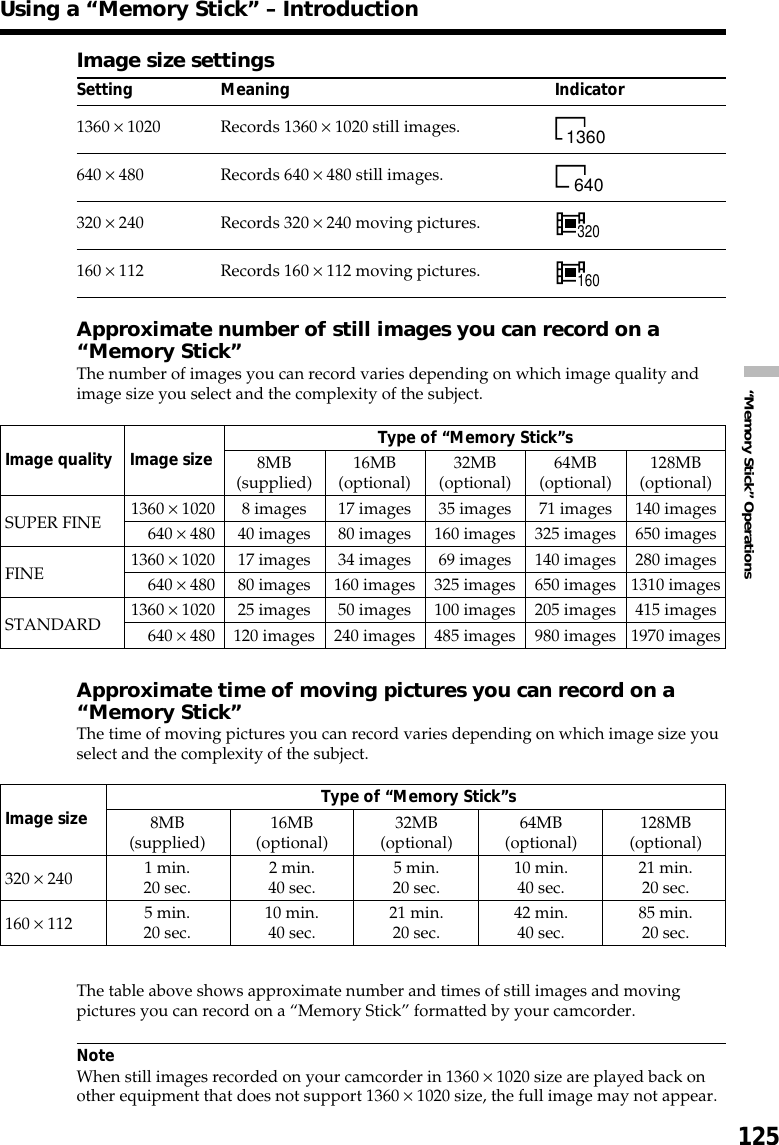
![124Selecting the image sizeYou can select either of two image sizesStill images: 1360 × 1020 or 640 × 480. (When the POWER switch is set to CAMERAor VCR, the image size is automatically set to 640 × 480.)The default setting is 1360 × 1020.Moving pictures: 320 × 240 or 160 × 112The default setting is 320 × 240.(1)Set the POWER switch to MEMORY/NETWORK (DCR-TRV50 only). Makesure that the LOCK switch is set to the left (unlock) position.(2)Press MENU, then turn the SEL/PUSH EXEC dial to select STILL SET (stillimage) or MOVIE SET (moving picture) in , then press the dial (p. 203).(3)Turn the SEL/PUSH EXEC dial to select IMAGESIZE, then press the dial.(4)Turn the SEL/PUSH EXEC dial to select the desired image size, then press thedial.The indicator changes as follows:Still images:1360 640Moving pictures:320 160Using a “Memory Stick” – Introduction341VCRMEMORY/NETWORKCAMERAOFF(CHG)POWERLOCK3201360MEMORY SET STILL SET BURST QUALITY IMAGESIZE RETURN 1360 × 1020 640 × 480[MENU] : ENDMEMORY SET MOVIE SET IMAGESIZE REMAIN RETURN320 × 240160 × 112[MENU] : ENDREMAIN 40secMEMORY SET STILL SET BURST QUALITY IMAGESIZE RETURN 640 × 480[MENU] : ENDREMAIN 60REMAIN 12MEMORY SET MOVIE SET IMAGESIZE REMAIN RETURN160 × 112[MENU] : ENDREMAIN 2minSTILL SET MOVIE SETSTILL SET MOVIE SETMENU](https://usermanual.wiki/Sony-Group/DCRTRV50.manual3/User-Guide-230851-Page-24.png)
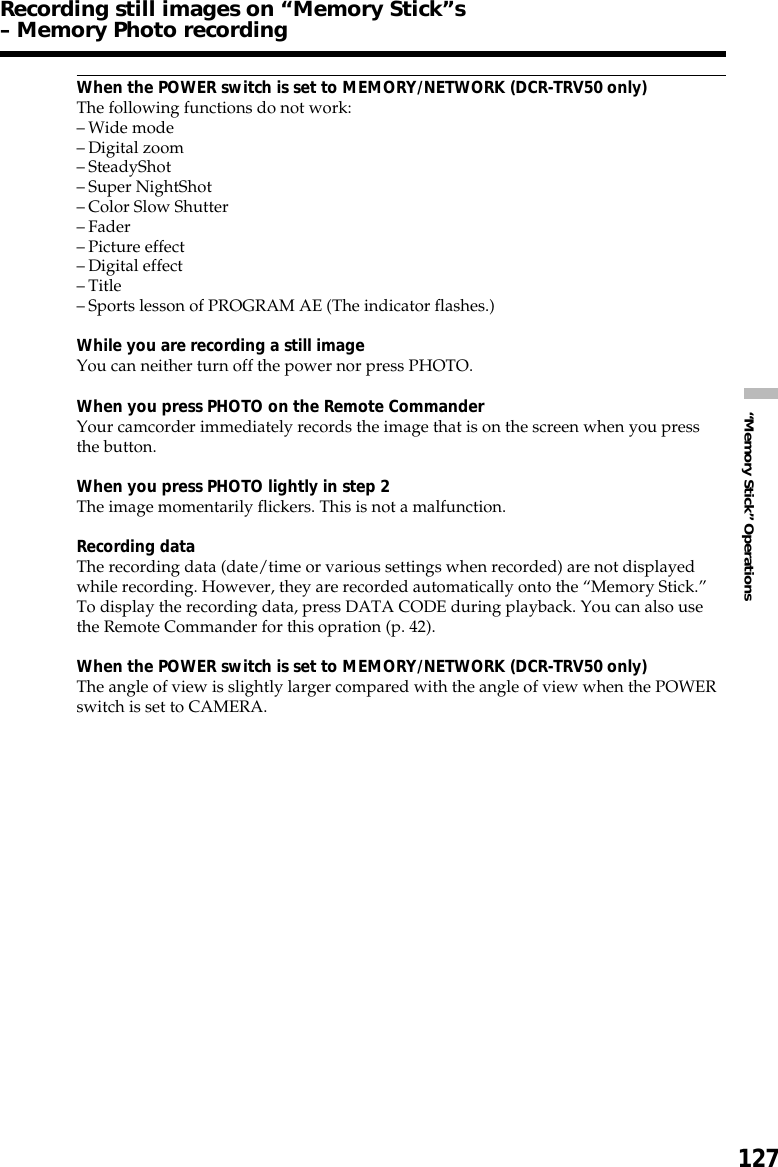
![126You can record still images on “Memory Stick”s.Before operationInsert a “Memory Stick” into your camcorder.(1)Set the POWER switch to MEMORY/NETWORK (DCR-TRV50 only). Makesure that the LOCK switch is set to the left (unlock) position.(2)Press PHOTO lightly. The green z mark stops flashing, then lights up. Thebrightness of the image and focus are adjusted, being targeted for the middleof the image and are fixed. Recording does not start yet.(3)Press PHOTO deeper.The still image will be displayed after the shutter sounds.Recording is complete when the bar scroll indicator disappears.The image when you pressed PHOTO deeper will be recorded on the“Memory Stick.”You can record still images on “Memory Stick”s in the taperecording or tape recording standbyFor the details, see page 47.Recording still images on “MemoryStick”s – Memory Photo recording321 / 12SFN1360SFN1360FNINDEXPLAYFNINDEXPLAYPHOTOPHOTO1LOCKVCRMEMORY/NETWORKCAMERAOFF(CHG)POWER[a][b][a]: Number of recorded images[b]: Approximate number of images that canbe recorded on the “Memory Stick”](https://usermanual.wiki/Sony-Group/DCRTRV50.manual3/User-Guide-230851-Page-26.png)
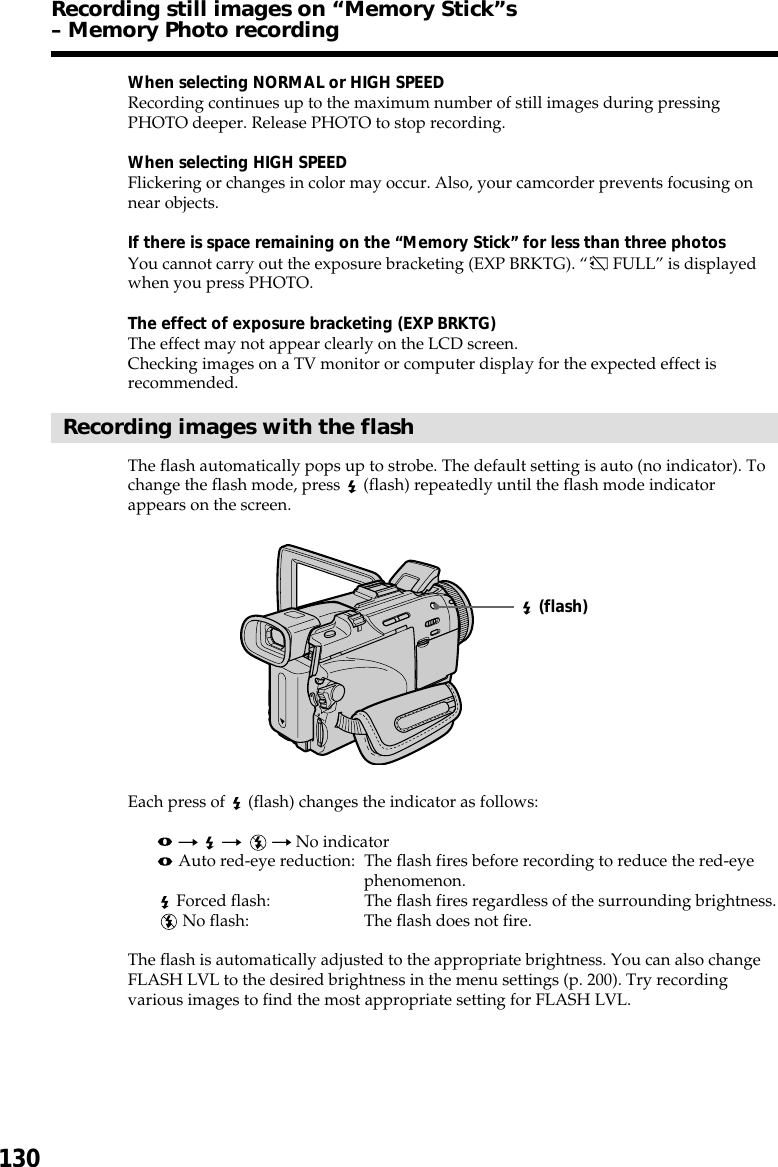
![128Recording still images on “Memory Stick”s– Memory Photo recordingRecording images continuouslyYou can record still images continuously. Before recording, select one of the four modesdescribed below in the menu settings.NORMAL [a]Your camcorder shoots up to three still images in 1360 × 1020 size or nine still images in640 × 480 size at about 0.5 sec intervals. ( )HIGH SPEED [a]Your camcorder shoots up to 16 still images in 640 × 480 size at about 0.07 sec intervals.( )EXP BRKTG (Exposure Bracketing)Your camcorder automatically shoots three images at about 0.5 sec intervals at differentexposures. ( )MULTI SCRN (Multi Screen) [b]Your camcorder shoots nine still images at about 0.4 sec intervals and displays theimages on a single page divided into nine boxes. Still images are recorded in 640 × 480size. ( )[a] [b]](https://usermanual.wiki/Sony-Group/DCRTRV50.manual3/User-Guide-230851-Page-28.png)
![129“Memory Stick” Operations(1)Set the POWER switch to MEMORY/NETWORK (DCR-TRV50 only). Makesure that the LOCK switch is set to the left (unlock) position.(2)Press MENU, then turn the SEL/PUSH EXEC dial to select STILL SET in ,then press the dial (p. 203).(3)Turn the SEL/PUSH EXEC dial to select BURST, then press the dial.(4)Turn the SEL/PUSH EXEC dial to select the desired setting, then press thedial.(5)Press MENU to make the menu setting disappear.(6)Press PHOTO deeper.If the capacity of the “Memory Stick” becomes full” FULL” appears on the screen, and you cannot record a still image on this “MemoryStick.”The number of still images in continuous shootingThe number of still images you can shoot continuously varies depending on the imagesize and the capacity of the “Memory Stick.”During recording still images continuouslyThe flash does not work.When shooting with the self-timer or the Remote CommanderYour camcorder automatically records up to the maximum recordable number of stillimages.Recording still images on “Memory Stick”s– Memory Photo recording34MEMORY SET STILL SET BURST QUALITY IMAGESIZE RETURNOFF[MENU] : ENDMEMORY SET STILL SET BURST QUALITY IMAGESIZE RETURNOFFNORMALHIGH SPEEDEXP BRKTGMULTI SCRN[MENU] : ENDMEMORY SET STILL SET BURST QUALITY IMAGESIZE RETURNHIGH SPEED[MENU] : ENDMEMORY SET STILL SET BURST QUALITY IMAGESIZE RETURNOFFNORMALHIGH SPEEDEXP BRKTGMULTI SCRN[MENU] : ENDPHOTOMENU](https://usermanual.wiki/Sony-Group/DCRTRV50.manual3/User-Guide-230851-Page-29.png)
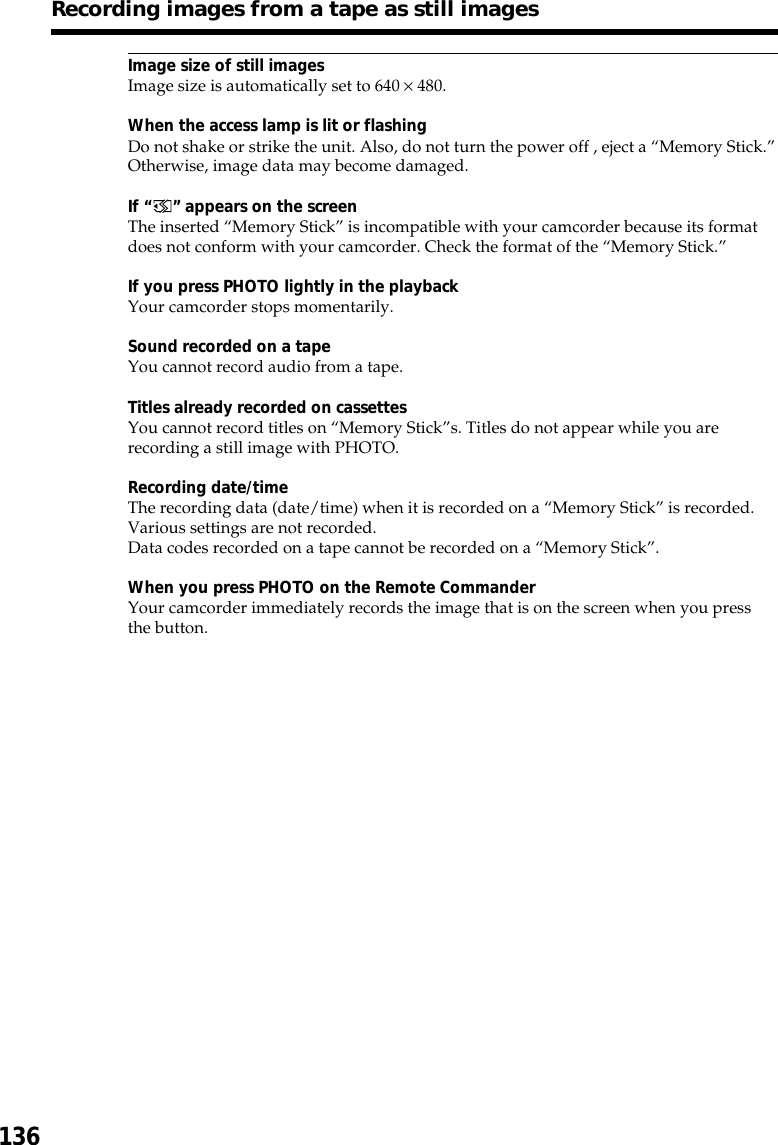
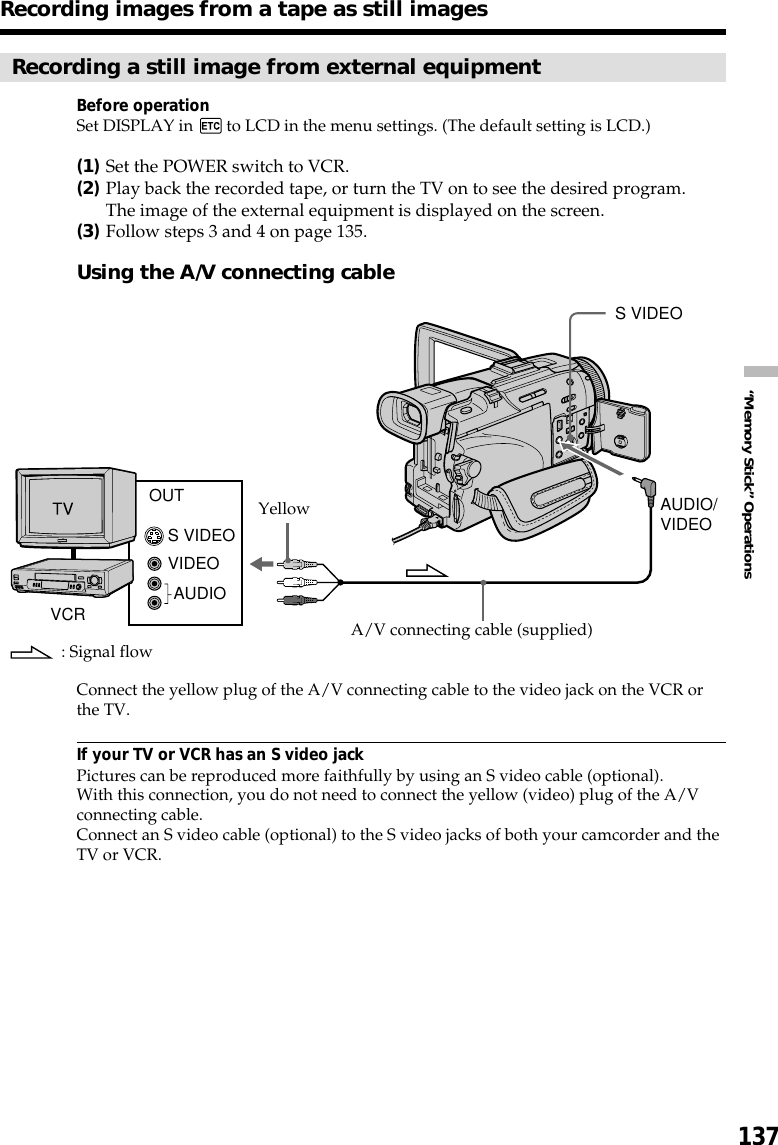
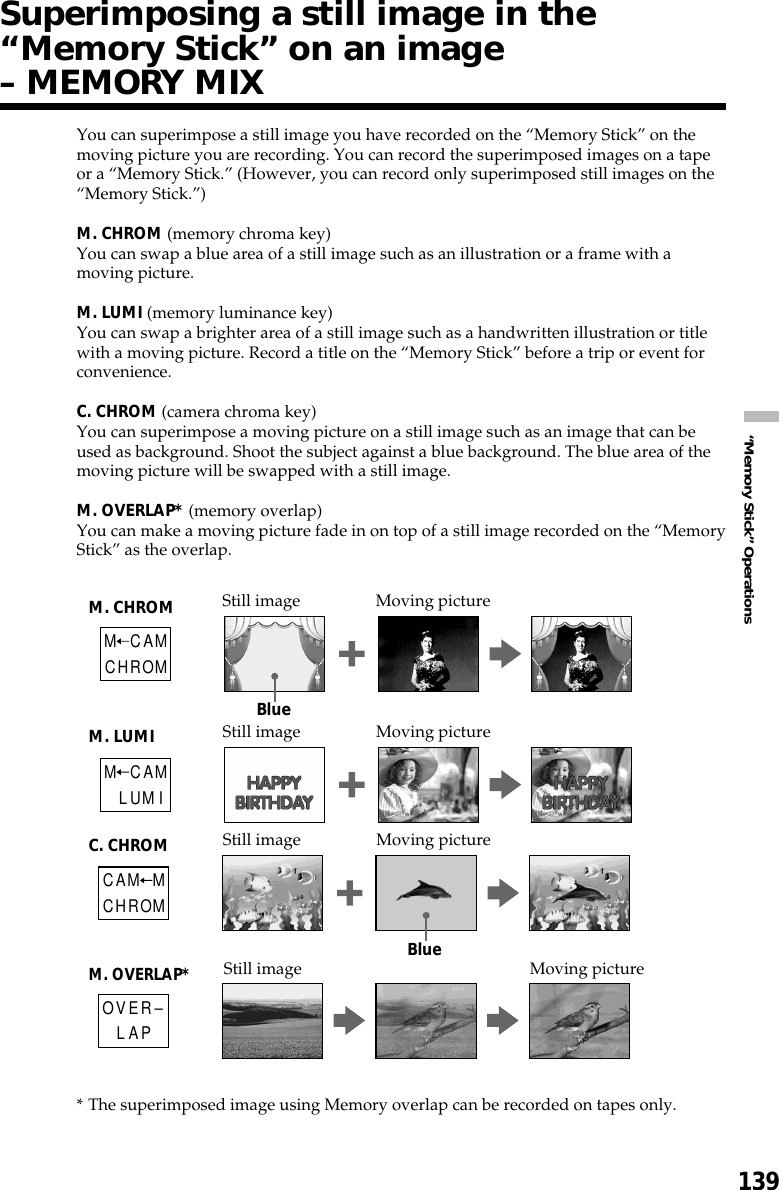
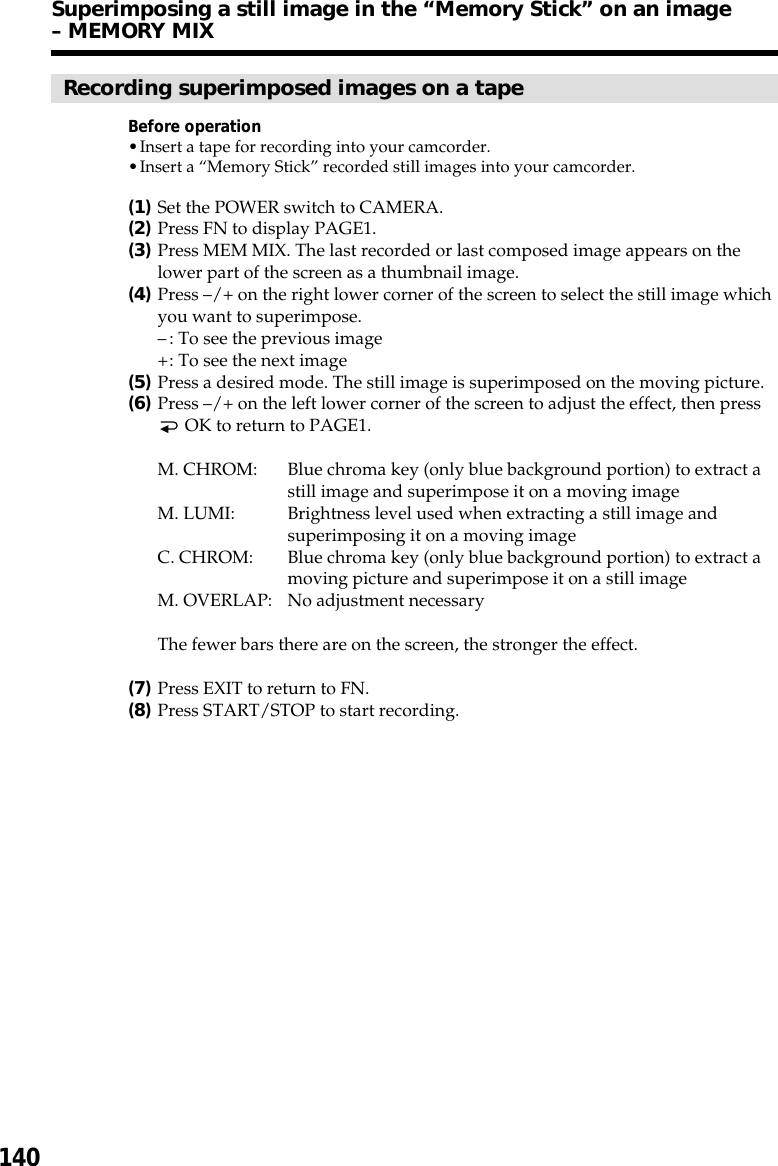
![135“Memory Stick” OperationsYour camcorder can read moving picture data recorded on a tape and record it as a stillimage on a “Memory Stick.” Your camcorder can also capture moving picture datathrough the input connector and record it as a still image on a “Memory Stick.”Before operation•Insert a recorded tape into your camcorder.•Insert a “Memory Stick” into your camcorder.(1)Set the POWER switch to VCR.(2)Press N. Moving pictures recorded on the tape are played back.(3)Press PHOTO lightly until picture you want to capture from the tape freezesand CAPTURE appears on the screen. Recording does not start yet.To change from the image selected to another image, release PHOTO once andpress it lightly again.(4)Press PHOTO deeper. The image displayed on the screen will be recorded onthe “Memory Stick.” Recording is complete when the bar scroll indicatordisappears.234CAPTUREFNINDEXPB FNINDEXPB1 / 12SFN640SFN640REW PLAY FFPHOTOPHOTORecording images from a tape as stillimages[a]: Number of recorded images[b]: Approximate number of images that canbe recorded on the “Memory Stick”[a][b]](https://usermanual.wiki/Sony-Group/DCRTRV50.manual3/User-Guide-230851-Page-35.png)

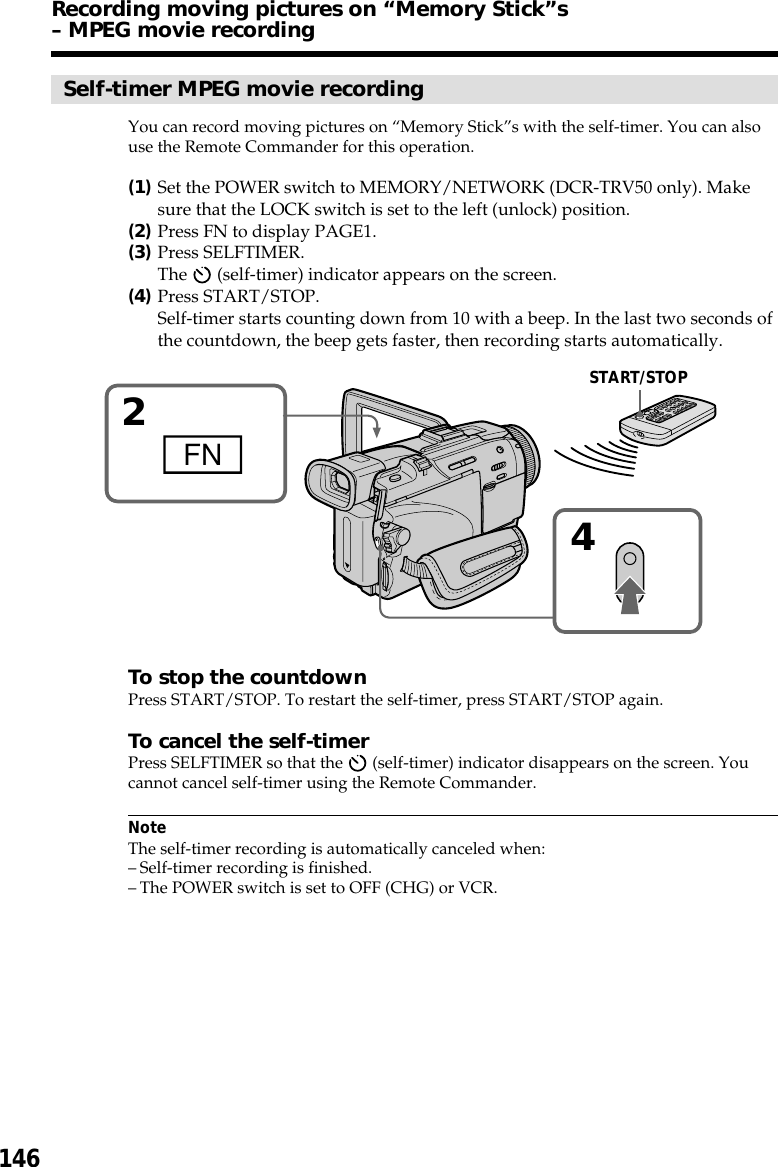
![144You can record moving pictures with sound on “Memory Stick”s.The picture and sound and recorded up to the capacity of “Memory Stick” (MPEGMOVIE EX).Before operationInsert a “Memory Stick” into your camcorder.(1)Set the POWER switch to MEMORY/NETWORK (DCR-TRV50 only). Makesure that the LOCK switch is set to the left (unlock) position.(2)Press START/STOP. Your camcorder starts recording. The camera recordinglamp located on the front of your camcorder lights up. The picture and soundare recorded up to the remaining capacity of “Memory Stick”. For moreinformation about recording time, see page 125.To stop recordingPress START/STOP.Recording moving pictures on “MemoryStick”s – MPEG movie recording232040min REC 0:00:0315minBBBFNINDEXPLAY[a][b][a]: Recording time that can be recorded onthe “Memory Stick”.[a] [b]: These indicators are displayed for fiveseconds after pressing START/STOP.This indicator is not recorded.](https://usermanual.wiki/Sony-Group/DCRTRV50.manual3/User-Guide-230851-Page-44.png)
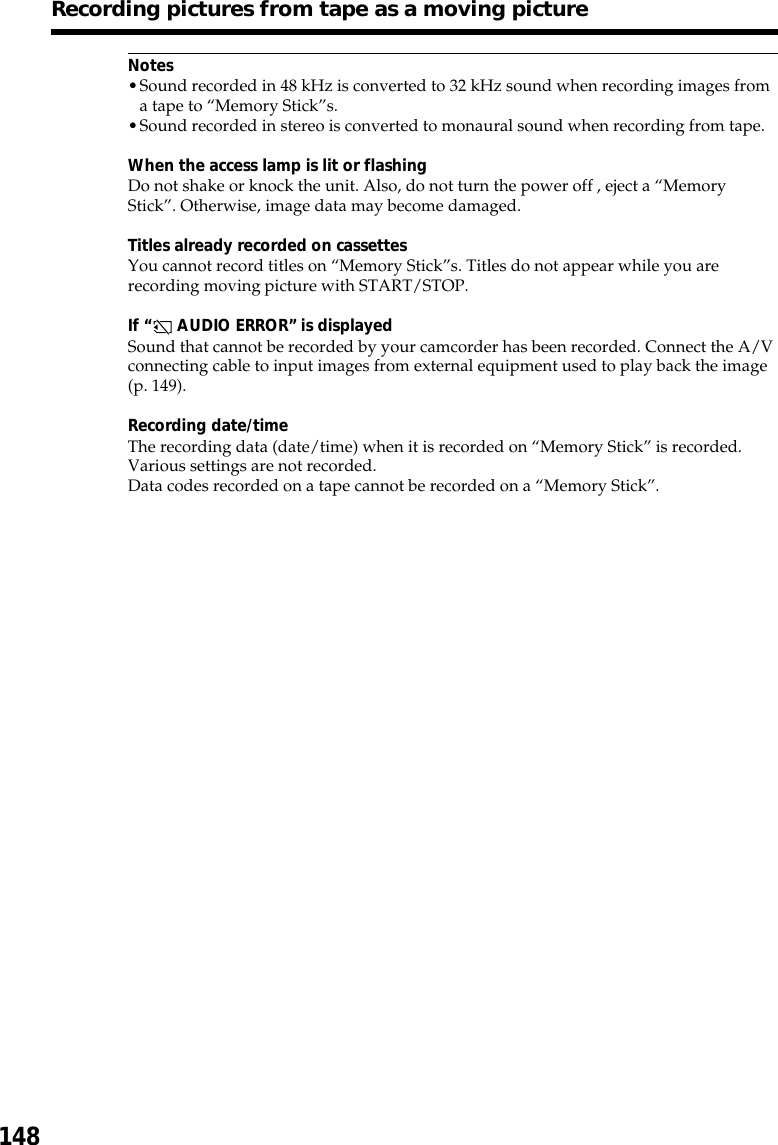
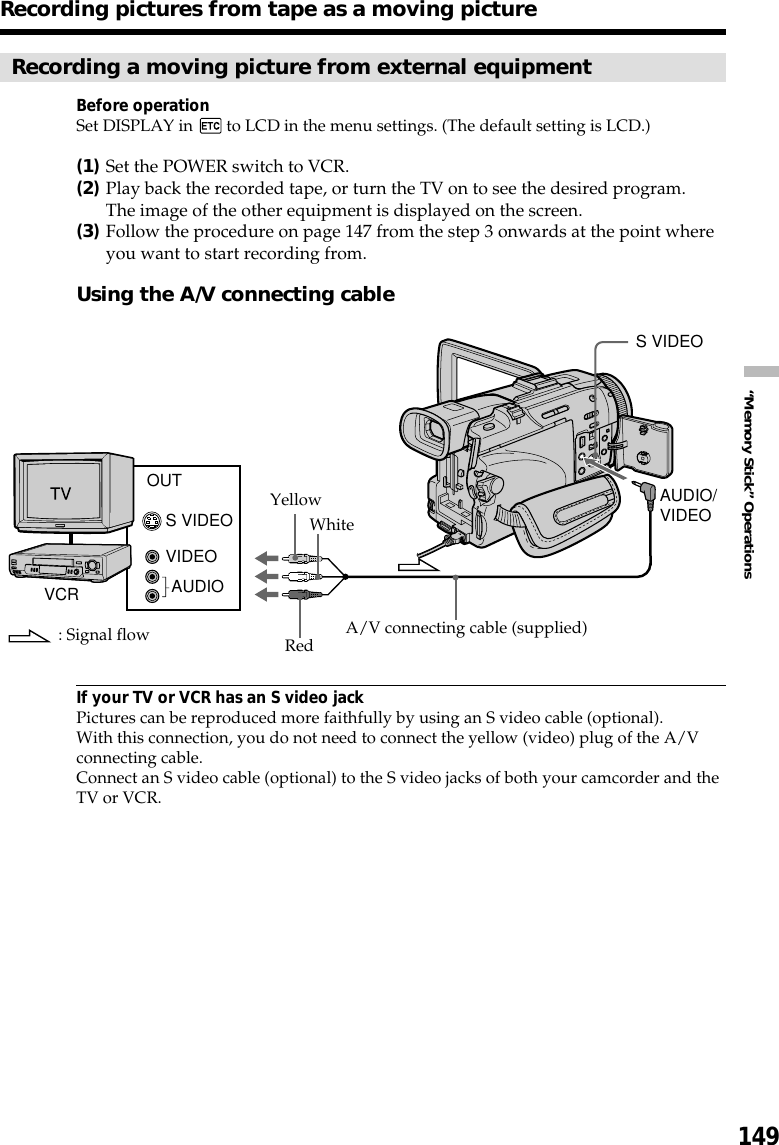
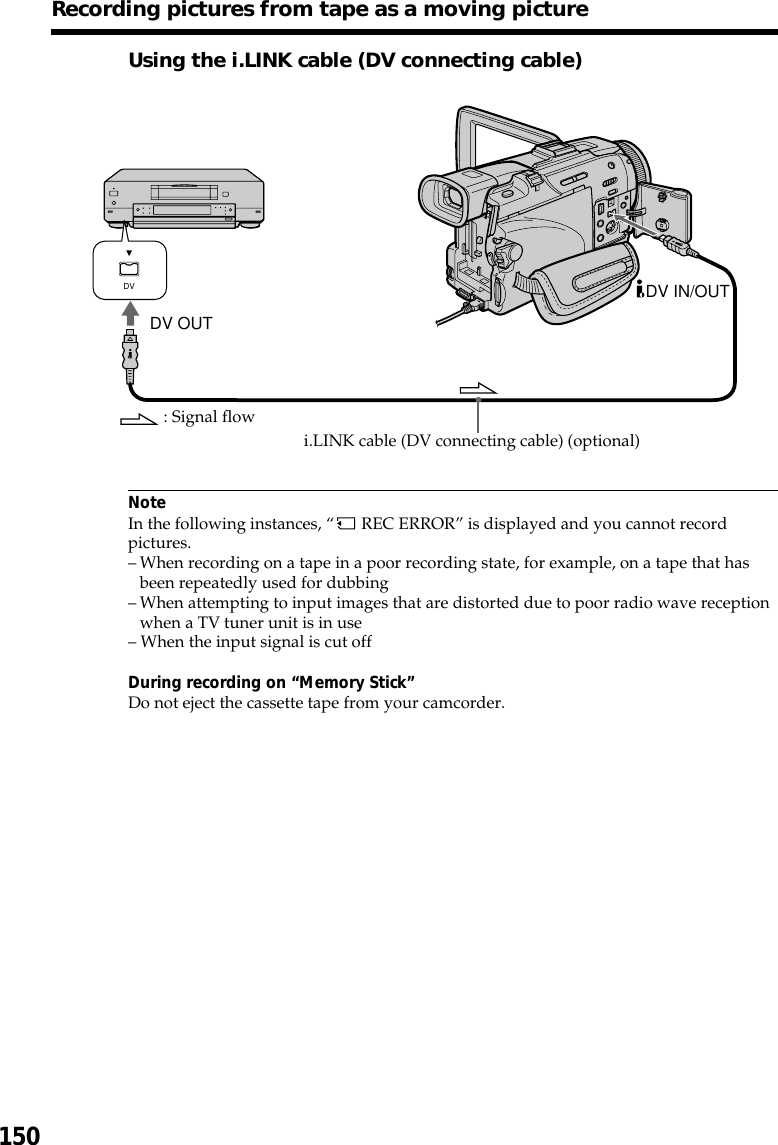
![147“Memory Stick” OperationsYour camcorder can read moving picture data recorded on a tape and record it as amoving picture on a “Memory Stick.” Your camcorder can also capture moving picturedata through the input connector and record it as a moving picture on a “MemoryStick.”Before operation•Insert a recorded tape into your camcorder.•Insert a “Memory Stick” into your camcorder.(1)Set the POWER switch to VCR.(2)Press N. The picture recorded on the tape is played back.And press X at the scene where you want to start recording from.(3)Press START/STOP on your camcorder. The picture and sound are recordedup to the remaining capacity of the “Memory Stick”. For more informationabout recording time, see page 125.To stop recordingPress START/STOP.Recording pictures from tape as a movingpicture32320BBBN40min REC 0:00:0315min0:15:42:43PLAY PAUSEFNINDEXPB[a]: The recording time that can berecorded on the “Memory Stick.”[a] [b]: This indicator is displayed forfive seconds after pressing START/STOP. This indicator is not recorded.[a][b]](https://usermanual.wiki/Sony-Group/DCRTRV50.manual3/User-Guide-230851-Page-47.png)