Sony Group DCRTRV50 Sony Handycam DCR-TRV50 User Manual DCR TRV40 50
Sony Corporation Sony Handycam DCR-TRV50 DCR TRV40 50
UserManual.wiki
>
Sony Group
>
DCRTRV50 User Manual
>
manual2
Contents
1.
manual1
2.
manual2
3.
manual3
4.
manual4
5.
manual5
6.
Network manual
7.
network manual
8.
manual insert
manual2
Navigation menu
Upload a User Manual
Namespaces
Wiki Guide
HTML
PDF
Info
Views
User Manual
Discussion / Help
Navigation

![54You can manually adjust and set the white balance. This adjustment makes whitesubjects look white and allows more natural color balance. Normally white balance isautomatically adjusted.(1)Set the POWER switch to CAMERA or MEMORY/NETWORK (DCR-TRV50only). Press MENU, then select WHT BAL in with the SEL/PUSH EXECdial (p. 200).(2)Turn the SEL/PUSH EXEC dial to select the desired white balance, then pressdial.HOLD :Recording a single-colored subject or background OUTDOOR :•When recording a sunset/sunrise, just after sunset, just before sunrise, neonsigns, or fireworks•Under a color-matching fluorescent lampn INDOOR :•Where lighting condition changes quickly•Excessively bright places such as studios•Under sodium lamps or mercury lampsTo return to the automatic white balanceSet WHT BAL to AUTO in the menu settings.If the picture is being taken in a studio lit by TV lightingWe recommend that you record in the INDOOR.When you record under fluorescent lightingUse the automatic white balance or HOLD.Your camcorder may not adjust the white balance correctly in the INDOOR.In the automatic white balancePoint your camcorder at a white subject for about 10 seconds after setting the POWERswitch to CAMERA to get a better adjustment when:–You detach the battery for replacement.–You take your camcorder outdoors from inside a house holding the exposure, or viceversa.In the HOLD white balanceSet the white balance to AUTO and reset to HOLD after a few seconds when:–You change the PROGRAM AE.–You take your camcorder outdoors from inside a house, or vice versa.1[MENU] : ENDMANUAL SET P EFFECT FLASH LVL WHT BAL N.S. LIGHT AUTO SHTR RETURNAUTOHOLDOUTDOORINDOORSTBYMENUAdjusting the white balance manually](https://usermanual.wiki/Sony-Group/DCRTRV50.manual2/User-Guide-230850-Page-4.png)
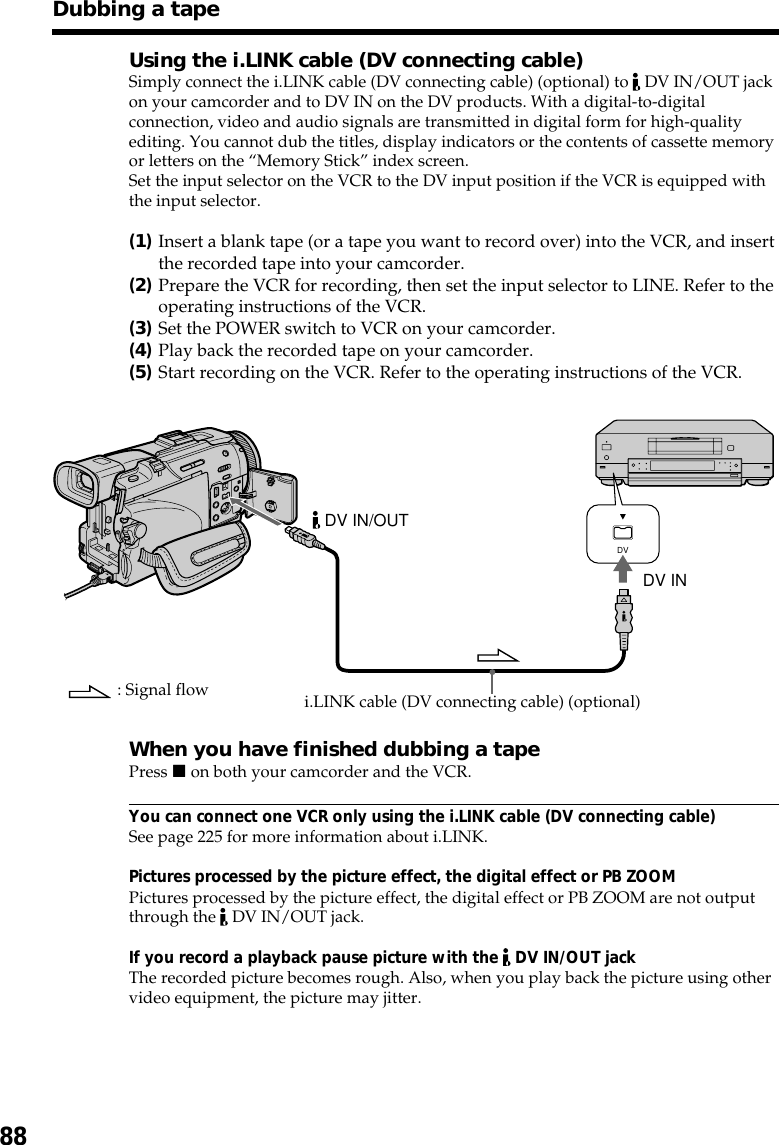
![55Advanced Recording OperationsYou can record a 16:9 wide picture to watch on a 16:9 wide-screen TV (16:9WIDE).If you connect a TV compatible with the ID-1/ID-2 system, the screen size isautomatically selected.Black bands appear on the screen during recording in 16:9WIDE mode [a]. The pictureduring playback on a normal TV [b] or on a wide-screen TV [c] is compressed in thelongwise direction. If you set the screen mode of the wide-screen TV to the full mode,you can watch pictures of normal images [d].(1)In the standby, press MENU, then turn the SEL/PUSH EXEC dial to select16:9WIDE in , then press the dial (p. 201).(2)Turn the SEL/PUSH EXEC dial to select ON, then press the dial.To cancel the wide modeSet 16:9WIDE to OFF in the menu settings.Using the wide mode[a][c][b][d]16:9WIDE2ONCAMERA SET D ZOOM PHOTO REC 16:9WIDE STEADYSHOT FRAME REC INT. REC RETURN[MENU] : ENDMENU](https://usermanual.wiki/Sony-Group/DCRTRV50.manual2/User-Guide-230850-Page-5.png)

![57Advanced Recording OperationsYou can fade in or out to give your recording a more professional appearance.MONOTONEWhen fading in, the picture gradually changes from black-and-white to color.When fading out, the picture gradually changes from color to black-and-white.1) You can use the bounce when D ZOOM is set to OFF in the menu settings.2) Fade in only.Using the faderFADEROVERLAP2)WIPE2)DOT2)[a] RECSTBYRECSTBY[b]M. FADER(mosaic)BOUNCE1) 2)](https://usermanual.wiki/Sony-Group/DCRTRV50.manual2/User-Guide-230850-Page-7.png)
![58(1) When fading in [a]In the standby, press FADER until the desired fader indicator flashes.When fading out [b]In the recording, press FADER until the desired fader indicator flashes.The indicator changes as follows:FADER tM. FADER tBOUNCE tMONOTONE(no indicator)TDOT TWIPE TOVERLAPThe last selected fader is indicated first of all.(2)Press START/STOP. The fader indicator stops flashing.After fade in/out ends, your camcorder automatically returns to the normalmode.To cancel the faderBefore pressing START/STOP, press FADER until the indicator disappears.NoteYou cannot use the following functions while using the fader. Also, you cannot use thefader while using the following functions:–Digital effect–Super NightShot–Color Slow Shutter–Tape photo recording–Recording still images on a “Memory Stick” in the tape recording or tape recordingstandby–Recording with the flash–Interval recording–Frame recordingWhen you select OVERLAP, WIPE, or DOTYour camcorder automatically stores the image recorded on a tape. While the image isbeing stored, the indicators flash fast, and the playback picture disappears. At thisstage, the picture may not be recorded clearly, depending on the tape condition.Using the fader1FADERFADERSTART/STOP](https://usermanual.wiki/Sony-Group/DCRTRV50.manual2/User-Guide-230850-Page-8.png)
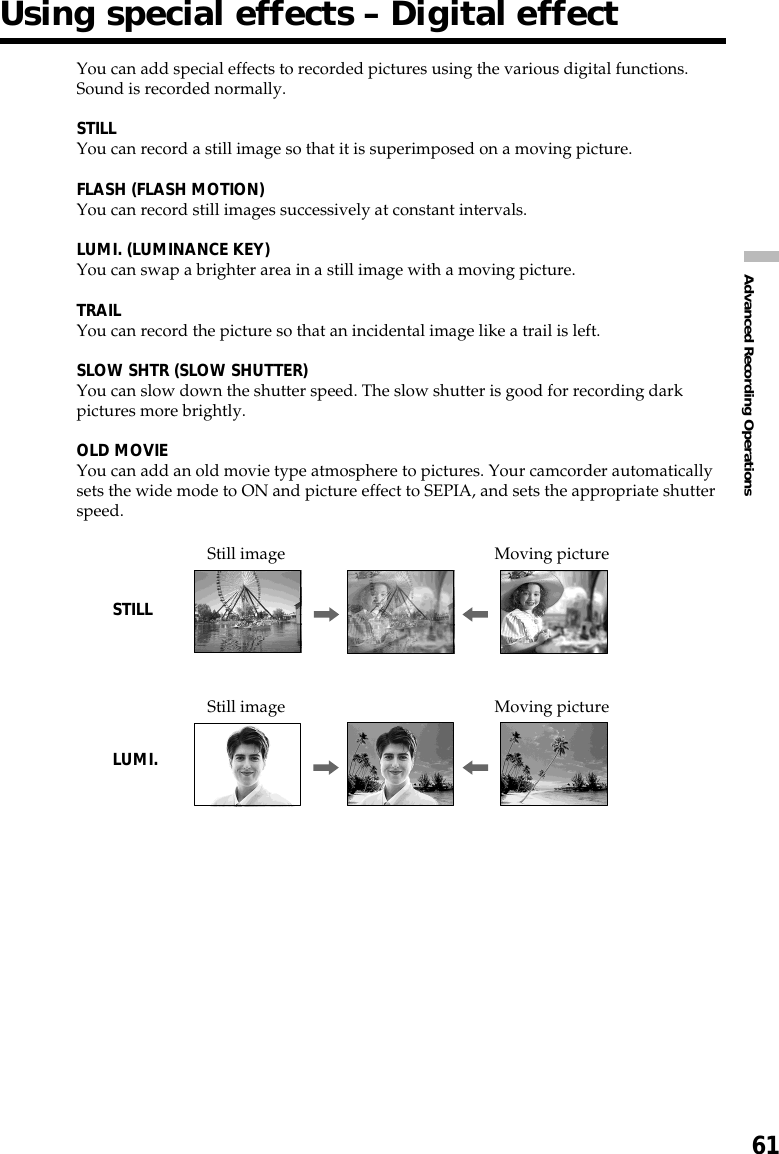
![60You can digitally process images to obtain special effects like those in films or on TV.NEG. ART [a] : The color and brightness of the picture are reversed.SEPIA : The picture appears in sepia.B&W : The picture appears in monochrome (black-and-white).SOLARIZE [b] : The light intensity becomes clearer, to make the picture look more likean illustration.SLIM [c] : The picture expands vertically.STRETCH [d] : The picture expands horizontally.PASTEL [e] : The contrast of the picture is emphasized, to make the picture lookmore like an animated cartoon.MOSAIC [f] : The picture appears mosaic-patterned.(1)Set the POWER switch to CAMERA. Press MENU, then select P EFFECT in with the SEL/PUSH EXEC dial, then press the dial (p. 200).(2)Turn the SEL/PUSH EXEC dial to select the desired picture effect, then pressthe dial.To cancel the picture effectSet P EFFECT to OFF in the menu settings.The following functions do not work during the picture effect–Recording still images on a “Memory Stick” in the tape recording or tape recordingstandby–OLD MOVIE of digital effect–BounceWhen you set the POWER switch to OFF (CHG)Picture effect is automatically canceled.Using special effects – Picture effect[a] [b] [c] [d] [e] [f]1MANUAL SET P EFFECT FLASH LVL WHT BAL N. S. LIGHT AUTO SHTR RETURNOFFNEG. ARTSEPIAB&WSOLARIZESLIMSTRETCHPASTELMOSAIC[MENU] : ENDMENU](https://usermanual.wiki/Sony-Group/DCRTRV50.manual2/User-Guide-230850-Page-10.png)
![72You can make a time-lapse recording by setting the camcorder to automatically recordand standby sequentially. You can achieve an excellent recording for flowering, gradualappearances, etc., with this function.(1)In the standby, press MENU, then turn the SEL/PUSH EXEC dial to selectINT. REC in , then press the dial (p. 201).(2)Turn the SEL/PUSH EXEC dial to select SET, then press the dial.(3)Turn the SEL/PUSH EXEC dial to set INTERVAL and REC TIME.1Turn the SEL/PUSH EXEC dial to select INTERVAL, then press the dial.2Turn the SEL/PUSH EXEC dial to select the desired interval time, thenpress the dial.The time: 30SEC y 1MIN y 5MIN y 10MIN3Turn the SEL/PUSH EXEC dial to select REC TIME, then press the dial.4Turn the SEL/PUSH EXEC dial to select the desired recording time, thenpress the dial.The time: 0.5SEC y 1SEC y 1.5SEC y 2SEC5Turn the SEL/PUSH EXEC dial to select RETURN, then press the dial.(4)Turn the SEL/PUSH EXEC dial to select ON, then press the dial.(5)Press MENU to erase the menu display. The INTERVAL indicator flashes.(6)Press START/STOP to start interval recording. The INTERVAL indicator lightsup.Interval recording10 min10 min1 s 1 s9 min 59 s 9 min 59 s[a][b][c]Example[a]REC TIME[b]Waiting time[c]INTERVAL](https://usermanual.wiki/Sony-Group/DCRTRV50.manual2/User-Guide-230850-Page-22.png)
![73Advanced Recording OperationsInterval recording46CAMERA SET D ZOOM PHOTO REC 16:9WIDE STEADYSHOT FRAME REC INT. REC RETURN ON[MENU] : END5 INTERVALSTBY[MENU] : END [MENU] : END[MENU] : END [MENU] : ENDCAMERA SET INT. REC INTERVAL REC TIME RETURN 30SECCAMERA SET INT. REC INTERVAL REC TIME RETURN 30SEC 1MIN 5MIN10MINCAMERA SET INT. REC INTERVAL REC TIME RETURN 0.5SECCAMERA SET INT. REC INTERVAL REC TIME RETURN 0.5SEC 1SEC1.5SEC 2SEC23MENU[MENU] : ENDCAMERA SET D ZOOM PHOTO REC 16:9WIDE STEADYSHOT FRAME REC INT. REC RETURN ONOFFSETSTBYSTBYSTBYSTBY[MENU] : ENDCAMERA SET INT. REC INTERVAL REC TIME RETURN 30SECSTBYSTBYSTBYTo cancel the interval recordingPerform either of the following:–Set INT. REC to OFF in the menu settings.–Set the POWER switch to other than CAMERA.To perform normal recording during the watinig timeYou can perform normal recording only once during the waiting time. Press START/STOP, and the indicator flashes and normal recording starts.To stop normal recording, press START/STOP again. To restart interval recording,perform step 6.On recording timeThere may be a discrepancy in the recording time of up to +/– six frames from theselected time.When pressing START/STOP during recording timeInterval recording stops. To restart it, perform step 6.](https://usermanual.wiki/Sony-Group/DCRTRV50.manual2/User-Guide-230850-Page-23.png)
![74You can make a recording with a stop-motion animated effect using frame recording.To create this effect, alternately move the subject a little and make a frame recording.We recommend that you use a tripod, and operate your camcorder using the RemoteCommander after step 4.(1)In the standby, press MENU, then turn the SEL/PUSH EXEC dial to selectFRAME REC in , then press the dial (p. 201).(2)Turn the SEL/PUSH EXEC dial to select ON, then press the dial.(3)Press MENU to erase the menu display.The FRAME REC indicator lights up.(4)Press START/STOP to start frame recording. Your camcorder makes arecording for about six frames, and returns to recording standby.(5)Move the subject, and repeat step 4.To cancel the frame recordingPerform either of the following:–Set FRAME REC to OFF in the menu settings.–Set the POWER switch to other than CAMERA.NoteThe remaining tape time is not indicated correctly if you use this function continuously.When using the frame recordingThe last recorded frame is longer than other frames.Frame by frame recording– Frame recording24CAMERA SET D ZOOM PHOTO REC 16:9WIDE STEADYSHOT FRAME REC INT. REC RETURNON [MENU] : ENDCAMERA SET D ZOOM PHOTO REC 16:9WIDE STEADYSHOT FRAME REC INT. REC RETURNOFFON [MENU] : ENDSTBY STBYMENU](https://usermanual.wiki/Sony-Group/DCRTRV50.manual2/User-Guide-230850-Page-24.png)
![75Advanced Playback OperationsDuring playback, you can process a scene using the following picture effect:NEG. ART, SEPIA, B&W and SOLARIZE.(1)In the playback or playback pause, press MENU, then select P EFFECT in with the SEL/PUSH EXEC dial (p. 200).(2)Turn the SEL/PUSH EXEC dial to select the desired picture effect, then pressthe dial.For details of each picture effect, see page 60.To cancel the picture effectSet P EFFECT to OFF in the menu settings.Notes•You cannot process externally input scenes using picture effect.•You cannot record images on a tape on your camcorder when you have processed theimage using picture effect. However, you can record images on a “Memory Stick”(p. 135, 147), or on a VCR using your camcorder as a player.Pictures processed by picture effectPictures processed by picture effect is not output through the DV IN/OUT jack.When you set the POWER switch to OFF (CHG) or stop playing backThe picture effect is automatically canceled.— Advanced Playback Operations —Playing back tapes with picture effectMENU1MANUAL SET P EFFECT RETURN OFFNEG. ARTSEPIAB&WSOLARIZE[MENU] : END](https://usermanual.wiki/Sony-Group/DCRTRV50.manual2/User-Guide-230850-Page-25.png)

![80If you use a cassette with cassette memory, you can search for the boundaries ofrecorded tape by title. Use the Remote Commander for this operation.Before operationSet CM SEARCH in to ON in the menu settings. (The default setting is ON.)(1)Set the POWER switch to VCR.(2)Press SEARCH MODE on the Remote Commander repeatedly until the TITLESEARCH indicator appears. The indicator changes as follows:TITLE SEARCH t DATE SEARCH t PHOTO SEARCH(no indicator) TPHOTO SCAN(3)Press . or > on the Remote Commander to select the title for playback.Your camcorder automatically starts playback of the scene having the title thatyou selected.[a]Actual point you are trying to search for[b]Present point on the tapeTo stop searchingPress x.If you use a cassette without cassette memoryYou cannot superimpose or search a title.If a tape has a blank portion between recorded portionsThe title search may not work correctly.To superimpose a titleSee page 110.Searching the boundaries of recordedtape by title – TITLE SEARCH3.>2SEARCHMODETITLE SEARCH 1 HELLO!2 CONGRATULATIONS!3 HAPPY NEW YEAR!4 PRESENT5 GOOD MORNING6 WEDDINGTITLE SEARCH 3 HAPPY NEW YEAR!4 PRESENT5 GOOD MORNING6 WEDDING7 NIGHT8 BASEBALL[b][a]](https://usermanual.wiki/Sony-Group/DCRTRV50.manual2/User-Guide-230850-Page-30.png)
![81Advanced Playback OperationsYou can automatically search for the point where the recording date changes and startplayback from that point (date search). Use a cassette with cassette memory forconvenience. Use the Remote Commander for this operation.Use this function to check where recording dates change or to edit the tape at eachrecording date.Searching for the date by using cassette memoryBefore operation•You can use this function only when playing back a cassette with cassette memory.•Set CM SEARCH in to ON in the menu settings. (The default setting is ON.)(1)Set the POWER switch to VCR.(2)Press SEARCH MODE on the Remote Commander repeatedly until the DATESEARCH indicator appears. The indicator changes as follows:TITLE SEARCH t DATE SEARCH t PHOTO SEARCH(no indicator) TPHOTO SCAN(3)Press . or > on the Remote Commander to select the date for playback.Your camcorder automatically starts playback at the beginning of the selecteddate.[a]Actual point you are trying to search for[b]Present point on the tapeTo stop searchingPress x.Searching a recording by date– DATE SEARCH3.>2SEARCHMODEDATE SEARCH1 SEP/ 5/022 SEP/ 6/023 DEC/24/024 JAN/ 1/035 FEB/ 11/036 APR/ 29/03DATE SEARCH1 SEP/ 5/022 SEP/ 6/023 DEC/24/024 JAN/ 1/035 FEB/ 11/036 APR/ 29/03[b][a]](https://usermanual.wiki/Sony-Group/DCRTRV50.manual2/User-Guide-230850-Page-31.png)
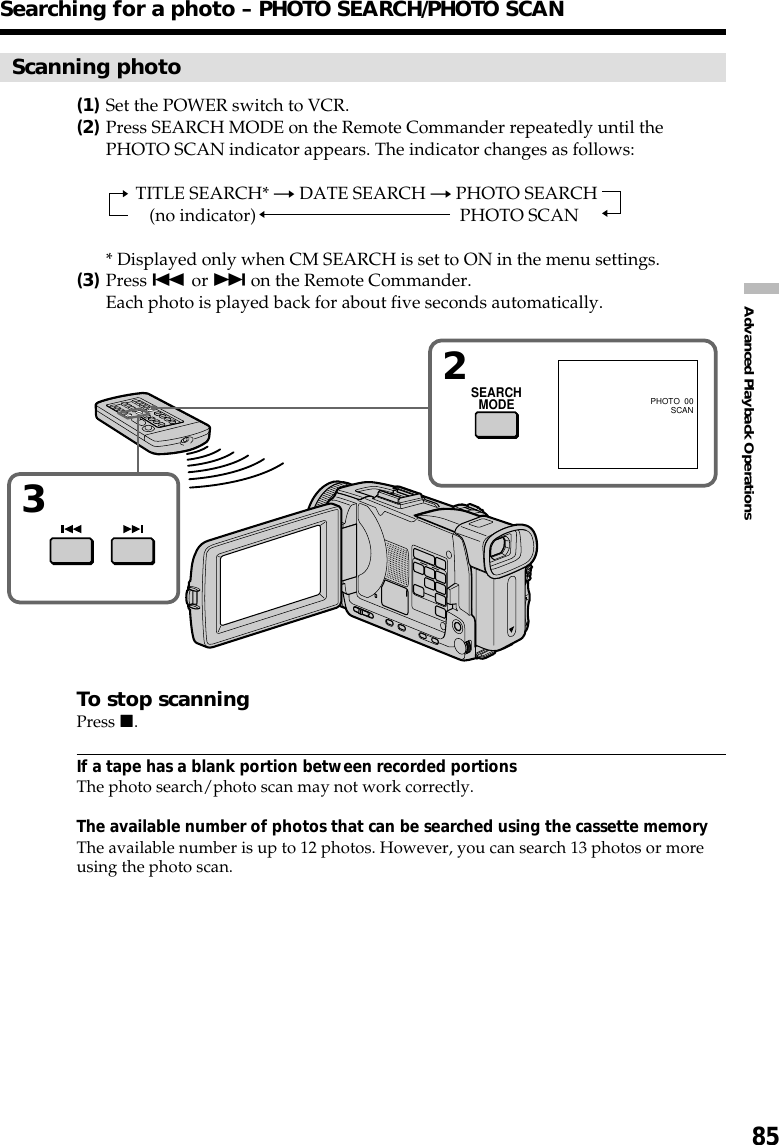
![83Advanced Playback OperationsYou can search for a still image you have recorded on a tape (PHOTO SEARCH).You can also search for still images one after another and display each image forfive seconds automatically regardless of cassette memory (PHOTO SCAN). Use theRemote Commander for these operations.Use this function to check or edit still images.Searching for a photo by using cassette memoryBefore operation•You can use this function only when playing back a cassette with cassette memory.•Set CM SEARCH in to ON in the menu settings. (The default setting is ON.)(1)Set the POWER switch to VCR.(2)Press SEARCH MODE on the Remote Commander repeatedly until thePHOTO SEARCH indicator appears. The indicator changes as follows:TITLE SEARCH t DATE SEARCH t PHOTO SEARCH(no indicator) TPHOTO SCAN(3)Press . or > on the Remote Commander to select the date for playback.Your camcorder automatically starts playback of the photo having the datethat you selected.[a]Actual point you are trying to search for[b]Present point on the tapeTo stop searchingPress x.Searching for a photo– PHOTO SEARCH/PHOTO SCAN3.>2SEARCHMODEPHOTO SEARCH1 SEP/ 5/02 5:30PM2 SEP/ 6/02 8:50AM3 DEC/24/02 10:30AM4 JAN/ 1/03 11:25PM5 FEB/ 11/03 4:11PM6 APR/ 29/03 1:45PMPHOTO SEARCH1 SEP/ 5/02 5:30PM2 SEP/ 6/02 8:50AM3 DEC/24/02 10:30AM4 JAN/ 1/03 11:25PM5 FEB/ 11/03 4:11PM6 APR/ 29/03 1:45PM[b][a]MENU](https://usermanual.wiki/Sony-Group/DCRTRV50.manual2/User-Guide-230850-Page-33.png)
![90Step 2: Setting the VCR to operate with the A/V connecting cableTo edit using the VCR, send the control signal by infrared rays to the remote sensor onthe VCR.When you connect using an A/V connecting cable, follow the procedure below, steps(1) to (4), to send the control signal correctly.(1) Set the IR SETUP code1Set the POWER switch to VCR on your camcorder.2Turn the power of the connected VCR on, then set the input selector to LINE.When you connect a video camera recorder, set its power switch to VCR/VTR.3Press MENU, then turn the SEL/PUSH EXEC dial to select VIDEO EDIT in, then press the dial (p. 209).4Turn the SEL/PUSH EXEC dial to select TAPE, then press the dial.5Turn the SEL/PUSH EXEC dial to select EDIT SET, then press the dial.6Turn the SEL/PUSH EXEC dial to select CONTROL, then press the dial.7Turn the SEL/PUSH EXEC dial to select IR, then press the dial.8Turn the SEL/PUSH EXEC dial to select IR SETUP and turn the dial to selectIR SETUP code number of your VCR, then press the dial.Check the code in “About IR SETUP codes.” (p. 91)Dubbing only desired scenes – Digital program editing (on tapes)43658VIDEO EDIT MARK UNDO ERASE ALL START EDIT SETOTHERS DATA CODE BEEP COMMANDER DISPLAY VIDEO EDIT RETURN RETURNTAPEMEMORYIR0:08:55:06TOTAL 0:00:00:00SCENE 0[MENU] : ENDVIDEO EDIT EDIT SET CONTROL ADJ TEST ”CUT–IN” ”CUT–OUT” IR SETUP PAUSEMODE IR TEST RETURNIRi. LINK0:08:55:06[MENU] : ENDVIDEO EDIT EDIT SET CONTROL ADJ TEST ”CUT–IN” ”CUT–OUT” IR SETUP PAUSEMODE IR TEST RETURN 30:08:55:06[MENU] : ENDVIDEO EDIT EDIT SET CONTROL ADJ TEST ”CUT–IN” ”CUT–OUT” IR SETUP PAUSEMODE IR TEST RETURNIR0:08:55:06[MENU] : ENDVIDEO EDIT MARK UNDO ERASE ALL START EDIT SET1 IN0:08:55:06TOTAL 0:00:00:00SCENE 0[MENU] : END[MENU] : ENDOTHERS DATA CODE BEEP COMMANDER DISPLAY VIDEO EDIT RETURN READY[MENU] : ENDOTHERS DATA CODE BEEP COMMANDER DISPLAY VIDEO EDIT RETURN RETURNTAPEMEMORY[MENU] : ENDMENU](https://usermanual.wiki/Sony-Group/DCRTRV50.manual2/User-Guide-230850-Page-40.png)
![92(2) Setting the modes to cancel the recording pause on the VCR1Turn the SEL/PUSH EXEC dial to select PAUSEMODE, then press the dial.2Turn the SEL/PUSH EXEC dial to select the mode to cancel recording pauseon the VCR, then press the dial.Refer to the operating instructions of your VCR.Buttons to cancel recording pause on the VCRThe buttons vary depending on your VCR. To cancel recording pause:–Select PAUSE if the button to cancel recording pause is X.–Select REC if the button to cancel recording pause is z.–Select PB if the button to cancel recording pause is N.(3) Setting your camcorder and the VCR to face each otherLocate the infrared rays emitter of your camcorder and face it towards the remotesensor of the VCR.Set the devices about 30 cm (12 in.) apart, and remove any obstacles between thedevices.Dubbing only desired scenes – Digital program editing (on tapes)VCRRemote sensorA/V connecting cable (supplied)Infrared rays emitter12VIDEO EDIT EDIT SET CONTROL ADJ TEST ”CUT–IN” ”CUT–OUT” IR SETUP PAUSEMODE IR TEST RETURNPAUSERECPB0:08:55:06[MENU] : ENDVIDEO EDIT EDIT SET CONTROL ADJ TEST ”CUT–IN” ”CUT–OUT” IR SETUP PAUSEMODE IR TEST RETURNPAUSE0:08:55:06[MENU] : END](https://usermanual.wiki/Sony-Group/DCRTRV50.manual2/User-Guide-230850-Page-42.png)
![93Editing(4) Confirming VCR operation1Insert a recordable tape into the VCR, then set to recording pause.2Turn the SEL/PUSH EXEC dial to select IR TEST, then press the dial.3Turn the SEL/PUSH EXEC dial to select EXECUTE, then press the dial.If the VCR starts recording, the setting is correct.When recording is finished, the indicator changes to COMPLETE.When the VCR does not operate correctly•After checking the code in “About IR SETUP codes”, set the IR SETUP or thePAUSEMODE again.•Place your camcorder at least 30 cm (12 in.) away from the VCR.•Refer to the operating instructions of your VCR.Dubbing only desired scenes – Digital program editing (on tapes)23VIDEO EDIT EDIT SET CONTROL ADJ TEST ”CUT–IN” ”CUT–OUT” IR SETUP PAUSEMODE IR TEST RETURNENGAGEREC PAUSERETURNEXECUTE0:08:55:06[MENU] : ENDVIDEO EDIT EDIT SET CONTROL ADJ TEST ”CUT–IN” ”CUT–OUT” IR SETUP PAUSEMODE IR TEST RETURN COMPLETE0:08:55:06[MENU] : END](https://usermanual.wiki/Sony-Group/DCRTRV50.manual2/User-Guide-230850-Page-43.png)
![94Step 2: Setting the VCR to operate with the i.LINK cable(DV connecting cable)When you connect using the i.LINK cable (DV connecting cable) (optional), follow theprocedure below.(1)Set the POWER switch to VCR on your camcorder.(2)Turn the power of the connected VCR on, then set the input selector to DVinput. When you connect a digital video camera recorder, set its power switchto VCR/VTR.(3)Press MENU, then turn the SEL/PUSH EXEC dial to select VIDEO EDIT in, then press the dial (p. 209).(4)Turn the SEL/PUSH EXEC dial to select TAPE, then press the dial.(5)Turn the SEL/PUSH EXEC dial to select EDIT SET, then press the dial.(6)Turn the SEL/PUSH EXEC dial to select CONTROL, then press the dial.(7)Turn the SEL/PUSH EXEC dial to select i.LINK, then press the dial.43657VIDEO EDIT MARK UNDO ERASE ALL START EDIT SETOTHERS DATA CODE BEEP COMMANDER DISPLAY VIDEO EDIT RETURN RETURNTAPEMEMORYIR0:08:55:06TOTAL 0:00:00:00SCENE 0[MENU] : ENDVIDEO EDIT EDIT SET CONTROL ADJ TEST ”CUT–IN” ”CUT–OUT” IR SETUP PAUSEMODE IR TEST RETURNIRi. LINK0:08:55:06[MENU] : ENDVIDEO EDIT EDIT SET CONTROL ADJ TEST ”CUT–IN” ”CUT–OUT” IR SETUP PAUSEMODE IR TEST RETURNi. LINK0:08:55:06[MENU] : ENDVIDEO EDIT MARK UNDO ERASE ALL START EDIT SET1 IN0:08:55:06TOTAL 0:00:00:00SCENE 0[MENU] : END[MENU] : ENDOTHERS DATA CODE BEEP COMMANDER DISPLAY VIDEO EDIT RETURN READY[MENU] : ENDOTHERS DATA CODE BEEP COMMANDER DISPLAY VIDEO EDIT RETURN RETURNTAPEMEMORY[MENU] : ENDVIDEO EDIT EDIT SET CONTROL ADJ TEST ”CUT–IN” ”CUT–OUT” IR SETUP PAUSEMODE IR TEST RETURNIR0:08:55:06[MENU] : ENDMENUDubbing only desired scenes – Digital program editing (on tapes)](https://usermanual.wiki/Sony-Group/DCRTRV50.manual2/User-Guide-230850-Page-44.png)
![96Notes•When you complete step 3, the image used to adjust the synchronization is recordedfor about 50 seconds.•If you start recording from the very beginning of the tape, the first few seconds of thetape may not record properly. Be sure to allow about 10 seconds’ lead before startingrecording.•When you connect with an i.LINK cable (DV connecting cable) you may not be able tooperate the dubbing function correctly, depending on the VCR. Keep the i.LINKconnection, and set CONTROL to IR in the menu settings. Video and audio are sentby digital signals.Dubbing only desired scenes – Digital program editing (on tapes)2,3 68VIDEO EDIT EDIT SET CONTROL ADJ TEST ”CUT–IN” ”CUT–OUT” IR SETUP PAUSEMODE IR TEST RETURNRETURNEXECUTEENGAGEREC PAUSE0:08:55:06[ME VIDEO EDIT EDIT SET CONTROL ADJ TEST ”CUT–IN” ”CUT–OUT” IR SETUP PAUSEMODE IR TEST RETURNEXECUTINGNo. 5 IN –600:08:55:06[ME VIDEO EDIT EDIT SET CONTROL ADJ TEST ”CUT–IN” ”CUT–OUT” IR SETUP PAUSEMODE IR TEST RETURNCOMPLETE0:08:55:06[MENU] : ENDVIDEO EDIT EDIT SET CONTROL ADJ TEST ”CUT–IN” ”CUT–OUT” IR SETUP PAUSEMODE IR TEST RETURN 00:08:55:06[MENU] : ENDVIDEO EDIT EDIT SET CONTROL ADJ TEST ”CUT–IN” ”CUT–OUT” IR SETUP PAUSEMODE IR TEST RETURN 00:08:55:06[MENU] : END](https://usermanual.wiki/Sony-Group/DCRTRV50.manual2/User-Guide-230850-Page-46.png)
![97EditingDubbing only desired scenes – Digital program editing (on tapes)Operation 1: Making a program(1)Insert the tape for playback into your camcorder, and insert a tape forrecording into the VCR.(2)Press MENU and turn the SEL/PUSH EXEC dial to select VIDEO EDIT in ,then press the dial (p. 209).(3)Turn the SEL/PUSH EXEC dial to select TAPE, then press the dial.(4)Search for the beginning of the first scene you want to insert using the videooperation buttons, then pause playback.You can fine-adjust one frame at a time with EDITSEARCH.(5)Press MARK on the Remote Commander, or turn the SEL/PUSH EXEC dial toselect MARK, then press the dial.The IN point of the first program is set, and the top part of the program markchanges to light blue.(6)Search for the end of the first scene you want to insert using the videooperation buttons, then pause playback.(7)Press MARK on the Remote Commander, or the SEL/PUSH EXEC dial.The OUT point of the first program is set, then the bottom part of the programmark changes to light blue.(8)Repeat steps 4 to 7, then set the program.When the program is set, the program mark changes to light blue.You can set up to 20 programs in maximum.52387OTHERS DATA CODE BEEP COMMANDER DISPLAY VIDEO EDIT RETURN READY[MENU] : ENDOTHERS DATA CODE BEEP COMMANDER DISPLAY VIDEO EDIT RETURN RETURNTAPEMEMORY[MENU] : ENDVIDEO EDIT MARK UNDO ERASE ALL START EDIT SET1 IN 0:08:55:06TOTAL 0:00:00:00SCENE 0[MENU] : ENDVIDEO EDIT MARK UNDO ERASE ALL START EDIT SET4 IN 0:10:01:23TOTAL 0:00:47:12SCENE 3[MENU] : ENDVIDEO EDIT MARK UNDO ERASE ALL START EDIT SET2 IN 0:09:07:06TOTAL 0:00:12:00SCENE 1[MENU] : ENDVIDEO EDIT MARK UNDO ERASE ALL START EDIT SET1 OUT0:08:55:06TOTAL 0:00:00:00SCENE 0[MENU] : ENDN X N X N XMENU](https://usermanual.wiki/Sony-Group/DCRTRV50.manual2/User-Guide-230850-Page-47.png)