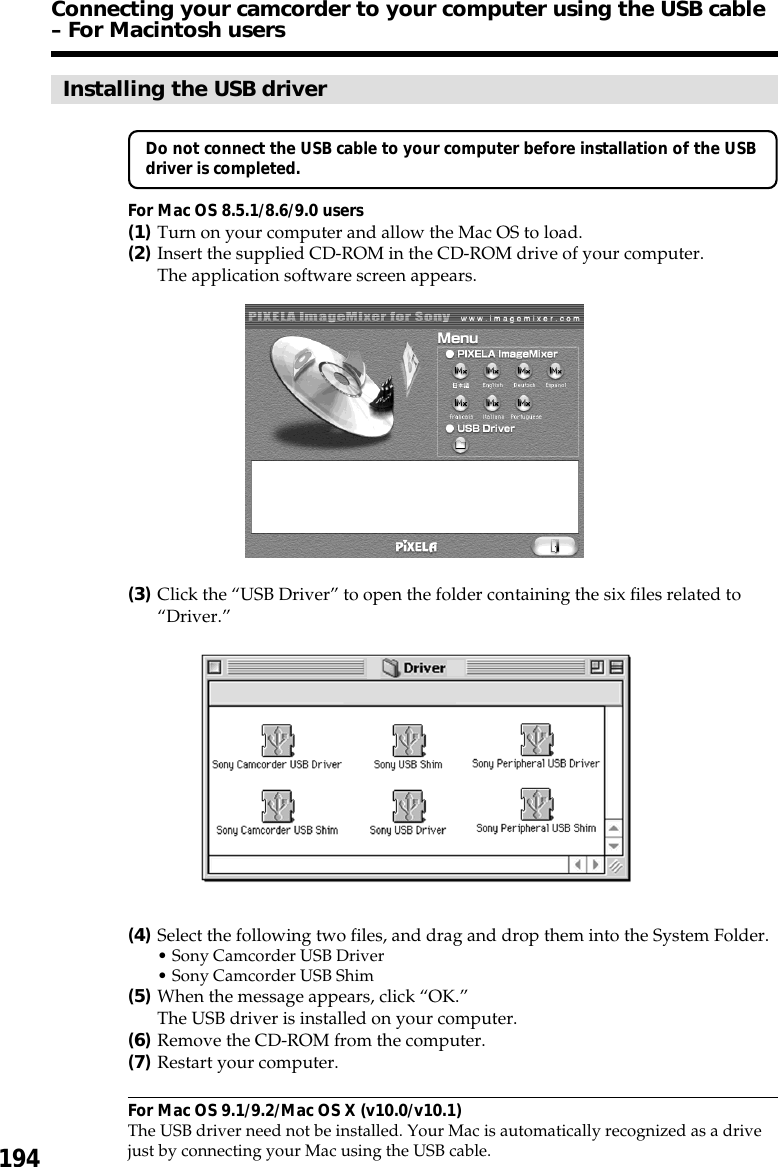
Sony Group DCRTRV50 Sony Handycam DCR-TRV50 User Manual DCR TRV40 50
Sony Corporation Sony Handycam DCR-TRV50 DCR TRV40 50
UserManual.wiki
>
Sony Group
>
DCRTRV50 User Manual
>
manual4
Contents
1.
manual1
2.
manual2
3.
manual3
4.
manual4
5.
manual5
6.
Network manual
7.
network manual
8.
manual insert
manual4
Navigation menu
Upload a User Manual
Namespaces
Wiki Guide
HTML
PDF
Info
Views
User Manual
Discussion / Help
Navigation
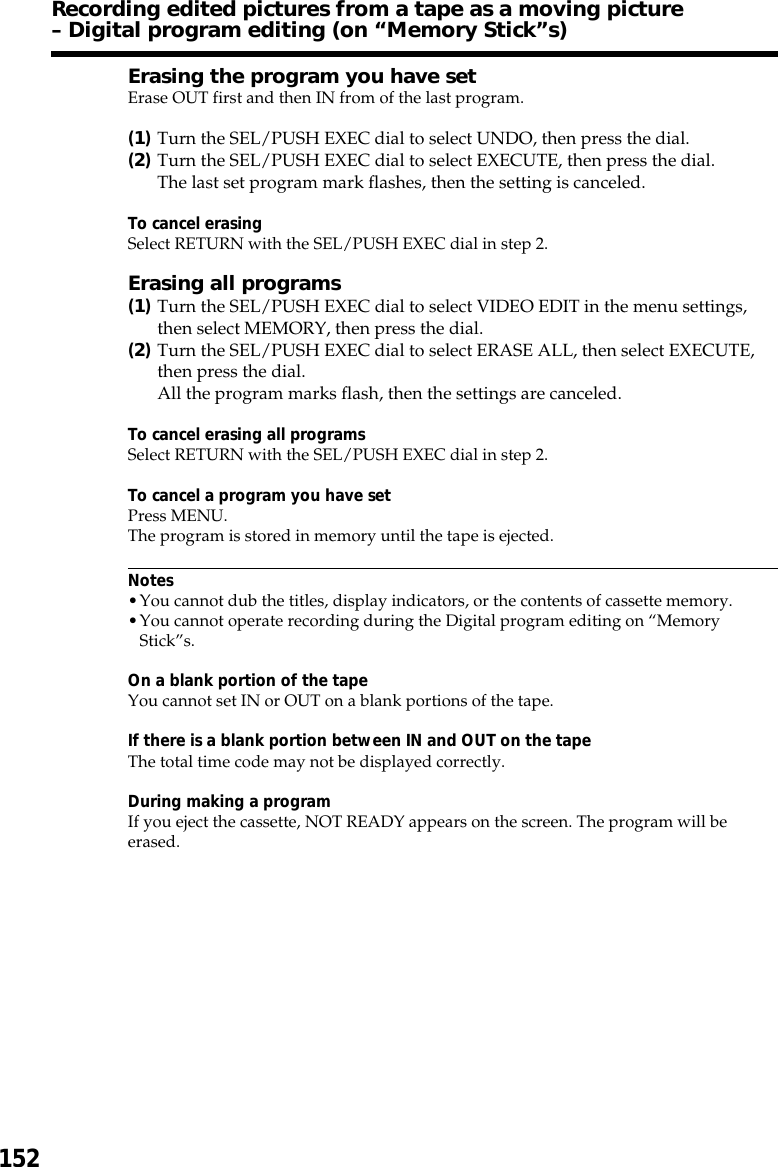
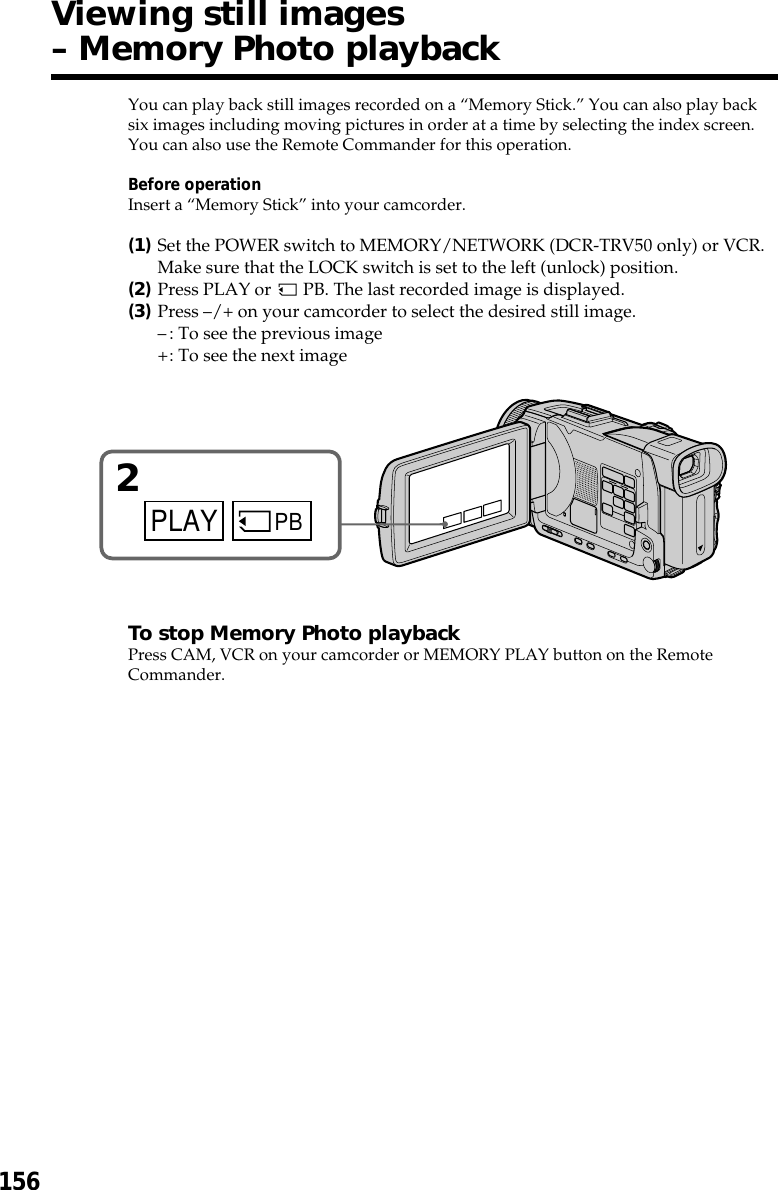
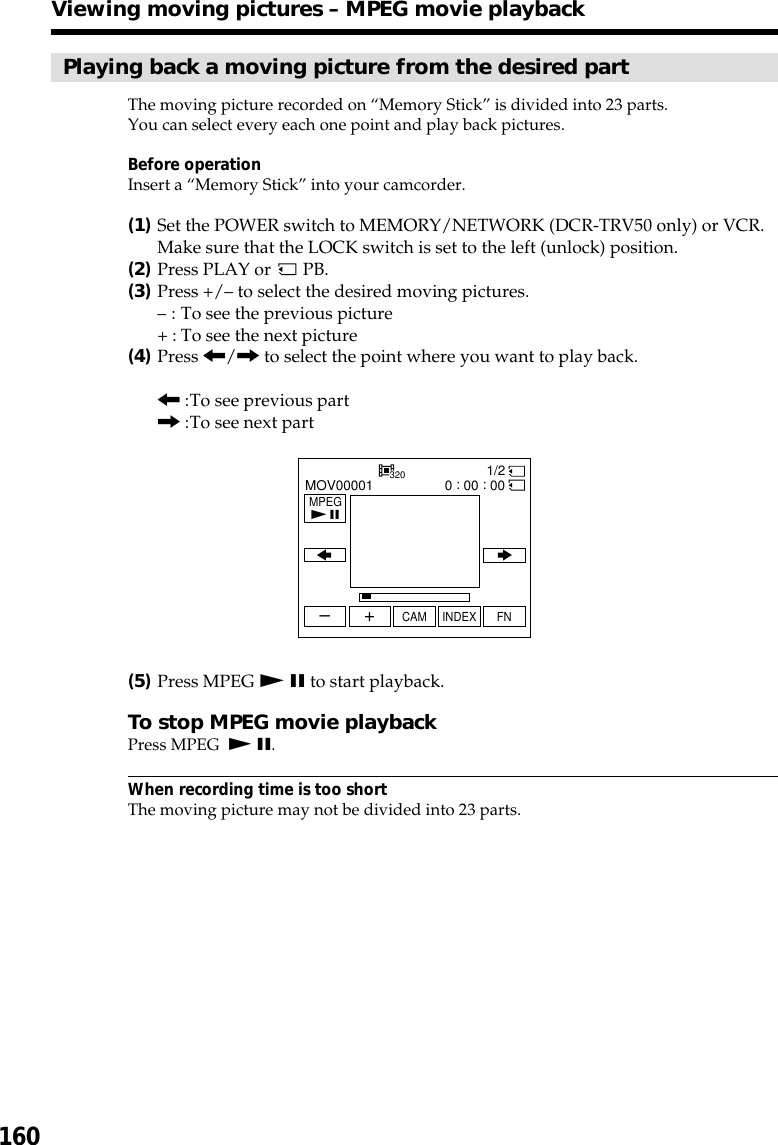
![151“Memory Stick” OperationsYou can duplicate selected scenes (programs) for editing onto “Memory Stick”s.Making the program(1)Set the POWER switch to VCR.(2)Insert the tape for playback, and a “Memory Stick” for recording into yourcamcorder.(3)Press MENU and turn the SEL/PUSH EXEC dial to select VIDEO EDIT in ,then press the dial (p. 209).(4)Turn the SEL/PUSH EXEC dial to select MEMORY, then press the dial.(5)Turn the SEL/PUSH EXEC dial to select IMAGESIZE and select the desiredimage size, then press the dial.(6)Search for the beginning of the first scene you want to insert using the videooperation buttons, then pause playback.You can fine-adjust one frame at a time with EDITSEARCH.(7)Press MARK on the Remote Commander, or turn the SEL/PUSH EXEC dial toselect MARK, the press the dial.The IN point of the first program is set, and the top part of the program markchanges to light blue.(8)Search for the end of the first scene you want to insert using the videooperation buttons, then pause playback.(9)Press MARK on the Remote Commander, or the SEL/PUSH EXEC dial.The OUT point of the first program is set, then the bottom part of the programmark changes to light blue.(10)Repeat steps 6 to 9, then set the program.When one program is set, the program mark changes to light blue.You can set 20 programs in maximum.79106,8REW PLAY FFSTOP PAUSE320 320 320VIDEO EDIT MARK UNDO ERASE ALL START IMAGESIZE1 OUT0:08:55:06TOTAL 0:00:00SCENE 0 2min TOTAL 0:00:12SCENE 1 2min TOTAL 0:00:31SCENE 3 2min[MENU] : ENDVIDEO EDIT MARK UNDO ERASE ALL START IMAGESIZE2 IN 0:08:58:06[MENU] : ENDVIDEO EDIT MARK UNDO ERASE ALL START IMAGESIZE4 IN 0:10:01:23[MENU] : ENDN X N X N XMENURecording edited pictures from a tape asa moving picture – Digital programediting (on “Memory Stick”s)](https://usermanual.wiki/Sony-Group/DCRTRV50.manual4/User-Guide-230852-Page-1.png)
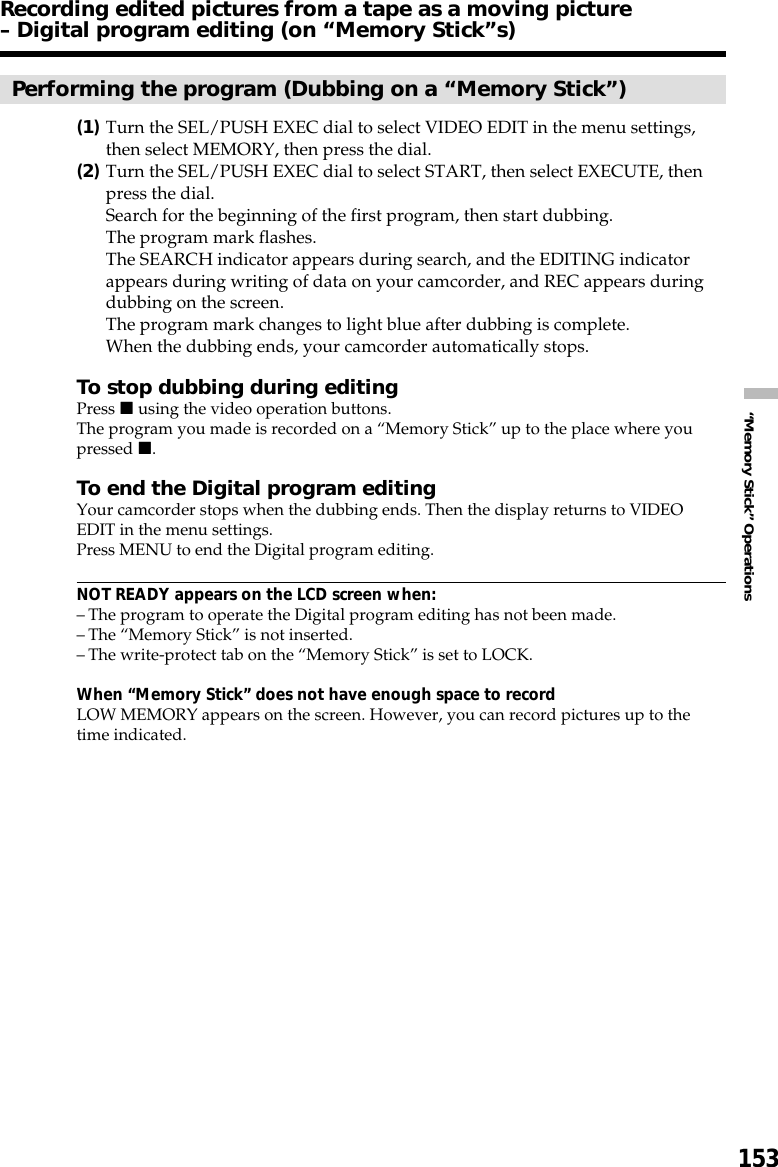
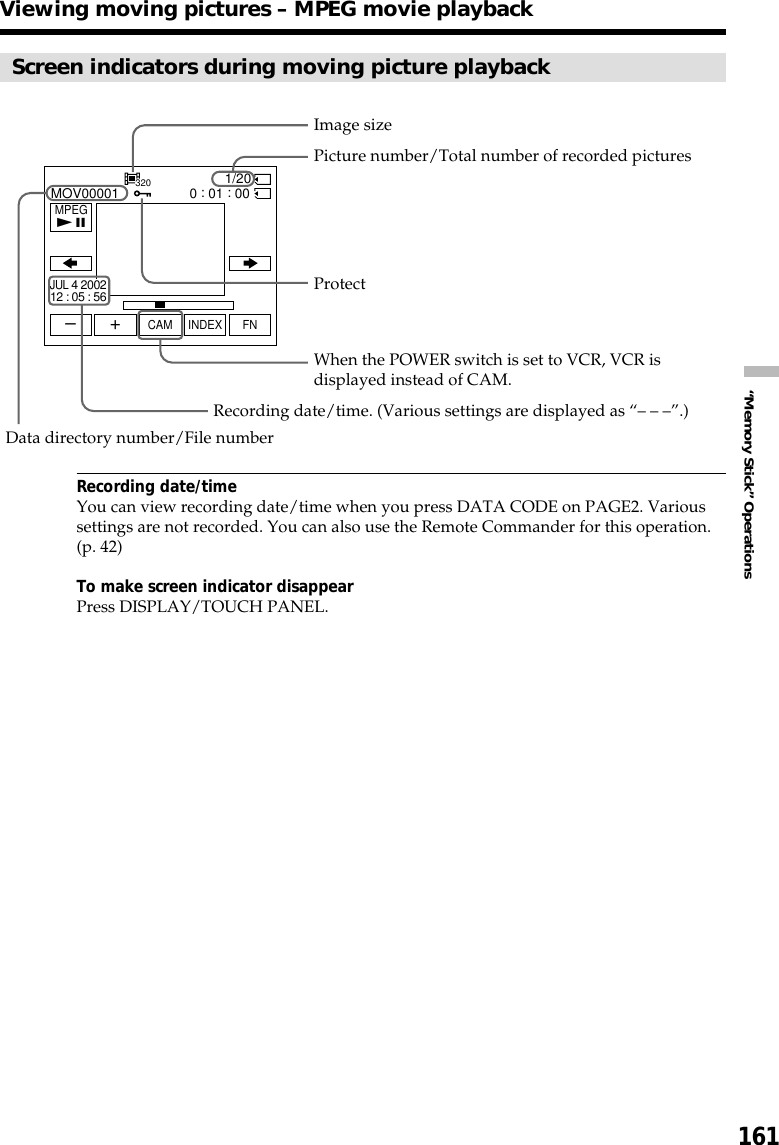
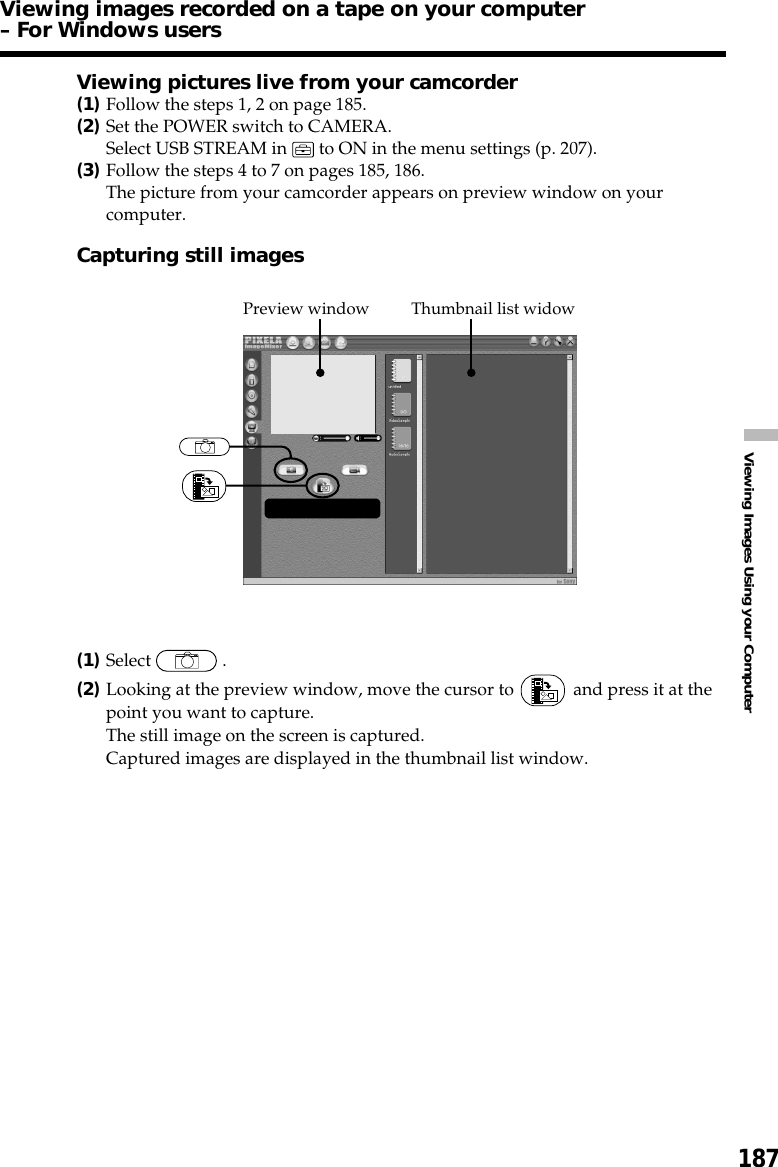
![154Using the search function, you can automatically capture only still images from tapesand record them on a “Memory Stick” in sequence.Before operation•Insert a recorded tape into your camcorder and rewind the tape.•Insert a “Memory Stick” into your camcorder.(1)Set the POWER switch to VCR.(2)Press MENU and turn the SEL/PUSH EXEC dial to select PHOTO SAVE in, then press the dial (p. 204).PHOTO BUTTON appears on the screen.(3)Press PHOTO deeper. The still images from the tape are recorded on the“Memory Stick.” The number of still images copied is displayed. END isdisplayed when copying ends.To stop copyingPress MENU or x.When the “Memory Stick” becomes fullMEMORY FULL appears on the screen, and copying stops. Insert another “MemoryStick” and repeat the procedure from step 2.Copying still images from a tape– PHOTO SAVE32PHOTOSAV I NG0END4PHOTO BUTTON640STD640STD640STDPHOTO SAVE 0:00:00:004/15PHOTO SAVE 0:30:00:008/15MEMORY SET STILL SET MOVIE SET PHOTO SAVE FILE NO. RETURNREADY[MENU] : ENDPHOTO SAVE 0:00:00:004/15[PHOTO] : START [MENU] : END[MENU] : END [MENU] : ENDMENU](https://usermanual.wiki/Sony-Group/DCRTRV50.manual4/User-Guide-230852-Page-4.png)
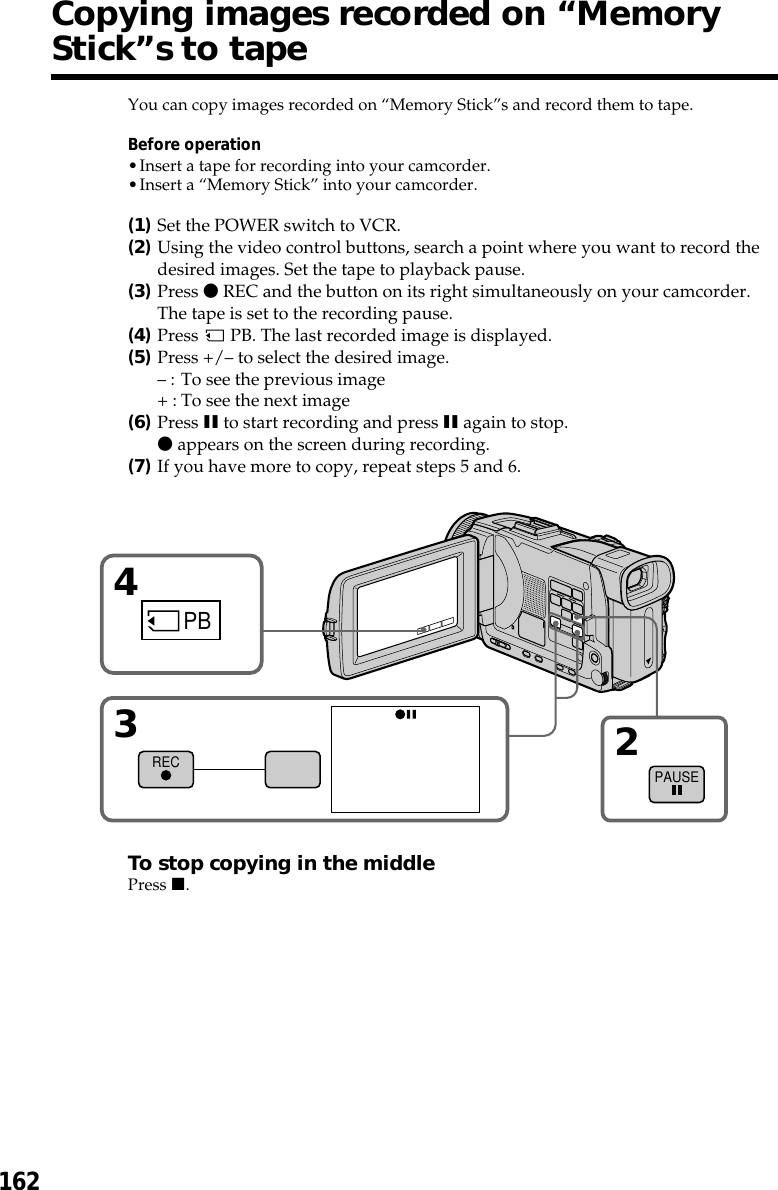
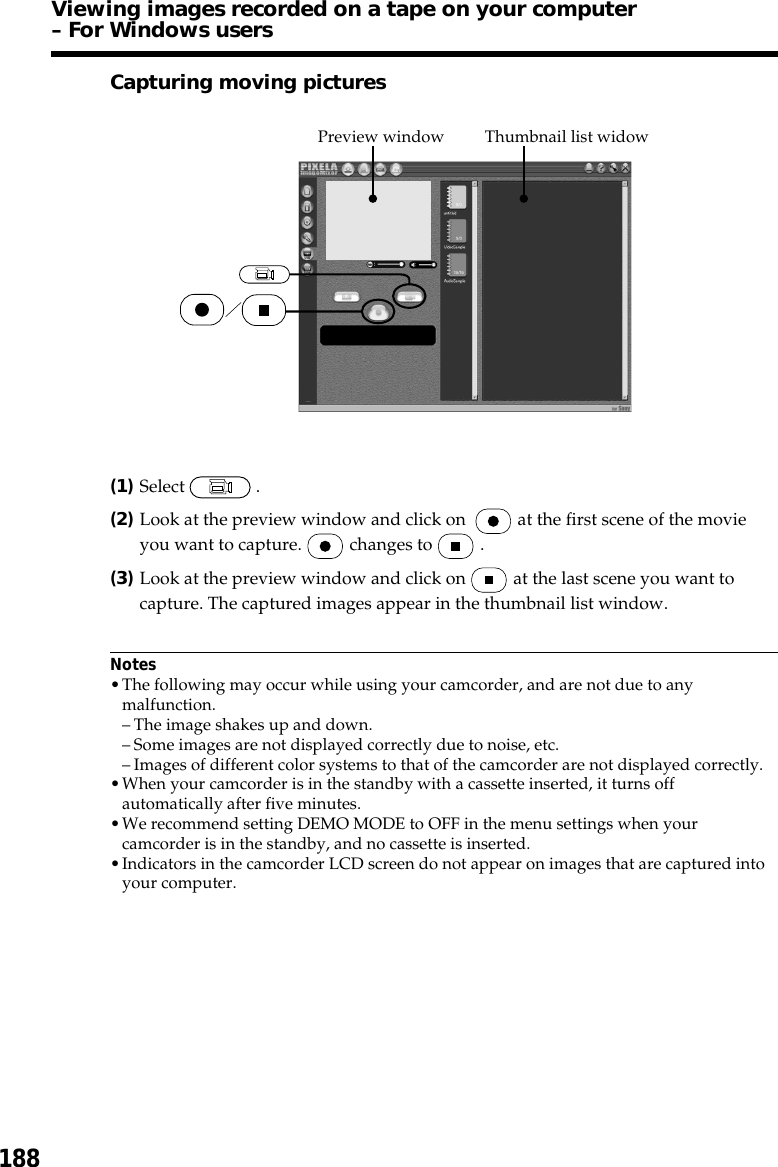
![170Deleting all imagesYou can delete all unprotected images in a “Memory Stick.”Before operationInsert a “Memory Stick” into your camcorder.(1)Set the POWER switch to MEMORY/NETWORK (DCR-TRV50 only). Makesure that the LOCK switch is set to the left (unlock) position.(2)Press MENU, then turn the SEL/PUSH EXEC dial to select DELETE ALL in, then press the dial (p. 204).(3)Turn the SEL/PUSH EXEC dial to select OK, then press the dial. OK changesto EXECUTE.(4)Turn the SEL/PUSH EXEC dial to select EXECUTE, then press the dial.DELETING flashes on the screen. When all unprotected images are deleted,COMPLETE is displayed.To cancel deleting all the images in the “Memory Stick”Select RETURN in step 3 or 4.While DELETING appearsDo not turn the POWER switch or press any buttons.Deleting images – DELETE243MEMORY SET STILL SET MOVIE SET FILE NO. DELETE ALL FORMAT RETURN[MENU] : ENDREADYMEMORY SET STILL SET MOVIE SET FILE NO. DELETE ALL FORMAT RETURN[MENU] : ENDRETURNOKMEMORY SET STILL SET MOVIE SET FILE NO. DELETE ALL FORMAT RETURN[MENU] : ENDRETURNOKMEMORY SET STILL SET MOVIE SET FILE NO. DELETE ALL FORMAT RETURN[MENU] : ENDRETURNEXECUTEMEMORY SET STILL SET MOVIE SET FILE NO. DELETE ALL FORMAT RETURN[MENU] : ENDDELETINGMEMORY SET STILL SET MOVIE SET FILE NO. DELETE ALL FORMAT RETURN[MENU] : ENDCOMPLETEMENU](https://usermanual.wiki/Sony-Group/DCRTRV50.manual4/User-Guide-230852-Page-20.png)


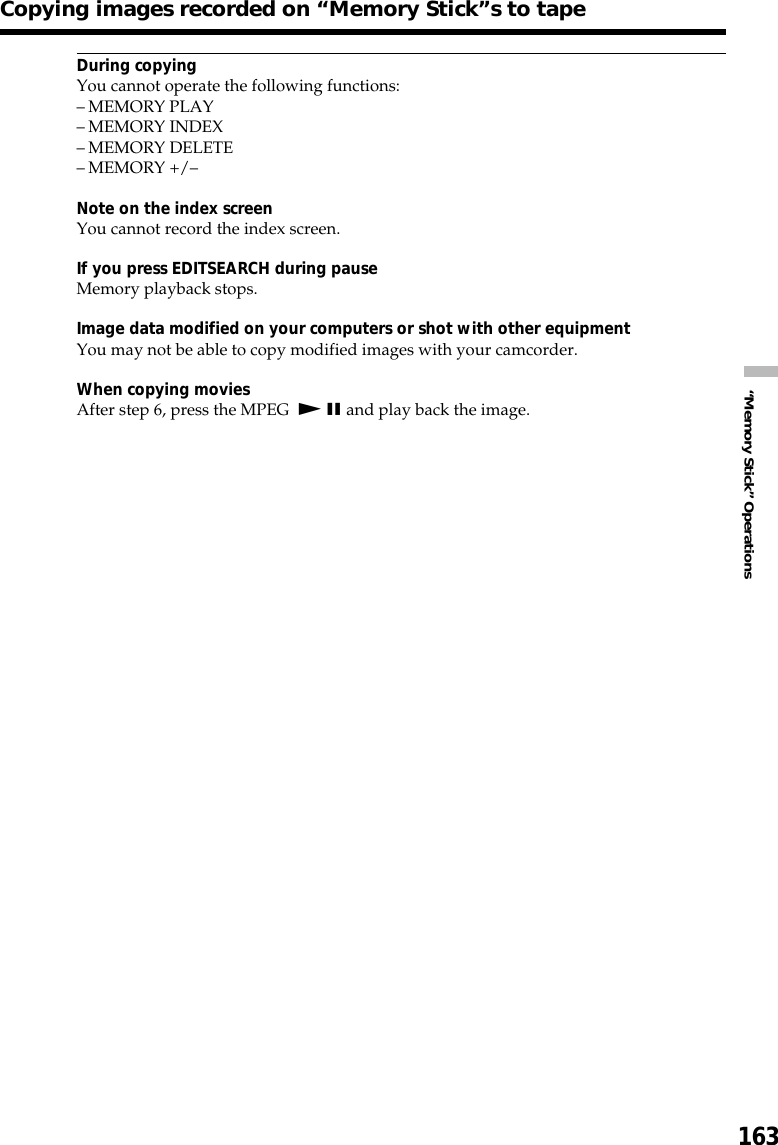
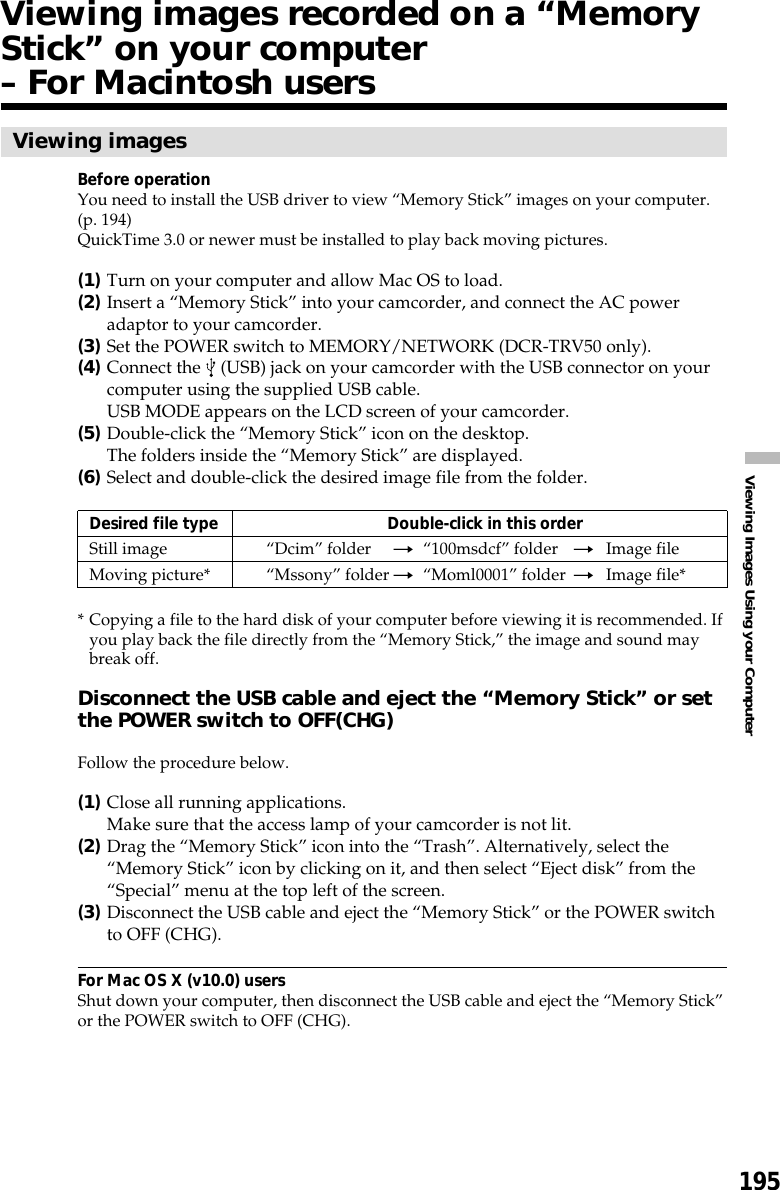
![191Viewing Images Using your Computer(6)Select and double-click the desired image file from the folder.For the detailed folder and file name, see “Image file storage destinations andimage files”.Desired file type Double-click in this orderStill image “Dcim” folder t“100msdcf” folder tImage fileMoving picture* “Mssony” folder t“Moml0001” folder tImage file** Copying a file to the hard disk of your computer before viewing it is recommended. Ifyou play back the file directly from the “Memory Stick,” the image and sound maybreak off.Image file storage destinations and image filesImage files recorded with your camcorder are grouped in folders by recording mode.The meanings of the file names are as follows. ssss stands for any number withinthe range from 0001 to 9999.For Windows Me users(The drive recognizing your camcorder is [E:].)Folder File Meaning100MSDCF DSC0ssss.JPG Still image fileMOML0001 MOV0ssss.MPG Moving picture fileFolder containing moving picture dataFolder containing still image dataViewing images recorded on a “Memory Stick” on your computer– For Windows users](https://usermanual.wiki/Sony-Group/DCRTRV50.manual4/User-Guide-230852-Page-41.png)
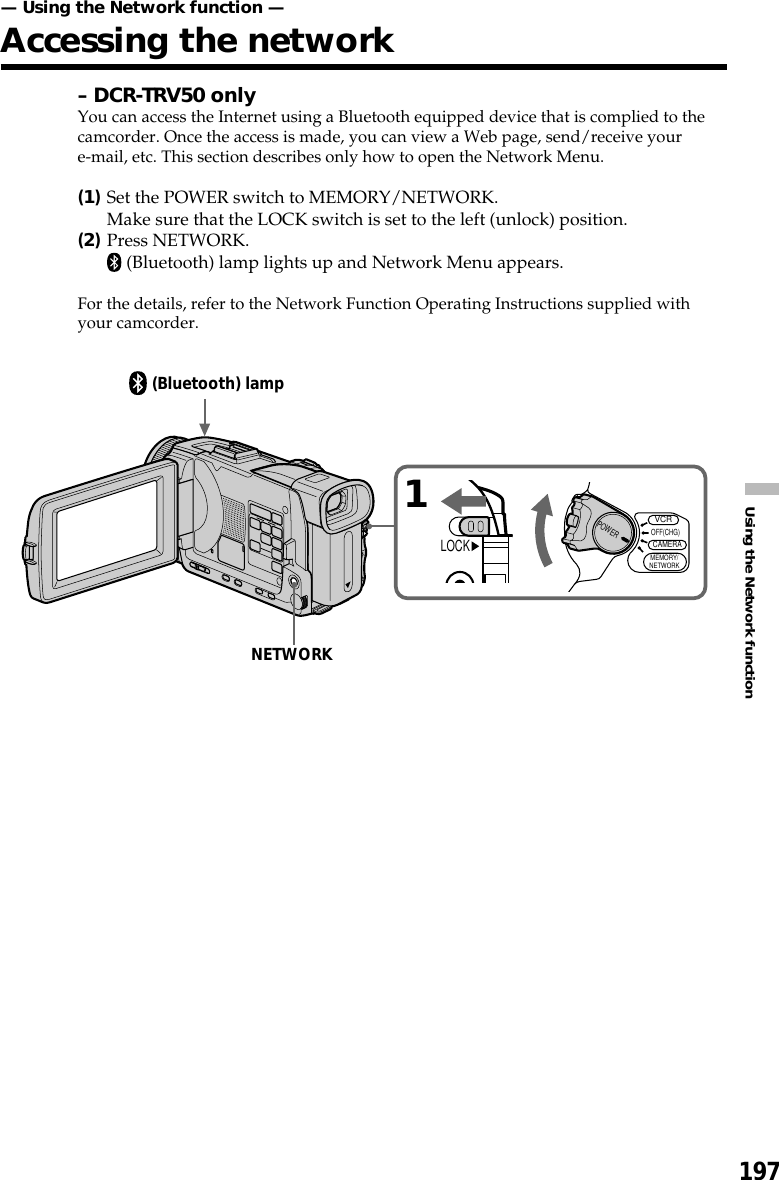
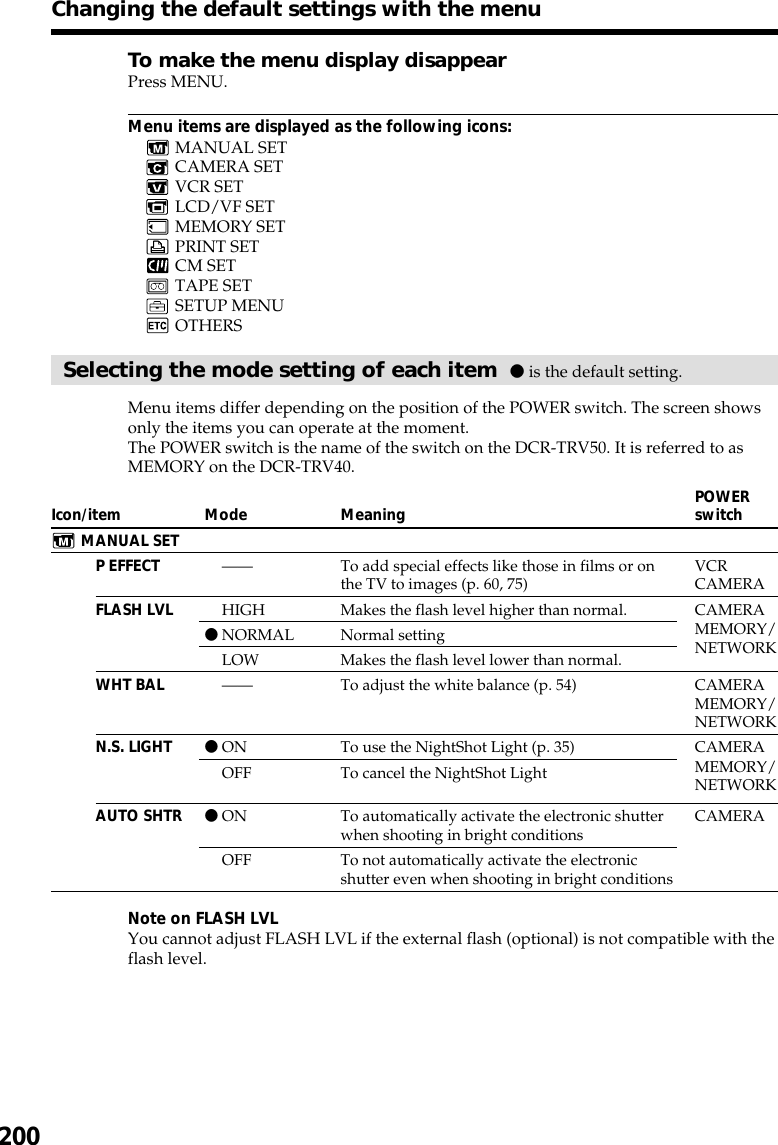
![199Customizing Your CamcorderTo change the mode settings in the menu settings, select the menu items with the SEL/PUSH EXEC dial. The default settings can be partially changed. First, select the icon,then the menu item and then the mode.(1)Set the POWER switch to CAMERA, VCR or MEMORY/NETWORK (DCR-TRV50 only), press MENU.(2)Turn the SEL/PUSH EXEC dial to select the desired icon, then press the dial toset.(3)Turn the SEL/PUSH EXEC dial to select the desired item, then press the dial toset.(4)Turn the SEL/PUSH EXEC dial to select the desired mode, then press the dialto set.(5)If you want to change other items, select RETURN and press the dial, thenrepeat steps 2 to 4.For details, see “Selecting the mode setting of each item” (p. 200).— Customizing Your Camcorder —Changing the default settings with themenuCAMERAVCRMEMORY/NETWORK*1234ororMENUMANUAL SET P EFFECT FLASH LVL WHT BAL N. S. LIGHT AUTO SHTR[MENU] : ENDTAPE SET REC MODE AUDIO MODE REMAIN[MENU] : ENDTAPE SET REC MODE AUDIO MODE REMAIN RETURNSP[MENU] : ENDTAPE SET REC MODE AUDIO MODE REMAIN RETURN AUTO[MENU] : ENDTAPE SET REC MODE AUDIO MODE REMAIN RETURN AUTOON[MENU] : ENDTAPE SET REC MODE AUDIO MODE REMAIN RETURN AUTOON[MENU] : ENDTAPE SET REC MODE AUDIO MODE REMAIN RETURN ON[MENU] : ENDMANUAL SET FLASH LVL WHT BAL N. S. LIGHT[MENU] : ENDMANUAL SET P EFFECT[MENU] : END* DCR-TRV50 only(continued on the following page)](https://usermanual.wiki/Sony-Group/DCRTRV50.manual4/User-Guide-230852-Page-49.png)