Sony Group DCRTRV50 Sony Handycam DCR-TRV50 User Manual DCR TRV40 50
Sony Corporation Sony Handycam DCR-TRV50 DCR TRV40 50
Contents
manual4
151
“Memory Stick” Operations
You can duplicate selected scenes (programs) for editing onto “Memory Stick”s.
Making the program
(1)Set the POWER switch to VCR.
(2)Insert the tape for playback, and a “Memory Stick” for recording into your
camcorder.
(3)Press MENU and turn the SEL/PUSH EXEC dial to select VIDEO EDIT in ,
then press the dial (p. 209).
(4)Turn the SEL/PUSH EXEC dial to select MEMORY, then press the dial.
(5)Turn the SEL/PUSH EXEC dial to select IMAGESIZE and select the desired
image size, then press the dial.
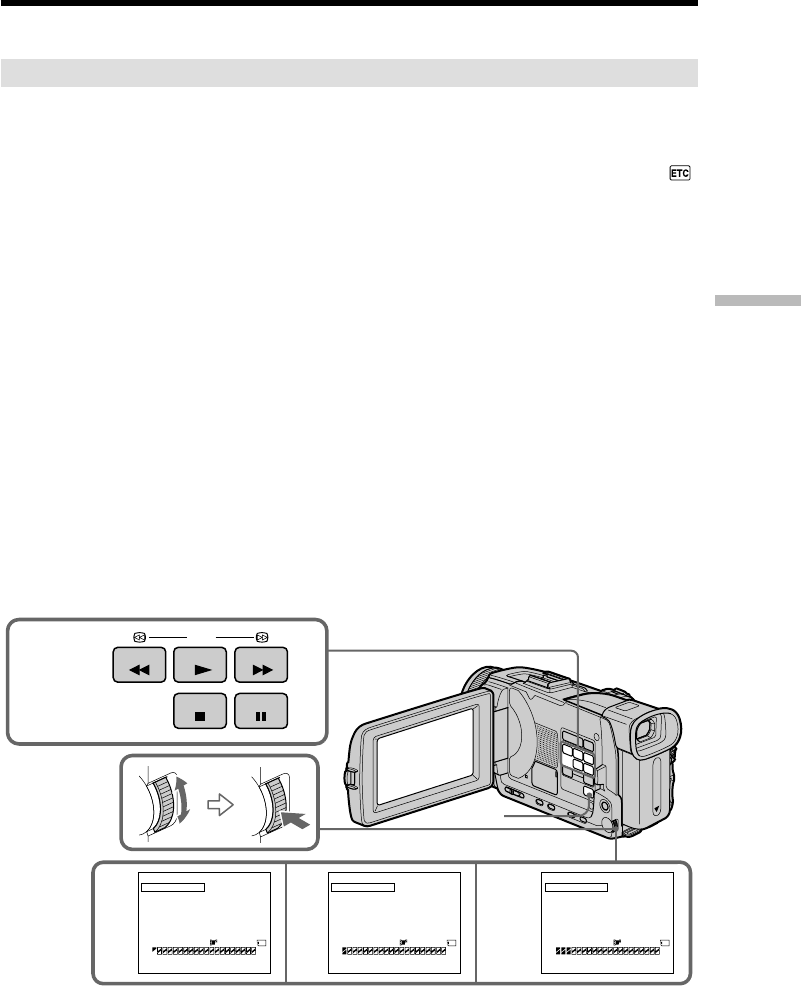
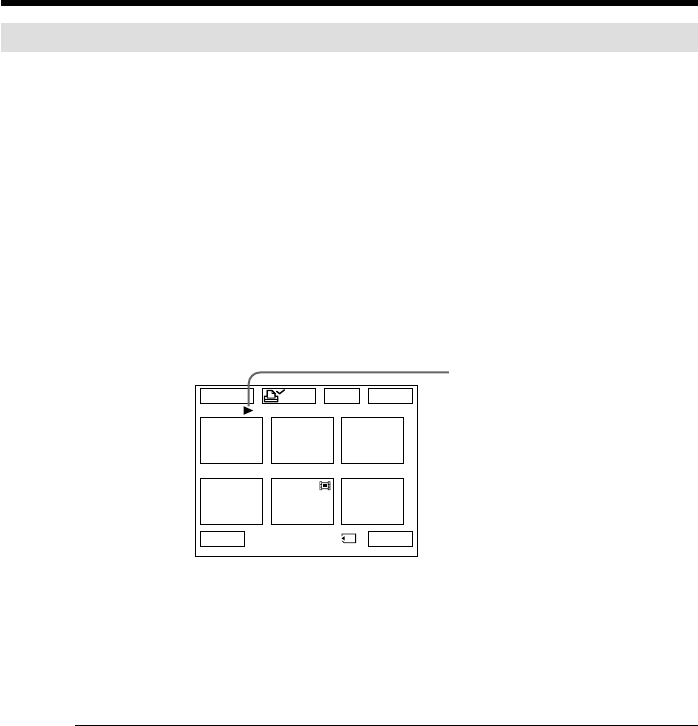
(6)Search for the beginning of the first scene you want to insert using the video
operation buttons, then pause playback.
You can fine-adjust one frame at a time with EDITSEARCH.
(7)Press MARK on the Remote Commander, or turn the SEL/PUSH EXEC dial to
select MARK, the press the dial.
The IN point of the first program is set, and the top part of the program mark
changes to light blue.
(8)Search for the end of the first scene you want to insert using the video
operation buttons, then pause playback.
(9)Press MARK on the Remote Commander, or the SEL/PUSH EXEC dial.
The OUT point of the first program is set, then the bottom part of the program
mark changes to light blue.
(10)Repeat steps 6 to 9, then set the program.
When one program is set, the program mark changes to light blue.
You can set 20 programs in maximum.
7910
6,8
REW PLAY FF
STOP PAUSE
320 320 320
VIDEO EDIT
MARK
UNDO
ERASE ALL
START
IMAGESIZE
1 OUT
0:08:55:06
TOTAL 0:00:00
SCENE 0 2min TOTAL 0:00:12
SCENE 1 2min TOTAL 0:00:31
SCENE 3 2min
[MENU] : END
VIDEO EDIT
MARK
UNDO
ERASE ALL
START
IMAGESIZE
2 IN 0:08:58:06
[MENU] : END
VIDEO EDIT
MARK
UNDO
ERASE ALL
START
IMAGESIZE
4 IN 0:10:01:23
[MENU] : END
N X N X N X
MENU
Recording edited pictures from a tape as
a moving picture – Digital program
editing (on “Memory Stick”s)

152
Recording edited pictures from a tape as a moving picture
– Digital program editing (on “Memory Stick”s)
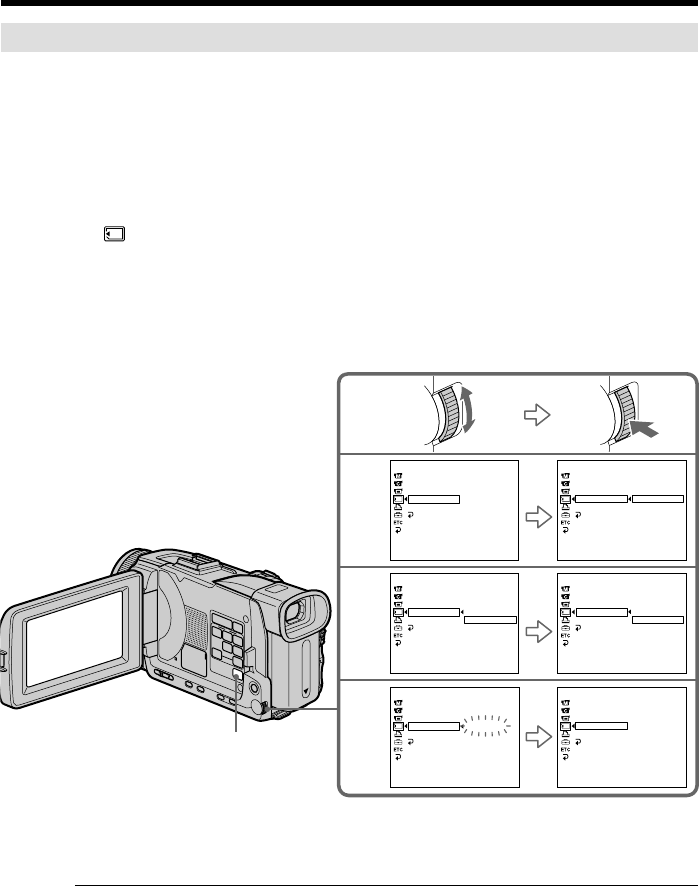
Erasing the program you have set
Erase OUT first and then IN from of the last program.
(1)Turn the SEL/PUSH EXEC dial to select UNDO, then press the dial.
(2)Turn the SEL/PUSH EXEC dial to select EXECUTE, then press the dial.
The last set program mark flashes, then the setting is canceled.
To cancel erasing
Select RETURN with the SEL/PUSH EXEC dial in step 2.
Erasing all programs
(1)Turn the SEL/PUSH EXEC dial to select VIDEO EDIT in the menu settings,
then select MEMORY, then press the dial.
(2)Turn the SEL/PUSH EXEC dial to select ERASE ALL, then select EXECUTE,
then press the dial.
All the program marks flash, then the settings are canceled.
To cancel erasing all programs
Select RETURN with the SEL/PUSH EXEC dial in step 2.
To cancel a program you have set
Press MENU.
The program is stored in memory until the tape is ejected.
Notes
•You cannot dub the titles, display indicators, or the contents of cassette memory.
•You cannot operate recording during the Digital program editing on “Memory
Stick”s.
On a blank portion of the tape
You cannot set IN or OUT on a blank portions of the tape.
If there is a blank portion between IN and OUT on the tape
The total time code may not be displayed correctly.
During making a program
If you eject the cassette, NOT READY appears on the screen. The program will be
erased.

153
“Memory Stick” Operations
Recording edited pictures from a tape as a moving picture
– Digital program editing (on “Memory Stick”s)
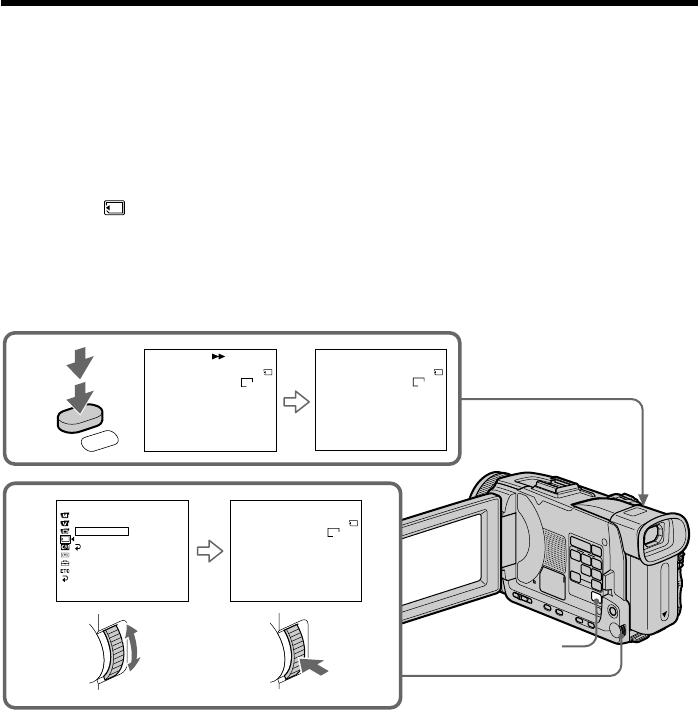
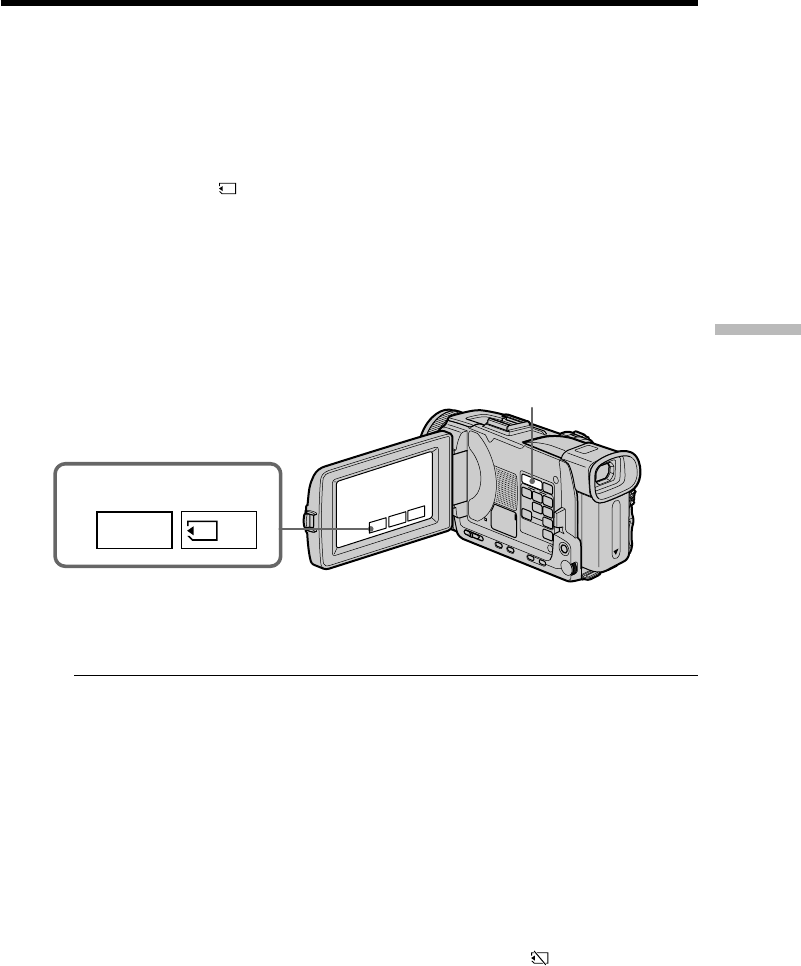
Performing the program (Dubbing on a “Memory Stick”)
(1)Turn the SEL/PUSH EXEC dial to select VIDEO EDIT in the menu settings,
then select MEMORY, then press the dial.
(2)Turn the SEL/PUSH EXEC dial to select START, then select EXECUTE, then
press the dial.
Search for the beginning of the first program, then start dubbing.
The program mark flashes.
The SEARCH indicator appears during search, and the EDITING indicator
appears during writing of data on your camcorder, and REC appears during
dubbing on the screen.
The program mark changes to light blue after dubbing is complete.
When the dubbing ends, your camcorder automatically stops.
To stop dubbing during editing
Press x using the video operation buttons.
The program you made is recorded on a “Memory Stick” up to the place where you
pressed x.
To end the Digital program editing
Your camcorder stops when the dubbing ends. Then the display returns to VIDEO
EDIT in the menu settings.
Press MENU to end the Digital program editing.
NOT READY appears on the LCD screen when:
–The program to operate the Digital program editing has not been made.
–The “Memory Stick” is not inserted.
–The write-protect tab on the “Memory Stick” is set to LOCK.
When “Memory Stick” does not have enough space to record
LOW MEMORY appears on the screen. However, you can record pictures up to the
time indicated.
154
Using the search function, you can automatically capture only still images from tapes
and record them on a “Memory Stick” in sequence.
Before operation
•Insert a recorded tape into your camcorder and rewind the tape.
•Insert a “Memory Stick” into your camcorder.
(1)Set the POWER switch to VCR.
(2)Press MENU and turn the SEL/PUSH EXEC dial to select PHOTO SAVE in
, then press the dial (p. 204).
PHOTO BUTTON appears on the screen.
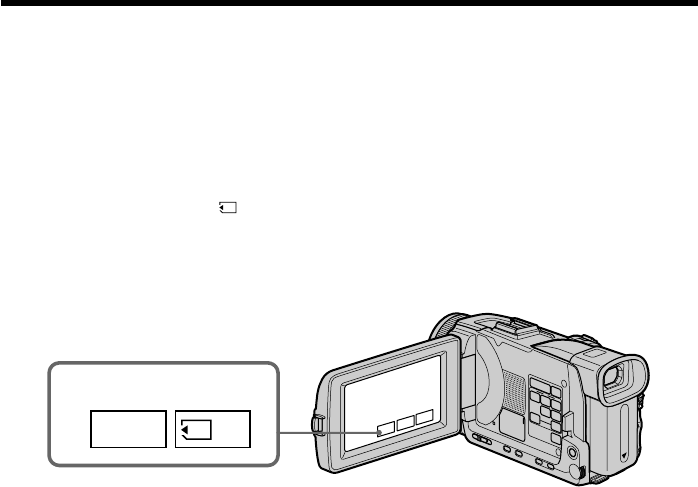
(3)Press PHOTO deeper. The still images from the tape are recorded on the
“Memory Stick.” The number of still images copied is displayed. END is
displayed when copying ends.
To stop copying
Press MENU or x.
When the “Memory Stick” becomes full
MEMORY FULL appears on the screen, and copying stops. Insert another “Memory
Stick” and repeat the procedure from step 2.
Copying still images from a tape
– PHOTO SAVE
3
2
PHOTO
SAV
I
NG
0END
4
PHOTO BUTTON
640
STD
640
STD
640
STD
PHOTO SAVE 0:00:00:00
4/15
PHOTO SAVE 0:30:00:00
8/15
MEMORY SET
STILL SET
MOVIE SET
PHOTO SAVE
FILE NO.
RETURN
READY
[MENU] : END
PHOTO SAVE 0:00:00:00
4/15
[PHOTO] : START [MENU] : END
[MENU] : END [MENU] : END
MENU

155
“Memory Stick” Operations
Copying still images from a tape – PHOTO SAVE
Image size of still images
Image size is automatically set to 640 × 480.
When the access lamp is lit or flashing
Do not shake or knock your camcorder. As well do not turn the power off, eject a
“Memory Stick”. Otherwise, image data may become damaged.
If the write-protect tab on the “Memory Stick” is set to LOCK
NOT READY appears when you select the item in the menu settings.
When you change “Memory Stick”s during copying
Your camcorder resumes copying from the last image recorded on the previous
“Memory Stick.”
156
You can play back still images recorded on a “Memory Stick.” You can also play back
six images including moving pictures in order at a time by selecting the index screen.
You can also use the Remote Commander for this operation.
Before operation
Insert a “Memory Stick” into your camcorder.
(1)Set the POWER switch to MEMORY/NETWORK (DCR-TRV50 only) or VCR.
Make sure that the LOCK switch is set to the left (unlock) position.
(2)Press PLAY or PB. The last recorded image is displayed.
(3)Press –/+ on your camcorder to select the desired still image.
–: To see the previous image
+: To see the next image
To stop Memory Photo playback
Press CAM, VCR on your camcorder or MEMORY PLAY button on the Remote
Commander.
Viewing still images
– Memory Photo playback
PLAY PB
2
157
“Memory Stick” Operations
You may not be able to play back images with your camcorder:
–When playing back image data modified on your computer.
–When playing back image data shot with other equipment.
Notes on the file name
•The directory number may not be displayed and only the file name may be displayed
if the structure of the directory does not conform to the DCF standard.
•“ - DIRECTORY ERROR” may appear on screen if the structure of the directory
does not conform to the DCF standard. While this message appears, you can play back
images but cannot record them on the “Memory Stick.”
•The file name flashes on the screen if the file is corrupted or the file is unreadable.
To play back recorded images on a TV screen
•Before operation, connect your camcorder to the TV with the A/V connecting cable
supplied with your camcorder.
•When operating memory photo playback on a TV or on the LCD screen, image quality
may appear to have deteriorated. This is not a malfunction. The image data is as good
as ever.
•Turn the audio volume of the TV down before operation, or noise (howling) may be
output from the TV speakers.
Still image
You can select still images also with –/+ on PAGE1/PAGE2/PAGE3.
When no image is recorded on the “Memory Stick”
When you press MEMORY PLAY on the Remote Commander, “ NO FILE” appears.
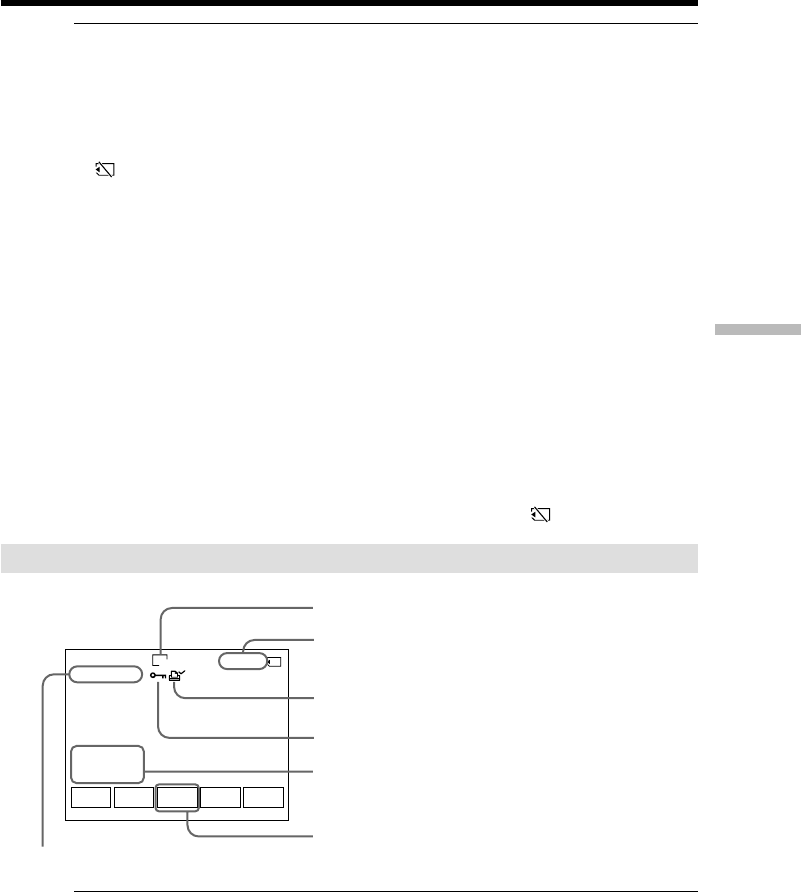
Screen indicators during still image playback
Recording data
You can view recording data (date/time or various settings when recorded) when you
press DATA CODE on PAGE2. You can also use the Remote Commander for this
operation.
To make screen indicators disappear
Press DISPLAY/TOUCH PANEL.
Viewing still images – Memory Photo playback
6/100
MEMORY PLAY
100–0006
1360
JUL 4 2002
12:05:56 AM
FNINDEXCAM
+–
Image number/Total number of recorded images
Image size
Data Directory Number, File Number
Protect
Print mark
When the POWER switch is set to VCR, VCR is
displayed instead of CAM
Recording date/time/various settings
158
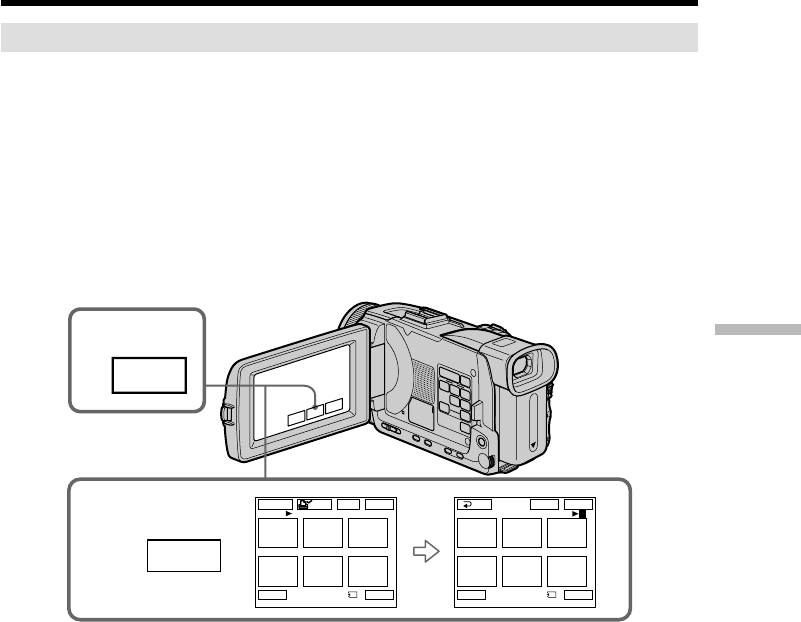
Playing back six recorded images at a time (index screen)
You can play back six recorded images at a time. This function is especially useful when
searching for a particular image.
Before operation
Insert a “Memory Stick” into your camcorder.
(1)Set the POWER switch to MEMORY/NETWORK (DCR-TRV50 only) or VCR.
Make sure that the LOCK switch is set to the left (unlock) position.
(2)Press INDEX to display the index screen.
A red B mark appears above the image that is displayed before changing to the index
screen mode.
T : To display the previous six images
t : To display the following six images
To return to FN
Press EXIT.
To return to the normal playback screen (single screen)
Press the image you want to display.
Note
When displaying the index screen, the number appears above each image. This
indicates the order in which images are recorded on the “Memory Stick.” These
numbers are different from the data file names.
Image data modified on your computer or shot with other equipment
These files are sometimes not displayed on the index screen.
Viewing still images – Memory Photo playback
1 / 40
123
456
EXITDEL
MARK
-
MARK
T t
B mark
159
“Memory Stick” Operations
You can play back moving pictures recorded on a “Memory Stick.” You can also play
back six images including still images in order at a time by selecting the index screen.
Before operation
Insert a “Memory Stick” into your camcorder.
(1)Set the POWER switch to MEMORY/NETWORK (DCR-TRV50 only) or VCR.
Make sure that the LOCK switch is set to the left (unlock) position.
(2)Press PLAY or PB.
(3)Press –/+ to select the desired moving pictures.
– : To see the previous picture
+ : To see the next picture
(4)Press MPEG N X to start playback.
(5)To adjust the volume, press either of the two buttons on VOLUME.
– : To turn down
+ : To turn up
When you close the LCD panel, sound is muted.
To stop MPEG movie playback
Press MPEG N X.
You may not be able to play back images with your camcorder:
–When playing back image data modified on your computer.
–When playing back image data shot with other equipment.
To play back recorded picutres on a TV screen
•Before operation connect your camcorder to the TV with the A/V connecting cable
supplied with your camcorder.
•Turn the audio volume of the TV down before operation, or noise (howling) may be
output from the TV speakers.
Moving picture
You can select moving pictures also with –/+ on PAGE1/PAGE2/PAGE3.
When no image is recorded on the “Memory Stick”
When you press MEMORY PLAY on the Remote Commander, “ NO FILE” appears.
Viewing moving pictures
– MPEG movie playback
PLAY PB
2
VOLUME
160
Viewing moving pictures – MPEG movie playback
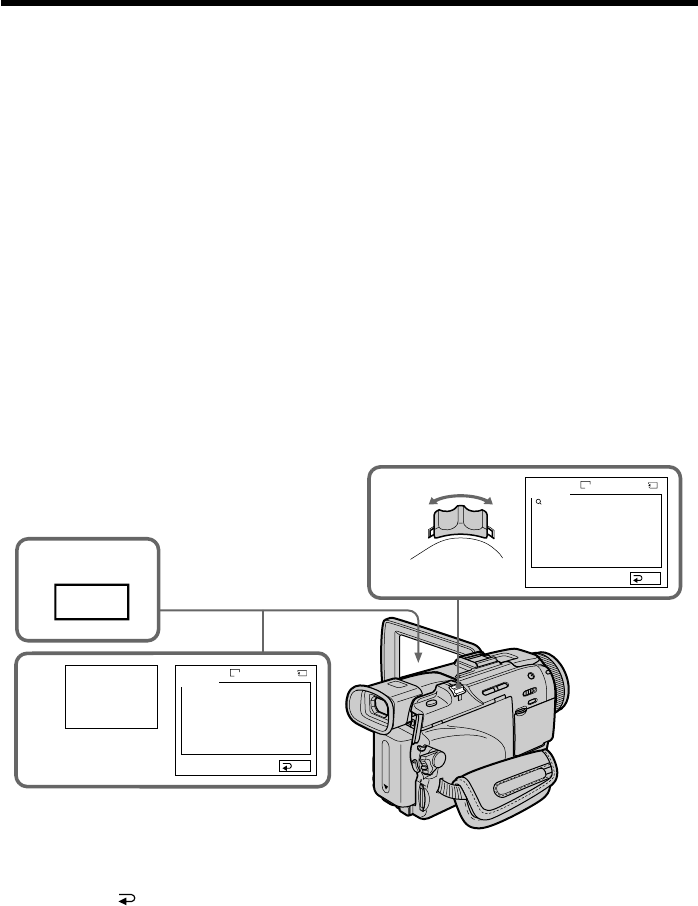
Playing back a moving picture from the desired part
The moving picture recorded on “Memory Stick” is divided into 23 parts.
You can select every each one point and play back pictures.
Before operation
Insert a “Memory Stick” into your camcorder.
(1)Set the POWER switch to MEMORY/NETWORK (DCR-TRV50 only) or VCR.
Make sure that the LOCK switch is set to the left (unlock) position.
(2)Press PLAY or PB.
(3)Press +/– to select the desired moving pictures.
– : To see the previous picture
+ : To see the next picture
(4)Press </, to select the point where you want to play back.
< :To see previous part
, :To see next part
(5)Press MPEG N X to start playback.
To stop MPEG movie playback
Press MPEG N X.
When recording time is too short
The moving picture may not be divided into 23 parts.
FN
MPEG
N X
INDEXCAM
+–
320
1/2
0 : 00 : 00MOV00001

161
“Memory Stick” Operations
Screen indicators during moving picture playback
Recording date/time
You can view recording date/time when you press DATA CODE on PAGE2. Various
settings are not recorded. You can also use the Remote Commander for this operation.
(p. 42)
To make screen indicator disappear
Press DISPLAY/TOUCH PANEL.
Viewing moving pictures – MPEG movie playback
FN
MPEG
N X
–––
–––
INDEXCAM
+–
320
1/20
0 : 01 : 00MOV00001
––
JUL
4 2002
12 : 05 : 56
Data directory number/File number
Picture number/Total number of recorded pictures
Image size
Protect
Recording date/time. (Various settings are displayed as “– – –”.)
When the POWER switch is set to VCR, VCR is
displayed instead of CAM.
162
You can copy images recorded on “Memory Stick”s and record them to tape.
Before operation
•Insert a tape for recording into your camcorder.
•Insert a “Memory Stick” into your camcorder.
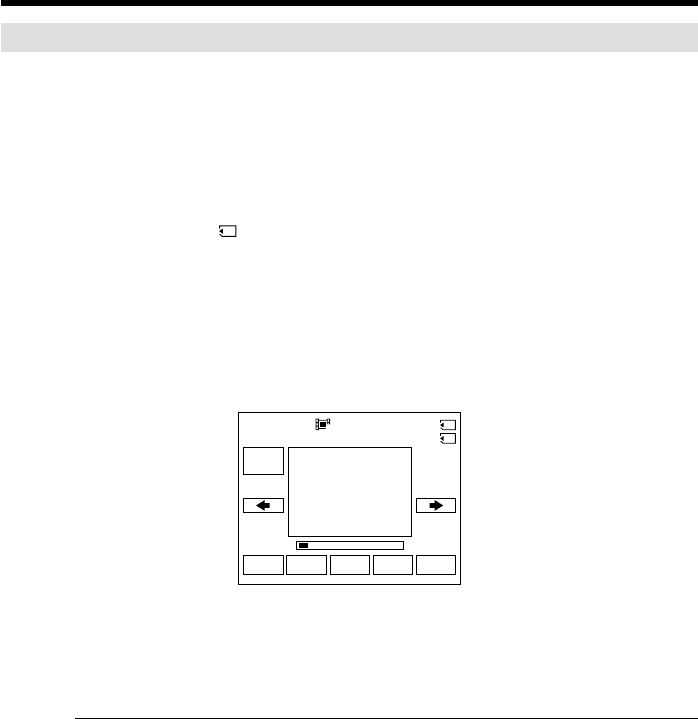
(1)Set the POWER switch to VCR.
(2)Using the video control buttons, search a point where you want to record the
desired images. Set the tape to playback pause.
(3)Press z REC and the button on its right simultaneously on your camcorder.
The tape is set to the recording pause.
(4)Press PB. The last recorded image is displayed.
(5)Press +/– to select the desired image.
– : To see the previous image
+ : To see the next image
(6)Press X to start recording and press X again to stop.
z appears on the screen during recording.
(7)If you have more to copy, repeat steps 5 and 6.
To stop copying in the middle
Press x.
Copying images recorded on “Memory
Stick”s to tape
3
4
REC
PB
2
PAUSE

163
“Memory Stick” Operations
Copying images recorded on “Memory Stick”s to tape
During copying
You cannot operate the following functions:
–MEMORY PLAY
–MEMORY INDEX
–MEMORY DELETE
–MEMORY +/–
Note on the index screen
You cannot record the index screen.
If you press EDITSEARCH during pause
Memory playback stops.
Image data modified on your computers or shot with other equipment
You may not be able to copy modified images with your camcorder.
When copying movies
After step 6, press the MPEG N X and play back the image.
164
You can enlarge still images recorded on a “Memory Stick.” You can select and view a
desired part from the enlarged still image. Also, you can copy the desired part of the
enlarged still image to tapes or “Memory Stick”s.
Before operation
Insert a “Memory Stick” into your camcorder.
(1)Set the POWER switch to MEMORY/NETWORK (DCR-TRV50 only). Press FN
to display PAGE1 during the memory playback (p. 120).
When you set the POWER switch to VCR, press FN and select PAGE2 during
the memory playback (p. 24).
(2)Press PB ZOOM. PB ZOOM screen appears.
(3)Press the area that you want to enlarge in the frame on the PB ZOOM screen.
The area you pressed moves to the center of the screen, and the playback
image is enlarged approximately at twice the size. If you press the other area,
the area moves to the center of the screen.
(4)Adjust the zoom ratio by the power zoom lever.
You can enlarge the image from approximately 1.1 times up to five times its
size.
W : Decreases the zoom ratio
T : Increases the zoom ratio
To cancel PB ZOOM
Press END.
Enlarging still images recorded on
“Memory Stick”s – Memory PB ZOOM
1
4
FN
2
PB
ZOOM
MEMORY PLAY
3/14
END
100–0003
1360
MEMORY PLAY
3/14
END
100–0003
1360
W
T
PB ZOOM
PB ZOOM
× 5.0

165
“Memory Stick” Operations
Enlarging still images recorded on “Memory Stick”s
– Memory PB ZOOM
The PB ZOOM is canceled when the following operations:
–MENU
–MEMORY PLAY
–MEMORY INDEX
–MEMORY +/–
Moving pictures recorded on “Memory Stick”s
The PB ZOOM does not work.
To record the still image processed by Memory PB ZOOM on “Memory Stick”s
Press the PHOTO button to record the still image processed by PB ZOOM. (Images are
recorded at 640 × 480 size.)
In the PB ZOOM mode
If you press DISPLAY/TOUCH PANEL button, the frame on the PB ZOOM screen
disappears. You cannot move the part you pressed to the center of the screen.
Edge of the enlarged image
The edge of the enlarged image cannot be displayed at the center of the screen.
To record an image proceeded on PB ZOOM on tapes
Record an image following the procedure on page 162.
166
You can automatically play back images in sequence. This function is useful especially
when checking recorded images or during a presentation.
Before operation
Insert a “Memory Stick” into your camcorder.
(1)Set the POWER switch to MEMORY/NETWORK (DCR-TRV50 only). Make
sure that the LOCK switch is set to the left (unlock) position.
(2)Press FN and select PAGE3.
(3)Press SLIDE SHOW.
(4)Press START. Your camcorder plays back the images recorded on a “Memory
Stick” in sequence.
To stop the slide show
Press END.
To pause during a slide show
Press PAUSE.
To return to FN
Press END to return to PAGE3, then press EXIT.
To start the slide show from a particular image
Select the desired image using –/+ buttons before step 4.
To view recorded images on TV
Before operation connect your camcorder to a TV with the A/V connecting cable
supplied with your camcorder.
If you change the “Memory Stick” during operation
The slide show does not operate. If you change the “Memory Stick,” be sure to follow
the steps again from the beginning.
Playing back images in a continuous loop
– SLIDE SHOW
1
2
FN
4
1 / 6
SLIDE SHOW
100–0001
+–
PAUSE
END
VCR
MEMORY/
NETWORK
CAMERA
OFF(CHG)
POWER
LOCK
1360
167
“Memory Stick” Operations
You can protect selected images to prevent accidental erasure of important images.
Before operation
Insert a “Memory Stick” into your camcorder.
(1)Set the POWER switch to MEMORY/NETWORK (DCR-TRV50 only) or VCR.
Make sure that the LOCK switch is set to the left (unlock) position.
(2)Press INDEX on your camcorder to display the index.
(3)Press - MARK. The screen to protect the image appears.
(4)Press the image you want to protect. The “-” appears on the protected
image.
To return to FN
Press EXIT.
To cancel image protection
Press the image you want to cancel image protection in step 4 again. The “-”
disappears.
Note
Formatting erases all information on the “Memory Stick,” including the protected
image data. Before formatting a “Memory Stick”, check its contents.
If the write-protect tab on the “Memory Stick” is set to LOCK
You cannot protect images.
Preventing accidental erasure
– Image protection
2
INDEX
3,4 123
456
EXIT
RET.
-
MARK
1 / 40
123
456
EXITDEL
MARK
-
MARK
T t
-
2 / 40
Tt
-
MARK
168
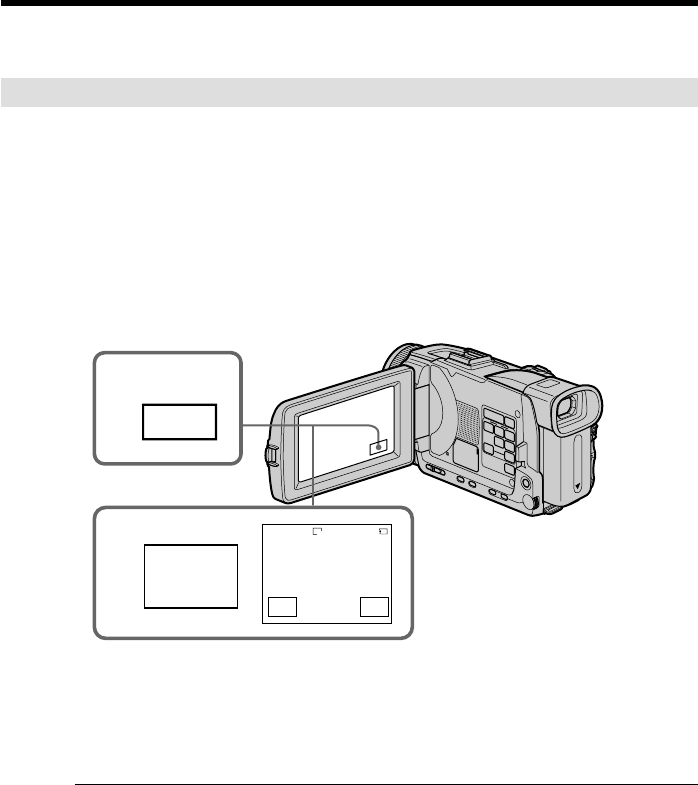
You can delete images stored in a “Memory Stick.” You can delete all images or only
selected images.
Deleting selected images
Before operation
Insert a “Memory Stick” into your camcorder.
(1)Set the POWER switch to MEMORY/NETWORK (DCR-TRV50 only) or VCR.
Make sure that the LOCK switch is set to the left (unlock) position.
(2)Play back the image you want to delete.
(3)Press FN to display PAGE1.
(4)Press DELETE. “DELETE?” appears on the LCD screen.
(5)Press OK. The selected image is deleted.
To return to FN
Press EXIT.
To cancel deleting an image
Press CANCEL in step 5.
Notes
•To delete a protected image, first cancel image protection.
•Once you delete an image, you cannot restore it. Before deleting an image, carefully
check the image.
If the write-protect tab on the “Memory Stick” is set to LOCK
You cannot delete images.
Deleting images – DELETE
4
DELE–
TE
DELETE
100–0003 3 / 40
DELETE?
OK CAN–
CEL
3FN
1360
169
“Memory Stick” Operations
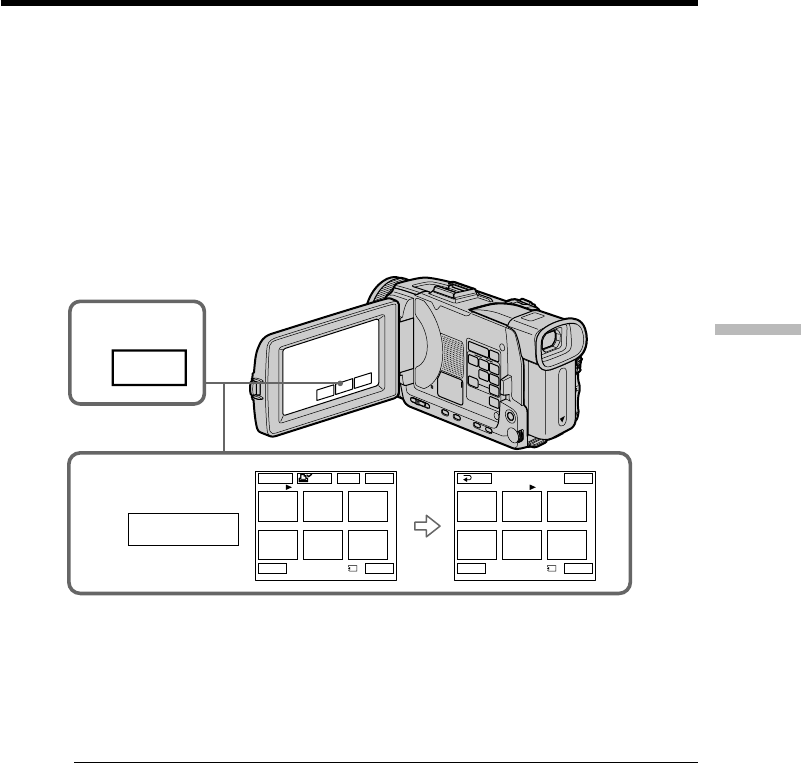
Deleting selected images on the index screen
Before operation
Insert a “Memory Stick” into your camcorder.
(1)Set the POWER switch to MEMORY/NETWORK (DCR-TRV50 only). Make
sure that the LOCK switch is set to the left (unlock) position.
(2)Press INDEX to display the index screen.
(3)Press DEL. Then press the images you want to delete. The number of the
selected image is highlighted.
(4)Press EXEC. “DELETE?” appears on the LCD screen.
(5)Press OK. The selected images are deleted.
To return to FN
Press EXIT.
To cancel deleting an image
Press CANCEL in step 5.
Deleting images – DELETE
2
INDEX
3
13
2
456
EXIT
123
456
EXITDEL
MARK
-
MARK
-
EXEC
DEL
1 / 40
Tt
3 / 40
Tt
RET
.
DEL
170
Deleting all images
You can delete all unprotected images in a “Memory Stick.”
Before operation
Insert a “Memory Stick” into your camcorder.
(1)Set the POWER switch to MEMORY/NETWORK (DCR-TRV50 only). Make
sure that the LOCK switch is set to the left (unlock) position.
(2)Press MENU, then turn the SEL/PUSH EXEC dial to select DELETE ALL in
, then press the dial (p. 204).
(3)Turn the SEL/PUSH EXEC dial to select OK, then press the dial. OK changes
to EXECUTE.
(4)Turn the SEL/PUSH EXEC dial to select EXECUTE, then press the dial.
DELETING flashes on the screen. When all unprotected images are deleted,
COMPLETE is displayed.
To cancel deleting all the images in the “Memory Stick”
Select RETURN in step 3 or 4.
While DELETING appears
Do not turn the POWER switch or press any buttons.
Deleting images – DELETE
2
4
3
MEMORY SET
STILL SET
MOVIE SET
FILE NO.
DELETE ALL
FORMAT
RETURN
[MENU] : END
READY
MEMORY SET
STILL SET
MOVIE SET
FILE NO.
DELETE ALL
FORMAT
RETURN
[MENU] : END
RETURN
OK
MEMORY SET
STILL SET
MOVIE SET
FILE NO.
DELETE ALL
FORMAT
RETURN
[MENU] : END
RETURN
OK
MEMORY SET
STILL SET
MOVIE SET
FILE NO.
DELETE ALL
FORMAT
RETURN
[MENU] : END
RETURN
EXECUTE
MEMORY SET
STILL SET
MOVIE SET
FILE NO.
DELETE ALL
FORMAT
RETURN
[MENU] : END
DELETING
MEMORY SET
STILL SET
MOVIE SET
FILE NO.
DELETE ALL
FORMAT
RETURN
[MENU] : END
COMPLETE
MENU

171
“Memory Stick” Operations
You can specify a recorded still image to print out by writing a print mark. This
function is useful for printing out still images later.
Your camcorder conforms to the DPOF (Digital Print Order Format) standard for
specifying still images to print out.
Before operation
Insert a “Memory Stick” into your camcorder.
(1)Set the POWER switch to MEMORY/NETWORK (DCR-TRV50 only) or VCR.
Make sure that the LOCK switch is set to the left (unlock) position.
(2)Press INDEX to display the index screen.
(3)Press MARK. The screen to write a print mark appears.
(4)Press the image you want to write a print mark. The “” appears on the
selected image.
To return to FN
Press EXIT.
To cancel writing print marks
Press the image you want to cancel the print mark in step 4 again . The disappears.
If the write-protect tab on the “Memory Stick” is set to LOCK
You cannot write print marks on still images.
Moving pictures
You cannot write print marks on moving pictures.
Writing a print mark – PRINT MARK
2
INDEX
3,4
123
456
EXIT
123
456
EXITDEL
MARK
-
MARK
MARK
1 / 40
Tt
2 / 40
Tt
RET. MARK

172
You can use the optional printer on your camcorder to print images on print paper.
For details, refer to the operating instructions of the printer.
There are various ways of printing still images. The following describes the setup for
print by selecting in the menu settings and the set up for print setup by selecting
9PIC PRINT on the touch panel on your camcorder.
Before operation
•Insert a recorded “Memory Stick” into your camcorder.
•Attach the optional printer to your camcorder as illustrated.
Setting with the menu
You can print DATE/TIME on print paper.
(1)Set the POWER switch to MEMORY/NETWORK (DCR-TRV50 only). Make
sure that the LOCK switch is set to the left (unlock) position.
(2)Press MENU, then turn the SEL/PUSH EXEC dial to select DATE/TIME in
, then press the dial (p. 205).
(3)Turn the SEL/PUSH EXEC dial to select the desired mode.
Using the optional printer
DATE
JUL 4 2002
DAY & TIME
4 12:00AM
Printer
MENU
FN
173
“Memory Stick” Operations
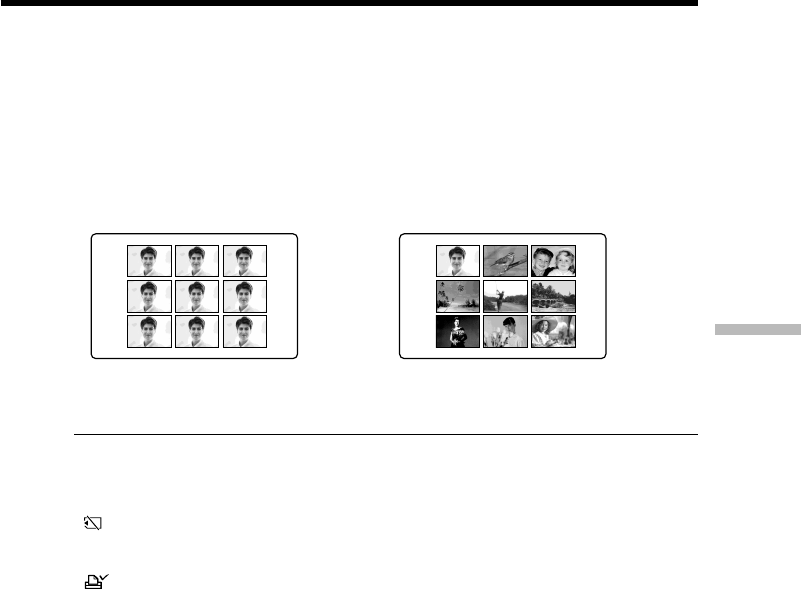
Setting with the touch panel
You can make 9 stickers on a single sheet when you print images recorded on a
“Memory Stick” in 9PIC PRINT.
(1)Set the POWER switch to MEMORY/NETWORK (DCR-TRV50 only). Make
sure that the LOCK switch is set to the left (unlock) position.
(2)Press FN and select PAGE3.
(3)Press 9PIC PRINT.
(4)Press the desired mode.
* Nine still images with print marks are printed together.
Moving pictures recorded on “Memory Stick”
You cannot print moving pictures.
When “Memory Stick” has no files
“ NO STILL IMAGE FILE” appears on the screen.
When there are no files with a PRINT MARK
“ NO PRINT MARK” appears on the screen.
Images processed by 9PIC PRINT
You cannot insert a DATE/TIME indicator.
Images recorded in the MULTI SCRN
You cannot print images recorded in the multi screen mode on sticker type print paper.
Using the optional printer
SAME PICS MULTI PICS or MARKED PICS*
174
There are the following ways of connecting the camcorder to a computer in order to
view images saved on a “Memory Stick” or recorded on tape on your computer.
To view images on a computer which has a Memory Stick slot, first eject the “Memory
Stick” from the camcorder and then insert it into the computer’s Memory Stick slot.
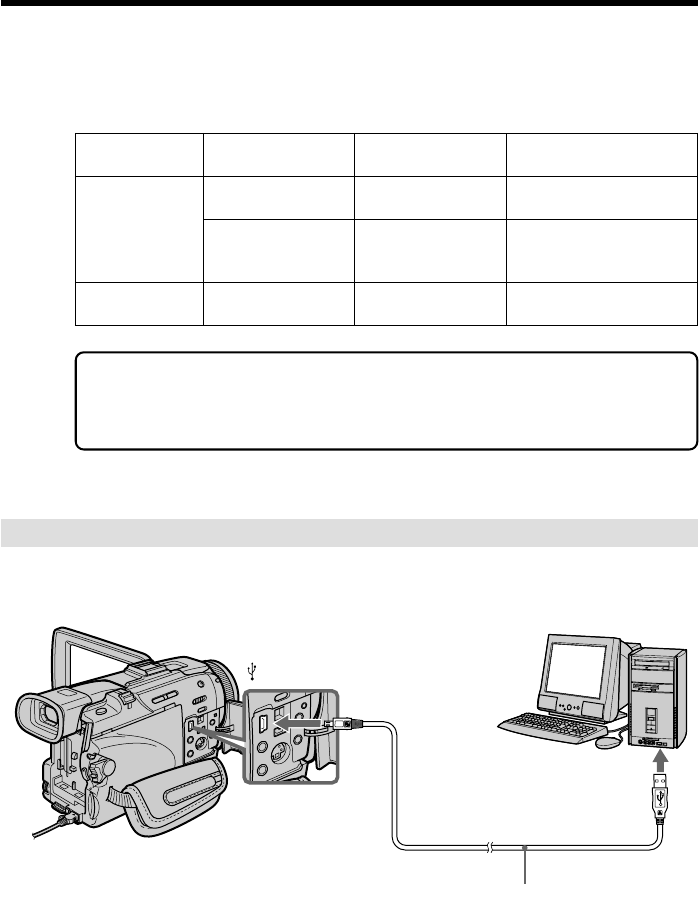
When connecting to a computer via the USB jack, complete installation of the
USB driver before connecting the camcorder to the computer. If you connect
the camcorder to the computer first, you will not be able to install the USB
driver correctly.
For details about your computer’s connectors and editing software, contact the
computer manufacturer.
Viewing images recorded on a tape
When connecting to a computer using the USB jack
For more information, see page 177.
Camcorder Connection Computer environment
Connection jack cable requirements
USB jack USB cable USB connector,
(supplied) editing software
Tape stills and i.LINK cable DV connector,
movies DV jack (DV connecting editing software
cable ) (optional)
“Memory Stick”USB jack USB cable USB connector,
stills and movies (supplied) editing software
— Viewing Images Using your Computer —
Viewing images on your computer
– Introduction
(USB) jack
USB connector
USB cable (supplied)
Push into the end
175
Viewing Images Using your Computer
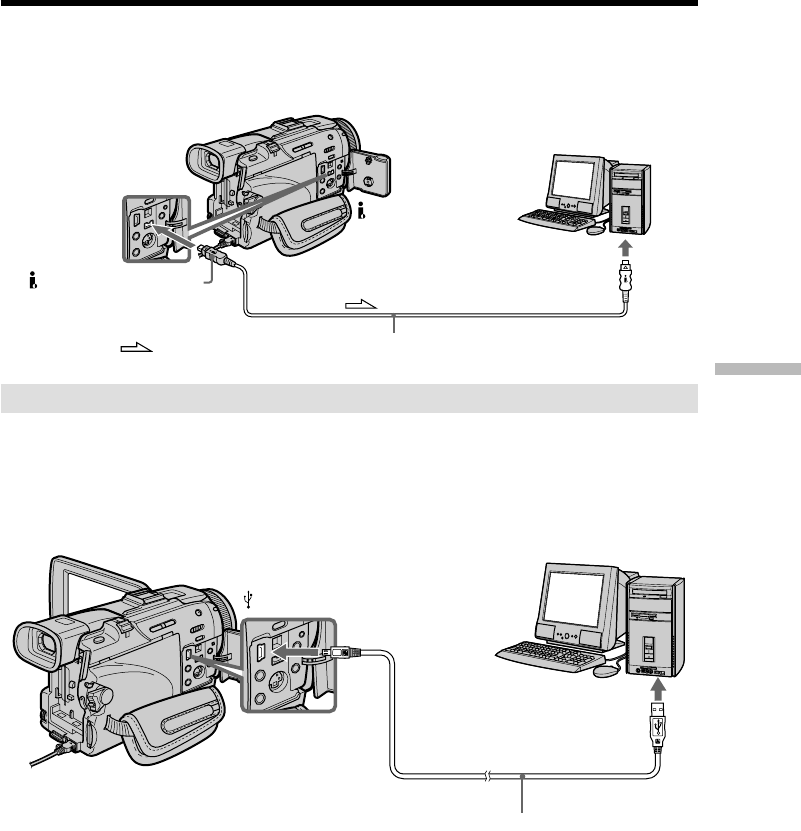
When connecting to a computer using the DV jack
Your computer must have a DV connector and editing software installed that can read
video signals.
Viewing images recorded on a “Memory Stick”
When connecting to a computer using the USB jack
There are two methods of USB connection, NORMAL and PTP. The default setting is
NORMAL. Here we explain how to use the camcorder with a standard USB connection
(NORMAL).
See page 177 when using Windows and page 193 when using Macintosh.
You can also use a Memory Stick Reader/Writer (optional).
When connecting to a computer without a USB jack
Use an optional floppy disk adaptor for Memory Stick or a PC card adaptor for Memory
Stick.
When purchasing an accessory, check its catalog beforehand for the recommended
operating environment.
Viewing images on your computer – Introduction
USB cable (supplied)
(USB) jack
USB connector
: Signal flow i.LINK cable (DV connecting cable) (optional)
DV IN/OUT
is marked on this side
DV connector

176
Viewing images on your computer – Introduction
Notes on using your computer
“Memory Stick”
•“Memory Stick” operations on your camcorder cannot be assured if a “Memory Stick”
formatted on your computer is used on your camcorder, or if the “Memory Stick” in
your camcorder was formatted from your computer when the USB cable was
connected.
•Do not compress the data on the “Memory Stick.” Compressed files cannot be played
back on your camcorder.
Software
•Depending on your application software, the file size may increase when you open a
still image file.
•When you load an image modified using retouching software from your computer to
your camcorder or when you directly modify the image on your camcorder, the image
format will differ so a file error indicator may appear and you may be unable to open
the file.
Communications with your computer
Communications between your camcorder and your computer may not recover after
recovering from Suspend, Resume, or Sleep.

177
Viewing Images Using your Computer
Connecting your camcorder to your
computer using the USB cable
– For Windows users
Complete installation of the USB driver before connecting the camcorder to
the computer. If you connect the camcorder to the computer first, you will not
be able to install the USB driver correctly.
When connecting to a computer using the USB cable
You must install a USB driver onto your computer in order to connect the camcorder to
the computer’s USB connector. The USB driver can be found on the CD-ROM supplied,
along with the application software required for viewing images.
If you connect your camcorder and your computer using the USB cable, you can view
pictures live from your camcorder and pictures recorded on a tape on your computer
(USB streaming function).
Furthermore, if you download pictures from your camcorder to your computer, you can
process or edit them in image processing software and append them to e-mail.
You can view images recorded on a “Memory Stick” on your computer.
Recommended computer usage environment when connecting
via USB cable and viewing tape images on the computer
OS:
Microsoft Windows 98SE, Windows Me, Windows 2000 Professional, Windows XP
Home Edition or Windows XP Professional
Standard installation is required.
However, operation is not assured if the above environment is an upgraded OS.
You cannot hear sound if your computer is running Windows 98, but you can read still
images.
CPU:
Minimum 500 MHz Intel Pentium III or faster (800 MHz or faster recommended)
Application:
DirectX 8.0a or later
Sound system:
16 bit stereo sound card and stereo speakers
Memory:
64 MB or more
Hard disk:
Available memory required for installation:
at least 200MB
Available hard disc memory recommended:
at least 1GB (depending on the size of the image files edited)
Display:
4 MB VRAM video card, Minimum 800 × 600 dot Hi color (16 bit color, 65 000 colors),
Direct Draw display driver capability (At 800 × 600 dot or less, 256 colors and less, this
product will not operate correctly.)
Others:
This product is compatible with DirectX technology, so it is necessary to install DirectX.
The USB connector must be provided as standard.
You cannot use this function in the Macintosh environment.

178
Connecting your camcorder to your computer using the USB cable
– For Windows users
Recommended computer usage environment when connecting
via USB cable and viewing “Memory Stick” images on the
computer
OS:
Microsoft Windows 98, Windows 98SE, Windows Me, Windows 2000 Professional,
Windows XP Home Edition or Windows XP Professional
Standard installation is required.
However, operation is not assured if the above environment is an upgraded OS.
CPU:
MMX Pentium 200 MHz or faster
The USB connector must be provided as standard.
Windows Media Player must be installed (to play back moving pictures).
Notes
•Operations are not guaranteed for the Windows environment if you connect two or
more USB equipment to a single computer at the same time, or when using a hub.
•Some equipment may not operate depending on the type of USB equipment that is
used simultaneously.
•Operations are not guaranteed for all the recommended computer environments
mentioned above.
•Windows and Windows Media are trademarks or registered trademarks of Microsoft
Corporation in the United States and/or other countries.
•Pentium is trademark or registered trademark of Intel Corporation.
•All other product names mentioned herein may be the trademarks or registered
trademarks of their respective companies. Furthermore, “TM” and “®” are not
mentioned in each case in this manual.
179
Viewing Images Using your Computer
Installing the USB driver
Start the following operation without connecting the USB cable to your
computer.
Connect the USB cable according to “Making the computer recognize the
camcorder”.
If you are using Windows 2000 Professional or Windows XP Home Edition/
Professional, log in with permission of Administrators.
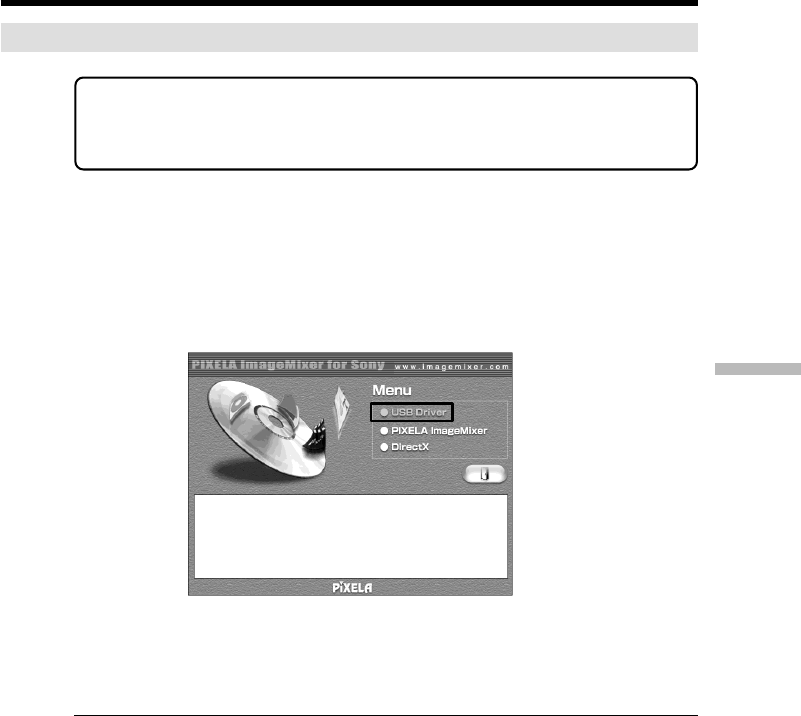
(1)Turn on your computer and allow Windows to load.
(2)Insert the supplied CD-ROM in the CD-ROM drive of your computer. The
application software starts up and the title screen appears.
(3)Move the cursor to USB Driver and click. This starts USB driver installation.
(4)Follow the on-screen messages to install the USB driver.
(5)Remove the CD-ROM and then restart the computer, in accordance with the
instructions on the screen.
Note
If you connect the USB cable before USB driver installation is complete, the USB driver
will not be properly registered. Carry out installation again in accordance with the steps
on page 182.
Windows XP Home Edition/Professional users
If you go to USBCONNECT in the menu settings and select PTP, you can copy
“Memory Stick” images from the camcorder onto your computer without installing the
USB driver. This is ideal for simply copying images from a camcorder onto a computer.
Refer to page 207 for details.
Connecting your camcorder to your computer using the USB cable
– For Windows users
180
USB connector
(USB) jack
USB cable (supplied)
Push into the end
Making the computer recognize the camcorder
Viewing images recorded on a tape
Refer to page 181 for details on viewing “Memory Stick” images on your computer.
You need to install PIXELA ImageMixer to view images recorded on a tape on your
computer. Install it from the CD-ROM supplied with your camcorder.
To install and use this software in Windows 2000 Professional, you must be authorized
as Power Users or Administrators. For Windows XP Home Edition/Professional, you
must be authorized as Administrators.
(1)Turn on your computer and allow Windows to load.
If you are using your computer, close all running applications.
(2)Insert the supplied CD-ROM into the CD-ROM drive of your computer.
The application software starts up and the title screen appears. If the title
screen does not appear, double-click “My Computer” and then “ImageMixer”
(CD-ROM Drive). The application software screen appears after a while.
(3)Move the cursor to “PIXELA ImageMixer” and click.
The Install Wizard program starts up and the “Select Settings Language”
screen appears.
(4)Select the language for installation.
(5)Follow the on-screen messages.
The installation screen disappears when installation is complete.
(6)Click DirectX.
Follow the on-screen messages to install DirectX.
Restart your computer when the installation is completed.
(7)Connect the AC power adaptor to your camcorder.
(8)Set the POWER switch to VCR.
(9)Select USB STREAM in to ON in the menu settings (p. 207).
(10)With the CD-ROM inserted, connect the USB jacks of the camcorder and
computer using the USB cable supplied with your camcorder.
Your computer recognizes the camcorder, and the Windows Add Hardware
Wizard starts.
Connecting your camcorder to your computer using the USB cable
– For Windows users
181
Viewing Images Using your Computer
(11)Follow the on-screen messages so that the Add Hardware Wizard recognizes
that the USB drivers have been installed. The Add Hardware Wizard starts
three times because three different USB drivers are installed. Be sure to allow
the installation to complete without interrupting it.
For Windows 2000 Professional, Windows XP Home Edition/Professional users
(12)After the “File Needed” screen appears.
Open “Browse...” t “My Computer” t “ImageMixer” t “Sonyhcb.sys”,
and click “OK”.
Viewing images recorded on “Memory Stick”s
Before operation
Set USBCONNECT in to NORMAL in the menu settings. (The default setting is
NORMAL.)
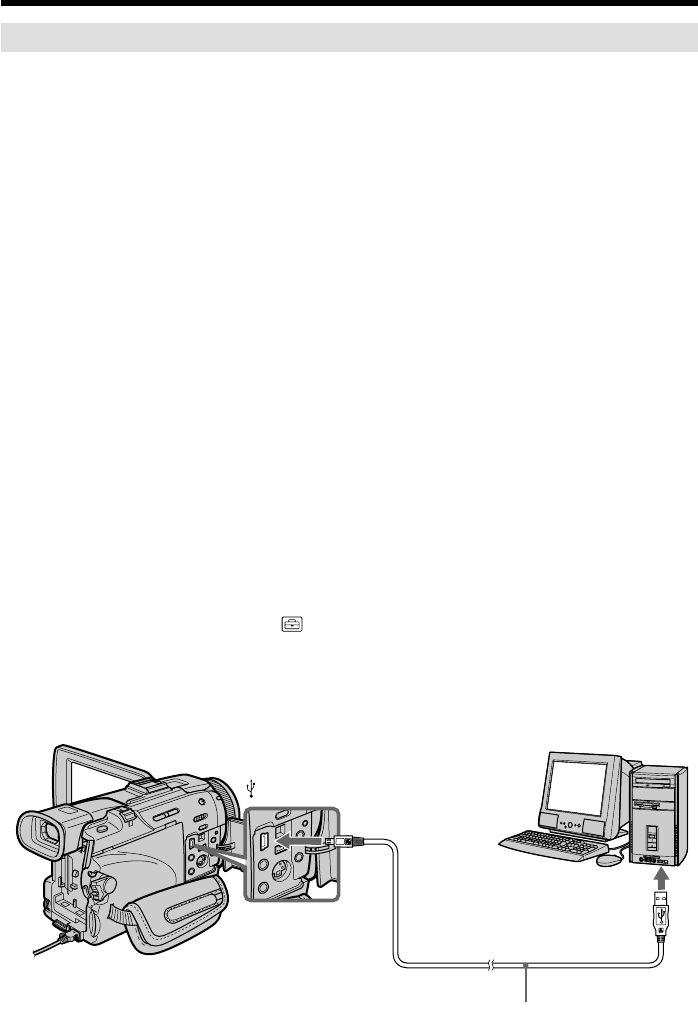
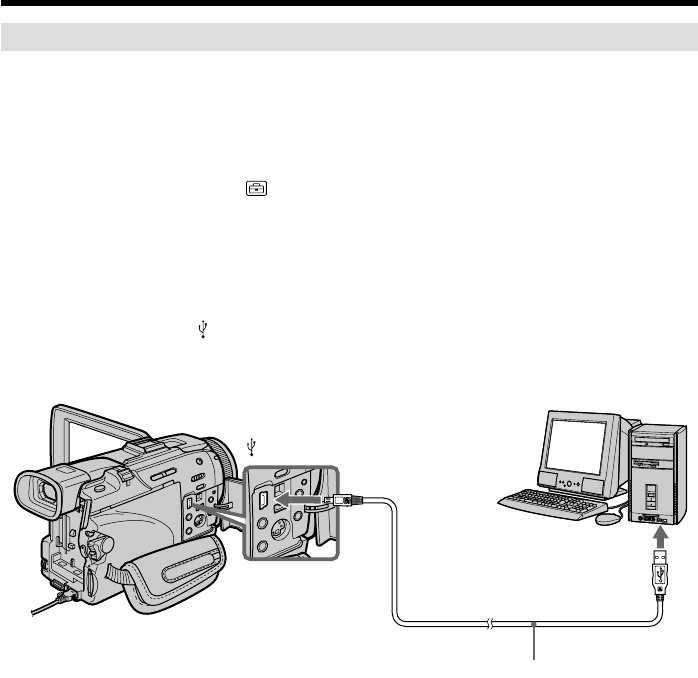
(1)Insert a “Memory Stick” into your camcorder.
(2)Connect the AC power adaptor and set the POWER switch to MEMORY/
NETWORK (DCR-TRV50 only).
(3)Connect the (USB) jack on your camcorder with the USB connector on your
computer using the supplied USB cable.
USB MODE appears on the LCD screen of your camcorder. Your computer
recognizes the camcorder, and the Add Hardware Wizard starts.
(4)Follow the on-screen messages so that the Add Hardware Wizard recognizes
that the USB drivers have been installed. The Add Hardware Wizard starts
two times because two different USB drivers are installed. Be sure to allow the
installation to complete without interrupting it.
You cannot install the USB driver if a “Memory Stick” is not in your camcorder.
Be sure to insert a “Memory Stick” into your camcorder before installing the USB
driver.
Connecting your camcorder to your computer using the USB cable
– For Windows users
USB connector
(USB) jack
USB cable (supplied)
Push into the end

182
Connecting your camcorder to your computer using the USB cable
– For Windows users
If you cannot install the USB driver
The USB driver has been registered incorrectly as your computer was connected to your
camcorder before installation of the USB driver was completed. Perform the following
procedure to correctly install the USB driver.
Viewing images recorded on a tape
Step 1: Uninstall the incorrect USB driver
1Turn on your computer and allow Windows to load.
2Connect the AC power adaptor, and set the POWER switch to VCR.
3Connect the USB connector on your computer to the (USB) jack on your
camcorder using the USB cable supplied with your camcorder.
4Open your computer’s “Device Manager”.
Windows XP Home Edition/Professional:
Select “Start” t “Control Panel” t “System” t “Hardware”, and click the
“Device Manager” button.
If there is no “System” inside “Pick a category” after clicking “Control Panel”,
click “Switch to classic view” instead.
Windows 2000 Professional:
Select “My Computer” t “Control Panel” t “System” t “Hardware” tab,
and click the “Device Manager” button.
Windows 98SE/Windows Me:
Select “My Computer” t “Control Panel” t “System”, and click “Device
Manager”.
183
Viewing Images Using your Computer
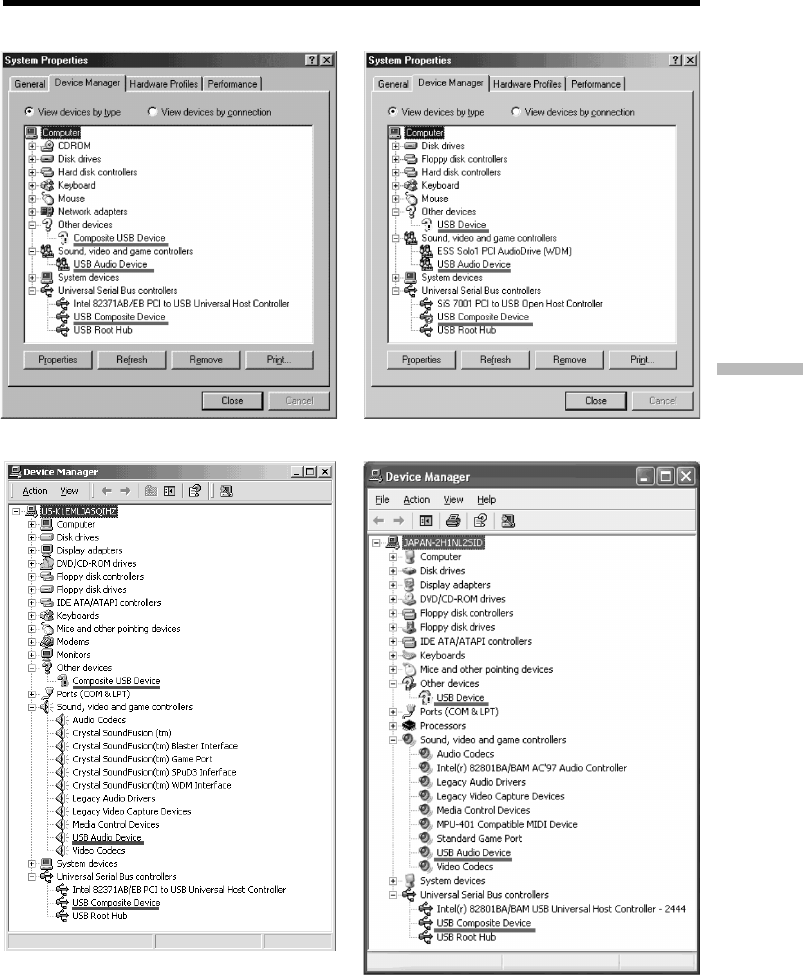
Windows 2000 Professional
Windows XP Home Edition/Professional
Connecting your camcorder to your computer using the USB cable
– For Windows users
Windows 98SE Windows Me
5Select and delete the underlined devices below.

184
6Turn the POWER switch to OFF (CHG) on your camcorder, and then
disconnect the USB cable.
7Restart your computer.
Step 2: Install the USB driver on the supplied CD-ROM
Perform the entire procedure described in “Installing the USB driver” on page 179.
Viewing images recorded on a “Memory Stick”
Step1: Uninstall the incorrect USB driver
1Turn on your computer and allow Windows to load.
2Insert a “Memory Stick” into your camcorder.
3Connect the AC power adaptor, and set the POWER switch to MEMORY/
NETWORK (DCR-TRV50 only).
4Connect the USB connector on your computer to the (USB) jack on your
camcorder using the USB cable supplied with your camcorder.
5Open your computer’s “Device Manager”.
Windows 2000 Professional:
Select “My Computer” t “Control Panel” t “System” t “Hardware”, and
click the “Device Manager” button.
Other OS:
Select “My Computer” t “Control Panel” t “System”, and click “Device
Manager”.
6Select “Other devices”.
Select the device prefixed with the “?” mark and delete.
Ex: (?)Sony Handycam
7Turn the POWER switch to OFF (CHG) on your camcorder, and then
disconnect the USB cable.
8Restart your computer.
Step2: Install the USB driver on the supplied CD-ROM
Perform the entire procedure described in “Installing the USB driver” on page 179.
Connecting your camcorder to your computer using the USB cable
– For Windows users
185
Viewing Images Using your Computer
Capturing images with “PIXELA ImageMixer Ver.1.0 for Sony”
You need to install the USB driver and PIXELA ImageMixer to view images recorded
on a tape on your computer (p. 179).
To install and use the software in Windows 2000 Professional, you must be authorized
as Power Users or Administrators. For Windows XP Home Edition/Professional, you
must be authorized as Administrators.
Viewing images recorded on a tape
(1)Turn on your computer and allow Windows to load.
(2)Connect the AC power adaptor, and insert a cassette into your camcorder.
(3)Set the POWER switch to VCR.
Select USB STREAM in to ON in the menu settings (p. 207).
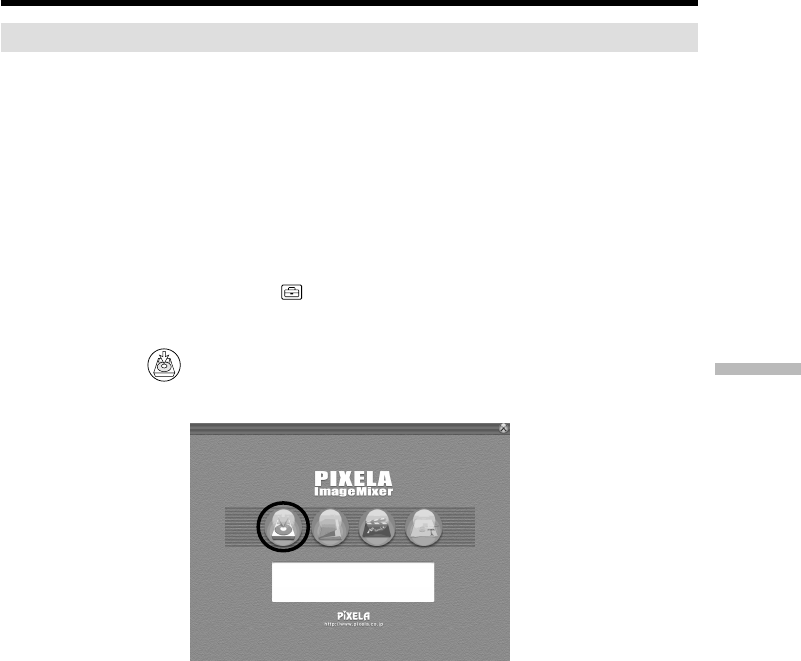
(4)Select “Start” t “Programs” t “PIXELA” t “ImageMixer” t “PIXELA
ImageMixer Ver.1.0 for Sony”.
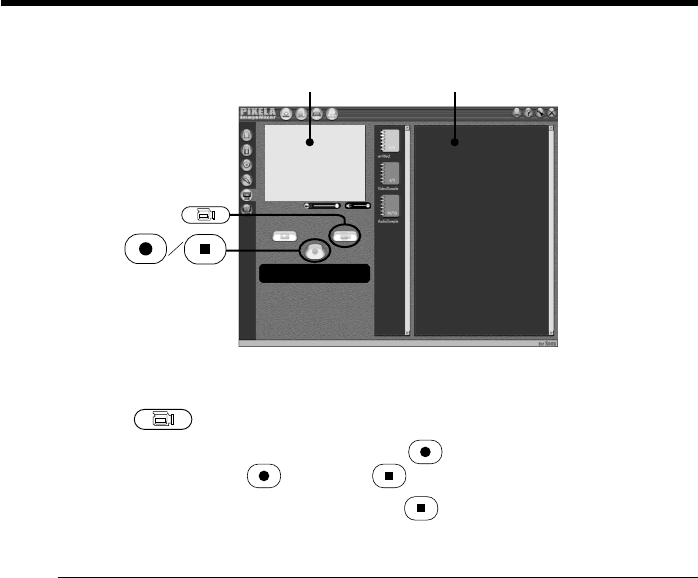
(5)Click on the screen.
The “PIXELA ImageMixer Ver.1.0 for Sony” startup screen appears on your
computer. The title screen appears.
Viewing images recorded on a tape on
your computer – For Windows users
186
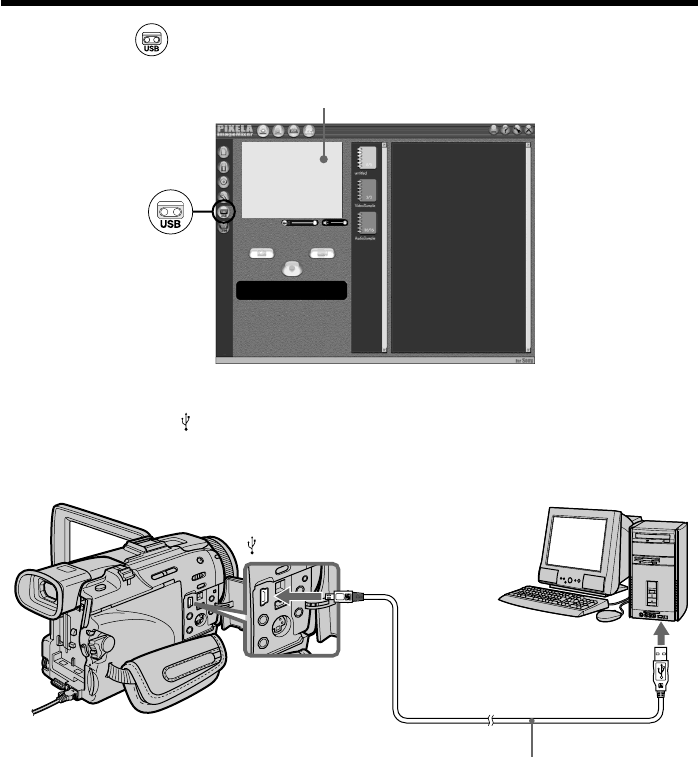
(6)Select .
(7)Connect the (USB) jack on your camcorder with the USB connector on your
computer using the supplied USB cable.
(8)Press N to start playback.
The picture from the tape appears on preview window on your computer.
Preview window
USB connector
(USB) jack
USB cable (supplied)
Push into the end
Viewing images recorded on a tape on your computer
– For Windows users
187
Viewing Images Using your Computer
Viewing pictures live from your camcorder
(1)Follow the steps 1, 2 on page 185.
(2)Set the POWER switch to CAMERA.
Select USB STREAM in to ON in the menu settings (p. 207).
(3)Follow the steps 4 to 7 on pages 185, 186.
The picture from your camcorder appears on preview window on your
computer.
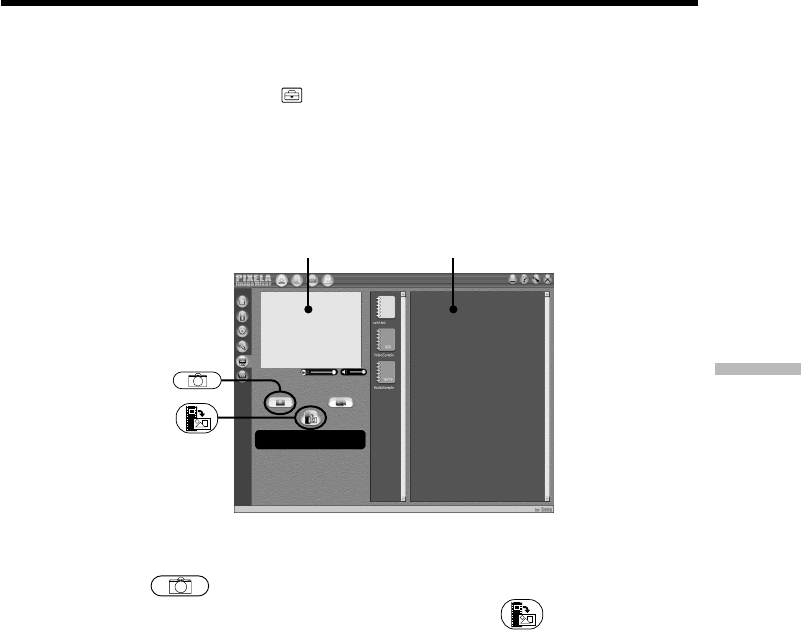
Capturing still images
(1)Select .
(2)Looking at the preview window, move the cursor to and press it at the
point you want to capture.
The still image on the screen is captured.
Captured images are displayed in the thumbnail list window.
Viewing images recorded on a tape on your computer
– For Windows users
Preview window Thumbnail list widow
188
Capturing moving pictures
(1)Select .
(2)Look at the preview window and click on at the first scene of the movie
you want to capture. changes to .
(3)Look at the preview window and click on at the last scene you want to
capture. The captured images appear in the thumbnail list window.
Notes
•The following may occur while using your camcorder, and are not due to any
malfunction.
–The image shakes up and down.
–Some images are not displayed correctly due to noise, etc.
–Images of different color systems to that of the camcorder are not displayed correctly.
•When your camcorder is in the standby with a cassette inserted, it turns off
automatically after five minutes.
•We recommend setting DEMO MODE to OFF in the menu settings when your
camcorder is in the standby, and no cassette is inserted.
•Indicators in the camcorder LCD screen do not appear on images that are captured into
your computer.
Preview window Thumbnail list widow
Viewing images recorded on a tape on your computer
– For Windows users

189
Viewing Images Using your Computer
If image data cannot be transferred by the USB connection
The USB driver has been registered incorrectly as your computer was connected to your
camcorder before installation of the USB driver was completed. Reinstall the USB driver
following the procedure on page 182.
If any trouble occurs
Close all running applications, then restart your computer.
Carry out the following operations after quitting the application:
–Disconnect the USB cable.
–Change the POWER switch to the other position or set the POWER switch to OFF
(CHG) on your camcorder.
Seeing the on-line help (operating instructions) of “PIXELA
ImageMixer Ver.1.0 for Sony”
A “PIXELA ImageMixer Ver.1.0 for Sony” on-line help site is available where you can
find the detailed operating method of “PIXELA ImageMixer Ver.1.0 for Sony”.
(1)Click located in the upper-right corner of the screen.
The ImageMixer’s Manual screen appears.
(2)You can find the information you need from the list of contents.
To close on-line help
Click at the top right of the screen.
If you have any questions about “PIXELA ImageMixer Ver.1.0 for Sony”
“ImageMixer Ver.1.0 for Sony” is a trademark of PIXELA corporation. For more
information, refer to the instruction manual of the CD-ROM supplied with your
camcorder.
Note on using your computer
Communications with your computer
Communications between your camcorder and your computer may not recover after
recovering from Suspend, Resume, or Sleep.
Viewing images recorded on a tape on your computer
– For Windows users
190
Viewing images
Before operation
•You need to install the USB driver to view “Memory Stick” images on your computer.
(p. 179)
An application such as Windows Media Player must be installed to play back moving
pictures in Windows environment.
•Set USBCONNECT in to NORMAL in the menu settings. (The default setting is
NORMAL.)
(1)Turn on your computer and allow Windows to load.
(2)Insert a “Memory Stick” into your camcorder, and connect the AC power
adaptor to your camcorder.
(3)Set the POWER switch to MEMORY/NETWORK (DCR-TRV50 only).
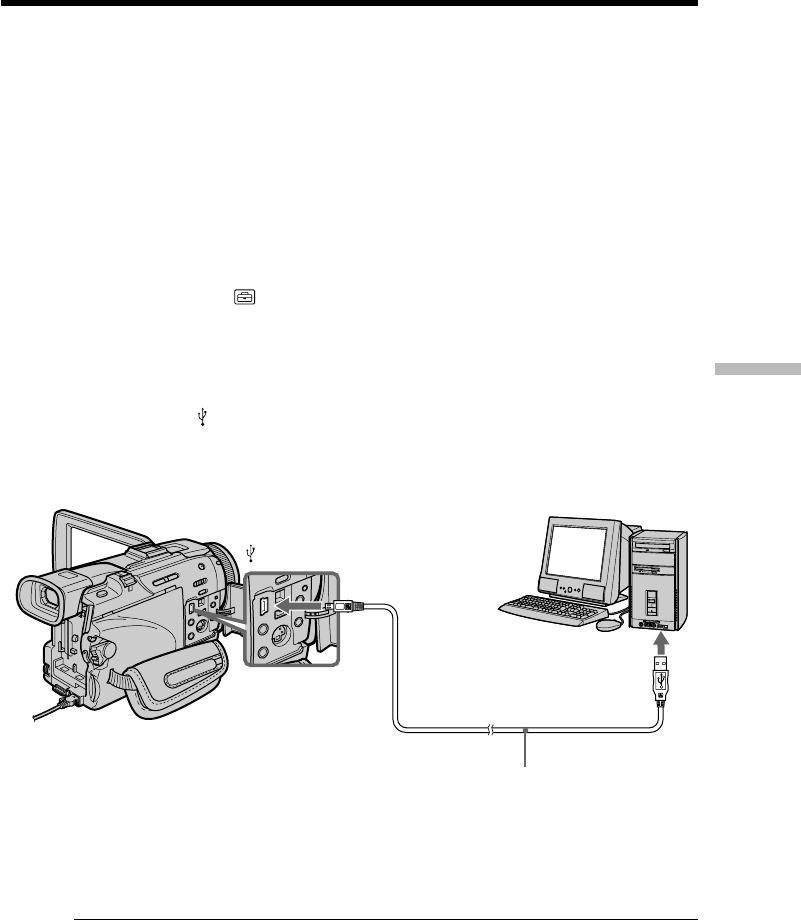
(4)Connect the (USB) jack on your camcorder with the USB connector on your
computer using the supplied USB cable.
USB MODE appears on the LCD screen of your camcorder.
(5)Open “My Computer” on Windows and double-click the newly recognized
drive (Example: “Removable Disk (E:)”).
The folders inside the “Memory Stick” are displayed.
USB connector
USB cable (supplied)
(USB) jack
Viewing images recorded on a “Memory
Stick” on your computer
– For Windows users
191
Viewing Images Using your Computer
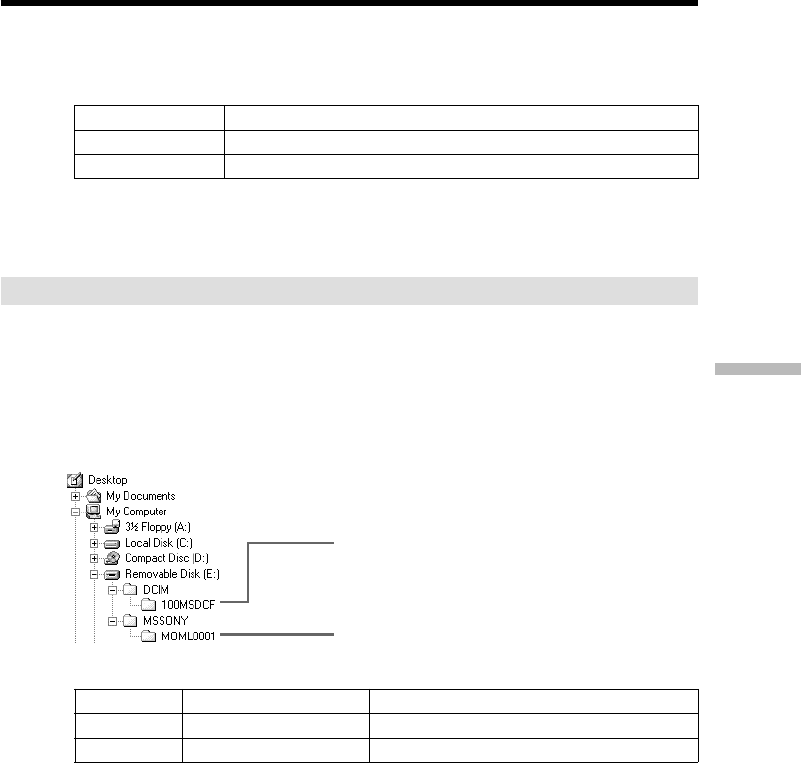
(6)Select and double-click the desired image file from the folder.
For the detailed folder and file name, see “Image file storage destinations and
image files”.
Desired file type Double-click in this order
Still image “Dcim” folder t“100msdcf” folder tImage file
Moving picture* “Mssony” folder t“Moml0001” folder tImage file*
* Copying a file to the hard disk of your computer before viewing it is recommended. If
you play back the file directly from the “Memory Stick,” the image and sound may
break off.
Image file storage destinations and image files
Image files recorded with your camcorder are grouped in folders by recording mode.
The meanings of the file names are as follows. ssss stands for any number within
the range from 0001 to 9999.
For Windows Me users
(The drive recognizing your camcorder is [E:].)
Folder File Meaning
100MSDCF DSC0ssss.JPG Still image file
MOML0001 MOV0ssss.MPG Moving picture file
Folder containing moving picture data
Folder containing still image data
Viewing images recorded on a “Memory Stick” on your computer
– For Windows users

192
Disconnect the USB cable and eject the “Memory Stick” or set
the POWER switch to OFF(CHG).
– For Windows 2000 Professional/Me, Windows XP Home Edition/Professional
users
To unplug the USB cable, eject the “Memory Stick” or set the POWER switch to OFF
(CHG) follow the procedure below.
(1)Move the cursor to the “Unplug or Eject Hardware” icon on the Task Tray and
click to cancel the applicable drive.
(2)After the “Safe to remove” message appears, disconnect the USB cable and
eject the “Memory Stick” or set the POWER switch to OFF(CHG).
Viewing images recorded on a “Memory Stick” on your computer
– For Windows users

193
Viewing Images Using your Computer
Connecting your camcorder to your
computer using the USB cable
– For Macintosh users
When connecting to a computer using the USB cable
You must install a USB driver onto your computer in order to connect the camcorder to
the computer’s USB connector. The USB driver can be found on the CD-ROM supplied,
along with the application software required for viewing images.
Recommended computer usage environment when connecting
via USB cable and viewing “Memory Stick” images on the
computer
Mac OS 8.5.1/8.6/9.0/9.1/9.2 or Mac OS X (v10.0/v10.1)
Standard installation is required.
However, note that the upgrade to Mac OS 9.0/9.1 should be used for the following
models.
•iMac with the Mac OS 8.6 standard installation and a slot loading type CD-ROM drive
•iBook or Power Mac G4 with the Mac OS 8.6 standard installation
The USB connector must be provided as standard.
QuickTime 3.0 or newer must be installed (to play back moving pictures).
Notes
•Operations are not guaranteed for the Macintosh environment if you connect two or
more USB equipment to a single computer at the same time, or when using a hub.
•Some equipment may not operate depending on the type of USB equipment that is
used simultaneously.
•Operations are not guaranteed for all the recommended computer environments
mentioned above.
•Macintosh and Mac OS, QuickTime are trademarks of Apple Computer Inc.
•All other product names mentioned herein may be the trademarks or registered
trademarks of their respective companies. Furthermore, “TM” and “®” are not
mentioned in each case in this manual.
194
Installing the USB driver
Do not connect the USB cable to your computer before installation of the USB
driver is completed.
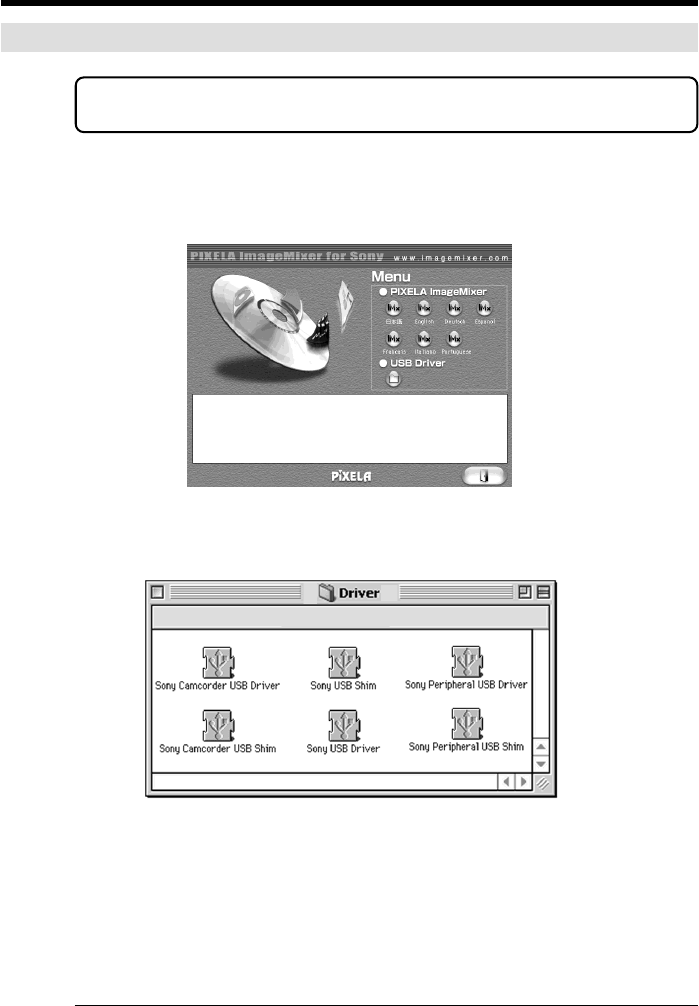
For Mac OS 8.5.1/8.6/9.0 users
(1)Turn on your computer and allow the Mac OS to load.
(2)Insert the supplied CD-ROM in the CD-ROM drive of your computer.
The application software screen appears.
(3)Click the “USB Driver” to open the folder containing the six files related to
“Driver.”
(4)Select the following two files, and drag and drop them into the System Folder.
•Sony Camcorder USB Driver
•Sony Camcorder USB Shim
(5)When the message appears, click “OK.”
The USB driver is installed on your computer.
(6)Remove the CD-ROM from the computer.
(7)Restart your computer.
For Mac OS 9.1/9.2/Mac OS X (v10.0/v10.1)
The USB driver need not be installed. Your Mac is automatically recognized as a drive
just by connecting your Mac using the USB cable.
Connecting your camcorder to your computer using the USB cable
– For Macintosh users

195
Viewing Images Using your Computer
Viewing images
Before operation
You need to install the USB driver to view “Memory Stick” images on your computer.
(p. 194)
QuickTime 3.0 or newer must be installed to play back moving pictures.
(1)Turn on your computer and allow Mac OS to load.
(2)Insert a “Memory Stick” into your camcorder, and connect the AC power
adaptor to your camcorder.
(3)Set the POWER switch to MEMORY/NETWORK (DCR-TRV50 only).
(4)Connect the (USB) jack on your camcorder with the USB connector on your
computer using the supplied USB cable.
USB MODE appears on the LCD screen of your camcorder.
(5)Double-click the “Memory Stick” icon on the desktop.
The folders inside the “Memory Stick” are displayed.
(6)Select and double-click the desired image file from the folder.
Desired file type Double-click in this order
Still image “Dcim” folder t“100msdcf” folder tImage file
Moving picture* “Mssony” folder t“Moml0001” folder tImage file*
* Copying a file to the hard disk of your computer before viewing it is recommended. If
you play back the file directly from the “Memory Stick,” the image and sound may
break off.
Disconnect the USB cable and eject the “Memory Stick” or set
the POWER switch to OFF(CHG)
Follow the procedure below.
(1)Close all running applications.
Make sure that the access lamp of your camcorder is not lit.
(2)Drag the “Memory Stick” icon into the “Trash”. Alternatively, select the
“Memory Stick” icon by clicking on it, and then select “Eject disk” from the
“Special” menu at the top left of the screen.
(3)Disconnect the USB cable and eject the “Memory Stick” or the POWER switch
to OFF (CHG).
For Mac OS X (v10.0) users
Shut down your computer, then disconnect the USB cable and eject the “Memory Stick”
or the POWER switch to OFF (CHG).
Viewing images recorded on a “Memory
Stick” on your computer
– For Macintosh users
196
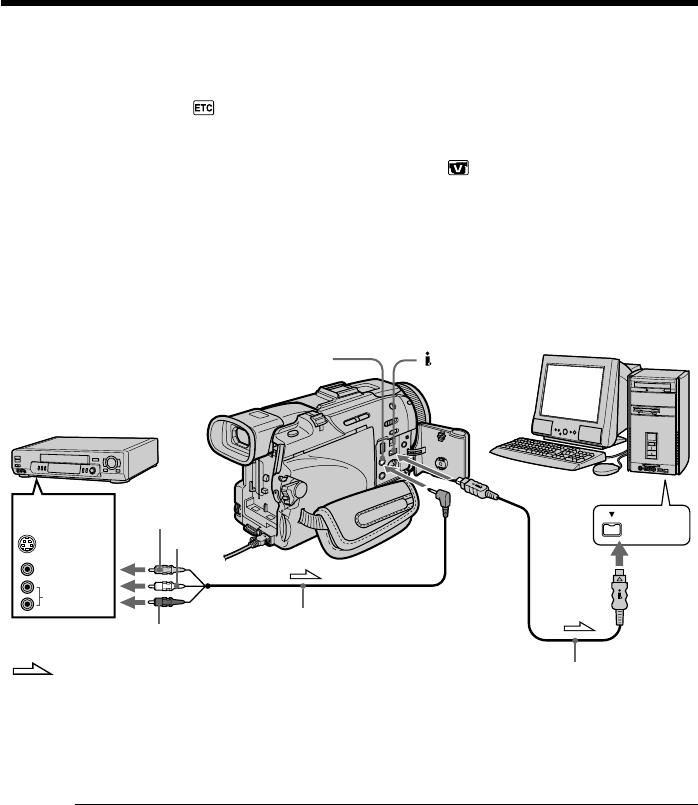
You can capture images and sound from an analog video unit connected to your
computer which has the i.LINK (DV) jack connected to your camcorder.
Before operation
Set DISPLAY in to LCD in the menu settings. (The default setting is LCD.)
(1)Set the POWER switch to VCR.
(2)Press MENU, then select A/V t DV OUT in to ON with the SEL/PUSH
EXEC dial (p. 202).
(3)Start playback on the analog video unit.
(4)Start procedures for capturing images and sound on your computer. The
operation procedures depend on your computer and the software you are
using.
For details on how to capture images, refer to the instruction manual of your
computer and software you are using.
After capturing images and sound
Stop capturing procedures on your computer , and stop the playback on the analog
video unit.
Notes
•You need to install software that supports the exchange video signals.
•Depending on the state of the video signals, the computer may not be able to output
the images correctly when you convert video signals into digital video signals via
your camcorder.
•You cannot record or capture the video output via your camcorder when the video
tapes include copyright protection signals such as the ID-2 system.
•You can capture images and sound with an S video cable (optional) instead of the
A/V connecting cable (supplied).
If your computer has a USB connector
You can connect using a USB cable, but images may not be transfered smoothly.
Capturing images from an analog video unit
on your computer – Signal convert function
i.LINK
VIDEO
AUDIO
S VIDEO
OUT
AUDIO/VIDEO DV IN/OUT
i.LINK cable (DV connecting cable) (optional)
: Signal flow
VCR
Yellow
White
Red A/Vconnecting cable (supplied)
197
Using the Network function
– DCR-TRV50 only
You can access the Internet using a Bluetooth equipped device that is complied to the
camcorder. Once the access is made, you can view a Web page, send/receive your
e-mail, etc. This section describes only how to open the Network Menu.
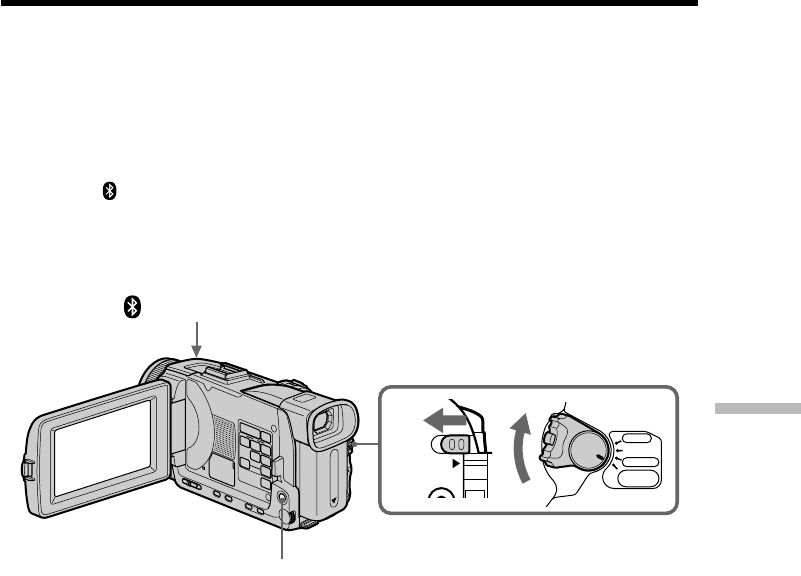
(1)Set the POWER switch to MEMORY/NETWORK.
Make sure that the LOCK switch is set to the left (unlock) position.
(2)Press NETWORK.
(Bluetooth) lamp lights up and Network Menu appears.
For the details, refer to the Network Function Operating Instructions supplied with
your camcorder.
— Using the Network function —
Accessing the network
1
VCR
MEMORY/
NETWORK
CAMERA
OFF(CHG)
POWER
LOCK
(Bluetooth) lamp
NETWORK
198
Accessing the network
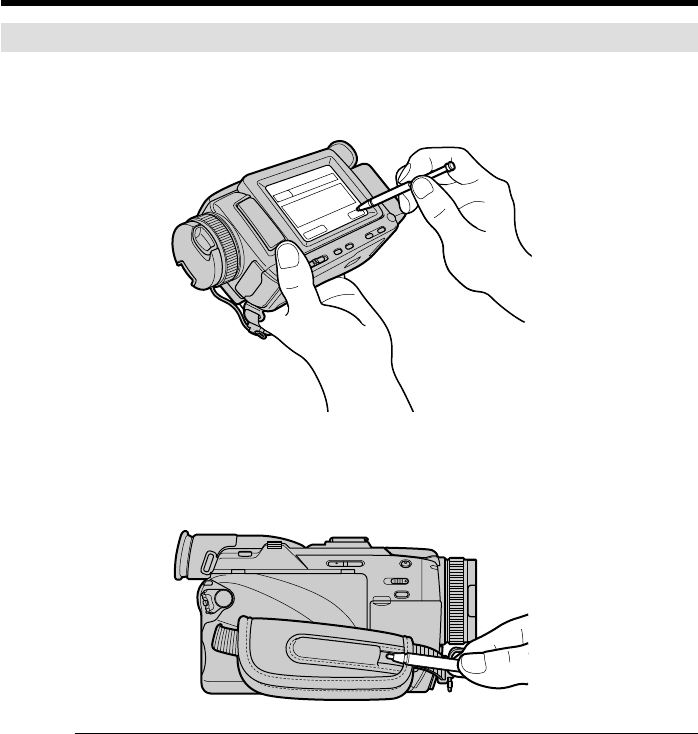
How to hold your camcorder when operating in NETWORK mode
Hold your camcorder with your hand through the grip belt to keep from dropping it.
The operation buttons needed in NETWORK mode are displayed on the LCD screen.
Press the buttons with the stylus supplied.
After using the stylus
Put it back in the holder. Hold the stylus correctly as shown in the illustration and insert
it until it clicks.
On trademarks
•The BLUETOOTH trademarks are owned by their proprietor and used by Sony
Corporation under license.
•All other product names mentioned herein may be the trademarks or registered
trademarks of their respective companies. Furthermore, “TM” and “®” are not
mentioned in each case in this manual.
Note
Make sure that your camcorder is in the standby with the POWER switch set to
MEMORY/NETWORK.
During using the network function
You cannot use the optional printer.
199
Customizing Your Camcorder
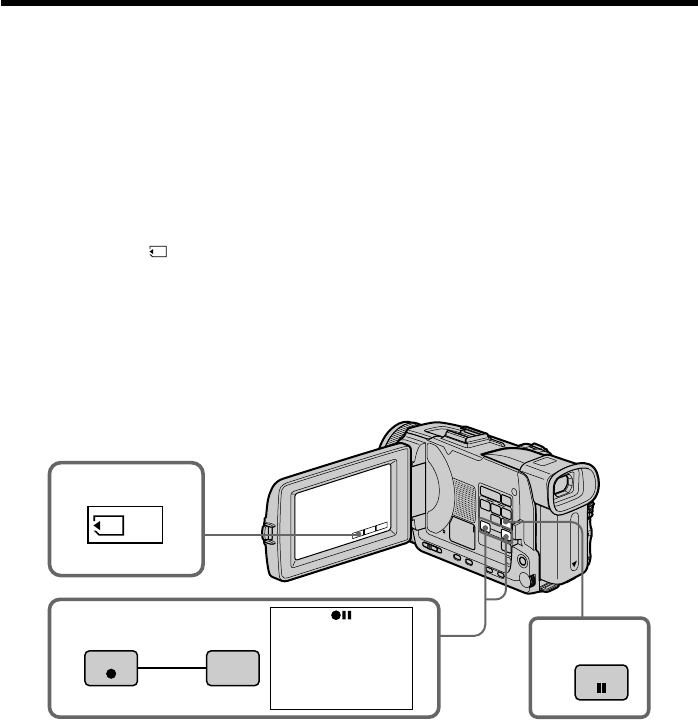
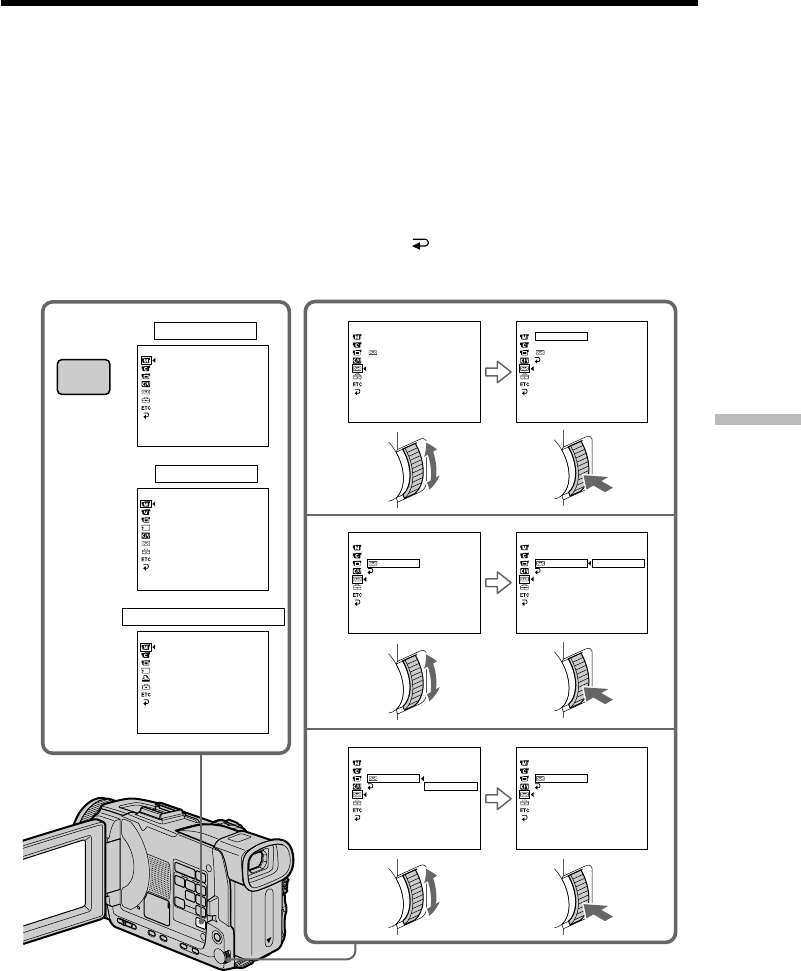
To change the mode settings in the menu settings, select the menu items with the SEL/
PUSH EXEC dial. The default settings can be partially changed. First, select the icon,
then the menu item and then the mode.
(1)Set the POWER switch to CAMERA, VCR or MEMORY/NETWORK (DCR-
TRV50 only), press MENU.
(2)Turn the SEL/PUSH EXEC dial to select the desired icon, then press the dial to
set.
(3)Turn the SEL/PUSH EXEC dial to select the desired item, then press the dial to
set.
(4)Turn the SEL/PUSH EXEC dial to select the desired mode, then press the dial
to set.
(5)If you want to change other items, select RETURN and press the dial, then
repeat steps 2 to 4.
For details, see “Selecting the mode setting of each item” (p. 200).
— Customizing Your Camcorder —
Changing the default settings with the
menu
CAMERA
VCR
MEMORY/NETWORK*
12
3
4
or
or
MENU
MANUAL SET
P EFFECT
FLASH LVL
WHT BAL
N. S. LIGHT
AUTO SHTR
[MENU] : END
TAPE SET
REC MODE
AUDIO MODE
REMAIN
[MENU] : END
TAPE SET
REC MODE
AUDIO MODE
REMAIN
RETURN
SP
[MENU] : END
TAPE SET
REC MODE
AUDIO MODE
REMAIN
RETURN AUTO
[MENU] : END
TAPE SET
REC MODE
AUDIO MODE
REMAIN
RETURN AUTO
ON
[MENU] : END
TAPE SET
REC MODE
AUDIO MODE
REMAIN
RETURN AUTO
ON
[MENU] : END
TAPE SET
REC MODE
AUDIO MODE
REMAIN
RETURN ON
[MENU] : END
MANUAL SET
FLASH LVL
WHT BAL
N. S. LIGHT
[MENU] : END
MANUAL SET
P EFFECT
[MENU] : END
* DCR-TRV50 only
(continued on the following page)
200
Icon/item
MANUAL SET
P EFFECT
FLASH LVL
WHT BAL
N.S. LIGHT
AUTO SHTR
To make the menu display disappear
Press MENU.
Menu items are displayed as the following icons:
MANUAL SET
CAMERA SET
VCR SET
LCD/VF SET
MEMORY SET
PRINT SET
CM SET
TAPE SET
SETUP MENU
OTHERS
Selecting the mode setting of each item z is the default setting.
Menu items differ depending on the position of the POWER switch. The screen shows
only the items you can operate at the moment.
The POWER switch is the name of the switch on the DCR-TRV50. It is referred to as
MEMORY on the DCR-TRV40.
Changing the default settings with the menu
Mode
——
HIGH
zNORMAL
LOW
——
zON
OFF
zON
OFF
Meaning
To add special effects like those in films or on
the TV to images (p. 60, 75)
Makes the flash level higher than normal.
Normal setting
Makes the flash level lower than normal.
To adjust the white balance (p. 54)
To use the NightShot Light (p. 35)
To cancel the NightShot Light
To automatically activate the electronic shutter
when shooting in bright conditions
To not automatically activate the electronic
shutter even when shooting in bright conditions
POWER
switch
VCR
CAMERA
CAMERA
MEMORY/
NETWORK
CAMERA
MEMORY/
NETWORK
CAMERA
MEMORY/
NETWORK
CAMERA
Note on FLASH LVL
You cannot adjust FLASH LVL if the external flash (optional) is not compatible with the
flash level.