Sony Group DCRTRV50 Sony Handycam DCR-TRV50 User Manual DCR TRV40 50
Sony Corporation Sony Handycam DCR-TRV50 DCR TRV40 50
Contents
manual2
51
Advanced Recording Operations
Self-timer recording
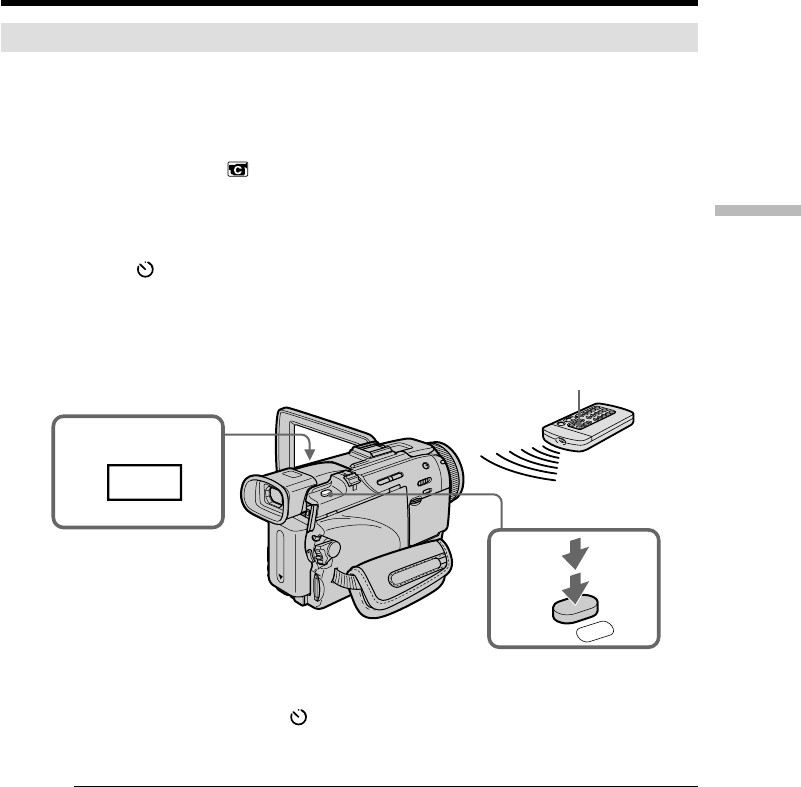
You can record still images on “Memory Stick”s with the self-timer. You can also use
the Remote Commander for this operation.
Before operation
•Insert a “Memory Stick” into your camcorder (p. 119).
•Set PHOTO REC in to MEMORY in the menu settings.(The default setting is
MEMORY.)
(1)In the standby, press FN and select PAGE2.
(2)Press SELFTIMER.
The (self-timer) indicator appears on the screen.
(3)Press PHOTO deeper.
The self-timer starts counting down from 10 with a beep. In the last two
seconds of the countdown, the beep gets faster, then the recording starts
automatically.
To cancel the self-timer
Press SELFTIMER so that the (self-timer) indicator disappears from the screen while
your camcorder is in the standby. You cannot cancel self-timer using the Remote
Commander.
Note
The self-timer recording is automatically canceled when:
–The self-timer recording is finished.
–The POWER switch is set to OFF (CHG) or VCR.
Self-timer recording
You can operate the self-timer recording only during the recording standby.
Recording still images on a “Memory Stick” during tape recording
3
PHOTO
1FN
PHOTO
52
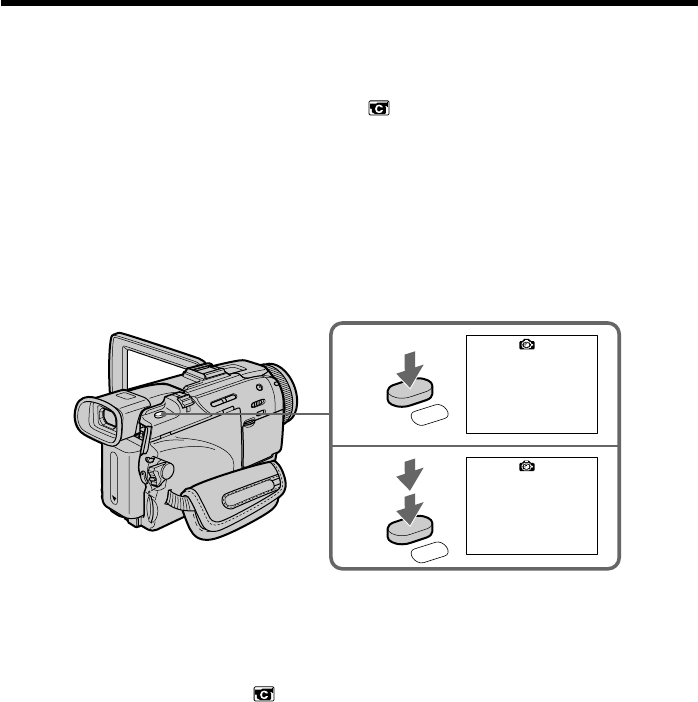
You can record still images such as photographs on tapes.
You can record about 510 images in the SP mode and about 765 images in the LP mode
on a 60-minute tape.
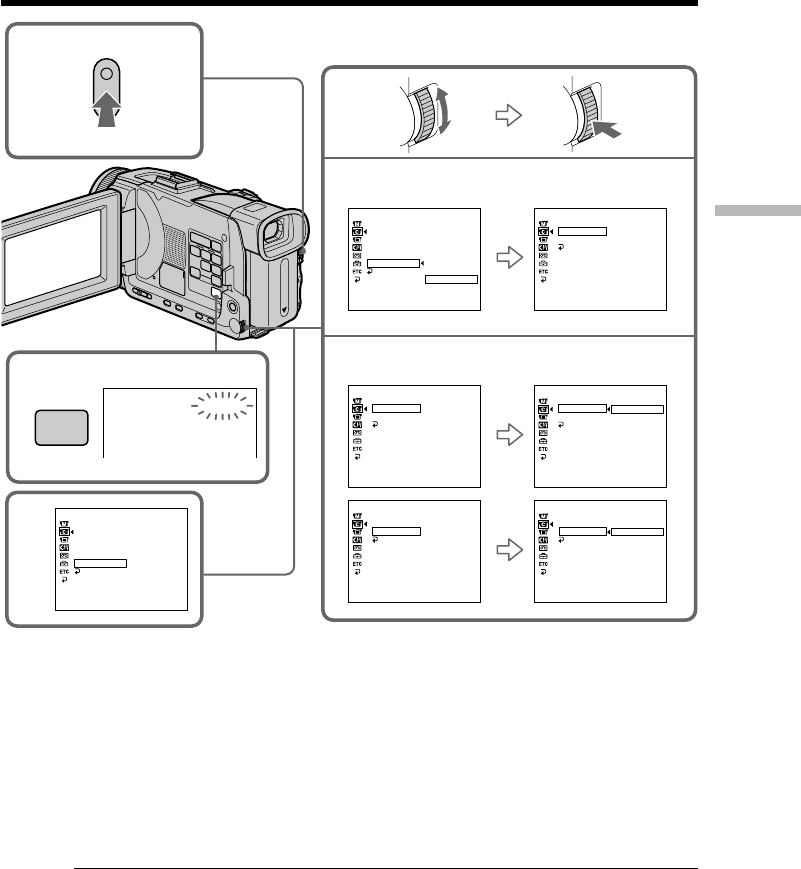
(1)In the standby, set PHOTO REC in to TAPE in the menu settings (p. 201).
(2)Keep pressing PHOTO lightly until a still image appears.
The CAPTURE indicator appears. Recording does not start yet.
To change the still image, release PHOTO, select a still image again, and then
press and hold PHOTO lightly.
(3)Press PHOTO deeper.
The still image on the screen is recorded for about seven seconds. The sound
during those seven seconds is also recorded.
The still image is displayed on the screen until recording is completed.
Recording images with the flash
For the details, see page 49.
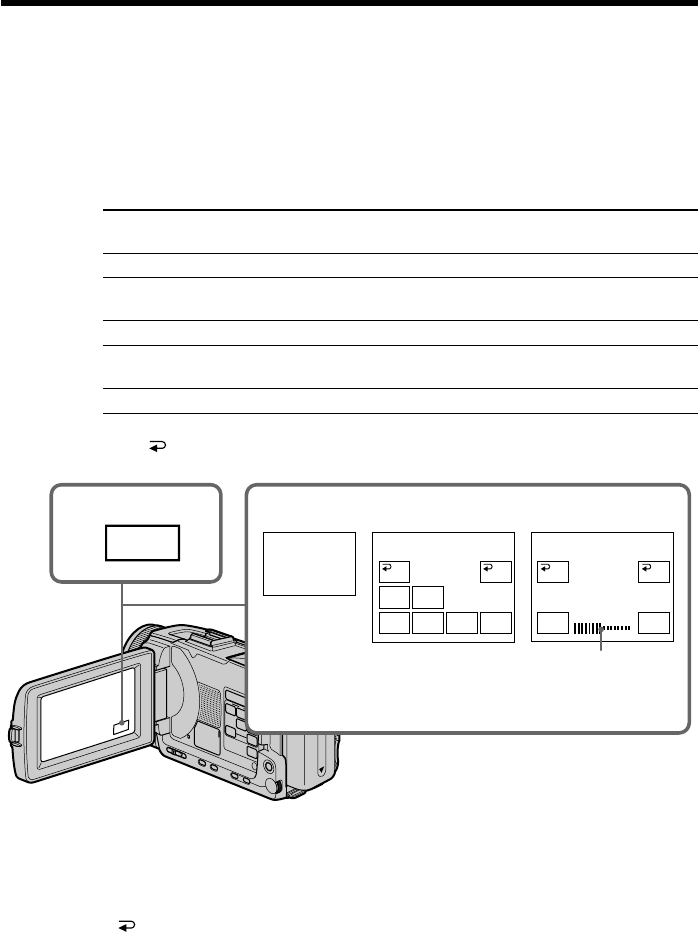
Recording images with self-timer
(1)Set PHOTO REC in to TAPE in the menu settings (p. 201).
(2)Follow steps 1 and 3 on page 51.
Recording still images on a tape
– Tape Photo recording
2
•••••••
3
CAPTURE
PHOTO
PHOTO

53
Advanced Recording Operations
Recording still images on a tape – Tape Photo recording
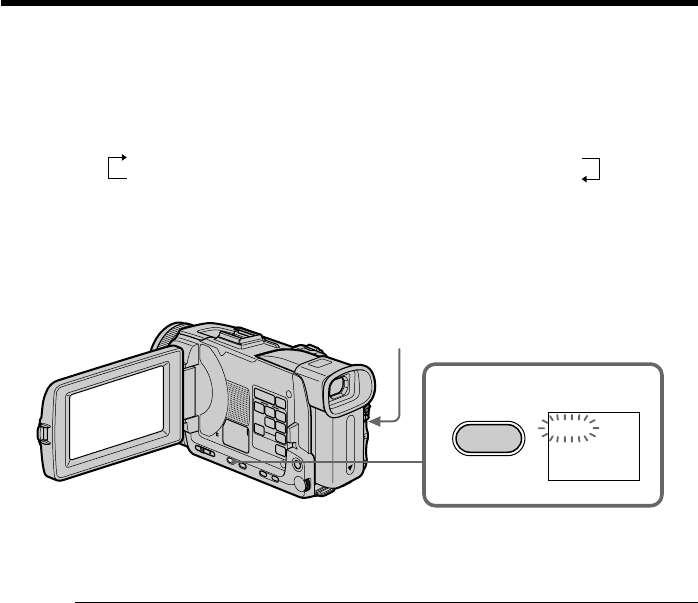
Notes
•During tape photo recording, you cannot change the mode or setting.
•When recording a still image, do not shake your camcorder. The image may fluctuate.
•You cannot use PHOTO during the following operations ( indicator flashes on
the screen):
–Fader
–Digital effect
If you record a moving subject with the tape photo recording
When you play back the still image on other equipment, the image may fluctuate.
This is not a malfunction.
To use the tape photo recording with the Remote Commander
Press PHOTO on the Remote Commander. Your camcorder records an image on the
screen immediately.
To use the tape photo recording during the normal camera recording
You cannot check an image on the screen by pressing PHOTO lightly. Press PHOTO
deeper. The still image is then recorded for about seven seconds, and your camcorder
returns to the standby.
To record clear still images with little unsteadiness
We recommend that you record on “Memory Stick”s using the Memory Photo
recording.
When playing back images recorded with the flash on other equipment
These images may flicker.
54
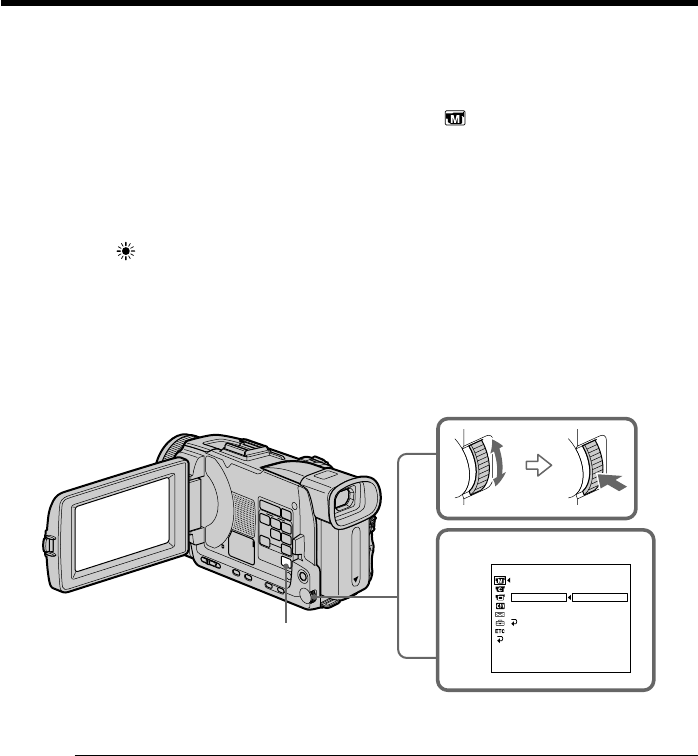
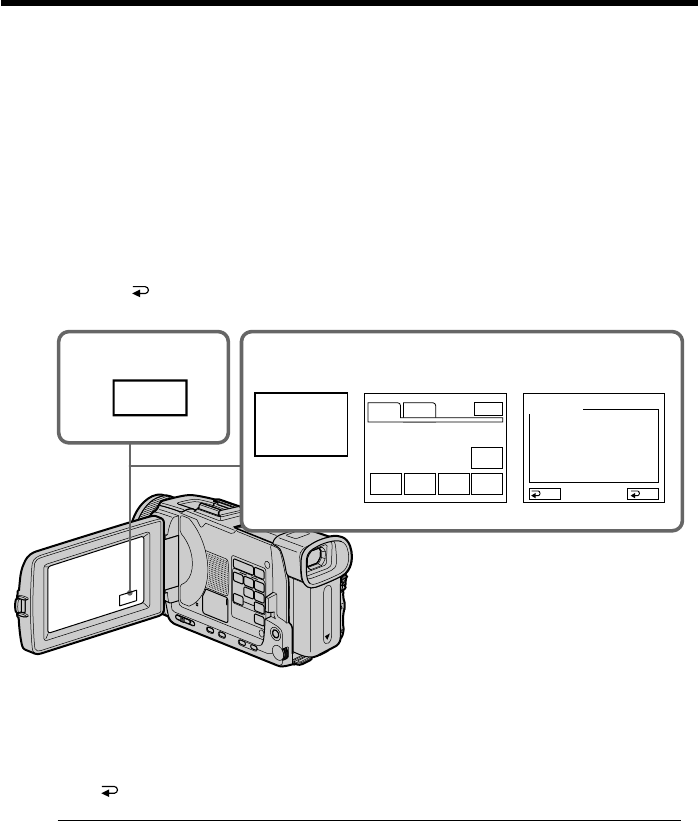
You can manually adjust and set the white balance. This adjustment makes white
subjects look white and allows more natural color balance. Normally white balance is
automatically adjusted.
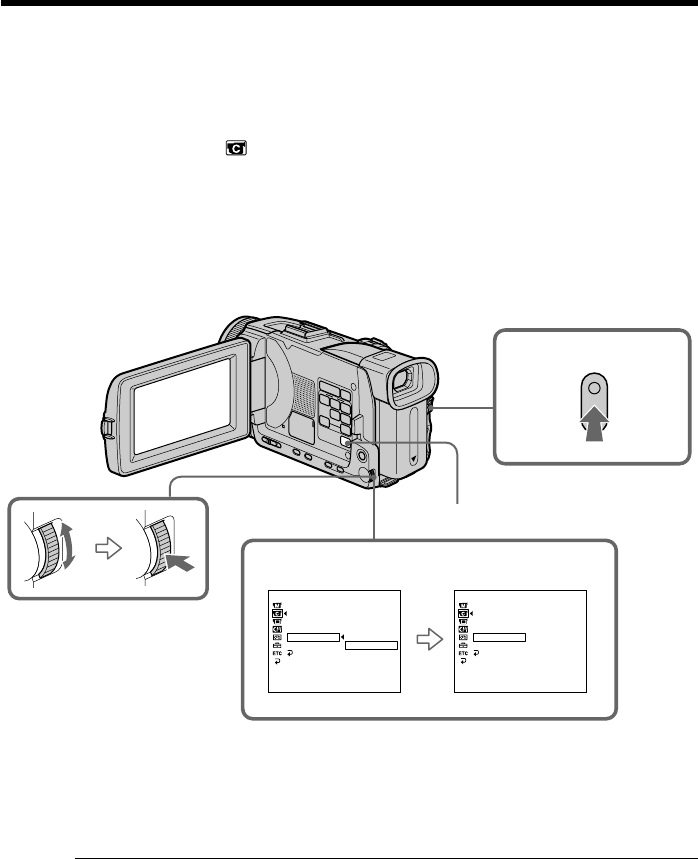
(1)Set the POWER switch to CAMERA or MEMORY/NETWORK (DCR-TRV50
only). Press MENU, then select WHT BAL in with the SEL/PUSH EXEC
dial (p. 200).
(2)Turn the SEL/PUSH EXEC dial to select the desired white balance, then press
dial.
HOLD :
Recording a single-colored subject or background
OUTDOOR :
•When recording a sunset/sunrise, just after sunset, just before sunrise, neon
signs, or fireworks
•Under a color-matching fluorescent lamp
n INDOOR :
•Where lighting condition changes quickly
•Excessively bright places such as studios
•Under sodium lamps or mercury lamps
To return to the automatic white balance
Set WHT BAL to AUTO in the menu settings.
If the picture is being taken in a studio lit by TV lighting
We recommend that you record in the INDOOR.
When you record under fluorescent lighting
Use the automatic white balance or HOLD.
Your camcorder may not adjust the white balance correctly in the INDOOR.
In the automatic white balance
Point your camcorder at a white subject for about 10 seconds after setting the POWER
switch to CAMERA to get a better adjustment when:
–You detach the battery for replacement.
–You take your camcorder outdoors from inside a house holding the exposure, or vice
versa.
In the HOLD white balance
Set the white balance to AUTO and reset to HOLD after a few seconds when:
–You change the PROGRAM AE.
–You take your camcorder outdoors from inside a house, or vice versa.
1
[MENU] : END
MANUAL SET
P EFFECT
FLASH LVL
WHT BAL
N.S. LIGHT
AUTO SHTR
RETURN
AUTO
HOLD
OUTDOOR
INDOOR
STBY
MENU
Adjusting the white balance manually
55
Advanced Recording Operations
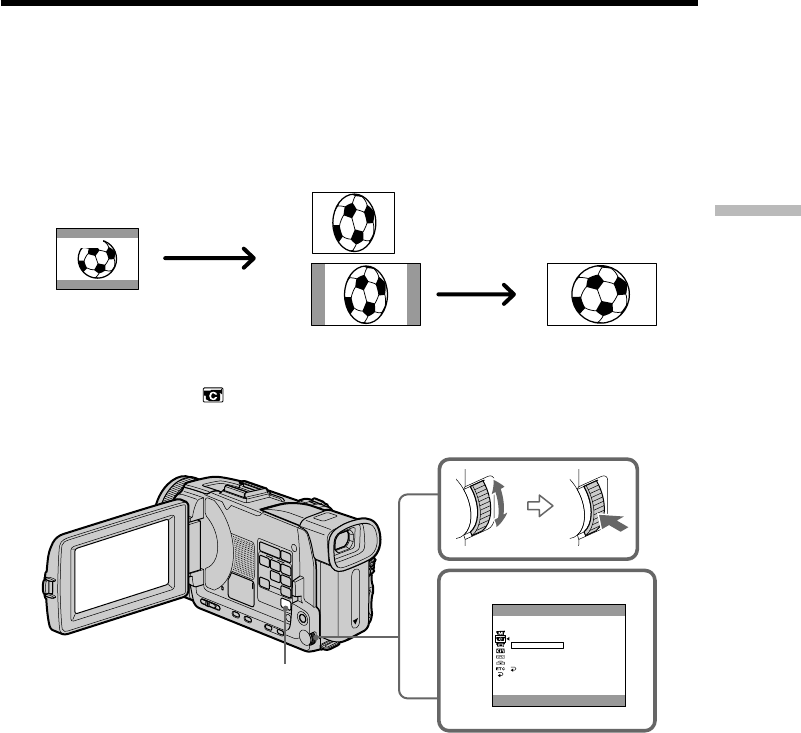
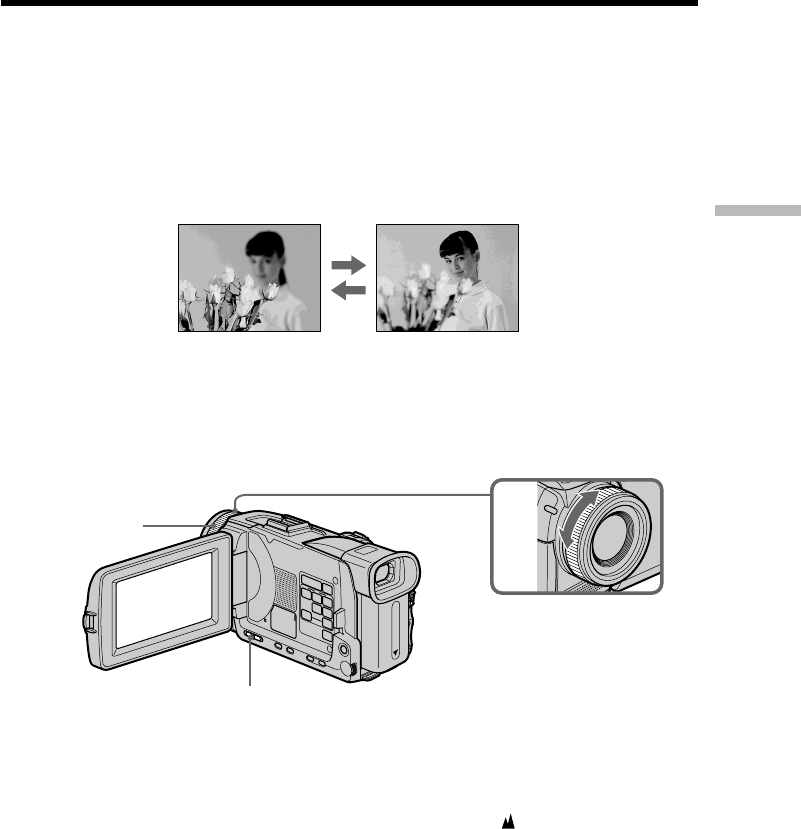
You can record a 16:9 wide picture to watch on a 16:9 wide-screen TV (16:9WIDE).
If you connect a TV compatible with the ID-1/ID-2 system, the screen size is
automatically selected.
Black bands appear on the screen during recording in 16:9WIDE mode [a]. The picture
during playback on a normal TV [b] or on a wide-screen TV [c] is compressed in the
longwise direction. If you set the screen mode of the wide-screen TV to the full mode,
you can watch pictures of normal images [d].
(1)In the standby, press MENU, then turn the SEL/PUSH EXEC dial to select
16:9WIDE in , then press the dial (p. 201).
(2)Turn the SEL/PUSH EXEC dial to select ON, then press the dial.
To cancel the wide mode
Set 16:9WIDE to OFF in the menu settings.
Using the wide mode
[a]
[c]
[b]
[d]
16:9
WIDE
2
ON
CAMERA SET
D ZOOM
PHOTO REC
16:9WIDE
STEADYSHOT
FRAME REC
INT. REC
RETURN
[MENU] : END
MENU

56
In the wide mode
You cannot select the following functions:
–Recording still images on a “Memory Stick” in the tape recording or tape recording
standby
–OLD MOVIE
–BOUNCE
During recording
You cannot select or cancel the wide mode. When you cancel the wide mode, set your
camcorder to the standby and then set 16:9WIDE to OFF in the menu settings.
Connection for a TV
Pictures recorded in the 16:9WIDE mode automatically appear on the TV screen at full
size when:
–You connect your camcorder to a TV that is compatible with the video ID (ID-1/ID-2)
system.
–You connect your camcorder to the S video jack on the TV.
ID-1 system
The ID-1 system sends aspect ratio (screen horizontal/vertical ratio) information (16:9,
4:3, or letter box) with video signals.
ID-2 system
The ID-2 system sends a copyright protection signal with ID-1 signals inserted between
video signals when you connect your camcorder to other equipment using an A/V
connecting cable.
Using the wide mode
57
Advanced Recording Operations
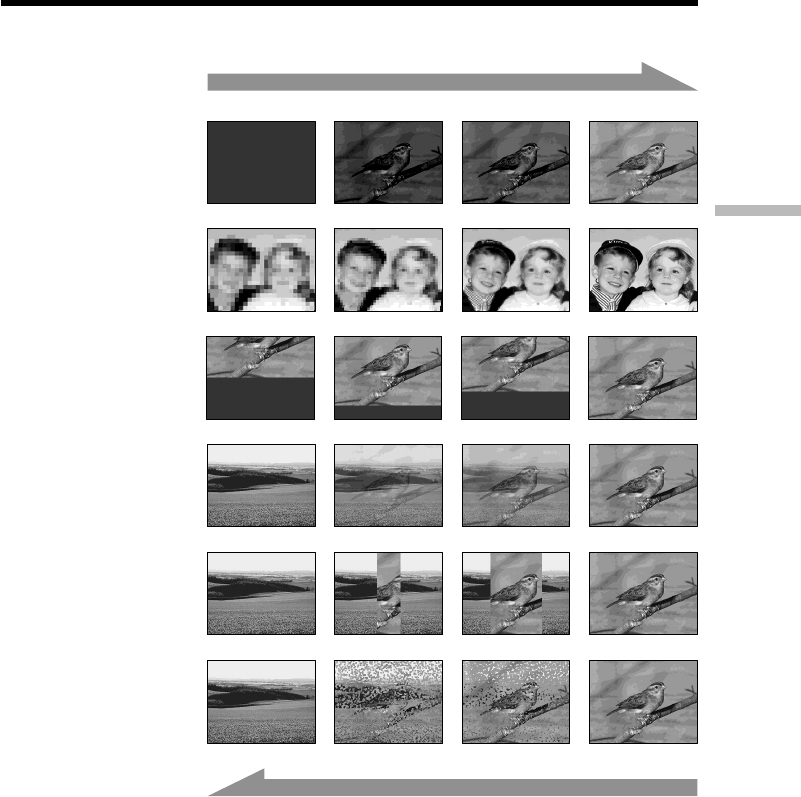
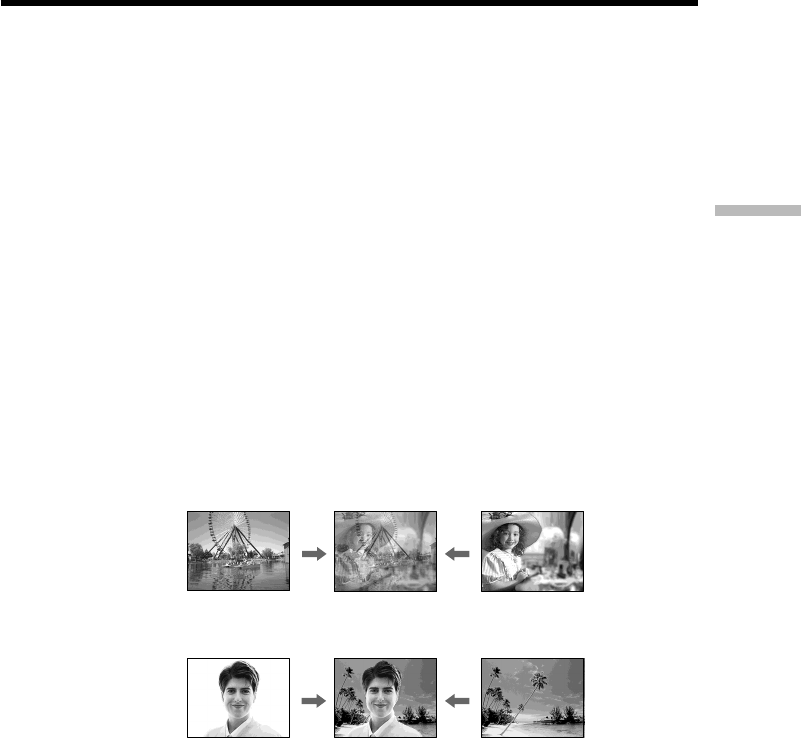
You can fade in or out to give your recording a more professional appearance.
MONOTONE
When fading in, the picture gradually changes from black-and-white to color.
When fading out, the picture gradually changes from color to black-and-white.
1) You can use the bounce when D ZOOM is set to OFF in the menu settings.
2) Fade in only.
Using the fader
FADER
OVERLAP2)
WIPE2)
DOT2)
[a] RECSTBY
RECSTBY
[b]
M. FADER
(mosaic)
BOUNCE1) 2)
58
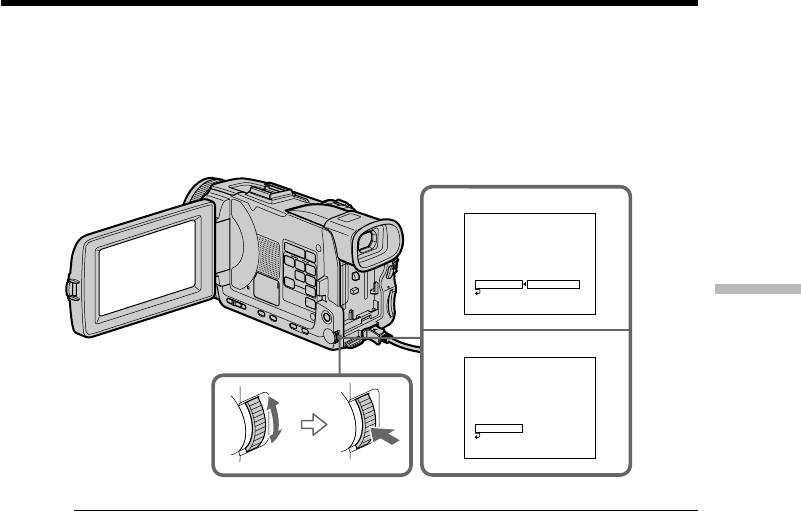
(1) When fading in [a]
In the standby, press FADER until the desired fader indicator flashes.
When fading out [b]
In the recording, press FADER until the desired fader indicator flashes.
The indicator changes as follows:
FADER tM. FADER tBOUNCE tMONOTONE
(no indicator)TDOT TWIPE TOVERLAP
The last selected fader is indicated first of all.
(2)Press START/STOP. The fader indicator stops flashing.
After fade in/out ends, your camcorder automatically returns to the normal
mode.
To cancel the fader
Before pressing START/STOP, press FADER until the indicator disappears.
Note
You cannot use the following functions while using the fader. Also, you cannot use the
fader while using the following functions:
–Digital effect
–Super NightShot
–Color Slow Shutter
–Tape photo recording
–Recording still images on a “Memory Stick” in the tape recording or tape recording
standby
–Recording with the flash
–Interval recording
–Frame recording
When you select OVERLAP, WIPE, or DOT
Your camcorder automatically stores the image recorded on a tape. While the image is
being stored, the indicators flash fast, and the playback picture disappears. At this
stage, the picture may not be recorded clearly, depending on the tape condition.
Using the fader
1
FADER
FADER
START/STOP

59
Advanced Recording Operations
When you set the POWER switch to MEMORY/NETWORK (DCR-TRV50 only)
You cannot use the fader.
While using the bounce, you cannot use the following functions:
–Focus
–Zoom
–Picture effect
–Exposure
–Flexible Spot Meter
Note on the bounce
The BOUNCE indicator does not appear in the following mode or functions:
–When D ZOOM is activated in the menu settings
–Wide mode
–Picture effect
–PROGRAM AE
Using the fader
60
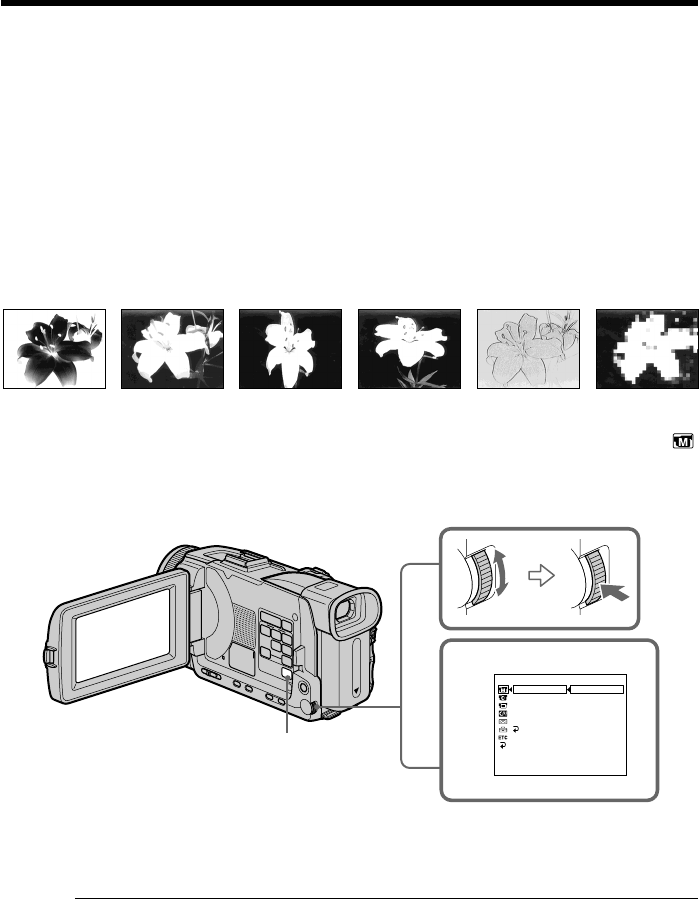
You can digitally process images to obtain special effects like those in films or on TV.
NEG. ART [a] : The color and brightness of the picture are reversed.
SEPIA : The picture appears in sepia.
B&W : The picture appears in monochrome (black-and-white).
SOLARIZE [b] : The light intensity becomes clearer, to make the picture look more like
an illustration.
SLIM [c] : The picture expands vertically.
STRETCH [d] : The picture expands horizontally.
PASTEL [e] : The contrast of the picture is emphasized, to make the picture look
more like an animated cartoon.
MOSAIC [f] : The picture appears mosaic-patterned.
(1)Set the POWER switch to CAMERA. Press MENU, then select P EFFECT in
with the SEL/PUSH EXEC dial, then press the dial (p. 200).
(2)Turn the SEL/PUSH EXEC dial to select the desired picture effect, then press
the dial.
To cancel the picture effect
Set P EFFECT to OFF in the menu settings.
The following functions do not work during the picture effect
–Recording still images on a “Memory Stick” in the tape recording or tape recording
standby
–OLD MOVIE of digital effect
–Bounce
When you set the POWER switch to OFF (CHG)
Picture effect is automatically canceled.
Using special effects – Picture effect
[a] [b] [c] [d] [e] [f]
1
MANUAL SET
P EFFECT
FLASH LVL
WHT BAL
N. S. LIGHT
AUTO SHTR
RETURN
OFF
NEG. ART
SEPIA
B&W
SOLARIZE
SLIM
STRETCH
PASTEL
MOSAIC
[MENU] : END
MENU
61
Advanced Recording Operations
Using special effects – Digital effect
You can add special effects to recorded pictures using the various digital functions.
Sound is recorded normally.
STILL
You can record a still image so that it is superimposed on a moving picture.
FLASH (FLASH MOTION)
You can record still images successively at constant intervals.
LUMI. (LUMINANCE KEY)
You can swap a brighter area in a still image with a moving picture.
TRAIL
You can record the picture so that an incidental image like a trail is left.
SLOW SHTR (SLOW SHUTTER)
You can slow down the shutter speed. The slow shutter is good for recording dark
pictures more brightly.
OLD MOVIE
You can add an old movie type atmosphere to pictures. Your camcorder automatically
sets the wide mode to ON and picture effect to SEPIA, and sets the appropriate shutter
speed.
STILL
LUMI.
Still image
Still image
Moving picture
Moving picture
62
Using special effects – Digital effect
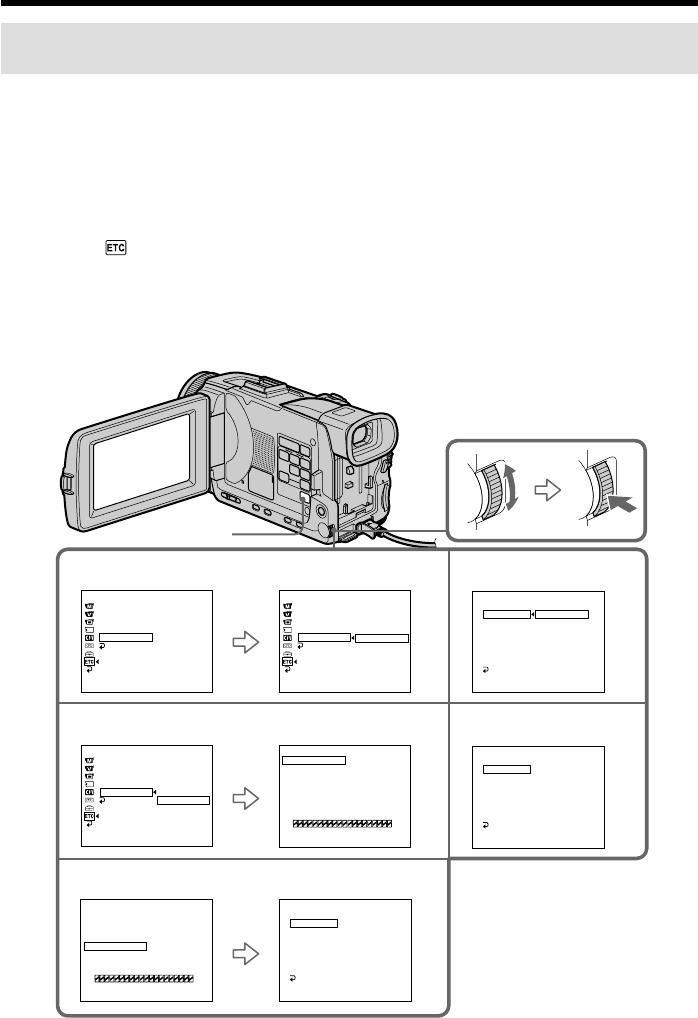
(1)Set the POWER switch to CAMERA, press FN to display PAGE1.
(2)Press DIG EFFT. The screen to select a desired digital effect appears.
(3)Press a desired digital effect. In the STILL and LUMI. modes, the still image is
stored in memory.
(4)Press –/+ to adjust the effect.
–: To reduce the effect
+: To increase the effect
Items to be adjusted
STILL The rate of the still image you want to superimpose on the moving
picture
FLASH The interval of frame by frame playback
LUMI. The color scheme of the area in the still image which is to be
swapped with a moving picture
TRAIL The vanishing time of the incidental image
SLOW SHTR Shutter speed. The larger the shutter speed number, the slower the
shutter speed.
OLD MOVIE No adjustment necessary
(5)Press OK to return to PAGE1.
To return to FN
Press EXIT.
To cancel the digital effect
Press OFF to return to PAGE1.
12~4
FN
LUMI.
–+
OK
OFF
DIG
EFFT
DIG EFFT DIG EFFT
STILL
SLOW
SHTR OLD
MOVIE
OFF OK
LUMI.FLASH TRAIL
The bar appears when setting following
digital effect : STILL, FLASH, LUMI.,
TRAIL.

63
Advanced Recording Operations
Using special effects – Digital effect
Notes
•The following functions do not work during digital effect:
–Fader
–Super NightShot
–Color Slow Shutter
–Tape photo recording
–Recording still images on a “Memory Stick” in the tape recording or tape recording
standby
•The PROGRAM AE does not work in the slow shutter.
•The following functions do not work in the old movie:
–Wide mode
–Picture effect
–PROGRAM AE
When you set the POWER switch to OFF (CHG)
Digital effect is automatically canceled.
When recording in the slow shutter
Auto focus may not be effective. Focus manually using a tripod.
Shutter speed
Shutter speed number Shutter speed
SLOW SHTR 1 1/30
SLOW SHTR 2 1/15
SLOW SHTR 3 1/8
SLOW SHTR 4 1/4
64
Using the PROGRAM AE
You can select the PROGRAM AE (Auto Exposure) to suit your specific shooting
requirements.
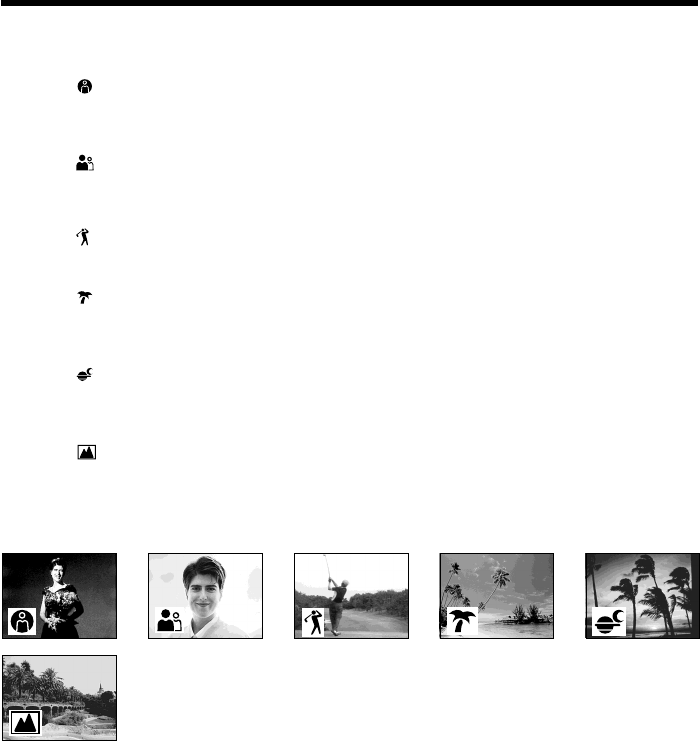
Spotlight
This mode prevents people’s faces, for example, from appearing excessively white
when shooting subjects lit by strong light in the theater.
Soft portrait
This mode brings out the subject while creating a soft background for subjects such as
people or flowers.
Sports lesson
This mode minimizes camera-shake on fast-moving subjects such as in tennis or golf.
Beach & ski
This mode prevents people’s faces from appearing dark in strong light or reflected light,
such as at a beach in midsummer or on a ski slope.
Sunset & moon
This mode allows you to maintain atmosphere when you are recording sunsets, general
night views, fireworks displays and neon signs.
Landscape
This mode is for when you are recording distant subjects such as mountains, and
prevents your camcorder from focusing on glass or metal mesh in windows when you
are recording a subject behind glass or a screen.
65
Advanced Recording Operations
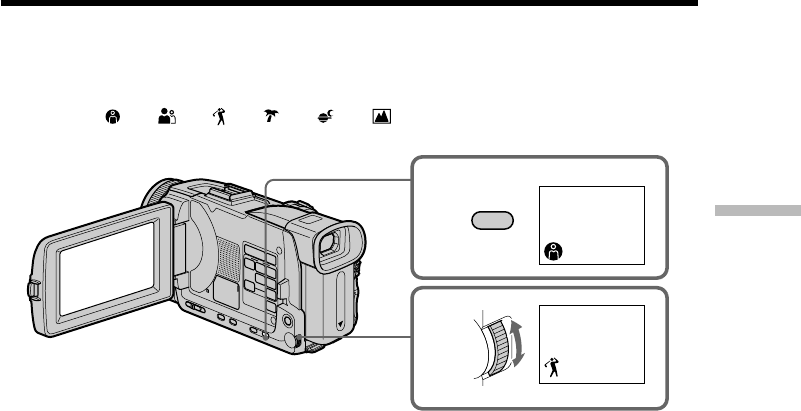
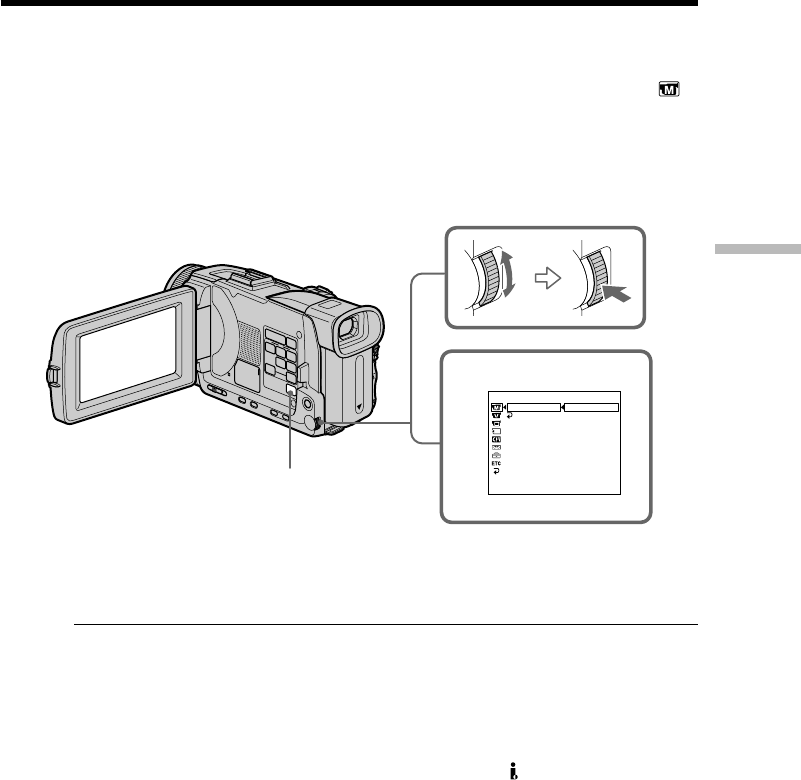
(1)Set the POWER switch to CAMERA or MEMORY/NETWORK (DCR-TRV50
only), press PROGRAM AE. The PROGRAM AE indicator appears.
(2)Turn the SEL/PUSH EXEC dial to select the desired PROGRAM AE.
The indicator changes as follows:
y y y y y
To cancel the PROGRAM AE
Press PROGRAM AE.
Using the PROGRAM AE
1
2
PROGRAM
AE

66
Using the PROGRAM AE
Notes
•Because your camcorder is set to focus only on subjects in the middle to far distance,
you cannot take close-ups in the following modes:
–Spotlight
–Sports lesson
–Beach & ski
•Your camcorder is set to focus only on distant subjects in the following modes:
–Sunset & moon
–Landscape
•The following functions do not work in the PROGRAM AE:
–Color Slow Shutter
–Slow Shutter
–Old movie
–Bounce
•When you set the POWER switch to MEMORY/NETWORK (DCR-TRV50 only),
Sports lesson does not work. (The indicator flashes.)
•The PROGRAM AE does not work in the following cases. (The indicator flashes.)
–To set NIGHTSHOT to ON
–To record images on a “Memory Stick” using the MEMORY MIX.
While WHT BAL is set to AUTO in the menu settings
The white balance is adjusted even if the PROGRAM AE is selected.
You can adjust the following functions while using the PROGRAM AE
–Exposure
–Flexible Spot Meter
If you are recording under a discharge tube such as a fluorescent lamp, sodium
lamp or mercury lamp
Flickering or changes in color may occur in the following modes. If this happens, turn
the PROGRAM AE off.
–Soft portrait
–Sports lesson
67
Advanced Recording Operations
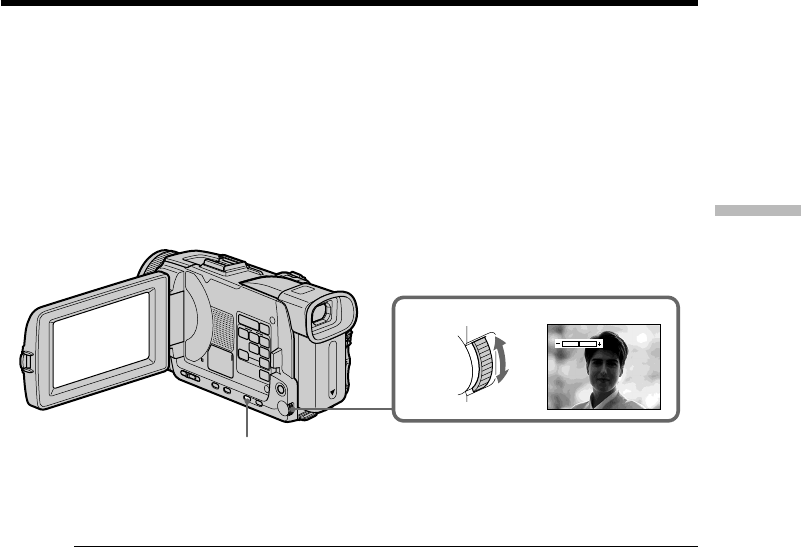
You can manually adjust and set the exposure. Normally the exposure is automatically
adjusted. Adjust the exposure manually in the following cases:
–When the subject is backlit
–When shooting subjects and dark backgrounds
–When recording dark pictures (e.g. night scenes) faithfully
(1)Set the POWER switch to CAMERA or MEMORY/NETWORK (DCR-TRV50
only), press EXPOSURE.
The exposure indicator appears.
(2)Turn the SEL/PUSH EXEC dial to adjust the brightness.
To return to the automatic exposure
Press EXPOSURE.
When you adjust the exposure manually, the following functions do not work:
– Color Slow Shutter
– Backlight
Your camcorder automatically returns to the automatic exposure:
–If you change the PROGRAM AE.
–If you slide NIGHTSHOT to ON.
Adjusting the exposure manually
2
EXPOSURE
68
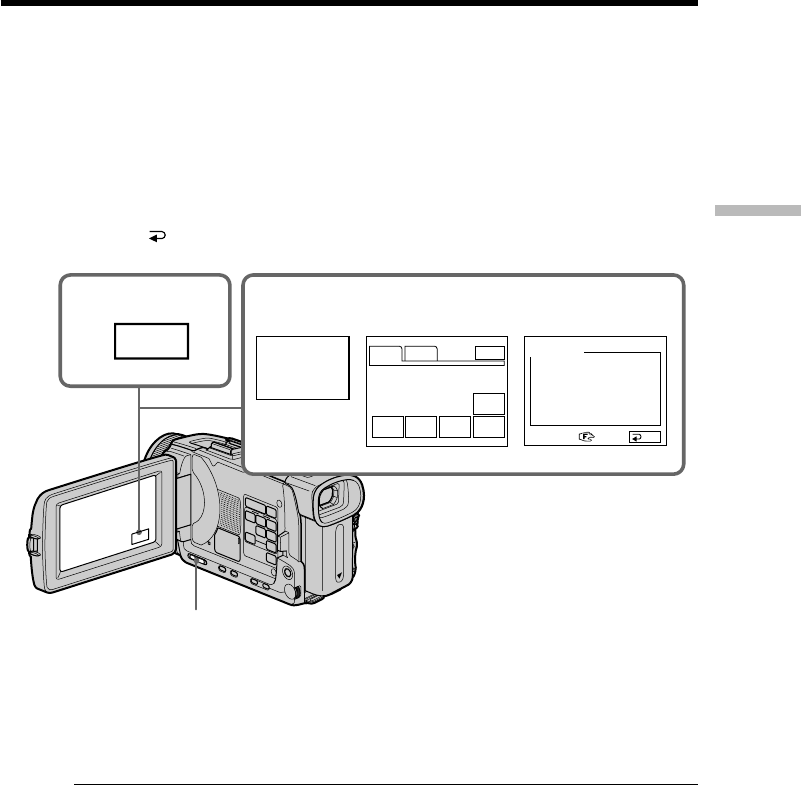
You can take a picture with the appropriate exposure automatically for just the point
you want to focus on and with its exposure fixed. Use the Flexible Spot Meter in the
following cases:
–The subject is backlit.
–When there is strong contrast between the subject and background such as with a
subject that is on stage and lighted by a spotlight.
(1)When the POWER switch is set to CAMERA or MEMORY/NETWORK (DCR-
TRV50 only), press FN to display PAGE1.
(2)Press SPOT METER. The SPOT METER screen appears.
(3)Press the desired area in the frame on the LCD screen.
The SPOT METER indicator flashes on the LCD screen. The exposure of the
point you selected is adjusted.
(4)Press OK to return to PAGE1.
To return to FN
Press EXIT.
To return to the automatic exposure
Press AUTO to return to PAGE1.
The following functions do not work during Flexible Spot Meter
–Color Slow Shutter
–Backlight
–Exposure
If you slide NIGHTSHOT to ON
Your camcorder automatically returns from the Flexible Spot Meter to automatic
exposure.
Using the spot light-metering
– Flexible Spot Meter
12~4
FN
SPOT
METER
OK
AUTO
PAGE1 PAGE2
EXIT
END
SCH
SPOT
FOCUS DIG
EFFT MEM
M I X SPOT
METER
SPOT METER
69
Advanced Recording Operations
You can gain better results by manually adjusting the focus in the following cases.
Normally, focus is automatically adjusted.
•The autofocus is not effective when shooting
–Subjects through glass coated with water droplets
–Horizontal stripes
–Subjects with little contrast with backgrounds such as walls and sky
•When you want to change the focus from a subject in the foreground to a subject in
the background.
•Shooting a stationary subject when using a tripod.
(1)Set FOCUS to MAN when the POWER switch is set to CAMERA or
MEMORY/NETWORK (DCR-TRV50 only).
The 9 indicator appears.
(2)Turn the focus ring to sharpen focus.
To return to the autofocus
Set FOCUS to AUTO.
To record distant subjects
When you set FOCUS to INFINITY, the lens focuses on and indicator appears. When
you release FOCUS, your camcorder returns to the manual focus. Use this mode when
your camcorder focuses on near objects even though you are trying to shoot a distant
object.
Focusing manually
2
Focus ring
FOCUS switch

70
To focus precisely
It is easier to focus on subjects if you adjust the zoom to shoot at the “W” (wide-angle)
after focusing at the “T” (telephoto) position.
When you shoot close to the subject
Focus at the end of the “W” (wide-angle) position.
9 changes as follows:
when recording a distant subject
when the subject is too close to focus on
Focal distance information is displayed for about three seconds on the screen in
the following cases:
–When switching the focus adjustment mode from autofocus to manual
–When turning the focus ring
Focal distance information
–This information aids focusing if it is not easy to focus on the subject, for example,
when recording in the dark. Use this information as a rough guide to get a sharp
focus.
–You cannot get correct information if you have attached a conversion lens (optional) to
your camcorder.
Focusing manually
71
Advanced Recording Operations
You can take a picture with the appropriate focus automatically for just the point you
want to focus on and with its focus fixed.
(1)When the POWER switch is set to CAMERA or MEMORY/NETWORK (DCR-
TRV50 only), set FOCUS to MAN.
(2)Press FN to display PAGE1.
(3)Press SPOT FOCUS. The SPOT FOCUS screen appears.
(4)Press the desired area in the frame on the LCD screen.
The 9 indicator flashes on the LCD screen. The focus of the point you selected
is adjusted.
(5)Press OK to return to PAGE1.
To return to FN
Press EXIT.
To return to the autofocus
Set FOCUS to AUTO.
The following functions do not work during Spot Focus:
–Exposure
–Fader
–Backlight
–PROGRAM AE
Focal distance information
It is not displayed on the screen.
Using the spot focus – Spot Focus
23~5
FN
SPOT
FOCUS
OK
SPOT
FOCUS DIG
EFFT MEM
M I X SPOT
METER
END
SCH
PAGE1 PAGE2
EXIT
SPOT FOCUS
FOCUS switch
72
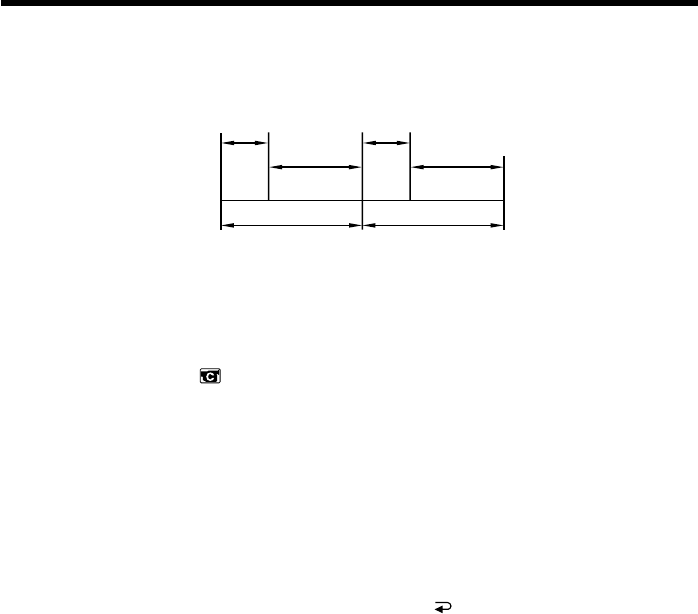
You can make a time-lapse recording by setting the camcorder to automatically record
and standby sequentially. You can achieve an excellent recording for flowering, gradual
appearances, etc., with this function.
(1)In the standby, press MENU, then turn the SEL/PUSH EXEC dial to select
INT. REC in , then press the dial (p. 201).
(2)Turn the SEL/PUSH EXEC dial to select SET, then press the dial.
(3)Turn the SEL/PUSH EXEC dial to set INTERVAL and REC TIME.
1Turn the SEL/PUSH EXEC dial to select INTERVAL, then press the dial.
2Turn the SEL/PUSH EXEC dial to select the desired interval time, then
press the dial.
The time: 30SEC y 1MIN y 5MIN y 10MIN
3Turn the SEL/PUSH EXEC dial to select REC TIME, then press the dial.
4Turn the SEL/PUSH EXEC dial to select the desired recording time, then
press the dial.
The time: 0.5SEC y 1SEC y 1.5SEC y 2SEC
5Turn the SEL/PUSH EXEC dial to select RETURN, then press the dial.
(4)Turn the SEL/PUSH EXEC dial to select ON, then press the dial.
(5)Press MENU to erase the menu display. The INTERVAL indicator flashes.
(6)Press START/STOP to start interval recording. The INTERVAL indicator lights
up.
Interval recording
10 min10 min
1 s 1 s
9 min 59 s 9 min 59 s
[a]
[b]
[c]
Example
[a]REC TIME
[b]Waiting time
[c]INTERVAL
73
Advanced Recording Operations
Interval recording
4
6
CAMERA SET
D ZOOM
PHOTO REC
16:9WIDE
STEADYSHOT
FRAME REC
INT. REC
RETURN ON
[MENU] : END
5
INTERVAL
STBY
[MENU] : END [MENU] : END
[MENU] : END [MENU] : END
CAMERA SET
INT. REC
INTERVAL
REC TIME
RETURN
30SEC
CAMERA SET
INT. REC
INTERVAL
REC TIME
RETURN
30SEC
1MIN
5MIN
10MIN
CAMERA SET
INT. REC
INTERVAL
REC TIME
RETURN 0.5SEC
CAMERA SET
INT. REC
INTERVAL
REC TIME
RETURN 0.5SEC
1SEC
1.5SEC
2SEC
2
3
MENU
[MENU] : END
CAMERA SET
D ZOOM
PHOTO REC
16:9WIDE
STEADYSHOT
FRAME REC
INT. REC
RETURN ON
OFF
SET
STBY
STBY
STBY
STBY
[MENU] : END
CAMERA SET
INT. REC
INTERVAL
REC TIME
RETURN
30SEC
STBY
STBY
STBY
To cancel the interval recording
Perform either of the following:
–Set INT. REC to OFF in the menu settings.
–Set the POWER switch to other than CAMERA.
To perform normal recording during the watinig time
You can perform normal recording only once during the waiting time. Press START/
STOP, and the indicator flashes and normal recording starts.
To stop normal recording, press START/STOP again. To restart interval recording,
perform step 6.
On recording time
There may be a discrepancy in the recording time of up to +/– six frames from the
selected time.
When pressing START/STOP during recording time
Interval recording stops. To restart it, perform step 6.
74
You can make a recording with a stop-motion animated effect using frame recording.
To create this effect, alternately move the subject a little and make a frame recording.
We recommend that you use a tripod, and operate your camcorder using the Remote
Commander after step 4.
(1)In the standby, press MENU, then turn the SEL/PUSH EXEC dial to select
FRAME REC in , then press the dial (p. 201).
(2)Turn the SEL/PUSH EXEC dial to select ON, then press the dial.
(3)Press MENU to erase the menu display.
The FRAME REC indicator lights up.
(4)Press START/STOP to start frame recording. Your camcorder makes a
recording for about six frames, and returns to recording standby.
(5)Move the subject, and repeat step 4.
To cancel the frame recording
Perform either of the following:
–Set FRAME REC to OFF in the menu settings.
–Set the POWER switch to other than CAMERA.
Note
The remaining tape time is not indicated correctly if you use this function continuously.
When using the frame recording
The last recorded frame is longer than other frames.
Frame by frame recording
– Frame recording
2
4
CAMERA SET
D ZOOM
PHOTO REC
16:9WIDE
STEADYSHOT
FRAME REC
INT. REC
RETURN
ON
[MENU] : END
CAMERA SET
D ZOOM
PHOTO REC
16:9WIDE
STEADYSHOT
FRAME REC
INT. REC
RETURN
OFF
ON
[MENU] : END
STBY STBY
MENU
75
Advanced Playback Operations
During playback, you can process a scene using the following picture effect:
NEG. ART, SEPIA, B&W and SOLARIZE.
(1)In the playback or playback pause, press MENU, then select P EFFECT in
with the SEL/PUSH EXEC dial (p. 200).
(2)Turn the SEL/PUSH EXEC dial to select the desired picture effect, then press
the dial.
For details of each picture effect, see page 60.
To cancel the picture effect
Set P EFFECT to OFF in the menu settings.
Notes
•You cannot process externally input scenes using picture effect.
•You cannot record images on a tape on your camcorder when you have processed the
image using picture effect. However, you can record images on a “Memory Stick”
(p. 135, 147), or on a VCR using your camcorder as a player.
Pictures processed by picture effect
Pictures processed by picture effect is not output through the DV IN/OUT jack.
When you set the POWER switch to OFF (CHG) or stop playing back
The picture effect is automatically canceled.
— Advanced Playback Operations —
Playing back tapes with picture effect
MENU
1
MANUAL SET
P EFFECT
RETURN OFF
NEG. ART
SEPIA
B&W
SOLARIZE
[MENU] : END
76
During playback, you can process a scene using the following digital effect:
STILL, FLASH, LUMI. and TRAIL.
(1)In the playback or playback pause, press FN and select PAGE2.
(2)Press DIG EFFT. The screen to select a desired digital effect appears.
(3)Press a desired digital effect. In the STILL or LUMI., the picture where you
select the mode is stored in memory as a still image.
(4)Press –/+ to adjust the effect. Refer to page 62 for details.
(5)Press OK to return to PAGE2.
To return to FN
Press EXIT.
To cancel the digital effect
Press OFF to return to PAGE2.
Notes
•You cannot process externally input scenes using digital effect.
•You cannot record images on a tape on your camcorder when you have processed the
image using digital effect. However, you can record images on a “Memory Stick”
(p. 135, 147), or on a VCR using your camcorder as a player.
Pictures processed by digital effect
Pictures processed by digital effect is not output through the DV IN/OUT jack.
When you set the POWER switch to OFF (CHG) or stop playing back
Digital effect is automatically canceled.
Playing back tapes with digital effect
12,3
FN
DIG
EFFT
OKOFF
STILL FLASH LUMI. TRAIL
DIG EFFT
77
Advanced Playback Operations
You can enlarge playback images recorded on tapes. Besides the operation described
here, your camcorder can enlarge still images recorded on “Memory Stick”s (p. 164).
(1)In the playback or playback pause, press FN and select PAGE2.
(2)Press PB ZOOM. The PB ZOOM screen appears.
(3)Press the area you want to enlarge in the frame on the PB ZOOM screen.
The area you pressed moves to the center of the screen, and the playback
image is enlarged approximately at twice the size. If you press the other area
again, the area moves to the center of the screen.
(4)Adjust the zoom ratio by the power zoom lever.
You can enlarge the image from approximately 1.1 times up to five times its
size.
W: Decreases the zoom ratio.
T: Increases the zoom ratio.
To cancel the PB ZOOM
Press END.
Enlarging images recorded on tapes
– Tape PB ZOOM
1FN
W
T
2
PB
ZOOM
END
END
4
× 5.0
PB ZOOM
PB ZOOM

78
Enlarging images recorded on tapes – Tape PB ZOOM
Notes
•You cannot process externally input scenes using the PB ZOOM.
•You cannot record images on a tape on your camcorder when you have processed the
image using the tape PB ZOOM. However, you can record images on a VCR using
your camcorder as a player.
•You cannot record moving pictures on a “Memory Stick” on your camcorder when
you have processed the picture using the tape PB ZOOM.
The PB ZOOM is automatically canceled when you activate the following:
–Set the POWER switch to OFF (CHG).
–Stop playback.
–Press MENU.
– Insert a “Memory Stick.”
Pictures in the PB ZOOM
Pictures in the PB ZOOM are not output through the DV IN/OUT jack and the
(USB) jack.
In the PB ZOOM
If you press DISPLAY/TOUCH PANEL button, the frame on the PB ZOOM screen
disappears. You cannot move the part you pressed to the center of the screen.
Edge of the enlarged image
The edge of the enlarged image cannot be displayed at the center of the screen.
79
Advanced Playback Operations
Your camcorder goes forward or backward to automatically stop at a desired scene
having a tape counter value of “0:00:00”. Use the Remote Commander for this
operation.
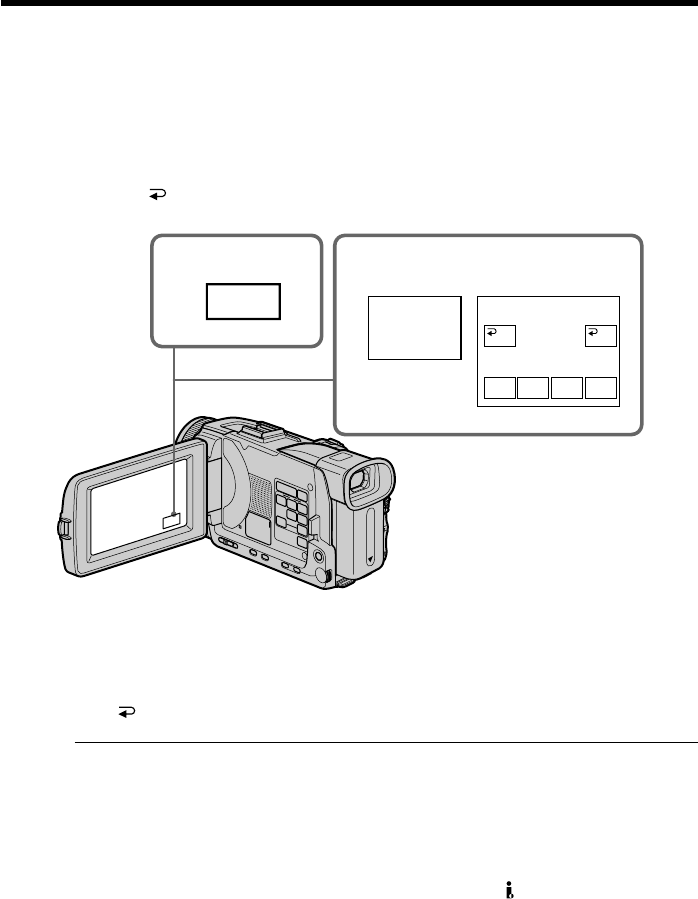
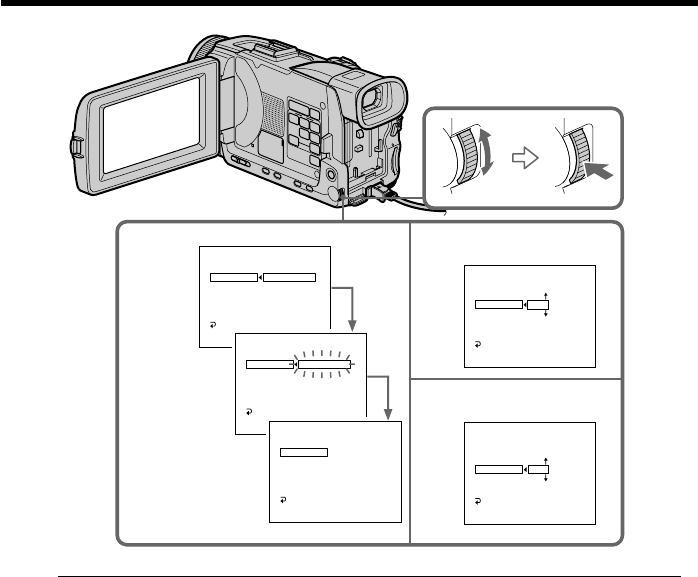
(1)In the playback, press DISPLAY when the ZERO SET MEMORY indicator does
not appear.
(2)Press ZERO SET MEMORY at the point you want to locate later. The tape
counter shows “0:00:00” and then starts counting. The ZERO SET MEMORY
indicator flashes.
(3)Press x when you want to stop playback.
(4)Press m to rewind the tape to the tape counter’s zero point. The tape stops
automatically when the tape counter reaches approximately zero. The ZERO
SET MEMORY indicator disappears, and the time code appears.
(5)Press N. Playback starts from the counter’s zero point.
Notes
•When you press ZERO SET MEMORY before rewinding the tape, the zero set memory
will be canceled.
•There may be a discrepancy of several seconds from the time code.
•The ZERO SET MEMORY indicator disappears when you press FN.
If a tape has a blank portion between recorded portions
The zero set memory may not work correctly.
Quickly locating a scene
– ZERO SET MEMORY
ZERO SET MEMORY
DISPLAY
m
x
N
80
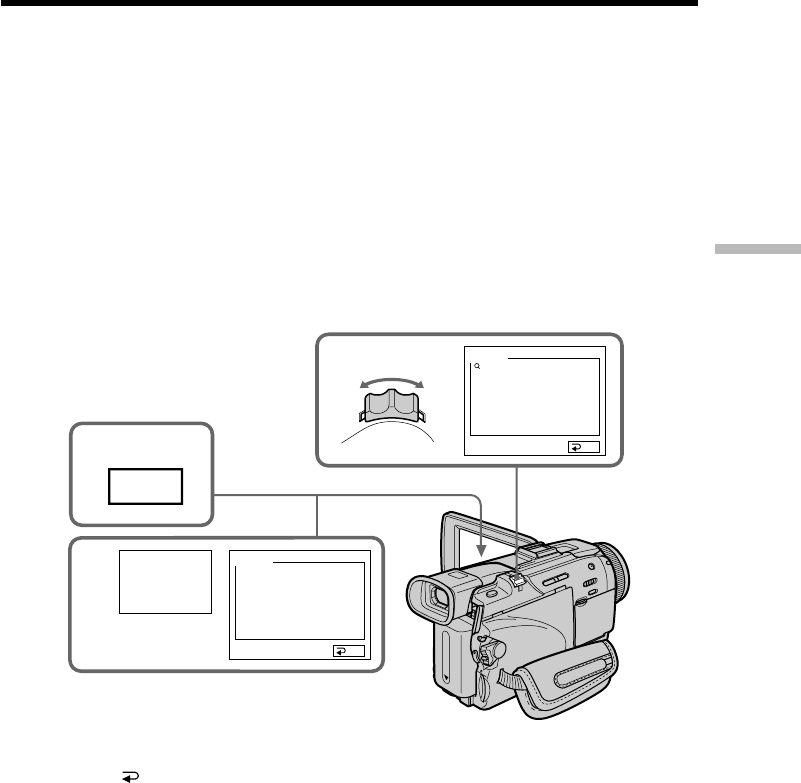
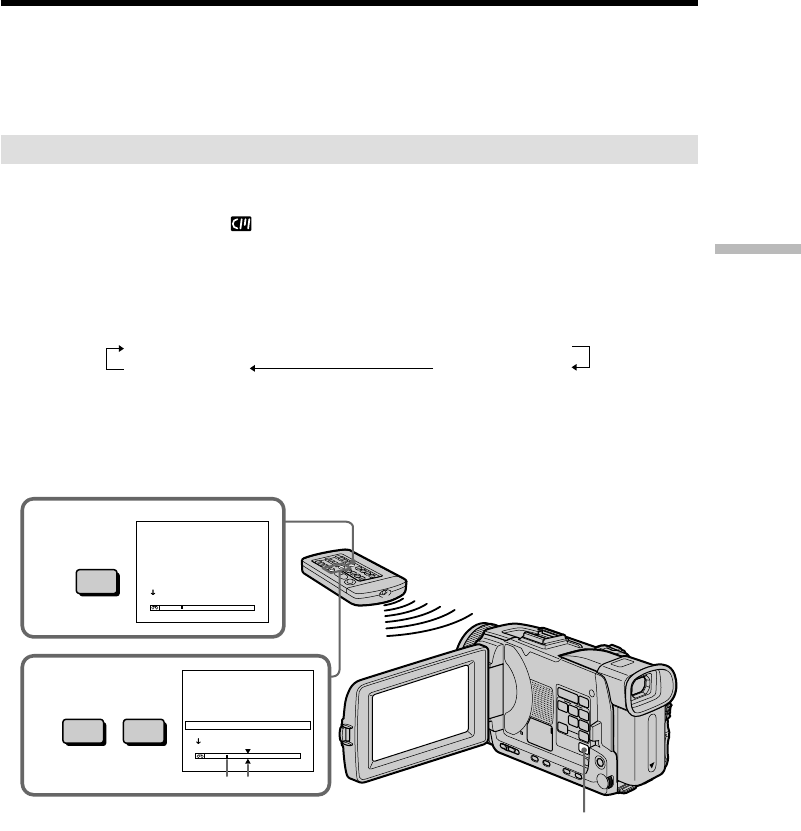
If you use a cassette with cassette memory, you can search for the boundaries of
recorded tape by title. Use the Remote Commander for this operation.
Before operation
Set CM SEARCH in to ON in the menu settings. (The default setting is ON.)
(1)Set the POWER switch to VCR.
(2)Press SEARCH MODE on the Remote Commander repeatedly until the TITLE
SEARCH indicator appears. The indicator changes as follows:
TITLE SEARCH t DATE SEARCH t PHOTO SEARCH
(no indicator) TPHOTO SCAN
(3)Press . or > on the Remote Commander to select the title for playback.
Your camcorder automatically starts playback of the scene having the title that
you selected.
[a]Actual point you are trying to search for
[b]Present point on the tape
To stop searching
Press x.
If you use a cassette without cassette memory
You cannot superimpose or search a title.
If a tape has a blank portion between recorded portions
The title search may not work correctly.
To superimpose a title
See page 110.
Searching the boundaries of recorded
tape by title – TITLE SEARCH
3
.>
2
SEARCH
MODE
TITLE SEARCH
1 HELLO!
2 CONGRATULATIONS!
3 HAPPY NEW YEAR!
4 PRESENT
5 GOOD MORNING
6 WEDDING
TITLE SEARCH
3 HAPPY NEW YEAR!
4 PRESENT
5 GOOD MORNING
6 WEDDING
7 NIGHT
8 BASEBALL
[b][a]
81
Advanced Playback Operations
You can automatically search for the point where the recording date changes and start
playback from that point (date search). Use a cassette with cassette memory for
convenience. Use the Remote Commander for this operation.
Use this function to check where recording dates change or to edit the tape at each
recording date.
Searching for the date by using cassette memory
Before operation
•You can use this function only when playing back a cassette with cassette memory.
•Set CM SEARCH in to ON in the menu settings. (The default setting is ON.)
(1)Set the POWER switch to VCR.
(2)Press SEARCH MODE on the Remote Commander repeatedly until the DATE
SEARCH indicator appears. The indicator changes as follows:
TITLE SEARCH t DATE SEARCH t PHOTO SEARCH
(no indicator) TPHOTO SCAN
(3)Press . or > on the Remote Commander to select the date for playback.
Your camcorder automatically starts playback at the beginning of the selected
date.
[a]Actual point you are trying to search for
[b]Present point on the tape
To stop searching
Press x.
Searching a recording by date
– DATE SEARCH
3
.>
2
SEARCH
MODE
DATE SEARCH
1 SEP/ 5/02
2 SEP/ 6/02
3 DEC/24/02
4 JAN/ 1/03
5 FEB/ 11/03
6 APR/ 29/03
DATE SEARCH
1 SEP/ 5/02
2 SEP/ 6/02
3 DEC/24/02
4 JAN/ 1/03
5 FEB/ 11/03
6 APR/ 29/03
[b][a]
82
Note
If one day’s recording is less than two minutes, your camcorder may not accurately find
the point where the recording date changes.
If a tape has a blank portion between recorded portions
The date search may not work correctly.
Cassette memory
The tape with cassette memory can hold six recording dates. If you search among seven
or more dates, see “Searching for the date without using cassette memory” below.
Searching for the date without using cassette memory
(1)Set the POWER switch to VCR.
(2)Press MENU, then select CM SEARCH in to OFF with the SEL/PUSH
EXEC dial (p. 205).
(3)Press SEARCH MODE on the Remote Commander repeatedly until the DATE
SEARCH indicator appears. The indicator changes as follows:
DATE SEARCH t PHOTO SEARCH t PHOTO SCAN t (no indicator)
(4)Press . on the Remote Commander to search for the previous date or press
> on the Remote Commander to search for the next date. Your camcorder
automatically starts playback at the point where the date changes. Each time
you press . or > your camcorder searches for the previous or next date.
To stop searching
Press x.
Searching a recording by date – DATE SEARCH
83
Advanced Playback Operations
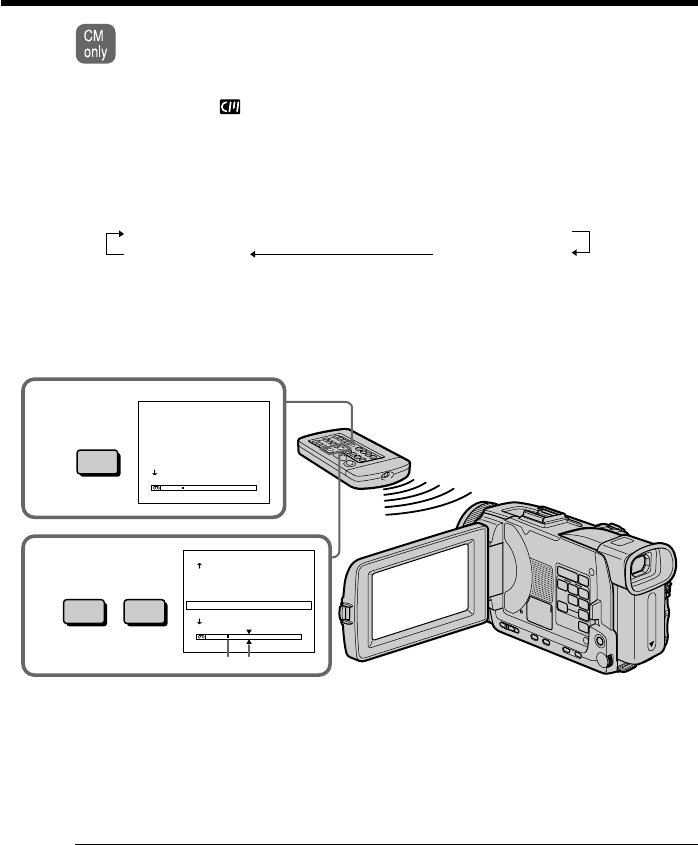
You can search for a still image you have recorded on a tape (PHOTO SEARCH).
You can also search for still images one after another and display each image for
five seconds automatically regardless of cassette memory (PHOTO SCAN). Use the
Remote Commander for these operations.
Use this function to check or edit still images.
Searching for a photo by using cassette memory
Before operation
•You can use this function only when playing back a cassette with cassette memory.
•Set CM SEARCH in to ON in the menu settings. (The default setting is ON.)
(1)Set the POWER switch to VCR.
(2)Press SEARCH MODE on the Remote Commander repeatedly until the
PHOTO SEARCH indicator appears. The indicator changes as follows:
TITLE SEARCH t DATE SEARCH t PHOTO SEARCH
(no indicator) TPHOTO SCAN
(3)Press . or > on the Remote Commander to select the date for playback.
Your camcorder automatically starts playback of the photo having the date
that you selected.
[a]Actual point you are trying to search for
[b]Present point on the tape
To stop searching
Press x.
Searching for a photo
– PHOTO SEARCH/PHOTO SCAN
3.>
2SEARCH
MODE
PHOTO SEARCH
1 SEP/ 5/02 5:30PM
2 SEP/ 6/02 8:50AM
3 DEC/24/02 10:30AM
4 JAN/ 1/03 11:25PM
5 FEB/ 11/03 4:11PM
6 APR/ 29/03 1:45PM
PHOTO SEARCH
1 SEP/ 5/02 5:30PM
2 SEP/ 6/02 8:50AM
3 DEC/24/02 10:30AM
4 JAN/ 1/03 11:25PM
5 FEB/ 11/03 4:11PM
6 APR/ 29/03 1:45PM
[b][a]
MENU

84
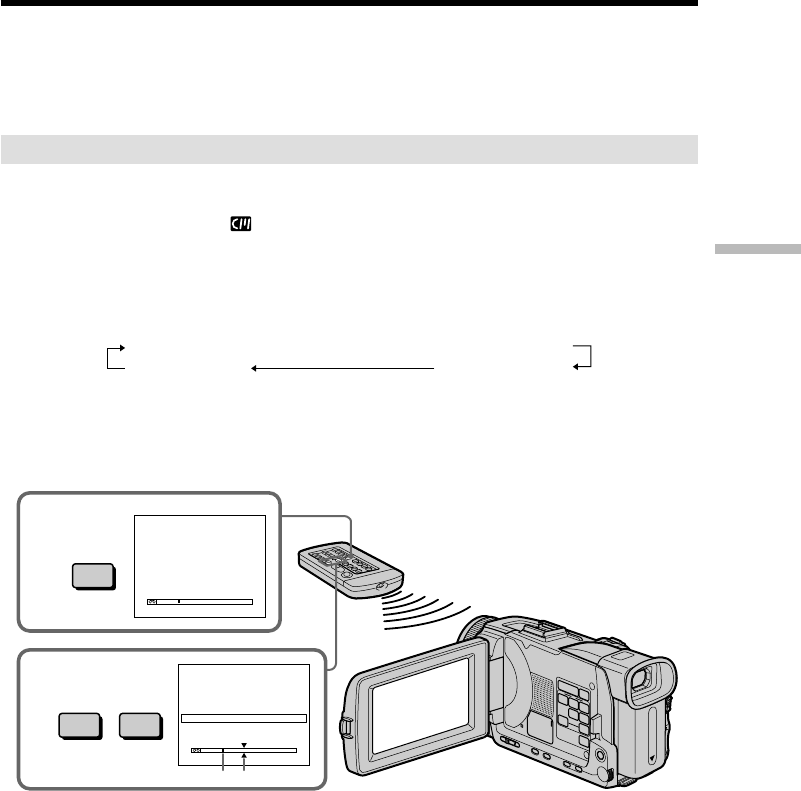
Searching for a photo without using cassette memory
(1)Set the POWER switch to VCR.
(2)Press MENU, then turn the SEL/PUSH EXEC dial to select CM SEARCH in
to OFF, then press the dial (p. 205).
(3)Press SEARCH MODE on the Remote Commander repeatedly until the
PHOTO SEARCH indicator appears. The indicator changes as follows:
DATE SEARCH t PHOTO SEARCH t PHOTO SCAN t (no indicator)
(4)Press . or > on the Remote Commander to select the photo for playback.
Each time you press . or > your camcorder searches for the previous or
next photo.
Your camcorder automatically starts playback of the photo.
To stop searching
Press x.
Searching for a photo – PHOTO SEARCH/PHOTO SCAN

85
Advanced Playback Operations
Scanning photo
(1)Set the POWER switch to VCR.
(2)Press SEARCH MODE on the Remote Commander repeatedly until the
PHOTO SCAN indicator appears. The indicator changes as follows:
TITLE SEARCH* t DATE SEARCH t PHOTO SEARCH
(no indicator) TPHOTO SCAN
* Displayed only when CM SEARCH is set to ON in the menu settings.
(3)Press . or > on the Remote Commander.
Each photo is played back for about five seconds automatically.
To stop scanning
Press x.
If a tape has a blank portion between recorded portions
The photo search/photo scan may not work correctly.
The available number of photos that can be searched using the cassette memory
The available number is up to 12 photos. However, you can search 13 photos or more
using the photo scan.
SEARCH
MODE
3
2
PHOTO 00
SCAN
Searching for a photo – PHOTO SEARCH/PHOTO SCAN
86
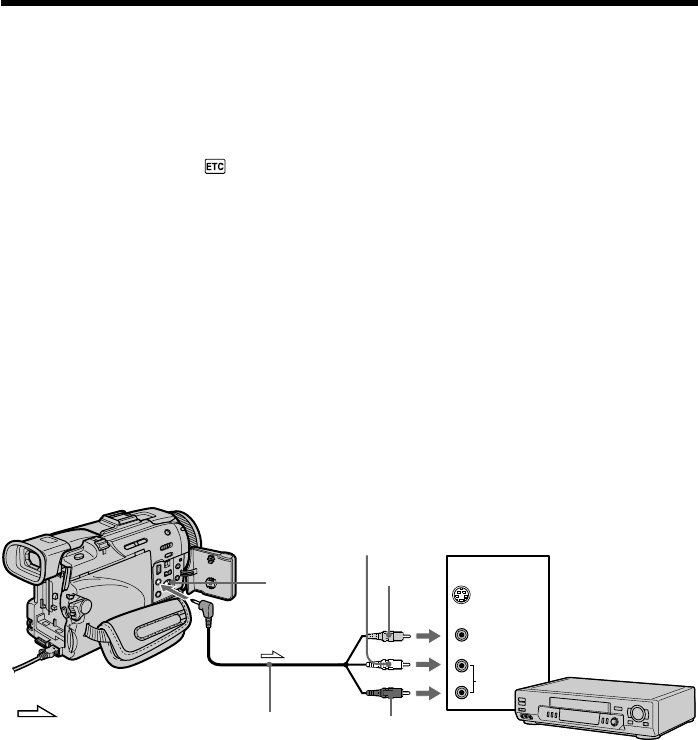
Using the A/V connecting cable
You can dub or edit on the VCR connected to your camcorder using your camcorder as
a player.
Connect your camcorder to the VCR using the A/V connecting cable supplied with
your camcorder.
Before operation
•Set DISPLAY in to LCD in the menu settings. (The default setting is LCD.)
•Press the following buttons to make the indicator disappear so that they will not be
superimposed on the edited tape:
On your camcorder:
DISPLAY/TOUCH PANEL, DATA CODE
On the Remote Commander:
DISPLAY, DATA CODE, SEARCH MODE
(1)Insert a blank tape (or a tape you want to record over) into the VCR, and insert
the recorded tape into your camcorder.
(2)Prepare the VCR for recording, then set the input selector to LINE.
Connect the A/V connecting cable to AUDIO/VIDEO jack.
Refer to the operating instructions of the VCR.
(3)Set the POWER switch to VCR on your camcorder.
(4)Play back the recorded tape on your camcorder.
(5)Start recording on the VCR. Refer to the operating instructions of your VCR.
When you have finished dubbing a tape
Press x on both your camcorder and the VCR.
— Editing —
Dubbing a tape
S VIDEO
VIDEO
AUDIO
IN
AUDIO/VIDEO
S VIDEO
: Signal flow
VCR
Yellow
White
Red
A/V connecting
cable (supplied)
87
Editing
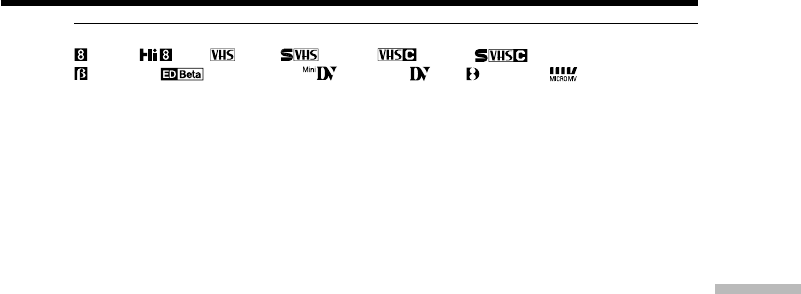
You can edit on VCRs that support the following systems:
8 mm, Hi8, VHS, S-VHS, VHSC, S-VHSC,
Betamax, ED Betamax, mini DV, DV, Digital8, MICRO MV
If your VCR is a monaural type
Connect the yellow plug of the A/V connecting cable to the video input jack and the
white or the red plug to the audio input jack on the VCR or the TV. When the white
plug is connected, the left channel audio is output, and when the red plug is connected,
the right channel audio is output.
If your VCR has an S video jack
Pictures can be reproduced more faithfully by using an S video cable (optional).
With this connection, you do not need to connect the yellow (video) plug of the A/V
connecting cable.
Connect an S video cable (optional) to the S video jacks of both your camcorder and the
VCR.
This connection produces higher quality DV format pictures.
Dubbing a tape
88
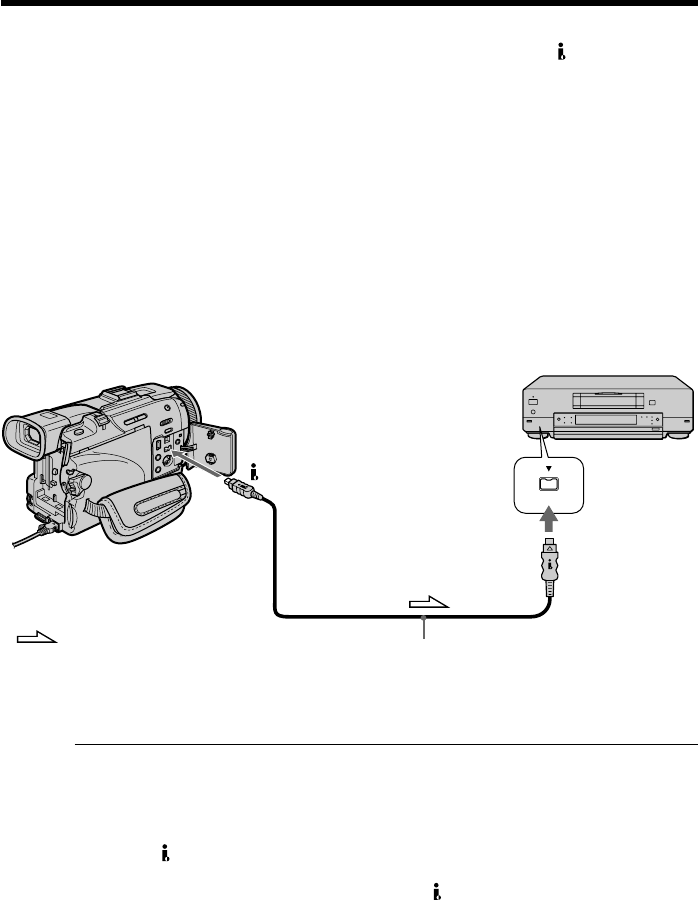
Using the i.LINK cable (DV connecting cable)
Simply connect the i.LINK cable (DV connecting cable) (optional) to DV IN/OUT jack
on your camcorder and to DV IN on the DV products. With a digital-to-digital
connection, video and audio signals are transmitted in digital form for high-quality
editing. You cannot dub the titles, display indicators or the contents of cassette memory
or letters on the “Memory Stick” index screen.
Set the input selector on the VCR to the DV input position if the VCR is equipped with
the input selector.
(1)Insert a blank tape (or a tape you want to record over) into the VCR, and insert
the recorded tape into your camcorder.
(2)Prepare the VCR for recording, then set the input selector to LINE. Refer to the
operating instructions of the VCR.
(3)Set the POWER switch to VCR on your camcorder.
(4)Play back the recorded tape on your camcorder.
(5)Start recording on the VCR. Refer to the operating instructions of the VCR.
When you have finished dubbing a tape
Press x on both your camcorder and the VCR.
You can connect one VCR only using the i.LINK cable (DV connecting cable)
See page 225 for more information about i.LINK.
Pictures processed by the picture effect, the digital effect or PB ZOOM
Pictures processed by the picture effect, the digital effect or PB ZOOM are not output
through the DV IN/OUT jack.
If you record a playback pause picture with the DV IN/OUT jack
The recorded picture becomes rough. Also, when you play back the picture using other
video equipment, the picture may jitter.
Dubbing a tape
DV
DV IN/OUT
DV IN
i.LINK cable (DV connecting cable) (optional)
: Signal flow
89
Editing
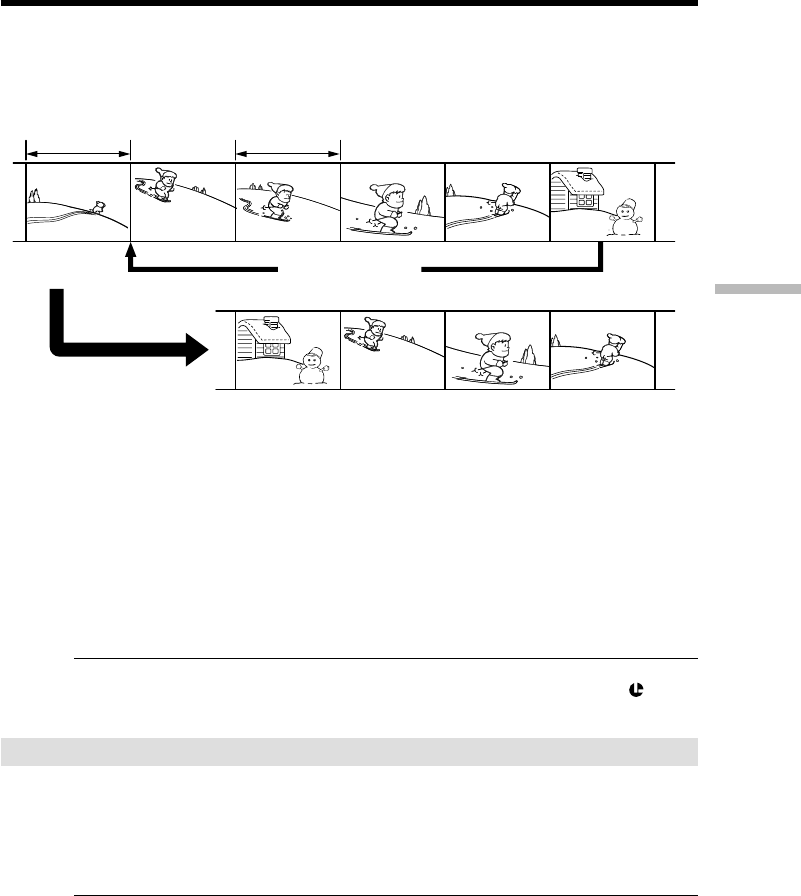
You can duplicate selected scenes (programs) for editing onto a tape without operating
the VCR.
Scenes can be selected by frame. You can set up to 20 programs.
Your camcorder can also dub on “Memory Stick”s. See page 151 for more information.
Before operating the Digital program editing on tapes
recorded on other equipment
Step 1Connecting the VCR (p. 89).
Step 2Setting the VCR for operation (p. 90, 94).
Step 3Adjusting the synchronization of the VCR (p. 95).
When you dub using the same VCR again, you can skip steps 2 and 3.
Using the Digital program editing on tapes recorded on other
equipment
Operation 1Making a program (p. 97).
Operation 2Performing the program (dubbing a tape) (p. 99).
Note
When editing digital video on tapes, the operation signals cannot be sent with
LANC.
Step 1: Connecting the VCR
You can connect both an A/V connecting cable and an i.LINK cable (DV connecting
cable).
When you use the A/V connecting cable, connect the devices as illustrated on page 86.
When you use an i.LINK cable (DV connecting cable), connect the devices as illustrated
on page 88.
If you connect using an i.LINK cable (DV connecting cable)
With a digital-to-digital connection, video and audio signals are transmitted in digital
form for high-quality editing.
Dubbing only desired scenes
– Digital program editing (on tapes)
Unwanted scene Unwanted scene
Switch the order
90
Step 2: Setting the VCR to operate with the A/V connecting cable
To edit using the VCR, send the control signal by infrared rays to the remote sensor on
the VCR.
When you connect using an A/V connecting cable, follow the procedure below, steps
(1) to (4), to send the control signal correctly.
(1) Set the IR SETUP code
1Set the POWER switch to VCR on your camcorder.
2Turn the power of the connected VCR on, then set the input selector to LINE.
When you connect a video camera recorder, set its power switch to VCR/VTR.
3Press MENU, then turn the SEL/PUSH EXEC dial to select VIDEO EDIT in
, then press the dial (p. 209).
4Turn the SEL/PUSH EXEC dial to select TAPE, then press the dial.
5Turn the SEL/PUSH EXEC dial to select EDIT SET, then press the dial.
6Turn the SEL/PUSH EXEC dial to select CONTROL, then press the dial.
7Turn the SEL/PUSH EXEC dial to select IR, then press the dial.
8Turn the SEL/PUSH EXEC dial to select IR SETUP and turn the dial to select
IR SETUP code number of your VCR, then press the dial.
Check the code in “About IR SETUP codes.” (p. 91)
Dubbing only desired scenes – Digital program editing (on tapes)
4
36
5
8
VIDEO EDIT
MARK
UNDO
ERASE ALL
START
EDIT SET
OTHERS
DATA CODE
BEEP
COMMANDER
DISPLAY
VIDEO EDIT
RETURN RETURN
TAPE
MEMORY
IR
0:08:55:06
TOTAL 0:00:00:00
SCENE 0
[MENU] : END
VIDEO EDIT
EDIT SET
CONTROL
ADJ TEST
”CUT–IN”
”CUT–OUT”
IR SETUP
PAUSEMODE
IR TEST
RETURN
IR
i. LINK
0:08:55:06
[MENU] : END
VIDEO EDIT
EDIT SET
CONTROL
ADJ TEST
”CUT–IN”
”CUT–OUT”
IR SETUP
PAUSEMODE
IR TEST
RETURN
3
0:08:55:06
[MENU] : END
VIDEO EDIT
EDIT SET
CONTROL
ADJ TEST
”CUT–IN”
”CUT–OUT”
IR SETUP
PAUSEMODE
IR TEST
RETURN
IR
0:08:55:06
[MENU] : END
VIDEO EDIT
MARK
UNDO
ERASE ALL
START
EDIT SET
1 IN0:08:55:06
TOTAL 0:00:00:00
SCENE 0
[MENU] : END
[MENU] : END
OTHERS
DATA CODE
BEEP
COMMANDER
DISPLAY
VIDEO EDIT
RETURN READY
[MENU] : END
OTHERS
DATA CODE
BEEP
COMMANDER
DISPLAY
VIDEO EDIT
RETURN RETURN
TAPE
MEMORY
[MENU] : END
MENU

91
Editing
Dubbing only desired scenes – Digital program editing (on tapes)
* TV/VCR component
Note on IR SETUP codes
Digital program editing is not possible if the VCR does not support IR SETUP codes.
About IR SETUP codes
The IR SETUP code is stored in the memory of your camcorder. Be sure to set the
correct code to match your VCR. The default setting is code number 3.
Brand IR SETUP code
Sony 1, 2, 3, 4, 5, 6
Admiral (M. Wards) 89
Aiwa 47, 54, 80
Akai 49, 51
Audio Dynamic 21, 35
Bell&Howell 36
(M. Wards)
Broksonic 21, 70, 82
Canon 77, 78
Citizen 47
Craig 47, 73
Curtis Mathis 8, 77, 80
Daewoo 26, 40, 77
DBX 21, 33, 35
Dimensia 8
Emerson 26, 48, 59, 70, 80, 81, 82
Fisher 36, 37, 44, 45
Funai 80
General Electric 8, 32*, 77, 94*, 101
Goldstar/LG 47
GO VIDEO 71
Hitachi 8, 42, 78
HQ 40
Instant Replay 77, 78
JC Penny 8, 21, 33, 35, 36, 42, 77
JVC 12, 13, 14, 21, 33, 35
Kenwood 21, 33, 35, 47
LXI (Sears) 36, 37, 42, 44, 45, 47, 49, 80
Magnavox 17, 77, 78, 83
Marantz 21, 33, 35
Marta 47
Memorex 37, 77
Minolta 8, 42
Brand IR SETUP code
Mitsubishi/MGA 22, 23, 24, 28, 29
Multitech 23, 32, 80
NEC 21, 33, 35
Olympic 77, 78
Optimus 22
Orion 60
Panasonic 16, 17, 77, 78
Pentax 8, 42
Philco 26, 70, 77, 78
Philips 47, 77, 78, 83
Pioneer 78
Quasar 6, 16, 17, 77, 78
RCA/PROSCAN 7, 8, 16, 40, 41, 42, 77, 78, 78*, 83,
101
Realistic 22, 36, 37, 77, 80, 88
Sansui 21
Singer 73
Samsung 24, 24*, 32, 32*, 41, 94, 94*
Sanyo 26, 36, 37, 47
Scott 22, 23, 24, 28, 32, 37, 40, 41
Sharp 88, 89
Shintom 73
Signature 2000 80, 89
Sylvania 77, 78, 80, 83
Symphonic 80
Tashiro 47
Tatung 21, 33, 35
Teac 21, 33, 35, 80
Technics 77, 78
Toshiba 7, 40, 49
Wards 37, 47, 88, 89, 95
Yamaha 21, 33, 35, 36
Zenith 95
92
(2) Setting the modes to cancel the recording pause on the VCR
1Turn the SEL/PUSH EXEC dial to select PAUSEMODE, then press the dial.
2Turn the SEL/PUSH EXEC dial to select the mode to cancel recording pause
on the VCR, then press the dial.
Refer to the operating instructions of your VCR.
Buttons to cancel recording pause on the VCR
The buttons vary depending on your VCR. To cancel recording pause:
–Select PAUSE if the button to cancel recording pause is X.
–Select REC if the button to cancel recording pause is z.
–Select PB if the button to cancel recording pause is N.
(3) Setting your camcorder and the VCR to face each other
Locate the infrared rays emitter of your camcorder and face it towards the remote
sensor of the VCR.
Set the devices about 30 cm (12 in.) apart, and remove any obstacles between the
devices.
Dubbing only desired scenes – Digital program editing (on tapes)
VCR
Remote sensor
A/V connecting cable (supplied)
Infrared rays emitter
12
VIDEO EDIT
EDIT SET
CONTROL
ADJ TEST
”CUT–IN”
”CUT–OUT”
IR SETUP
PAUSEMODE
IR TEST
RETURN
PAUSE
REC
PB
0:08:55:06
[MENU] : END
VIDEO EDIT
EDIT SET
CONTROL
ADJ TEST
”CUT–IN”
”CUT–OUT”
IR SETUP
PAUSEMODE
IR TEST
RETURN
PAUSE
0:08:55:06
[MENU] : END
93
Editing
(4) Confirming VCR operation
1Insert a recordable tape into the VCR, then set to recording pause.
2Turn the SEL/PUSH EXEC dial to select IR TEST, then press the dial.
3Turn the SEL/PUSH EXEC dial to select EXECUTE, then press the dial.
If the VCR starts recording, the setting is correct.
When recording is finished, the indicator changes to COMPLETE.
When the VCR does not operate correctly
•After checking the code in “About IR SETUP codes”, set the IR SETUP or the
PAUSEMODE again.
•Place your camcorder at least 30 cm (12 in.) away from the VCR.
•Refer to the operating instructions of your VCR.
Dubbing only desired scenes – Digital program editing (on tapes)
2
3
VIDEO EDIT
EDIT SET
CONTROL
ADJ TEST
”CUT–IN”
”CUT–OUT”
IR SETUP
PAUSEMODE
IR TEST
RETURN
ENGAGE
REC PAUSE
RETURN
EXECUTE
0:08:55:06
[MENU] : END
VIDEO EDIT
EDIT SET
CONTROL
ADJ TEST
”CUT–IN”
”CUT–OUT”
IR SETUP
PAUSEMODE
IR TEST
RETURN COMPLETE
0:08:55:06
[MENU] : END
94
Step 2: Setting the VCR to operate with the i.LINK cable
(DV connecting cable)
When you connect using the i.LINK cable (DV connecting cable) (optional), follow the
procedure below.
(1)Set the POWER switch to VCR on your camcorder.
(2)Turn the power of the connected VCR on, then set the input selector to DV
input. When you connect a digital video camera recorder, set its power switch
to VCR/VTR.
(3)Press MENU, then turn the SEL/PUSH EXEC dial to select VIDEO EDIT in
, then press the dial (p. 209).
(4)Turn the SEL/PUSH EXEC dial to select TAPE, then press the dial.
(5)Turn the SEL/PUSH EXEC dial to select EDIT SET, then press the dial.
(6)Turn the SEL/PUSH EXEC dial to select CONTROL, then press the dial.
(7)Turn the SEL/PUSH EXEC dial to select i.LINK, then press the dial.
4
36
5
7
VIDEO EDIT
MARK
UNDO
ERASE ALL
START
EDIT SET
OTHERS
DATA CODE
BEEP
COMMANDER
DISPLAY
VIDEO EDIT
RETURN RETURN
TAPE
MEMORY
IR
0:08:55:06
TOTAL 0:00:00:00
SCENE 0
[MENU] : END
VIDEO EDIT
EDIT SET
CONTROL
ADJ TEST
”CUT–IN”
”CUT–OUT”
IR SETUP
PAUSEMODE
IR TEST
RETURN
IR
i. LINK
0:08:55:06
[MENU] : END
VIDEO EDIT
EDIT SET
CONTROL
ADJ TEST
”CUT–IN”
”CUT–OUT”
IR SETUP
PAUSEMODE
IR TEST
RETURN
i. LINK
0:08:55:06
[MENU] : END
VIDEO EDIT
MARK
UNDO
ERASE ALL
START
EDIT SET
1 IN0:08:55:06
TOTAL 0:00:00:00
SCENE 0
[MENU] : END
[MENU] : END
OTHERS
DATA CODE
BEEP
COMMANDER
DISPLAY
VIDEO EDIT
RETURN READY
[MENU] : END
OTHERS
DATA CODE
BEEP
COMMANDER
DISPLAY
VIDEO EDIT
RETURN RETURN
TAPE
MEMORY
[MENU] : END
VIDEO EDIT
EDIT SET
CONTROL
ADJ TEST
”CUT–IN”
”CUT–OUT”
IR SETUP
PAUSEMODE
IR TEST
RETURN
IR
0:08:55:06
[MENU] : END
MENU
Dubbing only desired scenes – Digital program editing (on tapes)

95
Editing
Dubbing only desired scenes – Digital program editing (on tapes)
When you connect using the i.LINK cable (DV connecting cable)
You cannot dub the titles, display indicators.
Note
When you connect with an i.LINK cable (DV connecting cable), you may not be able to
operate the dubbing function correctly, depending on the VCR.
Set CONTROL to IR in the menu settings of your camcorder.
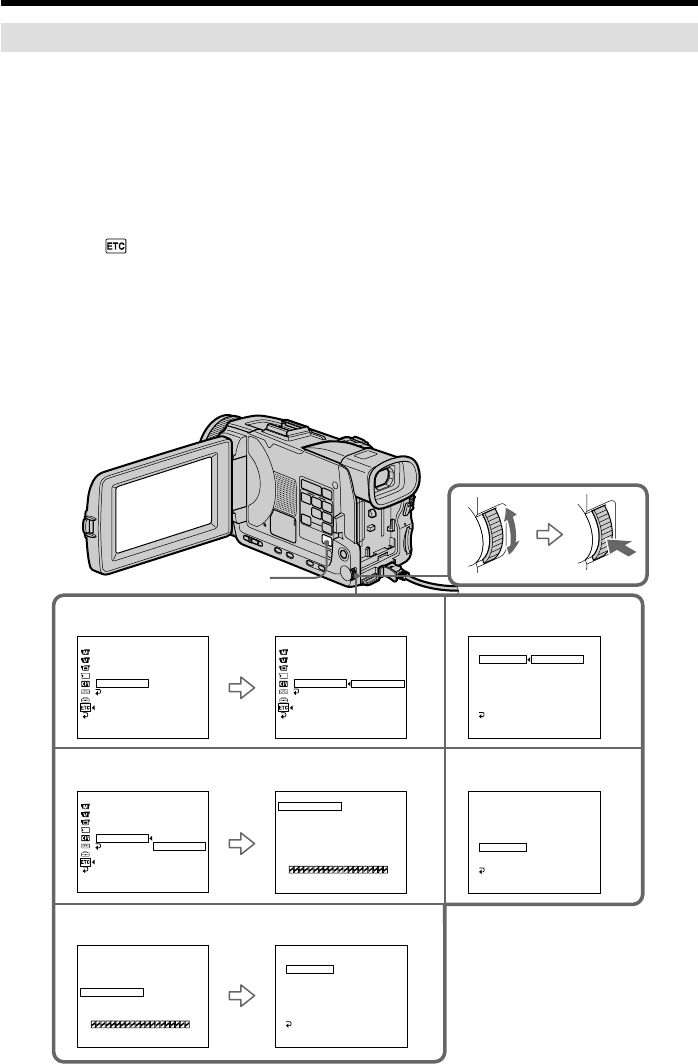
Step 3: Adjusting the synchronization of the VCR
You can adjust the synchronization of your camcorder and the VCR. Have a pen and
paper ready for notes. Before operation, eject a cassette from your camcorder.
(1)Insert a blank tape (or a tape you want to record over) into the VCR, then set
to recording pause.
When you select i.LINK in CONTROL, you do not need to set to recording
pause.
(2)Turn the SEL/PUSH EXEC dial to select ADJ TEST, then press the dial.
(3)Turn the SEL/PUSH EXEC dial to select EXECUTE, then press the dial.
IN and OUT are recorded on an image for five times each to calculate the
number values for adjusting the synchronization.
The EXECUTING indicator flashes on the screen.
When finished, the indicator changes to COMPLETE.
(4)Rewind the tape in the VCR, then start slow playback.
Take a note of the first number value of each IN and the closing number value
of each OUT.
(5)Calculate the average of all the first number values of each IN, and the
average of all the last number values of each OUT.
(6)Turn the SEL/PUSH EXEC dial to select “CUT-IN”, then press the dial.
(7)Turn the SEL/PUSH EXEC dial to select the average number value of IN, then
press the dial.
The calculated start position for recording is set.
(8)Turn the SEL/PUSH EXEC dial to select “CUT-OUT”, then press the dial.
(9)Turn the SEL/PUSH EXEC dial to select the average number value of OUT,
then press the dial.
The calculated stop position for recording is set.
(10)Turn the SEL/PUSH EXEC dial to select RETURN, then press the dial.
96
Notes
•When you complete step 3, the image used to adjust the synchronization is recorded
for about 50 seconds.
•If you start recording from the very beginning of the tape, the first few seconds of the
tape may not record properly. Be sure to allow about 10 seconds’ lead before starting
recording.
•When you connect with an i.LINK cable (DV connecting cable) you may not be able to
operate the dubbing function correctly, depending on the VCR. Keep the i.LINK
connection, and set CONTROL to IR in the menu settings. Video and audio are sent
by digital signals.
Dubbing only desired scenes – Digital program editing (on tapes)
2,3 6
8
VIDEO EDIT
EDIT SET
CONTROL
ADJ TEST
”CUT–IN”
”CUT–OUT”
IR SETUP
PAUSEMODE
IR TEST
RETURN
RETURN
EXECUTE
ENGAGE
REC PAUSE
0:08:55:06
[ME VIDEO EDIT
EDIT SET
CONTROL
ADJ TEST
”CUT–IN”
”CUT–OUT”
IR SETUP
PAUSEMODE
IR TEST
RETURN
EXECUTING
No. 5
IN
–60
0:08:55:06
[ME VIDEO EDIT
EDIT SET
CONTROL
ADJ TEST
”CUT–IN”
”CUT–OUT”
IR SETUP
PAUSEMODE
IR TEST
RETURN
COMPLETE
0:08:55:06
[MENU] : END
VIDEO EDIT
EDIT SET
CONTROL
ADJ TEST
”CUT–IN”
”CUT–OUT”
IR SETUP
PAUSEMODE
IR TEST
RETURN
0
0:08:55:06
[MENU] : END
VIDEO EDIT
EDIT SET
CONTROL
ADJ TEST
”CUT–IN”
”CUT–OUT”
IR SETUP
PAUSEMODE
IR TEST
RETURN
0
0:08:55:06
[MENU] : END
97
Editing
Dubbing only desired scenes – Digital program editing (on tapes)
Operation 1: Making a program
(1)Insert the tape for playback into your camcorder, and insert a tape for
recording into the VCR.
(2)Press MENU and turn the SEL/PUSH EXEC dial to select VIDEO EDIT in ,
then press the dial (p. 209).
(3)Turn the SEL/PUSH EXEC dial to select TAPE, then press the dial.
(4)Search for the beginning of the first scene you want to insert using the video
operation buttons, then pause playback.
You can fine-adjust one frame at a time with EDITSEARCH.
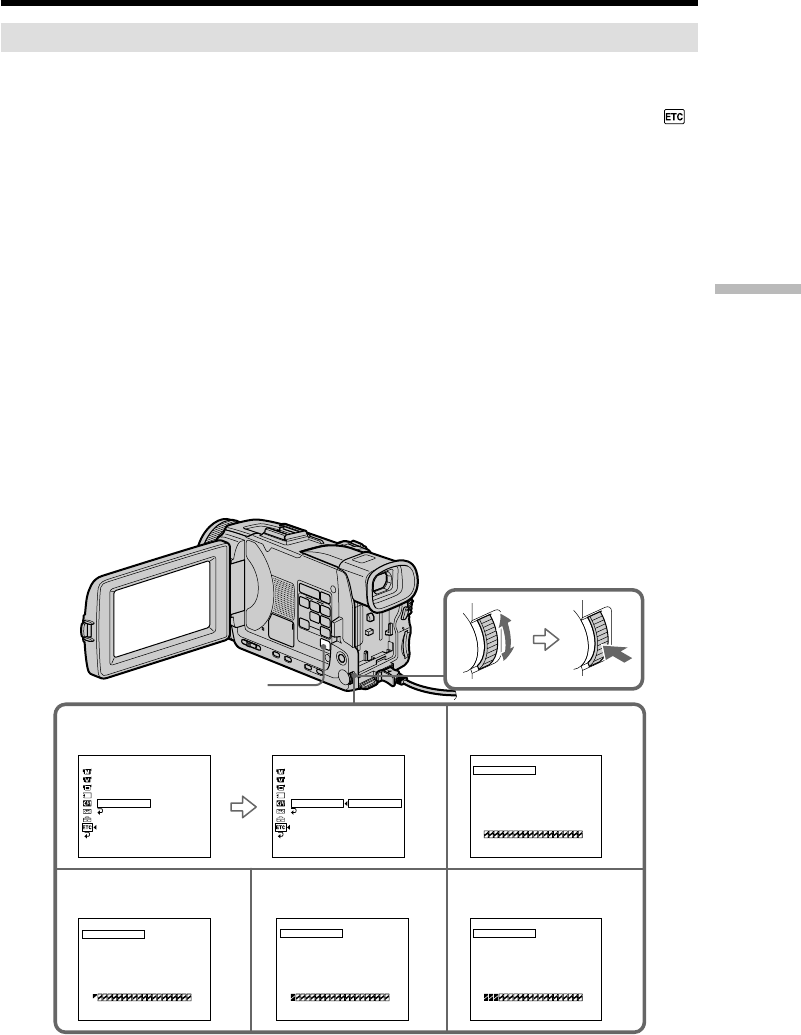
(5)Press MARK on the Remote Commander, or turn the SEL/PUSH EXEC dial to
select MARK, then press the dial.
The IN point of the first program is set, and the top part of the program mark
changes to light blue.
(6)Search for the end of the first scene you want to insert using the video
operation buttons, then pause playback.
(7)Press MARK on the Remote Commander, or the SEL/PUSH EXEC dial.
The OUT point of the first program is set, then the bottom part of the program
mark changes to light blue.
(8)Repeat steps 4 to 7, then set the program.
When the program is set, the program mark changes to light blue.
You can set up to 20 programs in maximum.
5
23
8
7
OTHERS
DATA CODE
BEEP
COMMANDER
DISPLAY
VIDEO EDIT
RETURN READY
[MENU] : END
OTHERS
DATA CODE
BEEP
COMMANDER
DISPLAY
VIDEO EDIT
RETURN RETURN
TAPE
MEMORY
[MENU] : END
VIDEO EDIT
MARK
UNDO
ERASE ALL
START
EDIT SET
1 IN 0:08:55:06
TOTAL 0:00:00:00
SCENE 0
[MENU] : END
VIDEO EDIT
MARK
UNDO
ERASE ALL
START
EDIT SET
4 IN 0:10:01:23
TOTAL 0:00:47:12
SCENE 3
[MENU] : END
VIDEO EDIT
MARK
UNDO
ERASE ALL
START
EDIT SET
2 IN 0:09:07:06
TOTAL 0:00:12:00
SCENE 1
[MENU] : END
VIDEO EDIT
MARK
UNDO
ERASE ALL
START
EDIT SET
1 OUT
0:08:55:06
TOTAL 0:00:00:00
SCENE 0
[MENU] : END
N X N X N X
MENU

98
Dubbing only desired scenes – Digital program editing (on tapes)
Erasing the program you have set
Erase OUT first and then IN from of the last program.
(1)Turn the SEL/PUSH EXEC dial to select UNDO, then press the dial.
(2)Turn the SEL/PUSH EXEC dial to select EXECUTE, then press the dial.
The last set program mark flashes, then the setting is canceled.
To cancel erasing
Turn the SEL/PUSH EXEC dial to select RETURN, then press the dial in step 2.
Erasing all programs
(1)Turn the SEL/PUSH EXEC dial to select VIDEO EDIT in the menu settings,
then select TAPE, then press the dial.
(2)Turn the SEL/PUSH EXEC dial to select ERASE ALL, then select EXECUTE,
then press the dial.
All the program marks flash, then the settings are canceled.
To cancel erasing all programs
Select RETURN with the SEL/PUSH EXEC dial in step 2.
To cancel a program you have set
Press MENU.
The program is stored in memory until the tape is ejected.
Note
You cannot operate recording during Digital program editing.
On a blank portion of the tape
You cannot set IN or OUT on a blank portion of the tape.
If there is a blank portion between IN and OUT on the tape
The total time code may not be displayed correctly.

99
Editing
Operation 2: Performing the program (Dubbing a tape)
Make sure that your camcorder and VCR are connected, and that the VCR is set to
recording pause. When you use an i.LINK cable (DV connecting cable), this procedure
is not necessary.
When you use a digital video camera recorder, set its power switch to VCR/VTR.
(1)Turn the SEL/PUSH EXEC dial to select VIDEO EDIT in the menu settings,
then select TAPE, then press the dial.
(2)Turn the SEL/PUSH EXEC dial to select START, then select EXECUTE, then
press the dial.
Search for the beginning of the first program, then start dubbing.
The program mark flashes.
The SEARCH indicator appears during search, and the EDITING indicator
appears during edit on the screen.
The program mark changes to light blue after dubbing ends.
When dubbing ends, your camcorder and the VCR automatically stop.
To stop dubbing during editing
Press x using the video operation buttons.
To end the Digital program editing
Your camcorder stops when the dubbing ends. Then the display returns to VIDEO
EDIT in the menu settings.
Press MENU to end the Digital program editing.
You cannot record on the VCR when:
–The tape has run out.
–The write-protect tab on the cassette is set to lock.
–The IR SETUP code is not correct. (when IR is selected)
–The button to cancel recording pause is not correct. (when IR is selected)
NOT READY appears on the LCD screen when:
–The program to operate the Digital program editing has not been made.
–i.LINK is selected but an i.LINK cable (DV connecting cable) is not connected.
–The power of the connected VCR is not turned on. (when you set i.LINK)
Dubbing only desired scenes – Digital program editing (on tapes)
100
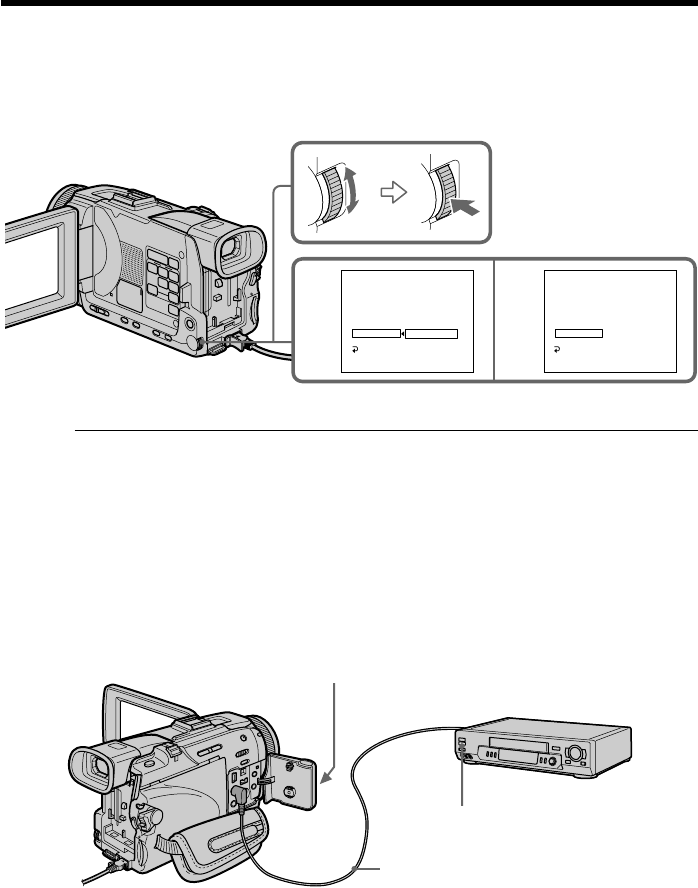
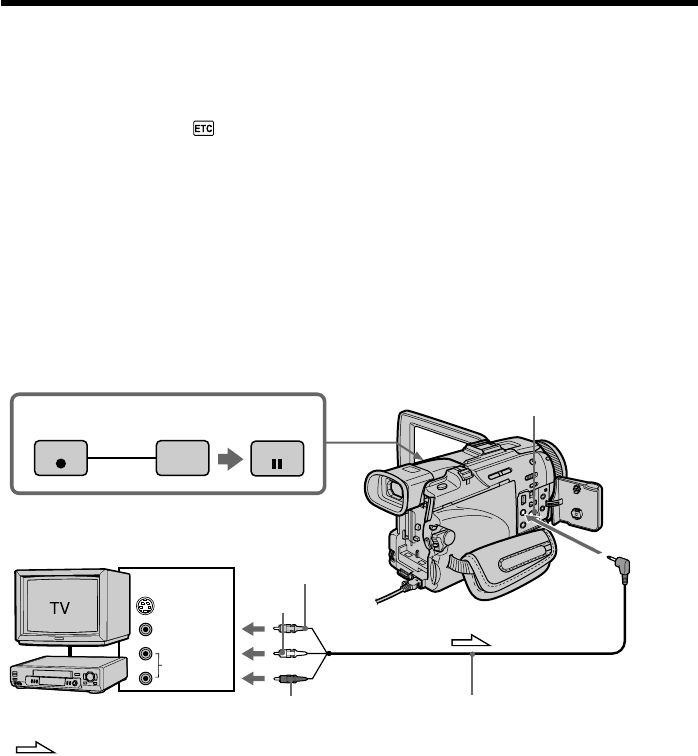
Recording video or TV programs
Using the A/V connecting cable
You can record a tape from another VCR or a TV program from a TV that has video/
audio outputs. Use your camcorder as a recorder.
Before operation
Set DISPLAY in to LCD in the menu settings. (The default setting is LCD.)
(1)Insert a blank tape (or a tape you want to record over) into your camcorder. If
you are recording a tape from the VCR, insert a recorded tape into the VCR.
(2)Set the POWER switch to VCR on your camcorder.
(3)Press z REC and the button on its right simultaneously on your camcorder,
then immediately press X on your camcorder.
(4)Press N on the VCR to start playback if you record a tape from a VCR. Select
a TV program if you are recording from a TV. The picture from a TV or VCR
appears on the screen.
(5)Press X on your camcorder at the scene where you want to start recording
from.
When you have finished dubbing a tape
Press x on both your camcorder and the VCR.
Using the Remote Commander
In step 3, press z REC and MARK simultaneously, then immediately press X. In step 5,
press X at the scene where you want to start recording from.
3
REC PAUSE
S VIDEO
VIDEO
AUDIO
OUT
AUDIO/
VIDEO
S VIDEO
: Signal flow
VCR
White
Yellow
Red A/V connecting cable (supplied)