Sony A3252011 GSM/GPRS/EDGE/WCDMA/HSDPA Mobile Phone with BT User Manual Sofia UG P1C EN
Sony Mobile Communications Inc GSM/GPRS/EDGE/WCDMA/HSDPA Mobile Phone with BT Sofia UG P1C EN
Sony >
Contents
- 1. 08 user guide part 1
- 2. 08 user guide part 2
- 3. 08 user guide part 3
- 4. 08 user manual part 1
08 user guide part 2

21Calling
To enter Myself information
1From standby select Menu > Contacts.
2Scroll to Myself and select Open.
3Scroll to an option and edit the
information.
4Select Save.
To add your own business card
1From standby select Menu > Contacts.
2Scroll to Myself and select Open.
3Scroll to My contact info and select
Add > Create new.
4Scroll between tabs and select the
fields to add information.
5Enter the information and select Save.
To send your business card
1From standby select Menu > Contacts.
2Scroll to Myself and select Open.
3Scroll to My contact info and select
Send.
4Select a transfer method.
Groups
You can create a group of phone
numbers and email addresses from
Phone contacts to send messages to.
See Messaging on page 28. You can
also use groups (with phone numbers)
when you create accepted callers lists.
See Accept calls on page 26.
To create a group of numbers and
email addresses
1From standby select Menu > Contacts.
2Scroll to New contact and select Options
> Groups.
3Scroll to New group and select Add.
4Enter a name for the group and select
Cont.
5Scroll to New and select Add.
6For each contact phone number or
email address you want to mark, scroll
to it and select Mark.
7Select Cont. > Done.
Call list
You can view information about recent
calls.
To call a number from the call list
1From standby press and scroll
to a tab.
2Scroll to a name or a number and
press .
To enter a symbol select Options > Add
symbol > Insert.
Make sure the receiving device supports
the transfer method you select.
Sofia_UG_P1C_EN.book Page 21 Wednesday, July 18, 2007 5:45 PM
0REFLIGHTEDBY
0REFLIGHTEDBY
22 Calling
To add a call list number to contacts
1From standby press and scroll to
a tab.
2Scroll to the number and select Save.
3Select New contact to create a new
contact or select an existing contact
to add the number to.
To clear the call list
1From standby press .
2Scroll to the All tab and select Options
> Delete all.
Speed dial
Speed dialling lets you select nine
contacts that you can dial quickly.
The contacts can be saved in
positions 1-9.
To add contacts to speed dial
numbers
1From standby select Menu > Contacts.
2Scroll to New contact and select Options
> Speed dial.
3Scroll to a position number and select
Add.
4Select a contact.
To speed dial
•From standby enter the position
number and press .
Voicemail
If your subscription includes an
answering service, callers can leave a
voicemail message when you cannot
answer a call.
To enter your voicemail number
1From standby select Menu > Messaging
> Settings > Voicemail number.
2Enter the number and select OK.
To call your voicemail service
•From standby press and hold down
.
Voice control
By creating voice commands you can:
•Voice dial – call someone by saying
their name
•Activate voice dialling by saying
a “magic word”
•Answer and reject calls when you
use a handsfree
To record a voice command using
voice dialling
1From standby select Menu > Settings
> the General tab > Voice control >
Voice dialling > Activate.
2Select Yes > New voice command and
select a contact. If the contact has
more than one number, select the
number to add the voice command to.
Sofia_UG_P1C_EN.book Page 22 Wednesday, July 18, 2007 5:45 PM
0REFLIGHTEDBY
0REFLIGHTEDBY
23Calling
3Record a voice command such as
“John mobile”.
4Follow the instructions that appear.
Wait for the tone and say the
command to record. The voice
command is played back to you.
5If the recording sounds OK, select
Yes. If not, select No and repeat steps
3 and 4.
To re-record a voice command
1From standby select Menu > Settings >
the General tab > Voice control > Voice
dialling > Edit names.
2Scroll to a command and select
Options > Replace voice.
3Wait for the tone and say the command.
Voice dialling
You can hear your recorded contact
name
when you receive a call from
that contact.
To voice dial
1From standby press and hold down
a volume key.
2Wait for the tone and say a recorded
name, for example “John mobile”.
The name is played back to you and
the call is connected.
The magic word
You can record and use a voice
command as a magic word to activate
voice dialling without pressing any keys.
Your handsfree must be connected to
your phone when using the magic word.
To activate and record the magic
word
1From standby select Menu > Settings
> the General tab > Voice control >
Magic word > Activate.
2Follow the instructions that appear
and select Cont. Wait for the tone and
say the magic word.
3Select Yes to accept or No for a new
recording.
4Follow the instructions that appear
and select Cont.
5Select where your magic word is to
be activated.
To make a call using the magic word
1In standby make sure is visible.
2Say the magic word.
3Wait for the tone and say a voice
command.
Voice commands are saved in the phone
memory only. They cannot be used in
another phone.
You should choose a long, unusual word
or phrase that can easily be distinguished
from ordinary background speech.
Bluetooth handsfree does not support
this feature.
Sofia_UG_P1C_EN.book Page 23 Wednesday, July 18, 2007 5:45 PM
0REFLIGHTEDBY
0REFLIGHTEDBY
24 Calling
Voice answering
When you use a handsfree, you can
answer or reject incoming calls with
your voice.
To activate voice answering and
record voice answer commands
1From standby select Menu > Settings
> the General tab > Voice control >
Voice answer > Activate.
2Follow the instructions that appear
and select Cont. Wait for the tone
and say “Answer”, or another word.
3Select Yes to accept or No for a new
recording.
4Follow the instructions that appear
and select Cont.. Wait for the tone
and say “Busy”, or another word.
5Select Yes to accept or No for a new
recording.
6Follow the instructions that appear
and select Cont.
7Select where your voice answering
is to be activated.
To answer a call using voice
commands
•Say “Answer”.
To reject a call using voice
commands
•Say “Busy”.
Diverting calls
You can divert calls, for example,
to an answering service.
Divert call options
Standard options are:
•Divert always – divert all your calls
•When busy – if a call is ongoing
•Not reachable – if your phone is
turned off or unreachable
•No reply – if a call is not answered
in a specified time
To divert calls
1From standby select Menu > Settings
> the Calls tab > Divert calls.
2Select a call type and a divert option.
3Select Activate.
4Enter the number to divert calls to and
select OK.
More than one call
You can handle more than one call at
a time. For example, you can put an
ongoing call on hold, while you make
or answer a second call. You can also
switch between the two calls. You
cannot answer a third call without
ending one of the first two calls.
When Restrict calls is used, some
divert call options are not available.
See Restricted dialling on page 26.
Sofia_UG_P1C_EN.book Page 24 Wednesday, July 18, 2007 5:45 PM
0REFLIGHTEDBY
0REFLIGHTEDBY
25Calling
Call waiting
When call waiting is used, you hear
a beep if you receive a second call.
To activate call waiting
•From standby select Menu > Settings
> the Calls tab > Manage calls > Call
waiting > Activate.
To make a second call
1During the call, select Options > Hold.
This puts the ongoing call on hold.
2Select Options > Add call.
3Enter the number to call and press
.
To answer a second call
•During the call, press . This puts
the ongoing call on hold.
To reject a second call
•During the call, press and continue
with the ongoing call.
To end an ongoing call and answer
a second call
•During the call, select Replace active
call.
Handling two voice calls
You can have calls ongoing and on
hold at the same time.
To switch between two calls
•During the call, press .
To join two calls
•During the call, select Options > Join
calls.
To connect two calls
•During the call, select Options >
Transfer call. You are disconnected
from both calls.
To end an ongoing call and return
to the call on hold
•First press and then .
Receiving a third voice call
You cannot answer a third call without
ending one of the first two calls or
joining them.
Conference calls
With a conference call, you can have a
joint conversation with up to five people.
To add a new participant
1During the call, select Options > Hold.
This puts the joined calls on hold.
2Select Options > Add call.
3Enter the number to call and press .
4Select Options > Join calls to add the
new participant.
5Repeat this task to add more
participants.
Sofia_UG_P1C_EN.book Page 25 Wednesday, July 18, 2007 5:45 PM
0REFLIGHTEDBY
0REFLIGHTEDBY
26 Calling
To release a participant
1Select Options > Release part.
2Select the participant to release.
To have a private conversation
1During the call, select Options > Talk to
and select the participant to talk to.
2To resume the conference call, select
Options > Join calls.
My numbers
You can view, add and edit your own
phone numbers.
To check your phone numbers
1From standby select Menu > Contacts.
2Scroll to New contact and select Options
> Special numbers > My numbers.
3Select an option.
Accept calls
You can choose to receive calls from
certain phone numbers only.
To add numbers to the accepted
callers list
1From standby select Menu > Settings
> the Calls tab > Manage calls > Accept
calls > Only from list.
2Scroll to New and select Add.
3Scroll to a contact or select Groups.
To accept all calls
•From standby select Menu > Settings
> the Calls tab > Manage calls > Accept
calls > All callers.
Restricted dialling
You can restrict outgoing and incoming
calls. A password from your service
provider is required.
Restrict calls options
Standard options are:
•All outgoing – all outgoing calls
•Outgoing intl – all outgoing
international calls
•Outgoing intl roam. – all outgoing
international calls except to your
home country
•All incoming – all incoming calls
•Inc. when roaming – all incoming
calls when you are abroad
See Groups on page 21.
If you divert incoming calls, you cannot
use some restrict calls options.
Sofia_UG_P1C_EN.book Page 26 Wednesday, July 18, 2007 5:45 PM
0REFLIGHTEDBY
0REFLIGHTEDBY
27Calling
To restrict calls
1From standby select Menu > Settings
> the Calls tab > Manage calls >
Restrict calls.
2Select an option.
3Select Activate.
4Enter your password and select OK.
Fixed dialling
Fixed dialling allows calls to be made
only to certain numbers saved on
the SIM card. The fixed numbers
are protected by your PIN2.
Partial numbers can be saved. For
example, saving 0123456 allows calls
to be made to all numbers starting
with 0123456.
To use fixed dialling
1From standby select Menu > Contacts.
2Scroll to New contact and select Options
> Special numbers > Fixed dialling >
Activate.
3Enter your PIN2 and select OK.
4Select OK again to confirm.
To save a fixed number
1From standby select Menu > Contacts.
2Scroll to New contact and select Options
> Special numbers > Fixed dialling >
Fixed numbers > New number.
3Enter the information and select Save.
Call time and cost
During a call, the duration of the call
is shown. You can check the duration
of your last call, outgoing calls and the
total time of your calls.
To check the call time
•From standby select Menu > Settings
> the Calls tab > Time & cost > Call
timers.
When fixed dialling is used, you cannot
view or manage any phone numbers
saved on the SIM card but you can still call
the international emergency number, 112.
Sofia_UG_P1C_EN.book Page 27 Wednesday, July 18, 2007 5:45 PM
0REFLIGHTEDBY
0REFLIGHTEDBY
28 Messaging
Messaging
Receiving and saving messages
You are notified when you receive a
message. Messages are automatically
saved in the phone memory. When the
phone memory is full, you can delete
messages or save them on a memory
card or on the SIM card.
To save a message on a memory
card
•From standby select Menu > Messaging
> Settings > General > Save to >
Memory card.
To save a message on the SIM card
1From standby select Menu >
Messaging and select a folder.
2Scroll to a message and select
Options > Save message.
To view a message from the inbox
1From standby select Menu >
Messaging > Inbox.
2Scroll to the message and select View.
To delete a message
1From standby select Menu >
Messaging and select a folder.
2Scroll to the message and press .
Text messages
Text messages can contain simple
pictures, sound effects, animations,
and melodies.
Before you use messaging
You must have a service centre number.
The number is supplied by your service
provider and is usually saved on the
SIM card. If the number to your service
centre is not saved on your SIM card,
you must enter the number yourself.
To enter a service centre number
1From standby select Menu >
Messaging > Settings > Text message
and scroll to Service centre. The
number is shown if it is saved on the
SIM card.
2If there is no number shown, select Edit.
3Scroll to New ServiceCentre and select
Add.
4Enter the number, including the
international “+” sign and country code.
5Select Save.
To write and send a text message
1From standby select Menu > Messaging
> Write new > Text message.
2Write the message and select Cont. >
Contacts look-up.
3Select a recipient and select Send.
Sofia_UG_P1C_EN.book Page 28 Wednesday, July 18, 2007 5:45 PM
0REFLIGHTEDBY
0REFLIGHTEDBY

29Messaging
To add an item to a text message
1When you write the message, select
Options > Add item.
2Select an option and then an item.
To call a number in a text message
•When you view the message, scroll
to the phone number and press .
Picture messages
Picture messages can contain text,
pictures, slides, sound recordings,
video clips, signatures and
attachments. You can send picture
messages to a mobile phone or an
email address.
Before you use picture messaging
You must set an Internet profile and
the address of your message server.
If no Internet profile or message server
exists, you can receive all the settings
automatically from your network
operator or at
www.sonyericsson.com/support.
To select an MMS profile
1From standby select Menu > Messaging
> Settings > Picture message > MMS
profile.
2Select a profile.
To set the message server address
1From standby select Menu > Messaging
> Settings > Picture message.
2Scroll to MMS profile and select Edit.
3Select Options > Edit.
4Scroll to Message server and select Edit.
5Enter the address and select OK > Save.
To create and send a picture message
1From standby select Menu > Messaging
> Write new > Picture msg.
2
Enter text. To add items to the message
,
press , scroll and select an item.
3Select Cont. > Contacts look-up.
4Select a recipient and select Send.
Receiving picture messages
You can select how to download your
picture messages. Standard options
when you download picture messages
are:
•Always – automatic download.
•Ask in roaming – ask to download
when not in home network.
•Not in roaming – do not download
when not in home network.
If you send a text message to a group,
you will be charged for each member.
See Groups on page 21.
Sofia_UG_P1C_EN.book Page 29 Wednesday, July 18, 2007 5:45 PM
0REFLIGHTEDBY
0REFLIGHTEDBY
30 Messaging
•Always ask – ask to download.
•Off – new messages appear in the
Inbox.
To set automatic download
1From standby select Menu > Messaging
> Settings > Picture message > Auto
download.
2Select an option.
To save an item in a picture message
•When you view a picture message
select Options > Save items and select
an item.
To delete a message
1From standby select Menu > Messaging
and select a folder.
2Select the message and press .
Message options
You can set standard options for all
messages or choose specific settings
each time you send a message.
To set text message options
1From standby select Menu > Messaging
> Settings > Text message.
2Scroll to an option and select Edit.
To set picture message options
1From standby select Menu > Messaging
> Settings > Picture message.
2Scroll to an option and select Edit.
To set message options for a specific
message
1When the message is ready and a
recipient is selected, select Options >
Advanced.
2Scroll to an option and select Edit.
Templates
If you often use the same phrases and
pictures in a message, you can save
the message as a template.
To add a text message template
1From standby select Menu > Messaging
> Templates > New template > Text.
2Insert text or select Options to add
items. Select OK.
3Enter a title and select OK.
To use a picture message template
1From standby select Menu > Messaging
> Templates.
2Scroll to a template and select Use.
3When the message is ready, select
Cont. > Contacts look-up.
4Select a recipient and select Send.
Sofia_UG_P1C_EN.book Page 30 Wednesday, July 18, 2007 5:45 PM
0REFLIGHTEDBY
0REFLIGHTEDBY
31Messaging
To add a picture message template
1From standby select Menu > Messaging
> Templates > New template > Picture
msg.
2Enter text. To add items to the
message, press , scroll and select
an item.
3Select Yes, enter a title and select OK.
To save a message as a template
1
From standby select
Menu
>
Messaging
> Inbox.
2Scroll to the message and select
Options > Save as template.
Voice messages
You can send and receive a sound
recording as a voice message.
To record and send a voice message
1From standby select Menu > Messaging
> Write new > Voice message.
2Record the message and select Stop
> Send > Contacts look-up.
3Select a recipient and select Send.
Email
You can use standard email functions
and your computer email address in
your phone.
Before you use email
You can use the setup wizard to check
if settings are available for your email
account or you can enter them manually.
You can also receive settings at
www.sonyericsson.com/support.
To create an email account
1From standby select Menu > Messaging
> Email > Accounts.
2Scroll to New account and select Add.
To write and send an email message
1From standby select Menu > Messaging
> Email > Write new.
2Select Add > Enter email address. Enter
the email address and select OK.
3To enter more recipients, select Edit.
Scroll to an option and select Add >
Enter email address. Enter the email
address and select OK. When you are
ready, select Done.
The sender and recipient must have
a subscription supporting picture
messaging.
If you enter settings manually, you can
contact your email provider for more
information. An email provider could be
the company that supplied your email
address.
Sofia_UG_P1C_EN.book Page 31 Wednesday, July 18, 2007 5:45 PM
0REFLIGHTEDBY
0REFLIGHTEDBY
32 Messaging
4Scroll to Subject:. Select OK and enter
a subject.
5Scroll to Text:. Select OK and enter the
text.
6Scroll to Attachments:. Select Add and
select a file to attach.
7Select Cont. > Send.
To receive and read an email
message
1From standby select Menu > Messaging
> Email > Inbox > Options > Send&rec.
2Scroll to the message and select View.
To save an email message
1From standby select Menu > Messaging
> Email > Inbox.
2
Scroll to the message and select
Options
> Save message.
To reply to an email message
1From standby select Menu > Messaging
> Email > Inbox.
2Scroll to the message and select
Options > Reply.
3Write the reply and select OK.
4Select Cont. > Send.
To view an attachment in an email
message
•When you view the message, select
Options > Attachments > View.
To save an attachment in an email
message
•When you view the message, select
Options > Attachments > View > Save.
Synchronizing email
Email can be synchronized with
a Microsoft Exchange Server
(Microsoft® Outlook®). For more
information see Synchronizing on
page 54.
Active email account
If you have several email accounts,
you can change which one is active.
To change the active email account
1From standby select Menu > Messaging
> Email > Accounts.
2Select an account.
To delete an email (POP3)
1From standby select Menu > Messaging
> Email > Inbox.
2Scroll to the message and select
Options > Mark for deletion.
Marked emails will be deleted when you
next connect to your server.
Sofia_UG_P1C_EN.book Page 32 Wednesday, July 18, 2007 5:45 PM
0REFLIGHTEDBY
0REFLIGHTEDBY
33Messaging
To delete an email (IMAP4)
1From standby select Menu > Messaging
> Email > Inbox.
2Scroll to the message and select
Options > Mark for deletion.
3Select Options > Clear inbox.
Push email
You can receive notification in your
phone from your email server that
you have new email messages.
To turn on push email notification
•From standby select Menu > Messaging
> Email > Settings > Push email.
My friends
You can connect and log in to the
My friends server to communicate
online with chat messages.
Before you use My friends
If no settings exist in your phone, you
need to enter server settings. Your
service provider can provide standard
settings information such as:
•Username
•Password
•Server address
•Internet profile
To enter My friends server settings
1From standby select Menu > Messaging
> My friends > Configure.
2Scroll to a setting and select Add.
To log in to the My friends server
•From standby select Menu > Messaging
> My friends > Log in.
To log out of the My friends server
•Select Options > Log out.
To add a chat contact
1From standby select Menu >
Messaging > My friends > the Contacts
tab.
2Select Options > Add contact.
To send a chat message
1From standby select Menu > Messaging
> My friends > the Contacts tab.
2Scroll to a contact and select Chat.
3Write the message and select Send.
Status
You can show your status, for example,
Happy or Busy, to your contacts only.
You can also show your status to all
users on the My friends server.
Marked email messages will be deleted
in the phone and on the server.
Sofia_UG_P1C_EN.book Page 33 Wednesday, July 18, 2007 5:45 PM
0REFLIGHTEDBY
0REFLIGHTEDBY
34 Messaging
To show my status
1From standby select Menu > Messaging
> My friends > Options > Settings >
Show my status.
2Select an option.
To update your own status
1From standby select Menu > Messaging
> My friends > the My status tab.
2Edit the information.
Chat group
A chat group can be started by your
service provider, by an individual
My friends user or by yourself. You
can save chat groups by saving a chat
invitation or by searching for a specific
chat group.
To create a chat group
1From standby select Menu > Messaging
> My friends > the Chat groups tab.
2Select Options > Add chat group >
New chat group.
3Select who to invite from your
contacts list and select Cont.
4Enter a short invitation text and select
Cont. > Send.
To add a chat group
1From standby select Menu > Messaging
> My friends > the Chat groups tab >
Options > Add chat group.
2Select an option.
To save a conversation
1From standby select Menu > Messaging
> My friends > the Conversations tab.
2Scroll to a conversation and select
Options > Advanced > Save
conversation.
To view a saved conversation
1From standby select Menu > Messaging
> My friends > the Conversations tab.
2Select Options > Saved conv.
Area and cell information
Area and cell information are text
messages, for example, local traffic
reports that are sent to subscribers
within a certain network area.
To turn area information on
1From standby select Menu > Messaging
> Settings > Area info.
2Scroll to Reception and select Edit > On.
Conversation history is saved between
log out and when you log in again to
let you return to chat messages from
previous conversations.
Sofia_UG_P1C_EN.book Page 34 Wednesday, July 18, 2007 5:45 PM
0REFLIGHTEDBY
0REFLIGHTEDBY
35Imaging
Imaging
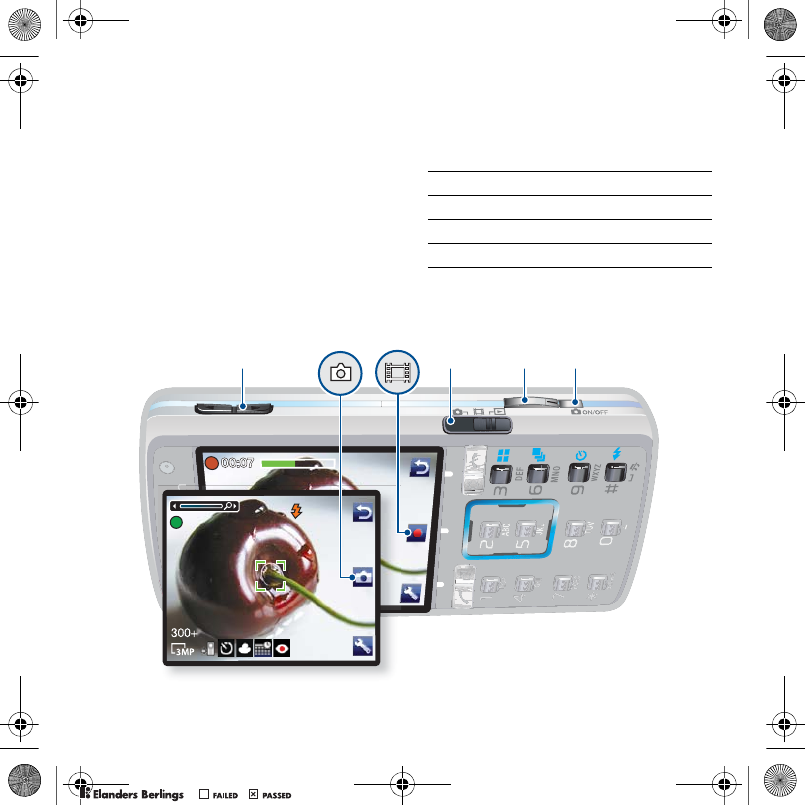
Camera and video recorder
You can take pictures and record
video clips to view, save or send.
Viewfinder and camera keys
1 Zoom in or out
2 Switch camera/video/view
3 Take pictures/Record video
4 Turn the camera on or off
1234
Sofia_UG_P1C_EN.book Page 35 Wednesday, July 18, 2007 5:45 PM
0REFLIGHTEDBY
0REFLIGHTEDBY
36 Imaging
Using the camera
To activate the camera
•When the phone is turned on, press
.
To take a picture
1Activate the camera and use
to select camera.
2Press halfway down to use
auto focus.
3When the dot and focus frame are
green, press fully down to take a
picture.
4The picture is automatically saved
on the memory card.
To record a video clip
1Activate the camera and use
to select video recorder.
2Press fully down to start
recording.
To stop recording
1Press .
2The video clip is automatically saved
on the memory card.
To use zoom
•Press the volume keys up or down.
To adjust brightness
•Press or .
Getting more from the camera
BestPic™ helps you capture the
precise moment. You can improve an
under-exposed picture with Photo fix.
To use BestPic™
1Activate the camera and use
to select camera.
2Select > Shoot mode > BestPic™.
3Press halfway down to use auto
focus.
4When the dot and focus frame are
green, press fully down to complete
the shot.
5Select Save all or press or to
choose the best picture and select
Save.
To improve a picture with Photo fix
1Activate the camera and use
to select camera.
2Select > Settings.
Do not look directly at the camera Xe flash
in the phone using a magnification device.
Failure to comply with this warning may
damage your eyes.
Do not record with a strong light source
in the background. Place the subject
within the focus frame. Use a support or
the self-timer to avoid a blurred picture.
Sofia_UG_P1C_EN.book Page 36 Wednesday, July 18, 2007 5:45 PM
0REFLIGHTEDBY
0REFLIGHTEDBY
37Imaging
3Make sure Review is set to On.
4Take a picture.
5During review, select Options > Photo fix.
To view pictures and video clips
1Activate the camera and use
to select view.
2Scroll to the item.
3Press to view a video clip.
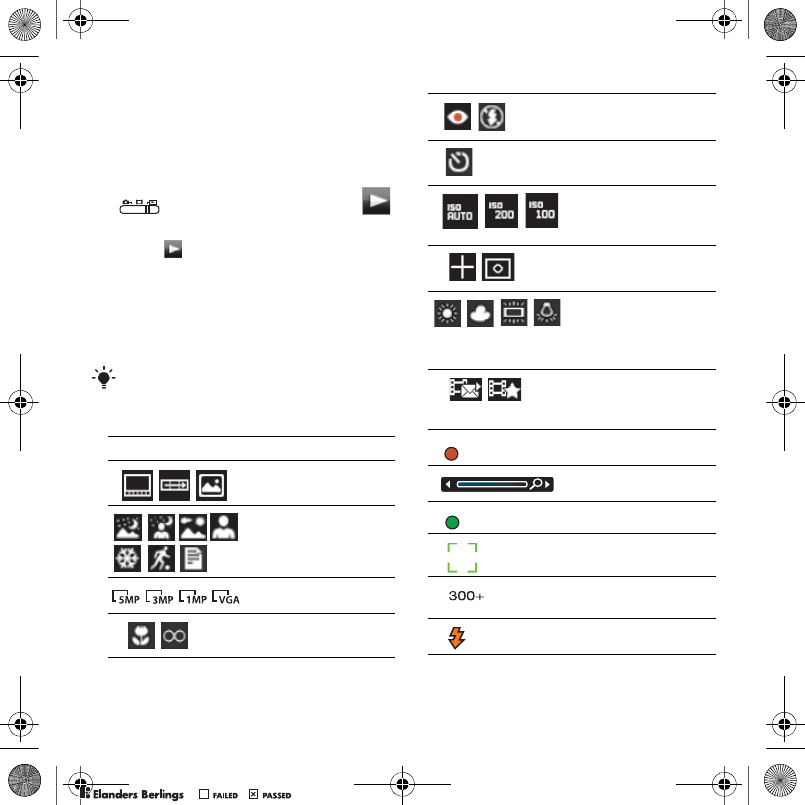
Camera icons and settings
Icons on the screen inform what the
current setting is. More camera settings
are available in Settings.
Use Photo mate to learn about camera
functions. Photo mate is an interactive
tutorial, included in your phone.
Icon Description
Shoot mode
Scenes. Predefined
settings for common
picture situations
Picture size
Focus
Flash
Self-timer
ISO. The light
sensitivity of the
camera
Metering mode
White balance. To
adjust colour tones
to the lighting
conditions
Video size. For
picture messages,
the size is limited
Video: recording
Zoom
Auto focus
Focus frame
Camera: remaining
pictures
Flash is charging
Sofia_UG_P1C_EN.book Page 37 Wednesday, July 18, 2007 5:45 PM
0REFLIGHTEDBY
0REFLIGHTEDBY
38 Imaging
To change settings
•Activate the camera and select .
To view information about settings
•Scroll to a setting and select .
Camera shortcuts
Transferring pictures
Transfer to and from your computer
You can use Bluetooth™ wireless
technology and the USB cable to
transfer pictures and video clips
between your computer and phone.
See Bluetooth™ wireless technology
on page 51 and Using the USB cable
on page 52 for more information.
You can view, enhance and organize
your pictures and video clips on your
computer by installing the Adobe™
Photoshop™ Album Starter Edition
or the Sony Ericsson Media Manager.
These are included on the CD that
comes with your phone and are
available for download at
www.sonyericsson.com/support.
Picture blog
A picture blog is a personal Web page.
If your subscription supports this
service, you can send pictures to a blog.
To send camera pictures to a blog
1From standby select Media and scroll
to Photo > Camera album.
2Scroll to a month and a picture. Select
View.
3Select Options > Send > To blog.
4Add title and text.
5Select OK > Publish.
Key Shortcut
Camera: Shoot mode
Video: Video size
Camera: Scenes
Video: Night mode
Self-timer
Camera key guide
Camera: Flash
Video: AF light
Web services may require a separate
license agreement between you and the
service provider. Additional regulations
and charges may apply. Contact your
service provider.
Sofia_UG_P1C_EN.book Page 38 Wednesday, July 18, 2007 5:45 PM
0REFLIGHTEDBY
0REFLIGHTEDBY
39Imaging
To go to a blog address from contacts
1From standby select Menu > Contacts.
2Scroll to a contact and select a Web
address
3Select Go to.
To send a picture or video clip
1From standby select Media.
2Scroll to an item and select Options >
Send.
3Select a transfer method.
To receive a picture or video clip
•Follow the instructions that appear.
Camera printing
You can print camera pictures using
the USB cable connected to a
compatible printer.
To print camera pictures using the
USB cable
1From standby select Media and scroll
to Photo > Camera album.
2Scroll to a month and a picture.
3Select Options > Print.
4Select an option.
5Connect the USB cable to the phone.
6Connect the USB cable to the printer.
7Wait for feedback in the phone and
select OK.
8Enter printer settings, if required and
select Print.
Pictures
You can view, add, edit or delete
pictures in Media.
Using pictures
You can add a picture to a contact,
use it during phone startup, as a
wallpaper in standby or as a screen
saver.
To use pictures
1From standby select Media and scroll
to Photo > Camera album.
2Scroll to a month and a picture. Select
View.
3Select Options > Use as.
4Select an option.
To view pictures in a slide show
1From standby select Media and scroll
to Photo > Camera album.
2Scroll to a month and a picture. Select
View.
Make sure the receiving device supports
the transfer method you select.
You can also print using a Bluetooth
compatible printer.
You should disconnect and re-connect
the USB cable if there is a printer error.
Sofia_UG_P1C_EN.book Page 39 Wednesday, July 18, 2007 5:45 PM
0REFLIGHTEDBY
0REFLIGHTEDBY
40 Imaging
3Select Options > Slide show.
4Select a mood.
Photo tags
You can tag pictures to categorise
them.
To tag pictures
1From standby select Media and scroll
to Photo > Camera album.
2Scroll to a month and a picture. Select
View.
3Press and scroll to a tag.
4Press the centre touch option.
5For each picture you want to tag, use
or to scroll to the picture and
press the centre touch option.
To create a new photo tag
1From standby select Media and scroll
to Photo > Camera album.
2Scroll to a month and a picture. Select
View.
3Press and select Options > New tag.
4Enter a name and select OK.
5Select an icon.
6Press the centre touch option to tag
the picture.
PhotoDJ™ and VideoDJ™
You can edit pictures and video clips.
To edit and save a picture
1From standby select Media and scroll
to Photo > Camera album.
2Scroll to a month and a picture. Select
View.
3Select Options > Edit in PhotoDJ™.
4Edit the picture.
5Select Options > Save.
To edit and save a video clip
1From standby select Menu > Organizer
> File manager > Videos.
2Scroll to a video clip and select Open
> Options > VideoDJ™.
3Edit the video clip.
4Select Options > Save.
To trim a video clip
1From standby select Menu > Organizer
> File manager > Videos.
2Scroll to a video clip and select Open
> Options > VideoDJ™ > Edit > Trim.
3Select Set to set the starting point and
select Start.
4Select Set to set the ending point and
select End.
5Select Trim > Save.
Sofia_UG_P1C_EN.book Page 40 Wednesday, July 18, 2007 5:45 PM
0REFLIGHTEDBY
0REFLIGHTEDBY
41Entertainment
Themes
You can change the appearance of the
screen through items such as colours
and wallpaper. You can also create
new themes and download them.
For more information, go to
www.sonyericsson.com/support.
To set a theme
1From standby select Menu > Organizer
> File manager.
2Scroll to Themes and select Open.
3Scroll to a theme and select Set.
Entertainment
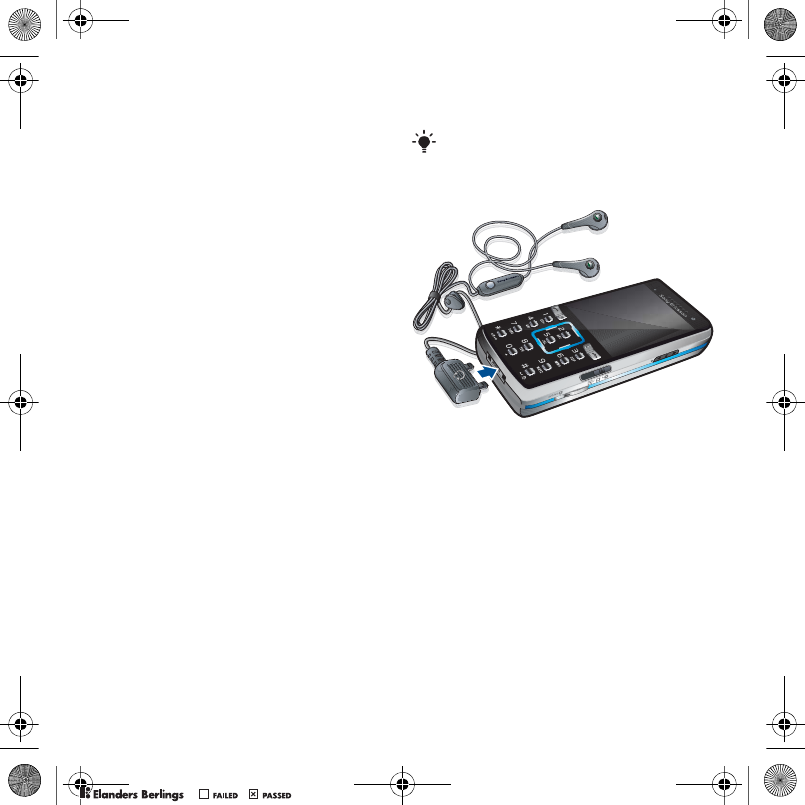
Stereo portable handsfree
To use the handsfree
•Connect the portable handsfree.
Music stops when you receive a call
and resumes when the call has ended.
Music and video players
To play music
1From standby select Media and scroll
to Music.
2Scroll to a title and select Play.
To navigate your media see Navigation
on page 12.
Sofia_UG_P1C_EN.book Page 41 Wednesday, July 18, 2007 5:45 PM
0REFLIGHTEDBY
0REFLIGHTEDBY
42 Entertainment
To play videos
1From standby select Media and scroll
to Video.
2Scroll to a title and select Play.
Music and video controls
To stop playing music
•Press the centre touch option.
To resume playing music
•Press the centre touch option.
To change the volume
•When you listen to music, press the
volume keys up or down.
To move between tracks
•When you listen to music, press
or .
To fast forward and rewind
•When you listen to music, press and
hold down or .
To return to the player menus
•Select Back.
To return to the players
•Select Options > Resume.
To exit the player menus
•Press and hold down .
To send music
1From standby select Media and scroll
to Music.
2Scroll to a title and select Options >
Send.
3Select a transfer method.
To receive music
•Follow the instructions that appear.
Transferring music from
a computer
With Sony Ericsson Media Manager,
included on the CD with your phone,
you can transfer music from CDs, your
computer or that you have purchased
to the phone memory or a memory
card.
Before you use Media Manager
You need one of these operating
systems to use Media Manager
on your computer:
Make sure the receiving device supports
the transfer method you select.
Sony Ericsson Media Manager software
is also available for download at
www.sonyericsson.com/support.
Sofia_UG_P1C_EN.book Page 42 Wednesday, July 18, 2007 5:45 PM
0REFLIGHTEDBY
0REFLIGHTEDBY
43Entertainment
•Windows Vista™ (32 bit and 64 bit
versions of: Ultimate, Enterprise,
Business, Home Premium, Home
Basic)
•Windows XP (Pro or Home)
To install Media Manager
1Turn on your computer and insert the
CD. The CD starts automatically and
the installation window opens.
2Select a language and click OK.
3Click Install Sony Ericsson Media
Manager and follow the instructions.
To use Media Manager
1Connect the phone to a computer with
the USB cable that came with the
phone.
2Computer: Start/Programs/
Sony Ericsson/Media Manager.
3Phone: Select Mass storage > Menu >
Settings > the Connectivity tab > USB >
USB mode > Mass storage. The phone
will shut down in this mode but will
restart again when it is disconnected
from the USB cable.
4For safe disconnection of the USB cable
in mass storage mode, right-click the
removable disk icon in Windows
Explorer and select Eject. See Using
the USB cable on page 52.
For details on transferring music, refer
to Media Manager Help. Click in
the top right corner of the Media
Manager window.
Browsing files
Music and video files are saved and
categorized.
•Artists – list tracks you have transferred
using Media Manager.
•Albums – list music tracks by album
in your phone and on a memory card.
•Tracks – list all music tracks in your
phone and on a memory card.
•Audio books – list audio books you
have transferred from your computer.
•Podcasts – list all podcasts you have
transferred from your computer.
•Playlists – create own lists of tracks.
•Video – list all video clips in your
phone or on a memory card.
Playlists
You can create playlists to organize
files. You can sort the files by artist or
title. Files can be added to more than
one playlist.
Do not remove the USB cable from your
phone or computer during transfer, as
this may corrupt the memory card or the
phone memory.
Sofia_UG_P1C_EN.book Page 43 Wednesday, July 18, 2007 5:45 PM
0REFLIGHTEDBY
0REFLIGHTEDBY

44 Entertainment
Deleting a playlist, or a file from a
playlist, does not delete the file from the
memory, just the reference to the file.
To create a playlist
1From standby select Media and scroll
to Music > Playlists.
2Scroll to New playlist and select Add.
3Enter a name and select OK.
4Scroll to a track and select Mark.
5Select Add to add the track to the
playlist.
To add files to a playlist
1From standby select Media and scroll
to Music > Playlists.
2Scroll to the playlist and select Open.
3Select Options > Add media.
4Scroll to a track and select Mark.
5Select Add to add the track to the
playlist.
To remove tracks from a playlist
1From standby select Media and scroll
to Music > Playlists.
2Scroll to a playlist and select Open.
3Scroll to the track and press .
To delete a playlist
1From standby select Media and scroll
to Music > Playlists.
2Scroll to a playlist and press .
To view information about a track
•Scroll to a track and select Options >
Information.
Online music and video clips
You can view video clips and listen to
music by streaming them to your phone
from the Internet. If settings are not
already in your phone, see Settings on
page 49. For more information, contact
your network operator or go to
www.sonyericsson.com/support.
To select a data account for
streaming
1From standby select Menu > Settings
> the Connectivity tab > Streaming
settings.
2Select the data account to use.
To stream music and video clips
1From standby select Menu > Internet.
2Select > Options > Go to > Bookmarks.
3Select a link to stream from.
TrackID™
TrackID™ is a free music recognition
service. Search for song titles, artists
and album names.
Sofia_UG_P1C_EN.book Page 44 Wednesday, July 18, 2007 5:45 PM
0REFLIGHTEDBY
0REFLIGHTEDBY
45Entertainment
To search for song information
•When you hear a song through a
loudspeaker, from standby select
Menu > Entertainment > TrackID™.
•When the radio is playing select
Options > TrackID™.
Radio
To listen to the radio
1Connect the handsfree to the phone.
2From standby select Menu > Radio.
To change the volume
•When the radio is playing, press the
volume keys up or down.
To automatically search for channels
•When the radio is playing, select
Search.
To manually search for channels
•When the radio is playing, press
or .
To switch between preset channels
•When the radio is playing, press
or .
Saving channels
You can save up to 20 preset channels.
To save channels
•When you have found a radio channel
select Options > Save.
To select saved channels
1From standby select Menu > Radio >
Options > Channels.
2Select a radio channel.
To save channels in positions 1 to 10
•When you have found a radio channel,
press and hold down – .
To select channels saved in positions
1 to 10
•When the radio is playing, press
– .
PlayNow™
You can listen to music before you
purchase and download it to your
phone.
Before you use PlayNow™
You must have the required settings in
your phone. See Settings on page 49.
Do not use your phone as a radio
in places where this is prohibited.
This service is not available in all countries.
In some countries you can purchase
music from some of the world’s top
musical artists.
Sofia_UG_P1C_EN.book Page 45 Wednesday, July 18, 2007 5:45 PM
0REFLIGHTEDBY
0REFLIGHTEDBY
46 Entertainment
To listen to PlayNow™ music
1From standby select Menu >
PlayNow™.
2Select music from a list.
Downloading from PlayNow™
The price appears when you select to
download and save a music file. Your
phone bill or prepay card is debited
when a purchase is accepted.
To download a music file
When you have listened to a music file
preview, you can agree to accept the
conditions.
1Select Yes to download.
2A text message is sent to confirm
payment and the file is made available
to download.
Ringtones and melodies
To set a ringtone
1From standby select Menu > Settings
> the Sounds & alerts tab > Ringtone.
2Find and select a ringtone.
To set the ringtone volume
1From standby select Menu > Settings
> the Sounds & alerts tab > Ring
volume.
2Press or to change the volume.
3Select Save.
To turn the ringtone off
•From standby press and hold down
.
To set the vibrating alert
1From standby select Menu > Settings >
the Sounds & alerts tab > Vibrating alert.
2Select an option.
To send a ringtone
1From standby select Menu > Organizer
> File manager.
2Scroll to Music and select Open.
3Scroll to a ringtone and select Options
> Send.
4Select a transfer method.
To receive a ringtone
•Follow the instructions that appear.
MusicDJ™
You can compose and edit your own
melodies to use as ringtones. A melody
consists of four types of tracks –
Drums, Basses, Chords, and Accents.
All signals except the alarm signal are
affected.
Make sure the receiving device supports
the transfer method you select.
You are not allowed to exchange some
copyright-protected material. A protected
file has a icon.
Sofia_UG_P1C_EN.book Page 46 Wednesday, July 18, 2007 5:45 PM
0REFLIGHTEDBY
0REFLIGHTEDBY
47Entertainment
A track contains a number of music
blocks. The blocks consist of pre-
arranged sounds with different
characteristics. The blocks are grouped
into Intro, Verse, Chorus, and Break.
You compose a melody by adding
music blocks to the tracks.
To compose a melody
1From standby select Menu >
Entertainment > MusicDJ™.
2Select to Insert, Copy or Paste blocks.
3Use , , or to scroll between
the blocks.
4Select Options > Save melody.
To send a melody
1From standby select Menu > Organizer
> File manager.
2Scroll to Music and select Open.
3Find a melody and select Options >
Send.
4Select a transfer method.
To receive a melody
•Follow the instructions that appear.
Sound recorder
You can record a voice memo or a call.
Recorded sounds can also be set as
ringtones.
To record a sound
•From standby select Menu >
Entertainment > Record sound.
To listen to a recording
1From standby select Menu > Organizer
> File manager.
2Scroll to Music and select Open.
3Scroll to a recording and select Play.
Games
Your phone contains several games.
You can also download games. Help
texts are available for most games.
To start a game
1From standby select Menu >
Entertainment > Games.
2Select a game.
To end a game
•Press .
Make sure the receiving device supports
the transfer method you select.
You cannot send a polyphonic melody
or MP3 file in a text message.
In some countries or states it is required
by law that you inform the other person
before recording the call.
Sofia_UG_P1C_EN.book Page 47 Wednesday, July 18, 2007 5:45 PM
0REFLIGHTEDBY
0REFLIGHTEDBY

48 Entertainment
Gaming control
The keys on your phone can be used
for different gaming control functions.
For some games you can tilt the entire
phone left, right, up and down for
gaming control.
Applications
You can download and run Java
applications. You can also view
information or set different
permissions.
Before you use Java™ applications
If settings are not already entered in
your phone, see Settings on page 49.
To select a Java application
1From standby select Menu > Organizer
> Applications.
2Select an application.
To view information about a Java
application
1From standby select Menu > Organizer
> Applications.
2Scroll to an application and select
Options > Information.
To set permissions for a Java
application
1From standby select Menu > Organizer
> Applications.
2Scroll to an application and select
Options > Permissions.
3Set permissions.
Java application screen size
Some Java applications are designed
for a specific screen size. For more
information, contact the application
vendor.
To set the screen size for a Java
application
1From standby select Menu > Organizer
> Applications.
2Scroll to an application and select
Options > Screen size.
3Select an option.
Internet profiles for Java applications
Some Java applications need to
connect to the Internet to receive
information. Most Java applications
use the same Internet settings as your
Web browser.
Sofia_UG_P1C_EN.book Page 48 Wednesday, July 18, 2007 5:45 PM
0REFLIGHTEDBY
0REFLIGHTEDBY
49Connectivity
Connectivity
Settings
Before you synchronize with an Internet
service, use the Internet, PlayNow™,
My friends, Java, picture messaging,
email and picture blog you need to
have settings in your phone.
If settings are not already entered, you
can download settings using the setup
wizard or by going to
www.sonyericsson.com/support.
To download settings using the
Setup wizard
1From standby select Menu > Settings
> the General tab > Setup wizard >
Settings download.
2Follow the instructions that appear.
To download settings using a
computer
1Go to www.sonyericsson.com/support.
2Follow the instructions on the screen.
Phone name
You can enter a name for your phone
to be shown to other devices.
To enter a phone name
1From standby select Menu > Settings
> the Connectivity tab > Phone name.
2Enter the phone name and select OK.
Using the Internet
You can use the Internet to access
online services.
To start browsing
1From standby select Menu > Internet.
2Select Options > Go to.
3Select an option.
To exit the browser
•When you browse the Internet, select
Options > Exit browser.
To make a call while browsing
•When you browse the Internet press .
To save an item from a Web page
1When you browse the Internet, select
an item.
2Select Options > Tools and save
the item.
To find text on a Web page
1When you browse the Internet, select
Options > Tools > Find on page.
2Enter text and press Find.
Contact your network operator or service
provider for more information.
Sofia_UG_P1C_EN.book Page 49 Wednesday, July 18, 2007 5:45 PM
0REFLIGHTEDBY
0REFLIGHTEDBY
50 Connectivity
To send a link
1When you browse the Internet, select
Options > Tools > Send link.
2Select an option.
Using bookmarks
You can create and edit bookmarks as
quick links to your favourite Web pages.
To create a bookmark
1When you browse the Internet, select
Options > Tools > Add bookmark >
Bookmarks.
2Enter a title and an address. Select
Save.
To select a bookmark
1From standby select Menu > Internet.
2Select Options > Go to > Bookmarks.
3Scroll to a bookmark and select Go to.
Internet keypad shortcuts
You can use the keypad to go directly
to an Internet browser function.
To select Internet keypad shortcuts
1From standby select Menu > Internet.
2Select Options > Advanced > Keypad
mode > Shortcuts.
Internet security and certificates
Your phone supports secure browsing.
Certain Internet services, such as
banking, require certificates in your
phone. Your phone may already contain
certificates when you buy it or you can
download new certificates.
To view certificates in the phone
•From standby select Menu > Settings >
the General tab > Security > Certificates.
Web feeds
You can receive frequently updated
content, such as podcasts or news
headlines, as Web feeds. You can add
feeds for a page, if it has the icon.
Key Shortcut
Bookmarks
- Enter text to Enter
address, Search Internet
or search in Bookmarks.
Fullscreen or Landscape
or Normal screen.
Zoom
Pan & zoom (when
Smart-Fit is off).
Sofia_UG_P1C_EN.book Page 50 Wednesday, July 18, 2007 5:45 PM
0REFLIGHTEDBY
0REFLIGHTEDBY
51Connectivity
To add new feeds for a Web page
•When you browse a page on the
Internet that has Web feeds, select
Options > Web feeds.
To create a new Web feed
1From standby select Menu > Messaging
> Web feeds > Options > New feed.
2Enter the address and select Go to.
To set options for Web feeds
1From standby select Menu > Messaging
> Web feeds.
2Scroll to a Web feed and select
Options.
3Select an option.
Bluetooth™ wireless
technology
The Bluetooth function makes wireless
connection to other Bluetooth devices
possible. You can, for example:
•Connect to handsfree devices.
•Connect to several devices at the
same time.
•Connect to computers and access
the Internet.
•Exchange items and play multiplayer
games.
Before you use Bluetooth wireless
technology
You must turn on the Bluetooth function
to communicate with other devices.
You must also pair your phone with
other Bluetooth devices.
To turn the Bluetooth function on
•From standby select Menu > Settings
> the Connectivity tab > Bluetooth >
Turn on.
To pair the phone with a device
1From standby select Menu > Settings
> the Connectivity tab > Bluetooth >
My devices.
2Scroll to New device and select Add
to search for available devices.
3Select a device.
4Enter a passcode, if required.
To allow connection to the phone
1From standby select Menu > Settings
> the Connectivity tab > Bluetooth >
My devices.
2Select a device from the list.
3Select Options > Allow connection.
We recommend a range within 10 metres,
with no solid objects in between, for
Bluetooth communication.
Make sure that the device you want to
pair your phone with has the Bluetooth
function activated and is made visible.
Sofia_UG_P1C_EN.book Page 51 Wednesday, July 18, 2007 5:45 PM
0REFLIGHTEDBY
0REFLIGHTEDBY

52 Connectivity
To pair the phone with a Bluetooth
handsfree for the first time
1From standby select Menu > Settings
> the Connectivity tab > Bluetooth >
Handsfree.
2Select Yes.
3Enter a passcode, if required.
To pair the phone with more than one
Bluetooth handsfree
1From standby select Menu > Settings
> the Connectivity tab > Bluetooth >
Handsfree > My handsfree > New
handsfree.
2Scroll to a device and select Add.
Power saving
You can save battery power with the
Power save function. You can only
connect with a single Bluetooth device.
You must turn this function off if you
want to connect with more than one
Bluetooth device at the same time.
To turn powersave on
•From standby select Menu > Settings
> the Connectivity tab > Bluetooth >
Powersave > On.
Visibility
If you want other Bluetooth devices
to be able to discover your phone, you
can choose to make your phone visible.
To receive an item
1From standby select Menu > Settings
> the Connectivity tab > Bluetooth >
Visibility > Show phone.
2When you receive an item, follow the
instructions that appear.
Transferring sound to and from
a Bluetooth handsfree
You can transfer the sound to and
from a Bluetooth handsfree using
a phone key or the handsfree key.
To transfer sound
1From standby select Menu > Settings
> the Connectivity tab > Bluetooth >
Handsfree > Incoming call.
2Select an option. In phone transfers
sound to the phone. In handsfree
transfers sound to the handsfree.
File transfer
You can synchronize and transfer files
using Bluetooth wireless technology.
See Synchronization using a computer
on page 54.
Using the USB cable
You can connect your phone to
a computer with the USB cable to
transfer files using Mass storage
or Media transfer. You can also
synchronize, transfer files and use
Sofia_UG_P1C_EN.book Page 52 Wednesday, July 18, 2007 5:45 PM
0REFLIGHTEDBY
0REFLIGHTEDBY

53Connectivity
your phone as a modem using Phone
mode. For more information go to the
Getting started section at
www.sonyericsson.com/support.
Before you use the USB cable
You need one of these operating
systems to transfer files using
a USB cable:
•Windows® 2000
•Windows XP (Pro and Home)
•Windows Vista (32 bit and 64 bit
versions of: Ultimate, Enterprise,
Business, Home Premium, Home
Basic)
Media transfer and Mass storage
You can drag and drop files between
your phone or memory card and a
computer in Microsoft Windows
Explorer.
To use media transfer and mass
storage mode
1Connect the USB cable to the phone
and the computer.
2Phone: Select Mass storage > Menu >
Settings > the Connectivity tab > USB >
USB mode > Mass storage. The phone
will shut down in this mode and restart
when disconnected from the USB
cable.
3Phone: Select Media transfer and the
phone will remain activated during file
transfer.
4Computer: Wait until the phone memory
and memory card appear as external
disks in Windows Explorer.
5Drag and drop selected files between
the phone and the computer.
Only use a USB cable supported by your
phone. Do not remove the USB cable
from your phone or computer during file
transfer as this may corrupt the phone
memory or the memory card.
Before transferring files you must install
the Sony Ericsson PC Suite software
on your computer. See To install the
Sony Ericsson PC Suite on page 55.
Sofia_UG_P1C_EN.book Page 53 Wednesday, July 18, 2007 5:45 PM
0REFLIGHTEDBY
0REFLIGHTEDBY