Sony A5025011 Licensed transmitter User Manual 08 user guide part 2
Sony Mobile Communications Inc Licensed transmitter 08 user guide part 2
Sony >
Contents
- 1. 08 user guide part 1
- 2. 08 user guide part 2
- 3. 08 user guide part 3
08 user guide part 2
21
Before use
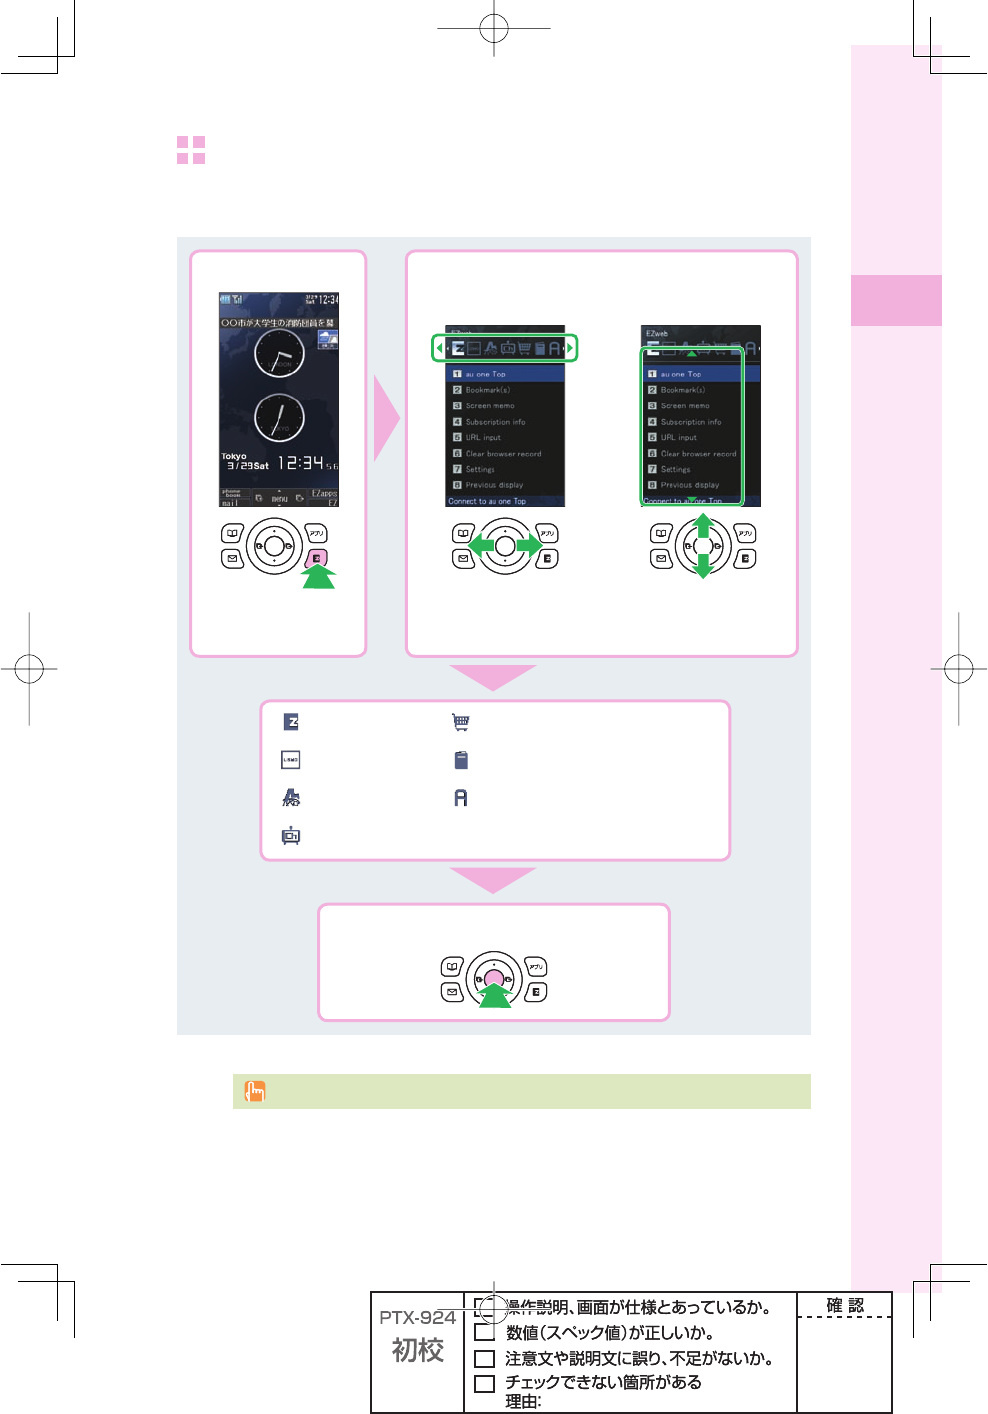
EZ Service menu
You can access the information sites on EZweb and use EZ Navi, EZ Channel-Plus/
EZ Channel, etc.
)NTHEIDLESCREEN 3ELECTFROMTHE%:3ERVICEMENU
0RESS
e
%:TODISPLAY
THE%:3ERVICEMENU
0RESS
s
TOSELECTA
CATEGORY
0RESS
j
TOSELECTAN
ITEM
%:WEB
,)3-/
%:NAVI
%:#HANNELPLUS
3HOPPING!UCTIONS
%:"OOK
%:APPS
0RESS
p
SELECTTOSELECTTHEITEM
The default menu screen design depends on the color of the main unit.
22
Before use
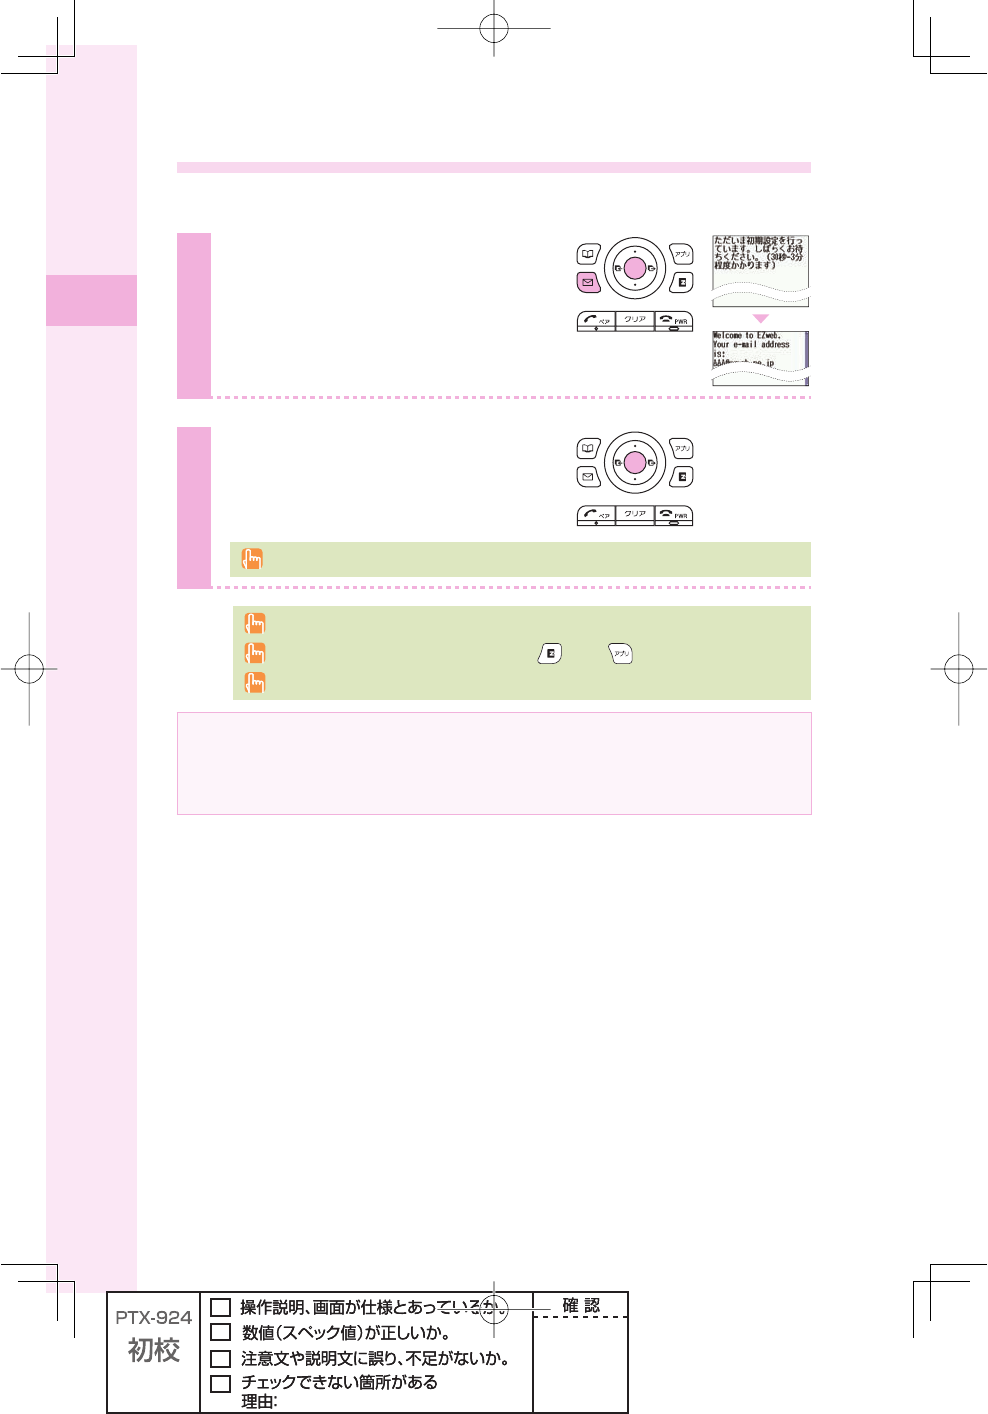
Initial settings for e-mail and EZweb
If you subscribed to the EZweb service, make the following initial settings.
1
Press q (mail) in the idle screen,
and press p (ok).
2
Press p (OK).
Without EZ News Flash settings, EZ News Flash setting screen appears.
Initial settings cannot be made in Overseas (GSM) mode.
You can also initialize the settings by pressing (EZ) or (EZapps) in the idle screen.
Your e-mail address is automatically determined when you initialize the settings.
If you have not subscribed to EZweb service yet
Contact an au shop or Customer Service Center. You need to subscribe to the EZweb
service to use e-mail, EZweb or other EZ services.
23
Before use
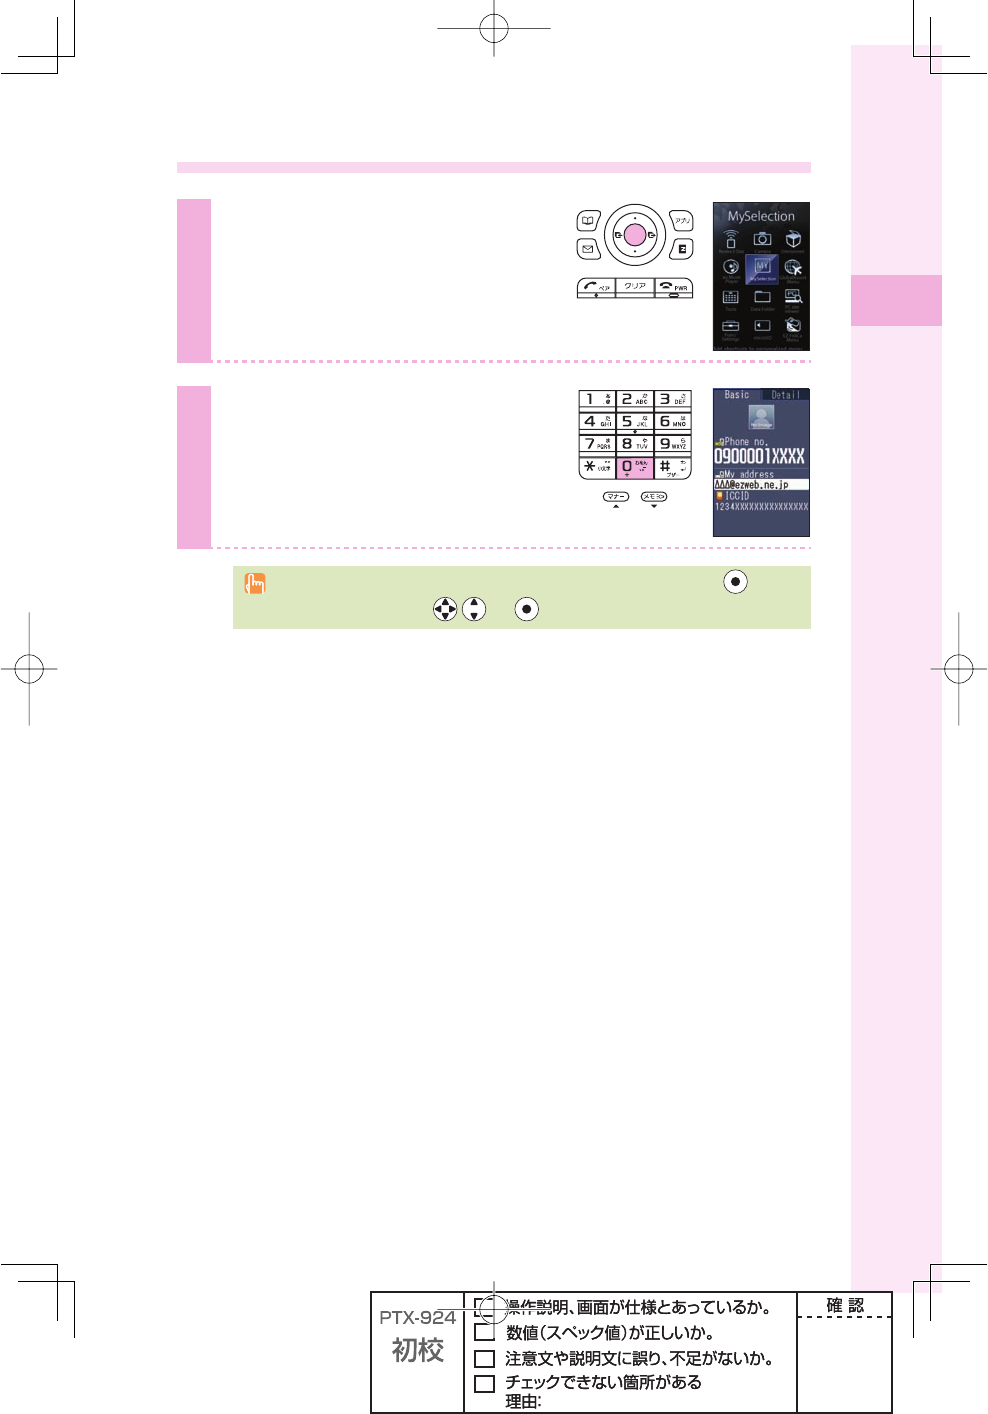
Confi rming your cellphone number/e-mail address
1
Press p (menu) in the idle
screen.
2
Press 0.
You can confi rm your cellphone number and
e-mail address.
You can also confi rm your cellphone number and e-mail address by pressing (menu)
in the idle screen, and use / and to select "Func/Settings"
→
"Profi le."
24
Before use
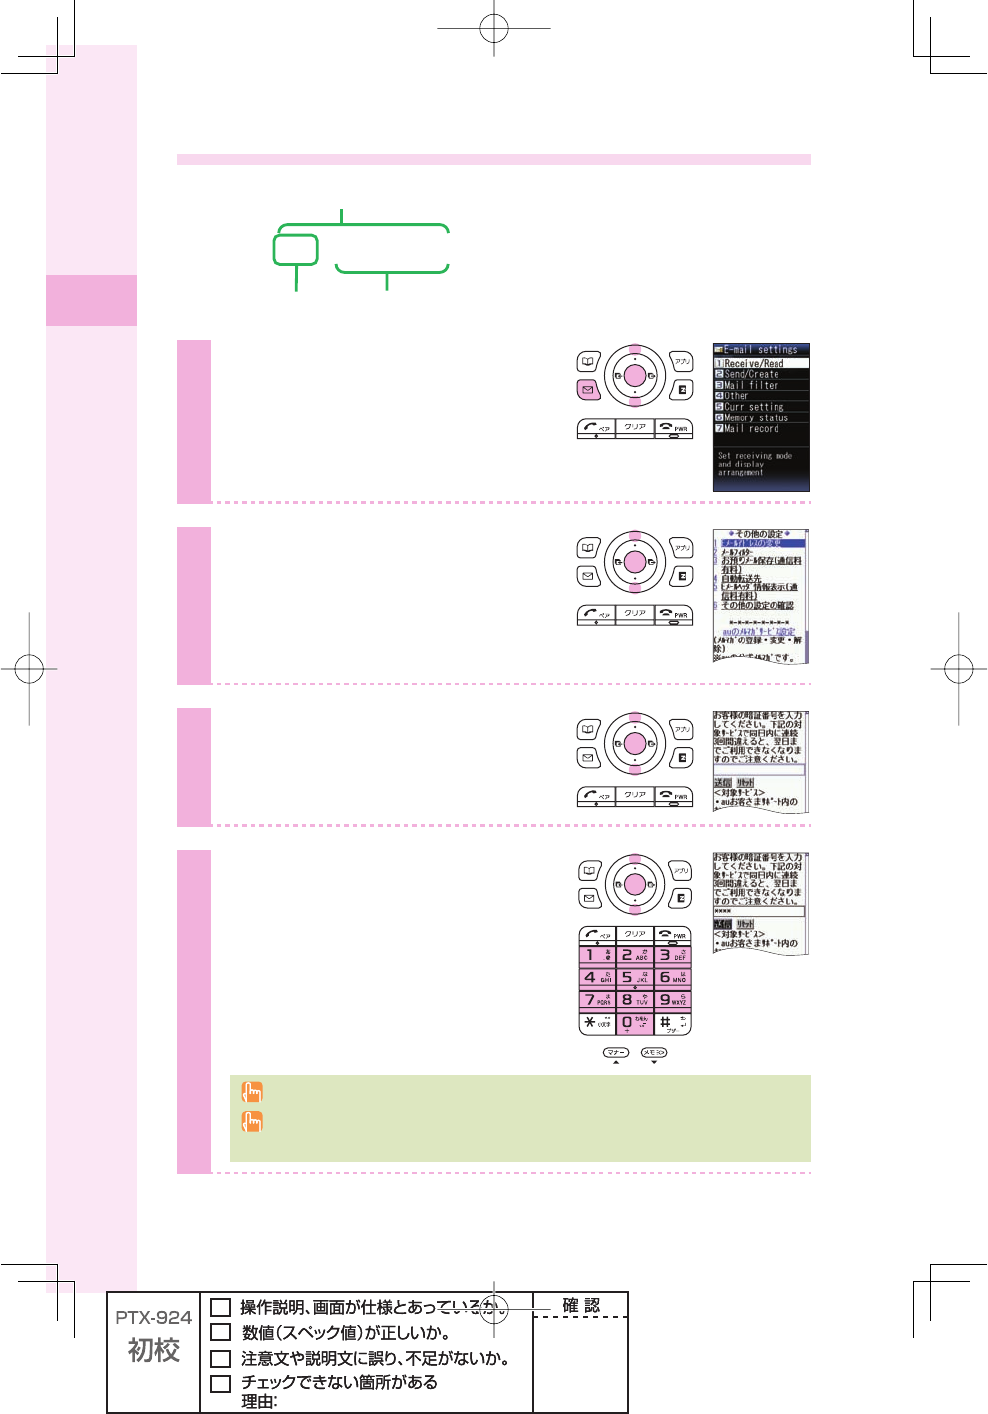
Changing your e-mail address
EMAILADDRESS
$OMAIN
%XAMPLE
△△△
EZWEBNEJP
#HANGEABLEPART
1
Press q (mail) in the idle screen.
Press j to select "Settings,"
and press p (select).
2
Press j to select "Other," and
press p (select).
Press j to select "Yes," and
press p (select).
3
Press j to select "Eメール
アドレスの変更," and press
p (Select).
4
Press j to select the input fi eld,
and press p (Edit).
Enter your security code, and
press p (ok).
Security code is the 4-digit number that you wrote in the application form when subscribing.
Note that no setting operation is allowed until the following day if you enter the wrong
security code three times a day.
25
Before use
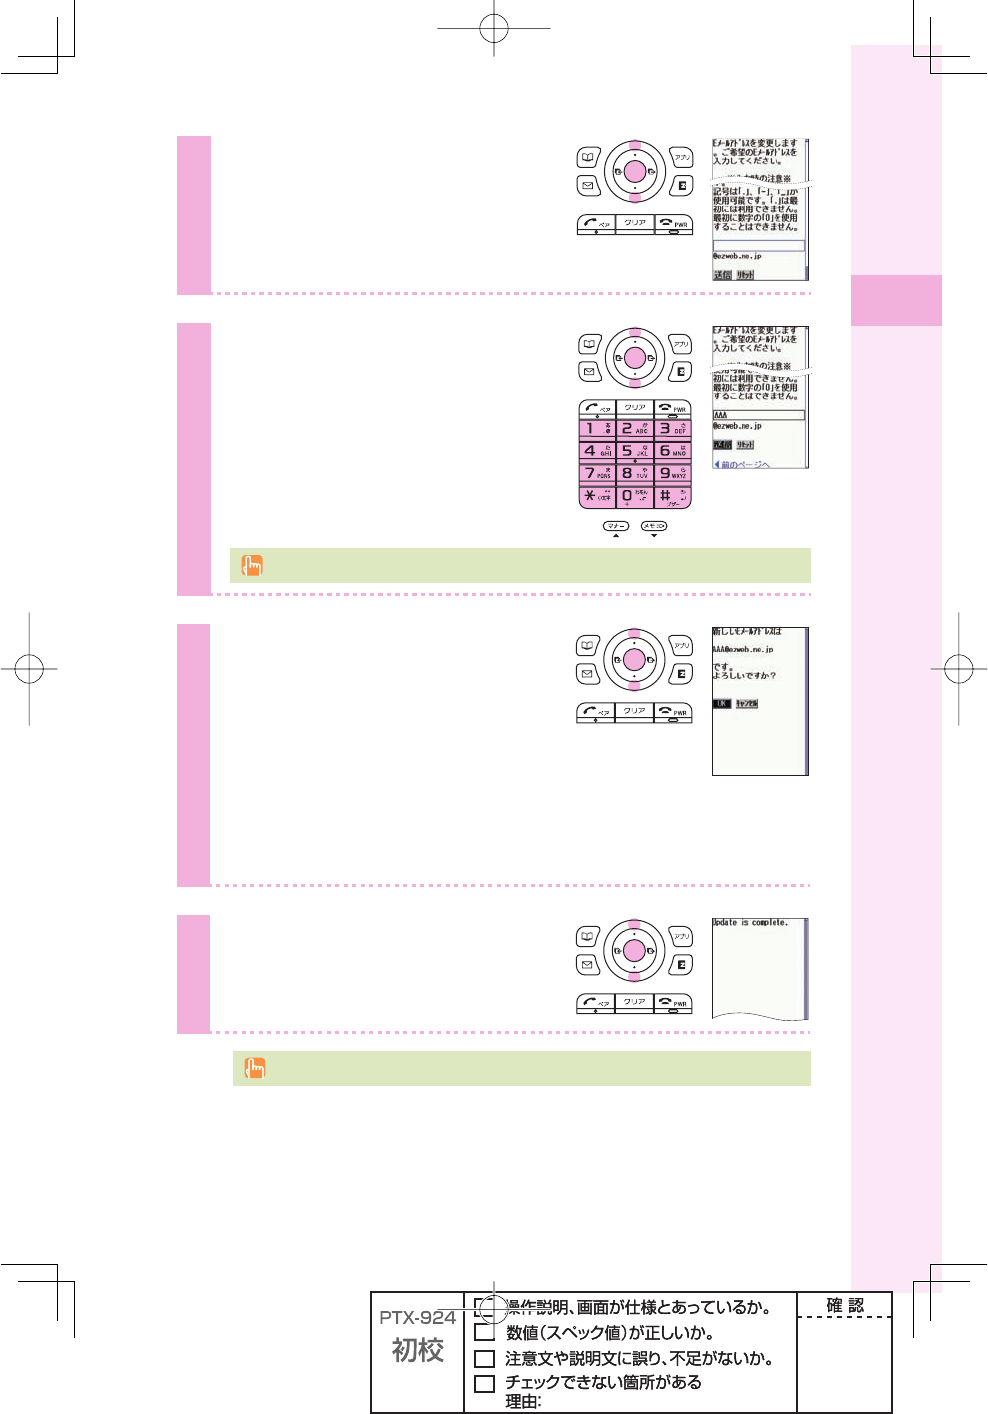
5
Press j to select "送信," and
press p (Select).
Press j to select "承諾する,"
and press p (Select).
6
Press j to select the input fi eld,
and press p (Edit).
Enter the text before @, and press
p (ok).
For details on how to input e-mail addresses, see page 38.
7
Press j to select "送信," and
press p (Select).
When the e-mail address cannot be changed
The e-mail address that you entered is already used. Enter a different e-mail
address.
8
Press j to select "OK," and
press p (Select).
For details on how to confi rm your e-mail address, see page 23.
26
Before use
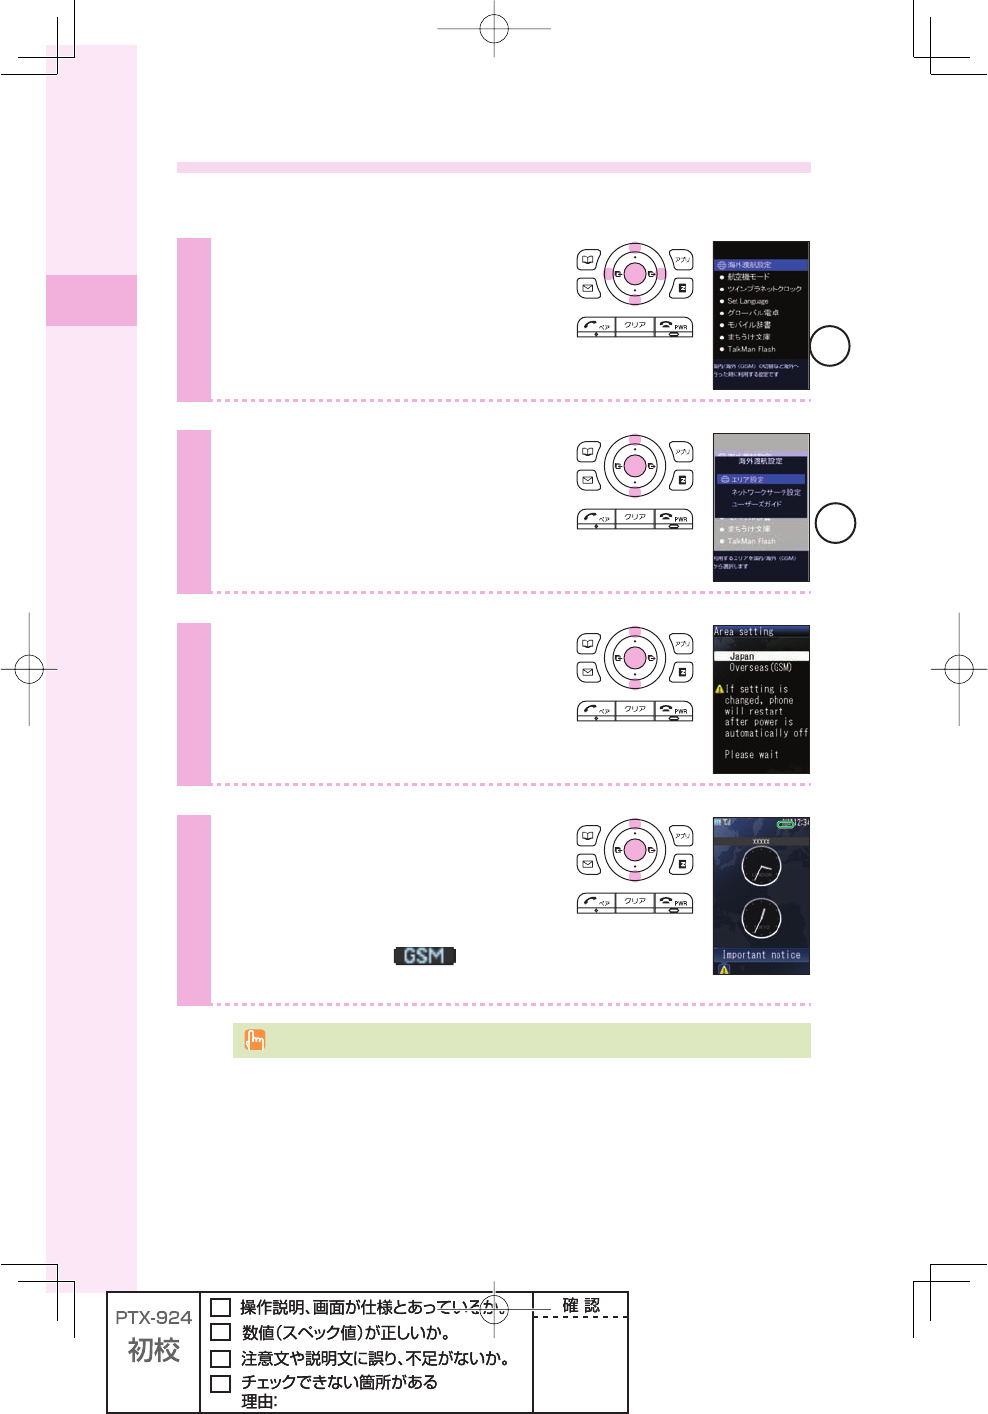
Using W62S overseas
You can use your W62S overseas just by changing the Area Setting to "Overseas (GSM)".
1
Press p (menu) in the idle
screen.
Press o to select "GlobalAssort
Menu," and press p (select).
2
Press j to select "Overseas
Settings," and press p (select).
3
Press j to select "Area Setting,"
and press p (select).
4
Press j to select "Overseas
(GSM)," and press p (select).
W62S will restart after the power is
automatically off, then and
"Important notice" appears in the idle screen.
Change Area Setting after fi nishing currently running functions.
仮
仮
27
Before use
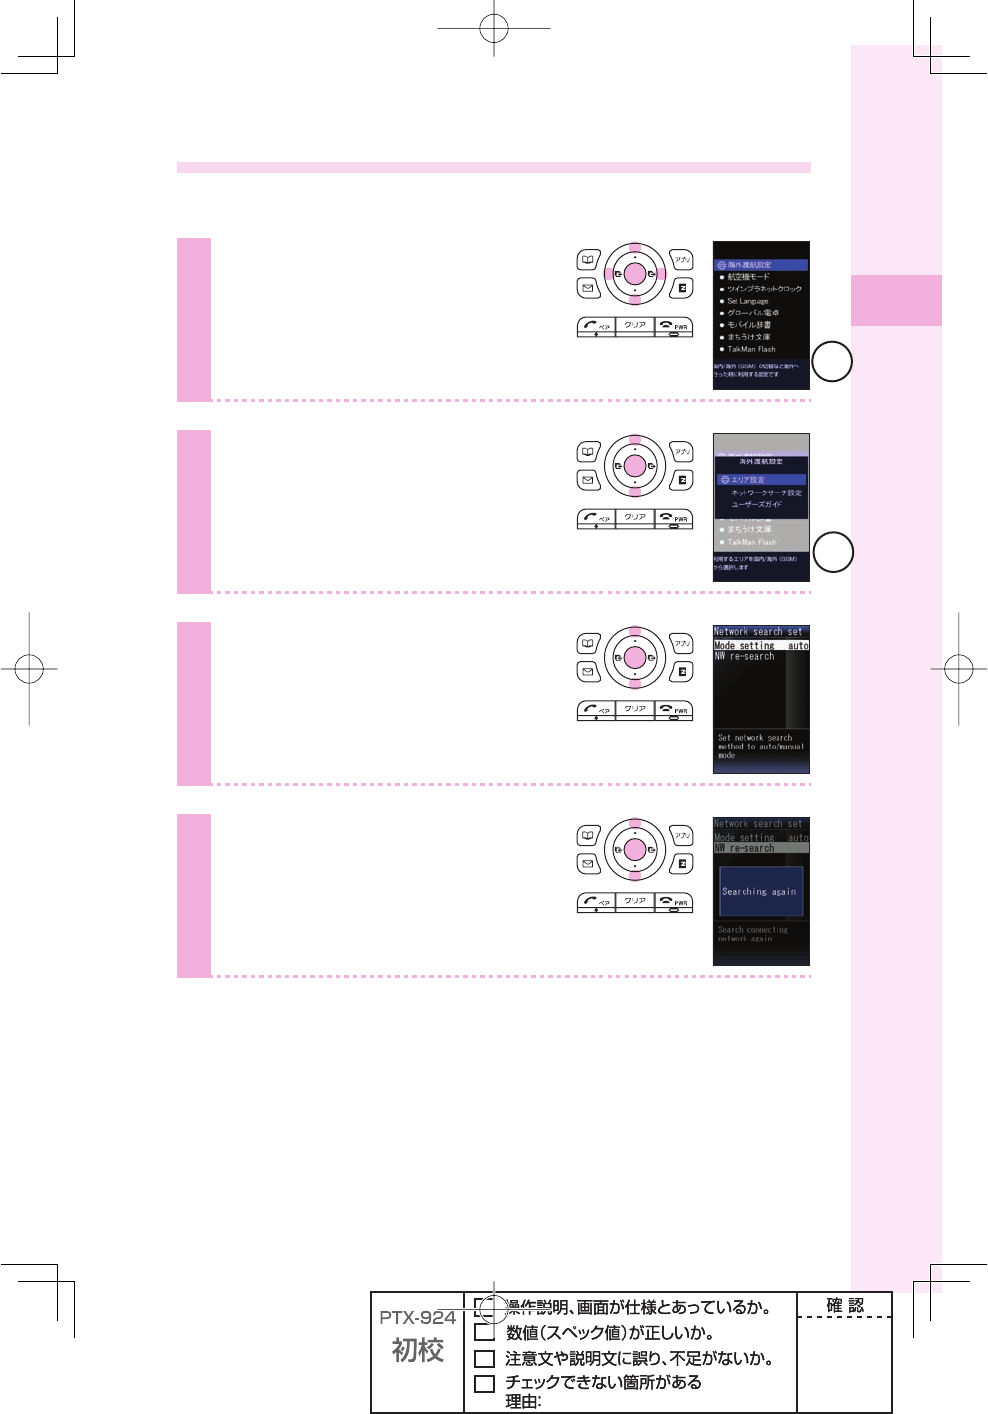
Changing network from abroad
Select the network to connect when using W62S overseas.
1
Press p (menu) in the idle
screen.
Press o to select "GlobalAssort
Menu," and press p (select).
2
Press j to select "Overseas
Settings," and press p (select).
3
Press j to select "Network
Search Set," and press
p (select).
4
Press j to select
"NW re-search," and press
p (select).
仮
仮

28
Phone call
Making a call
1
Press 0 to 9 to enter the
other party's phone number, and
press T.
To call a regular phone, enter the phone number starting with the area code.
To notify the other party of your cellphone number
Enter "186" before the cellphone number of the other party.
Not to notify the other party of your cellphone number
Enter "184" before the cellphone number of the other party.
Making an international call
au International Call Service
Available without any additional application.
Example: To call 212-123-△△△ in the USA
005345
→
1
→
212
→
123
→
△△△△
→
0RESS
T
)NTERNATIONALACCESSCODE !REACODE 0HONENUMBER
#OUNTRYCODE53!
Calling charges for this service are added to monthly mobile phone calling charges and
billed together.
Please check the Country code at the au Customer Center.
For charges, please refer to au MOBILE PHONE SERVICE GUIDE or au Customer Center.
Phone call
29
Phone call
001 KOKUSAI MOBILE TALK
Application required. For inquiries, please contact the KDDI Customer Service Center.
フリーコール 0077-7160 (toll-free; open 9:00 to 20:00 on everyday including weekends and national holiday)
Example: To call 212-123-△△△ in the USA
001
→
010
→
1
→
212
→
123
→
△△△△
→
0RESS
T
+$$))NTERNATIONAL
ACCESSCODE
!REACODE 0HONENUMBER
#OUNTRYCODE53!
Charges for 001 KOKUSAI MOBILE TALK are charged separately from monthly au
telephone charges.
Please check the Country code at the au Customer Center.
For charges, please refer to au MOBILE PHONE SERVICE GUIDE or au Customer
Center.
Making an international call from overseas
See steps 1 to 4 in "Using W62S overseas" (page 26) to set the Area Setting to
"Overseas (GSM)."
Press 0 to 9 to enter the other party's phone number, and press
p (call).
Press j to select how to call, and press p (select).
"Call" : Make a call
"Dial to Japan (+81)": Automatically delete the fi rst "0" of the entered phone number and
attach "+" (international code) and "81" (Japan country code); then
make a call
"Int'l call (+)" : Automatically attach "+" (international code) before the phone
number and call
30
Phone call
Receiving a call
1
Press T or p (call) to answer
the call.
When you have fi nished the call, press .
The display when you receive a call
Phone number When the other party has set to notify Caller ID
※If the other party's name and phone number are already saved in
the phone book, that person's name is also displayed
" ID Unsent" When the other party has set not to notify Caller ID
"Payphone" When you have received a call from a payphone
"Not support" When you have received a call from a party that is not able to notify
Caller ID
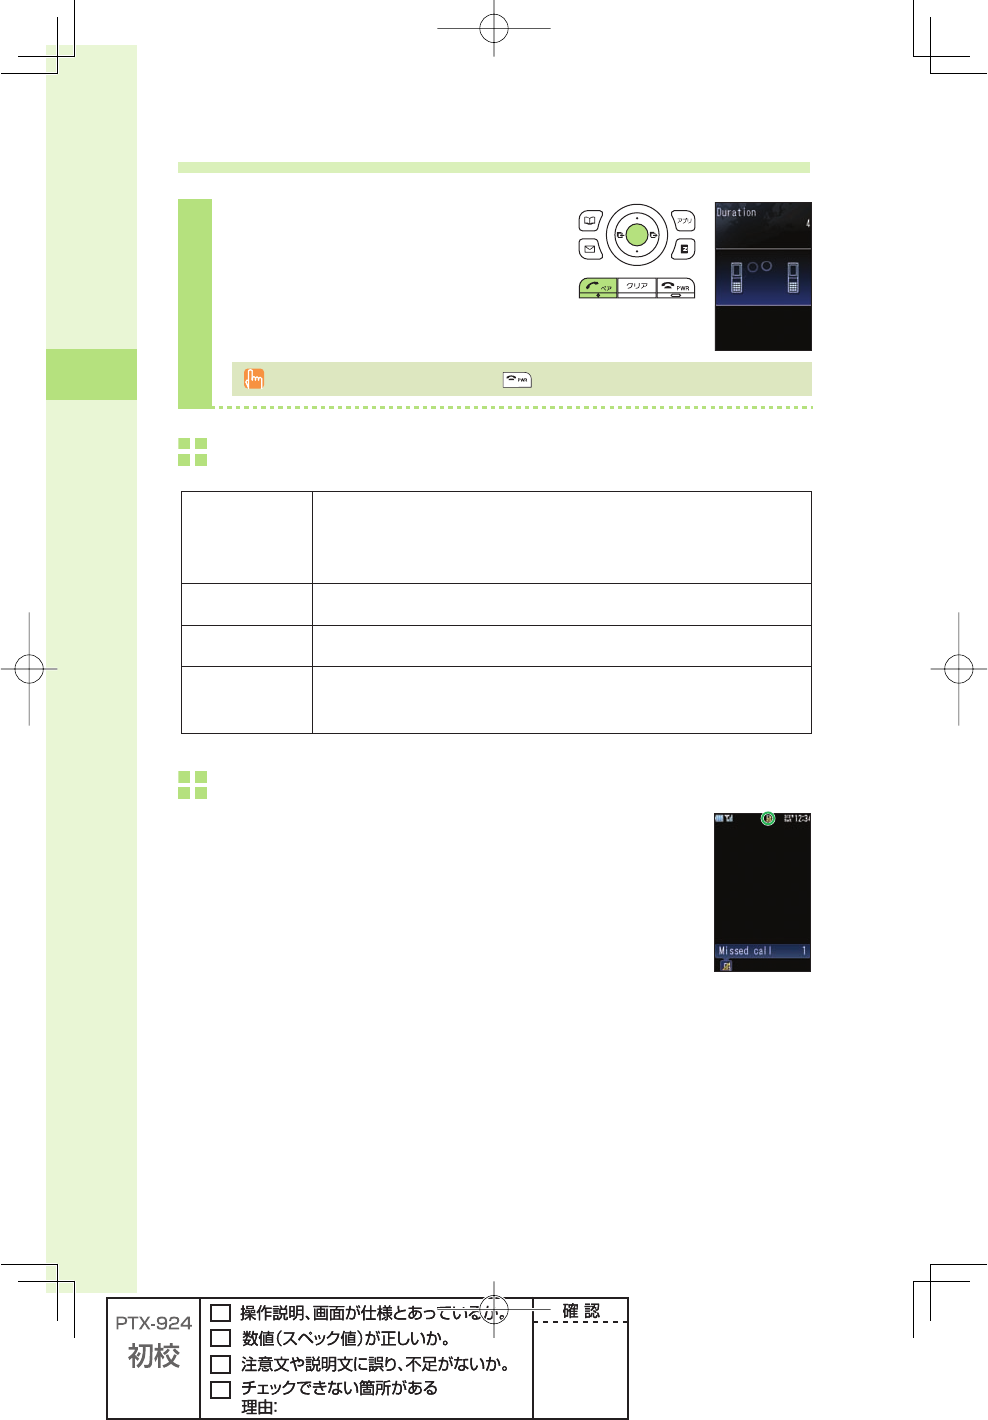
The display if you are unable to answer a call
If you are unable to answer a call, you are notifi ed that you had a call on
the display.
If you press p (select), you can confi rm the phone number of the other
party that called you and redial that party.
31
Phone call
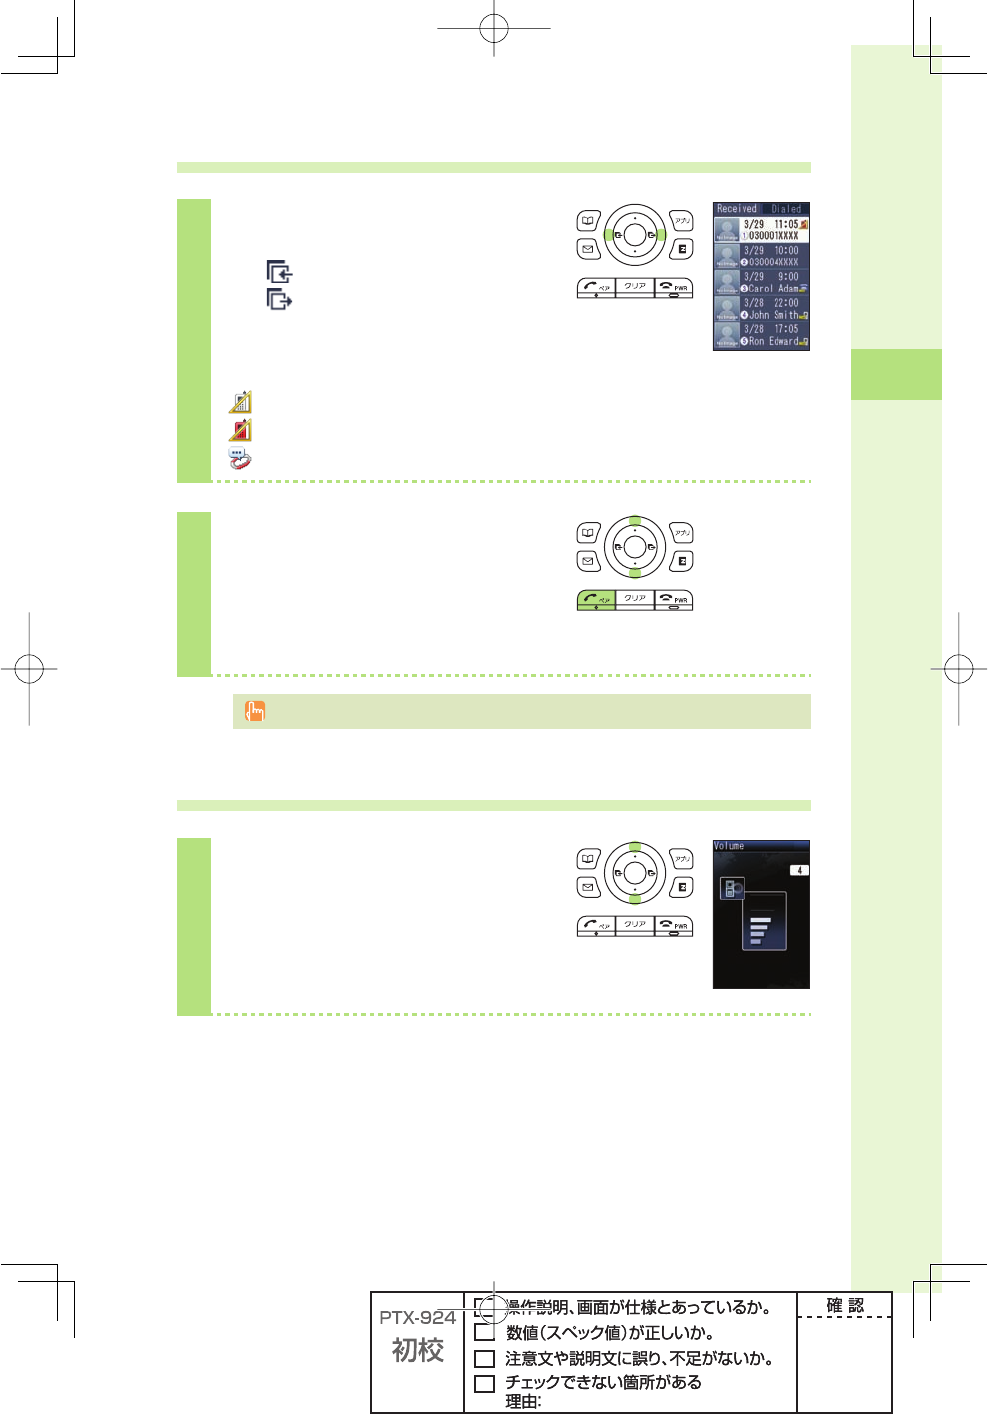
Redialing the number (Dialed/Received)
1
Press s in the idle screen.
l( ):Display Received calls.
r( ):Display Dialed calls.
Icons of Received calls
:The call that you did not answer (missed call)
:The call within three seconds of incoming time (one-ring call)
:The message stored at the Voice Mail center
2
Press j to select the phone
number you want to call, and press
T.
The call is connected to the phone number you selected.
In each memory, the phone numbers of last 30 calls can be saved.
Changing the volume during a call
1
Press j during a call.
u: The volume increases
(Level 1 to 5).
d: The volume decreases
(Level 5 to 1).
32
Phone call
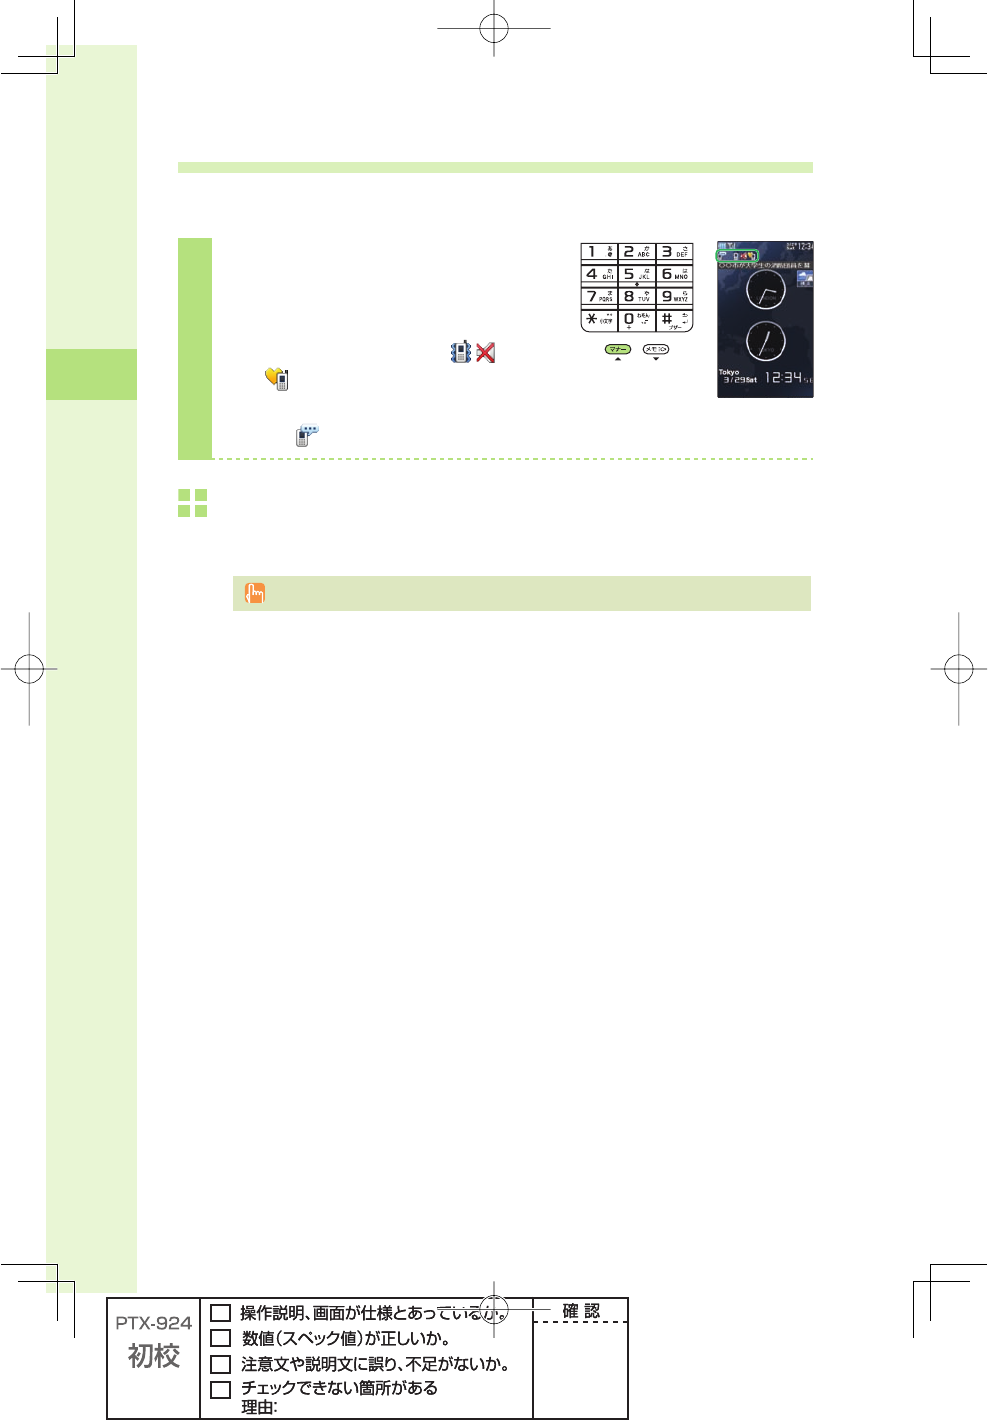
Setting the manner mode
The W62S vibrates to notify you of incoming calls.
1
Hold down m for at least one
second in the idle screen.
The manner mode is set, and
and appear in the display.
At the same time, record message is
set, and appears in the display.
To cancel the manner mode
Hold down m for at least one second in the idle screen.
There are four types of manner settings: "Manner," "Silent," "Drive" and "Original."
33
Phone call
Changing the volume and tone of the ringtone
Example: When setting a "preset" ringtone
1
Press p (menu) in the idle
screen.
2
Press o to select
"Func/Settings," and
press p (select).
3
Press j to select
"Sound/Vibrator," and
press p (select).
4
Press j to select
"Incoming set," and
press p (select).
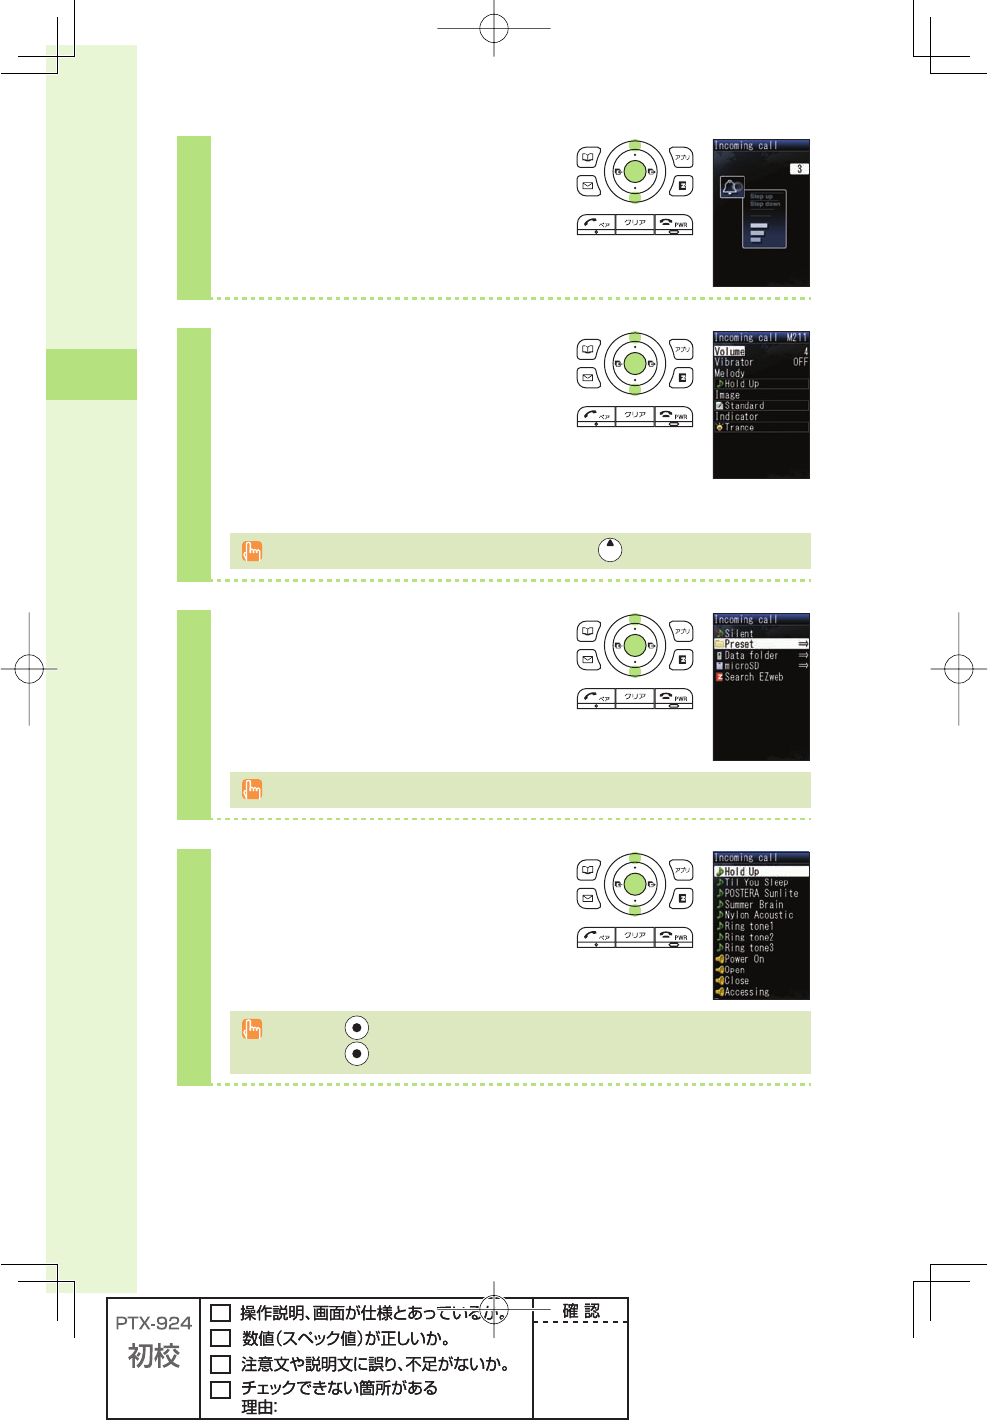
5
Press j to select
"Incom. call," and
press p (select).
Continued on the next page
34
Phone call
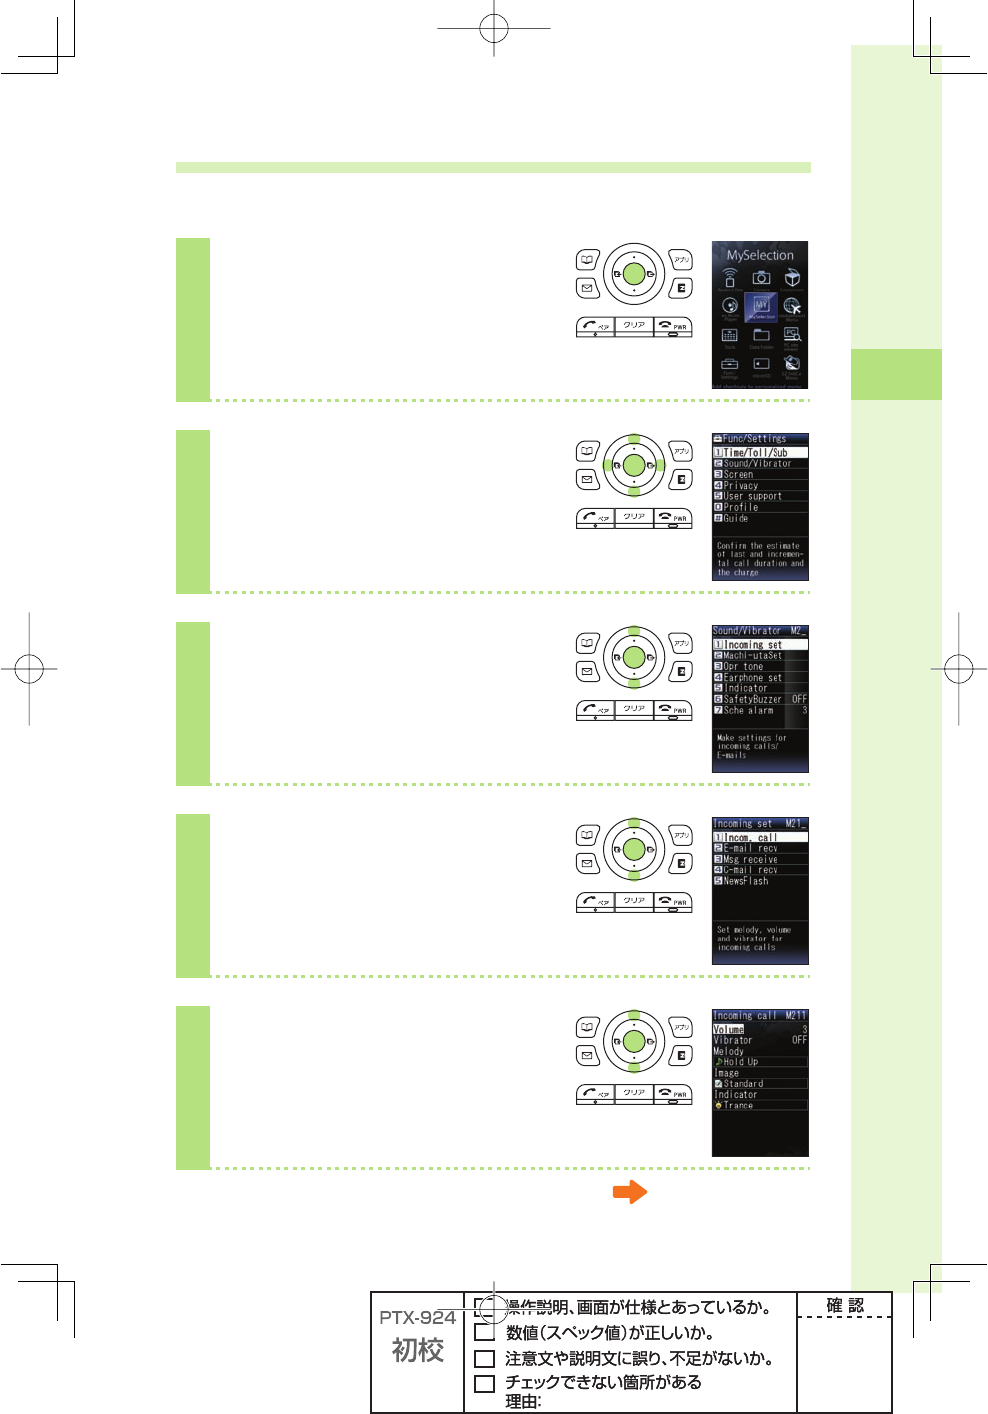
6
Press j to select "Volume," and
press p (select).
7
Press j to adjust the volume,
and press p (ok).
"OFF" :The ringtone does not sound.
"1" to "5" :The ringtone sounds at the level you set.
"Step down" :The volume of the ringtone decreases.
"Step up" :The volume of the ringtone increases.
"Step down" and "Step up" can be selected by pressing over "5."
8
Press j to select "Melody," and
press p (select).
"Hold Up" is set by default.
9
Press j to select "Preset," and
press p (select).
If you press (play), the ringtone you selected plays back.
If you press ( ■
) while the ringtone is being played, W62S stops playing.
35
Phone call
10
Press j to select a ringtone, and
press A (save).
Setting the record message
1
Hold down M for at least one
second in the idle screen.
Record message is set, and appears in
the display.
You can also use the record message to record a message from the other party by
pressing (memo) while receiving a call.
You can record up to ten messages within 60 seconds each.
To cancel record message
Hold down M for at least one second in the idle screen.
If the record message still contains any message, remains in the display even after
canceling record message. disappears when record message data is deleted.
When you turn the power off or when you are in a place where the signal is weak, use
Answering Service (Voice Mail).
36
Phone call
Playing back recorded messages
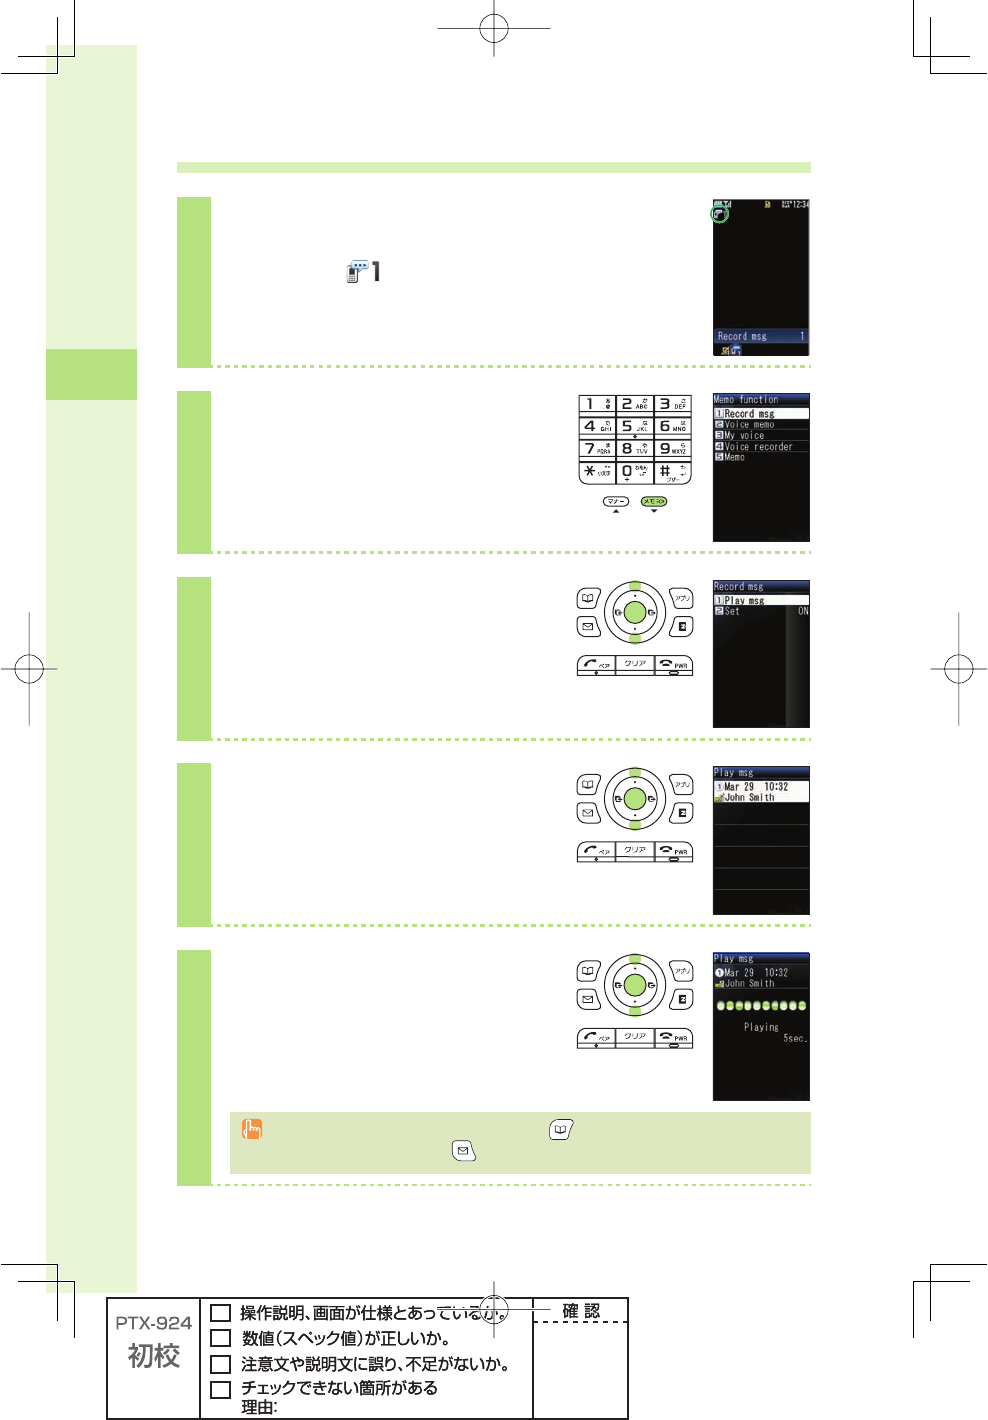
When a message is recorded
A message and (number of recorded messages) appear in
the idle screen.
1
Press M in the idle screen.
2
Press j to select "Record msg,"
and press p (select).
3
Press j to select "Play msg,"
and press p (select).
4
Press j to select the recorded
message to play back, and press
p (play).
You can delete recorded messages by pressing
(delete)
while the recorded message
is playing back, or by pressing (delete) after playing the recorded message.
37
Text input
Changing the input mode
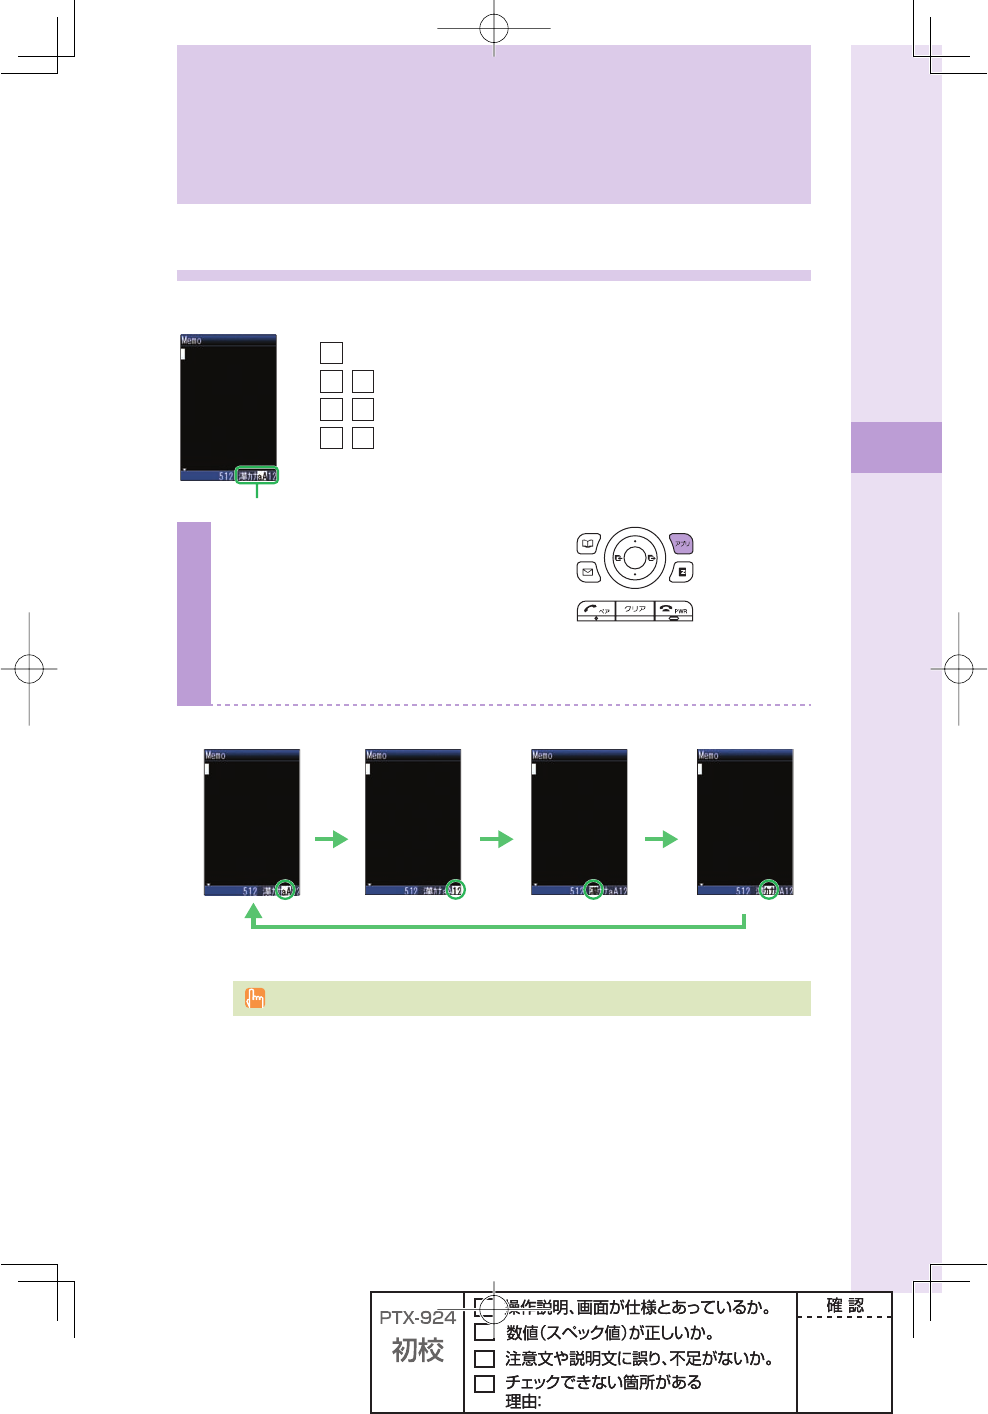
Input text by changing the input modes below.
)NPUTMODE
漢:Kanji/Hiragana mode
カナ/カ:Kana mode (single/double byte)
aA
/A:English mode (single/double byte)
12
/1:Number mode (single/double byte)
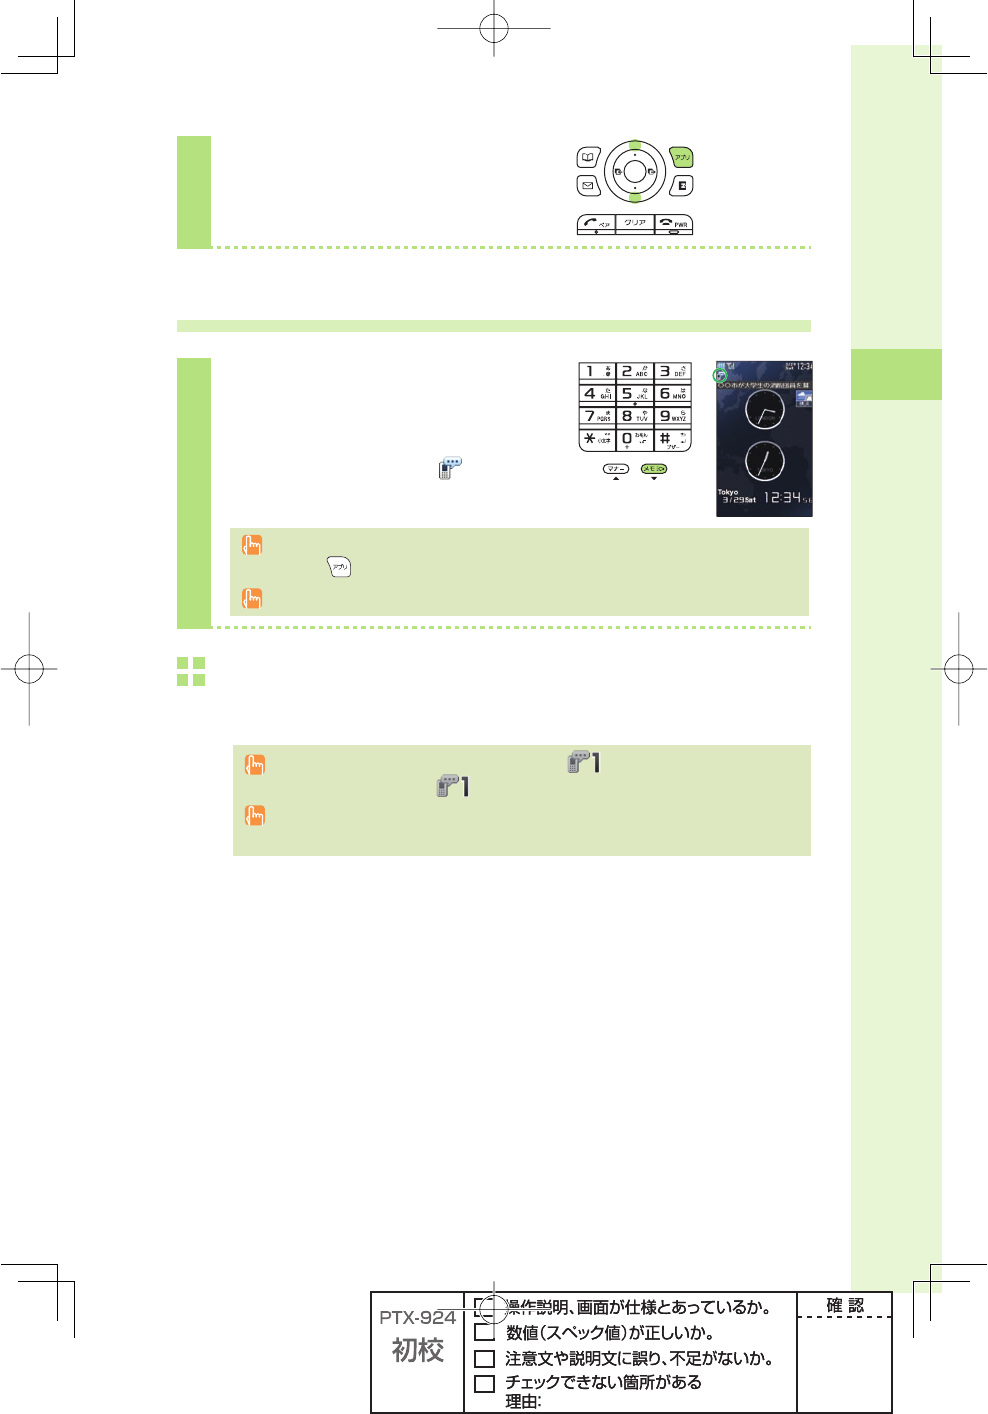
1
Press A (mode) in the text input
screen.
Each time you press A (mode), the input mode changes in following order:
English → Number → Kanji/Hiragana → Kana → English...
English mode
A
Number mode Kanji/Hiragana mode Kana mode
AA
A
The input mode that you can select is different depending on the current input screen.
Text input

38
Text input
Inputting text
To input alphanumerics
In the text input screen, press the keys as described in the table below.
→
2222222
→→→→→
ABC!"#
%XAMPLE
◆
Character key assignment table (single byte alphanumerics)
Key
Number of times to press the key
123456789
1.@- _ / : ~1
2abcABC2
3de fDEF3
4gh iGHI 4
5jklJKL5
6mn oMNO6
7pq r sPQRS7
8tuvTUV8
9wxyzWXYZ9
0Space 0 !"#$%&’()%+, -. /:;<=>?@[¥]^ _ `{|}~
*※1 .,-!?
#Break lines
Back space function when entering characters※2
※1
* is also used to switch between uppercase and lowercase of current displayed
characters.
※2 When you enter the characters by pressing keys, # is used to reverse the order of
characters to be appeared (Back Space function).
Example: 2→2→#
a
→ b → a
You can input your e-mail address using up to 30 single bytes alphanumeric in lowercase
including "-" (hyphen), "." (dot), and "_" (underscore). Note, however, "." (dot) and "0"
cannot be used at the beginning of your e-mail address. Characters and symbols with blue
background in the above table cannot be used before @ of "△△△@ezweb.ne.jp."
39
Text input
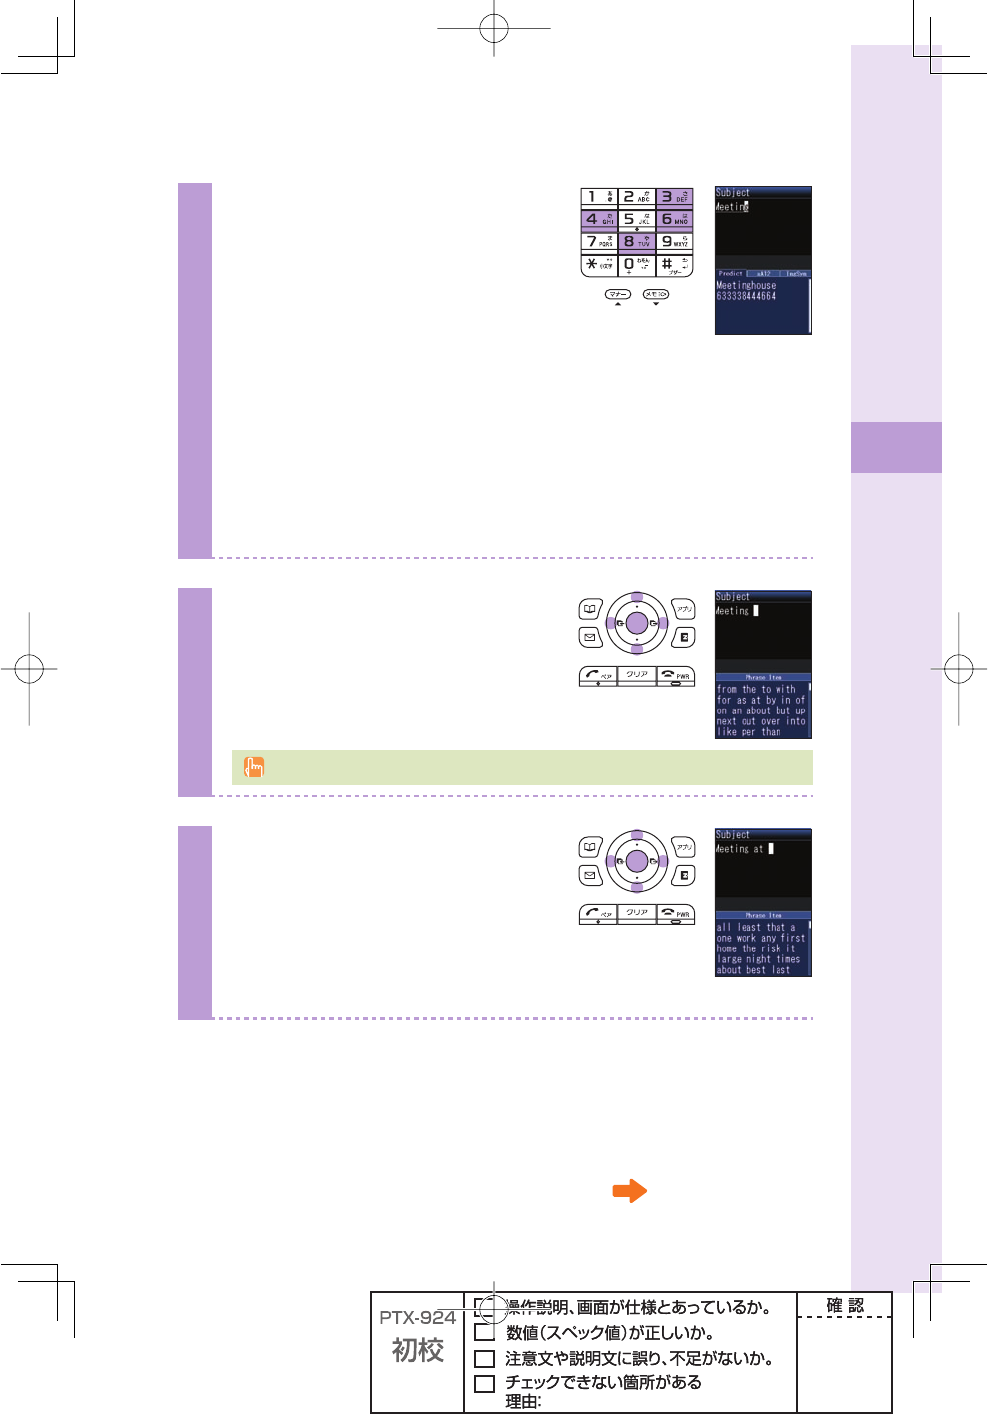
Example: To input "Meeting at 1 p.m." in the mail subject
1
Input "Meeting" in the text input
screen.
M: Press 6 once.
e : Press 3 twice.
e : Press 3 twice.
t : Press
8 once.
i : Press
4 three times.
n : Press 6 twice.
g : Press 4 once.
Prediction candidate appears. You do not have to enter
"Meeting" entirely if the word you want to enter appears in
the Prediction candidate.
2
Press d, Press o to select
"Meeting," and press p (select).
"Meeting (space)" is entered, and Phrase
Item appears.
A space is automatically entered after a word.
3
Press d, Press o to select
"at" from the Phrase Item, and
press p (select).
You can also input "at" by pressing 2
once and 8 once.
Continued on the next page
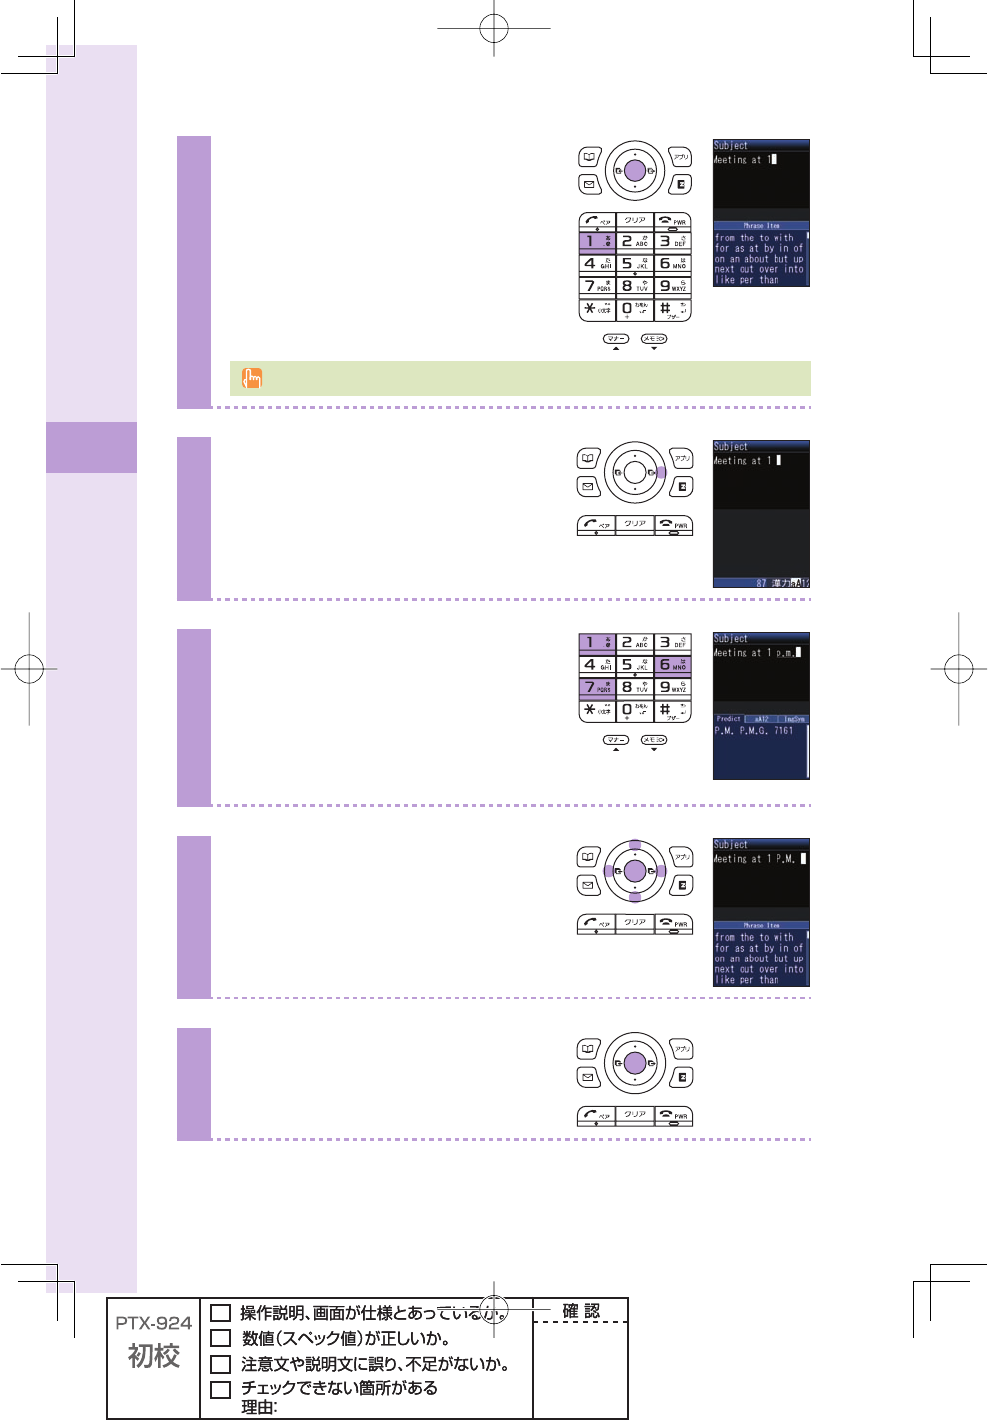
40
Text input
4
Enter "1," and press p (fi x).
1: Press 1 eight times.
Or, press 1 once and # once.
When you selected from the Phrase Item, jump to step 6.
5
Press r, and enter a space.
6
Input "p.m."
p : Press 7 once.
. : Press
1 once.
m: Press 6 once.
. : Press
1 once.
7
Press d, Press o to select
"p.m.," and press p (select).
8
Press p (ok).
41
Text input
To consecutively input characters assigned to the same key
Input the fi rst character, press r and press the next character key.
After inputting the fi rst character, no operation for about four seconds automatically moves
entering position.
Example: To input "ab"
Press 2 once. Press r . Press 2 twice.
To input uppercase characters
%XAMPLE
2**
→→
A!A
To delete characters
0RESS
c
ONCE
(OLDDOWN
c
FORATLEASTONESECOND
%XAMPLE
ABCDEABCD
ABCDE
!LLCHARACTERSAREDELETED
Continued on the next page
42
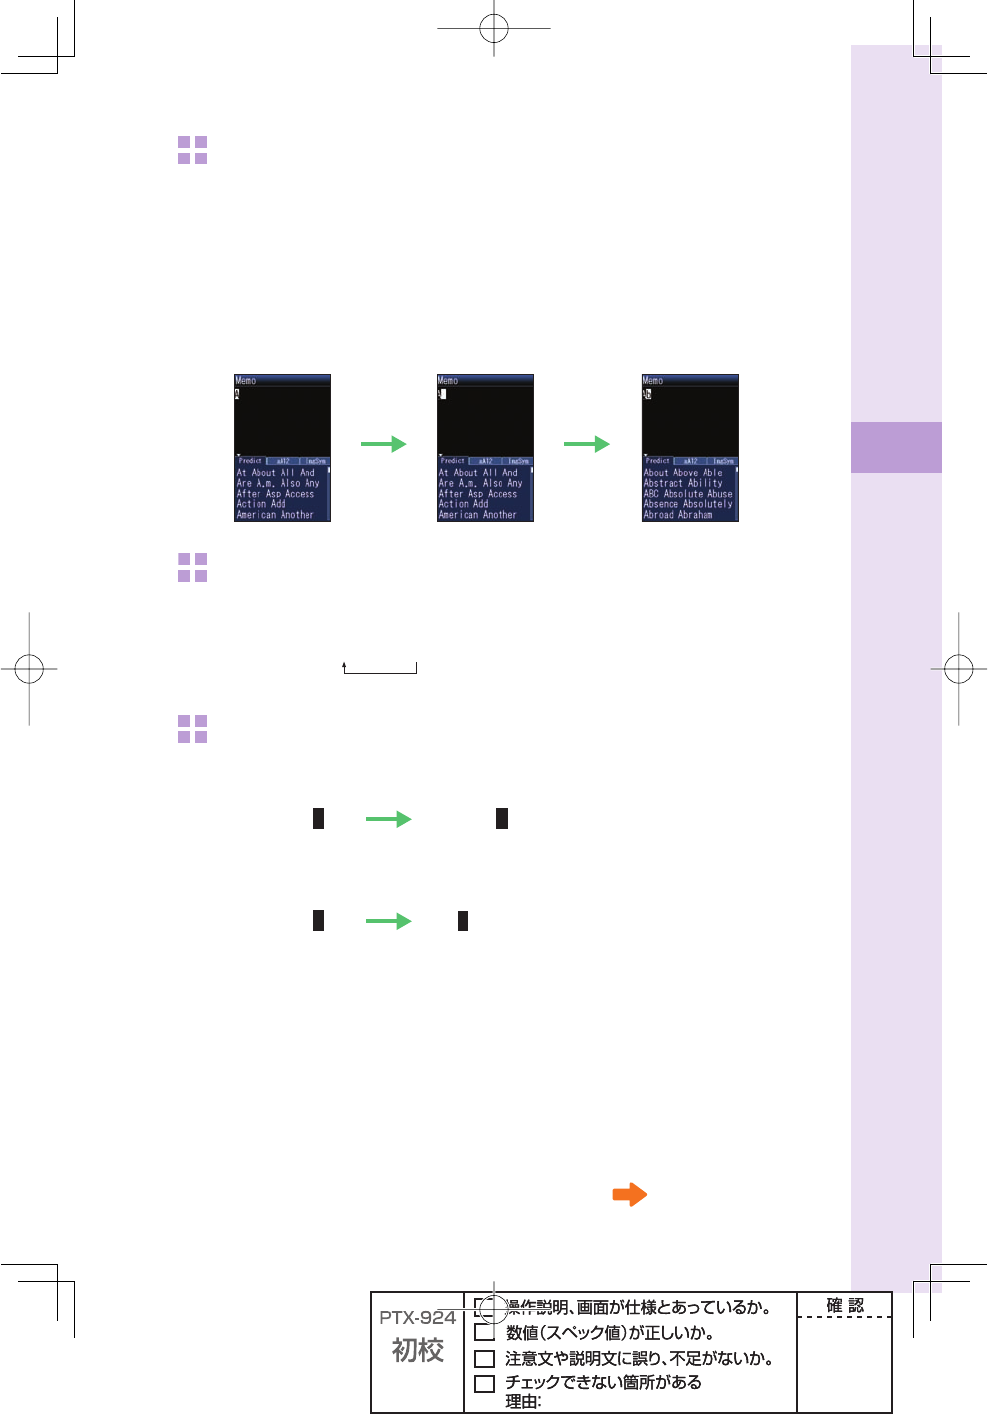
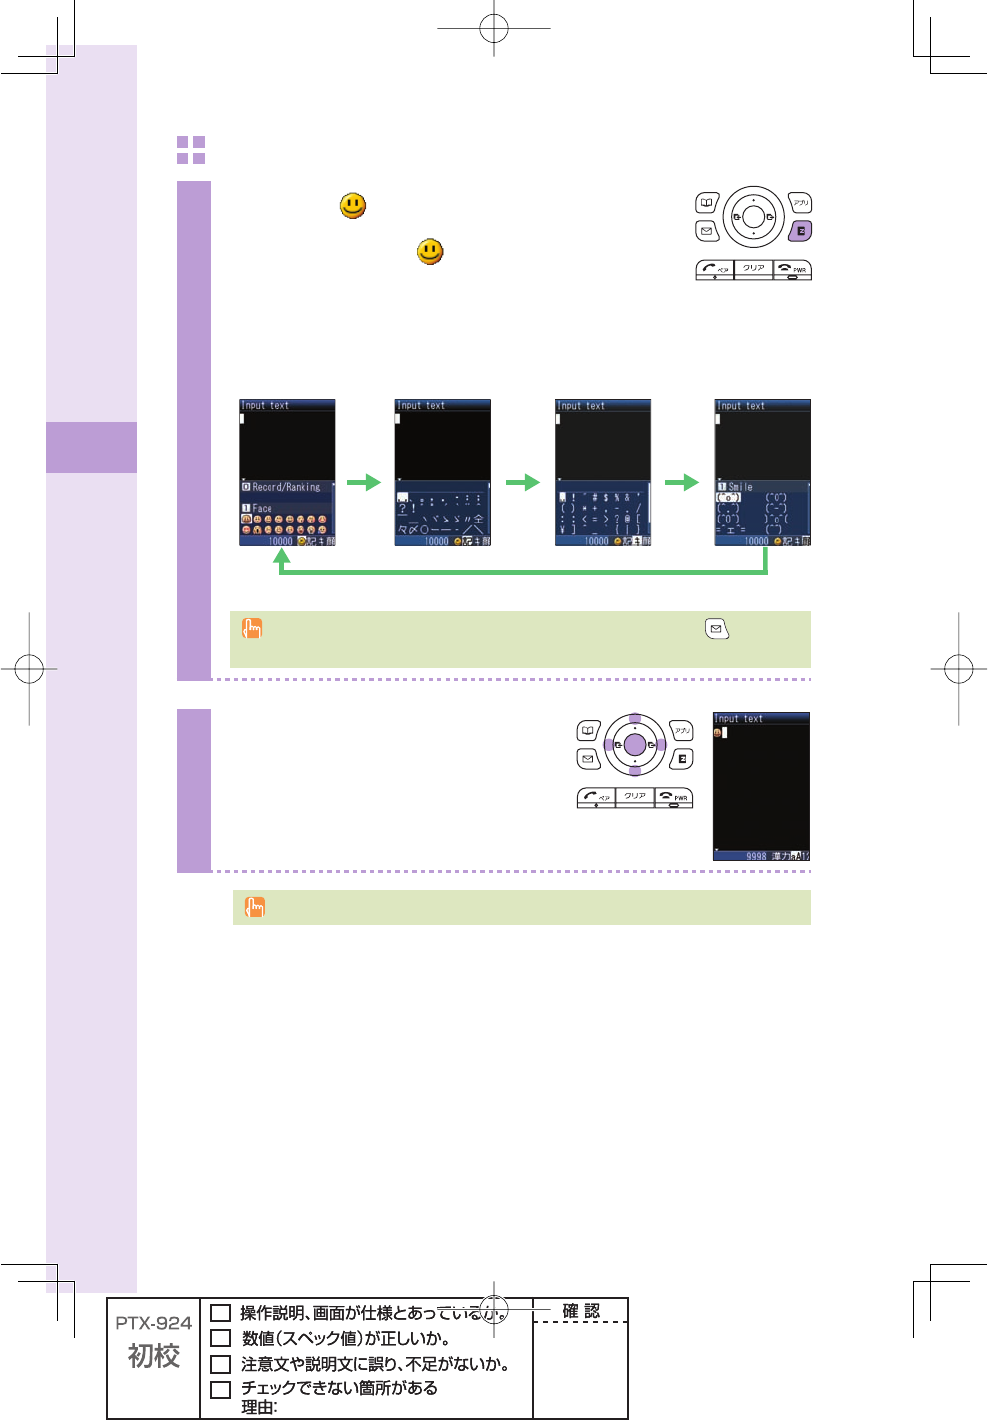
Text input
To input pictorial characters, symbols and emoticons
1
Press e ( /smb) in the text input screen.
Each time you press
e
( /smb), the character group
changes in following order: Pictorial characters→Symbols
(double byte)→Symbols (single byte)→Emoticons→Pictorial
characters...
0ICTORIALCHARACTERS
3YMBOLS
DOUBLEBYTE
3YMBOLS
SINGLEBYTE %MOTICONS
eee
e
You can switch categories of pictorial characters or emoticons by pressing (category)
on each selection screen.
2
Press o to select the character
group you want to use, and press
p (select).
The character group that you can select is different depending on the current input screen.
43
Text input
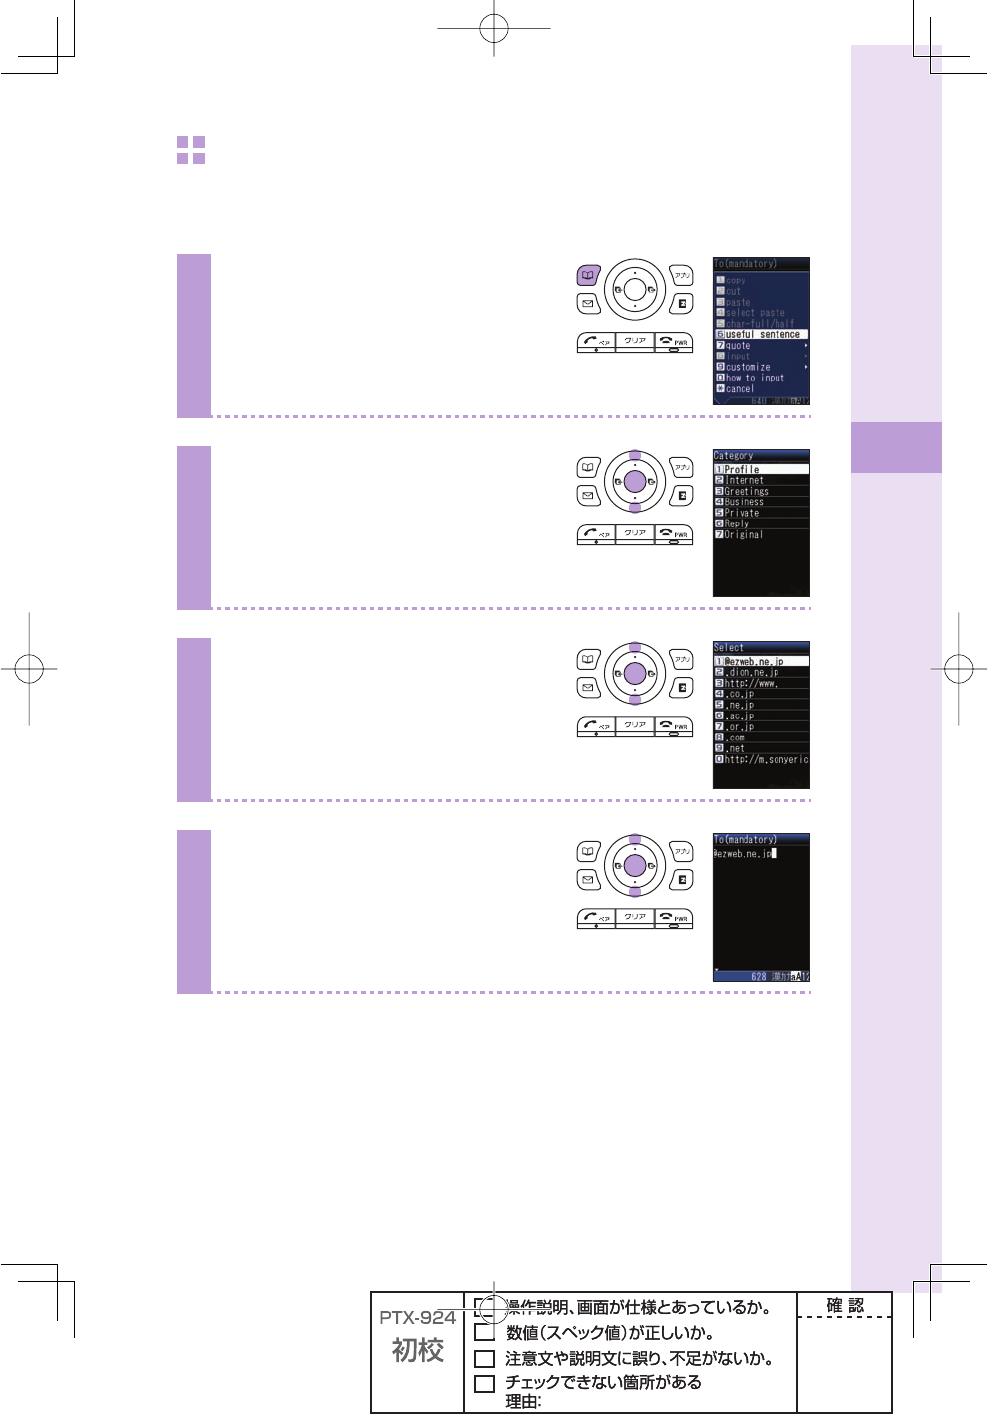
To input useful sentences
You can enter your frequently used sentences using our useful sentence list.
Example: To input "@ezweb.ne.jp" in the mail address
1
Press B (option) in the text
input screen.
2
Press j to select "useful
sentence," and press p (select).
3
Press j to select "Internet," and
press p (select).
4
Press j to select "@ezweb.
ne.jp," and press p (select).
44
Phone book
You can save up to 1,000 phone numbers or e-mail addresses.
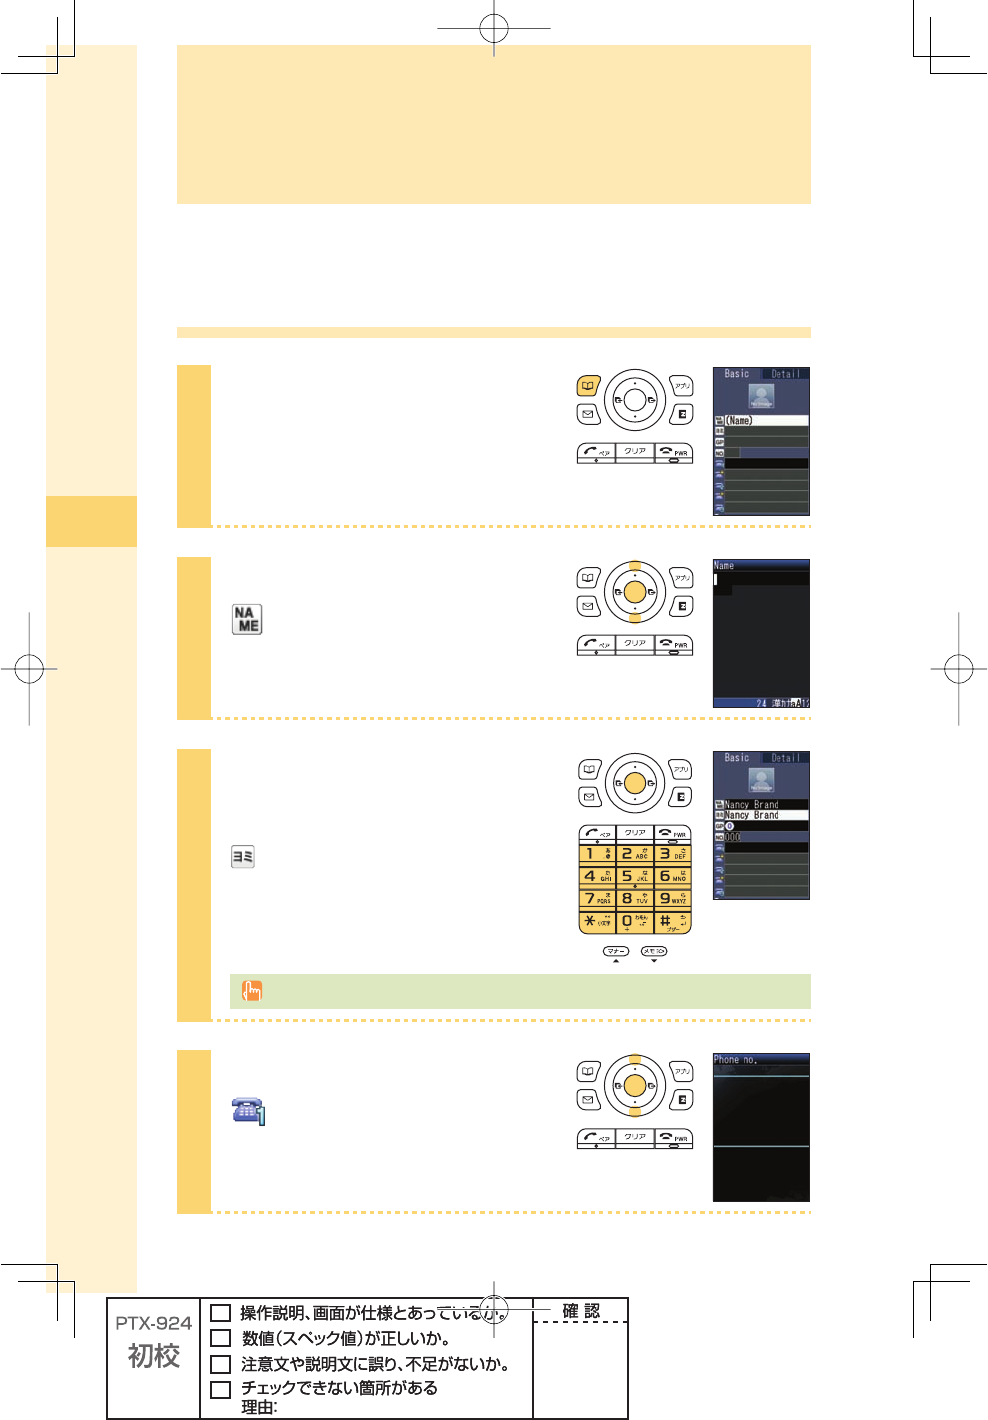
Saving to the phone book
1
Hold down B (phone book) for
at least one second in the idle
screen.
2
Press j to select
(Name), and press
p (select).
3
Enter the name, and press
p (ok).
(JP reading) is automatically entered.
For details on how to enter text, see page 37.
4
Press j to select
(Phone no.1), and press
p (select).
Phone book
45
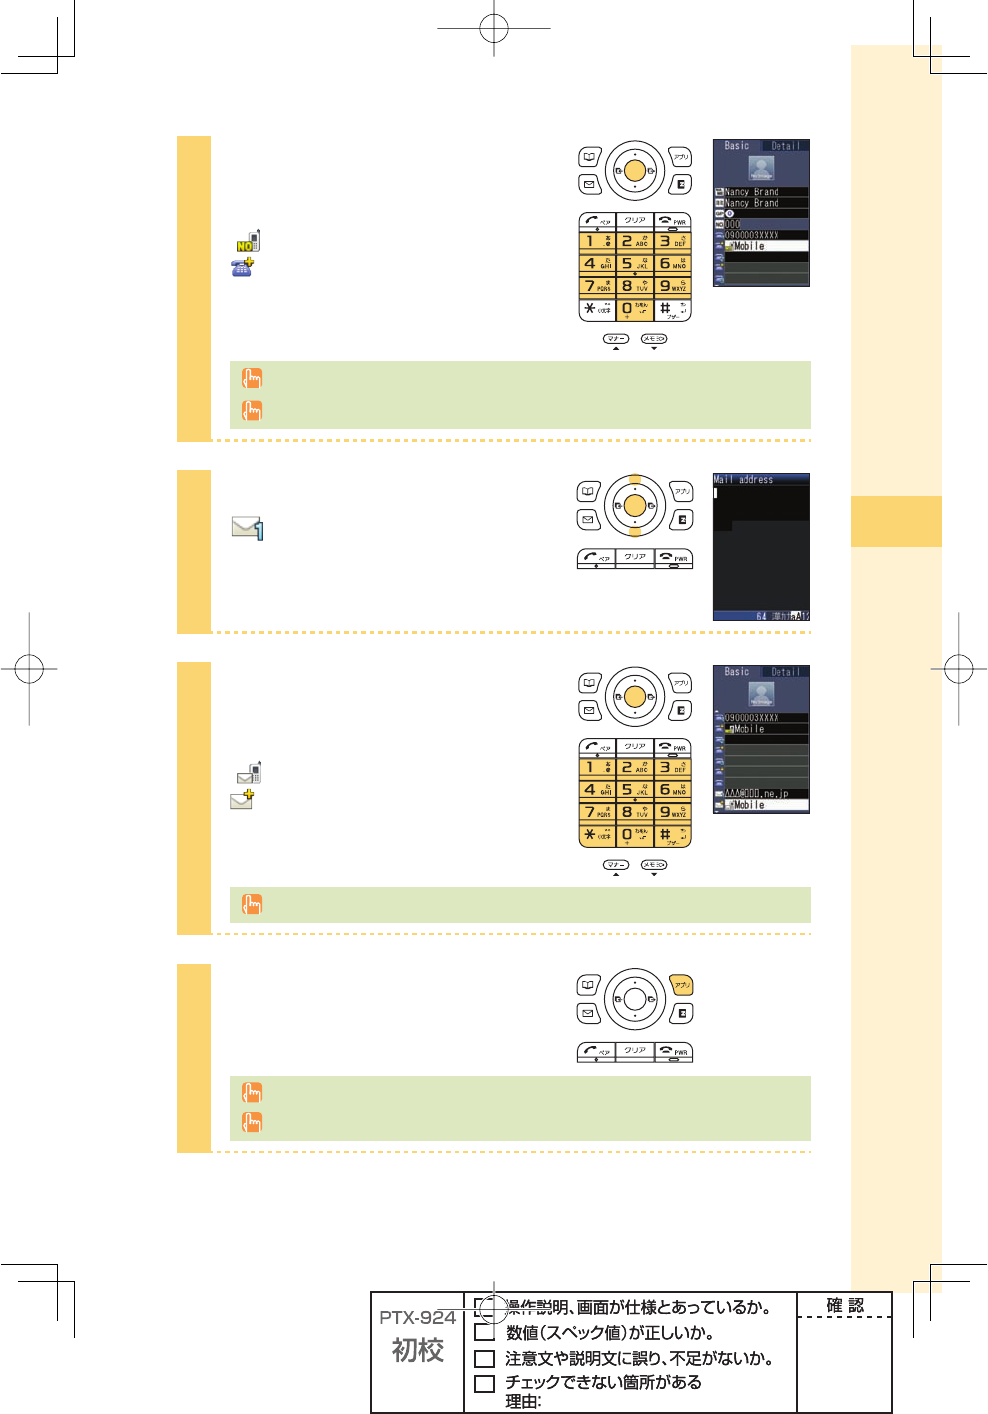
Phone book
5
Enter the phone number, and
press p (ok).
" Mobile" is automatically entered to
(phone type).
When saving a regular phone number, start with the area code.
To end saving to the phone book, jump to step 8.
6
Press j to select
(Mail address1), and press
p (select).
7
Enter the e-mail address, and
press p (ok).
"
Mobile" is automatically entered to
(e-mail address type).
For details on how to enter e-mail addresses, see page 38.
8
Press A (cmplt).
The entry is automatically saved to the smallest available memory number from 000 to 999.
You can also save other items such as groups, ringtones, postal addresses and birthdays.
46
Phone book
Editing the phone book
Example: To edit phone numbers
1
Press B (phone book) in the idle
screen.
To switch from the " あ" to "ETC"
display lines
Press s.
2
Press o to select the entry
to edit, and press p (select).
3
Press A (edit).
4
Press j to select the item you
want to edit (in this case, ),
and press p (select).
47
Phone book
5
Edit the information, and press
p (ok).
6
Press A (cmplt).
Deleting the phone book
Example: To delete one entry
Press B (phone book) in the idle screen. Press o to select the entry to
delete, and press p (select).
Press B (option). Press j to select "delete," and press p (select).
Press j to select "Yes," and press p (select).
48
Phone book
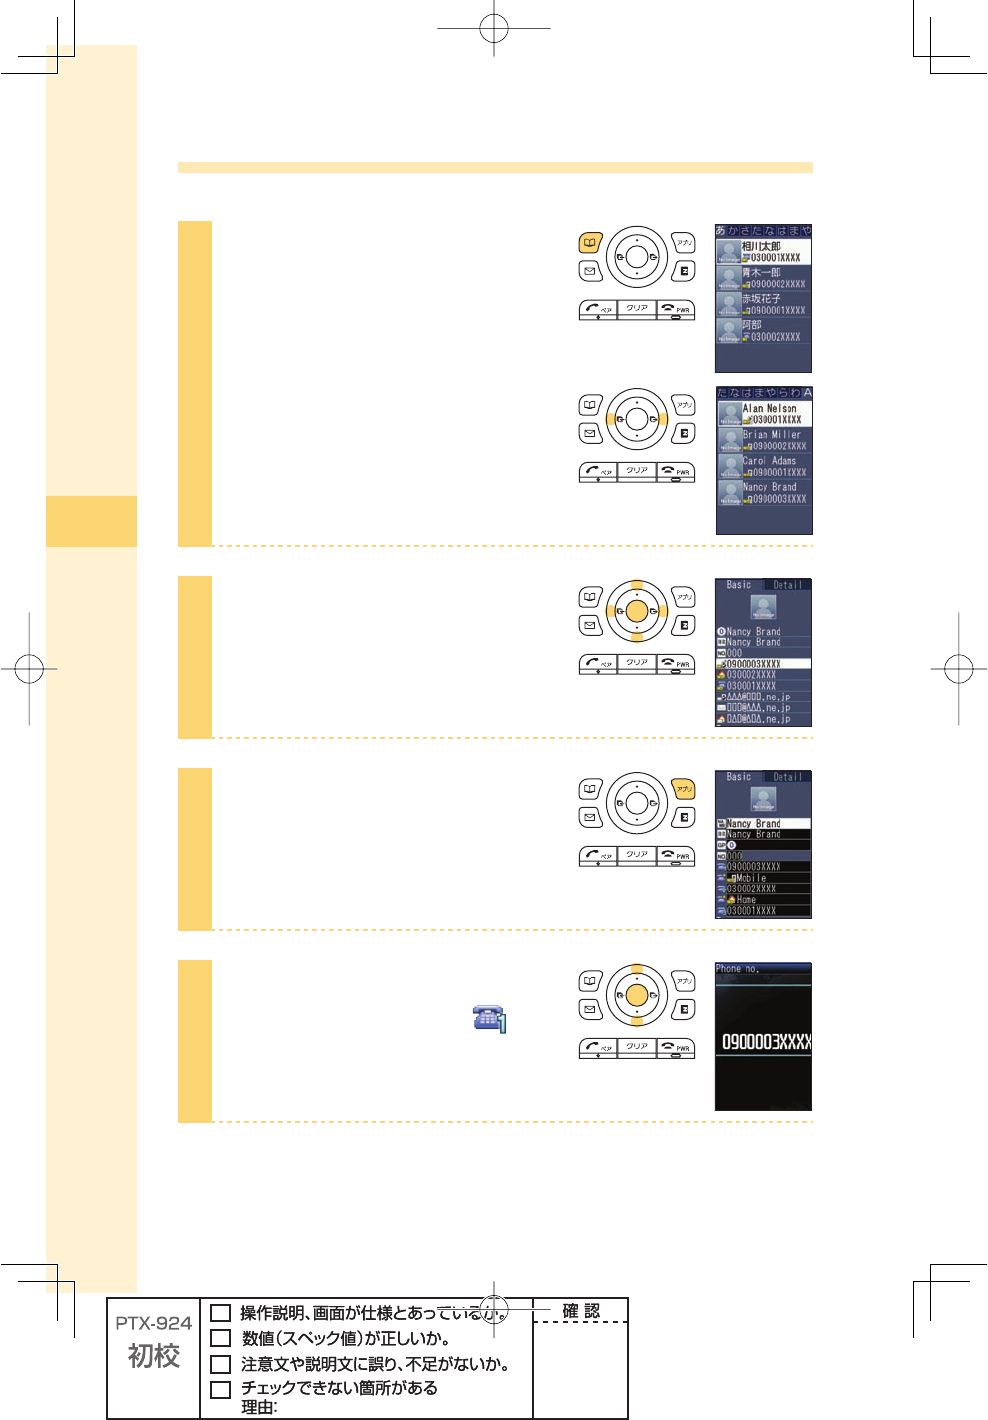
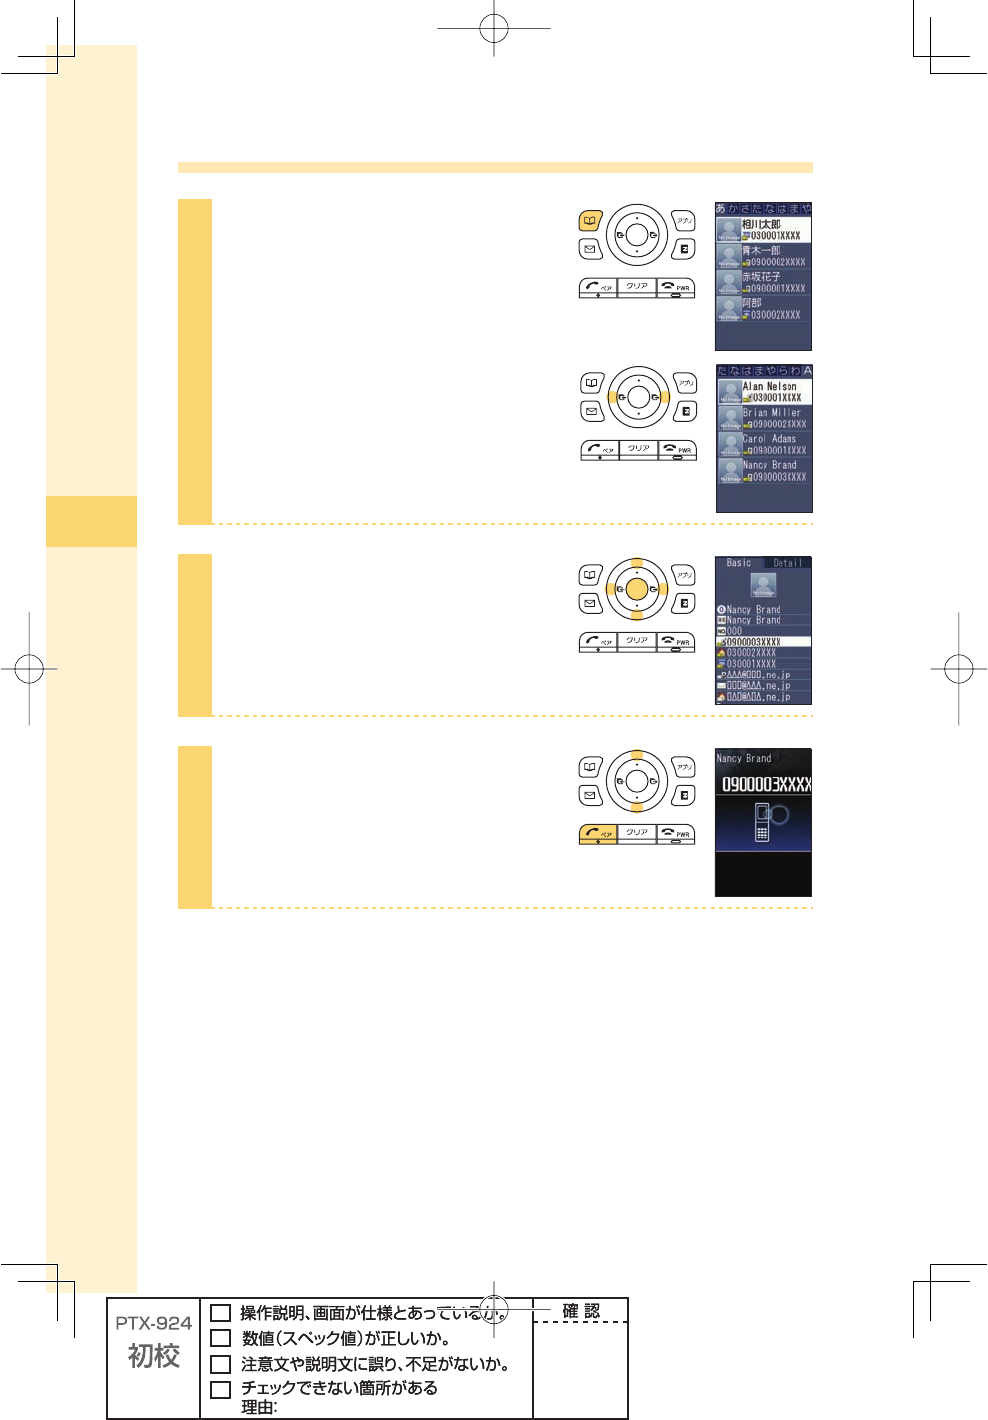
Making a call from the phone book
1
Press B (phone book) in the idle
screen.
To switch from the " あ" to "ETC"
display lines
Press s.
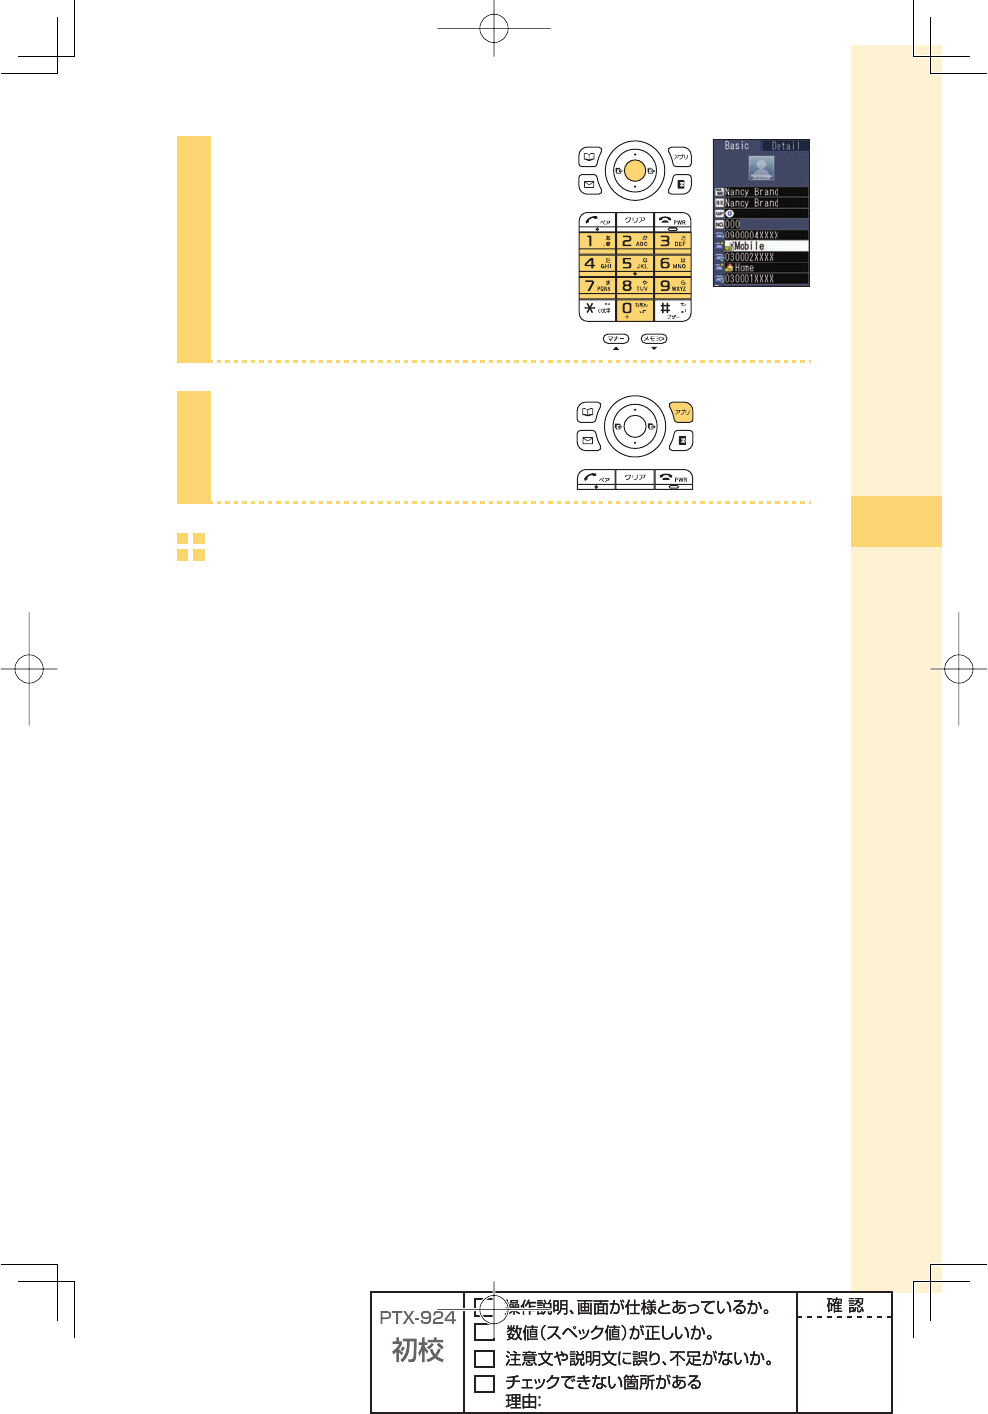
2
Press o to select the person to
call, and press p (select).
3
Press j to select the phone
number, and press T.

49
Phone book
Saving from Dialed/Received calls
1
Press s in the idle screen.
l( ):Display Received calls.
r( ):Display Dialed calls.
2
Press j to select the phone
number to save in the phone book,
and press A (save).
"New":Create and save a new address.
"Add" :Add and save newly added information.
3
Press j to select "New," and
press p (select).
The phone book edit screen appears.
The phone number you selected is
automatically entered.
For details on how to save information in the phone book, see steps 2 to 8 on pages 44
and 45.
50
Pair Function
Pair Function
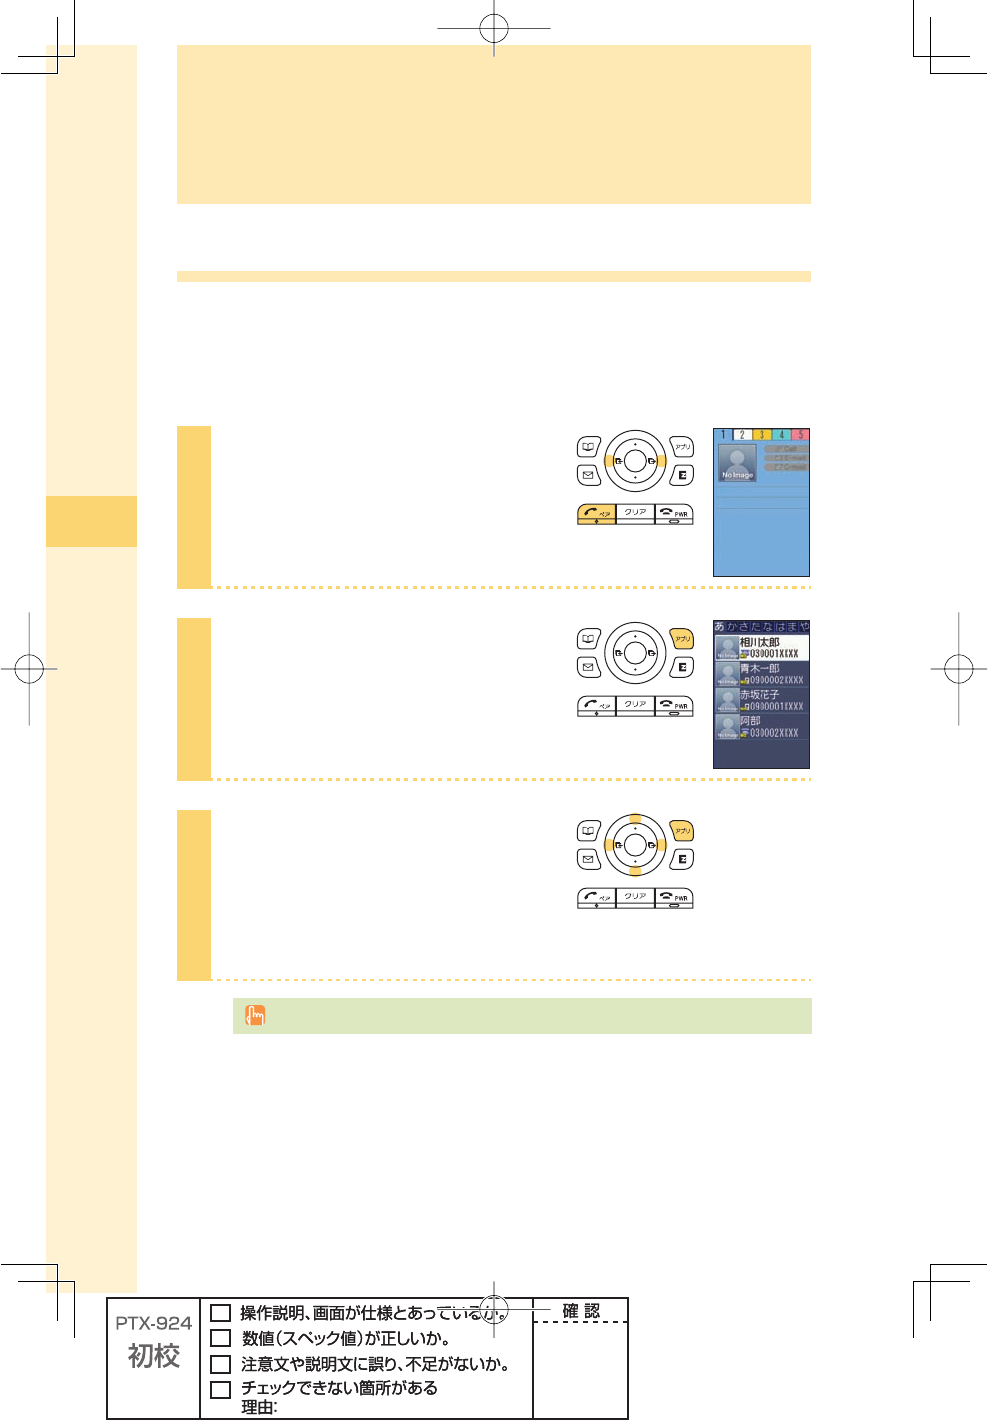
Saving to the Pair Function
You can save up to fi ve phone numbers (like frequently used ones) from the phone book,
and make calls or send mails with a simple operation.
You need to save Pair Partners to the phone book beforehand. For details on how to save
numbers in the phone book, see pages 44 and 45.
1
Press T in the idle screen,
press s to display the tab you
want to save a partner to.
2
Press A (set).
3
Press o to select the person to
save, and press A (save).
Name, Phone no., Mail address and image
of the person you selected are saved.
Deleting Pair Partner's data from the phone book also cancel the Pair Function for those data.
51
Pair Function
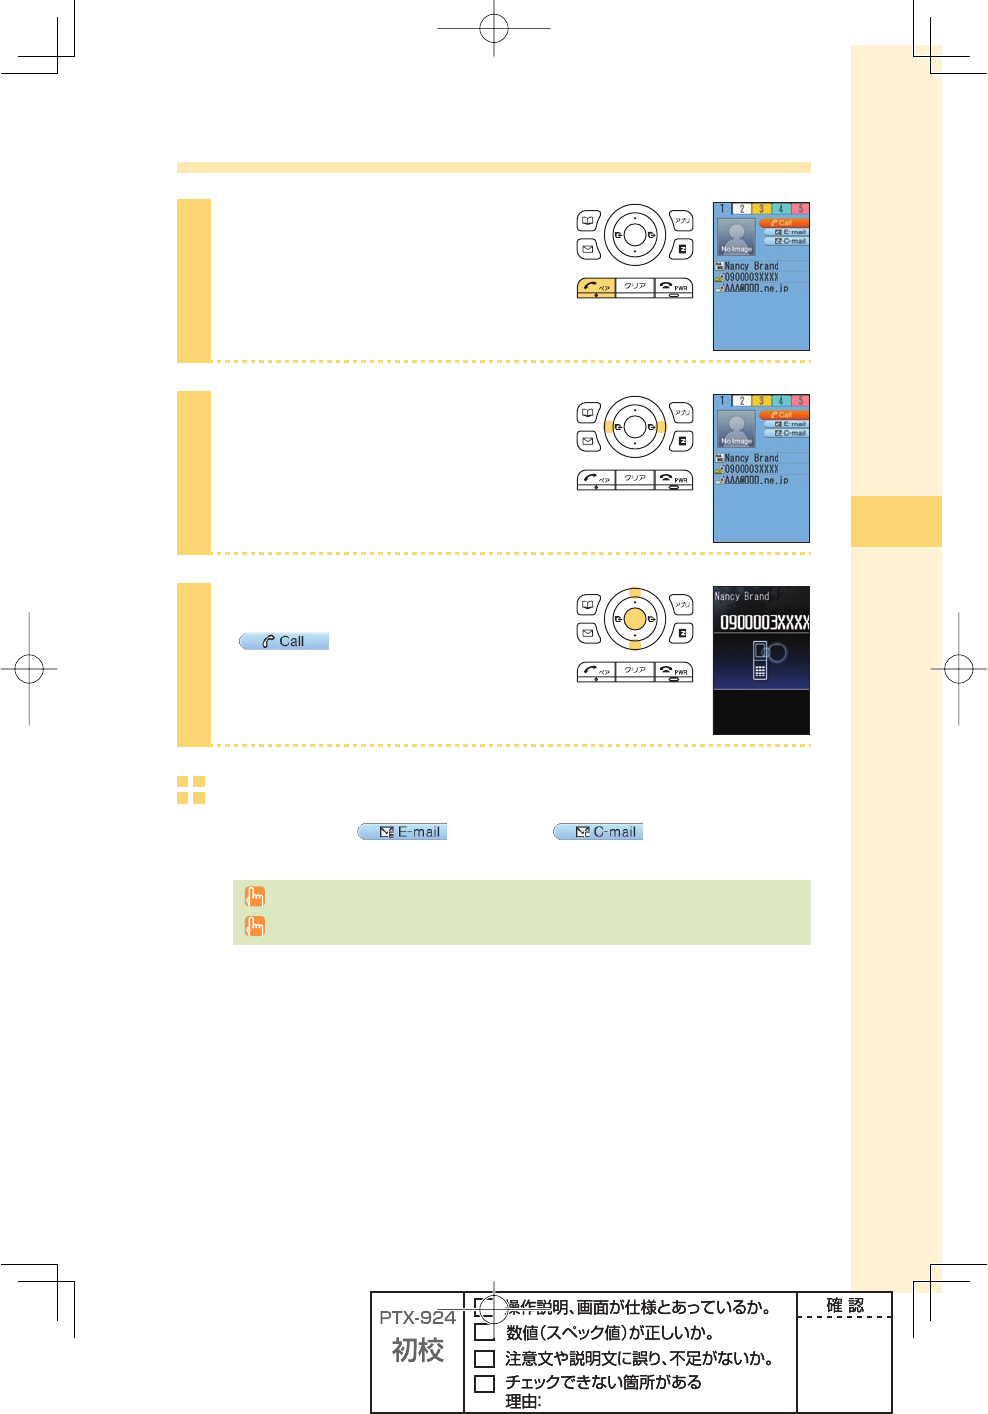
Making a call by using Pair Function
1
Press T in the idle screen.
2
Press s to select the person to
call.
3
Press j to select
(Call), and press
p (select).
To send mail
Press j to select (E-mail) or (C-mail), and press
p (select) in step 3.
For details on how to create or send e-mail, see steps 7 to 11 on pages 54 and 55.
For details on how to create or send C-mail, see steps 3 to 4 on page 62.

52
Mail
Using e-mail
EZweb subscription required
About e-mail
E-mail allows you to exchange mail with PCs or cellphones that supports e-mail. You can
send mail comprising up to 5,000 double/10,000 single byte characters, also photos and
movies.
Before using e-mail
・
You need to subscribe to the EZweb service to use the e-mail service. Contact an au
shop or Customer Service Center if you did not subscribe to the service at the time
of purchase.
・
Make initial settings before using the e-mail and EZweb services. See page 22 to
make initial settings.
・
You can send e-mail to up to fi ve recipients※1 at a time.
・
You can send up to 1,000 e-mails (counted by recipients of messages) in one day.
・
It may take a short while to send/receive mails when they have attachments.
※1 When address number restrict is set to "off," you can send e-mail to up to 30
recipients.
,ETgSHAVELUNCH
TOMORROW
,ETgSHAVE
LUNCH
TOMORROW
9OUCANSENDEMAILSTOAUAND
OTHERCELLPHONES
9OUCANSEND
EMAILSTO0#S
!NEMAILISSENTTOANEMAIL
ADDRESS
%XAMPLE
△△△
□□□
□□
JP ,ETgSHAVELUNCH
TOMORROW
Data communications fee (varied by the data amount) is charged when sending/receiving
e-mail.
Mail
53
Mail
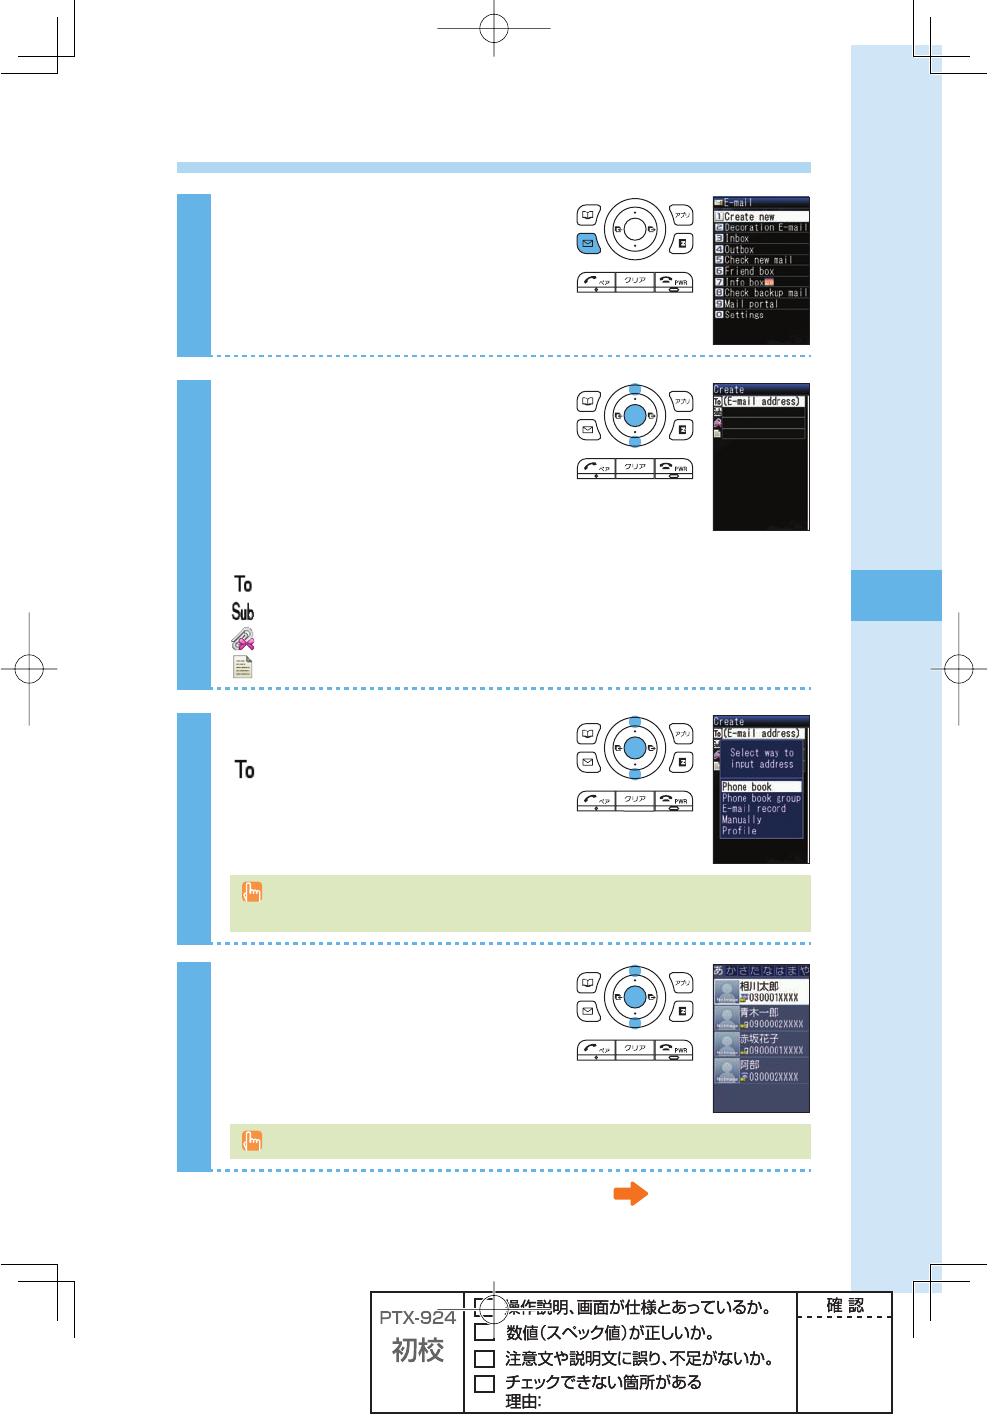
Creating and sending e-mail
1
Press q (mail) in the idle screen.
2
Press j to select "Create new,"
and press p (select).
Icons
(E-mail address): The e-mail address of the recipient
(Subject) : The subject of the e-mail
(Attached data) : The data attached to e-mail
(Text) : The main text of the e-mail
3
Press j to select
(E-mail address), and press
p (select).
There are three types of destinations: To, Cc and Bcc. You can send e-mail to several
destinations at a time.
4
Press j to select "Phone book,"
and press p (select).
You can also select an address from sent/received record or enter an address manually.
Continued on the next page
54
Mail
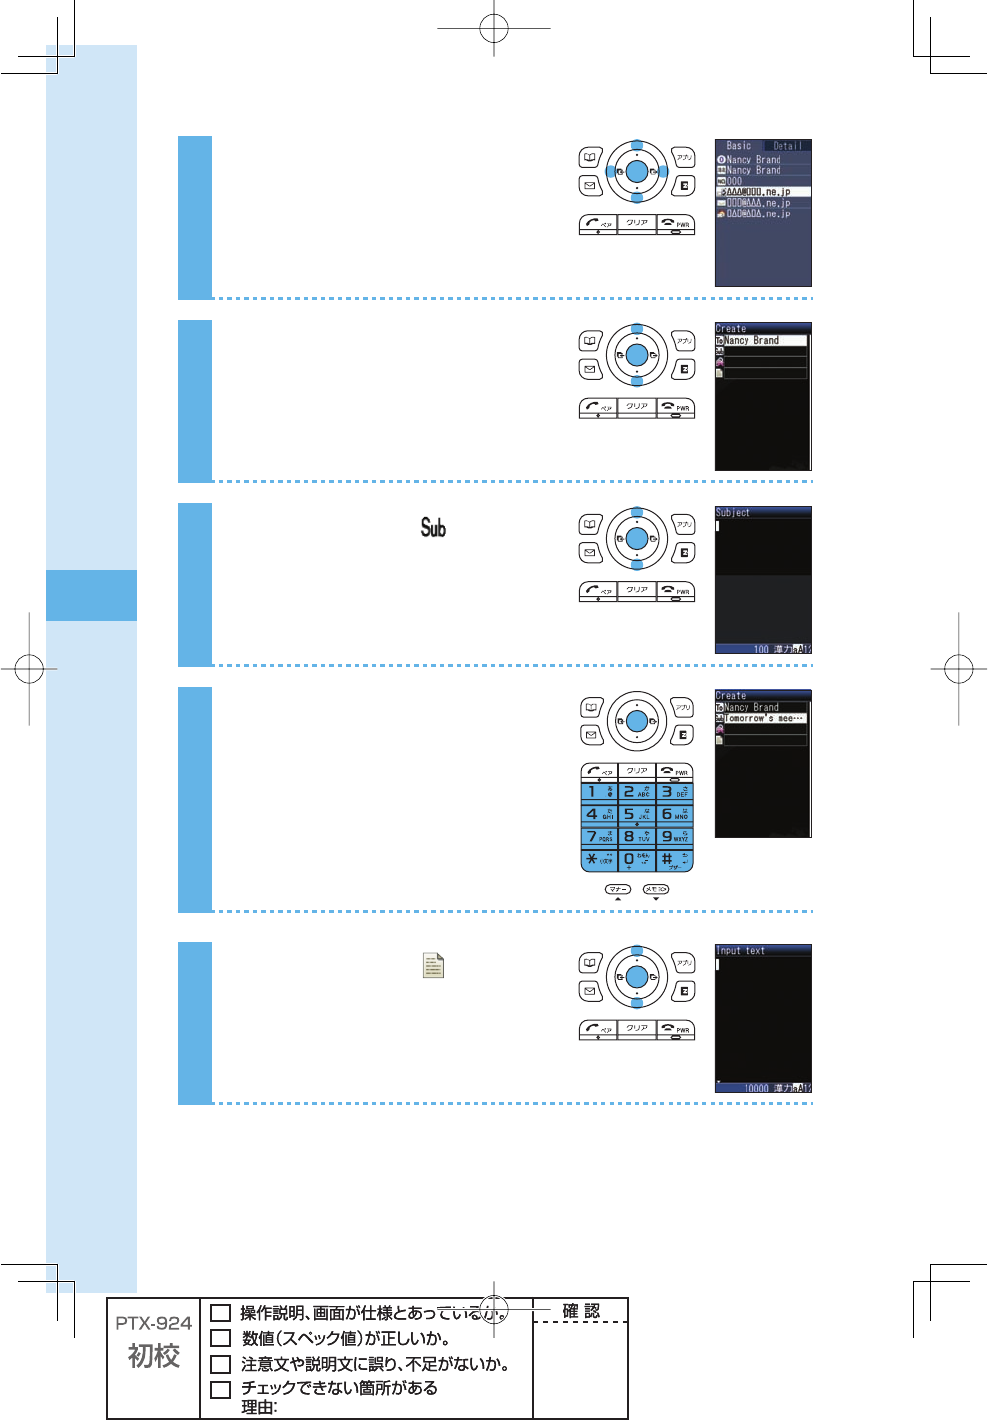
5
Press o to select a person you
want to send an e-mail to, and
press p (select).
6
Press j to select an e-mail
address, and press p (select).
7
Press j to select (Subject),
and press p (select).
8
Enter the subject, and press
p (ok).
9
Press j to select (Text), and
press p (select).
55
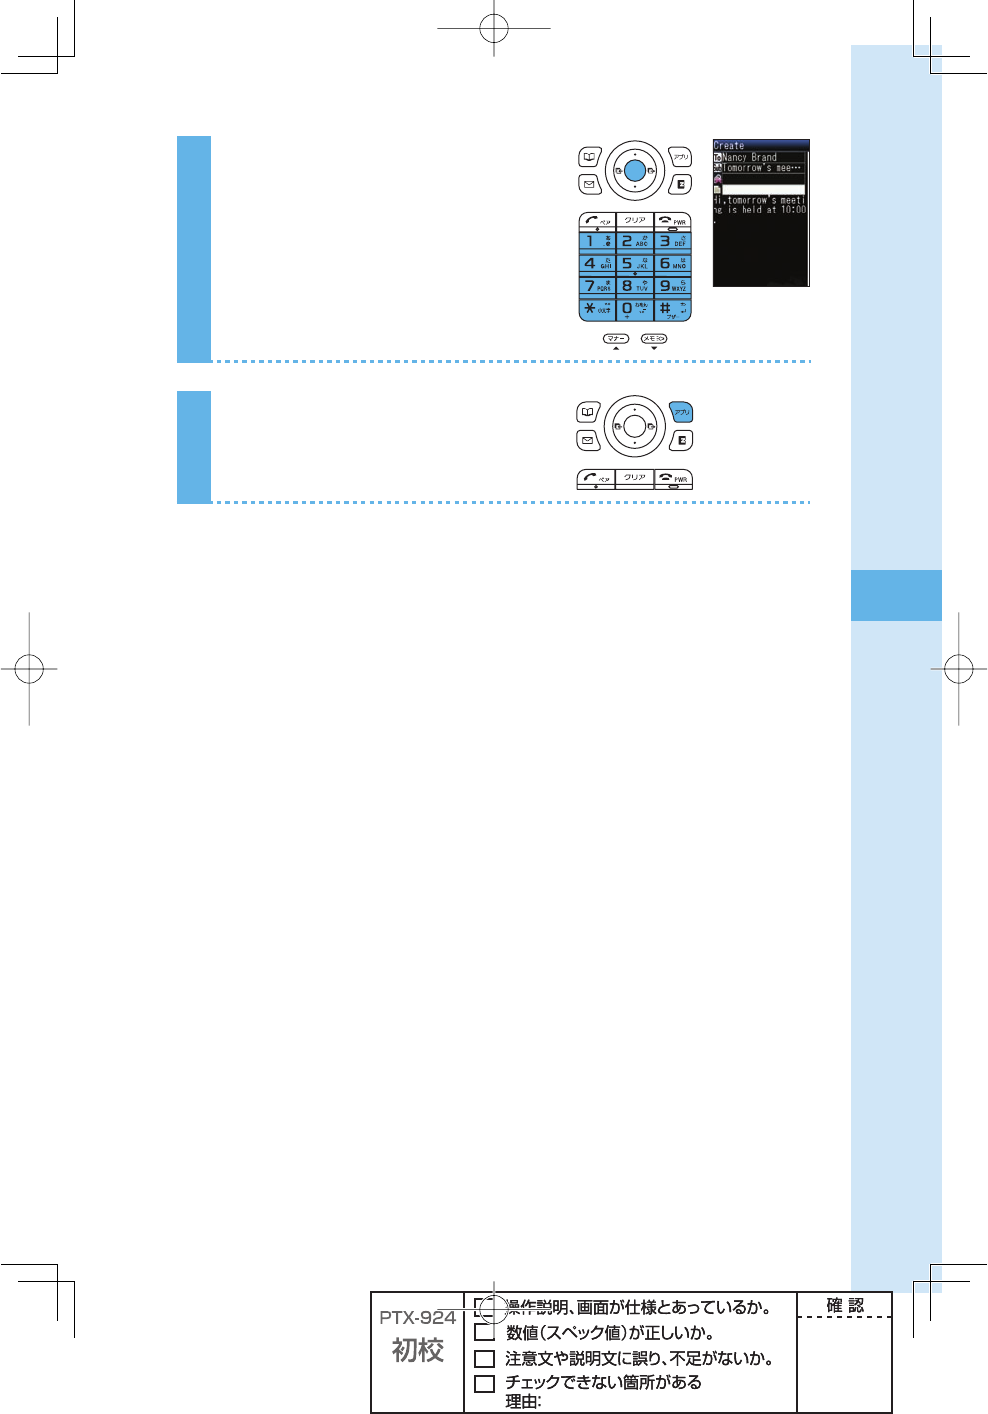
Mail
10
Enter the main text, and press
p (ok).
11
Press A (send).
The e-mail is sent.

56
Mail
Opening a received e-mail
When you receive an e-mail
A message and appear in the idle screen.
1
Press p (select).
Icon
:The folder containing new mail
2
Press j to select the folder
containing new mail, and press
p (select).
Icons
:The "read mail" that has already been read
:The "unread mail" that has not yet been read
3
Press j to select the new mail,
and press p (viewer).
How to view received mail
4HEREADMAIL
4HESUBJECT
4HEMAINTEXT
4HEADDRESS
5PTOADDRESSESWILLBEDISPLAYEDINCLUDING4O#C
4HEDATEANDTIMEWHENTHEMAILWASRECEIVED
4HESENDER
!NAMEISDISPLAYEDIFITISSAVEDINTHEPHONEBOOK
Hold down for at least one second to change the font size.
Press or to return to the received messages.
57
Mail
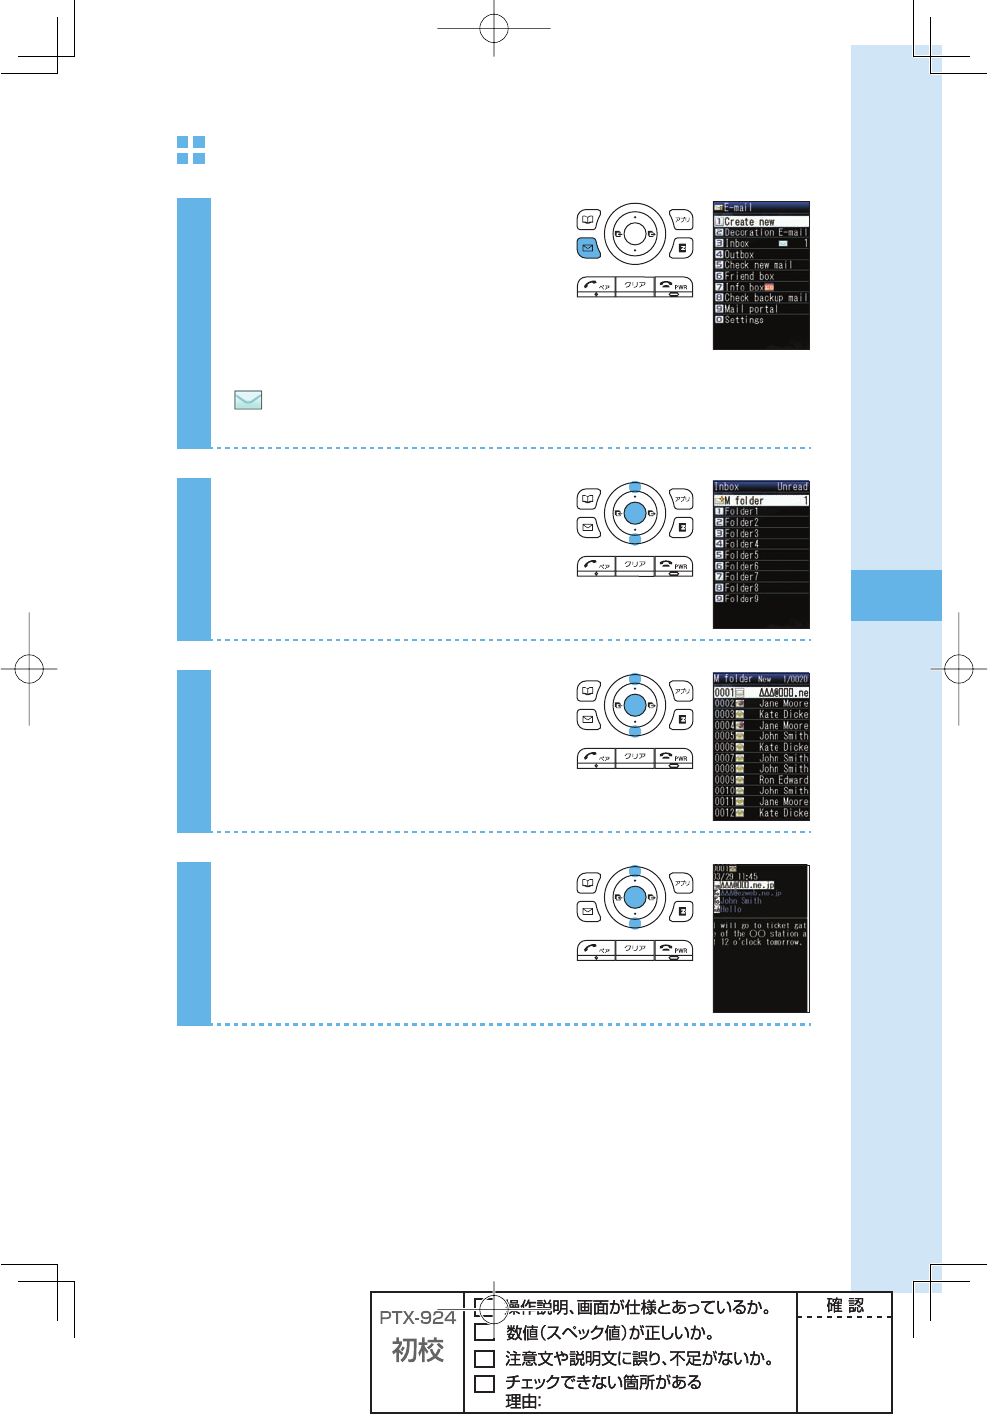
To open an e-mail in the Inbox
1
Press q (mail) in the idle screen.
Icon
: The "unread mail" that has not yet been read
The number on the right side is the number of unread mails.
2
Press j to select "Inbox," and
press p (select).
3
Press j to select the folder
containing the mail you want to
read, and press p (select).
4
Press j to select the mail you
want to read, and press
p (viewer).
58
Mail
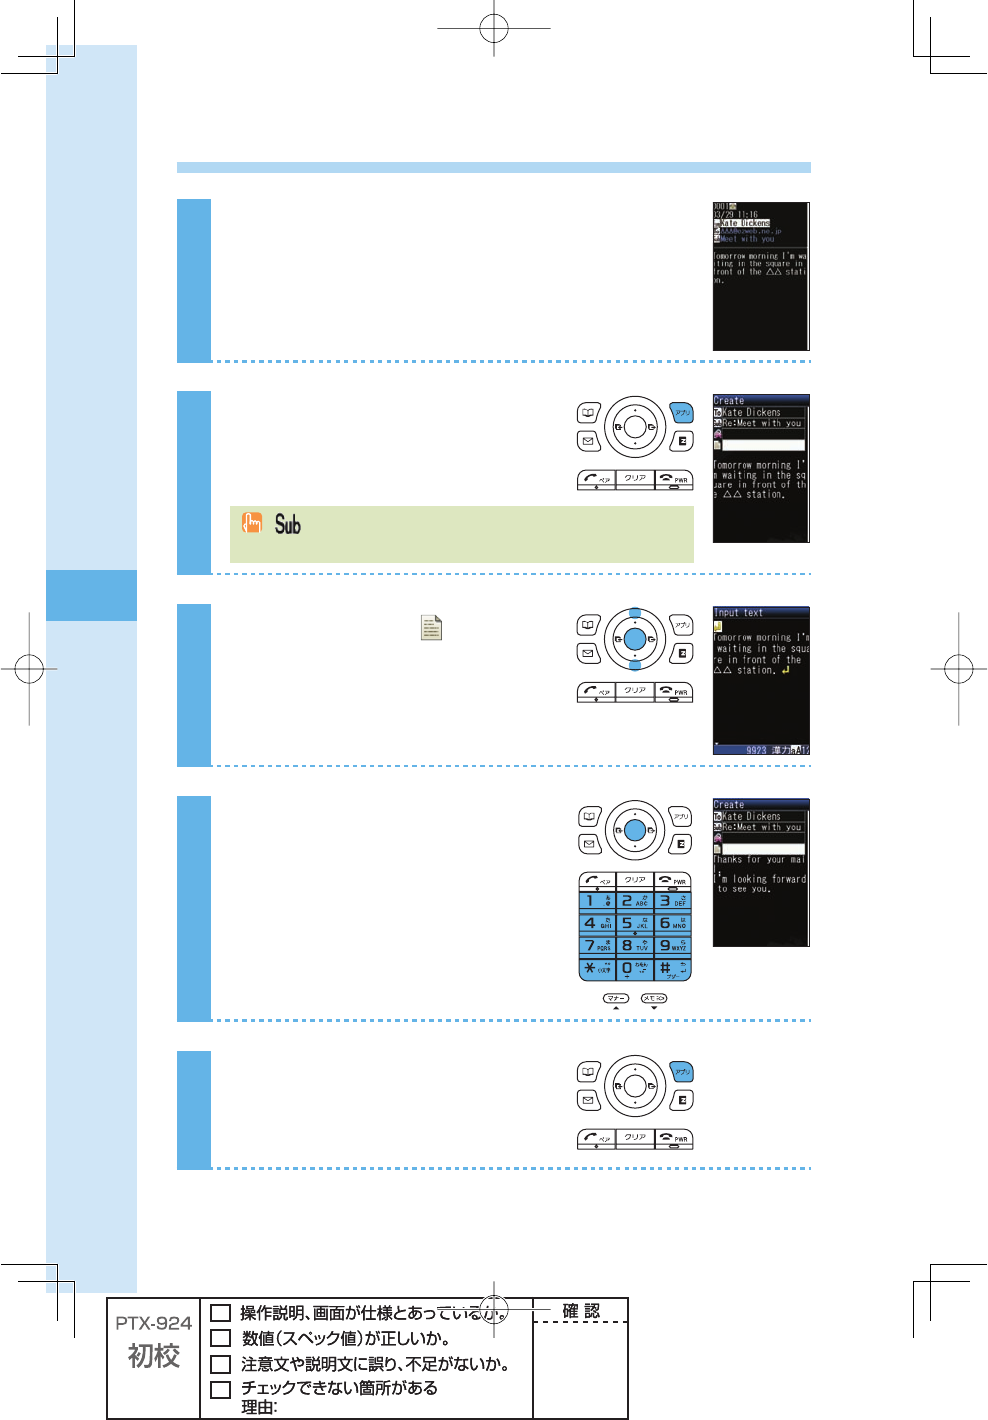
Replying to a received e-mail
1
See steps 1 to 4 in "To open an e-mail in the
Inbox" (page 57) to display the e-mail to reply.
2
Press A (reply).
(Subject) is prefi xed with "Re:," and the main text of the e-mail is
quoted.
3
Press j to select , and press
p (select).
4
Input the main text, and press
p (ok).
5
Press A (send).
The e-mail is sent.
59
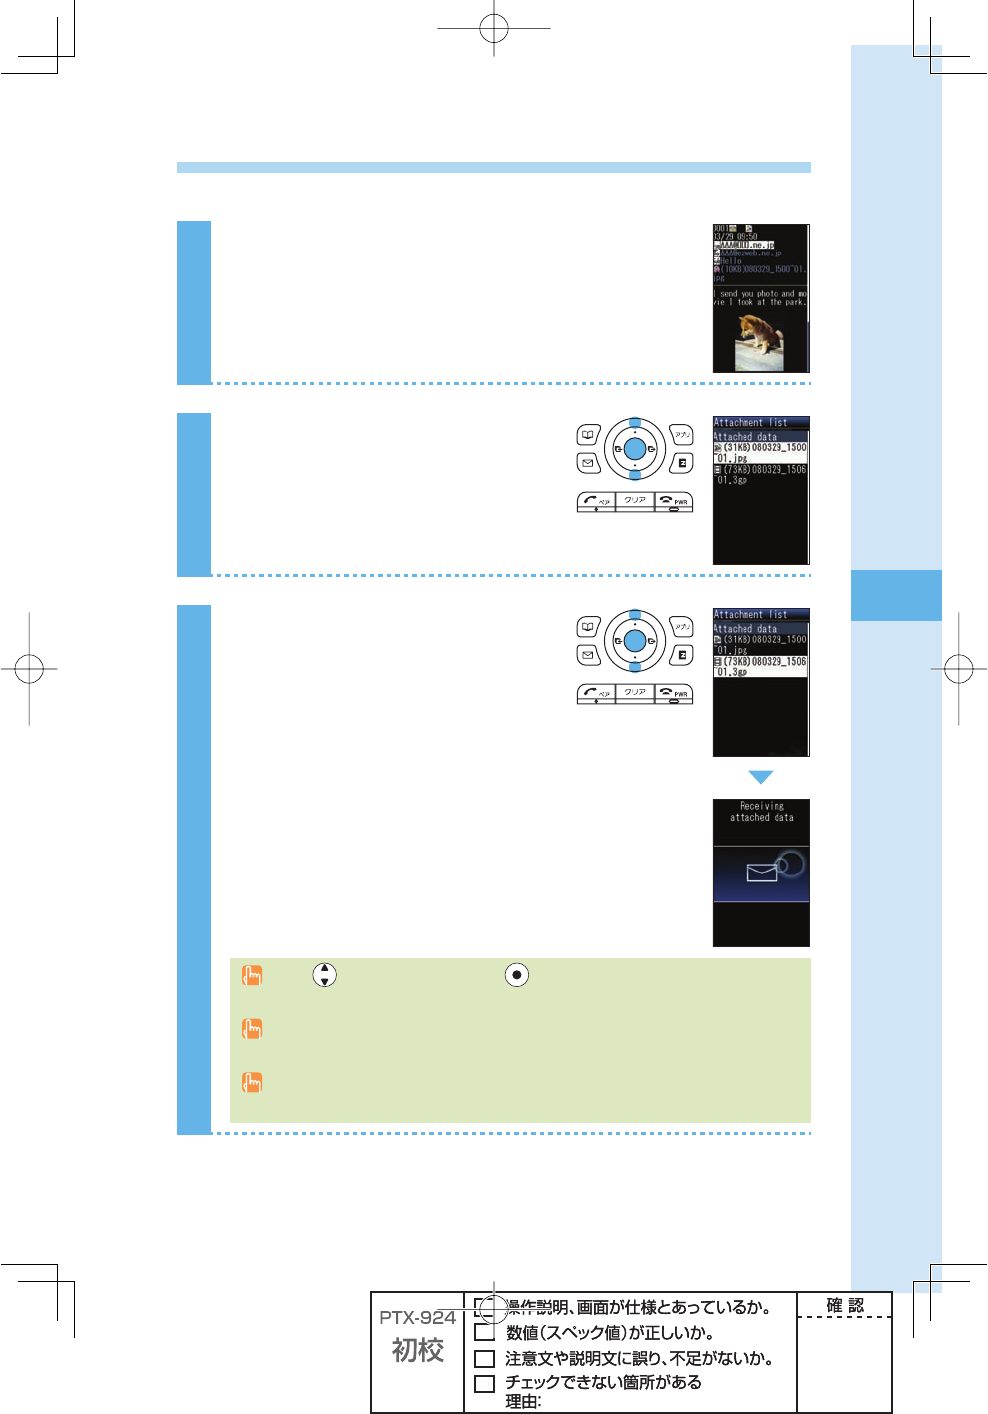
Mail
Reading e-mails with photo or movie attached
Example: To read an e-mail with photo and movie attached
1
See steps 1 to 3 in "Opening a received e-mail"
(page 56) to view a mail.
The photo is displayed.
2
Press j to select Attached data
fi eld, and press p (select).
The Attachment list screen appears.
3
Press j to select a fi le name,
and press p (recv).
The movie is received. Press p (play) to
view the movie.
Press
to select a photo, and press (view) to display the entire photo on the
screen.
Some attached data do not appear automatically depending on their size. If they do not
appear, go to step 3.
It may take a short while to send/receive mails depending on the data attached to them or
the reception strength of the place you are in.
60
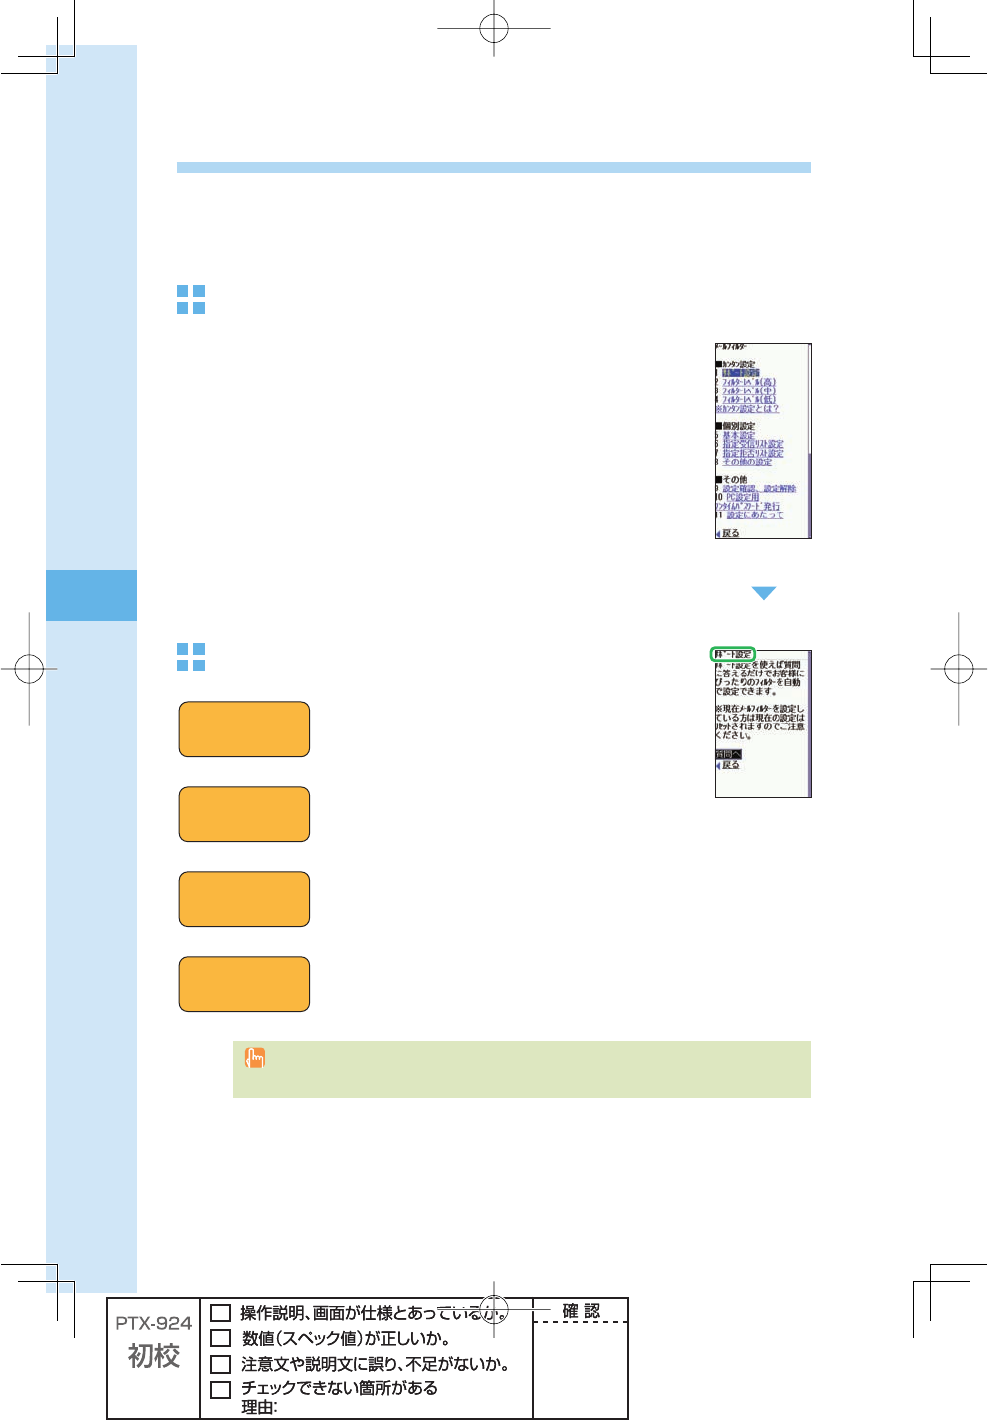
Mail
Filtering spam
We recommend that you set our mail fi lter function to block spam.
Using Supportive setting, you can set mail fi lter function with simple operations answering
onscreen questions.
Setting the mail fi lter
Example: To access the Supportive setting
Press q (mail) in the idle screen. Press j to select
"Settings" → "Mail fi lter," and press p (select).
Press j to select "Yes," and press p (select).
Press j to select "次へ," and press p (Select).
Enter your security code. Press j to select "送信," and
press p (Select).
Press j to select the item you want to confi rm, and
press p (Select).
Simple settings
フィルターレベ ル(高)
&ILTERLEVEL3TRICT
フィルターレベ ル(中)
&ILTERLEVEL-ODERATE
フィルターレベ ル(低)
&ILTERLEVEL.ORMAL
9OUCANSETYOURMAILFILTERPREFERENCESBYANSWERING
QUESTIONS
4HISISRECOMMENDEDFORTHOSEWHOWANTTOCONFIRM
ONEgSPREFERENCESSTEPBYSTEP
9OUCANBLOCKALLINCOMINGEMAILSFROM0#
4HISISRECOMMENDEDFORTHOSEWHOUSEEMAILONLY
BETWEENCELLPHONES
9OUCANBLOCKTHEINCOMINGEMAILFROMSPECIFIEDSENDER
ALSOTHEEMAILWITH
未承諾広告※
INITgSTITLEAND
SPOOFEMAIL
4HISISRECOMMENDEDFORTHOSEWHOHAVETROUBLESWITH
SPAMSENDER
9OUCANBLOCKTHEINCOMINGEMAILCONTAINING
未承諾広告※
INITgSTITLEANDSPOOFEMAIL
4HISISRECOMMENDEDFORALLEMAILUSERS
サポート設定
3UPPORTIVESETTING
By changing your e-mail address, you can prevent spam from being received. For details
on how to change e-mail address, see pages 24 and 25.