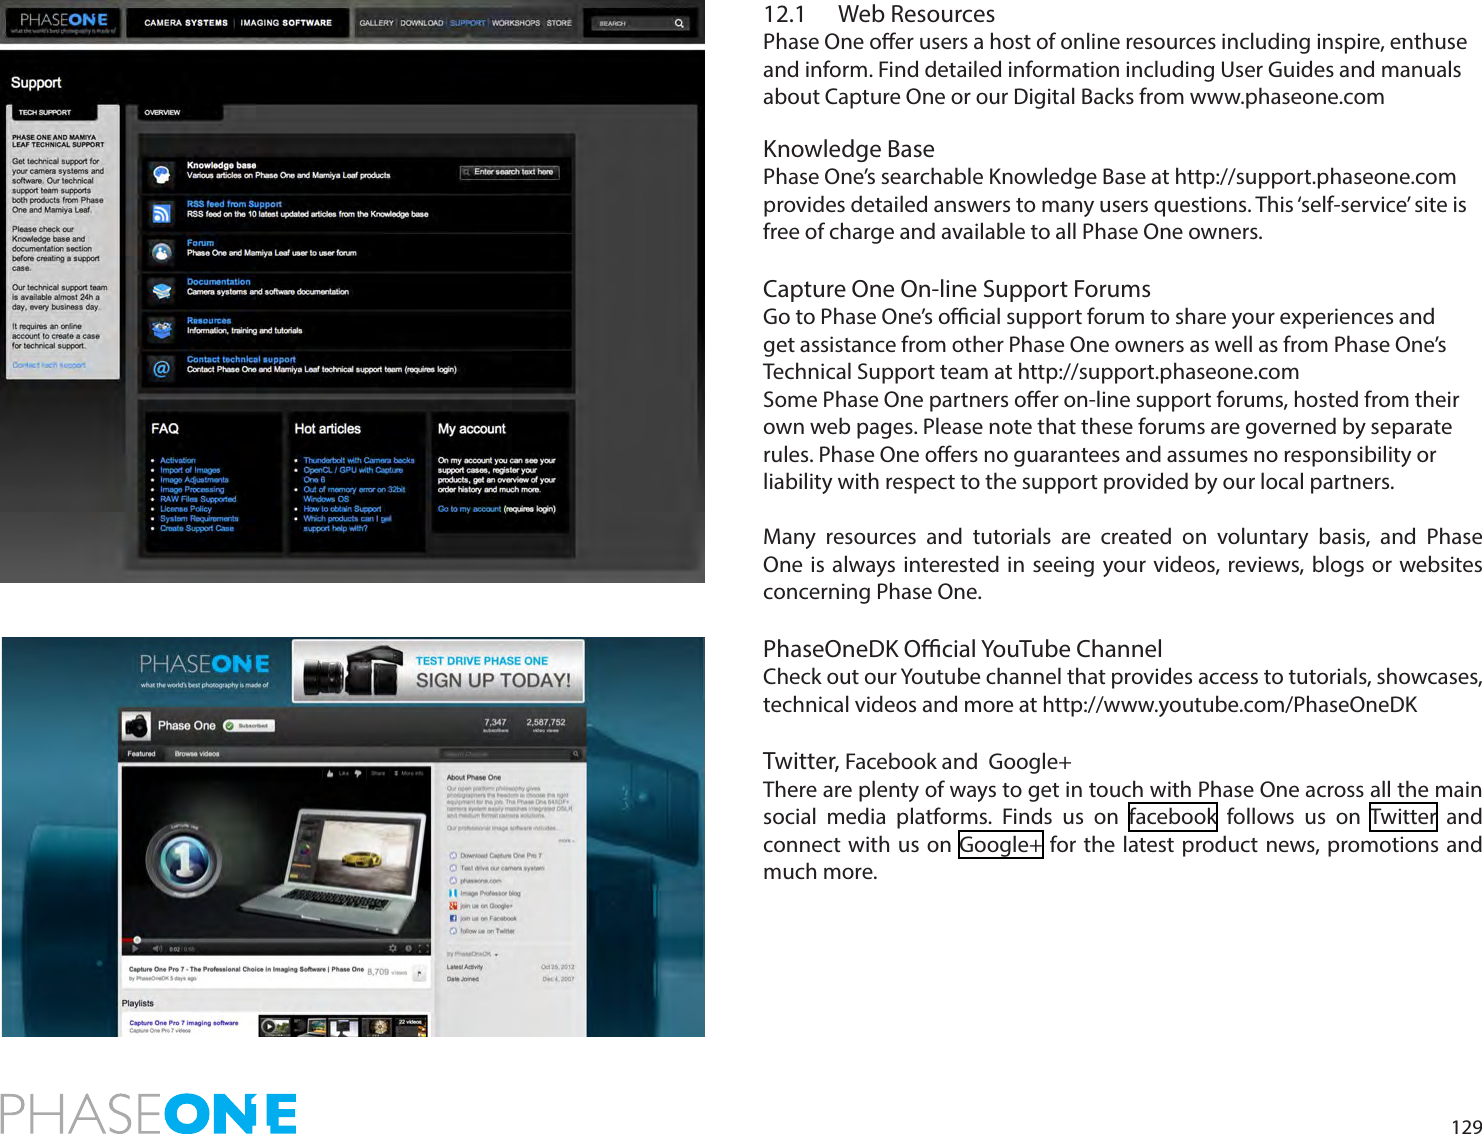
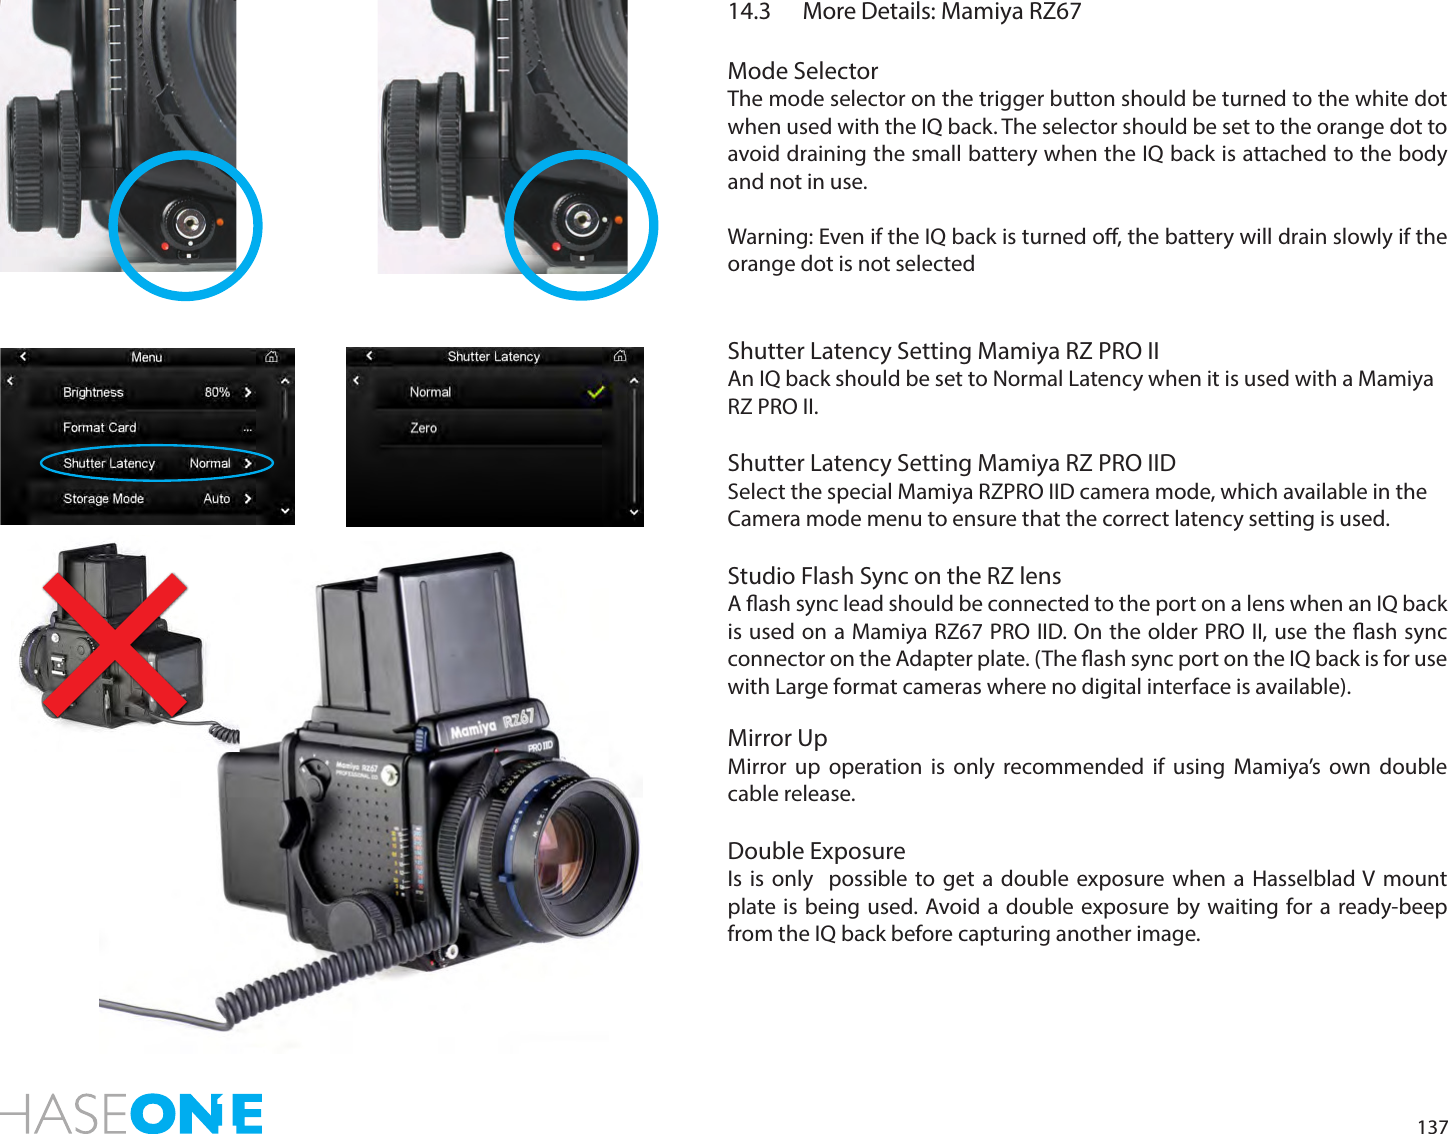
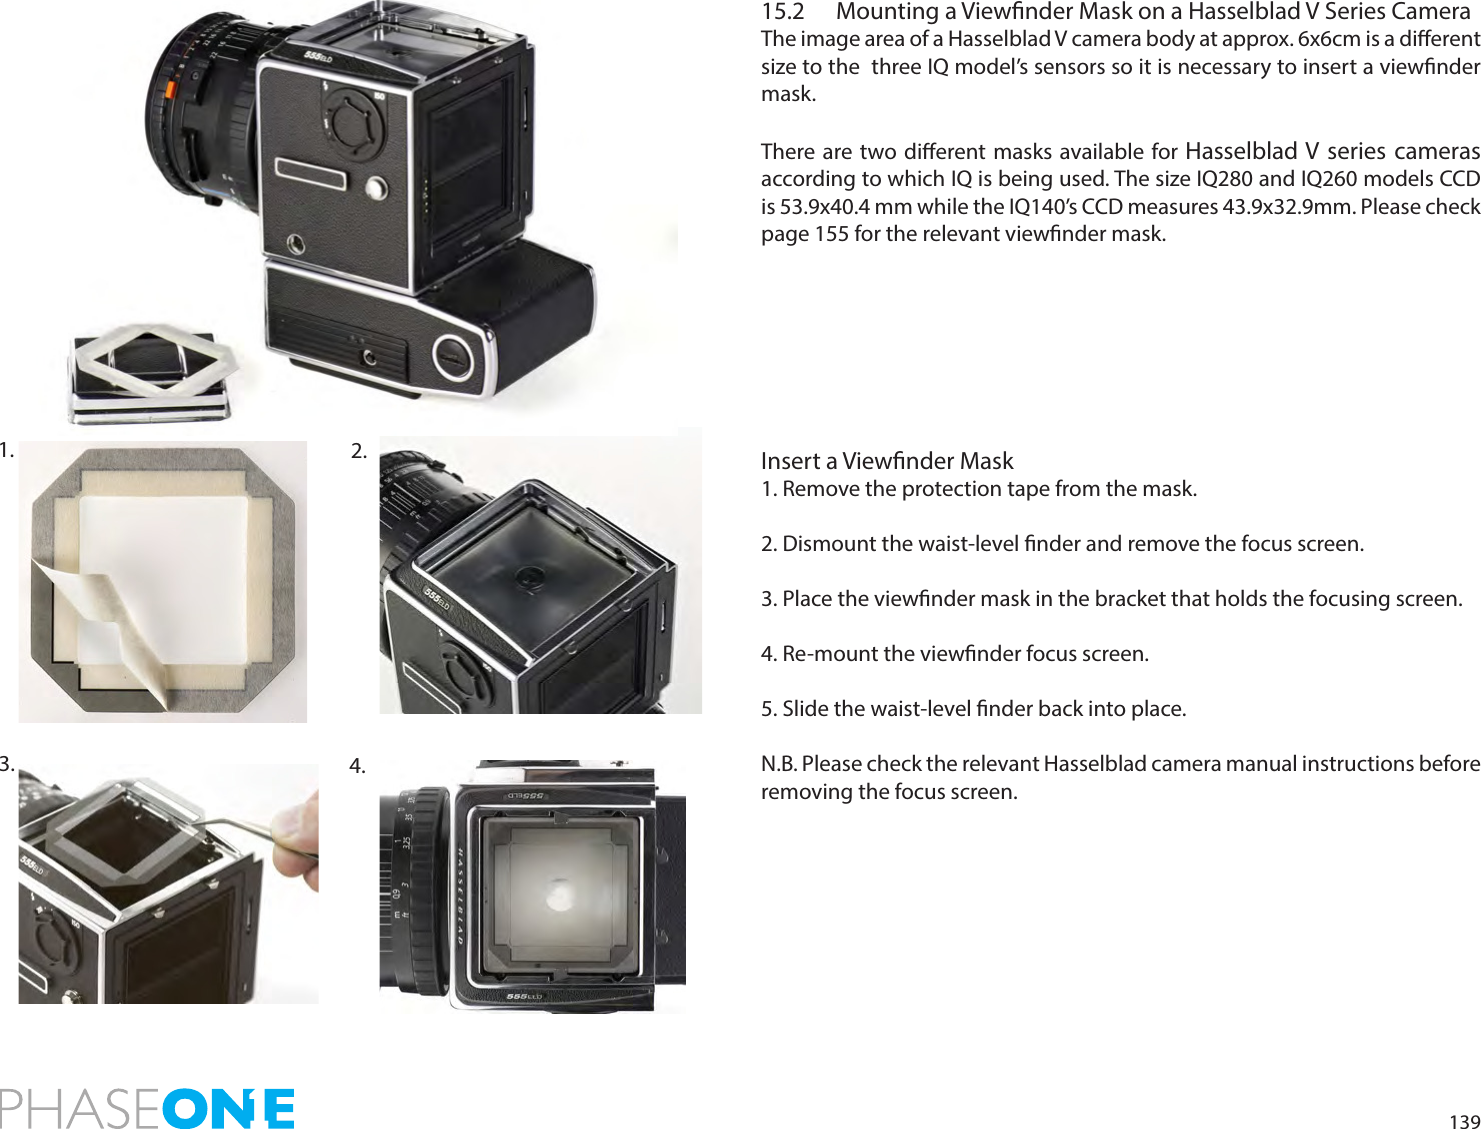
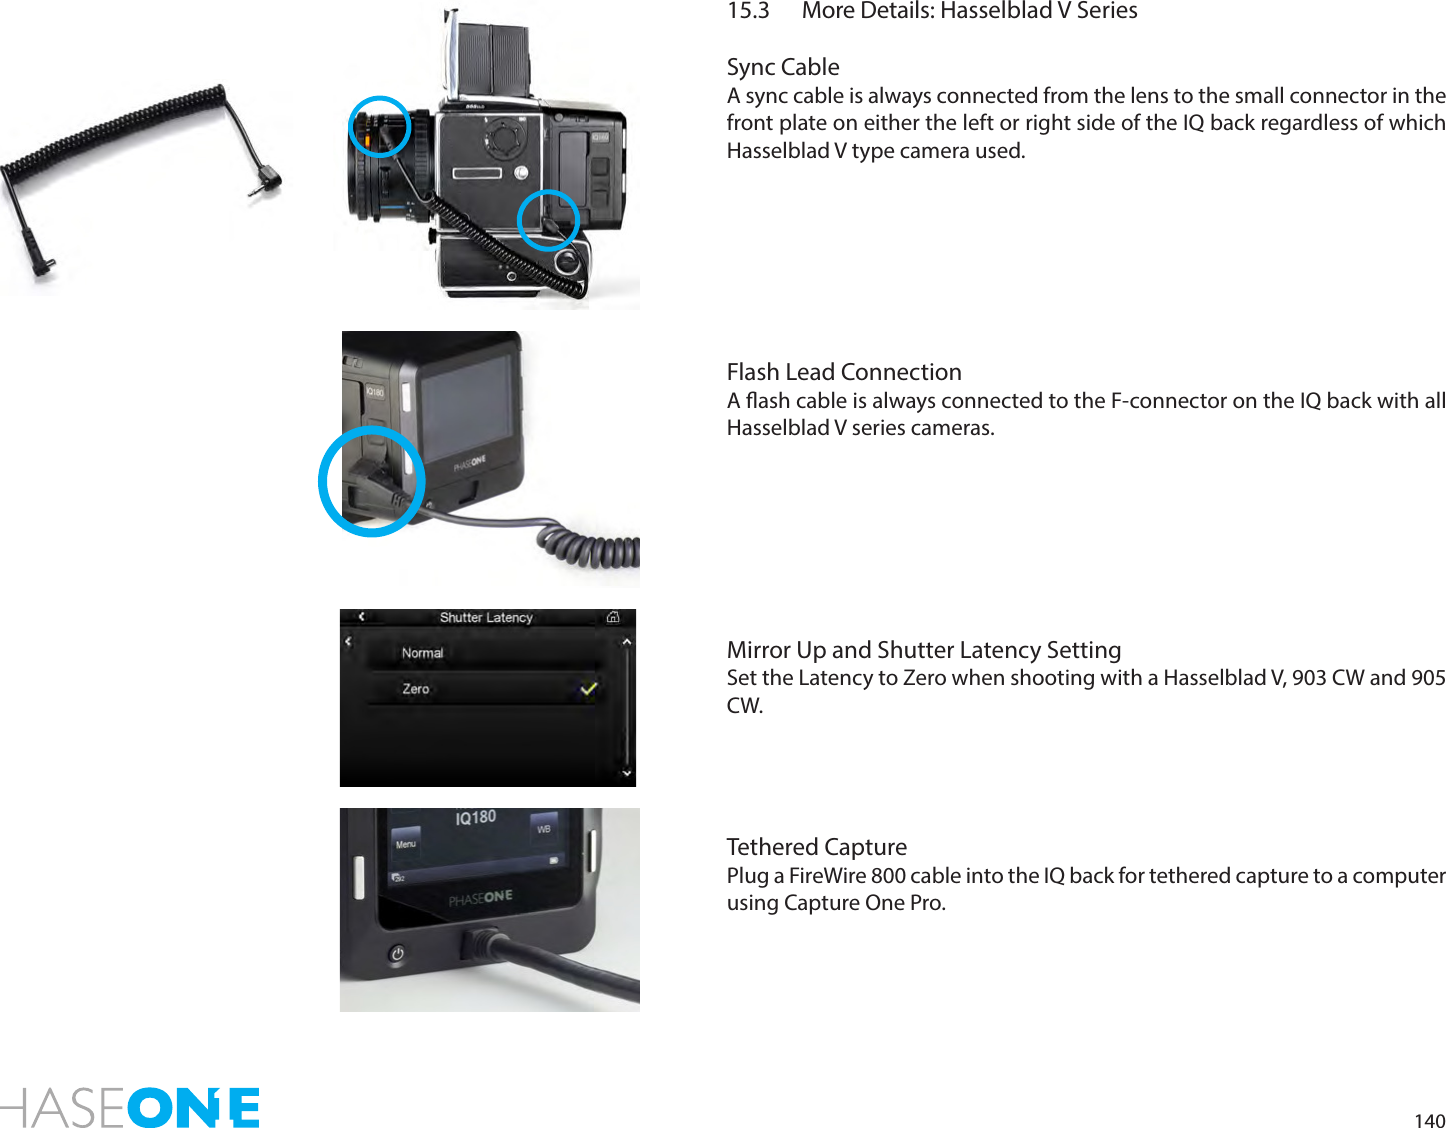
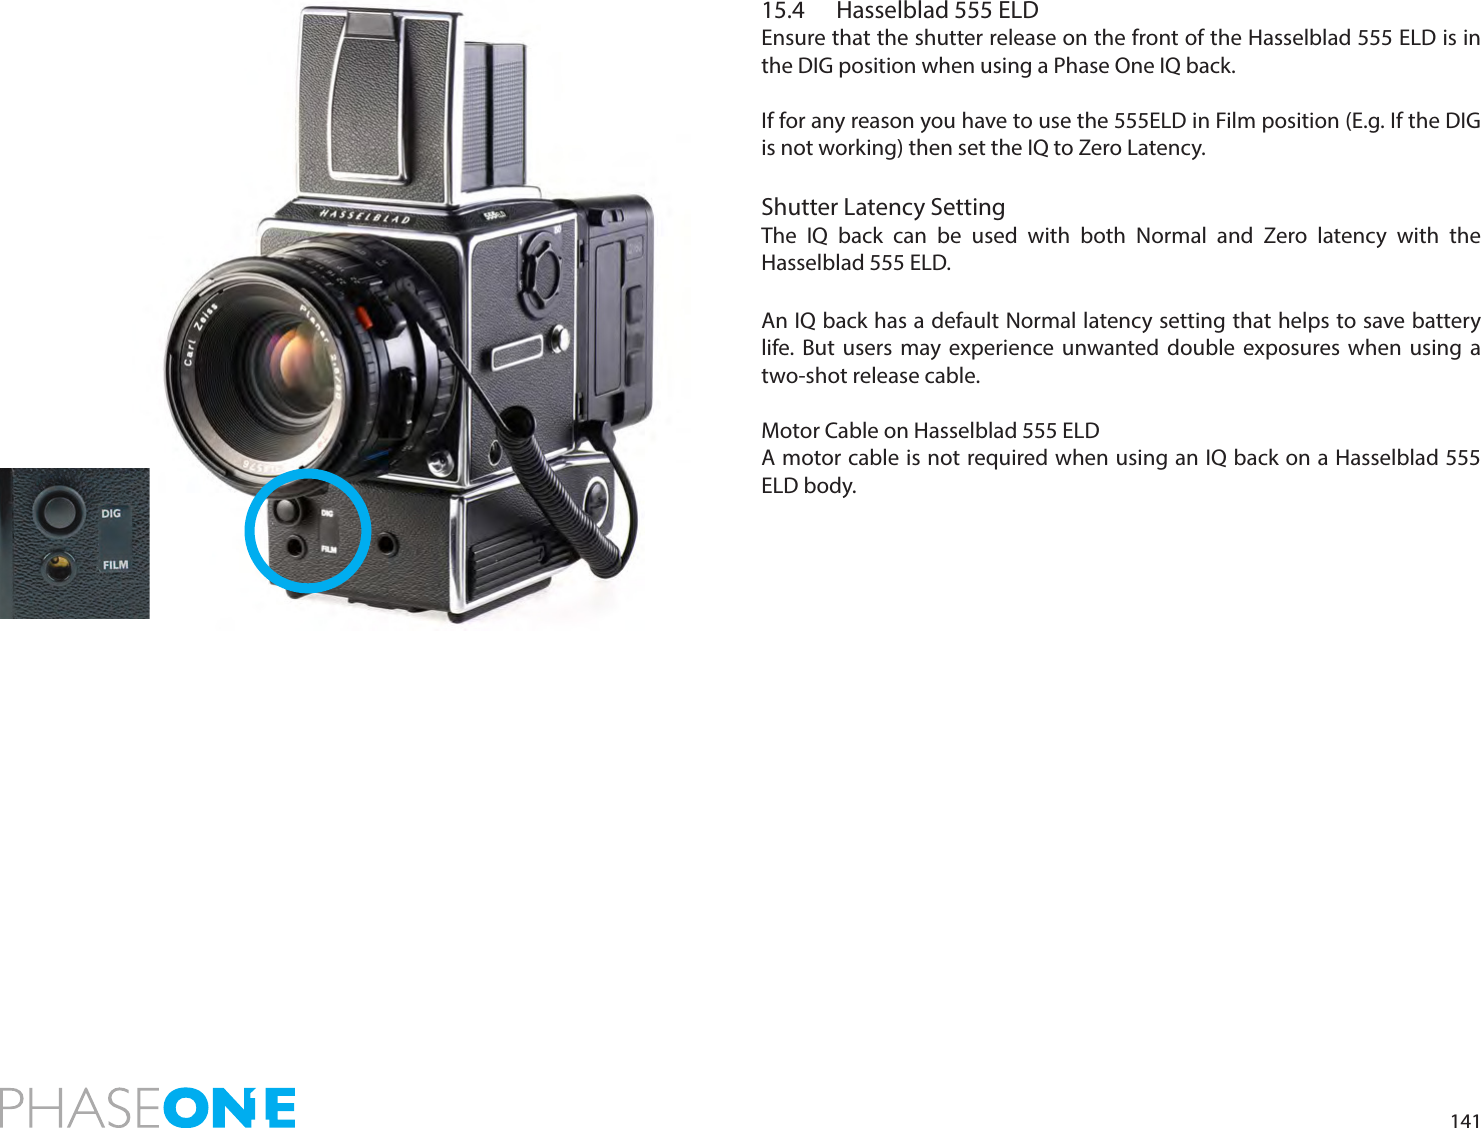
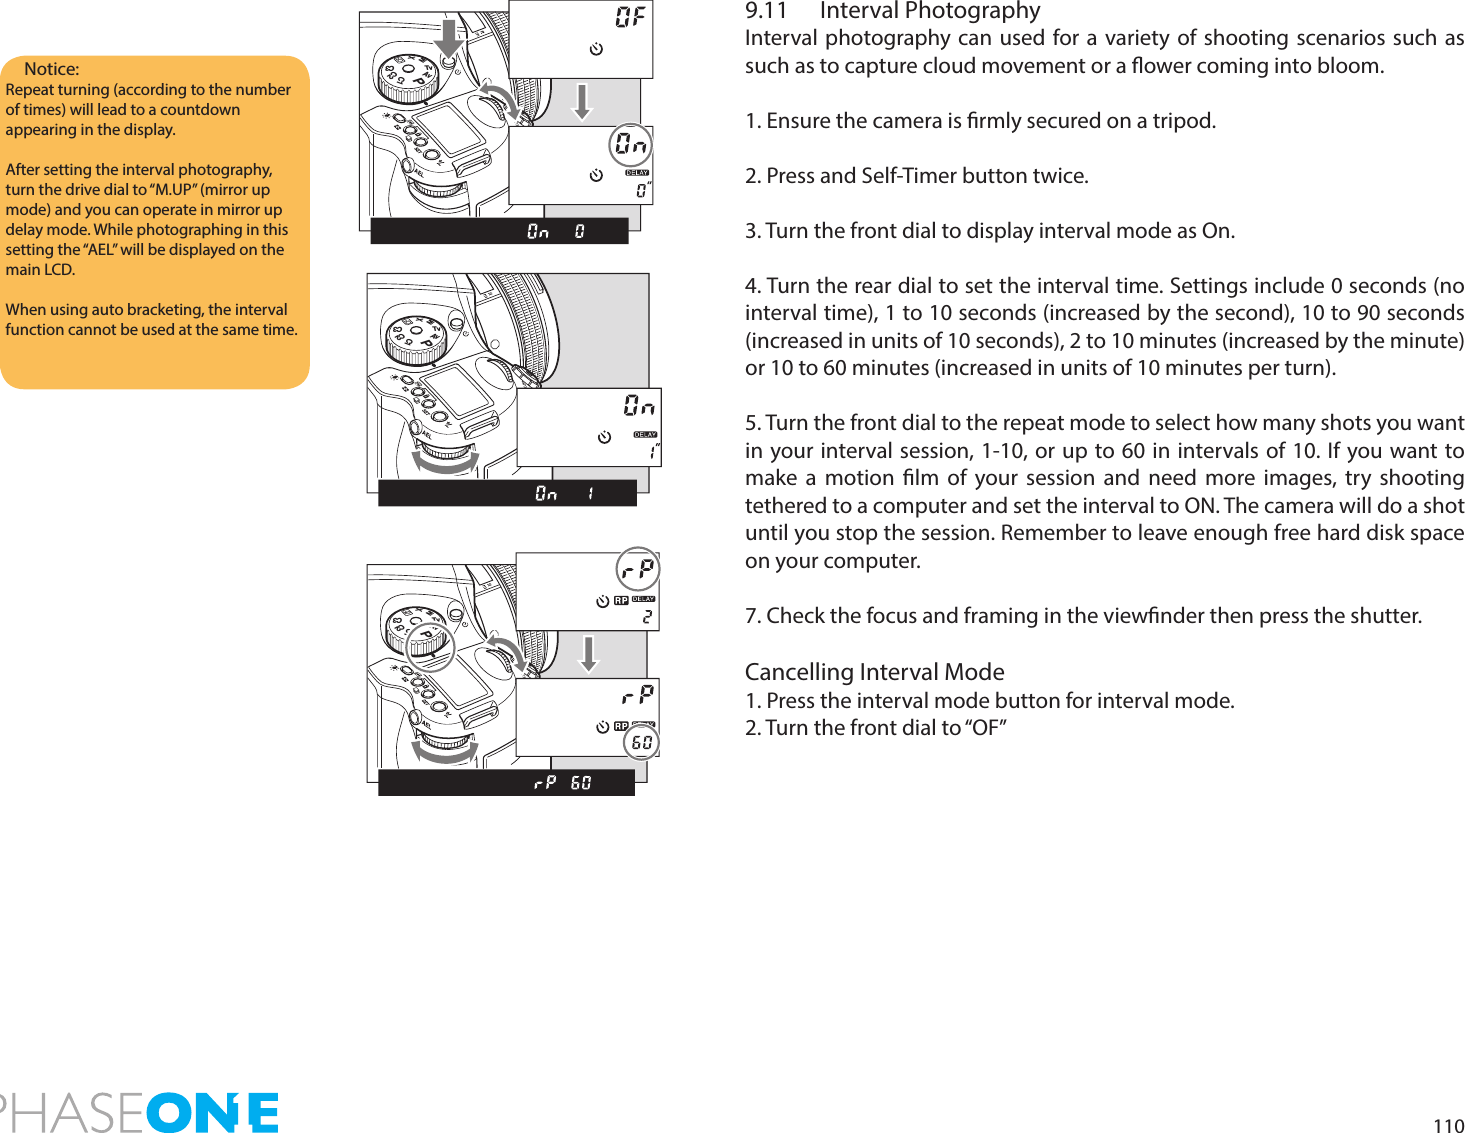
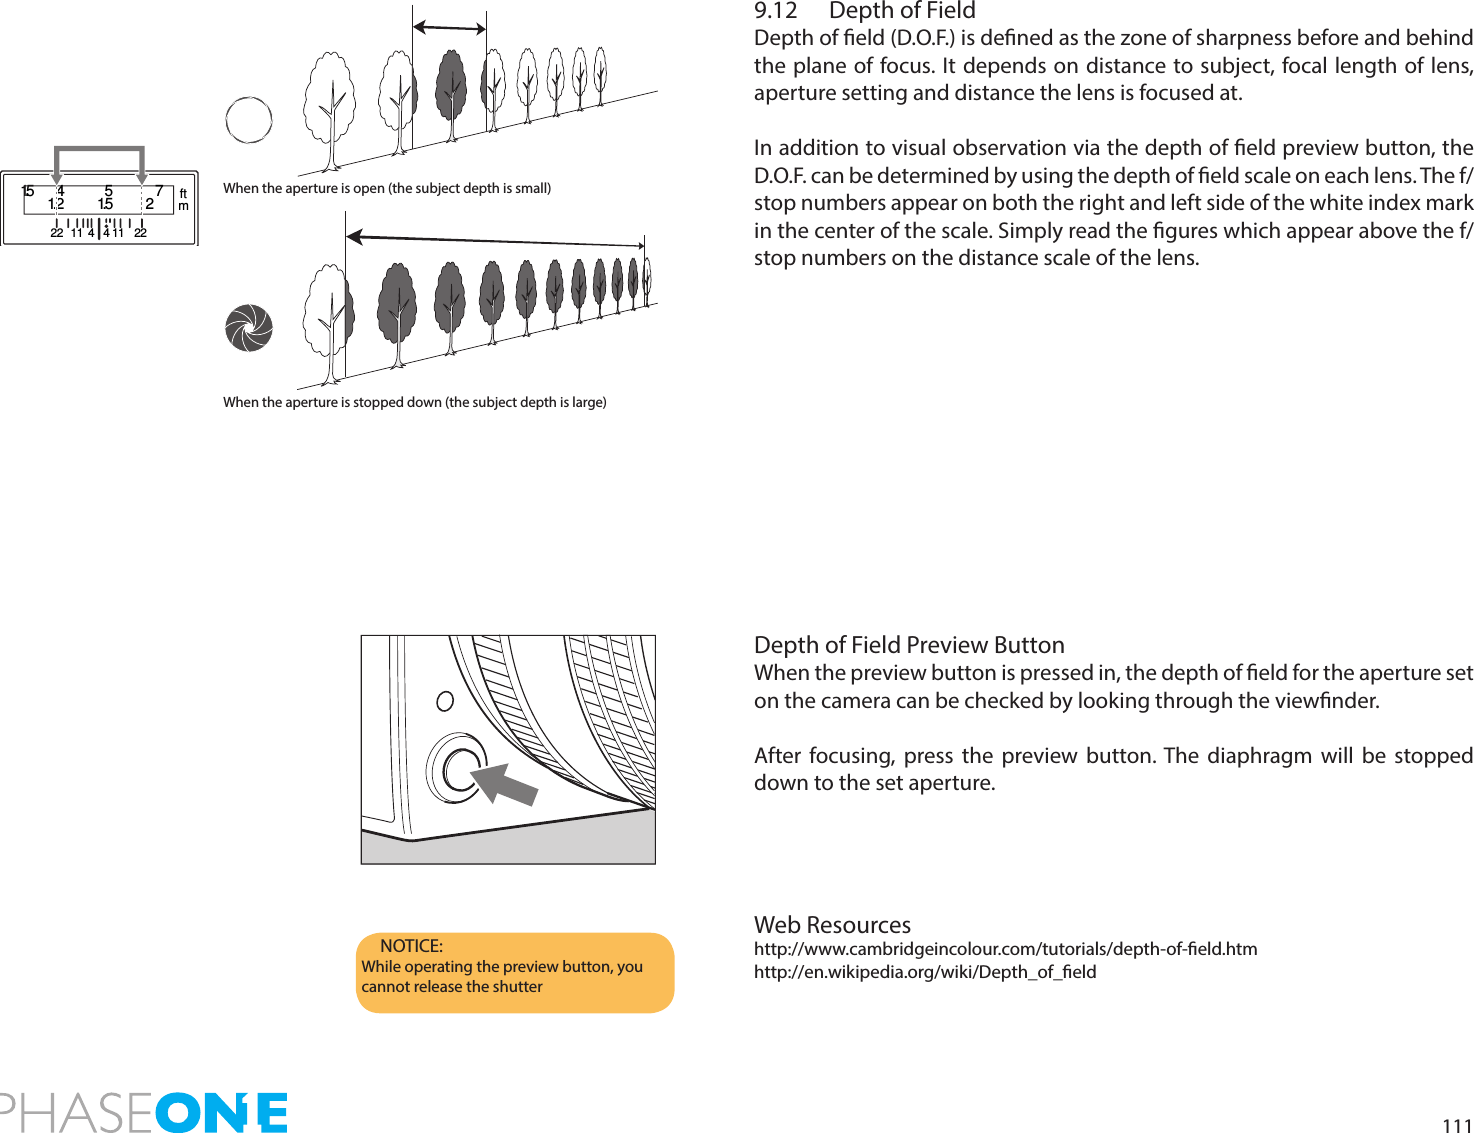
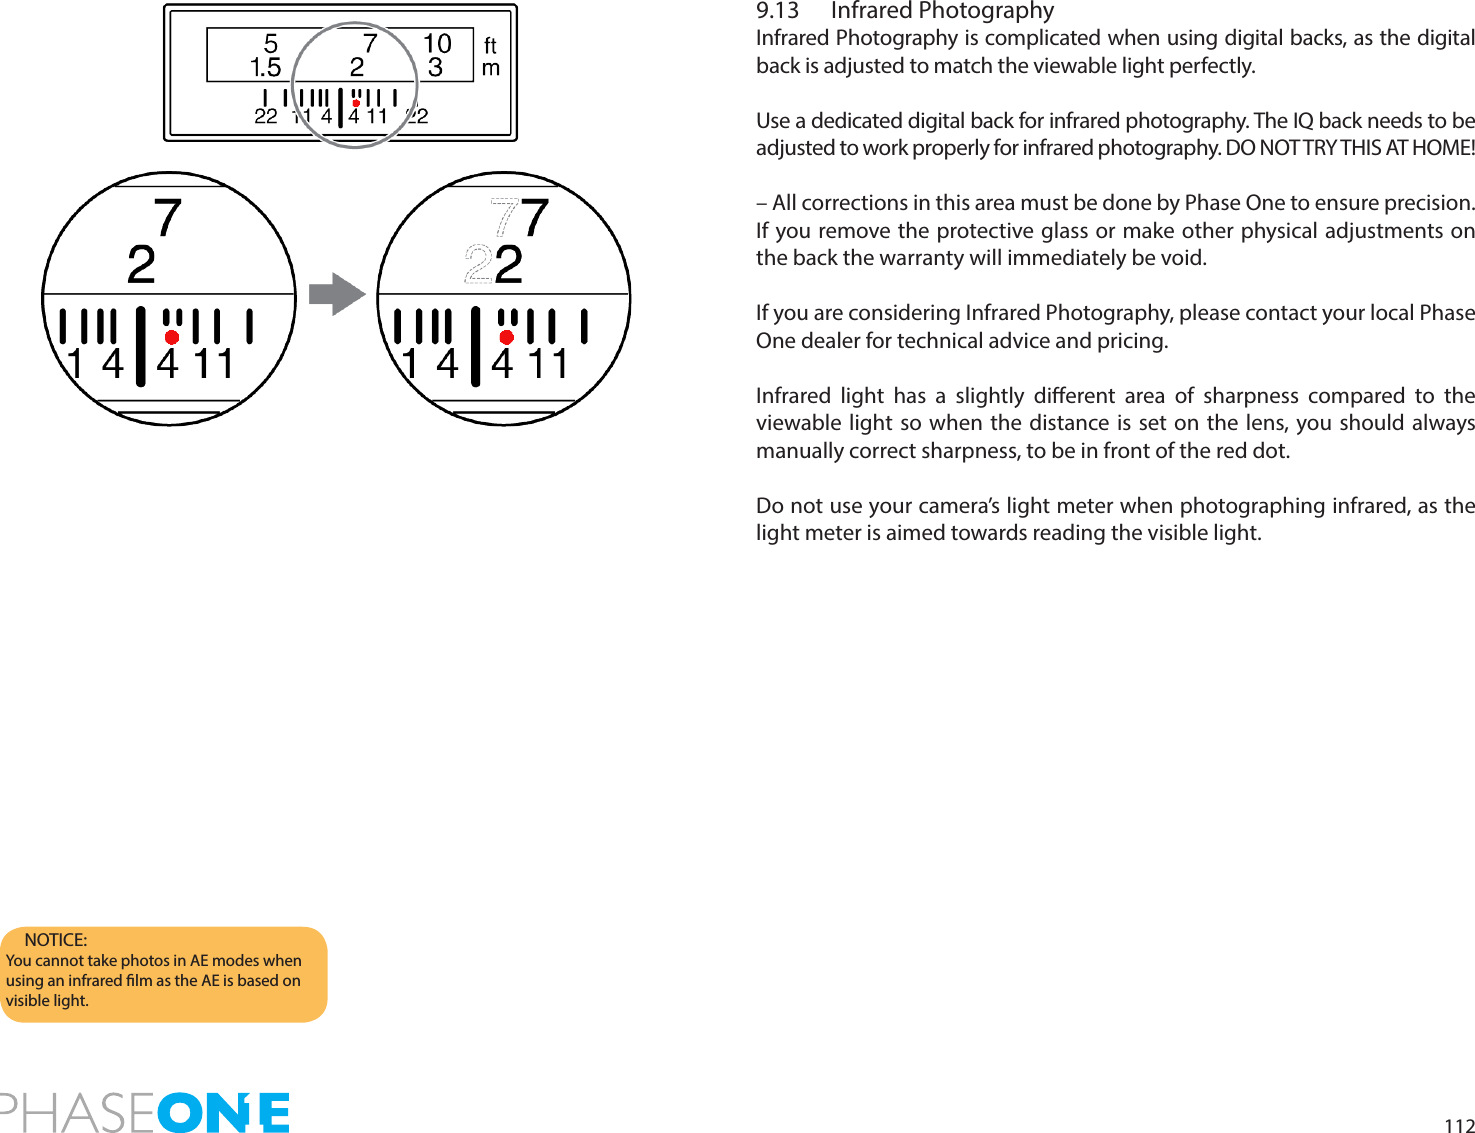
SparkLAN Communications WUBR507N 802.11abgn Wireless USB Module User Manual Phase One 645 DF and IQ Digital Back Users Guide
SparkLAN Communications, Inc. 802.11abgn Wireless USB Module Phase One 645 DF and IQ Digital Back Users Guide
Contents
WUBR-507N_UserMan_2
![1009.0 Advanced 645DF+ Camera Functions9.1 Exposure CompensationIn situations providing extreme high contrast, the resulting photograph may be under or overexposed. When this occurs, use the Exposure Compensation function. Exposure Compensation can also be used when you want to intentionally create overexposed or underexposed pictures.N.B. Creating an under or overexposed image can also be eectivity achieved with the High Dynamic Range Tool and Exposure Tool in Capture One.The exposure compensation dial icon:1. Press the Exposure Compensation button [A] so that icon appears on the camera’s top LCD. When the front or rear dial is turned counter-clockwise, the exposure is increased and when it is turned clockwise, it is decreased. The exposure compensation value can be checked on the external LCD or LCD inside the viewnder.2. After taking the pictures, press the Exposure Compensation button [A] again to return the exposure compensation value to 0. The exposure compensation value mark on the external LCD is cleared and the exposure compensation function is released.NOTICE: After taking pictures using the Exposure Compensation feature, be sure to return the exposure compensation dial to the 0 position.The exposure compensation feature is available during AE locked operation.The width of the exposure compensation step can be changed.The maximum amount of the compensation can be set either at ±3 or ±5. Exposure mode Exposure compensation displayPProgram AEThe set value is displayedAv Aperture Value PriorityTv Time Value PriorityMManual ModeThe dierence between the metered value and the set Exposure value is displayedXSync Mode Not displayedPAvTvMXCFC1C2C3A](https://usermanual.wiki/SparkLAN-Communications/WUBR507N.WUBR-507N-UserMan-2/User-Guide-2002052-Page-2.png)
![1019.2 AE LockAE lock function is useful in a number of shooting scenarios but is particularly useful when capturing panoramic images where a consistent exposure is needed to seamlessly stick images together in post production. The AEL button will lock the Auto-exposure value as the photo is being recomposed.1. Turn the shutter release mode selector lever to S or C.2. Turn the exposure mode setting dial and select P, Av or Tv.3. Focus on the subject for metering exposure, and press the AEL button on the rear of the grip. [ ] Will appear on the viewnder LCD, indicating that the exposure value is locked. 4. Slide the camera to recompose the shot, and take the picture.When you press and hold AEL button the over/under exposure value will be shown to the far right in the viewnder LCD.NOTICE: [ ] in the viewnder LCD blinks to indicate the exposure is locked, when you continue to take the next picture in the AE lock mode.If you turn the shutter release mode selector lever to the L (power OFF) position, or after elapse of one hour, the AE lock mode will automatically be cancelled.In the Manual M exposure mode, you cannot use the AE lock function. When the dierence between the metered value and the set value is displayed, press the AEL button [A] for approximately one second, and one-push shift function will be activated and the camera will automatically adjust the shutter speed. PAvTvMXCFC1C2C3A](https://usermanual.wiki/SparkLAN-Communications/WUBR507N.WUBR-507N-UserMan-2/User-Guide-2002052-Page-3.png)
![1029.3 Metered-Value Dierence IndicatorKeep pressing the AEL button [A] and the dierence between the metered exposure value and the exposure of the new composition will be displayed on the viewnder LCD. This function can be used to see if an object of very dierent brightness levels can be properly photographed.If the dierence between the set value and the metered value exceeds 6EV, the viewnder LCD blinks “– u –” for underexposure and “– o – ” for overexposure.By turning the front or rear dial in the AE lock mode, you can change the aperture and shutter speed value without changing the exposure value that is set when entered into AE lock mode.In the P mode (Program AE) mode, turning either the front or rear dial shifts the program to PH and PL. When in Av (Aperture priority AE) or Tv Shutter priority AE), turning one of the dials changes both the aperture and shutter speed values.NOTICE:The way to cancel the AE lock can be changed. C-11 AEL function lock/unlock mode [AEL]Half-pressing of he shutter release button can activate the AE lock mode. C-10 Release button [HALF]The assignment of the AEL button and AFL button can be swapped by using C-09 AEL & AFL button [AEFL]Exposure compensation and auto-bracketing function can be used when the camera is in the AE lock mode in normal operation or with the mirror locked up.PAvTvMXCFC1C2C3A](https://usermanual.wiki/SparkLAN-Communications/WUBR507N.WUBR-507N-UserMan-2/User-Guide-2002052-Page-4.png)
![1039.4 Auto BracketingAuto Bracketing can be used when it is dicult to determine your exposure compensation value. This function automatically captures dierent exposure variations in succession. The bracketing margin can be selected as desired for shooting in Auto Bracketing mode.1. Turn the Shutter Release Mode Lever to the S or C position.When set at the S position, you can shoot a single frame with each full press of the Shutter Release button. In the C mode, the camera takes a series of three frames successively with one press of the shutter release button.2. Turn on Auto Bracketing by pressing the Auto Bracketing button[A] for approximately one second. The Auto Bracketing icon will blink on the top LCD panel. Turn the front dial (before this indicator times out) and change OF on the display to On.3. When the shutter button is pressed in Auto Bracketing mode, the auto bracketing mark will blink on the LCD inside the viewnder. The bracket step width is displayed and the Auto Bracketing icon will also blink. 4. To deactivate the bracketing function, press the Auto Bracketing set button[A], turn the rear dial, set auto bracketing mode to OF, and release.Then press the Auto Bracketing set button [A] or half-press the shutter button to return to the normal display mode.NOTICE: When you want to cancel the auto-bracketing mode, turn the rear dial to change “On” to “OF”NOTICE: After multiple turns, the mark [RP] will appear in the main LCD.Repeat turning will lead to a countdown being displayed on the main LCD and after taking a photo the camera will return to Auto Bracketing mode.The setting for the Auto Bracketing will be stored by pressing any other button or leaving the camera for 5 seconds.UnderexposureBracketing MarginOverexposureAuto Bracketing IconStandardSetting selectionPAvTvMXCFC1C2C3APAvTvMXCFC1C2C3PAvTvMXCFC1C2C3](https://usermanual.wiki/SparkLAN-Communications/WUBR507N.WUBR-507N-UserMan-2/User-Guide-2002052-Page-5.png)
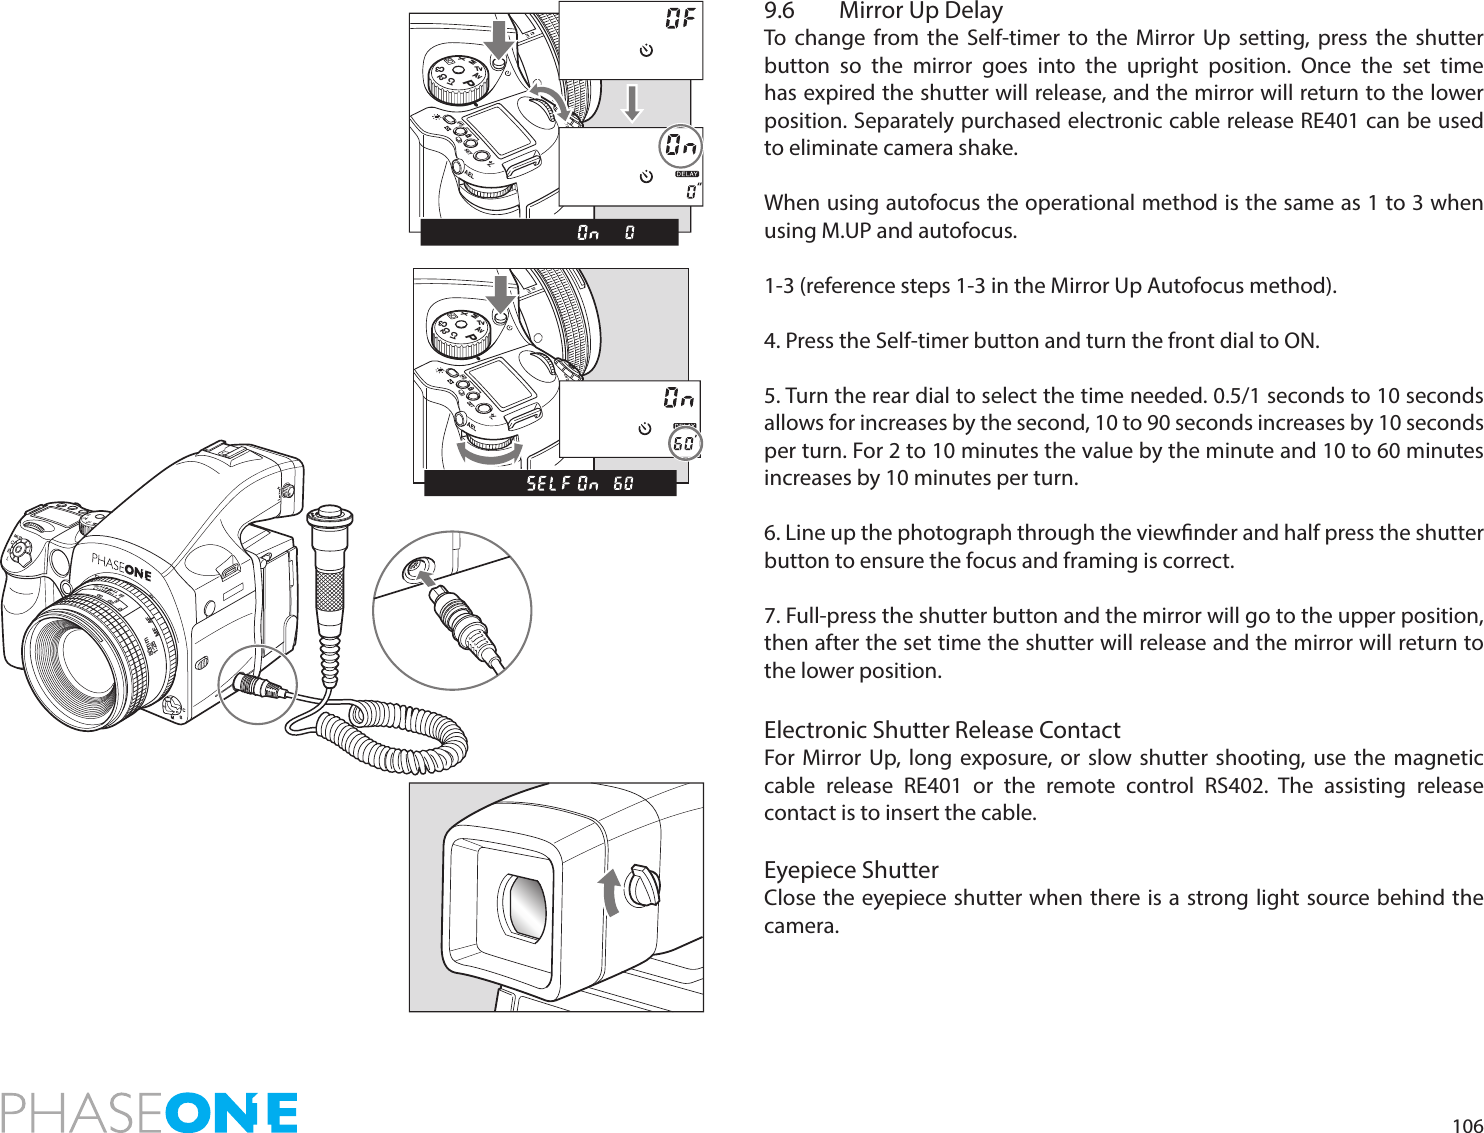
![1079.7 Bulb Mode & Long ExposureTo make an exposure longer than 30 seconds, adjust the shutter speed to “B” (bulb). In order to prevent camera shake, use the RE401 or RS402 electromagnetic shutter release and tripod.1. Turn the exposure mode dial to M (manual mode).2. Turn the front dial to select ‘bulb’, then turn the rear dial to set the aperture.3. Determine the composition, focus and then take the picture. The shutter remains open as long as the shutter release button is pressed.Setting Long ExposuresWhen photographing under normal conditions, the shutter speed can be adjusted for longer exposures.Turn the front dial for shooting time settings. New time settings include 1, bulb, tine(Time), 2, 4, 8, 15, 30, 60.9.8 Camera Display LightPress the backlight button[A] to illuminate the top display to see it at night or in dark places.The backlight will go on for approximately 20 seconds and turn o unless it is pressed again.The backlight will be lit for approximately another 10 seconds when operating the camera.NOTICE: When releasing the shutter, or pressing the backlight button [A] while the backlight is on, the backlight will go OFF.Choose the time of display light. C-03 Sleeptimer [HOLd]NOTICE:As the camera is electronically controlled even during exposures, it is recommended to replace batteries before bulb exposure.NOTICE: Using “tIME” (Time) setting, the shutter will open and close according to the number of times you press it.“tIME” (Time) photography is electronically controlled so it is possible that the batteries will drain quickly. In the case, please replace the batteries with new ones.PAvTvMXCFC1C2C3PAvTvMXCFC1C2C3ATvAvXMCFPC2C3C1](https://usermanual.wiki/SparkLAN-Communications/WUBR507N.WUBR-507N-UserMan-2/User-Guide-2002052-Page-9.png)
![1089.9 Front/Rear Dial Lock MechanismsWhen the Electronic Dial Lock is On, all currently set values in Av (Aperture Priority AE), Tv (Shutter Priority AE) and M (Manual mode) cannot be adjusted with the front or rear dials. This prevents accidental change of shutter speed or aperture values.Press down the two lock buttons [A] and [B] at the same time for approximately one second, until the On indicator blinks.To release the mode, hold down the same buttons until OF blinks. is displayed on the main LCD to indicate that operation of the front and rear dials is locked.When the dial lock is ON, the shutter speed and aperture will not change even if you turn the front or rear dial.When you activate the electronic dial lock, and then operate the electronic dial, the dial lock indicator on the main panel blinks for three seconds to show that the electronic dial lock is functioning.NOTICE: The setting will be stored after one second.Dial lock can not be set when the exposure mode is P (program AE).Even while dial lock is set, the front dial or rear dial can still be used to perform the various settings. (Dial lock is temporarily released.)PAvTvMXCFC1C2C3PAvTvMXCFC1C2C3PAvTvMXCFC1C2C3AB](https://usermanual.wiki/SparkLAN-Communications/WUBR507N.WUBR-507N-UserMan-2/User-Guide-2002052-Page-10.png)

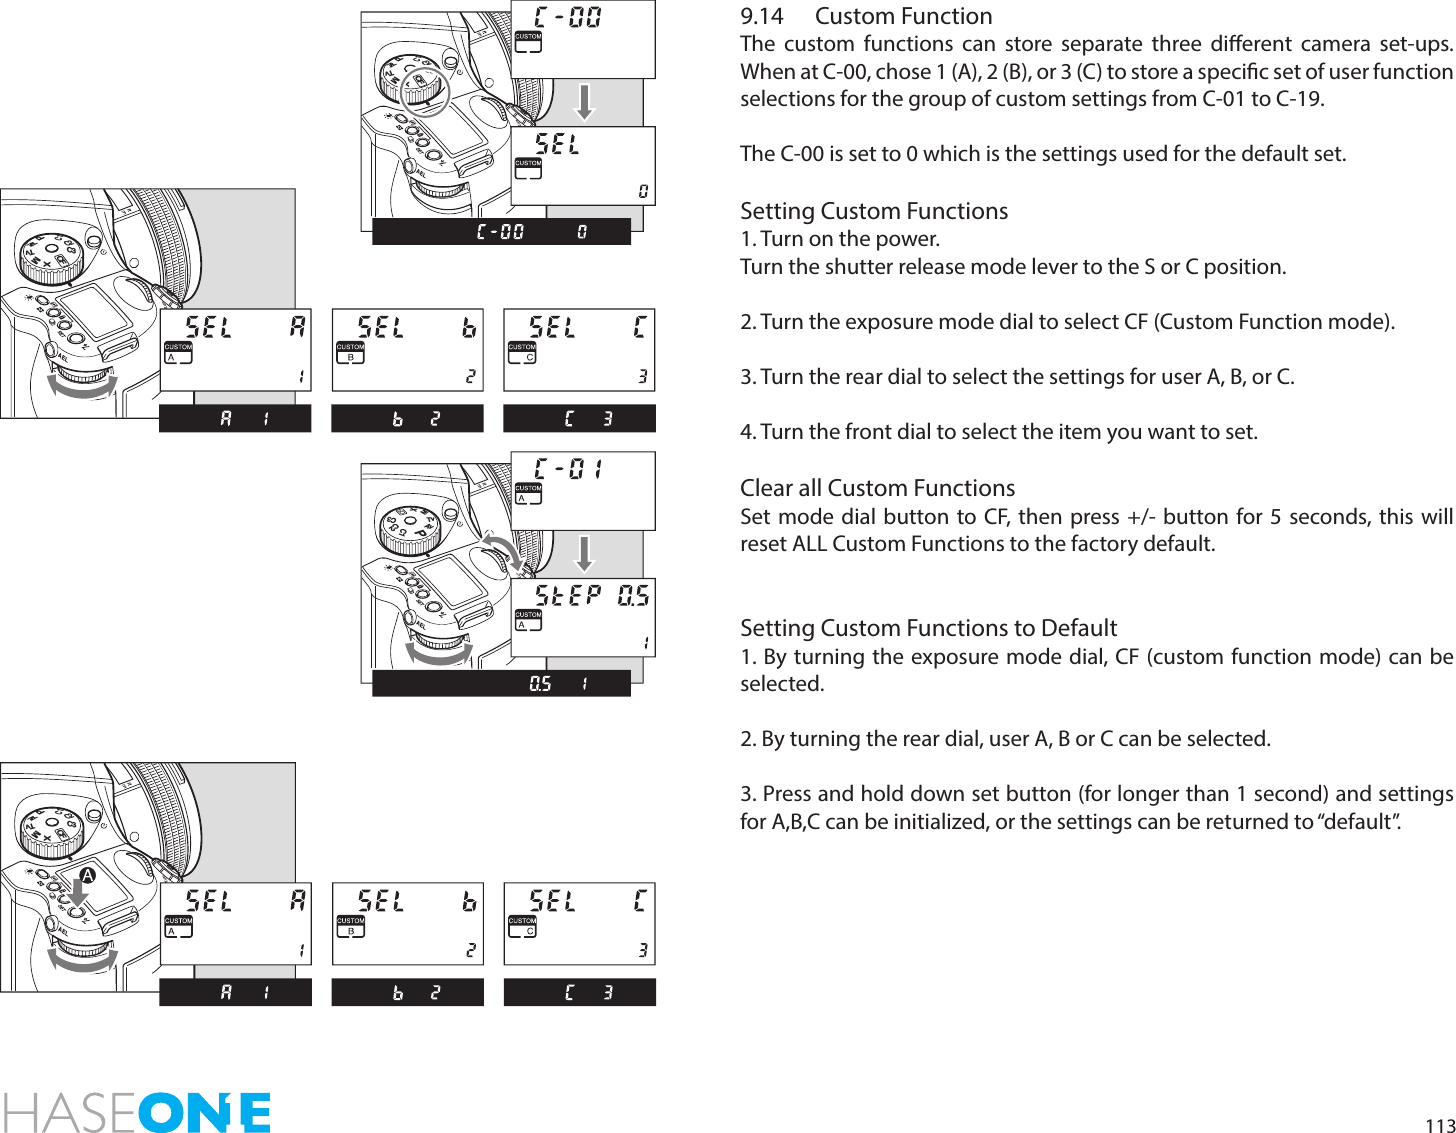
![1149.15 Types of Custom FunctionsC-00 Custom functions prole [SEL]0: None (default=0)1: A2: B3: CWhen “0” has been selected and set, none of the custom items can be set.C-01 EV-Steps [StEP]This function is used to set the size of increments concerning the shutter speed, f-number and exposure compensation value.0: 0.3 (1/3EV step: default setting)1: 0.5 (1/2EV step)2: 1.0 (1EV step)C-02 Lens change [I rI S]This function is used to set the f-number display method for the previously used lens when the lenses have been interchanged. The default setting is “0” in which case the f-number of the lens prior to the changeover is displayed.0: Previous f-number1: Maximum aperture setting2: Minimum aperture settingC-03 Sleeptimer [HOLd]This function is used to set the time for sleep mode to be established after the camera’s power is turned on. The default setting is 15 seconds.0: 15 seconds1: 30 seconds2: 60 seconds3: DisabledThe batteries will continuously lose power when “On” (no sleep mode)has been set.C-04 Battery Type [bat t ]This function is used to set the batteries used in the camera so that the remaining battery charge will be displayed correctly on the external LCD panel.0: Alkaline1: NiCd, NiMH, Li–ion2: Li-ION (Only for use with Li-Ion battery Kit or Vertical Grip)C-05 Bracketing [St no]Setting bracket’s width for auto bracketing setting0: 3 Exposures1: 5 Exposures2: 7 ExposuresC-06 Front/Rear dial [dF]This function is used to interchange the functions of the front and reardials in the M (manual mode).0: Front dial: TV, rear dial: Av [OF]1: Front dial: AV rear dial: Tv [On]C-07 Rear dial in P mode [d_AC]Initializing the P mode on the rear dial then changing the function to the front dial will cancel out P mode function on the rear dial.0: Enable1: DisableC-08 Dial Direction [d_dl]This function is used to determine the direction in which the electronic dial is to be rotated to increase and decrease shutter speed, the f-number, and exposure compensation.0: CW: Decrease [OF]1: CW: Increase [On]C-09 AEL & AFL button [AEFL]This function is used to set whether to interchange the operations of the front and rear AEL and AFL buttons.0: Default setting (front: AFL, rear: AEL) [OF]1: Switched (front AEL, rear: AFL) [On]C-10 Release button [HALF]This function is used to set the AE lock and AF operations when the shutter release button is half-pressed.0: AF operation (default setting)1: AF & AE operation2: Only shutter release](https://usermanual.wiki/SparkLAN-Communications/WUBR507N.WUBR-507N-UserMan-2/User-Guide-2002052-Page-16.png)
![115C-11 AEL function lock/unlock mode [AEL]This function is used to set the method of operating the AEL button to lock AE. At the default setting, when the AEL button is pressed, AE is locked; pressing the button again releases the AE lock. At the “1” setting (released after one shot), after AE lock is set, it is released when the shutter is triggered. At the “2” setting, AE lock is only kept while the AE lock button is being pressed.0: One shot1: Continuous2: While pressedC-12 AFL [AFL]This function is used to set the AF lock method when the AFL button is operated. AF >< Lock is activated with one press of the auto-lock button then deactivated with a second press.0: While pressed (default setting)1: AF operation2: ContinuousC-13 M-mode AEL [OnEP]When using M (manual mode) one push function, the shutter speed or aperture value can be set automatically by pressing AEL button.0: Shutter speed shift [t v]1: Aperture value shift [Av ]2: No [no]C-14 AF assist setting [AF_L]The AF auxiliary light res automatically when the subject is too dark to perform AF, but this function can be used to prevent the AF auxiliary light from ring.0: On [On]1: O [OF]C-15 Flash sync. [FLSY]When shooting moving subjects with ash you can set the synchronization timing. This allows you to have the ash re at the beginning of the exposure or at the end of the exposure.0: First (default setting)1: SecondC-16 Beep [bu]When the SET button is pressed a beep sounds0: ON (AF) (Default setting)1: ON2: OFFC-17 Shutter TV, AV & P [Sh_P]When using P, Av or Tv mode and the leaf shutter lens is attached but you prefer to use the focal plane shutter.0: Mixed. Default (Focal Plane shutter operation at < 1S)1: Leaf shutter2: Focal plane shutter C-18 Shutter in M & X [Sh]When initializing the setting, use of the lens shutter (and its respective ranges) or the focal plane shutter can be chosen when the leaf shutter lens is attached.0: Mixed. Default (Focal Plane shutter operation at < 1S)1: Leaf shutter2: Focal plane shutter C-19 AF Priority [AF_2]Accuracy of auto-focusing priority (default setting) or speed priority can be decided. Use the front dial to scroll to Custom function 19 and the rear dial to set AF Priority to one of the following:00: Speed01: AccuracyPlease note: On IQ, P 65+ or P 40+ digital backs, this CF function can also be set from within the digital back menu system: Menu > 645DF > Setup Custom A > AF priorityC-20 AF Fine TuneUse the front dial to scroll to Custom function 20. Use the rear dial to ne-tune the focus point on a subject that is closer or further away from the camera.50: Neutral factory calibrationMinus: Move AF point closerPlus: Move AF point further away](https://usermanual.wiki/SparkLAN-Communications/WUBR507N.WUBR-507N-UserMan-2/User-Guide-2002052-Page-17.png)
![12210.2 Battery SocketNever leave batteries in the socket if the camera or back is not planned to be used for longer periods. Keep contacts clean and dry at all times.External Battery SocketUse an external battery case PE401 when using the camera in cold temperatures where the battery capacity may drop. 1. Turn the shutter release mode selector lever to the L position (power o).2. Use a coin or similar object to turn and remove the external battery socket cap.3. Remove the battery case from the camera body4. Connect the external battery case to the body. Connect the plug of the external battery case in which the batteries are installed, to the external battery socket.5. Reinstall the original battery case, from which the batteries were removed, in the body. Turn the battery case lock to lock it in the body.10.3 Tripod/Electronic Shutter Release ContactKeep all contacts clean and dry at all time.When using a tripod with 3/8” screw (instead of 1/4” screw) remove the small screw[A] from the tripod screw hole on the bottom of the body using a plus screwdriver, then use a coin to remove the tripod screw adapter bushing[B].You will nd Electronic Shutter Release both on the camera body and on the back. When used, it is recommended to use the shutter release on the back. Keep both contacts dry and clean.Notice:Make sure to re-install the empty battery case into the body.The empty battery cassette must be inserted into the body.The batteries may generate heat if the external battery case is connected to the body while the batteries are loaded on the body.ABCSM.UPL](https://usermanual.wiki/SparkLAN-Communications/WUBR507N.WUBR-507N-UserMan-2/User-Guide-2002052-Page-24.png)