Ubiquiti AF2X Digital Point-to-Point Radio User Manual airFiber X User Guide
Ubiquiti Networks, Inc. Digital Point-to-Point Radio airFiber X User Guide
Ubiquiti >
Contents
- 1. user manual Part 1
- 2. user manual Part 2
- 3. user manual Part 3
- 4. user manual Part 4
user manual Part 3
13
Chapter 4: Main TabairFiber® X User Guide
Ubiquiti Networks, Inc.
Chapter 4: Main Tab
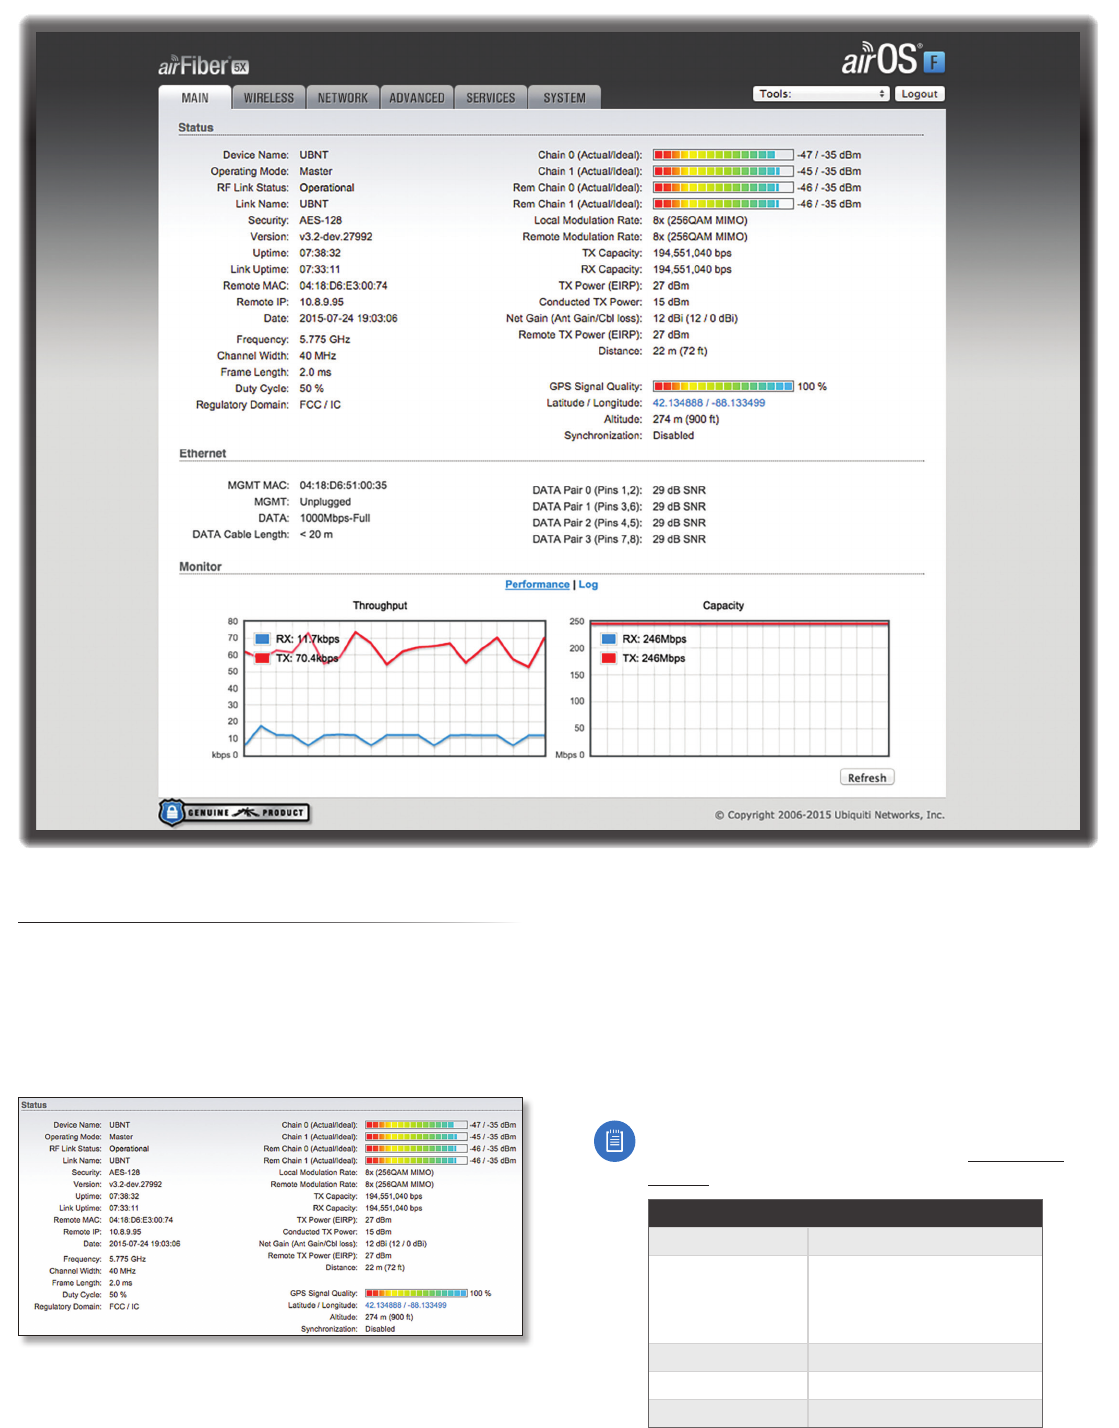
The Main tab displays a summary of the link status
information, current values of the basic configuration
settings, network settings and information, and traffic
statistics.
Status
Device Name Displays the customizable name or
identifier of the device. The Device Name (also known
as host name) is displayed in registration screens and
discovery tools.
Operating Mode Displays the mode of the AirFiberX
radio: Slave, Master, or Reset.
RF Link Status Displays the status of the AirFiberX radio:
RFOff, Syncing, Beaconing, Registering, Enabling, Listening,
Operational, DFS CAC, or RADAR Detected.
Note: Most of the RF Link Statuses map to specific
flash rates of the Link Status LED (See “LEDs” on
page 2 for more details.)
Status Flash Rate of LED
RF Off Off
Syncing
DFS countries only:
• DFS CAC
• RADAR Detected
Short Flash (1:3 on/off cycle)
Beaconing Normal Flash (1:1 on/off cycle)
Registering Long Flash (3:1 on/off cycle)
Operational On
14
Chapter 4: Main Tab airFiber® X User Guide
Ubiquiti Networks, Inc.
The following applies to the AF-5X only:
When the AF-5X operates in a DFS country and within a
valid DFS band for that country, it performs a Channel
Availability Check (CAC) before operating. The rules vary
by country and frequency, but in general:
- FCC domains If the AF-5X operates in a DFS band
(5.2GHz or 5.4GHz band), the AF‑5X performs a
60-second check on the Masteronly.
- ETSI domains For most frequencies, the AF-5X
performs a 60-second check on the Master and Slave;
however, if it operates in the 5600‑5650 MHz range,
then the AF-5X performs a 10-minute check.
While the AF-5X is performing this check, the RF Link
Status displays DFS CAC, and the RF Link Timeout is
displayed.
If radar is detected, the RF Link Status displays RADAR
Detected, and the RF Link Timeout is displayed.
RF Link Timeout (Available only if the RF Link Status
is DFS CAC or RADAR Detected.) During the DFS CAC or
RADARDetected state, the RF Link Timeout counts down
the time remaining before the AirFiberX radio can move
to the next RF link state.
Link Name Displays the name of your link.
Security AES-128 is enabled at all times.
Version Displays the airFiber Configuration Interface
software version.
Uptime This is the total time the device has been running
since the latest reboot (when the device was powered up)
or software upgrade. The time is displayed in days, hours,
minutes, and seconds.
Link Uptime This is the total time the airFiber link has
been continuously operational. The time is displayed in
days, hours, minutes, and seconds.
Remote MAC Displays the Management Ethernet MAC
address of the remote AirFiberX radio.
Remote IP Displays the Management Ethernet IP address
of the remote airFiberX radio.
Date Displays the current system date and time. The
date and time are displayed in YEAR‑MONTH‑DAY
HOURS:MINUTES:SECONDS format. The system date and
time is retrieved from the Internet using NTP (Network
Time Protocol). The NTP Client is enabled by default on the
Services tab. The AirFiberX radio doesn’t have an internal
clock, and the date and time may be inaccurate if the
NTP Client is disabled or the device isn’t connected to the
Internet.
Frequency (Available if split frequencies are not enabled.)
Displays the current frequency. The AirFiberX radio uses
the radio frequency specified to transmit and receivedata.
TX Frequency (Available if split frequencies are enabled.)
Displays the frequency that the airFiberX radio uses to
transmit data.
RX Frequency (Available if split frequencies are enabled.)
Displays the frequency that the airFiberX radio uses to
receivedata.
Channel Width Size of the channel in MHz.
Frame Length Displays the currently configured frame
length of the radio: 2.0ms, 2.5ms, 4.0ms, or 5ms. Longer
frame lengths result in higher throughput for a given
configuration, but also result in slightly higher latency.
Duty Cycle Displays the duty cycle.
Regulatory Domain Displays the regulatory domain
(FCC/IC, ETSI, or Other), as determined by country
selection.
Chain 0/1 (Actual/Ideal) Displays the actual and ideal
power levels (in dBm) of the received signal for each chain.
The actual number indicates the current RX signal
strength. The ideal number is the RX signal strength of a
perfectly aligned link. These two numbers indicate exactly
how many dB out of alignment the system is.
When the link is aimed correctly, the bar graphs are full-
scale. If the bar graphs are not full-scale, they indicate that
your link is not optimally aimed.
Rem Chain 0/1 (Actual/Ideal) Displays the actual and
ideal power levels (in dBm) of the received signal for each
chain of the remote airFiberX radio. The bar graphs will
display as full-scale once the link is aimed correctly.
Local Modulation Rate Displays the modulation rate:
• 8x (256QAM MIMO)
• 6x (64QAM MIMO)
• 4x (16QAM MIMO)
• 2x (QPSK MIMO)
• 1x (½ Rate QPSK xRT™*)
• ¼x (¼ Rate QPSK xRT)
*xtreme Range Technology
If Automatic Rate Adaptation is enabled on the Wireless
tab, then Local Modulation Rate displays the current speed
in use and depends on the Maximum Modulation Rate
specified on the Wireless tab and current link conditions.
Remote Modulation Rate Displays the modulation rate
of the remote airFiberX radio:
• 8x (256QAM MIMO)
• 6x (64QAM MIMO)
• 4x (16QAM MIMO)
• 2x (QPSK MIMO)
• 1x (½ Rate QPSK xRT)
• ¼x (¼ Rate QPSK xRT)
TX Capacity Displays the potential TX throughput, how
much the airFiberX radio can send, after accounting for
the modulation and error rates.
15
Chapter 4: Main TabairFiber® X User Guide
Ubiquiti Networks, Inc.
RX Capacity Displays the potential RX throughput, how
much the airFiberX radio can receive, after accounting for
the modulation and error rates.
TX Power (EIRP) Displays the current average transmit
output power (in dBm) of the airFiberX radio.
Note: If “(Limited)” is displayed, the transmit output
power has been limited to a value less than the
selected value, to comply with regulatory region
requirements. For a list of maximum output power
values by country and region, refer to “Frequency
Ranges and Power Levels per Country/Region” on
page 50.
Conducted TX Power Displays the conducted transmit
power out of the radio before any antenna gain.
Net Gain Displays the airFiberX radio’s net antenna gain,
which is the antenna gain minus cable loss. Antenna
gain (the gain of the antenna being used) and cable loss
(the loss in the cable from the radio to the antenna) are
set using the Antenna Gain and Cable Loss fields on the
Wireless tab.
Remote TX Power (EIRP) Displays the current average
transmit output power (in dBm) of the remote airFiberX
radio.
Distance Displays the distance between the airFiberX
radios.
GPS Signal Quality Displays Global Positioning System
(GPS) signal quality as a percentage value on a scale of
0-100%.
Latitude/Longitude Based on GPS tracking, reports the
device’s current latitude and longitude. Clicking the link
opens the reported latitude and longitude in a browser
using Google Maps™ (http://maps.google.com).
Altitude Based on GPS tracking, reports the device’s
current altitude relative to sea level.
Synchronization airFiber uses GPS to synchronize the
timing of its transmissions. By default, this option is
disabled.
Ethernet
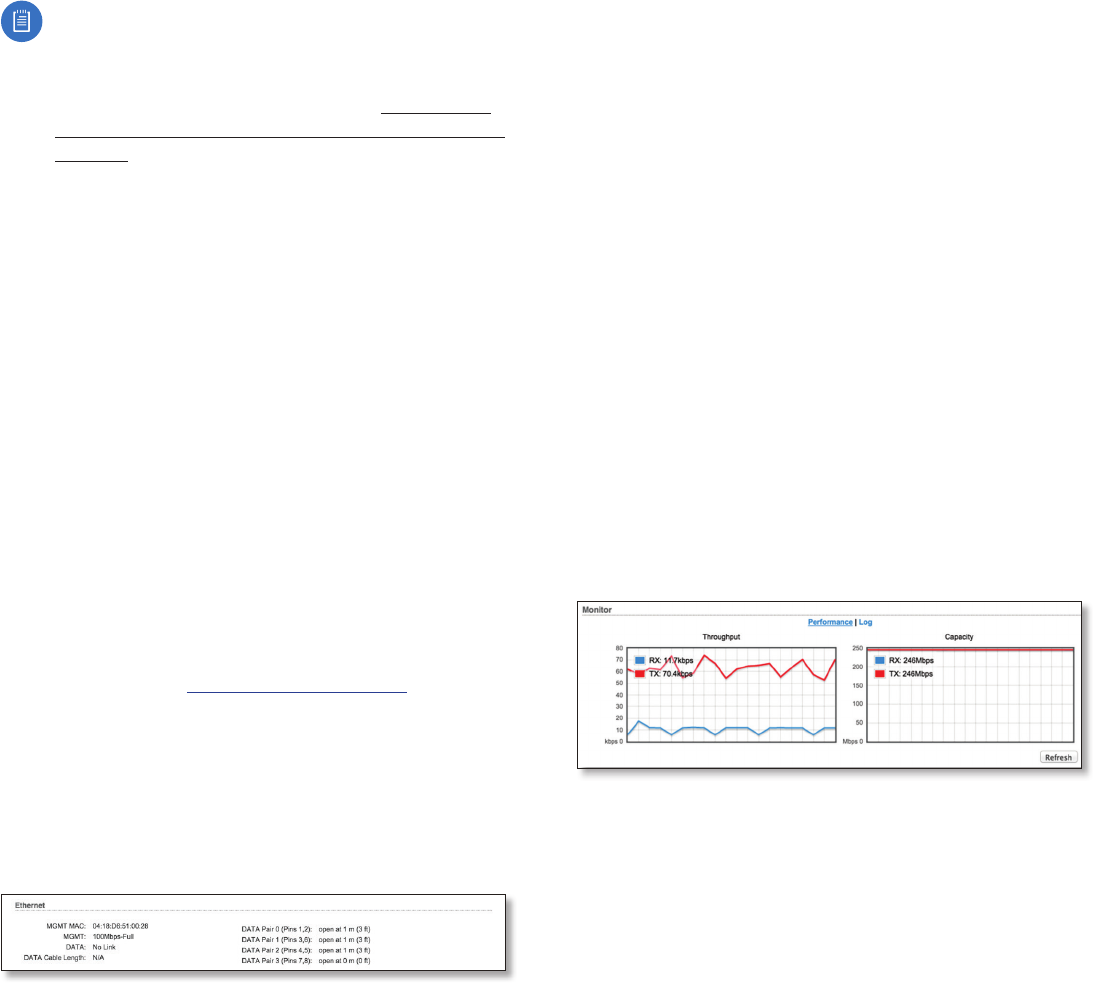
MGMT MAC Displays the MAC address of the
Management port.
MGMT Displays the speed and duplex of the
Managementport.
DATA Displays the speed and duplex of the Data port.
DATA Cable Length Displays the Ethernet cable length
from radio to remote port. This is displayed only for cables
longer than 20 m.
DATA Pair 0 (Pins 1,2) If the cable is functioning properly,
displays the SNR of the twisted pair; if the cable has a
fault, displays the fault (“open” or “short”) and the distance
at which the fault has occurred. If the remote port is
administratively shut down, this field displays “normal”.
DATA Pair 1 (Pins 3,6) If the cable is functioning properly,
displays the SNR of the twisted pair; if the cable has a
fault, displays the fault (“open” or “short”) and the distance
at which the fault has occurred. If the remote port is
administratively shut down, this field displays “normal”.
DATA Pair 2 (Pins 4,5) If the cable is functioning properly,
displays the SNR of the twisted pair; if the cable has a
fault, displays the fault (“open” or “short”) and the distance
at which the fault has occurred. If the remote port is
administratively shut down, this field displays “normal”.
DATA Pair 3 (Pins 7,8) If the cable is functioning properly,
displays the SNR of the twisted pair; if the cable has a
fault, displays the fault (“open” or “short”) and the distance
at which the fault has occurred. If the remote port is
administratively shut down, this field displays “normal”.
Monitor
There are two monitoring tools accessible via the links
on the Main tab. The default is Performance, which is
displayed when you first open the Main tab.
Performance
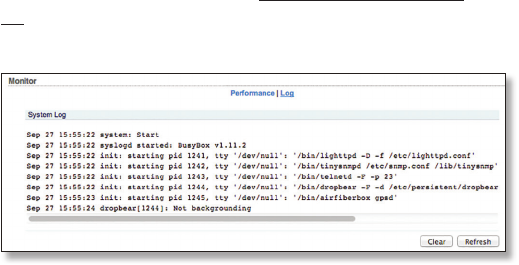
Throughput and Capacity charts display the current and
potential data traffic.
Throughput
Throughput displays the current data traffic on the Data
port in both graphical and numerical form. The chart scale
and throughput dimension (Bps, Kbps, Mbps) change
dynamically depending on the mean throughput value.
The statistics are updated automatically.
Capacity
Capacity displays the potential data traffic on the Data
port in both graphical and numerical form. The chart scale
and throughput dimension (Bps, Kbps, Mbps) change
dynamically depending on the mean throughput value.
The statistics are updated automatically.
Refresh If there is a delay in the automatic update, click
Refresh to manually update the statistics.
16
Chapter 4: Main Tab airFiber® X User Guide
Ubiquiti Networks, Inc.
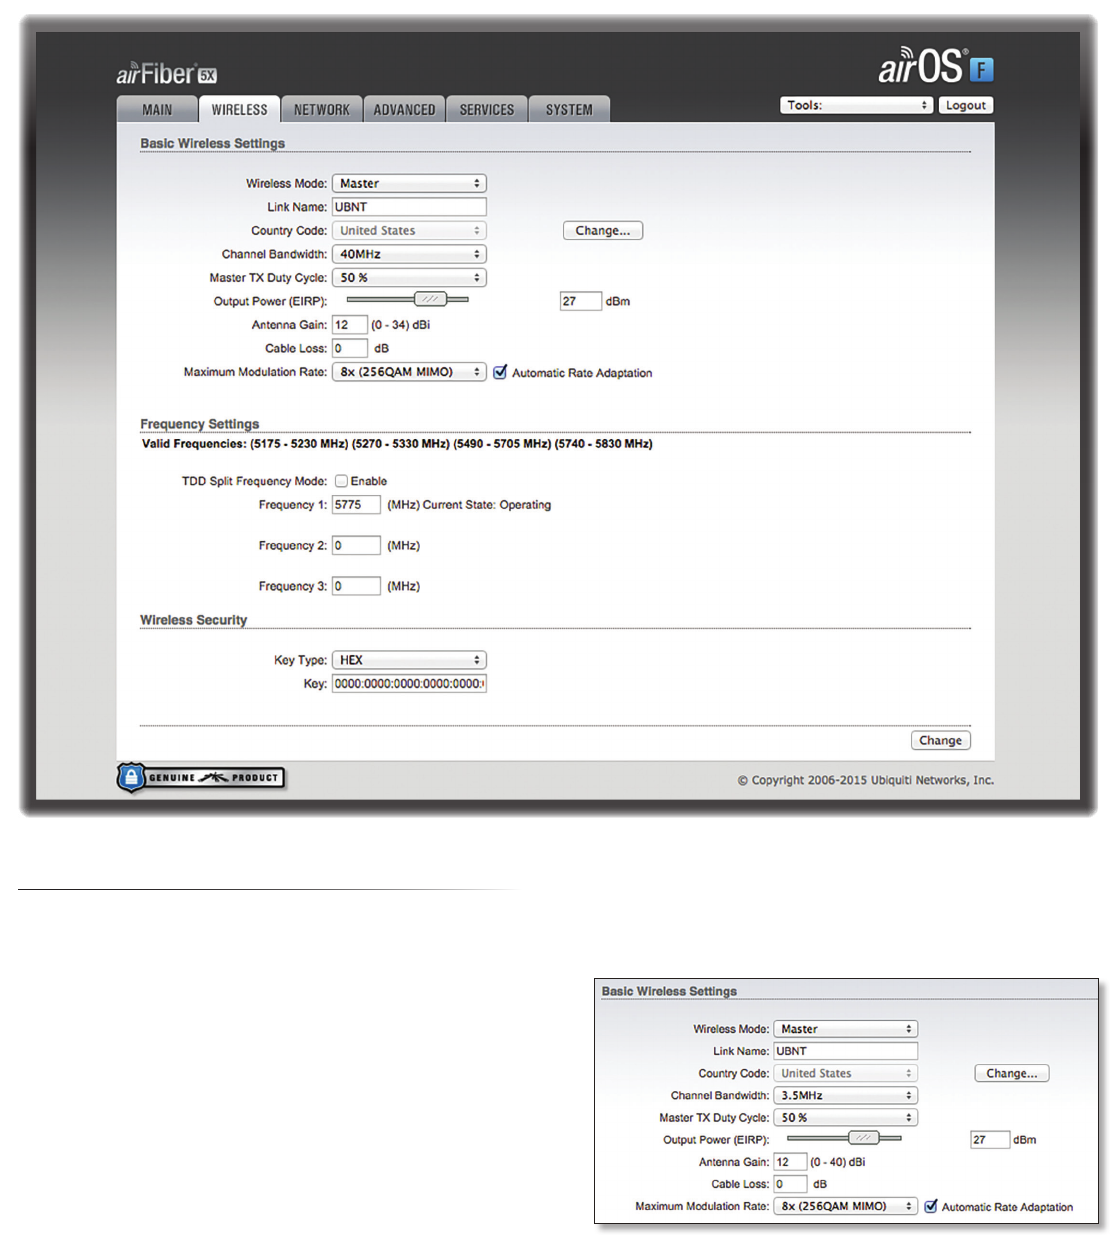
Log
When logging is enabled (see “System Log” on page
27 to enable logging), this option lists all registered
system events. By default, logging is not enabled.
Clear To delete all entries in the system log, click Clear.
Refresh To update the log content, click Refresh.
17
Chapter 5: Wireless TabairFiber® X User Guide
Ubiquiti Networks, Inc.
Chapter 5: Wireless Tab
The Wireless tab contains options to set up the wireless
part of the link. This includes wireless mode, link name,
frequencies, output power, speed, and wireless security.
Change To save or test your changes, click Change.
A new message appears. You have three options:
• Apply To immediately save your changes, click Apply.
• Test To try the changes without saving them, click Test.
To keep the changes, click Apply. If you do not click
Apply within 180 seconds (the countdown is displayed),
the airFiberX radio times out and resumes its earlier
configuration.
• Discard To cancel your changes, click Discard.
Write down the settings you configure on the Wireless tab.
You will need to enter the same settings on the airFiberX
radio at the other end of your PtP link. The exceptions are
as follows:
• Wireless Mode Configure one airFiberX radio as the
Master and the other as the Slave.
Basic Wireless Settings
In this section, configure the basic wireless settings, such
as wireless mode, link name, country code, frequencies,
output power, speed, and gain.
Wireless Mode By default, the Wireless Mode is Slave. You
must configure one airFiberX radio as Master because
each PtP link must have one Master.
Link Name Enter a name for your PtP link. This name
must be the same on both Master and Slave radios in
order for them to connect.
18
Chapter 5: Wireless Tab airFiber® X User Guide
Ubiquiti Networks, Inc.
Country Code Each country has its own power level
and frequency regulations. To ensure the airFiberX radio
operates under the necessary regulatory compliance rules,
you must select the country where your device will be used.
The frequency settings and output power limits will
be tuned according to the regulations of the selected
country. For details, refer to this table, “Frequency Ranges
and Power Levels per Country/Region” on page 50.
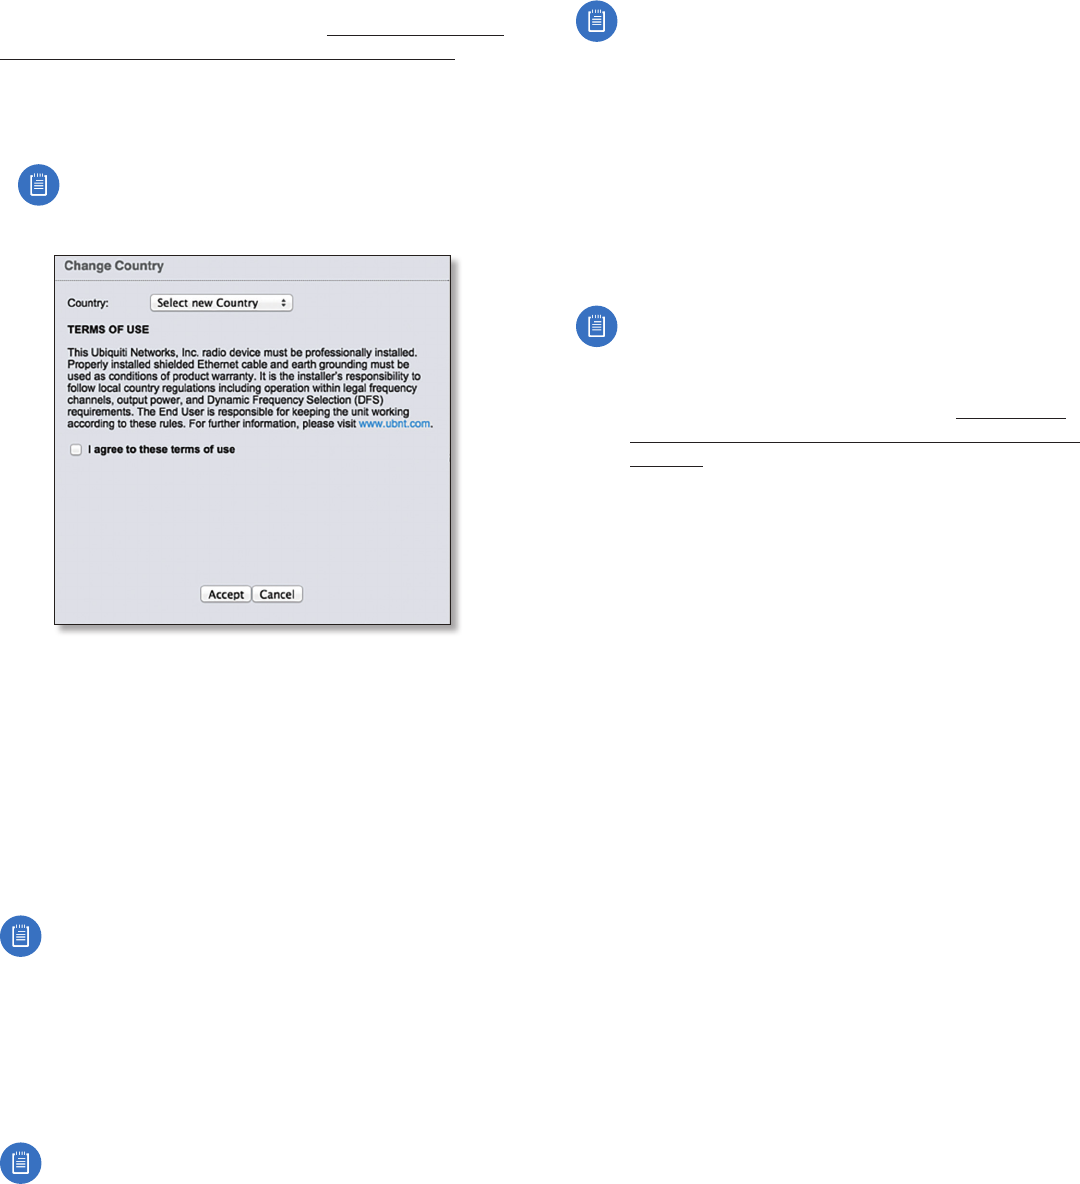
This radio is restricted to use with a license and to use only in
certain EU countries or geographical areas of EU countries.
• Change To select a new country, click Change.
Note: U.S. product versions are locked to the U.S.
Country Code to ensure compliance with FCC
regulations.
- Country Select the new country.
- I agree to these terms of use Check this box; you
must agree to the Terms of Use to use the product.
- Accept Saves your change.
- Cancel Discards your change.
Channel Bandwidth Select the appropriate channel size:
• AF-2X and AF-3X: 3.5, 5, 7, 10, 14, 20, 28, 30, 40, 50,
or 56 MHz
• AF-5X only: 5, 10, 20, 30, 40, or 50 MHz
Note:. The available channel bandwidths depend
on the regulatory requirements of the currently
selected country or region.
Frame Length (Available on AF-2X and AF-3X only.) Use
this to specify the frame length of the radio: default,
2.0ms, 2.5ms, 4.0ms, or 5ms. The frame length must be
the same on both Master and Slave radios. The default
value corresponds to 5ms for the 3.5MHz and 5MHz
bandwidths, or 2.0ms for all other bandwidths.
Note:. The AF-5X uses a frame length of 2.0ms (this
value cannot be changed).
Master TX Duty Cycle Use this to change the duty cycle
of the RF link (the Master’s TX percentage). Choose one of
the following values: 25%, 33%, 50%, 67%, or 75%.
Output Power (EIRP) Defines the maximum average
transmit output power (in dBm) of the airFiberX radio.
To specify the output power, use the slider or manually
enter the output power value. The transmit power level
maximum is limited according to country regulations.
Note: The Antenna Gain and Cable Loss should be
configured before the Output Power. This is because
the range of the Output Power field is affected by
the Antenna Gain and Cable Loss values – changing
the antenna gain or cable loss adjusts the maximum
and minimum values you can select using the
Output Power slider. Since the Output Power
already includes the antenna gain and cable loss, it
represents EIRP; therefore, the value of Output Power
is actually the total power the radio is transmitting
over the air. The current transmit power is displayed
by the TX Power EIRP setting on the Main tab.
Note: The airFiberX radio may limit the output
power to a value less than the value specified
by this field, to comply with regulatory region
requirements. For a list of maximum output power
values by country and region, refer to “Frequency
Ranges and Power Levels per Country/Region” on
page 50.
Antenna Gain Enter the gain in dBi of the antenna that is
used in your installation. An improper value could cause
DFS false detections when operating on DFS frequencies.
Cable Loss Enter the cable loss in dB of the cable that is
used in your installation. An improper value could cause
DFS false detections when operating on DFS frequencies.
Maximum Modulation Rate or Modulation Rate Higher
modulations support greater throughput but generally
require stronger RF signals and a higher Signal-to-Noise
Ratio (SNR). By default, Automatic Rate Adaptation is
enabled, and Maximum Modulation Rate is displayed. This
allows the airFiberX radio to automatically adjust the
modulation rate to changing RF signal conditions. Under
certain conditions, you may prefer to lock the Maximum
Modulation Rate to a lower setting to improve link
performance.
When Automatic Rate Adaptation is disabled, Modulation
Rate is displayed. Lock the Modulation Rate to the setting
of your choice.
Select one of the available modulation rates:
• 8x (256QAM MIMO)
• 6x (64QAM MIMO)
• 4x (16QAM MIMO)
• 2x (QPSK MIMO)
• 1x (½ Rate QPSK xRT)
• ¼x (¼ Rate QPSK xRT)
19
Chapter 5: Wireless TabairFiber® X User Guide
Ubiquiti Networks, Inc.
Frequency Settings
The Valid Frequencies for your Country Code selection are
displayed. Ensure that you use frequencies that comply
with the local country regulations.
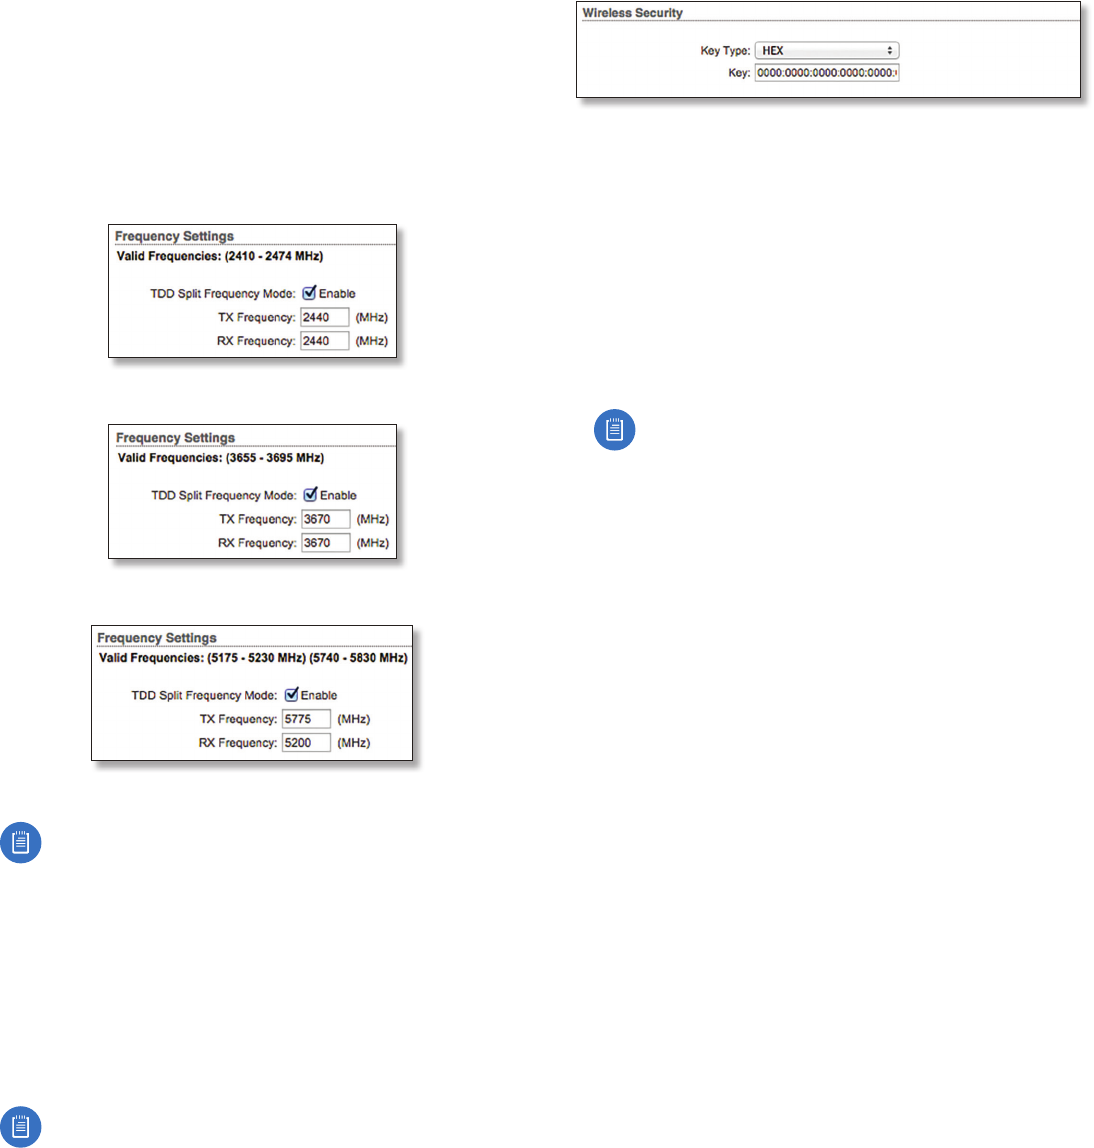
TDD Split Frequency Mode This option lets you
configure separate frequencies for TX and RX. To configure
split frequencies, enable this option and select a different
RX frequency on each side of the link. This feature is useful
if both sides of the link do not have a common, clean
frequency. It is important for the RX frequency to be
clean; if different frequencies are clean on each end of the
link, select the clean RX frequency on each end.
AF-2X Split Frequency Settings
AF-3X Split Frequency Settings
AF-5X Split Frequency Settings
Note for AF-5X only: Split frequency mode is not
available in DFS bands because the RX frequency
must match the TX frequency to allow the receiver
to scan for DFS on the TX frequency. In regions
where both DFS and non-DFS frequencies are
available, enabling split frequencies will disable any
DFS band frequencies. In regions where only DFS
frequencies are available, there will be no option to
turn on split frequencies.
Frequency Enter a valid frequency. The current state is
displayed.
Note: The Master and Slave should have the same
Frequency setting.
Wireless Security
airFiber uses 128-bit, AES (Advanced Encryption Standard)
encryption at all times.
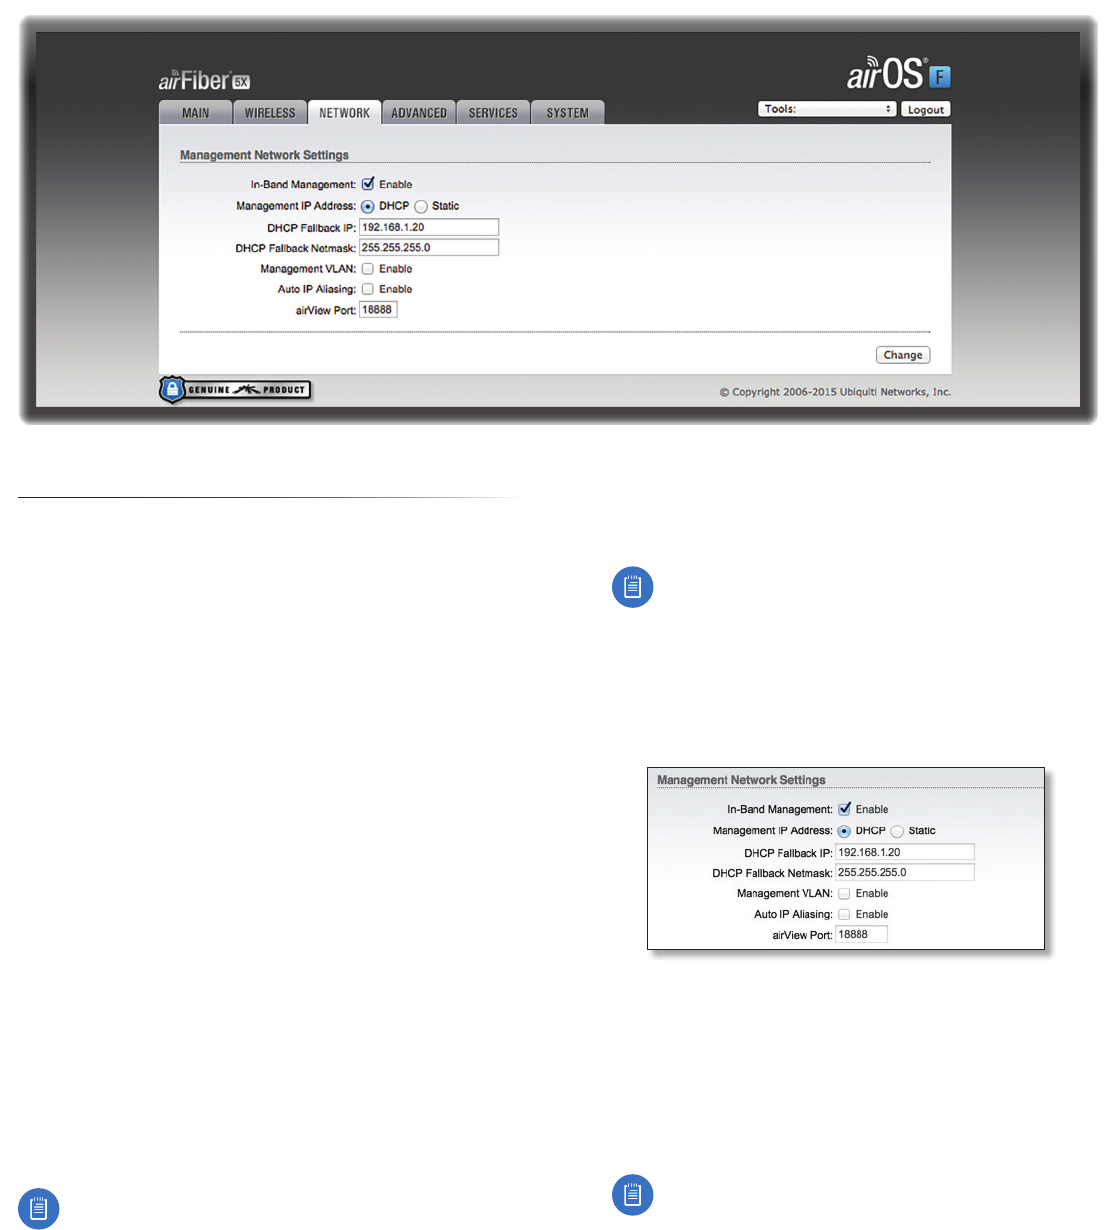
Key Type Specifies the character format.
• HEX By default, this option uses hexadecimal
characters. 0-9, A-F, or a-f are valid characters.
• ASCII ASCII uses the standard English alphabet and
numeric characters (0-9, A-Z, or a-z).
Key Select the format of the MAC address.
• HEX Enter 16bytes (eight, 16-bit HEX values). You can
omit zeroes and use colons, similar to the IPv6 format.
The default is:
0000:0000:0000:0000:0000:0000:0000:0000
Note: The airFiber Configuration Interface
supports IPv6 formats excluding dotted quad and
“::” (double-colon) notation.
• ASCII Enter a combination of alphanumeric characters.
Using 128-bit SHA1 (Secure Hash Algorithm 1), the
airFiberX radio hashes the ASCII key to create a 128-bit
key for AES.
20
Chapter 6: Network Tab airFiber® X User Guide
Ubiquiti Networks, Inc.
Chapter 6: Network Tab
The Network tab allows you to configure settings for the
management network. There are two ways to access the
airFiber Configuration Interface:
• Management Port Enabled by default. Use a direct
connection to the Management port for out-of-band
management.
• In-Band Management Enabled by default. In-band
management is available through the local Data port or
the Data port at the other end of the link.
The Management port and in-band management share
the default IP address of 192.168.1.20.
Change To save or test your changes, click Change.
A new message appears. You have three options:
• Apply To immediately save your changes, click Apply.
• Test To try the changes without saving them, click Test.
To keep the changes, click Apply. If you do not click
Apply within 180 seconds (the countdown is displayed),
the airFiberX radio times out and resumes its earlier
configuration.
• Discard To cancel your changes, click Discard.
Management Network Settings
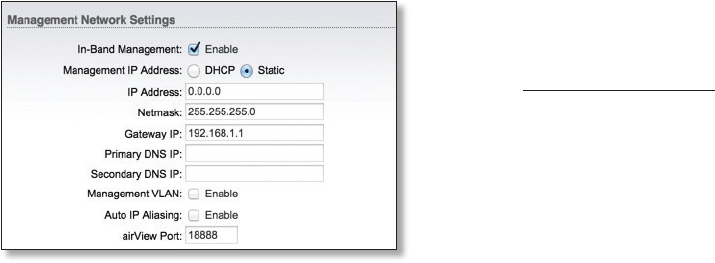
In-Band Management Enabled by default. In-band
management is available through the local Data port or
the Data port at the other end of the link.
Note: If In-Band Management is enabled, ensure
that each airFiberX radio in a link has a unique
IP Address. If the airFiberX radios use the same IP
Address, you may lose access via the Data ports.
Management IP Address The airFiberX radio can use
a static IP address or obtain an IP address from its DHCP
server.
• DHCP Keep the default, DHCP, to use DHCP reservation
on your router to assign a unique IP Address. The local
DHCP server assigns a reserved IP address, gateway IP
address, and DNS address to the airFiberX radio.
Note: If you select the DHCP option, ensure that
you use DHCP reservation because if you do not
know the IP address, then the only way to manage
the airFiberX radio is to reset the airFiberX radio
to its factory default settings. (Press and hold
the Reset button for more than five seconds.)
Its default Management IP Address is reset to
192.168.1.20.
- DHCP Fallback IP Specify the IP address the
airFiberX radio should use if a DHCP server is not
found.
- DHCP Fallback Netmask Specify the netmask the
airFiberX radio should use if a DHCP server is not
found.
• Static Assign static IP settings to the airFiberX radio.
Note: IP settings should be consistent with the
address space of the airFiberX radio’s network
segment.
21
Chapter 6: Network Tab airFiber® X User Guide
Ubiquiti Networks, Inc.
- IP Address Specify the IP address of the airFiberX
radio. This IP will be used for device management
purposes.
- Netmask When the netmask is expanded into its
binary form, it provides a mapping to define which
portions of the IP address range are used for the
network devices and which portions are used for host
devices. The netmask defines the address space of the
airFiberX radio’s network segment. The 255.255.255.0
(or “/24”) netmask is commonly used on many Class C
IP networks.
- Gateway IP Typically, this is the IP address of the host
router, which provides the point of connection to the
Internet. This can be a DSL modem, cable modem, or
WISP gateway router. The airFiberX radio directs data
packets to the gateway if the destination host is not
within the local network.
- Primary DNS IP Specify the IP address of the primary
DNS (Domain Name System) server.
- Secondary DNS IP Specify the IP address of the
secondary DNS server. This entry is optional and used
only if the primary DNS server is not responding.
Management VLAN If enabled, automatically creates a
management Virtual Local Area Network (VLAN).
• VLAN ID Enter a unique VLAN ID from 2 to 4094.
Auto IP Aliasing If enabled, automatically generates an
IP address for the corresponding WLAN/LAN interface.
The generated IP address is a unique Class B IP address
from the 169.254.X.Y range (netmask 255.255.0.0), which
is intended for use within the same network segment
only. The Auto IP always starts with 169.254.X.Y, with X
and Y as the last two octets from the MAC address of
the airFiberX radio. For example, if the MAC address is
00:15:6D:A3:04:FB, then the generated unique Auto IP will
be 169.254.4.251. (The hexadecimal value, FB, converts to
the decimal value,251.)
The Auto IP Aliasing setting can be useful because you
can still access and manage devices even if you lose,
misconfigure, or forget their IP addresses. Because an
Auto IP address is based on the last two octets of the MAC
address, you can determine the IP address of a device if
you know its MAC address.
airView Port The port number associated with the
airView spectrum analyzer tool. The default value is 18888.
For detailed information on the airView tool, refer to
“airView” on page 33.
22
Chapter 7: Advanced Tab airFiber® X User Guide
Ubiquiti Networks, Inc.
Chapter 7: Advanced Tab
The Advanced tab handles advanced wireless and Ethernet
settings. These settings should not be changed unless
you understand how the changes will affect the airFiberX
radio.
Change To save or test your changes, click Change.
A new message appears. You have three options:
• Apply To immediately save your changes, click Apply.
• Test To try the changes without saving them, click Test.
To keep the changes, click Apply. If you do not click
Apply within 180 seconds (the countdown is displayed),
the airFiberX radio times out and resumes its earlier
configuration.
• Discard To cancel your changes, click Discard.
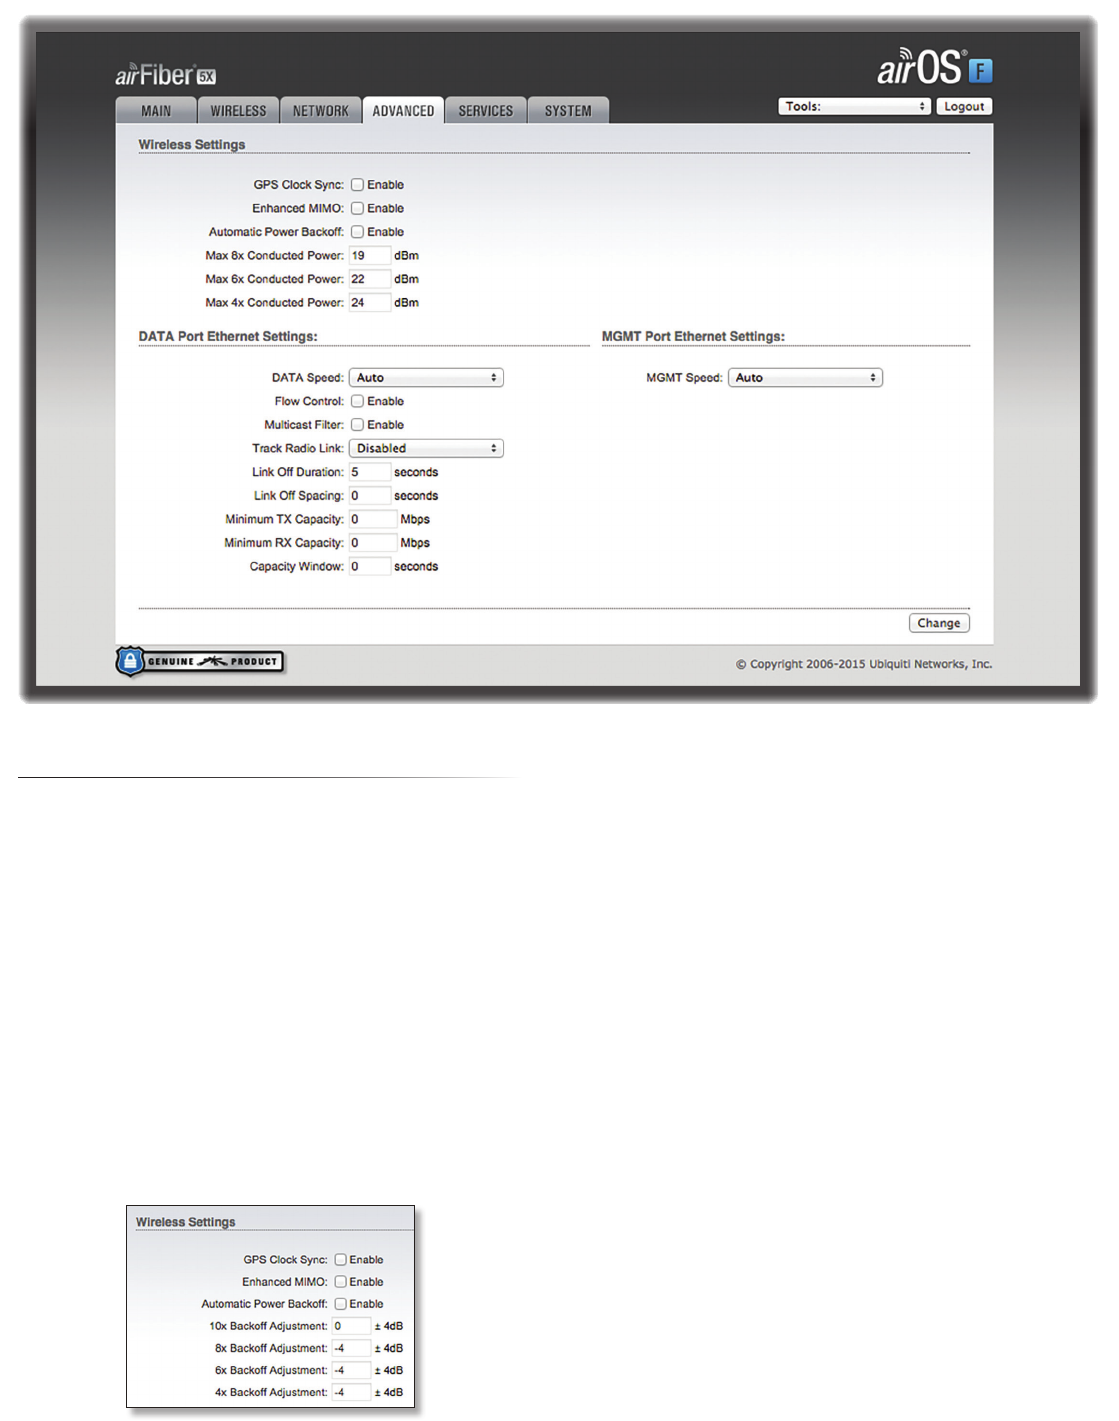
Wireless Settings
GPS Clock Sync The airFiber uses GPS to synchronize
the timing of its transmissions. By default, this option is
disabled.
Automatic Power Backoff This feature allows the radio
to automatically adjust the maximum TX power per
modulation so that the radio never transmits at a higher
power than each modulation rate can decode. The default
values in the Max 8x/6x/4x Conducted Power fields are
values determined to work at all temperatures and all
frequencies supported by the radio.
It may, however, be possible to increase the maximum
TX power for one or more modulations based on your
radio’s operating environment. For example, if a radio
is running at 6x and trying to switch into 8x operation,
you can increase the Max 8x Conducted Power value 1dB
at at time to see if the radio can maintain 8x operation
(Automatic Power Backoff must be enabled to allow the
Max Conducted Power fields to be edited). The same can
be done with 6x and 4x up to the maximum conducted
power of the radio.
Max 8x/6x/4x Conducted Power The maximum
conducted power for the 8x/6x/4x modulation rates. Each
field is editable only if Automatic Power Backoff is enabled.