Universal Electronics UR9964 OneForAll North America Kameleon 8 Device RF 2004 User Manual Part 3
Universal Electronics Inc OneForAll North America Kameleon 8 Device RF 2004 Users Manual Part 3
Contents
- 1. Users Manual Part 1
- 2. Users Manual Part 2
- 3. Users Manual Part 3
- 4. Users Manual Part 4
- 5. Users Manual Part 5
Users Manual Part 3
USER’S GUIDE
Using Macros 31
5. To save the macro, press and hold SETUP until the two bottom IR
segments flash twice. The Program Keys appear again.
6. Exit programming by pressing HOME once. The display returns to the
last-selected device menu screen.
7. Now, if you aim the remote control at the devices selected in step 4 and
press the programmed Macro Key once, the TV turns on and tunes to
channel 3. Then the Cable Box turns on and tunes to channel 071.
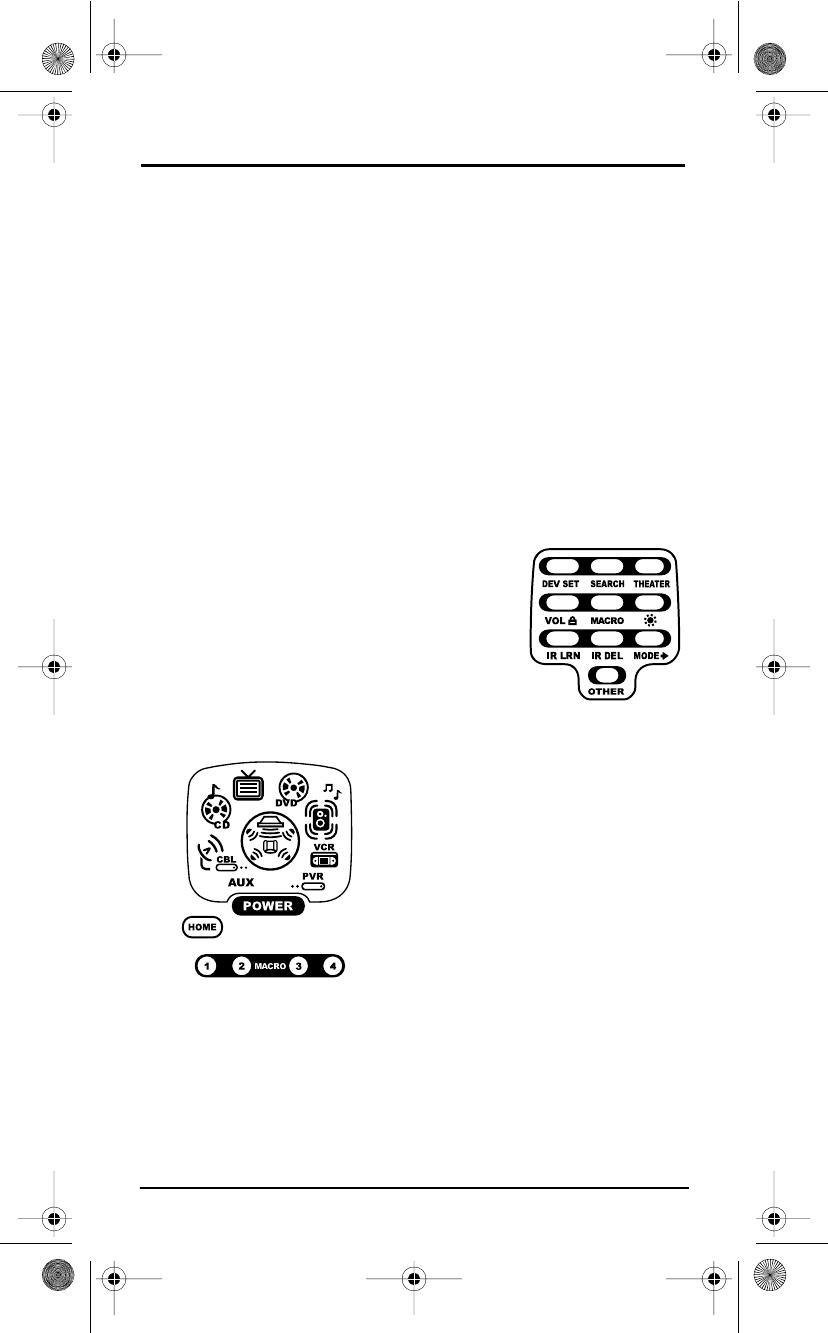
PROGRAMMING A MASTER POWER MACRO IN THE HOME THEATER MODE
A macro can be programmed onto the POWER key to turn on or off as many
as seven Home Theater devices.
NOTE: This following example assumes the Home Theater system contains a
Satellite Receiver, a DVD Player, an Audio Receiver, and a TV.
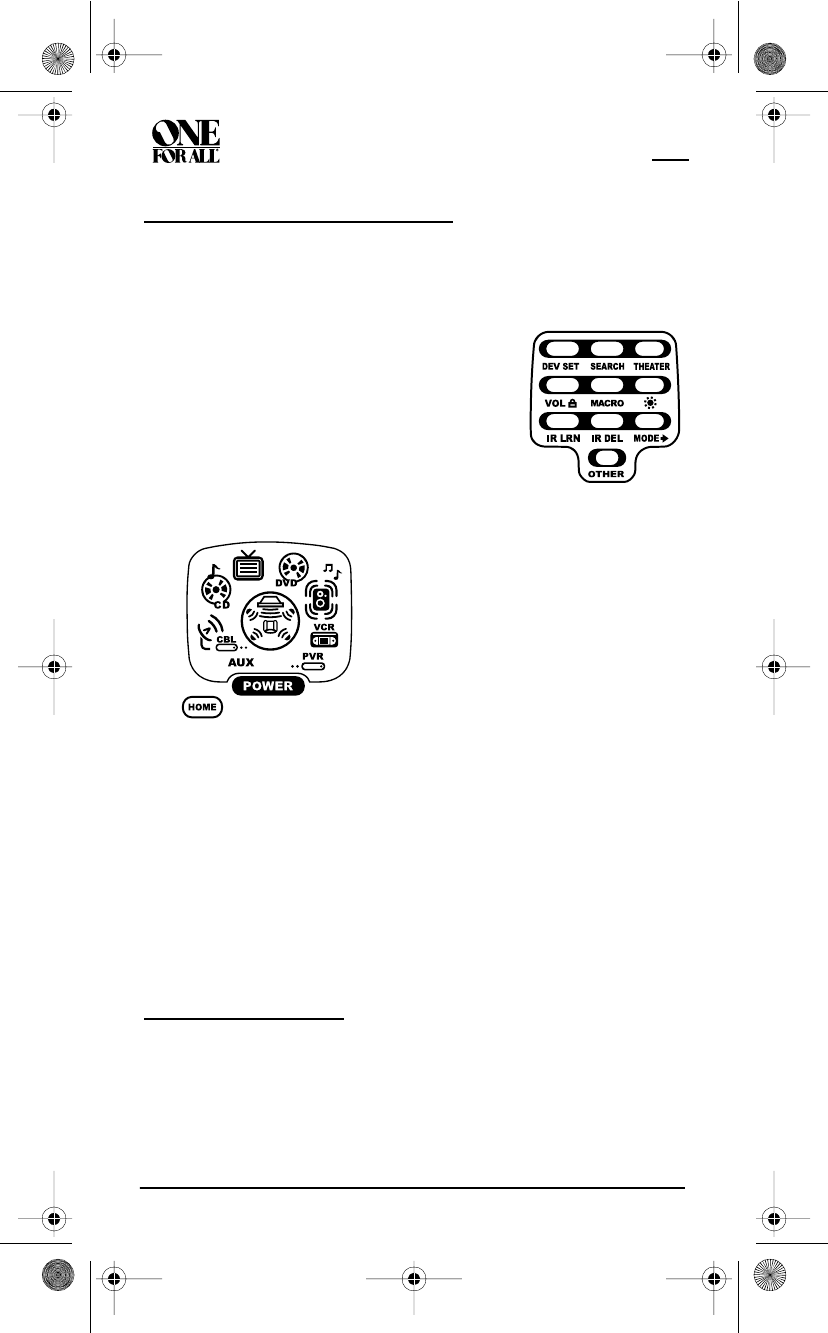
2. Press MACRO once.The Macro programming screen appears:
5. To save the power macro, press and hold SETUP until the two bottom IR
segments flash twice. The Program Keys appear again.
6. Exit programming by pressing HOME once. The display returns to the
last-selected device menu screen.
7. To test the power macro, first make sure all home theater devices
selected in step 4 are turned on. Aim the remote control at the devices
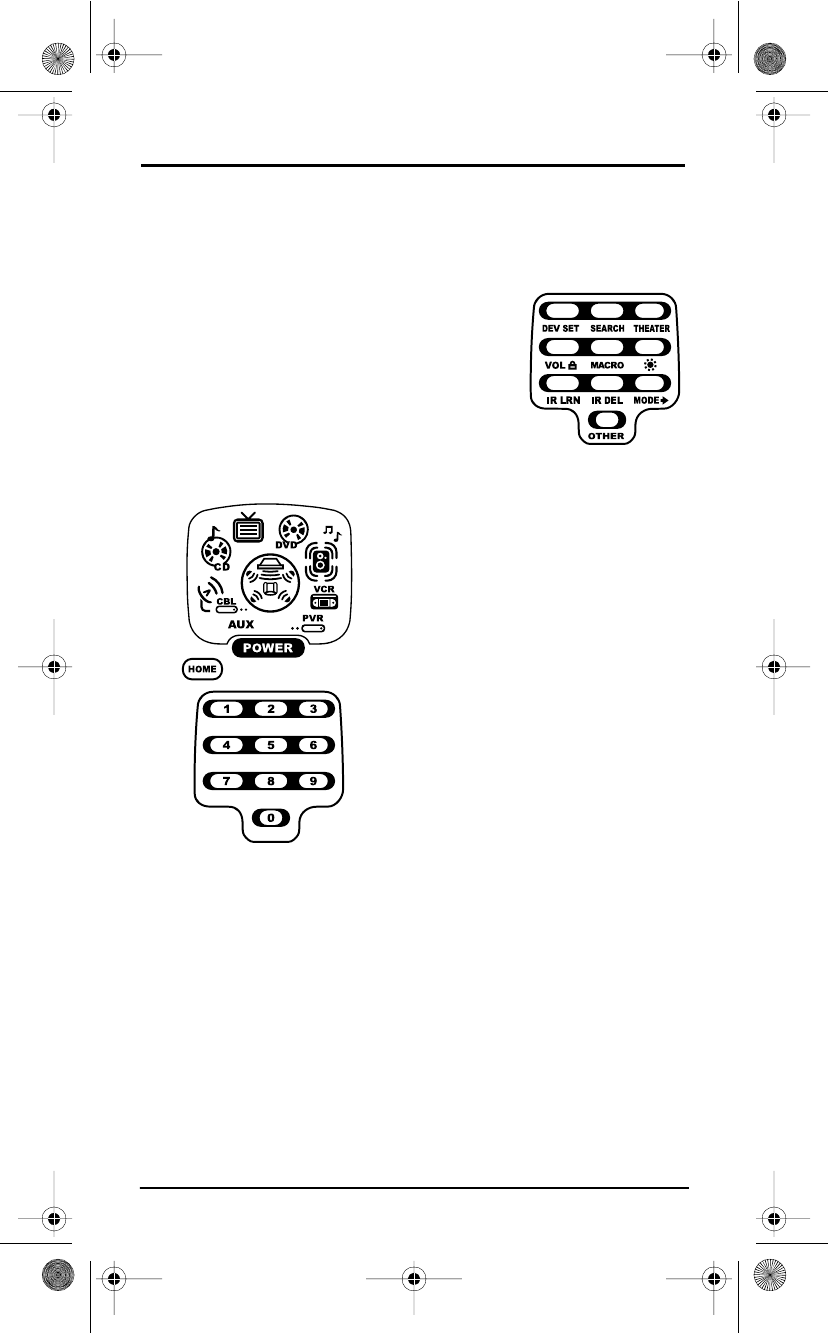
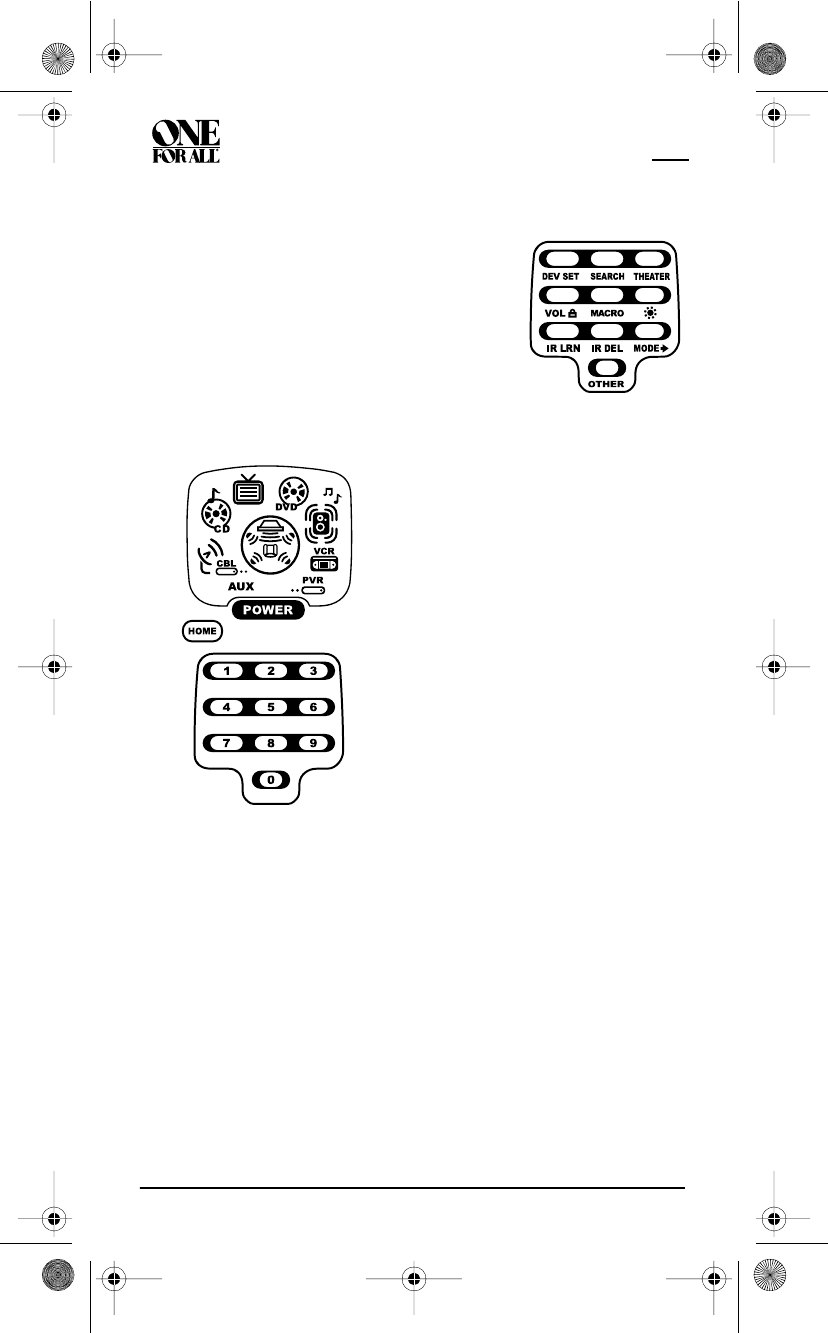
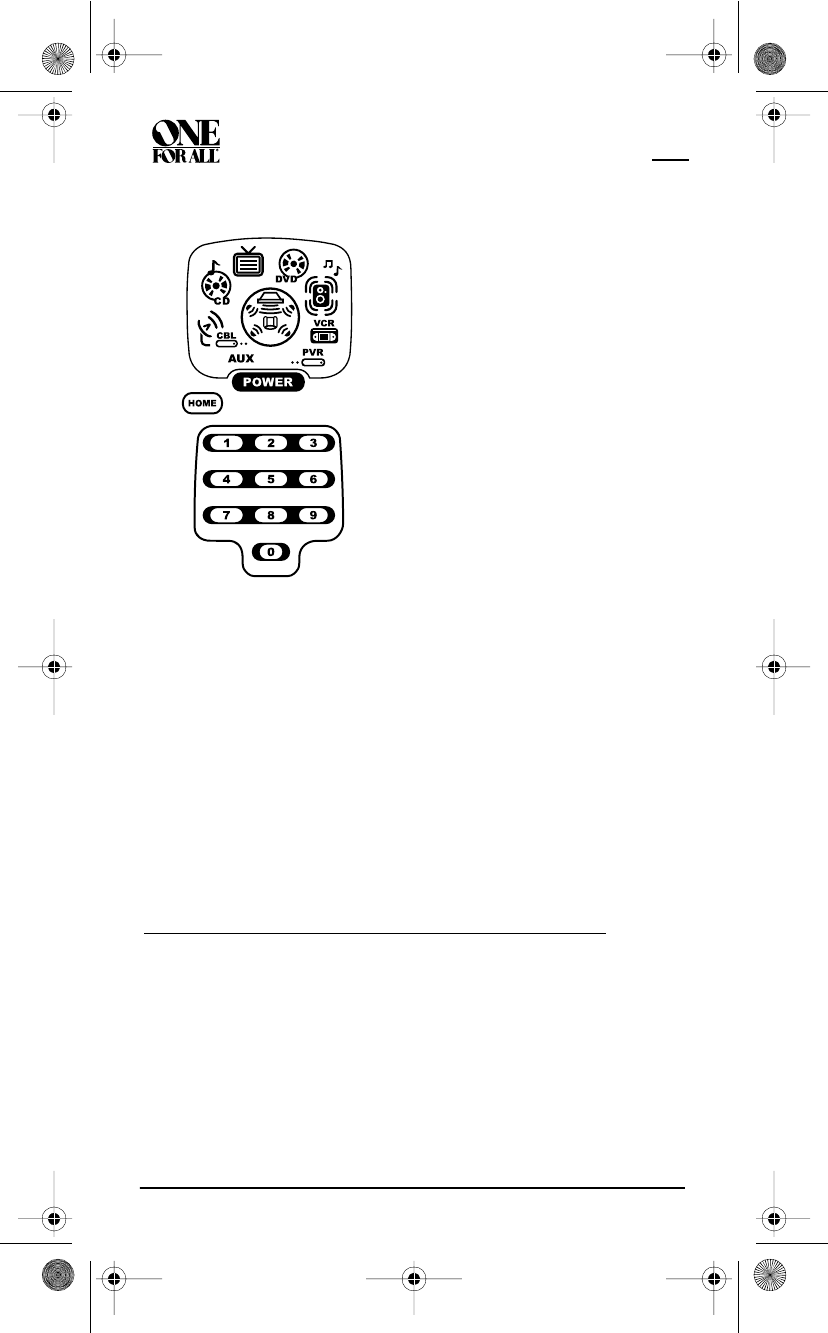
1. Press and hold SETUP until the two bottom IR
segments flash twice. The Program Keys
appear as SETUP flashes repeatedly.
3. Press POWER once.The last-selected
device menu screen, including HOME,
appears.
4. Enter the macro sequence. For this
example, press CBL/SAT once, followed
by POWER once. Next, press DVD once,
followed by POWER once.Then press
AUDIO once, followed by POWER once.
Finally, press TV once, followed by
POWER once.
OFA Kameleon wRF UG rev 3.fm Page 31 Monday, August 16, 2004 8:19 PM
KAMELEON 8-DEVICE REMOTE WITH RF
32 Using Learning
and press the Home Theater key once, followed by POWER once.The
devices should turn off in this order: Satellite Receiver, DVD Player,
Audio Receiver, and TV.
To turn on the devices on again in the same order as above, press
POWER once.
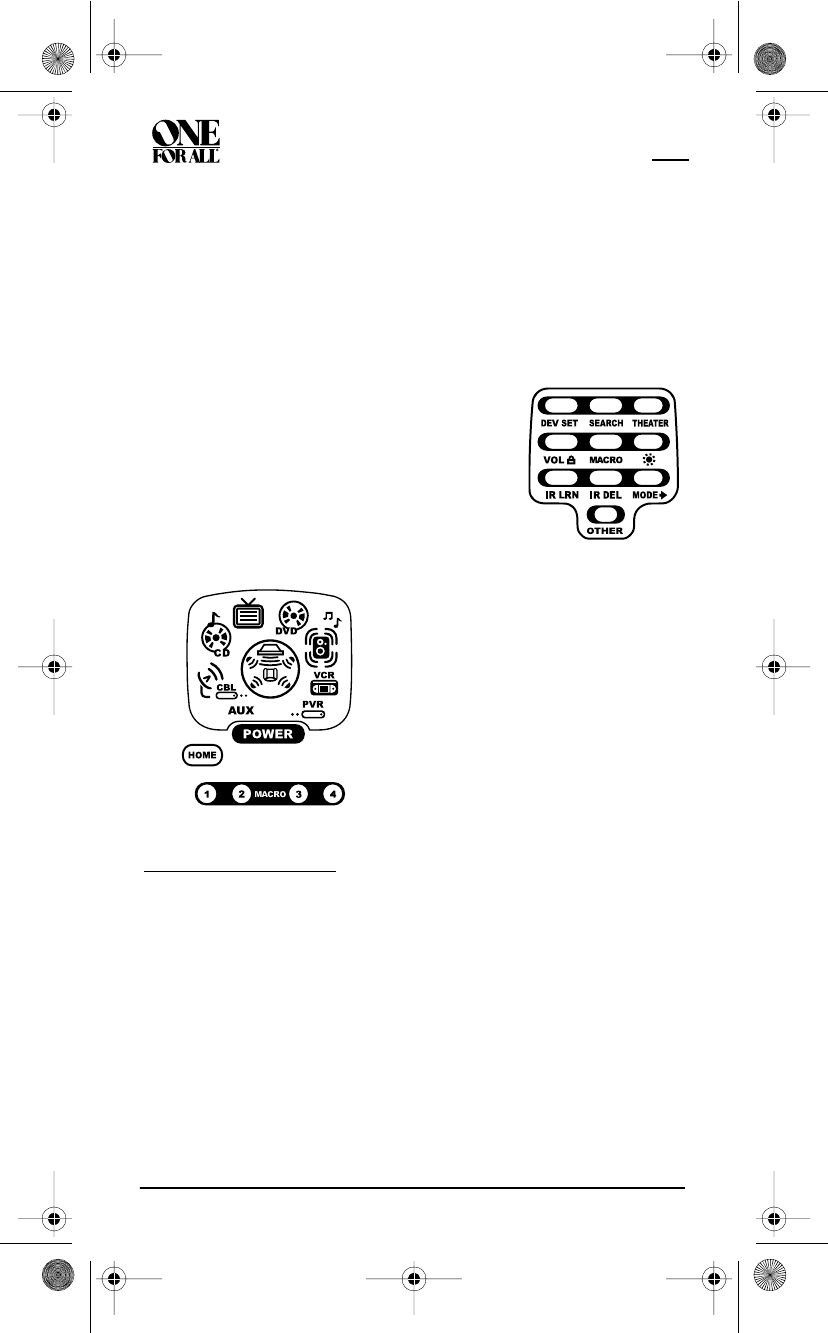
CLEARING A MACRO
2. Press MACRO once.The Macro programming screen appears:
USING LEARNING
The OFA Kameleon 8-Device Remote with RF includes a Learning feature so
you can add functions that are unique to your home entertainment devices
(e.g.,VCR Tracking Up or Down).However, there are some considerations:
LEARNING PRECAUTIONS
• Your original remote controls must be in working order for learning to
work properly.
• Learned keys are mode specific, so each one can store a unique function
for each mode.
• Learned keys can be used in macros (see Using Macros on page 30).
1. Press and hold SETUP until the two bottom IR
segments flash twice. The Program Keys
appear as SETUP flashes repeatedly.
3. Select the Macro Key to be cleared and
press it once.The last-selected device
menu screen appears.
4. Press and hold SETUP until the two
bottom IR segments flash twice. The
Program Keys appear again.
5. To exit programming, press HOME
once.The display returns to the last-
selected device menu screen.
OFA Kameleon wRF UG rev 3.fm Page 32 Monday, August 16, 2004 8:19 PM
USER’S GUIDE
Using Learning 33
• Do not use the following keys for learning: Device Keys, M1~M4, SETUP,
FAV, SCROLL, PRESET, PVR VOD, or Record (•) Key.
• Learning capacity is approximately 16 to 25 keys, depending on the code
being learned.
• If both learned and keymoved functions are assigned to the same key, the
last programmed function is stored.
• A learned function cannot be used as a source for Keymover (see Using
Keymover on page 38).
• Certain device codes are not learnable including multi-frequency types,
some high frequency ones, and other unusual formats.
• For optimum learning, avoid high levels of ambient light such as natural
sunlight or energy-efficient fluorescent lights.
NOTE: . Please have your original remote controls handy before programming
learning. Be sure to press each teaching key within 5 seconds of the previous entry.
Otherwise, the OFA Kameleon 8-Device Remote with RF exits programming mode.
PROGRAMMING A LEARNING KEY
2. Press IR LRN once.The IR Learn programming screen appears:
1. Press and hold SETUP until the two bottom IR
segments flash twice. The Program Keys appear as
SETUP flashes repeatedly.
3. Press a device key once (i.e., AUX, CBL/SAT,
CD, TV, DVD, AUDIO, VCR, or PVR) to assign
a mode for learning.The selected device
menu screen, including HOME, appears.
OFA Kameleon wRF UG rev 3.fm Page 33 Monday, August 16, 2004 8:19 PM

KAMELEON 8-DEVICE REMOTE WITH RF
34 Using Learning
4. Place the OFA Kameleon 8-Device Remote with RF head-to-head (about
2" apart) from your original remote control. Also locate the key (on your
original remote control) that will serve as the teaching function.
5. On the OFA Kameleon 8-Device Remote with RF, select and press a key
where the learned function will be stored.The IR segments display an
incoming animation, continue for three revolutions, and then the entire
display turns off.
After the display is off, press and hold the teaching key (on your original
remote control) until the display (on the OFA Kameleon 8-Device
Remote) turns on again.The two bottom IR segments flash twice when
the code is successfully captured.
NOTE: If the two bottom IR segments display one long flash, a learning
error has occurred.Try repeating this step again until a successful capture
occurs. If the function is still not captured, press HOME twice to
exit programming and review the “Learning Precautions” on the previous
page. If needed, also see “Troubleshooting” on page 57.After review, start
programming again at step 1.
6. To learn other functions, repeat steps 3 through 5 as desired.
7. To exit programming, press HOME twice. The display returns to the last-
selected device menu screen.
DELETING A SINGLE LEARNING KEY
2"
1. Press and hold SETUP until the two bottom IR
segments flash twice. The Program Keys
appear as SETUP flashes repeatedly.
OFA Kameleon wRF UG rev 3.fm Page 34 Monday, August 16, 2004 8:19 PM
USER’S GUIDE
Using Learning 35
2. Press IR DEL once.The IR Delete programming screen appears:
6. If desired, repeat steps 2 through 4 to delete another learned key.
7. Exit programming by pressing HOME once. The display returns to the
last-selected device menu screen.
DELETING ALL LEARNED KEYS IN A SPECIFIC MODE.
2. Press IR DEL once.The IR Delete programming screen appears:
4. Press the same device key (as in step 3) once. Upon deletion, the two
bottom IR segments flash twice as confirmation.The Program Keys
appear again.
5. If desired, repeat steps 2 through 4 to delete other learned keys from
another mode.
6. Exit programming by pressing HOME once. The display returns to the
last-selected device menu screen.
3. Press a device key once (i.e., AUX, CBL/
SAT, CD, TV, DVD, AUDIO, VCR, or PVR)
for the mode where the learned key to
be deleted resides. The selected device
menu screen, including HOME, appears.
4. Press the learned key to be deleted
twice. Upon deletion, the two bottom IR
segments flash twice as confirmation.
The Program Keys appear again.
1. Press and hold SETUP until the two bottom IR
segments flash twice. The Program Keys
appear as SETUP flashes repeatedly
3. Press a device key once (i.e.,AUX, CBL/
SAT,CD, TV,DVD, AUDIO, VCR, or PVR)
for the mode where the learned keys to
be deleted reside. The selected device
menu screen, including HOME, appears.
OFA Kameleon wRF UG rev 3.fm Page 35 Monday, August 16, 2004 8:19 PM
KAMELEON 8-DEVICE REMOTE WITH RF
36 Reassigning Device Keys
REASSIGNING DEVICE KEYS
The OFA Kameleon 8-Device Remote with RF can be set to control a second
device. For example, to control a TV, a cable box, and two DVD players, you
can reassign the unused AUX key to operate the second DVD player as follows:
2. Press MODE once.The Mode Mover programming screen appears:
4. For the destination mode, press a device key once (i.e., AUX, CBL/SAT,
CD, TV, DVD, AUDIO, VCR, or PVR). For this example, press AUX
once.Upon reassignment, the two bottom IR segments flash twice as
confirmation. The Program Keys appear again.
5. For this example, the AUX key is now ready to be set up to control your
second DVD player. See Programming Device Control on page 15. If
desired, repeat steps 2 to 4 to reassign another device.
6. Exit programming by pressing HOME once. The display returns to the
last-selected device menu screen.
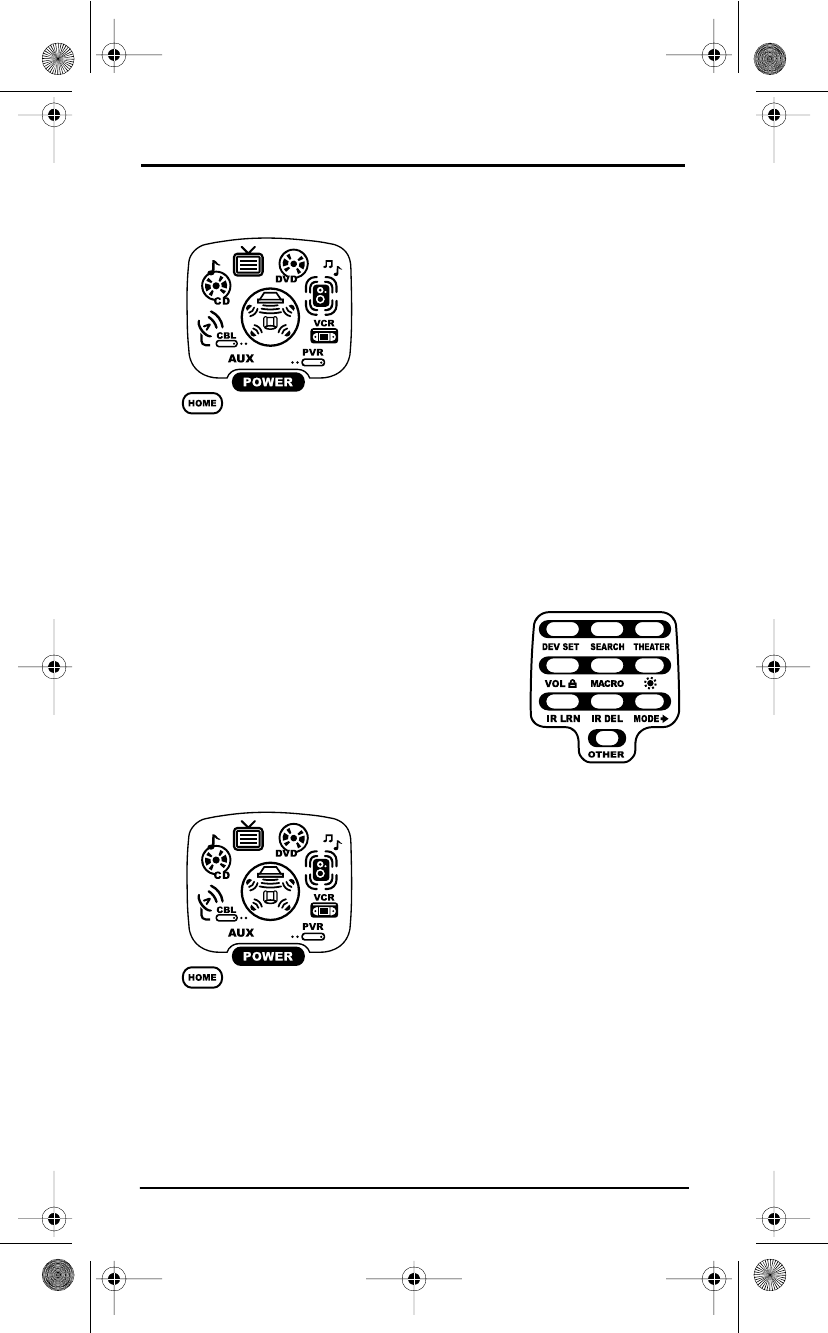
USING KEYMOVER
The OFA Kameleon 8-Device Remote with RF includes a Keymover feature
that allows you to map (or copy) keys from one mode (i.e., source mode) to
another mode (i.e., destination mode).
NOTE: Do not use any of the Device Keys as a source or destination key.
Also, do not use POWER as a destination key.
1. Press and hold SETUP until the two bottom IR
segments flash twice. The Program Keys
appear as SETUP flashes repeatedly
3. For the source mode, press a device key
once (i.e., AUX, CBL/SAT, CD, TV, DVD,
AUDIO, VCR, or PVR). For this example,
press DVD once. The selected device
menu screen, including HOME, appears.
NOTE: Only one device can be assigned
to an unused device key at a time.
OFA Kameleon wRF UG rev 3.fm Page 36 Monday, August 16, 2004 8:19 PM
USER’S GUIDE
Using Keymover 37
PROGRAMMING KEYMOVER
For example, if your DVD player does not have volume control, you can map
those keys (i.e., VOL!, VOL", and MUTE) from the TV mode to DVD mode:
2. Press OTHER once. The Other programming screen appears:
7. For the destination key, press a key to be moved once. For this example
press VOL! once.Upon keymoving, the two bottom IR segments
flash twice as confirmation. The Program Keys appear again.
8. Repeat steps 2 through 7 two more times to map the remaining volume
control keys, substituting VOL" and MUTE as source and destination
keys in steps 5 and 7.
9. Exit programming by pressing HOME once. The display returns to the
last-selected device menu screen.
You can now use your OFA Kameleon 8-Device Remote with RF to control the
TV’s volume and mute in the DVD mode, as well as in the TV mode.
1. Press and hold SETUP until the two bottom IR
segments flash twice. The Program Keys
appear as SETUP flashes repeatedly
3. Using the Number Keys, enter 9 9 4. The
two bottom IR segments flash twice.
4. For the source mode, press a device key
once (i.e., AUX, CD, etc). For this example,
press TV once. The source device menu
screen, including HOME, appears.
5. For the source key, press a key to be moved
once. For this example press VOL! once.
6. For the destination mode, press a device
key once (i.e., AUX, CBL/SAT, CD, TV, DVD,
AUDIO, VCR, or PVR). For this example,
press DVD once. The selected destination
device menu screen, including HOME,
appears.
OFA Kameleon wRF UG rev 3.fm Page 37 Monday, August 16, 2004 8:19 PM
KAMELEON 8-DEVICE REMOTE WITH RF
38 Using Keymover
RESTORING A SINGLE KEYMOVED KEY
2. Press the destination mode once where the keymoved key is stored.
Then press OTHER once. The Other programming screen appears:
RESTORING ALL KEYMOVED KEYS IN A SINGLE MODE
1. Perform steps 1 through 3 of Programming Keymover, above.
2. Press the destination mode twice where the keymoved keys are stored.
Upon key restoration, the two bottom IR segments flash twice as
confirmation. The Program Keys appear again.
3. Exit programming by pressing HOME once. The display returns to the
last-selected device menu screen.
1. Press and hold SETUP until the two bottom IR
segments flash twice. The Program Keys
appear as SETUP flashes repeatedly
3. Using the Number Keys, enter 9 9 4.The
two bottom IR segments flash twice.
4. Press the destination mode once where
the keymoved key is stored.Then press
the destination key twice.Upon key
restoration, the two bottom IR
segments flash twice as
confirmation.The Program Keys appear
again.
5. If desired, repeat steps 1 and 2 to restore
another key.
6. Exit programming by pressing HOME
once. The display returns to the last-
selected device menu screen.
OFA Kameleon wRF UG rev 3.fm Page 38 Monday, August 16, 2004 8:19 PM

USER’S GUIDE
Using Channel Scan 39
USING CHANNEL SCAN
In the AUX, CBL/SAT, or TV mode, use the FAV key to start a 3-second scan of
all channels. If programmed, use the FAV key to scan only your favorite
channels to view a channel (see Programming Favorite Channel Scan below).
1. Press AUX, CBL/SAT, or TV once.The two bottom IR segments flash once.
2. Press FAV once.The IR segments display outgoing animation as each
channel is changed.
•If Favorite Channel Scan has been set up, scanning of favorite
channels starts and cycles through stored channels for 3 minutes
or until stopped by pressing any key.
•If Favorite Channel Scan has not been set up, scanning starts with
the current channel, then proceeds to the next channel up and
cycles through all channels for 3 minutes or until stopped by
pressing any key.
3. To stop scanning channels at any time, press any key once.
PROGRAMMING FAVORITE CHANNEL SCAN
In the AUX, CBL/SAT, or TV mode, you can store a list of up to 10 favorite
channels, in any order, that are immediately scanned when FAV is pressed
(see Using Channel Scan above).
NOTE: . Favorite channels can only be programmed for one mode. After
programming, if FAV is pressed while in another mode, the remote control starts
a normal channel scan instead (if applicable to the selected device).
2. Select a Favorite Channel Mode by pressing AUX, CBL/SAT, or TV
once.The two bottom IR segments flash once as the selected device key
animates.
1. Press and hold SETUP until the two bottom IR
segments flash twice. The Program Keys
appear as SETUP flashes repeatedly
OFA Kameleon wRF UG rev 3.fm Page 39 Monday, August 16, 2004 8:19 PM
KAMELEON 8-DEVICE REMOTE WITH RF
40 Restoring Factory Default Settings
3. Press OTHER once.The Other programming screen appears:
NOTE: If the original remote control required pressing an Enter key to
change the channel, also press the ENTER key after the channel number
(e.g., 0 1 2 ENTER).
6. If desired, repeat step 5 for each channel to be stored, up to a total of 10
channels.
NOTE: After storing 10 channels, the remote control exits the Favorite
Channel programming screen and again displays the Program Keys.
7. To exit programming with fewer than 10 favorite channels stored, press
and hold SETUP until the two bottom IR segments flash twice and then
press HOME once.The display returns to the last-selected device menu
screen.
RESTORING FACTORY DEFAULT SETTINGS
The OFA Kameleon 8-Device Remote with RF includes an Setup Code
Reset program.You can use it to restore all your programmed codes to
factory settings and delete all custom programming.
IMPORTANT: Executing this program erases all code settings and all
custom settings for Home Theater, Macros, Learned Keys, Reassigned
Device Keys, Keymoved Keys, Favorite Channels, and all device settings.
4. Using the Number Keys, enter 9 9 6.
The two bottom IR segments flash
twice and display the Favorite Channel
programming screen.
NOTE: If the two bottom IR segments
display one long flash, an error has
occurred. Try repeating this step.
5. Using the Number Keys, enter a favorite
channel number (e.g., 0 1 2). Then
press SETUP once.The two bottom IR
segments flash three times confirming
your entry.
OFA Kameleon wRF UG rev 3.fm Page 40 Monday, August 16, 2004 8:19 PM

USER’S GUIDE
Clearing All Custom Programming 41
2. Press OTHER once.The Other programming screen appears:
CLEARING ALL CUSTOM PROGRAMMING
The OFA Kameleon 8-Device Remote with RF contains a Custom
Programming Reset program.You can use it to remove all custom
programming, except your setup codes and reassigned device keys.
IMPORTANT: Executing this program erases all custom settings for Home
Theater, Macros, Learned Keys, Keymoved Keys, and Favorite Channels.
1.
P
ress an
d
h
o
ld
SETUP
unt
il
t
h
e two
b
ottom
IR
segments flash twice. The Program Keys
appear as SETUP flashes repeatedly
3. Using the Number Keys, enter 9 7 7. The
two bottom IR segments flash twice
pause and flash twice again to confirm
the unit has been restored to factory
default settings.
4. Exit programming by pressing HOME
once. The display returns to the last-
selected device menu screen.
1. Press and hold SETUP until the two bottom IR
segments flash twice. The Program Keys
appear as SETUP flashes repeatedly
OFA Kameleon wRF UG rev 3.fm Page 41 Monday, August 16, 2004 8:19 PM
KAMELEON 8-DEVICE REMOTE
42 Manufacturer’s Codes
2. Press OTHER once.The Other programming screen appears:
MANUFACTURER’S CODES
SETUP CODES FOR AUDIO
AMPLIFIERS
SETUP CODES FOR AUDIO
RECEIVERS
3. Using the Number Keys, enter 9 8
0.The two bottom IR segments flash
twice pause and flash twice again to
confirm the unit has been restored to
factory default settings.
4. Exit programming by pressing HOME
once. The display returns to the last-
selected device menu screen.
GE 0078
JVC 0331
Optimus 0395
Realistic 0395
Soundesign 0078
Victor 0331
Wards 0078
Yamaha 0354
ADC 0531
Aiwa 0158, 0189, 1388,
0121, 1089
Alco 1390
Anam 1609
Apex Digital 1257
Audiotronic 1189
Audiovox 1390
Bose 1229
Capetronic 0531
Carver 1189, 0189, 1089
Coby 1263, 1389
Curtis 1263
Denon 1360
Fisher 1409
Glory Horse 1263
Harman/Kardon 0110, 0189
Integra 1298, 0135
JBL 0110, 1306
JVC 0074, 1263, 1374
Kenwood 1313, 1570, 1569,
1027, 0186
KLH 1390
Koss 1366
Linn 0189
Magnavox 1189, 1269, 0189,
1089, 0531
OFA Kameleon wRF UG rev 3.fm Page 42 Monday, August 16, 2004 8:19 PM
USER’S GUIDE
Manufacturer’s Codes 43
SETUP CODES FOR CABLE BOXES
SETUP CODES FOR CD PLAYERS
Marantz 1189, 1269, 0039,
0189, 1089
MCS 0039
Musicmagic 1089
Norcent 1389
Onkyo 1298, 0842, 0135
Optimus 1023, 0670, 0531,
0186, 0797
Oritron 1380, 1366
Panasonic 1518, 0039
Philips 1189, 1269, 0189,
1089
Pioneer 1023, 0531, 1384,
0150, 0014, 0630
Polk Audio 0189
Proscan 1254
Quasar 0039
RadioShack 1263
RCA 1023, 1609, 1254,
0531, 1390
Samsung 1295
Sansui 0189, 1089
Sharp 0186
Sharper Image 1416, 1549, 1385,
1411, 1546, 1723,
1263, 1410,1545,
1556, 0797, 1409
Sony 1058, 1258, 0158,
1758, 1158, 1658,
1558
Soundesign 0670
Stereophonics 1023
Sunfire 1313
Teac 1390
Technics 1308, 1518, 0039
Thorens 1189
Venturer 1390
Victor 0074
Wards 0158, 0189, 0014
Yamaha 0176, 1176, 0186,
1375
ABC 0003, 0008, 0014
Americast 0899
Bell & Howell 0014
Bell South 0899
Director 0476
General Instrument 0476, 0276, 0003
GoldStar 0144
Hamlin 0009, 0273
Jerrold 0476, 0276, 0003,
0014
Memorex 0000
Motorola 0476, 0276
Pace 0237
Panasonic 0000, 0107
Paragon 0000
Philips 0305, 0317
Pioneer 0877, 1877, 0144,
0533
Pulsar 0000
Quasar 0000
Regal 0279, 0273
Runco 0000
Samsung 0144
Scientific Atlanta 0877, 1877, 0477,
0008
Sony 1006
Starcom 0003
Supercable 0276
Torx 0003
Toshiba 0000
Zenith 0000, 0525, 0899
Aiwa 0157
Burmester 0420
California Audio Labs 0029
Carver 0157
Denon 0873
DKK 0000
DMX Electronics 0157
Garrard 0420
OFA Kameleon wRF UG rev 3.fm Page 43 Monday, August 16, 2004 8:19 PM

KAMELEON 8-DEVICE REMOTE
44 Manufacturer’s Codes
SETUP CODES FOR DVD PLAYERS
Genexxa 0032
Harman/Kardon 0157
Hitachi 0032
JVC 0072
Kenwood 0681, 0626, 0028
KLH 1318
Krell 0157
Linn 0157
Magnavox 0157
Marantz 0626, 0029, 0157
MCS 0029
Miro 0000
Mission 0157
MTC 0420
NSM 0157
Onkyo 0868
Optimus 1063, 0000, 0032,
0420
Panasonic 0029
Parasound 0420
Philips 0626, 0157
Pioneer 1063, 1062, 0032
Polk Audio 0157
Proton 0157
QED 0157
Quad 0157
Quasar 0029
RCA 1062, 0032, 0420
Realistic 0420
Rotel 0157, 0420
SAE 0157
Sansui 0157
Sharp 0861
Sonic Frontiers 0157
Sony 0490, 0000, 0100
TAG McLaren 0157
Tascam 0420
TDK 1208
Teac 0420
Technics 0029
Victor 0072
Wards 0157
Yamaha 0888, 0036, 1292
Zonda 0157
Aiwa 0641
Allegro 0869
AMW 0872
Apex Digital 0672, 0717, 0755,
0796, 1100, 0795,
0830, 0794,0797
Blaupunkt 0717
Blue Parade 0571
Broksonic 0868, 0695
CineVision 0876, 0869
Daewoo 0784
Denon 0490, 0634
DVD2000 0521
Emerson 0591, 0821, 0675
Enterprise 0591
Fisher 0670
Funai 0675
GE 0522, 0815, 0717
Go Video 0744, 0715, 0783
Greenhill 0717
Harman/Kardon 0702, 0582
Hitachi 0573, 0664
Hiteker 0672
Initial 0717
Integra 0627
JBL 0702
JVC 0558, 0623, 0867
Kenwood 0490, 0534, 0682
KLH 0717
Koss 0651
Lasonic 0798
Magnavox 0503, 0675
Marantz 0539
Memorex 0695
Microsoft 0522
Mintek 0717
Mitsubishi 1521, 0521
Nesa 0717
OFA Kameleon wRF UG rev 3.fm Page 44 Monday, August 16, 2004 8:19 PM
USER’S GUIDE
Manufacturer’s Codes 45
SETUP CODES FOR DVD PLAYER/
PVR COMBOS
SETUP CODES FOR DVD PLAYER/
VCR COMBOS (DVD CODES)
SETUP CODES FOR DVD PLAYER/
VCR COMBOS (VCR CODES)
SETUP CODES FOR HOME
AUTOMATION
Norcent 0872
Onkyo 0503, 0627
Oritron 0651
Panasonic 0490, 0632, 1490,
1462, 1362, 1762
Philips 0503, 0539, 0646,
0854
Pioneer 0525, 0571, 0632
Polk Audio 0539
Proscan 0522
Qwestar 0651
RCA 0522, 0571, 0717,
0822
Rio 0869
Rotel 0623
Sampo 0698
Samsung 0490, 0573, 0820
Sansui 0695
Sanyo 0873, 0695, 0670
Sharp 0630, 0752
Sharper Image 1117, 1112, 1995
Sherwood 0633
Shinsonic 0533
Sonic Blue 0869
Sony 0533, 0864
Sylvania 0821, 0675
Symphonic 0675
Technics 0490
Theta Digital 0571
Toshiba 0503, 0695, 1045
Tredex 0799
Urban Concepts 0503
Xbox 0522
Yamaha 0490, 0539, 0545,
0817
Zenith 0503, 0591, 0869
Panasonic 0490
RCA 0522
Allegro 0869
CineVision 0869
Go Video 0744, 0715
Hitachi 0664
JVC 0867
Memorex 0695
Panasonic 1762
RCA 0822
Samsung 0820
Sansui 0695
Sanyo 0873
Sharp 0630
Sony 0864
Sylvania 0675
Symphonic 0675
Toshiba 0503
Zenith 0869
Hitachi 0000
RCA 0060
Sanyo 0104
Sharp 0848
Sylvania 0000
Symphonic 0000
GE 0240
Lasko 0846
One For All 0167
RadioShack 0240
Security System 0167
Sharper Image 0846
Universal X10 0167
X10 0167
OFA Kameleon wRF UG rev 3.fm Page 45 Monday, August 16, 2004 8:19 PM