Verifone OMNI3600D Point of Sale Terminal User Manual
VeriFone Inc Point of Sale Terminal
Verifone >
Contents
User Manual Part I
Part Number 22379, Revision A
VERIX
OPERATING
ENVIRONMENT
SOFTPAY
E-PAYMENT
APPLICATION
VERIX
DEVELOPMENT
TOOLS
DEVELOPER
TOOLKIT
VERISHIELD
SECURITY
ARCHITECTURE
OMNI 33XX
MULTI-APPLICATION
APPLIANCES
VERICENTRE
APPLIANCE
MANAGEMENT
SUITE
RADIO MODEM
OMNI 3600
APPLIANCES
HAND-HELD
OMNI 37XX
HAND-OVER-COUNTER
MULTI-APPLICATION
APPLIANCES
Omni 3600
Reference Manual
All rights reserved. No part of the contents of this document may be reproduced or transmitted in any form without the written
permission of VeriFone, Inc.
The information contained in this document is subject to change without notice. Although VeriFone has attempted to ensure the
accuracy of the contents of this document, this document may include errors or omissions. The examples and sample programs are
for illustration only and may not be suited for your purpose. You should verify the applicability of any example or sample program
before placing the software into productive use. This document, including without limitation the examples and software programs, is
supplied “As-Is.”
VeriFone, Inc.
2455 Augustine Drive
Santa Clara CA 95054-3002
www.verifone.com
Part Number 22379, Revision A
Omni 3600 Reference Manual
© 2003 VeriFone, Inc.
VeriFone, the VeriFone logo, Omni, VeriCentre, Verix, and ZonTalk are registered trademarks of VeriFone. Other brand names or
trademarks associated with VeriFone’s products and services are trademarks of VeriFone, Inc.
All other brand names and trademarks appearing in this manual are the property of their respective holders.
Comments? Please e-mail all comments in this document to Tell_Us_More@VeriFone.com

OMNI 3600 REFERENCE MANUAL 3
CONTENTS
CHAPTER 1
Omni 3600
Terminal and
Omni 3600 Base
Installation
Select a Location . . . . . . . . . . . . . . . . . . . . . . . . . . . . . . . . . . . . . . . . . . . . . . . . . 7
Omni 3600 Terminal . . . . . . . . . . . . . . . . . . . . . . . . . . . . . . . . . . . . . . . . . . . . 7
Omni 3600 Base . . . . . . . . . . . . . . . . . . . . . . . . . . . . . . . . . . . . . . . . . . . . . . . 7
Environment . . . . . . . . . . . . . . . . . . . . . . . . . . . . . . . . . . . . . . . . . . . . . . . . . . 7
Convenience . . . . . . . . . . . . . . . . . . . . . . . . . . . . . . . . . . . . . . . . . . . . . . . . . . 8
Omni 3600 Terminal. . . . . . . . . . . . . . . . . . . . . . . . . . . . . . . . . . . . . . . . . . . . . . . 8
Unpack the Shipping Carton . . . . . . . . . . . . . . . . . . . . . . . . . . . . . . . . . . . . . . 8
Terminal Features. . . . . . . . . . . . . . . . . . . . . . . . . . . . . . . . . . . . . . . . . . . . . 10
Power Port . . . . . . . . . . . . . . . . . . . . . . . . . . . . . . . . . . . . . . . . . . . . . . . . . . 11
Smart Battery . . . . . . . . . . . . . . . . . . . . . . . . . . . . . . . . . . . . . . . . . . . . . . . . 11
Turn On/Off the Omni 3600 Terminal . . . . . . . . . . . . . . . . . . . . . . . . . . . . . . 14
Paper Installation . . . . . . . . . . . . . . . . . . . . . . . . . . . . . . . . . . . . . . . . . . . . . 14
Install/Replace MSAM Cards . . . . . . . . . . . . . . . . . . . . . . . . . . . . . . . . . . . . 16
Install/Replace SIM Card (GSM models) . . . . . . . . . . . . . . . . . . . . . . . . . . . 18
Wireless Transactions. . . . . . . . . . . . . . . . . . . . . . . . . . . . . . . . . . . . . . . . . . 20
Smart Card Reader Transactions . . . . . . . . . . . . . . . . . . . . . . . . . . . . . . . . . 20
Magnetic Card Reader Transactions . . . . . . . . . . . . . . . . . . . . . . . . . . . . . . 20
Antenna (Some Wireless Models) . . . . . . . . . . . . . . . . . . . . . . . . . . . . . . . . 21
Omni 3600 Base. . . . . . . . . . . . . . . . . . . . . . . . . . . . . . . . . . . . . . . . . . . . . . . . . 22
Unpack the Shipping Carton . . . . . . . . . . . . . . . . . . . . . . . . . . . . . . . . . . . . . 23
Omni 3600 Base Features . . . . . . . . . . . . . . . . . . . . . . . . . . . . . . . . . . . . . . 23
Power Connection. . . . . . . . . . . . . . . . . . . . . . . . . . . . . . . . . . . . . . . . . . . . . 26
Omni 3600 Terminal Docking . . . . . . . . . . . . . . . . . . . . . . . . . . . . . . . . . . . . 27
Spare Smart Battery Pack . . . . . . . . . . . . . . . . . . . . . . . . . . . . . . . . . . . . . . 27
Omni 3600 Base Communications Ports . . . . . . . . . . . . . . . . . . . . . . . . . . . 28
CHAPTER 2
Using the Terminal
Keys
Data Entry Modes. . . . . . . . . . . . . . . . . . . . . . . . . . . . . . . . . . . . . . . . . . . . . . . . 32
The Keypad . . . . . . . . . . . . . . . . . . . . . . . . . . . . . . . . . . . . . . . . . . . . . . . . . . . . 32
Function Key Descriptions . . . . . . . . . . . . . . . . . . . . . . . . . . . . . . . . . . . . . . 33
Programmable Function (PF) Key Descriptions . . . . . . . . . . . . . . . . . . . . . . . . . 35
CHAPTER 3
System Mode When to Use System Mode . . . . . . . . . . . . . . . . . . . . . . . . . . . . . . . . . . . . . . . . 37
Local and Remote Operations . . . . . . . . . . . . . . . . . . . . . . . . . . . . . . . . . . . . . . 37
Verifying Terminal Status . . . . . . . . . . . . . . . . . . . . . . . . . . . . . . . . . . . . . . . . . . 38
Entering System Mode . . . . . . . . . . . . . . . . . . . . . . . . . . . . . . . . . . . . . . . . . . . . 38
File Groups. . . . . . . . . . . . . . . . . . . . . . . . . . . . . . . . . . . . . . . . . . . . . . . . . . . . . 38
Passwords . . . . . . . . . . . . . . . . . . . . . . . . . . . . . . . . . . . . . . . . . . . . . . . . . . . . . 39
System Password . . . . . . . . . . . . . . . . . . . . . . . . . . . . . . . . . . . . . . . . . . . . . 39
File Group Passwords. . . . . . . . . . . . . . . . . . . . . . . . . . . . . . . . . . . . . . . . . . 39
System Mode Menus . . . . . . . . . . . . . . . . . . . . . . . . . . . . . . . . . . . . . . . . . . . . . 40
System Mode Procedures. . . . . . . . . . . . . . . . . . . . . . . . . . . . . . . . . . . . . . . 41
Enter and Exit System Mode . . . . . . . . . . . . . . . . . . . . . . . . . . . . . . . . . . . . 42
System Mode Menu 1. . . . . . . . . . . . . . . . . . . . . . . . . . . . . . . . . . . . . . . . . . 43
System Mode Menu 2. . . . . . . . . . . . . . . . . . . . . . . . . . . . . . . . . . . . . . . . . . 44

CONTENTS
4OMNI 3600 REFERENCE MANUAL
System Mode Menu 3. . . . . . . . . . . . . . . . . . . . . . . . . . . . . . . . . . . . . . . . . . 47
Edit Keyed Files . . . . . . . . . . . . . . . . . . . . . . . . . . . . . . . . . . . . . . . . . . . . . . 52
System Mode Menu 4. . . . . . . . . . . . . . . . . . . . . . . . . . . . . . . . . . . . . . . . . . 52
System Mode Menu 5. . . . . . . . . . . . . . . . . . . . . . . . . . . . . . . . . . . . . . . . . . . . . 54
System Mode Menu 6. . . . . . . . . . . . . . . . . . . . . . . . . . . . . . . . . . . . . . . . . . 55
System Mode Menu 7. . . . . . . . . . . . . . . . . . . . . . . . . . . . . . . . . . . . . . . . . . 56
CHAPTER 4
Performing
Downloads
Downloads and Uploads. . . . . . . . . . . . . . . . . . . . . . . . . . . . . . . . . . . . . . . . . . . 57
Download Methods. . . . . . . . . . . . . . . . . . . . . . . . . . . . . . . . . . . . . . . . . . . . . . . 58
Download Tools . . . . . . . . . . . . . . . . . . . . . . . . . . . . . . . . . . . . . . . . . . . . . . . . . 58
Download Content . . . . . . . . . . . . . . . . . . . . . . . . . . . . . . . . . . . . . . . . . . . . . . . 59
Full and Partial Downloads. . . . . . . . . . . . . . . . . . . . . . . . . . . . . . . . . . . . . . . . . 60
Omni 3600 Download Differences . . . . . . . . . . . . . . . . . . . . . . . . . . . . . . . . . . . 62
Support for Multiple Applications . . . . . . . . . . . . . . . . . . . . . . . . . . . . . . . . . 62
Use of RAM and Flash Memory . . . . . . . . . . . . . . . . . . . . . . . . . . . . . . . . . . 63
Redirection of Files During Application Downloads . . . . . . . . . . . . . . . . . . . 64
File Authentication Requirements. . . . . . . . . . . . . . . . . . . . . . . . . . . . . . . . . 69
Support for File Compression . . . . . . . . . . . . . . . . . . . . . . . . . . . . . . . . . . . . 76
Effect of Downloads on Existing Files and Data. . . . . . . . . . . . . . . . . . . . . . . . . 76
Set Up the Download Environment . . . . . . . . . . . . . . . . . . . . . . . . . . . . . . . . . . 77
Cable Connection for Direct Downloads . . . . . . . . . . . . . . . . . . . . . . . . . . . . 78
Telephone Line Connection for Telephone Downloads . . . . . . . . . . . . . . . . 80
Connections for Back-to-Back Downloads . . . . . . . . . . . . . . . . . . . . . . . . . . 80
Direct Application Downloads. . . . . . . . . . . . . . . . . . . . . . . . . . . . . . . . . . . . . . . 80
Hardware Checklist. . . . . . . . . . . . . . . . . . . . . . . . . . . . . . . . . . . . . . . . . . . . 80
Software Checklist . . . . . . . . . . . . . . . . . . . . . . . . . . . . . . . . . . . . . . . . . . . . 80
Checklist for Effects on Files and Settings in the Receiving Terminal . . . . . 81
Direct Application Download Procedure . . . . . . . . . . . . . . . . . . . . . . . . . . . . 81
Direct Operating System Downloads . . . . . . . . . . . . . . . . . . . . . . . . . . . . . . . . . 85
Hardware Checklist. . . . . . . . . . . . . . . . . . . . . . . . . . . . . . . . . . . . . . . . . . . . 85
Software Checklist . . . . . . . . . . . . . . . . . . . . . . . . . . . . . . . . . . . . . . . . . . . . 85
Checklist for Effects on Files and Settings in the Receiving Terminal . . . . . 86
Direct Operating System Download Procedure . . . . . . . . . . . . . . . . . . . . . . 86
Download by Telephone. . . . . . . . . . . . . . . . . . . . . . . . . . . . . . . . . . . . . . . . . . . 88
Hardware Checklist. . . . . . . . . . . . . . . . . . . . . . . . . . . . . . . . . . . . . . . . . . . . 88
Software Checklist . . . . . . . . . . . . . . . . . . . . . . . . . . . . . . . . . . . . . . . . . . . . 88
Telephone Downloads Procedure. . . . . . . . . . . . . . . . . . . . . . . . . . . . . . . . . 89
Back-to-Back Application Downloads. . . . . . . . . . . . . . . . . . . . . . . . . . . . . . . . . 91
Hardware Checklist. . . . . . . . . . . . . . . . . . . . . . . . . . . . . . . . . . . . . . . . . . . . 91
Software Checklist . . . . . . . . . . . . . . . . . . . . . . . . . . . . . . . . . . . . . . . . . . . . 91
Checklist for Effects on Files and Settings in the Receiving Terminal . . . . . 92
Back-to-Back Application Download Procedure . . . . . . . . . . . . . . . . . . . . . . 92
CHAPTER 5
File Authentication Introduction to File Authentication . . . . . . . . . . . . . . . . . . . . . . . . . . . . . . . . . . . 97
The VeriFone Certificate Authority . . . . . . . . . . . . . . . . . . . . . . . . . . . . . . . . 97
Special Files Used in the File Authentication Process . . . . . . . . . . . . . . . . . 98
How File Authentication Works . . . . . . . . . . . . . . . . . . . . . . . . . . . . . . . . . . . 99
Planning for File Authentication . . . . . . . . . . . . . . . . . . . . . . . . . . . . . . . . . 104
Digital Certificates and the File Authentication Process . . . . . . . . . . . . . . . 107
File Authentication and the Omni 3600 File System . . . . . . . . . . . . . . . . . . 111

CONTENTS
OMNI 3600 REFERENCE MANUAL 5
The FILESIGN.EXE File Signing Tool . . . . . . . . . . . . . . . . . . . . . . . . . . . . . . . 114
FILESIGN.EXE System Requirements. . . . . . . . . . . . . . . . . . . . . . . . . . . . 114
Operating Modes for FILESIGN.EXE . . . . . . . . . . . . . . . . . . . . . . . . . . . . . 115
Command-Line Entries for FILESIGN.EXE . . . . . . . . . . . . . . . . . . . . . . . . 116
Command-Line Mode Syntax Example . . . . . . . . . . . . . . . . . . . . . . . . . . . 117
FILESIGN.EXE Graphical Interface Mode . . . . . . . . . . . . . . . . . . . . . . . . . 117
CHAPTER 6
Troubleshooting
and Service
Smart Card . . . . . . . . . . . . . . . . . . . . . . . . . . . . . . . . . . . . . . . . . . . . . . . . . 119
System Messages . . . . . . . . . . . . . . . . . . . . . . . . . . . . . . . . . . . . . . . . . . . 119
Use Remote Diagnostics to Identify Problems . . . . . . . . . . . . . . . . . . . . . . 119
Troubleshooting . . . . . . . . . . . . . . . . . . . . . . . . . . . . . . . . . . . . . . . . . . . . . . . . 119
Terminal Display Does Not Show Correct or Readable Information. . . . . . 120
Smart Battery Will Not Charge . . . . . . . . . . . . . . . . . . . . . . . . . . . . . . . . . . 120
Telephone Line Connection Does Not Work Properly . . . . . . . . . . . . . . . . 120
Printer Does Not Work . . . . . . . . . . . . . . . . . . . . . . . . . . . . . . . . . . . . . . . . 120
Serial Port Does Not Work . . . . . . . . . . . . . . . . . . . . . . . . . . . . . . . . . . . . . 121
Terminal Does Not Process Transactions . . . . . . . . . . . . . . . . . . . . . . . . . 121
Keypad Does Not Respond . . . . . . . . . . . . . . . . . . . . . . . . . . . . . . . . . . . . 122
Cleaning and Care . . . . . . . . . . . . . . . . . . . . . . . . . . . . . . . . . . . . . . . . . . . . . . 122
Base Contacts . . . . . . . . . . . . . . . . . . . . . . . . . . . . . . . . . . . . . . . . . . . . . . 122
Smart Card Reader. . . . . . . . . . . . . . . . . . . . . . . . . . . . . . . . . . . . . . . . . . . 123
VeriFone Service and Support . . . . . . . . . . . . . . . . . . . . . . . . . . . . . . . . . . . . . 123
Return a Terminal, Omni 3600 Base, or Smart Battery . . . . . . . . . . . . . . . 123
Specifications . . . . . . . . . . . . . . . . . . . . . . . . . . . . . . . . . . . . . . . . . . . . . . . . . . 125
Power Requirements . . . . . . . . . . . . . . . . . . . . . . . . . . . . . . . . . . . . . . . . . 125
Environmental. . . . . . . . . . . . . . . . . . . . . . . . . . . . . . . . . . . . . . . . . . . . . . . 125
Dimensions . . . . . . . . . . . . . . . . . . . . . . . . . . . . . . . . . . . . . . . . . . . . . . . . . 125
Weight. . . . . . . . . . . . . . . . . . . . . . . . . . . . . . . . . . . . . . . . . . . . . . . . . . . . . 125
Accessories and Documentation . . . . . . . . . . . . . . . . . . . . . . . . . . . . . . . . . . . 126
How to Order . . . . . . . . . . . . . . . . . . . . . . . . . . . . . . . . . . . . . . . . . . . . . . . 126
APPENDIX A
System Messages
APPENDIX B
ASCII Table
APPENDIX C
Omni 3600 Base
Unit Port Pinouts
RS232 Port . . . . . . . . . . . . . . . . . . . . . . . . . . . . . . . . . . . . . . . . . . . . . . . . . 141
Telco Port . . . . . . . . . . . . . . . . . . . . . . . . . . . . . . . . . . . . . . . . . . . . . . . . . . 141
Telset Port . . . . . . . . . . . . . . . . . . . . . . . . . . . . . . . . . . . . . . . . . . . . . . . . . 141
Barrel Connector Polarity . . . . . . . . . . . . . . . . . . . . . . . . . . . . . . . . . . . . . . 142
GLOSSARY . . . . . . . . . . . . . . . . . . . . . . . . . . . . . . . . . . . . .143
INDEX . . . . . . . . . . . . . . . . . . . . . . . . . . . . . . . . . . . . . . . . .149

CONTENTS
6OMNI 3600 REFERENCE MANUAL
OMNI 3600 REFERENCE MANUAL 7
CHAPTER 1
Omni 3600 Terminal and Omni 3600 Base Installation
This chapter describes how to set up and install the Omni 3600 terminal and
Omni 3600 base, including how to:
•protect the terminal from adverse Environmental conditions,
•install and maintain the Smart Battery,
•establish communications connections through the Omni 3600 Base
Communications Ports, and
•connect optional peripheral devices through the Omni 3600 base (see
Peripheral Devices).
Select a
Location
This section provides tips on using and protecting your Omni 3600 terminal, and
location recommendations for the Omni 3600 base.
Omni 3600
Terminal
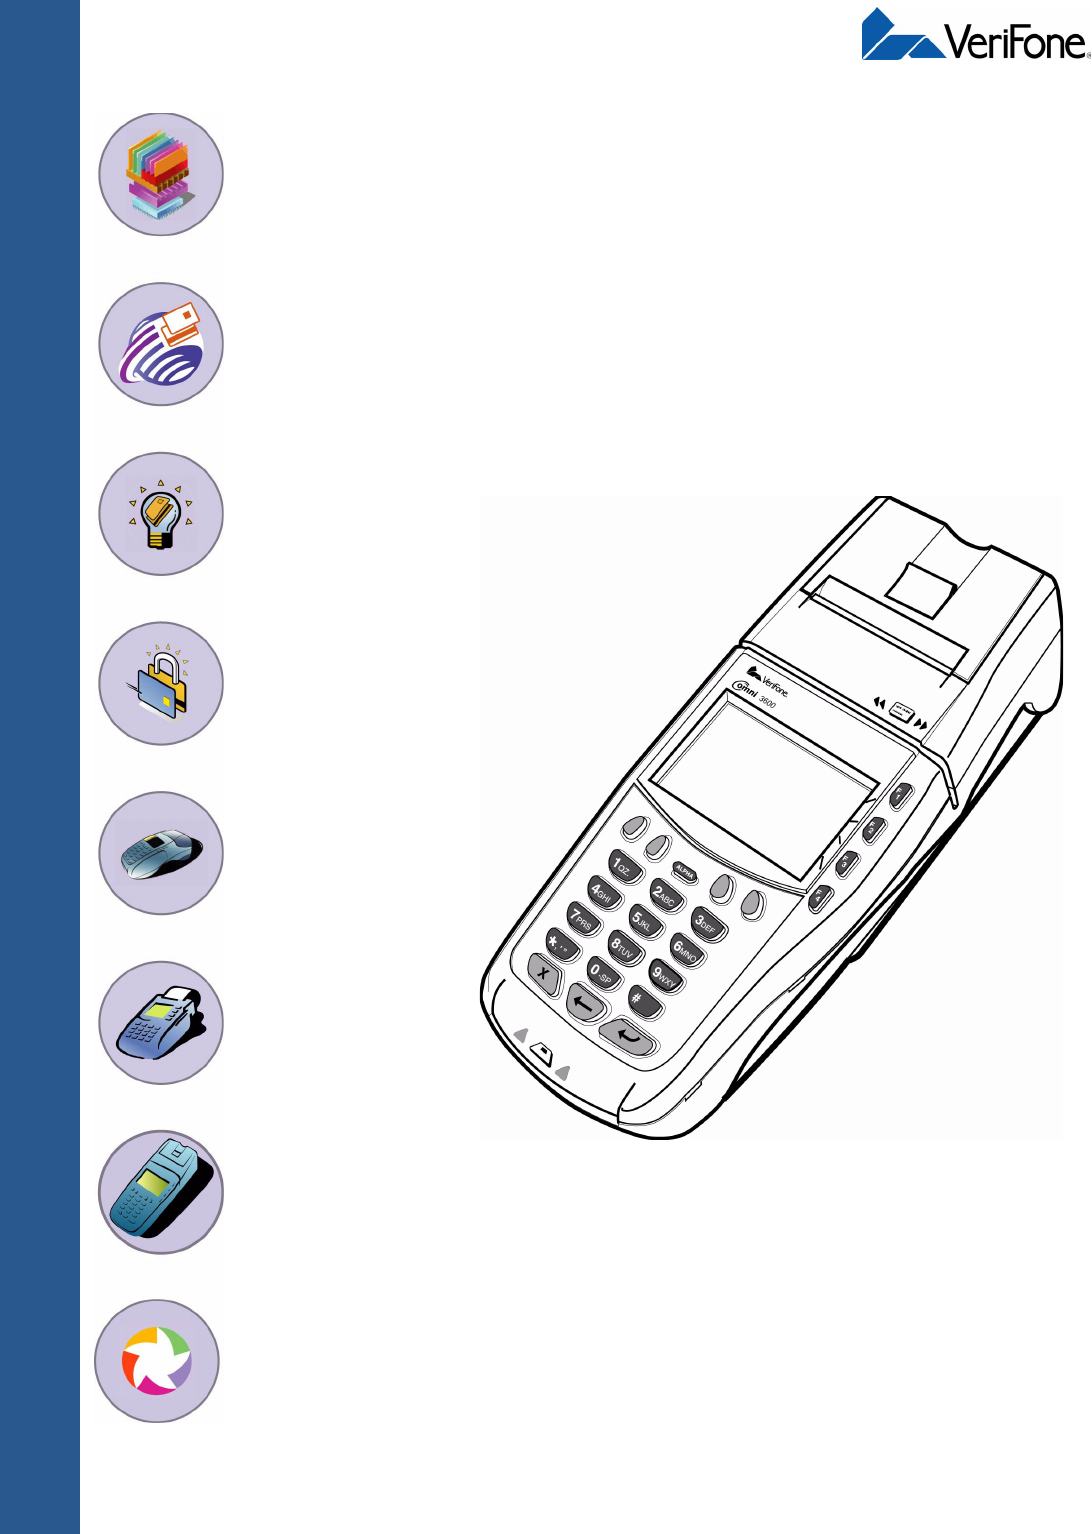
The Omni 3600 is a portable terminal for performing transactions remotely. Since
it is a portable unit, location is not a factor however, follow the rules established in
the Environment and Convenience sections.
Omni 3600 Base A prime location for the Omni 3600 base is a counter or other flat surface that
provides easy access to a power outlet and phone jack. Also, follow the rules
established in the Environment and Convenience sections.
Environment
•Do not use the Omni 3600 terminal or Omni 3600 base where there is
moisture or high humidity, chemicals or oils, or excessive heat or dust.
•Avoid locations near electrical appliances or other devices that emit excessive
voltage fluctuations or electrical noise (for example, air conditioners, electric
motors, neon signs, high-frequency or magnetic security devices, or computer
equipment).
NOTE This installation procedure is also available for end users in the Omni 3600
Installation Guide (VeriFone part number 22060), which can be downloaded at:
http://www.verifone.com/support/index.html
WARNING Do not leave this terminal in a non-climate-controlled
vehicle. The Omni 3600 terminal is highly sensitive to
temperature extremes. Subjecting the terminal to temperatures
outside the stated operating range can void your warranty.

OMNI 3600 TERMINAL AND OMNI 3600 BASE INSTALLATION
Omni 3600 Terminal
8OMNI 3600 REFERENCE MANUAL
•Never place the terminal in direct sunlight.
•Keep the Omni 3600 terminal and Omni 3600 base away from anything that
radiates heat, such as a stove or motor.
Convenience Omni 3600 Terminal
Keep the Omni 3600 terminal with you to perform transactions. When plugging the
Omni 3600 terminal into the power pack, ensure that the unit is placed close
enough to a power outlet so that the power cable readily reaches the unit. For
safety, do not string the power cable in a walkway or place across a walkway on
the floor.
Omni 3600 Base
Locate the Omni 3600 base so that you can readily dock the Omni 3600 terminal
on the cradle for recharging and downloading. Again, for safety, ensure that the
power cable readily reaches the Omni 3600 base unit, so as not to trip or interfere
in any way in a busy location.
Omni 3600
Terminal
This section discusses the features of the Omni 3600 terminal, including
•providing power to the Omni 3600 terminal,
•charging the smart battery,
•installing paper,
•installing MSAM cards, and
•completing magnetic card and smart card transactions.
Unpack the
Shipping Carton
Open the shipping carton and carefully inspect the contents for possible
tampering or shipping damage (Figure 1).
CAUTION Do not use the Omni 3600 terminal or Omni 3600 base outdoors. They are for
indoor use only, and are not waterproof or dustproof. Damage to the unit from
exposure to sun, rain, or dust may void your warranty.
WARNING Do not use the Omni 3600 terminal or Omni 3600 base near water, including a
bathtub, wash bowl, kitchen sink or laundry tub, in a wet basement, or near a
swimming pool. Avoid using these products during electrical storms.
OMNI 3600 TERMINAL AND OMNI 3600 BASE INSTALLATION
Omni 3600 Terminal
OMNI 3600 REFERENCE MANUAL 9
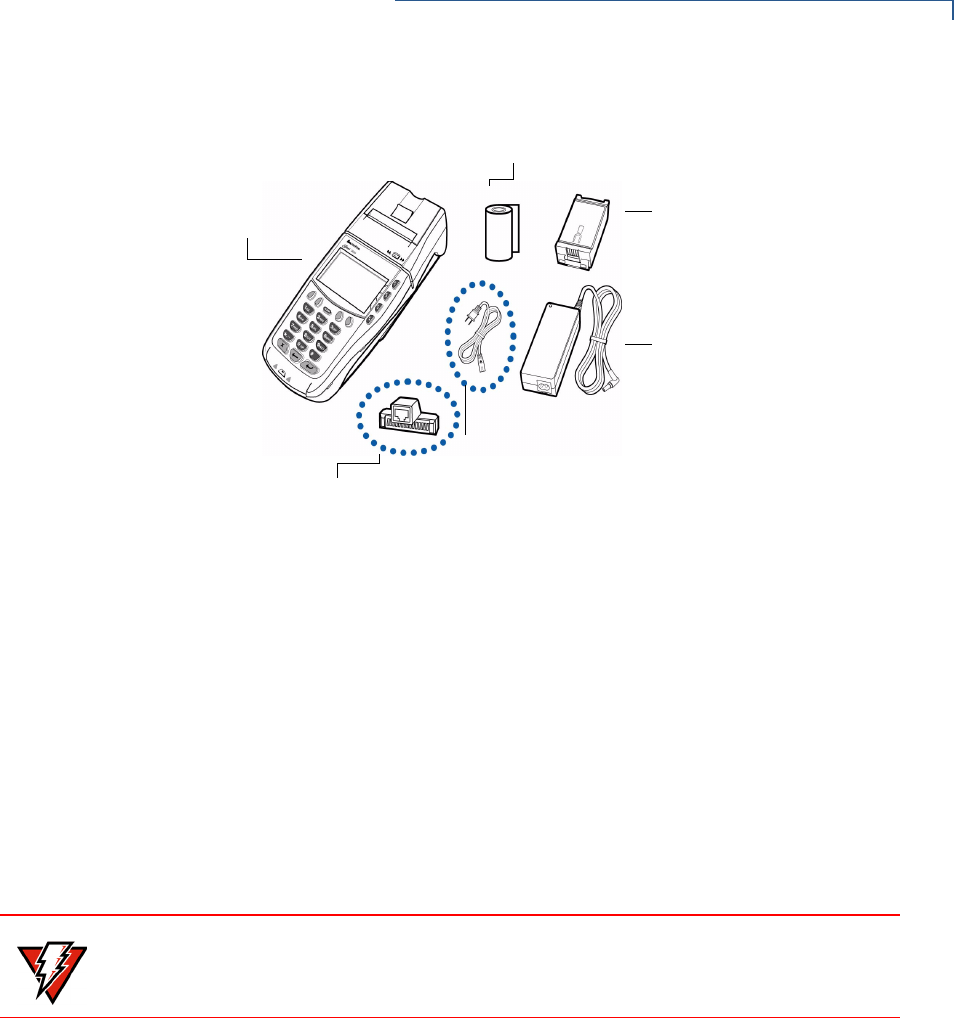
Figure 1 Omni 3600 Terminal Shipping Carton Components
1Remove the following items:
•Omni 3600 terminal
•Power pack and power cable (if present)
•Roll of thermal printer paper
•Battery pack
•MOD10 adaptor (optional)
2Remove all plastic wrap from the Omni 3600 terminal and components.
3Remove the clear protective film from the display lens.
SMART
BATTERY PACK
POWER PACK
PAPER ROLL
POWER CABLE
(REGIONAL)
OMNI 3600
TERMINAL
MOD10 ADAPTOR
(OPTIONAL)
WARNING Do not use a Omni 3600 terminal or Omni 3600 base that has been damaged or
tampered with.
OMNI 3600 TERMINAL AND OMNI 3600 BASE INSTALLATION
Omni 3600 Terminal
10 OMNI 3600 REFERENCE MANUAL
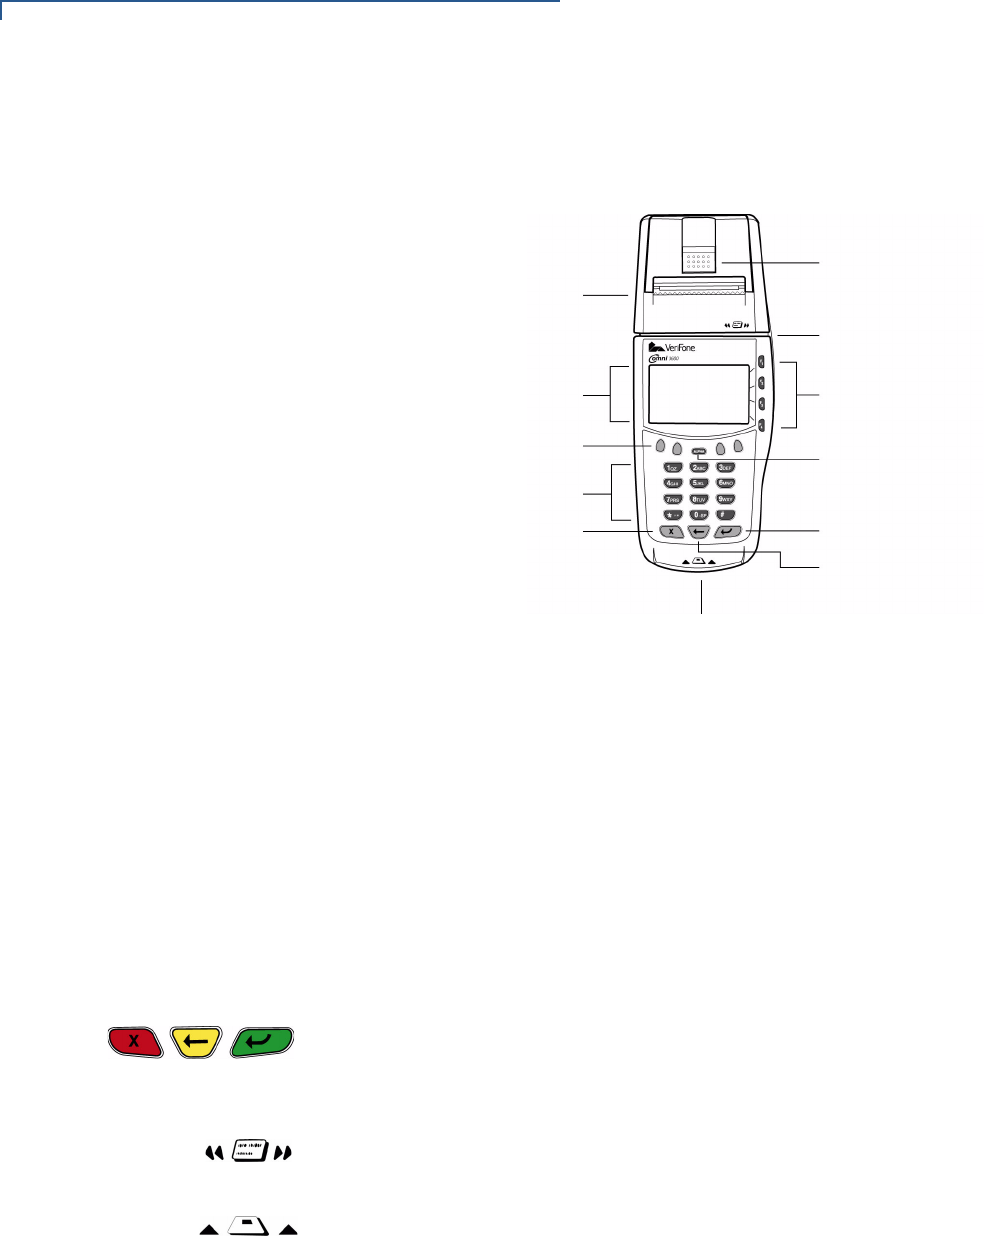
Terminal Features Figure 2 illustrates the physical features of the Omni 3600 terminal.
Figure 2 Omni 3600 Terminal Features
Notice the following features of the Omni 3600 terminal shown in Figure 2:
•The display
•Four types of keys:
•A 12-key, telephone-style keypad
•Eight function keys: four function keys, labeled F1 to F4, right display; four
unlabeled, programmable function (PF) keys above the keypad
•Three keys (icons at left) under the keypad (left-to-right: CANCEL/OFF,
BACKSPACE, ENTER/ON)
•An ALPHA key center above the keypad (see ALPHA Key, page 33)
•The magnetic card swipe, above the display. The icon at left shows proper
card orientation
•Smart card reader, in the front of the unit. The icon at left shows proper card
orientation
•The internal thermal printer and door release
•The smart battery pack installed in back of unit (Figure 4)
•A SAM (security access module) access door, underneath the battery
(Figure 9). The Omni 3600 terminal contains three micromodule-sized SAM
(MSAM) cardholders to support multiple stored-value card programs or other
merchant cards
PRINTER DOOR
RELEASE
CARD SWIPE
FUNCTION
KEYS
ALPHA KEY
ENTER/ON KEY
BACKSPACE KEY
CANCEL/OFF KEY
KEYPAD
PROGRAMMABLE
FUNCTION KEYS
INTERNAL THERMAL
PRINTER
SMART CARD
READER
DISPLAY
OMNI 3600 TERMINAL AND OMNI 3600 BASE INSTALLATION
Omni 3600 Terminal
OMNI 3600 REFERENCE MANUAL 11
The Omni 3600 terminal is equipped with a tamper-evident label (on a screw hole
on the case bottom).
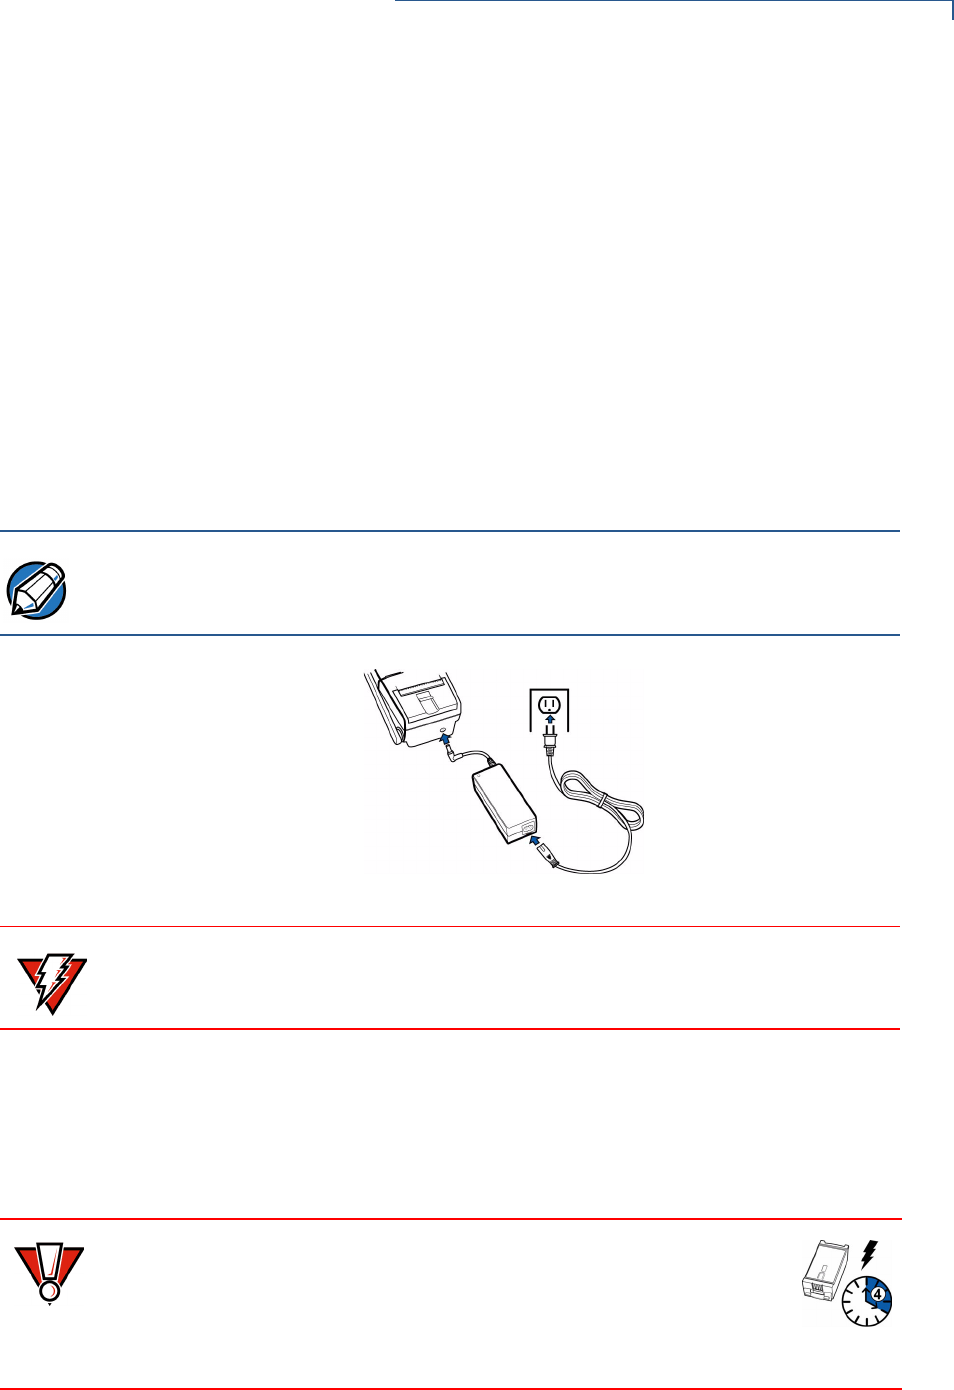
Power Port On the back of the Omni 3600 is one port—the power port. Use this port to
connect the Omni 3600 to the power pack to recharge the battery through the unit
Connect Power Pack
To connect the Omni 3600 terminal to power:
1Insert the round barrel connector (Figure 3) into the power port on the back of
the terminal.
2Insert the power cable into the power pack.
3Plug the power pack into a wall outlet or surge protector.
Figure 3 Connect Omni 3600 Terminal Power Pack
Smart Battery The Omni 3600 wireless terminal uses an Li-ion smart battery (see Accessories
and Documentation for ordering information). The internal logic of the smart
battery prevents both overcharging and undercharging (a fault condition in which
the battery level goes well below the minimum acceptable charge and the battery
becomes unusable).
NOTE Install a power surge protector to protect against possible damage caused by
lightning strikes and electrical surges.
WARNING
Do not plug the power pack into an outdoor outlet.
CAUTION Note that a new Li-ion battery’s full performance is achieved only after
two or three complete charge and discharge cycles.
On initial use, allow the Omni 3600 smart battery to charge 4 hours,
then fully discharge during normal operation, to ensure reliable battery
operation.
OMNI 3600 TERMINAL AND OMNI 3600 BASE INSTALLATION
Omni 3600 Terminal
12 OMNI 3600 REFERENCE MANUAL
The following are features of the smart battery:
•Two Li-ion cells
•A fuel gauge module
•monitors state of charge (voltage and current),
•communicates with the terminal (charge parameters and alarms to
indicate full discharge),
•determines full charge capacity (on charge cycle and uninterrupted
discharge cycle), and
•automatically shuts down when cell voltage is extremely low.
•A safety circuit
•prevents cell damage from overcharge/over-discharge,
•activates when the battery is left in an unused terminal for extended
periods, and
•resets when battery voltage reaches a preset threshold during the charge
cycle.
Refer to Spare Smart Battery Pack for smart battery instructions for the
Omni 3600 terminal on the Omni 3600 base.
Smart Battery Installation
The smart battery installs in a slot on the back of the terminal, as shown in
Figure 4. The locking tab clicks when the battery is in place. The slot is keyed, so
that there is only one way to insert the battery.
Figure 4 Install the Smart Battery
NOTE Conserve battery power by turning the Omni 3600 terminal off when not in use. If
the terminal is not to be used for several days, remove the battery from the
terminal as it continues to discharge even when the terminal is turned off.
NOTE The smart battery pack must be installed and holding a minimum of a 1% charge
to operate the Omni 3600 terminal.
OMNI 3600 TERMINAL AND OMNI 3600 BASE INSTALLATION
Omni 3600 Terminal
OMNI 3600 REFERENCE MANUAL 13
Smart Battery Removal
To remove the smart battery, press the locking tab at the top of the battery and
pull the smart battery from its slot.
Smart Battery Charging
On initial use, the smart battery must be fully charged and fully discharged
through normal operation. After unpacking your Omni 3600 terminal, install the
battery and connect the power pack to the unit for 4 hours. Disconnect the power
pack and allow your Omni 3600 terminal to remain on until the smart battery
completely discharges. Reconnect the power pack to the unit and allow the smart
battery to recharge a maximum of 4 hours.
It is also recommended that the smart battery receive a periodic full discharge. To
ensure a full discharge, use the unit until the battery is fully drained.
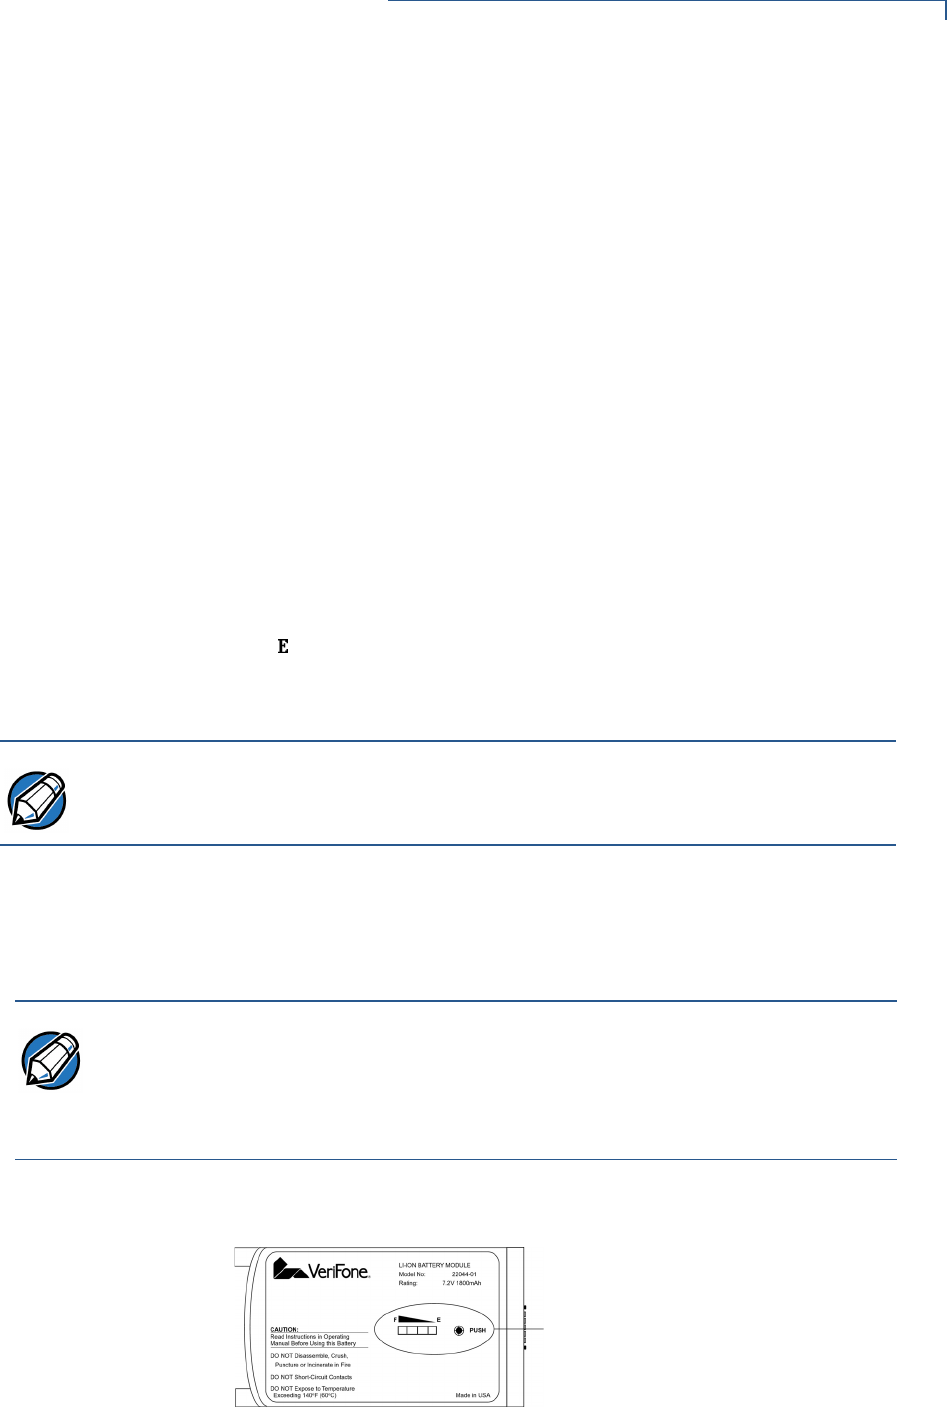
To determine the charge state of the battery, push the “test button” icon (shown in
Figure 5) on the bottom of the battery. The bar LED status indicators on the
battery each indicate 25% of the charge state. When the battery charge state
reaches 10%, the LED (Figure 5) blinks, indicating a low-charge state. The
battery charge state displays at the bottom of the first copyright screen when the
terminal is turned on.
The smart battery has a safety circuit to protect the Li-ion cells from overcharging
and over-discharging. If the battery is over-discharged, the safety circuit shuts
down the battery and none of the indicator LEDs (see Figure 5) on the battery
pack blink. The battery must then be recharged to restore operation.
If the Omni 3600 terminal is already running an application (for example, SoftPay),
a battery status indicator may appear on the display.
Figure 5 Smart Battery Charge Indicator LEDs and Test Button
NOTE Conserve battery power by turning the Omni 3600 terminal off when not in use. If
the terminal is not to be used for several days, remove the battery from the
terminal as it continues to discharge even when the terminal is turned off.
NOTE The Omni 3600 terminal automatically shuts off when the smart battery reaches
the critically low charge state. If this occurs, the smart battery must recharge a
minimum of 1/2 hour before it can power the terminal. It make take several
recharge attempts to reset the safety circuit when charging a smart battery that
has reached a critically low charge state.
BATTERY CHARGE STATE
TEST BUTTON AND STATUS
INDICATOR LEDS
OMNI 3600 TERMINAL AND OMNI 3600 BASE INSTALLATION
Omni 3600 Terminal
14 OMNI 3600 REFERENCE MANUAL
Smart Battery Life
To ensure that you get the longest possible performance from the smart battery, it
must be allowed to fully discharge periodically. The smart battery can be charged
and discharged hundreds of times, but will eventually wear out. When operating
times are noticeably shorter than usual, it is time to buy a new battery (see
Accessories and Documentation for ordering information).
Turn On/Off the
Omni 3600
Terminal
When the smart battery completes its initial charge, turn on the Omni 3600
terminal by pressing the green ENTER/ON key (icon at left) for approximately 3 sec.
The display screen lights and displays the initial VeriFone copyright screen. If an
application is loaded in the terminal, it starts after the initial VeriFone copyright
screen and displays a unique (copyright) screen. If no application is loaded in the
terminal, appears on screen after the initial VeriFone copyright
screen.
Turn off the Omni 3600 terminal by pressing the red CANCEL/OFF key (icon at left)
continuously until the cancel tone is heard (approximately 4 sec.). First a series of
beeps is heard, then the cancel tone. The unit then shuts off.
Paper Installation The internal thermal printer uses a roll of single-ply, thermal-sensitive paper 58
millimeters (2.25 inches) wide and 25 meters (82 feet) long. A pink out-of-paper
indicator line appears on the edge of the paper approximately 18 inches before
the end of the roll. After this line appears, there is enough paper remaining on the
roll to conclude at least one transaction.
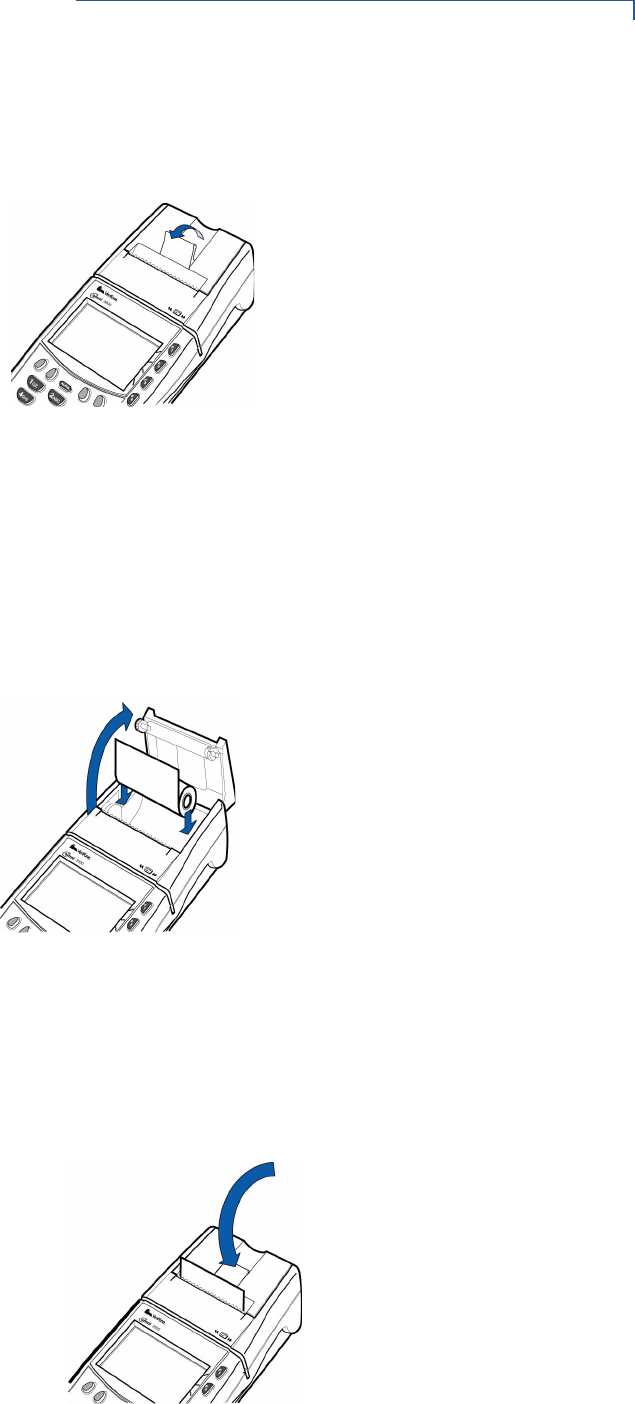
To install the paper roll in the internal thermal printer:
1Lift paper roll cover tab to unlock the printer door (Figure 6).
NOTE
It is recommended that you keep a spare, charged smart battery available.
WARNING Do not dispose of batteries in a fire. Li-ion batteries must be recycled
or disposed of properly. Do not dispose of Li-ion batteries in municipal
waste sites.
WARNING Poor-quality paper may jam the printer. Order high-quality paper from VeriFone;
refer to the ordering process listed in Accessories and Documentation.
CAUTION Store thermal paper in a dry, dark, cool place. Handle thermal paper carefully;
impact, friction, high temperatures, humidity, light, and oils affect the color and
storage characteristics.
OMNI 3600 TERMINAL AND OMNI 3600 BASE INSTALLATION
Omni 3600 Terminal
OMNI 3600 REFERENCE MANUAL 15
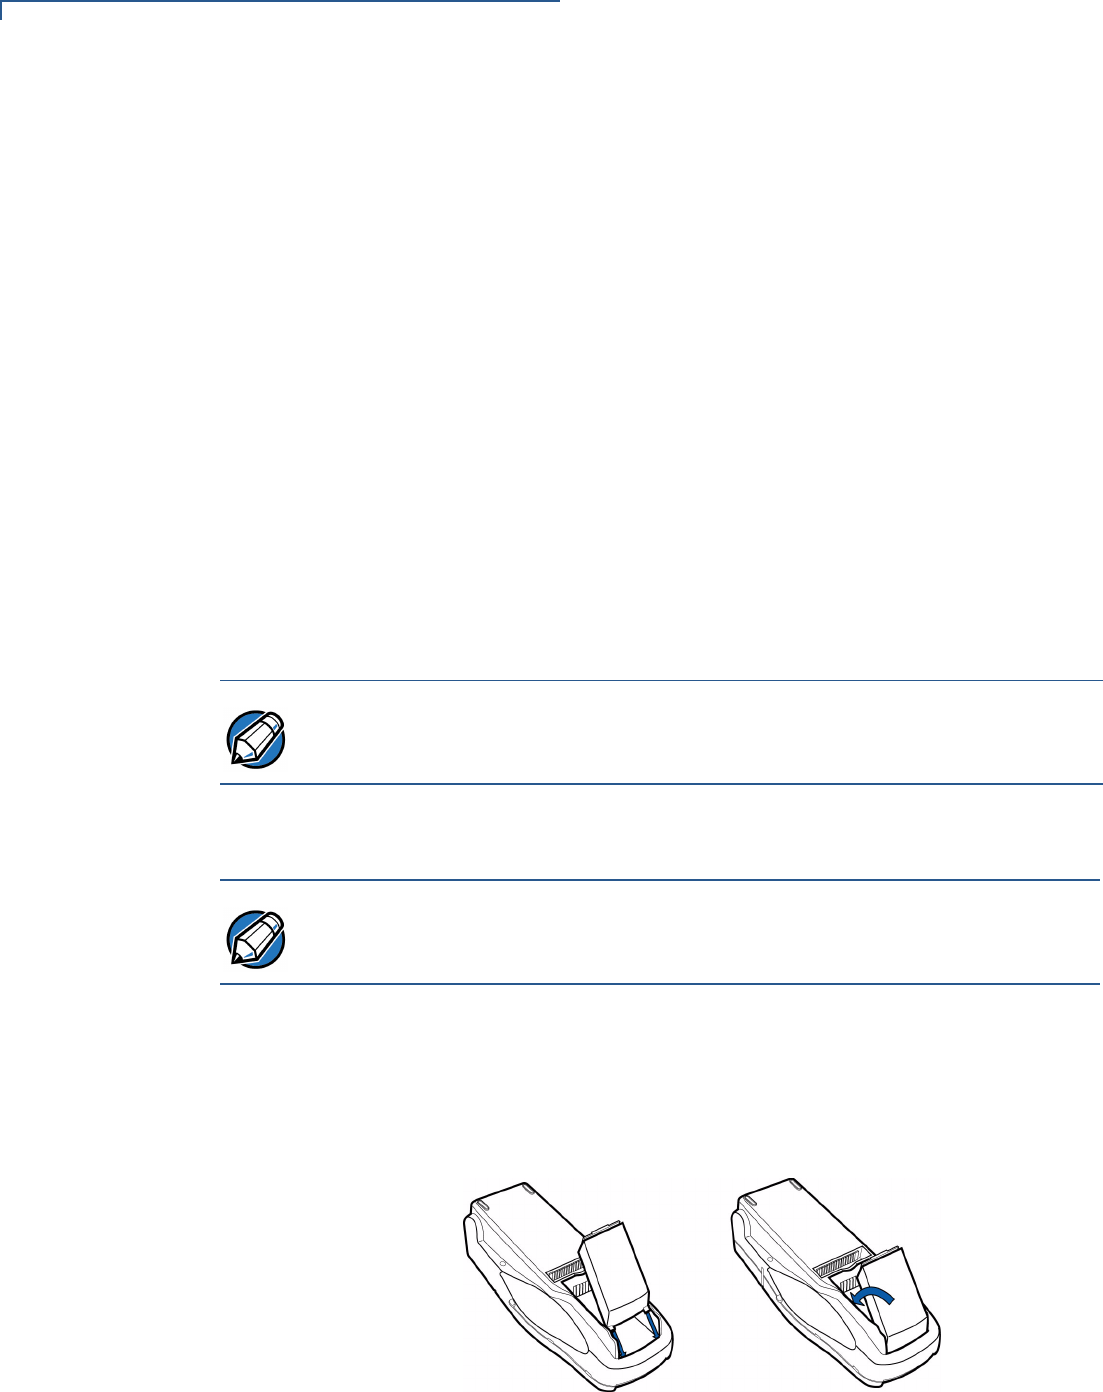
2Rotate the printer door up and back. Note that the door is hinged; it is not
necessary to remove it from the unit.
Figure 6 Open the Printer Cover
3Loosen the glued leading edge of the paper from the roll.
4Hold the paper roll so paper feeds from the bottom (Figure 7) and pull
approximately two inches of paper free of the roll.
5Drop the paper roll into the printer tray, allowing the free paper to extend
outside the printer door (Figure 7).
Figure 7 Load Paper
6Close the cover by gently pressing directly on the paper roll cover tab until it
clicks shut. Allow a small amount of paper to extend outside the cover, as
shown in Figure 8.
Figure 8 Close the Printer Cover