Wistron MS2119 Laptop with 2.4 GHz 802.11 User Manual AJ e
Wistron Corporation Laptop with 2.4 GHz 802.11 AJ e
Wistron >
Contents
Notebook Manual Part 2
11
Connectivity
• High-speed fax/data software modem
• Onboard PCI 10/100 Mbps LAN support
• Fast infrared wireless communication
• USB (Universal Serial Bus) ports (2.0)
• 2 IEEE 1394 ports (one mini port and one regular port)
• Optional 802.11b wireless LAN
• Optional 802.11b + Bluetooth combo module
Human-centric design and ergonomics
• Sleek, smooth and stylish design
• Full-sized keyboard
• Ergonomically-centered touchpad pointing device
• Launch keys
Expansion
• Upgradeable memory and hard disk
• Second hard disk module
• Secure Digital (SD) slot
AJ-e.book Page 11 Friday, April 11, 2003 5:18 PM

1 Getting familiar with your computer12
Display
The graphics display offers excellent viewing, display quality and desktop-
performance graphics. The computer supports a widescreen Thin-Film Transistor
(TFT) liquid crystal display (LCD) displaying up to 16.7 million colors at
1280x854 Super eXtended Graphics Array (SXGA) resolution.
Simultaneous display
The computer’s crisp display and multimedia capabilities are great for giving
presentations. If you prefer, you can also connect an external monitor when giving
presentations. This computer supports simultaneous LCD and CRT display.
Simultaneous display allows you to control the presentation from your computer
and at the same time face your audience. You can also connect other output
display devices such as LCD projection panels for large-audience presentations.
Power management
The power management system incorporates an "automatic LCD dim" feature that
automatically dims the LCD when the computer is powered by a battery pack to
conserve battery power. See “Power management” on page 45 for more
information on power management features.
Opening and closing the display
To open the display, slide the display cover latch to the left and lift up the cover,
then tilt it to a comfortable viewing position. See “Connecting the computer” on
page vii. The computer employs a microswitch that turns off the display (e.g.,
enters standby mode) to conserve power when you close the display cover, and
turns it back on when you open the display cover.
Note: If an external monitor is connected, the computer turns off the display
(but does not enter standby mode) when you close the display cover.
To close the display cover, fold it down gently until the display cover latch clicks
into place.
Caution: To avoid damaging the display, do not slam it when you close it.
Also, do not place any object on top of the computer when the display is
closed.
AJ-e.book Page 12 Friday, April 11, 2003 5:18 PM
13
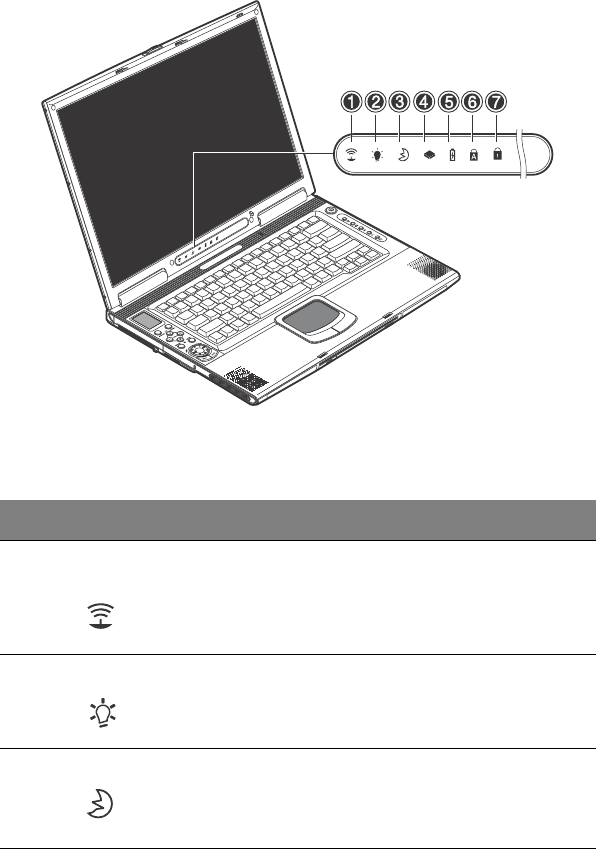
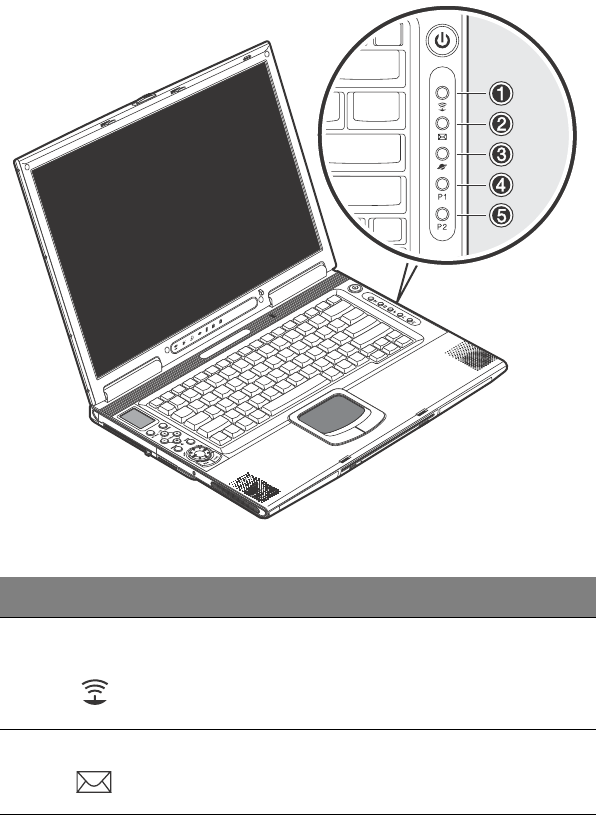
Indicators
The computer has seven easy-to-read status indicators (LEDs) under the display
screen.
The Power and Standby indicators are visible even when you close the display
cover so you can see the status of the computer while the cover is closed.
#Function Description
1Wireless
communication
Lights when the Bluetooth/Wireless LAN (optional)
capabilities are enabled.
2 Power Lights when the computer is on.
Blinks when a battery-low condition occurs.
3 Standby Blinks when computer enters Hibernation mode.
AJ-e.book Page 13 Friday, April 11, 2003 5:18 PM

1 Getting familiar with your computer14
4 Media activity Lights when the hard disk, or CD or DVD drive is
active.
5 Battery charge Lights when the battery is being charged.
6 Caps lock Lights when Caps Lock is activated.
7Num lock
(Fn-F11)
Lights when Numeric Lock is activated.
#Function Description
AJ-e.book Page 14 Friday, April 11, 2003 5:18 PM
15
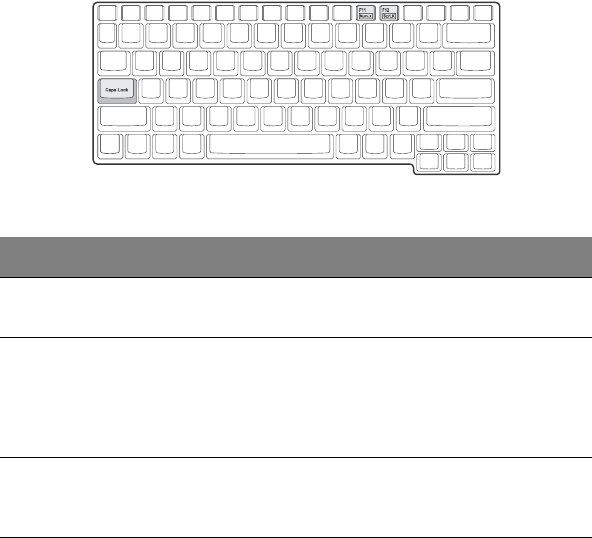
Keyboard
The keyboard has full-sized keys with an embedded keypad, separate cursor keys,
two Windows keys and twelve function keys.
Special keys
Lock keys
The keyboard has three lock keys which you can toggle on and off.
Lock Key Description
Caps Lock When Caps Lock is on, all alphabetic characters typed are in
uppercase.
Num Lock (Fn-
F11)
When Num Lock is on, the embedded keypad is in numeric mode.
The keys function as a calculator (complete with the arithmetic
operators +, -, *, and /). Use this mode when you need to do a lot of
numeric data entry. A better solution would be to connect an
external keypad. See “External keyboard” on page 51.
Scroll Lock
(Fn-F12)
When Scroll Lock is on, the screen moves one line up or down when
you press ↑ or ↓ respectively. Scroll Lock does not work with some
applications.
AJ-e.book Page 15 Friday, April 11, 2003 5:18 PM
1 Getting familiar with your computer16
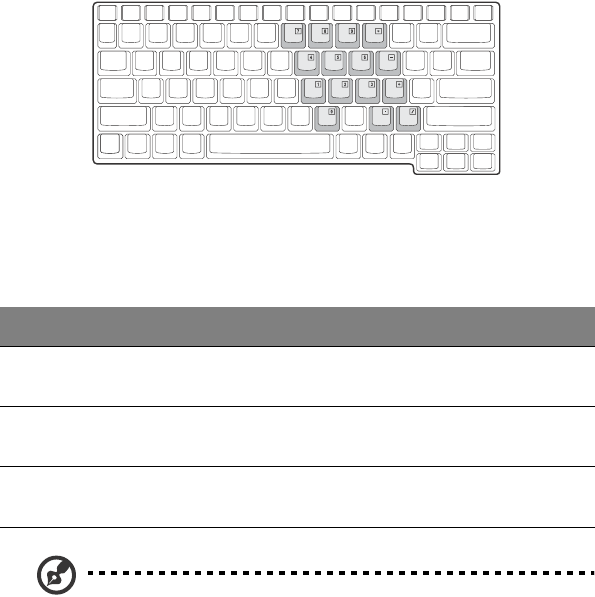
Embedded numeric keypad
The embedded numeric keypad functions like a desktop numeric keypad. It is
indicated by small characters located on the upper right corner of the keycaps. To
simplify the keyboard legend, cursor-control key symbols are not printed on the
keys.
Note: If an external keyboard or keypad is connected to the computer, the
numlock feature automatically shifts from the internal keyboard to the
external keyboard or keypad.
Desired Access Num Lock On Num Lock Off
Number keys on
embedded keypad
Type numbers in a normal
manner.
Cursor-control keys on
embedded keypad
Hold Shift while using cursor-
control keys.
Hold Fn while using
cursor-control keys.
Main keyboard keys Hold Fn while typing letters on
embedded keypad.
Type the letters in a
normal manner.
AJ-e.book Page 16 Friday, April 11, 2003 5:18 PM
17
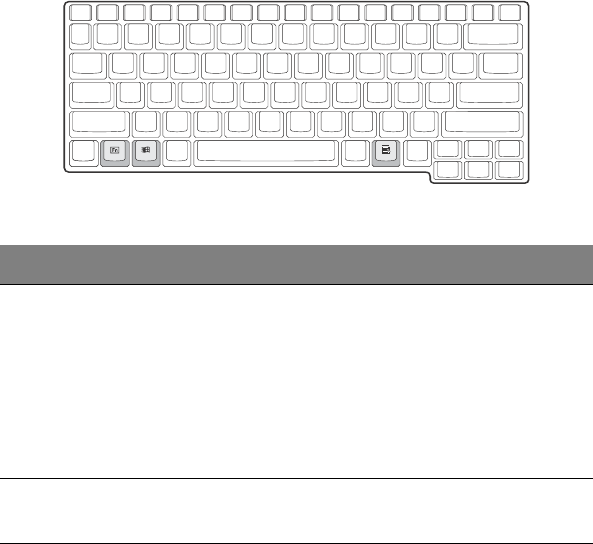
Windows keys
The keyboard has two keys that perform Windows-specific functions.
Key Description
Windows logo key Start button. Combinations with this key perform special
functions. Below are a few examples:
+ Tab (Activates next Taskbar button)
+ E (Explores My Computer)
+ F (Finds Document)
+ M (Minimizes All)
Shift + + M (Undoes Minimize All)
+ R (Displays Run dialog box)
Application key
(Fn-Application key)
Opens the application’s context menu (same as right-click).
AJ-e.book Page 17 Friday, April 11, 2003 5:18 PM
1 Getting familiar with your computer18
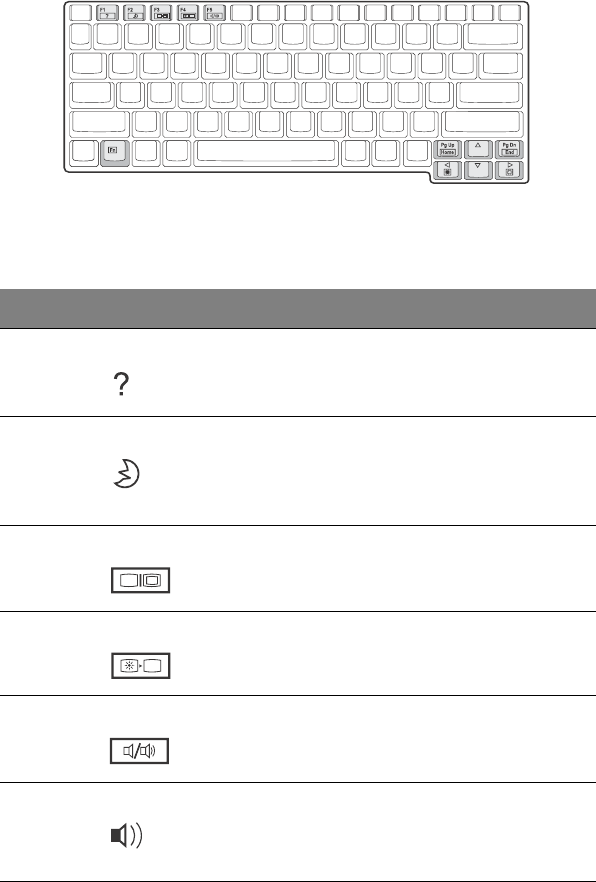
Hotkeys
The computer employs hotkeys or key combinations to access most of the
computer’s controls like screen contrast and brightness, volume output and the
BIOS setup utility.
HotKey Function Description
Fn-F1 Hotkey help Displays a list of the hotkeys and their functions.
Fn-F2 Sleep Puts the computer in Sleep mode, which can be
defined via the advanced section of the Power
Management Properties in the Windows Control
Panel.
Fn-F3 Display toggle Switches display output between the display
screen, external monitor (if connected) and both
the display screen and external monitor.
Fn-F4 Screen blank Turns the display screen backlight off to save
power. Press any key to return.
Fn-F5 Speaker on/off Turns the speakers on and off; mutes the sound.
Fn-↑Volume up Increases the speaker volume.
AJ-e.book Page 18 Friday, April 11, 2003 5:18 PM
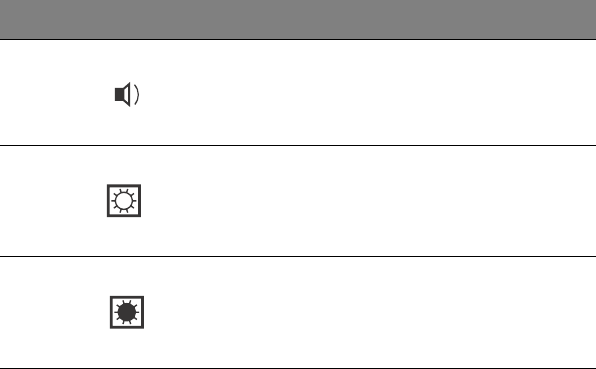
19
Activating hotkeys
When activating hotkeys, press and hold the Fn key before pressing the other key
in the hotkey combination.
Fn-↓Volume down Decreases the speaker volume.
Fn-→Brightness up Increases the screen brightness.
Fn-←Brightness down Decreases the screen brightness.
HotKey Function Description
AJ-e.book Page 19 Friday, April 11, 2003 5:18 PM
1 Getting familiar with your computer20
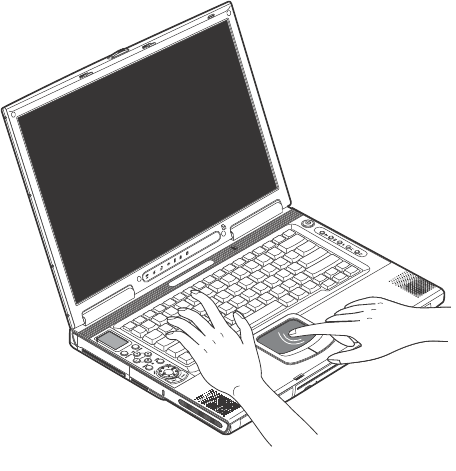
Keyboard ergonomics
Located below the keyboard, the wide and curved palm rest is ergonomically
designed to provide you with a very comfortable place to rest your hands while
you type.
AJ-e.book Page 20 Friday, April 11, 2003 5:18 PM
21
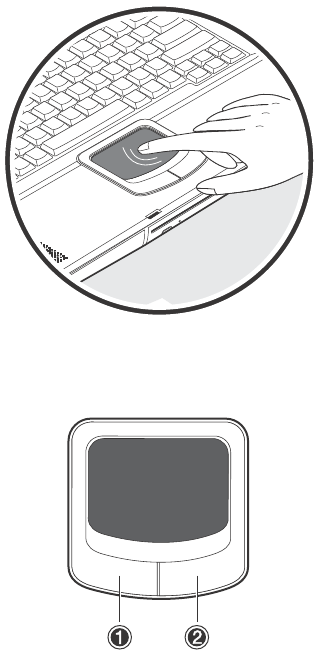
Touchpad
The built-in touchpad is a pointing device that senses movement on its surface.
This means the cursor responds as you move your finger on the surface of the
touchpad. The central location on the palm rest provides optimum comfort and
support.
Touchpad basics
The following teaches you how to use the touchpad:
• Move your finger across the touchpad to move the cursor.
• Press the left (1) and right (2) buttons located on the edge of the touchpad to
do selection and execution functions. These two buttons are similar to the left
and right buttons on a mouse. Tapping on the touchpad produces similar
results.
AJ-e.book Page 21 Friday, April 11, 2003 5:18 PM

1 Getting familiar with your computer22
Note: Keep your fingers dry and clean when using the touchpad. Also keep
the touchpad dry and clean. The touchpad is sensitive to finger movements.
Hence, the lighter the touch, the better the response. Tapping too hard will
not increase the touchpad’s responsiveness.
Function Left Button Right Button Tap
Execute Click twice
quickly.
Tap twice (at the same speed as
double-clicking the mouse
button).
Select Click once. Tap once.
Drag Click and hold,
then use finger
to drag the
cursor on the
touchpad.
Tap twice (at the same speed as
double-clicking the mouse
button) and hold finger to the
touchpad on the second tap to
drag the cursor.
Access
context menu
Click once.
AJ-e.book Page 22 Friday, April 11, 2003 5:18 PM
23
Launch keys
Located at the top of the keyboard are five launch keys used to launch frequently
used applications.
#Item Description
1 Wireless
communication
This button is used to enable or disable the Bluetooth/
Wireless LAN (optional) function.
2 Email The mail button is used to launch the email application.
AJ-e.book Page 23 Friday, April 11, 2003 5:18 PM

1 Getting familiar with your computer24
3 Internet browser By default, is used to launch your internet browser.
4 P1 This button is user-programmable.
5 P2 This button is user-programmable.
#Item Description
AJ-e.book Page 24 Friday, April 11, 2003 5:18 PM
25
Storage
This computer supplies you with the following media storage:
• High-capacity Enhanced-IDE hard disk
• Slot-loading DVD/CD-RW combo drive
• Secure Digital (SD) slot
• Optional external USB 3.5-inch floppy drive
• Optional second hard disk module
Hard disk
The high-capacity hard disk is the answer to your storage needs. This is where
your programs and data are stored.
Optical drive
A high-speed optical drive (DVD/CD-RW combo drive) gives you portable
multimedia access and at the same time lets you burn your data onto a CD
recordable disc.
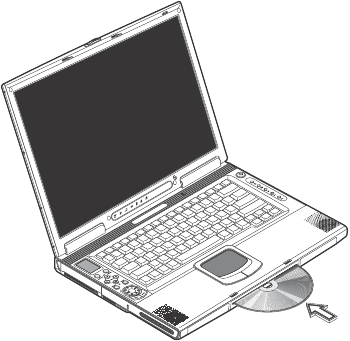
Inserting the disc
This computer features a slot-loading optical drive. To insert a disc into the optical
drive, gently push the disc into the slot and the drive will lock the disc in place and
pull it inside.
AJ-e.book Page 25 Friday, April 11, 2003 5:18 PM
1 Getting familiar with your computer26
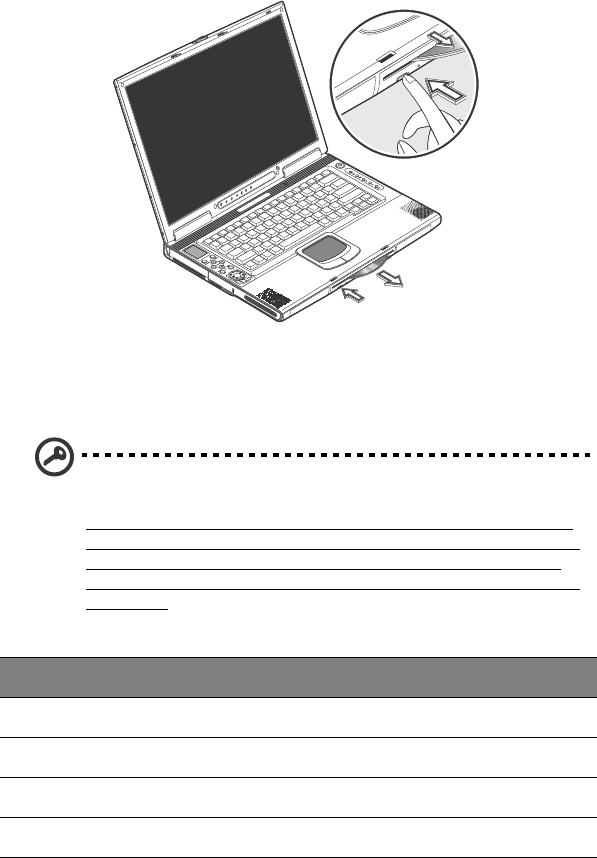
Ejecting the disc
To eject the disc from the slot, press the eject button and wait for the drive to eject
the disc.
Playing DVD movies
To play DVD movies in your computer, just insert the DVD disc into the drive and
the DVD movie will automatically play after a few seconds.
Important! When you launch the DVD player for the first time, the program
asks you to input the region code. DVD discs are divided into 6 regions.
Once your DVD drive is set to a region code, it will play DVD discs of that
region only. You can set the region code a maximum of five times (including
the first time), after which the last region code set will remain permanent.
Recovering your hard disk does not reset the number of times the region code
has been set. Refer to the table below for DVD movie region code
information.
Region code Country or region
1 U.S.A., Canada
2 Europe, Middle East, South Africa, Japan
3 Southeast Asia, Taiwan, Korea (South)
4 Latin America, Australia, New Zealand
AJ-e.book Page 26 Friday, April 11, 2003 5:18 PM

27
Note: To change the region code, insert a DVD movie of a different region
into the DVD-ROM drive. Please refer to the online help for more
information.
5 Former U.S.S.R., parts of Africa, India
6 People's Republic of China
Region code Country or region
AJ-e.book Page 27 Friday, April 11, 2003 5:18 PM
1 Getting familiar with your computer28
Connectivity options
The computer has built-in features for connecting to a network and communicating
with other computers.
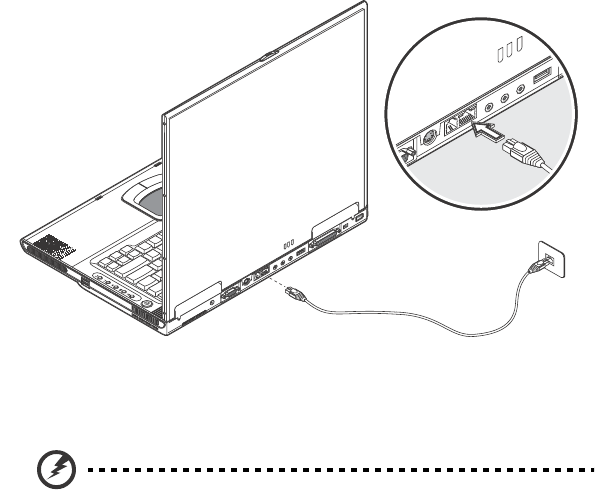
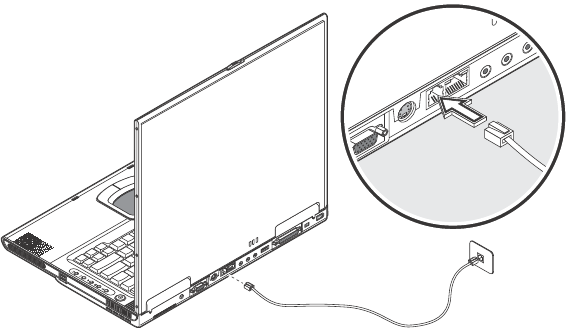
Ethernet and LAN
The built-in network feature allows you to connect your computer to an Ethernet-
based (10/100 Mbps) network.
To use the network feature, connect an Ethernet cable from the network jack on the
rear of the computer to a network jack or hub on your network.
Fax/data modem
The computer has a built-in fax/data modem (available in select countries).
Warning: This modem port is not compatible with digital phone lines.
Plugging this modem into a digital phone line will damage the modem.
AJ-e.book Page 28 Friday, April 11, 2003 5:18 PM
29
To use the fax/data modem port, connect a phone cable from the modem port to a
telephone jack.
AJ-e.book Page 29 Friday, April 11, 2003 5:18 PM
1 Getting familiar with your computer30
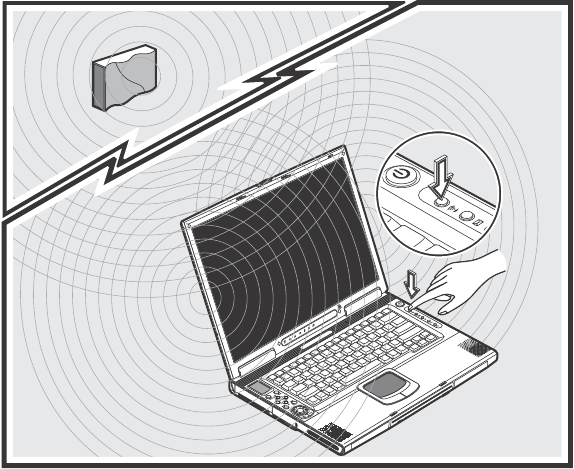
Optional wireless communication
This computer has optional wireless communication feature built-in. This feature
allows you to communicate with other wireless communication devices.
You can manually turn off your wireless communication feature.
AJ-e.book Page 30 Friday, April 11, 2003 5:18 PM