Wistron MS2119 Laptop with 2.4 GHz 802.11 User Manual AJ e
Wistron Corporation Laptop with 2.4 GHz 802.11 AJ e
Wistron >
Contents
Notebook Manual Part 3
31
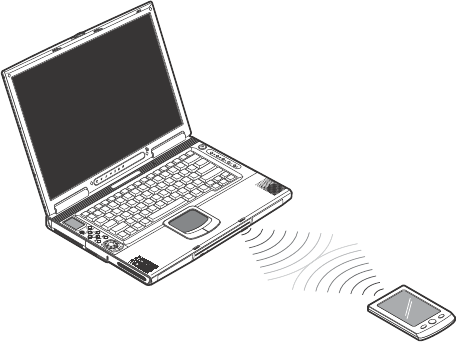
Fast infrared
The computer’s fast infrared (FIR) port allows you to do wireless data transfer
with other IR-aware computers and peripherals such as PDAs (personal digital
assistants), mobile phones, and infrared printers. The infrared port can transfer
data at speeds of up to 4 Mb/s at a distance of up to one meter.
To use FIR, position two IR-aware devices such that their IR ports are no more
than one meter apart and offset no more the 15 degrees.
When the two computers are in position, simply begin the data transfer as you
normally would. See your file transfer software for details.
AJ-e.book Page 31 Friday, April 11, 2003 5:18 PM

1 Getting familiar with your computer32
Audio
Your computer includes 16-bit high-fidelity stereo audio. The speaker located
near the keyboard, direct sound towards you to further enhance sound output.
There are audio ports on the rear panel of the computer. See “Rear view” on page
7 for the location of these ports. Also see “Audio devices” on page 54 for more
information on connecting external audio devices. Your computer has an optional
subwoofer module which can be inserted into the expansion module on the front of
the computer. See “Front view” on page 5 for the location of the expansion
module.
AJ-e.book Page 32 Friday, April 11, 2003 5:18 PM

33
AV control panel
The AV control panel is a special feature of this computer. Through this AV
control panel, you could play most of your audio/video CD, DVD, MP3 and SD
media.
#Item Description
1 LCD display Liquid-crystal display (LCD) displays current media
status.
2 Power button Turns on or off the power of the av control panel.
3 Source button Selects the playback source (CD/DVD, hard disk or
SD memory card).
4 Play/eject button Plays and pauses the media playback.
AJ-e.book Page 33 Friday, April 11, 2003 5:18 PM
1 Getting familiar with your computer34
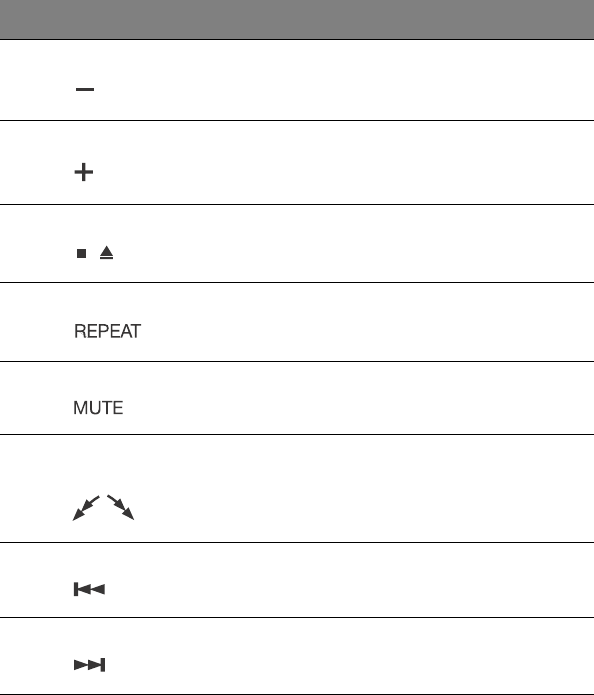
5 Volume down button Turns down the volume of the speakers during
playback.
6 Volume up button Turns up the volume of the speakers during playback.
7 Stop/Eject button Stops playback or ejects the CD/DVD-ROM disc.
8 Repeat button Selects the options: no repeat, repeat the currently
playing track or repeat all tracks during playback.
9 Mute button Mutes the sound coming out of the speakers.
10 Fast rewind/fast
forward dial
Use this dial to fast rewind or fast forward the track
currently playing.
11 Previous track button Lets you jump to the previous track on the playlists.
12 Next track button Lets you jump to the next track on the playlists.
# Item Description
AJ-e.book Page 34 Friday, April 11, 2003 5:18 PM
35
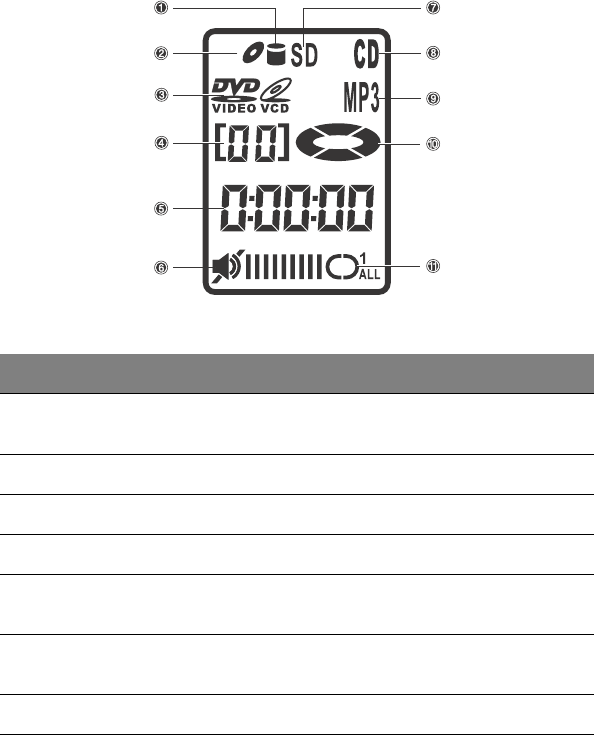
Understanding the AV control panel LCD screen
The AV control panel LCD screen displays all the information pertaining to the
audio/video media that’s being played in the computer.
#Item Description
1 Media source Indicate from what source your media is being
accessed.
2 Media type Indicate what type of media is being played.
3 Track number Displays the track number currently playing.
4 Elapsed time Displays how long the track has been playing.
5 Volume level, mute/
unmute
Displays the volume level, whether the volume is
muted or not.
6 Repeat track display Displays if the media being played is repeat none,
repeat one track or repeat all tracks.
7 Playback status Displays if the track is playing or in pause mode.
AJ-e.book Page 35 Friday, April 11, 2003 5:18 PM

1 Getting familiar with your computer36
Adjusting the volume
Adjusting the volume on the computer is as easy as pressing some buttons. Press
the minus (-) button on the AV control panel to decrease the volume on the
speaker, press the plus (+) button to increase the volume.
AJ-e.book Page 36 Friday, April 11, 2003 5:18 PM
37
Securing your computer
Security features include hardware and software locks — a security notch and
password.
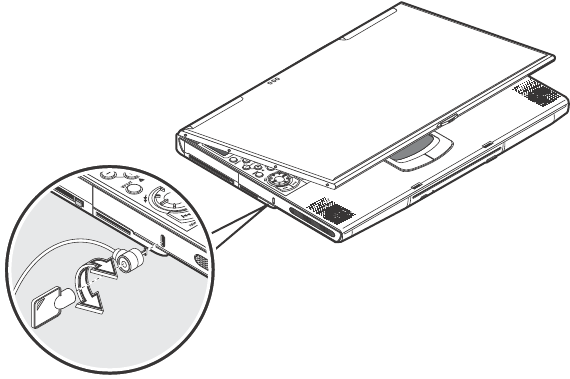
Security notch
A security notch located on the left panel of the computer lets you connect a
Kensington-compatible computer security lock.
Wrap a computer security lock cable around an immovable object such as a table
or locked drawer handle. Insert the lock into the notch and turn the key to secure
the lock. Some keyless models are also available.
Passwords
Passwords protect your computer from unauthorized access. When set, no one can
access the computer without entering the correct password.
There are three types of passwords you can set:
• Setup Password secures your computer against unauthorized entry to and use
of the BIOS Utility.
• Power-on Password secures your computer against unauthorized use.
• Hard Disk Password protects your data by preventing unauthorized access to
your hard disk.
See “BIOS Utility” on page 71 for details.
AJ-e.book Page 37 Friday, April 11, 2003 5:18 PM

1 Getting familiar with your computer38
Important: Do not forget your Setup and Hard Disk password! If you forget
your password, please get in touch with your dealer or an authorized service
center.
Setting a password
You can set the password using the BIOS Utility. See page 71.
AJ-e.book Page 38 Friday, April 11, 2003 5:18 PM

2 Operating on
battery power
AJ-e.book Page 39 Friday, April 11, 2003 5:18 PM

The computer operates on AC or battery power. This chapter
contains the information you need to know to operate the
computer on battery power. It also includes information on
how your computer manages and saves power.
AJ-e.book Page 40 Friday, April 11, 2003 5:18 PM

41
Battery pack
The computer uses a battery pack that gives you long use between charges.
Battery pack characteristics
The battery pack has the following characteristics:
• Employs current battery technology standards
The computer uses a Lithium-Ion battery pack which does not have the
memory effect problem of Nickel Cadmium (NiCd) batteries. Li-Ion batteries
consistently provide the longest battery life, best-suited for road warriors.
• Battery-low warning
When the battery charge level becomes low, the status indicator of the
computer flashes at regular intervals. This tells you that the battery power is
critically low (and you should save your work). You can correct this situation
by recharging the battery pack.
Whenever possible, use the AC adapter. The battery will come in handy when you
travel or during a power failure. It is advisable to have an extra fully-charged
battery pack available as backup. The computer supports a secondary battery
pack, swappable with the optical drive. See your dealer for more details.
Using a battery pack for the first time
When using a battery pack for the first time, follow these steps:
1. Connect the AC adapter to a power source and to the computer and fully
recharge the battery.
2. Disconnect the adapter to use up the battery before recharging again.
You only need to do this once or twice with a new battery or with a battery that's
been stored without being used for a long time. If the computer is to be stored for
more than two weeks, we suggest you remove the battery pack. Battery power
from a fully charged battery pack depletes in roughly a day with the computer in
Standby mode, a month in Hibernation mode or when power is off.
Warning! Do not expose battery packs to temperatures below 0ºC (32ºF) or
above 60ºC (140ºF). This may adversely affect the battery pack.
AJ-e.book Page 41 Friday, April 11, 2003 5:18 PM
2 Operating on battery power42
Installing and removing the battery pack
Important! Before removing the battery pack, make sure that you have an
AC adapter connected to the computer; otherwise, turn off the computer.
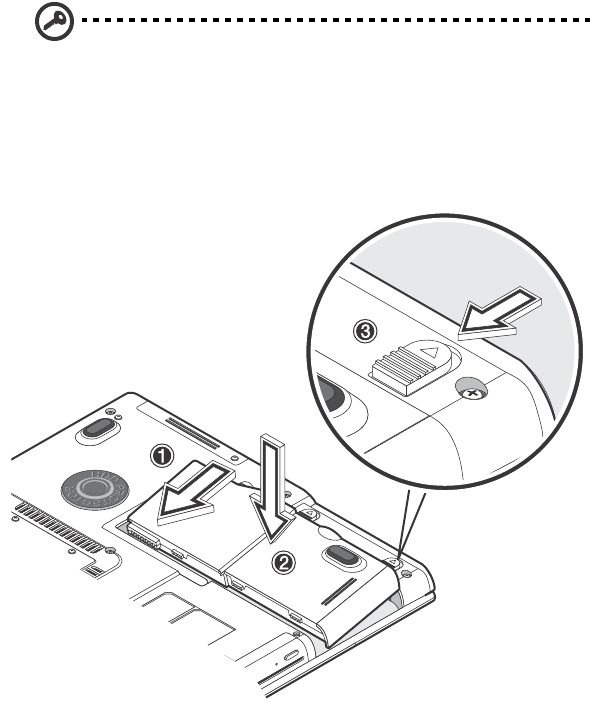
To install a battery pack:
Insert the battery at an angle (1); press gently on the battery (2) until it click into
place. Then slide the lock/unlock latch into the lock position (3).
AJ-e.book Page 42 Friday, April 11, 2003 5:18 PM
43
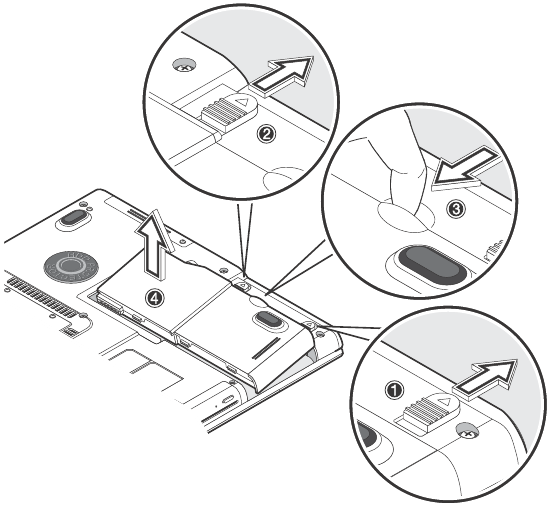
To remove the battery pack:
Slide the lock/unlock latch into the unlock position (1); slide and hold the battery
release latch (2); remove the battery pack by using the built-in slot in the battery
pack (3).
Charging the battery
To charge the battery, install the battery pack and plug the AC adapter into the
computer and an electrical outlet.
Charging modes
The adapter has two charging modes:
•Rapid mode
The computer uses rapid charging when power is turned off and a powered
AC adapter is connected to it. In rapid mode, a fully depleted battery gets
95% charged in approximately 1.5 hours.
• Charge-in-use mode
AJ-e.book Page 43 Friday, April 11, 2003 5:18 PM

2 Operating on battery power44
When the computer is in use with the AC adapter plugged in, the computer
also charges the battery pack if installed. This mode will take longer to fully
charge a battery than rapid mode. In charge-in-use mode, a fully depleted
battery gets 95% charged in approximately 4 hours.
Note: We suggest that you charge the battery pack before retiring for the day,
letting it charge overnight before traveling. This ensures a fully charged
battery for use the next day.
Checking the battery level
The Windows battery meter indicates the present battery level. Simply rest your
cursor on the battery meter (or AC plug) icon on the taskbar to see the present
charge level of your battery.
Optimizing battery life
This section helps you get the most out of battery operation. Optimizing battery
life prolongs the charge/recharge cycle and improves recharge efficiency. Follow
these suggestions to optimize and maximize battery power:
• Purchase an extra battery pack.
• Use the AC adapter whenever possible so that the battery is reserved for on-
the-go computing.
• Keep the battery pack in the computer powered by the AC adapter. The
constant trickle charge maintains the battery level to eliminate the battery
self-discharge effect. The charge-in-use function also charges the battery
pack.
• Eject the PC card from the card slot when it is not in use, since the PC card
draws extra power. See “Ejecting a card” on page 56.
• Store the battery pack in a cool, dry place. The recommended storage
temperature for battery packs ranges from 10 to 30 degrees Celsius. The
higher the storage temperature, the faster the battery pack self-discharges.
• The batteries can be recharged about 400 times when used as directed.
Excessive recharging decreases battery life.
• Take care of your battery pack and AC adapter. See “Care and maintenance”
on page ix of the preface.
AJ-e.book Page 44 Friday, April 11, 2003 5:18 PM

45
Battery-low warning
You never have to worry about battery power as long as you are using the AC
adapter. However, when you operate the computer on battery power, pay extra
attention to the power indicator on the display panel.
During a battery-low condition, the power indicator flashes at regular intervals
until battery power is depleted.
Warning! Connect the AC adapter to the computer as soon as possible. Data
is lost when computer power is cut off during Standby mode.
The following table shows the recommended course of action to take when you
encounter a battery-low condition.
Power management
This computer has a built-in power management unit that monitors system activity.
System activity refers to any activity involving one or more of the following
devices: keyboard, mouse, floppy drive, hard disk, peripherals connected to the
serial and parallel ports, and video memory. If no activity is detected for a period
of time (called an inactivity timeout), the computer stops some or all of these
devices in order to conserve energy.
This computer employs a power management scheme that supports ACPI
(Advanced Configuration and Power Interface) which allows for maximum power
Situation Recommended Action
AC adapter and power
outlet available
1. Connect the AC adapter to the computer.
2. Save all necessary files.
3. Resume work.
Power off the computer if you wish to recharge the battery
rapidly.
An extra fully-charged
battery pack available
1. Save all necessary files.
2. Exit the application.
3. Power off the computer.
4. Replace the battery pack.
5. Power on the computer and resume work.
AC adapter or power
outlet not available
1. Save all necessary files.
2. Exit the application.
3. Power off the computer.
AJ-e.book Page 45 Friday, April 11, 2003 5:18 PM