Yaesu Musen 50023X20 AIR BAND HT RADIO User Manual 2
Yaesu Musen Co., Ltd. AIR BAND HT RADIO 2
Contents
- 1. User Manual 1
- 2. User Manual 2
User Manual 2
FTA-250L OperATing MAnuAL2828
advanCed operatIon
Function Modes
The [FUNC] key provides up to 6 quick access func-
tion assignments.
1.
Press the
[FUNC] key
.
2.
Select the desired function
by pressing the [◄] or [►]
key, and then press the
[ENT] key.
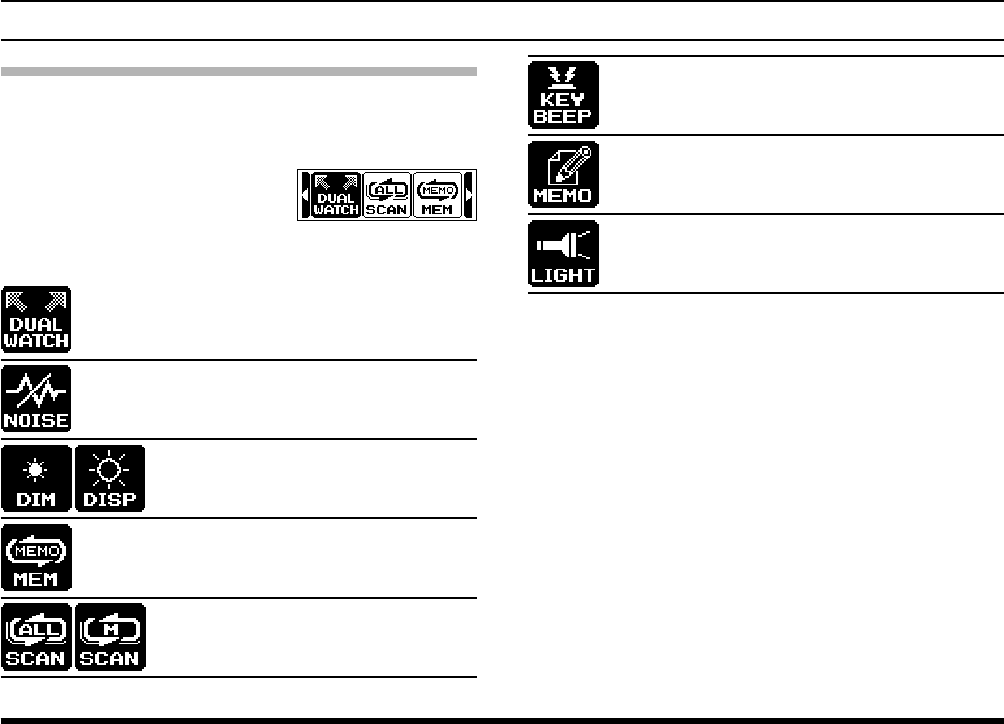
DUAL WATCH
Activates the dual watch function (see page
21).
RX NOISE
Setting the level of RX noise canceling (see
page 22).
DIM/DISP
Enable/Disable the display lamp il-
lumination.
SCAN MEM
The current channel is marked to be
scanned (see page 33).
SCAN
Activates the scan function (see
page 32).
KEY BEEP
Setting the loudness of key beeps (see
page 37).
MEMO
Enters Memory writing mode (see page
30).
LIGHT
The white LED may be used as a ashlight.
To program the function assigned to the function key:
1. [MENU] à “SETUP” à “CONFIG” à “KEY AS-
SIGNMENT”
.
2. Select the assign number (“1” to “6”) to which you
want to assign a function by pressing the [▲] or [▼]
key, and then press the [ENT] key.
3. Select the function you want to assign to the Func-
tion Screen by pressing the [◄] or [►] key, and
then press the [ENT] key.
Tip: The default setting:
1: DUAL WATCH 4: RX NOISE
2: SCAN 5: DIM/DISP
3: SCAN MEM 6: LIGHT
4. Press the PTT switch to return to normal opera-
tion.
FTA-250L OperATing MAnuAL 29
The FTA-250L is capable of programming up to 250
user-programmable memory channels with channel
frequency, channel tag (name) up to 7 characters,
and ag (marking for search renement).
The stored channels can be assigned to ALL or Group
Memory (GP1-GP9), which can be named with up to
8 characters.
The FTA-250L’s memory system allows you to store,
label, and recall channel frequencies you may use
frequently.
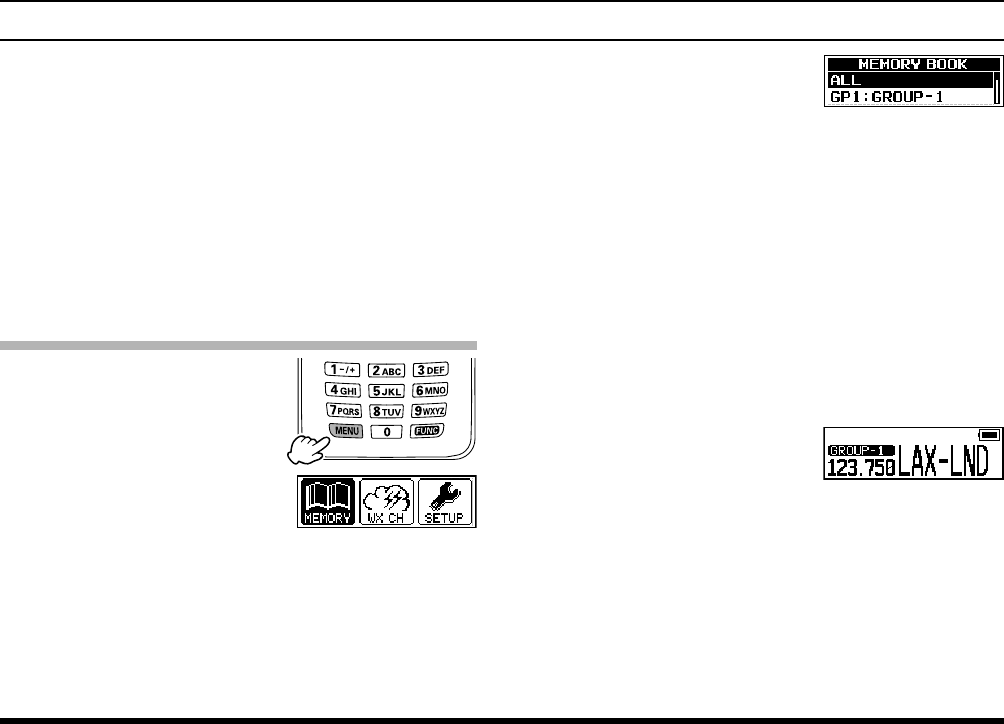
Recalling the Memories
1.
Press the
[MENU] key
to display the MENU
screen
.
2.
Select
“MEMORY” on
the screen by pressing
the [◄] or [►] key, and
then press the [ENT]
key.
3. Select a group that the
desired channel belongs
to, by pressing the [▲]
or [▼] key followed by
the [ENT] key.
The memory channels belong to either of the
following groups.
ALL : Group including all the memory
channels
GP1 to GP9 : Groups of memory channels that
you can set “GP1” to “GP9” when
storing.
The frequency and tag name of the channel listed
will be displayed along with the group name se-
lected in step 3.
4. Select a memory channel
with the [▲] or [▼] key.
5. To exit the Memory mode, press the [MENU] key,
select the mode other than “MEMORY” on the
screen by pressing the [◄] or [►] key, and then
press the [ENT] key.
memory operatIon
FTA-250L OperATing MAnuAL3030
memory operatIon
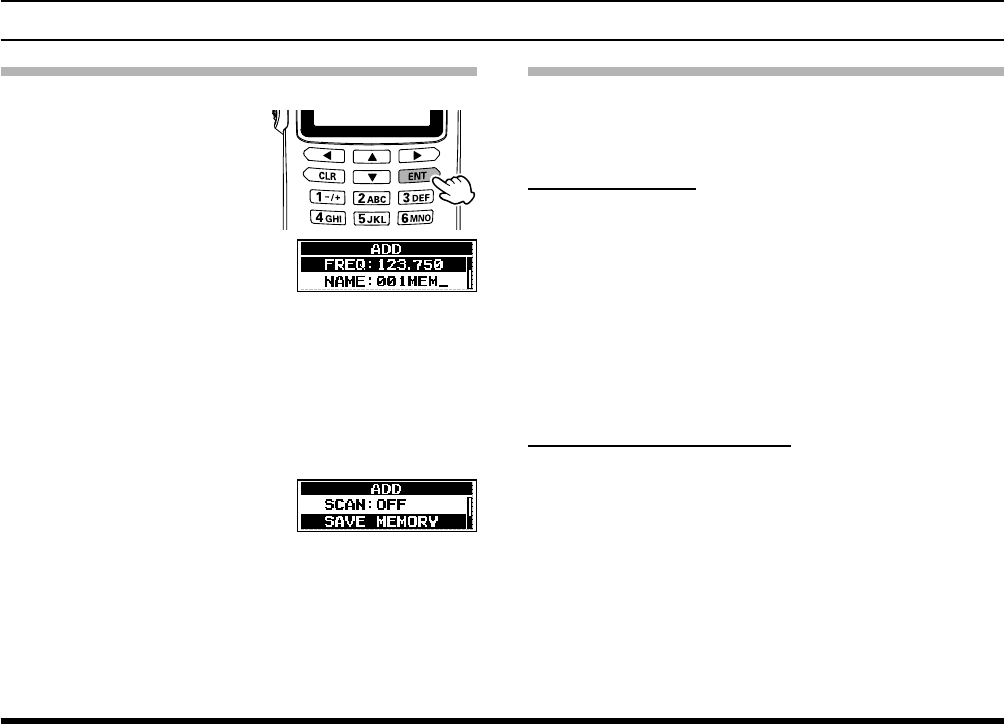
Instant Storage
1. Select a desired frequency.
2.
Press and hold the [ENT]
key.
The “ADD” selec-
tion appears on the
display, with the
frequency, channel
name (tag), group
name, and scan
memory already filled
in.
3. Press the [▲] or [▼] key to select the item, then
press the [ENT] key.
4. Input letters and/or numbers with the keypad, or
select a setting with the [▲], [▼], [◄], or [►] key,
then press the [ENT] key.
5. S
elect
“SAVE MEMORY”
by pressing the [▼] key,
and then press the [ENT]
key to store the frequen-
cy into the memory.
Note: You cannot store weather channels to the
memory by pressing the [ENT] key during the
WX mode.
Maintenance of the Memory
Adding new memory channels, editing the stored
information, and deleting the stored addresses are al-
lowed through the SETUP mode.
Adding entries
1. [MENU] à “SETUP” à “MEMORY BOOK” à
“ADD”
.
2. Select the item, input letters and/or numbers, se-
lect a setting, and store the changes in the same
way as the instant storage described previously.
Notes: You cannot skip the input of “NAME” (chan-
nel tag).
You must input of “FREQ” (channel fre-
quency).
Editing the information
1. [MENU] à “SETUP” à “MEMORY BOOK” à
“EDIT”
.
2. Press the [▲] or [▼] key to select the group in-
cluding the entry you want to edit, then press the
[ENT] key.
3. Press the [▲] or [▼] key to select the entry you
want to edit, then press the [ENT] key.
4. Select the item, input letters and/or numbers, se-
lect a setting, and then store the changes in the
same way as the instant storage described previ-
ously.
FTA-250L OperATing MAnuAL 3131
memory operatIon
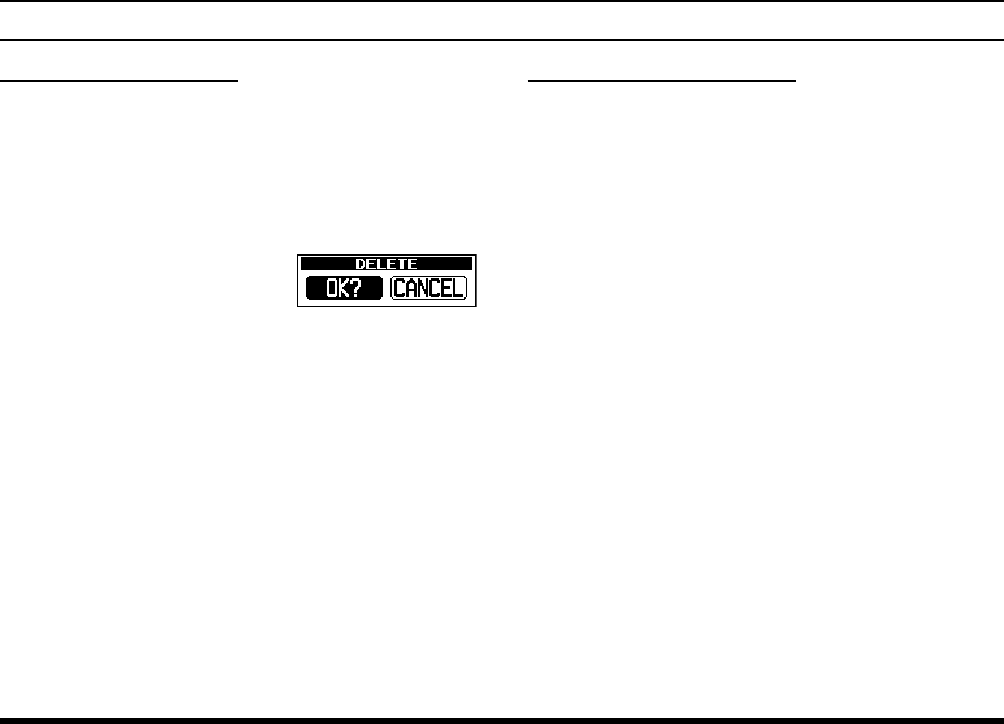
Deleting the memory
1. [MENU] à “SETUP” à “MEMORY BOOK” à “DE-
LETE”
.
2. Press the [▲] or [▼] key to select the group in-
cluding the entry you want to delete, then press
the [ENT] key.
3. Press the [▲] or [▼] key to select the entry you
want to delete, then press the [ENT] key.
4. S
elect
“OK?” on the
screen by pressing the [◄]
or [►] key, and then press
the [ENT] key.
5. Press the PTT switch to return to normal opera-
tion.
Setting the group name
1. [MENU] à “SETUP” à “MEMORY BOOK” à
“GROUP NAME”
.
2. Press the [▲] or [▼] key to select the group in-
cluding the entry you want to change, and then
press the [ENT] key.
3. Use the keypad to edit the letters and/or numbers
of the group name, then press the [ENT] key.
The cursor will move to the next digit of the group
name.
4. S
elect
“FINISH” by pressing the [◄] or [►] key,
and then press the [ENT] key.
5. Press the PTT switch to return to normal opera-
tion.
FTA-250L OperATing MAnuAL32
sCannIng operatIon
The FTA-250L allows you to scan active channels au-
tomatically in the COMM (COM band), MR, and WX
modes. It pauses on signals received, so you can talk
to the station(s) on the frequency received.
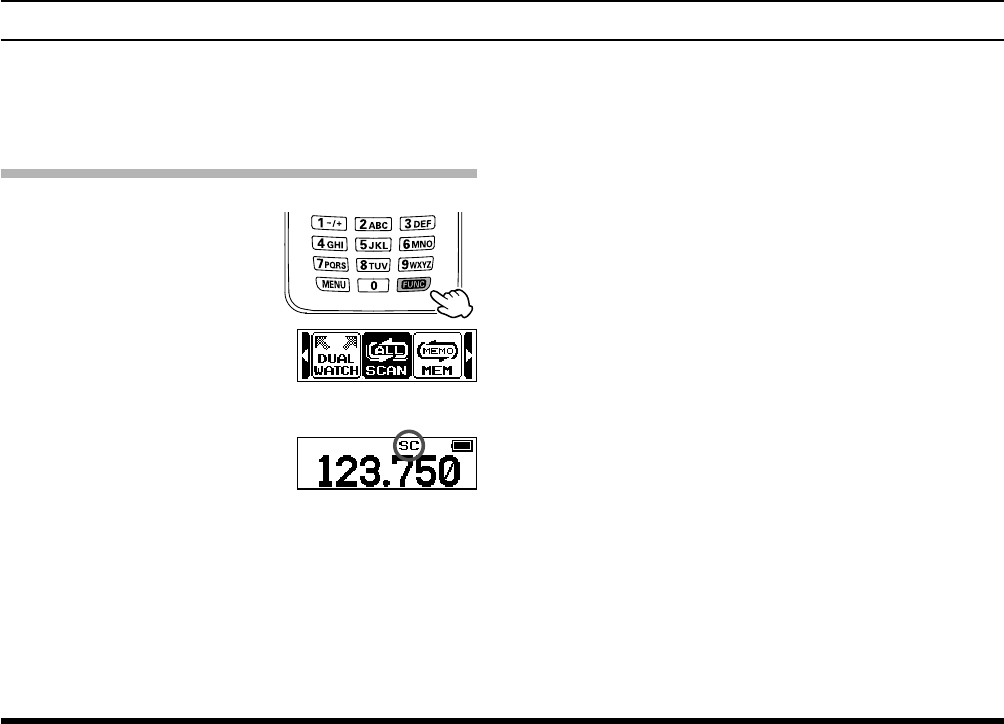
Scanning Channels
1. Set the transceiver to the COMM mode.
2.
Press the
[FUNC] key
to display the Function
screen
.
3. Select
“SCAN” on the
screen by pressing the
[◄] or [►] key, and then
press the [ENT] key.
The scanning starts and
the display returns to the
COMM mode screen.
The “SC” icon appears
on the display.
The scanner searches signals from the lowest fre-
quency to highest.
When the scanner encounters a signal, the scan-
ning pauses and the transceiver remains on that
channel until the signal disappears, and the fre-
quency indication on the display blinks.
After the signal disappears, scanning resumes.
To stop scanning, press the PTT switch or select
“SCAN” again in the Function screen.
Note: When you enable the alarm function at recep-
tion of the weather alert signal via the COMM
SETUP menu in the SETUP mode, the last
weather channel will be watched as the every
second frequency during a scan.
Example: When the last weather channel is 162.400
MHz (WX02), the transceiver scans in the
following order.
118.000 à 162.400 à 118.025 à
à 162.400 à 118.050 à 162.400 ...
The frequency of the last weather channel, however,
will not be displayed until the scanner encounters the
weather alert signal.
FTA-250L OperATing MAnuAL 3333
sCannIng operatIon
Scanning the Specied Channels
Among the memory and weather channels, you may
scan only those on which you want to see if a signal
exists.
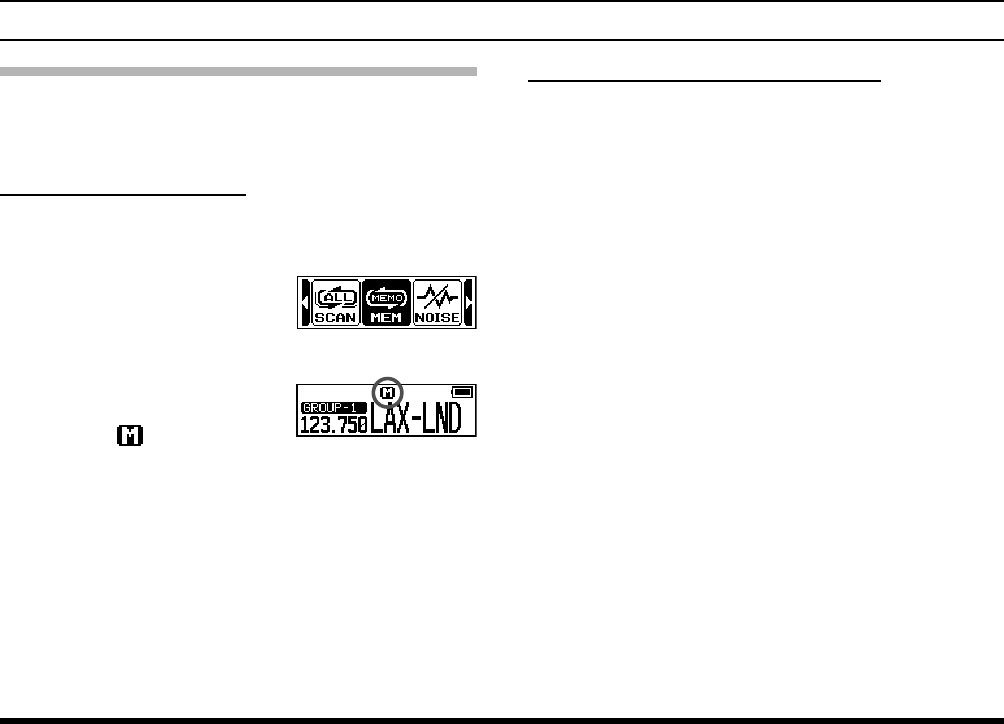
Marking the channels
1. Set the transceiver to the MR or WX mode and
tune to the channel that you want to be scanned.
2.
Press the
[FUNC] key
.
3. Select “MEMO MEM” by
pressing the [◄] or [►]
key, and then press the
[ENT] key.
The current channel is
marked to be scanned
and the “ ” icon, which
indicates that the channel
is the target of scanning,
will appear at the top side
of the memory name when
the display returns to the
MR or WX mode screen.
4. Repeat steps 1 to 3 above to mark other channels
as well.
Scanning the marked channels
1. Set the transceiver to the MR or WX mode.
2. The scanning starts and the display returns to the
MR or WX mode screen.
The FTA-250L operates in the same way as it does
when scanning all channels described in the previ-
ous page, except that it searches marked frequencies
only.
Note: When you enable the alarm function of the
weather alert signal via the COMM SETUP
menu in the SETUP mode, the last weather
channel will be watched as the every second
frequency during a scan.
Example: When the last weather channel is WX02
(162.4 MHz), the transceiver scans in the
following order.
001MEM à WX02 à 002MEM à
à WX02 à 003MEM à WX02 ...
The frequency of the last weather channel, however,
will not be displayed until the scanner encounters the
weather alert signal.
FTA-250L OperATing MAnuAL34
setup mode
Note: We do not recommend that any of the default
settings be changed until you are thoroughly
familiar with the operation of the FTA-250L.
Basic Operation
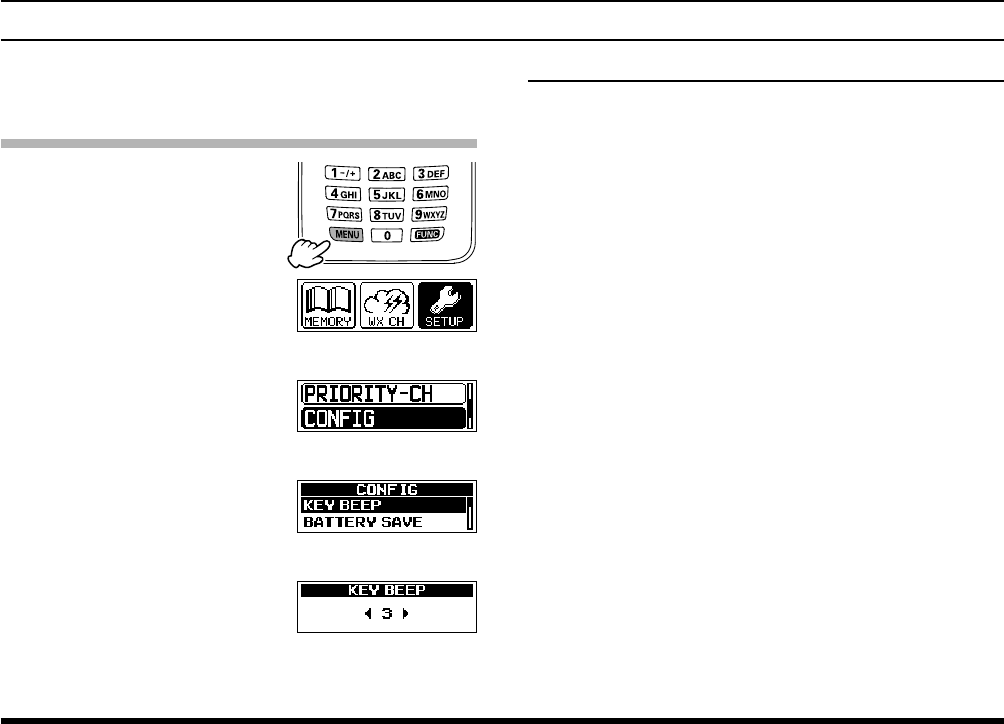
1.
Press the
[MENU] key to
display the MENU screen
.
2. Select
“SETUP” on the
MENU screen by press-
ing the [◄] or [►] key, and
then press the [ENT] key.
3. Select the desired menu
item by pressing the [▲]
or [▼] key, and then press
the [ENT] key.
4. Select the desired item by
pressing the [▲] or [▼]
key, and then press the
[ENT] key.
5.
Select
the desired setting
by pressing the [◄] or [►]
key.
6. Press the [ENT] key to store the selected setting.
7.
Press the PTT switch to return to normal operation.
Menu items
MEMORY BOOK
You may store the frequencies with a tag name to
the memory of the transceiver, and maintain the
stored entries.
COMM SETUP
You may set and adjust the operations of the
transceiver in the COM mode.
PRIORITY CH
You may set the priority channel for dual watch.
CONFIG
You may set and adjust the various congurations
of the radio.
ABOUT...
Conrm the version of software installed in the ra-
dio.
FTA-250L OperATing MAnuAL 3535
setup mode
Maintenance of the Memory
See pages 30 to 31 for details.
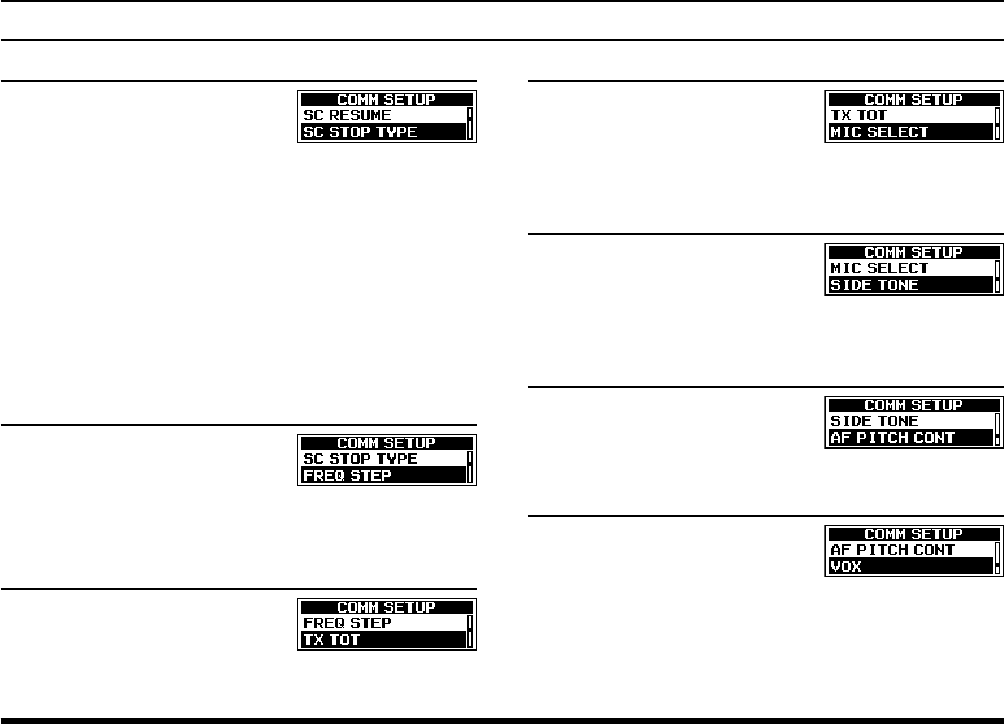
Setting of the COMM SETUP Mode Operation
Turning on/off the emergency call
You may enable or dis-
able the quick access to the
121.500 MHz emergency fre-
quency (see page 16).
Turning on/off the ANL
(Automatic Noise Limiter)
You may enable or disable the
ANL (automatic noise limiter)
feature (see page 26).
Setting the noise cancel
You may cancel background
noise when transmitting and
receiving (see page 22).
Turning on/off the weather alert
You may enable or disable the
alarm function when receiving
the weather alert signal (see
pages 20).
Turning on/off the scan stop with the PTT
You may lock out the PTT
switch during the scan opera-
tion (see page 32).
Setting the scan resume time
You may select a waiting time
till the resuming of scan after
the encountered signal disap-
pears.
The setting changes in the following order.
1
à
à 2
à
à 3
à
à 4
à
à 5 (SEC)
Tip: The default setting: 3 SEC
FTA-250L OperATing MAnuAL3636
setup mode
Setting the operation after stopping a scan
You may select the operations
listed below when encounter-
ing a signal during a scan.
The setting changes in the following order.
BUSY STOP: Stays on the frequency and will not
resume the scan.
5 SEC STOP: Stays on the frequency for 5 seconds
and then resume the scan.
10 SEC STOP: Stays on the frequency for 10 sec-
onds and then resume the scan.
Tip: The default setting: BUSY STOP
Setting the frequency step for tuning
You may select the channel
steps of 8.33*/25 kHz per step
(see page 27).
* 8.33 kHz; Europe only
Setting the time-out timer for transmission
You may select a desired
remaining time for the TOT
function (see page 22).
Setting the microphone conguration
You may change the assign-
ment of microphone controlled
with the PTT switch.(see page
23).
Setting the side tone operation
You may monitor your own
voice when talking into the
microphone through the head-
phones (see page 25).
Setting the audio lter of the receiver
You may select the operation
of the audio filter (see page
19).
Turning on/off the VOX operation
You may enable or disable
the VOX function (see page
24).
FTA-250L OperATing MAnuAL 3737
setup mode
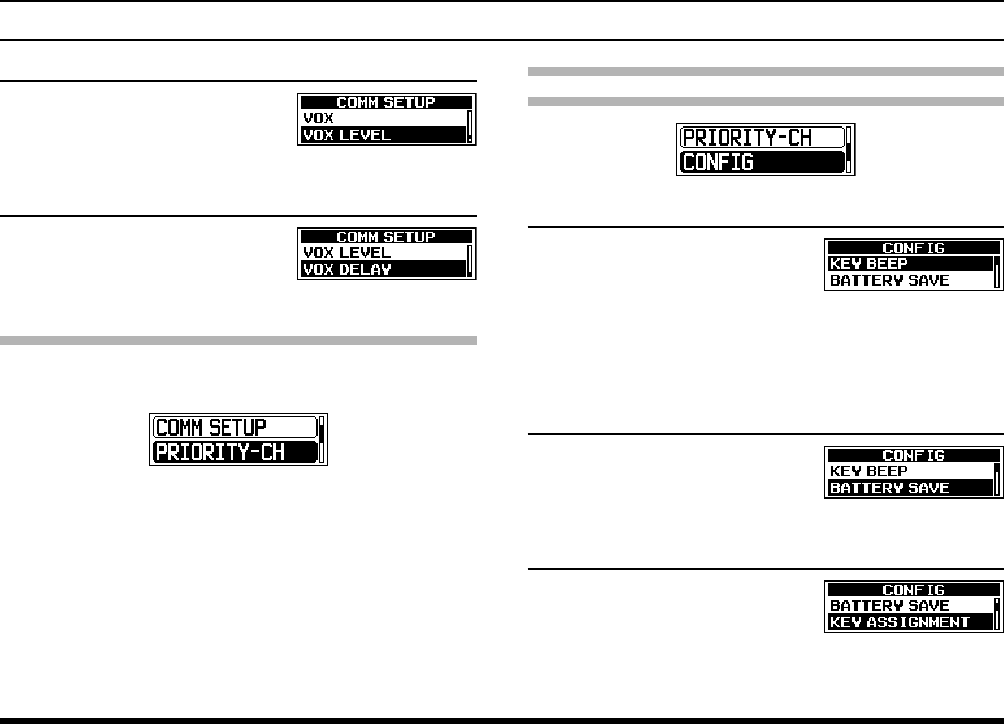
Setting the sensitivity of the VOX system
You may select a VOX gain of
the VOX function (see page
24).
Setting the sensing time of the VOX system
You may select a VOX delay
time of the VOX function (see
page 24).
PRIORITY CH
Setting the polled frequency for dual watch (see page
21).
Setting of the Operation and
Conguration of the Transceiver
Setting the loudness of key beeps
You may adjust the loudness
in 5 levels.
The setting changes in the following order.
OFF
à
à 1
à
à 2
à
à 3
à
à 4
à
à 5
Tip: The default setting: 3
Battery Save
You may select
the desired
interval of time for the battery
saver
(see page 23).
KEY ASSIGNMENT
You may program the func-
tion assigned to the function
screen (see page 28).
FTA-250L OperATing MAnuAL3838
setup mode
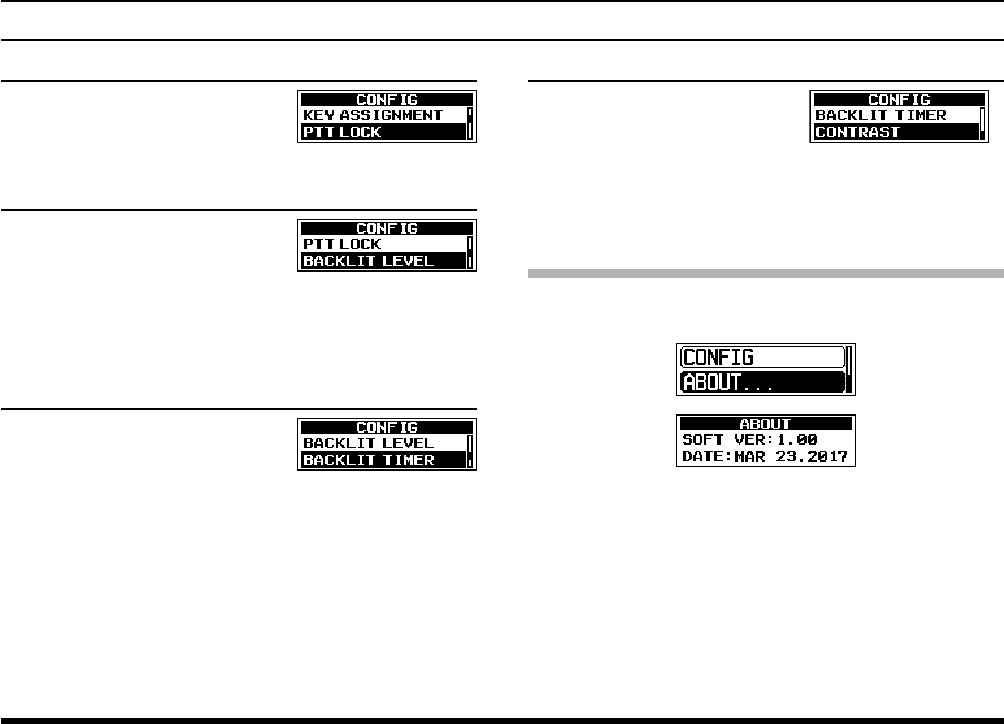
PTT LOCK
You may enable or disable the
PTT lock function (see page
26).
Setting the brightness of the display
You may adjust the backlight
brightness in 5 levels.
The setting changes in the following order.
OFF
à
à LV1
à
à LV2
à
à LV3
à
à LV4
à
à LV5
Tip: The default setting: LV5
Setting the lamp of the display
You may select the operation
of the display lighting from the
following 4 types.
OFF: No lighting at any time
CONTINUOUS: Lights at all time
5 / 10 / 30 / 60 / 120 / 300 (sec)
Lights for selected time when any
key is pressed.
EXT PO/KEY: Lights for 5 seconds only when any
key is pressed, or lights at all time
when the power is supplied through
the EXT DC jack.
Setting the contrast of the display
You may adjust the contrast in
30 levels.
The setting changes in the following order.
LV01
à
à LV02
à
..... à
LV29
à
à LV30
Tip: The default setting: LV15
About the Transceiver
You may conrm the version of the software currently
operating on the transceiver.
FTA-250L OperATing MAnuAL 3939
setup mode
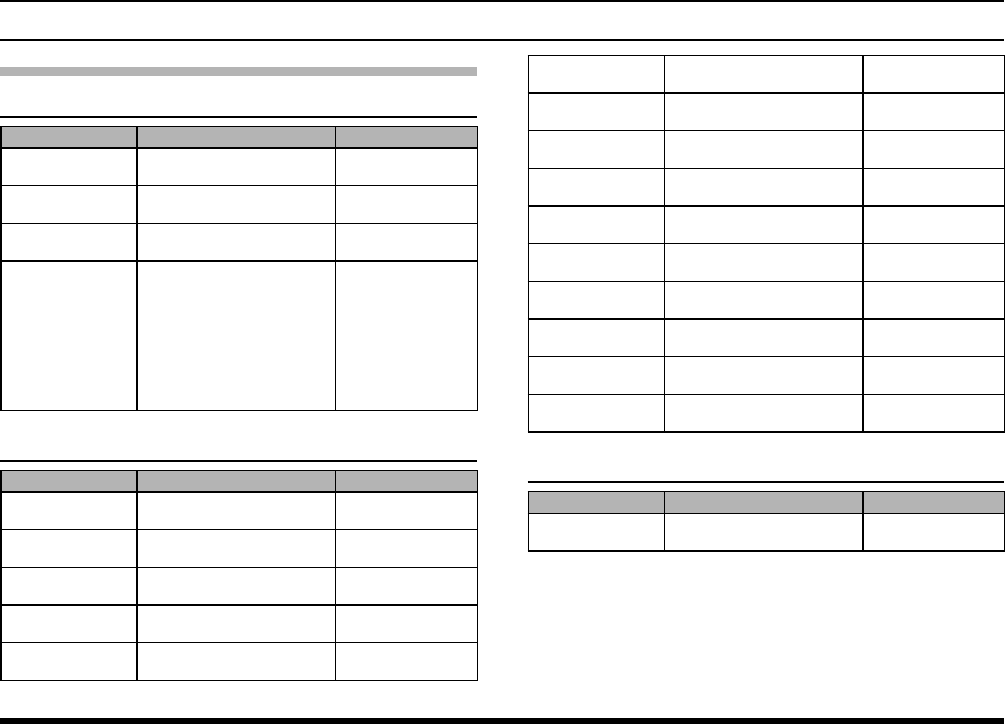
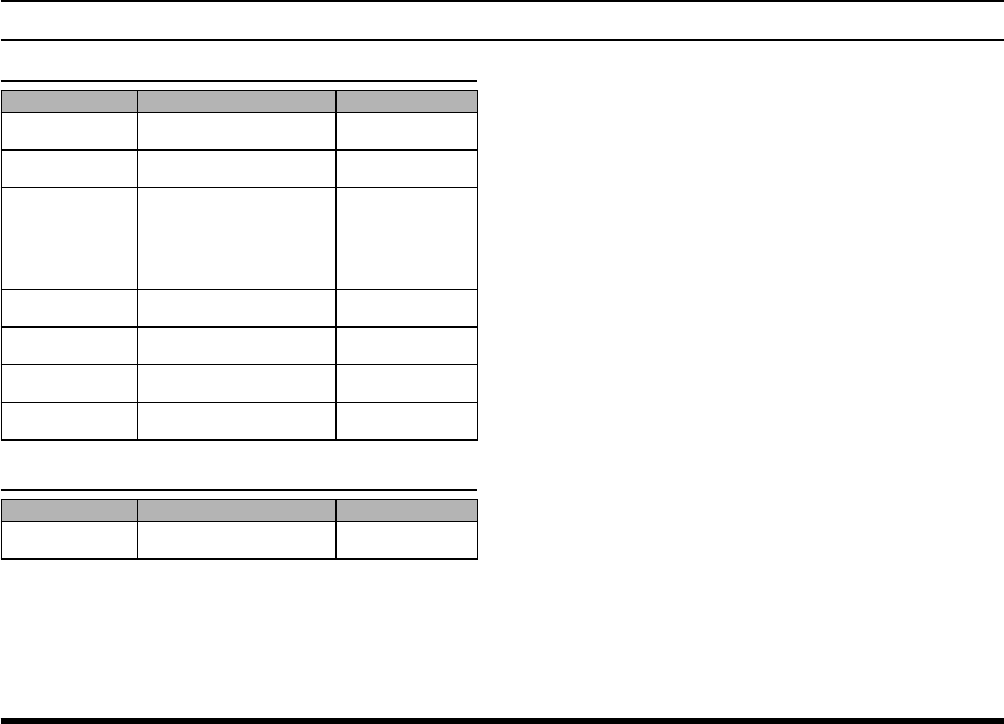
Summary of the SETUP Menu
Memory Book
Item Description Default Value
ADD Adding new channels or
destinations -
EDIT Editing the stored infor-
mation -
DELETE Deleting the stored chan-
nel or destination -
GROUP NAME Editing the group name
GP1 : GROUP-1
GP2 : GROUP-2
GP3 : GROUP-3
GP4 : GROUP-4
GP5 : GROUP-5
GP6 : GROUP-6
GP7 : GROUP-7
GP8 : GROUP-8
GP9 : GROUP-9
COMM SETUP
Item Description Default Value
EMERGENCY
CALL
Turning on/off the emer-
gency call ON
ANL Turning on/off the auto-
matic noise limiter OFF
NOISE CANCEL Setting the noise cancel
operation
TX MODE : OFF
RX MODE : OFF
WEATHER
ALERT
Turning on/off the weath-
er alert OFF
PTT SC STOP Turning on/off the scan
stop with the PTT ON
SC RESUME Setting the scan resume
time 3 SEC
SC STOP TYPE Setting the operation af-
ter stopping a scan BUSY STOP
FREQ STEP Setting the frequency
step for tuning 25 kHz
TX TOT Setting the time-out timer
for transmission 5 MIN
MIC SELECT Setting the microphone
conguration INTERNAL
SIDE TONE Setting the side tone op-
eration OFF
AF PITCH
CONT
Setting the audio lter of
the receiver NORMAL
VOX Turning on/off the VOX
operation OFF
VOX LEVEL Setting the sensitivity of
the VOX system LV2
VOX DELAY Setting the sensing time
of the VOX system 1.5 SEC
PRIORITY CH
Item Description Default Value
-Setting the polled fre-
quency for dual watch -
FTA-250L OperATing MAnuAL4040
setup mode
CONFIG
Item Description Default Value
KEY BEEP Setting the loudness of
key beeps 3
BATTERY SAVE Setting the power save
operation 50 %
KEY ASSIGN-
MENT
Setting the function as-
signed to the function
screen
1 : DUAL WATCH
2 : SCAN
3 : SCAN MEM
4 : RX NOISE
5 : DIM/DISP
6 : LIGHT
PTT LOCK Turning enable or disable
the PTT Lock function OFF
BACKLIT LEVEL Setting the brightness
level of the display LV5
BACKLIT TIM-
ER
Setting the backlight
timer of the display EXT PO/KEY
CONTRAST Setting the contrast of the
display LV15
ABOUT...
Item Description Default Value
-Conrming the version of
the software -

FTA-250L OperATing MAnuAL 41
speCIfICatIons
General
Frequency Range: TX: 118.000 to 136.975 MHz
RX: 118.000 to 136.975 MHz
161.650 to 163.275 MHz (Weather Channels; USA/Canada only)
Channel Spacing: 25 kHz/8.33 kHz (Europe only)
Emission Type: TX: AM
RX: AM & FM (FM: for receiving the Weather Channels)
Supply Voltage: 6.0 to 9.5 VDC (Battery Terminal)
9.0 to 10.5 VDC (EXT DC JACK with Charging)
Current Consumption (approx.): 300 µA (power off),
70 mA (battery saver on, saver ratio 50%)
90 mA (squelch on), 300 mA (receive), 900 mA (transmit 1.5 W Carrier)
Temperature Range: +14 ºF to + 140 ºF (–10 ºC to +60 ºC)
Case Size (W x H x D): 2.1 x 4.1 x 1.2 inches (52 x 105 x 30 mm) with SBR-25LI
Weight (approx.): 10.6 oz (300 g) with SBR-25LI, antenna and belt clip
Receiver
Circuit Type: Double-conversion superheterodyne
IFs: 47.25 MHz & 450 kHz
Sensitivity: Better than 0.8 µV (for 6 dB S/N with 1 kHz, 30 % modulation)
Selectivity: Better than 8 kHz/–6 dB
Adjacent CH. Selectivity: Less than 25 kHz/–60 dB
AF Output (@7.4 V): 0.7 W @ 16 Ohms, 10 % THD
Transmitter
Power Output (@ 7.4 V): 5.0 W (PEP), 1.5 W (Carrier Power)
Frequency Stability: Better than ±1 ppm (+14 ºF to + 140 ºF [–10 ºC to +60 ºC])
Modulation System: Low Level Amplitude Modulation
Spurious Emission: >70 dB below carrier
Int. Microphone Type: Condenser
Ext Mic. Impedance: 150 Ohms
Specications are subject to change without notice or obligation.
FTA-250L OperATing MAnuAL42
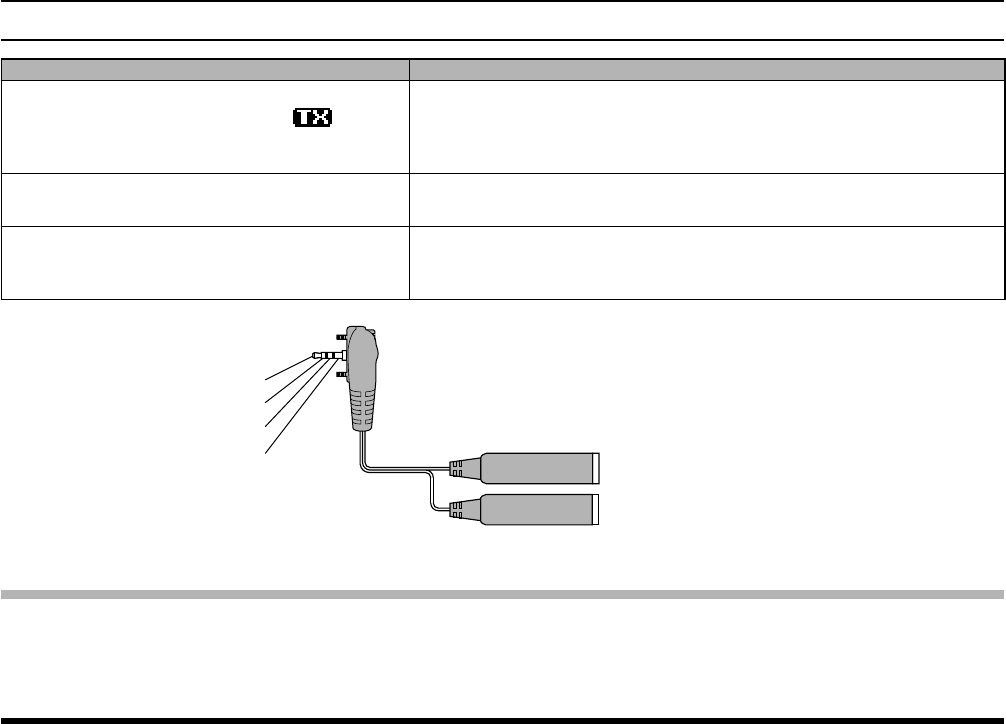
trouBleshootIng for headset ConneCtIon
Question Answer
When connecting the SCU-15 headset adapter cable
between the radio and a headset, the “ ” icon ap-
pears on the display and the radio cannot be operated.
This happens when the plug on the SCU-15 headset adapter cable is not prop-
erly inserted into the MIC/SP jack. To make proper contact within the radio, the
plug must be pushed all the way into the MIC/SP jack and be xed with the two
screws.
Can I purchase the optional PTT Switch from Yaesu? Contact your Aviation dealer for details regarding purchasing an aftermarket
Push-To-Talk switch.
Will my headset work with this radio? The SCU-15 headset adapter cable is made to operate with most headsets; how-
ever to be concretely sure check with the headset manufacturer using the wiring
shown below. Please conrm the connections and connector sizes are correct.
3.5mm plug
SCU-15
Speaker
PJ-055
(accepts 0.25” phone plug)
Microphone
PJ-068
(accepts 0.206” phone plug)
Speaker
PTT
Microphone
Ground
Headset specication requirements for SCU-15
Earphone (speaker) impedance: 8 Ω or above
Microphone impedance: 150 Ω ±20%
PTT pressed: Ground
PTT not pressed: Open

FTA-250L OperATing MAnuAL 43
note
FTA-250L OperATing MAnuAL44
Under Industry Canada regulations, this radio transmitter may only operate using an antenna of a type and maximum (or lesser) gain ap-
proved for the transmitter by Industry Canada. To reduce potential radio interference to other users, the antenna type and its gain should
be so chosen that the equivalent isotropically radiated power (e.i.r.p.) is not more than that necessary for successful communication.
Conformément à la réglementation d’Industrie Canada, le présent émetteur radio peut fonctionner avec une antenne d’un type et d’un
gain maximal (ou inférieur) approuvé pour l’émetteur par Industrie Canada. Dans le but de réduire les risques de brouillage radioélec-
trique à l’intention des autres utilisateurs, il faut choisir le type d’antenne et son gain de sorte que la puissance isotrope rayonnée quiva-
lente (p.i.r.e.) ne dépassepas l’intensité nécessaire à l’établissement d’une communication satisfaisante.
This radio transmitter (identify the device by certication number, or model number if Category II) has been approved by Industry Canada
to operate with the antenna types listed below with the maximum permissible gain and required antenna impedance for each antenna
type indicated. Antenna types not included in this list, having a gain greater than the maximum gain indicated for that type, are strictly
prohibited for use with this device.
Le présent émetteur radio (identier le dispositif par son numéro de certication ou son numéro de modèle s’il fait partie du matériel de
catégorie I) a été approuvé par Industrie Canada pour fonctionner avec les types d’antenne énumérés ci-dessous et ayant un gain ad-
missible maximal et l’impédance requise pour chaque type d’antenne. Les types d’antenne non inclus dans cette liste, ou dont le gain est
supérieur au gain maximal indiqué, sont strictement interdits pour l’exploitation de l’émetteur.
Part 15.21: Changes or modications to this device not expressly approved by YAESU MUSEN could void the user’s authorization to op-
erate this device.
Disposal of your Electronic and Electric Equipment
Products with the symbol (crossed-out wheeled bin) can-
not be disposed as household waste.
Electronic and Electric Equipment should be recycled at a
facility capable of handling these items and their waste by
products.
In EU countries, please contact your local
equipment supplier representative or service
center for information about the waste collec-
tion system in your country.
Attention in case of use
This transceiver works on frequencies which are not
generally permitted. For frequency allocation, apply for a
license at your local spectrum management authority. For
actual usage contact
your dealer or sales
shop in order to get
your transceiver ad-
justed to the allocated
frequency range.
List of national codes
AT BE BG CY CZ DE
DK ES EE FI FR GB
GR HR HU IE IT LT
LU LV MT NL PL PT
RO SK SI SE CH IS
LI NO – – – –

1703-AS
Printed in Japan
YAESU MUSEN CO., LTD.
Tennozu Parkside Building
2-5-8 Higashi-Shinagawa, Shinagawa-ku, Tokyo
140-0002 Japan
YAESU USA
6125 Phyllis Drive, Cypress, CA 90630, U.S.A.
YAESU UK
Unit 12, Sun Valley Business Park, Winnall Close
Winchester, Hampshire, SO23 0LB, U.K.
Copyright 2017
YAESU MUSEN CO., LTD.
All rights reserved.
No portion of this manual may be
reproduced without the permission of
YAESU MUSEN CO., LTD.