ZTE VICKI Wireless Netbook User Manual 00 C DC for XP
ZTE Corporation Wireless Netbook 00 C DC for XP
UserManual.wiki
>
ZTE
>
VICKI User Manual
>
user manual pt2
Contents
1.
user manual pt1
2.
user manual pt2
3.
user manual pt3
4.
user manual pt4
5.
user manual pt5
6.
user manual pt6
7.
user manual pt7
8.
user manual pt8
user manual pt2
Navigation menu
Upload a User Manual
Namespaces
Wiki Guide
HTML
PDF
Info
Views
User Manual
Discussion / Help
Navigation
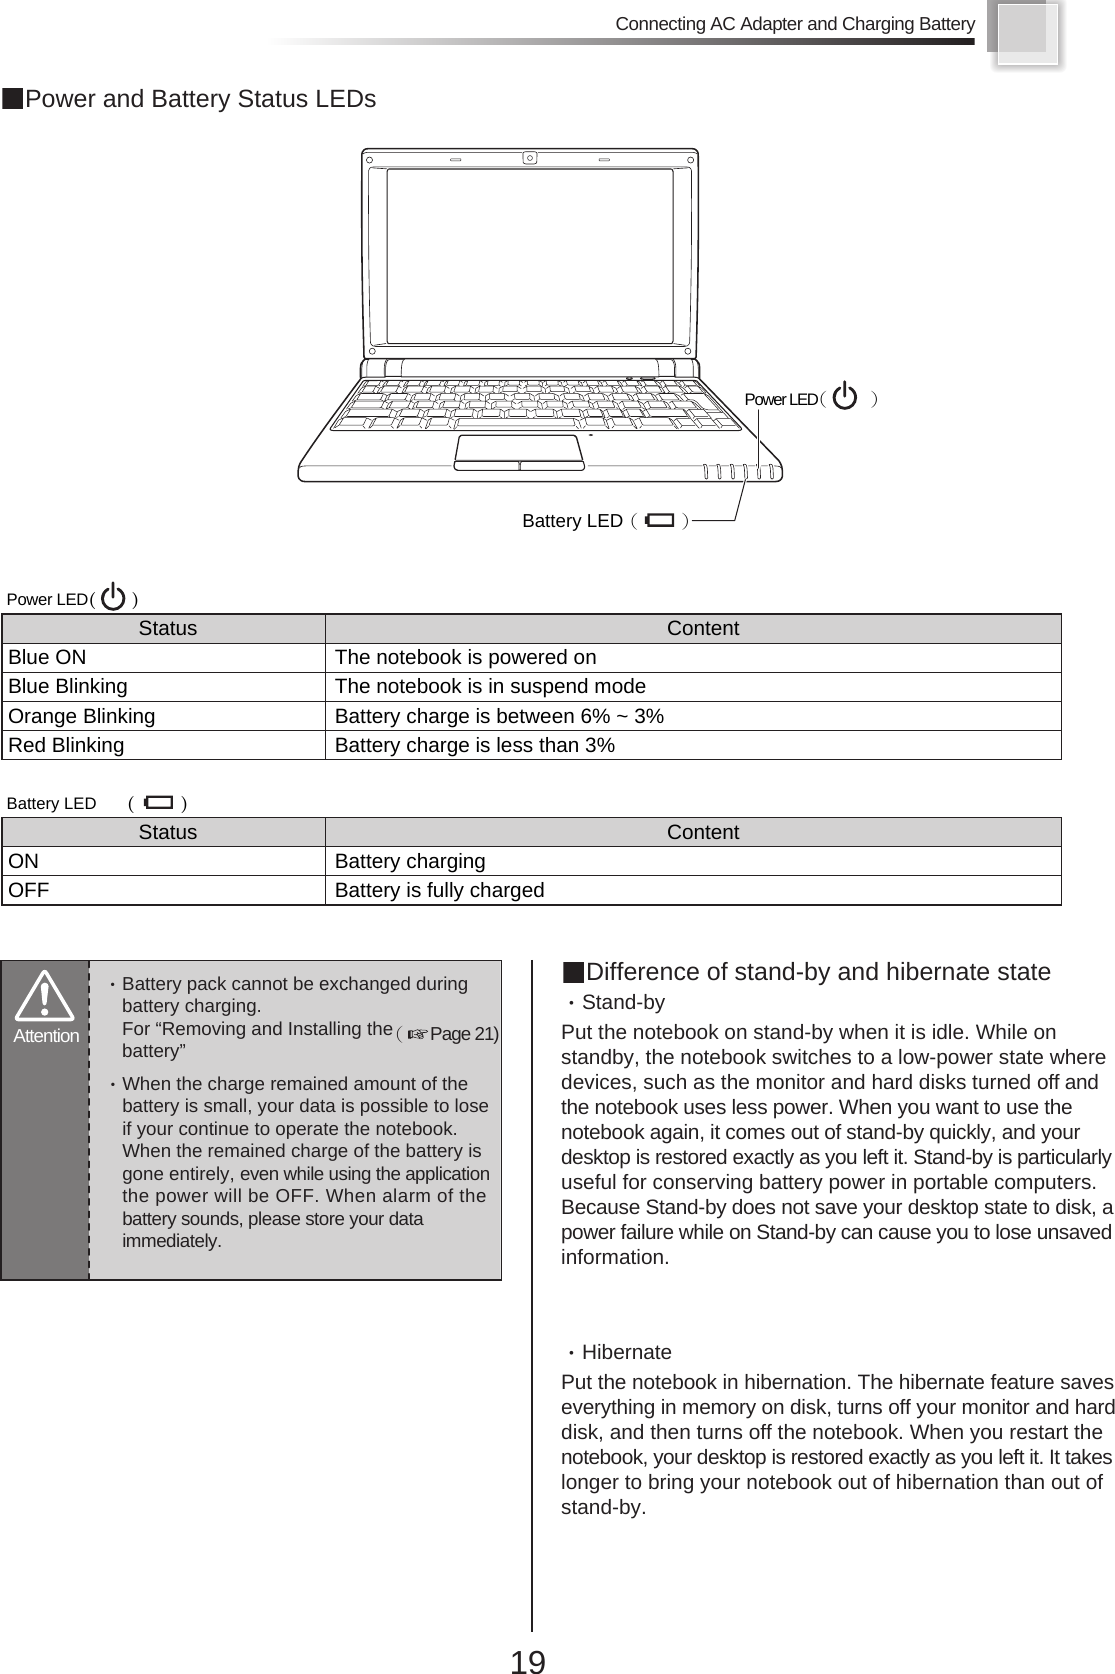
![Turning Your Notebook On/OffAfter set up the notebook, press the power button toturn on it. Windows XP desktop screen will appear. Press the power button to turn on your notebookWindows XP desktop screen will appear afterthe power button is pressed.※Depending on your notebook setup andsoftware, your desktop may have differentor additional shortcuts.・When you see two or more user account iconsare showed on Welcome Screen, please select the account you want to log in.Operates from the “start” menu to power off your notebookClick [Start] → [Turn Off Computer], and the“Turn off computer” dialog box will appear.Click [Turn Off].The notebook will be powered off later.Turn off the power of peripherals connected ifnecessary.RestartWe suggest you to do Windows restart when new devicedriver installed or Windows is running unstably. Click[Start] → [Turn off computer] → [Restart].・If mouse cursor freeze or the operation is unable tocontinue during the process of application software,please simultanely press Ctrl + Alt + Delete . It may terminate the specific application running.Tip 321Tip power button 1Turning Your Notebook On Turning Your Notebook OffAttention DO NOT turn off the notebook by pressing the powerbutton directly. It may damage Windows XP operatingsystem sometimes and you have to install WindowsXP again. Please follow the correct procedure to turnoff the notebook. Set Up Your Notebook10](https://usermanual.wiki/ZTE/VICKI.user-manual-pt2/User-Guide-1155413-Page-1.png)
![Switching User AccountClose current user account and start another account’soperation.Click [Start] → [Log Off], the “Log Off Windows” dialogbox will appear.Click [Log Off], when you want to close current useraccount.To log on, select user account icon on the Welcome Screen.・If the password was assigned for the account, please typethe password.・The password is case sensitive. For example, the sameletter in upper case and the same letter in lower case willbe considered to be two different letters. The Windows XP desktop screen will appearlater.※While the present user account uses the notebook, alsoanother user starts the use of the notebook simultaneously.Click [Start] → [Log Off], the “Log Off Windows” dialogbox will appear.Click [Switch User], the Welcome Screen with multipleuser account icons will appear.Click another user account icon, Windows displaysthe new user’s desktop and settings.しばらくすると、Windows XPのデスクトップ321Tip 321Switch to Another User Accoutログオフせずに切り替えるSet Up Your NotebookDepending on your notebook setup andsoftware, your desktop may have differentor additional shortcutsChange Users without Log Off11](https://usermanual.wiki/ZTE/VICKI.user-manual-pt2/User-Guide-1155413-Page-2.png)
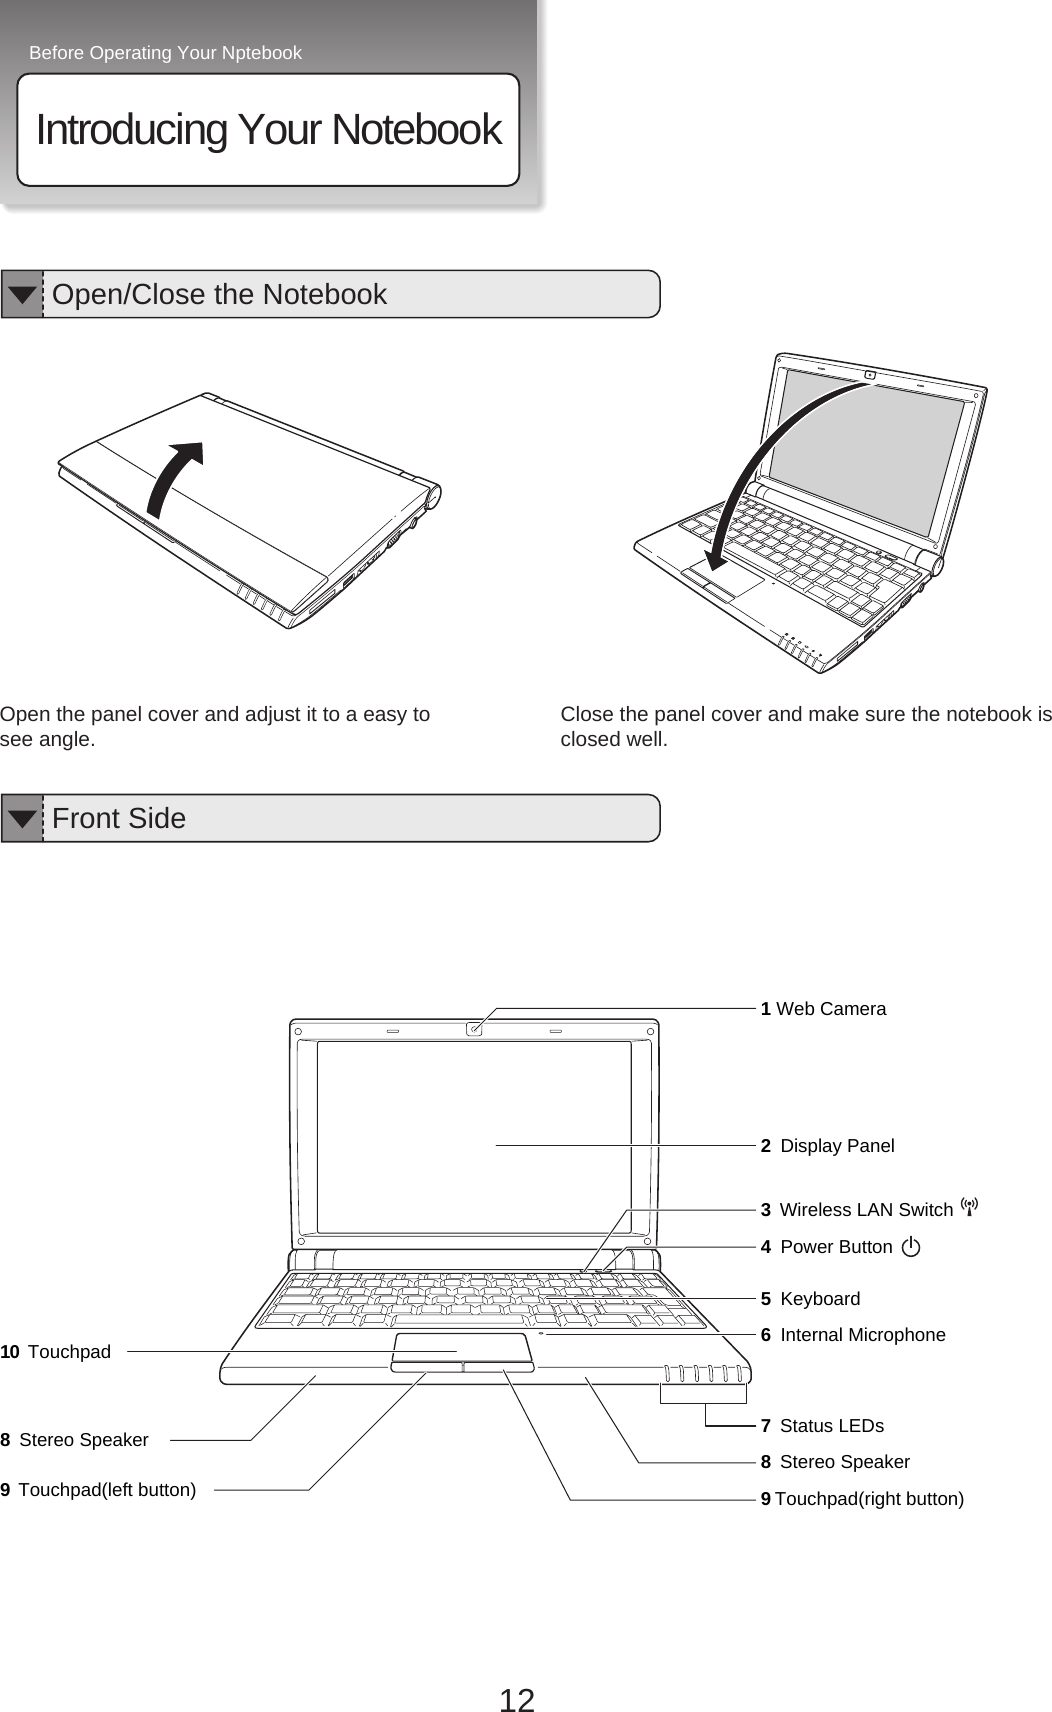
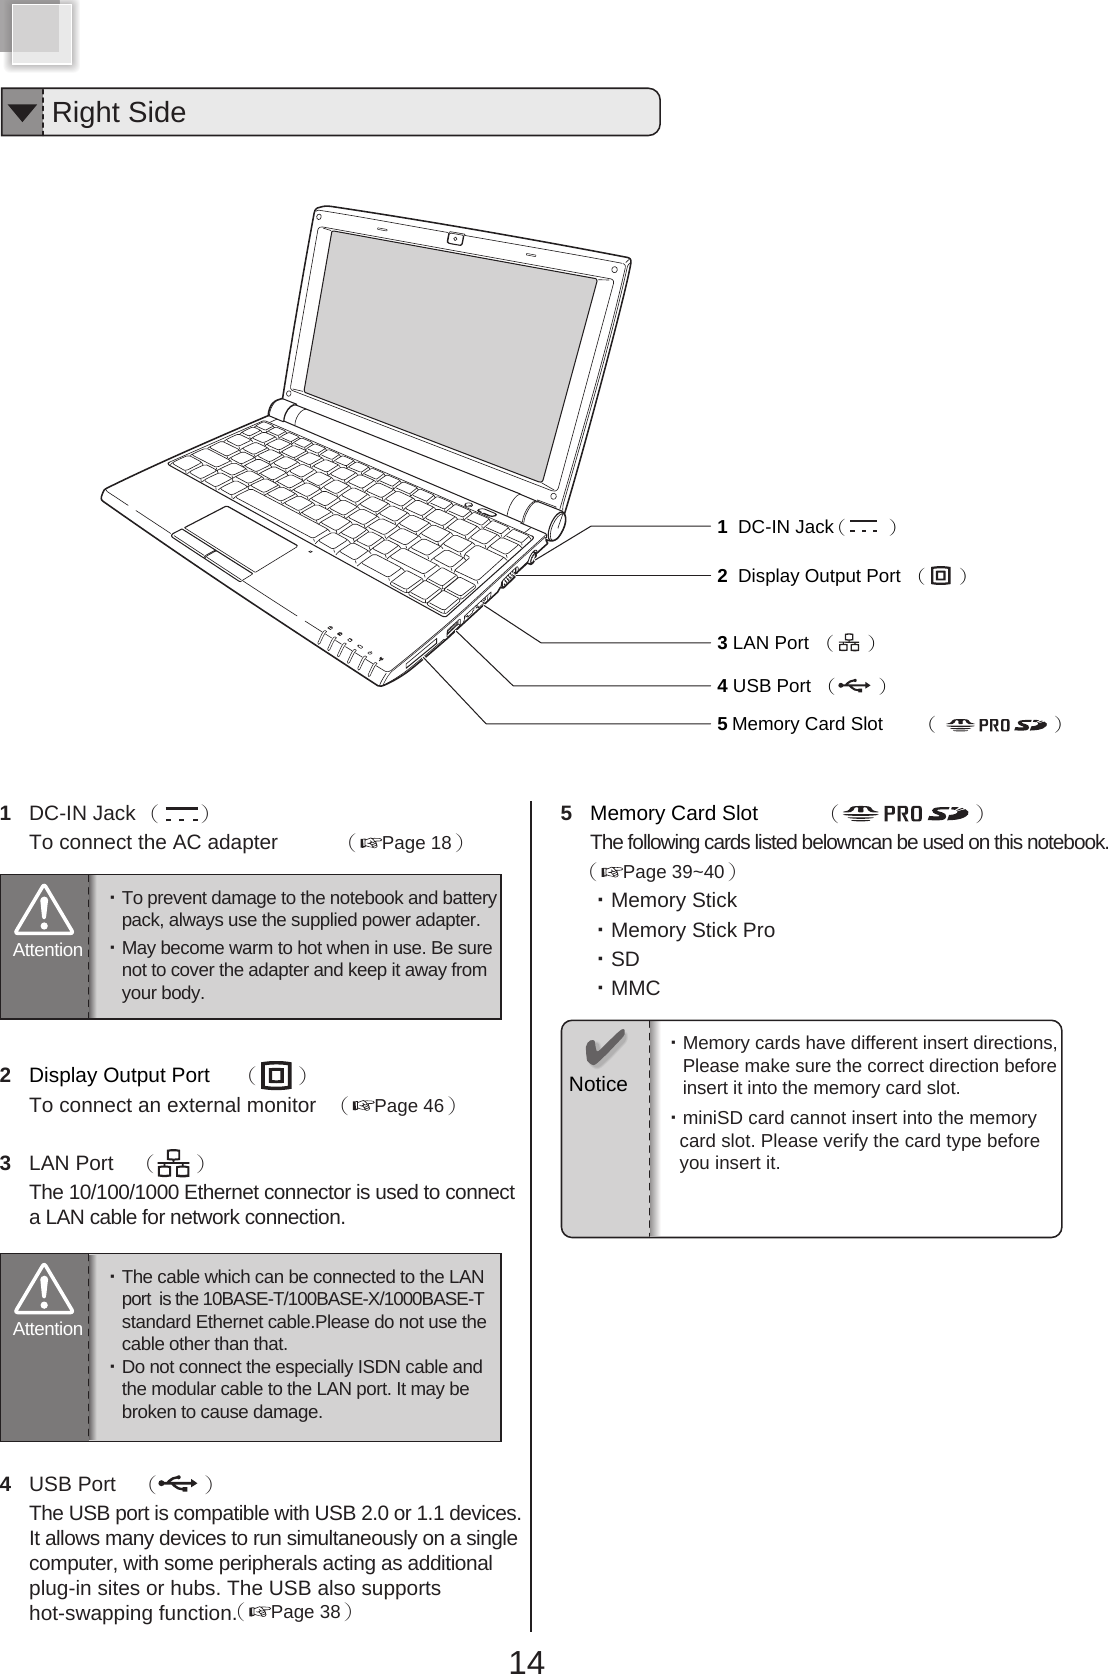
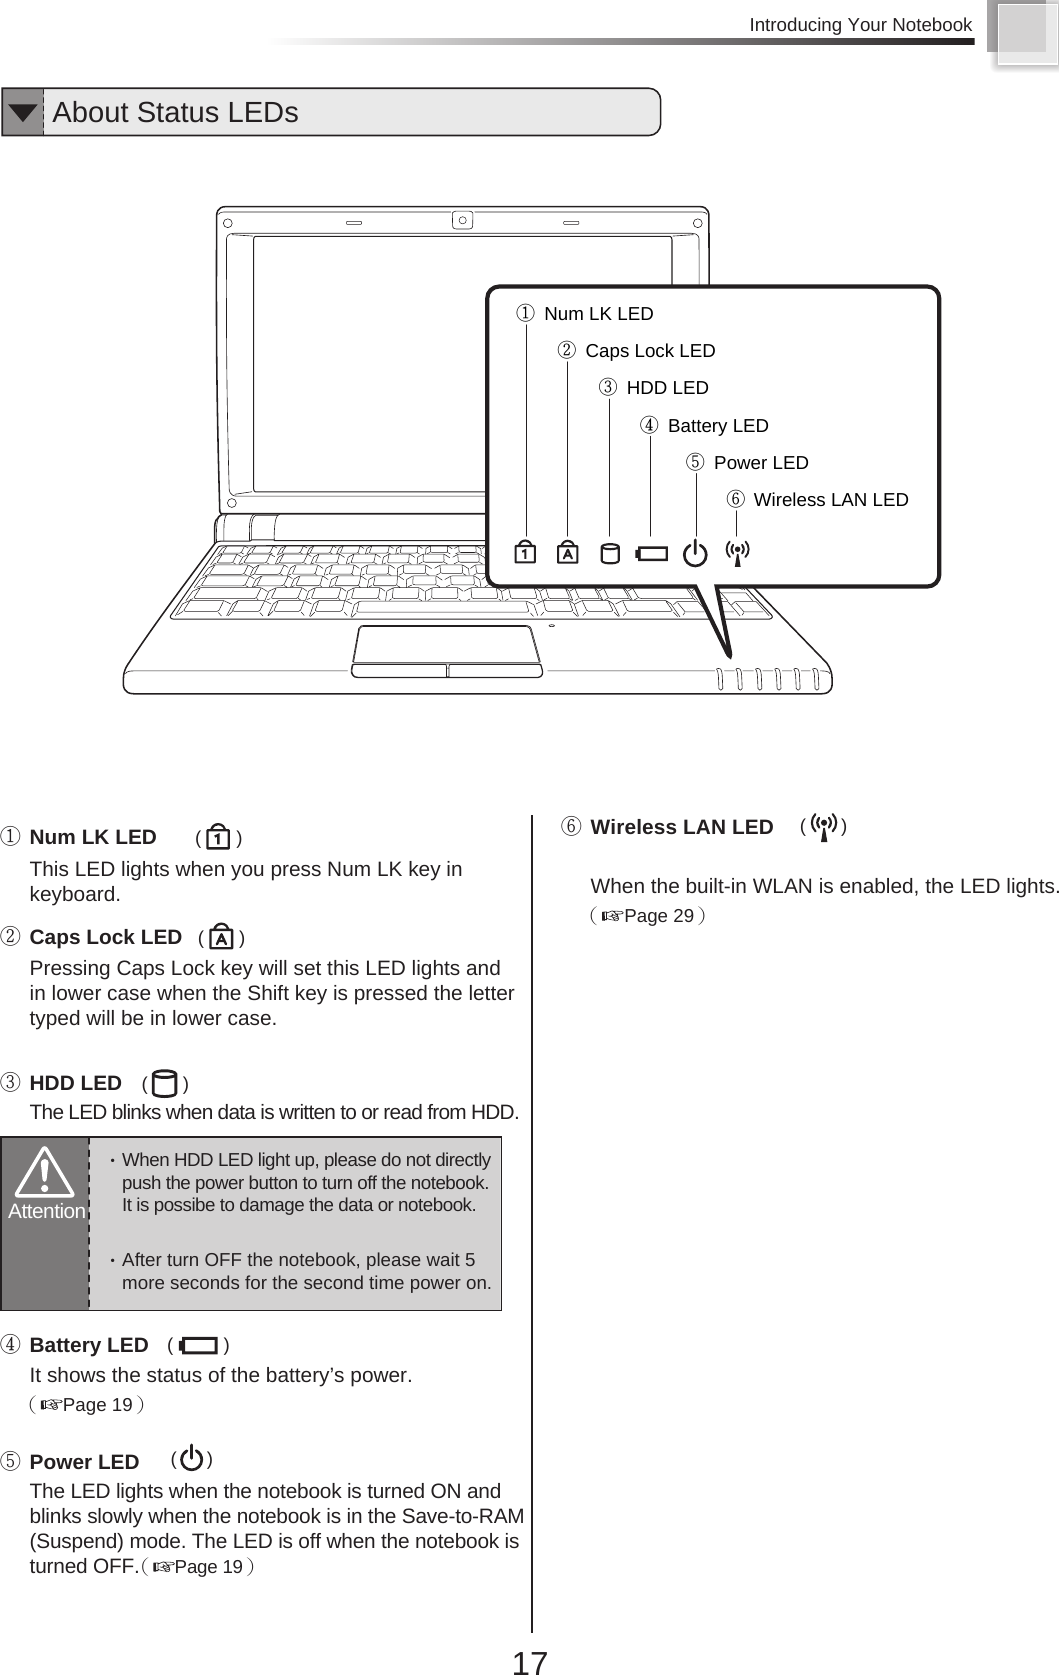
![Introducing Your Notebook1Web Camera(Page 32)2Display PanelIt functions as the same as a desktop monitor. TheLCD panel does not produce any radiation or flickeringso it is easier on the eyes. Use a soft cloth withoutany chemical liquids to clean the display panel.3Wireless LAN Switch ( )Press the button to enable the built-in WirelessLAN.(Page 29)4Power Button( )The button allows powering ON and OFF the notebook.(Page 10)The blue indicator LED lights when the notebook turned on.Click [Start] → [Control Panel] →[Performance and Maintenance] → [Power Options]for the advanced power option setting.5KeyboardThe keyboard provides with comfortable travel (depthat which the keys can be depressed) and palm rest for both hands. (Page 23~26)6Internal MicrophoneIt can be used for video conferencing, voice narration, audio recording, and multimedia applications.7Status LEDsIndicate the system status of the notebook.(Page 17)8Stereo SpeakerThe built-in speaker allows you to hear audio withoutany additional attachment.For Speaker volume down and up, you can use the Fn key to increase/decrease the volume. 9Touchpad(right button・left button)The touchpad and its buttons comprises a pointing devicethat provides the same functions as a desktop mouse.(Page 22)10 TouchpadThis is the pointing device of the notebook.(Page 22)The built-in camera allows picture taking or video recordingTipAttention・When HDD LED light up, please do not directlypush the power button to turn off the notebook.It is possibe to damage the data or notebook.・After turn OFF the notebook, please wait 5more seconds for the second time power on.設定は[start]ボタン→[Control Panel]→[Performance and Maintain]→[Power Options]→??????→[電源ボタン]で選択できます。(Page 24)13](https://usermanual.wiki/ZTE/VICKI.user-manual-pt2/User-Guide-1155413-Page-4.png)