ZTE VICKI Wireless Netbook User Manual 00 C DC for XP
ZTE Corporation Wireless Netbook 00 C DC for XP
ZTE >
Contents
user manual pt2
Turning Your Notebook On/Off
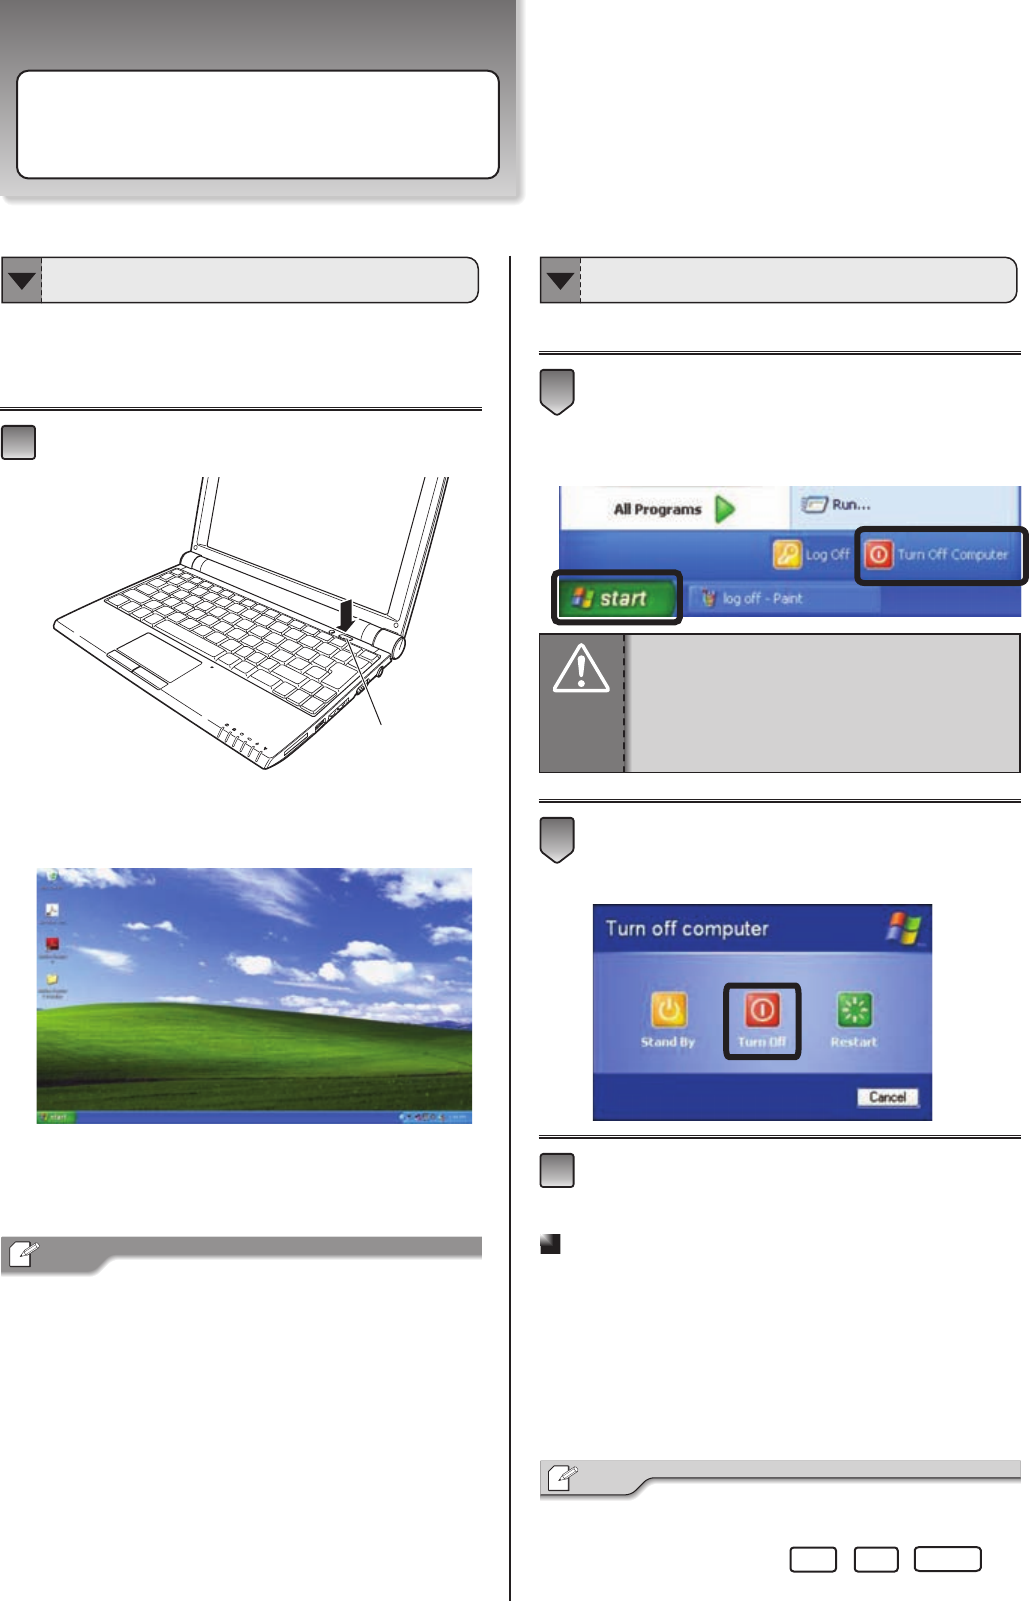
After set up the notebook, press the power button to
turn on it. Windows XP desktop screen will appear.
Press the power button to turn on your notebook
Windows XP desktop screen will appear after
the power button is pressed.
※Depending on your notebook setup and
software, your desktop may have different
or additional shortcuts.
・When you see two or more user account icons
are showed on Welcome Screen, please select
the account you want to log in.
Operates from the “start” menu to power off your notebook
Click [Start] → [Turn Off Computer], and the
“Turn off computer” dialog box will appear.
Click [Turn Off].
The notebook will be powered off later.
Turn off the power of peripherals connected if
necessary.
Restart
We suggest you to do Windows restart when new device
driver installed or Windows is running unstably. Click
[Start] → [Turn off computer] → [Restart].
・If mouse cursor freeze or the operation is unable to
continue during the process of application software,
please simultanely press Ctrl + Alt + Delete . It
may terminate the specific application running.
Tip
3
2
1
Tip
power button
1
Turning Your Notebook On Turning Your Notebook Off
Attention
DO NOT turn off the notebook by pressing the power
button directly. It may damage Windows XP operating
system sometimes and you have to install Windows
XP again. Please follow the correct procedure to turn
off the notebook.
Set Up Your Notebook
10
Switching User Account
Close current user account and start another account’s
operation.
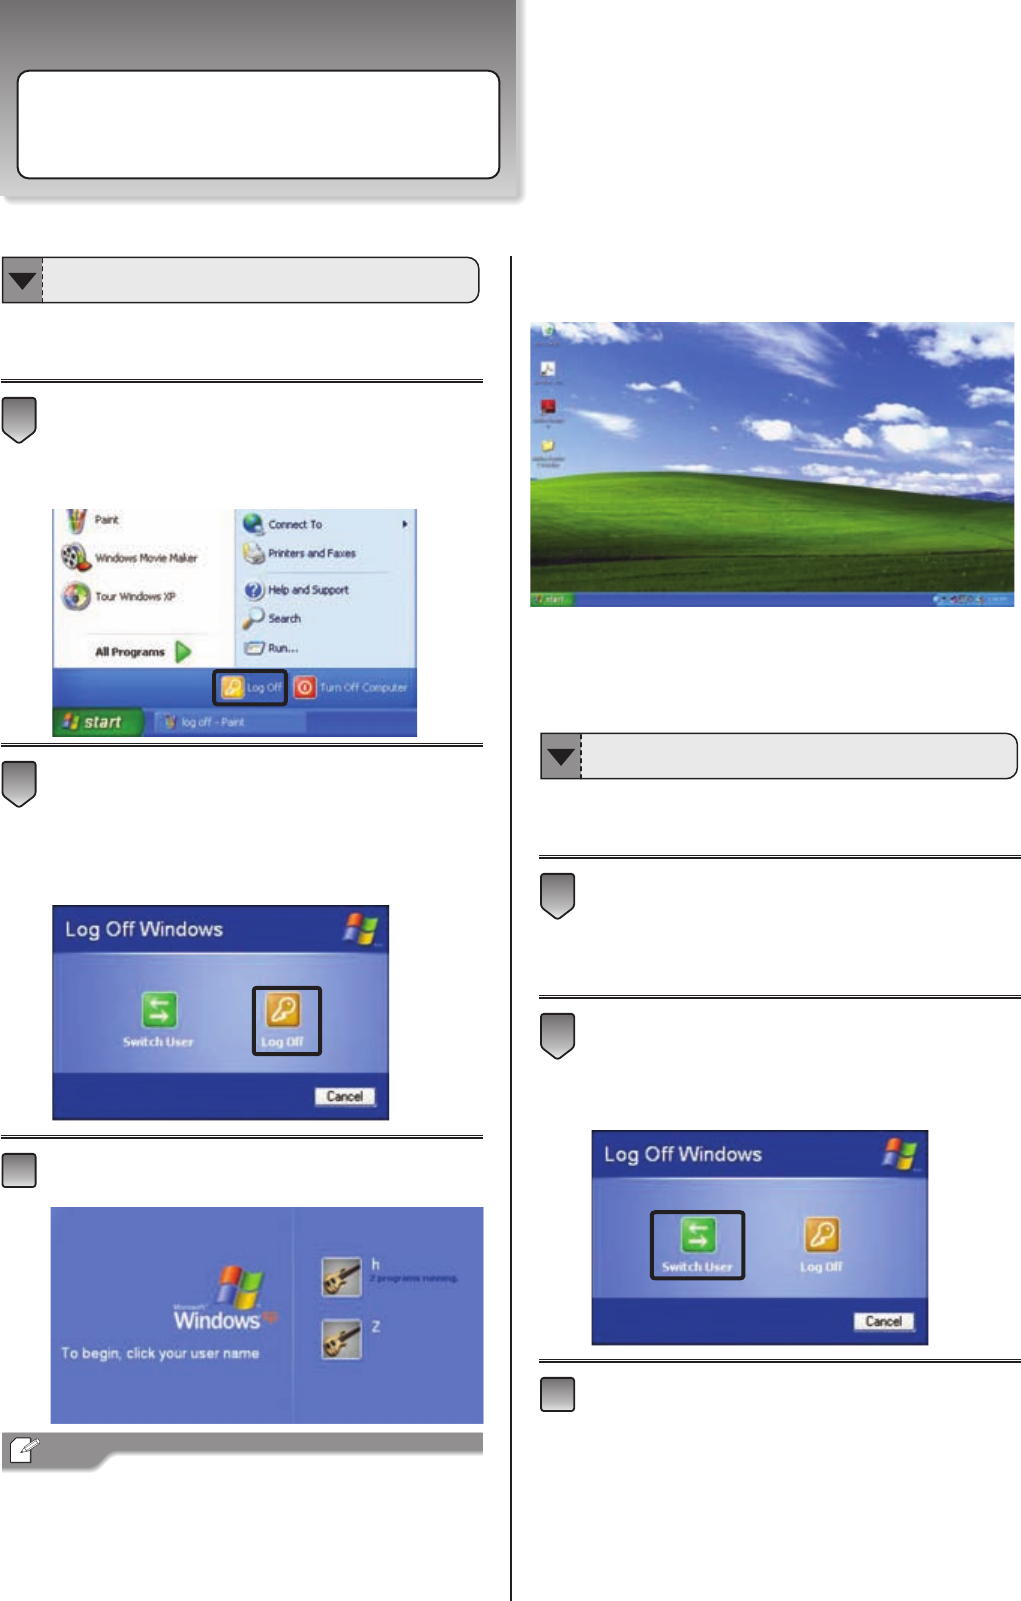
Click [Start] → [Log Off], the “Log Off Windows” dialog
box will appear.
Click [Log Off], when you want to close current user
account.
To log on, select user account icon on the
Welcome Screen.
・If the password was assigned for the account, please type
the password.
・The password is case sensitive. For example, the same
letter in upper case and the same letter in lower case will
be considered to be two different letters.
The Windows XP desktop screen will appear
later.
※
While the present user account uses the notebook, also
another user starts the use of the notebook simultaneously.
Click [Start] → [Log Off], the “Log Off Windows” dialog
box will appear.
Click [Switch User], the Welcome Screen with multiple
user account icons will appear.
Click another user account icon, Windows displays
the new user’s desktop and settings.
しばらくすると、Windows XPのデスクトップ
3
2
1
Tip
3
2
1
Switch to Another User Accout
ログオフせずに切り替える
Set Up Your Notebook
Depending on your notebook setup and
software, your desktop may have different
or additional shortcuts
Change Users without Log Off
11
Before Operating Your Nptebook
Introducing Your Notebook
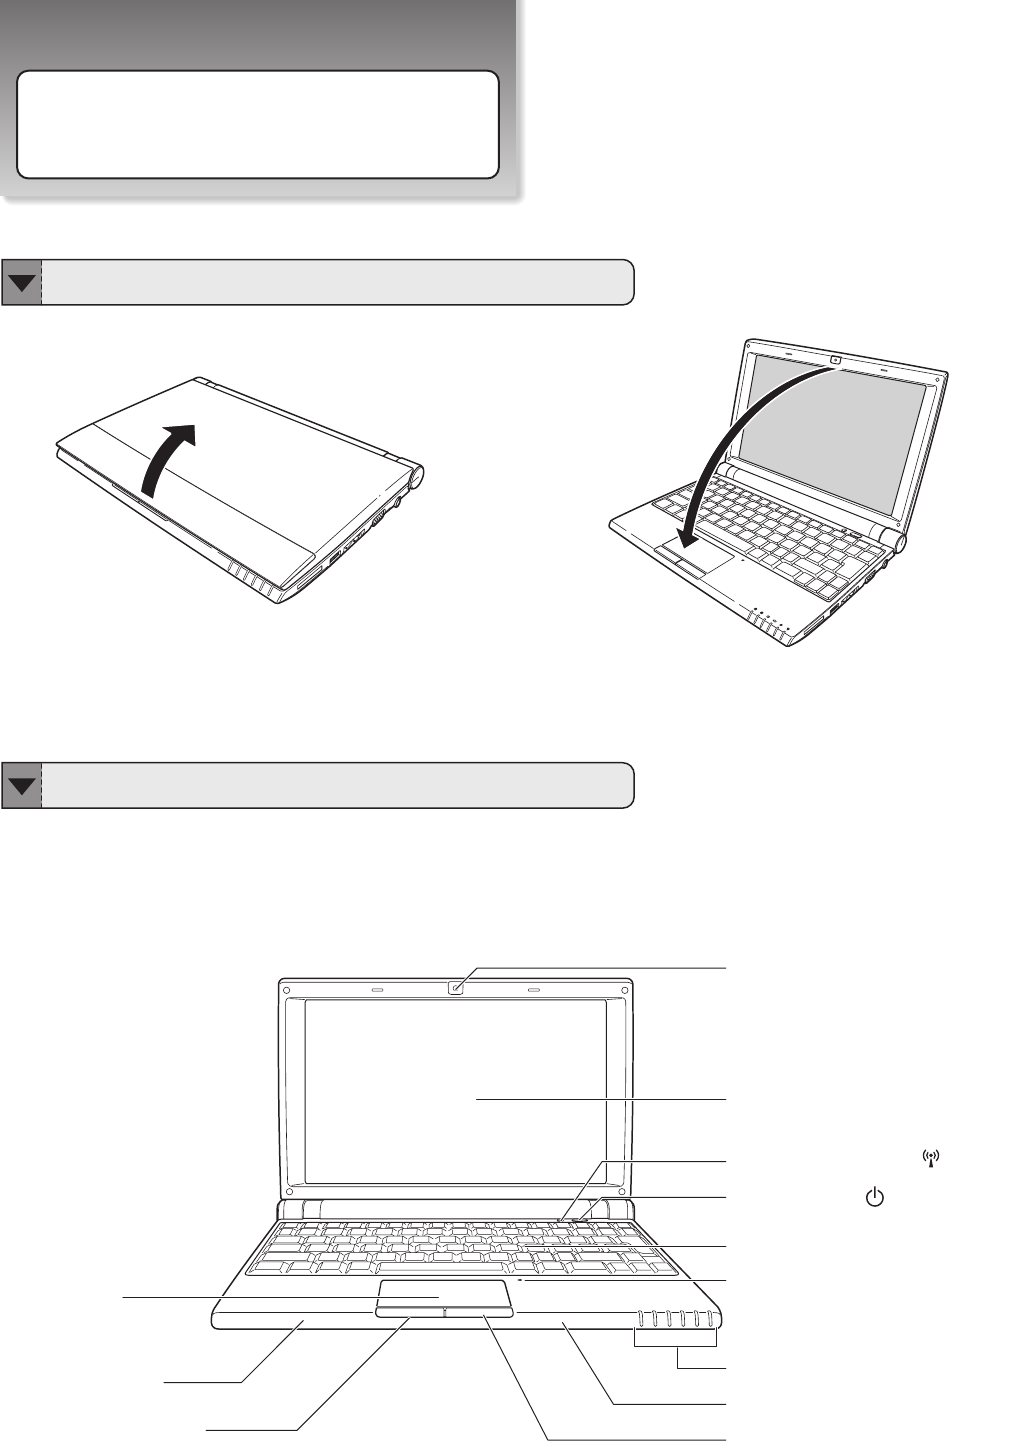
Open/Close the Notebook
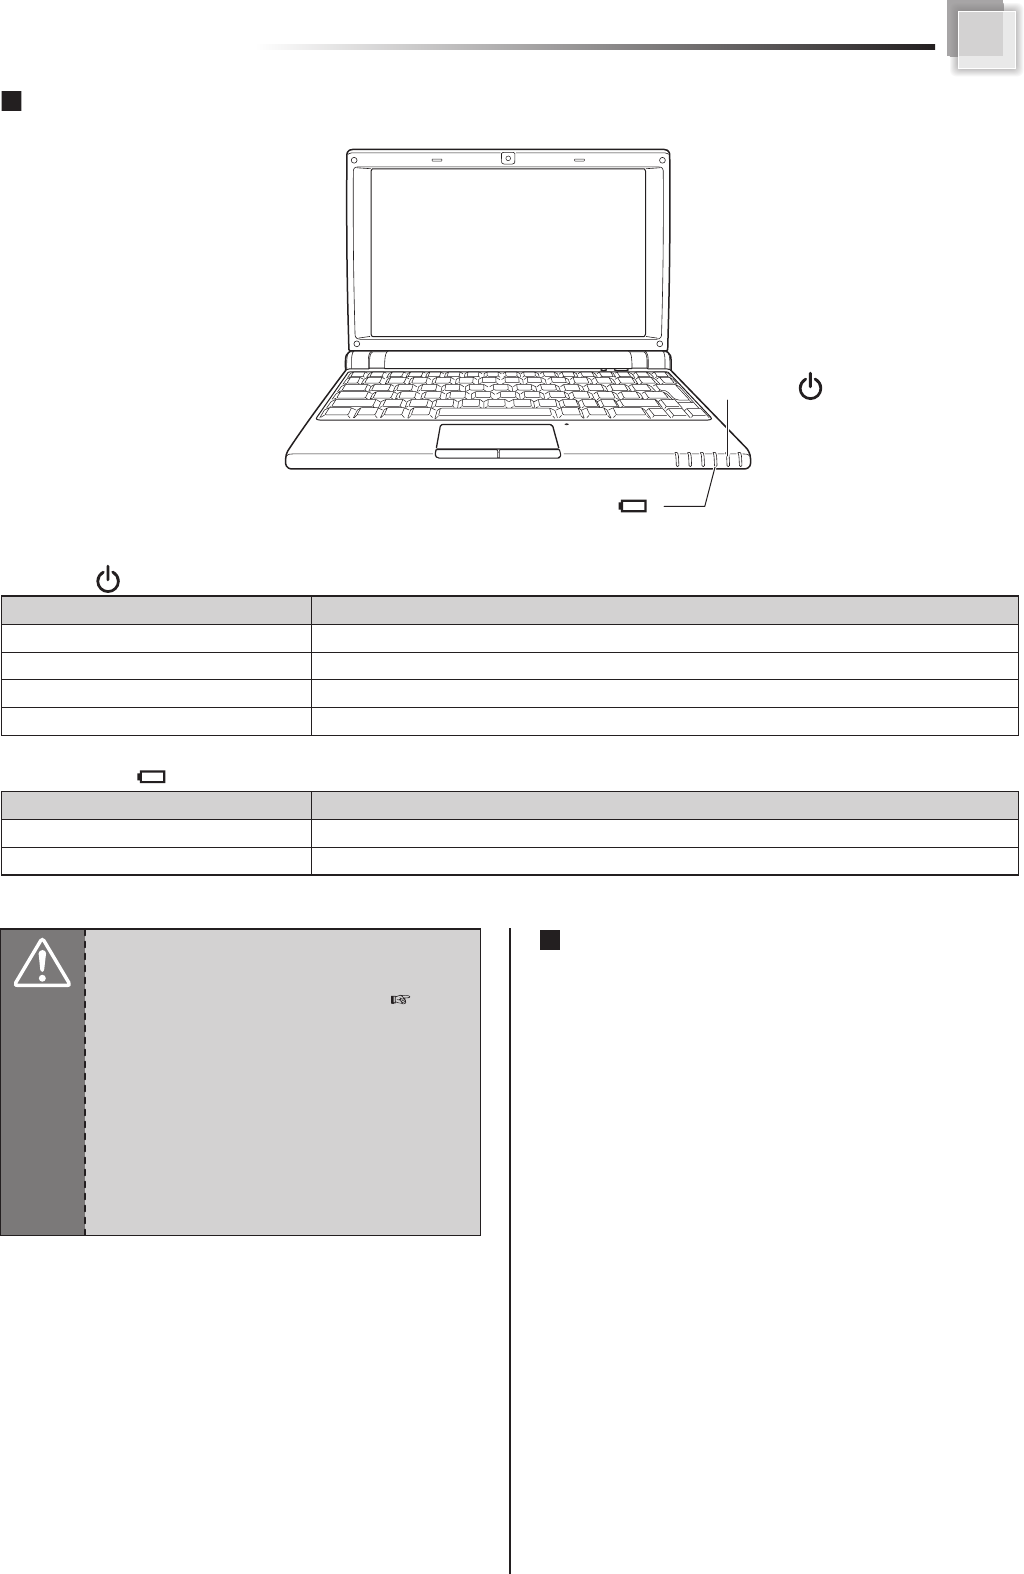
Front Side
1 Web Camera
2 Display Panel
5 Keyboard
6 Internal Microphone
4 Power Button
3 Wireless LAN Switch
8 Stereo Speaker
9 Touchpad(right button)
9 Touchpad(left button)
8 Stereo Speaker
10 Touchpad
7 Status LEDs
Open the panel cover and adjust it to a easy to
see angle. Close the panel cover and make sure the notebook is
closed well.
12
Introducing Your Notebook
1Web Camera
(Page 32)
2Display Panel
It functions as the same as a desktop monitor. The
LCD panel does not produce any radiation or flickering
so it is easier on the eyes. Use a soft cloth without
any chemical liquids to clean the display panel.
3Wireless LAN Switch ( )
Press the button to enable the built-in Wireless
LAN.
(Page 29)
4Power Button( )
The button allows powering ON and OFF the notebook.
(Page 10)
The blue indicator LED lights when the notebook turned on.
Click [Start] → [Control Panel] →
[Performance and Maintenance] → [Power Options]
for the advanced power option setting.
5Keyboard
The keyboard provides with comfortable travel (depth
at which the keys can be depressed) and palm rest
for both hands.
(Page 23~26)
6Internal Microphone
It can be used for video conferencing, voice narration
, audio recording, and multimedia applications.
7Status LEDs
Indicate the system status of the notebook.
(Page 17)
8Stereo Speaker
The built-in speaker allows you to hear audio without
any additional attachment.
For Speaker volume down and up, you can use the Fn key to
increase/decrease the volume.
9Touchpad(right button・left button)
The touchpad and its buttons comprises a pointing device
that provides the same functions as a desktop mouse.
(Page 22)
10 Touchpad
This is the pointing device of the notebook.
(Page 22)
The built-in camera allows picture taking or video
recording
Tip
Attention
・When HDD LED light up, please do not directly
push the power button to turn off the notebook.
It is possibe to damage the data or notebook.
・After turn OFF the notebook, please wait 5
more seconds for the second time power on.
設定は[start]ボタン→[Control Panel]→[Performance and Maintain]→[Power Options]→??????→[電源ボタン]
で選択できます。
(Page 24)
13
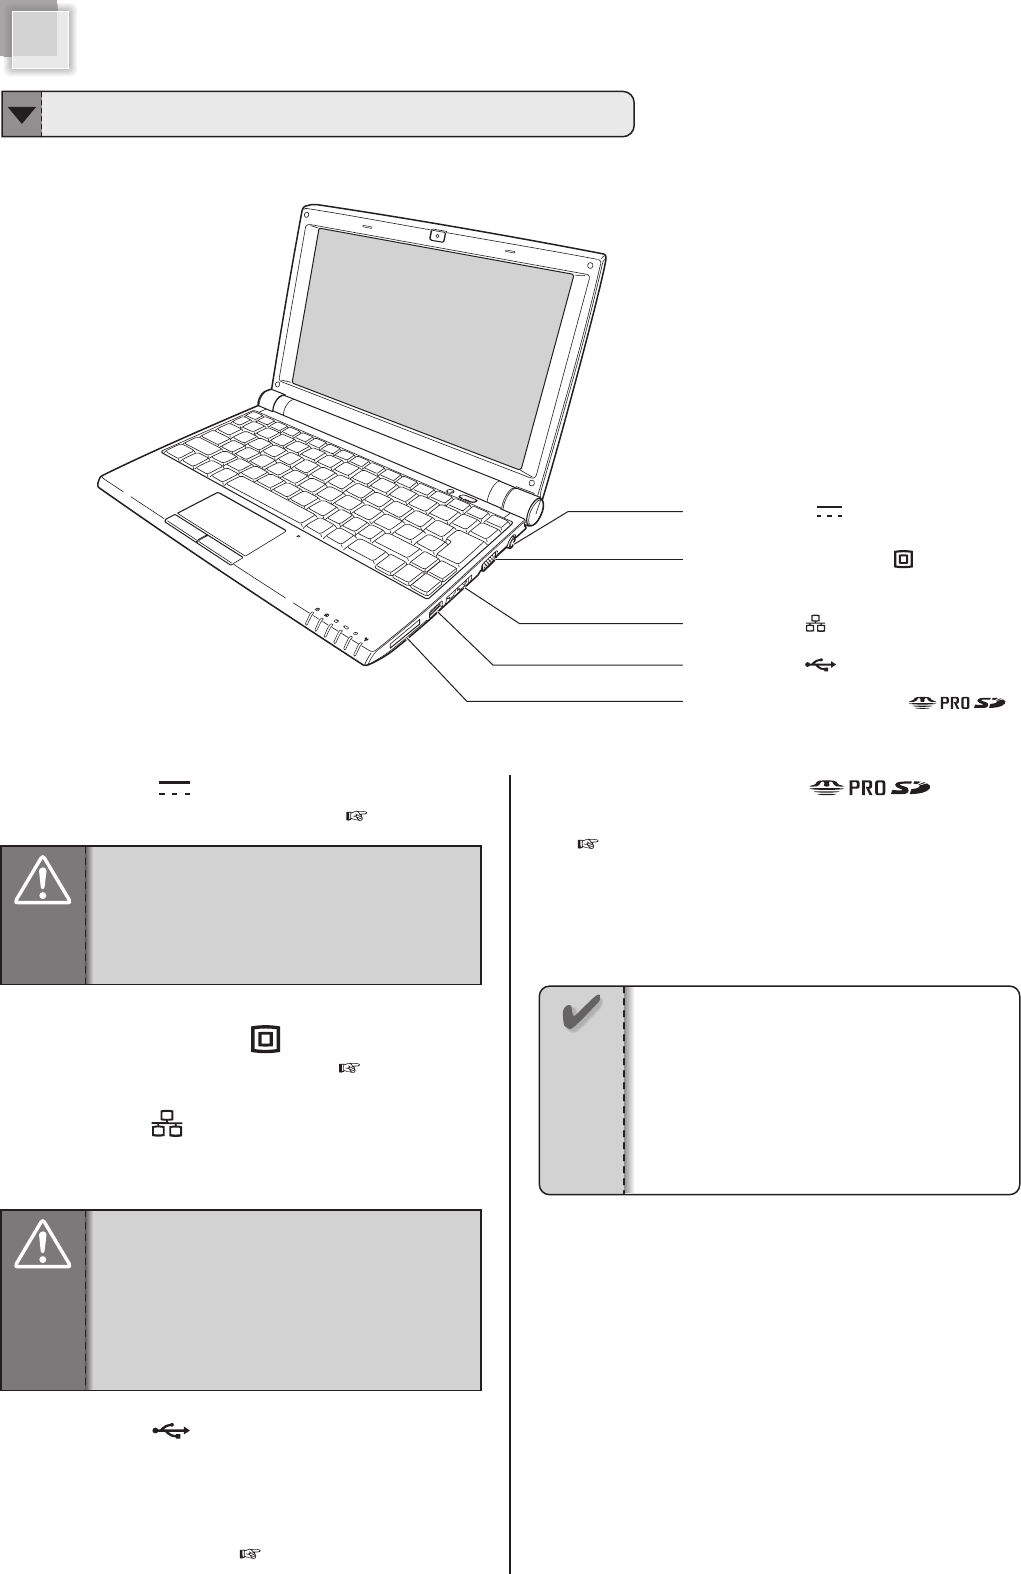
1 DC-IN Jack( )
3 LAN Port ( )
4 USB Port ( )
5 Memory Card Slot ( )
2 Display Output Port ( )
Right Side
1DC-IN Jack ( )
To connect the AC adapter (Page 18)
2Display Output Port ( )
To connect an external monitor (Page 46)
3LAN Port ( )
The 10/100/1000 Ethernet connector is used to connect
a LAN cable for network connection.
4USB Port ( )
The USB port is compatible with USB 2.0 or 1.1 devices.
It allows many devices to run simultaneously on a single
computer, with some peripherals acting as additional
plug-in sites or hubs. The USB also supports
hot-swapping function.
5Memory Card Slot ( )
The following cards listed belowncan be used on this notebook.
(Page 39~40)
・Memory Stick
・Memory Stick Pro
・SD
・MMC
Attention
・To prevent damage to the notebook and battery
pack, always use the supplied power adapter.
・May become warm to hot when in use. Be sure
not to cover the adapter and keep it away from
your body.
Attention
・The cable which can be connected to the LAN
port is the 10BASE-T/100BASE-X/1000BASE-T
standard Ethernet cable.Please do not use the
cable other than that.
・Do not connect the especially ISDN cable and
the modular cable to the LAN port. It may be
broken to cause damage.
Notice
・Memory cards have different insert directions,
Please make sure the correct direction before
insert it into the memory card slot.
・miniSD card cannot insert into the memory
card slot. Please verify the card type before
you insert it.
(Page 38)
14
Introducing Your Notebook
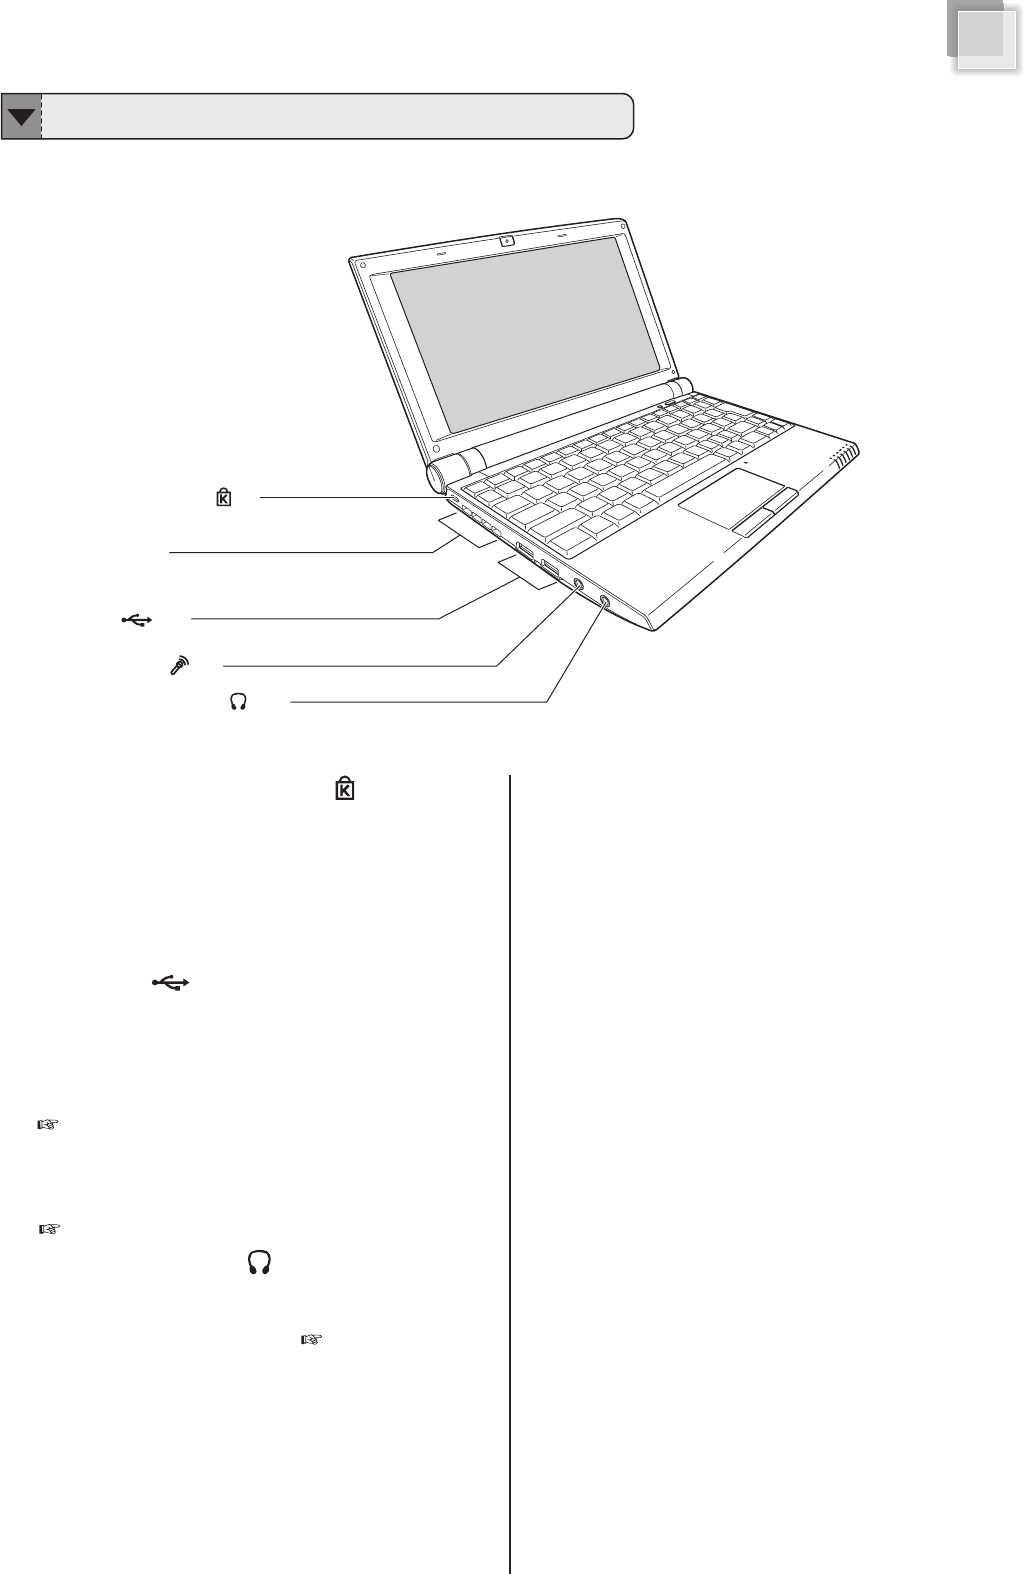
Left Side
1Kensington Lock Port ( )
Allows the notebook to be secured using Kensington
Lock.
2Ventilation Slot
The slot is designed to cool the system. DO NOT
block the ventilation for air circulation.
3USB Port ( )
The USB port is compatible with USB 2.0 or 1.1 devices.
It allows many devices to run simultaneously on a single
computer, with some peripherals acting as additional
plug-in sites or hubs. The USB also supports
hot-swapping function.
(Page 38)
4Microphone Jack
It is designed to connect the microphone used for
Skype, voice narrations, or simple voice recordings.
(Page 37)
5
Headphone Output Jack
It connects the notebook’s audio out signal to amplified
speakers or headphones. Using this jack automatically
disables the built-in speakers.
( )
(Page 37)
4 Microphone Jack
( )
5 Headphone Output Jack( )
1 Kensington Lock Port( )
3 USB Port ( )
2 Ventilation Slot
15
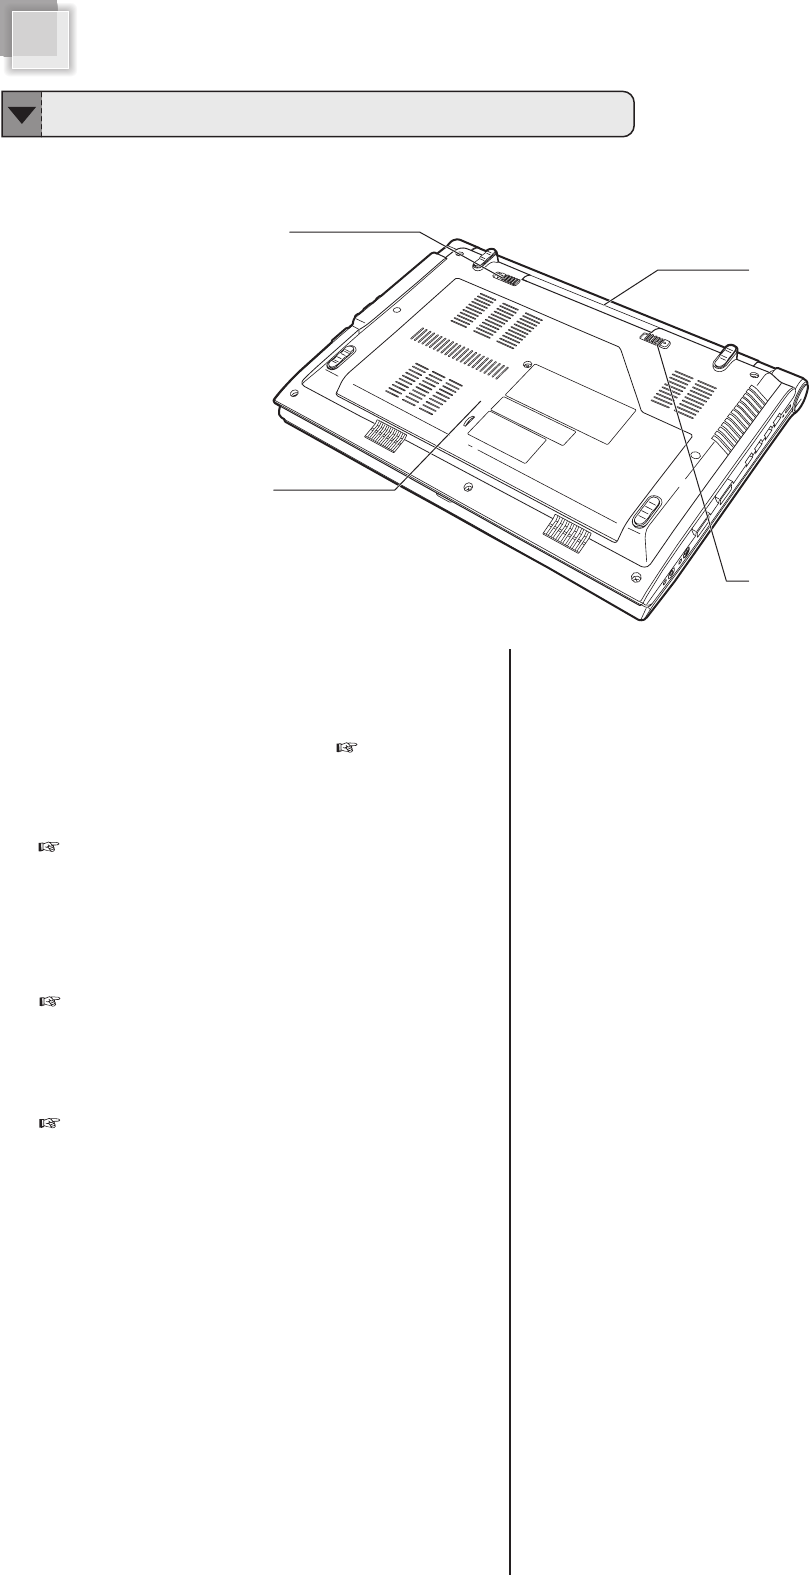
1 Battery Release Latch
4 Memory Module Cover
3 Battery Lock Switch
2 Battery Pack
Bottom Side
1Battery Release Latch
The latch keeps the battery pack secure. When the
battery pack is inserted, it will automatically lock.
When removing the battery pack, this latch must be
retained in the unlocked position.
(Page 21)
2Battery Pack
The notebook will be powered by the battery pack
when the AC adapter is disconnected.
(Page 18, 21)
3Battery Lock Switch
The switch is used to keep the battery pack secured.
Move the lock to the unlocked position to insert or
remove the battery pack. Move the lock to the locked
position after inserting the battery pack.
(Page 21)
4Memory Module Cover
The memory module, hard disk drive, and wireless
LAN module are located under the cover. Please take
the cover off when adding/removing the module.
(Page 42, 44)
16
Introducing Your Notebook
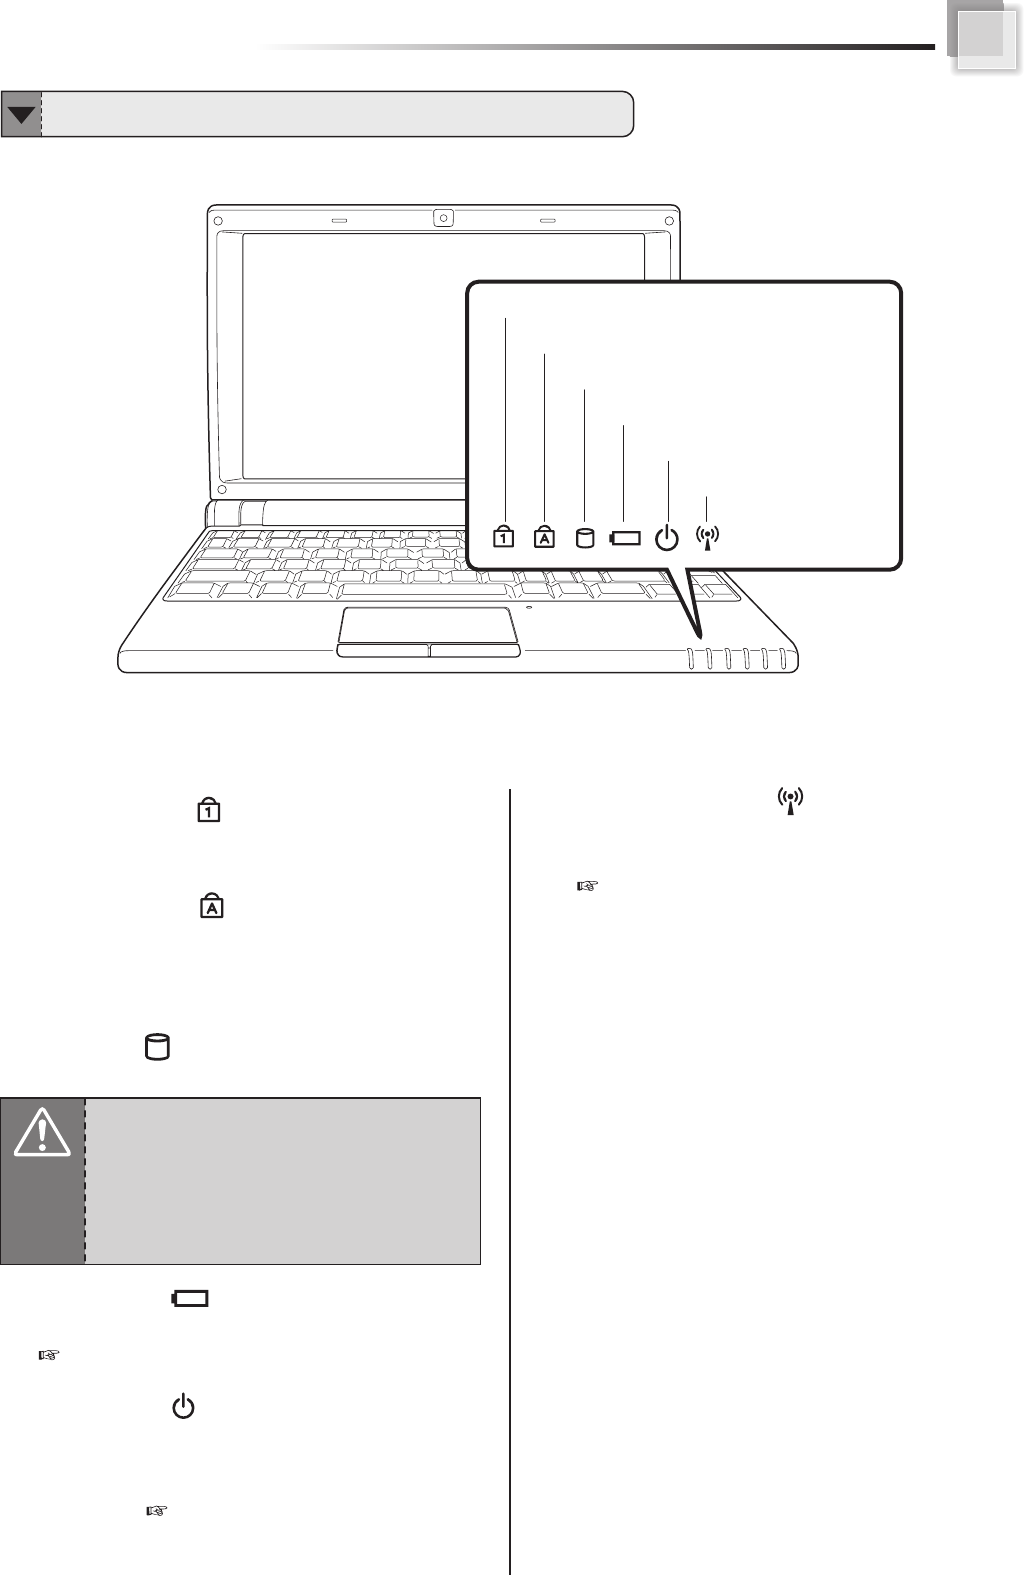
①Num LK LED
This LED lights when you press Num LK key in
keyboard.
②Caps Lock LED
Pressing Caps Lock key will set this LED lights and
in lower case when the Shift key is pressed the letter
typed will be in lower case.
③HDD LED
The LED blinks when data is written to or read from HDD.
④Battery LED
It shows the status of the battery’s power.
(Page 19)
⑤Power LED
The LED lights when the notebook is turned ON and
blinks slowly when the notebook is in the Save-to-RAM
(Suspend) mode. The LED is off when the notebook is
turned OFF.
(Page 19)
⑥Wireless LAN LED
When the built-in WLAN is enabled, the LED lights.
(Page 29)
① Num LK LED
② Caps Lock LED
③ HDD LED
④ Battery LED
⑤ Power LED
⑥ Wireless LAN LED
About Status LEDs
Attention
・When HDD LED light up, please do not directly
push the power button to turn off the notebook.
It is possibe to damage the data or notebook.
・After turn OFF the notebook, please wait 5
more seconds for the second time power on.
( )
( )
( )
( )
( )
( )
17
Ti p
2
DC-IN Jack
1
Tip
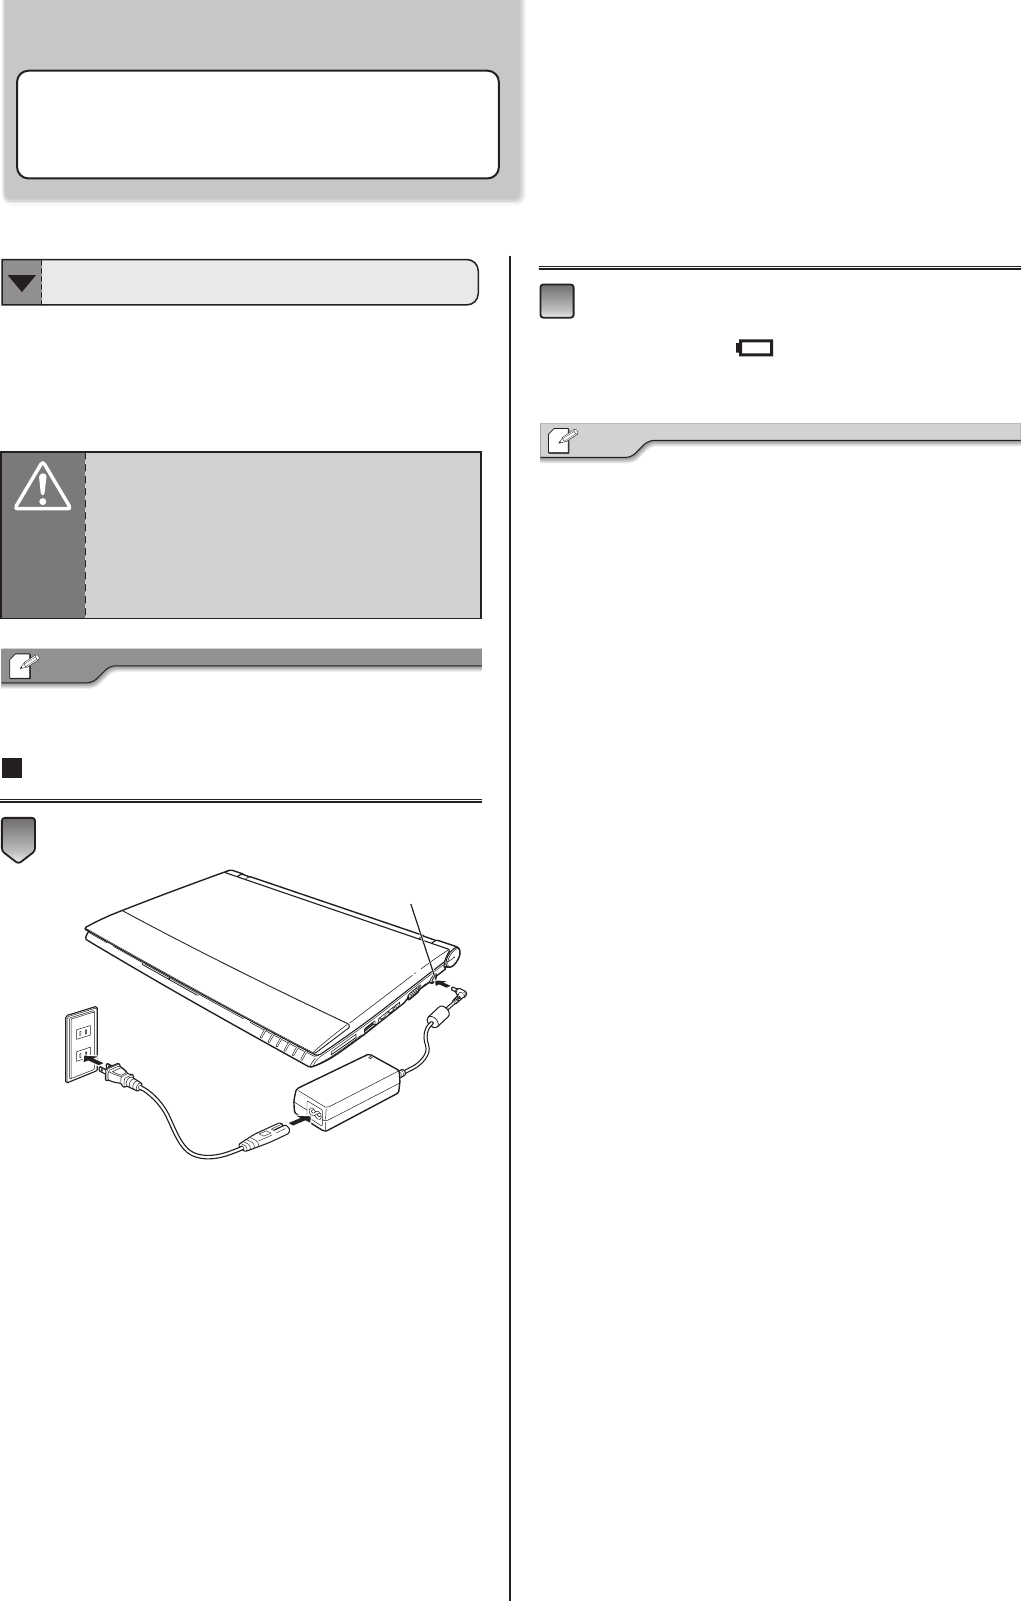
Connecting AC Adapter
and Charging Battery
For the First Time Using
Waring
・DO NOT use the AC adapter not included in
the package. Use of another type of adapter
may risk fire or explosion.
・DO NOT allow anything to rest on the AC
adapter. It may overheat the AC adapter
and risk fire or explosion.
The battery included in the package is not fully
charged. When you use the notebook for the
first time, please connect the AC adapter after
slide the battery pack.
・You can use the notebook while charging the batery.
Connecting AC adapter and charging battery
Connect the DC plug to DC-IN Jack.
Connect the AC power cord to the AC adapter and
connect the AC power cord to an AC outlet.
Battery LED ( )lights and the charge of
battery starts.
・The notebook comes with a universal AC-DC adapter for
connecting to any 100V-240V outlets without setting switches
or using power converters.
Different countries may require an adapter to connect the
provided AC power cord to a different standard. Most hotels
will provide universal outlets to support different power cords
as well as voltages.
When operating with the battery only, please remove the AC
adapter.When using with AC power, please connect the AC
adapter.
Before Operating Your Notebook
18
Connecting AC Adapter and Charging Battery
ご
使
用
の
前
に
Difference of stand-by and hibernate state
・Stand-by
Put the notebook on stand-by when it is idle. While on
standby, the notebook switches to a low-power state where
devices, such as the monitor and hard disks turned off and
the notebook uses less power. When you want to use the
notebook again, it comes out of stand-by quickly, and your
desktop is restored exactly as you left it. Stand-by is particularly
useful for conserving battery power in portable computers.
Because Stand-by does not save your desktop state to disk, a
power failure while on Stand-by can cause you to lose unsaved
information.
・Hibernate
Put the notebook in hibernation. The hibernate feature saves
everything in memory on disk, turns off your monitor and hard
disk, and then turns off the notebook. When you restart the
notebook, your desktop is restored exactly as you left it. It takes
longer to bring your notebook out of hibernation than out of
stand-by.
Power and Battery Status LEDs
Battery LED( )
Power LED( )
Content
Battery charging
Battery is fully charged
Status
ON
OFF
Battery LED ( )
Content
The notebook is powered on
The notebook is in suspend mode
Battery charge is between 6% ~ 3%
Battery charge is less than 3%
Status
Blue ON
Blue Blinking
Orange Blinking
Red Blinking
Power LED( )
Attention
・Battery pack cannot be exchanged during
battery charging.
For “Removing and Installing the
battery” (Page 21)
・When the charge remained amount of the
battery is small, your data is possible to lose
if your continue to operate the notebook.
When the remained charge of the battery is
gone entirely, even while using the application
the power will be OFF. When alarm of the
battery sounds, please store your data
immediately.
19