Zebra Technologies ZLANGVH Zebra Embedded 802.11b/g Radio User Manual Xi4 UG
Zebra Technologies Corporation Zebra Embedded 802.11b/g Radio Xi4 UG
Contents
- 1. User Manual
- 2. User Manual Part 1 of 3
- 3. User Manual Part 2 of 3
- 4. User Manual Part 3 of 3
User Manual Part 2 of 3
61
Operations
Load Media in Rewind Mode
2/23/09 Xi4 User Guide P1009874-001
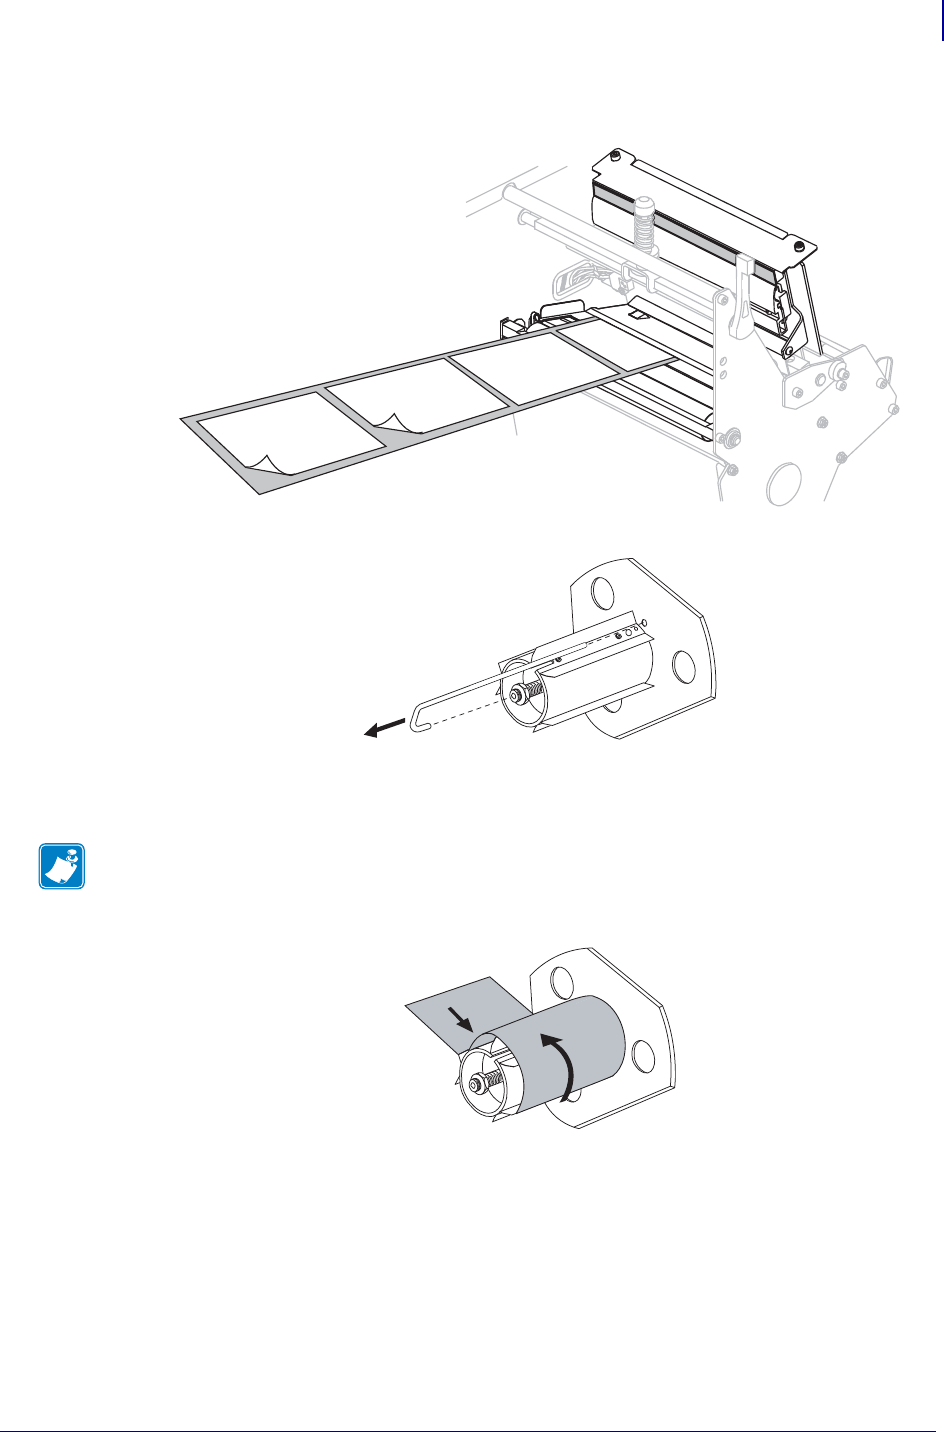
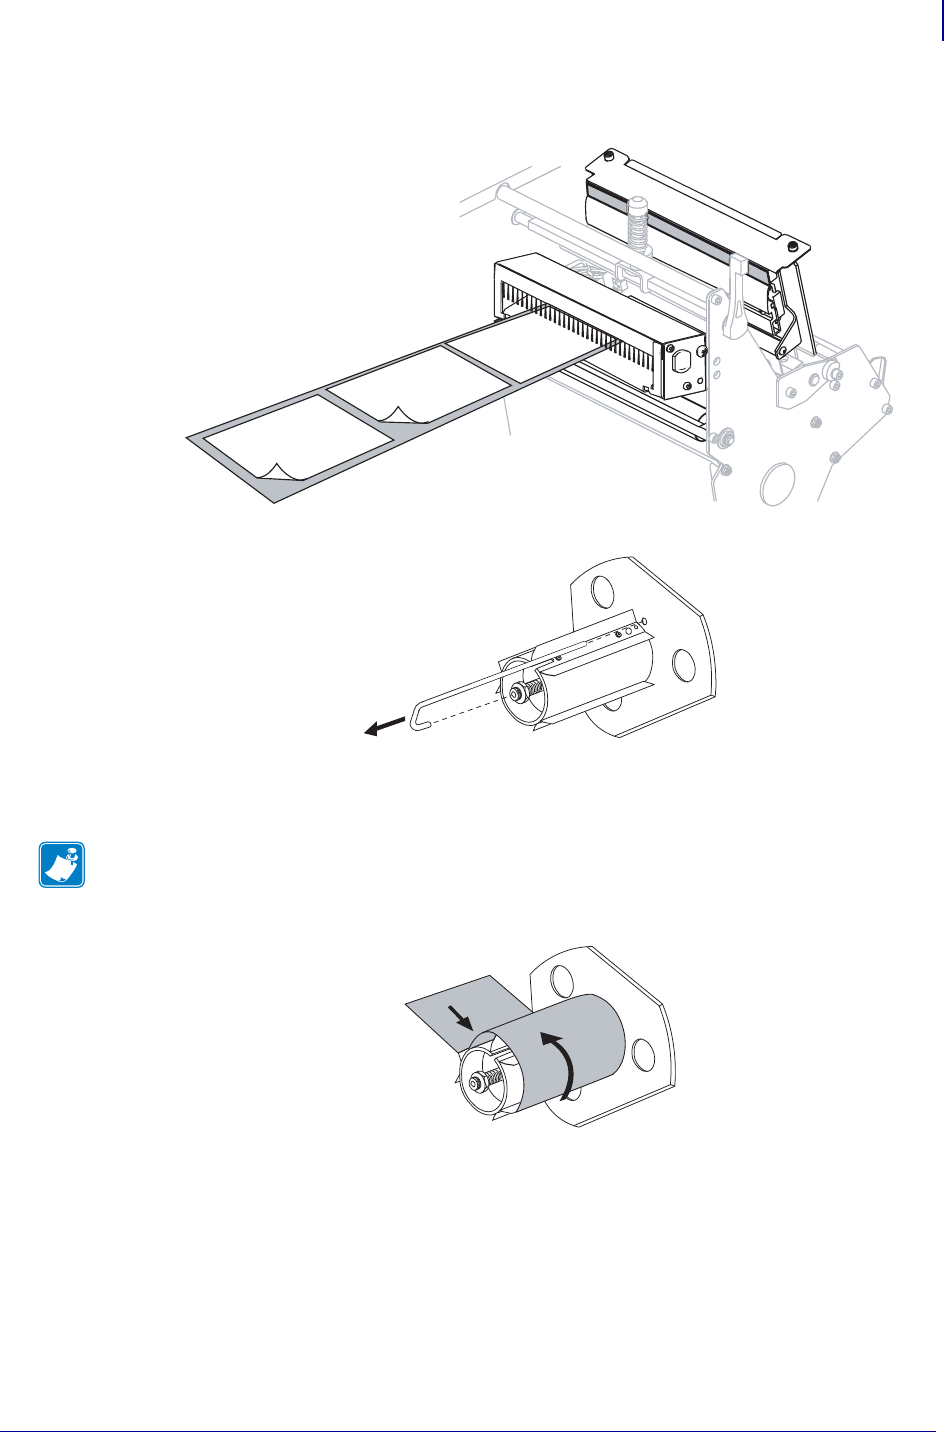
13. Extend approximately 36 in. (920 mm) of media out of the printer. Remove and discard
the labels from this exposed media.
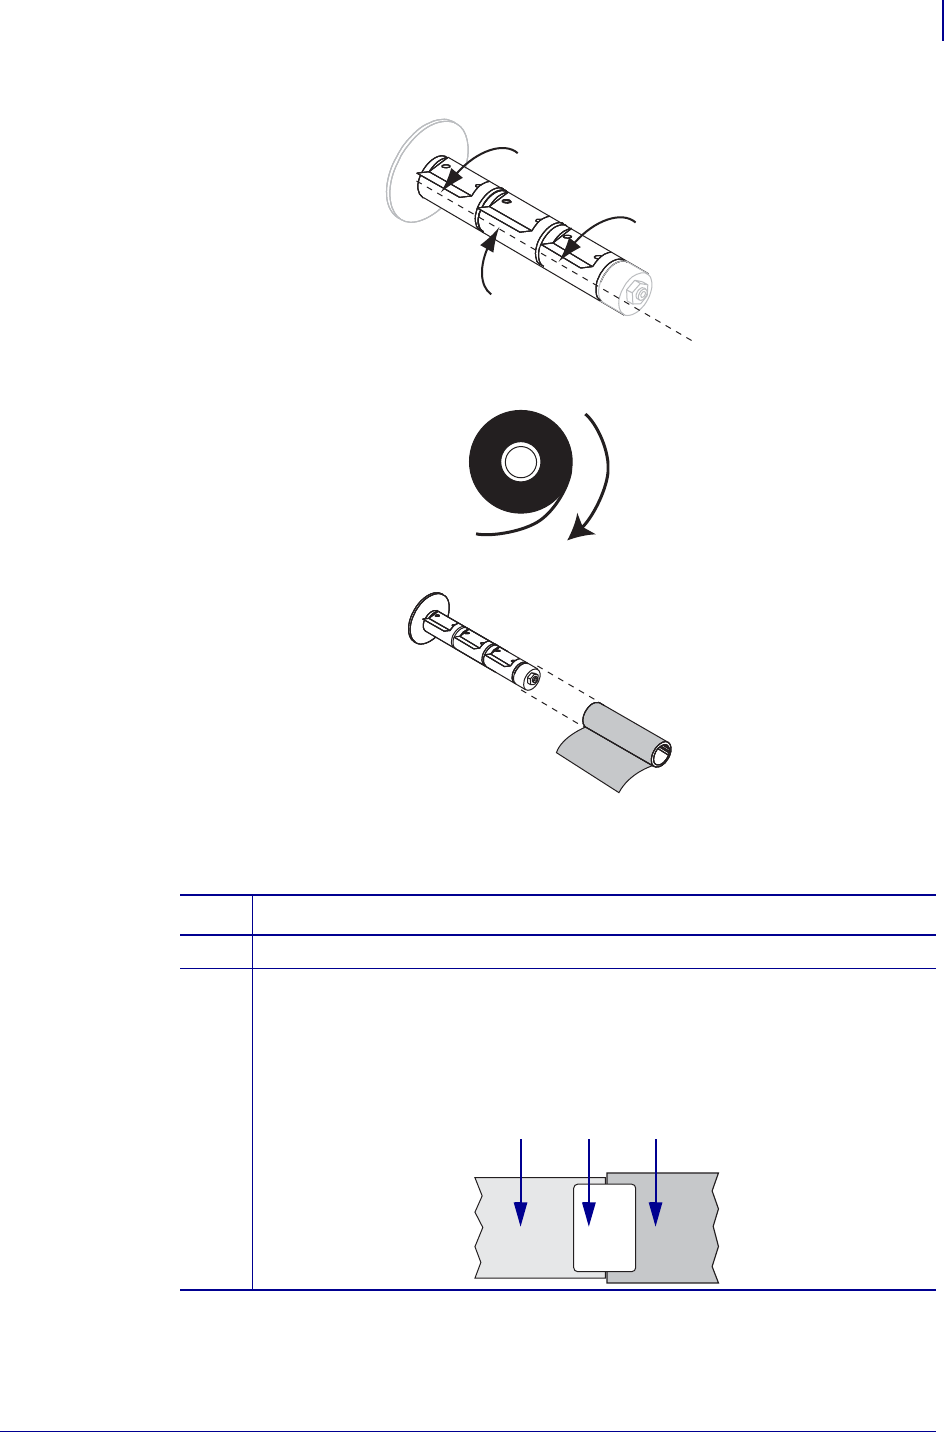
14. Remove the hook from the rewind spindle.
15. If you are using a core, slide it onto the rewind spindle until it is flush against the guide
plate.
16. Wind the media liner counterclockwise around the rewind spindle.
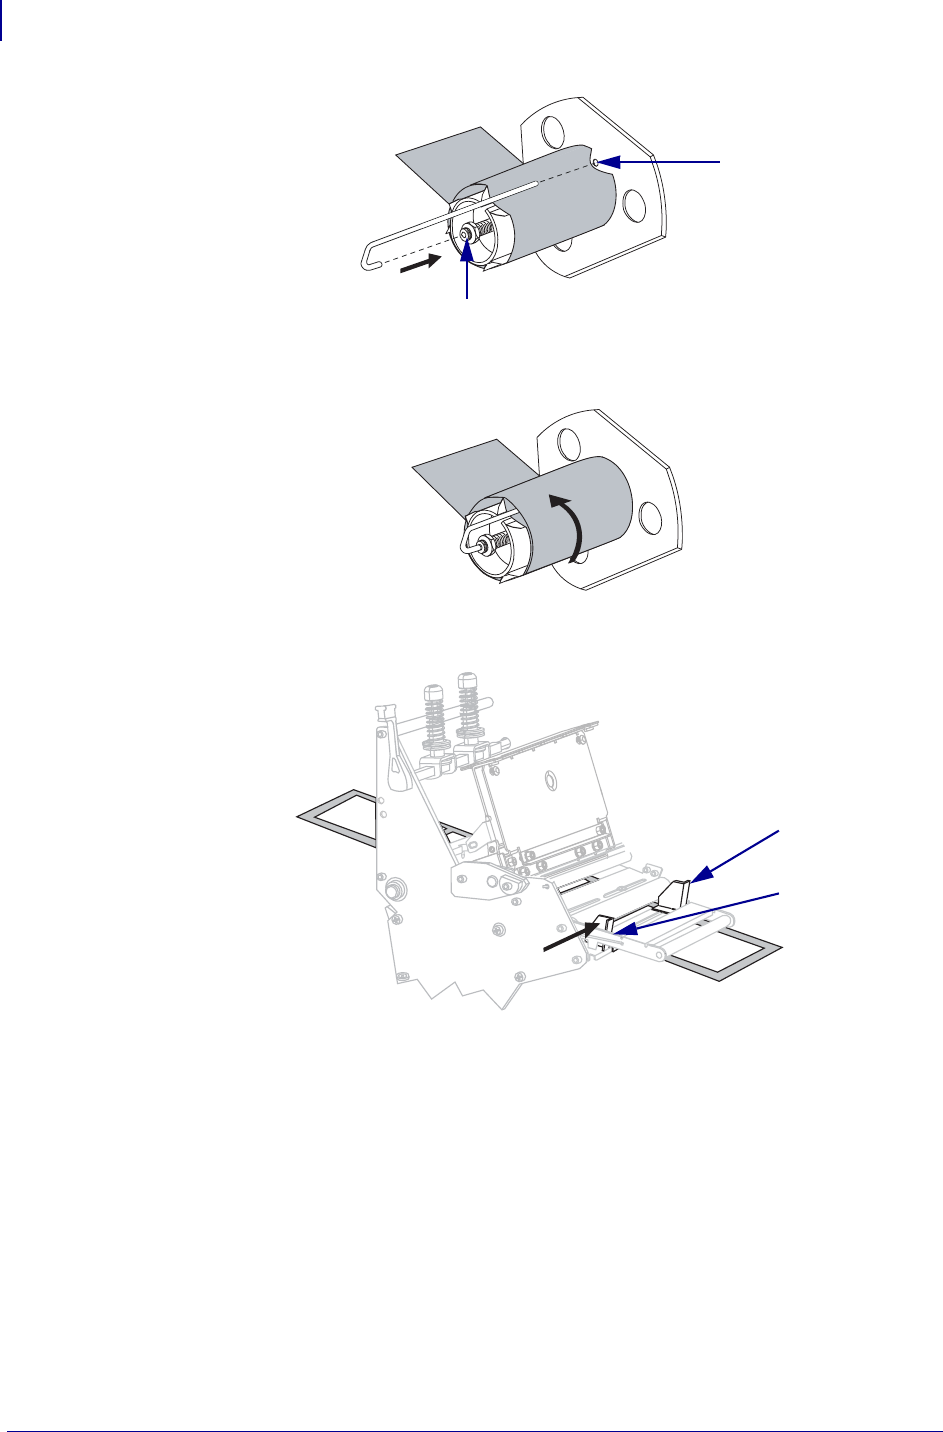
17. Reinstall the hook. Insert the short end of the hook into the hole in the center of the
adjusting nut (1). Insert the long end of the hook into the small hole on the guide plate (2).
Note • A core is not required.

Operations
Load Media in Rewind Mode
62
P1009874-001 Xi4 User Guide 2/23/09
18. Rotate the spindle counterclockwise several turns to wind the media liner over the hook
and remove any slack.
19. Align the media with the inner media guide (1). Slide in the outer media guide (2) until it
just touches the edge of the media.
2
1
1
2
63
Operations
Load Media in Rewind Mode
2/23/09 Xi4 User Guide P1009874-001
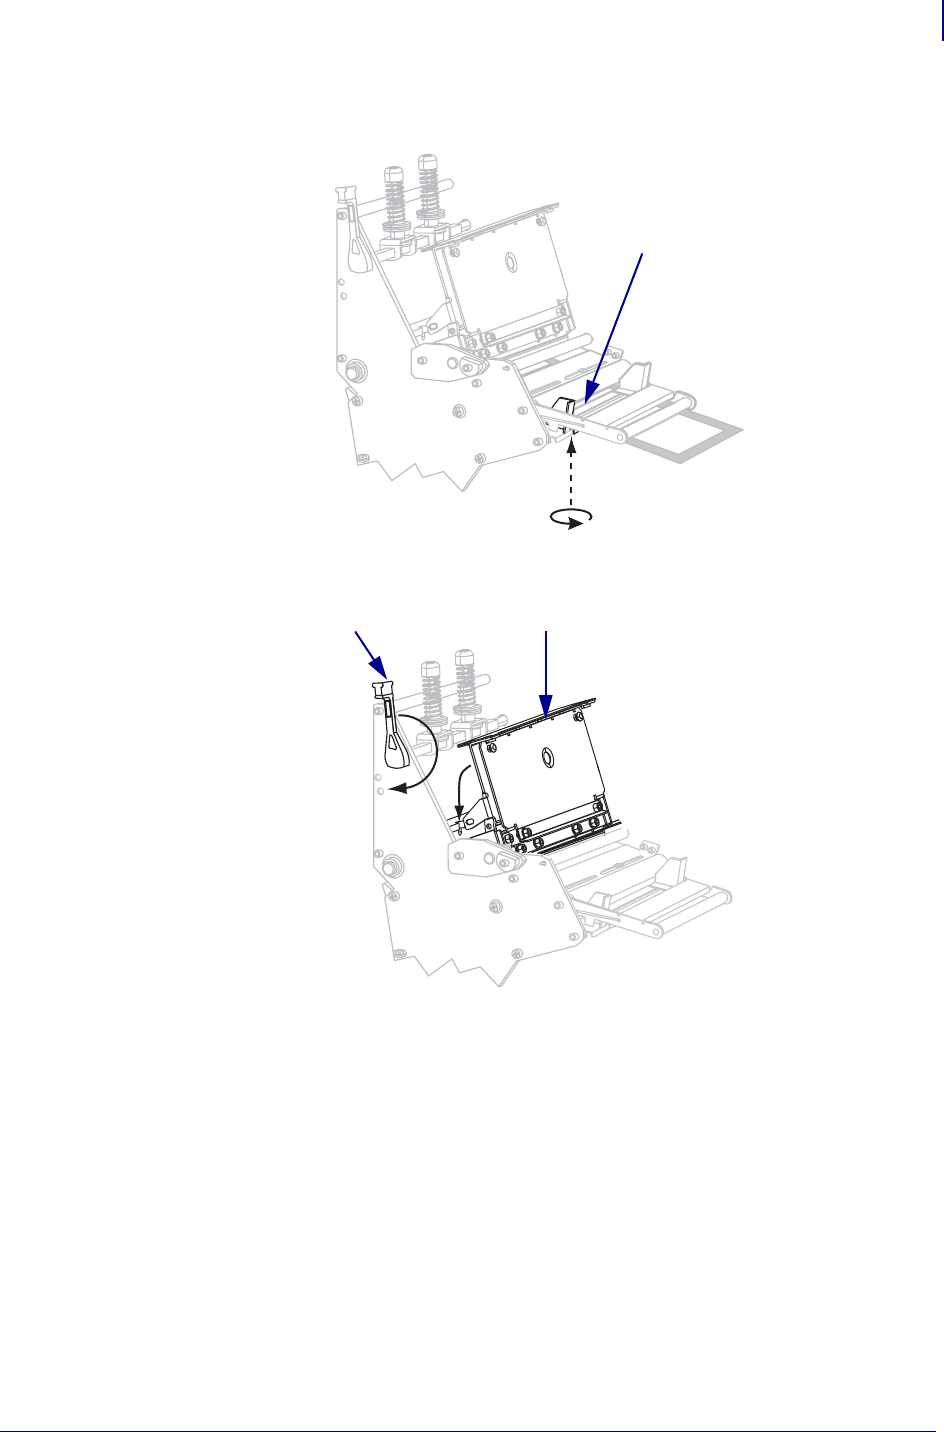
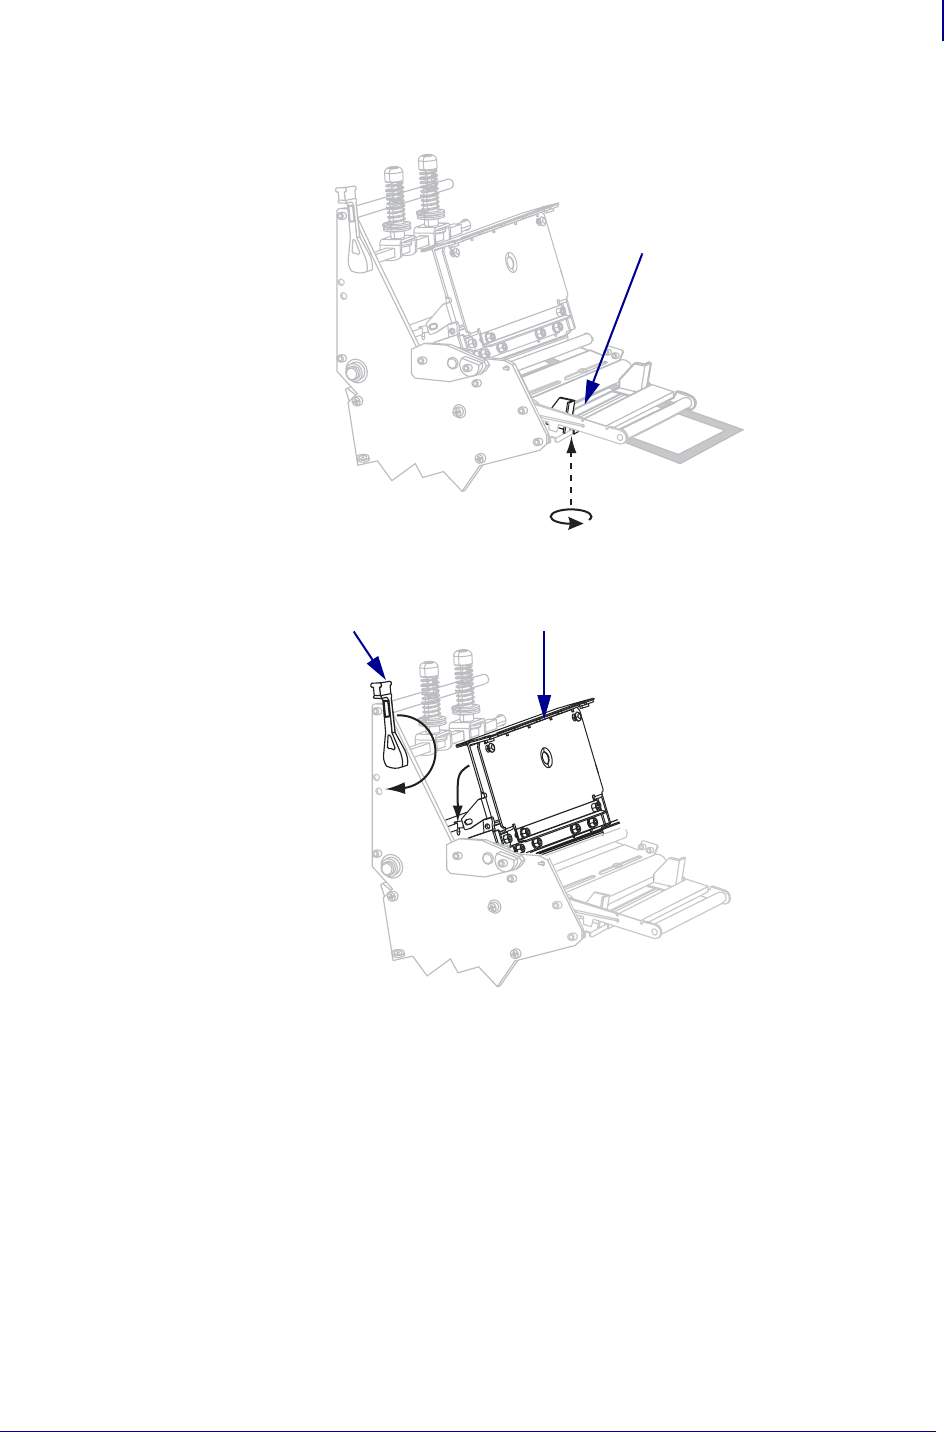
20. Tighten the thumb screw (not visible from this angle) that is located on the bottom of the
outer media guide (1).
21. Push down the printhead assembly (1), and then rotate the printhead-open lever (2)
clockwise until it locks into place.
The labels wind on the rewind spindle or core.
1
12
Operations
Load Media in Rewind Mode
64
P1009874-001 Xi4 User Guide 2/23/09
Remove Media Liner from the Rewind or Peel Spindle
Rewind mode and Peel-Off mode each use spindles to wind used media liner. Remove the
media liner from the spindle each time that you change labels.
To remove media liner from the rewind or peel spindle, complete these steps:
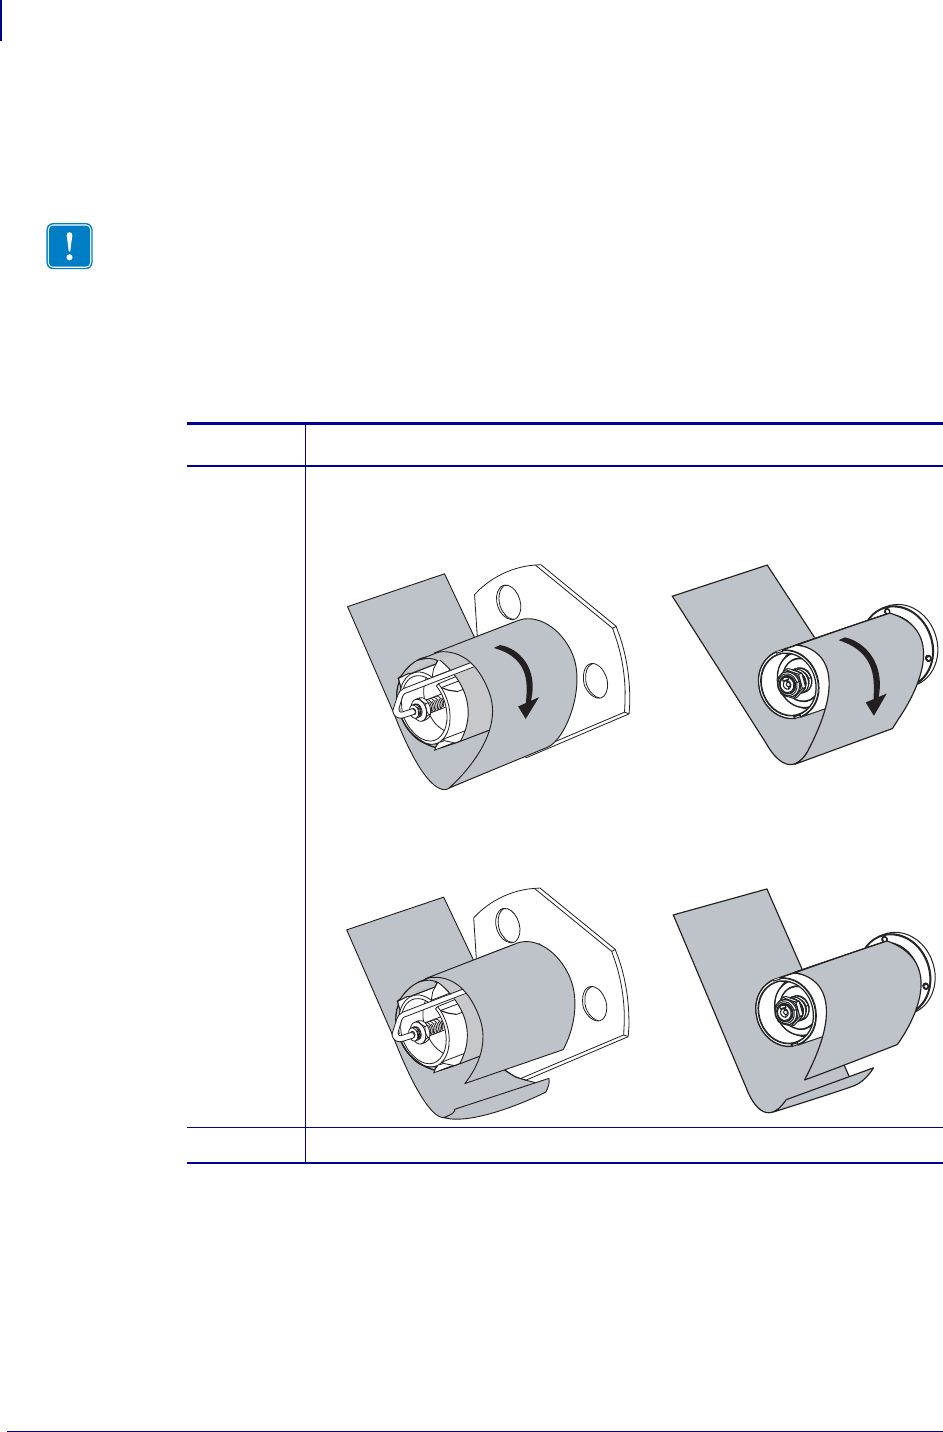
1. Has the media run out?
Important • It is not necessary to turn off the power to remove media liner from the spindle.
If power is turned off, all label formats and images, as well as any temporarily saved
parameter settings stored in the printer’s internal memory, are lost. When power is turned
back on, these items must be reloaded.
If... Then...
No a. Create slack in the media liner by rotating the spindle slightly
clockwise.
b. Cut or tear the media liner at the spindle.
Yes Continue with the next step.
Rewind Peel
Rewind Peel
65
Operations
Load Media in Rewind Mode
2/23/09 Xi4 User Guide P1009874-001
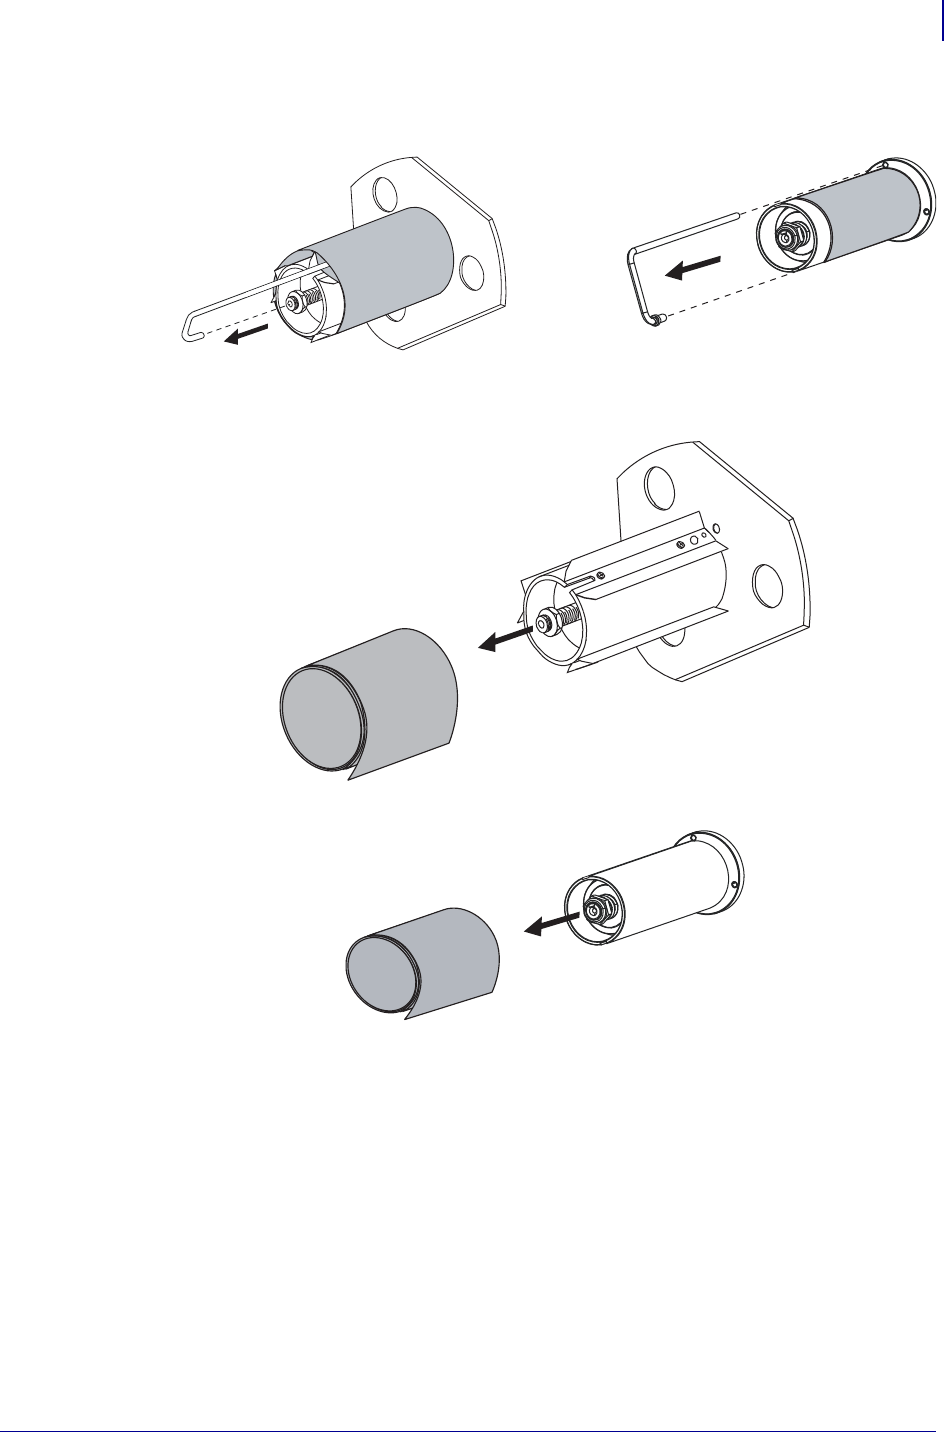
2. Pull out the spindle hook.
3. Slide the media liner off of the spindle and discard.
Rewind Peel
Rewind
Peel
Operations
Load Media in Rewind Mode (with Cutter Option)
66
P1009874-001 Xi4 User Guide 2/23/09
Load Media in Rewind Mode (with Cutter Option)
Some printers with the Cutter option can use Rewind mode to print and save a roll of labels
(Figure 10). This section shows how to load media for Rewind mode in printers that have a
Cutter option.
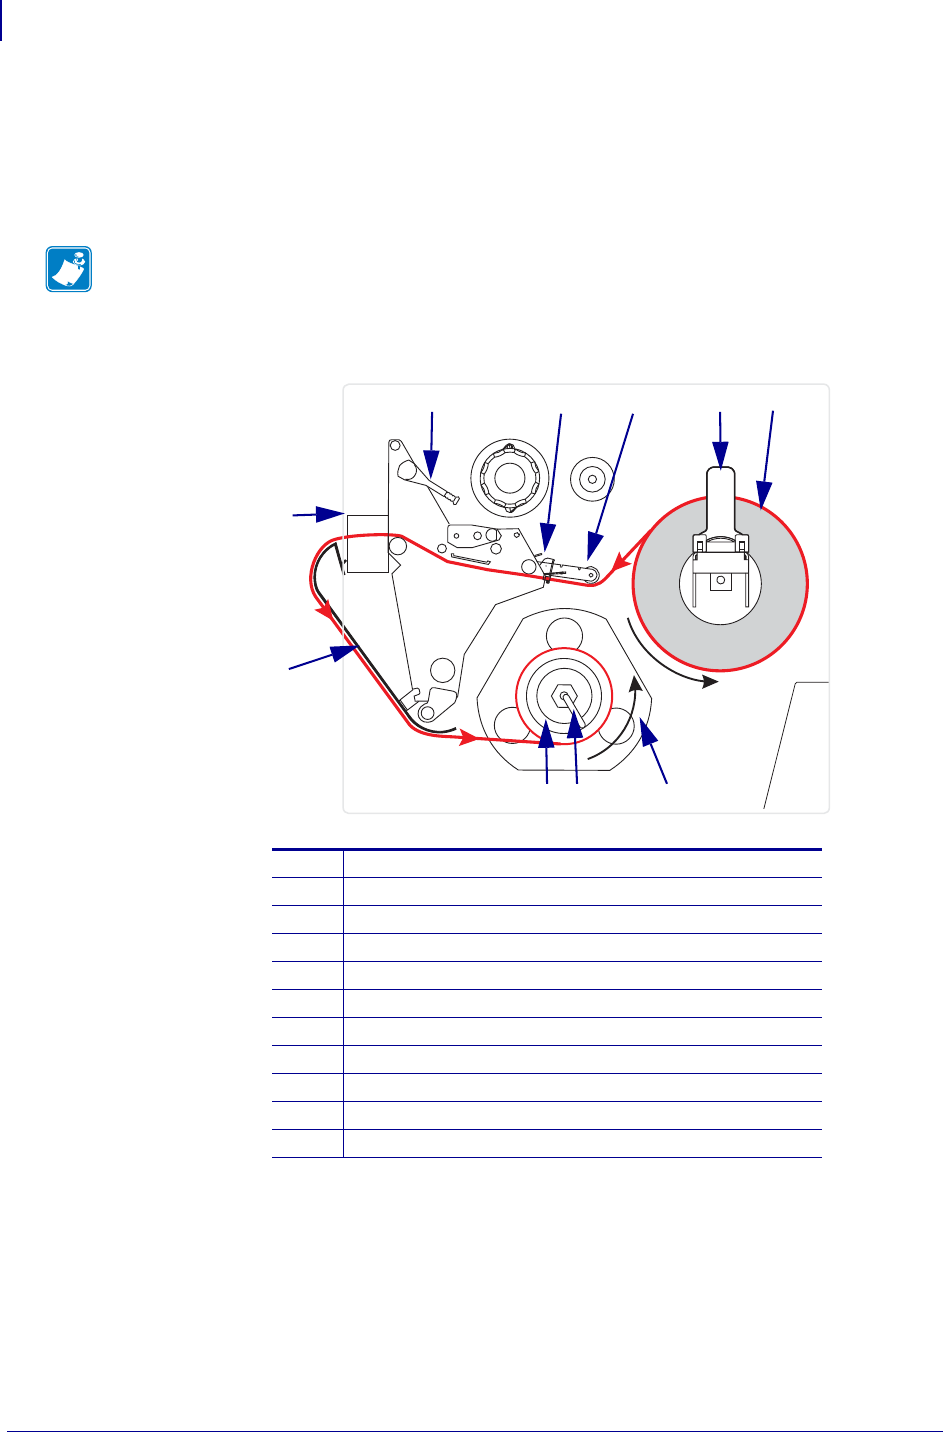
Figure 10 • Media Loaded in Rewind Mode with Cutter Option
Note • Rewind mode cannot be used with the Cutter option on 110Xi4 printers.
1Printhead-open lever
2Media guide
3Media guide roller
4Media supply guide
5Labels
6Guide plate
7Spindle hook
8Rewind spindle
9Rewind plate for Rewind mode with Cutter option*
10 Printed label
11 Cutter
* In new printers, remove the protective plastic covering from the rewind
plate before using.
12 4 5
8 7 6
9
10
3

67
Operations
Load Media in Rewind Mode (with Cutter Option)
2/23/09 Xi4 User Guide P1009874-001
To set up the Rewind mode for printers with the cutter option, complete
these steps:
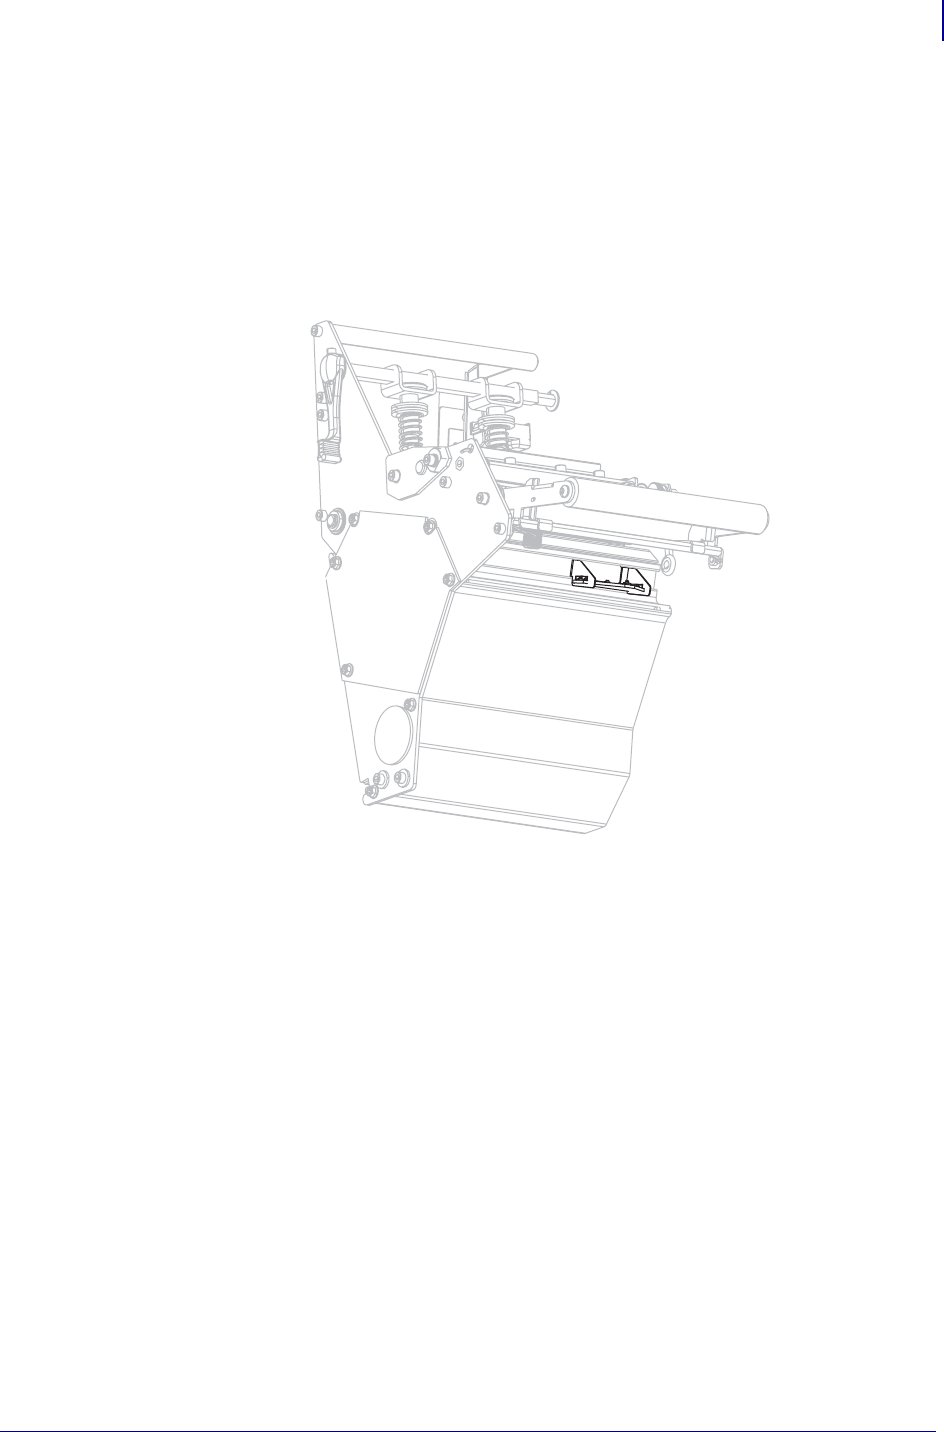
1. Remove the rewind plate from its storage location inside the printer.
2. Position the rewind plate so that the lip on the attached hook plate points down.
3. Insert the hook plate lip 1/2 in. (13 mm) into the lower slot in the side plate.
4. Slide in the rewind plate until it stops against the printer’s main frame.
Caution • While performing any tasks near an open printhead, remove all rings, watches,
hanging necklaces, identification badges, or other metallic objects that could touch the
printhead. You are not required to turn off the printer power when working near an open
printhead, but Zebra recommends it as a precaution. If you turn off the power, you will lose
all temporary settings, such as label formats, and you must reload them before you resume
printing.
1Slots on cutter
2Lower slot
3Rewind plate
4Lip
3
4
2
1
Operations
Load Media in Rewind Mode (with Cutter Option)
68
P1009874-001 Xi4 User Guide 2/23/09
5. Push the top edges of the rewind plate until the rewind plate snaps into place in the slots
on the cutter.
6. Set the printer to Rewind mode. See Select Print Mode on page 101 for instructions.
7. Insert media into the printer. See Prepare the Media for Loading on page 37 for
instructions.
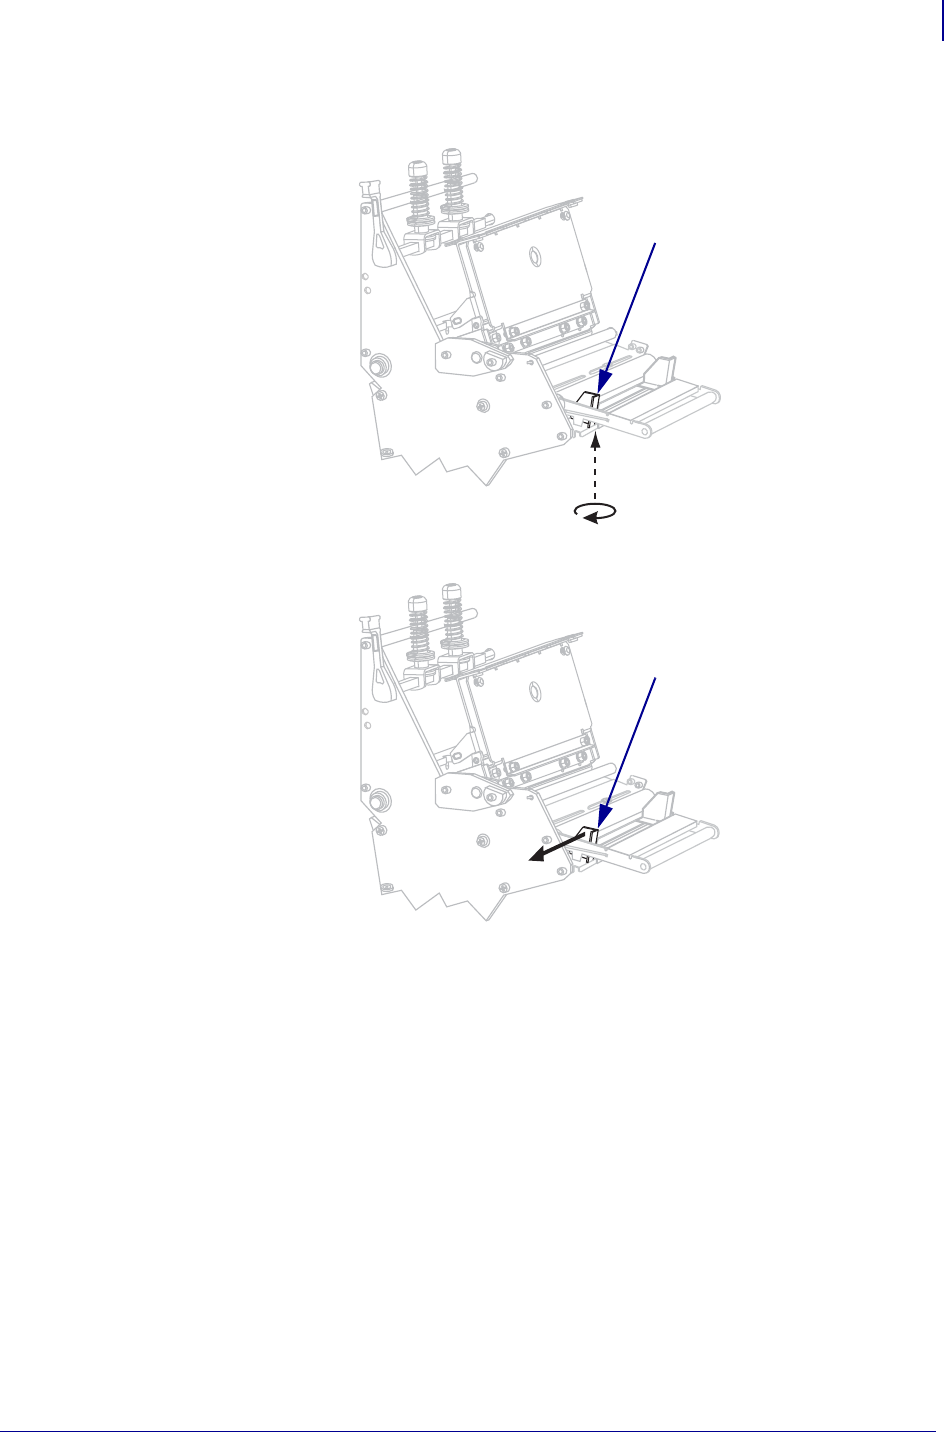
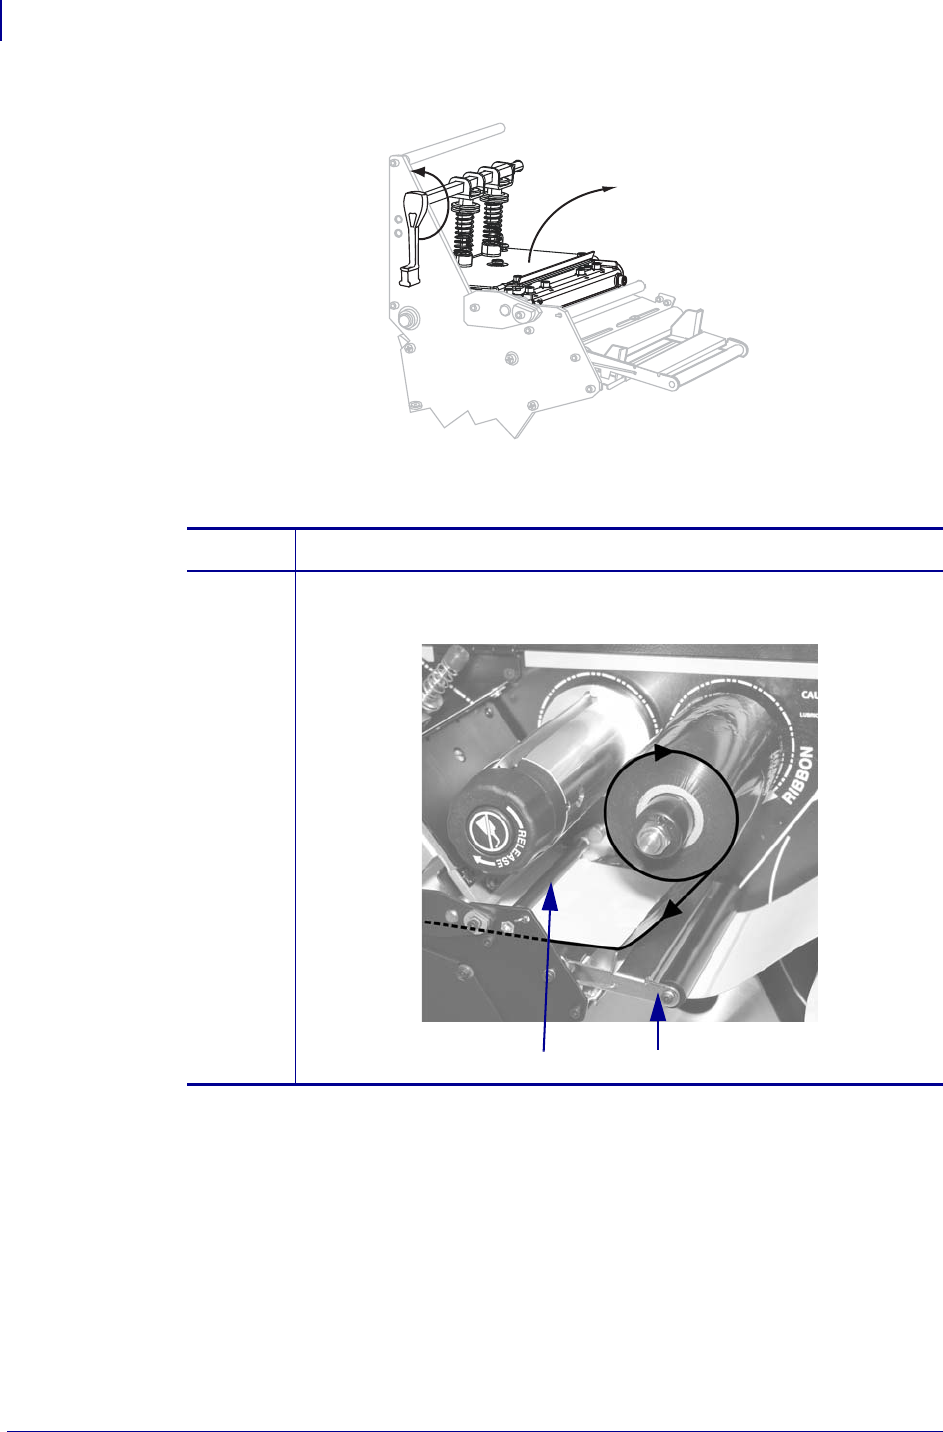
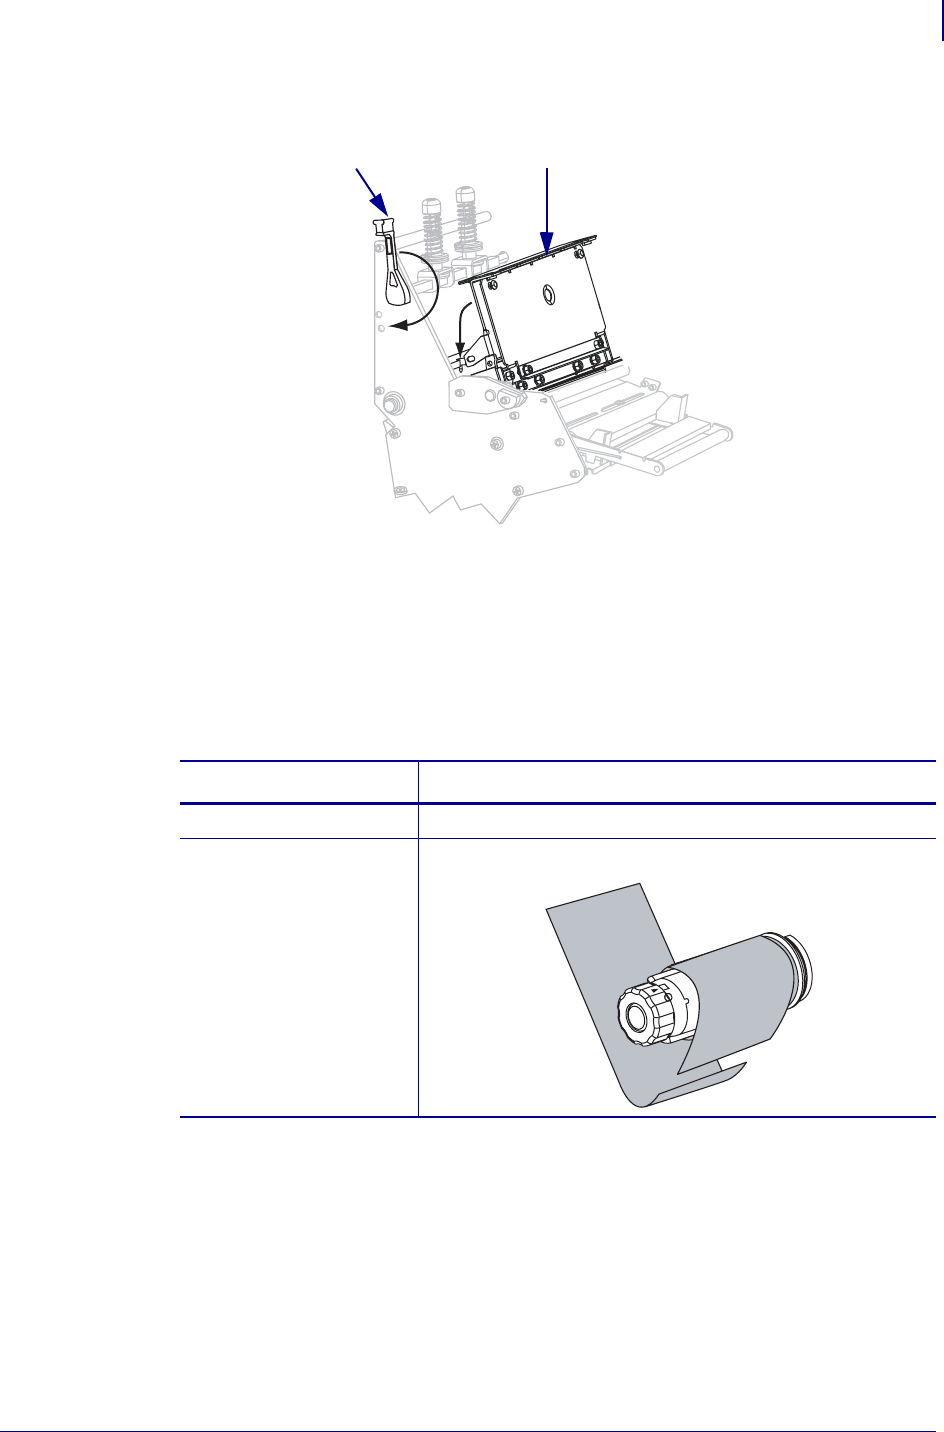
8. Open the printhead assembly by rotating the printhead-open lever (1) counter-clockwise.
1
69
Operations
Load Media in Rewind Mode (with Cutter Option)
2/23/09 Xi4 User Guide P1009874-001
9. Loosen the thumb screw (not visible from this angle) that is located on the bottom of the
outer media guide (1).
10. Slide the outer media guide (1) all the way out.
1
1
Operations
Load Media in Rewind Mode (with Cutter Option)
70
P1009874-001 Xi4 User Guide 2/23/09
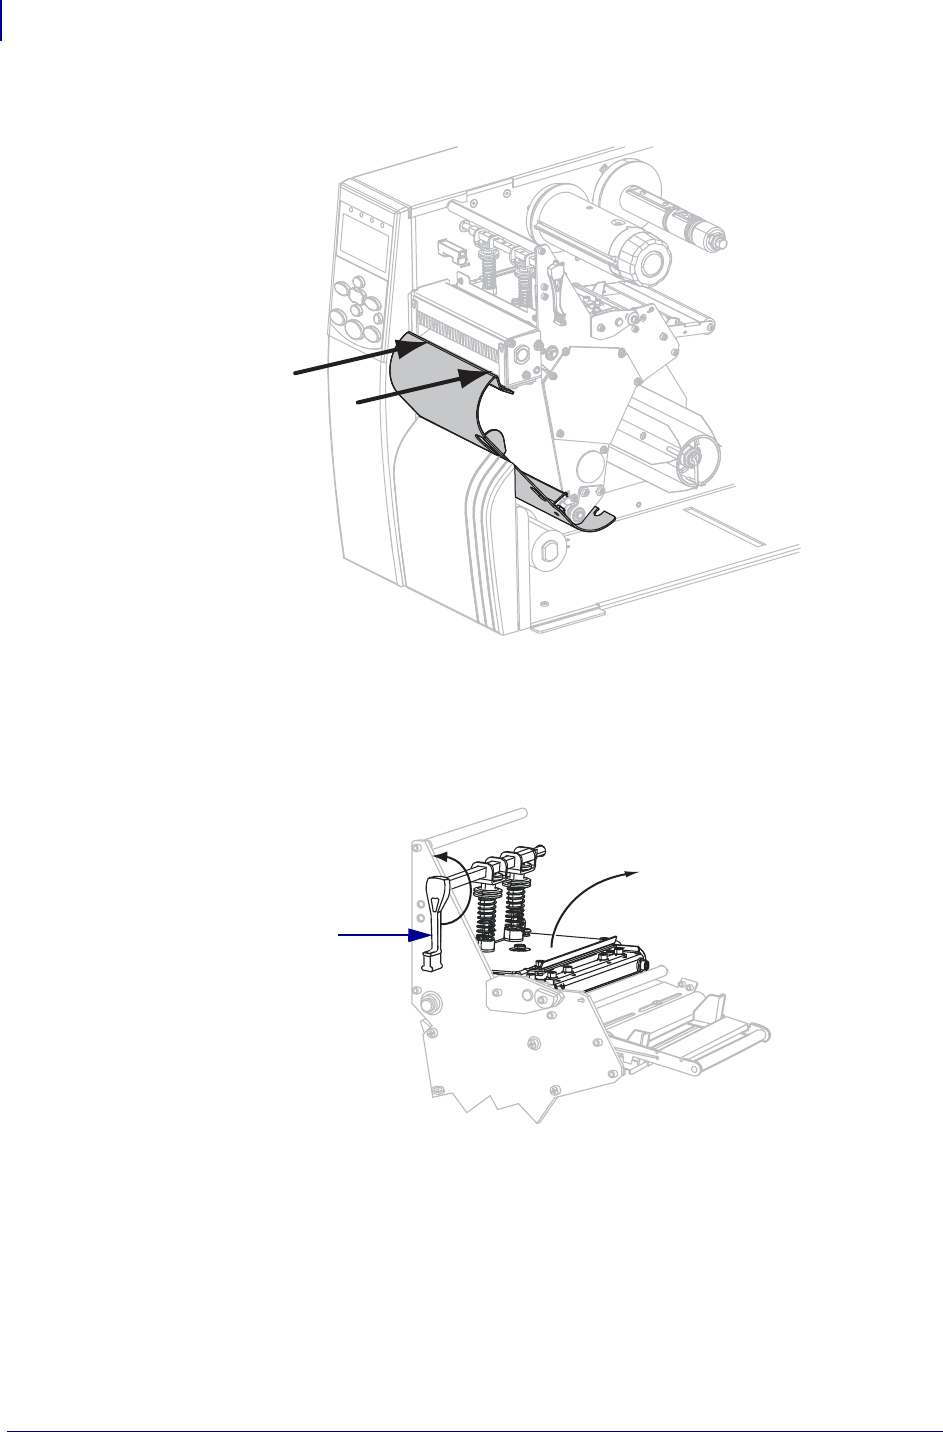
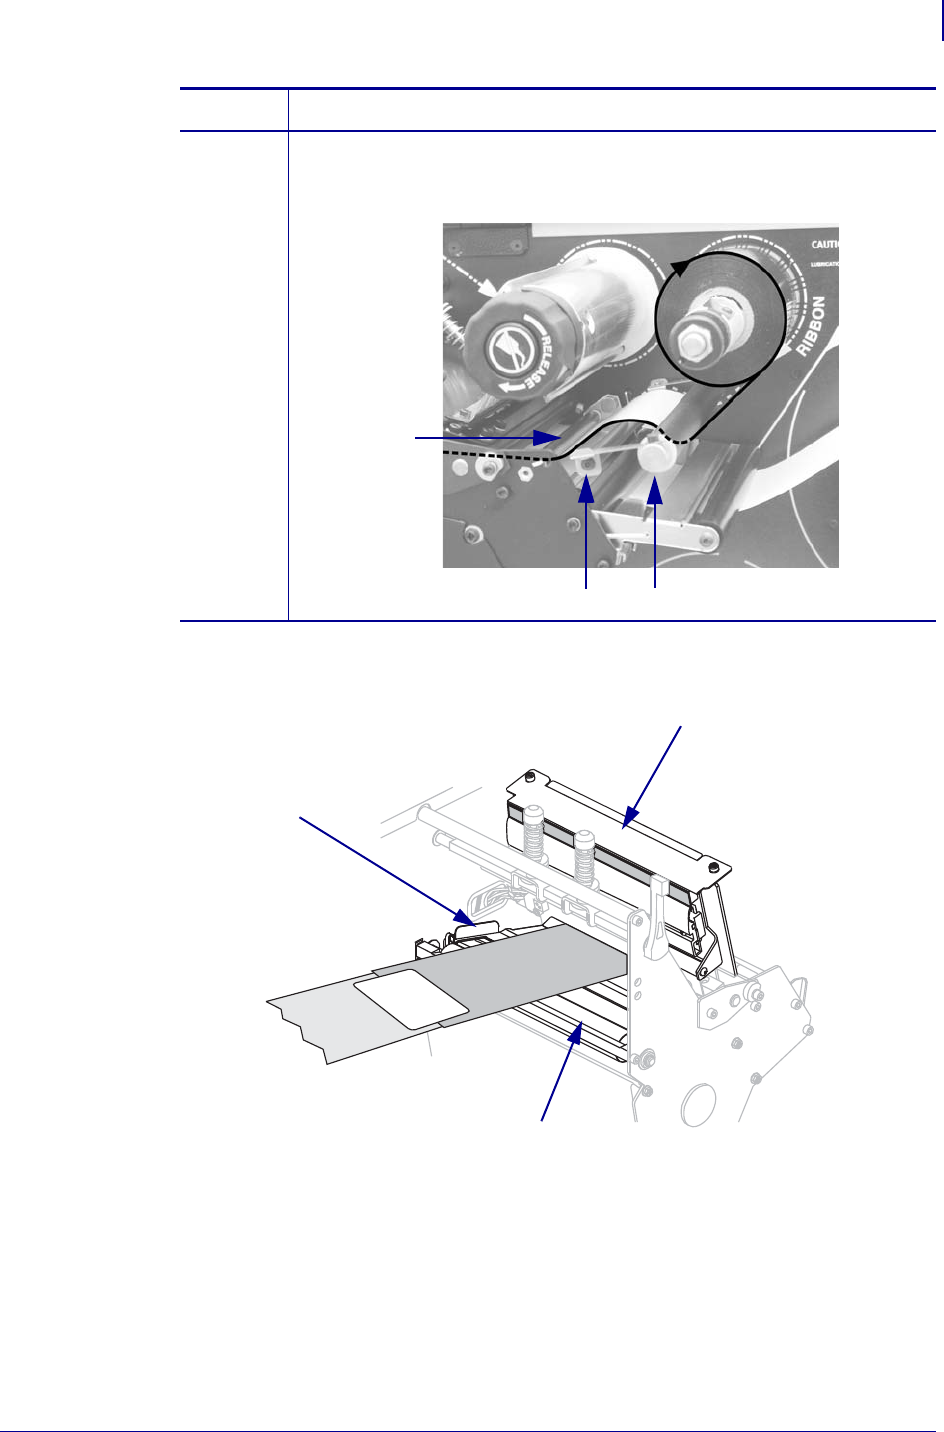
11. If your printer includes a media dancer assembly (1), thread the media under the media
dancer assembly roller. For all printers, thread the media under the media guide roller (2)
and then the upper media sensor (3).
12.
Important • Make sure that you thread the media under these components. If you thread
the media over the them, the media obstructs the ribbon sensor and causes a false
RIBBON OUT error.
2
3
1
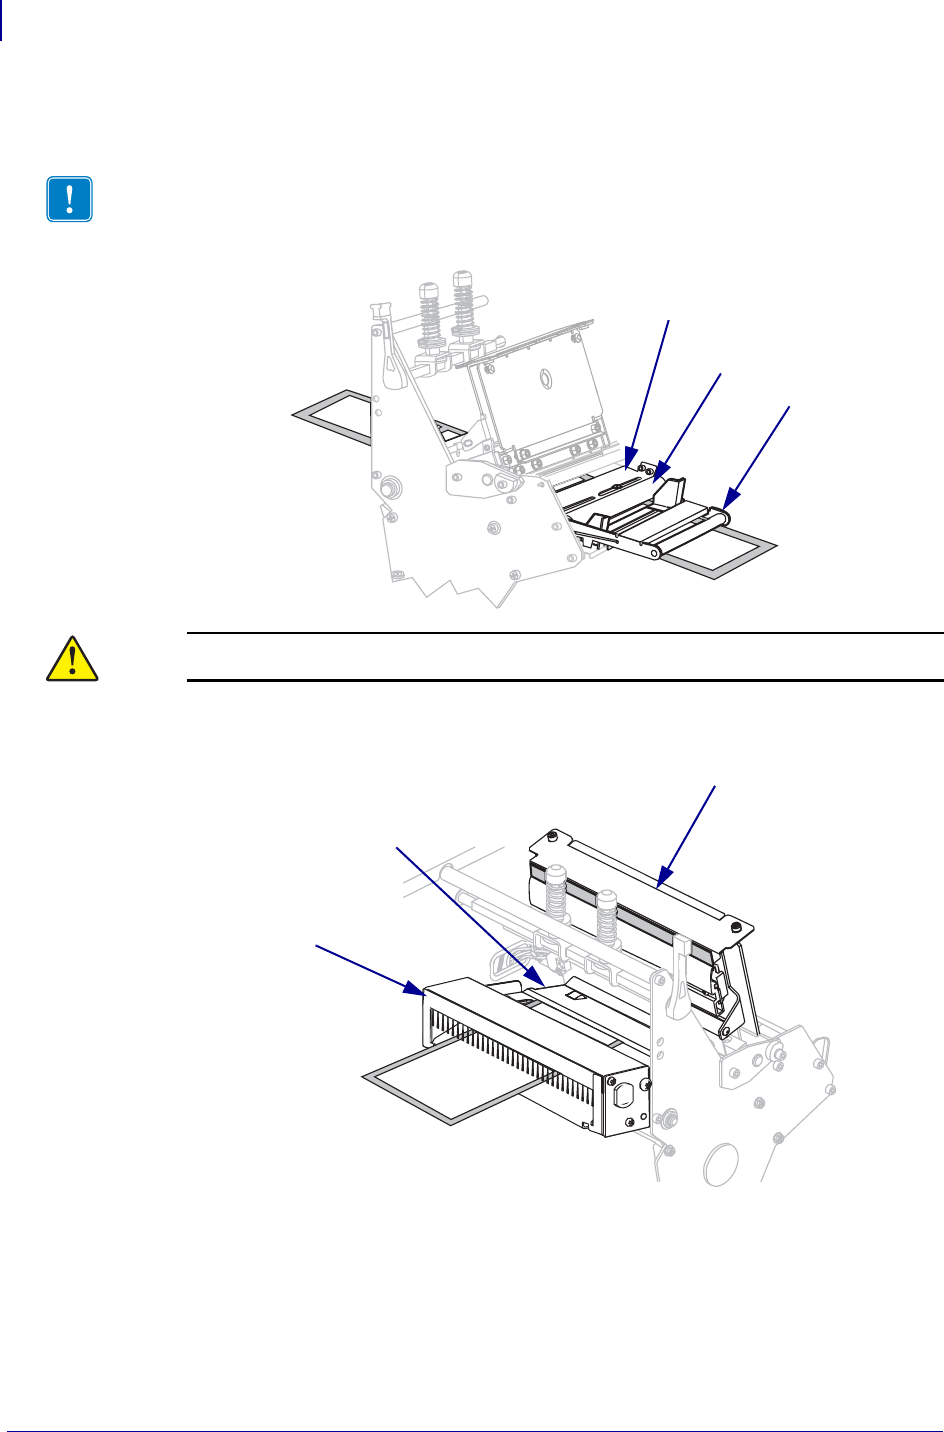
Caution • The cutter blade is sharp. Do not touch or rub the blade with your fingers.
Thread the media forward until it passes under the printhead assembly (1), under the
snap plate (2), and through the cutter assembly (3).
1
2
3
71
Operations
Load Media in Rewind Mode (with Cutter Option)
2/23/09 Xi4 User Guide P1009874-001
13. Extend approximately 36 in. (920 mm) of media out of the printer. Remove and discard
the labels from this exposed media.
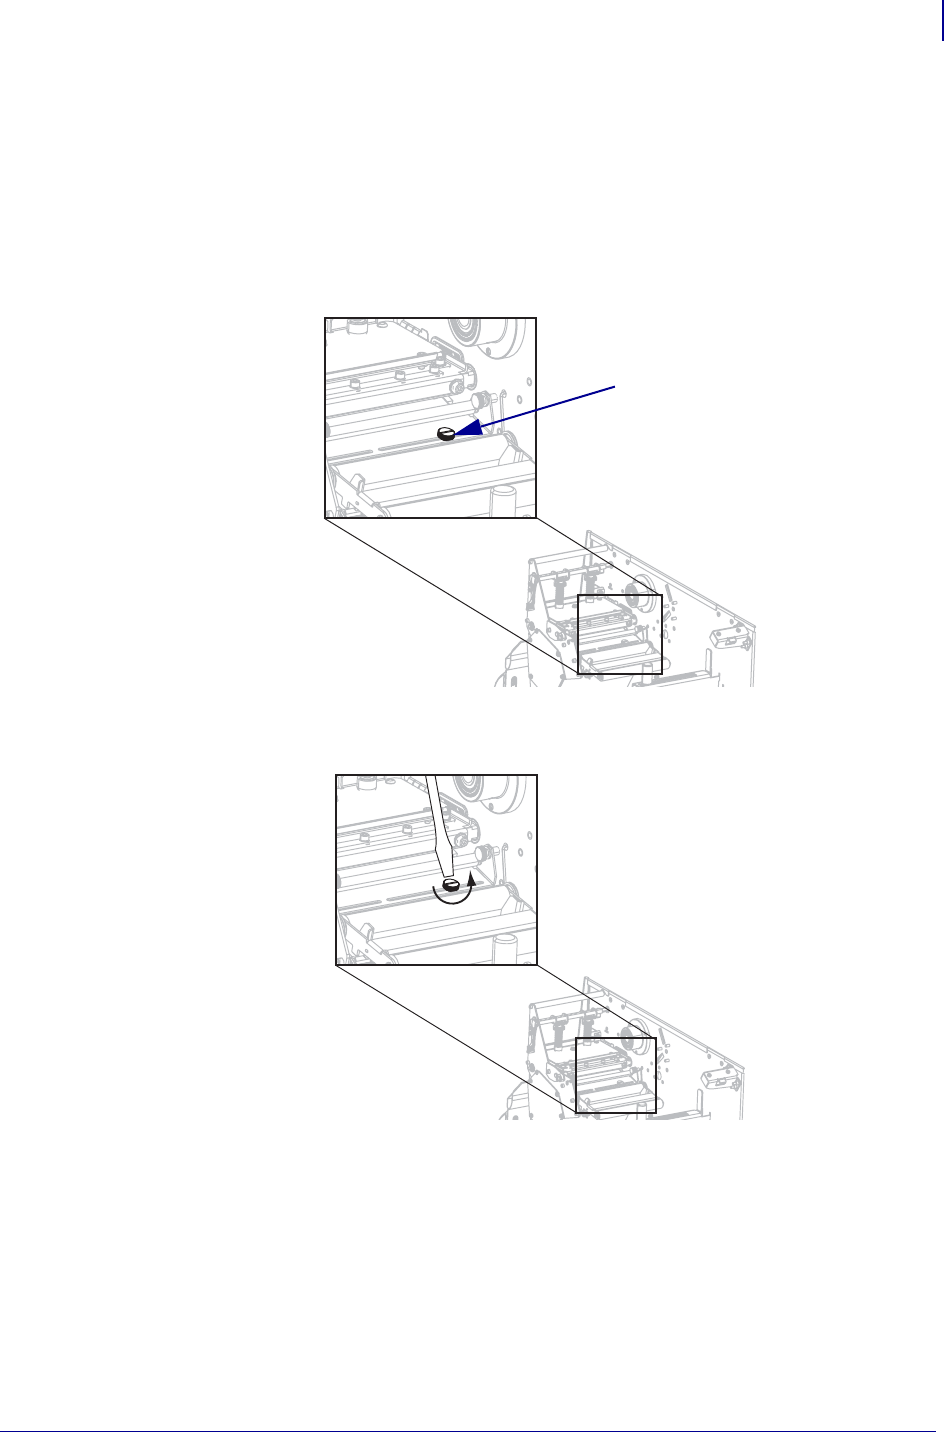
14. Remove the hook from the rewind spindle.
15. If you are using a core, slide it onto the rewind spindle until it is flush against the guide
plate.
16. Wind the media liner counterclockwise around the rewind spindle.
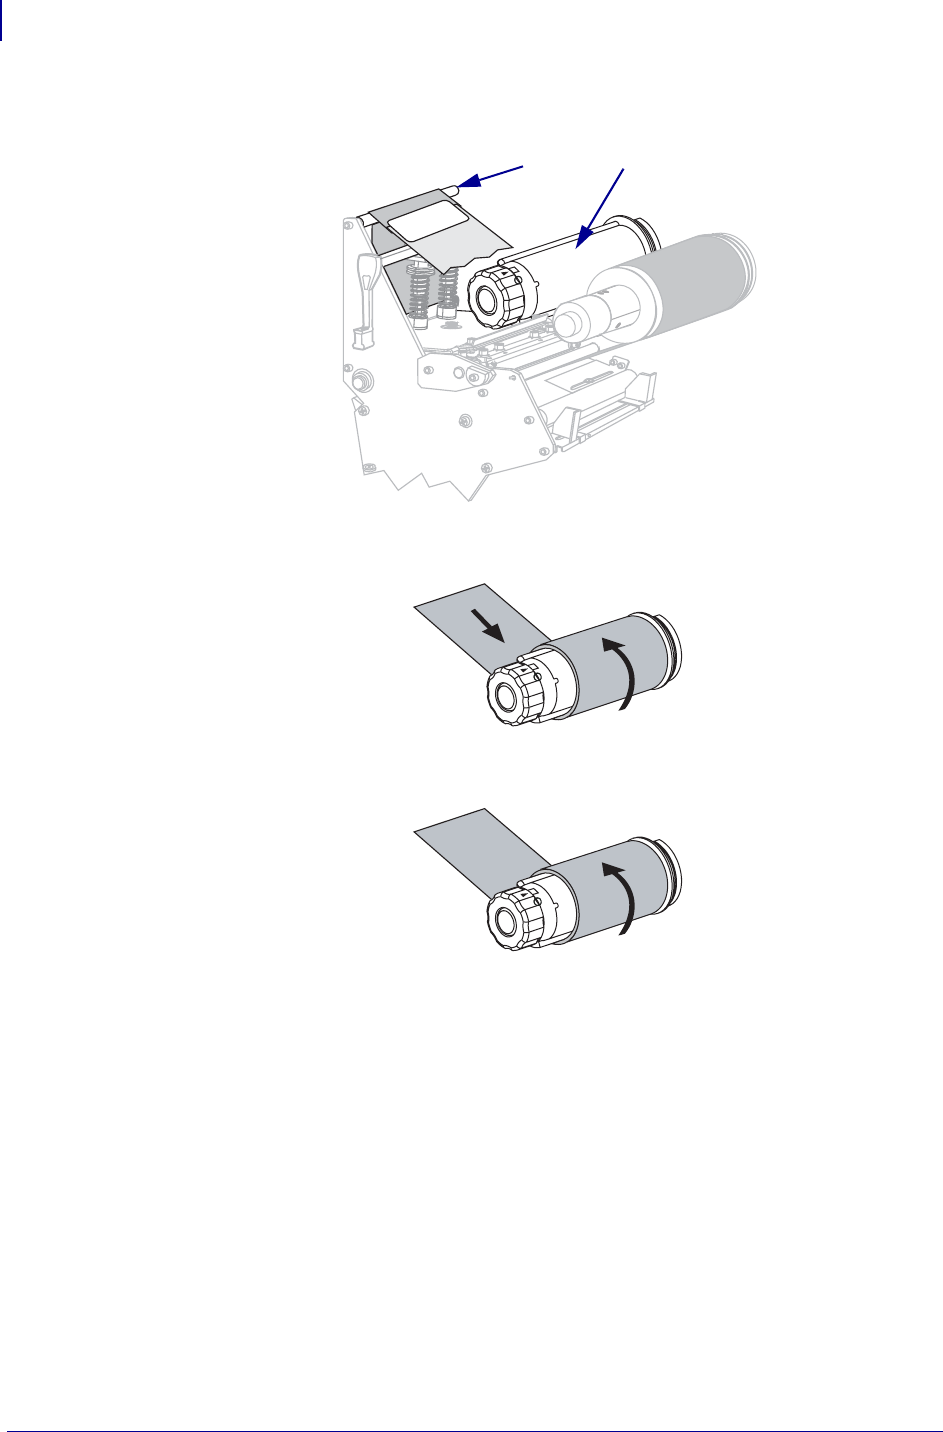
17. Reinstall the hook. Insert the short end of the hook into the hole in the center of the
adjusting nut (1). Insert the long end of the hook into the small hole on the guide plate (2).
Note • A core is not required.
Operations
Load Media in Rewind Mode (with Cutter Option)
72
P1009874-001 Xi4 User Guide 2/23/09
18. Rotate the spindle counterclockwise several turns to wind the media liner over the hook
and remove any slack.
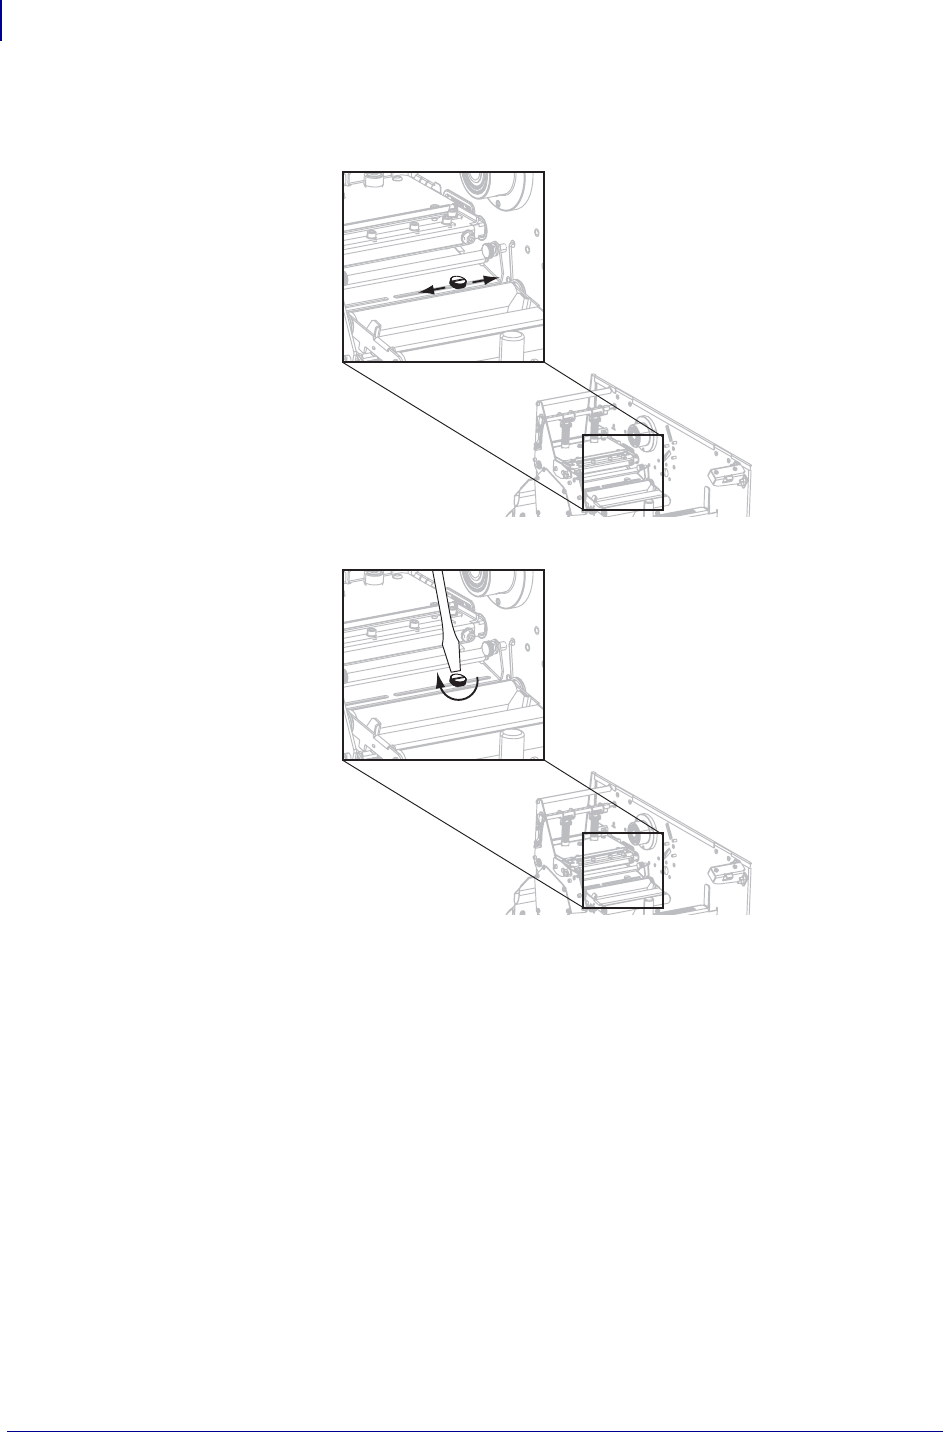
19. Align the media with the inner media guide (1). Slide in the outer media guide (2) until it
just touches the edge of the media.
2
1
1
2
73
Operations
Load Media in Rewind Mode (with Cutter Option)
2/23/09 Xi4 User Guide P1009874-001
20. Tighten the thumb screw (not visible from this angle) that is located on the bottom of the
outer media guide (1).
21. Push down the printhead assembly (1), and then rotate the printhead-open lever (2)
clockwise until it locks into place.
The labels wind on the rewind spindle or core.
22. For instructions for removing the labels from the rewind spindle, see Remove Media Liner
from the Rewind or Peel Spindle on page 64.
1
12
Operations
Load Ribbon
74
P1009874-001 Xi4 User Guide 2/23/09
Load Ribbon
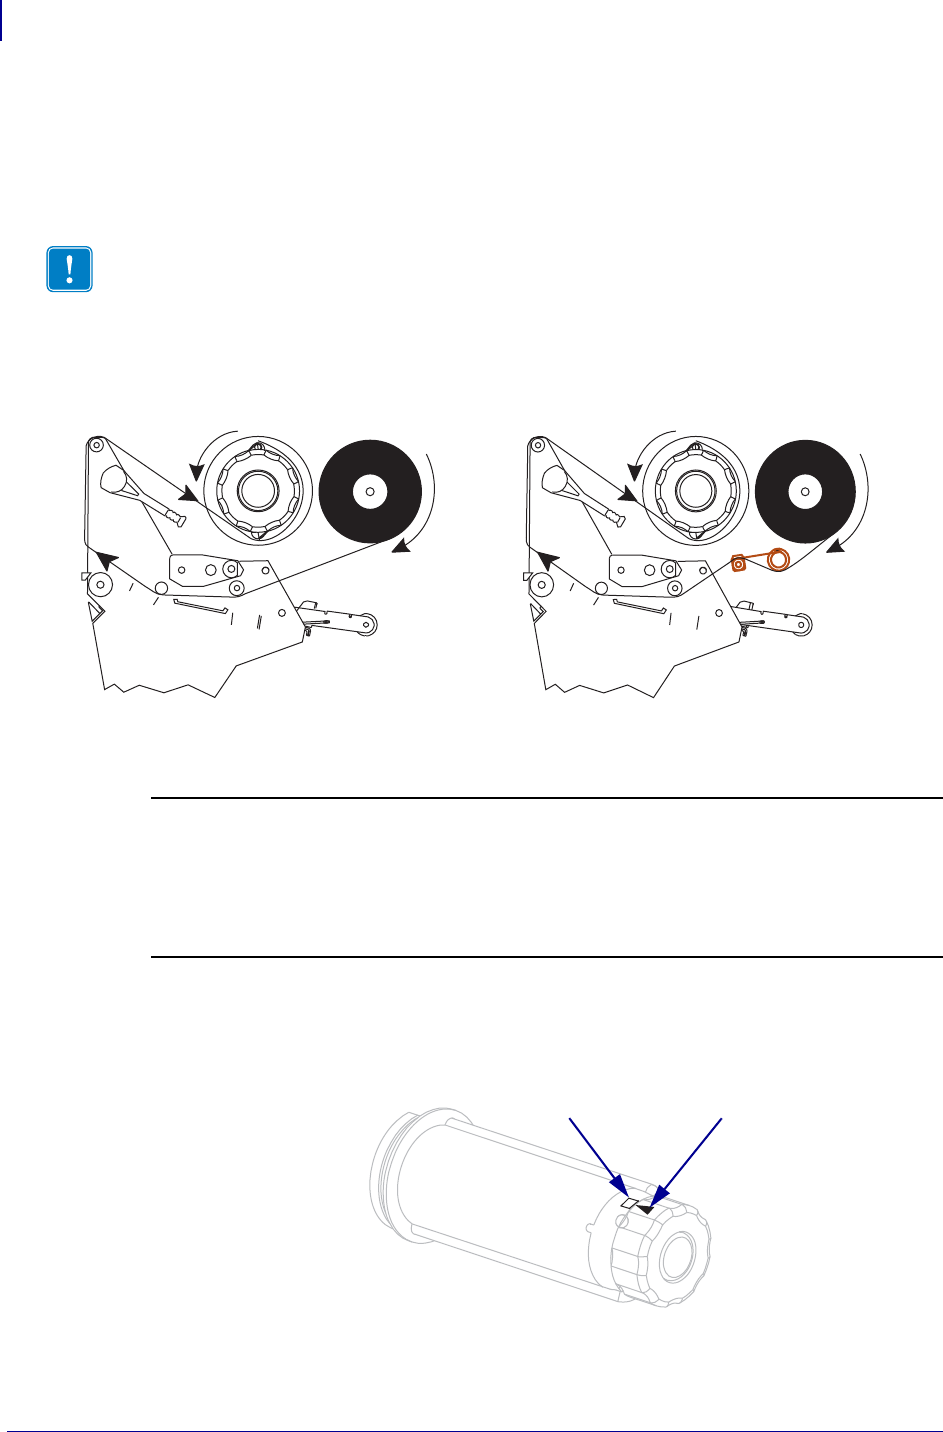
Use the instructions in this section to load ribbon for use with thermal transfer labels. For
direct thermal labels, do not load ribbon in the printer. The ribbon path is slightly different for
printers with ribbon dancers (Figure 11).
Figure 11 • Ribbon Path
To load ribbon, complete these steps:
1. Align the arrow (1) on the ribbon take-up spindle knob with the notch (2) in the ribbon
take-up spindle.
Important • Use ribbon that is wider than the media to protect the printhead from wear.
Ribbon must be coated on the outside.
Without Ribbon Dancer With Ribbon Dancer
Caution • While performing any tasks near an open printhead, remove all rings, watches,
hanging necklaces, identification badges, or other metallic objects that could touch the
printhead. You are not required to turn off the printer power when working near an open
printhead, but Zebra recommends it as a precaution. If you turn off the power, you will lose
all temporary settings, such as label formats, and you must reload them before you resume
printing.
12
75
Operations
Load Ribbon
2/23/09 Xi4 User Guide P1009874-001
2. Align the segments of the ribbon supply spindle.
3. Orient the ribbon with the loose end unrolling clockwise.
4. Place the roll of ribbon on the ribbon supply spindle. Push the roll back as far as it will go.
5. A ribbon leader makes ribbon loading and unloading easier. Does your roll of ribbon have
paper or something else attached to the end to serve as a ribbon leader?
If… Then…
Yes Continue with the next step.
No a. Tear off a strip of media (labels and liner) about 6–12 in. (150–305 mm)
long from the roll.
b. Peel a label from the media strip.
c. Use this label (1) to attach the end of the ribbon (2) to the media strip (3).
The media strip acts as a leader.
23 1
Operations
Load Ribbon
76
P1009874-001 Xi4 User Guide 2/23/09
6. Open the printhead assembly by rotating the printhead-open lever counter-clockwise.
7. Does your printer contain a ribbon dancer assembly? (See Figure 11 on page 74 for the
ribbon dancer location.)
If... Then...
No Thread the ribbon over the media dancer assembly (1) and under the
ribbon guide roller (2).
21
77
Operations
Load Ribbon
2/23/09 Xi4 User Guide P1009874-001
8. Push the ribbon leader forward until it passes under the printhead assembly (1), over the
snap plate (2), and then over the platen roller (3).
Yes a. Thread the ribbon through the ribbon dancer. The ribbon must go
under the upper roller (1) and then over the lower roller (2).
b. Thread the ribbon under the ribbon guide roller (3).
If... Then...
3
21
1
3
2
Operations
Load Ribbon
78
P1009874-001 Xi4 User Guide 2/23/09
9. Bring the ribbon leader over the upper ribbon roller (1) and then toward the ribbon take-up
spindle (2).
10. Wind the ribbon leader and attached ribbon counterclockwise around the ribbon take-up
spindle.
11. Rotate the spindle counterclockwise several turns to wind the ribbon and remove any
slack.
21
79
Operations
Load Ribbon
2/23/09 Xi4 User Guide P1009874-001
12. Push down the printhead assembly (1), and then rotate the printhead-open lever (2)
clockwise until it locks into place.
Remove Used Ribbon
Remove used ribbon from the ribbon take-up spindle each time you change the roll of ribbon.
To remove used ribbon, complete these steps:
1. Has the ribbon run out?
12
If the ribbon... Then
Ran out Continue with the next step.
Did not run out Cut or break the ribbon before the ribbon take-up spindle.
Operations
Load Ribbon
80
P1009874-001 Xi4 User Guide 2/23/09
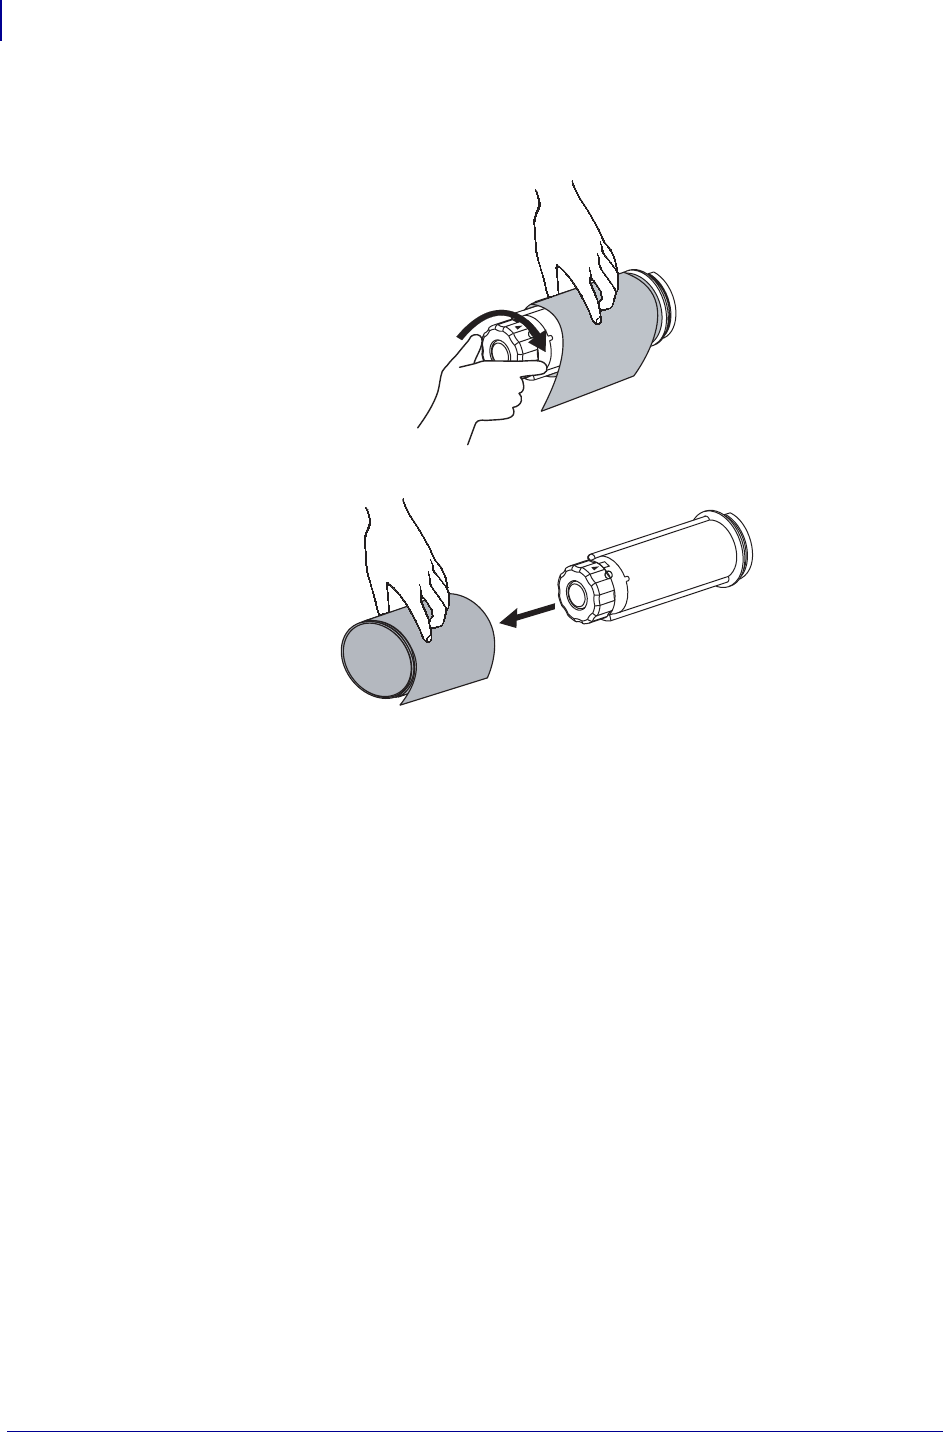
2. While holding the ribbon take-up spindle, turn the ribbon release knob clockwise until it
stops.
The ribbon release bars pivot down, easing the spindle’s grip on the used ribbon.
3. Slide the used ribbon off of the ribbon take-up spindle and discard.

81
Operations
Calibrate the Printer
2/23/09 Xi4 User Guide P1009874-001
Calibrate the Printer
Calibrate the printer when it is first put into service. Calibration allows the printer to establish
the proper settings for the specific media and ribbon used in your application. You may
calibrate the printer at other times as needed. Table 8 shows the different methods for
calibration.
Table 8 • Types of Calibration
Type of Calibration Description When/How It Occurs
Auto-calibration The printer automatically sets the
value it detects for the spaces between
labels.
Occurs at the following times:
• When the printer is first turned on if
CALIBRATION is selected for
MEDIA POWER UP (see Select
Media Power-Up Option
on page 113).
• When the printer feeds media after
the printhead is closed if
CALIBRATION is selected for
HEAD CLOSE (see Select Head
Close Option on page 114).
• As part of both the sensor profile
and media and ribbon sensor
calibration procedures.
Long (Standard)
Calibration The printer does the following:
• feeds media and ribbon
• sets the values it detects for media
length, media type (continuous or
non-continuous), and print mode
(thermal transfer or direct thermal)
• updates the sensor values
To perform a long calibration, do one
of the following:
• Press PAUSE on the control panel
to pause the printer, and then press
CALIBRATE.
• Select CALIBRATION for the
MEDIA POWER UP or HEAD
CLOSE parameter (see Select
Media Power-Up Option
on page 113 or Select Head Close
Option on page 114).
Short Calibration The printer calibrates using the
current sensor values rather than
detecting the spaces between labels
and resetting the sensors. This
calibration sequence uses fewer labels
than the long calibration sequence, but
it is less reliable because the values
that are stored in the sensors could be
incorrect.
Select SHORT CAL for the MEDIA
POWER UP or HEAD CLOSE
parameter (see Select Media
Power-Up Option on page 113 or
Select Head Close Option
on page 114.

Operations
Calibrate the Printer
82
P1009874-001 Xi4 User Guide 2/23/09
Sensor Profile
Calibration The printer auto-calibrates and prints
a media sensor profile. Select the SENSOR PROFILE
option on the control panel. See Print
Sensor Profile on page 108 for
instructions.
Media and Ribbon
Sensor Sensitivity
Calibration
One of the most common adjustments
to printer settings. The printer resets
the sensitivity of the sensors to detect
correctly the media and ribbon that
you are using. If you change the type
of ribbon and/or media, you might
need to reset the sensitivity of the
media and ribbon sensors. When the
sensors are at their new sensitivity, the
printer performs an auto-calibration.
Select the MEDIA AND RIBBON
CALIBRATE option on the control
panel. See Calibrate Media and
Ribbon Sensor Sensitivity on page 109
for instructions.
Table 8 • Types of Calibration (Continued)
Type of Calibration Description When/How It Occurs
83
Operations
Adjust Media Sensors
2/23/09 Xi4 User Guide P1009874-001
Adjust Media Sensors
The transmissive sensor consists of two sections: a light source (the lower media sensor) and a
light sensor (the upper media sensor). The media passes between the two.
Adjust these sensors only when the printer cannot detect the top of the label. The control panel
LCD displays ERROR CONDITION PAPER OUT, even though there are labels loaded in
the printer.
Upper Media Sensor—Inside Half of Media
To adjust the upper media sensor for the inside half of the media, complete
these steps:
1. Remove the ribbon (if ribbon is used).
2. Locate the upper media sensor adjustment screw (1). The upper media sensor eye is
directly below the adjustment screw head.
Note • For most models of Xi4, the upper media sensor can be positioned along the inside
half of the media (the side closest to the back frame of the printer) or the outside half of the
media (the side farthest from the back frame of the printer). However, for the 220Xi4, you
cannot move the sensors to the outside half of the media.
XX
YY
ZZ
1
Operations
Adjust Media Sensors
84
P1009874-001 Xi4 User Guide 2/23/09
3. Using a thin, flat-blade screwdriver, loosen the upper media sensor adjustment screw.
4. Slide the upper media sensor along the slot to the desired position (for non-continuous
media with a notch or hole in the media, the sensor must be directly above the notch or
hole).
5. Tighten the adjustment screw to secure the upper media sensor.
6. Adjust the lower media sensor to match the new position of the upper media sensor. See
Lower Media Sensor on page 87.
XX
YY
ZZ
XX
YY
ZZ
XX
YY
ZZ
85
Operations
Adjust Media Sensors
2/23/09 Xi4 User Guide P1009874-001
Upper Media Sensor—Outside Half of Media
To adjust the upper media sensor for the outside half of the media, complete
these steps (all models except the 220Xi4):
1. Remove the ribbon (if ribbon is used).
2. Locate the upper media sensor adjustment screw (1). The upper media sensor eye is
directly below the adjustment screw head.
3. Using a thin, flat-blade screwdriver, loosen and then remove the upper media sensor
adjustment screw.
4. Lift the upper media sensor assembly from the slot, and move it and the wire cover to the
outside slot. Carefully pull the wires through the cable tie. You may need to set aside the
sensor wire cover if the adjustment is too far to the outside.
5. Replace and slightly tighten the adjustment screw.
XX
YY
ZZ
1
XX
YY
ZZ
Operations
Adjust Media Sensors
86
P1009874-001 Xi4 User Guide 2/23/09
6. Slide the upper media sensor along the slot to the desired position (for non-continuous
media with a notch or hole in the media, the sensor must be directly above the notch or
hole).
7. Tighten the adjustment screw.
8. Make sure that the wires are routed back into the groove of the media sensor bracket.
9. Adjust the lower media sensor to match the new position of the upper media sensor. See
Lower Media Sensor on page 87.
XX
YY
ZZ
XX
YY
ZZ
87
Operations
Adjust Media Sensors
2/23/09 Xi4 User Guide P1009874-001
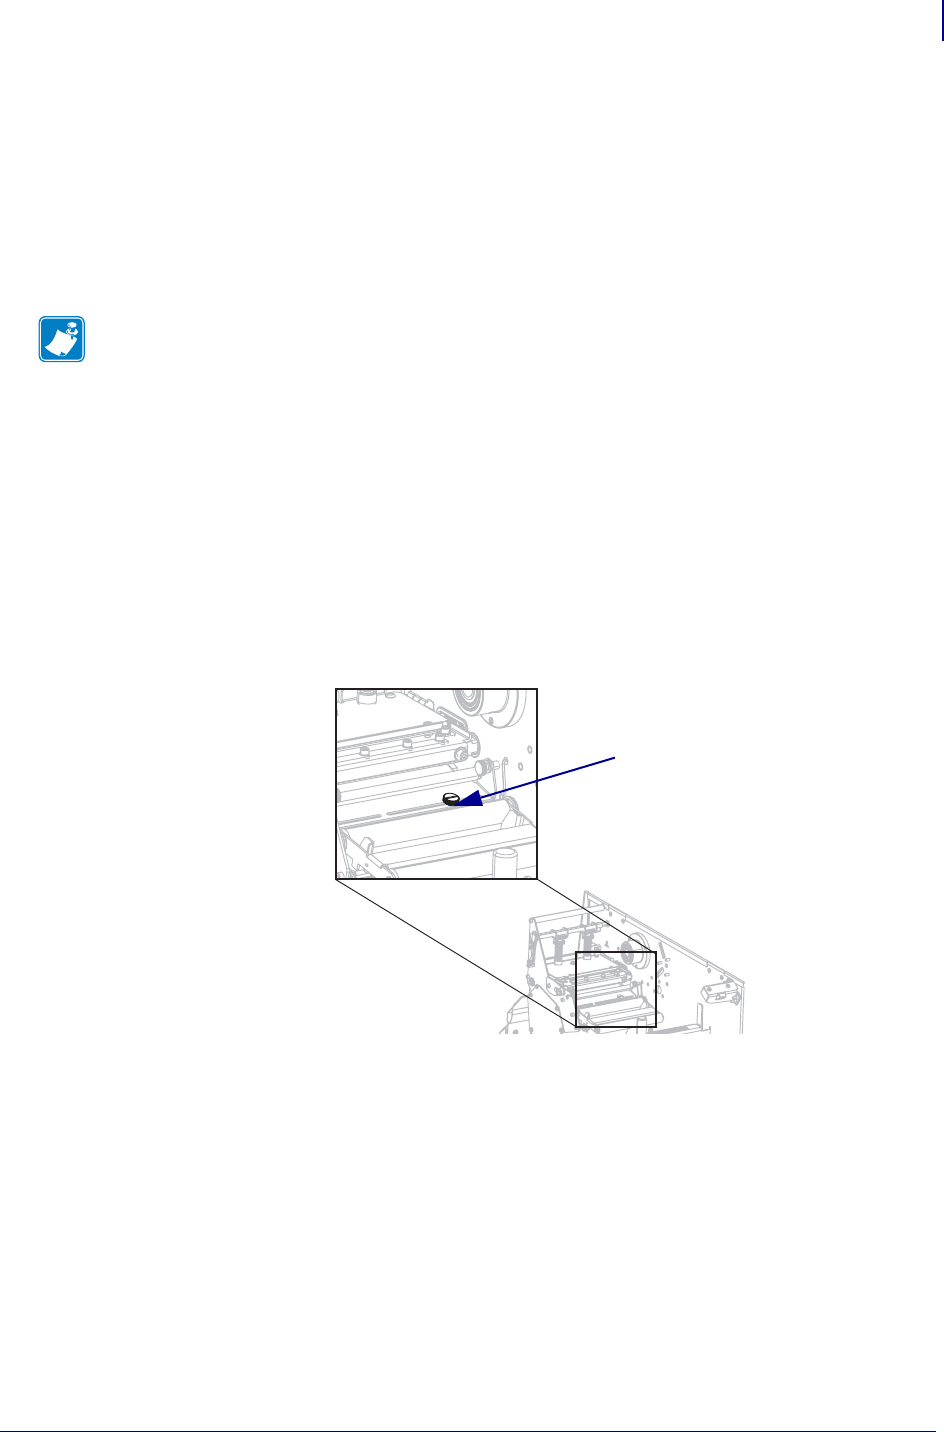
Lower Media Sensor
After you adjust the upper media sensor, adjust the lower media sensor to match its new
position.
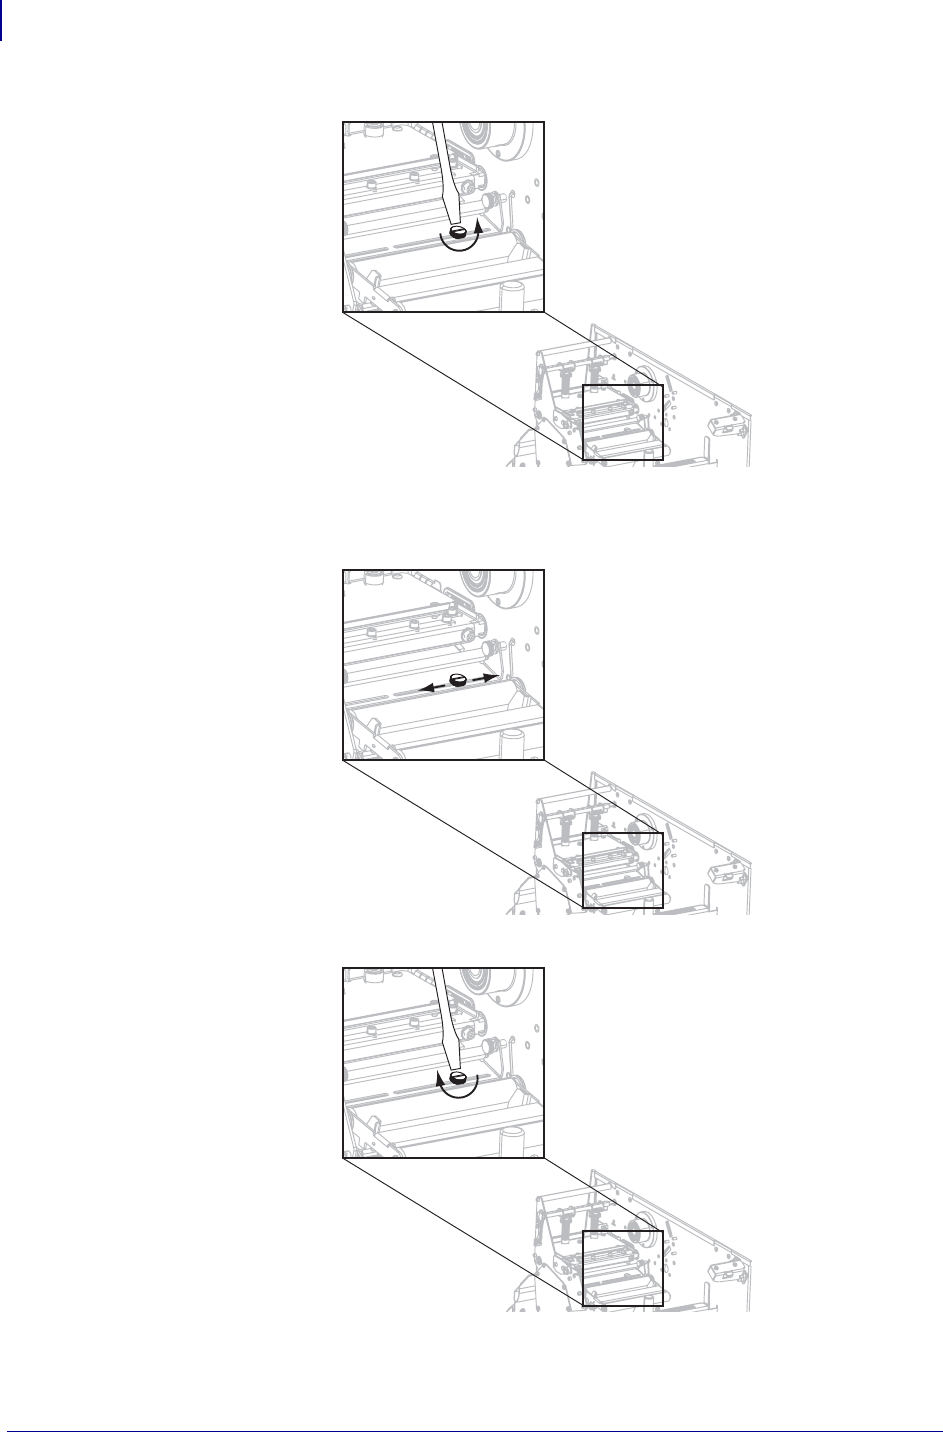
To adjust the lower media sensor, complete these steps:
1. Locate the lower media sensor assembly under the rear roller. The sensor is a spring clip
holding a circuit board.
2. Slide the lower sensor until it is under the upper media sensor. Use the light that shines
from the sensor to help align it with the upper sensor. Gently pull wires out as needed
(wires should have a little slack).
Operations
Adjust Printhead Pressure and Toggle Position
88
P1009874-001 Xi4 User Guide 2/23/09
Adjust Printhead Pressure and Toggle Position
Print quality depends on the labels and ribbon used as well as the toggle pressure and position.
Make sure that your labels and ribbon are acceptable for your application. If they are, check
the toggle position and then the printhead pressure.
Toggle Position Adjustment
You may need to adjust the toggles if printing is too light on one side or if thick labels are used.
If the toggle pressure is too light or uneven, the labels and ribbon may slip.
To position the toggles, complete these steps:
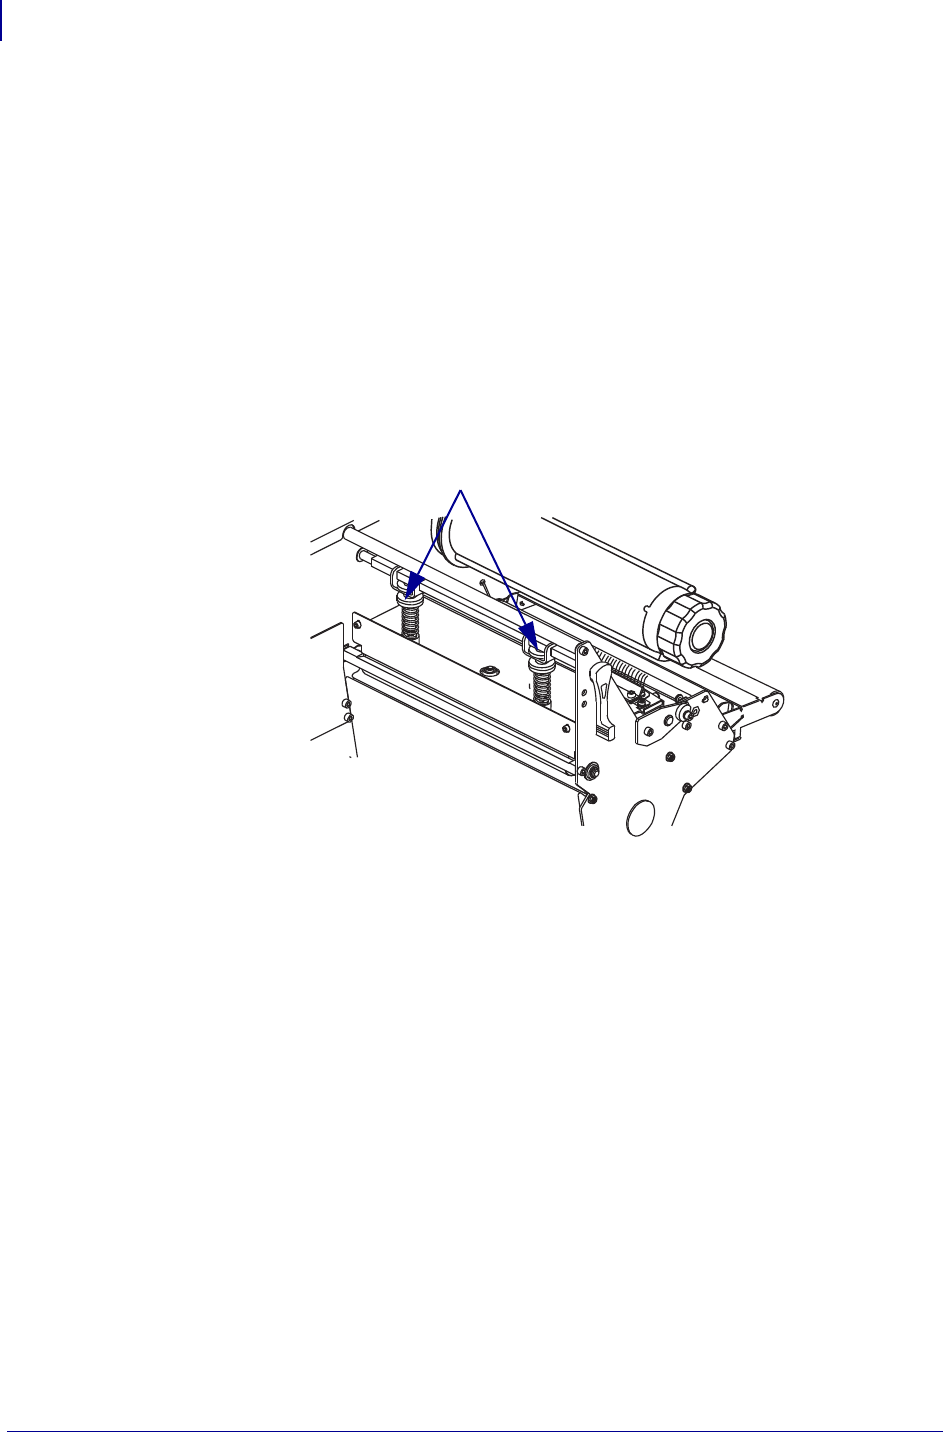
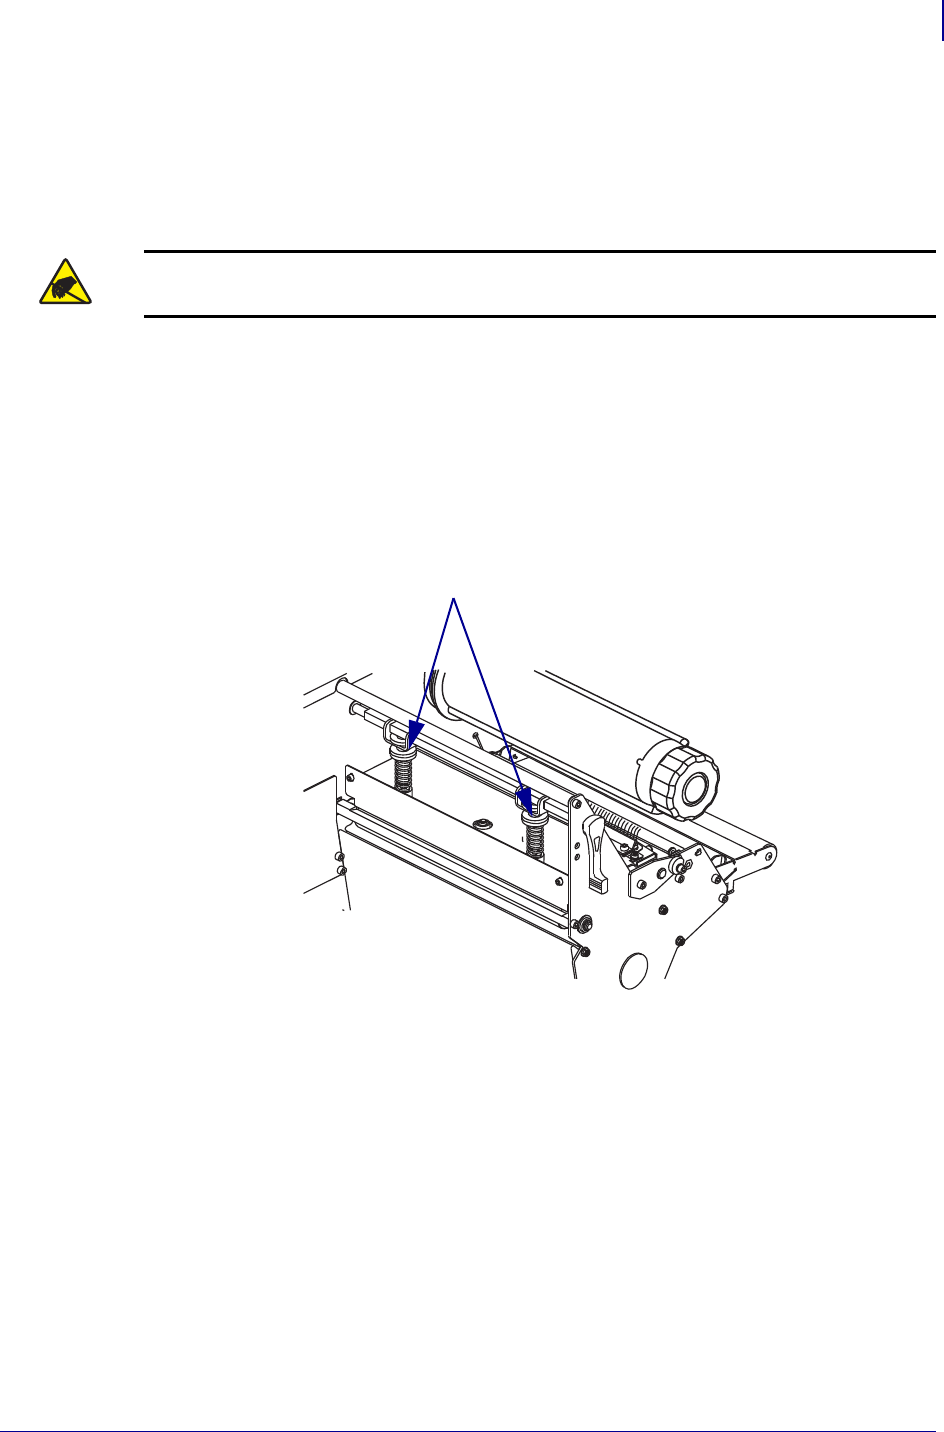
1. Loosen the locking nuts (1) at the top of the toggle assemblies.
2. Slide the toggles until they provide even pressure on the media. For extremely narrow
media, position one toggle over the center of the labels, and decrease the pressure on the
unused toggle.
3. Tighten the locking nuts.
1
89
Operations
Adjust Printhead Pressure and Toggle Position
2/23/09 Xi4 User Guide P1009874-001
Printhead Pressure Adjustment
If positioning the toggles properly does not solve a print quality problem, try adjusting the
printhead pressure. Maximize printhead life by using the lowest pressure that produces the
desired print quality.
To adjust printhead pressure, complete these steps:
1. Print some labels at 2.4 in. (61 mm) per second by running the PAUSE Self Test
on page 154.
2. While printing labels, use the control panel controls to lower the darkness setting until the
labels are printing gray instead of black.
3. Loosen the upper knurled nuts on the toggle assemblies (1).
Caution • Observe proper electrostatic safety precautions when handling any
static-sensitive components such as circuit boards and printheads.
1

Operations
Adjust Printhead Pressure and Toggle Position
90
P1009874-001 Xi4 User Guide 2/23/09
4. Some media types require higher pressure to print well. For these media types, increase or
decrease pressure using the lower knurled nuts (1) until the left and right edges of the
printed area are equally dark.
5. Increase the darkness level using the control panel controls until the printing is clear.
6. Tighten the upper knurled nuts.
1

91
Operations
Adjust Printhead Pressure and Toggle Position
2/23/09 Xi4 User Guide P1009874-001
Notes • ___________________________________________________________________
__________________________________________________________________________
__________________________________________________________________________
__________________________________________________________________________
__________________________________________________________________________
__________________________________________________________________________
__________________________________________________________________________
__________________________________________________________________________
__________________________________________________________________________
__________________________________________________________________________

Operations
Adjust Printhead Pressure and Toggle Position
92
P1009874-001 Xi4 User Guide 2/23/09

2/23/09 Xi4 User Guide P1009874-001
4
Configuration
This section describes the control panel parameters that are used to configure the printer for
operation.
Contents
Setup Mode . . . . . . . . . . . . . . . . . . . . . . . . . . . . . . . . . . . . . . . . . . . . . . . . . . . . . . . . . . . 94
Enter and Use Setup Mode . . . . . . . . . . . . . . . . . . . . . . . . . . . . . . . . . . . . . . . . . . . . . 94
Exit Setup Mode. . . . . . . . . . . . . . . . . . . . . . . . . . . . . . . . . . . . . . . . . . . . . . . . . . . . . . 95
Change Password-Protected Parameters . . . . . . . . . . . . . . . . . . . . . . . . . . . . . . . . . . . . 96
Default Password Value. . . . . . . . . . . . . . . . . . . . . . . . . . . . . . . . . . . . . . . . . . . . . . . . 96
Disable the Password Protection Feature . . . . . . . . . . . . . . . . . . . . . . . . . . . . . . . . . . 96
Print a Configuration Label. . . . . . . . . . . . . . . . . . . . . . . . . . . . . . . . . . . . . . . . . . . . . . . . 97
Print a Network Configuration Label . . . . . . . . . . . . . . . . . . . . . . . . . . . . . . . . . . . . . . . . 98
Standard Control Panel Parameters . . . . . . . . . . . . . . . . . . . . . . . . . . . . . . . . . . . . . . . . 99
Additional Control Panel Parameters. . . . . . . . . . . . . . . . . . . . . . . . . . . . . . . . . . . . . . . 121
Configuration
Setup Mode
94
P1009874-001 Xi4 User Guide 2/23/09
Setup Mode
After you have installed the media and ribbon and the Power-On Self Test (POST) is complete,
the control panel displays PRINTER READY. You may now set printer parameters for your
application using the control panel display and the buttons directly below it. If it becomes
necessary to restore the initial printer defaults, see FEED and PAUSE Self Test on page 158.
Enter and Use Setup Mode
Use the LCD on the control panel to view and adjust printer settings through Setup mode.
When a parameter is changed, an asterisk (*) appears in the upper left corner of the display to
indicate that the value is different from the one currently active in the printer.
Important • Certain printing conditions may require that you adjust printing parameters,
such as print speed, darkness, or print mode. These conditions include (but are not
limited to):
• printing at high speeds
• peeling the media
• the use of extremely thin, small, synthetic, or coated labels
Because these and other factors affect print quality, run tests to determine the best
combination of printer settings and media for your application. A poor match may limit print
quality or print rate, or the printer may not function properly in the desired print mode.
Note • If the printer is operating on an IP network and you have a ZebraNet 10/100 Print
Server or Wireless Plus Print Server, you can change the printer’s parameters in these
additional ways:
• with ZebraLink™ WebView. For information, see the appropriate print server user guide.
• with ZebraNet Bridge. For information, see the ZebraNet Bridge Enterprise Printer
Management User Guide.
Press this key... To do the following...
SETUP/EXIT enter or exit Setup mode.
SELECT select or deselect a parameter.
PLUS (+) continue to the next parameter.
MINUS (-) return to the previous parameter in the cycle.
95
Configuration
Setup Mode
2/23/09 Xi4 User Guide P1009874-001
Exit Setup Mode
When you exit setup mode, you have several options for saving, changing, or not changing
parameters.
To leave Setup mode, complete these steps:
1. Press SETUP/EXIT.
The LCD displays SAVE CHANGES.
2. Press PLUS (+) or MINUS (-) to display the save options:
3. Press NEXT/SAVE to select the displayed choice.
When the configuration and calibration sequence is done, PRINTER READY displays.
LCD Description
PERMANENT Stores values in the printer even when power is turned off.
TEMPORARY Saves the changes until power is turned off.
CANCEL Cancels all changes made since you entered Setup mode,
except for changes made to the darkness and tear-off settings,
which go into effect as soon as they are made.
LOAD DEFAULTS Restores all parameters other than the network settings back to
the factory defaults. Use care when loading defaults because
you will need to reload all settings that you changed manually.
Note • On non-RFID printers, loading factory defaults
causes the printer to auto-calibrate.
LOAD LAST SAVE Loads values from the last permanent save.
DEFAULT NET Restores the wired and wireless network settings back to
factory defaults.

Configuration
Change Password-Protected Parameters
96
P1009874-001 Xi4 User Guide 2/23/09
Change Password-Protected Parameters
Certain parameters, including the communication parameters, are password-protected by
factory default.
The first time that you attempt to change a password-protected parameter, the printer displays
ENTER PASSWORD. Before you can change the parameter, you must enter the four-digit
numeric password. After you have entered the password correctly, you do not have to enter it
again unless you leave Setup mode by pressing SETUP/EXIT or by turning off (O) the printer.
To enter a password for a password-protected parameter, complete
these steps:
1. At the password prompt, use MINUS (-) to change the selected digit position.
2. When you have selected the digit that you wish to change, use PLUS (+) to increase the
selected digit value. Repeat these two steps for each digit of the password.
3. After entering the password, press NEXT/SAVE.
The parameter you selected to change is displayed. If the password was entered correctly,
you can change the value.
Default Password Value
The default password value is 1234. The password can be changed using the Zebra
Programming Language (ZPL) command ^KP (Define Password) or using the printer’s web
pages (ZebraNet® 10/100 Print Server or Wireless Plus Print Server required).
Disable the Password Protection Feature
You can disable the password protection feature so that it no longer prompts you for a
password by setting the password to 0000 via the ^KP ZPL command. To re-enable the
password-protection feature, send the ZPL command ^KPx, where x can be any number from
1 to 9999.
Caution • Do not change password-protected parameters unless you have a complete
understanding of the parameters’ functions. If the parameters are set incorrectly, the printer
may function unpredictably.
97
Configuration
Print a Configuration Label
2/23/09 Xi4 User Guide P1009874-001
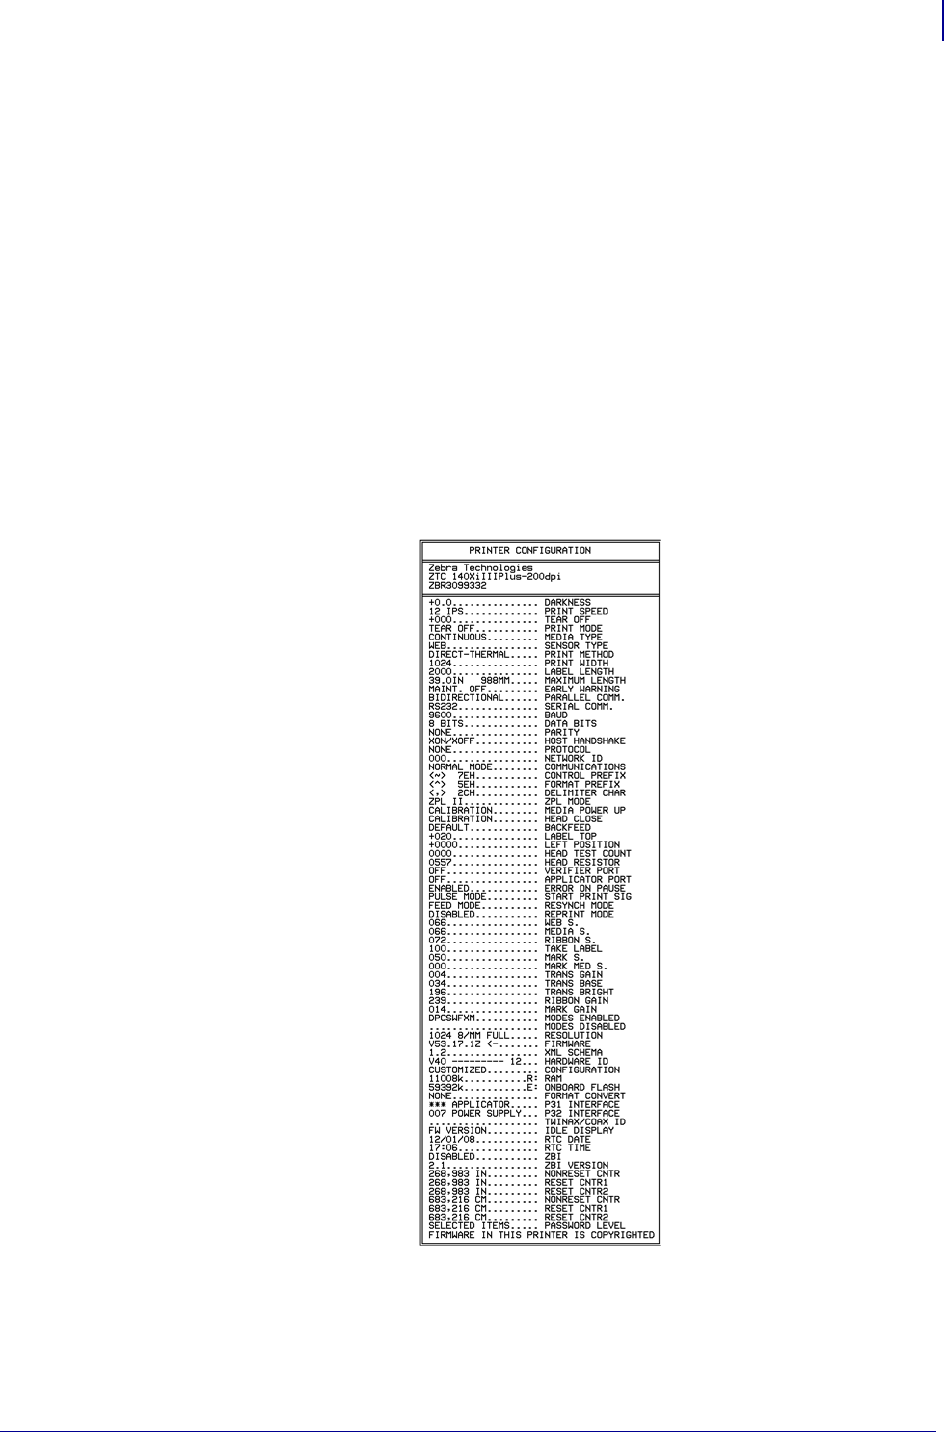
Print a Configuration Label
A configuration label lists the printer settings that are stored in configuration memory. After
you load the media and ribbon (if necessary), print a configuration label as a record of your
printer’s current settings. Keep the label to use when troubleshooting printing problems.
To print a configuration label, complete these steps:
1. On the control panel, press SETUP/EXIT.
2. Press NEXT/SAVE or PREVIOUS to scroll through the parameters until you reach
LIST SETUP.
3. Press PLUS (+) to confirm printing.
A configuration label prints (Figure 12).
Figure 12 • Sample Configuration Label
Configuration
Print a Network Configuration Label
98
P1009874-001 Xi4 User Guide 2/23/09
Print a Network Configuration Label
If you are using a print server, you can print a network configuration label after the printer is
connected to the network.
To print a network configuration label, complete these steps:
1. On the control panel, press SETUP/EXIT.
2. Press NEXT/SAVE or PREVIOUS to scroll through the parameters until you reach
LIST NETWORK.
3. Press PLUS (+) to confirm printing.
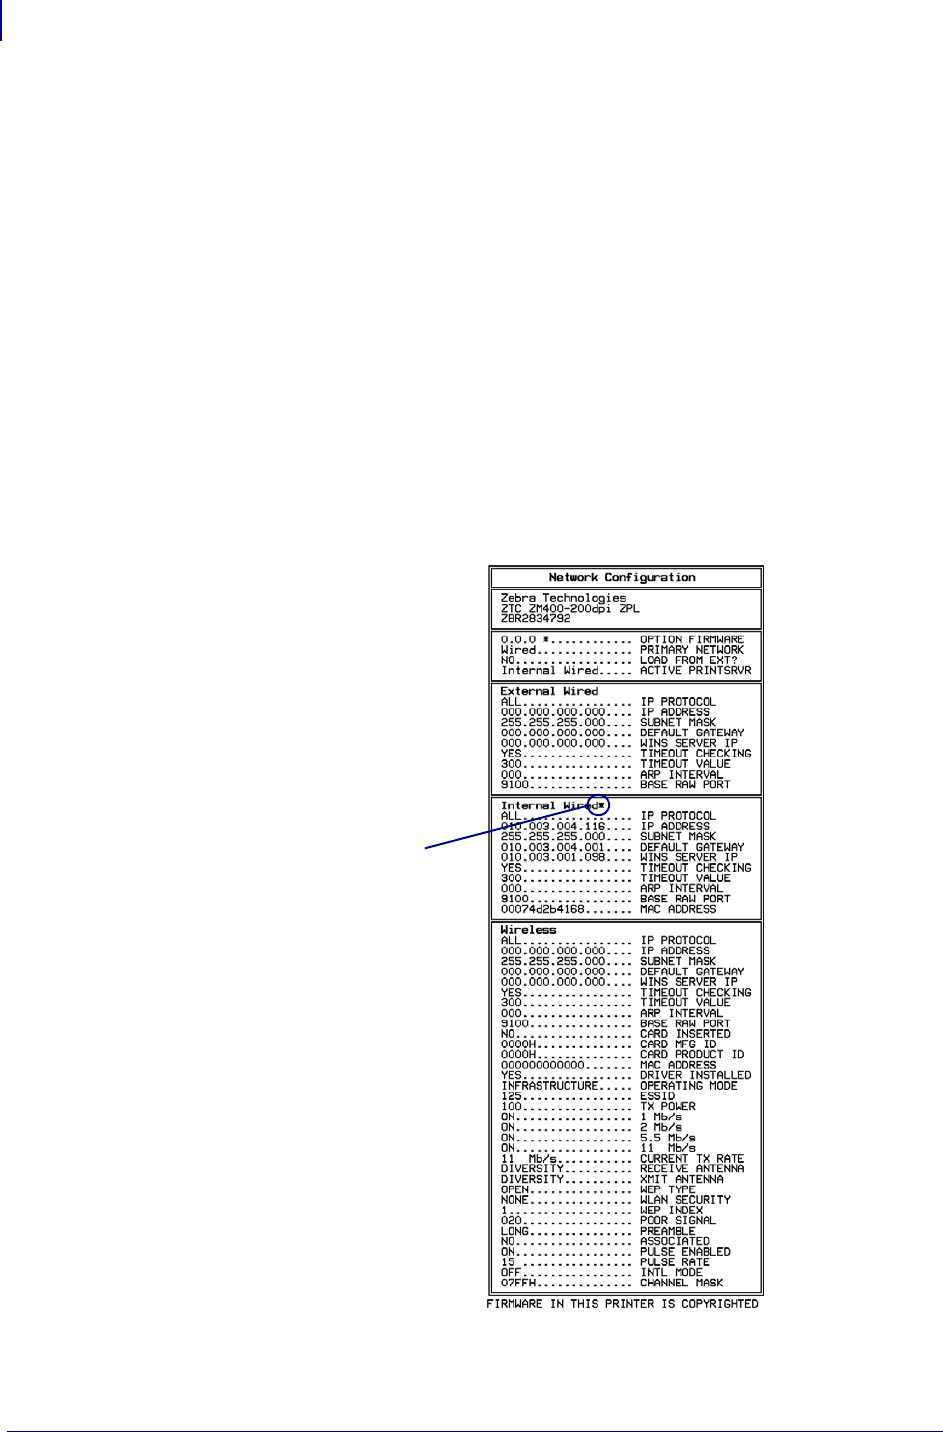
A network configuration label prints (Figure 13). An asterisk designates whether the
wired or wireless print server is active. If no wireless print server is installed, the wireless
portion of the label does not print.
Figure 13 • Network Configuration Label (With a Wireless Print Server Installed)
asterisk
indicating the
active print
server
99
Configuration
Standard Control Panel Parameters
2/23/09 Xi4 User Guide P1009874-001
Standard Control Panel Parameters
Table 9 shows parameters in the order in which they are displayed when you press
NEXT/SAVE after entering Setup mode. For parameters that do not appear in this table, see
Additional Control Panel Parameters on page 121.
Note • Your label preparation software or the printer driver may override adjustments made
through the control panel. Refer to the software or driver documentation for more
information.
Table 9 • Printer Parameters (Continued, page 1 of 22)
Language/Parameter Action/Explanation
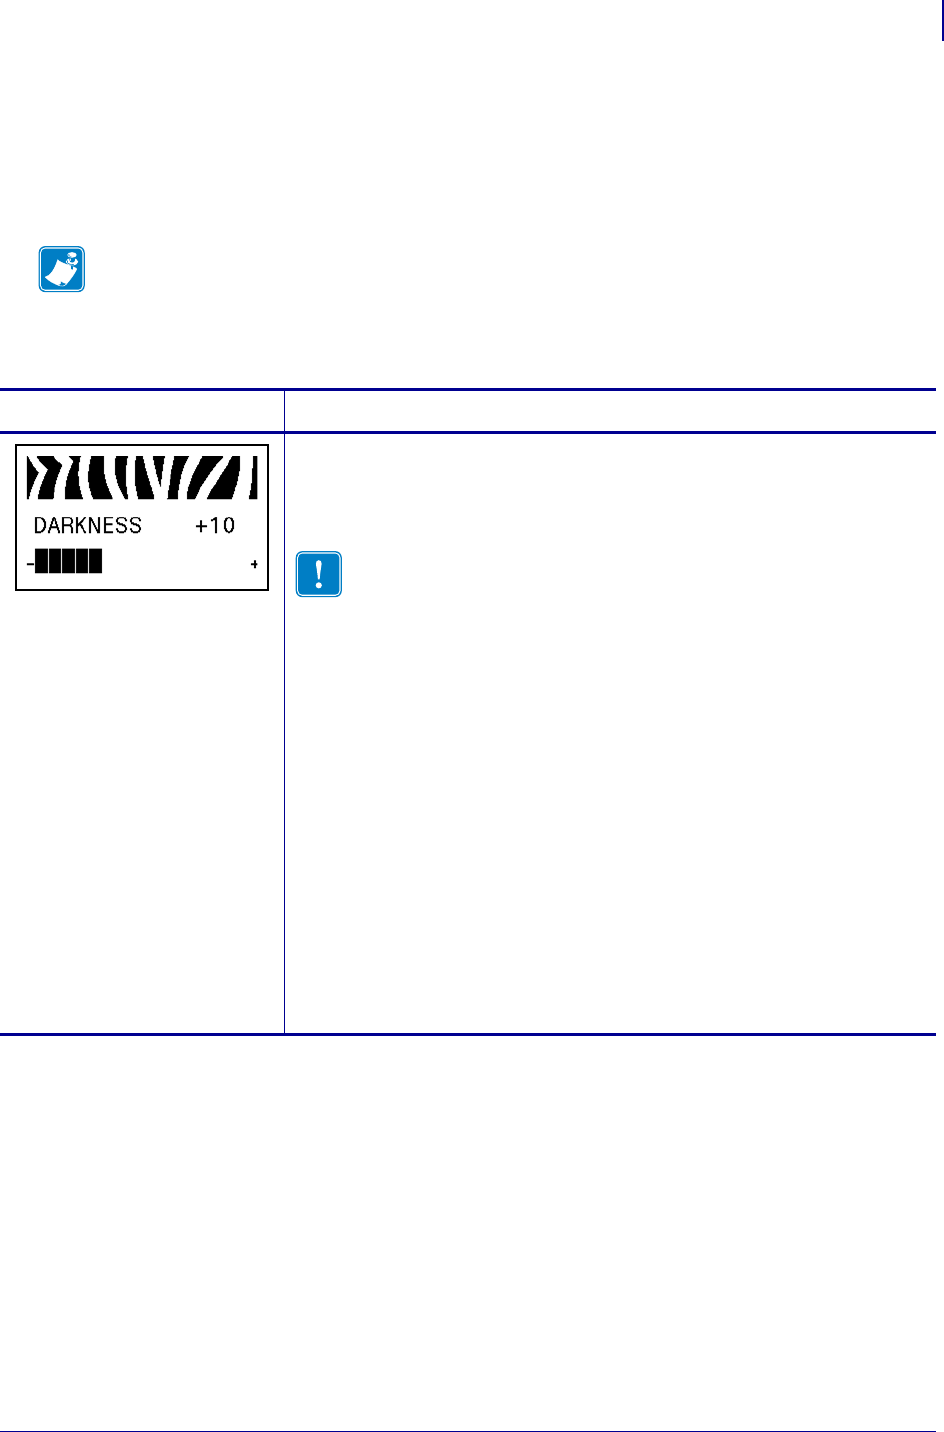
Adjust Print Darkness
Darkness (burn duration) settings depend on a variety of factors, including
ribbon type, media type, and the condition of the printhead. You may adjust
the darkness for consistent high-quality printing.
Important • Set the darkness to the lowest setting that provides
good print quality. If the darkness is set too high, the ink may
smear, the ribbon may burn through, or the printhead may wear
prematurely.
If printing is too light or if there are voids in printed areas, increase the
darkness. If printing is too dark or if there is spreading or bleeding of
printed areas, decrease the darkness.
The FEED Self Test on page 155 can be used to determine the best darkness
setting. You may want to adjust darkness while performing the PAUSE Self
Test on page 154. Because the darkness setting takes effect immediately,
you can see the results on labels that are currently printing. Darkness
settings also may be changed by the driver or software settings.
Default Value: +10
Range: 00 to +30
To change the value shown:
1. Press PLUS (+) to increase darkness.
2. Press MINUS (-) to decrease darkness.
Configuration
Standard Control Panel Parameters
100
P1009874-001 Xi4 User Guide 2/23/09
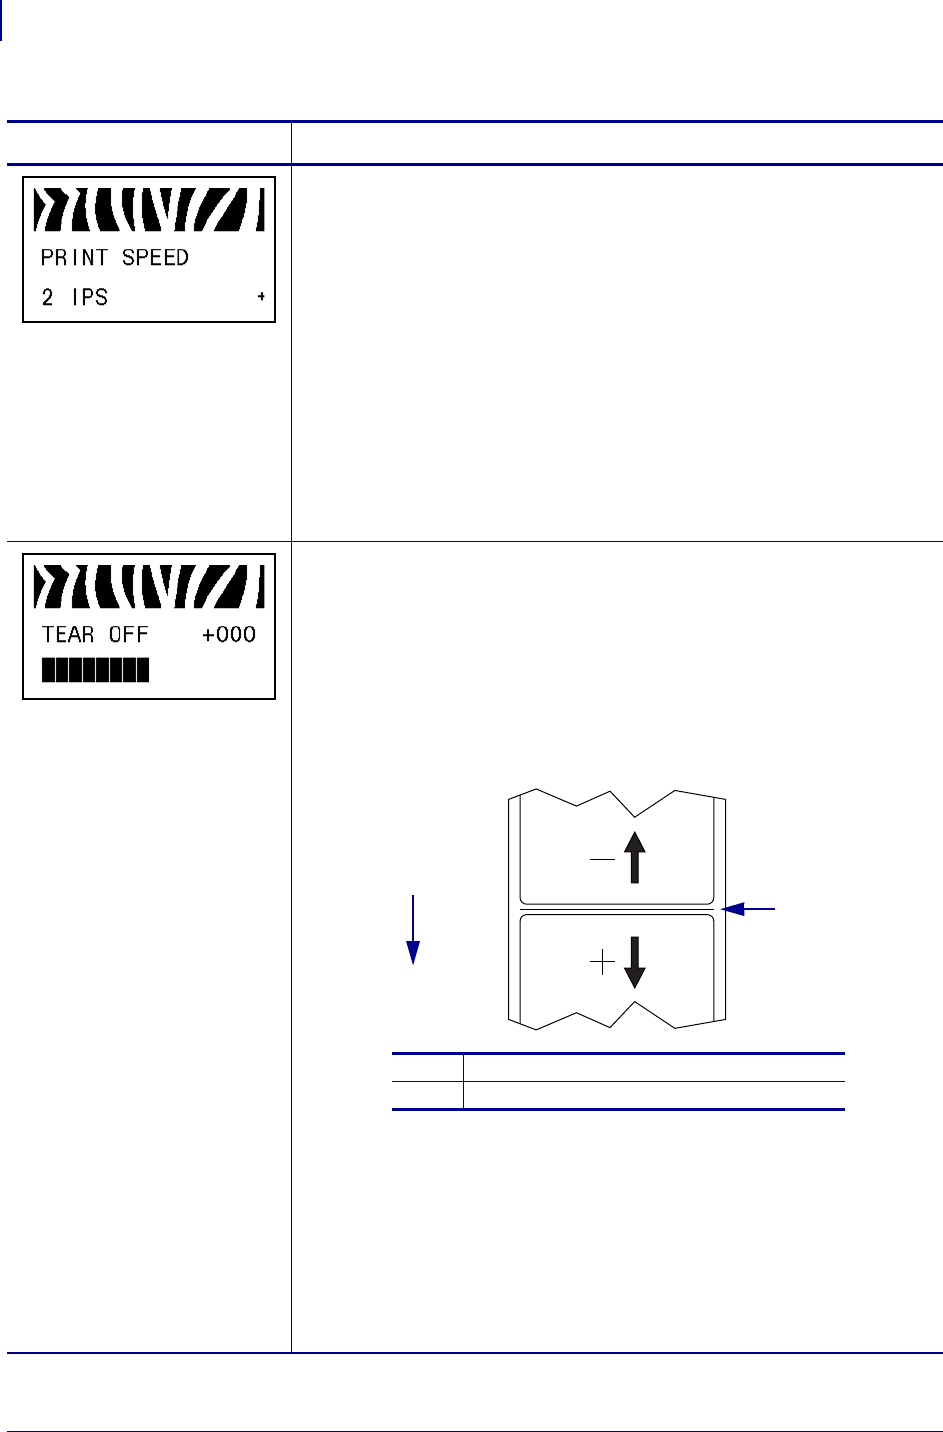
Adjust Print Speed
Adjusts the speed for printing a label (given in inches per second). Slower
print speeds typically yield better print quality. Print speed changes take
effect upon exiting Setup mode.
Default Value: 2 IPS
Range:
• 200 dpi: 2 to 10 IPS
• 300 dpi: 2 to 8 IPS
• 600 dpi: 1 to 4 IPS
To change the value shown:
1. Press PLUS (+) to increase the value.
2. Press MINUS (-) to decrease the value.
Adjust the Tear-Off Position
This parameter establishes the position of the media over the
tear-off/peel-off bar after printing.
See Figure 14. Higher numbers move the media out (the tear line moves
closer to the leading edge of the next label), and lower numbers move the
media in (the tear line moves closer to the edge of the label just printed).
Figure 14 • Tear-Off Position Adjustment
Default Value: 0
Range: -120 to +120
To change the value shown:
1. Press PLUS (+) to increase the value. Each press adjusts the tear-off
position by four dot rows.
2. Press MINUS (-) to decrease the value. Each press adjusts the tear-off
position by four dot rows.
Table 9 • Printer Parameters (Continued, page 2 of 22)
Language/Parameter Action/Explanation
1Media direction
2Factory-set tear line location at position 00
1
2