ZyXEL Communications MAX200M1 WiMAX IEEE802.16e Indoor Basic CPE-2.5GHz User Manual ZyBook
ZyXEL Communications Corporation WiMAX IEEE802.16e Indoor Basic CPE-2.5GHz ZyBook
Contents
- 1. User manual1
- 2. User manual2
- 3. User manual3
- 4. User manual4
User manual2
ZyXEL MAX-200M1 Series User’s Guide
Chapter 7 WAN Setup 71
CHAPTER 7
WAN Setup
This chapter describes how to configure WAN settings.
7.1 WAN Overview
A WAN (Wide Area Network) is an outside connection to another network or the Internet.
Your ZyXEL Device uses the IEEE 802.16e WiMAX standard to connect wirelessly to a
WiMAX base station (see Section 1.1 on page 29).
7.2 WiMAX
WiMAX (Worldwide Interoperability for Microwave Access) is the IEEE 802.16 wireless
networking standard, which provides high-bandwidth, wide-range wireless service across
wireless Metropolitan Area Networks (MANs). ZyXEL is a member of the WiMAX Forum,
the industry group dedicated to promoting and certifying interoperability of wireless
broadband products.
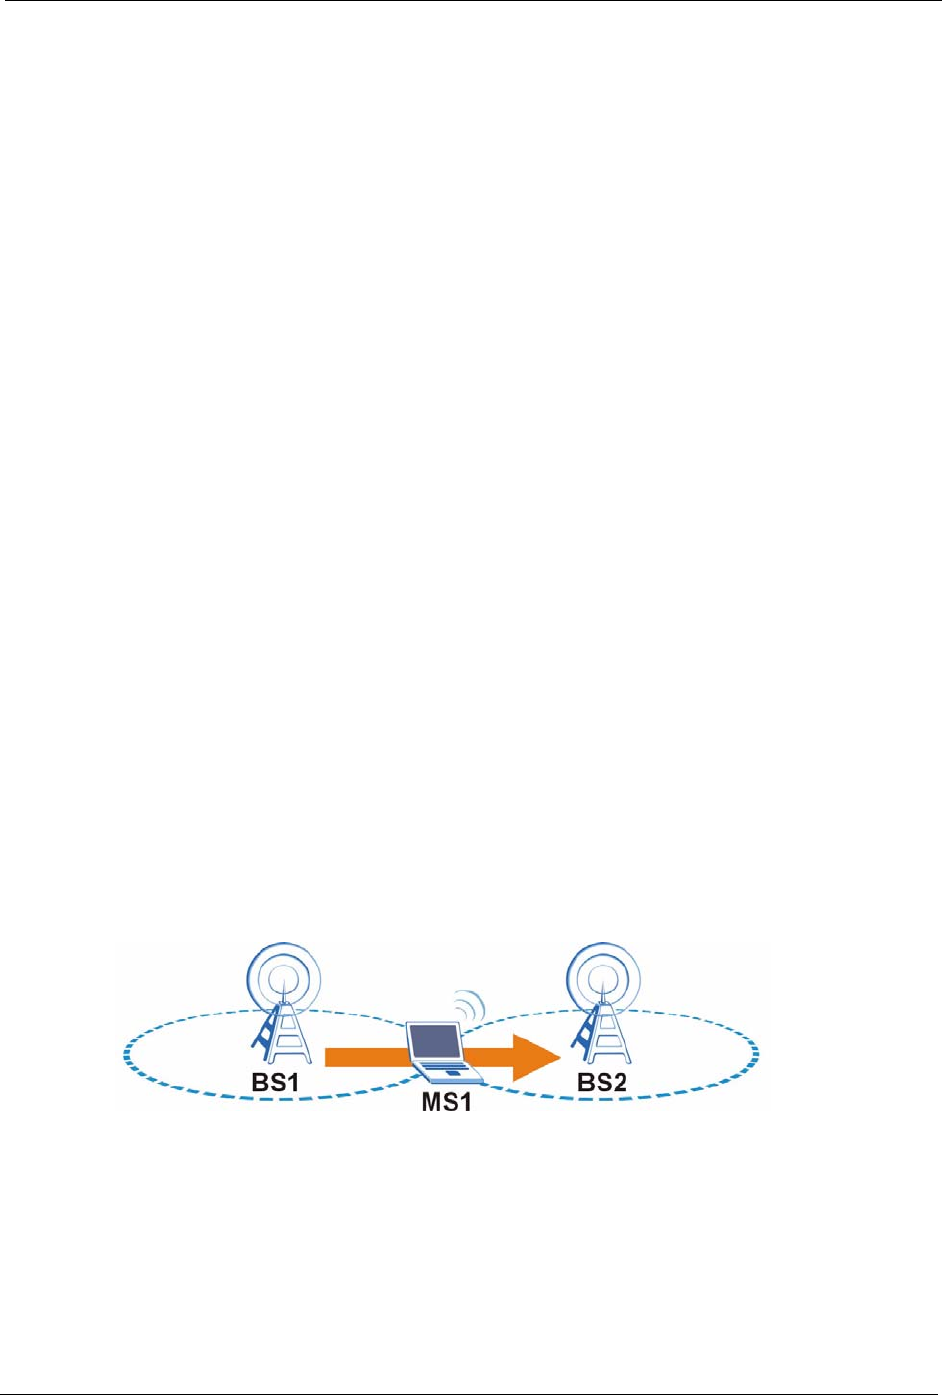
In a wireless MAN, a wireless-equipped computer is known either as a mobile station (MS) or
a subscriber station (SS). Mobile stations use the IEEE 802.16e standard and are able to
maintain connectivity while switching their connection from one base station to another base
station (handover) while subscriber stations use other standards that do not have this capability
(IEEE 802.16-2004, for example). The following figure shows an MS-equipped notebook
computer MS1 moving from base station BS1’s coverage area and connecting to BS2.
Figure 37 WiMax: Mobile Station
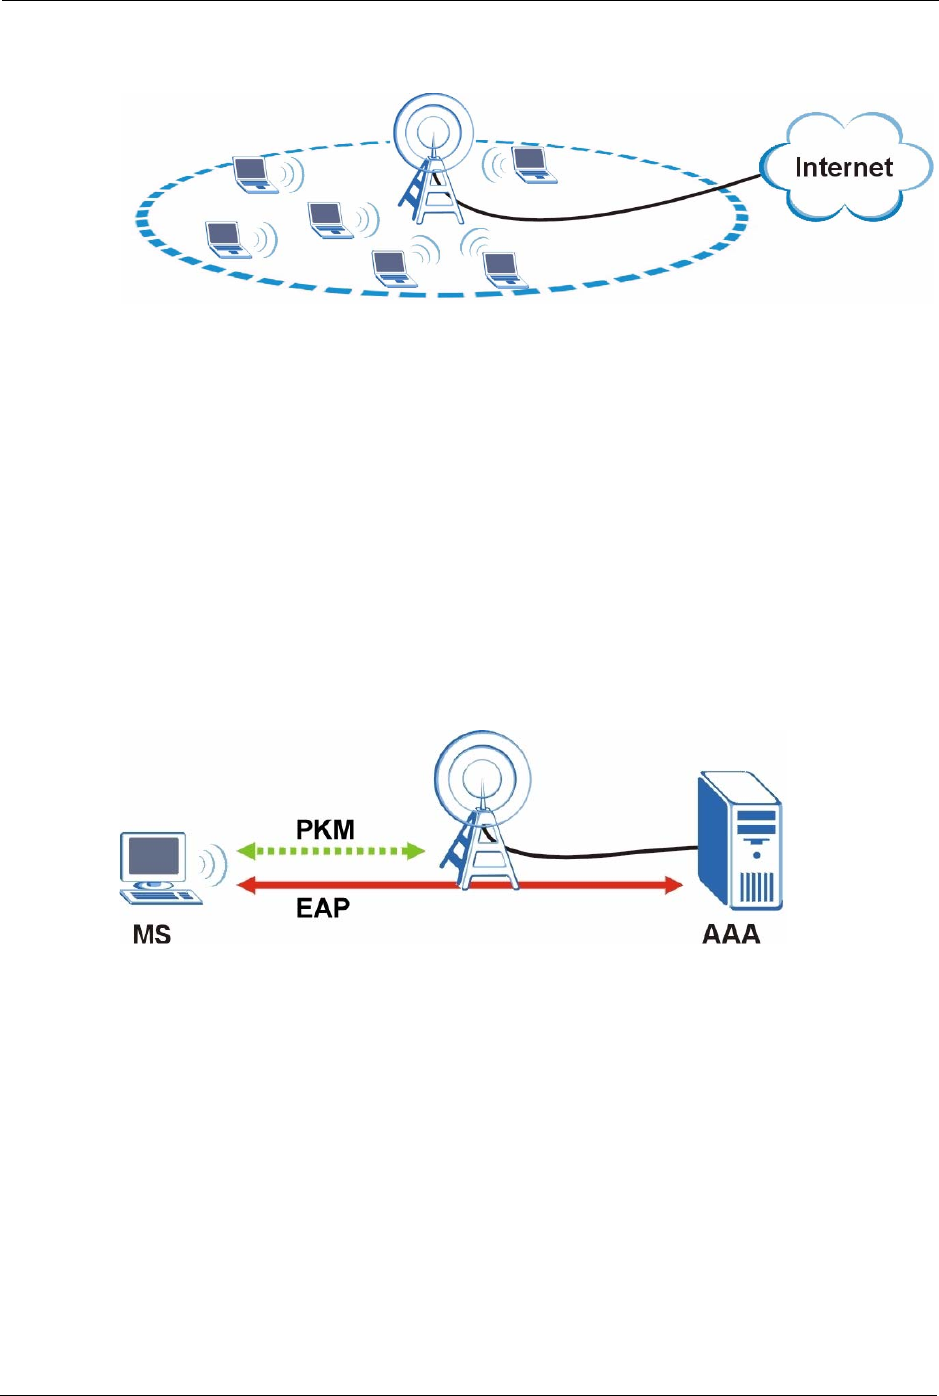
WiMAX technology uses radio signals (around 2 to 10 GHz) to connect subscriber stations
and mobile stations to local base stations. Numerous subscriber stations and mobile stations
connect to the network through a single base station (BS), as in the following figure.
ZyXEL MAX-200M1 Series User’s Guide
72 Chapter 7 WAN Setup
Figure 38 WiMAX: Multiple Mobile Stations
A base station's coverage area can extend over many hundreds of meters, even under poor
conditions. A base station provides network access to subscriber stations and mobile stations,
and communicates with other base stations.
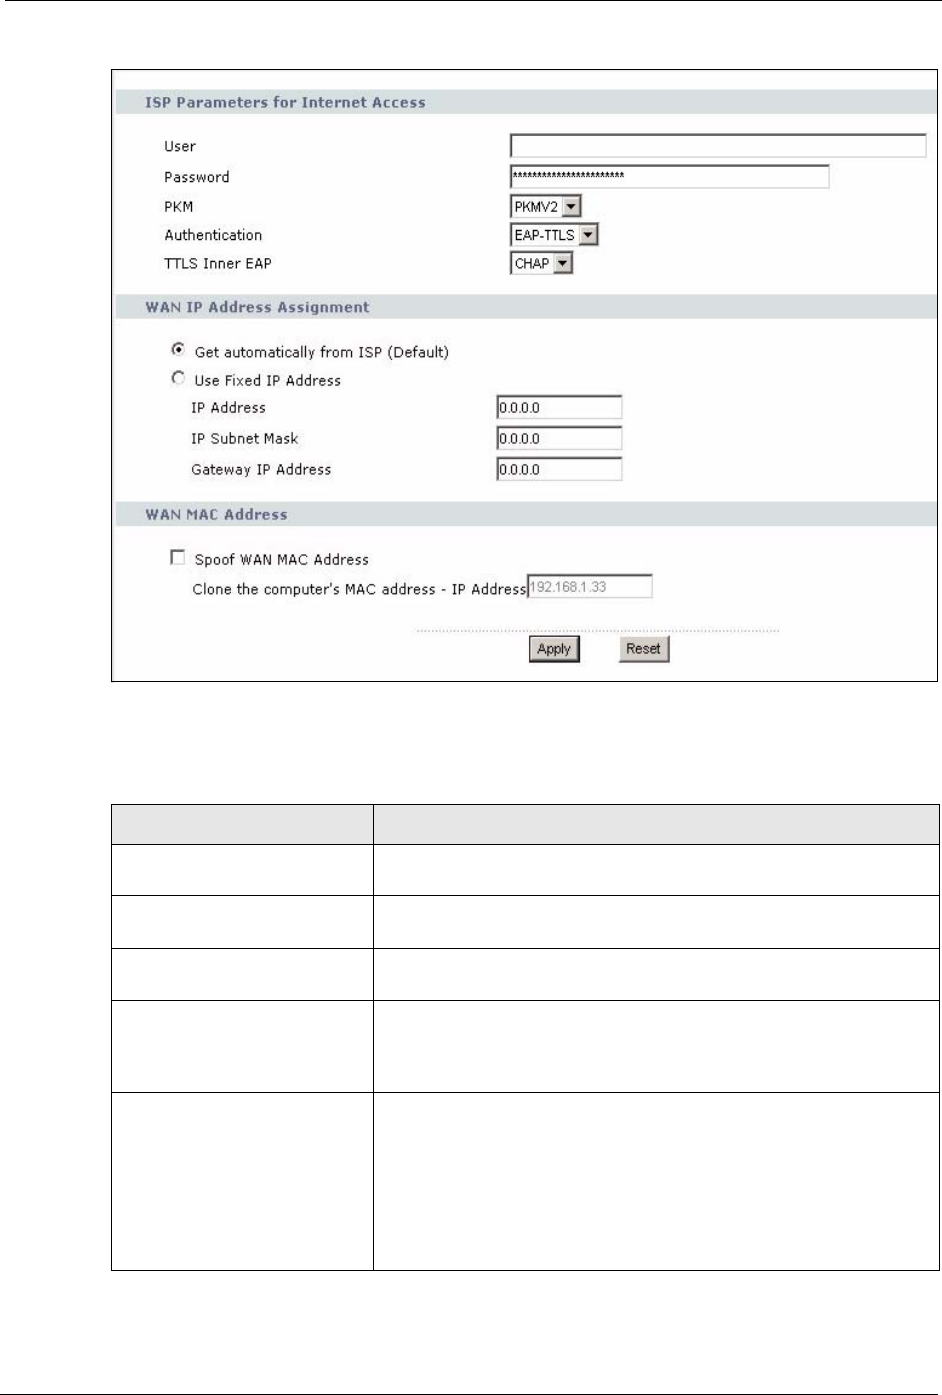
7.2.1 Authentication
When authenticating a user, the base station uses a third-party RADIUS or Diameter server
known as an AAA (Authentication, Authorization and Accounting) server to authenticate the
mobile or subscriber stations.
The following figure shows a base station using an AAA server to authenticate mobile station
MS, allowing it to access the Internet.
Figure 39 Using an AAA Server
In this figure, the dashed arrow shows the PKM (Privacy Key Management) secured
connection between the mobile station and the base station, and the solid arrow shows the EAP
secured connection between the mobile station, the base station and the AAA server. See the
WiMAX security appendix for more details.
7.3 Internet Access Setup
To change your ZyXEL Device’s Internet access settings, click Network > WAN. The
Internet Connection screen displays.
ZyXEL MAX-200M1 Series User’s Guide
Chapter 7 WAN Setup 73
Figure 40 Network > WAN > Internet Connection
The following table describes the labels in this screen.
Table 13 Network > WAN > Internet Connection
LABEL DESCRIPTION
ISP Parameters for Internet
Access
User Use this field to enter the username associated with your Internet
access account. You can enter up to 61 printable ASCII characters.
Password Use this field to enter the password associated with your Internet
access account. You can enter up to 47 printable ASCII characters.
PKM This field displays the Privacy Key Management version number. PKM
provides security between the ZyXEL Device and the base station. At
the time of writing, the ZyXEL Device supports PKMv2 only. See the
WiMAX security appendix for more information.
Authentication This field displays the user authentication method. Authentication is
the process of confirming the identity of a mobile station (by means of
a username and password, for example).
At the time of writing, the ZyXEL Device supports EAP-TTLS only.
EAP-TTLS allows a mobile station and a base station to establish a
secure link with an AAA (Authentication, Authorization and
Accounting) server in order to exchange authentication information.
See the WiMAX security appendix for more details.

ZyXEL MAX-200M1 Series User’s Guide
74 Chapter 7 WAN Setup
7.4 Frequency Settings
In a WiMAX network, a mobile or subscriber station must use a radio frequency supported by
the base station to communicate. When the ZyXEL Device looks for a connection to a base
station, it can search a range of frequencies.
TTLS Inner EAP This field displays the type of secondary authentication method. Once
a secure EAP-TTLS connection is established, the inner EAP is the
protocol used to exchange security information between the mobile
station, the base station and the AAA server to authenticate the
mobile station. At the time of writing, the ZyXEL Device supports only
CHAP (Challenge Handshake Authentication Protocol). See the
WiMAX security appendix for more details.
WAN IP Address Assignment
Get automatically from ISP
(Default)
Select this if you have a dynamic IP address. A dynamic IP address is
not fixed; the ISP assigns you a different one each time you connect
to the Internet.
Use Fixed IP Address A static IP address is a fixed IP that your ISP gives you. Type your ISP
assigned IP address in the IP Address field below.
IP Subnet Mask Enter a subnet mask in dotted decimal notation.
Refer to the appendices to calculate a subnet mask If you are
implementing subnetting.
Gateway IP Address Specify a gateway IP address (supplied by your ISP).
WAN MAC Address
Spoof WAN MAC Address You can use the factory-assigned default MAC Address, or clone the
MAC address of a computer or other network device on your LAN.
To clone a MAC address, select the check box next to Spoof WAN
MAC Address and enter the IP address of the computer on the LAN
whose MAC you are cloning. Once it is successfully configured, the
address will be copied to the rom file (ZyNOS configuration file). It will
not change unless you change the setting or upload a different ROM
file.
Otherwise, configure nothing to have the ZyXEL Device use the
factory-assigned default MAC address.
Clone the computer’s MAC
address - IP address:
Enter the IP address of the computer on the LAN whose MAC you are
cloning.
It is recommended that you clone the MAC address prior to hooking
up the WAN port.
Apply Click this button to save your settings.
Reset Click this button to return all the fields in this screen to their default
values.
Table 13 Network > WAN > Internet Connection
LABEL DESCRIPTION
ZyXEL MAX-200M1 Series User’s Guide
Chapter 7 WAN Setup 75
Radio frequency is measured in Hertz (Hz).
7.4.1 Frequency Ranges
The following figure shows the ZyXEL Device searching a range of frequencies to find a
connection to a base station.
Figure 41 Frequency Ranges
In this figure, A is the WiMAX frequency range. “WiMAX frequency range” refers to the
entire range of frequencies the ZyXEL Device is capable of using to transmit and receive (see
the Product Specifications appendix for details).
In the figure, B shows the operator frequency range. This is the range of frequencies within the
WiMAX frequency range supported by your operator (service provider).
The operator range is subdivided into bandwidth steps. In the figure, each C is a bandwidth
step.
The arrow D shows the ZyXEL Device searching for a connection.
Have the ZyXEL Device search only certain frequencies by configuring the downlink
frequencies. Your operator can give you information on the supported frequencies.
The downlink frequencies are points of the frequency range your ZyXEL Device searches for
an available connection. Use the Site Survey screen to set these bands. You can set the
downlink frequencies anywhere within the WiMAX frequency range. In this example, the
downlink frequencies have been set to search all of the operator range for a connection.
7.4.2 Configuring Frequency Settings
You need to set the ZyXEL Device to scan one or more specific radio frequencies to find an
available connection to a WiMAX base station.
Table 14 Radio Frequency Conversion
1 kHz = 1000 Hz
1 MHz = 1000 kHz (1000000 Hz)
1 GHz = 1000 MHz (1000000 kHz)
ZyXEL MAX-200M1 Series User’s Guide
76 Chapter 7 WAN Setup
Use the WiMAX Frequency screen to define the radio frequencies to be searched for
available wireless connections. See Section 7.4.2.1 on page 77 for an example of using the
WiMAX Frequency screen.
• The ZyXEL Device searches the DL Frequency settings in ascending numerical order,
from [0] to [9].
• If you enter a 0 in a DL Frequency field, the ZyXEL Device immediately moves on to
the next DL Frequency field.
• When the ZyXEL Device connects to a base station, the values in this screen are
automatically set to the base station’s frequency. The next time the ZyXEL Device
searches for a connection, it searches only this frequency. If you want the ZyXEL Device
to search other frequencies, enter them in the DL Frequency fields.
The following table describes some examples of DL Frequency settings.
Click Network > WAN > WiMAX Frequency to display the screen shown next.
Table 15 DL Frequency Example Settings
EXAMPLE 1 EXAMPLE 2
DL Frequency [0]: 2500000 2500000
DL Frequency [1]: 2550000 2550000
DL Frequency [2] 0 2600000
DL Frequency [3]: 00
DL Frequency [4]: 00
The ZyXEL Device
searches at 2500000 kHz,
and then searches at
2550000 kHz if it has not
found a connection.
The ZyXEL Device
searches at 2500000 kHz
and then at 2550000 kHz
if it has not found an
available connection. If it
still does not find an
available connection, it
searches at 2600000 kHz.
ZyXEL MAX-200M1 Series User’s Guide
Chapter 7 WAN Setup 77
Figure 42 Network > WAN >WiMAX Frequency
The following table describes the labels in this screen.
7.4.2.1 Using the WiMAX Frequency Screen: Example
In this example, your Internet service provider has given you a list of supported frequencies, as
follows.
Use the WiMAX Frequency screen to enter the frequencies you want the ZyXEL Device to
scan for a connection to a base station.
Table 16 Network > WAN > WiMAX Frequency
LABEL DESCRIPTION
DL Frequency
[0] ~ [9]
These fields show the downlink frequency settings in kilohertz (kHz). Enter
values in these fields to have the ZyXEL Device scan these frequencies for
available channels in ascending numerical order.
Contact your service provider for details of supported frequencies.
Apply Click this button to save your settings.
Reset Click this button to return all the fields in this screen to their default values.
Table 17 Example Supported Frequencies (GHz)
2.5
2.525
2.6
2.625
ZyXEL MAX-200M1 Series User’s Guide
78 Chapter 7 WAN Setup
1In the DL Frequency [0] field, enter 2500000 (2500000 kilohertz (kHz) is equal to 2.5
gigahertz).
2In the DL Frequency [1] field, enter 2525000.
3In the DL Frequency [2] field, enter 2600000.
4In the DL Frequency [3] field, enter 2625000.
Leave the rest of the DL Frequency fields at zero. The screen appears as follows.
Figure 43 Completing the WiMAX Frequency Screen
5Click Apply. The ZyXEL Device stores your settings.
When the ZyXEL Device searches for available frequencies, it scans all frequencies from
DL Frequency [0] to DL Frequency [3]. When it finds an available connection, the
fields in this screen will be automatically set to use that frequency.
7.5 Configuring Advanced WAN Settings
Click Network > WAN > Advanced to display the following screen.
ZyXEL MAX-200M1 Series User’s Guide
Chapter 7 WAN Setup 79
Figure 44 Network > WAN > Advanced
The following table describes the labels in this screen.
Table 18 Network > WAN > Advanced
LABEL DESCRIPTION
DNS Servers
First, Second and
Third DNS Server
Select Obtained from ISP if your ISP dynamically assigns DNS server
information (and the ZyXEL Device's WAN IP address). Use the drop-down
list box to select a DNS server IP address that the ISP assigns in the field to
the right.
Select UserDefined if you have the IP address of a DNS server. Enter the
DNS server's IP address in the field to the right. If you chose UserDefined,
but leave the IP address set to 0.0.0.0, UserDefined changes to None after
you click Apply. If you set a second choice to UserDefined, and enter the
same IP address, the second UserDefined changes to None after you click
Apply.
Select None if you do not want to configure DNS servers. You must have
another DHCP sever on your LAN, or else the computers must have their
DNS server addresses manually configured. If you do not configure a DNS
server, you must know the IP address of a computer in order to access it.
RIP & Multicast Setup
RIP Direction Select the RIP direction from None, Both, In Only and Out Only.
RIP Version Select the RIP version from RIP-1, RIP-2B and RIP-2M.
Multicast IGMP (Internet Group Multicast Protocol) is a network-layer protocol used to
establish membership in a multicast group. The ZyXEL Device supports both
IGMP version 1 (IGMP-v1) and IGMP-v2. Select None to disable it.
Windows Networking
(NetBIOS over TCP/IP)
NetBIOS (Network Basic Input/Output System) are TCP or UDP packets that
enable a computer to connect to and communicate with a LAN. For some dial-
up services such as PPPoE or PPTP, NetBIOS packets cause unwanted calls.
However it may sometimes be necessary to allow NetBIOS packets to pass
through to the WAN in order to find a computer on the WAN.
ZyXEL MAX-200M1 Series User’s Guide
80 Chapter 7 WAN Setup
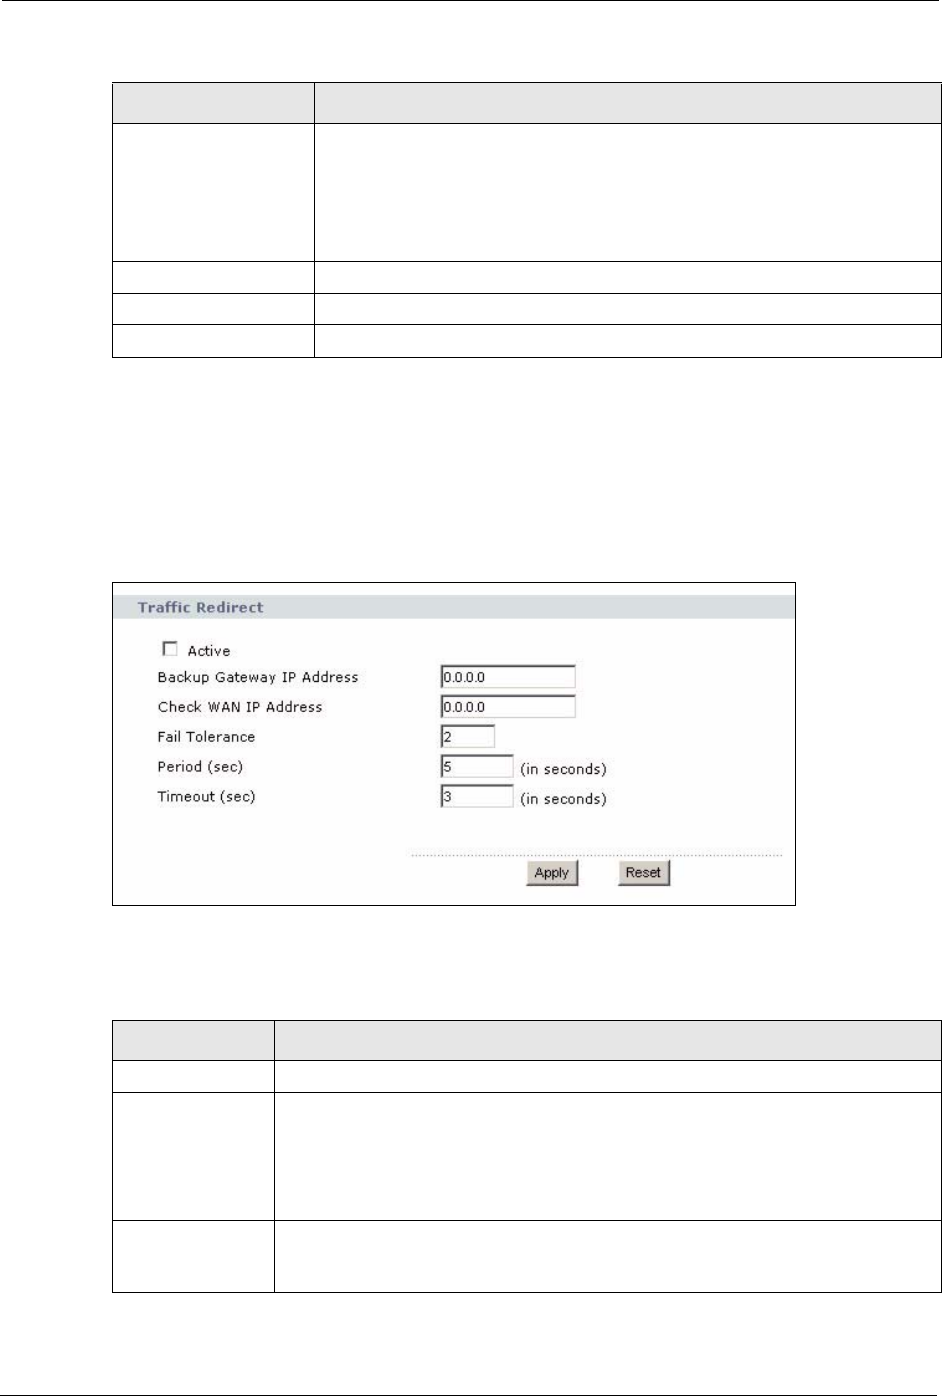
7.6 Configuring Traffic Redirect Settings
To change your ZyXEL Device’s traffic redirect settings, click Network > WAN > Traffic
Redirect. The screen appears as shown.
Figure 45 Network > WAN > Traffic Redirect
The following table describes the labels in this screen.
Allow between LAN
and WAN
Select this check box to forward NetBIOS packets from the LAN to the WAN
and from the WAN to the LAN. If your firewall is enabled with the default policy
set to block WAN to LAN traffic, you also need to enable the default WAN to
LAN firewall rule that forwards NetBIOS traffic.
Clear this check box to block all NetBIOS packets going from the LAN to the
WAN and from the WAN to the LAN.
Allow Trigger Dial Select this option to allow NetBIOS packets to initiate calls.
Apply Click this button to save your settings.
Reset Click this button to return all the fields in this screen to their default values.
Table 18 Network > WAN > Advanced
LABEL DESCRIPTION
Table 19 Network > WAN > Traffic Redirect
LABEL DESCRIPTION
Traffic Redirect
Active Select this check box to have the ZyXEL Device use traffic redirect if the normal
WAN connection goes down.
Note: If you activate traffic redirect, you must configure the Check
WAN IP Address field.
Backup Gateway
IP Address
Type the IP address of your backup gateway in dotted decimal notation. The
ZyXEL Device automatically forwards traffic to this IP address if the ZyXEL
Device's Internet connection terminates.
ZyXEL MAX-200M1 Series User’s Guide
Chapter 7 WAN Setup 81
Check WAN IP
Address
Configure this field to test your ZyXEL Device's WAN accessibility. Type the IP
address of a reliable nearby computer (for example, your ISP's DNS server
address).
Note: If you activate either traffic redirect or dial backup, you must
configure an IP address here.
When using a WAN backup connection, the ZyXEL Device periodically pings the
addresses configured here and uses the other WAN backup connection (if
configured) if there is no response.
Fail Tolerance Type the number of times (2 recommended) that your ZyXEL Device may ping the
IP addresses configured in the Check WAN IP Address field without getting a
response before switching to a WAN backup connection (or a different WAN
backup connection).
Period (sec) The ZyXEL Device tests a WAN connection by periodically sending a ping to either
the default gateway or the address in the Check WAN IP Address field.
Type a number of seconds (5 to 300) to set the time interval between checks. Allow
more time if your destination IP address handles lots of traffic.
Timeout (sec) Type the number of seconds (1 to 10) for your ZyXEL Device to wait for a response
to the ping before considering the check to have failed. This setting must be less
than the Period. Use a higher value in this field if your network is busy or
congested.
Apply Click this button to save your settings.
Reset Click this button to return all the fields in this screen to their default values.
Table 19 Network > WAN > Traffic Redirect
LABEL DESCRIPTION

ZyXEL MAX-200M1 Series User’s Guide
82 Chapter 7 WAN Setup

ZyXEL MAX-200M1 Series User’s Guide
Chapter 8 LAN 83
CHAPTER 8
LAN
Use these screens to set up the ZyXEL Device on the LAN. You can configure its IP address
and subnet mask, DHCP services, and other subnets. You can also control how the ZyXEL
Device sends routing information using RIP, and you can enable and disable Any IP.
8.1 LAN Overview
A Local Area Network (LAN) is a shared communication system to which many computers
are attached. A LAN is usually a computer network limited to the immediate area, such as the
same building or floor of a building.
8.1.1 IP Address and Subnet Mask
Similar to the way houses on a street share a common street name, computers on a LAN share
one common network number.
Where you obtain your network number depends on your particular situation. If the ISP or
your network administrator assigns you a block of registered IP addresses, follow their
instructions in selecting the IP addresses and the subnet mask.
If the ISP did not explicitly give you an IP network number, then most likely you have a single
user account and the ISP will assign you a dynamic IP address when the connection is
established. If this is the case, it is recommended that you select a network number from
192.168.0.0 to 192.168.255.0 and you must enable the Network Address Translation (NAT)
feature of the ZyXEL Device. The Internet Assigned Number Authority (IANA) reserved this
block of addresses specifically for private use; please do not use any other number unless you
are told otherwise. Let's say you select 192.168.1.0 as the network number; which covers 254
individual addresses, from 192.168.1.1 to 192.168.1.254 (zero and 255 are reserved). In other
words, the first three numbers specify the network number while the last number identifies an
individual computer on that network.
Once you have decided on the network number, pick an IP address that is easy to remember,
for instance, 192.168.1.1, for your ZyXEL Device, but make sure that no other device on your
network is using that IP address.
The subnet mask specifies the network number portion of an IP address. Your ZyXEL Device
will compute the subnet mask automatically based on the IP address that you entered. You
don't need to change the subnet mask computed by the ZyXEL Device unless you are
instructed to do otherwise.

ZyXEL MAX-200M1 Series User’s Guide
84 Chapter 8 LAN
8.1.2 DHCP Setup
DHCP (Dynamic Host Configuration Protocol, RFC 2131 and RFC 2132) allows individual
clients to obtain TCP/IP configuration at start-up from a server. You can configure the ZyXEL
Device as a DHCP server or disable it. When configured as a server, the ZyXEL Device
provides the TCP/IP configuration for the clients. If DHCP service is disabled, you must have
another DHCP server on your LAN, or else each computer must be manually configured.
The ZyXEL Device is pre-configured with a pool of IP addresses for the DHCP clients (DHCP
Pool). See the product specifications in the appendices. Do not assign static IP addresses from
the DHCP pool to your LAN computers.
These parameters should work for the majority of installations. If your ISP gives you explicit
DNS server address(es), see Section 8.2.2 on page 88.
8.1.3 LAN TCP/IP
The ZyXEL Device has built-in DHCP server capability that assigns IP addresses and DNS
servers to systems that support DHCP client capability.
The LAN parameters of the ZyXEL Device are preset in the factory with the following values:
• IP address of 192.168.1.1 with subnet mask of 255.255.255.0 (24 bits)
• DHCP server enabled with 32 client IP addresses starting from 192.168.1.33.
These parameters should work for the majority of installations. If your ISP gives you explicit
DNS server address(es), see Section 8.2.2 on page 88.
8.1.4 DNS Server Address
DNS (Domain Name System) is for mapping a domain name to its corresponding IP address
and vice versa. The DNS server is extremely important because without it, you must know the
IP address of a machine before you can access it. The DNS server addresses that you enter in
the DHCP setup are passed to the client machines along with the assigned IP address and
subnet mask.
There are two ways that an ISP disseminates the DNS server addresses. The first is for an ISP
to tell a customer the DNS server addresses, usually in the form of an information sheet, when
s/he signs up. If your ISP gives you the DNS server addresses, enter them in the DNS Server
fields in DHCP Setup, otherwise, leave them blank.
Some ISPs choose to pass the DNS servers using the DNS server extensions of PPP IPCP (IP
Control Protocol) after the connection is up. If your ISP did not give you explicit DNS servers,
chances are the DNS servers are conveyed through IPCP negotiation. The ZyXEL Device
supports the IPCP DNS server extensions through the DNS proxy feature.

ZyXEL MAX-200M1 Series User’s Guide
Chapter 8 LAN 85
If the Primary and Secondary DNS Server fields in the LAN Setup screen are not specified,
for instance, left as 0.0.0.0, the ZyXEL Device tells the DHCP clients that it itself is the DNS
server. When a computer sends a DNS query to the ZyXEL Device, the ZyXEL Device
forwards the query to the real DNS server learned through IPCP and relays the response back
to the computer.
Please note that DNS proxy works only when the ISP uses the IPCP DNS server extensions. It
does not mean you can leave the DNS servers out of the DHCP setup under all circumstances.
If your ISP gives you explicit DNS servers, make sure that you enter their IP addresses in the
LAN Setup screen. This way, the ZyXEL Device can pass the DNS servers to the computers
and the computers can query the DNS server directly without the ZyXEL Device’s
intervention.
8.1.5 RIP Setup
RIP (Routing Information Protocol) allows a router to exchange routing information with
other routers. The RIP Direction field controls the sending and receiving of RIP packets.
When set to:
•Both - the ZyXEL Device will broadcast its routing table periodically and incorporate the
RIP information that it receives.
•In Only - the ZyXEL Device will not send any RIP packets but will accept all RIP
packets received.
•Out Only - the ZyXEL Device will send out RIP packets but will not accept any RIP
packets received.
•None - the ZyXEL Device will not send any RIP packets and will ignore any RIP packets
received.
The Version field controls the format and the broadcasting method of the RIP packets that the
ZyXEL Device sends (it recognizes both formats when receiving). RIP-1 is universally
supported; but RIP-2 carries more information. RIP-1 is probably adequate for most networks,
unless you have an unusual network topology.
Both RIP-2B and RIP-2M sends the routing data in RIP-2 format; the difference being that
RIP-2B uses subnet broadcasting while RIP-2M uses multicasting.
8.1.6 Multicast
Traditionally, IP packets are transmitted in one of either two ways - Unicast (1 sender - 1
recipient) or Broadcast (1 sender - everybody on the network). Multicast delivers IP packets to
a group of hosts on the network - not everybody and not just 1.
IGMP (Internet Group Multicast Protocol) is a network-layer protocol used to establish
membership in a Multicast group - it is not used to carry user data. IGMP version 2 (RFC
2236) is an improvement over version 1 (RFC 1112) but IGMP version 1 is still in wide use. If
you would like to read more detailed information about interoperability between IGMP
version 2 and version 1, please see sections 4 and 5 of RFC 2236. The class D IP address is
used to identify host groups and can be in the range 224.0.0.0 to 239.255.255.255. The address

ZyXEL MAX-200M1 Series User’s Guide
86 Chapter 8 LAN
224.0.0.0 is not assigned to any group and is used by IP multicast computers. The address
224.0.0.1 is used for query messages and is assigned to the permanent group of all IP hosts
(including gateways). All hosts must join the 224.0.0.1 group in order to participate in IGMP.
The address 224.0.0.2 is assigned to the multicast routers group.
The ZyXEL Device supports both IGMP version 1 (IGMP-v1) and IGMP version 2 (IGMP-
v2). At start up, the ZyXEL Device queries all directly connected networks to gather group
membership. After that, the ZyXEL Device periodically updates this information. IP
multicasting can be enabled/disabled on the ZyXEL Device LAN and/or WAN interfaces in
the web configurator (LAN; WAN ). Select None to disable IP multicasting on these
interfaces.
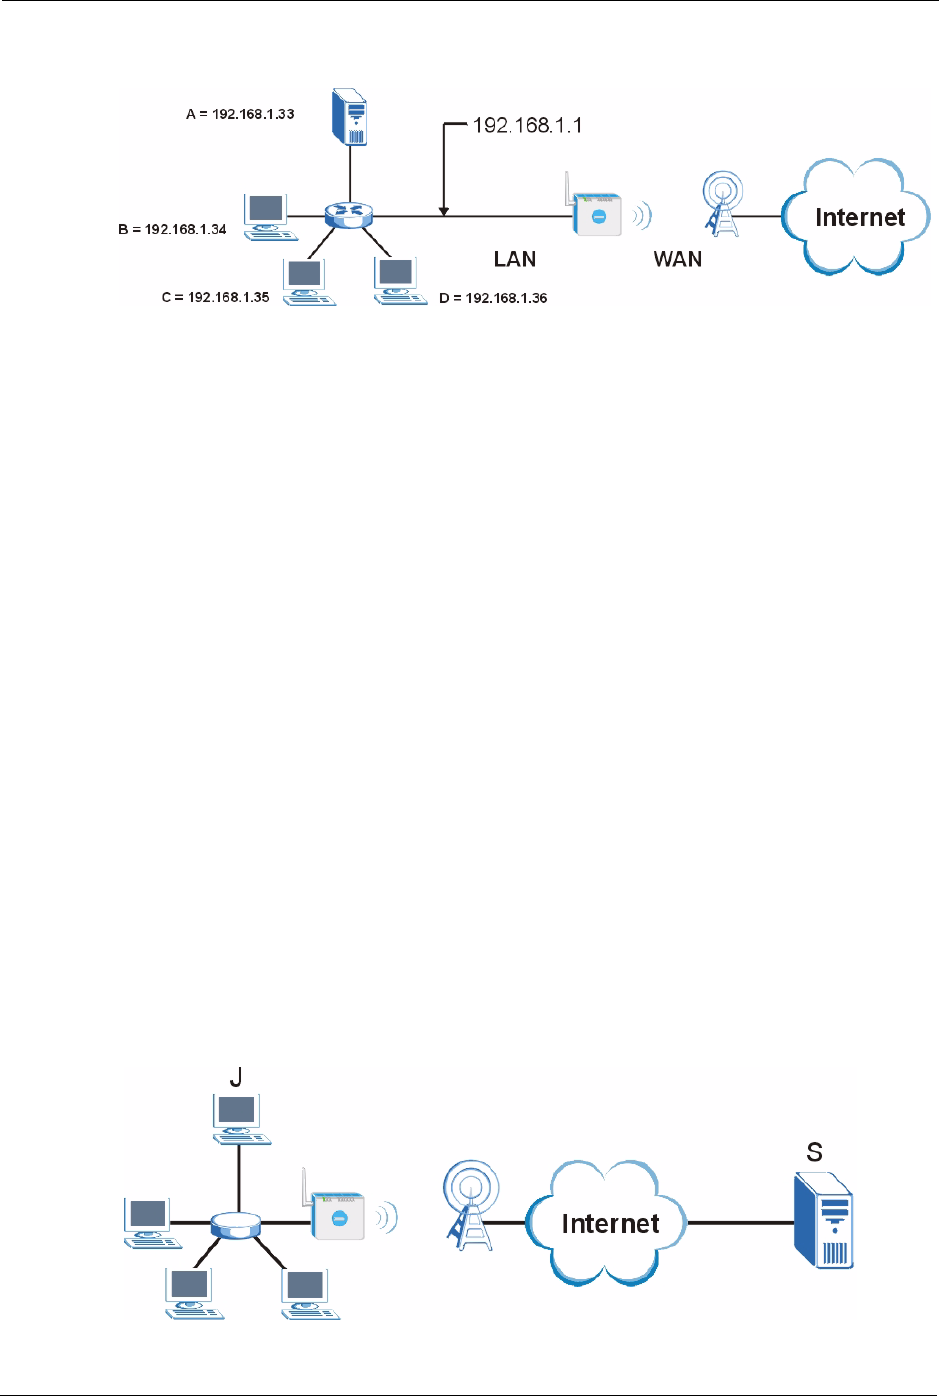
8.1.7 Any IP
Traditionally, you must set the IP addresses and the subnet masks of a computer and the
ZyXEL Device to be in the same subnet to allow the computer to access the Internet (through
the ZyXEL Device). In cases where your computer is required to use a static IP address in
another network, you may need to manually configure the network settings of the computer
every time you want to access the Internet via the ZyXEL Device.
With the Any IP feature and NAT enabled, the ZyXEL Device allows a computer to access the
Internet without changing the network settings (such as IP address and subnet mask) of the
computer, when the IP addresses of the computer and the ZyXEL Device are not in the same
subnet. Whether a computer is set to use a dynamic or static (fixed) IP address, you can simply
connect the computer to the ZyXEL Device and access the Internet.
The following figure depicts a scenario where a computer is set to use a static private IP
address in the corporate environment. In a residential house where a ZyXEL Device is
installed, you can still use the computer to access the Internet without changing the network
settings, even when the IP addresses of the computer and the ZyXEL Device are not in the
same subnet.

ZyXEL MAX-200M1 Series User’s Guide
Chapter 8 LAN 87
Figure 46 Any IP Example
The Any IP feature does not apply to a computer using either a dynamic IP address or a static
IP address that is in the same subnet as the ZyXEL Device’s IP address.
Note: You must enable NAT to use the Any IP feature on the ZyXEL Device.
Address Resolution Protocol (ARP) is a protocol for mapping an Internet Protocol address (IP
address) to a physical machine address, also known as a Media Access Control or MAC
address, on the local area network. IP routing table is defined on IP Ethernet devices (the
ZyXEL Device) to decide which hop to use, to help forward data along to its specified
destination.
The following lists out the steps taken, when a computer tries to access the Internet for the first
time through the ZyXEL Device.
1When a computer (which is in a different subnet) first attempts to access the Internet, it
sends packets to its default gateway (which is not the ZyXEL Device) by looking at the
MAC address in its ARP table.
2When the computer cannot locate the default gateway, an ARP request is broadcast on the
LAN.
3The ZyXEL Device receives the ARP request and replies to the computer with its own
MAC address.
4The computer updates the MAC address for the default gateway to the ARP table. Once
the ARP table is updated, the computer is able to access the Internet through the ZyXEL
Device.
5When the ZyXEL Device receives packets from the computer, it creates an entry in the IP
routing table so it can properly forward packets intended for the computer.
After all the routing information is updated, the computer can access the ZyXEL Device and
the Internet as if it is in the same subnet as the ZyXEL Device.

ZyXEL MAX-200M1 Series User’s Guide
88 Chapter 8 LAN
8.2 LAN Screens
8.2.1 LAN IP Screen
Use this screen to set up the ZyXEL Device’s IP address and subnet mask. To access this
screen, click Network > LAN > IP.
Figure 47 Network > LAN > IP
Each field is described in the following table.
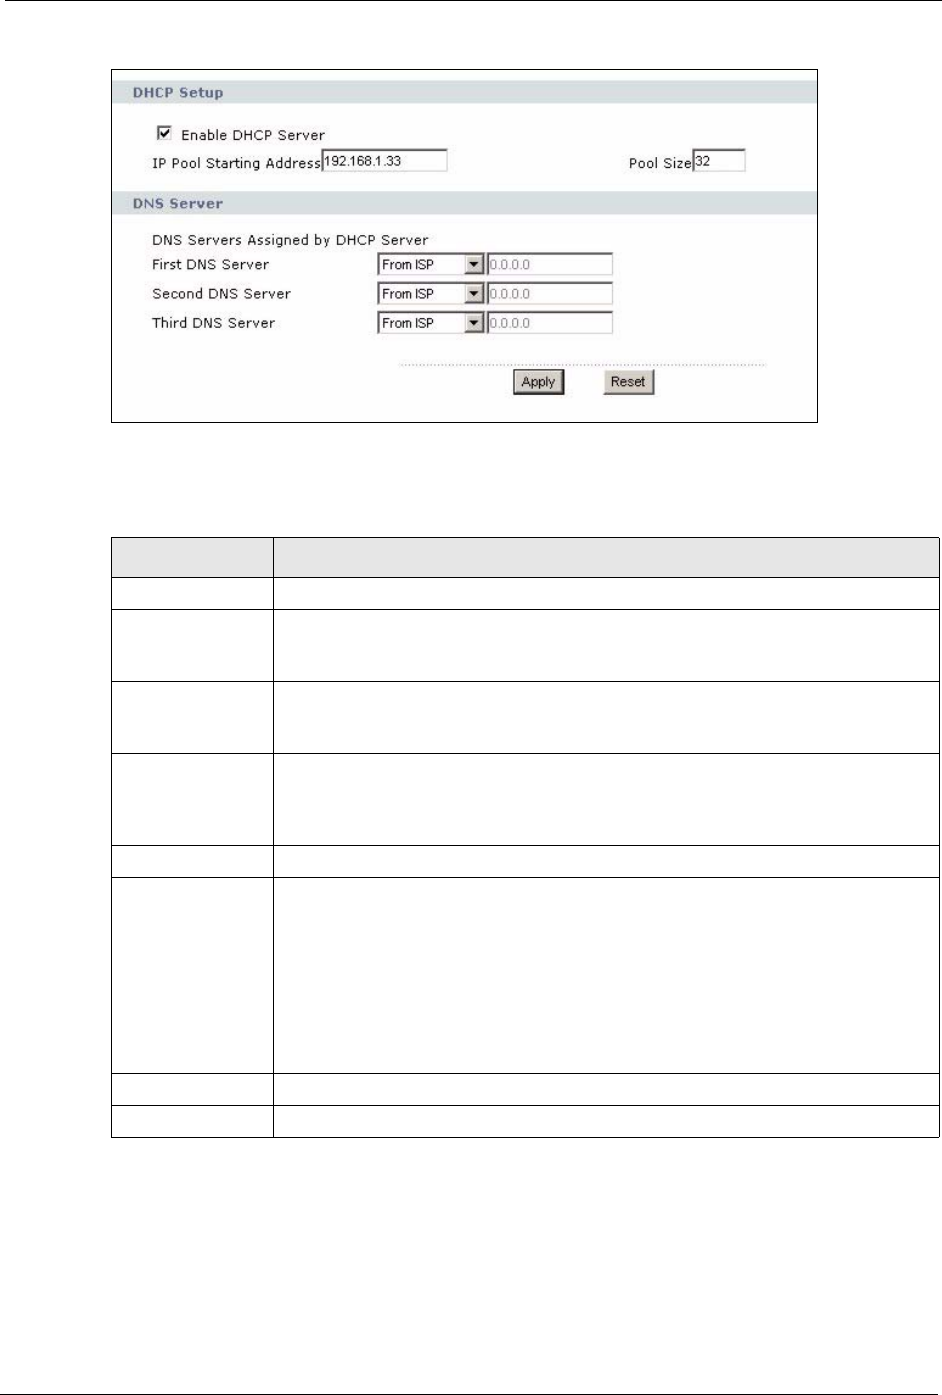
8.2.2 LAN DHCP Setup Screen
Use this screen to enable, disable, and configure the DHCP server in the ZyXEL Device. To
access this screen, click Network > LAN > DHCP Setup.
Table 20 Network > LAN > IP
LABEL DESCRIPTION
IP Address Enter the IP address of the ZyXEL Device on the LAN.
Note: This field is the IP address you use to access the ZyXEL
Device on the LAN. If the web configurator is running on a
computer on the LAN, you lose access to the web
configurator as soon as you change this field and click Apply.
You can access the web configurator again by typing the new
IP address in the browser.
IP Subnet Mask Enter the subnet mask of the LAN.
Apply Click this to save your changes.
Reset Click this to set every field in this screen to its default value.
ZyXEL MAX-200M1 Series User’s Guide
Chapter 8 LAN 89
Figure 48 Network > LAN > DHCP Setup
Each field is described in the following table.
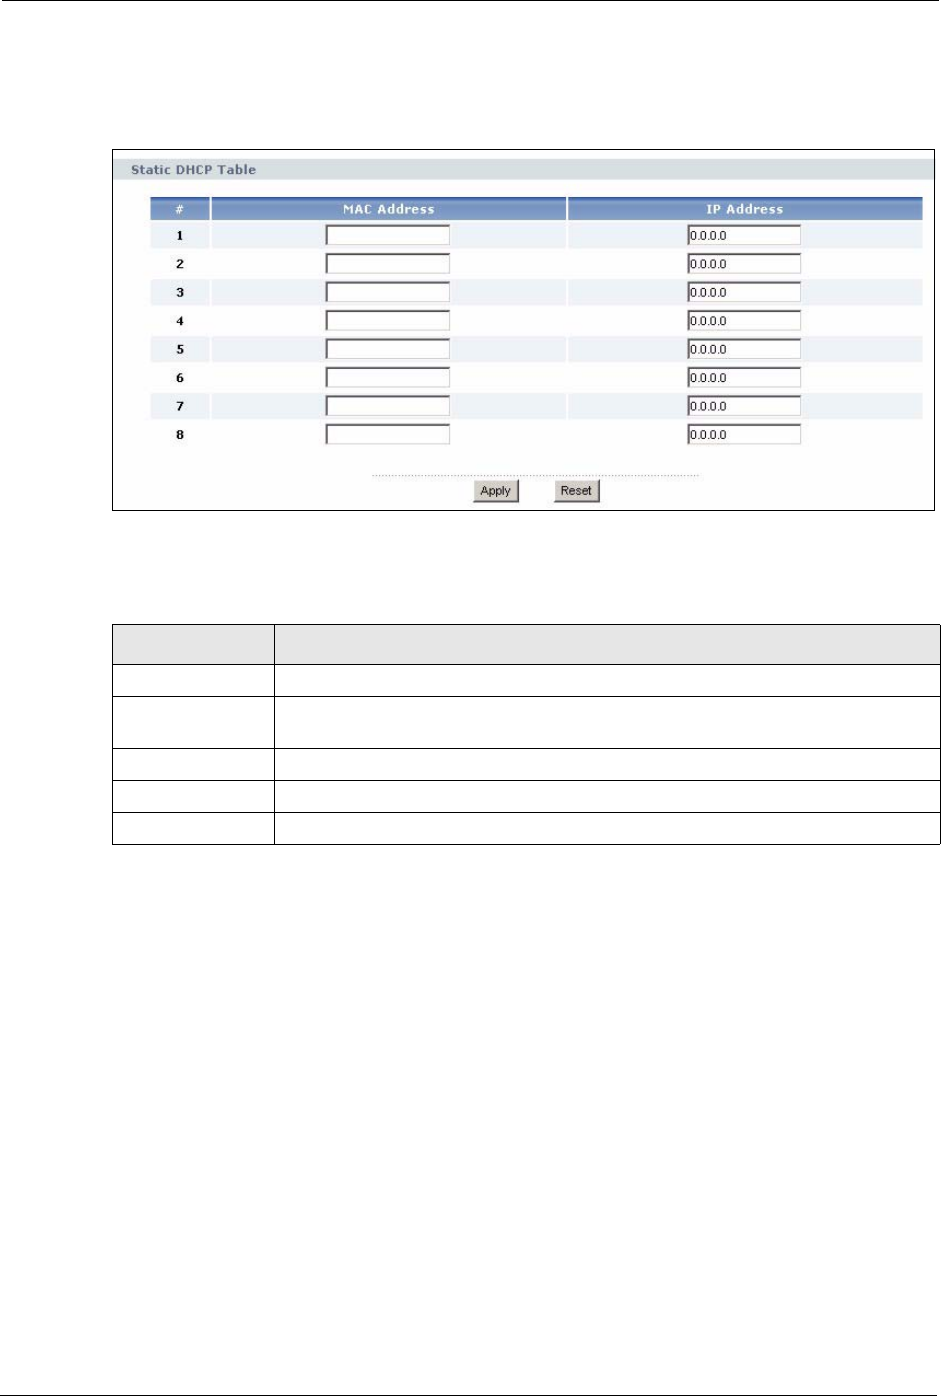
8.2.3 LAN Static DHCP Screen
Note: This screen has no effect if the DHCP server is not enabled. You can enable it
in Network > LAN > DHCP Setup.
Table 21 Network > LAN > DHCP Setup
LABEL DESCRIPTION
DHCP Setup
Enable DHCP
Server
Select this if you want the ZyXEL Device to be the DHCP server on the LAN. As a
DHCP server, the ZyXEL Device assigns IP addresses to DHCP clients on the
LAN and provides the subnet mask and DNS server information.
IP Pool Starting
Address
Enter the IP address from which the ZyXEL Device begins allocating IP addresses,
if you have not specified an IP address for this computer in Network > LAN >
Static DHCP.
Pool Size Enter the number of IP addresses to allocate. This number must be at least one
and is limited by a subnet mask of 255.255.255.0 (regardless of the subnet the
ZyXEL Device is in). For example, if the IP Pool Start Address is 10.10.10.10, the
ZyXEL Device can allocate up to 10.10.10.254, or 245 IP addresses.
DNS Server
First DNS Server
Second DNS
Server
Third DNS Server
Specify the IP addresses of a maximum of three DNS servers that the network can
use. The ZyXEL Device provides these IP addresses to DHCP clients. You can
specify these IP addresses two ways.
From ISP - provide the DNS servers provided by the ISP on the WAN port.
User Defined - enter a static IP address.
DNS Relay - this setting will relay DNS information from the DNS server obtained
by the ZyXEL Device.
None - no DNS service will be provided by the ZyXEL Device.
Apply Click this to save your changes.
Reset Click this to set every field in this screen to its default value.
ZyXEL MAX-200M1 Series User’s Guide
90 Chapter 8 LAN
Use this screen to make the ZyXEL Device assign a specific IP address to a specific computer
on the LAN. To access this screen, click Network > LAN > Static DHCP.
Figure 49 Network > LAN > Static DHCP
Each field is described in the following table.
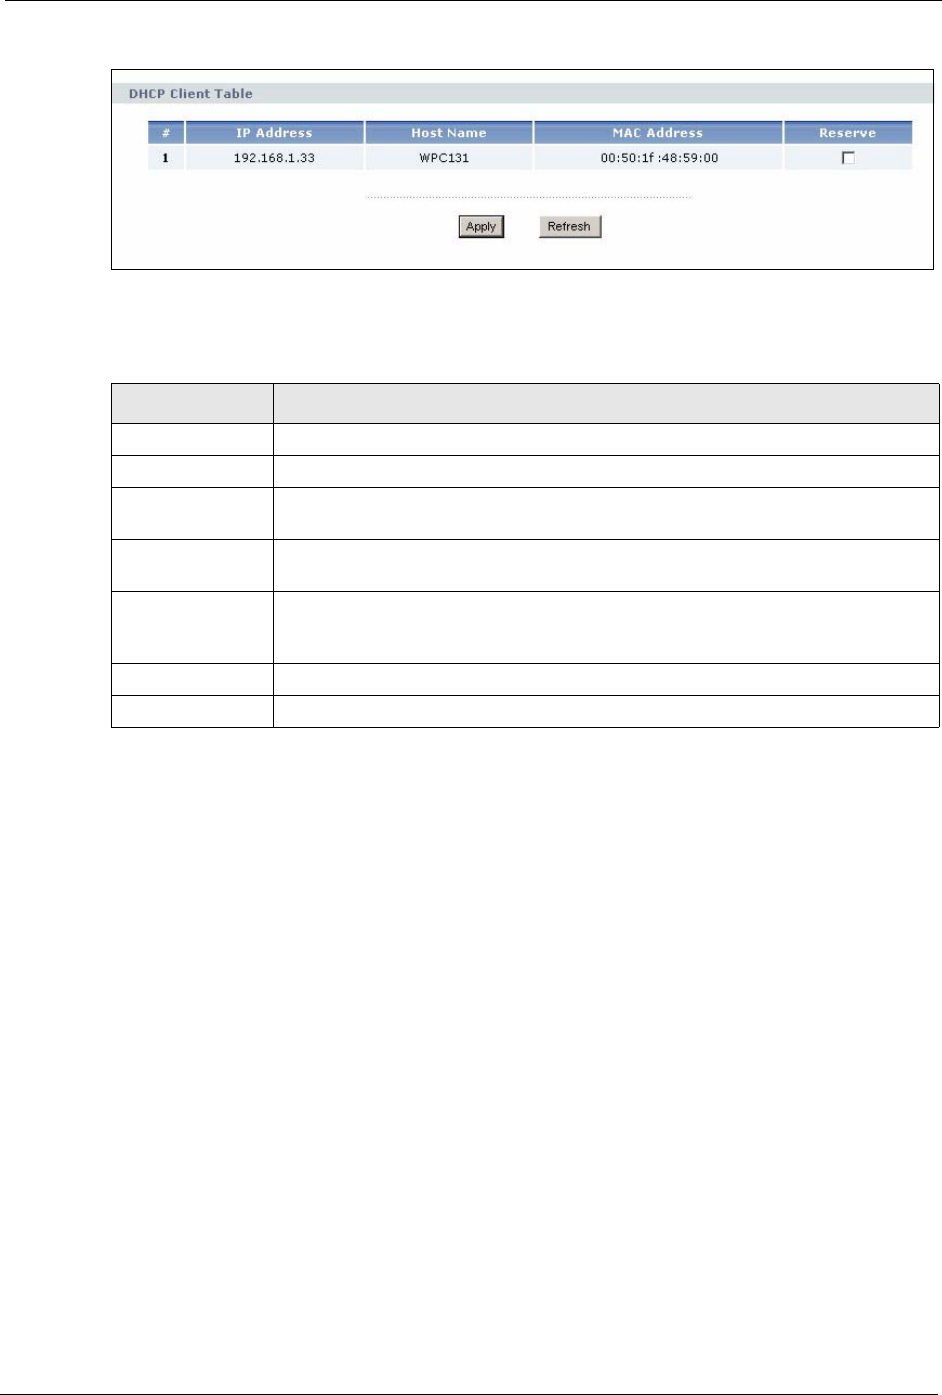
8.2.4 LAN Client List Screen
Note: This screen is empty if the DHCP server is not enabled. You can enable it in
Network > LAN > DHCP Setup.
Use this screen to look at the IP addresses the ZyXEL Device has assigned to DHCP clients on
the LAN. To access this screen, click Network > LAN > Client List.
Table 22 Network > LAN > Static DHCP
LABEL DESCRIPTION
#This field is a sequential value. It is not associated with a specific entry.
MAC Address Enter the MAC address of the computer to which you want the ZyXEL Device to
assign the same IP address.
IP Address Enter the IP address you want the ZyXEL Device to assign to the computer.
Apply Click this to save your changes.
Reset Click this to set every field in this screen to its default value.
ZyXEL MAX-200M1 Series User’s Guide
Chapter 8 LAN 91
Figure 50 Network > LAN > Client List
Each field is described in the following table.
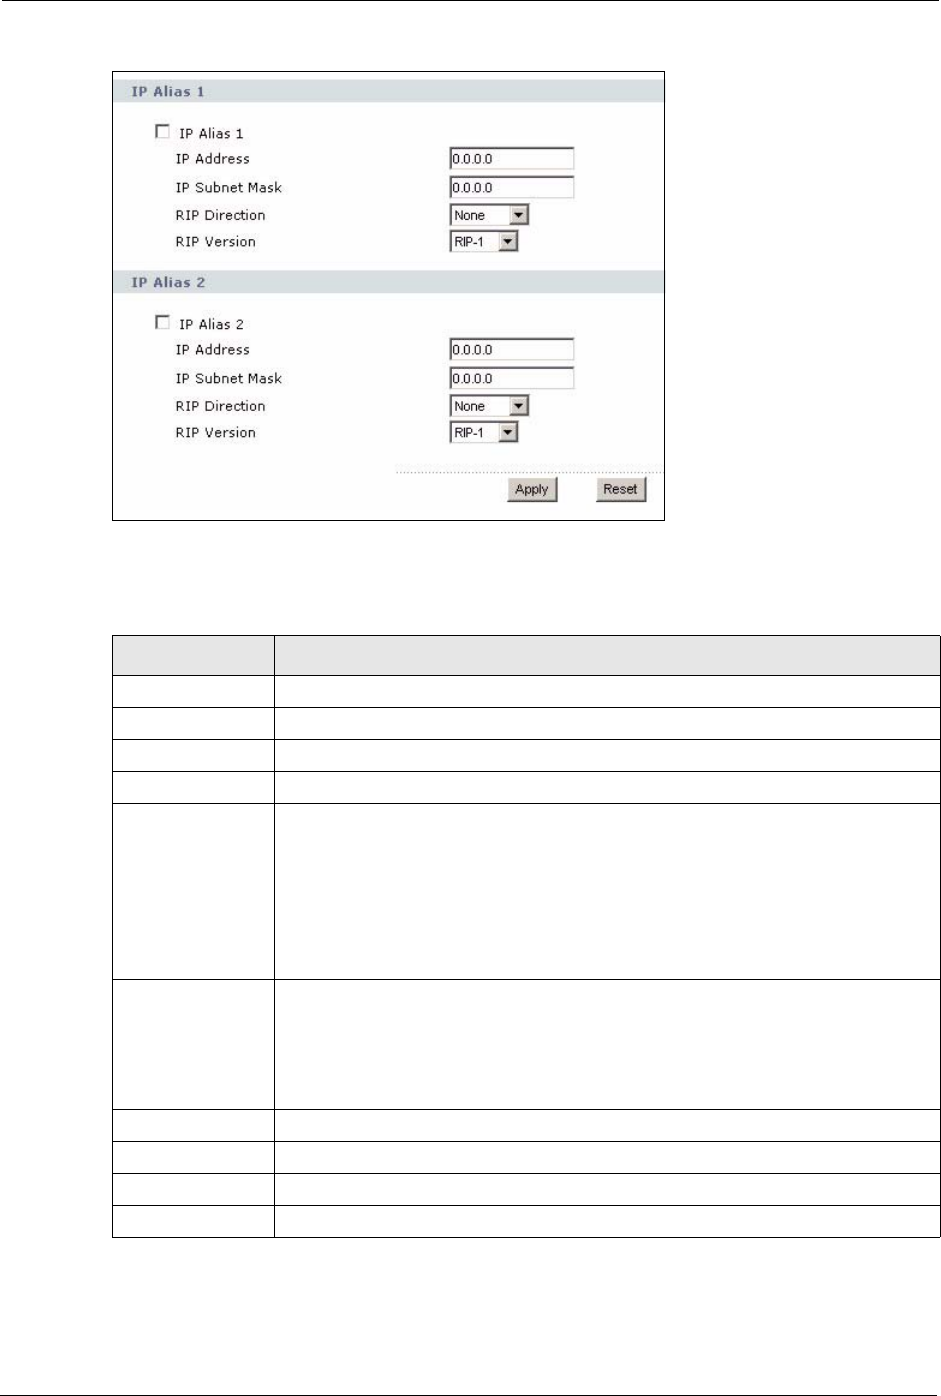
8.2.5 LAN IP Alias Screen
Use this screen to add subnets on the LAN port. You can also control what routing information
is sent and received by each subnet. To access this screen, click Network > LAN > IP Alias.
Table 23 Network > LAN > Client List
LABEL DESCRIPTION
#This field is a sequential value. It is not associated with a specific entry.
IP Address This field displays the IP address the ZyXEL Device assigned to the computer.
Host Name This field displays the system name of the computer to which the ZyXEL Device
assigned the IP address.
MAC Address This field displays the MAC address of the computer to which the ZyXEL Device
assigned the IP address.
Reserve Select this if you want to always assign this IP address to this MAC address. Then,
click Apply. The ZyXEL Device creates an entry in the LAN Static DHCP screen.
See Section 8.2.2 on page 88.
Apply Click this to save your changes and to apply them to the ZyXEL Device.
Reset Click this to set every field in this screen to its default value.
ZyXEL MAX-200M1 Series User’s Guide
92 Chapter 8 LAN
Figure 51 Network > LAN > IP Alias
Each field is described in the following table.
Table 24 Network > LAN > IP Alias
LABEL DESCRIPTION
IP Alias 1
IP Alias 1 Select this to add the specified subnet to the LAN port.
IP Address Enter the IP address of the ZyXEL Device on the subnet.
IP Subnet Mask Enter the subnet mask of the subnet.
RIP Direction Use this field to control how much routing information the ZyXEL Device sends and
receives on the subnet.
None - The ZyXEL Device does not send or receive routing information on the
subnet.
Both - The ZyXEL Device sends and receives routing information on the subnet.
In Only - The ZyXEL Device only receives routing information on the subnet.
Out Only - The ZyXEL Device only sends routing information on the subnet.
RIP Version Select which version of RIP the ZyXEL Device uses when it sends or receives
information on the subnet.
RIP-1 - The ZyXEL Device uses RIPv1 to exchange routing information.
RIP-2B - The ZyXEL Device broadcasts RIPv2 to exchange routing information.
RIP-2M - The ZyXEL Device multicasts RIPv2 to exchange routing information.
IP Alias 2
IP Alias 2 Select this to add the specified subnet to the LAN port.
IP Address Enter the IP address of the ZyXEL Device on the subnet.
IP Subnet Mask Enter the subnet mask of the subnet.

ZyXEL MAX-200M1 Series User’s Guide
Chapter 8 LAN 93
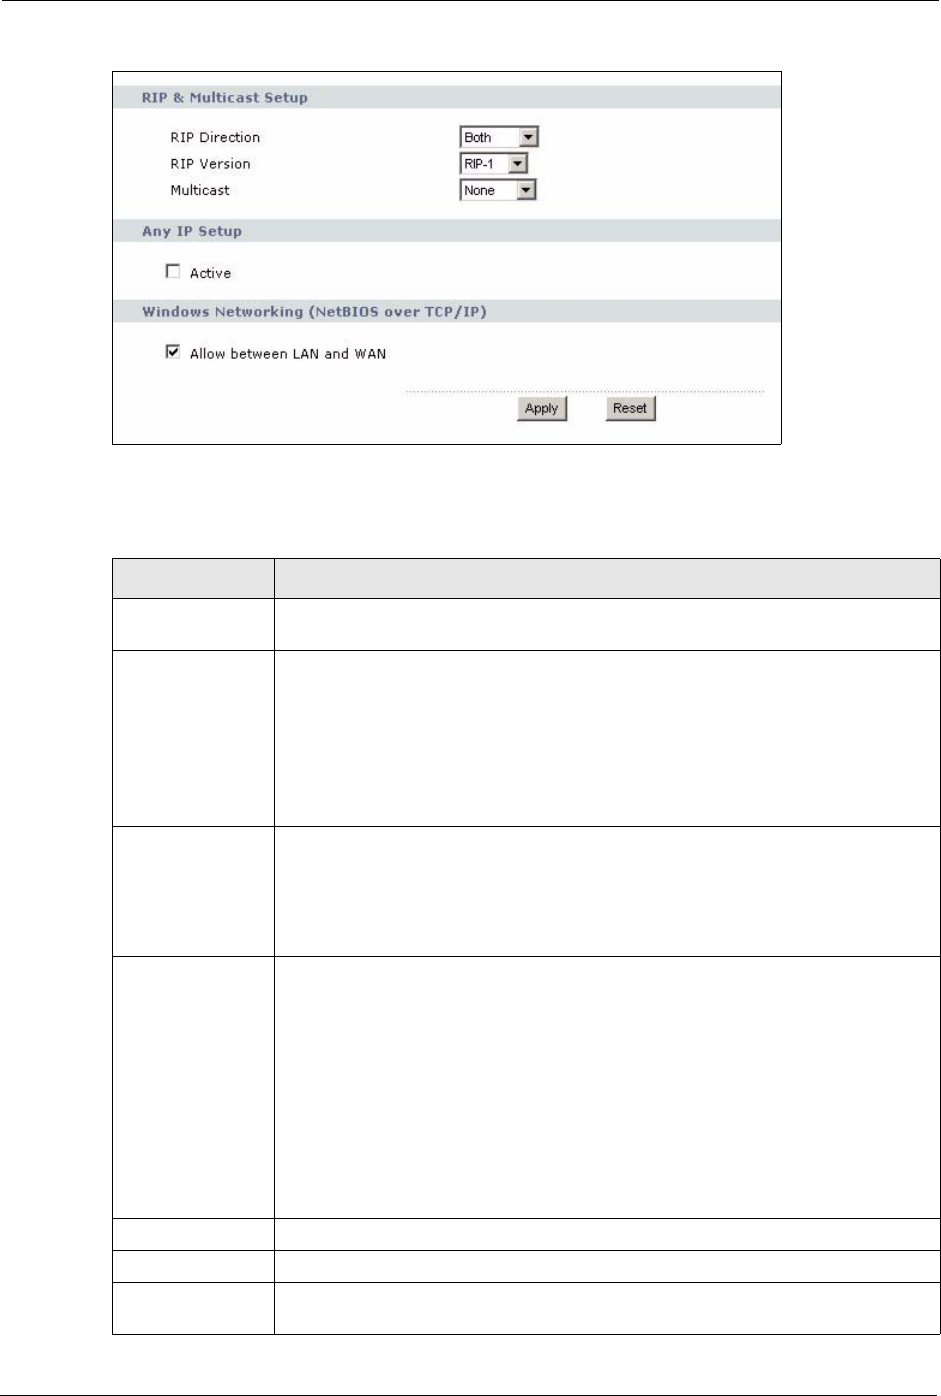
8.2.6 LAN Advanced Screen
Use this screen to activate or deactivate the Any IP feature. You can also control what routing
information is sent and received by each subnet. To access this screen, click Network > LAN
> Advanced.
RIP Direction Use this field to control how much routing information the ZyXEL Device sends and
receives on the subnet.
None - The ZyXEL Device does not send or receive routing information on the
subnet.
Both - The ZyXEL Device sends and receives routing information on the subnet.
In Only - The ZyXEL Device only receives routing information on the subnet.
Out Only - The ZyXEL Device only sends routing information on the subnet.
RIP Version Select which version of RIP the ZyXEL Device uses when it sends or receives
information on the subnet.
RIP-1 - The ZyXEL Device uses RIPv1 to exchange routing information.
RIP-2B - The ZyXEL Device broadcasts RIPv2 to exchange routing information.
RIP-2M - The ZyXEL Device multicasts RIPv2 to exchange routing information.
Apply Click this to save your changes.
Reset Click this to set every field in this screen to its default value.
Table 24 Network > LAN > IP Alias
LABEL DESCRIPTION
ZyXEL MAX-200M1 Series User’s Guide
94 Chapter 8 LAN
Figure 52 Network > LAN > Advanced
Each field is described in the following table.
Table 25 Network > LAN > Advanced
LABEL DESCRIPTION
RIP & Multicast
Setup
RIP Direction Use this field to control how much routing information the ZyXEL Device sends and
receives on the subnet.
None - The ZyXEL Device does not send or receive routing information on the
subnet.
Both - The ZyXEL Device sends and receives routing information on the subnet.
In Only - The ZyXEL Device only receives routing information on the subnet.
Out Only - The ZyXEL Device only sends routing information on the subnet.
RIP Version Select which version of RIP the ZyXEL Device uses when it sends or receives
information on the subnet.
RIP-1 - The ZyXEL Device uses RIPv1 to exchange routing information.
RIP-2B - The ZyXEL Device broadcasts RIPv2 to exchange routing information.
RIP-2M - The ZyXEL Device multicasts RIPv2 to exchange routing information.
Multicast You do not have to enable multicasting to use RIP-2M. (See RIP Version.)
Select which version of IGMP the ZyXEL Device uses to support multicasting on
the LAN. Multicasting sends packets to some computers on the LAN and is an
alternative to unicasting (sending packets to one computer) and broadcasting
(sending packets to every computer).
None - The ZyXEL Device does not support multicasting.
IGMP-v1 - The ZyXEL Device supports IGMP version 1.
IGMP-v2 - The ZyXEL Device supports IGMP version 2.
Multicasting can improve overall network performance. However, it requires extra
processing and generates more network traffic. In addition, other computers on the
LAN have to support the same version of IGMP.
Any IP Setup
Active Select this if you want to let computers on different subnets use the ZyXEL Device.
Windows
Networking
NetBIOS over TCP/IP

ZyXEL MAX-200M1 Series User’s Guide
Chapter 8 LAN 95
Allow between
LAN and WAN
Select this check box if you want the ZyXEL Device to send NetBIOS (Network
Basic Input/Output System) packets between the LAN and WAN. You should also
make sure that NetBIOS packets are not blocked in Security > Firewall >
Services.
NetBIOS packets are TCP or UDP packets that enable a computer to connect to
and communicate with computers on other networks. It may sometimes be
necessary to allow NetBIOS packets to pass through the ZyXEL Device in order to
allow computers on the LAN to find computers on the WAN and vice versa.
This is the same setting you can set in Network > WAN > Advanced.
Apply Click this to save your changes and to apply them to the ZyXEL Device.
Reset Click this to set every field in this screen to its default value.
Table 25 Network > LAN > Advanced
LABEL DESCRIPTION

ZyXEL MAX-200M1 Series User’s Guide
96 Chapter 8 LAN

ZyXEL MAX-200M1 Series User’s Guide
Chapter 9 NAT 97
CHAPTER 9
NAT
Use these screens to configure port forwarding and trigger ports for the ZyXEL Device. You
can also enable and disable SIP, FTP, and H.323 ALG.
9.1 NAT Overview
9.1.1 Port Forwarding: Services and Port Numbers
A NAT server set is a list of inside (behind NAT on the LAN) servers, for example, web or
FTP, that you can make accessible to the outside world even though NAT makes your whole
inside network appear as a single machine to the outside world.
Use the NAT Port Forwarding Screen to forward incoming service requests to the server(s) on
your local network. You may enter a single port number or a range of port numbers to be
forwarded, and the local IP address of the desired server. The port number identifies a service;
for example, web service is on port 80 and FTP on port 21. In some cases, such as for
unknown services or where one server can support more than one service (for example both
FTP and web service), it might be better to specify a range of port numbers.
In addition to the servers for specified services, NAT supports a default server. A service
request that does not have a server explicitly designated for it is forwarded to the default
server. If the default is not defined, the service request is simply discarded.
See Appendix F on page 249 for some examples of services.
For example, let's say you want to assign ports 21-25 to one FTP, Telnet and SMTP server (A
in the example), port 80 to another (B in the example) and assign a default server IP address of
192.168.1.35 to a third (C in the example). You assign the LAN IP addresses and the ISP
assigns the WAN IP address. The NAT network appears as a single host on the Internet.
ZyXEL MAX-200M1 Series User’s Guide
98 Chapter 9 NAT
Figure 53 Multiple Servers Behind NAT Example
9.1.2 Trigger Port Forwarding
Some services use a dedicated range of ports on the client side and a dedicated range of ports
on the server side. With regular port forwarding you set a forwarding port in NAT to forward a
service (coming in from the server on the WAN) to the IP address of a computer on the client
side (LAN). The problem is that port forwarding only forwards a service to a single LAN IP
address. In order to use the same service on a different LAN computer, you have to manually
replace the LAN computer's IP address in the forwarding port with another LAN computer's IP
address,
Trigger port forwarding solves this problem by allowing computers on the LAN to
dynamically take turns using the service. The ZyXEL Device records the IP address of a LAN
computer that sends traffic to the WAN to request a service with a specific port number and
protocol (a "trigger" port). When the ZyXEL Device's WAN port receives a response with a
specific port number and protocol ("incoming" port), the ZyXEL Device forwards the traffic
to the LAN IP address of the computer that sent the request. After that computer’s connection
for that service closes, another computer on the LAN can use the service in the same manner.
This way you do not need to configure a new IP address each time you want a different LAN
computer to use the application.
9.1.2.1 Trigger Port Forwarding Example
The following is an example of trigger port forwarding. In this example, J is Jane’s computer
and S is the Real Audio server.
Figure 54 Trigger Port Forwarding Process: Example

ZyXEL MAX-200M1 Series User’s Guide
Chapter 9 NAT 99
1Jane requests a file from the Real Audio server (port 7070).
2Port 7070 is a “trigger” port and causes the ZyXEL Device to record Jane’s computer IP
address. The ZyXEL Device associates Jane's computer IP address with the "incoming"
port range of 6970-7170.
3The Real Audio server responds using a port number ranging between 6970-7170.
4The ZyXEL Device forwards the traffic to Jane’s computer IP address.
5Only Jane can connect to the Real Audio server until the connection is closed or times
out. The ZyXEL Device times out in three minutes with UDP (User Datagram Protocol),
or two hours with TCP/IP (Transfer Control Protocol/Internet Protocol).
9.1.2.2 Two Points To Remember About Trigger Ports
1Trigger events only happen on data that is coming from inside the ZyXEL Device and
going to the outside.
2If an application needs a continuous data stream, that port (range) will be tied up so that
another computer on the LAN can’t trigger it.
9.1.3 SIP ALG
Some applications, such as SIP, cannot operate through NAT (are NAT un-friendly) because
they embed IP addresses and port numbers in their packets’ data payload.
Some NAT routers may include a SIP Application Layer Gateway (ALG). An Application
Layer Gateway (ALG) manages a specific protocol (such as SIP, H.323 or FTP) at the
application layer.
A SIP ALG allows SIP calls to pass through NAT by examining and translating IP addresses
embedded in the data stream.
When the ZyXEL Device registers with the SIP register server, the SIP ALG translates the
ZyXEL Device’s private IP address inside the SIP data stream to a public IP address. You do
not need to use STUN or an outbound proxy (see Chapter 10 on page 105) if your ZyXEL
Device is behind a SIP ALG.
9.2 NAT Screens
9.2.1 NAT General Screen
Use this screen to enable and disable NAT and to allocate memory for NAT and firewall rules.
To access this screen, click Network > NAT > General.
ZyXEL MAX-200M1 Series User’s Guide
100 Chapter 9 NAT
Figure 55 Network > NAT > General
Each field is described in the following table.
9.2.2 NAT Port Forwarding Screen
Use this screen to look at the current port-forwarding rules in the ZyXEL Device, and to
enable, disable, activate, and deactivate each one. You can also set up a default server to
handle ports not covered by rules. To access this screen, click Network > NAT > Port
Forwarding.
Table 26 Network > NAT > General
LABEL DESCRIPTION
NAT Setup
Enable Network
Address
Translation
Select this if you want to use port forwarding, trigger ports, or any of the ALG.
Max NAT/Firewall
Session Per User
When computers use peer to peer applications, such as file sharing
applications, they may use a large number of NAT sessions. If you do not
limit the number of NAT sessions a single client can establish, this can result in all
of the available NAT sessions being used. In this case, no additional NAT sessions
can be established, and users may not be able to access the Internet.
Each NAT session establishes a corresponding firewall session. Use this field to
limit the number of NAT/firewall sessions each client computer can establish
through the ZyXEL Device.
If your network has a small number of clients using peer to peer applications, you
can raise this number to ensure that their performance is not degraded by the
number of NAT sessions they can establish. If your network has a large number of
users using peer to peer applications, you can lower this number to ensure no
single client is using all of the available NAT sessions.
Apply Click this to save your changes and to apply them to the ZyXEL Device.
Cancel Click this to set every field in this screen to its last-saved value.
ZyXEL MAX-200M1 Series User’s Guide
Chapter 9 NAT 101
Figure 56 Network > NAT > Port Forwarding
Each field is described in the following table.
Table 27 Network > NAT > Port Forwarding
LABEL DESCRIPTION
Default Server
Setup
Default Server Enter the IP address of the server to which the ZyXEL Device should forward
packets for ports that are not specified in the Port Forwarding section below or in
the Management > Remote MGMT screens. Enter 0.0.0.0 if you want the ZyXEL
Device to discard these packets instead.
Port Forwarding
#This field is a sequential value, and it is not associated with a specific rule. The
sequence is important, however. The ZyXEL Device checks each rule in order, and
it only follows the first one that applies.
Active Select this to enable this rule. Clear this to disable this rule.
Name This field displays the name of the rule. It does not have to be unique.
Start Port This field displays the beginning of the range of port numbers forwarded by this
rule.
End Port This field displays the end of the range of port numbers forwarded by this rule. If it
is the same as the Start Port, only one port number is forwarded.
Server IP Address This field displays the IP address of the server to which packet for the selected
port(s) are forwarded.
Modify This column provides icons to edit and delete rules.
To edit a rule, click the Edit icon next to the rule. The NAT Port Forwarding Edit
screen appears.
To delete a rule, click the Remove icon next to the rule. All the information in the
rule returns to the default settings.
Apply Click this to save your changes and to apply them to the ZyXEL Device.
Reset Click this to set every field in this screen to its last-saved value.
ZyXEL MAX-200M1 Series User’s Guide
102 Chapter 9 NAT
9.2.3 NAT Port Forwarding Edit Screen
Use this screen to activate, deactivate, and edit each port-forwarding rule in the ZyXEL
Device. To access this screen, click an Edit icon in Network > NAT > Port Forwarding.
Figure 57 Network > NAT > Port Forwarding > Edit
Each field is described in the following table.
9.2.4 NAT Trigger Port Screen
Use this screen to maintain port-triggering rules in the ZyXEL Device. To access this screen,
click Network > NAT > Trigger Port.
Table 28 Network > NAT > Port Forwarding > Edit
LABEL DESCRIPTION
Active Select this to enable this rule. Clear this to disable this rule.
Service Name Enter a name to identify this rule. You can use 1 - 31 printable ASCII characters, or
you can leave this field blank. It does not have to be a unique name.
Start Port
End Port
Enter the port number or range of port numbers you want to forward to the
specified server.
To forward one port number, enter the port number in the Start Port and End Port
fields.
To forward a range of ports,
• enter the port number at the beginning of the range in the Start Port field
• enter the port number at the end of the range in the End Port field.
Server IP Address Enter the IP address of the server to which to forward packets for the selected port
number(s). This server is usually on the LAN.
Apply Click this to save your changes and to apply them to the ZyXEL Device.
Cancel Click this to set every field in this screen to its last-saved value.
ZyXEL MAX-200M1 Series User’s Guide
Chapter 9 NAT 103
Figure 58 Network > NAT > Trigger Port
Each field is described in the following table.
Table 29 Network > NAT > Trigger Port
LABEL DESCRIPTION
Name Enter a name to identify this rule. You can use 1 - 15 printable ASCII characters, or
you can leave this field blank. It does not have to be a unique name.
Incoming
Start Port
End Port
Enter the incoming port number or range of port numbers you want to forward to
the IP address the ZyXEL Device records.
To forward one port number, enter the port number in the Start Port and End Port
fields.
To forward a range of ports,
• enter the port number at the beginning of the range in the Start Port field
• enter the port number at the end of the range in the End Port field.
If you want to delete this rule, enter zero in the Start Port and End Port fields.
Trigger
Start Port
End Port
Enter the outgoing port number or range of port numbers that makes the ZyXEL
Device record the source IP address and assign it to the selected incoming port
number(s).
To select one port number, enter the port number in the Start Port and End Port
fields.
To select a range of ports,
• enter the port number at the beginning of the range in the Start Port field
• enter the port number at the end of the range in the End Port field.
If you want to delete this rule, enter zero in the Start Port and End Port fields.
Apply Click this to save your changes and to apply them to the ZyXEL Device.
Cancel Click this to discard your changes.
ZyXEL MAX-200M1 Series User’s Guide
104 Chapter 9 NAT
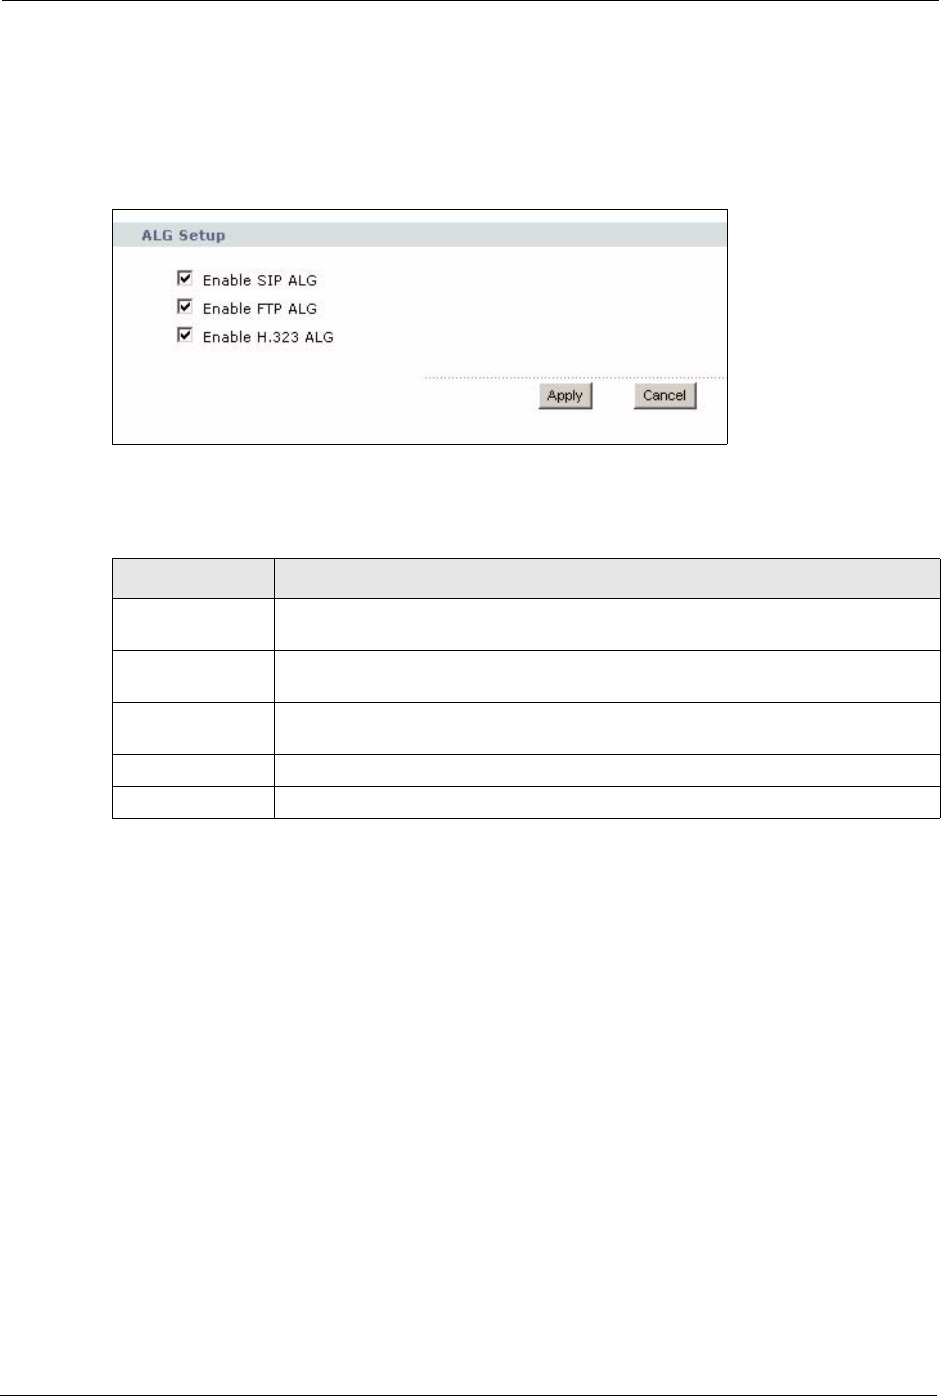
9.2.5 NAT ALG Screen
Use this screen to enable and disable SIP (VoIP), FTP (file transfer), and H.323 (audio-visual)
ALG in the ZyXEL Device. To access this screen, click Network > NAT > ALG.
Figure 59 Network > NAT > ALG
Each field is described in the following table.
Table 30 Network > NAT > ALG
LABEL DESCRIPTION
Enable SIP ALG Select this to make sure SIP (VoIP) works correctly with port-forwarding and port-
triggering rules.
Enable FTP ALG Select this to make sure FTP (file transfer) works correctly with port-forwarding and
port-triggering rules.
Enable H.323 ALG Select this to make sure H.323 (audio-visual programs, such as NetMeeting) works
correctly with port-forwarding and port-triggering rules.
Apply Click this to save your changes and to apply them to the ZyXEL Device.
Cancel Click this to discard your most recent changes.

ZyXEL MAX-200M1 Series User’s Guide
Chapter 10 SIP 105
CHAPTER 10
SIP
Use these screens to set up your SIP accounts and to configure QoS settings.
10.1 SIP Overview
10.1.1 Introduction to VoIP
VoIP (Voice over IP) is the sending of voice signals over the Internet Protocol. This allows you
to make phone calls and send faxes over the Internet at a fraction of the cost of using the
traditional circuit-switched telephone network. You can also use servers to run telephone
service applications like PBX services and voice mail. Internet Telephony Service Provider
(ITSP) companies provide VoIP service. A company could alternatively set up an IP-PBX and
provide it’s own VoIP service.
Circuit-switched telephone networks require 64 kilobits per second (kbps) in each direction to
handle a telephone call. VoIP can use advanced voice coding techniques with compression to
reduce the required bandwidth.
10.1.2 Introduction to SIP
The Session Initiation Protocol (SIP) is an application-layer control (signaling) protocol that
handles the setting up, altering and tearing down of voice and multimedia sessions over the
Internet.
SIP signaling is separate from the media for which it handles sessions. The media that is
exchanged during the session can use a different path from that of the signaling. SIP handles
telephone calls and can interface with traditional circuit-switched telephone networks.
10.1.3 SIP Identities
A SIP account uses an identity (sometimes referred to as a SIP address). A complete SIP
identity is called a SIP URI (Uniform Resource Identifier). A SIP account's URI identifies the
SIP account in a way similar to the way an e-mail address identifies an e-mail account. The
format of a SIP identity is SIP-Number@SIP-Service-Domain.
10.1.3.1 SIP Number
The SIP number is the part of the SIP URI that comes before the “@” symbol. A SIP number
can use letters like in an e-mail address (johndoe@your-ITSP.com for example) or numbers
like a telephone number (1122334455@VoIP-provider.com for example).
ZyXEL MAX-200M1 Series User’s Guide
106 Chapter 10 SIP
10.1.3.2 SIP Service Domain
The SIP service domain of the VoIP service provider (the company that lets you make phone
calls over the Internet) is the domain name in a SIP URI. For example, if the SIP address is
1122334455@VoIP-provider.com, then “VoIP-provider.com” is the SIP service domain.
10.1.4 SIP Call Progression
The following figure displays the basic steps in the setup and tear down of a SIP call. A calls
B.
1A sends a SIP INVITE request to B. This message is an invitation for B to participate in a
SIP telephone call.
2B sends a response indicating that the telephone is ringing.
3B sends an OK response after the call is answered.
4A then sends an ACK message to acknowledge that B has answered the call.
5Now A and B exchange voice media (talk).
6After talking, A hangs up and sends a BYE request.
7B replies with an OK response confirming receipt of the BYE request and the call is
terminated.
10.1.5 SIP Client Server
SIP is a client-server protocol. A SIP client is an application program or device that sends SIP
requests. A SIP server responds to the SIP requests.
When you use SIP to make a VoIP call, it originates at a client and terminates at a server. A
SIP client could be a computer or a SIP phone. One device can act as both a SIP client and a
SIP server.
Table 31 SIP Call Progression
A B
1. INVITE
2. Ringing
3. OK
4. ACK
5.Dialogue (voice traffic)
6. BYE
7. OK

ZyXEL MAX-200M1 Series User’s Guide
Chapter 10 SIP 107
10.1.5.1 SIP User Agent
A SIP user agent can make and receive VoIP telephone calls. This means that SIP can be used
for peer-to-peer communications even though it is a client-server protocol. In the following
figure, either A or B can act as a SIP user agent client to initiate a call. A and B can also both
act as a SIP user agent to receive the call.
Figure 60 SIP User Agent
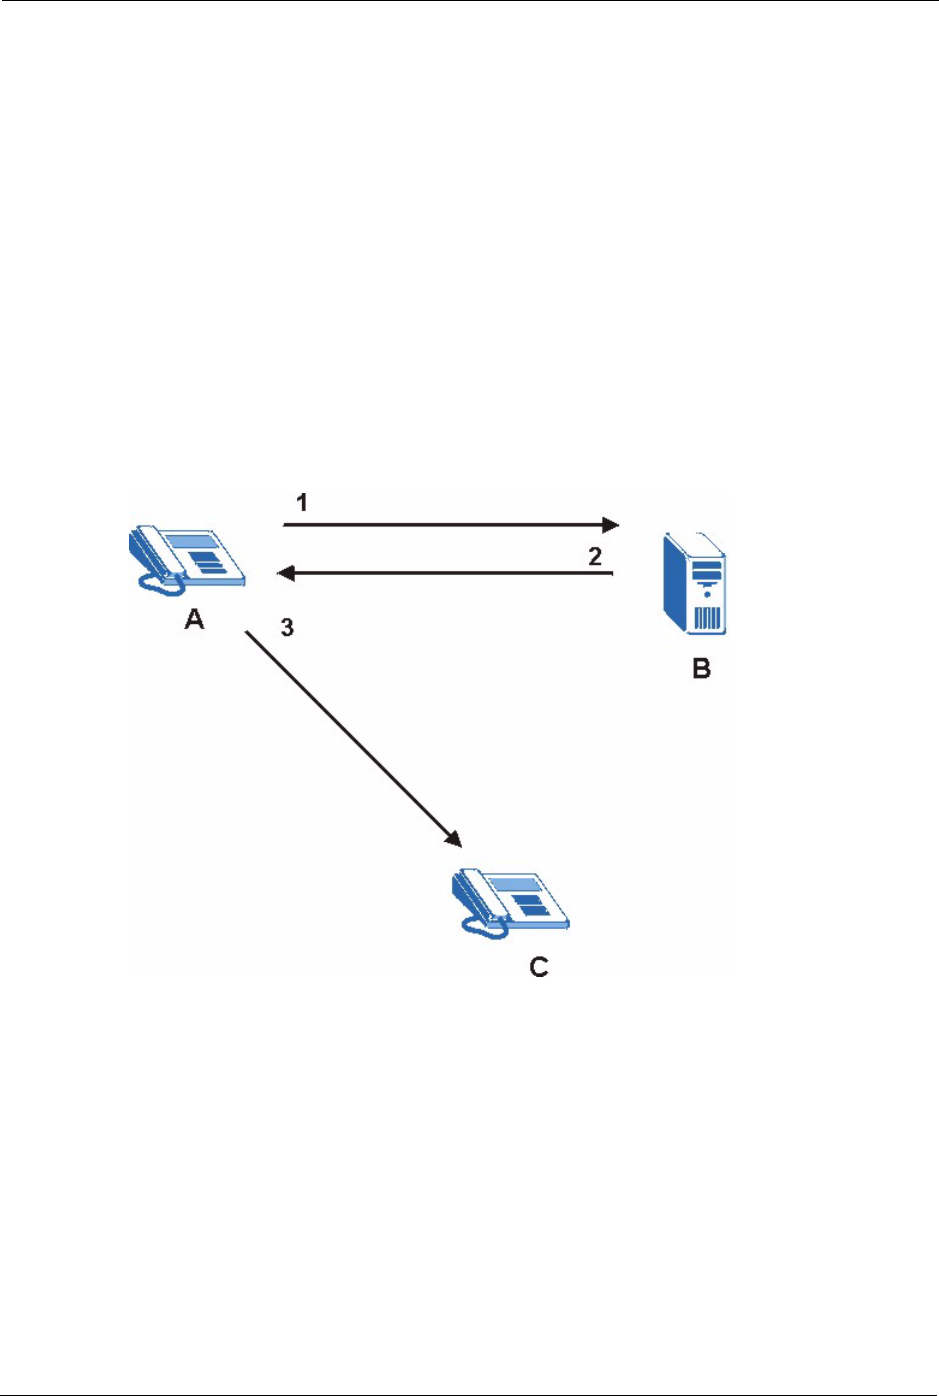
10.1.5.2 SIP Proxy Server
A SIP proxy server receives requests from clients and forwards them to another server.
In the following example, you want to use client device A to call someone who is using client
device C.
1The client device (A in the figure) sends a call invitation to the SIP proxy server (B).
2The SIP proxy server forwards the call invitation to C.
Figure 61 SIP Proxy Server
ZyXEL MAX-200M1 Series User’s Guide
108 Chapter 10 SIP
10.1.5.3 SIP Redirect Server
A SIP redirect server accepts SIP requests, translates the destination address to an IP address
and sends the translated IP address back to the device that sent the request. Then the client
device that originally sent the request can send requests to the IP address that it received back
from the redirect server. Redirect servers do not initiate SIP requests.
In the following example, you want to use client device A to call someone who is using client
device C.
1Client device A sends a call invitation for C to the SIP redirect server (B).
2The SIP redirect server sends the invitation back to A with C’s IP address (or domain
name).
3Client device A then sends the call invitation to client device C.
Figure 62 SIP Redirect Server
10.1.5.4 SIP Register Server
A SIP register server maintains a database of SIP identity-to-IP address (or domain name)
mapping. The register server checks your user name and password when you register.
10.1.6 RTP
When you make a VoIP call using SIP, the RTP (Real time Transport Protocol) is used to
handle voice data transfer. See RFC 1889 for details on RTP.

ZyXEL MAX-200M1 Series User’s Guide
Chapter 10 SIP 109
10.1.7 NAT and SIP
The ZyXEL Device must register its public IP address with a SIP register server. If there is a
NAT router between the ZyXEL Device and the SIP register server, the ZyXEL Device
probably has a private IP address. The ZyXEL Device lists its IP address in the SIP message
that it sends to the SIP register server. NAT does not translate this IP address in the SIP
message. The SIP register server gets the ZyXEL Device’s IP address from inside the SIP
message and maps it to your SIP identity. If the ZyXEL Device has a private IP address listed
in the SIP message, the SIP server cannot map it to your SIP identity. See Chapter 9 on page
97 for more information about NAT.
Use a SIP ALG (Application Layer Gateway), Use NAT, STUN, or outbound proxy to allow
the ZyXEL Device to list its public IP address in the SIP messages.
10.1.7.1 SIP ALG
See Section 9.1.3 on page 99.
10.1.7.2 Use NAT
If you know the NAT router’s public IP address and SIP port number, you can use the Use
NAT feature to manually configure the ZyXEL Device to use a them in the SIP messages. This
eliminates the need for STUN or a SIP ALG.
You must also configure the NAT router to forward traffic with this port number to the ZyXEL
Device.
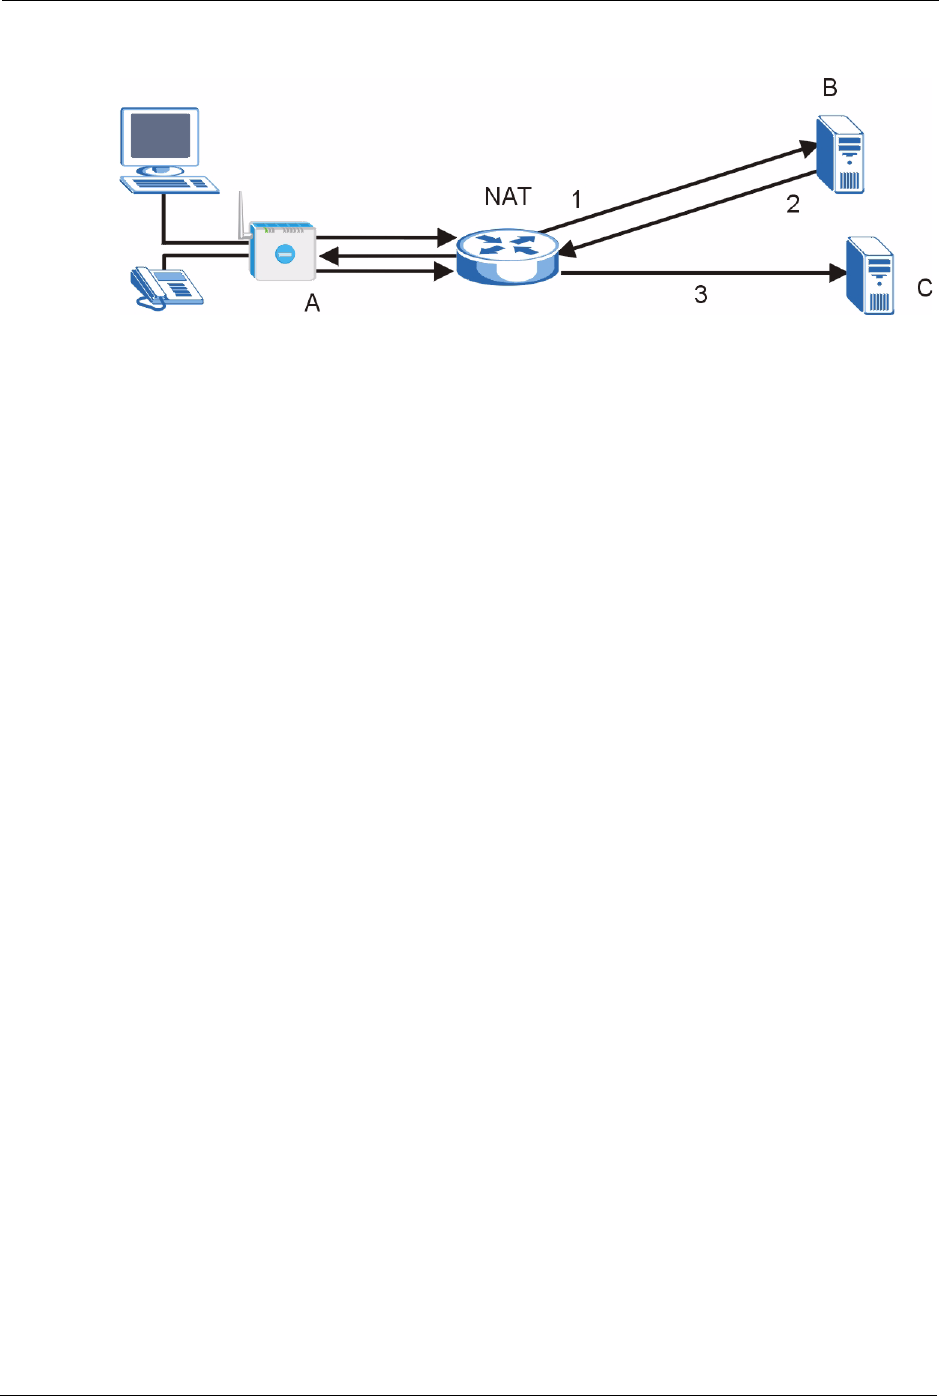
10.1.7.3 STUN
STUN (Simple Traversal of User Datagram Protocol (UDP) through Network Address
Translators) allows the ZyXEL Device to find the presence and types of NAT routers and/or
firewalls between it and the public Internet. STUN also allows the ZyXEL Device to find the
public IP address that NAT assigned, so the ZyXEL Device can embed it in the SIP data
stream. STUN does not work with symmetric NAT routers or firewalls. See RFC 3489 for
details on STUN.
The following figure shows how STUN works.
1The ZyXEL Device (A) sends SIP packets to the STUN server (B).
2The STUN server (B) finds the public IP address and port number that the NAT router
used on the ZyXEL Device’s SIP packets and sends them to the ZyXEL Device.
3The ZyXEL Device uses the public IP address and port number in the SIP packets that it
sends to the SIP server (C).
ZyXEL MAX-200M1 Series User’s Guide
110 Chapter 10 SIP
Figure 63 STUN
10.1.7.4 Outbound Proxy
Your VoIP service provider may host a SIP outbound proxy server to handle all of the ZyXEL
Device’s VoIP traffic. This allows the ZyXEL Device to work with any type of NAT router and
eliminates the need for STUN or a SIP ALG. Turn off a SIP ALG on a NAT router in front of
the ZyXEL Device to keep it from retranslating the IP address (since this is already handled by
the outbound proxy server).
10.1.8 Voice Coding
A codec (coder/decoder) codes analog voice signals into digital signals and decodes the digital
signals back into voice signals. The ZyXEL Device supports the following codecs.
•G. 7 11 is a Pulse Code Modulation (PCM) waveform codec. PCM measures analog signal
amplitudes at regular time intervals (sampling) and converts them into digital bits
(quantization). Quantization “reads” the analog signal and then “writes” it to the nearest
digital value. For this reason, a digital sample is usually slightly different from its analog
original (this difference is known as “quantization noise”).
G.711 provides excellent sound quality but requires 64kbps of bandwidth.
•G. 7 2 3 is an Adaptive Differential Pulse Code Modulation (ADPCM) waveform codec.
Differential (or Delta) PCM is similar to PCM, but encodes the audio signal based on the
difference between one sample and a prediction based on previous samples, rather than
encoding the sample’s actual quantized value. Many thousands of samples are taken each
second, and the differences between consecutive samples are usually quite small, so this
saves space and reduces the bandwidth necessary.
However, DPCM produces a high quality signal (high signal-to-noise ratio or SNR) for
high difference signals (where the actual signal is very different from what was predicted)
but a poor quality signal (low SNR) for low difference signals (where the actual signal is
very similar to what was predicted). This is because the level of quantization noise is the
same at all signal levels. Adaptive DPCM solves this problem by adapting the difference
signal’s level of quantization according to the audio signal’s strength. A low difference
signal is given a higher quantization level, increasing its signal-to-noise ratio. This
provides a similar sound quality at all signal levels.
G.723 provides high quality sound and requires 20 or 40 kbps.

ZyXEL MAX-200M1 Series User’s Guide
Chapter 10 SIP 111
•G. 7 2 9 is an Analysis-by-Synthesis (AbS) hybrid waveform codec. It uses a filter based on
information about how the human vocal tract produces sounds. The codec analyzes the
incoming voice signal and attempts to synthesize it using its list of voice elements. It tests
the synthesized signal against the original and, if it is acceptable, transmits details of the
voice elements it used to make the synthesis. Because the codec at the receiving end has
the same list, it can exactly recreate the synthesized audio signal.
G.729 provides good sound quality and reduces the required bandwidth to 8kbps.
10.1.9 PSTN Call Setup Signaling
PSTNs (Public Switched Telephone Networks) use DTMF or pulse dialing to set up telephone
calls.
Dual-Tone Multi-Frequency (DTMF) signaling uses pairs of frequencies (one lower frequency
and one higher frequency) to set up calls. It is also known as Touch Tone®. Each of the keys
on a DTMF telephone corresponds to a different pair of frequencies.
Pulse dialing sends a series of clicks to the local phone office in order to dial numbers.1
10.1.10 MWI (Message Waiting Indication)
Enable Message Waiting Indication (MWI) enables your phone to give you a message–waiting
(beeping) dial tone when you have one or more voice messages. Your VoIP service provider
must have a messaging system that sends message-waiting-status SIP packets as defined in
RFC 3842.
10.1.11 Custom Tones (IVR)
IVR (Interactive Voice Response) is a feature that allows you to use your telephone to interact
with the ZyXEL Device. The ZyXEL Device allows you to record custom tones for the Caller
Ringing Tone and On Hold Tone functions. The same recordings apply to both the caller
ringing and on hold tones.
1. The ZyXEL Device supports DTMF at the time of writing.
Table 32 Custom Tones Details
LABEL DESCRIPTION
Total Time for All Tones 128 seconds for all custom tones combined
Maximum Time per Individual
Tone
20 seconds
Total Number of Tones
Recordable
8
You can record up to eight different custom tones but the total time must
be 128 seconds or less.

ZyXEL MAX-200M1 Series User’s Guide
112 Chapter 10 SIP
10.1.11.1 Recording Custom Tones
Use the following steps if you would like to create new tones or change your tones:
1Pick up the phone and press **** on your phone’s keypad and wait for the message that
says you are in the configuration menu.
2Press a number from 1101~1108 on your phone followed by the # key.
3Play your desired music or voice recording into the receiver’s mouthpiece. Press the #
key.
4You can continue to add, listen to, or delete tones, or you can hang up the receiver when
you are done.
10.1.11.2 Listening to Custom Tones
Do the following to listen to a custom tone:
1Pick up the phone and press **** on your phone’s keypad and wait for the message that
says you are in the configuration menu.
2Press a number from 1201~1208 followed by the # key to listen to the tone.
3You can continue to add, listen to, or delete tones, or you can hang up the receiver when
you are done.
10.1.11.3 Deleting Custom Tones
Do the following to delete a custom tone:
1Pick up the phone and press **** on your phone’s keypad and wait for the message that
says you are in the configuration menu.
2Press a number from 1301~1308 followed by the # key to delete the tone of your choice.
Press 14 followed by the # key if you wish to clear all your custom tones.
3You can continue to add, listen to, or delete tones, or you can hang up the receiver when
you are done.
10.1.12 Quality of Service (QoS)
Quality of Service (QoS) refers to both a network's ability to deliver data with minimum delay
and the networking methods used to provide bandwidth for real-time multimedia applications.
10.1.12.1 Type Of Service (ToS)
Network traffic can be classified by setting the ToS (Type Of Service) values at the data source
(for example, at the ZyXEL Device) so a server can decide the best method of delivery, that is
the least cost, fastest route and so on.

ZyXEL MAX-200M1 Series User’s Guide
Chapter 10 SIP 113
10.1.12.2 DiffServ
DiffServ is a class of service (CoS) model that marks packets so that they receive specific per-
hop treatment at DiffServ-compliant network devices along the route based on the application
types and traffic flow. Packets are marked with DiffServ Code Points (DSCPs) indicating the
level of service desired. This allows the intermediary DiffServ-compliant network devices to
handle the packets differently depending on the code points without the need to negotiate paths
or remember state information for every flow. In addition, applications do not have to request
a particular service or give advanced notice of where the traffic is going.1
10.1.12.3 DSCP and Per-Hop Behavior
DiffServ defines a new DS (Differentiated Services) field to replace the Type of Service (TOS)
field in the IP header. The DS field contains a 2-bit unused field and a 6-bit DSCP field which
can define up to 64 service levels. The following figure illustrates the DS field.
Figure 64 DiffServ: Differentiated Service Field
DSCP is backward compatible with the three precedence bits in the ToS octet so that non-
DiffServ compliant, ToS-enabled network device will not conflict with the DSCP mapping.
The DSCP value determines the forwarding behavior, the PHB (Per-Hop Behavior), that each
packet gets across the DiffServ network. Based on the marking rule, different kinds of traffic
can be marked for different priorities of forwarding. Resources can then be allocated
according to the DSCP values and the configured policies.
10.1.12.4 VLAN
Virtual Local Area Network (VLAN) allows a physical network to be partitioned into multiple
logical networks. Only stations within the same group can communicate with each other.
Your ZyXEL Device can add IEEE 802.1Q VLAN ID tags to voice frames that it sends to the
network. This allows the ZyXEL Device to communicate with a SIP server that is a member of
the same VLAN group. Some ISPs use the VLAN tag to identify voice traffic and give it
priority over other traffic.
1. The ZyXEL Device does not support DiffServ at the time of writing.
DSCP
(6-bit)
Unused
(2-bit)
ZyXEL MAX-200M1 Series User’s Guide
114 Chapter 10 SIP
10.2 SIP Screens
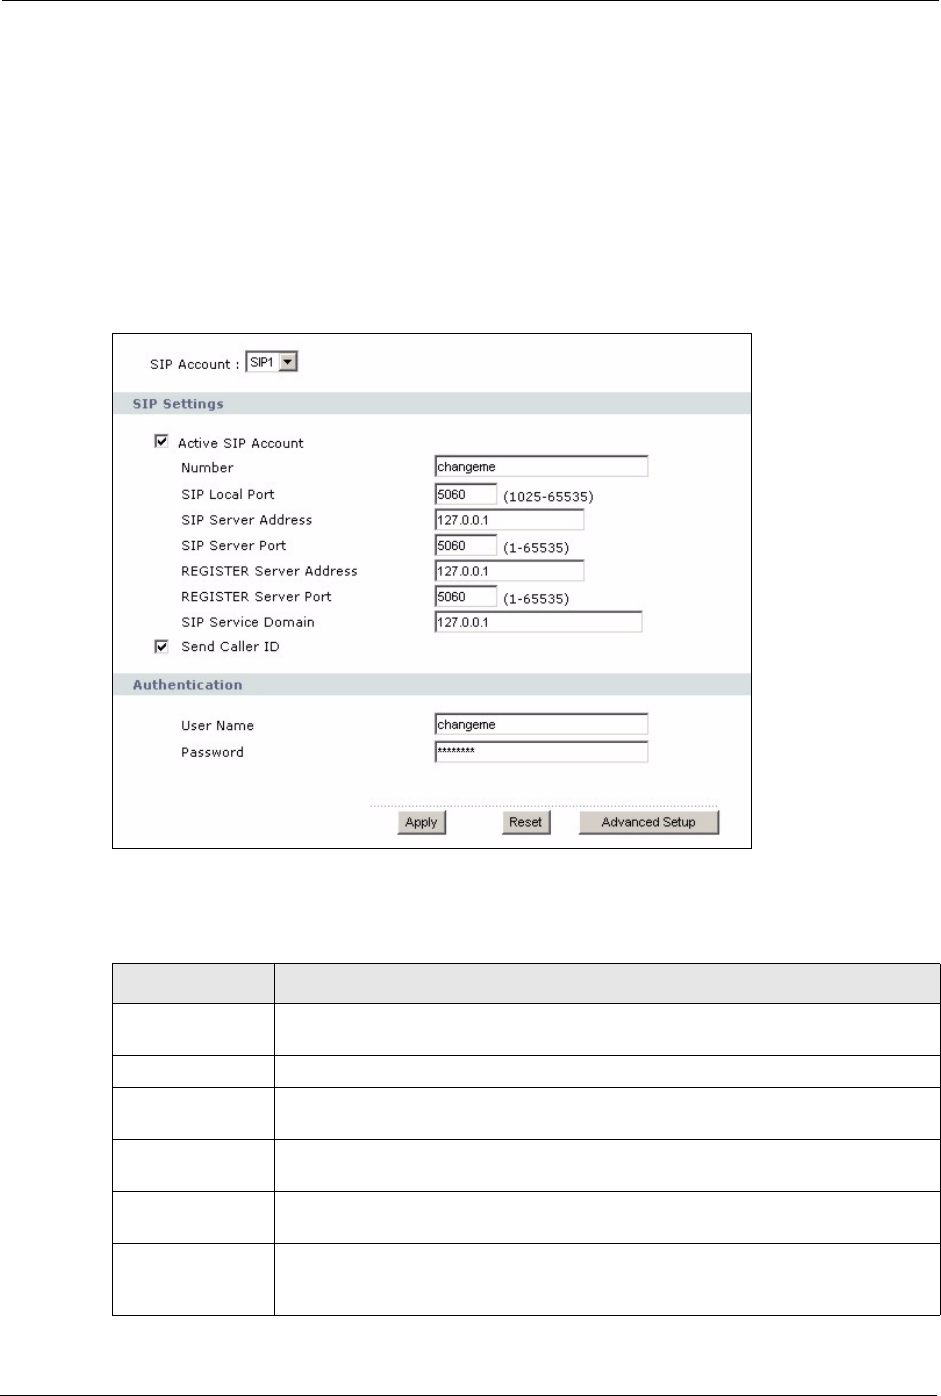
10.2.1 SIP Settings Screen
Use this screen to maintain basic information about each SIP account. Your VoIP service
provider (the company that lets you make phone calls over the Internet) should provide this.
You can also enable and disable each SIP account. To access this screen, click VoIP > SIP >
SIP Settings.
Figure 65 VoIP > SIP > SIP Settings
Each field is described in the following table.
Table 33 VoIP > SIP > SIP Settings
LABEL DESCRIPTION
SIP Account Select the SIP account you want to see in this screen. If you change this field, the
screen automatically refreshes.
SIP Settings
Active SIP
Account
Select this if you want the ZyXEL Device to use this account. Clear it if you do not
want the ZyXEL Device to use this account.
Number Enter your SIP number. In the full SIP URI, this is the part before the @ symbol.
You can use up to 127 printable ASCII characters.
SIP Local Port Enter the ZyXEL Device’s listening port number, if your VoIP service provider gave
you one. Otherwise, keep the default value.
SIP Server
Address
Enter the IP address or domain name of the SIP server provided by your VoIP
service provider. You can use up to 95 printable ASCII characters. It does not
matter whether the SIP server is a proxy, redirect or register server.
ZyXEL MAX-200M1 Series User’s Guide
Chapter 10 SIP 115
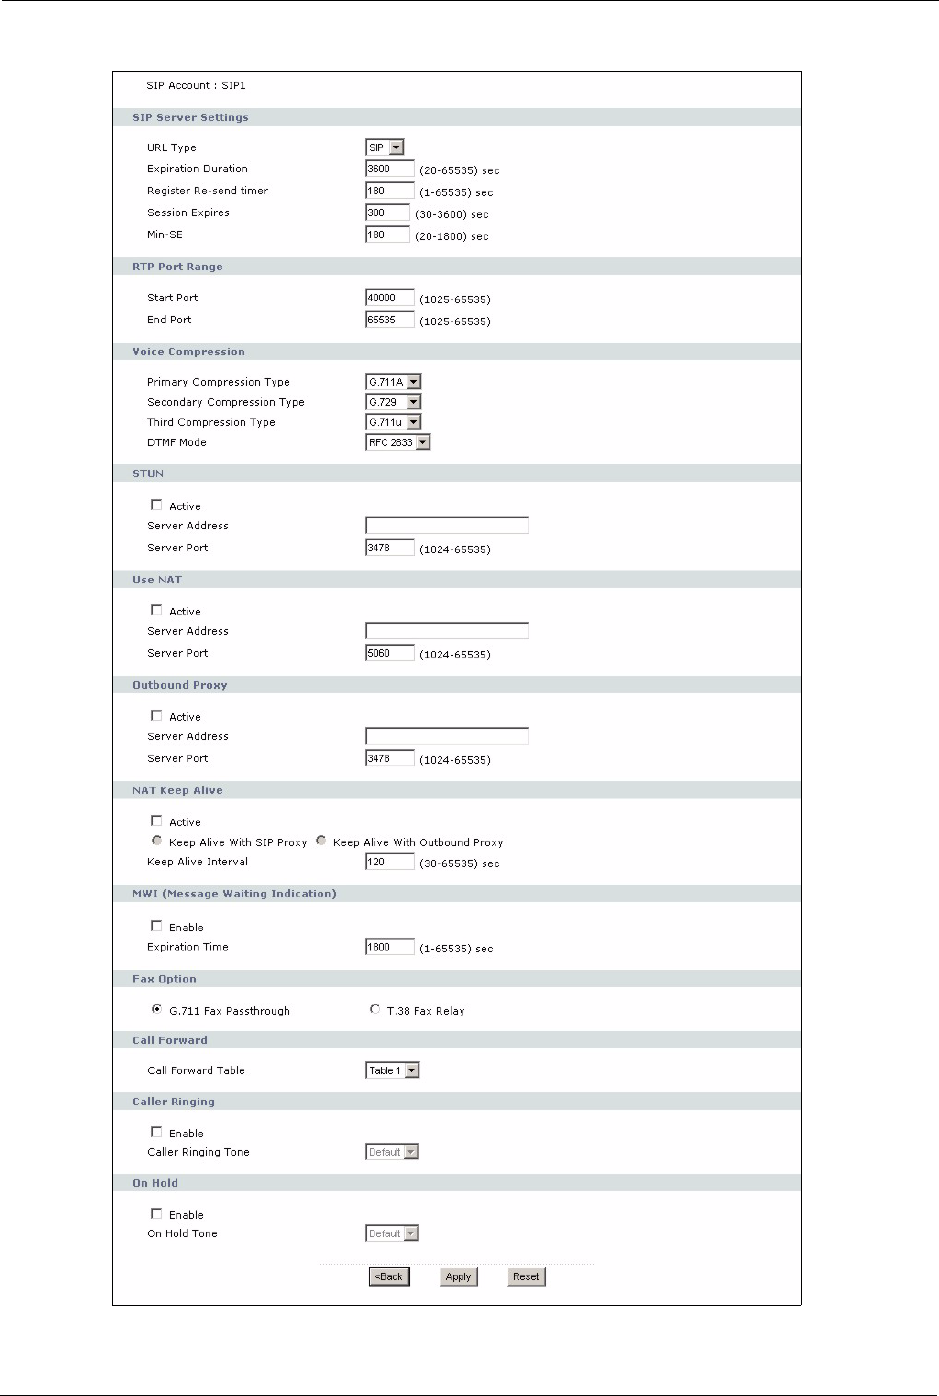
10.2.2 Advanced SIP Setup Screen
Use this screen to maintain advanced settings for each SIP account. To access this screen, click
Advanced Setup in VoIP > SIP > SIP Settings.
SIP Server Port Enter the SIP server’s listening port number, if your VoIP service provider gave you
one. Otherwise, keep the default value.
REGISTER Server
Address
Enter the IP address or domain name of the SIP register server, if your VoIP
service provider gave you one. Otherwise, enter the same address you entered in
the SIP Server Address field. You can use up to 95 printable ASCII characters.
REGISTER Server
Port
Enter the SIP register server’s listening port number, if your VoIP service provider
gave you one. Otherwise, enter the same port number you entered in the SIP
Server Port field.
SIP Service
Domain
Enter the SIP service domain name. In the full SIP URI, this is the part after the @
symbol. You can use up to 127 printable ASCII Extended set characters.
Send Caller ID Select this if you want to send identification when you make VoIP phone calls.
Clear this if you do not want to send identification.
Authentication
User Name Enter the user name for registering this SIP account, exactly as it was given to you.
You can use up to 95 printable ASCII characters.
Password Enter the user name for registering this SIP account, exactly as it was given to you.
You can use up to 95 printable ASCII Extended set characters.
Apply Click this to save your changes.
Reset Click this to set every field in this screen to its last-saved value.
Advanced Setup Click this to edit the advanced settings for this SIP account. The Advanced SIP
Setup screen appears.
Table 33 VoIP > SIP > SIP Settings
LABEL DESCRIPTION
ZyXEL MAX-200M1 Series User’s Guide
116 Chapter 10 SIP
Figure 66 VoIP > SIP > SIP Settings > Advanced

ZyXEL MAX-200M1 Series User’s Guide
Chapter 10 SIP 117
Each field is described in the following table.
Table 34 VoIP > SIP > SIP Settings > Advanced
LABEL DESCRIPTION
SIP Account This field displays the SIP account you see in this screen.
SIP Server
Settings
URL Type Select whether or not to include the SIP service domain name when the ZyXEL
Device sends the SIP number.
SIP - include the SIP service domain name
TEL - do not include the SIP service domain name
Expiration
Duration
Enter the number of seconds your SIP account is registered with the SIP register
server before it is deleted. The ZyXEL Device automatically tries to re-register your
SIP account when one-half of this time has passed. (The SIP register server might
have a different expiration.)
Register Re-send
timer
Enter the number of seconds the ZyXEL Device waits before it tries again to
register the SIP account, if the first try failed or if there is no response.
Session Expires Enter the number of seconds the conversation can last before the call is
automatically disconnected. Usually, when one-half of this time has passed, the
ZyXEL Device or the other party updates this timer to prevent this from happening.
Min-SE Enter the minimum number of seconds the ZyXEL Device accepts for a session
expiration time when it receives a request to start a SIP session. If the request has
a shorter time, the ZyXEL Device rejects it.
RTP Port Range
Start Port
End Port
Enter the listening port number(s) for RTP traffic, if your VoIP service provider gave
you this information. Otherwise, keep the default values.
To enter one port number, enter the port number in the Start Port and End Port
fields.
To enter a range of ports,
• enter the port number at the beginning of the range in the Start Port field
• enter the port number at the end of the range in the End Port field.
Voice
Compression
Select the type of voice coder/decoder (codec) that you want the ZyXEL Device to
use.
G.711 provides high voice quality but requires more bandwidth (64 kbps).
•G.711A is typically used in Europe.
•G.711u is typically used in North America and Japan.
G.723 provides good voice quality, and requires 20 or 40 kbps.
In contrast, G.729 requires only 8 kbps.
The ZyXEL Device must use the same codec as the peer. When two SIP devices
start a SIP session, they must agree on a codec.
Primary
Compression Type
Select the ZyXEL Device’s first choice for voice coder/decoder.
Secondary
Compression Type
Select the ZyXEL Device’s second choice for voice coder/decoder. Select None if
you only want the ZyXEL Device to accept the first choice.
Third
Compression Type
This field is disabled if Secondary Compression Type is None.
Select the ZyXEL Device’s third choice for voice coder/decoder. Select None if you
only want the ZyXEL Device to accept the first or second choice.

ZyXEL MAX-200M1 Series User’s Guide
118 Chapter 10 SIP
DTMF Mode Control how the ZyXEL Device handles the tones that your telephone makes when
you push its buttons. You should use the same mode your VoIP service provider
uses.
RFC 2833 - send the DTMF tones in RTP packets
PCM - send the DTMF tones in the voice data stream. This method works best
when you are using a codec that does not use compression (like G.711). Codecs
that use compression (like G.729) can distort the tones.
SIP INFO - send the DTMF tones in SIP messages
STUN
Active Select this if all of the following conditions are satisfied.
• There is a NAT router between the ZyXEL Device and the SIP server.
• The NAT router is not a SIP ALG.
• Your VoIP service provider gave you an IP address or domain name for a
STUN server.
Otherwise, clear this field.
Server Address Enter the IP address or domain name of the STUN server provided by your VoIP
service provider.
Server Port Enter the STUN server’s listening port, if your VoIP service provider gave you one.
Otherwise, keep the default value.
Use NAT
Active Select this if you want the ZyXEL Device to send SIP traffic to a specific NAT
router. You must also configure the NAT router to forward traffic with the specified
port to the ZyXEL Device. This eliminates the need for STUN or a SIP ALG.
Server Address Enter the public IP address or domain name of the NAT router.
Server Port Enter the port number that your SIP sessions use with the public IP address of the
NAT router.
Outbound Proxy
Active Select this if your VoIP service provider has a SIP outbound server to handle voice
calls. This allows the ZyXEL Device to work with any type of NAT router and
eliminates the need for STUN or a SIP ALG. Turn off any SIP ALG on a NAT router
in front of the ZyXEL Device to keep it from retranslating the IP address (since this
is already handled by the outbound proxy server).
Server Address Enter the IP address or domain name of the SIP outbound proxy server.
Server Port Enter the SIP outbound proxy server’s listening port, if your VoIP service provider
gave you one. Otherwise, keep the default value.
NAT Keep Alive
Active Select this to stop NAT routers between the ZyXEL Device and SIP server (a SIP
proxy server or outbound proxy server) from dropping the SIP session. The ZyXEL
Device does this by sending SIP notify messages to the SIP server based on the
specified interval.
Keep Alive with
SIP Proxy
Select this if the SIP server is a SIP proxy server.
Keep Alive with
Outbound Proxy
Select this if the SIP server is an outbound proxy server. You must enable
Outbound Proxy to use this.
Keep Alive Interval Enter how often (in seconds) the ZyXEL Device should send SIP notify messages
to the SIP server.
Table 34 VoIP > SIP > SIP Settings > Advanced
LABEL DESCRIPTION

ZyXEL MAX-200M1 Series User’s Guide
Chapter 10 SIP 119
10.2.3 SIP QoS Screen
Use this screen to maintain ToS and VLAN settings for the ZyXEL Device. To access this
screen, click VoIP > SIP > QoS.
MWI (Message
Waiting Indication)
Enable Select this if you want to hear a waiting (beeping) dial tone on your phone when
you have at least one voice message. Your VoIP service provider must support this
feature.
Expiration Time Keep the default value, unless your VoIP service provider tells you to change it.
Enter the number of seconds the SIP server should provide the message waiting
service each time the ZyXEL Device subscribes to the service. Before this time
passes, the ZyXEL Device automatically subscribes again.
Fax Option This field controls how the ZyXEL Device handles fax messages.
G.711 Fax
Passthrough
Select this if the ZyXEL Device should use G.711 to send fax messages. The peer
devices must also use G.711.
T.38 Fax Relay Select this if the ZyXEL Device should send fax messages as UDP or TCP/IP
packets through IP networks. This provides better quality, but it may have inter-
operability problems. The peer devices must also use T.38.
Call Forward
Call Forward Table Select which call forwarding table you want the ZyXEL Device to use for incoming
calls. You set up these tables in VoIP > Phone Book > Incoming Call Policy.
Caller Ringing
Enable Check this box if you want people to hear a customized recording when they call
you.
Caller Ringing
Tone
Select the tone you want people to hear when they call you. See Section 10.1.11
on page 111 for information on how to record these tones.
On Hold
Enable Check this box if you want people to hear a customized recording when you put
them on hold.
On Hold Tone Select the tone you want people to hear when you put them on hold. See Section
10.1.11 on page 111 for information on how to record these tones.
<Back Click this to return to the SIP Settings screen without saving your changes.
Apply Click this to save your changes.
Cancel Click this to set every field in this screen to its last-saved value.
Table 34 VoIP > SIP > SIP Settings > Advanced
LABEL DESCRIPTION
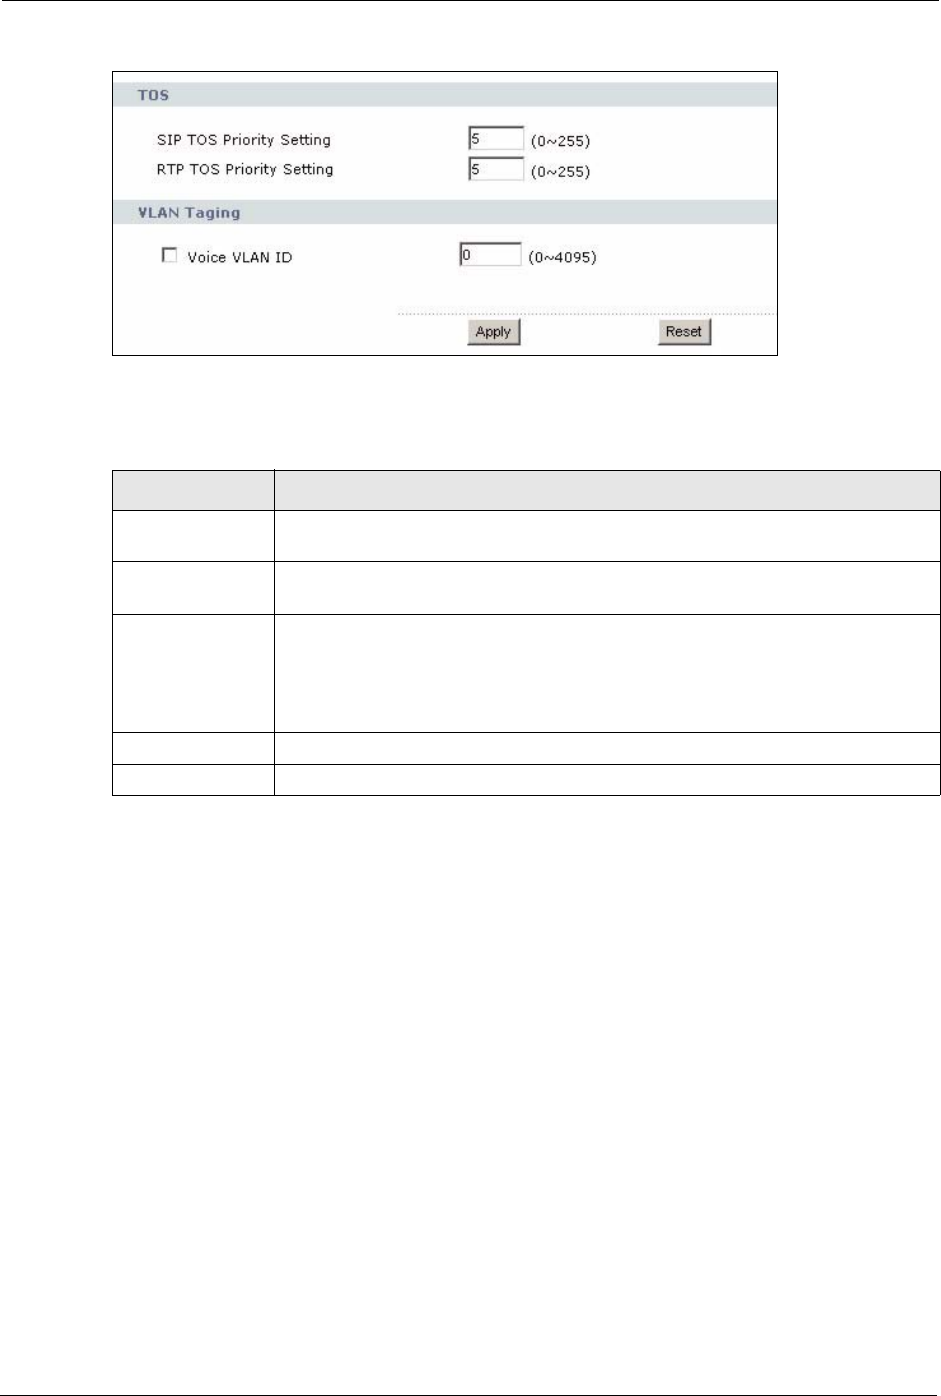
ZyXEL MAX-200M1 Series User’s Guide
120 Chapter 10 SIP
Figure 67 VoIP > SIP > QoS
Each field is described in the following table.
Table 35 VoIP > SIP > QoS
LABEL DESCRIPTION
SIP TOS Priority
Setting
Enter the priority for SIP voice transmissions. The ZyXEL Device creates Type of
Service priority tags with this priority to voice traffic that it transmits.
RTP TOS Priority
Setting
Enter the priority for RTP voice transmissions. The ZyXEL Device creates Type of
Service priority tags with this priority to RTP traffic that it transmits.
Voice VLAN ID Select this if the ZyXEL Device has to be a member of a VLAN to communicate
with the SIP server. Ask your network administrator, if you are not sure. Enter the
VLAN ID provided by your network administrator in the field on the right. Your LAN
and gateway must be configured to use VLAN tags.
Otherwise, clear this field.
Apply Click this to save your changes.
Reset Click this to set every field in this screen to its last-saved value.

ZyXEL MAX-200M1 Series User’s Guide
Chapter 11 Phone 121
CHAPTER 11
Phone
Use these screens to configure the phone you use to make phone calls with the ZyXEL Device.
11.1 Phone Overview
You can configure the volume, echo cancellation, VAD settings and custom tones for the
phone port on the ZyXEL Device. You can also select which SIP account to use for making
outgoing calls.
11.1.1 Voice Activity Detection/Silence Suppression/Comfort Noise
Voice Activity Detection (VAD) detects whether or not speech is present. This lets the ZyXEL
Device reduce the bandwidth that a call uses by not transmitting “silent packets” when you are
not speaking.
When using VAD, the ZyXEL Device generates comfort noise when the other party is not
speaking. The comfort noise lets you know that the line is still connected as total silence could
easily be mistaken for a lost connection.
11.1.2 Echo Cancellation
G.168 is an ITU-T standard for eliminating the echo caused by the sound of your voice
reverberating in the telephone receiver while you talk.
11.1.3 Supplementary Phone Services Overview
Supplementary services such as call hold, call waiting, call transfer, etc. are generally
available from your VoIP service provider. The ZyXEL Device supports the following
services:
• Call Hold
• Call Waiting
• Making a Second Call
• Call Transfer
• Call Forwarding
• Three-Way Conference
• Internal Calls
• Caller ID
ZyXEL MAX-200M1 Series User’s Guide
122 Chapter 11 Phone
• CLIP (Calling Line Identification Presentation)
• CLIR (Calling Line Identification Restriction)
Note: To take full advantage of the supplementary phone services available though
the ZyXEL Device's phone port, you may need to subscribe to the services
from your VoIP service provider.
11.1.3.1 The Flash Key
Flashing means to press the hook for a short period of time (a few hundred milliseconds)
before releasing it. On newer telephones, there should be a "flash" key (button) that generates
the signal electronically. If the flash key is not available, you can tap (press and immediately
release) the hook by hand to achieve the same effect. However, using the flash key is preferred
since the timing is much more precise. The ZyXEL Device may interpret manual tapping as
hanging up if the duration is too long
You can invoke all the supplementary services by using the flash key.
11.1.3.2 Europe Type Supplementary Phone Services
This section describes how to use supplementary phone services with the Europe Type Call
Service Mode. Commands for supplementary services are listed in the table below.
After pressing the flash key, if you do not issue the sub-command before the default sub-
command timeout (2 seconds) expires or issue an invalid sub-command, the current operation
will be aborted.
11.1.3.2.1 European Call Hold
Call hold allows you to put a call (A) on hold by pressing the flash key.
Table 36 European Type Flash Key Commands
COMMAND SUB-COMMAND DESCRIPTION
Flash Put a current call on hold to place a second call.
Switch back to the call (if there is no second call).
Flash 0 Drop the call presently on hold or reject an incoming call which is
waiting for answer.
Flash 1 Disconnect the current phone connection and answer the incoming
call or resume with caller presently on hold.
Flash 2 1. Switch back and forth between two calls.
2. Put a current call on hold to answer an incoming call.
3. Separate the current three-way conference call into two
individual calls (one is on-line, the other is on hold).
Flash 3 Create three-way conference connection.
Flash *98# Transfer the call to another phone.

ZyXEL MAX-200M1 Series User’s Guide
Chapter 11 Phone 123
If you have another call, press the flash key and then “2” to switch back and forth between
caller A and B by putting either one on hold.
Press the flash key and then “0” to disconnect the call presently on hold and keep the current
call on line.
Press the flash key and then “1” to disconnect the current call and resume the call on hold.
If you hang up the phone but a caller is still on hold, there will be a remind ring.
11.1.3.2.2 European Call Waiting
This allows you to place a call on hold while you answer another incoming call on the same
telephone (directory) number.
If there is a second call to a telephone number, you will hear a call waiting tone. Take one of
the following actions.
• Reject the second call.
Press the flash key and then press “0”.
• Disconnect the first call and answer the second call.
Either press the flash key and press “1”, or just hang up the phone and then answer the
phone after it rings.
• Put the first call on hold and answer the second call.
Press the flash key and then “2”.
11.1.3.2.3 European Call Transfer
Do the following to transfer an incoming call (that you have answered) to another phone.
1Press the flash key to put the caller on hold.
2When you hear the dial tone, dial “*98#” followed by the number to which you want to
transfer the call. to operate the Intercom.
3After you hear the ring signal or the second party answers it, hang up the phone.
11.1.3.2.4 European Three-Way Conference
Use the following steps to make three-way conference calls.
1When you are on the phone talking to someone, place the flash key to put the caller on
hold and get a dial tone.
2Dial a phone number directly to make another call.
3When the second call is answered, press the flash key and press “3” to create a three-way
conversation.
4Hang up the phone to drop the connection.
ZyXEL MAX-200M1 Series User’s Guide
124 Chapter 11 Phone
5If you want to separate the activated three-way conference into two individual
connections (one is on-line, the other is on hold), press the flash key and press “2”.
11.1.3.3 USA Type Supplementary Services
This section describes how to use supplementary phone services with the USA Type Call
Service Mode. Commands for supplementary services are listed in the table below.
After pressing the flash key, if you do not issue the sub-command before the default sub-
command timeout (2 seconds) expires or issue an invalid sub-command, the current operation
will be aborted.
11.1.3.3.1 USA Call Hold
Call hold allows you to put a call (A) on hold by pressing the flash key.
If you have another call, press the flash key to switch back and forth between caller A and B
by putting either one on hold.
If you hang up the phone but a caller is still on hold, there will be a remind ring.
11.1.3.3.2 USA Call Waiting
This allows you to place a call on hold while you answer another incoming call on the same
telephone (directory) number.
If there is a second call to your telephone number, you will hear a call waiting tone.
Press the flash key to put the first call on hold and answer the second call.
11.1.3.3.3 USA Call Transfer
Do the following to transfer an incoming call (that you have answered) to another phone.
1Press the flash key to put the caller on hold.
2When you hear the dial tone, dial “*98#” followed by the number to which you want to
transfer the call. to operate the Intercom.
3After you hear the ring signal or the second party answers it, hang up the phone.
Table 37 USA Type Flash Key Commands
COMMAND SUB-COMMAND DESCRIPTION
Flash Put a current call on hold to place a second call. After the second
call is successful, press the flash key again to have a three-way
conference call.
Put a current call on hold to answer an incoming call.
Flash *98# Transfer the call to another phone.
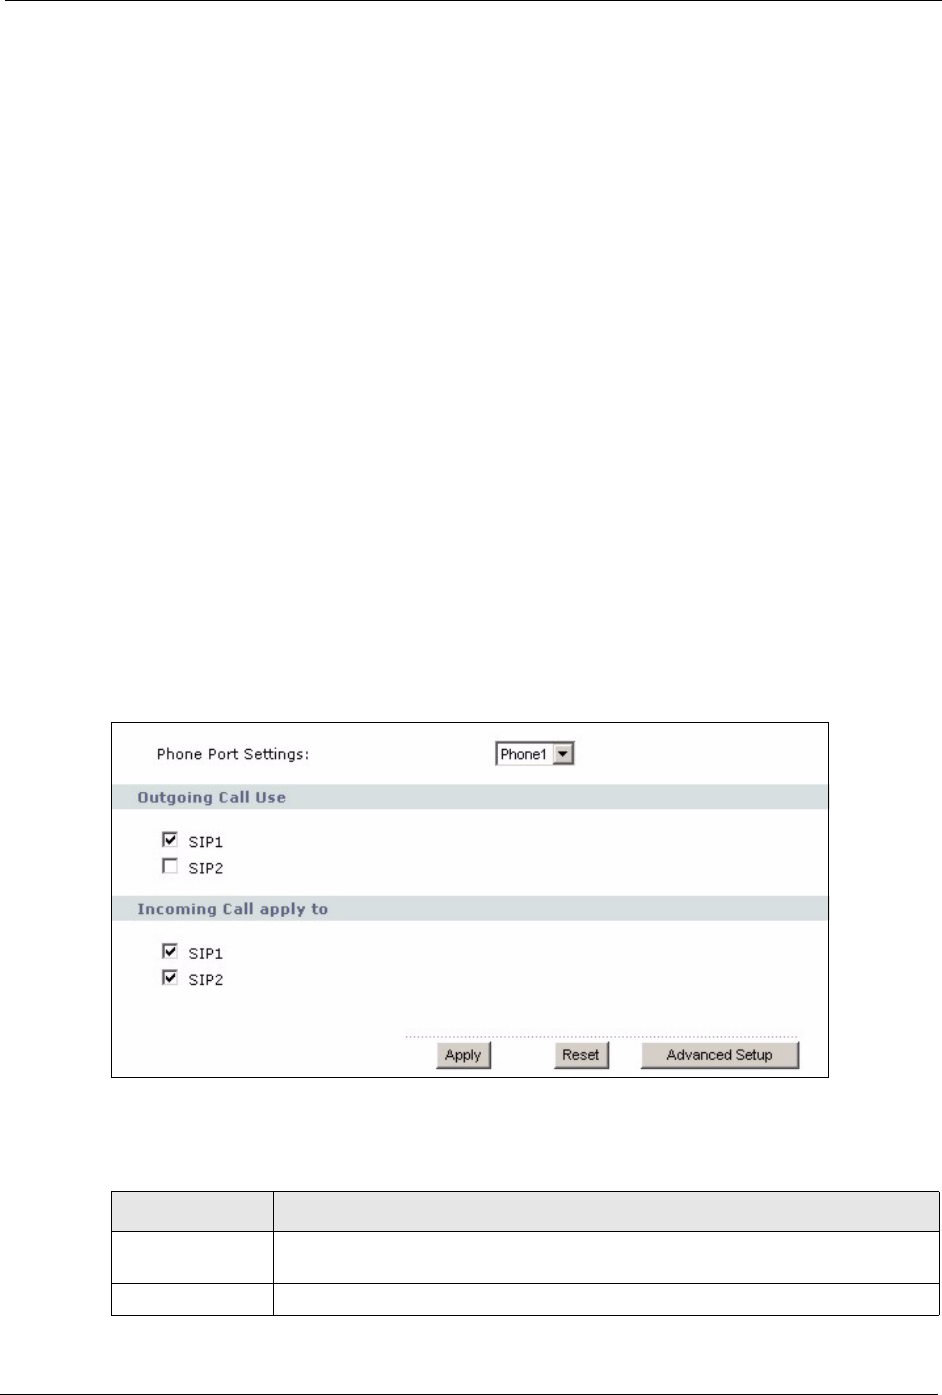
ZyXEL MAX-200M1 Series User’s Guide
Chapter 11 Phone 125
11.1.3.3.4 USA Three-Way Conference
Use the following steps to make three-way conference calls.
1When you are on the phone talking to someone, place the flash key to put the caller on
hold and get a dial tone.
2Dial a phone number directly to make another call.
3When the second call is answered, press the flash key, wait for the sub-command tone and
press “3” to create a three-way conversation.
4Hang up the phone to drop the connection.
5If you want to separate the activated three-way conference into two individual
connections (one is on-line, the other is on hold), press the flash key, wait for the sub-
command tone and press “2”.
11.2 Phone Screens
11.2.1 Analog Phone Screen
Use this screen to control which SIP accounts and PSTN line each phone uses. To access this
screen, click VoIP > Phone > Analog Phone.
Figure 68 VoIP > Phone > Analog Phone
Each field is described in the following table.
Table 38 VoIP > Phone > Analog Phone
LABEL DESCRIPTION
Phone Port
Settings
Select the phone port you want to see in this screen. If you change this field, the
screen automatically refreshes.
Outgoing Call Use
ZyXEL MAX-200M1 Series User’s Guide
126 Chapter 11 Phone
11.2.2 Advanced Analog Phone Setup Screen
Use this screen to edit advanced settings for each phone port. To access this screen, click
Advanced Setup in VoIP > Phone > Analog Phone.
SIP1 Select this if you want this phone port to use the SIP1 account when it makes calls.
If you select both SIP accounts, the ZyXEL Device tries to use SIP2 first.
SIP2 Select this if you want this phone port to use the SIP2 account when it makes calls.
If you select both SIP accounts, the ZyXEL Device tries to use SIP2 first.
Incoming Call
apply to
SIP1 Select this if you want to receive phone calls for the SIP1 account on this phone
port. If you select more than one source for incoming calls, there is no way to
distinguish between them when you receive phone calls.
SIP2 Select this if you want to receive phone calls for the SIP2 account on this phone
port. If you select more than one source for incoming calls, there is no way to
distinguish between them when you receive phone calls.
Apply Click this to save your changes.
Reset Click this to set every field in this screen to its last-saved value.
Advanced Setup Click this to edit the advanced settings for this phone port. The Advanced Analog
Phone Setup screen appears.
Table 38 VoIP > Phone > Analog Phone
LABEL DESCRIPTION
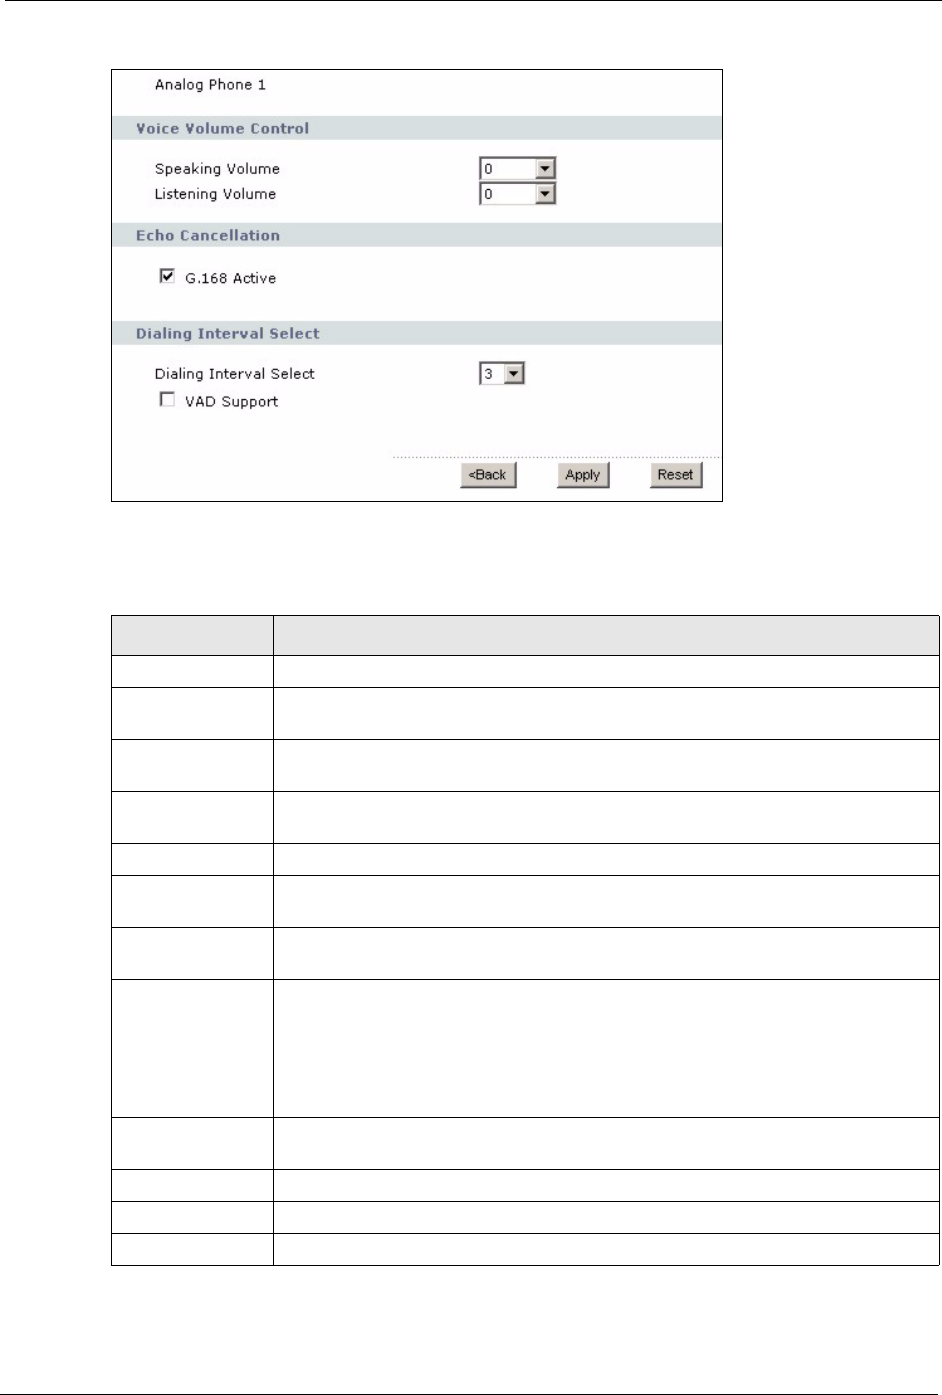
ZyXEL MAX-200M1 Series User’s Guide
Chapter 11 Phone 127
Figure 69 VoIP > Phone > Analog Phone > Advanced
Each field is described in the following table.
Table 39 VoIP > Phone > Analog Phone > Advanced
LABEL DESCRIPTION
Analog Phone This field displays the phone port you see in this screen.
Voice Volume
Control
Speaking Volume Enter the loudness that the ZyXEL Device uses for speech that it sends to the peer
device. -1 is the quietest, and 1 is the loudest.
Listening Volume Enter the loudness that the ZyXEL Device uses for speech that it receives from the
peer device. -1 is the quietest, and 1 is the loudest.
Echo Cancellation
G.168 Active Select this if you want to eliminate the echo caused by the sound of your voice
reverberating in the telephone receiver while you talk.
Dialing Interval
Select
Dialing Interval
Select
Enter the number of seconds the ZyXEL Device should wait after you stop dialing
numbers before it makes the phone call. The value depends on how quickly you
dial phone numbers.
If you select Active Immediate Dial in VoIP > Phone > Common, you can press
the pound key (#) to tell the ZyXEL Device to make the phone call immediately,
regardless of this setting.
VAD Support Select this if the ZyXEL Device should stop transmitting when you are not
speaking. This reduces the bandwidth the ZyXEL Device uses.
<Back Click this to return to the Analog Phone screen without saving your changes.
Apply Click this to save your changes and to apply them to the ZyXEL Device.
Reset Click this to set every field in this screen to its last-saved value.
ZyXEL MAX-200M1 Series User’s Guide
128 Chapter 11 Phone
11.2.3 Common Phone Settings Screen
Use this screen to activate and deactivate immediate dialing. To access this screen, click VoIP
> Phone > Common.
Figure 70 VoIP > Phone > Common
Each field is described in the following table.
11.2.4 Phone Region Screen
Use this screen to maintain settings that often depend on which region of the world the ZyXEL
Device is in. To access this screen, click VoIP > Phone > Region.
Table 40 VoIP > Phone > Common
LABEL DESCRIPTION
Active Immediate
Dial
Select this if you want to use the pound key (#) to tell the ZyXEL Device to make
the phone call immediately, instead of waiting the number of seconds you selected
in the Dialing Interval Select in VoIP > Phone > Analog Phone.
If you select this, dial the phone number, and then press the pound key if you do
not want to wait. The ZyXEL Device makes the call immediately.
Apply Click this to save your changes.
Reset Click this to set every field in this screen to its last-saved value.
ZyXEL MAX-200M1 Series User’s Guide
Chapter 11 Phone 129
Figure 71 VoIP > Phone > Region
Each field is described in the following table.
Table 41 VoIP > Phone > Region
LABEL DESCRIPTION
Region Settings Select the place in which the ZyXEL Device is located. Do not select Default.
Call Service Mode Select the mode for supplementary phone services (call hold, call waiting, call
transfer and three-way conference calls) that your VoIP service provider supports.
Europe Type - use supplementary phone services in European mode
USA Type - use supplementary phone services American mode
You might have to subscribe to these services to use them. Contact your VoIP
service provider.
Apply Click this to save your changes and to apply them to the ZyXEL Device.
Reset Click this to set every field in this screen to its last-saved value.

ZyXEL MAX-200M1 Series User’s Guide
130 Chapter 11 Phone

ZyXEL MAX-200M1 Series User’s Guide
Chapter 12 Firewall 131
CHAPTER 12
Firewall
Use these screens to enable, configure and disable the firewall that protects your ZyXEL
Device and your LAN from unwanted or malicious traffic.
12.1 Firewall Overview
Originally, the term firewall referred to a construction technique designed to prevent the
spread of fire from one room to another. The networking term "firewall" is a system or group
of systems that enforces an access-control policy between two networks. It may also be
defined as a mechanism used to protect a trusted network from an untrusted network. Of
course, firewalls cannot solve every security problem. A firewall is one of the mechanisms
used to establish a network security perimeter in support of a network security policy. It should
never be the only mechanism or method employed. For a firewall to guard effectively, you
must design and deploy it appropriately. This requires integrating the firewall into a broad
information-security policy. In addition, specific policies must be implemented within the
firewall itself.
12.1.1 Stateful Inspection Firewall.
Stateful inspection firewalls restrict access by screening data packets against defined access
rules. They make access control decisions based on IP address and protocol. They also
"inspect" the session data to assure the integrity of the connection and to adapt to dynamic
protocols. These firewalls generally provide the best speed and transparency; however, they
may lack the granular application level access control or caching that some proxies support.
Firewalls, of one type or another, have become an integral part of standard security solutions
for enterprises.
12.1.2 About the ZyXEL Device Firewall
The ZyXEL Device firewall is a stateful inspection firewall and is designed to protect against
Denial of Service attacks when activated. The ZyXEL Device's purpose is to allow a private
Local Area Network (LAN) to be securely connected to the Internet. The ZyXEL Device can
be used to prevent theft, destruction and modification of data, as well as log events, which may
be important to the security of your network.
The ZyXEL Device is installed between the LAN and a WiMAX base station connecting to
the Internet. This allows it to act as a secure gateway for all data passing between the Internet
and the LAN.
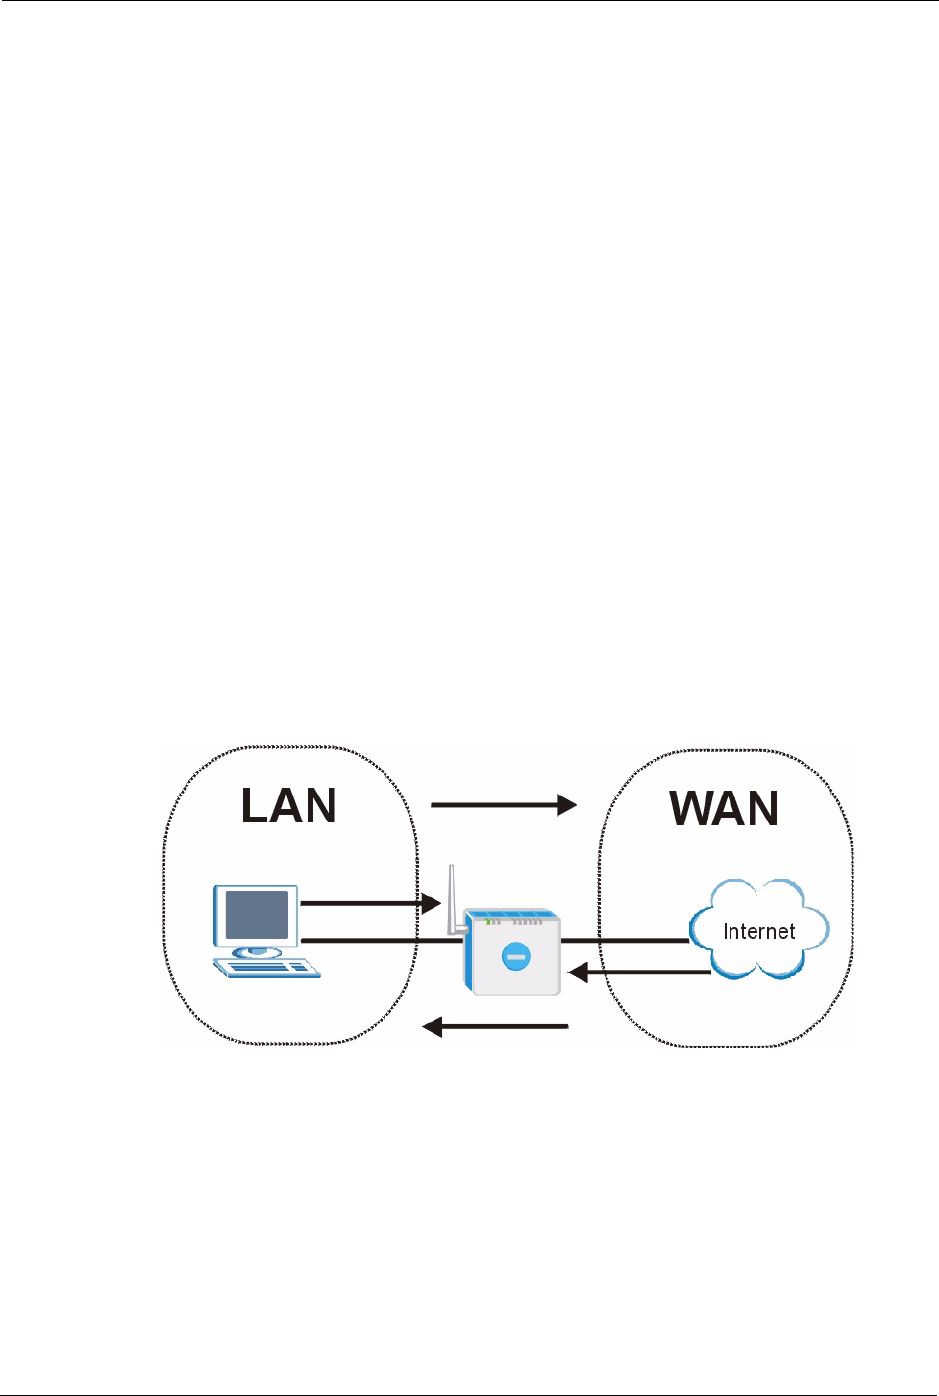
ZyXEL MAX-200M1 Series User’s Guide
132 Chapter 12 Firewall
The ZyXEL Device has one Ethernet (LAN) port. The LAN (Local Area Network) port
attaches to a network of computers, which needs security from the outside world. These
computers will have access to Internet services such as e-mail, FTP and the World Wide Web.
However, “inbound access” is not allowed (by default) unless the remote host is authorized to
use a specific service.
12.1.3 Guidelines For Enhancing Security With Your Firewall
1Change the default password via web configurator.
2Think about access control before you connect to the network in any way.
3Limit who can access your router.
4Don't enable any local service (such as telnet or FTP) that you don't use. Any enabled
service could present a potential security risk. A determined hacker might be able to find
creative ways to misuse the enabled services to access the firewall or the network.
5For local services that are enabled, protect against misuse. Protect by configuring the
services to communicate only with specific peers, and protect by configuring rules to
block packets for the services at specific interfaces.
6Protect against IP spoofing by making sure the firewall is active.
7Keep the firewall in a secured (locked) room.
12.1.4 The Firewall, NAT and Remote Management
Figure 72 Firewall Rule Directions
12.1.4.1 LAN-to-WAN rules
LAN-to-WAN rules are local network to Internet firewall rules. The default is to forward all
traffic from your local network to the Internet.
You can block certain LAN-to-WAN traffic in the Services screen (click the Services tab). All
services displayed in the Blocked Services list box are LAN-to-WAN firewall rules that block
those services originating from the LAN.
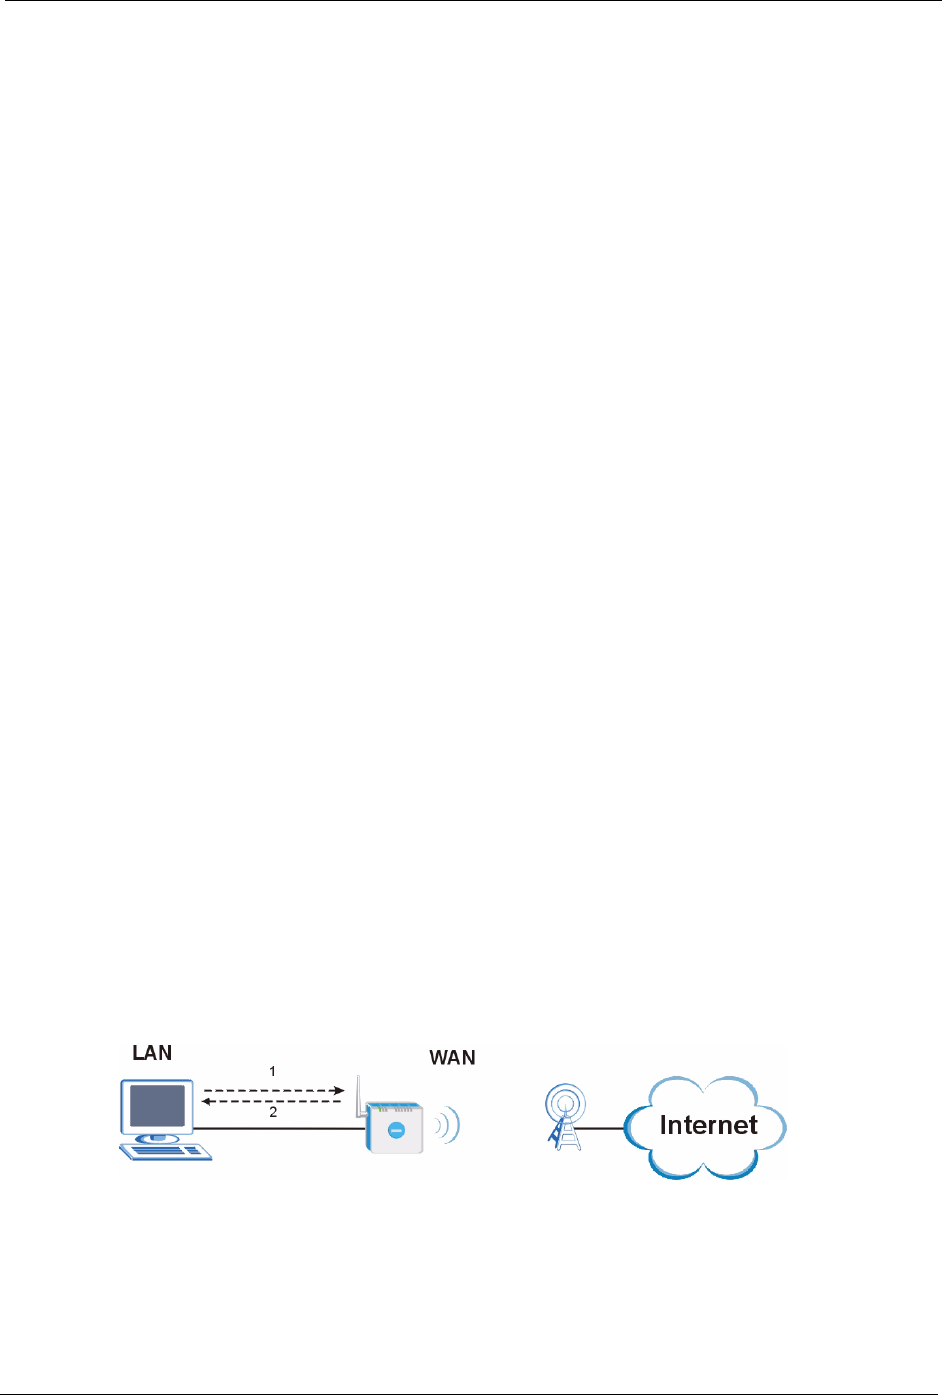
ZyXEL MAX-200M1 Series User’s Guide
Chapter 12 Firewall 133
Blocked LAN-to-WAN packets are considered alerts. Alerts are “higher priority logs” that
include system errors, attacks and attempted access to blocked web sites. Alerts appear in red
in the View Log screen. You may choose to have alerts e-mailed immediately in the Log
Settings screen.
LAN-to-LAN/ZyXEL Device means the LAN to the ZyXEL Device LAN interface. This is
always allowed, as this is how you manage the ZyXEL Device from your local computer.
12.1.4.2 WAN-to-LAN rules
WAN-to-LAN rules are Internet to your local network firewall rules. The default is to block
all traffic from the Internet to your local network.
How can you forward certain WAN to LAN traffic? You may allow traffic originating from the
WAN to be forwarded to the LAN by:
• Configuring NAT port forwarding rules.
• Configuring One-to-One and Many-One-to-One NAT mapping rules in the SMT NAT
menus.
• Configuring WAN or LAN & WAN access for services in the Remote Management
screens or SMT menus. When you allow remote management from the WAN, you are
actually configuring WAN-to-WAN/ZyXEL Device firewall rules. WAN-to-WAN/
ZyXEL Device firewall rules are Internet to the ZyXEL Device WAN interface firewall
rules. The default is to block all such traffic. When you decide what WAN-to-LAN
packets to log, you are in fact deciding what WAN-to-LAN and WAN-to-WAN/ZyXEL
Device packets to log.
Forwarded WAN-to-LAN packets are not considered alerts.
12.2 Triangle Route
When the firewall is on, your ZyXEL Device acts as a secure gateway between your LAN and
the Internet. In an ideal network topology, all incoming and outgoing network traffic passes
through the ZyXEL Device to protect your LAN against attacks.
Figure 73 Ideal Firewall Setup
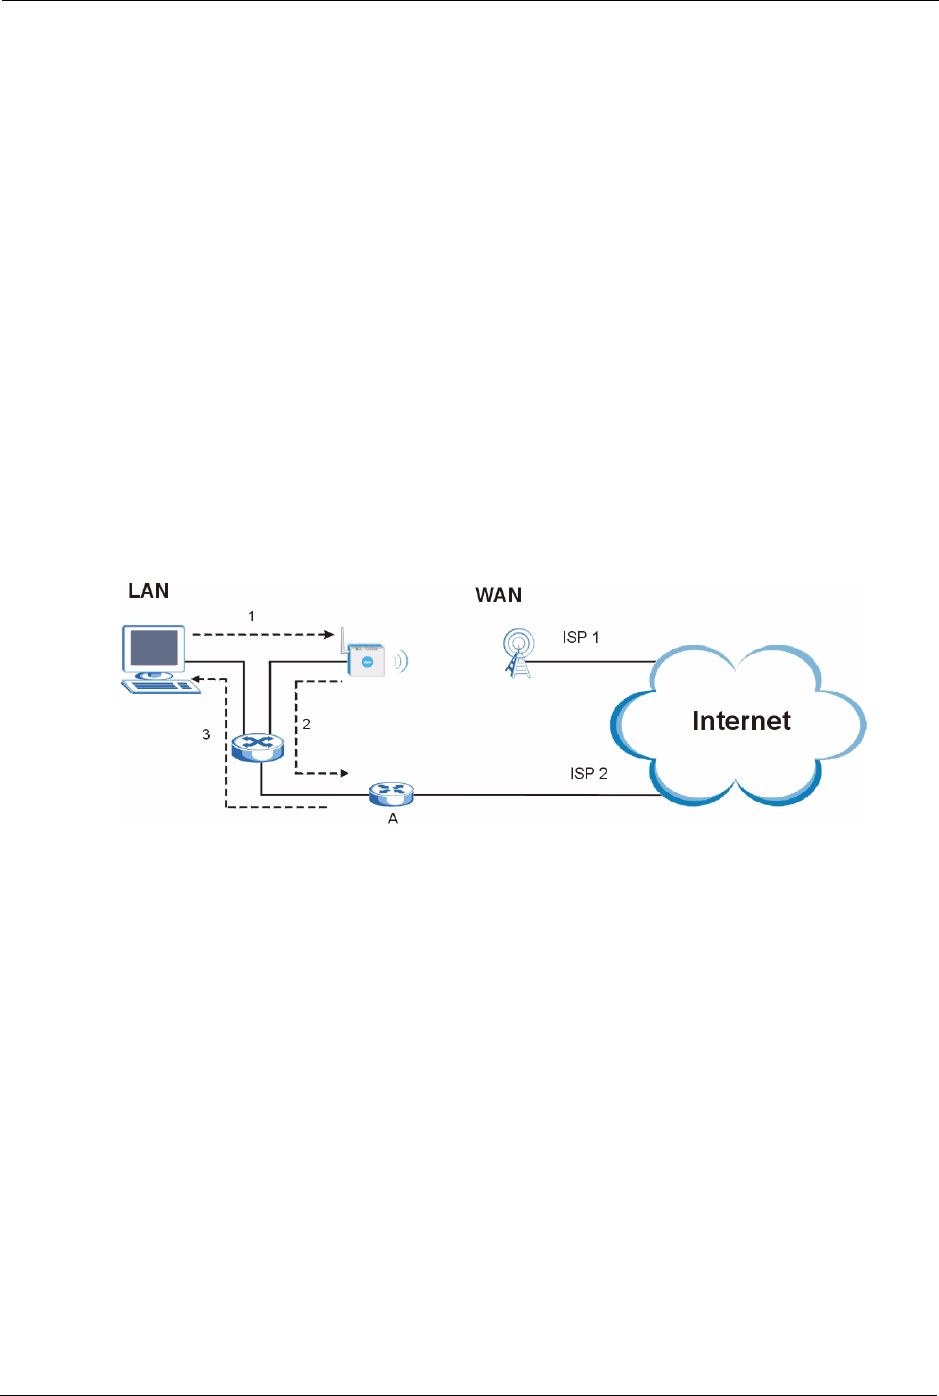
ZyXEL MAX-200M1 Series User’s Guide
134 Chapter 12 Firewall
12.2.1 The “Triangle Route” Problem
A traffic route is a path for sending or receiving data packets between two Ethernet devices.
You may have more than one connection to the Internet (through one or more ISPs). If an
alternate gateway is on the LAN (and its IP address is in the same subnet as the ZyXEL
Device’s LAN IP address), the “triangle route” (also called asymmetrical route) problem may
occur. The steps below describe the “triangle route” problem.
1A computer on the LAN initiates a connection by sending out a SYN packet to a
receiving server on the WAN.
2The ZyXEL Device reroutes the SYN packet through Gateway A on the LAN to the
WA N.
3The reply from the WAN goes directly to the computer on the LAN without going
through the ZyXEL Device.
As a result, the ZyXEL Device resets the connection, as the connection has not been
acknowledged.
Figure 74 “Triangle Route” Problem
12.2.2 Solving the “Triangle Route” Problem
If you have the ZyXEL Device allow triangle route sessions, traffic from the WAN can go
directly to a LAN computer without passing through the ZyXEL Device and its firewall
protection.
Another solution is to use IP alias. IP alias allows you to partition your network into logical
sections over the same Ethernet interface. Your ZyXEL Device supports up to three logical
LAN interfaces with the ZyXEL Device being the gateway for each logical network.
It’s like having multiple LAN networks that actually use the same physical cables and ports.
By putting your LAN and Gateway A in different subnets, all returning network traffic must
pass through the ZyXEL Device to your LAN. The following steps describe such a scenario.
1A computer on the LAN initiates a connection by sending a SYN packet to a receiving
server on the WAN.
2The ZyXEL Device reroutes the packet to Gateway A, which is in Subnet 2.
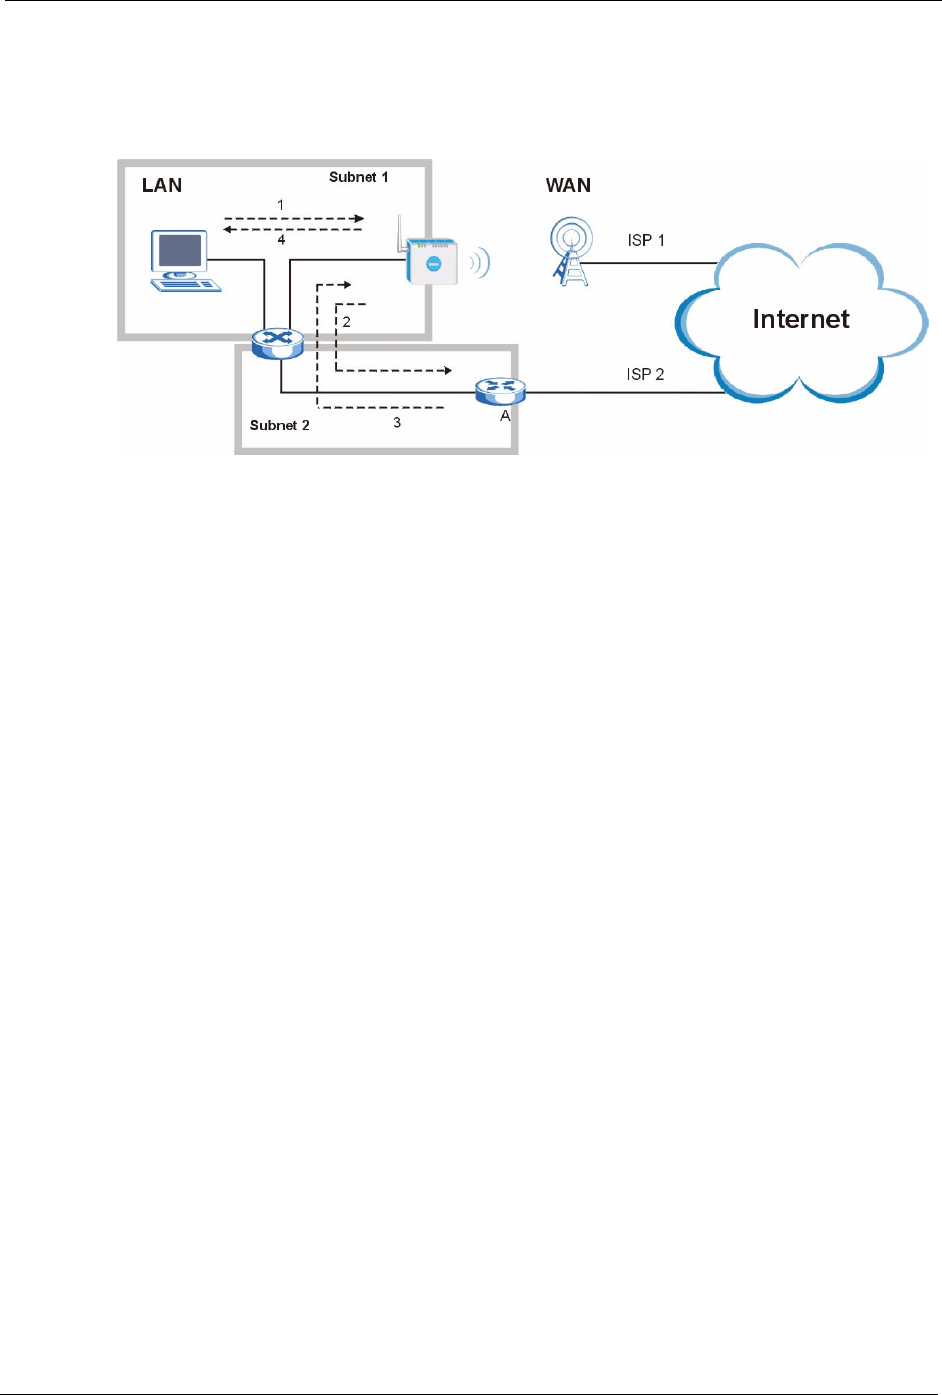
ZyXEL MAX-200M1 Series User’s Guide
Chapter 12 Firewall 135
3The reply from the WAN goes to the ZyXEL Device.
4The ZyXEL Device then sends it to the computer on the LAN in Subnet 1.
Figure 75 IP Alias
12.3 Firewall Screens
12.3.1 General Firewall Screen
Use this screen to configure the basic settings for your firewall. To access this screen, click
Security > Firewall > General.
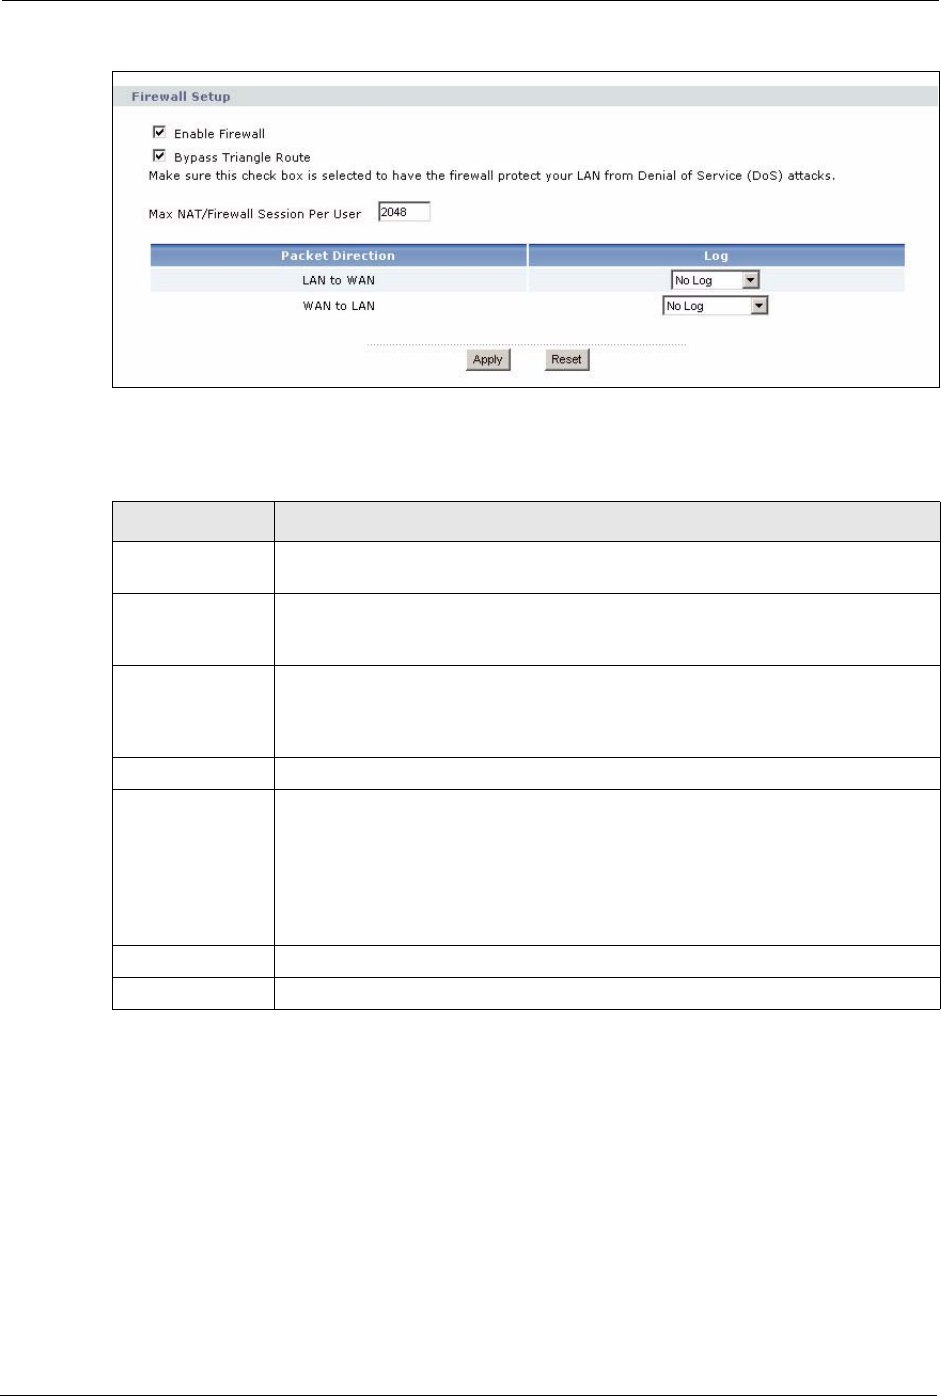
ZyXEL MAX-200M1 Series User’s Guide
136 Chapter 12 Firewall
Figure 76 Security > Firewall > General
Each field is described in the following table.
12.3.2 Firewall Services Screen
Use this screen to enable service blocking, to set up the date and time service blocking is
effective, and to maintain the list of services you want to block. To access this screen, click
Security > Firewall > Services.
Table 42 Security > Firewall > General
LABEL DESCRIPTION
Enable Firewall Select this to activate the firewall. The ZyXEL Device controls access and protects
against Denial of Service (DoS) attacks when the firewall is activated.
Bypass Triangle
Route
Select this if you want to let some traffic from the WAN go directly to a computer in
the LAN without passing through the ZyXEL Device. See the appendices for more
information about triangle route topology.
Max NAT/Firewall
Session Per User
Select the maximum number of NAT rules and firewall rules the ZyXEL Device
enforces at one time. The ZyXEL Device automatically allocates memory for the
maximum number of rules, regardless of whether or not there is a rule to enforce.
This is the same number you enter in Network > NAT > General.
Packet Direction This field displays each direction that packets pass through the ZyXEL Device.
Log Select the situations in which you want to create log entries for firewall events.
No Log - do not create any log entries
Log Blocked - (LAN to WAN only) create log entries when packets are blocked
Log Forwarded - (WAN to LAN only) create log entries when packets are
forwarded
Log All - create log entries for every packet
Apply Click this to save your changes.
Reset Click this to set every field in this screen to its last-saved value.
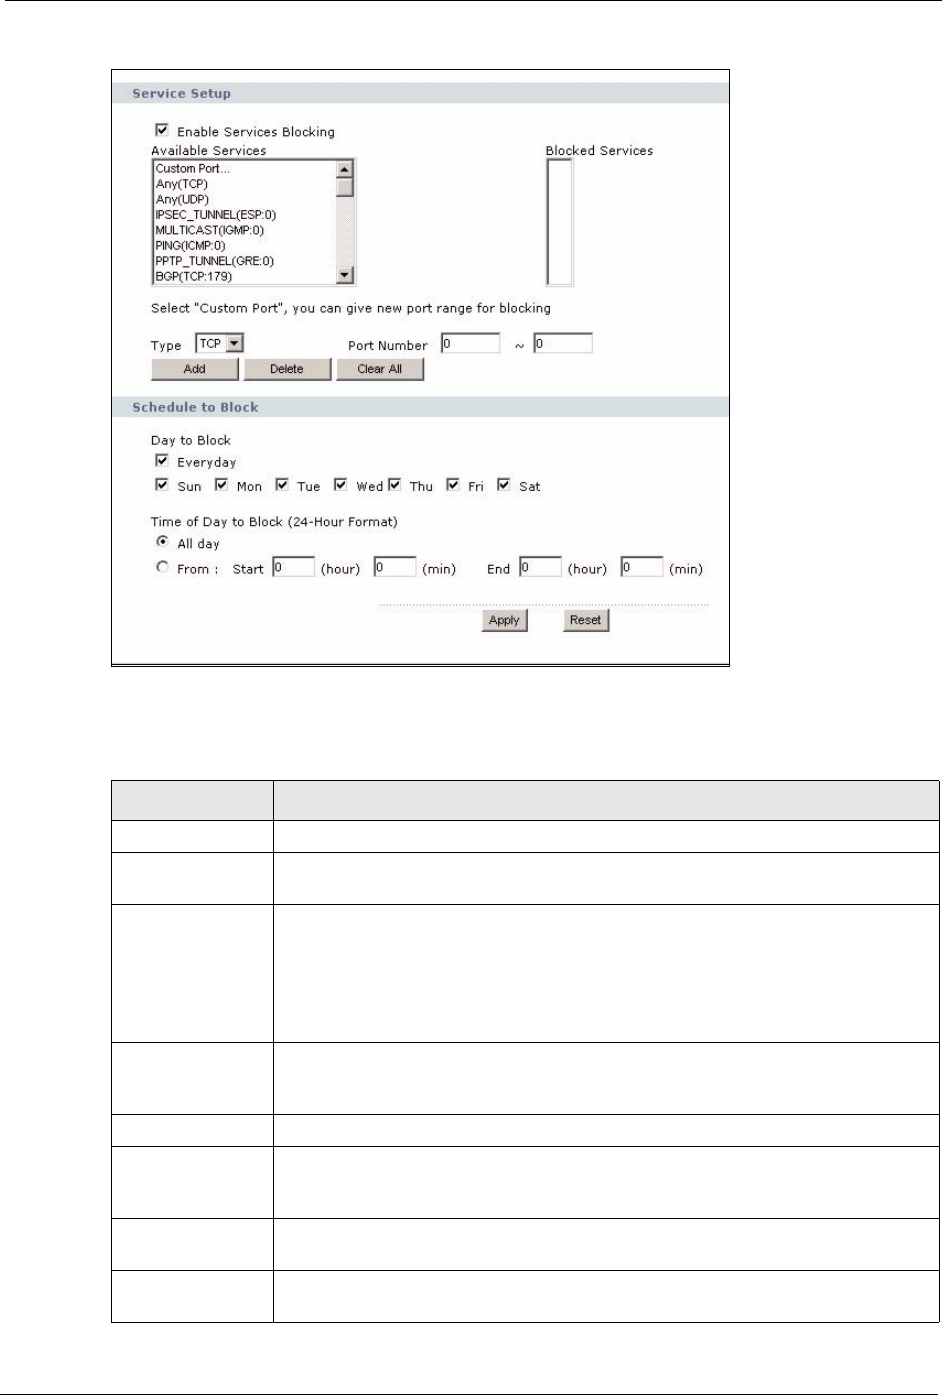
ZyXEL MAX-200M1 Series User’s Guide
Chapter 12 Firewall 137
Figure 77 Security > Firewall > Services
Each field is described in the following table.
Table 43 Security > Firewall > Services
LABEL DESCRIPTION
Service Setup
Enable Services
Blocking
Select this to activate service blocking. The Schedule to Block section controls
what days and what times service blocking is actually effective, however.
Available Services This is a list of pre-defined services (destination ports) you may prohibit your LAN
computers from using. Select the port you want to block, and click Add to add the
port to the Blocked Services field.
A custom port is a service that is not available in the pre-defined Available
Services list. You must define it using the Type and Port Number fields. See
Appendix F on page 249 for some examples of services.
Blocked Services This is a list of services (ports) that are inaccessible to computers on your LAN
when service blocking is effective. To remove a service from this list, select the
service, and click Delete.
Type Select TCP or UDP, based on which one the custom port uses.
Port Number Enter the range of port numbers that defines the service. For example, suppose
you want to define the Gnutella service. Select TCP type and enter a port range of
6345-6349.
Add Click this to add the selected service in Available Services to the Blocked
Services list.
Delete Select a service in the Blocked Services, and click this to remove the service from
the list.

ZyXEL MAX-200M1 Series User’s Guide
138 Chapter 12 Firewall
Clear All Click this to remove all the services in the Blocked Services list.
Schedule to Block
Day to Block Select which days of the week you want the service blocking to be effective.
Time of Day to
Block
Select what time each day you want service blocking to be effective. Enter times in
24-hour format; for example, 3:00pm should be entered as 15:00.
Apply Click this to save your changes.
Reset Click this to set every field in this screen to its last-saved value.
Table 43 Security > Firewall > Services
LABEL DESCRIPTION

ZyXEL MAX-200M1 Series User’s Guide
Chapter 13 Phone Book 139
CHAPTER 13
Phone Book
Use these screens to maintain call-forwarding rules and speed-dial settings.
13.1 Phone Book Overview
Speed dial provides shortcuts for dialing frequently used (VoIP) phone numbers. It is also
required if you want to make peer-to-peer calls. In peer-to-peer calls, you call another VoIP
device directly without going through a SIP server. In the ZyXEL Device, you must set up a
speed dial entry in the phone book in order to do this. Select Non-Proxy (Use IP or URL) in
the Type column and enter the callee’s IP address or domain name. The ZyXEL Device sends
SIP INVITE requests to the peer VoIP device when you use the speed dial entry.
You do not need to configure a SIP account in order to make a peer-to-peer VoIP call.
13.2 Phone Book Screens
13.2.1 Incoming Call Policy Screen
Use this screen to maintain rules for handling incoming calls. You can block, redirect, or
accept them. To access this screen, click VoIP > Phone Book > Incoming Call Policy.
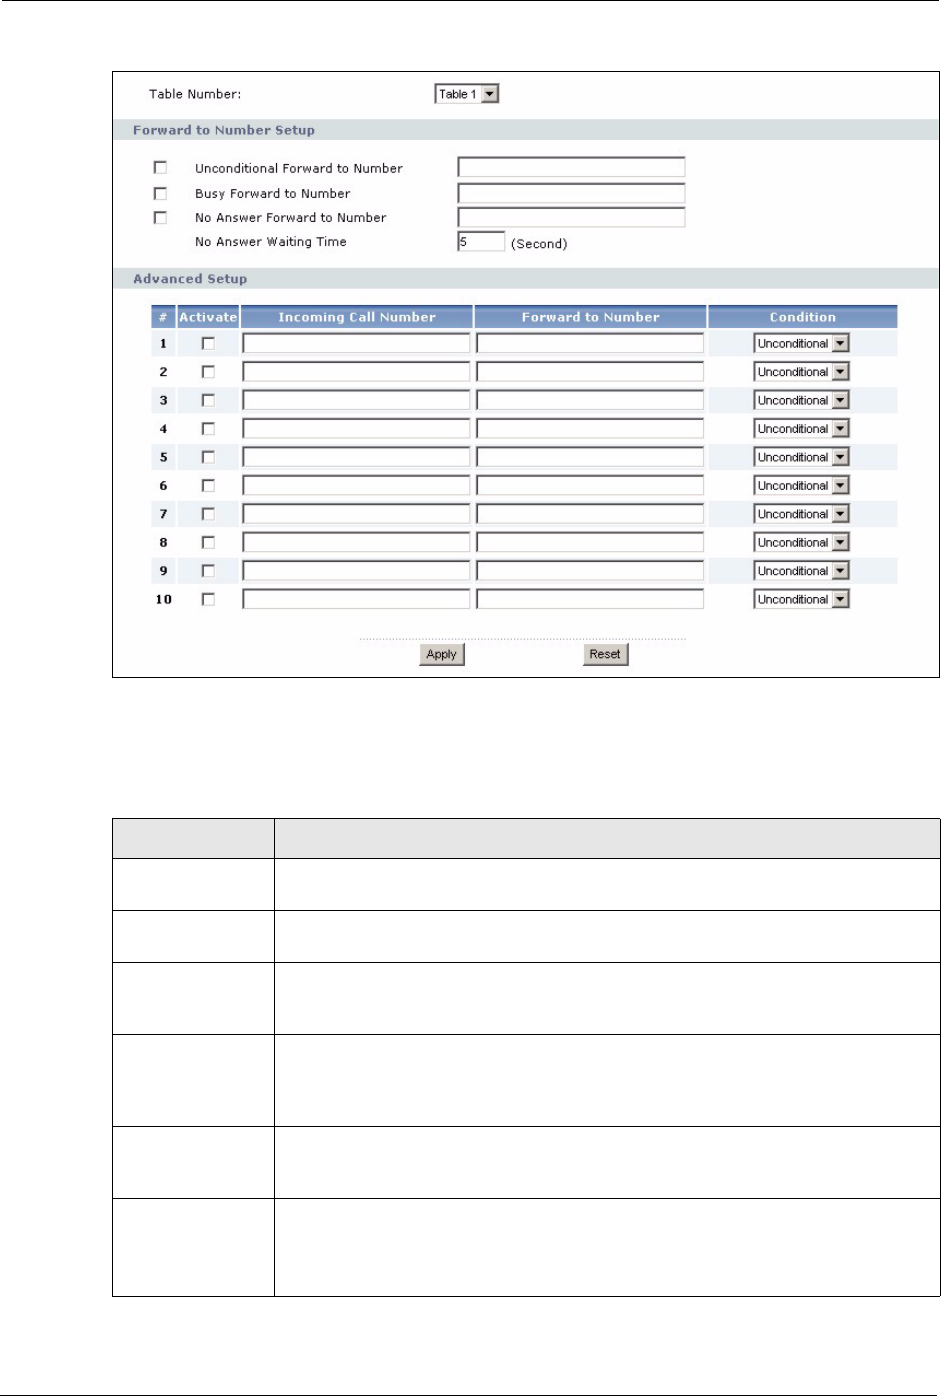
ZyXEL MAX-200M1 Series User’s Guide
140 Chapter 13 Phone Book
Figure 78 VoIP > Phone Book > Incoming Call Policy
You can create two sets of call-forwarding rules. Each one is stored in a call-forwarding table.
Each field is described in the following table.
Table 44 VoIP > Phone Book > Incoming Call Policy
LABEL DESCRIPTION
Table Number Select the call-forwarding table you want to see in this screen. If you change this
field, the screen automatically refreshes.
Forward to
Number Setup
The ZyXEL Device checks these rules, in the order in which they appear, after it
checks the rules in the Advanced Setup section.
Unconditional
Forward to
Number
Select this if you want the ZyXEL Device to forward all incoming calls to the
specified phone number, regardless of other rules in the Forward to Number
section. Specify the phone number in the field on the right.
Busy Forward to
Number
Select this if you want the ZyXEL Device to forward incoming calls to the specified
phone number if the phone port is busy. Specify the phone number in the field on
the right. If you have call waiting, the incoming call is forwarded to the specified
phone number if you reject or ignore the second incoming call.
No Answer
Forward to
Number
Select this if you want the ZyXEL Device to forward incoming calls to the specified
phone number if the call is unanswered. (See No Answer Waiting Time.) Specify
the phone number in the field on the right.
No Answer
Waiting Time
This field is used by the No Answer Forward to Number feature and No Answer
conditions below.
Enter the number of seconds the ZyXEL Device should wait for you to answer an
incoming call before it considers the call is unanswered.

ZyXEL MAX-200M1 Series User’s Guide
Chapter 13 Phone Book 141
13.2.2 Speed Dial Screen
You have to create speed-dial entries if you want to make peer-to-peer calls or call SIP
numbers that use letters. You can also create speed-dial entries for frequently-used SIP phone
numbers. Use this screen to add, edit, or remove speed-dial entries. To access this screen, click
VoIP > Phone Book > Speed Dial.
Advanced Setup The ZyXEL Device checks these rules before it checks the rules in the Forward to
Number section.
# This field is a sequential value, and it is not associated with a specific rule. The
sequence is important, however. The ZyXEL Device checks each rule in order, and
it only follows the first one that applies.
Activate Select this to enable this rule. Clear this to disable this rule.
Incoming Call
Number
Enter the phone number to which this rule applies.
Forward to
Number
Enter the phone number to which you want to forward incoming calls from the
Incoming Call Number. You may leave this field blank, depending on the
Condition.
Condition Select the situations in which you want to forward incoming calls from the
Incoming Call Number, or select an alternative action.
Unconditional - The ZyXEL Device immediately forwards any calls from the
Incoming Call Number to the Forward to Number.
Busy - The ZyXEL Device forwards any calls from the Incoming Call Number to
the Forward to Number when your SIP account already has a call connected.
No Answer - The ZyXEL Device forwards any calls from the Incoming Call
Number to the Forward to Number when the call is unanswered. (See No
Answer Waiting Time.)
Block - The ZyXEL Device rejects calls from the Incoming Call Number.
Accept - The ZyXEL Device allows calls from the Incoming Call Number. You
might create a rule with this condition if you do not want incoming calls from
someone to be forwarded by rules in the Forward to Number section.
Apply Click this to save your changes and to apply them to the ZyXEL Device.
Reset Click this to set every field in this screen to its last-saved value.
Table 44 VoIP > Phone Book > Incoming Call Policy
LABEL DESCRIPTION
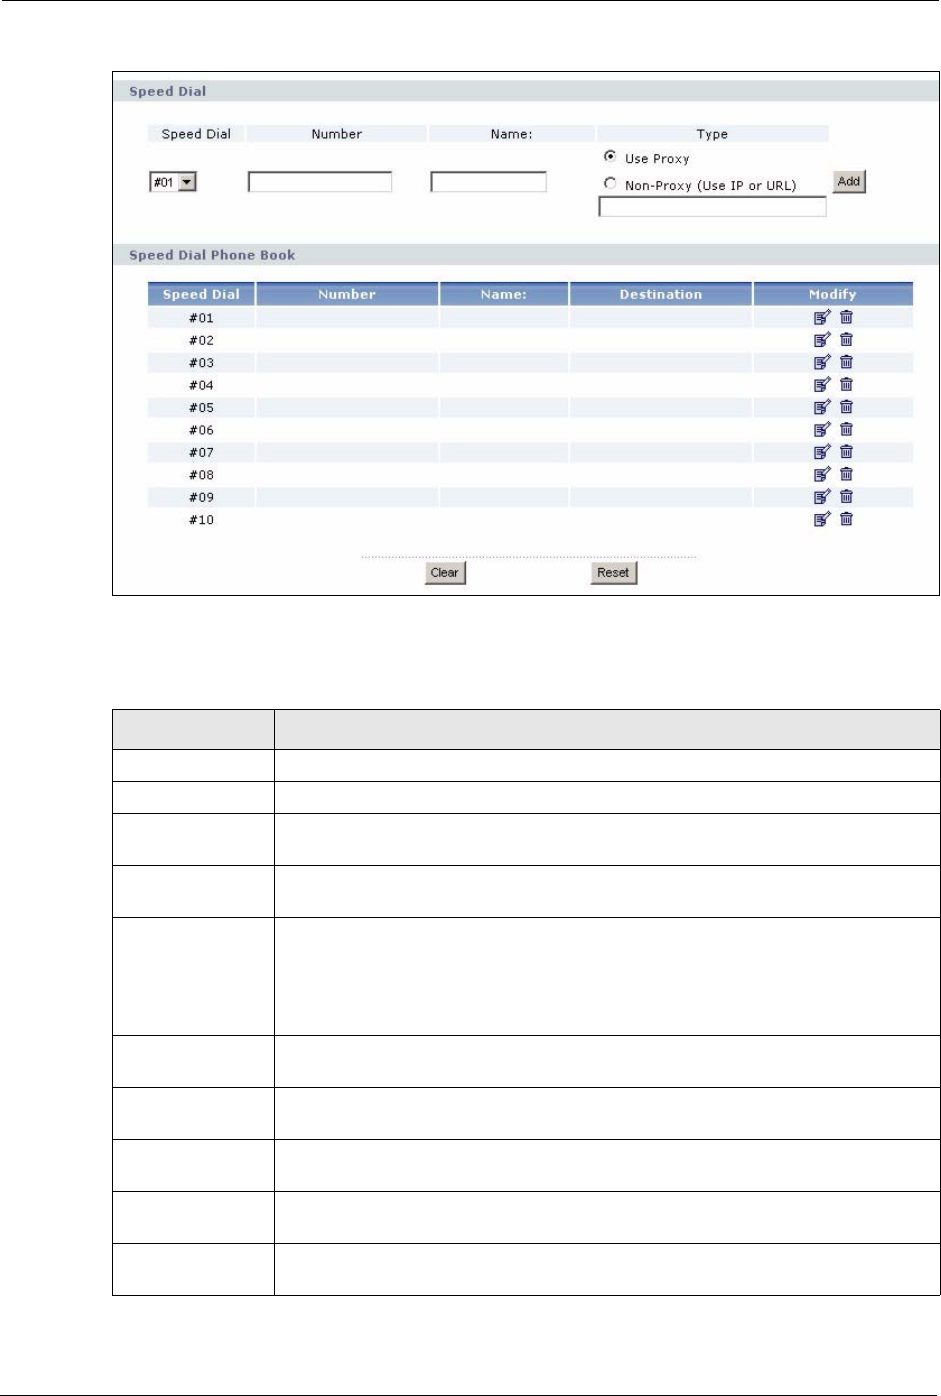
ZyXEL MAX-200M1 Series User’s Guide
142 Chapter 13 Phone Book
Figure 79 VoIP > Phone Book > Speed Dial
Each field is described in the following table.
Table 45 VoIP > Phone Book > Speed Dial
LABEL DESCRIPTION
Speed Dial Use this section to create or edit speed-dial entries.
Speed Dial Select the speed-dial number you want to use for this phone number.
Number Enter the SIP number you want the ZyXEL Device to call when you dial the speed-
dial number.
Name Enter a name to identify the party you call when you dial the speed-dial number.
You can use up to 127 printable ASCII characters.
Type Select Use Proxy if you want to use one of your SIP accounts to call this phone
number.
Select Non-Proxy (Use IP or URL) if you want to use a different SIP server or if
you want to make a peer-to-peer call. In this case, enter the IP address or domain
name of the SIP server or the other party in the field below.
Add Click this to use the information in the Speed Dial section to update the Speed
Dial Phone Book section.
Speed Dial Phone
Book
Use this section to look at all the speed-dial entries and to erase them.
Speed Dial This field displays the speed-dial number you should dial to use this entry. You
should dial the numbers the way they appear in the screen.
Number This field displays the SIP number the ZyXEL Device calls when you dial the
speed-dial number.
Name This field displays the name of the party you call when you dial the speed-dial
number.

ZyXEL MAX-200M1 Series User’s Guide
Chapter 13 Phone Book 143
Destination This field is blank, if the speed-dial entry uses one of your SIP accounts.
Otherwise, this field shows the IP address or domain name of the SIP server or
other party. (This field corresponds with the Type field in the Speed Dial section.)
Modify Use this field to edit or erase the speed-dial entry.
Click the Edit icon to copy the information for this speed-dial entry into the Speed
Dial section, where you can change it.
Click the Remove icon to erase this speed-dial entry.
Clear Click this to erase all the speed-dial entries.
Reset Click this to set every field in this screen to its last-saved value.
Table 45 VoIP > Phone Book > Speed Dial
LABEL DESCRIPTION

ZyXEL MAX-200M1 Series User’s Guide
144 Chapter 13 Phone Book

ZyXEL MAX-200M1 Series User’s Guide
Chapter 14 Content Filter 145
CHAPTER 14
Content Filter
Use these screens to create and enforce policies that restrict access to the Internet based on
content.
14.1 Content Filtering Overview
Internet content filtering allows you to create and enforce Internet access policies tailored to
their needs. Content filtering is the ability to block certain web features or specific URL
keywords.
The ZyXEL Device can block web features such as ActiveX controls, Java applets, cookies
and disable web proxies. The ZyXEL Device also allows you to define time periods and days
during which the ZyXEL Device performs content filtering.
14.2 Content Filtering Screens
14.2.1 Content Filter Screen
Use this screen to set up a trusted IP address, which web features are restricted, and which
keywords are blocked when content filtering is effective. To access this screen, click Security
> Content Filter > Filter.
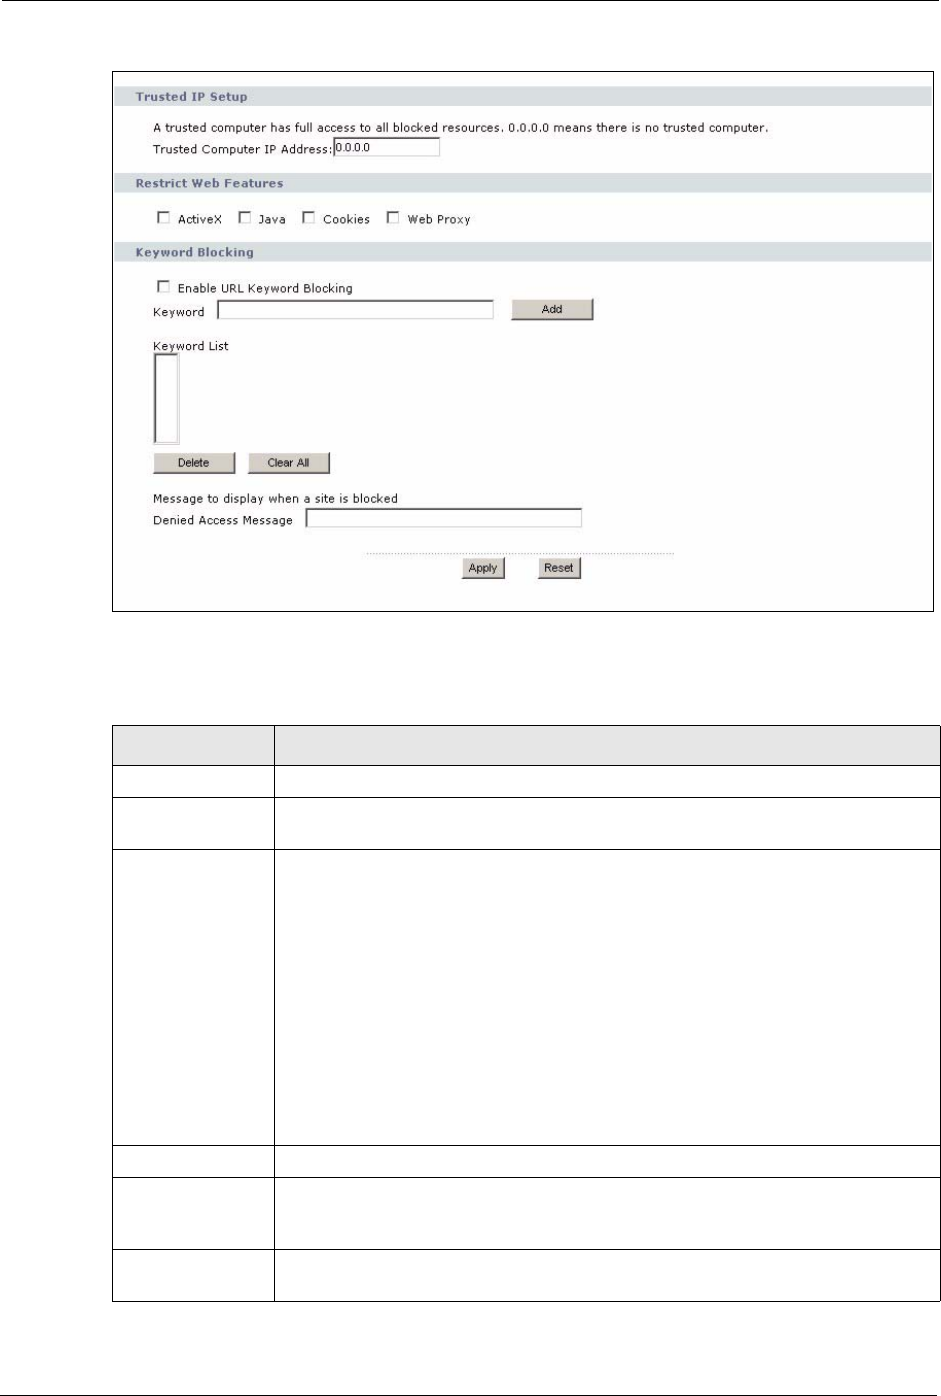
ZyXEL MAX-200M1 Series User’s Guide
146 Chapter 14 Content Filter
Figure 80 Security > Content Filter > Filter
Each field is described in the following table.
Table 46 Security > Content Filter > Filter
LABEL DESCRIPTION
Trusted IP Setup
Trusted Computer
IP Address
You can allow a specific computer to access all Internet resources without the
restrictions you set in these screens. Enter the IP address of the trusted computer.
Restrict Web
Features
Select the web features you want to disable. If a user downloads a page with a
restricted feature, that part of the web page appears blank or grayed out.
ActiveX - This is a tool for building dynamic and active Web pages and distributed
object applications. When you visit an ActiveX Web site, ActiveX controls are
downloaded to your browser, where they remain in case you visit the site again.
Java - This is used to build downloadable Web components or Internet and
intranet business applications of all kinds.
Cookies - This is used by Web servers to track usage and to provide service
based on ID.
Web Proxy - This is a server that acts as an intermediary between a user and the
Internet to provide security, administrative control, and caching service. When a
proxy server is located on the WAN, it is possible for LAN users to avoid content
filtering restrictions.
Keyword Blocking
Enable URL
Keyword Blocking
Select this if you want the ZyXEL Device to block Web sites based on words in the
web site address. For example, if you block the keyword bad, http://
www.website.com/bad.html is blocked.
Keyword Type a keyword you want to block in this field. You can use up to 64 printable
ASCII characters. There is no wildcard character, however.
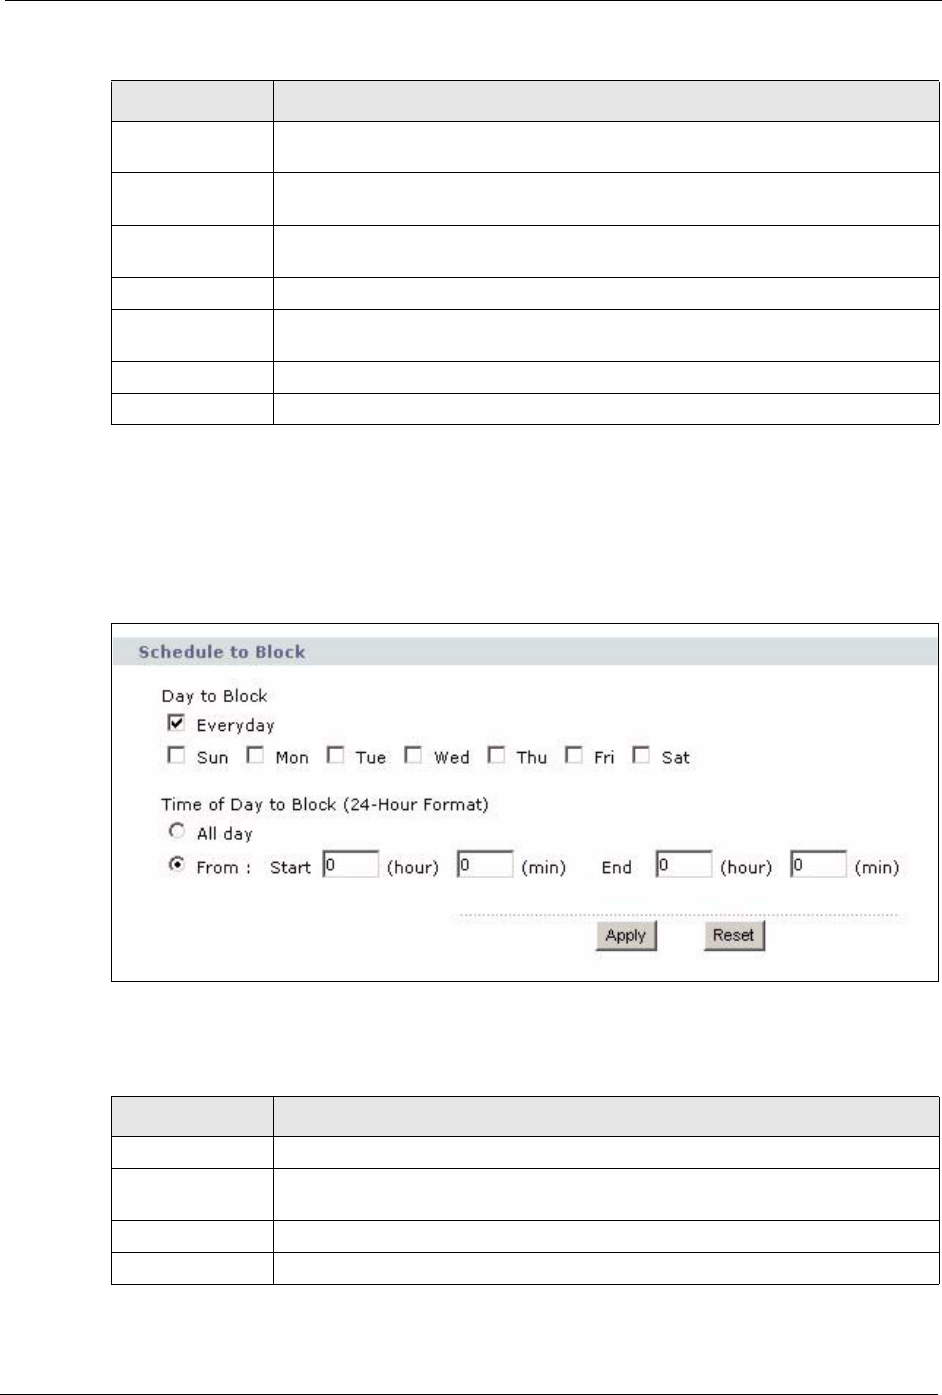
ZyXEL MAX-200M1 Series User’s Guide
Chapter 14 Content Filter 147
14.2.2 Content Filter Schedule Screen
Use this screen to set up the schedule when content filtering is effective. To access this screen,
click Security > Content Filter > Schedule.
Figure 81 Security > Content Filter > Schedule
Each field is described in the following table.
Add Click this to add the specified Keyword to the Keyword List. You can enter up to
64 keywords.
Keyword List This field displays the keywords that are blocked when Enable URL Keyword
Blocking is selected. To delete a keyword, select it, click Delete, and click Apply.
Delete Click Delete to remove the selected keyword in the Keyword List. The keyword
disappears after you click Apply.
Clear All Click this button to remove all of the keywords in the Keyword List.
Denied Access
Message
Enter the message that is displayed when the ZyXEL Device’s content filter feature
blocks access to a web site.
Apply Click this to save your changes and to apply them to the ZyXEL Device.
Cancel Click this to set every field in this screen to its last-saved value.
Table 46 Security > Content Filter > Filter
LABEL DESCRIPTION
Table 47 Security > Content Filter > Schedule
LABEL DESCRIPTION
Day to Block Select which days of the week you want content filtering to be effective.
Time of Day to
Block
Select what time each day you want content filtering to be effective. Enter times in
24-hour format; for example, 3:00pm should be entered as 15:00.
Apply Click this to save your changes.
Reset Click this to set every field in this screen to its last-saved value.

ZyXEL MAX-200M1 Series User’s Guide
148 Chapter 14 Content Filter

ZyXEL MAX-200M1 Series User’s Guide
Chapter 15 Static Route 149
CHAPTER 15
Static Route
Use these screens to configure static routes on the ZyXEL Device.
15.1 Static Route Overview
Each remote node specifies only the network to which the gateway is directly connected, and
the ZyXEL Device has no knowledge of the networks beyond. For instance, the ZyXEL
Device knows about network N2 in the following figure through remote node Router 1.
However, the ZyXEL Device is unable to route a packet to network N3 because it doesn't
know that there is a route through the same remote node Router 1 (via gateway Router 2). The
static routes are for you to tell the ZyXEL Device about the networks beyond the remote
nodes.
Figure 82 Example of Static Routing Topology
15.2 Static Route Screens
15.2.1 IP Static Route Screen
Use this screen to look at static routes in the ZyXEL Device. To access this screen, click
Management > Static Route > IP Static Route.
Note: The first static route is the default route and cannot be modified or deleted.
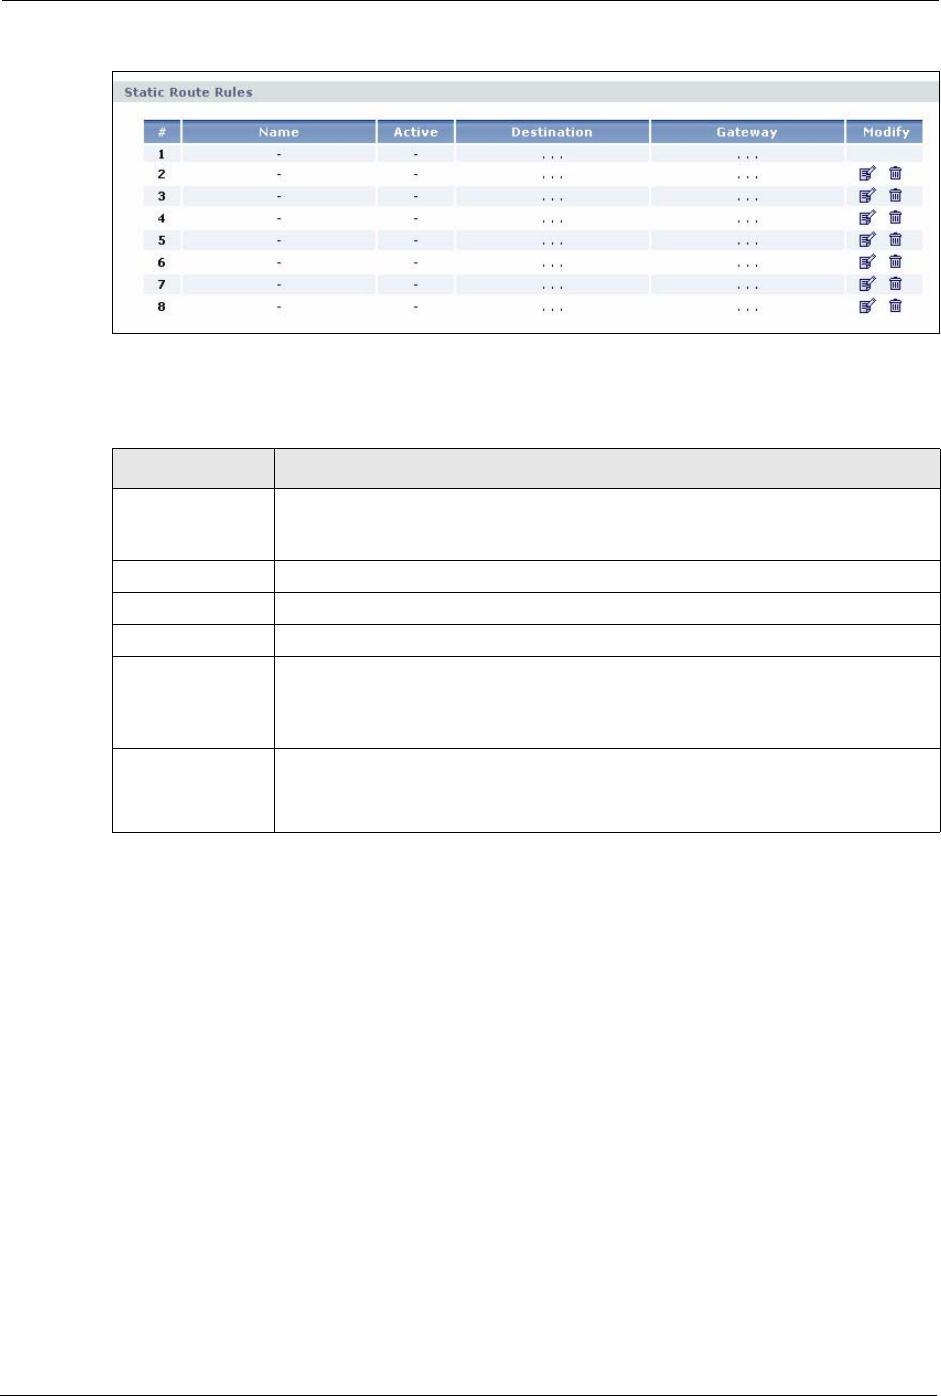
ZyXEL MAX-200M1 Series User’s Guide
150 Chapter 15 Static Route
Figure 83 Management > Static Route > IP Static Route
Each field is described in the following table.
15.2.2 IP Static Route Edit Screen
Use this screen to edit a static route in the ZyXEL Device. To access this screen, click an Edit
icon in Management > Static Route > IP Static Route.
Table 48 Management > Static Route > IP Static Route
LABEL DESCRIPTION
#This field is a sequential value, and it is not associated with a specific rule. The
sequence is important, however. The ZyXEL Device checks each rule in order, and
it follows only the first one that applies.
Name This field displays the name that describes the static route.
Active This field shows whether this static route is active (Yes) or not (No).
Destination This field displays the destination IP address(es) that this static route affects.
Gateway This field displays the IP address of the gateway to which the ZyXEL Device
should send packets for the specified Destination. The gateway is a router or a
switch on the same network segment as the device's LAN or WAN port. The
gateway helps forward packets to their destinations.
Modify Use this field to edit or erase the static route.
Click the Edit icon to open the IP Static Route Edit screen for this static route.
Click the Remove icon to erase this static route.