ASUSTeK Computer M303 M303 GSM Camera Phone User Manual M303 UserMan
ASUSTeK Computer Inc M303 GSM Camera Phone M303 UserMan
Part 3

161161
161161
161
Multimedia Messaging Service (MMS) ............................................. 180
Composing an MMS message ................................................... 180
Launching the MMS message editor .................................. 180
Choosing the message recipient(s) .................................. 180
Entering the message subject .......................................... 182
Adding text to the MMS message ..................................... 182
Adding an image to the MMS message ............................. 184
Adding an audio file to the MMS message ........................ 186
Adding another slide(s) .................................................... 188
Adjusting the slide duration .............................................. 189
Previewing the MMS message ........................................... 189
Sending the MMS message ...................................................... 190
Saving the MMS message ......................................................... 190
Managing the MMS Inbox .......................................................... 191
Using the MMS Inbox menu ............................................... 191
Managing the MMS Outbox ...................................................... 192
Using the MMS Outbox menu ............................................ 192
Changing the MMS message settings ...................................... 193
Changing the MMS validity period ..................................... 194
Delaying the MMS message delivery ................................. 195
Activating the Read Report function ................................ 196
Activating the delivery report ........................................... 197
Auto downloading MMS messages .................................... 198
Activating the sender visibility ......................................... 198
Viewing the MMS memory status ............................................ 199
162162
162162
162
Ask your phone operator on how to activate the MMS feature. Only
mobile phones with MMS feature can send/receive MMS messages.
Messaging features
The phone is capable of creating, sending, and receiving both multimedia
messaging service (MMS) or short message service (SMS) messages to
and from other mobile phones. MMS allows you to send text messages
with audio and image attachments to an MMS-enabled mobile phone or
e-mail. SMS, on the other hand, allows you to send short text messages
to any mobile phone.
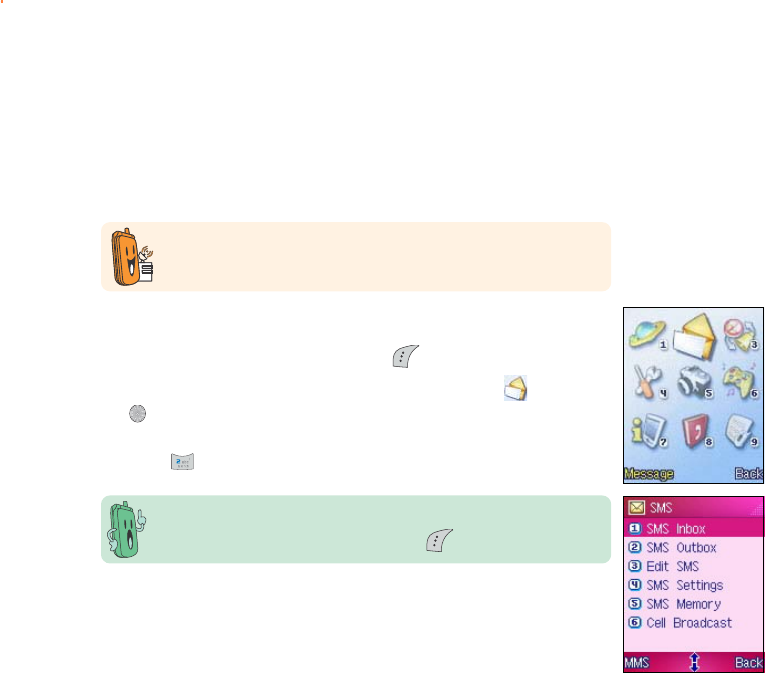
The display shows the SMS menu by default. You can switch from
SMS to MMS, or vice-versa, by clicking .
To access the MessageMessage
MessageMessage
Message menu:
1. Put the phone in idle mode, then press to display the main menu.
2. Use the navigation keys to select the MessageMessage
MessageMessage
Message icon , then press
to display the MessageMessage
MessageMessage
Message menu.
OROR
OROR
OR
Press to display the MessageMessage
MessageMessage
Message menu.
163163
163163
163
Short Message Service (SMS)
The phone allows you to compose and send Short Message Service
(SMS) or text message to another mobile phone.
Composing and sending an SMS messageComposing and sending an SMS message
Composing and sending an SMS messageComposing and sending an SMS message
Composing and sending an SMS message
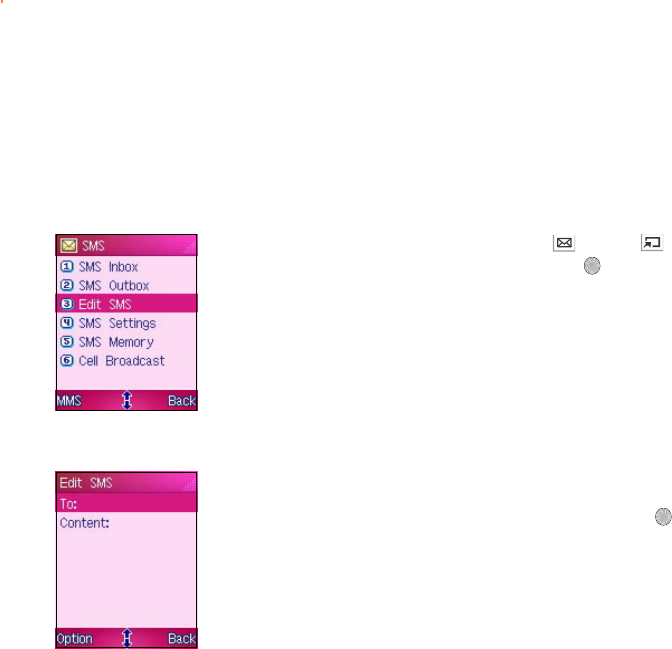
Launching the SMS message editorLaunching the SMS message editor
Launching the SMS message editorLaunching the SMS message editor
Launching the SMS message editor
To launch the SMS message editor, use the (up) or
(down) button to select Edit SMSEdit SMS
Edit SMSEdit SMS
Edit SMS, then press . The SMS
message editor screen appears.
Choosing the message recipient(s)Choosing the message recipient(s)
Choosing the message recipient(s)Choosing the message recipient(s)
Choosing the message recipient(s)
To choose the recipient(s):
1. In the Edit MMS Edit MMS
Edit MMS Edit MMS
Edit MMS screen, highlight the To:To:
To:To:
T o : field then press .
APhone Number Phone Number
Phone Number Phone Number
Phone Number window appears.
164164
164164
164
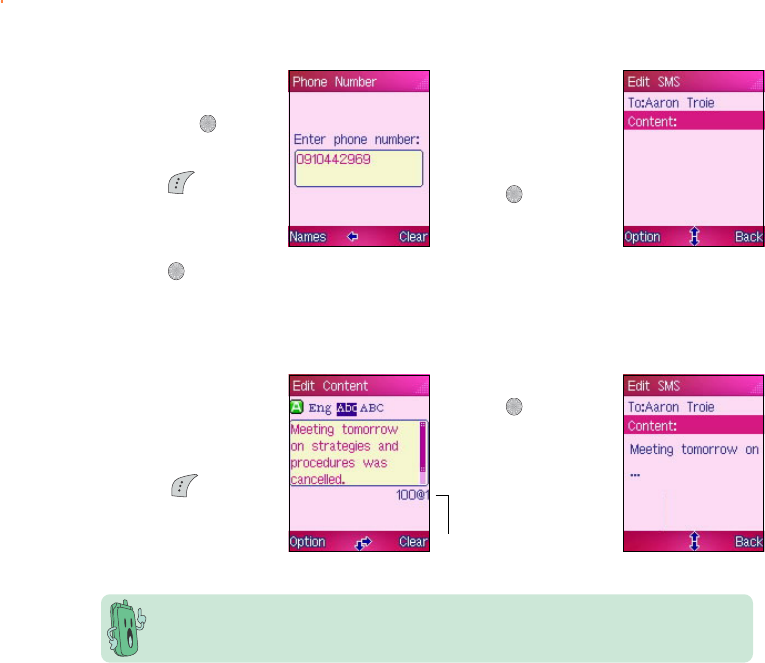
Your SMS message may contain up to 670 characters. Use the character/message counter
below the message field to determine how many characters you have keyed-in and how
many SMS messages you have composed.
Character/Character/
Character/Character/
Character/
message countmessage count
message countmessage count
message count
2. Key-in the phone
number of the recipient,
then press .
OROR
OROR
OR
Press (Names) to
open the PhonebookPhonebook
PhonebookPhonebook
Phonebook,
select a phone book
entry(ies), then
press .
3. The recipient’s name
or number appears in
the ToTo
ToTo
T o field.
Highlight the
ContentContent
ContentContent
Con t e n t field, then
press to compose
the SMS message.
1. Use the keypad to
compose the SMS
message.
OROR
OROR
OR
Press (Option)
to insert a common
word, or copy text
from the clipboard.
2. When finished,
press to return to
the Edit SMSEdit SMS
Edit SMSEdit SMS
Edit SMS
screen.
Composing the SMS messageComposing the SMS message
Composing the SMS messageComposing the SMS message
Composing the SMS message
To compose the SMS message:
165165
165165
165
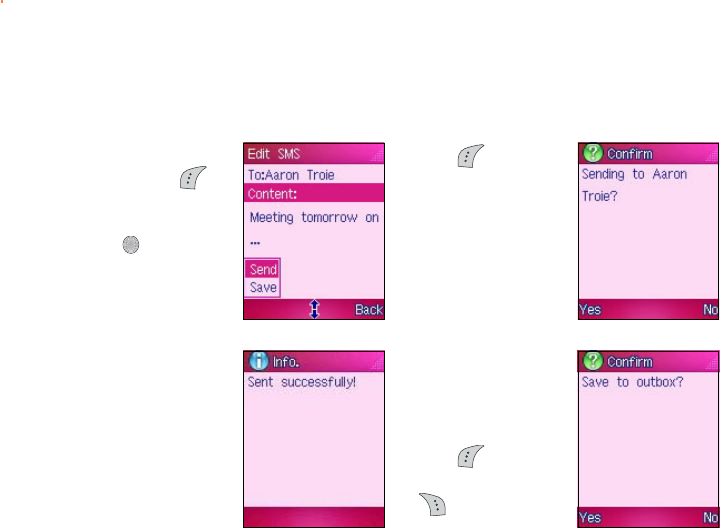
Sending the SMS messageSending the SMS message
Sending the SMS messageSending the SMS message
Sending the SMS message
To send the SMS message:
1. From the Edit SMSEdit SMS
Edit SMSEdit SMS
Edit SMS
screen, press
(Option), select
SendSend
SendSend
Send, then
press .
Otherwise, select
SaveSave
SaveSave
S a v e to store the
message.
2. Press (Yes) when
a confirmation
screen appears.
ASentSent
SentSent
Sent
successfully!successfully!
successfully!successfully!
successfully!
message appears to
indicate that the SMS
message was sent to
the recipients.
3. The phone prompts
you to save the SMS
message to the SMSSMS
SMSSMS
SMS
OutboxOutbox
OutboxOutbox
Outbox.
Press (Yes) to
save the message or
(No) to cancel.

166166
166166
166
Saving the SMS messageSaving the SMS message
Saving the SMS messageSaving the SMS message
Saving the SMS message
Save an SMS message to the SMS Outbox if you want to edit it or send it
later.
To save an SMS message:
1. Compose an SMS message following the instructions in the previous
section.
2. In the Edit SMS Edit SMS
Edit SMS Edit SMS
Ed i t S M S window, press (Option), then select SaveSave
SaveSave
Save.
ASaved successfullySaved successfully
Saved successfullySaved successfully
Sa ved s u cc ess fu l ly! message appears indicating that you have
saved the SMS message to the SMS Outbox. The display returns to
the Edit SMS Edit SMS
Edit SMS Edit SMS
Edit SMS window.
22
22
2
22
22
2
167167
167167
167
Viewing an SMS messageViewing an SMS message
Viewing an SMS messageViewing an SMS message
Viewing an SMS message
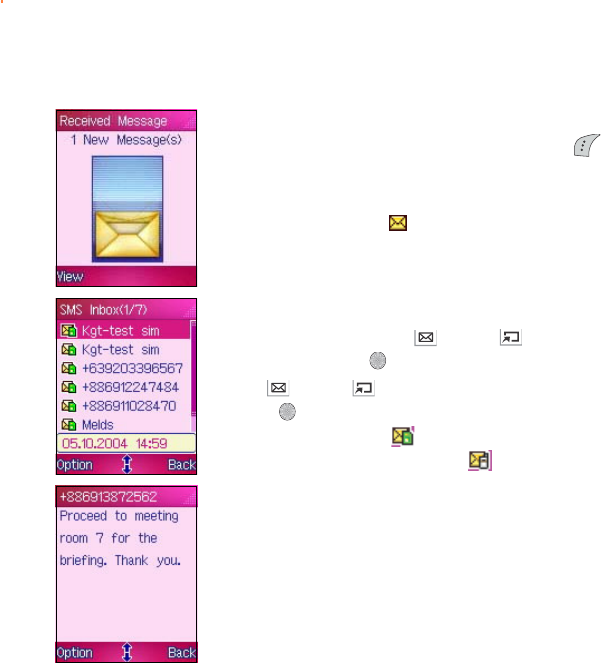
When the phone is in idle mode and you receive an SMS message, the
screen displays an animated letter enevelope. Press (View) to open
and view the message. Otherwise, press any other key to close the
Received MessageReceived Message
Received MessageReceived Message
Received Message window.
A new SMS message icon appears on the icon bar of the idle main
display when you choose to ignore the new SMS message.
If you receive an SMS message while in other phone modes, you can view
the SMS messages by following this instructions.
1. From the SMS menu, use (up) or (down) to select SMSSMS
SMSSMS
SMS
InboxInbox
InboxInbox
I n b o x, then press .
2. Use (up) or (down) to select the unread message, then
press to view. An unread message saved in the SIM memory is
preceded by this icon . An unread message saved in the phone
memory is preceded by this icon .
Refer to the section “Managing the SMS Inbox” for details.
168168
168168
168
Managing the SMS InboxManaging the SMS Inbox
Managing the SMS InboxManaging the SMS Inbox
Managing the SMS Inbox
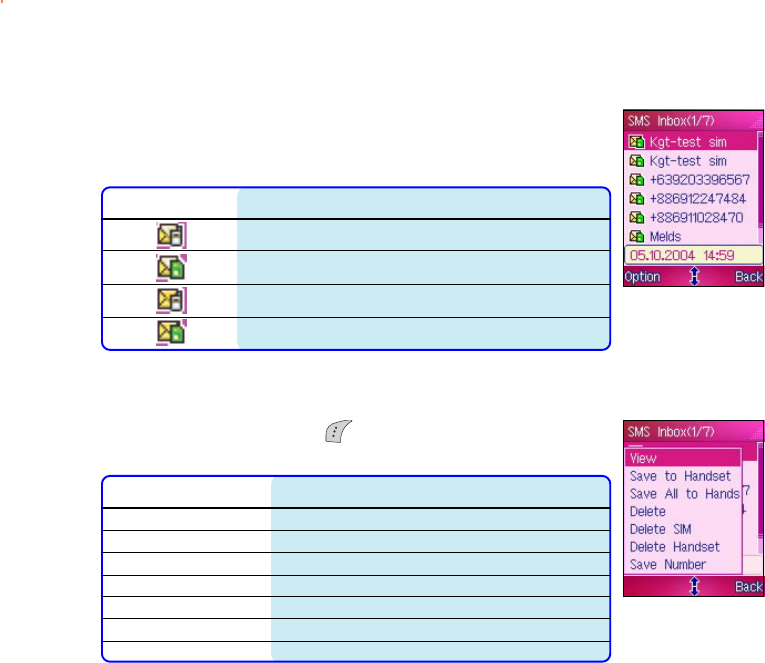
The phone saves all SMS messages received in the SMS Inbox. You can
view, reply, forward, or delete the messages stored in the SMS Inbox.
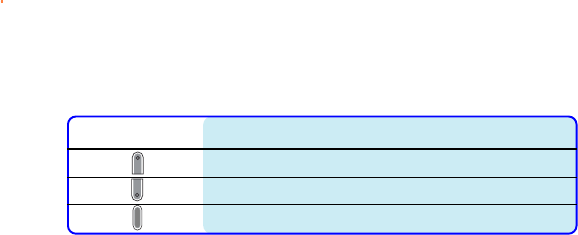
Take note of the following icons preceding a message.
IconIcon
IconIcon
Icon Indicates that the SMS messageIndicates that the SMS message
Indicates that the SMS messageIndicates that the SMS message
Indicates that the SMS message
received by the phone has already been read
received by the SIM card has already been read
received by the phone has not been read
received by the SIM card has not been read
Using the SMS Inbox menuUsing the SMS Inbox menu
Using the SMS Inbox menuUsing the SMS Inbox menu
Using the SMS Inbox menu
When in the SMS InboxSMS Inbox
SMS InboxSMS Inbox
SMS Inbox, press (Option) to display a pop-up menu
containing the options for the selected message or multiple messages.
OptionOption
OptionOption
Option Allows you toAllows you to
Allows you toAllows you to
Allows you to
ViewView
ViewView
V i e w Read the selected message
Save to HandsetSave to Handset
Save to HandsetSave to Handset
S a v e t o H a n d s e t Save the selected message to the phone memory
Save all to HandsetSave all to Handset
Save all to HandsetSave all to Handset
S a v e a l l t o H a n d s e t Save all messages to the phone memory
DeleteDelete
DeleteDelete
D e l e t e Delete the selected message
Delete SIMDelete SIM
Delete SIMDelete SIM
D e l e t e S I M Delete all messages saved in the SIM memory
Delete HandsetDelete Handset
Delete HandsetDelete Handset
D e l e t e H a n d s e t Delete all messages saved in the phone memory
Save NumberSave Number
Save NumberSave Number
S a v e N u m b e r Save the phone number of the message sender
169169
169169
169
Managing the SMS OutboxManaging the SMS Outbox
Managing the SMS OutboxManaging the SMS Outbox
Managing the SMS Outbox
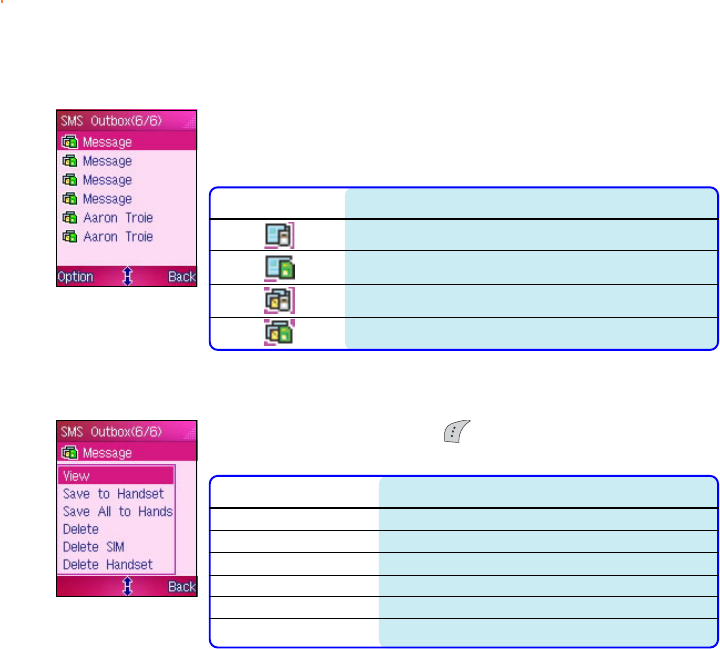
The SMS Outbox contains all saved and draft messages. You can view,
send, or delete the messages stored in the SMS Outbox. Take note of
the following icons preceding messages in the SMS Outbox.
IconIcon
IconIcon
Icon Indicates that the SMS messageIndicates that the SMS message
Indicates that the SMS messageIndicates that the SMS message
Indicates that the SMS message
stored in the phone memory has already been sent
stored in the SIM memory has already been sent
stored in the phone memory has not been sent
stored in the SIM memory has not been sent
Using the SMS Outbox menuUsing the SMS Outbox menu
Using the SMS Outbox menuUsing the SMS Outbox menu
Using the SMS Outbox menu
When in the SMS OutboxSMS Outbox
SMS OutboxSMS Outbox
SMS Outbox, press (Option) to display a pop-up menu
containing the options for the selected message or multiple messages.
OptionOption
OptionOption
Option Allows you toAllows you to
Allows you toAllows you to
Allows you to
ViewView
ViewView
V i e w Read the selected message
Save to HandsetSave to Handset
Save to HandsetSave to Handset
S a v e t o H a n d s e t Save the selected message to the phone memory
Save all to HandsetSave all to Handset
Save all to HandsetSave all to Handset
S a v e a l l t o H a n d s e t Save all messages to the phone memory
DeleteDelete
DeleteDelete
D e l e t e Delete the selected message
Delete SIMDelete SIM
Delete SIMDelete SIM
D e l e t e S I M Delete all messages saved in the SIM memory
Delete HandsetDelete Handset
Delete HandsetDelete Handset
D e l e t e H a n d s e t Delete all messages saved in the phone memory
170170
170170
170
Changing the SMS message settingsChanging the SMS message settings
Changing the SMS message settingsChanging the SMS message settings
Changing the SMS message settings
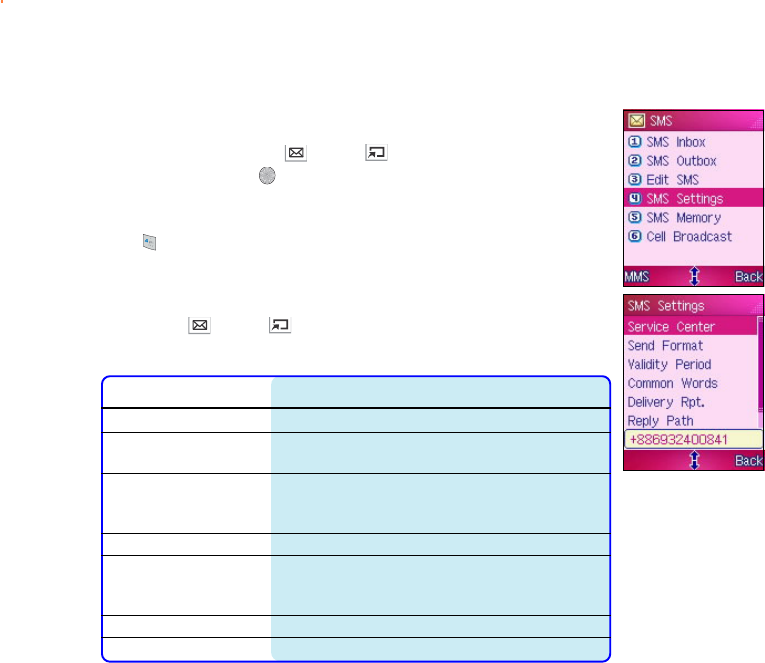
To access the SMS Settings SMS Settings
SMS Settings SMS Settings
SMS Settings menu:
From the SMSSMS
SMSSMS
S M S menu, use (up) or (down) to select SMSSMS
SMSSMS
SMS
SettingsSettings
SettingsSettings
Sett i n g s, then press .
OROR
OROR
OR
Press to display the SMS Settings SMS Settings
SMS Settings SMS Settings
SMS Settings menu.
The SMS Settings SMS Settings
SMS Settings SMS Settings
SM S S e t ti n gs menu consists of seven menu options that you can
select using (up) or (down).
Refer to the table below for a brief description of each menu item.
IconIcon
IconIcon
Icon FunctionFunction
FunctionFunction
Function
Service CenterService Center
Service CenterService Center
S e r v i c e C e n t e r Selects the SMS service center.*
Send formatSend format
Send formatSend format
S e n d f o r m a t Sets the SMS message format to Implicit, Text, Fax,
ERMES, Paging, X400, or E-mail.
Validity PeriodValidity Period
Validity PeriodValidity Period
V a l i d i t y P e r i o d Sets the the validity period for SMS messages to
one hour, six hours, one day, three days, one week,
or maximum period.
Common WordsCommon Words
Common WordsCommon Words
Common Words View, edit, or delete common messages.
Delivery ReportDelivery Report
Delivery ReportDelivery Report
D e l i v e r y R e p o r t Activates or deactivates the delivery report feature.
When activated, an SMS message notifies you that
the sent SMS message reached its recipient.
Reply PathReply Path
Reply PathReply Path
R e p l y P a t h Activates or deactivates the reply path.
Auto Move to HandsetAuto Move to Handset
Auto Move to HandsetAuto Move to Handset
Auto Move to Handset Saves all incoming messages to the handset.
171171
171171
171
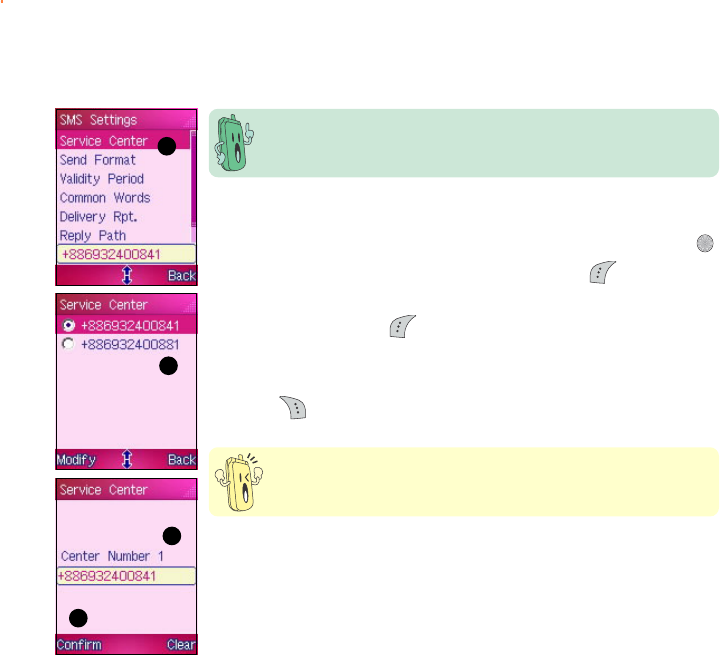
Changing the service center numberChanging the service center number
Changing the service center numberChanging the service center number
Changing the service center number
11
11
1
22
22
2
33
33
3
44
44
4
Be careful when changing the service center number. SMS
messaging fails when you set an incorrect service center number.
To change the SMS service center number:
1. Highlight Service Center Service Center
Service Center Service Center
Se rv i ce Ce nt e r from theSMS Settings menu, then press .
2. Select the service center from the list, then press (Modify).
3. Key-in the service center number that you obtained from your phone
operator, then press (Confirm).
4. The display returns to the previous menu with the new service
center number.
5. Press (Back) to return to the SMS Settings SMS Settings
SMS Settings SMS Settings
SMS Settings menu.
Obtain the correct service center number from your phone operator
before you change this item.
172172
172172
172
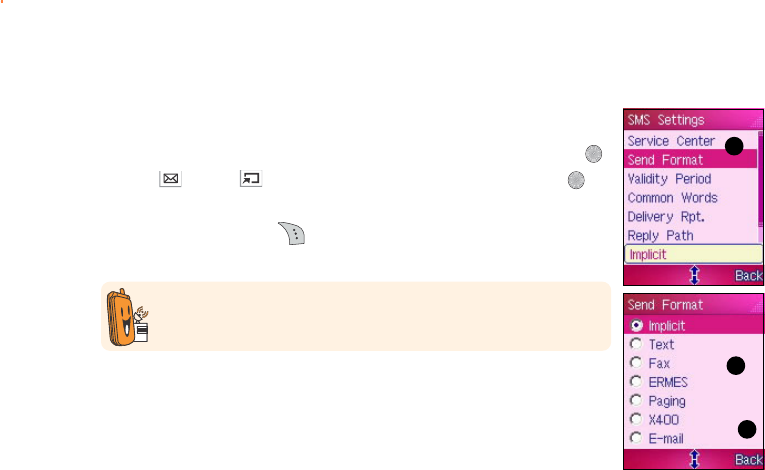
Changing the message formatChanging the message format
Changing the message formatChanging the message format
Changing the message format
To select a message format:
1. Highlight Send Format Send Format
Send Format Send Format
Se n d F o rm a t from the SMS Settings menu, then press .
2. Use (up) or (down) to highlight the format, then press to
select.
3. When finished, press (Back) to return to the SMS SettingsSMS Settings
SMS SettingsSMS Settings
SMS Settings
menu.
Inquire with your phone operator if the available message formats
are supported by their network.
11
11
1
22
22
2
33
33
3
173173
173173
173
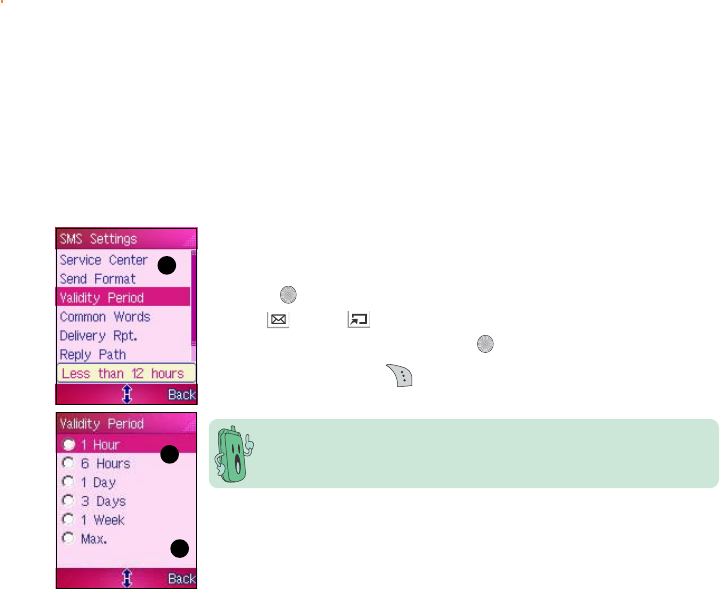
Changing the SMS validity periodChanging the SMS validity period
Changing the SMS validity periodChanging the SMS validity period
Changing the SMS validity period
The SMS validity period is the time period that you allow the phone
operator to send your SMS message until it reaches the recipients. For
example, if you sent an SMS message to a mobile phone that is not in
the coverage area, the phoe operator continuously sends the SMS
message to that mobile phone within the duration you specified.
To select a message format:
1. Highlight Validity Period Validity Period
Validity Period Validity Period
Va l id i ty Pe r iod from the SMS Settings menu, then
press .
2. Use (up) or (down) to highlight the validity period for the
SMS message sending, then press to select.
3. When finished, press (Back) to return to the SMS SettingsSMS Settings
SMS SettingsSMS Settings
SMS Settings
menu.
The default message validity period depends on the SIM card
setting. Read the SIM card documentation for details.
11
11
1
22
22
2
33
33
3
174174
174174
174
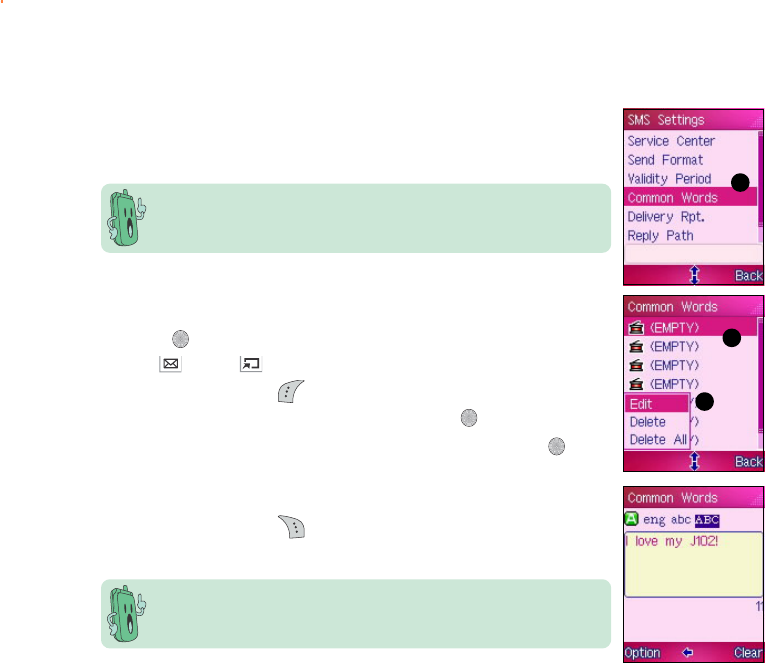
Creating common message(s)Creating common message(s)
Creating common message(s)Creating common message(s)
Creating common message(s)
For your convenience, you can create and store Common MessagesCommon Messages
Common MessagesCommon Messages
Common Messages
in your phone. You can easily retrieve these messages when you want to
send a quick note.
To create a common message:
1. Highlight Common WordsCommon Words
Common WordsCommon Words
Common Words from the SMS Settings menu, then
press .
2. Use (up) or (down) to highlight an (EMPTY)(EMPTY)
(EMPTY)(EMPTY)
( E M P TY) common
message, then press (Option).
3. Select EditEdit
EditEdit
E d i t from the pop-up menu, then press .
4. Use the keypad to key-in the common message, then press .
5. The created common message now appears in the CommonCommon
CommonCommon
Common
WordsWords
WordsWords
W o r d s list.
6. When finished, press (Back) to return to the SMS SettingsSMS Settings
SMS SettingsSMS Settings
SMS Settings
menu.
You can create up to eight can messages, each with a maximum of
26 characters.
11
11
1
22
22
2
33
33
3
Use the DeleteDelete
DeleteDelete
Delete or Delete All Delete All
Delete All Delete All
D e l e t e A l l command from the CommonCommon
CommonCommon
Common
WordsWords
WordsWords
W o r d s pop-up menu to delete a common message.
175175
175175
175
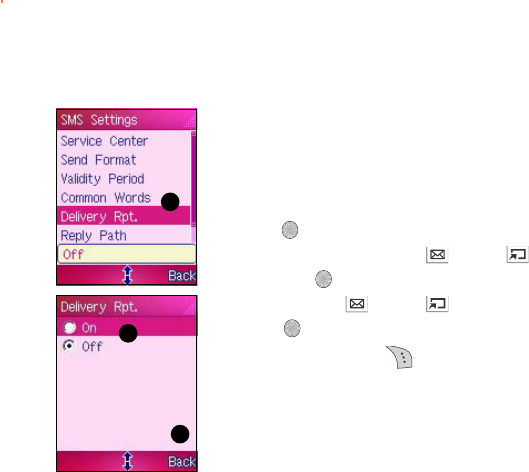
Activating delivery reportsActivating delivery reports
Activating delivery reportsActivating delivery reports
Activating delivery reports
If you wish to know that the messages you sent are delivered to the
recipient, enable the Delivery Rpt. Delivery Rpt.
Delivery Rpt. Delivery Rpt.
De l iv e ry R pt . option.
To activate delivery report:
1. Highlight Delivery Rpt. Delivery Rpt.
Delivery Rpt. Delivery Rpt.
De l i ver y Rp t . from the SMS Settings menu, then
press .
2. To enable the feature, use (up) or (down) to highlight OnOn
OnOn
On,
then press .
To disable, use (up) or (down) to highlight OffOff
OffOff
Off, then
press .
3. When finished, press (Back) to return to the SMS SettingsSMS Settings
SMS SettingsSMS Settings
SMS Settings
menu.
11
11
1
22
22
2
33
33
3
176176
176176
176
11
11
1
22
22
2
33
33
3
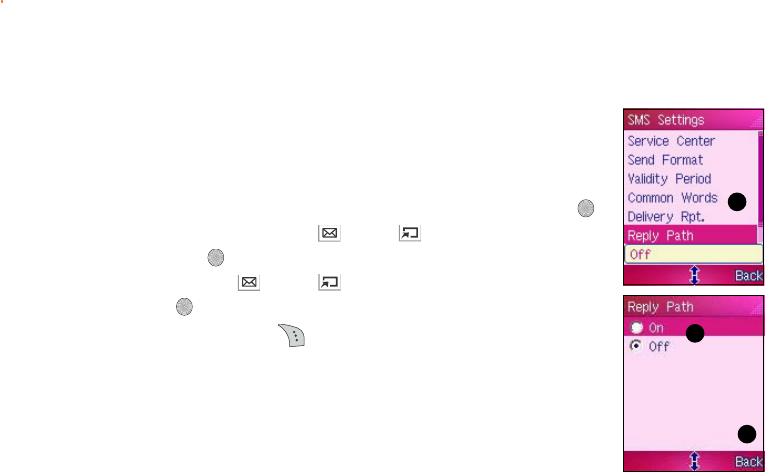
Activating the reply pathActivating the reply path
Activating the reply pathActivating the reply path
Activating the reply path
Activating the reply path allows the SMS message recipient to reply to
your SMS message, using the embedded service center number.
To activate the reply path:
1. Highlight Reply Path Reply Path
Reply Path Reply Path
Re p l y P a t h from the SMS Settings menu, then press .
2. To enable the feature, use (up) or (down) to highlight OnOn
OnOn
On,
then press .
To disable, use (up) or (down) to highlight OffOff
OffOff
Off, then
press .
3. When finished, press (Back) to return to the SMS SettingsSMS Settings
SMS SettingsSMS Settings
SMS Settings
menu.
177177
177177
177
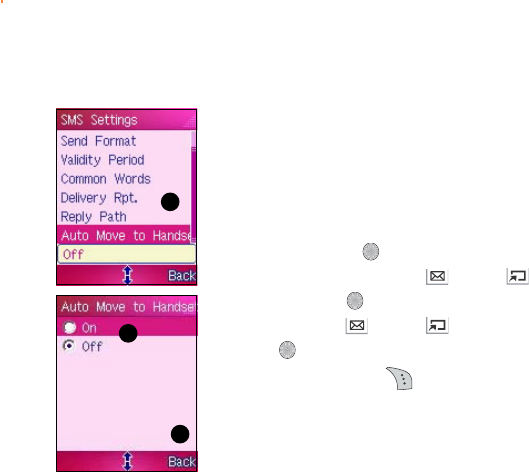
Auto moving SMS messages to the handsetAuto moving SMS messages to the handset
Auto moving SMS messages to the handsetAuto moving SMS messages to the handset
Auto moving SMS messages to the handset
Activating the Auto Move to Handset feature allows you to transfer
all incoming SMS messages from the SIM card to the handset
automatically.
To activate this feature:
1. Highlight Auto Move to Handset Auto Move to Handset
Auto Move to Handset Auto Move to Handset
Au to Mov e t o H a nd se t from the SMS Settings
menu, then press .
2. To enable the feature, use (up) or (down) to highlight
OnOn
OnOn
O n, then press .
To disable, use (up) or (down) to highlight OffOff
OffOff
Off, then
press .
3. When finished, press (Back) to return to the SMSSMS
SMSSMS
SMS
SettingsSettings
SettingsSettings
Settings menu.
11
11
1
22
22
2
33
33
3
178178
178178
178
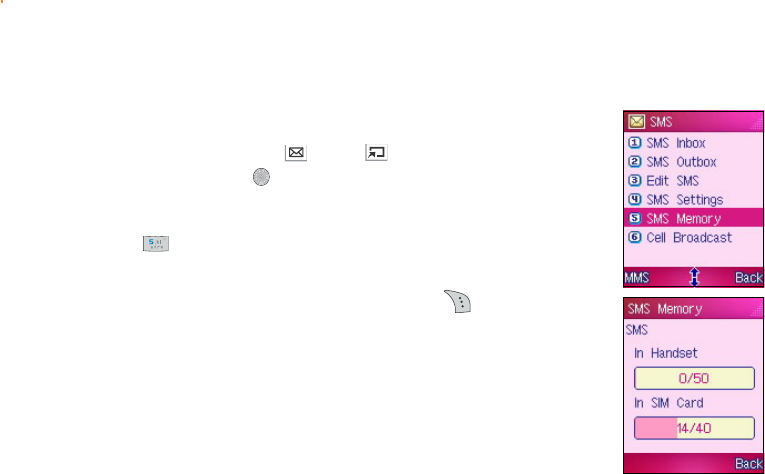
Viewing the SMS memory statusViewing the SMS memory status
Viewing the SMS memory statusViewing the SMS memory status
Viewing the SMS memory status
To view the phone and SIM SMS memory status:
From the SMSSMS
SMSSMS
S M S menu, use (up) or (down) to select SMSSMS
SMSSMS
SMS
MemoryMemory
MemoryMemory
Memory, then press .
OROR
OROR
OR
Press to display the SMS MemorySMS Memory
SMS MemorySMS Memory
SMS Memory.
The screen shows the used SMS memory over the total available
memory in both the handset and SIM card. Press (Back) to return to
the SMSSMS
SMSSMS
S M S menu.
189189
189189
189
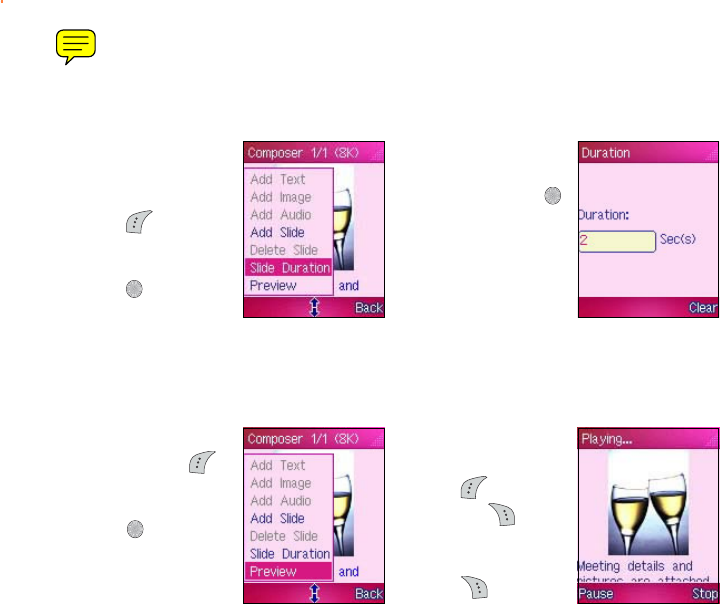
Adjusting the slide durationAdjusting the slide duration
Adjusting the slide durationAdjusting the slide duration
Adjusting the slide duration
To adjust the slide duration:
1. Select the slide from
the ComposerComposer
ComposerComposer
Composer
window.
2. Press (Option),
select SlideSlide
SlideSlide
Slide
DurationDuration
DurationDuration
Duration, then
press .
3. Adjust the slide
duration using the
keypad, then press .
The display returns
to the ComposerComposer
ComposerComposer
Composer
window.
Previewing the MMS messagePreviewing the MMS message
Previewing the MMS messagePreviewing the MMS message
Previewing the MMS message
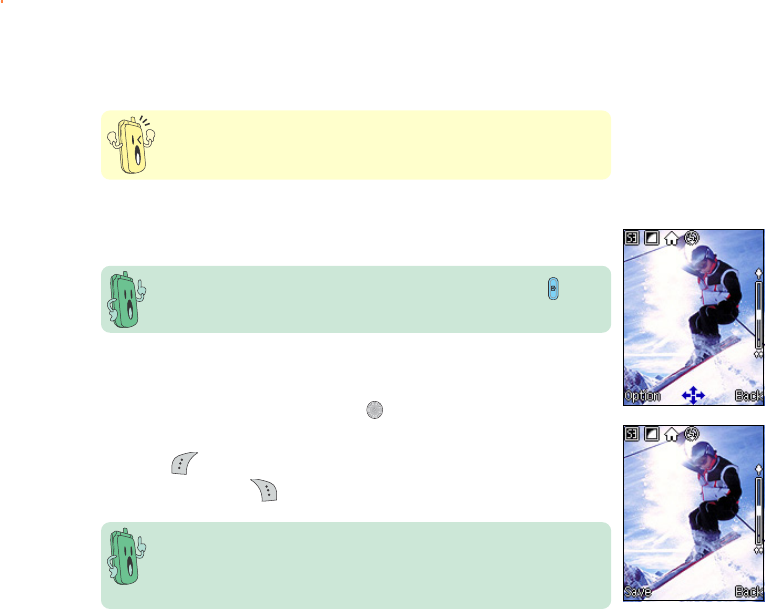
To preview the MMS message:
1. In the ComposerComposer
ComposerComposer
Composer
window, press
(Option), select
PreviewPreview
PreviewPreview
Preview, then
press .
2. The MMS message
plays on screen.
Press (Pause) to
pause or (Stop)
to stop the preview.
After previewing.
press (Back) to
return to the
ComposerComposer
ComposerComposer
Composer window.
190190
190190
190
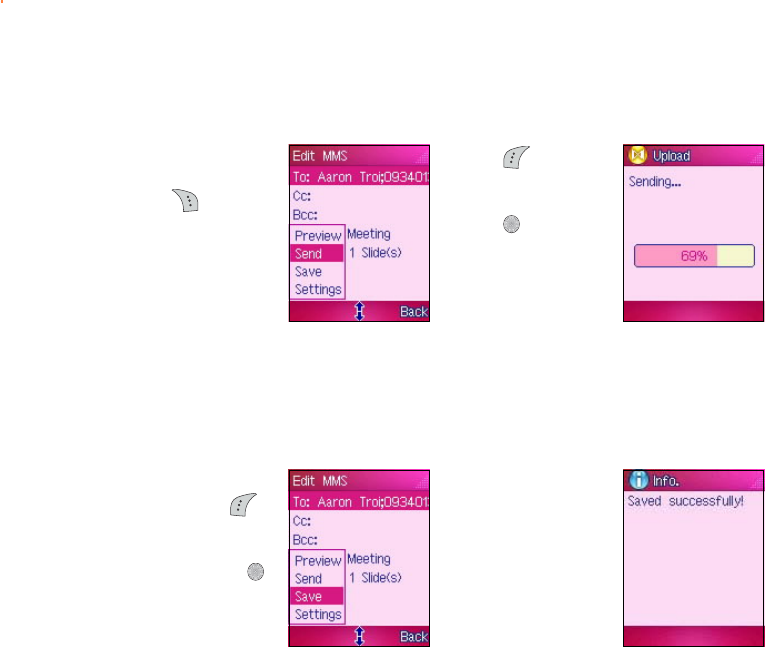
Sending the MMS messageSending the MMS message
Sending the MMS messageSending the MMS message
Sending the MMS message
To send the MMS message:
Saving the MMS messageSaving the MMS message
Saving the MMS messageSaving the MMS message
Saving the MMS message
To save the MMS message:
1. When in the
ComposerComposer
ComposerComposer
Composer window,
press (Back) to
return to the EditEdit
EditEdit
Edit
MMSMMS
MMSMMS
M M S window.
2. Press (Option),
select SendSend
SendSend
S e n d from the
pop-up menu, then
press .
The MMS message is uploaded to the MMS server of your phone operator for sending to
the message recipients. The display returns to the Edit MMS Edit MMS
Edit MMS Edit MMS
Ed i t M M S window.
1. In the Edit MMSEdit MMS
Edit MMSEdit MMS
Edit MMS
window, press
(Option), select SaveSave
SaveSave
Save
from the pop-up
menu, then press .
ASavedSaved
SavedSaved
Saved
successfully!successfully!
successfully!successfully!
successfully!
window appears to
indicate that the
MMS message is
saved to the MMS
Outbox.
191191
191191
191
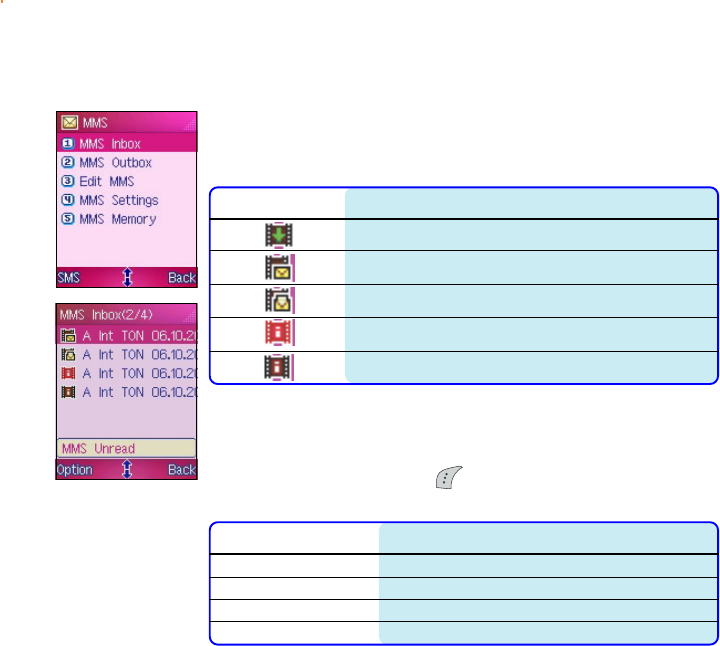
Managing the MMS InboxManaging the MMS Inbox
Managing the MMS InboxManaging the MMS Inbox
Managing the MMS Inbox
The phone saves all downloaded MMS messages in the MMS Inbox. You
can view, review, forward, or delete the messages stored in the MMS
Inbox. Take note of the following icons preceding an MMS message.
IconIcon
IconIcon
Icon Indicates that the MMS messageIndicates that the MMS message
Indicates that the MMS messageIndicates that the MMS message
Indicates that the MMS message
received has been successfully downloaded to the phone
has not been read
has been read
notification has not been read
notification has already been read
Using the MMS Inbox menuUsing the MMS Inbox menu
Using the MMS Inbox menuUsing the MMS Inbox menu
Using the MMS Inbox menu
When in the MMS InboxMMS Inbox
MMS InboxMMS Inbox
MMS Inbox, press (Option) to display a pop-up menu
containing the options for the selected message or multiple messages.
OptionOption
OptionOption
Option Allows you toAllows you to
Allows you toAllows you to
Allows you to
ViewView
ViewView
V i e w View the selected message
DeleteDelete
DeleteDelete
D e l e t e Delete the selected message
DeleteDelete
DeleteDelete
Delete
AllAll
AllAll
A l l Delete all messages in the MMS Inbox
Call OutCall Out
Call OutCall Out
C a l l O u t Dial the number of the MMS sender
192192
192192
192
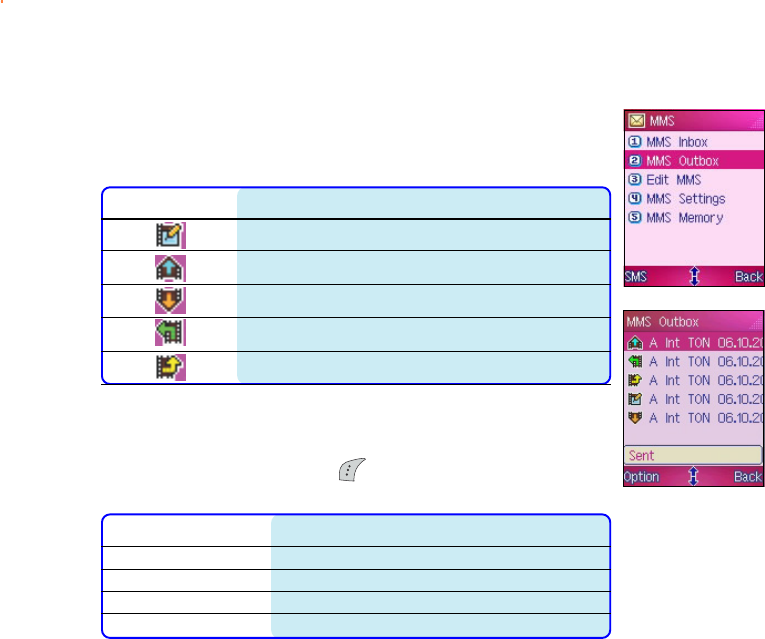
Managing the MMS OutboxManaging the MMS Outbox
Managing the MMS OutboxManaging the MMS Outbox
Managing the MMS Outbox
The MMS Outbox contains all saved and draft MMS messages. You can
view, review, forward, or delete the messages stored in the MMS Outbox.
Take note of the following icons preceding a message.
IconIcon
IconIcon
Icon Indicates that the MMS messageIndicates that the MMS message
Indicates that the MMS messageIndicates that the MMS message
Indicates that the MMS message
is a saved MMS message draft
was sent and stored in the MMS Outbox
saved in the MMS Outbox has not been sent
received has been forwarded to another recipient
received has been replied
Using the MMS Outbox menuUsing the MMS Outbox menu
Using the MMS Outbox menuUsing the MMS Outbox menu
Using the MMS Outbox menu
When in the MM
MM
MMS OutboxMS Outbox
MS OutboxMS Outbox
MS Outbox, press (Option) to display a pop-up menu
containing the options for the selected message or multiple messages.
OptionOption
OptionOption
Option Allows you toAllows you to
Allows you toAllows you to
Allows you to
ViewView
ViewView
V i e w View the selected message
SendSend
SendSend
S e n d Send the selected message to another recipient
DeleteDelete
DeleteDelete
D e l e t e Delete the selected message
DeleteDelete
DeleteDelete
Delete
AllAll
AllAll
A l l Delete all messages in the MMS Outbox

193193
193193
193
Changing the MMS message settingsChanging the MMS message settings
Changing the MMS message settingsChanging the MMS message settings
Changing the MMS message settings
To access the MMS Settings MMS Settings
MMS Settings MMS Settings
MMS Settings menu:
From the MMSMMS
MMSMMS
M M S menu, use (up) or (down) to select MMSMMS
MMSMMS
MMS
SettingsSettings
SettingsSettings
Sett i n g s, then press .
OROR
OROR
OR
Press to display the SMS Settings SMS Settings
SMS Settings SMS Settings
SMS Settings menu.
The MMS Settings MMS Settings
MMS Settings MMS Settings
MM S S e t ti n gs menu consists of six menu options that you can
select using (up) (down).
Refer to the table below for a brief description of each menu item.
IconIcon
IconIcon
Icon FunctionFunction
FunctionFunction
Function
Validity PeriodValidity Period
Validity PeriodValidity Period
V a l i d i t y P e r i o d Sets the the validity period for MMS messages to
one hour, six hours, one day, three days, one week,
or maximum period.
Delay DeliveryDelay Delivery
Delay DeliveryDelay Delivery
D e l a y D e l i v e r y Delays the delivery of the MMS message to the
intended recipients by immediate, one hour, six
hours, one day, three days, or one week.
Delivery ReportDelivery Report
Delivery ReportDelivery Report
D e l i v e r y R e p o r t Activates or deactivates the delivery report feature.
When activated, an MMS message notifies you that
the sent MMS message has reached its recipient.
Read ReportRead Report
Read ReportRead Report
R e a d R e p o r t Enables or disables the read repaort feature.
Auto DownloadAuto Download
Auto DownloadAuto Download
A u t o D o w n l o a d Activates or deactivates the auto-download feature.
Sender VisibilitySender Visibility
Sender VisibilitySender Visibility
Sender Visibility Activates or deactivates the sender visibility feature.
ProfilesProfiles
ProfilesProfiles
P r o f i l e s Allows you to select the network profile to use for
MMS messaging.
194194
194194
194
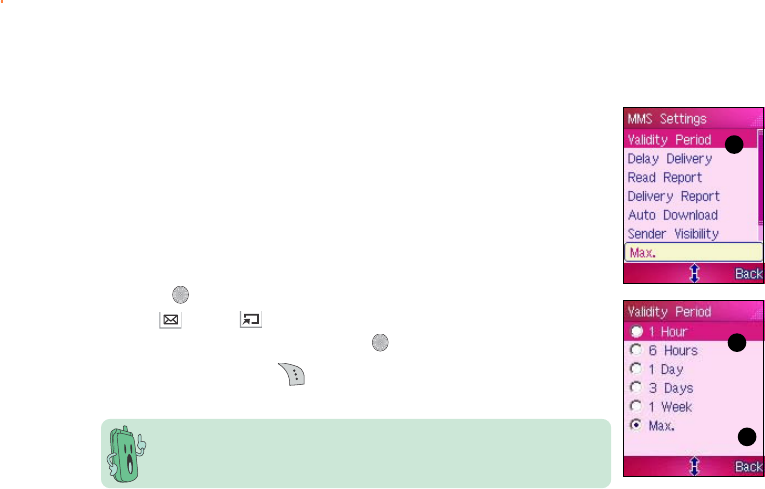
Changing the MMS validity periodChanging the MMS validity period
Changing the MMS validity periodChanging the MMS validity period
Changing the MMS validity period
The MMS validity period is the time period that you allow the phone
operator to send your MMS message until it reaches the recipients. For
example, if you sent an MMS message to a mobile phone that is not in
the coverage area, the phone operator continuously sends the MMS
message to that mobile phone within the duration you specified.
To set the validity period for your MMS messages:
1. Highlight Validity Period Validity Period
Validity Period Validity Period
Va l id i ty Pe r iod from the MMS Settings menu, then
press .
2. Use (up) or (down) to highlight the validity period for the
MMS message sending, then press to select.
3. When finished, press (Back) to return to the MMS SettingsMMS Settings
MMS SettingsMMS Settings
MMS Settings
menu.
The default message validity period depends on your phone
operator.
11
11
1
22
22
2
33
33
3

195195
195195
195
Delaying the MMS message deliveryDelaying the MMS message delivery
Delaying the MMS message deliveryDelaying the MMS message delivery
Delaying the MMS message delivery
You can delay the sending of the MMS message using this item.
To delay the MMS message delivery:
1. Highlight Delay DeliveryDelay Delivery
Delay DeliveryDelay Delivery
Del ay De liv ery from the MMS Settings menu, then
press .
2. Use (up) or (down) to highlight the delay period for the MMS
message sending, then press to select.
3. When finished, press (Back) to return to the MMS SettingsMMS Settings
MMS SettingsMMS Settings
MMS Settings
menu.
11
11
1
22
22
2
33
33
3
196196
196196
196
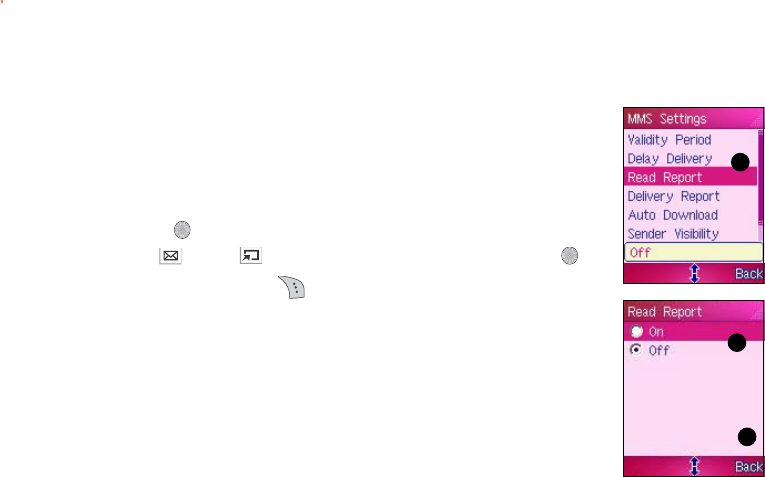
Activating the Read Report functionActivating the Read Report function
Activating the Read Report functionActivating the Read Report function
Activating the Read Report function
The Read Report function notifies you everytime the phone receives an
MMS message.
To activate the read report function:
1. Highlight Read Report Read Report
Read Report Read Report
Re a d Rep o r t from the MMS Settings menu, then
press .
2. Use (up) or (down) to select highlight OnOn
OnOn
O n, then press .
3. When finished, press (Back) to return to the MMS SettingsMMS Settings
MMS SettingsMMS Settings
MMS Settings
menu.
11
11
1
22
22
2
33
33
3
197197
197197
197
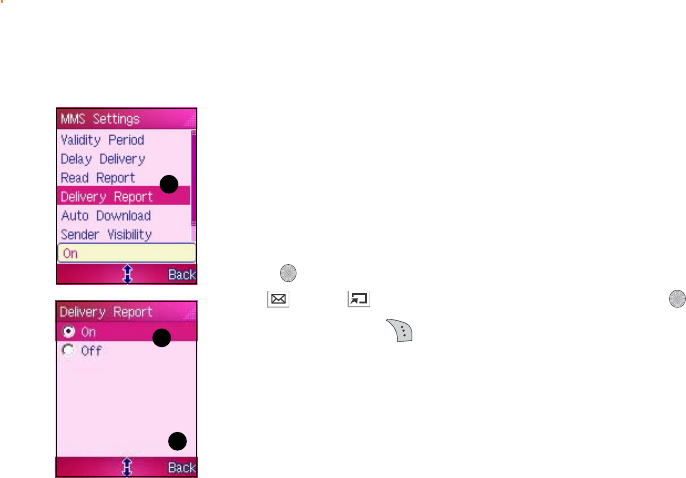
Activating the delivery reportActivating the delivery report
Activating the delivery reportActivating the delivery report
Activating the delivery report
The Delivery Report function lets you know that the message recipients
have received the sent MMS message. When activated, your phone
receives a delivery report everytime a message recipient downloads the
MMS message.
To activate the delivery report:
1. Highlight Delivery ReportDelivery Report
Delivery ReportDelivery Report
Del ive ry Re por t from the MMS Settings menu, then
press .
2. Use (up) or (down) to select highlight OnOn
OnOn
O n, then press .
3. When finished, press (Back) to return to the MMS SettingsMMS Settings
MMS SettingsMMS Settings
MMS Settings
menu.
11
11
1
22
22
2
33
33
3
198198
198198
198
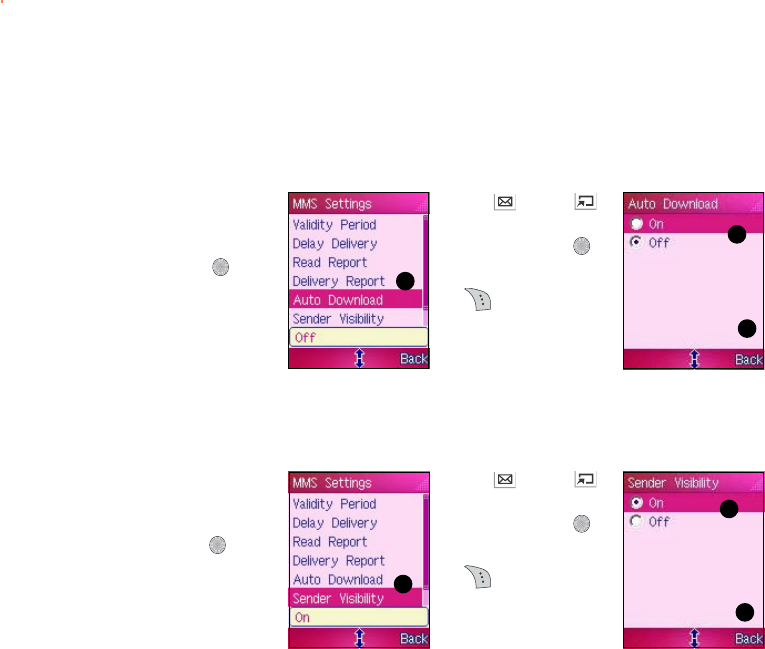
Auto downloading MMS messagesAuto downloading MMS messages
Auto downloading MMS messagesAuto downloading MMS messages
Auto downloading MMS messages
Auto download allows the phone to immediately download from the phone operator MMS
server all MMS messages received.
To activate the auto download function:
11
11
1
22
22
2
33
33
3
Activating the sender visibilityActivating the sender visibility
Activating the sender visibilityActivating the sender visibility
Activating the sender visibility
To activate the delivery report:
11
11
1
22
22
2
33
33
3
1. Highlight AutoAuto
AutoAuto
Auto
DownloadDownload
DownloadDownload
Download from the
MMS Settings menu,
then press .
2. Use (up) or
(down) to highlight
OnOn
OnOn
O n, then press .
3. When finished, press
(Back) to return
to the MMSMMS
MMSMMS
MMS
SettingsSettings
SettingsSettings
Settings menu.
2. Use (up) or
(down) to highlight
OnOn
OnOn
O n, then press .
3. When finished, press
(Back) to return
to the MMSMMS
MMSMMS
MMS
SettingsSettings
SettingsSettings
Settings menu.
1. Highlight SenderSender
SenderSender
Sender
VisibilityVisibility
VisibilityVisibility
Visibility from the
MMS Settings menu,
then press .
199199
199199
199
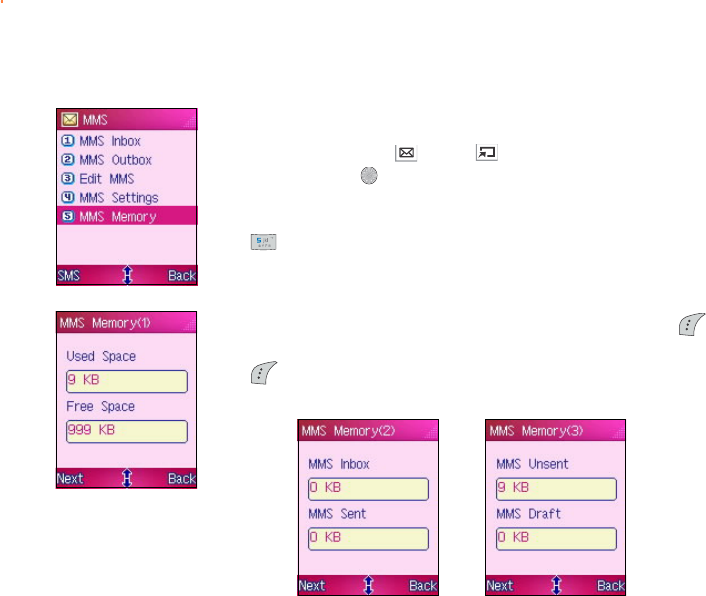
Viewing the MMS memory statusViewing the MMS memory status
Viewing the MMS memory statusViewing the MMS memory status
Viewing the MMS memory status
To view the phone MMS memory status:
From the MMSMMS
MMSMMS
M M S menu, use (up) or (down) to select MMSMMS
MMSMMS
MMS
MemoryMemory
MemoryMemory
Memory, then press .
OROR
OROR
OR
Press to display the MMS MemoryMMS Memory
MMS MemoryMMS Memory
MMS Memory.
The screen shows the total used and available MMS memory. Press
(Next) to view the total memory used by inbox and sent messages.
Press (Next) to view the total memory used by draft and unsent
messages. Refer to the screen captures below.
Memory used byMemory used by
Memory used byMemory used by
Memory used by
inbox and sentinbox and sent
inbox and sentinbox and sent
inbox and sent
messagesmessages
messagesmessages
messages
Memory used byMemory used by
Memory used byMemory used by
Memory used by
draft and unsentdraft and unsent
draft and unsentdraft and unsent
draft and unsent
messagesmessages
messagesmessages
messages

200200
200200
200

This chapter provides information on
how to capture photos and videos
using the camera.
M303
Capturing Moments

202202
202202
202
Chapter summaryChapter summary
Chapter summaryChapter summary
Chapter summary
Camera ............................................................................................ 204
Capture ........................................................................................... 205
Capture display ........................................................................ 205
Key definition ........................................................................... 206
Basic camera settings .............................................................. 207
Capturing a photo .................................................................... 208
Changing the camera settings ................................................. 209
Viewing your photos ................................................................ 216
Using the photo options .......................................................... 217
Editing your photos .................................................................. 218
Adding preview effects to your photo ..................................... 219
Adding frames to your photo .................................................. 220
Using the external display for self-capture .............................. 221
Using the capture timer ........................................................... 222
Using multi-capture .................................................................. 224
AVI Recorder ................................................................................... 226
Recorder mode display ............................................................. 226
Capturing videos ...................................................................... 227
Adding preview effects to your video ..................................... 228

203203
203203
203
Adjusting the video brightness and contrast ........................... 229
Viewing your videos ................................................................. 231
Using the video options ........................................................... 232
Listening to MP3 music files .................................................... 233
204204
204204
204
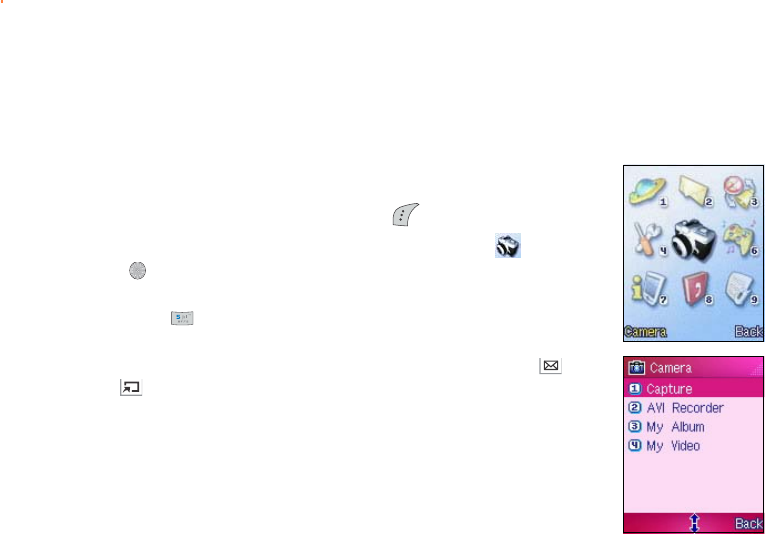
Camera
The phone comes with a 300K pixel built-in camera and flash that allows
you to capture, edit, and share photos and videos. The following
sections tell how to use the camera and its features.
To access the CameraCamera
CameraCamera
C a m e r a menu:
1. Put the phone in idle mode, then press to display the main menu.
2. Use the navigation keys to select the CameraCamera
CameraCamera
Came r a icon , then press
to display the CameraCamera
CameraCamera
C a m e r a menu.
OROR
OROR
OR
Press to display the CameraCamera
CameraCamera
C a m e r a menu.
The CameraCamera
CameraCamera
C a m e r a menu has four options that you can select using (up)
or (down).
205205
205205
205
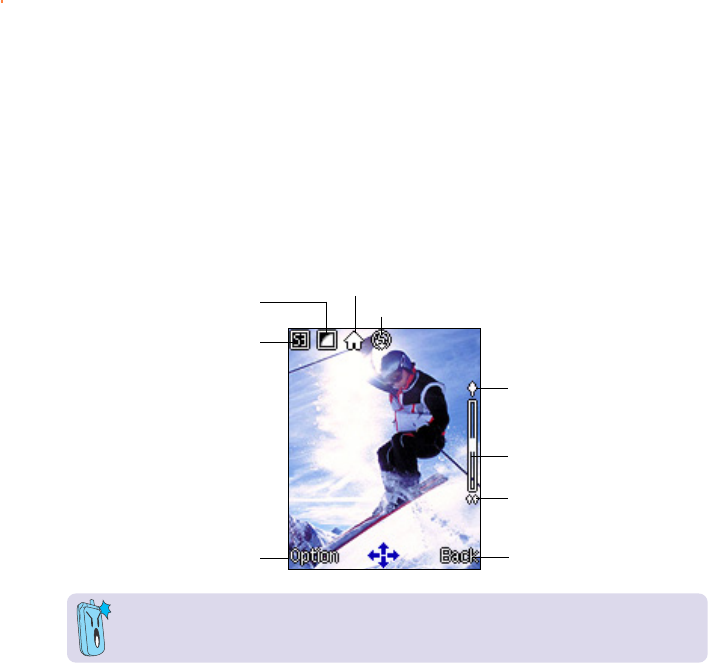
Option keyOption key
Option keyOption key
Option key
Photo sizePhoto size
Photo sizePhoto size
Photo size
Photo qualityPhoto quality
Photo qualityPhoto quality
Photo quality Capture modeCapture mode
Capture modeCapture mode
Capture mode
Flash iconFlash icon
Flash iconFlash icon
Flash icon
Zoom indicatorZoom indicator
Zoom indicatorZoom indicator
Zoom indicator
Back keyBack key
Back keyBack key
Back key
Zoom inZoom in
Zoom inZoom in
Zoom in
Zoom outZoom out
Zoom outZoom out
Zoom out
The above display shows the default camera settings. The phone restores these settings
everytime you set the phone to camera mode.
Capture
The CaptureCapture
CaptureCapture
Cap t u r e function allows you to capture single or multiple photos, edit, and share them
using the MMS messaging feature.
Capture displayCapture display
Capture displayCapture display
Capture display
Familiarize yourself with the capture display before using the camera. The illustration below
shows the icons that may appear on the display when the phone is in capture mode.
206206
206206
206
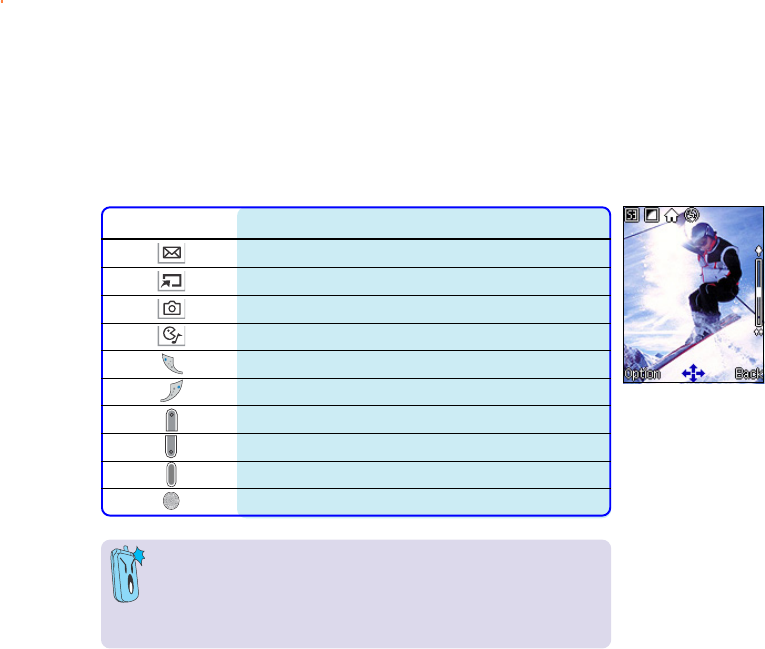
Key definitionKey definition
Key definitionKey definition
Key definition
The function of the following keys changes when the phone is in Capture
mode.
Normal capture mode (Main display)Normal capture mode (Main display)
Normal capture mode (Main display)Normal capture mode (Main display)
Normal capture mode (Main display)
• The camera uses more battery power than other phone
functions. Make sure the battery is fully charged before using
the camera.
• The camera automatically turns off when no key is pressed
within three minutes.
KeyKey
KeyKey
Key Press toPress to
Press toPress to
Press to
zoom in the subject
zoom out the subject
decrease the brightness
increase the brightness
switch to self-capture or return to normal capture mode
turn the flash on or off
select the next image frame
select the previous image frame
remove the image frame
capture the image
207207
207207
207
Basic camera settingsBasic camera settings
Basic camera settingsBasic camera settings
Basic camera settings
The following sections tell you how to change the basic camera settings. Consider the
following settings before taking a photograph.
•Photo sizePhoto size
Photo sizePhoto size
Ph o to s i z e. The phone supports a maximum photo size of 640x480 pixels (landscape).
You can select from three other photo sizes.
•Photo qualityPhoto quality
Photo qualityPhoto quality
Ph o to q ua l it y. Three photo quality settings are available. The better the photo quality,
the larger the file size.
•Capture modeCapture mode
Capture modeCapture mode
Ca p tu r e mo d e.You can choose from four capture modes: Auto, Night, Indoor, or
Outdoor. Refer to the respective section for details.
•ElementsElements
ElementsElements
El e m e nts. You can adjust the photo brightness and contrast.
•Auxiliary lightingAuxiliary lighting
Auxiliary lightingAuxiliary lighting
Auxiliary lighting. The phone camera comes with a flash that you can use when taking
photos in areas with poor lighting condition.
•Special EffectsSpecial Effects
Special EffectsSpecial Effects
Sp ec i al Ef f ec ts. You can choose from six preview effects, 15 special effects, and 20
frame designs to transform your photos into fine works of art or funny photos.
•Special featuresSpecial features
Special featuresSpecial features
Sp ec i al fea tu r es. You can use multi-capture when shooting multiple photos, or
self-capture to take a photo of yourself using the external display.
KeyKey
KeyKey
Key Press toPress to
Press toPress to
Press to
zoom in the subject
zoom out the subject
capture the image
Self capture mode (External display)Self capture mode (External display)
Self capture mode (External display)Self capture mode (External display)
Self capture mode (External display)
208208
208208
208
Capturing a photoCapturing a photo
Capturing a photoCapturing a photo
Capturing a photo
DO NOT use the camera on places where picture taking is
prohibited. Take note of local regulations before using the camera.
To capture a photo:
1. Put the camera in CaptureCapture
CaptureCapture
Cap t u r e mode to show the capture display.
When the phone is in idle mode, press the capture button on the
side of the phone to launch the camera.
2. Point the camera to your subject. Make sure your subject fits in the
capture display.
3. Hold the phone firmly, then press to capture. The screen displays
the captured photo.
4. Press (Save) to save the photo to the My Album My Album
My Album My Album
My A l b u m folder.
Otherwise, press (Back) to return to the capture display.
The phone automatically assigns a file name to the photo. The file
name is usually a combination of the date and the sequence that
photo was taken (e.g. PIC100705). You can rename the photo file
name in the My Album My Album
My Album My Album
M y A l b u m folder.
209209
209209
209
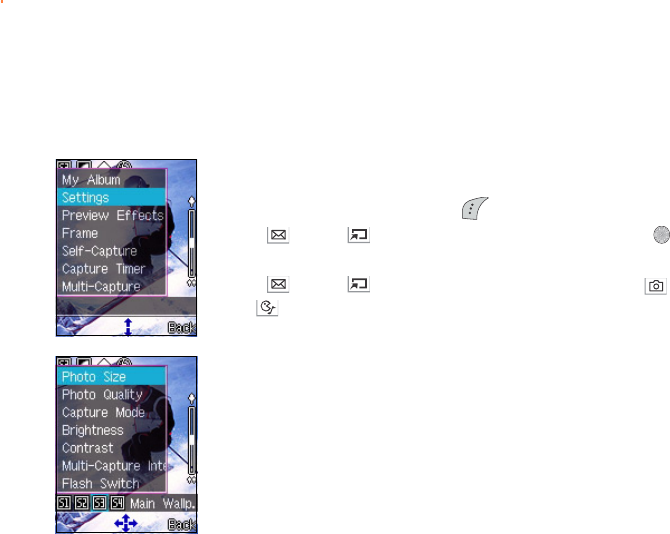
Changing the camera settingsChanging the camera settings
Changing the camera settingsChanging the camera settings
Changing the camera settings
You can change the capture size, quality, mode, brightness, contrast,
multi-capture interval, and flash settings using the capture display menu.
To access the camera settings:
1. From the capture display, press (Option).
2. Use (up) or (down) to select SettingsSettings
SettingsSettings
Settings, then press .
The camera settings menu appears.
3. Use (up) or (down) to select a setting, then press (left)
or (right) to adjust. Refer to the succeeding sections for details.
210210
210210
210
• You can use portrait images as wallpaper for the external display.
• You can find all captured images in the My Album My Album
My Album My Album
M y A l b u m folder.
3. Press to select the photo size. The screen returns to the capture
display. Landscape orientation
The frame changes into a landscape orientation when you select or
photo size. Rotate the phone 90º counterclockwise to properly
view your subject. The default setting is .
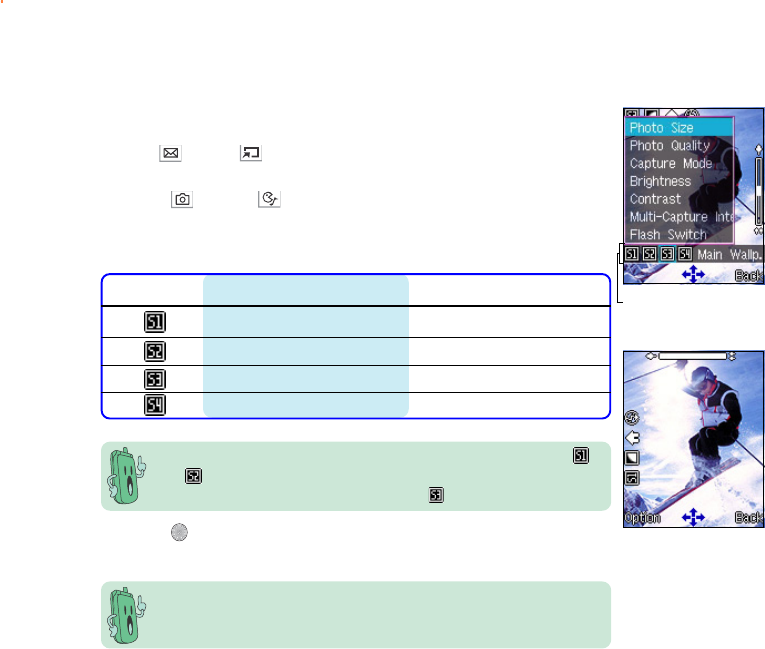
Photo sizes
Setting the photo sizeSetting the photo size
Setting the photo sizeSetting the photo size
Setting the photo size
To set the photo size:
1. Use (up) or (down) to highlight Photo Size Photo Size
Photo Size Photo Size
Ph o t o S i z e from the
camera settings menu.
2. Press (left) or (right) to select a photo size. The selected
photo size is displayed on top of the soft key bar. Refer to the table
below for a comparison of the photo sizes.
IconIcon
IconIcon
Icon Photo size (pixels)Photo size (pixels)
Photo size (pixels)Photo size (pixels)
Photo size (pixels) Display orientationDisplay orientation
Display orientationDisplay orientation
Display orientation
VGA (640 x 480) Landscape
QVGA (320 x 240) Landscape
Main Wallpaper (128 x 160) Portrait
Portrait (64 x 96) Portrait