ASUSTeK Computer M303 M303 GSM Camera Phone User Manual M303 UserMan
ASUSTeK Computer Inc M303 GSM Camera Phone M303 UserMan
Part 4
211211
211211
211
Setting the photo qualitySetting the photo quality
Setting the photo qualitySetting the photo quality
Setting the photo quality
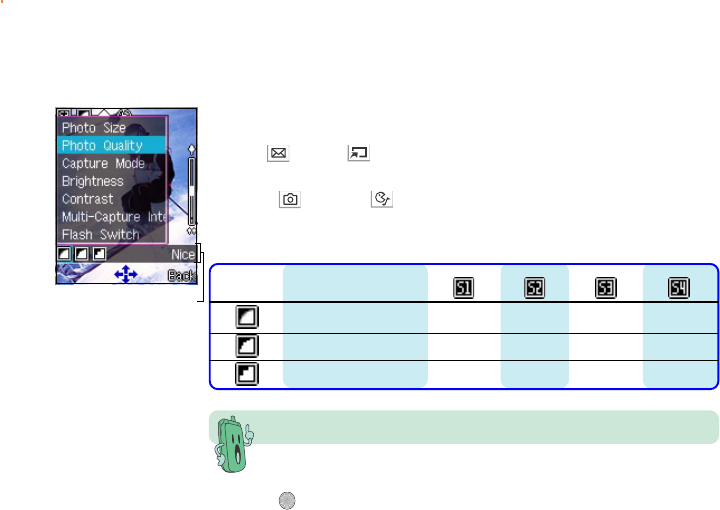
To set the photo quality:
1. Use (up) or (down) to highlight Photo Quality Photo Quality
Photo Quality Photo Quality
Photo Quality from the
camera settings menu.
2. Press (left) or (right) to select a photo quality. The selected
photo quality is displayed on top of the soft key bar. Refer to the
table below for a comparison of the photo qualities.
Photo quality IconIcon
IconIcon
Icon DescriptionDescription
DescriptionDescription
Description
Nice 63.3 KB 33.3 KB 6.4 KB 4 KB
Normal 62.3 KB 30.0 KB 5.7 KB 3 KB
Economic 60.6 KB 28.3 KB 5.2 KB 2.3 KB
3. Press to select the photo quality. The screen returns to the
capture display.
The better the photo quality, the larger the file size.
212212
212212
212
3. Press to select the capture mode. The screen returns to the
capture display.
Capture
modes
Setting the capture modeSetting the capture mode
Setting the capture modeSetting the capture mode
Setting the capture mode
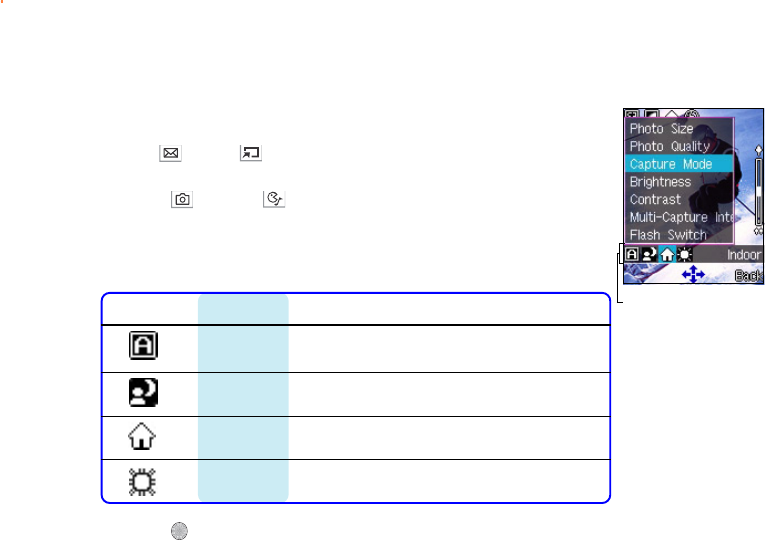
To set the capture mode:
1. Use (up) or (down) to highlight Capture Mode Capture Mode
Capture Mode Capture Mode
Capture Mode from the
camera settings menu.
2. Press (left) or (right) to select from four pre-installed
capture modes. The selected mode is displayed on top of the soft
key bar. Refer to the table below for a description of the capture
modes.
IconIcon
IconIcon
Icon ModeMode
ModeMode
Mode DescriptionDescription
DescriptionDescription
Description
AutoAuto
AutoAuto
A u t o The camera automatically adjusts to the lighting
condition.
NightNight
NightNight
N i g h t Select this option when capturing photos during
nighttime or in poor lighting conditions
IndoorIndoor
IndoorIndoor
I n d o o r Select this option when capturing indoor photos.
OutdoorOutdoor
OutdoorOutdoor
O u t do o r Select this option when capturing outdoor
photos.
213213
213213
213
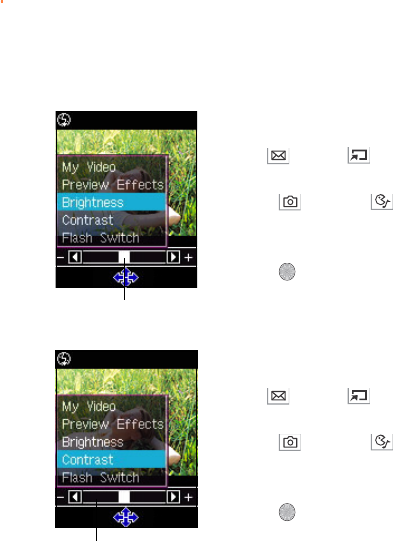
Adjusting the photo brightness and contrastAdjusting the photo brightness and contrast
Adjusting the photo brightness and contrastAdjusting the photo brightness and contrast
Adjusting the photo brightness and contrast
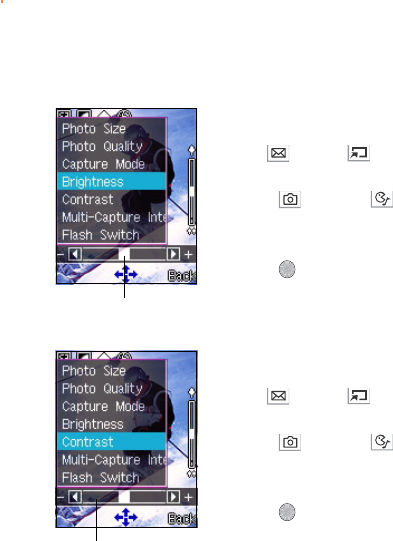
To adjust the brightness:
1. Use (up) or (down) to highlight BrightnessBrightness
BrightnessBrightness
Brigh t n e s s from the
camera settings menu.
2. Press (left) or (right) to move the slider to the left
(decrease) or right (increase) until the you achieve the desired
brightness.
3. Press . The screen returns to the capture display.
SliderSlider
SliderSlider
Slider
To adjust the contrast:
1. Use (up) or (down) to highlight ContrastContrast
ContrastContrast
Con t r a s t from the camera
settings menu.
2. Press (left) or (right) to move the slider to the left
(decrease) or right (increase) until the you achieve the desired
contrast.
3. Press . The screen returns to the capture display.
SliderSlider
SliderSlider
Slider
214214
214214
214
Setting the multi-capture intervalSetting the multi-capture interval
Setting the multi-capture intervalSetting the multi-capture interval
Setting the multi-capture interval
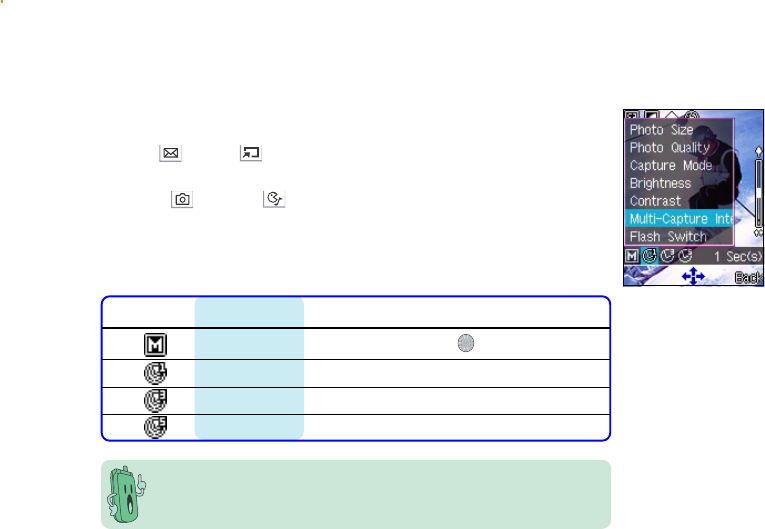
To set the multi-capture interval:
1. Use (up) or (down) to highlight Multi-Capture IntervalMulti-Capture Interval
Multi-Capture IntervalMulti-Capture Interval
Multi-Capture Interval
from the camera settings menu.
2. Press (left) or (right) to select from four multi-capture
intervals. The selected interval is displayed on top of the soft key
bar. Refer to the table below for a description of the the multi-
capture intervals.
See the section “Using the multi-capture feature” for details on
multiple capture.
IconIcon
IconIcon
Icon IntervalInterval
IntervalInterval
Interval The camera captures a photoThe camera captures a photo
The camera captures a photoThe camera captures a photo
The camera captures a photo
manual everytime you press
1 second in one-second intervals
3 seconds in three-second intervals
5 seconds in five-second intervals
215215
215215
215
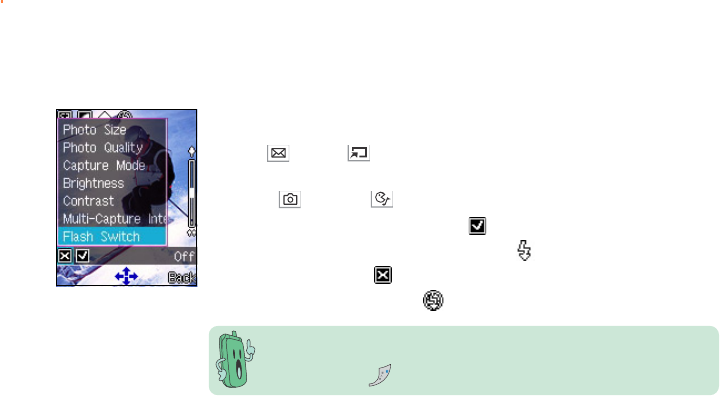
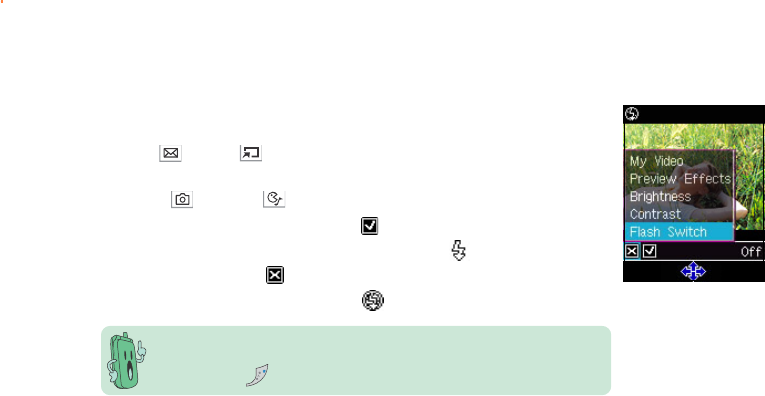
Turning the flash on or offTurning the flash on or off
Turning the flash on or offTurning the flash on or off
Turning the flash on or off
To turn the flash on or off:
1. Use (up) or (down) to highlight Flash Switch Flash Switch
Flash Switch Flash Switch
Flash Switch from the
camera settings menu.
2. Press (left) or (right) to turn the flash on or off.
When you select the check mark , the flash is turned on and the
flash icon on the capture display shows .
When you selected , the flash is turned off and the flash icon on
the capture display shows .
When in camera mode, you can turn the flash on or off
by pressing .

216216
216216
216
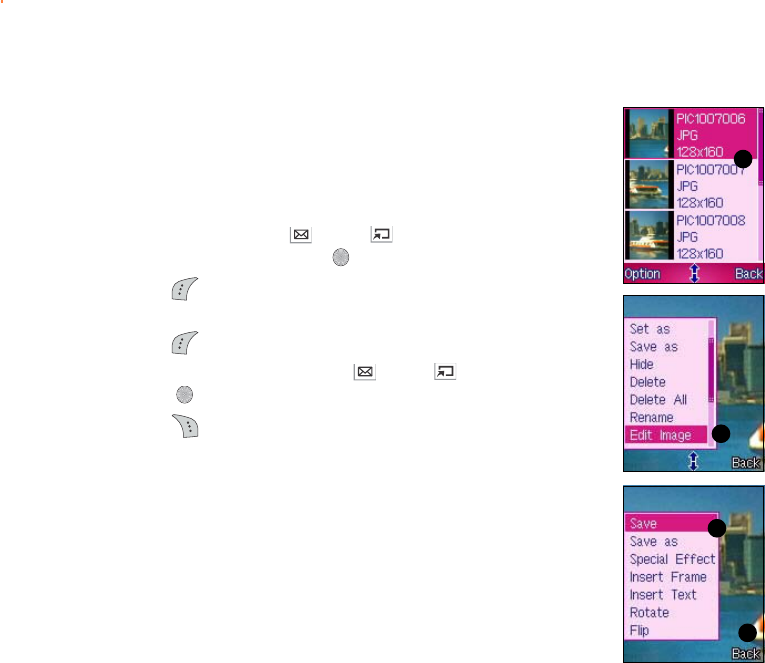
Viewing your photosViewing your photos
Viewing your photosViewing your photos
Viewing your photos
You can view all saved photos in the My Album My Album
My Album My Album
My A l b um folder.
To open the My Album My Album
My Album My Album
My A l b um folder from the Camera menu:
Go to the Camera menu, select My Album My Album
My Album My Album
My A l bum from the menu, then
press .
OROR
OROR
OR
In the CameraCamera
CameraCamera
Ca m e ra menu, press to open My AlbumMy Album
My AlbumMy Album
My Album.
To open the My Album My Album
My Album My Album
My A l b um folder from the capture display:
When in the capture display, press (Option), select My Album,
then press .
To view a photo:
1. Use (up) or (down) to select the photo you want to view,
then press . The photo appears on the screen.
2. Press (Option) to access the photo settings menu.
Otherwise press (Back) to return to My AlbumMy Album
My AlbumMy Album
My Album.
The phone remains in camera mode when you access the MyMy
MyMy
My
AlbumAlbum
AlbumAlbum
A l b u m folder from the capture display.

217217
217217
217
Using the photo optionsUsing the photo options
Using the photo optionsUsing the photo options
Using the photo options
The photo options allow you to save, hide, delete, rename, edit, send,
and slideshow the photos saved in the My Album My Album
My Album My Album
My A l b um folder.
To access the photo options:
1. From My AlbumMy Album
My AlbumMy Album
My A l bum, press (Option) to display the photo options
menu.
2. Use (up) or (down) to select an option, then press . Refer
to the table below for a description of each option.
OptionOption
OptionOption
Option Allows you toAllows you to
Allows you toAllows you to
Allows you to
ViewView
ViewView
V i e w open an image in full screen mode
Change ViewChange View
Change ViewChange View
C h a n g e V iew view images in namelist or thumbnail modes
Set asSet as
Set asSet as
S e t a s save an image as main or external display wallpaper
Save asSave as
Save asSave as
S a v e a s save an image in main display size (128 x 160 jpeg) or
external display size (64 x 96 jpeg)
HideHide
HideHide
H i d e save the image in the Private Album folder
DeleteDelete
DeleteDelete
D e le t e delete an image
Delete AllDelete All
Delete AllDelete All
D e l e t e All delete all images in the My Album folder
RenameRename
RenameRename
Rename rename an image
Edit ImageEdit Image
Edit ImageEdit Image
E d i t I mage apply special effects, frame, text, rotate, or flip an image
Four In OneFour In One
Four In OneFour In One
F o u r I n O n e create a photo collage of four stored images
Send MMSSend MMS
Send MMSSend MMS
S e n d M M S send an image to an MMS-enabled phone
DetailDetail
DetailDetail
D e t a i l view the image details including the filename, size, format, etc.
Slide ShowSlide Show
Slide ShowSlide Show
S l i d e S h o w view a slide show of all images saved in an My Album folder
StorageStorage
StorageStorage
S t o ra g e view the My Album storage status
218218
218218
218
11
11
1
44
44
4
55
55
5
Editing your photosEditing your photos
Editing your photosEditing your photos
Editing your photos
You can add special effects, frame design, and texts to photos saved in
My AlbumMy Album
My AlbumMy Album
My A l bum using the Edit Image Edit Image
Edit Image Edit Image
Edit I m a g e function in the photo options menu.
You can also use this function to rotate or flip the images.
To edit a photo:
1. From My AlbumMy Album
My AlbumMy Album
My Album, Use (up) or (down) to select the photo
you want to edit, then press to display the photo in full screen.
2. Press (Option), then select Edit Image Edit Image
Edit Image Edit Image
Edit I m a g e from the photo
options menu.
3. Press (Option) to display the photo editing menu.
4. Select an editing function using (up) or (down), then
press .
5. Press to return to My AlbumMy Album
My AlbumMy Album
My Album. 22
22
2
219219
219219
219
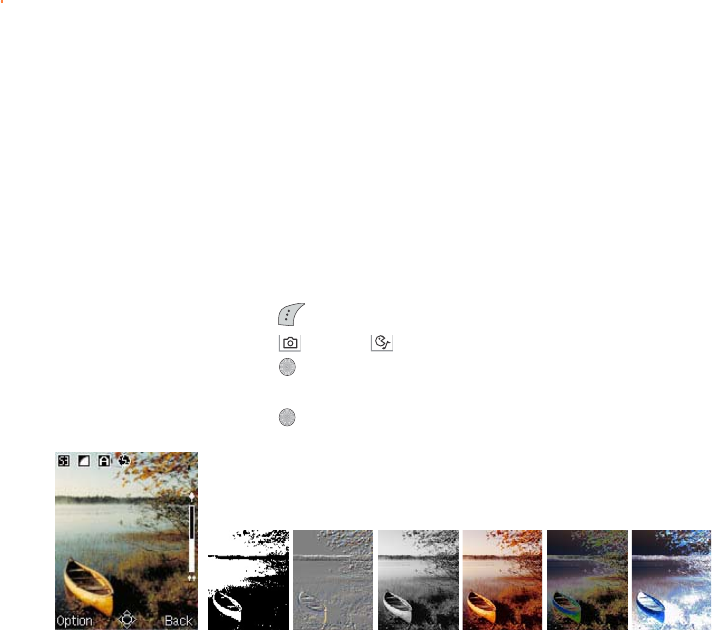
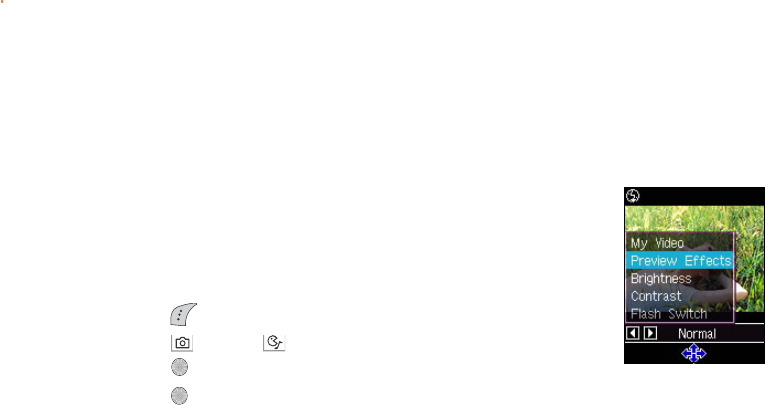
Adding preview effects to your photoAdding preview effects to your photo
Adding preview effects to your photoAdding preview effects to your photo
Adding preview effects to your photo
You can add a preview effect to your subject before capturing the
photo. The phone comes with six pre-installed preview effects that you
can apply to your photos.
To add an effect to your photo:
1. Put the Camera in CaptureCapture
CaptureCapture
Ca p t ure mode.
2. Point the camera to your subject. Make sure your subject fits in the
capture display.
3. Press (Option), then highlight Preview Effects Preview Effects
Preview Effects Preview Effects
Preview Effects from the menu.
4. Press (left) or (right) to select the preview effect, then
press . Refer to the illustrations below for a comparison of preview
effects.
5. Press to capture the photo.
6. To return to normal mode, repeat steps 3 to 4, then select NormalNormal
NormalNormal
Normal
in the Preview EffectsPreview Effects
Preview EffectsPreview Effects
Preview Effects.
NormalNormal
NormalNormal
Normal 2 Value2 Value
2 Value2 Value
2 Value EmbossedEmbossed
EmbossedEmbossed
Embossed GrayGray
GrayGray
Gray SepiaSepia
SepiaSepia
Sepia SolarizeSolarize
SolarizeSolarize
Solarize NegativeNegative
NegativeNegative
Negative
220220
220220
220
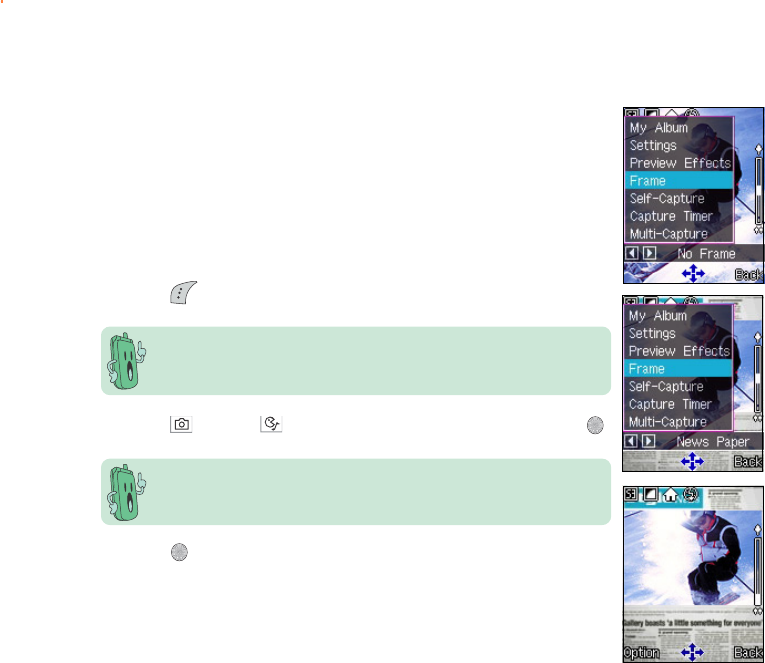
Adding frames to your photoAdding frames to your photo
Adding frames to your photoAdding frames to your photo
Adding frames to your photo
You can add a frame design to your photos using any of the 20
pre-installed frames.
To add a frame to your photo:
1. Put the Camera in CaptureCapture
CaptureCapture
Ca p t ure mode.
2. Point the camera to your subject. Make sure your subject fits in the
capture display.
3. Press (Option), then highlight FrameFrame
FrameFrame
Frame from the menu.
You can also select the next/previous/no frame by pressing the
volume up/volume down/camera button at the side of the phone.
4. Press (left) or (right) to select a frame design, then press .
The photo size automatically changes to main wallpaper when you
select FrameFrame
FrameFrame
Frame. You cannot change the photo size when you add a
frame to a photo.
5. Press to capture the photo.
6. To remove the frame from your photos, repeat steps 1 to 4, then
select No Frame No Frame
No Frame No Frame
No Frame from the FrameFrame
FrameFrame
Frame options.

221221
221221
221
Using the external display for self-captureUsing the external display for self-capture
Using the external display for self-captureUsing the external display for self-capture
Using the external display for self-capture
You can use the external display to do a self-capture.
To use the self-capture feature:
1. Put the Camera in CaptureCapture
CaptureCapture
Ca p t ure mode.
2. Press (Option), highlight Self CaptureSelf Capture
Self CaptureSelf Capture
S e l f C a ptu r e from the menu, then
press . The main display shows a camera on the background.
OROR
OROR
OR
Press the to enable self-capture.
3. Point the camera to yourself, then use the external display as the
capture reference.
4. Press the capture button on the side of the phone. The photo is
automatically saved in My Album.My Album.
My Album.My Album.
My Album. Press Press
Press Press
Press (Back) to return to
capture display.
Press the volume up or volume down side keys to zoom in or zoom
out the image on the external display.
5. Open the phone flip top to return to the normal capture display
mode.
You can also enable the self-capture mode by closing the phone flip
top when in Camera mode.
222222
222222
222
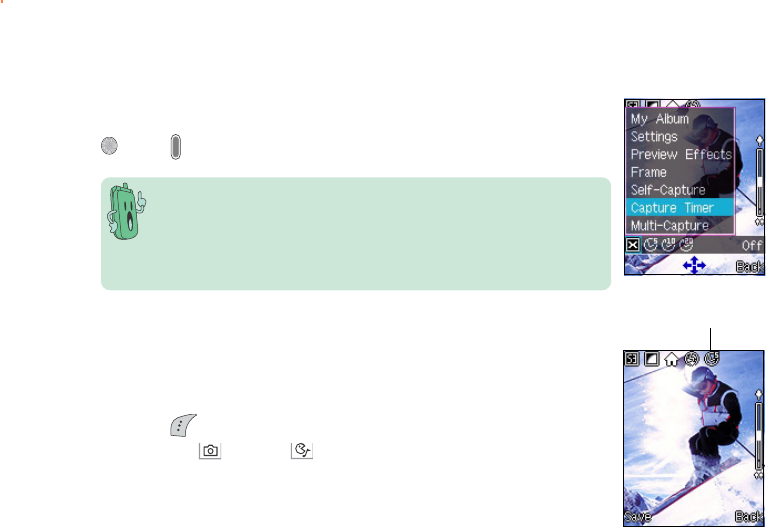
Using the capture timerUsing the capture timer
Using the capture timerUsing the capture timer
Using the capture timer
You can use the capture timer to capture a photo without pressing the
key or button.
• Determine the best location for the phone before using this
feature. Try pointing the camera on your subject in different
angles and locations for best results.
• The multi-capture feature automatically turns-off when you
select capture timer.
Setting the capture timerSetting the capture timer
Setting the capture timerSetting the capture timer
Setting the capture timer
To set the capture timer:
1. Put the Camera in CaptureCapture
CaptureCapture
Ca p t ure mode.
2. Press (Option), highlight Capture TimerCapture Timer
Capture TimerCapture Timer
C a p tur e Tim e r from the menu.
3. Press the (left) or (right) button to select from three
capture timers. The selected capture timer icon is displayed on the
icon bar. Refer to the table on the next page for a description of the
capture timers.
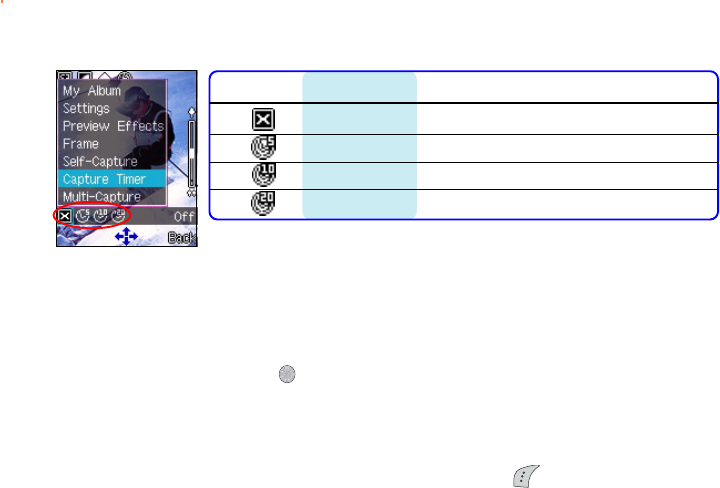
Capture timer
223223
223223
223
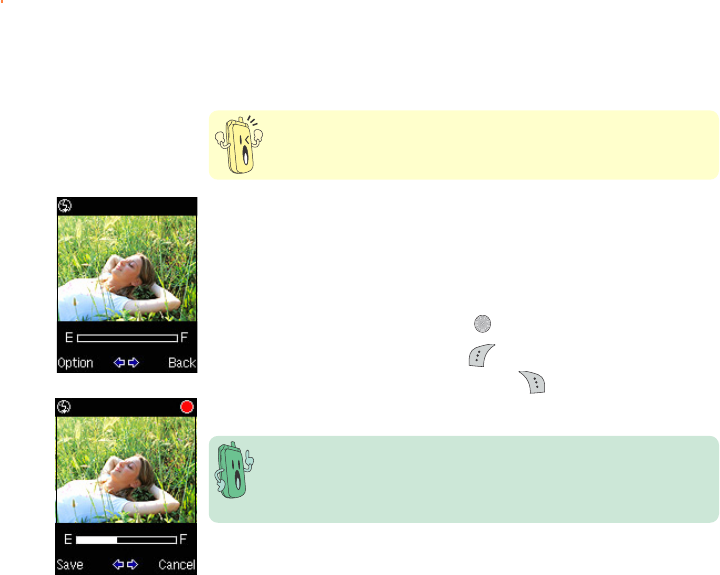
Capturing a photo using the capture timerCapturing a photo using the capture timer
Capturing a photo using the capture timerCapturing a photo using the capture timer
Capturing a photo using the capture timer
1. After selecting the capture timer, place the phone on a stable
surface making sure that the camera points correctly to the subject.
2. Press . The phone automatically captures the photo after the
capture timer expires.
If you are using the external display, the photo is automatically
saved in My AlbumMy Album
My AlbumMy Album
My Album.
If you are using the main display, press (Save) to save the
photo to My AlbumMy Album
My AlbumMy Album
My Album.
IconIcon
IconIcon
Icon TimerTimer
TimerTimer
Timer DescriptionDescription
DescriptionDescription
Description
Off The capture timer is off.
5 seconds The camera starts to capture in 5 seconds
10 seconds The camera starts to capture in 10 seconds
20 seconds The camera starts to capture in 20 seconds

224224
224224
224
Using multi-captureUsing multi-capture
Using multi-captureUsing multi-capture
Using multi-capture
The multi-capture feature allows you to capture multiple photos in
specific time intervals. Use multi-capture when capturing sequential or
motion photos.
To use multi-capture:
1. Set the multi-capture interval following the instructions on the
“Setting the multi-capture interval” section.
2. Put the Camera in CaptureCapture
CaptureCapture
Ca p t ure mode.
3. Press (Option), highlight Multi-CaptureMulti-Capture
Multi-CaptureMulti-Capture
Multi-Capture from the menu.
4. Press (left) or button to select the number of photos you
want to capture. You can capture 4 [ ], 6 [ ], 9 [ ], or 16
photos. The multi-capture icon appears in the icon bar.
5. Point the camera to your first subject, then press to start
multi-capturing. The camera automatically captures the images on
the main display in time intervals you earlier set.
When finished, the display shows a thumbnail of each captured
photo.
6. Press (Save) to save the photos.
• If the photo size is set larger than , the multi-capture
feature automatically changes the photo size to . Refer to
page 210 for details on photo sizes.
• The capture timer function automatically turns-off when you
use multi-capture.
Multi-capture icon
225225
225225
225
Viewing multi-capture photosViewing multi-capture photos
Viewing multi-capture photosViewing multi-capture photos
Viewing multi-capture photos
To view the multi-captured photos:
1. Open the My Album My Album
My Album My Album
My A l b um folder.
2. Use (up) or (down) to locate the sequential photos
(i.e. PIC1007011.1, PIC1007011.2, etc).
The phone automatically saves an extra photo file containing a
thumbnail of each photo. The phone saves this file in the MyMy
MyMy
My
AlbumAlbum
AlbumAlbum
A l b u m folder together with the other four, six, nine, or 16 source
photos.
3. Select a photo, then press to display.
4. Press (Back) to return to My AlbumMy Album
My AlbumMy Album
My Album.

226226
226226
226
AVI Recorder
The AVI Recorder AVI Recorder
AVI Recorder AVI Recorder
AVI Recorder allows you to capture short video files using the
phone camera. The video files are saved in .AVI format and is stored in
the My VideosMy Videos
My VideosMy Videos
My V i d e os folder.
To access the AVI RecorderAVI Recorder
AVI RecorderAVI Recorder
AVI Recorder:
1. From the CameraCamera
CameraCamera
Ca m e ra menu, use (up) or (down) to select AVIAVI
AVIAVI
AVI
RecorderRecorder
RecorderRecorder
Re c o rder, then press .
OROR
OROR
OR
Press to display the MessageMessage
MessageMessage
Message menu.
Recorder mode displayRecorder mode display
Recorder mode displayRecorder mode display
Recorder mode display
Familiarize yourself with the capture display
before using the AVI recorder. The AVI recorder
screen features a memory indicator that tells
you the amount of memory used by the
recording. The recording automatically stops
when it reaches the full memory mark (F). Option keyOption key
Option keyOption key
Option key
Flash iconFlash icon
Flash iconFlash icon
Flash icon
Back keyBack key
Back keyBack key
Back key
Memory indicatorMemory indicator
Memory indicatorMemory indicator
Memory indicator
227227
227227
227
Capturing videosCapturing videos
Capturing videosCapturing videos
Capturing videos
DO NOT use the recorder in places where video capture is
prohibited. Take note of local regulations before using the recorder.
To capture a video:
1. Put the Camera in AVI RecorderAVI Recorder
AVI RecorderAVI Recorder
AVI Re c o r d e r mode.
2. Point the camera to your subject. Make sure your subject fits in the
capture display.
3. Hold the phone firmly, then press to start the video capture.
4. After recording is finished, press (Save) to save the video to
the My Video My Video
My Video My Video
My V i d eo folder. Otherwise, press (Cancel) to ignore the
recording and return to the recorder mode display.
The phone automatically assigns a file name to the video. The file
name is usually a combination of the date and the sequence that
video was taken (e.g. AVI100705). You can rename the video file
name in the My Video My Video
My Video My Video
My Video folder.
228228
228228
228
Adding preview effects to your videoAdding preview effects to your video
Adding preview effects to your videoAdding preview effects to your video
Adding preview effects to your video
You can apply a preview effect to your video before capturing. The
phone comes with six pre-installed preview effects that you can choose
for your videos.
To add an effect to your video:
1. Put the Camera in AVI Recorder AVI Recorder
AVI Recorder AVI Recorder
AVI Recorder mode.
2. Point the camera to your subject. Make sure your subject fits in the
capture display.
3. Press (Option), then highlight Preview Effects Preview Effects
Preview Effects Preview Effects
Preview Effects from the menu.
4. Press (left) or (right) to select the preview effect, then
press .
5. Press to start capturing the video.
6. To return to normal mode, repeat steps 3 to 4, then select NormalNormal
NormalNormal
Normal
as in the Preview EffectsPreview Effects
Preview EffectsPreview Effects
Preview Effects selection.
229229
229229
229
Adjusting the video brightness and contrastAdjusting the video brightness and contrast
Adjusting the video brightness and contrastAdjusting the video brightness and contrast
Adjusting the video brightness and contrast
To adjust the brightness:
1. Use (up) or (down) to highlight BrightnessBrightness
BrightnessBrightness
Bright n e s s from the video
settings menu.
2. Press (left) or (right) to move the slider to the left
(decrease) or right (increase) until the you achieve the desired
brightness.
3. Press . The screen returns to the video recorder display.
SliderSlider
SliderSlider
Slider
To adjust the contrast:
1. Use (up) or (down) to highlight ContrastContrast
ContrastContrast
Con t r a s t from the video
settings menu.
2. Press (left) or (right) to move the slider to the left
(decrease) or right (increase) until the you achieve the desired
contrast.
3. Press . The screen returns to the video recorder display.
SliderSlider
SliderSlider
Slider
230230
230230
230
Turning the flash on or offTurning the flash on or off
Turning the flash on or offTurning the flash on or off
Turning the flash on or off
To turn the flash on or off:
1. Use (up) or (down) to highlight Flash Switch Flash Switch
Flash Switch Flash Switch
Flash Switch from the
video settings menu.
2. Press (left) or (right) to turn the flash on or off.
When you select the check mark , the flash is turned on and the
flash icon in the video recorder display shows .
When you selected , the flash is turned off and the flash icon in
the video recorder display shows .
When in camera mode, you can turn the flash on or off by
pressing .