Alcatel Canada 31T28A04A22A Alcatel 7390 LMDS Broadband Wireless System - 31GHz User Manual 3cc12426aaaaTQbja01
Alcatel Canada Inc Alcatel 7390 LMDS Broadband Wireless System - 31GHz 3cc12426aaaaTQbja01
Contents
- 1. Base Station User Manual 1 0f 14
- 2. Base Station User Manual 2 0f 14
- 3. Base Station User Manual 3 0f 14
- 4. Base Station User Manual 4 0f 14
- 5. Base Station User Manual 5 0f 14
- 6. Base Station User Manual 6 0f 14
- 7. Base Station User Manual 7 0f 14
- 8. Base Station User Manual 8 0f 14
- 9. Base Station User Manual 9 0f 14
- 10. Base Station User Manual 10 0f 14
- 11. Base Station User Manual 11 0f 14
- 12. Base Station User Manual 12 0f 14
- 13. Base Station User Manual 13 0f 14
- 14. Base Station User Manual 14 0f 14
Base Station User Manual 10 0f 14

3CC12426AAAA TQ BJA 01 Issue 01 - April 2001 - Draft 04 301/346
302
7.5 – Sub-band distribution plan
(*) : figures given here represent the total bandwidth, i.e. from the lower edge of the lowest channel to
the higher edge of the highest channel.
Cross-polarized radio Down-link Up-link
LMCS/AB 27 850 ¾ 28 350 27 350 ¾ 27 650
LMCS/F 25 600 ¾ 25 850 25 350 ¾ 25 600
LMCS/C 27 100 ¾ 27 350 26 850 ¾ 27 100
LMDS/A 27 500 ¾ 28 350 31.075 ¾ 31 225
LMDS/B 31 225 ¾ 31 300 31 000 ¾ 31 075
38/700/1 39 700 ¾ 40 000 39 000 ¾ 39 300

302/346 Issue 01 - April 2001 - Draft 04 3CC12426AAAA TQ BJA 01
302

3CC12426AAAA TQ BJA 01 Issue 01 - April 2001 - Draft 04 303/346
308
Appendix 1 – Installation sheet
A.1.1 – 7390DBS
General information:Operator................. Date.......... Visa..........
Equipment characteristics
Name
Address
........................................................................................
No ......... Street......................................................
Bld......... Stair................... Floor.................
Town .............................................................
Country .........................................................
Operator
Site identification
Name of Base Station
Version
Designation Reference ICS Serial No.
Subrack
Fan
PSU 1
PSU 2
CPL
IBS 1
IBS 2
IBS 3
IBS 4
IBS 5
IBS 6
IBS 7
IBS 8

304/346 Issue 01 - April 2001 - Draft 04 3CC12426AAAA TQ BJA 01
308
Equipment characteristics and onboard software
Designation Part number ICS Serial No. Downloaded software
ANT 1
ANT 2
TNT 1
TNT 2
TNT 3
TNT 4
AMD 1
AMD 2
AMD 3
AMD 4
AMD 5
AMD 6
AMD 7
AMD 8

3CC12426AAAA TQ BJA 01 Issue 01 - April 2001 - Draft 04 305/346
308
A.1.2 – 7390 X-Pol RBS
General information:Operator.................. Date............. Visa..........
Equipment characteristics
Initial configuration (1+0):
Name
Address
...................................................................................
No ......... Street................................................
Bld......... Stair................... Floor...........
Town .............................................................
Country .........................................................
Operator
Site identification
Name of Base Station
Version
Designation 1 2 3 4
Mains
Reference
ICS
Serial No.
Tx level
Band
Sub-band
Type of cable
Length of cable
Cable attenuateur (upstream)
Cable attenuateur (downstream)
Tilt
Azimuth
Height of X-Pol RBS
Type of Mounting

306/346 Issue 01 - April 2001 - Draft 04 3CC12426AAAA TQ BJA 01
308
Redundancy (1+1):
Designation 5 6 7 8
Mains
Reference
ICS
Serial No.
Tx level
Band
Sub-band
Onboard software
version
Type of cable
Length of cable
Tilt
Azimuth
Height of X-Pol RBS
Type of Mounting

3CC12426AAAA TQ BJA 01 Issue 01 - April 2001 - Draft 04 307/346
308
A.1.3 – Check point list for BS commissioning
CHECKING THE SAFETY REGULATIONS:
– Equipment ground wire OK NOK
– Differential protection OK NOK
– Fire protection OK NOK
CHECKING THE RADIO INSTALLATION:
– No contaminants or possible outflow on the antennas and radio OK NOK
– No personnel allowed in the antenna fields OK NOK
– Use of torque wrenchs for the radio assembly OK NOK
– Mast rigidity and absence of vibration OK NOK
– Antenna clearance in immediate vicinity OK NOK
– Check that the ET390998 coaxial cable is installed OK NOK
– Radio grounding OK NOK
CHECKING THE WIRING BETWEEN X-Pol RBS AND DBS:
– No crushed cables OK NOK
– Observance of the minimum bend radius OK NOK
– Quality of cable ground wire installation OK NOK
– Sealing of ground relays on the cable OK NOK
CHECKING THE DBS INSTALLATION:
– Min Max temperature of the premises containing the DBS (-5º to +55ºC) OK NOK
– Check air inlets and outlets of the DBS backplane OK NOK
– Check the 48 Volt polarity OK NOK
– Check the ground wire of the DBS backplane OK NOK
– Check that all the client access cables are shielded OK NOK
– On the DBS panel, J101, J104 and J113 must not be connected OK NOK
– Check the optical fiber routing OK NOK
– Check the connection sequence of the X-Pol RBS cables on the panel OK NOK

308/346 Issue 01 - April 2001 - Draft 04 3CC12426AAAA TQ BJA 01
308
PAGE INTENTIONALLY LEFT BLANK
3CC12426AAAA TQ BJA 01 Issue 01 - April 2001 - Draft 04 309/346
324
Appendix 2 – Installation of 7390LT software
A.2.1 – Requirements
1. Microsoft Windows NT operating system running (Service Pack 5 or above)
2. A7390LT installation Kit
3. User account with Administrator privileges to log-on with
Note: Users without Administrator privileges will not be able to install SNTP service, required to run
properly the A7390LT.
A.2.2 – Installation Procedure
1. Be sure you have administrator rights
2. Close all the aplications before start the 7390LT Installation
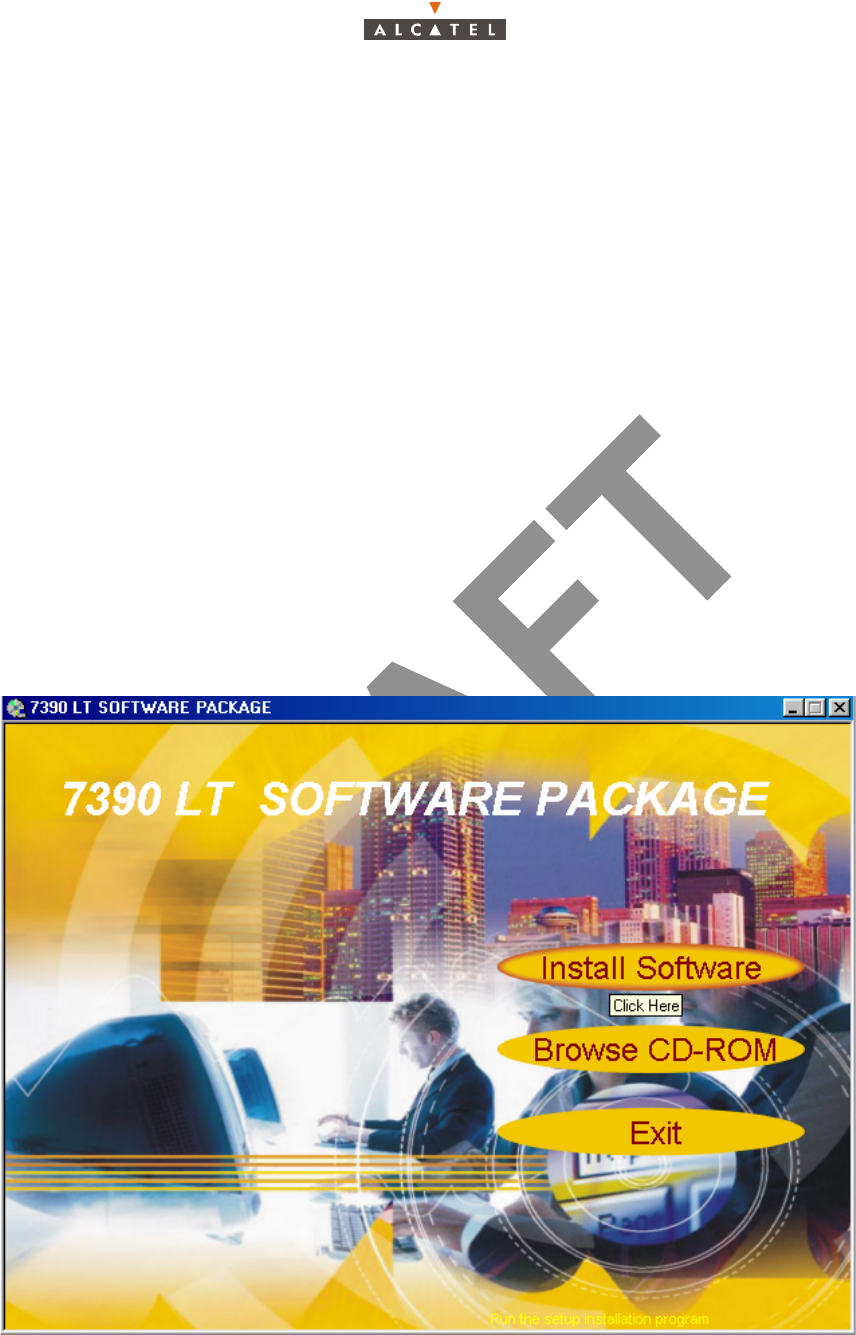
3. Insert the CD " 7390LT Software Package"
• The window " 7390LT Software Package" appears

310/346 Issue 01 - April 2001 - Draft 04 3CC12426AAAA TQ BJA 01
324
•Click on "Install Software"
• The window "Install Software" appears
•Click on "7390LT Application Software Release 2.2a"
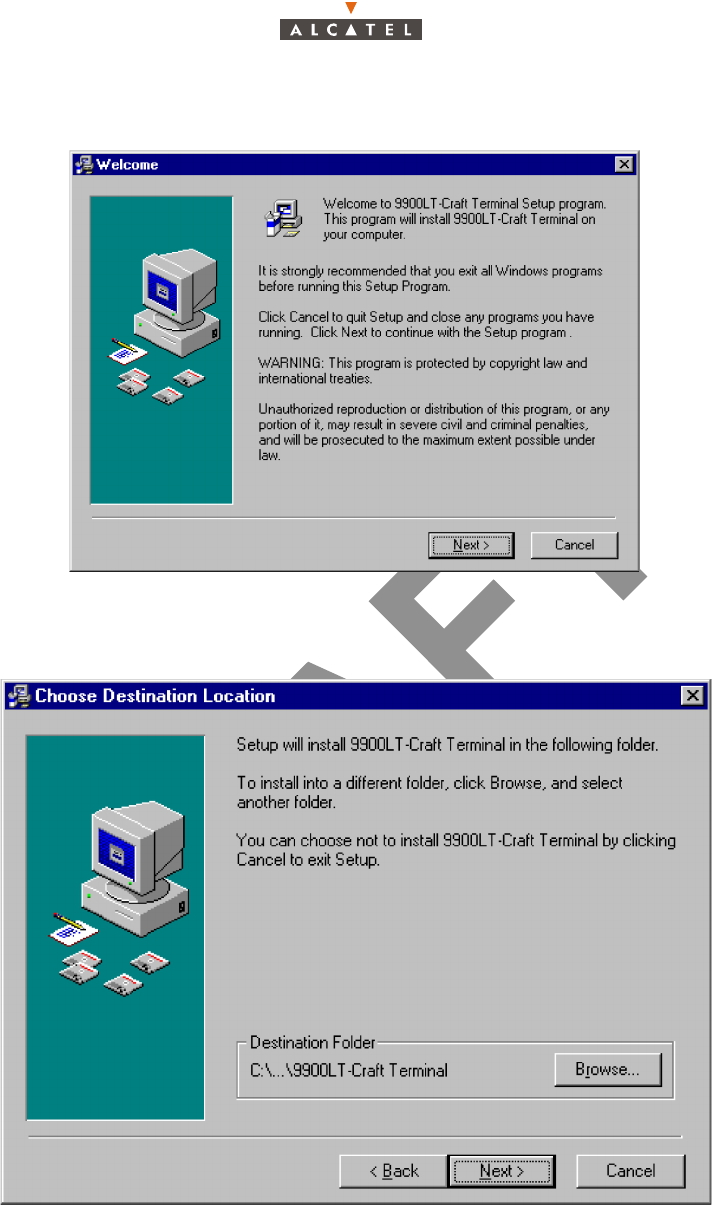
4. When the "Welcome" screen appears (see below), click on "Next" button to continue the installation
3CC12426AAAA TQ BJA 01 Issue 01 - April 2001 - Draft 04 311/346
324
procedure or press "cancel" to exit the installation program.
5. The "Choose Destination Location" screen appears (see below). If you agree with the default
destination folder, click on the "Next" button. If you disagree, you can change it by clicking on
"Browse" button and selecting the desired destination folder.
Nota :
– If you use always the default directory, un-install the previous LT version before.
– If you want to install several LT versions on the same computer, use different folders at each time.
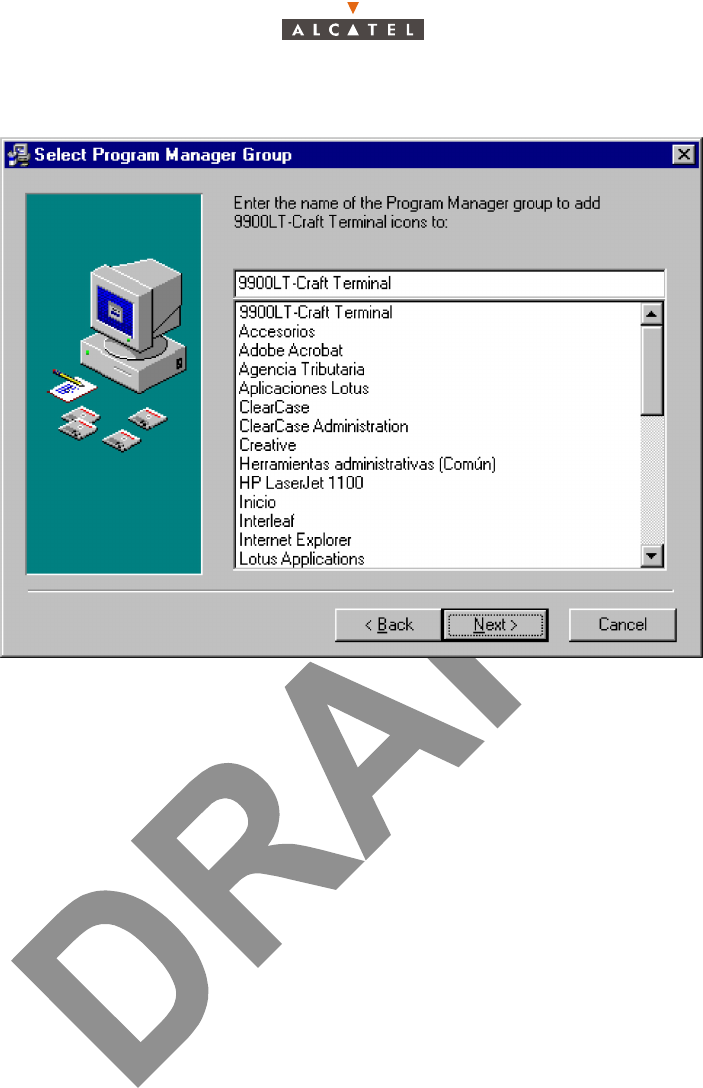
6. The "Select Program Manager Group" screen appears (see below). If you agree with the default
312/346 Issue 01 - April 2001 - Draft 04 3CC12426AAAA TQ BJA 01
324
group name, click on "Next" button. If you disagree, you can change it by typing the desired name.
Note: If you want to install several LTs on the same computer use different names for the Program
group.
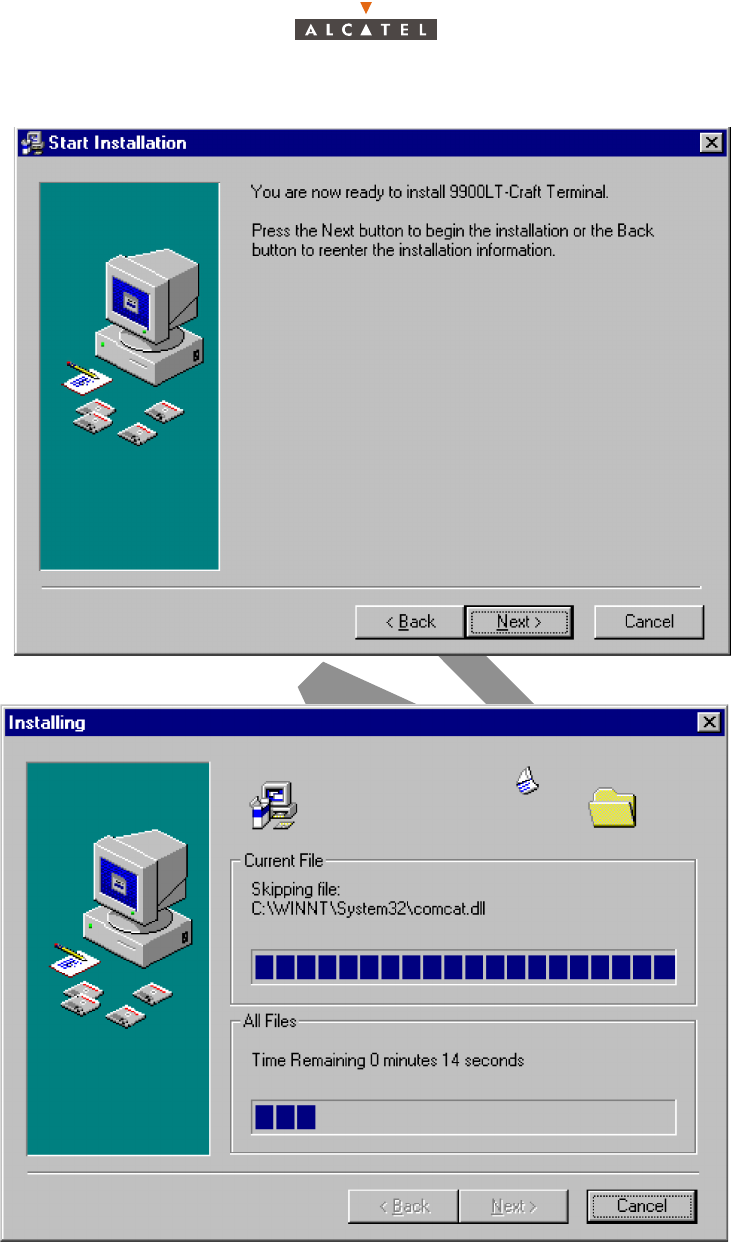
7. The "Start Installation" screen appears (see below). Now, you are ready to install the A7390LT (Craft
Terminal) in your computer. Click on the "Next" button to install it. You can cancel the LT installation
by clicking on the "cancell" button or you can chnage some of the choosen options by clicking on the
"Back" button.
3CC12426AAAA TQ BJA 01 Issue 01 - April 2001 - Draft 04 313/346
324
8. The following window appears indicating that the LT installation is running.
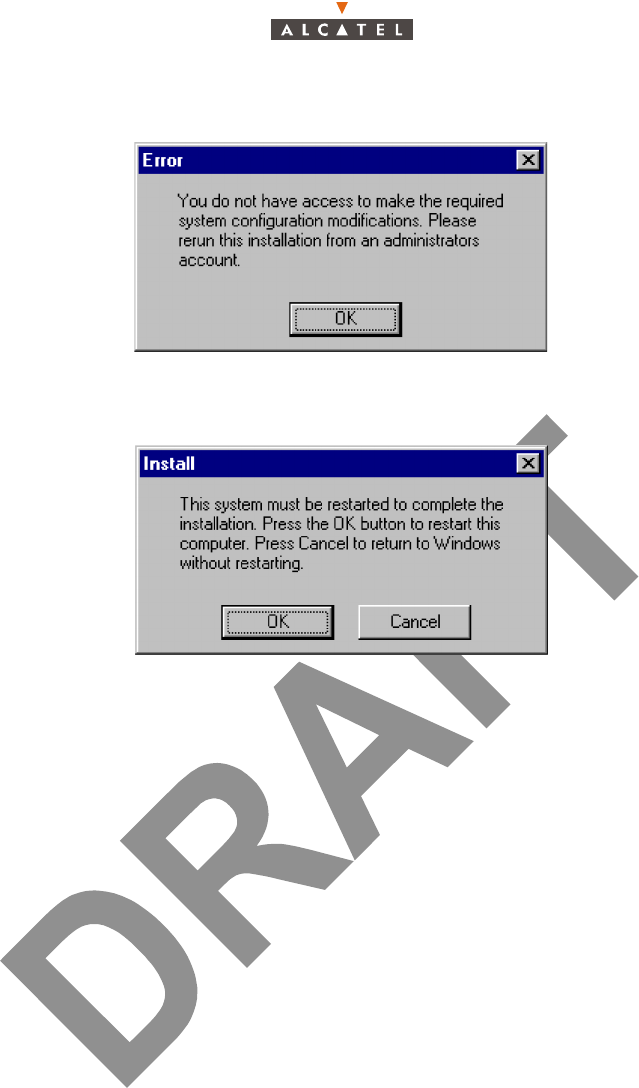
9. If you dont't have administrator rights, the following window appears. The LT installation has not
been completely succesful, so you have to get administrator rights and start again.
314/346 Issue 01 - April 2001 - Draft 04 3CC12426AAAA TQ BJA 01
324
10. The installation has been completed. The following window appears. Press OK to restart your
computer.
11. After copying files, the Simple Network Time Protocol (SNTP) service is installed and started. After
this, the installation process is complete.
12. Now, you are ready to run the 7390LT application.
3CC12426AAAA TQ BJA 01 Issue 01 - April 2001 - Draft 04 315/346
324
A.2.3 – License the .OCX files
1. Run the Ptlic32.exe file located in :
C:\Program_files\7390LT-Craft Terminal\Ptlic32.exe
The "Power TCP" windows appears.
2. Click on the "Licensing" button
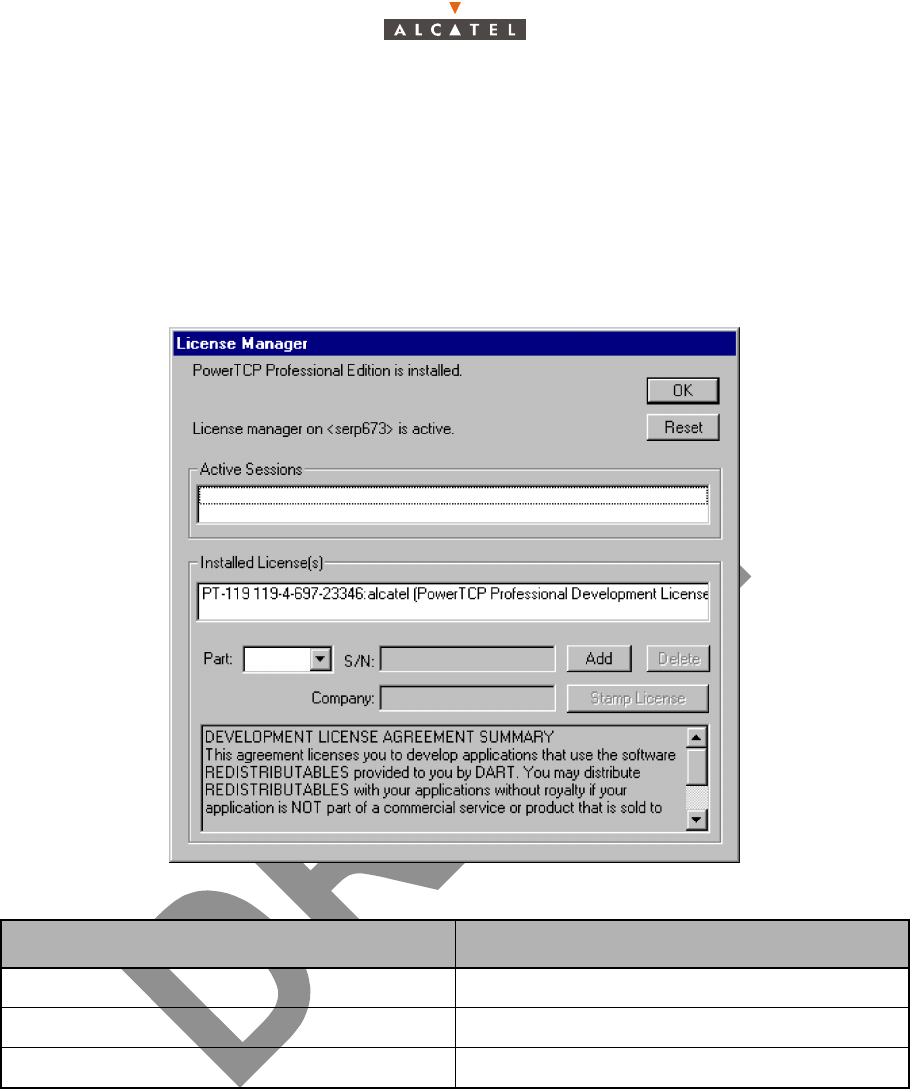
The following window appears:
3. Enter the following values
4. Click on Add
The license is printed in the box "Installed License"
5. Click on the license
6. Click on the "Stamp license" button
7. Select the following OCX file to stamp the license:
C:\WinNT\System32\ptsnmp32.ocx
A window appears on the screen mentioning that the licensing has been done succesfully.
8. Move back to the main window (see window above), click on the license detailed in the box "Installed
License", and then click on the Delete button.
Field Value
Part PT-119
S/N 119-4-697-23346
Company Alcatel CIT