Apple E3091A Cellular Phone with Bluetooth and WLAN Radios User Manual AA15XX User Guide v1 0x
Apple Inc. Cellular Phone with Bluetooth and WLAN Radios AA15XX User Guide v1 0x
Apple >
Contents
- 1. RF exposure statements (FCC only)
- 2. User_Guide_v1.0_draft_Part1
- 3. User_Guide_v1.0_draft_Part2
- 4. User_Guide_v1.0_draft_Part3
- 5. User_Guide_v1.0_draft_Part4
- 6. User_Guide_v1.0_draft_Part5
- 7. User_Guide_v1.0_draft_Part6
- 8. User_Guide_v1.0_draft_Part7
- 9. User_Guide_v1.0_draft_Part8
- 10. Manual part1
- 11. Manual part2
User_Guide_v1.0_draft_Part6
135
!
APPLE CONFIDENTIAL
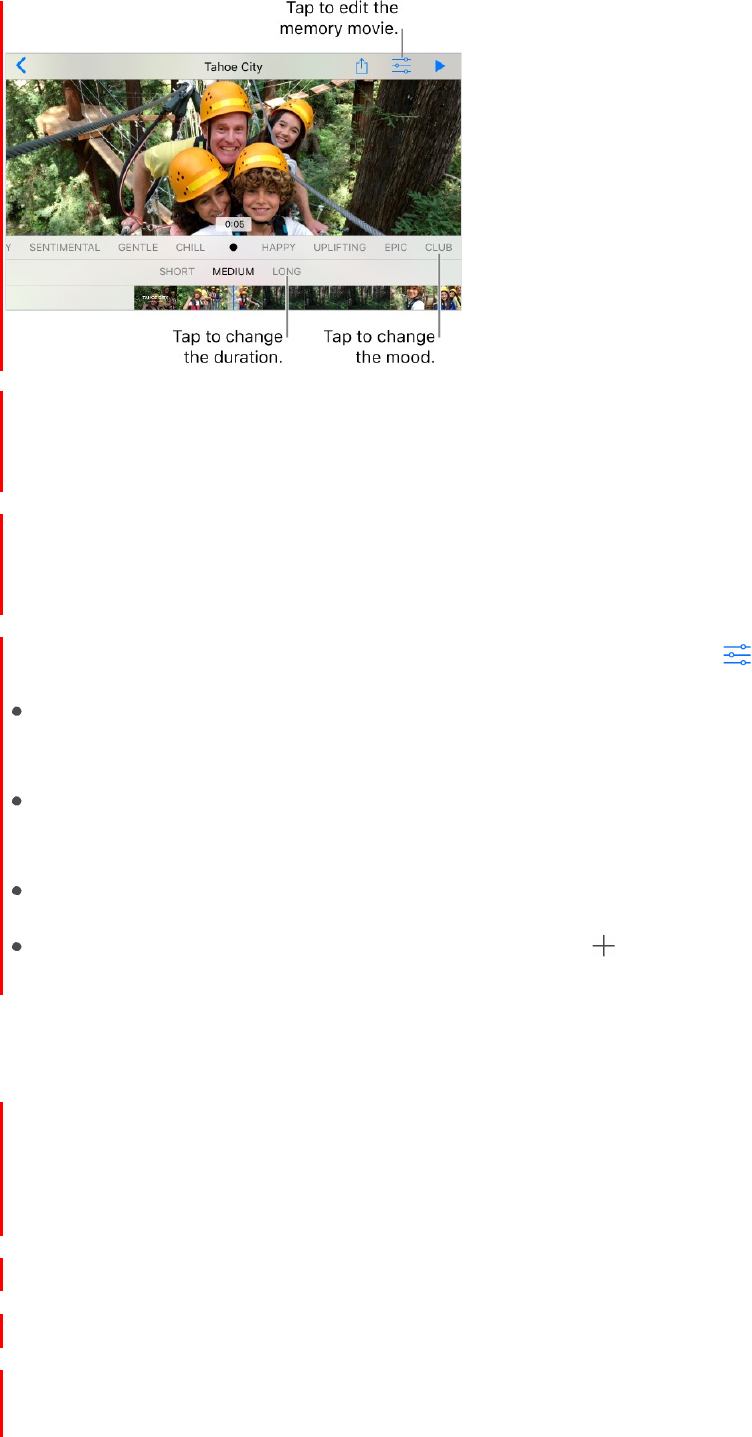
Change the mood. Tap a memory movie while it’s playing, then tap a mood or swipe
left or right on the moods to choose a new one. (Moods include distinct fonts and
soundtracks.)
Change the duration. Tap a memory movie while it’s playing, then tap a duration or
swipe to choose short, medium, or long. All durations may not be available for every
movie.
Customize a memoryTap a memory movie while it’s playing, then tap
to:
Edit the title: Tap Title, tap the title and subtitle to edit them, then choose a title
style.
Choose different music: Tap Music, then choose music from a soundtrack or from
your music library (only music stored on iPhone is available).
Choose a custom duration: Tap Duration.
Choose photos and videos: Tap Photos & Videos, tap , then tap the photos and
videos you want in the memory. Deselect photos and videos to remove them.
People
Photos scans your photo library for people’s faces and adds the most frequently found
faces to the People album. You can assign names to the people Photos finds, add
people who appear less frequently, mark people as favorites, and view memories that
contain specific people. The more photos you have, the longer the first scan takes.
People are synced among devices that use your Apple ID.
Note: The People feature isn’t available on iPhone 5.
Add more people. Tap Albums > People, tap Add People, select people to add, then
tap Add.
DRAFT

136
!
APPLE CONFIDENTIAL
Merge people. If the People album shows one person identified as two or more people,
tap Select, tap each instance of the person, then tap Merge.
Remove a misidentified person. Tap a person in the Photos album, then tap Show All
to see all photos they appear in. Tap Select, tap Show Faces, tap the misidentified face,
tap , then tap Not This Person.
Name a person. Tap Albums > People, tap a person, tap Add Name, then enter the
name. Tap the name in the list if you see it (the names are from your Contacts app).
Type the person’s name if they’re not in Contacts. The name is automatically assigned
to any pictures of the person that are added later.
View photos that contain a person. Tap Albums > People, then tap the person.
Mark people as favorites. In the People album tap Select, tap one or more people,
then tap Favorite.You can also drag a person to the Favorites area.
To remove favorites, tap Select, tap the people who you want to remove, then tap
Unfavorite.
Hide and unhide people. Tap Albums > People, tap Select, tap the people you want to
hide, then tap Hide. To unhide people, tap Show Hidden People, tap Select, tap people,
then tap Unhide. Photos that contain hidden people don’t appear in Moments,
Collections, Years, and Memories but are visible in albums.
Show hidden people. Tap Albums > People, swipe up, then tap Show Hidden People.
To view all photos with hidden people, tap Albums > Hidden.
Places
The Places album creates collections of your photos and videos based on where they
were taken. Collections are displayed on a map within the album. Only pictures and
videos that have embedded location information (GPS data) are included.
View by location. Tap Albums > Places, then tap a collection. Zoom in on the map to
see more specific locations.
See a list of locations. While looking at the map, tap Grid.
View a location in the Maps app. On the Details screen, tap the location’s name or
address.
View a location-based memory movie. Tap Albums > Places, tap a location that has
several images, tap , then tap .
DRAFT

137
!
APPLE CONFIDENTIAL
iCloud Photo Library
iCloud Photo Library automatically uploads the photos and videos you take and stores
them in their original format at full resolution in iCloud. You can access your photos and
videos in iCloud Photo Library from any device where you’re signed in using the same
Apple ID.
Use the Photos app on iOS devices and Mac computers to open and edit your photos
and videos. Any changes you make are updated on all your devices. See Edit photos and
trim videos.
To use iCloud Photo Library, you need iOS 8.1 or later, OS X v10.10.3 or later, or iCloud
for Windows 5.
Note: If you turn on iCloud Photo Library, you can’t use iTunes to sync photos and videos
to iPhone.
Turn on iCloud Photo Library. Go to Settings > iCloud > Photos, or Settings > Photos &
Camera.
Optimize your storage or keep all your photos and videos in full-resolution on
iPhone. If your iCloud storage plan is over 5 GB, Optimize iPhone Storage is on by
default. It manages space on your iPhone by automatically keeping your full-resolution
photos and videos in iCloud and lightweight versions on your iPhone, as needed. To keep
the full-resolution originals on your iPhone, go to Settings > iCloud > Photos, then tap
Download and Keep Originals. Your originals are always stored in iCloud.
Download a full-resolution photo or video. If you’re not storing full-resolution
versions on iPhone, pinch to zoom in to 100%, or tap .
Note: To upload photos and videos to iCloud Photo Library, iPhone must be connected to
Wi-Fi. Using a cellular connection, you can download up to 100 MB at a time.
If your uploaded photos and videos exceed your storage plan, you can upgrade your
iCloud storage. Go to Settings > iCloud > Storage > Change Storage Plan to learn about
the options.
My Photo Stream
My Photo Stream automatically uploads your most recent photos to iCloud, so you can
import them to devices that aren’t using iCloud Photo Library. (My Photo Stream
doesn’t upload Live Photos or videos.)
Photos in My Photo Stream don’t count against your iCloud storage, and they’re kept
for 30 days in iCloud (up to 1000 photos).
DRAFT

138
!
APPLE CONFIDENTIAL
Turn My Photo Stream on or off. Go to Settings > iCloud > Photos. Or go to Settings >
Photos & Camera.
Use My Photo Stream without iCloud Photo Library. Photos you take with iPhone are
added to the My Photo Stream album when you leave the Camera app and iPhone is
connected to Wi-Fi. Any photos you add—including screenshots and photos saved from
email, for example—also appear in your My Photo Stream album.
Photos added to My Photo Stream on your other devices appear in your My Photo
Stream album on iPhone. iOS devices can keep up to 1000 of your most recent photos in
iCloud for 30 days; download photos to your computer or iOS device if you want to keep
them permanently. For more information, see My Photo Stream FAQ.
Manage My Photo Stream contents. In the My Photo Stream album, tap Select.
Save your best shots on iPhone: Select the photos, then tap Add To.
Share, print, or copy: Select the photos, then tap .
Delete photos: Select the photos, then tap .
Note: Although deleted photos are removed from My Photo Stream on all your devices,
the original photos remain in Photos on the device on which they were taken. Photos
that you save to another album on a device or computer also aren’t deleted. See My
Photo Stream FAQ.
iCloud Photo Sharing
With iCloud Photo Sharing, you can invite others who are using iCloud Photo Sharing to
view your photos and videos. If they’re using iCloud Photo Sharing (on iOS 6 or later or
OS X v10.8 or later), they can view your albums and leave comments. If they’re on iOS 7
or later or OS X v10.9 or later, they can add their own photos and videos. You can also
publish your album to a website for anyone to view. iCloud Photo Sharing works with or
without iCloud Photo Library and My Photo Stream.
Note: To use iCloud Photo Sharing, iPhone must be connected to the Internet. iCloud
Photo Sharing works over both Wi-Fi and cellular networks. Cellular data charges may
apply. See Cellular data settings.
DRAFT
139
!
APPLE CONFIDENTIAL
Turn on iCloud Photo Sharing. Go to Settings > iCloud > Photos. Or go to Settings >
Photos & Camera.
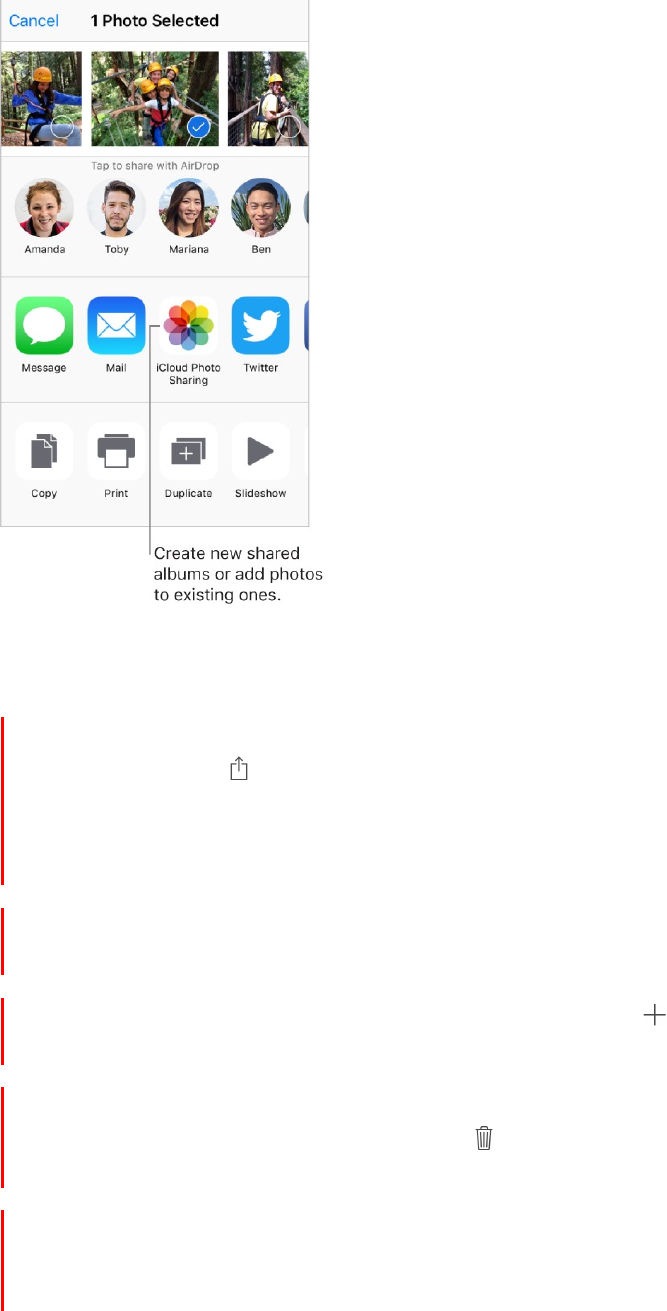
Share photos and videos. While viewing a photo or video, or after selecting multiple
photos or videos, tap , tap iCloud Photo Sharing, add comments, then share to an
existing shared album or create a new one. You can invite people to view your shared
album using the email address or the mobile phone number they use to receive text
messages.
Enable a public website. Tap Shared, tap an album, tap People, then turn on Public
Website. Tap Share Link if you want to announce the site.
Add items to a shared album. Tap Shared, tap an album, tap , select items, then tap
Done. You can add a comment, then tap Post.
Delete photos from a shared album. Tap Shared, tap an album, tap Select, select the
photos or videos you want to delete, then tap . You must be the owner of the shared
album or the photo.
Delete comments from a shared album. Select the photo or video that contains the
comment. Touch and hold the comment, then tap Delete. You must be the owner of the
shared album or the comment.
Rename a shared album. Tap Shared, tap Edit, then tap the name and enter a new one.
Add or remove subscribers, or turn Notifications on or off. Select the shared album,
then tap People.
DRAFT

140
!
APPLE CONFIDENTIAL
Subscribe to a shared album. When you receive an invitation, tap the Shared tab ,
then tap Accept. You can also accept an invitation in an email.
Add items to a shared album you subscribed to. Tap Shared, tap an album, then tap
. Select items, then tap Done. You can add a comment, then tap Post.
See your Family album. When Family Sharing is set up, a shared album called Family is
automatically created in Photos on all family members’ devices. Everyone in the family
can contribute photos, videos, and comments to the album, and be notified whenever
something new is added. For more information about setting up Family Sharing, see
Family Sharing.
Other ways to share photos and videos
You can share photos and videos in Mail or Messages, or using other apps you install.
Share or copy a photo or video. View a photo or video, then tap . If you don’t see ,
tap the screen to show the controls.
Tap More in Sharing to turn on the apps you want to use for sharing.
You can share a Live Photo using iMessage, iCloud Photo Sharing, AirDrop, and more. A
shared Live Photo plays in Photos on any iOS device with iOS 9 or later or Mac with
OS X v10.11 or later. For devices or services that don’t support Live Photos, a Live Photo
is shared as a still photo.
The size limit of attachments is determined by your service provider. iPhone may
compress photo and video attachments, if necessary.
You can also copy a photo or video, then paste it into an email or text message (MMS or
iMessage).
Share a memory movie. Tap a memory movie that’s playing, tap , then choose a
share option. See Memories.
Share or copy multiple photos and videos. While viewing by moment, tap Share.
Save or share a photo or video you receive.
Email: Tap to download the item if necessary, then touch and hold it to see sharing
and other options.
Text message: Tap the item in the conversation, then tap .
Photos and videos that you receive in messages or save from a webpage are saved to
your Photos tab. They can also be viewed in the Camera Roll or, if you’re using iCloud
Photo Library, the All Photos album.
DRAFT
141
!
APPLE CONFIDENTIAL
Edit photos and trim videos
You can edit still photos and Live Photos right on iPhone. If your photos are stored in
iCloud, your edits are updated across all your devices set up with iCloud, and both your
original and edited versions are saved. If you delete a photo, it’s deleted from all your
devices and iCloud. Photo app extensions can provide special editing options. See App
extensions.
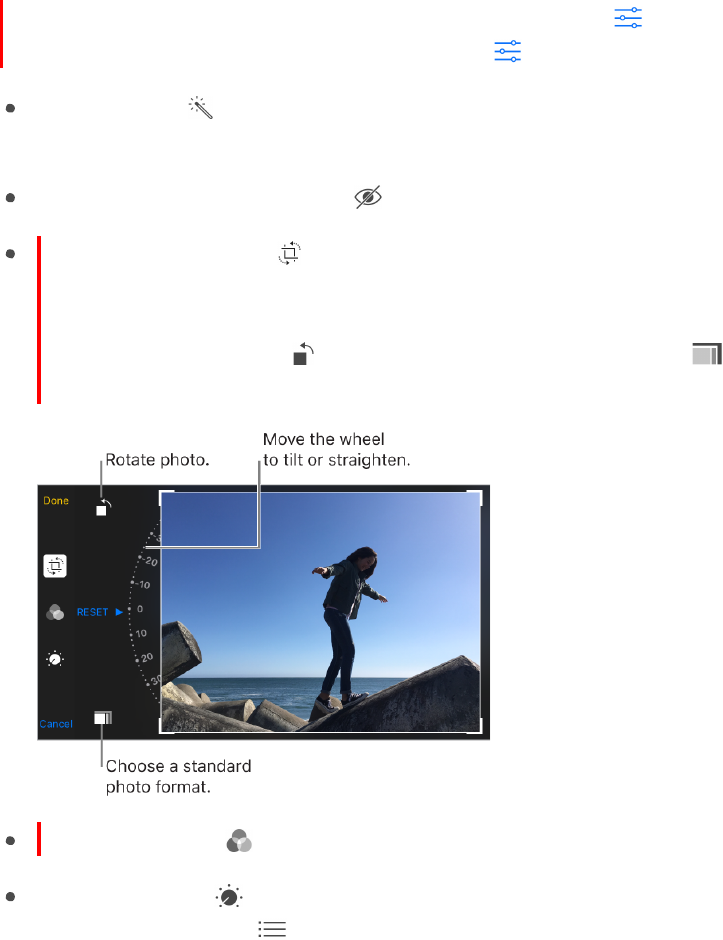
Edit a photo or Live Photo. View the photo full screen, tap , then tap a tool. To edit a
photo not taken with iPhone, tap the photo, tap , then tap Duplicate and Edit.
Auto-enhance
improves a photo’s exposure, contrast, saturation, and other
qualities.
With the Remove Red-eye tool , tap each eye that needs correcting.
To crop the photo, tap . Photos suggests an optimal crop, but you can drag the
corners of the grid tool to set your own crop. Move the wheel to tilt or straighten the
photo. Tap Auto to align the photo with the horizon, and tap Reset to undo
alignment changes. Tap
to rotate the photo 90 degrees. Tap
to choose a
standard crop ratio, such as 2:3 or Square.
With photo filters
you can apply different color effects, such as Mono or Chrome.
Tap Adjustments
to set Light, Color, and B&W (black & white) options. Tap the
down arrow, then tap
next to Light, Color, or B&W to choose the element you want
to adjust. Move the slider to the desired effect.
Compare the edited version to the original. Touch and hold the photo to view the
original. Release to see your edits.
Don’t like the results? Tap Cancel, then tap Discard Changes. Tap Done to save
changes.
DRAFT
142
!
APPLE CONFIDENTIAL
Revert to original. After you edit a photo and save your edits, you can revert to the
original image. Tap the image, tap , then tap Revert.
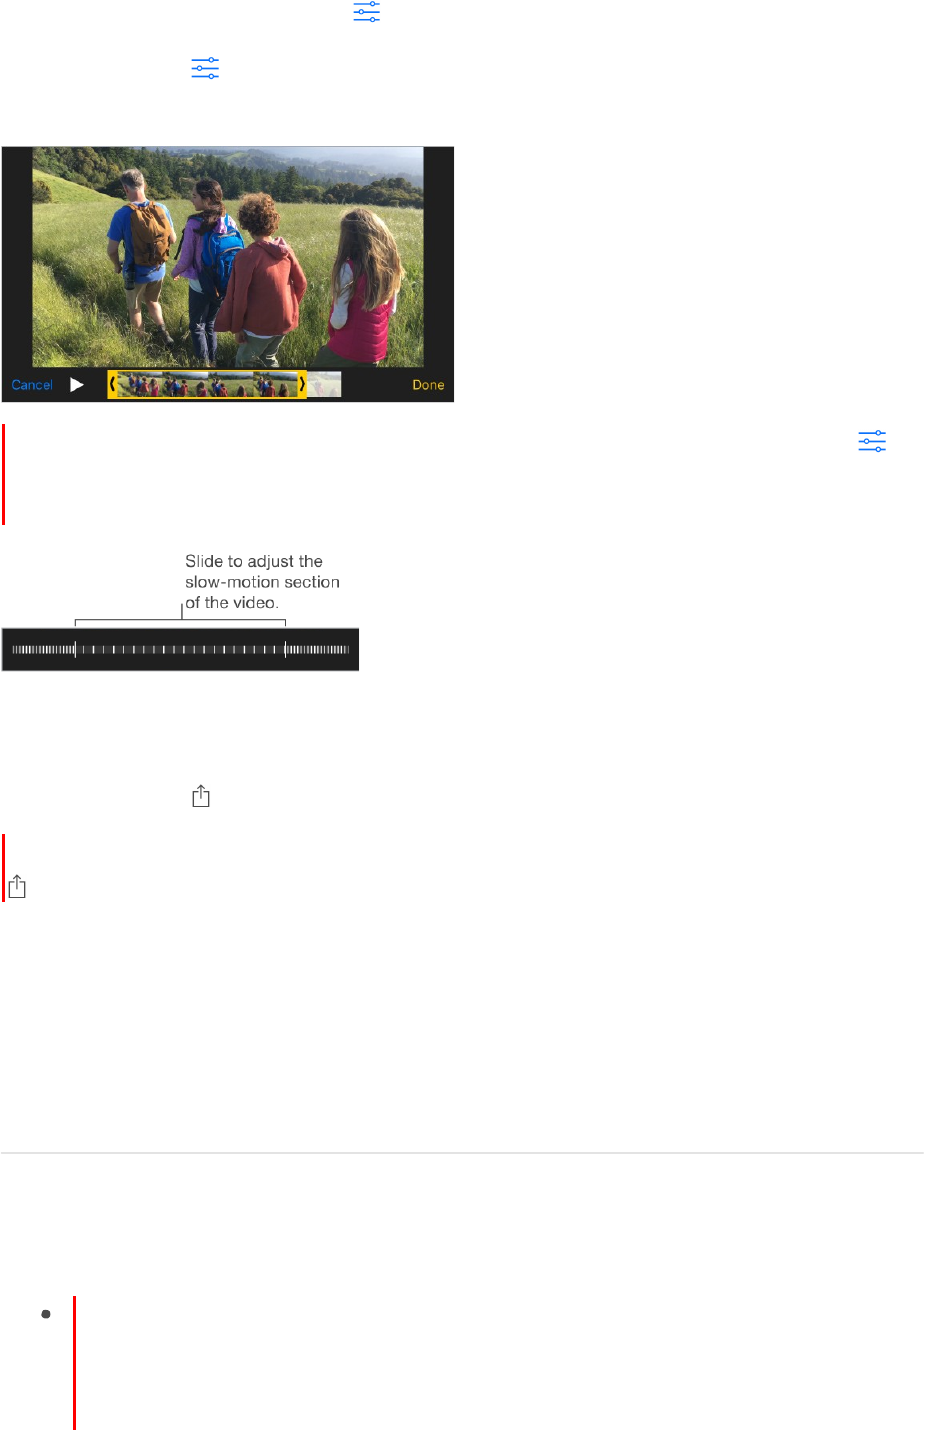
Trim a video. Tap
to display the controls, drag either end of the frame viewer, then
tap Done. Tap Save as New Clip to save the new video clip in your Videos album.
Set the slow motion section of a video shot in Slo-mo. (iPhone 5s and later) Tap ,
then use the vertical bars beneath the frame viewer. (See Shoot video for information
about Slo-mo.)
Print to an AirPrint-enable printer
Print photos: Tap , then tap Print.
To print multiple photos while viewing a photo album, tap Select, select the photos, tap
, then tap Print. See AirPrint.
Import photos and videos
You can import photos and videos directly from a digital camera, an SD memory card, or
another iOS device that has a camera. Use the Lightning to USB Camera Adapter or the
Lightning to SD Card Camera Reader (both sold separately).
1.
Insert the camera adapter or card reader into the Lightning connector on iPhone.
2.
Do one of the following:
Connect a camera: Use the USB cable that came with the camera to connect the
camera to the camera adapter. Turn on the camera, then make sure it’s in
transfer mode. For more information, see the documentation that came with the
DRAFT

143
!
camera.
APPLE CONFIDENTIAL
Insert an SD memory card into the card reader: Don’t force the card into the slot
on the reader; it fits only one way.
Connect an iOS device: Use the USB cable that came with the iOS device to
connect it to the camera adapter. Turn on and unlock the iOS device.
3.
Unlock iPhone.
4.
The Photos app opens and displays the photos and videos available for importing.
5.
Select the photos and videos to import.
Import all items: Tap Import All.
Import just some items: Tap the items you want to import (a checkmark appears
for each), tap Import, then tap Import Selected.
6.
After the photos and videos are imported, keep or delete them on the camera, card,
or iOS device.
7.
Disconnect the camera adapter or card reader.
A new event in the Last Import album contains all the photos you just imported.
To transfer the photos to your computer, connect iPhone to your computer and
import the images with a photo app such as Photos or Adobe Elements.
DRAFT
144
!
APPLE CONFIDENTIAL
Camera
Camera at a glance
You can take still photos and videos with the iSight camera on the back of iPhone and the
FaceTime camera on the front. With 2016 IPHONE, 2016 IPHONE PLUS, iPhone 6s,
iPhone 6s Plus, and iPhone SE, you can take Live Photos. Live Photos goes beyond
snapshots to capture life the way it
happens—in movement and sound.
2016 IPHONE and 2016 IPHONE PLUS capture photos in a wider color gamut so colors
look more true-to-life.
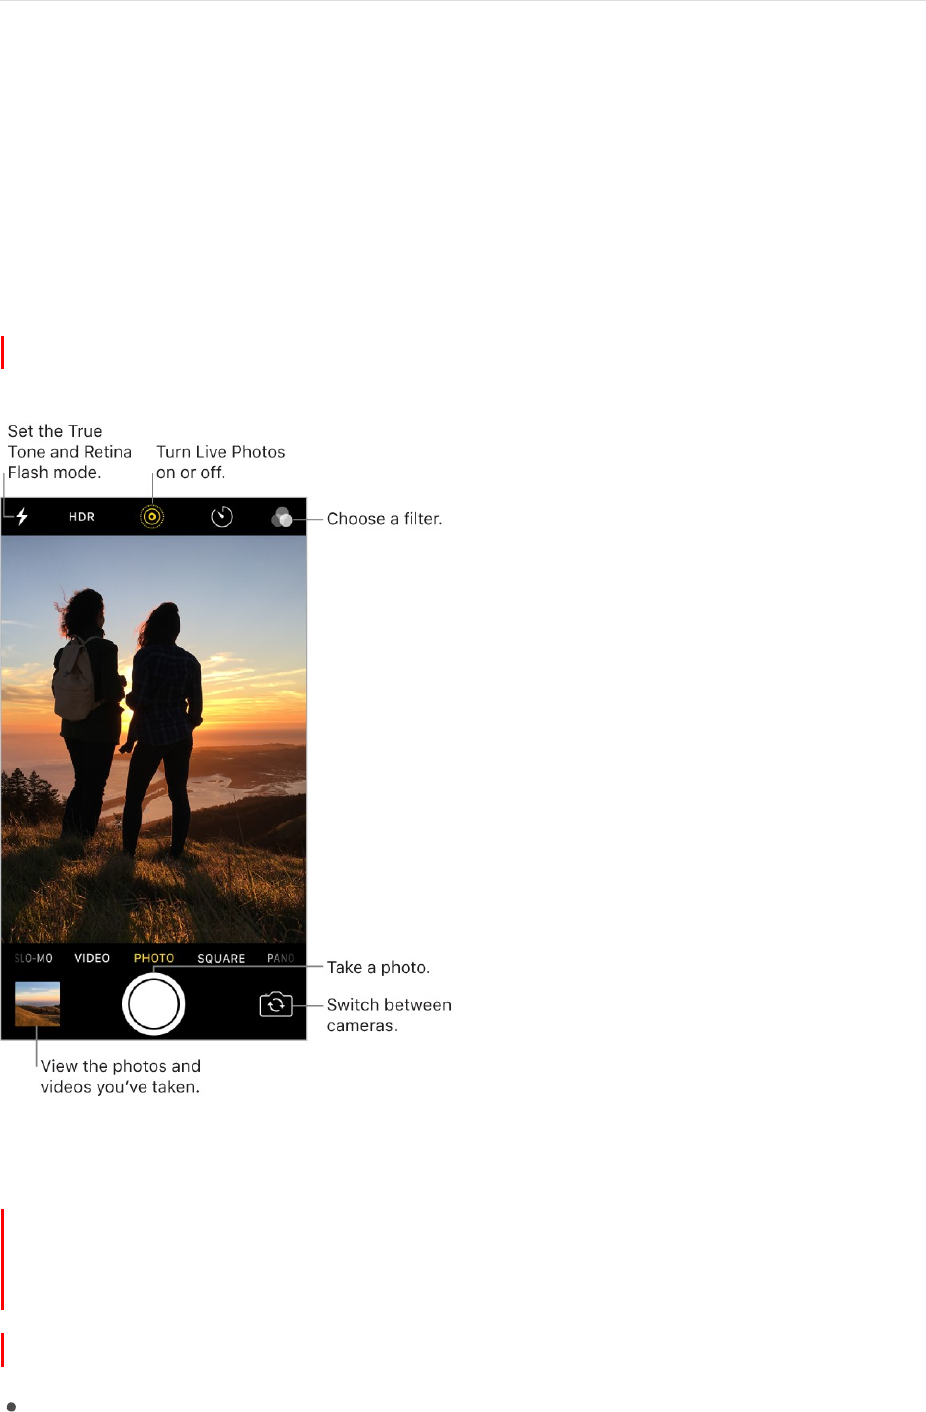
Take a photo
Choose a photo mode. Camera has several photo modes, so you can shoot stills,
square-format photos, and panoramas. To choose a mode, drag the screen left or right,
or tap the camera mode labels to choose Photo, Square, or Pano.
Take a photo. There’s more than one way to take a photo.
Open Camera, choose Photo or Square, then tap the Shutter button or press either
volume button.
DRAFT

145
!
APPLE CONFIDENTIAL
Swipe left on the Lock screen to make the camera screen appear, then take the
picture.
Press the Home button to return to the Lock screen.
3D Touch. In Control Center or on the Home screen, press the Camera icon,
then choose a quick action. See 3D Touch.
Note: Adjust the volume of the shutter sound with the Ringer and Alerts settings in
Settings > Sounds & Haptics (called Sounds on devices without 3D Touch. Or mute the
sound using the Ring/Silent switch. (In some countries, muting is disabled.)
Ask Siri. Say something like:
“Open Camera”
“Take a picture”
Keep it straight. To display a grid that can help you align shots, go to Settings >
Photos & Camera, then turn on Grid.
Zoom in or out. (iSight camera) Pinch the screen open to zoom in, and pinch closed to
zoom out.
On 2016 IPHONE PLUS, tap
to set the optical zoom to 2x. Or, pinch the image on
the screen to zoom
in and out. For finer zoom control on 2016 IPHONE PLUS, touch
the zoom control, then drag left or
right. On 2016 IPHONE PLUS you can zoom in up
to 6x for videos and up to 10x for photos.
Take a Live Photo. On devices that support Live Photo, make sure Live Photos is
turned on, then tap the Shutter button. The camera records what happens just before
and after you take your photo, along with the audio. The screen indicates the duration
of the Live Photo exposure.
Live Photos is on by default. To turn it on or off, tap . (Yellow is on.)
Take Burst shots. With the camera in Photo or Square mode, touch and hold the
Shutter button to take rapid-fire photos in bursts. The shutter sound is different, and
the counter shows how many shots you’ve taken. Lift your finger to stop. To see the
suggested shots and select the photos you want to keep, tap the thumbnail, then tap
Select. The gray dots below the thumbnails mark the suggested photos. To copy a
photo from the burst as a separate photo, tap the circle in the lower-right corner of the
photo. To delete the burst of photos, tap it, then tap .
Go to Settings > Photos & Camera to choose which burst photos to upload to your
Photo Stream.
DRAFT
146
!
APPLE CONFIDENTIAL
Take a selfie with Retina Flash. On devices that support Retina Flash, use the Retina
HD display as a flash with True Tone technology for your selfies. Turn the flash on,
switch to the FaceTime camera, then tap the Shutter button (the display flashes upon
exposure).
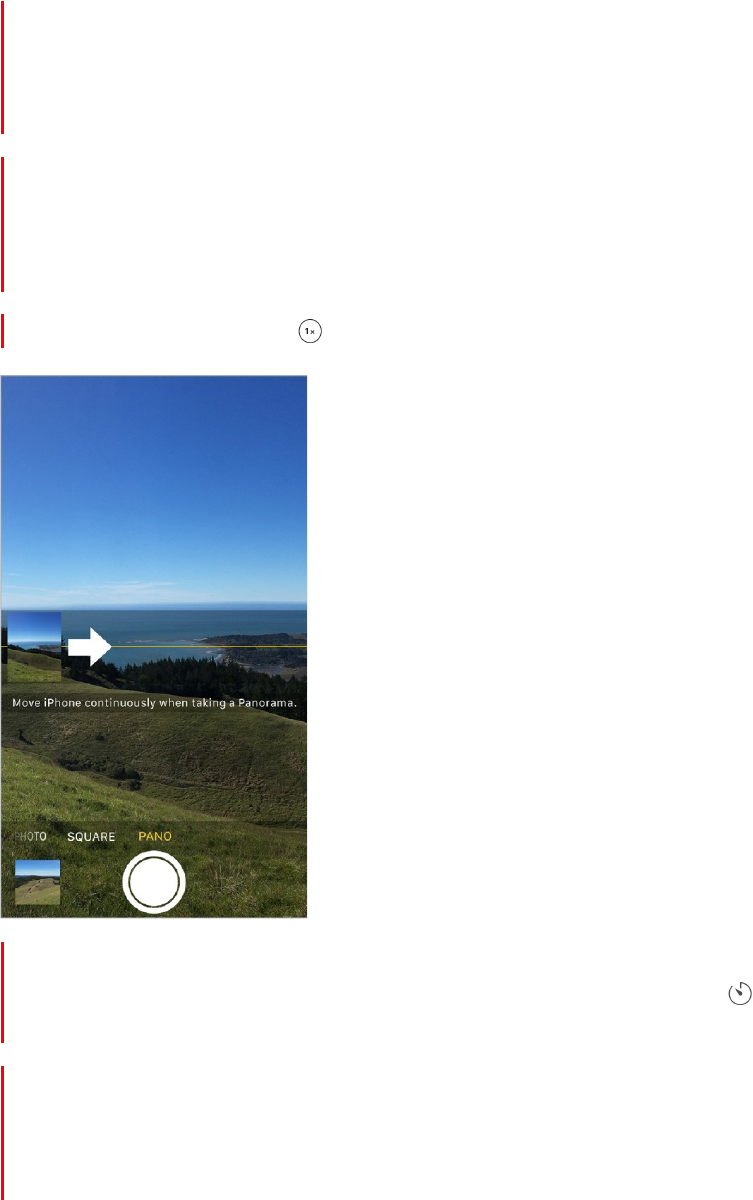
Take a panorama photo. (iSight camera) Choose Pano, tap the Shutter button, then
pan slowly in the direction of the arrow. To finish the pan, tap the button again. To pan
in the other direction, first tap the arrow. To pan vertically, rotate iPhone to landscape
orientation. You can reverse the direction of a vertical pan, too.
On 2016 IPHONE PLUS, tap
to shoot a Panorama at 2x.
Use the capture timer. Use the capture timer to avoid “camera shake” or give yourself
time to be in the shot. First stabilize iPhone, then frame your shot. Tap , tap 3s
(seconds) or 10s, then tap the Shutter button.
Capture what’s displayed on your screen. To take a screenshot, simultaneously press
and release the Sleep/Wake and Home buttons. The screenshot is added to the Photos
tab in Photos and can also be viewed in the Screenshots album or All Photos album (if
you’re using iCloud Photo Library).
DRAFT

147
!
APPLE CONFIDENTIAL
Adjust for the perfect shot
About auto exposure and face detection. When you’re taking a photo, a rectangle
may briefly appear to indicate where the automatic exposure is set. When you
photograph people, face detection balances the exposure across many faces. A
rectangle appears for each face detected.
With 2016 IPHONE and 2016 IPHONE PLUS, the camera also uses body detection for
auto exposure.
Lock the focus and exposure. Exposure is automatic, but you can set the exposure
manually for the next shot by tapping an object or area on the screen. To lock the
exposure and focus, touch and hold until the rectangle pulses. The screen indicates
when exposure and focus are locked. Take as many photos as you want. When you tap
the screen again, exposure and focus unlock, and the automatic settings and face
detection turn back on.
Note: Tapping the screen sets the focus and the exposure, and face detection is
temporarily turned off.
Adjust the exposure. Tap to see
next to the exposure rectangle, then slide up or
down to adjust the exposure.
Turn the flash on or off. Tap . The True Tone flash on the back of iPhone also
provides extra light when you need it. To use it as a flashlight, swipe up from the bottom
of iPhone and turn it on in Control Center. See Control Center.
Make it better. You can edit photos and trim videos, right on iPhone. See Edit photos
and trim videos.
Shoot video
With Camera you can shoot video, including slow-motion and time-lapse videos.
Record a video. Choose Video, then tap the Record button or press either volume
button, to start and stop recording. Video records at 30 fps (frames per second). On
iPhone SE, iPhone 6, iPhone 6 Plus, and later, you can switch it to 60 fps in Settings >
Photos & Camera > Record video. On iPhone 6s, iPhone 6s Plus, and iPhone SE, you
can also switch to 4K video at 30 fps. On 2016 IPHONE and 2016 IPHONE PLUS, you
can shoot 4K video at 60
fps. Go to Settings > Photos & Camera > Record Video.
Snap a still while recording: Tap the white Shutter button.
Take it slow: (iPhone 5s and later) Choose Slo-mo to shoot slow motion video. Later,
when you edit the video, you can set just a portion of it to play back in slow-motion,
and the rest plays back regular speed. On iPhone SE, iPhone 6, iPhone 6 Plus, and
DRAFT

148
!
APPLE CONFIDENTIAL
later, you can choose between 1080p video at 120 fps and 720p at 240 fps. On
2016 IPHONE
and 2016 IPHONE PLUS you can shoot 1080p Slo-mo at 240 fps.
Go to Settings > Photos &
Camera > Record Slo-mo.
Set the slow-motion section of a video. Tap the thumbnail, then tap Edit. Use the
vertical bars beneath the frame viewer to set the section you want to play back in slow
motion.
Zoom in or out when shooting video. (iSight camera) Pinch the image on the screen
open to zoom in, and pinch closed to zoom out.
Capture an experience with time-lapse. (iSight camera) Choose Time-Lapse, set up
iPhone where you want, then tap the Record button to start capturing a sunset, a flower
opening, or other experiences over a period of time. Tap the Record button again to
stop recording. The time-lapse photos are compiled into a short video.
With iOS 9 and later, time-lapse videos have video stabilization, which minimizes the
effect of camera movement during capture.
HDR
HDR (High Dynamic Range) helps you get great shots in high-contrast situations. When
shooting with the iSight camera, iPhone takes multiple photos in rapid succession, at
different exposure settings—and blends them together. The resulting photo has better
detail in the bright and midtone areas.
Use HDR. (iSight camera and the FaceTime camera on iPhone 5s and later) Tap the HDR
button. For best results, keep iPhone steady and avoid subject motion.
On iPhone 5s and later, you can choose HDR Auto so iPhone uses HDR when it’s most
effective.
Keep the normal photo and the HDR version. Go to Settings > Photos & Camera >
Keep Normal Photo. Both the normal and HDR versions of the photo appear in Photos.
In your albums, HDR versions of photos are marked with “HDR” in the corner.
DRAFT

149
!
APPLE CONFIDENTIAL
View, share, and print
Photos and videos you take are saved in Photos. With iCloud Photo Library turned on,
all new photos and videos are automatically uploaded and available in Photos on all your
iOS 8.1 or later devices set up with iCloud Photo Library. When iCloud Photo Library is
turned off, you can still collect up to 1,000 of your most recent photos in the My Photo
Stream album from your devices set up with iCloud.
Note: If Location Services is turned on, photos and videos are tagged with location data
that can be used by apps and photo-sharing websites. See Privacy.
View your photos. In Camera, tap the thumbnail image in the lower-left corner, then
swipe left or right to see the photos you’ve taken recently. Tap All Photos to see
everything in the Photos app.
Tap the screen to show or hide the controls.
Get sharing and printing options. While viewing an image, tap . See Share from
apps.
Upload photos and videos. Use iCloud Photo Library to upload photos and videos from
your iPhone to iCloud and access them on your iOS 8.1 or later devices where you’re
signed in to iCloud using the same Apple ID. You can also upload and download your
photos and videos from the Photos app on iCloud.com.
Sync photos and videos to iPhone from your Mac. Use the Photos settings pane in
iTunes. See Sync with iTunes.
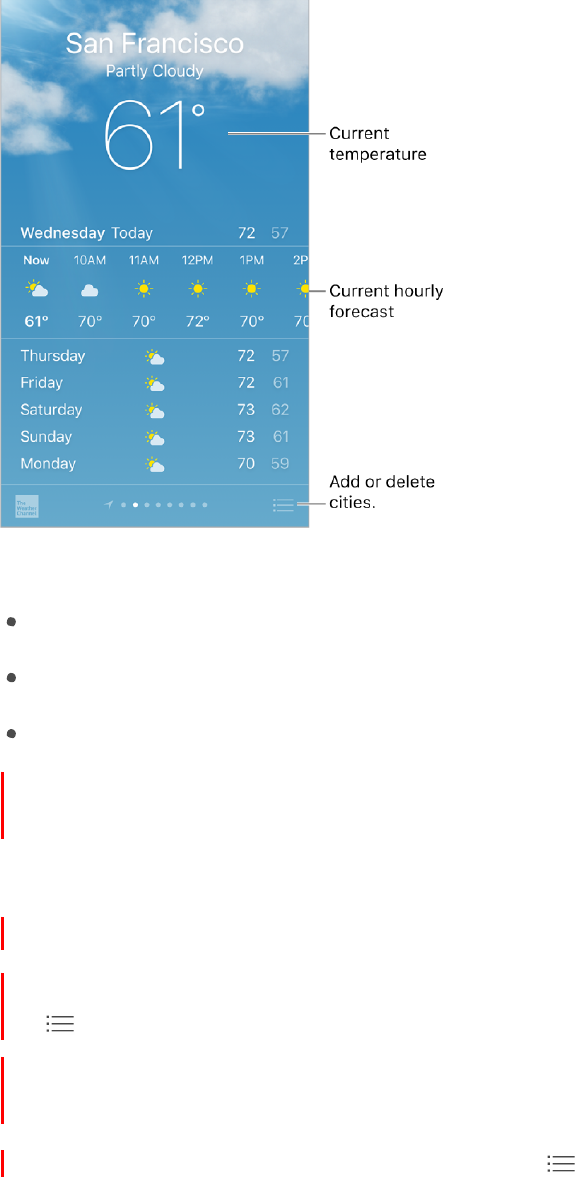
Weather
Get the current temperature and ten-day forecast for one or more cities around the
world, with hourly forecasts for the next 12 hours. Weather uses Location Services to get
the forecast for your current location.
DRAFT
150
!
APPLE CONFIDENTIAL
Ask Siri. Say something like:
“What’s the weather for today?”
“How windy is it out there?”
“When is sunrise in Paris?”
See the local weather. Swipe to the leftmost screen (available only when Location
Services is turned on in Settings > Privacy > Location Services).
View the current hourly forecast. Swipe the hourly display left or right.
See a detailed forecast. Swipe up.
See the weather in another city. Swipe left or right to see weather for another city, or
tap , then choose a city from the list.
3D Touch. To choose a forecast from the Home screen, press Weather, then choose
a location. Tap Add to add another location. See 3D Touch.
See all your cities at once. Pinch the screen or tap .
DRAFT

151
!
APPLE CONFIDENTIAL
3D Touch. To preview a city’s weather, press a city in your list of locations to peek
at the weather forecast, then press a little deeper to open it. See 3D Touch.
Add a city. Tap , then tap . Enter a city or zip code, then tap Search.
Delete a city. Tap , slide the city to the left, then tap Delete.
Rearrange the order of cities. Tap , touch and hold a city, then drag it up or down.
Choose Fahrenheit or Celsius. Tap , then tap °F or °C.
Turn local weather on or off. Go to Settings > Privacy > Location Services. See Privacy.
Use iCloud to push your list of cities to your other iOS devices. Go to Settings >
iCloud, then turn on iCloud Drive. See iCloud.
DRAFT
152
!
APPLE CONFIDENTIAL
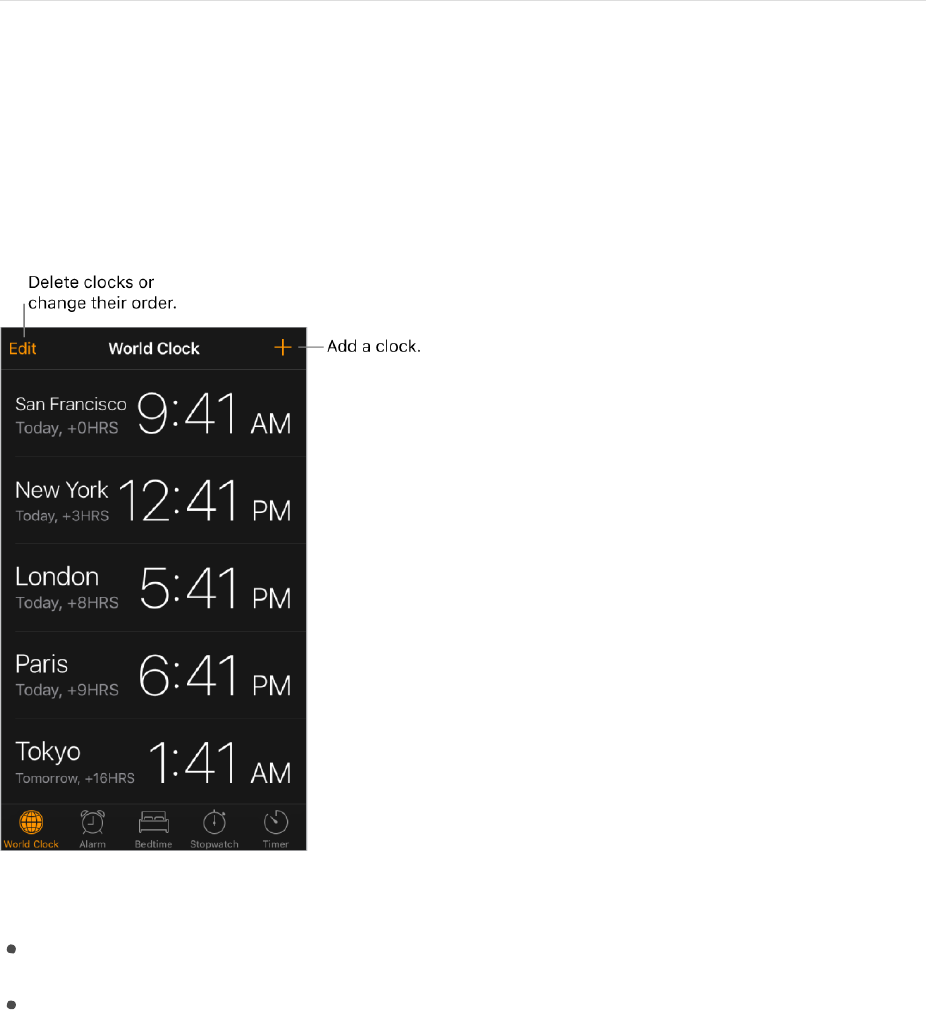
Clock
Clock at a glance
Use Clock to view times around the world, set a timer or alarm, use a stopwatch, or set
sleep reminders and wake alarms on a daily basis.
Ask Siri. Say something like:
“What time is it?”
“What time is it in London?”
Bedtime
Set the number of hours you want to sleep each night and Clock can remind you to go to
sleep, and sound an alarm to wake you up.
DRAFT
153
!
APPLE CONFIDENTIAL
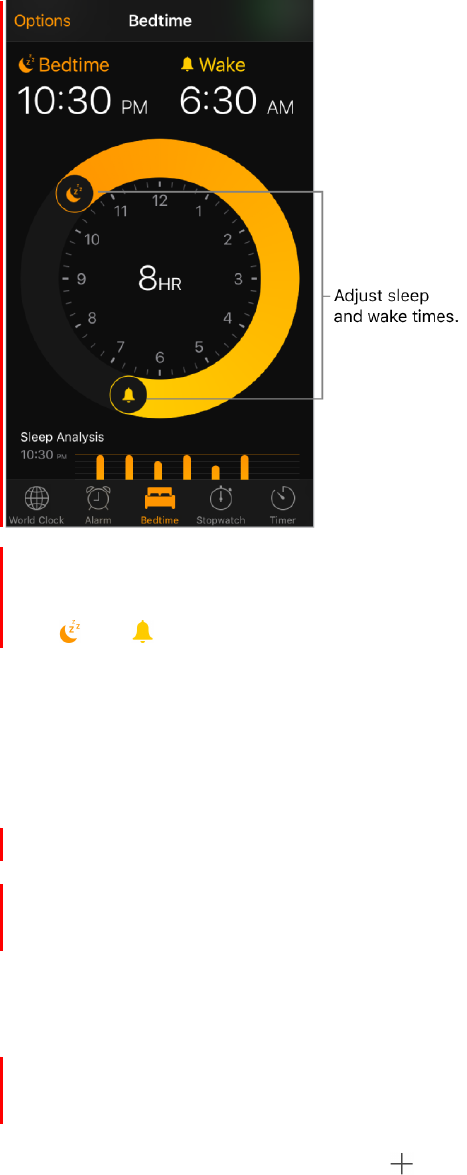
Set a bedtime reminder and alarm. Tap Bedtime, then follow the onscreen
instructions to set your reminder and alarm. After you’ve done the initial setup, you can
drag
and
to adjust your reminder and alarm times.
See your sleep history. The Sleep Analysis portion of the Bedtime tab shows your
sleeping period for the past several days, based on your use of iPhone during those
hours. Your sleep history is automatically provided to Health, too, where you can view
more data.
Set alarm days, tone, and loudness. Tap Options.
Suspend the alarm. Tap Bedtime, then drag the screen down to reveal the Bedtime
switch.
Alarms and timers
3D Touch. To set an alarm from the Home screen, press Clock, then choose a quick
action. See 3D Touch.
Create an alarm. Tap Alarm, then tap . Set the time and other options, then give the
alarm a name (like “Water the plants”).
Use the stopwatch or timer. You can use the stopwatch to keep time, record lap times,
or set a timer to alert you when time’s up.
Fall asleep to music or a podcast. Tap Timer, tap When Timer Ends, then choose Stop
Playing at the bottom.
DRAFT

154
!
APPLE CONFIDENTIAL
Get quick access to clock features. Swipe up from the bottom edge of the screen to
open Control Center, then tap . You can access Timer from Control Center even when
iPhone is locked.
Ask Siri. Say something like:
“Set the timer for 3 minutes”
“Wake me up tomorrow at 7 a.m.”
“What alarms do
I
have set?”
DRAFT
155
!
APPLE CONFIDENTIAL
Maps
Find places
WARNING: For important information about navigation and avoiding distractions that
could lead to dangerous situations, see Important safety information.
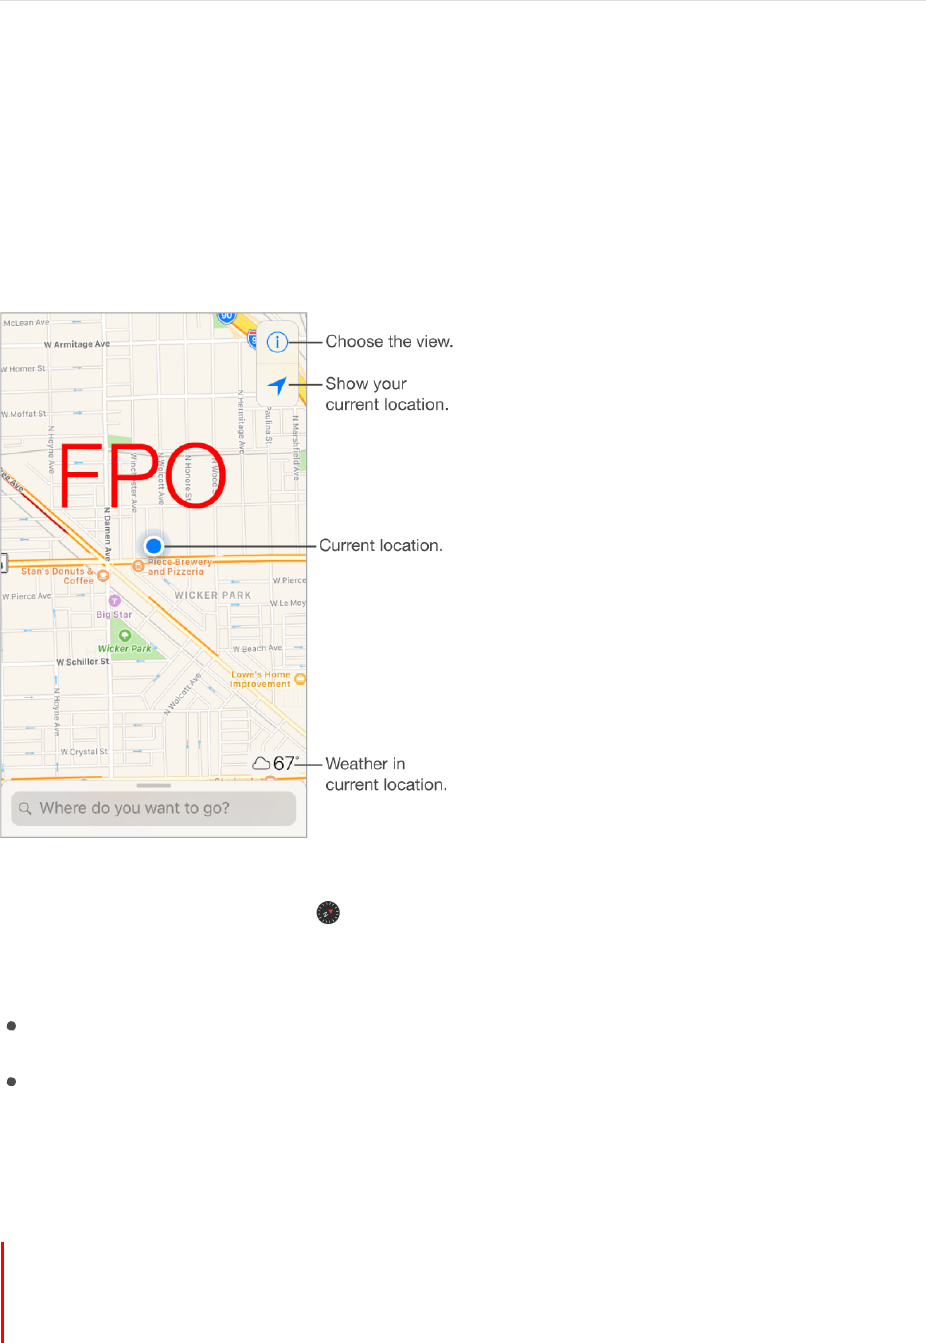
Move around Maps by dragging the screen. To face a different direction, rotate with two
fingers. To return to north, tap .
Ask Siri. Say something like:
“Find coffee near me”
“Show me the Golden Gate Bridge”
Zoom in or out. Double-tap with one finger to zoom in; tap with two fingers to zoom out
—or pinch open or closed. The scale appears in the upper left while zooming. To change
how distance is shown (in miles or kilometers), go to Settings > Maps.
Find nearby attractions, services, and more. Tap the search field, then tap a
category such as Food or Shopping. (For feature availability, see the iOS Feature
Availability webpage.)
3D Touch. To find nearby places from the Home screen, press Maps, then choose
the Search Nearby quick action. See 3D Touch.
DRAFT

156
!
APPLE CONFIDENTIAL
Search for a location. Tap the search field. You can search for a location in different
ways. For example:
Intersection (“8th and Market”)
Area (“Greenwich Village”)
Landmark (“Guggenheim”)
Zip code (“60622”)
Business (“movies,” “restaurants San Francisco CA,” “Apple Inc New York”)
Maps may also list recent locations, searches, or directions that you can choose from.
Expand or change the search area. To expand the area, tap with two fingers or pinch
closed, or drag the screen to another area. Then tap Search This Area.
Get info about a location. Tap a location, then swipe up to view all of the information
about it. Swipe to peek at the map, or tap
to close the info display.
Add a favorite location. While viewing info about a location, scroll to the bottom of the
information then tap Add to Favorites.
Book a table and other actions. If you’ve installed apps that have Map extensions, you
may be able to do things like make a reservation at a restaurant or order a ridesharing
vehicle to take you to the location. Visit the App Store to find apps that work with Maps.
Choose your view. Tap , then choose Map, Transit, or Satellite.
If transit information is unavailable, tap View Routing Apps to use an app for public or
other modes of transportation.
3D Touch. To mark your location from the Home screen, press Maps, then choose
the Mark My Location quick action. See 3D Touch.
Mark a location. Touch and hold the map until a dropped pin appears.
Share a location
Tap a pin or other location (such as a restaurant or museum) to display its info, then tap
and choose an option such as Mail or AirDrop. See Share from apps.
3D Touch. Press a location, then choose the Share Location or Send My Location
quick action. You can also press Maps on the Home screen, then choose a quick action.
See 3D Touch.
DRAFT

157
!
APPLE CONFIDENTIAL
Get more info
3D Touch. Press a location, then choose the Open Homepage or Call quick action.
See 3D Touch
Find out about traffic conditions. From the map or satellite view, tap , then turn on
Show Traffic. Orange dots show slowdowns, and red dots show stop-and-go traffic. To
see an incident report, tap a marker.
Help improve Maps. To report an incorrect label, a missing location, or other issue, tap
, then tap Report an Issue.
Get directions
Note: To get directions, iPhone must be connected to the Internet. To get directions
involving your current location, Location Services must also be on. (See also Privacy.)
Ask Siri. Say something like:
“Give me directions home”
“Transit directions to my dad’s work”
“What’s my ETA?”
“Find a gas station”
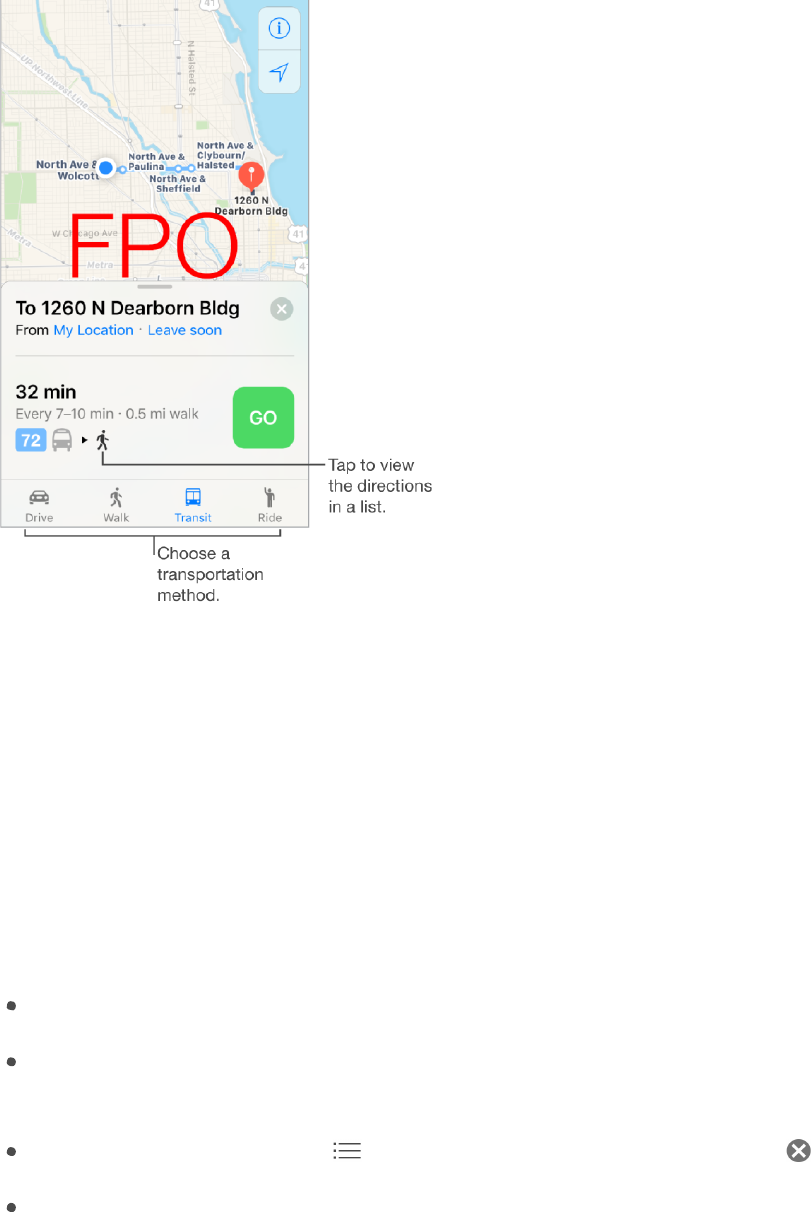
Find a route to a location. Tap the location to display its info, then tap Directions.
Directions are from your current location. To get other directions, tap Current Location,
then enter a different location.
Find a route between any two locations. Tap , enter the starting and ending
locations, then tap Route.
Choose an alternative route. If multiple routes appear, tap the one you want to take.
Show a driving, walking, or transit route. Tap Drive, Walk, or Transit.
In select cities, Maps provides public transportation information and multimodal routing,
from walking to a bus stop or train station to hopping off at your destination.
DRAFT
158
!
APPLE CONFIDENTIAL
If transit routes are unavailable in your area, tap View Routing Apps to use an app for
other modes of transportation.
Choose a transit time or date. Find a transit route, then tap Leave Soon to select a time
or date for departure or arrival. Tap Transit Options to choose which transit vehicles to
consider.
Hear turn-by-turn directions for a route. Find a route, then tap Start.
Maps follows your progress and speaks turn-by-turn directions to your destination. If
iPhone auto-locks, Maps stays onscreen and continues to announce directions.
Show or hide the controls: Tap the screen.
See the route overview: Tap Overview. To return to turn-by-turn directions, tap
Resume.
View directions as a list: Tap . To return to turn-by-turn directions, tap .
Choose a faster route: If you get an alert that suggests a faster route, tap Go to use
that route. Or, ask Siri something like “Take the faster route” or “Don’t change my
route.”
Maps may reroute you automatically in case of road closure. Maps may also alert you
to heavy traffic, construction, an accident, or other incidents ahead.
DRAFT

159
!
APPLE CONFIDENTIAL
Even if you open another app, Maps continues to give you turn-by-turn directions. To
return to Maps, tap the banner across the top of the screen. To automatically pause
spoken audio (such as a podcast or an audio book) when Maps speaks a turn-by-turn
instruction, go to Settings > Maps > Driving and Navigation, then turn on Pause Spoken
Audio.
Make a quick detour. To make a stop along your route, swipe up on the route card then
tap one of the suggested services, such as Gas Stations. Tap Go to add one to your
route.
Stop turn-by-turn directions. Tap End.
Ask Siri. Say something like: “Stop navigating.”
Use Maps on your Mac to get directions. Open Maps on your Mac (OS X v10.9 or
later), get directions for your trip, then choose File > Share > Send to [your device].
Your Mac and iPhone must both be set up with iCloud using the same Apple ID.
You can also use Handoff to pick up directions on another device. See Handoff.
Find your car
When you disconnect iPhone from your car’s Bluetooth or CarPlay system, and exit your
parked vehicle, Maps drops a “Parked Car” pin so you can easily navigate back to where
you left it.
Find where you left your car. Tap the Search field, then choose Parked Car from the
suggestions list.
Turn Parking Location on or off. Go to Maps > Settings > Show Parked Location.
Get a ride
After you find a destination, you can request a ride from a ride sharing company, if you
have a ridesharing app installed. (Not available in all areas.)
Request a ride. Search for your destination, tap Get Directions, then tap Get a Ride. If
you don’t have a ridesharing app installed, tap Find Ride Hailing Apps to download one
from the App Store.
Get a ridesharing app for Maps. Visit the App Store to find ridesharing apps that work
with Maps.
Remove pins and routes
Delete a dropped pin. Tap the location to display its info, then tap Remove Pin.
DRAFT

160
!
APPLE CONFIDENTIAL
Delete a past route. Past routes are listed below the Search field. To remove one,
swipe it to the left, then tap Remove.
Delete a favorite route. Swipe to the left on the route then tap Remove.
3D and Flyover
With 3D and Flyover, you can see three-dimensional views of, and even fly over, many of
the world’s major cities.
DRAFT

161
!
APPLE CONFIDENTIAL
View a 3D map. Tap , then tap 3D Map, or drag two fingers up. (Zoom in for a closer
look if the 3D map doesn’t appear.) For best effect, use the satellite view. Tap , then
tap Satellite.
Adjust the angle. Drag two fingers up or down.
Take a 3D tour with Flyover. An aerial tour is available for select cities and locations,
indicated by
next to the city name. (Zoom out if you don’t see any
markers.)
Search for a city, then tap its name, then tap Tour to begin.
To stop the tour, tap the screen to display the controls, then tap End Flyover Tour. To
return to standard view, tap , then tap Map.
DRAFT
162
!
APPLE CONFIDENTIAL
Videos
Videos at a glance
Open the Videos app to watch movies and TV shows. To watch music videos, open the
Music app. To view video podcasts, open the Podcasts app—see Podcasts at a glance.
To watch videos you record using Camera on iPhone, open the Photos app.
WARNING: For important information about avoiding hearing loss, see Important safety
information.
Watch a video. Tap the video in the list of videos.
Choose where to resume playback. Go to Settings > Videos, tap Start Playing, then
choose From Beginning or Where Left Off.
Choose playback quality. Go to Settings > Video, tap Playback Quality for Wi-Fi (and for
cellular, if you’ve turned on Use Cellular Data), then choose Best Available or Good.
Note: High-quality playback requires a faster Internet connection and uses more data.
Stream or download? If
appears on a video thumbnail, you can watch it without
downloading it to iPhone, if you have an Internet connection. To download the video to
iPhone so you can watch without using a Wi-Fi or cellular connection, tap
in the video
details.
DRAFT

163
!
APPLE CONFIDENTIAL
To show only the videos that are downloaded to iPhone, go to Settings > Videos, then
turn off Show iTunes Purchases.
Looking for podcasts or iTunes U videos? Open the Podcasts app or download the free
iTunes U app from the App Store.
Stop playing video automatically. If you often fall asleep while a video plays, open the
Clock app and tap Timer, then swipe to set the number of hours and minutes. Tap When
Timer Ends and choose Stop Playing, tap Set, then tap Start.
Add videos to your library
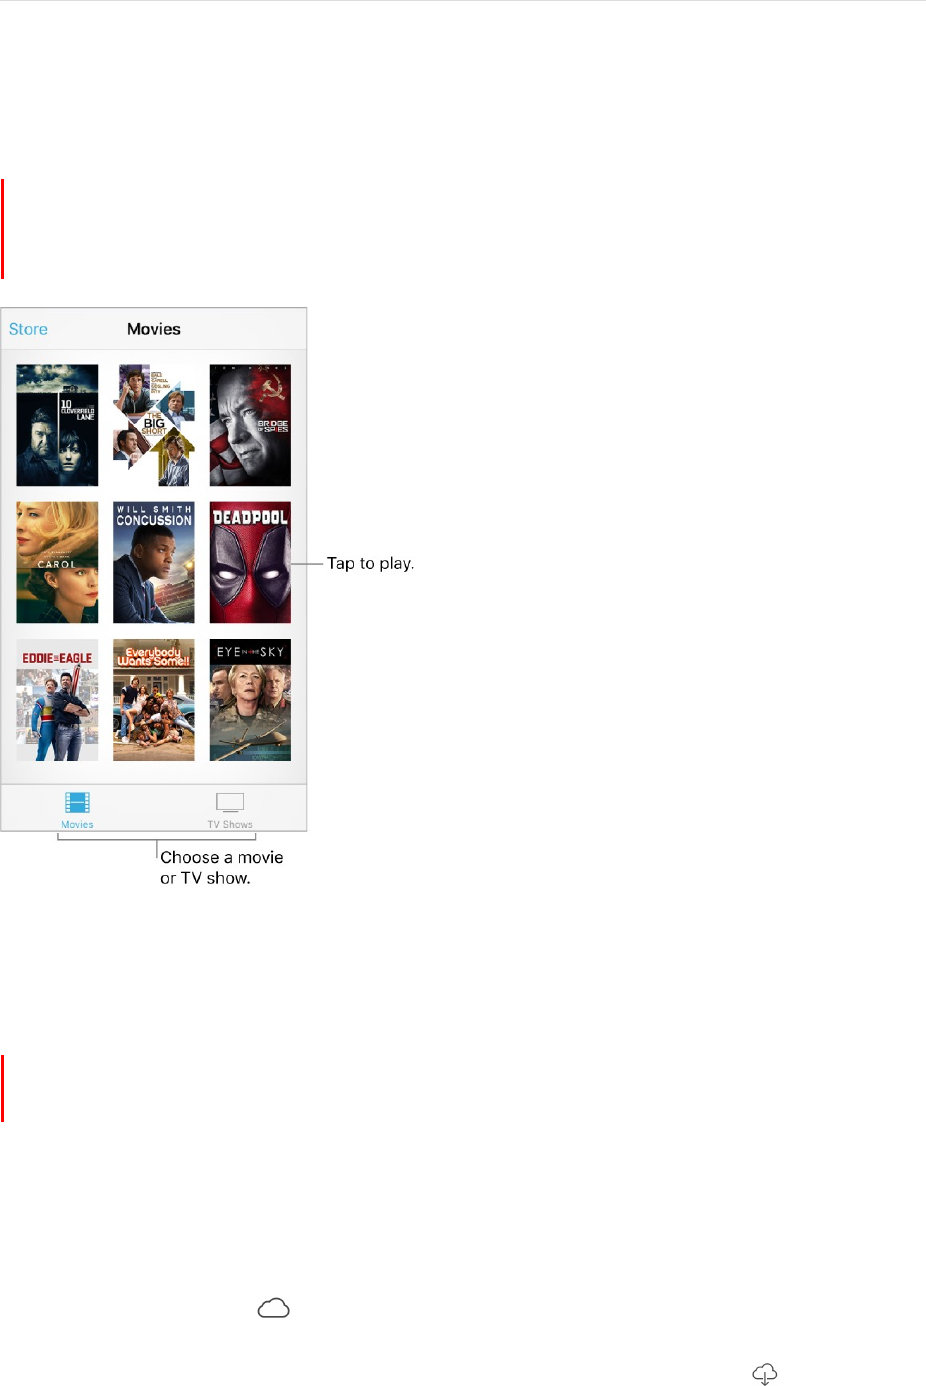
Buy or rent videos from the iTunes Store. Tap Store in the Videos app, or open the
iTunes Store app on iPhone, then tap Movies or TV Shows. The iTunes Store isn’t
available in all areas. See iTunes Store at a glance.
Transfer videos from your computer. Connect iPhone, then sync videos from iTunes on
your computer. See Sync with iTunes.
Stream videos from your computer. Turn on Home Sharing in iTunes on your
computer. On iPhone, go to Settings > Videos and enter the Apple ID and password you
used for Home Sharing on your computer. Open Videos on iPhone, then tap Shared.
Convert a video for iPhone. If you try to sync a video from iTunes to iPhone and a
message says the video can’t play on iPhone, you can convert the video. Select the video
in your iTunes library, then choose File > Create New Version > Create iPod or iPhone
Version. Then sync the converted video to iPhone.
Delete a video. Tap Edit in the upper right of your collection, then tap
on the video
thumbnail. If you don’t see the Edit button, look for
on your video thumbnails—those
videos haven’t been downloaded to iPhone, so you can’t delete them. To delete an
individual episode of a series, swipe left on the episode in the Episodes list.
Deleting a video (other than a rented movie) from iPhone doesn’t delete it from the
iTunes library on your computer, and you can sync the video back to iPhone later. If you
don’t want to sync the video back to iPhone, set iTunes to not sync the video. See Sync
with iTunes.
Important: If you delete a rented movie from iPhone, it’s deleted permanently and can't
be transferred back to your computer.
DRAFT
164
!
APPLE CONFIDENTIAL
Control playback
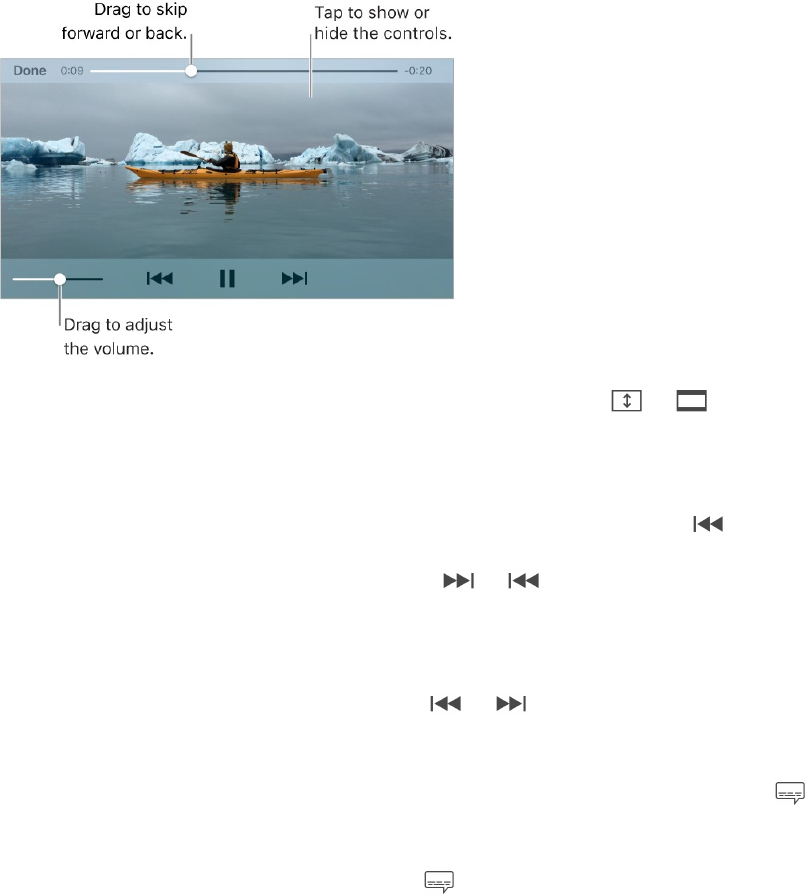
Scale the video to fill the screen or fit to the screen. Tap
or
. Or double-tap the
video. If you don’t see the scaling controls, your video already fits the screen perfectly.
Start over from the beginning. If the video contains chapters, drag the playhead along
the scrubber bar all the way to the left. If there are no chapters, tap .
Skip to the next or previous chapter. Tap
or
. You can also press the center
button or equivalent on a compatible headset two times (skip to next) or three times (skip
to previous).
Rewind or fast-forward. Touch and hold
or
. Or drag the playhead left or right.
Move your finger toward the bottom of the screen as you drag for finer control.
Select a different audio language. If the video offers other languages, tap , then
choose a language from the Audio list.
Show subtitles or closed captions. Tap . Not all videos offer subtitles or closed
captions.
Customize the appearance of closed captions. Go to Settings > General >
Accessibility > Subtitles & Captioning.
See closed captions and subtitles for the deaf and hard of hearing. Go to Settings >
General > Accessibility > Subtitles & Captioning, then turn on Closed Captions + SDH.
Watch the video on a TV. Swipe up from the bottom of the screen to show Control
Center, then tap AirPlay. For more about AirPlay and other ways to connect, see AirPlay.
DRAFT
165
!
APPLE CONFIDENTIAL
Wallet
Wallet at a glance
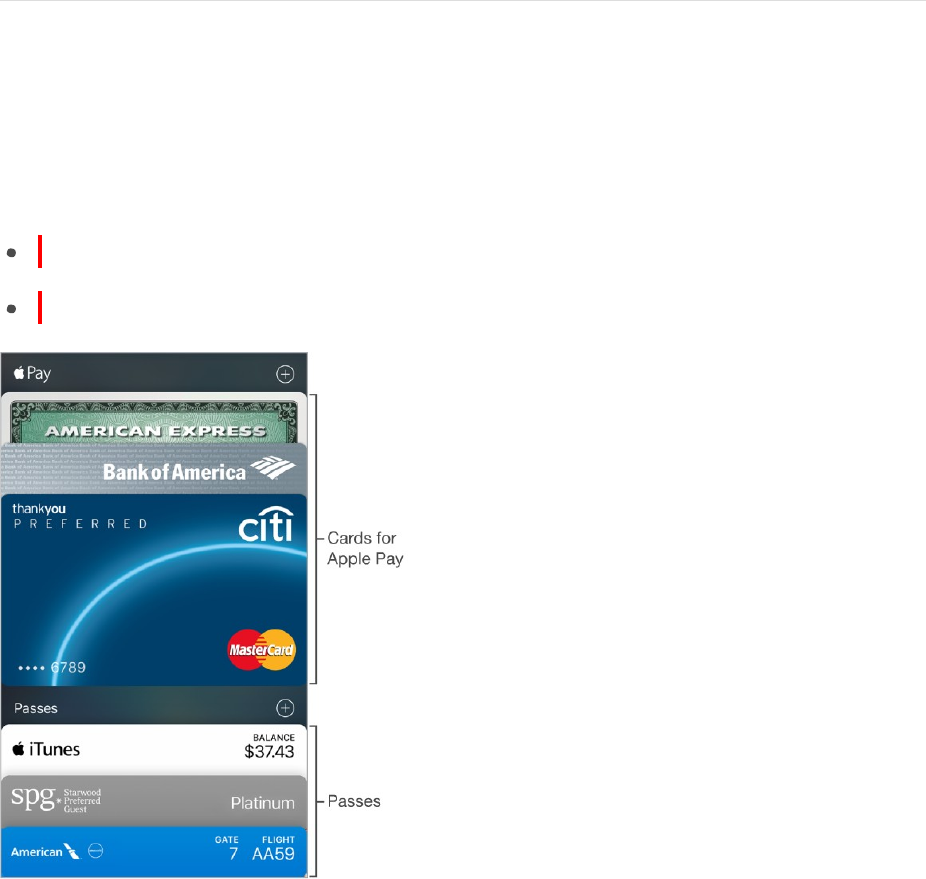
Use Wallet to keep cards and passes in one place for easy access:
Cards for Apple Pay: Credit, debit, and store cards
Passes: Boarding passes, movie tickets, coupons, reward cards, and more
DRAFT
166
!
APPLE CONFIDENTIAL
Apple Pay
About Apple Pay
On supported devices, you can use Apple Pay (not available in all areas) to make
purchases in stores that accept contactless payments, as well as within apps and
websites that support Apple Pay. The Wallet app holds credit and debit cards, which
appear at the top of your Wallet stack, for Apple Pay transactions.
For more information about how Apple Pay works, go to the Apple Pay website.
Set up Apple Pay
Sign in to iCloud. To use Apple Pay, sign in with your Apple ID at Settings > iCloud.
Then scroll down and turn on Wallet. See iCloud.
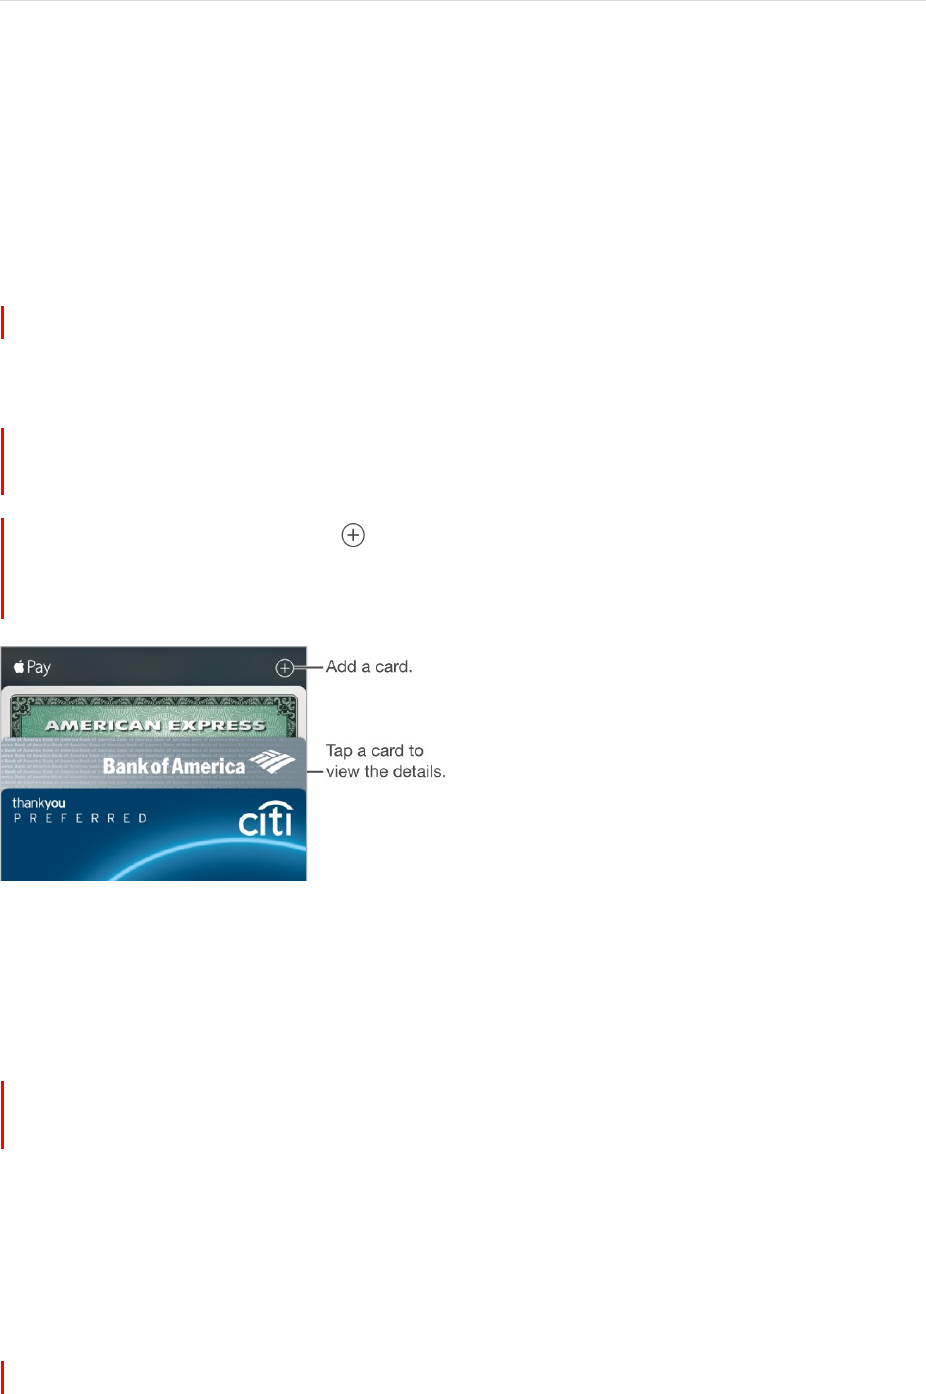
Add a credit or debit card. Tap
next to Apple Pay. The first time you add a credit or
debit card to Wallet, you may be asked to use the card you use with iTunes. Tap Next,
then position iPhone so that your card appears in the frame.
The card issuer determines if your card is eligible for Apple Pay, and may ask you for
additional information to complete the verification process. See the Apple Support article
Apple Pay participating banks.
You can add up to eight credit and debit cards, including store cards.
Note: If you sign out of iCloud, all the credit and debit cards you added to Apple Pay are
removed and will need to be re-added.
Set your default card. The first card you add to Wallet becomes your default card for
payments. To set a different card as the default, touch and hold the card in Wallet, then
drag it to the front of the stack.
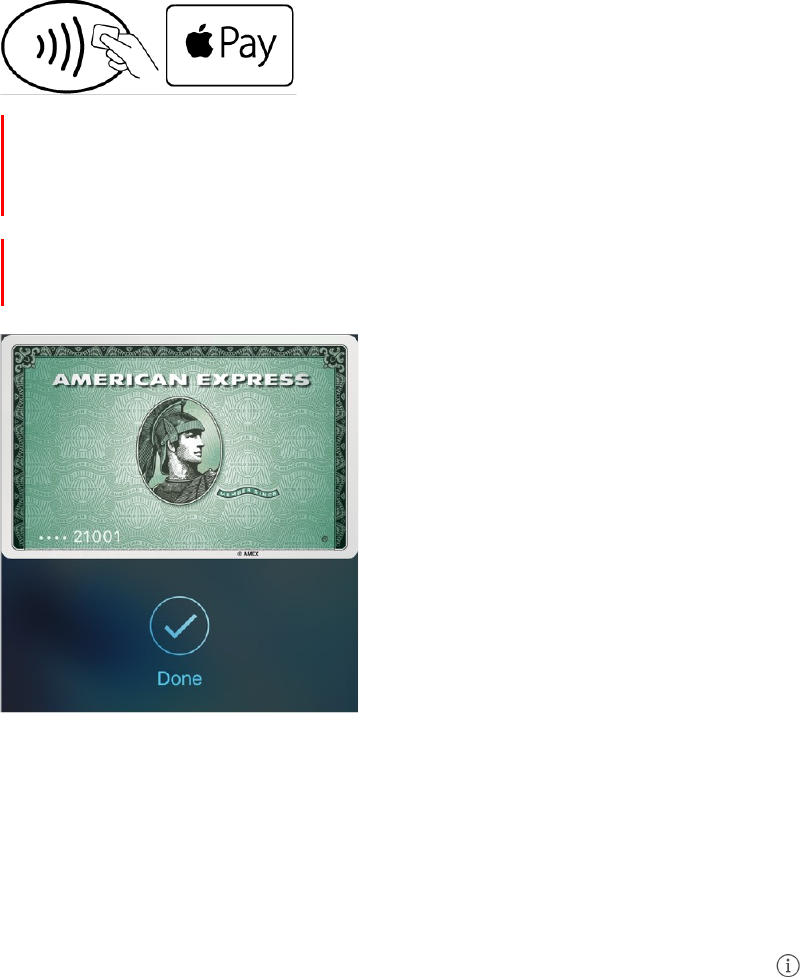
Pay at a store
You can use Apple Pay at contactless readers with the following symbols.
DRAFT
167
!
APPLE CONFIDENTIAL
Pay using your default card. Place your finger on Touch ID, then hold iPhone about an
inch (or 2.5 cm) from the symbol on the reader, until iPhone vibrates. A checkmark on
the screen and an audible beep confirm that the transaction is complete.
Or, if iPhone is locked, double-click the Home button and keep your finger lightly on the
Home button. Hold iPhone near the reader until iPhone vibrates.
3D Touch. To quickly access your default card, press the Wallet icon on the Home
screen. See 3D Touch.
Use another card. When the default card appears, tap it to display all your cards, then
tap the card you want to use.
Set up a store card for Automatic Selection. To automatically use a store card (rather
than the default card) with the associated merchant, tap the store card, tap , then turn
on Automatic Selection.
Note: If you have Location Services turned on, the location of your iPhone at the time
you make a purchase may be sent to Apple. See Privacy.
Pay within an app or website
When shopping within an app or on a website in Safari, look for the Apple Pay option
during checkout.
DRAFT

168
!
APPLE CONFIDENTIAL
Pay within an app or website on iPhone. During checkout, tap the Apple Pay or Buy
with Apple Pay button, then review the payment information. Make any changes before
you use Touch ID or your passcode to complete the payment.
Shop on your Mac and pay on iPhone
Using the Safari web browser, you can use your Mac to shop and begin checkout on
websites that support Apple Pay, and complete the payment with Apple Pay on your
iPhone. Your iPhone must be nearby and connected to a cellular network, and you must
be signed in to iCloud with the same Apple ID on both devices. See the Apple Support
article Use Continuity to connect your iPhone, iPad, iPod touch, and Mac
Checkout. On your Mac, choose the Apple Pay option during checkout, then review the
payment information. Make any changes to the shipping and billing information, or
choose a different card. Then on iPhone, review the payment summary, and use
Touch ID to complete the payment.
Prevent iPhone from confirming payments on Mac. If you don’t want to use Apple
Pay on your iPhone to confirm payments on your nearby Mac, go to Settings > Wallet &
Apple Pay, then turn off Allow Payments on Mac.
DRAFT
169
!
APPLE CONFIDENTIAL
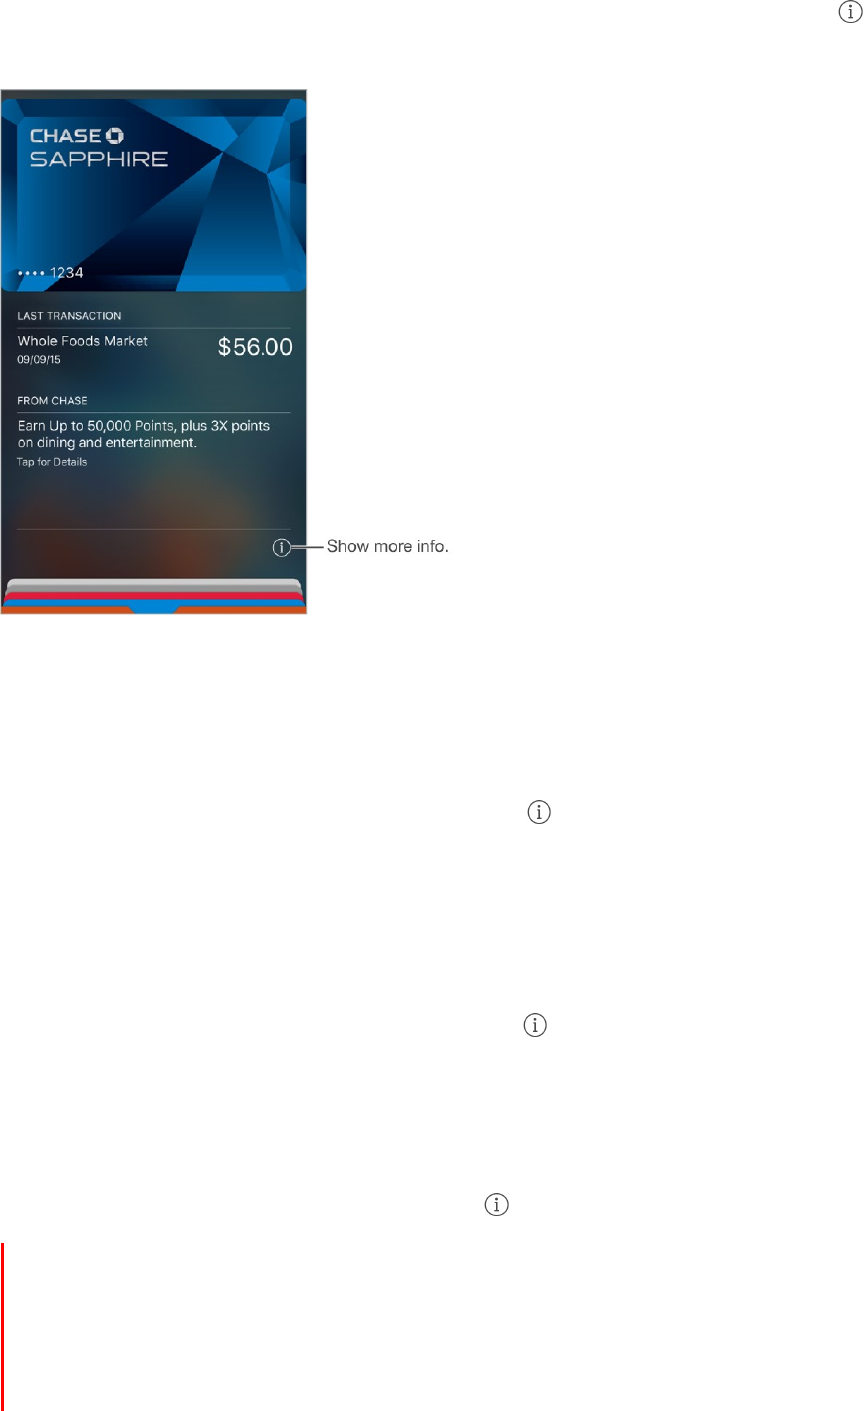
View card activity and manage cards
View your recent card activity. Tap a card. The last transaction may appear. Tap
to
see other recent activity.
Note: The authorized amount may differ from the amount of the payment charged to
your account. For example, a gas station may request an authorization of $99, even
though you only pump $25 worth of gasoline. To see the final charges, refer to your card
statement, which includes all Apple Pay transactions.
View the card information. Tap the card, then tap
and scroll down to view the last
four or five digits of the card number and the Device Account Number—the number
transmitted to the merchant.
Change the shipping address and contact information for purchases. Go to
Settings > Wallet & Apple Pay.
Change the billing information. Tap the card, tap , then tap the billing address to
make changes.
Keep cards from appearing on the Lock screen. Go to Settings > Wallet & Apple Pay.
Under Allow Access When Locked, turn off Double-Click Home Button.
Remove a card from Wallet. Tap the card, tap , then tap Remove Card.
If your iPhone is lost or stolen. If you enabled Find My iPhone, you can use it to help
locate and secure your iPhone—including suspending or removing the ability to make
purchases using your cards in Apple Pay. To do this, sign in with your Apple ID on the
iCloud website, then go to Settings > My Devices. You can also call the issuers of your
cards.
DRAFT
170
!
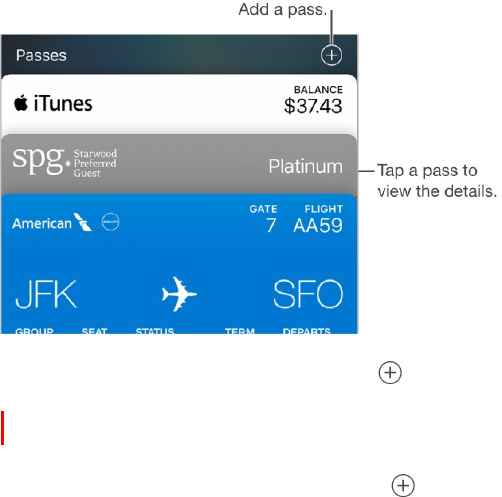
Passes
APPLE CONFIDENTIAL
Use passes in Wallet to check in for a flight, get into a movie, or redeem a coupon.
Passes can include useful information, such as the balance on your coffee card, a
coupon’s expiration date, or your seat number for a concert.
Find apps that support Wallet. Tap
next to Passes, then tap Find Apps for Wallet.
You can go to the iTunes Store web app on your computer.
Add a pass by scanning a code. Tap
next to Passes, then tap Scan Code to Add a
Pass. Point your iPhone at the code and frame it to add the pass.
Add a pass from an app, email, message, or website. Tap the pass or the link, then tap
Add.
Tip: When using Apple Pay at some locations, you may receive a notification that
allows you to easily add a rewards card for that merchant.
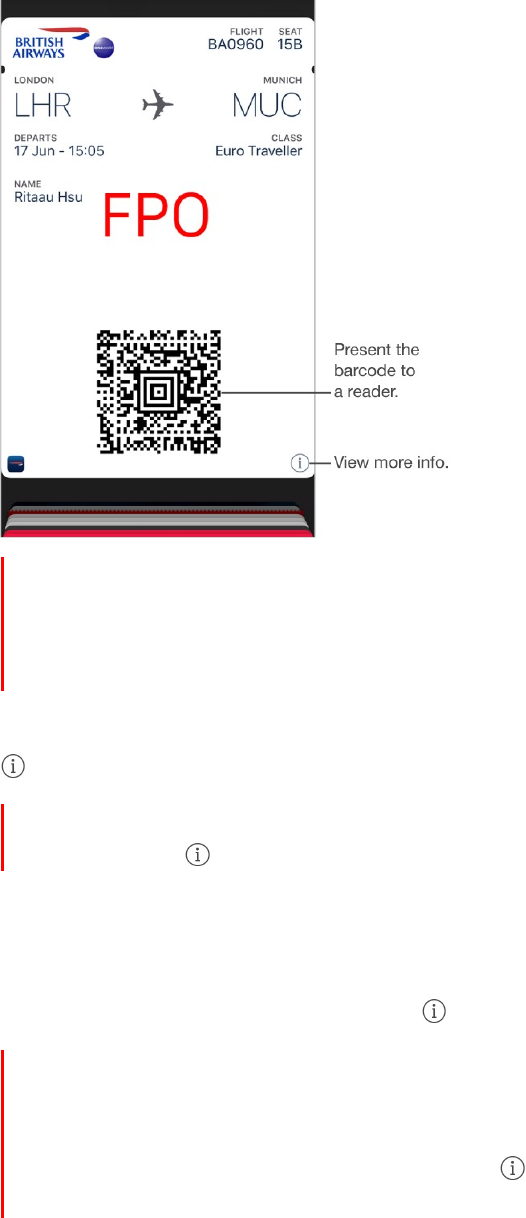
Use a pass. If an alert for a pass appears on the Lock screen, swipe up to open Wallet
and display the pass, then present the barcode to the reader. Otherwise, open Wallet,
select the pass, then present the barcode to the reader.
DRAFT
171
!
APPLE CONFIDENTIAL
Add funds to your Apple ID account. At Apple Stores and select retailers in most
countries, you can add funds to your Apple ID account using iTunes Pass. For
information about creating an iTunes Pass, see the Apple Support article About
iTunes Pass.
Share a pass. You can share a pass using Mail, Messages, or AirDrop. Tap the pass, tap
, then tap Share Pass. See Share from apps.
Refresh a pass. Passes are usually updated automatically. To refresh a pass manually,
tap the pass, tap , then pull the pass down.
Display a pass based on location. A pass can appear on the Lock screen when you
wake iPhone at the right time and place—for example, when you reach the airport for a
flight you’re taking. Make sure Location Services is turned on in Settings > Privacy >
Location Services. Then on the pass, tap , and turn on Suggest on Lock Screen.
Keep passes from appearing on the Lock screen when you double-click the Home
button. Go to Settings > Wallet & Apple Pay. Under Allow Access When Locked, turn off
Double-Click Home Button. For passes with notifications, to keep a specific pass from
appearing on the Lock screen, tap the pass, tap , then turn off Suggest on Lock
Screen.
On iPhone 5 and iPhone 5c, go to Settings > Passcode, tap Turn Passcode On, then turn
off Wallet. Pass notifications continue to appear, but you must enter a passcode to view
the pass.
Include passes on your other iOS devices. You can have passes that you add to one
iOS device appear on your other iOS devices. Go to Settings > iCloud, then turn on
Wallet.
DRAFT

172
!
APPLE CONFIDENTIAL
Note: This setting applies only to the passes in Wallet, not to the credit and debit cards.
Rearrange passes. Drag a pass in the stack to move it to a new location. The pass order
is updated on all your devices (iOS 7 or later).
Set notification options. Go to Settings > Notifications > Wallet.
Done with a pass? Tap the pass, tap , then tap Remove Pass.
DRAFT
173
!
APPLE CONFIDENTIAL
Notes
Take notes
Use Notes to jot down important information, add attachments—like photos, web links,
or maps—sketch ideas, and keep things organized. You can lock a note to keep it
private, add people so friends can view and edit a note, and more.
Turn on Notes in your iCloud account. Go to Settings > iCloud, then turn on Notes.
Your iCloud notes appear on all your iOS devices and Mac computers where you’re
signed in to iCloud using the same Apple ID.
Note: If you’ve been using an earlier version of Notes, you may need to upgrade your
iCloud notes to use all the features—sketching, checklists, paragraph styles, password
protection, adding people, and more. See the Upgrade your notes website.
Turn on an On My iPhone account. Go to Settings > Notes, then turn on On My
iPhone. Notes in this account appear only on your iPhone.
3D Touch. To start a new note from the Home screen, press Notes, then choose a
quick action. See 3D Touch.
DRAFT

174
!
APPLE CONFIDENTIAL
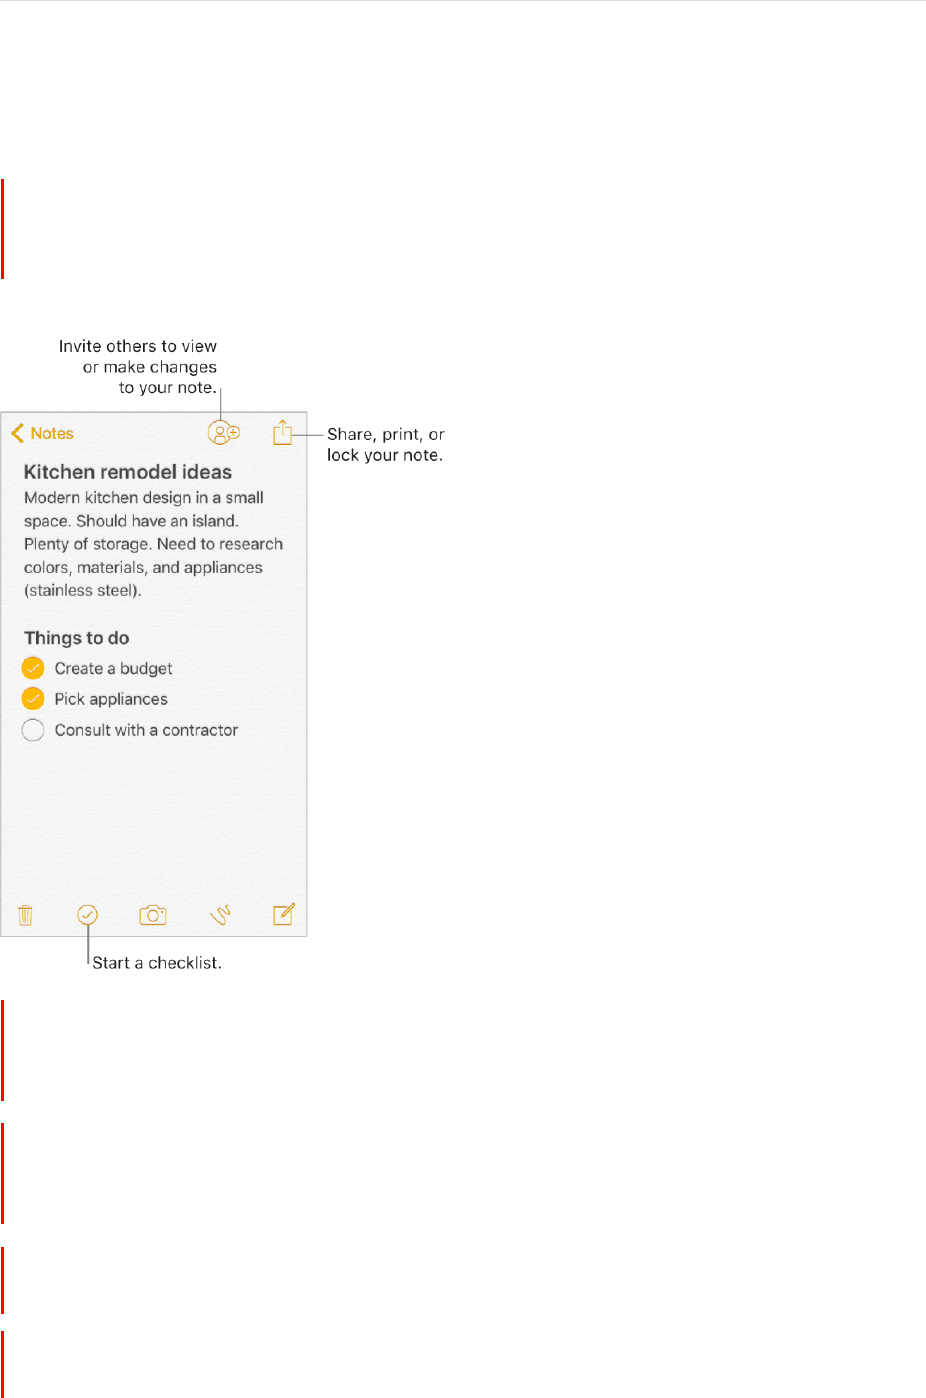
Create a new note. Tap . The first line of the note becomes the note’s title.
Ask Siri. Say something like: “Create a new note.”
Add a photo or video to your note. Tap , then tap . Take a new photo or video, or
tap Photo Library to select and add existing photos and videos.
If you want photos or videos you take in Notes to be automatically added to the Photos
app, go to Settings > Notes, then turn on Save Media to Photos.
Set the default account for when you start new notes with Siri or from the Today
screen. Go to Settings > Notes > Default Account.
Tip: To create and view Notes right from Today View, tap Edit at the bottom of the
Today screen, then add the Notes widget.
Format and edit notes
Create checklists, change paragraph styles, and add attachments.
Start a checklist. Tap a line in your note, tap , then tap . Tap
again to remove the
checklist format.
Change the text style. Tap , tap , then select the style.
Set a default formatting style for the first paragraph. Go to Settings > Notes, then
tap New Notes Start With. Choose Title, Heading, or Body.
DRAFT
175
!
APPLE CONFIDENTIAL
Add an attachment. When you’re in another app and find something (like a location in
Maps or a webpage in Safari) that you want to add to Notes, tap Share or , then tap
Add to Notes. You can create a new note or add the attachment to an existing one.
Mark up an image or PDF. You can use Markup to annotate an image. Tap the image
that’s in your note, tap , then tap Markup.
Change the preview size of attachments. Touch and hold an image, sketch, or PDF
attachment in a note, then choose a size for the preview.
Delete notes
Delete a note. Tap , when you are in a note. Or in the notes list, swipe the note left.
Didn’t mean to delete that note? If you change your mind, open the Recently Deleted
folder. Tap the note you want to keep, tap in the note, then tap Recover.
Create a sketch
Sometimes you may want a sketch to help you capture an idea or plan. Start a sketch
using the pencil, marker, or pen tool. Switch to the eraser if you make a mistake.
DRAFT

176
!
APPLE CONFIDENTIAL
3D Touch. If you press a little deeper as you draw, the pencil and marker leave a
darker line, and the pen tool leaves a wider line. Press a little deeper as you erase to
increase the area you erase. See 3D Touch.
Sketch in your note. Tap , tap , use your finger to sketch, then tap Done. Your
sketch appears in your note. Tap the sketch to edit it.
View more color choices. Tap the current color to view a color palette. Swipe the
palette left or right to see more colors. Or, hold iPhone in landscape orientation.
Draw straight lines. Tap the ruler tool to make it appear on your canvas. Draw a line
along the edge of the ruler. Tap the ruler tool again to make it disappear.
Move the ruler without changing its angle. Drag the ruler with one finger.
Adjust the angle of the ruler. Touch and hold the ruler with two fingers, then rotate your
fingers.
Mask a part of your sketch. Place the ruler along the edge of the area you want to
cover, then start your sketch. Draw lines that start away from the ruler’s edge, then come
toward it.
Hide the toolbar. Swipe the toolbar down to hide it and see just the tool you’re using.
Tap the tool you’re using to see the toolbar again.
Zoom in. Pinch open so you can sketch the details, then pinch closed to zoom back
out.
Tip: Drag two fingers to navigate when you’re zoomed in.
Scroll through all your sketches in a note. Swipe a sketch left or right with two fingers.
Add another sketch to your note. Tap . Or, if you already have multiple sketches,
swipe your last sketch left with two fingers.
Edit a sketch. Open the note that contains a sketch, then tap the sketch.
Start over. Touch and hold the eraser tool, then tap Erase All.
Organize your notes
3D Touch. To preview a note, press a note in the notes list to get a peek; press a little
deeper to open it. See 3D Touch.
Search for a note. Scroll to the top of the notes list to reveal the search field. If a note
is locked, only its title appears in the search results.
Ask Siri. Say something like: “Show notes from today.”
DRAFT

177
!
APPLE CONFIDENTIAL
Sort your notes. Go to Settings > Notes, then choose to sort notes by date edited,
date created, or title.
Search for a specific attachment. Tap
in the lower-left corner of the notes list to
see thumbnails of sketches, photos, links, documents, and other attachments. (You
don’t see attachments from locked notes.) To go to the note with a specific attachment,
touch and hold the thumbnail of the attachment, then tap Go to Note.
Create a folder to organize your Notes. From the Notes list, tap
to view your
folders. Tap New Folder (at the bottom of the folders list), then name your folder.
Delete a folder. From the Notes list, tap
to view your folders. Swipe a folder left, then
tap Delete.
Print a note. Tap
at the top of the note. For more information about printing, see
AirPrint.
Move notes from one folder or account to another. Swipe the note left in the notes list,
tap Move, then choose the folder or account.
To move several notes from one folder or account to another, tap Edit in the upper-right
corner of the notes list, tap the notes you want to move, then tap Move To.
Collaborate in Notes
Invite people to view and make edits to notes in your iCloud account and everyone will
see the latest changes.
Note: You can’t share a locked note.
Invite friends to share. In a note, tap , then choose how to send your invitation.
DRAFT
178
!
APPLE CONFIDENTIAL
Change your sharing preferences. In a note, tap , and you can choose to add
people, remove them, or stop sharing the note.
Use notes in multiple accounts
View and edit notes from other accounts (such as Google, Yahoo!, or AOL). Go to
Settings > Mail, Contacts, Calendars, then turn on Notes for the account. These notes
appear in Notes on all your other iOS devices and Mac computers where you’re also
signed in to that account.
Notes from these accounts can’t use many of the features in Notes.
Lock notes
Use a single password to lock and unlock notes in your iCloud account or in your On My
iPhone account. On iPhone 5s and later, you can also lock and unlock your notes with
Touch ID (if enabled).
You can view locked notes that are in your iCloud account on your iOS devices with
iOS 9.3 or later and Mac computers with OS X v10.11.4 or later.
You can lock notes that include images, sketches, maps, and web attachments, but not
other types of attachments like PDFs and iWork documents. You can’t lock notes that
you’ve shared.
Set a password. Go to Settings > Notes > Password.
DRAFT
179
!
APPLE CONFIDENTIAL
Set Touch ID to unlock your notes. Go to Settings > Notes > Password, then turn on
Use Touch ID (iPhone 5s and later).
Lock a note. In the note, tap , then tap Lock Note.
When a note is locked, the title remains visible in the notes list.
View a locked note. Tap a locked note, tap View Note, then follow the onscreen
instructions.
Unlocking one note unlocks all of your notes until your session times out, you tap the
lock icon at the top of the screen, you tap Lock Now at the bottom of the notes list, or
you lock your iPhone.
Remove a lock from a note. Tap , then tap Remove Lock.
Change your password. Go to Settings > Notes > Password, then tap Change
Password.
Forgot your password? Go to Settings > Notes > Password, then tap Reset Password.
You can’t access your locked notes if you forget your password and haven’t turned on
Touch ID. However, you can set a new password for any notes you want to protect going
forward. For more information, go to the Apple support article Keep your notes secure
with password-protection .
DRAFT

180
!
APPLE CONFIDENTIAL
Import notes from another app to Notes
Import notes from another app. Export the notes from a supported app. Then, with an
Evernote file, for example, touch and hold the exported file attachment (it has a .enex
filename extension) in Mail, then choose Add to Notes. After you import notes, you can
find them in the Imported Notes folder.
For more information, see the Apple support article Import your notes and files to the
Notes app.
DRAFT
181
!
APPLE CONFIDENTIAL
Reminders
Reminders at a glance
Reminders lets you keep track of all the things you need to do.
3D Touch. To add a reminder from the Home screen, press Reminders, then choose
a quick action. See 3D Touch.
Add a reminder. Tap a blank line in a list.
Share a list using iCloud. While viewing a list, tap Edit, then tap Sharing. Tap Add
Person and enter a name or email address. The people you share with also need to be
iCloud users. After they accept your invitation to share the list, you’ll all be able to add,
delete, and mark items as completed. Family members can also share a list. See Family
Sharing.
Ask Siri. Say something like:
“Remember to take an umbrella”
“Add artichokes to my groceries list”
“Read my work to-do list”
“Remind me to call my mom at 5”
Set a default list for new reminders. Go to Settings > Reminders.
DRAFT
182
!
APPLE CONFIDENTIAL
Delete a list. While viewing a list, tap Edit, then tap Delete List. All of the reminders in
the list are also deleted.
Delete a reminder. Swipe the reminder left, then tap Delete.
Change the order of lists. Touch and hold the list name, then drag the list to a new
location. To change the order of items in a list, tap Edit.
What list was that in? Scroll to the top to see the search field. All lists are searched by
the reminder’s name.
3D Touch. To set an reminders’s options, press a reminder, then choose a quick
action. See 3D Touch.
Keep your reminders up to date on other devices. Go to Settings > iCloud, then turn
on Reminders. Some other types of accounts, such as Exchange, also support
Reminders. Go to Settings > Mail, Contacts, Calendars, then turn on Reminders for the
accounts you want to use. You can change how reminders in the past are synced at
Settings > Reminders.
With OS X v10.10 or later, you can hand off reminders you’re editing between your Mac
and iPhone.
Scheduled reminders
Scheduled reminders notify you when they’re due.
Ask Siri. Say something like: “Remind me to take my medicine at 6 a.m. tomorrow.”
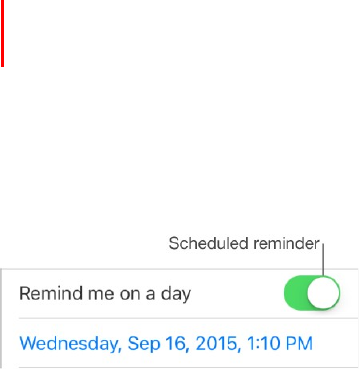
Schedule a reminder. Swipe a reminder to the left, tap More, then turn on “Remind me
on a day.” Tap Alarm to set the date and time. Tap Repeat to schedule the reminder for
regularly occurring intervals.
Don’t bother me now. You can turn off Reminders notifications in Settings >
Notifications. To silence notifications temporarily, turn on Do Not Disturb.
DRAFT

183
!
APPLE CONFIDENTIAL
Location reminders
Be reminded when you arrive at or leave a location. Swipe a reminder to the left, tap
More, then turn on “Remind me at a location.” Tap Location, then select a location in the
list, or enter an address. After you define a location, you can drag to change the size of
the geofence on the map, which sets the approximate distance at which you want to be
reminded. You can’t save a location reminder in Outlook or Microsoft Exchange accounts.
Ask Siri. Say something like: “Remind me to stop at the grocery store when
I
leave
here.”
Add common locations to your My Info card. When you set a location reminder,
locations in the list include addresses from your My Info card in People. Add your work,
home, and other favorite addresses to your card for easy access in Reminders.
Stocks
Keep track of the major exchanges and your stock portfolio, see the change in value over
time, and get news about the companies you’re watching.
DRAFT