Apple E3091A Cellular Phone with Bluetooth and WLAN Radios User Manual AA15XX User Guide v1 0x
Apple Inc. Cellular Phone with Bluetooth and WLAN Radios AA15XX User Guide v1 0x
Apple >
Contents
- 1. RF exposure statements (FCC only)
- 2. User_Guide_v1.0_draft_Part1
- 3. User_Guide_v1.0_draft_Part2
- 4. User_Guide_v1.0_draft_Part3
- 5. User_Guide_v1.0_draft_Part4
- 6. User_Guide_v1.0_draft_Part5
- 7. User_Guide_v1.0_draft_Part6
- 8. User_Guide_v1.0_draft_Part7
- 9. User_Guide_v1.0_draft_Part8
- 10. Manual part1
- 11. Manual part2
User_Guide_v1.0_draft_Part7
184
!
APPLE CONFIDENTIAL
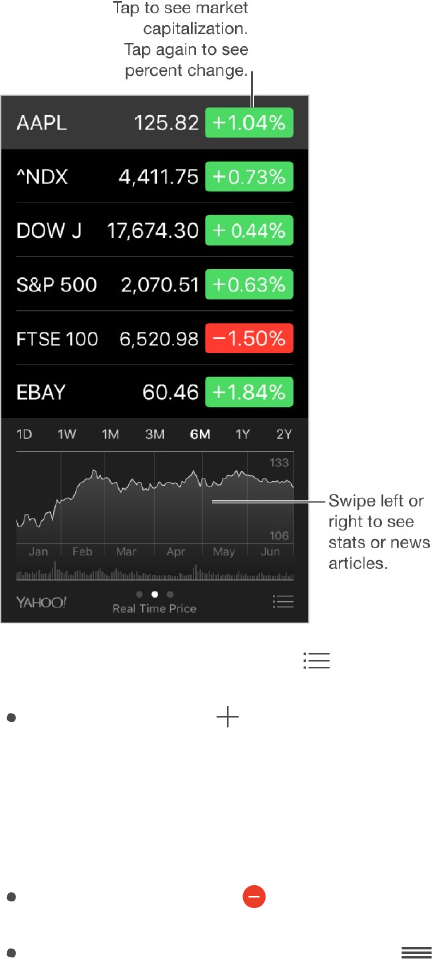
Manage your stock list. Tap .
Add an item: Tap . Enter a symbol, company name, fund name, or index, then tap
Search.
3D Touch. Press Stocks on the Home screen, then choose Search. See
3D Touch.
Delete an item: Tap .
Rearrange the order of items: Drag
up or down.
While viewing stock info, you can tap any of the values along the right side of the screen
to switch the display to price change, market capitalization, or percentage change. Swipe
the info beneath the stock list to see the summary, chart, or news for the selected stock.
Tap a news headline to view the article in Safari.
On iPhone 6 Plus, iPhone 6s Plus, or 2016 IPHONE PLUS, use landscape orientation to
see your stock list
with news, or with the summary and chart, all at the same time.
You can also see your stocks in Notification Center. See Notifications.
Note: Quotes may be delayed 20 minutes or more, depending upon the reporting
service.
DRAFT
185
!
APPLE CONFIDENTIAL
Add a news article to your reading list. Touch and hold the news headline, then tap
Add to Reading List. To add all news articles to your reading list, tap Add All to Reading
List.
Ask Siri. Say something like:
“How are the markets going?”
“How’s Apple stock today?”
Find out more. Tap YAHOO!
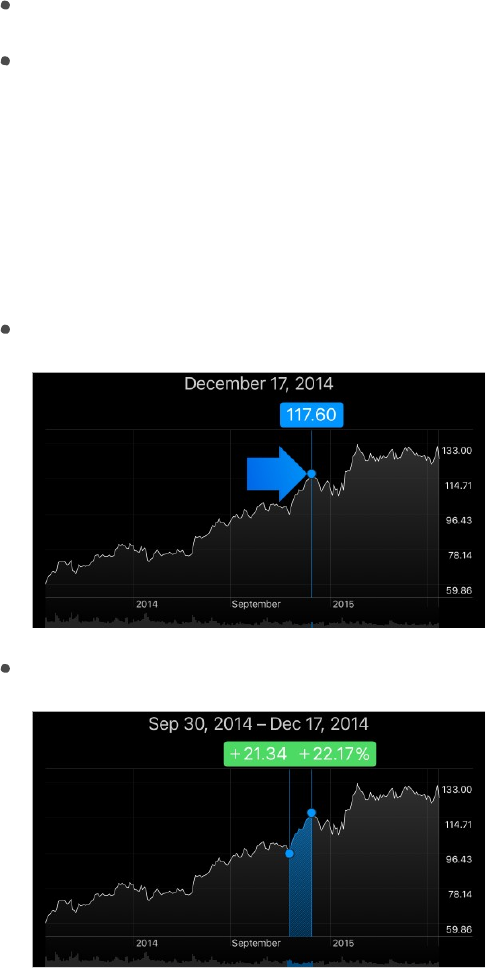
View a full-screen chart. (Rotate iPhone to landscape orientation. On iPhone 6 Plus,
iPhone 6s Plus, and 2016 IPHONE PLUS, rotate to landscape orientation, then touch
the chart to expand
it to full-screen view.) Swipe left or right to see your other stock
charts.
See the value for a specific date or time: Touch the chart with one finger.
See the difference in value over time: Touch the chart with two fingers.
Use iCloud to keep your stock list up to date on your iOS devices. Go to Settings >
iCloud, then turn on iCloud Drive. See iCloud.
DRAFT
186
!
APPLE CONFIDENTIAL
iTunes Store
iTunes Store at a glance
Use the iTunes Store to add music, movies, TV shows, and more to iPhone.
Note: You need an Internet connection and an Apple ID to use the iTunes Store. The
iTunes Store isn't available in all areas.
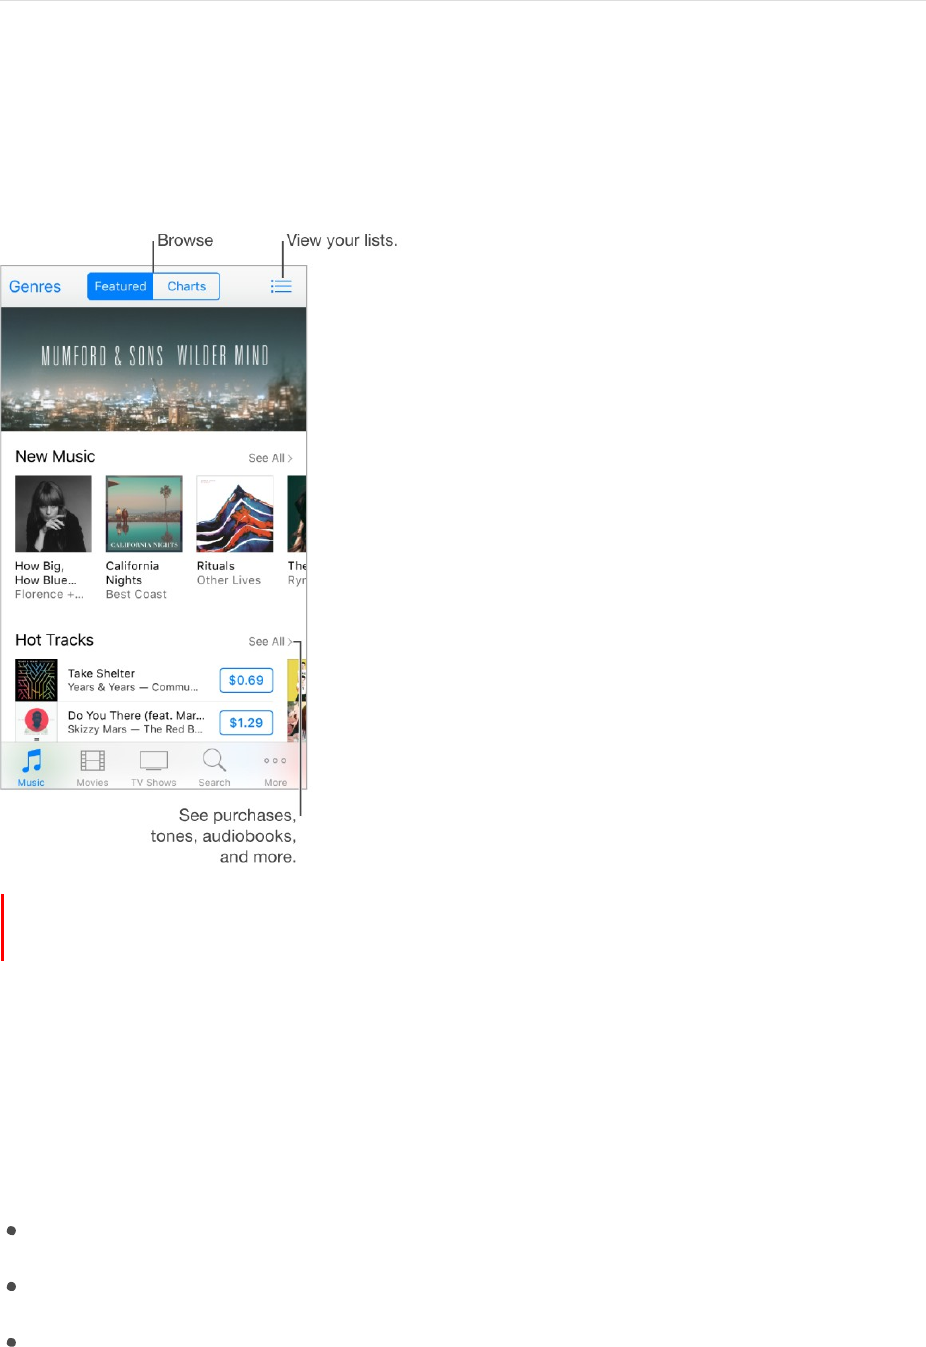
Browse or search
Browse by category or genre. Tap one of the categories (Music, Movies, or TV Shows).
Tap Genres to refine the list.
Ask Siri. Say something like:
“Look for kids’ shows in iTunes”
“Purchase song name by band name”
“Redeem an iTunes Store gift card”
DRAFT
187
!
APPLE CONFIDENTIAL
If you know what you’re looking for, tap Search. You can tap a search term that’s
trending among other iTunes users, or enter info in the search field, then tap Search
again.
3D Touch. To find songs, TV shows, and movies from the Home screen, press
iTunes Store, then choose Search. See 3D Touch.
Access family members’ purchases. With Family Sharing turned on, you can view and
download songs, TV shows, and movies purchased by other family members. Tap More,
tap Purchased, then choose a family member.
Ask Siri to tag it. When you hear music playing around you, ask Siri “What song is
playing?” Siri tells you what the song is and gives you an easy way to purchase it. It also
saves the song to the Siri tab in the iTunes Store so you can buy it later. To see a list of
tagged songs available for preview or purchase, tap Music, tap , then tap Siri.
Preview a song or video. Tap it.
Add to your Wish List. To track a song you might want to buy later, add it to your Wish
List. View the song, tap , then tap Add to Wish List. To view your Wish List, tap ,
then tap Wish List.
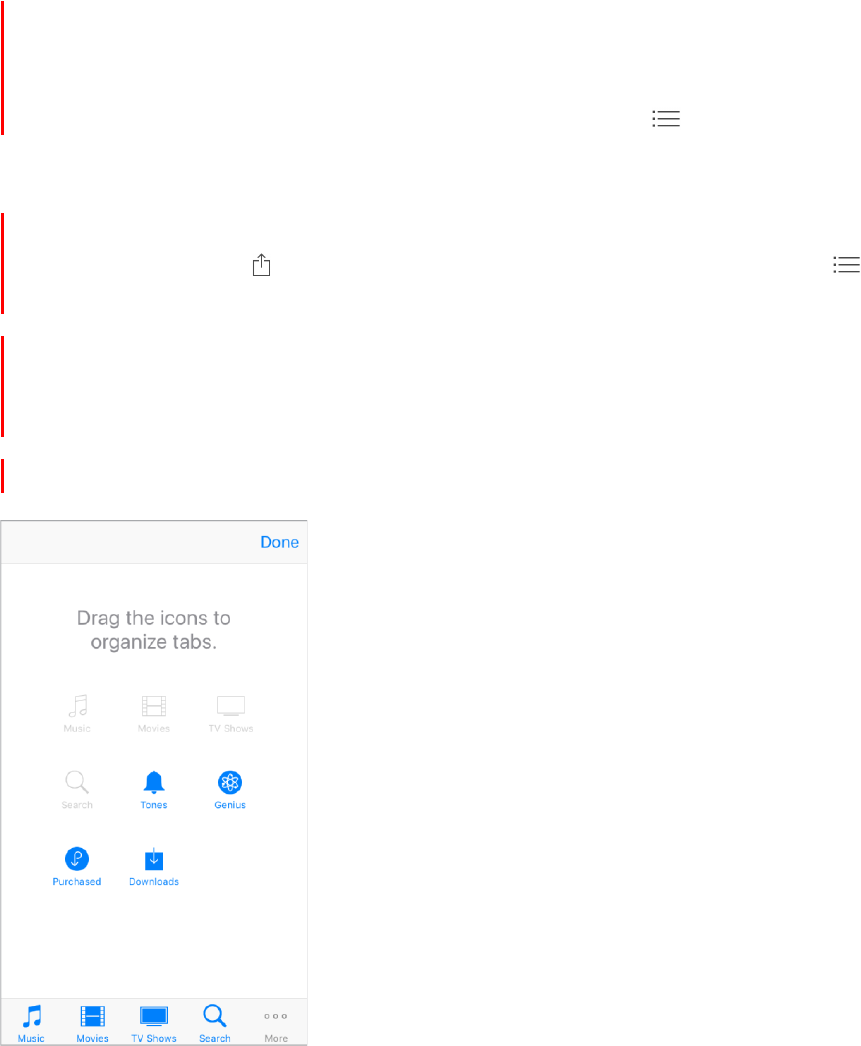
Organize the tabs for quick access. To rearrange the icons at the bottom of the
screen, tap More, then tap Edit. To rearrange icons, drag them. To replace an icon, drag
another icon over the one you want to replace. Tap Done.
##TK callouts: Reorder or replace icons (pointing to tabs at bottom) ##
DRAFT

188
!
APPLE CONFIDENTIAL
Purchase, rent, or redeem
Buy and download an item. Tap the item’s price, then tap Buy. If the item is free, tap
Get.
If you see
instead of a price, you’ve already purchased the item, and you can
download it again without a charge.
3D Touch. To redeem songs, TV shows, and movies from the Home screen, press
iTunes Store, then choose the Redeem quick action. See 3D Touch.
Sign in with your Apple ID. If you are not signed in with your Apple ID, the iTunes Store
prompts you to do so before you make a purchase. To view or edit your Apple ID, go to
Settings > iTunes & App Store, and tap your Apple ID.
Store your music in iCloud. You can subscribe to iTunes Match, a service that stores
your music on iPhone in iCloud for access on all your Apple devices. If you’re a
subscriber, go to Settings > iTunes & App Store, and turn on iTunes Match.
Bought something on another device? To view your purchases, tap More, then tap
Purchased. To automatically download items that you purchased on other Apple devices,
go to Settings > iTunes & App Store to set up automatic downloads.
Limit downloads to Wi-Fi connections. To prevent downloads from using cellular data,
go to Settings > iTunes & App Store, then turn off Use Cellular Data.
See the progress of a download. Tap More, then tap Downloads.
Watch your time with rentals. In some areas, you can rent movies. You have 30 days to
begin watching a rented movie. After you start watching it, you can play it as many times
as you want in the allotted time (24 hours in the U.S. iTunes Store; 48 hours in other
countries). When your time’s up, the movie is deleted. Rentals can’t be transferred to
another device; however, you can use AirPlay and Apple TV to view a rental on your
television.
Approve purchases with Family Sharing. With Family Sharing set up, the family
organizer can review and approve purchases made by family members under a certain
age. For more information, see Family Sharing.
Hide individual purchases. Using iTunes on a computer, family members can hide any
of their purchases so other family members can’t view or download them. For more
information, see Family Sharing.
Send a gift. View the item you want to give, tap , then tap Gift. Or tap one of the
categories (Music, Movies, or TV Shows), scroll to the bottom, then tap Send Gift to send
an iTunes gift certificate to someone.
DRAFT
189
!
APPLE CONFIDENTIAL
Use a gift card or code. Tap Music, scroll to the bottom, then tap Redeem.
Create an iTunes Pass. Tap Music, scroll to the bottom, tap Redeem, then tap Get
Started under iTunes Pass. See the Apple Support article About iTunes Pass.
DRAFT
190
!
APPLE CONFIDENTIAL
App Store
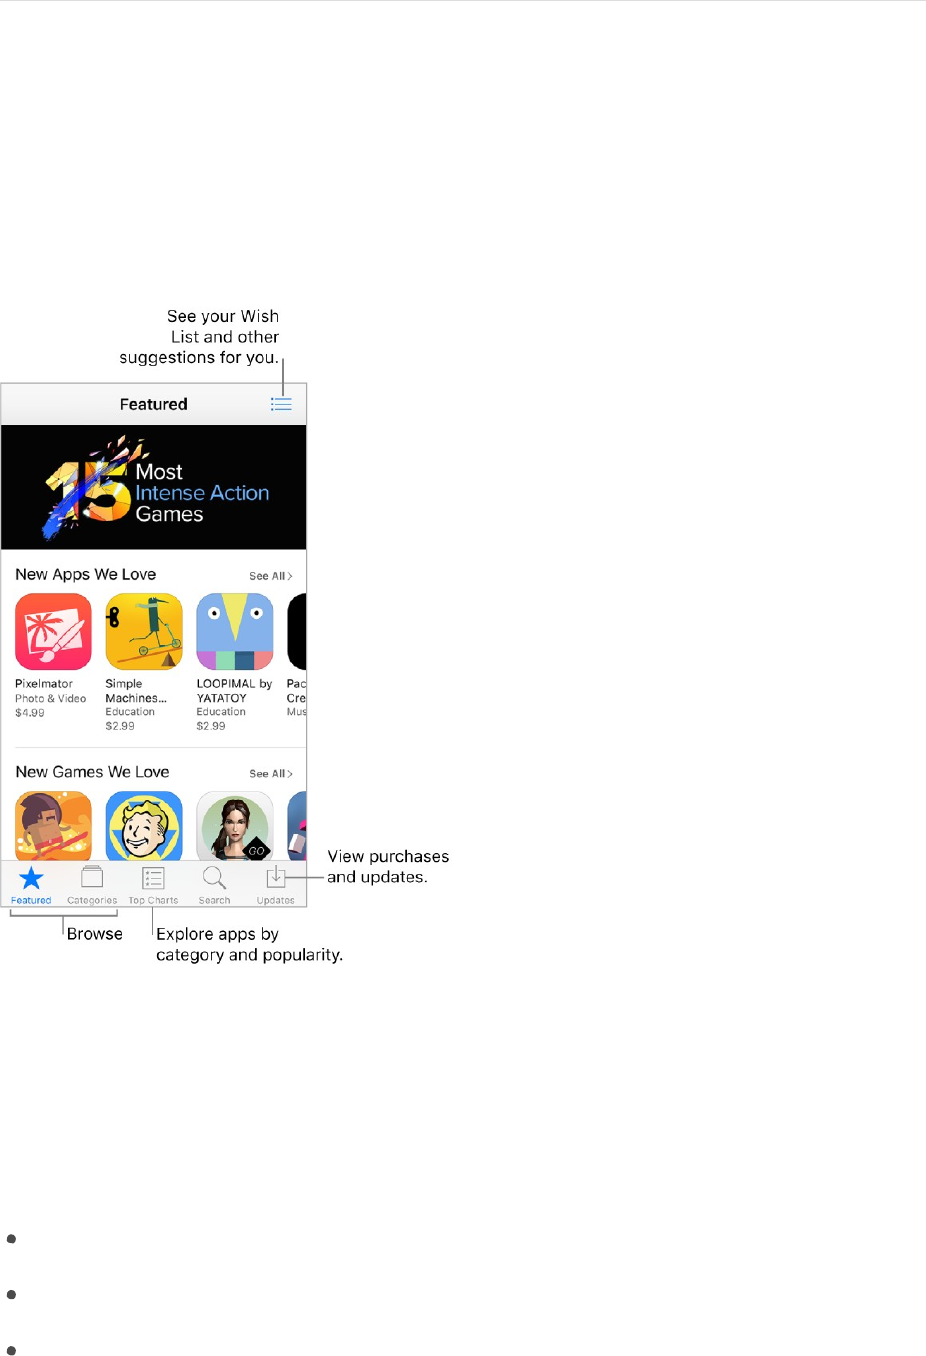
App Store at a glance
Use the App Store to browse, purchase, and download apps to iPhone. Your apps update
automatically over Wi-Fi (unless you turn off this feature), so you can keep up with the
latest improvements and features.
Note: You need an Internet connection and an Apple ID to use the App Store. The
App Store is not available in all areas.
Find apps
Ask Siri. Say something like:
“Find apps by Apple”
“Purchase app name”
“Redeem an iTunes Store gift card”
Browse by category. Tap Categories to focus on the apps you want, for example,
Education, Medical, or Sports.
DRAFT

191
!
APPLE CONFIDENTIAL
Find a specific app. Tap Search, enter info in the search field, then tap Search again.
3D Touch. To find apps from the Home screen, press App Store, then choose
Search. See 3D Touch.
View and download family members’ app purchases. With Family Sharing turned on,
you can view and download apps purchased by your family members. Tap Updates, tap
Purchased, then choose a family member. For more information, see Family Sharing.
Tell a friend about an app. View the app, tap , then choose an option. See Share from
apps.
Add an item to Wish List. To track an app you might want to purchase later, view the
app, tap , then tap Add to Wish List. To see your Wish List, tap .
Purchase, redeem, and download
Sign in with your Apple ID to buy items from the App Store. If you don’t have an
Apple ID, you can create one at the time of purchase.
Buy and download an app. Tap the app’s price, then tap Buy. If the app is free, tap Get,
then tap Install.
If you see
instead of a price, you’ve already purchased the app and you can download
it again, free of charge. While the app is downloading or updating, its icon appears on the
Home screen with a progress indicator.
Download apps purchased on another device. To view your purchased apps, tap
Updates, then tap Purchased. To automatically download apps that you purchased on
other Apple devices, go to Settings > iTunes & App Store to set up automatic downloads.
Limit downloads to Wi-Fi connections. To prevent downloads from using cellular data,
go to Settings > iTunes & App Store, then turn off Use Cellular Data.
Approve purchases with Family Sharing. With Family Sharing set up, the family
organizer can review and approve purchases made by other family members under a
certain age. For more information, see Family Sharing.
Hide individual purchases. Family members can hide any of their purchases so other
family members can’t view or download them. For more information, see Family Sharing.
Restrict in-app purchases. Many apps provide extra content or enhancements for a
fee. To prevent in-app purchases, go to Settings > General > Restrictions, make sure
Restrictions is enabled, then turn off In-App Purchases. You can also set other
restrictions, such as limiting app downloads by age ratings. See Set Restrictions.
Give an app. View the app, tap , then tap Gift.
DRAFT

192
!
APPLE CONFIDENTIAL
Give an iTunes gift certificate. Tap Featured, scroll to the bottom, then tap Send Gift.
Redeem a gift card or code. Tap Featured, scroll to the bottom, then tap Redeem.
Create an iTunes Pass. Tap Featured, scroll to the bottom, tap Redeem, then tap Get
Started below iTunes Pass. See the Apple Support article About iTunes Pass.
Manage your apps.
Arrange your apps
Organize with folders
Remove apps
DRAFT
193
!
APPLE CONFIDENTIAL
iBooks
Get books
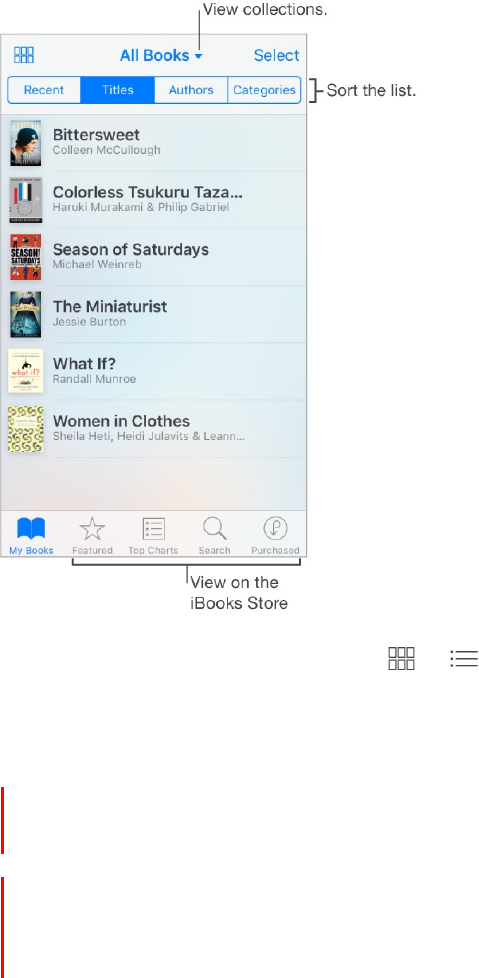
Get books from the iBooks Store. In iBooks, use the buttons at the bottom of the
screen to access the iBooks Store. Tap Featured to browse the latest releases, or Top
Charts to view the most popular. To find a specific book, tap Search.
3D Touch. To get a book from the Home screen, press iBooks, then choose the
Search iBooks Store quick action. See 3D Touch.
Ask Siri. Say something like: “Find books by author name.”
Read a book
3D Touch. To open a book from the Home screen, press iBooks, then choose from
the menu of recently accessed books. See 3D Touch.
Open a book. Tap the book you want to read. If you don’t see it on the bookshelf, swipe
left or right to see other collections.
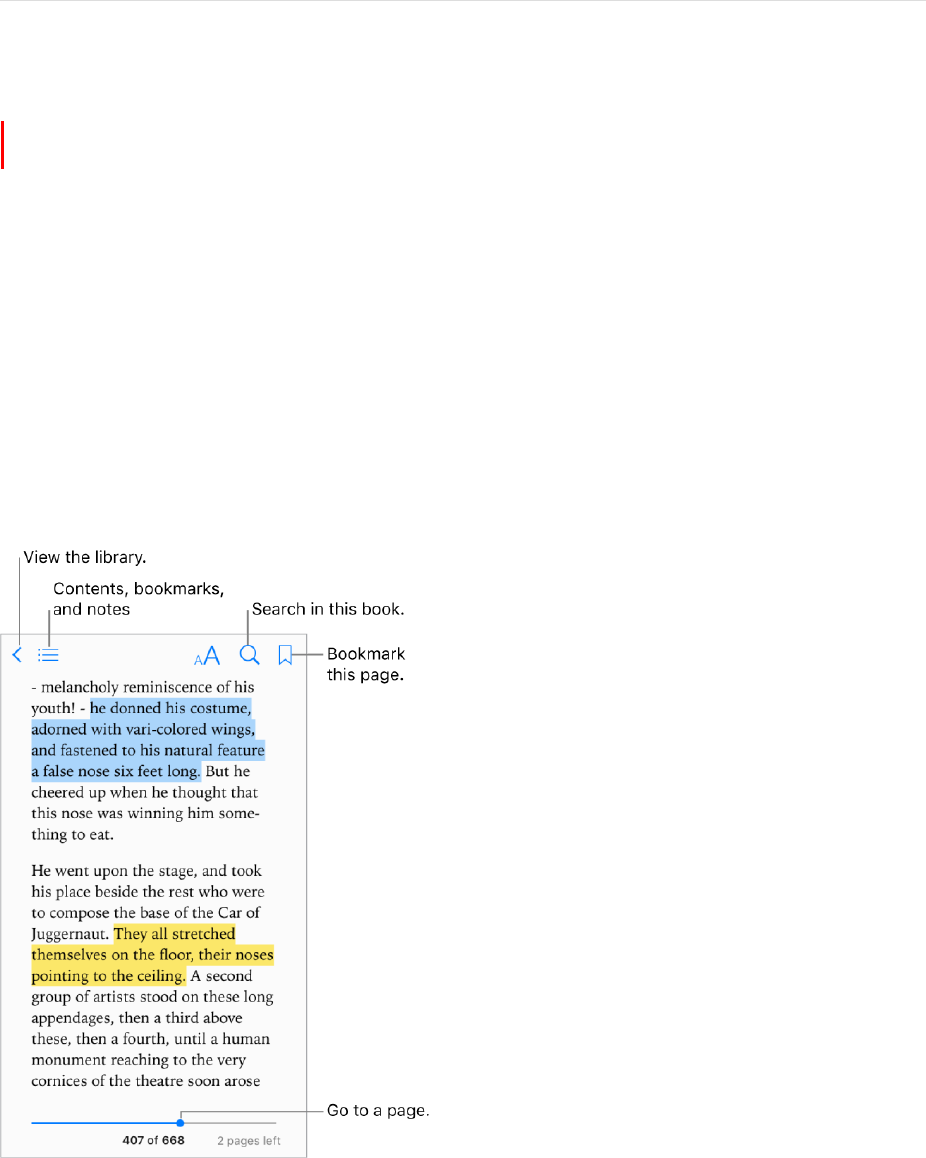
Show the controls. Tap near the center of a page. Not all books have the same controls,
but some of the things you can do include searching, viewing the table of contents, and
sharing what you’re reading.
DRAFT
194
!
APPLE CONFIDENTIAL
Close a book. Tap Library, or pinch the page.
Enlarge an image. Tap, or with some books double-tap, the image.
Read by columns. In books that support it, double-tap a column of text to zoom in, then
swipe up or to the left to move to the next column.
Go to a specific page. Use the page navigation controls at the bottom of the screen. Or
tap
and enter a page number, then tap the page number in the search results.
Get a definition. Double-tap a word, then tap Define in the menu that appears.
(Definitions aren’t available for all languages.)
Remember your place. Tap
to add a bookmark, or tap again to remove it. You can
have multiple bookmarks—to see them all, tap , then tap Bookmarks. You don’t need
to add a bookmark when you close the book because iBooks remembers where you left
off. You can sync bookmarks with your other devices in Settings > iBooks.
Remember the good parts. Some books let you add highlights and notes. To add a
highlight, touch and hold a word, then move your finger to draw the highlight. To add a
note, double-tap a word to select it, move the grab points to adjust the selection, then
tap Note in the menu that appears. To see all the highlights and notes you’ve made, tap
, then tap Notes.
Share the good parts. Tap some highlighted text, then, in the menu that appears, tap .
If the book is from the iBooks Store, a link to the book is included automatically. (Sharing
may not be available in all regions.)
Share a link to a book. Tap near the center of a page to display the controls, tap ,
then tap .
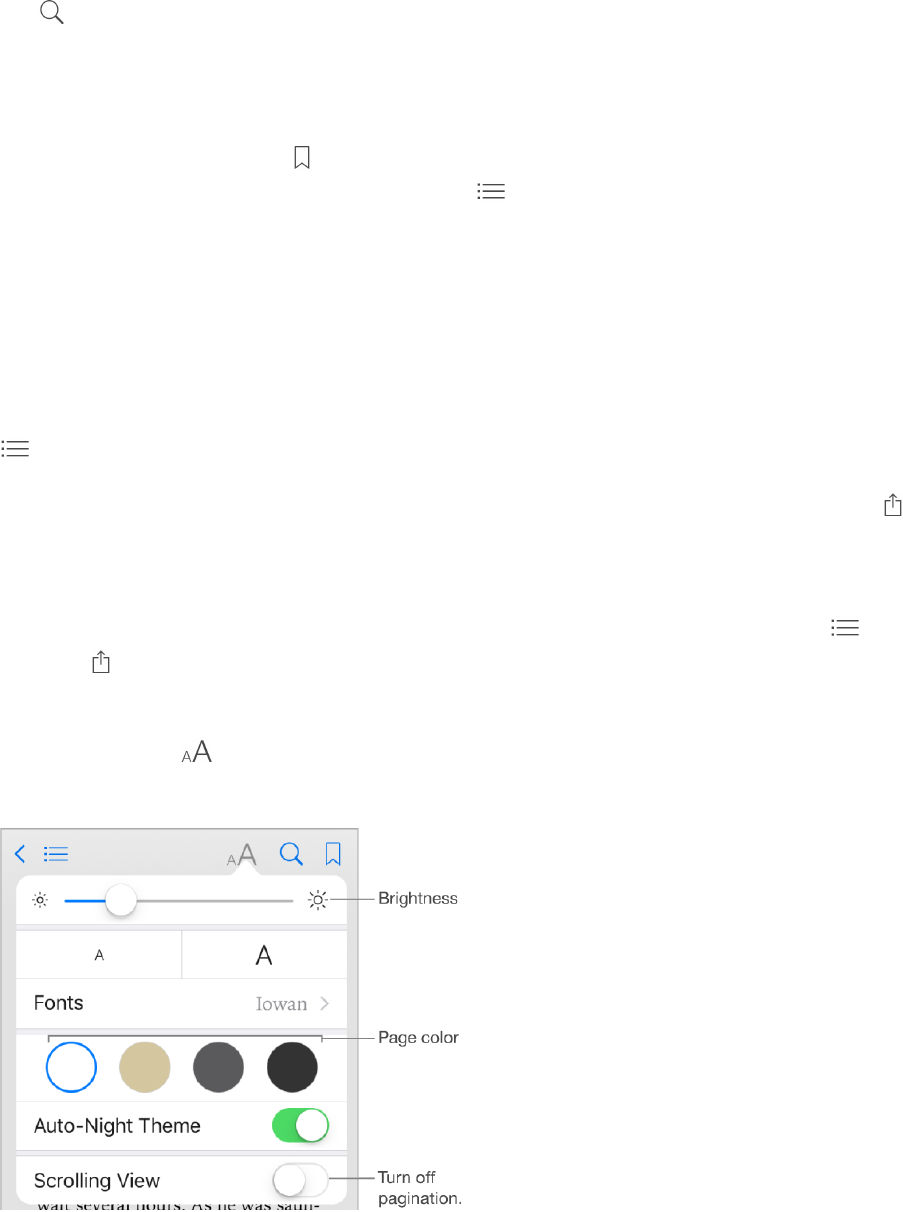
Change the way a book looks. Some books let you change the font, font size, and color
of the page. (Tap .) You can also change justification and hyphenation in Settings >
iBooks. These settings apply to all books that support them.
DRAFT

195
!
APPLE CONFIDENTIAL
Change the brightness. Tap . If you don’t see , tap
first.
Dim the screen when it’s dark. Turn on Auto-Night Theme to automatically change the
bookshelf, page color, and brightness when using iBooks in low-light conditions. (Not all
books support Auto-Night Theme.)
Interact with multimedia
Some books have interactive elements, such as movies, diagrams, presentations,
galleries, and 3D objects. To interact with a multimedia object, tap, swipe, or pinch it. To
view an element full-screen, pinch open with two fingers. When you finish, pinch it
closed.
Study notes and glossary terms
In books that support it, you can review all of your highlights and notes as study cards.
See all your notes. Tap . Search your notes, or tap a chapter to see notes you made
in that chapter. You can sync your notes with your other devices in Settings > iBooks.
Delete notes. Tap Select, select some notes, then tap .
Review your notes as study cards. Tap Study Cards. Swipe to move between cards.
Tap Flip Card to see its back.
Shuffle your study cards. Tap , then turn on Shuffle.
Study glossary terms. If a book includes a glossary, tap
to include those words in
your study cards.
DRAFT
196
!
APPLE CONFIDENTIAL
Listen to an audiobook
Open an audiobook. Audiobooks are identified by a
on the cover. Tap the book you
want to listen to. If you don’t see it in the library, swipe left or right to view other
collections.
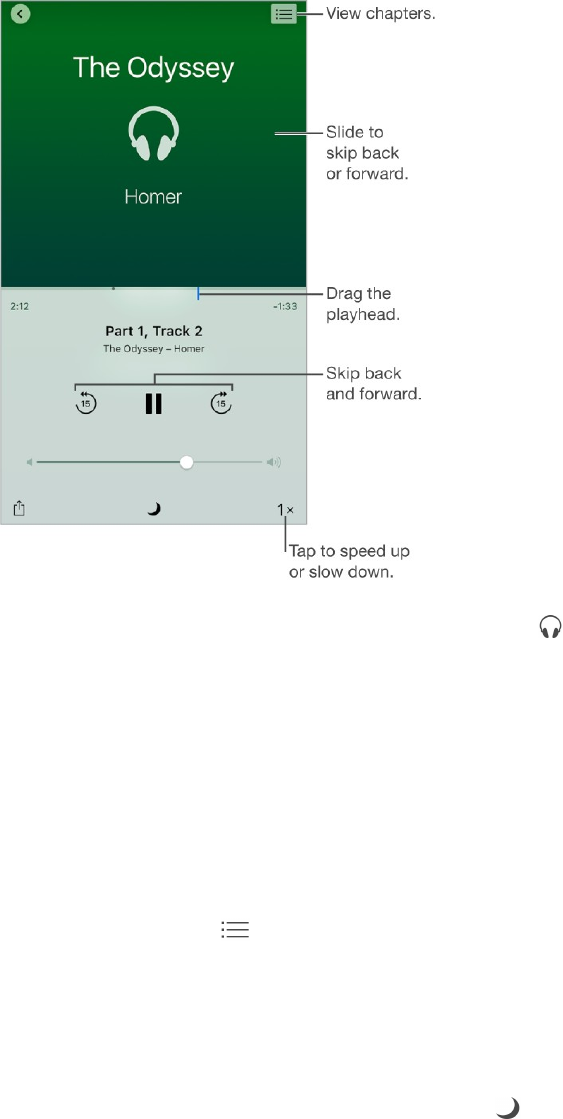
Skip farther forward or back. Touch and hold the arrows, or slide and hold the cover. To
change the number of seconds that skipping moves, go to Settings > iBooks.
Speed it up, or slow it down. Tap the playback speed in the lower-right corner, then
choose a different speed. 1x is normal speed, 0.75x is three-quarters speed, and so on.
Go to a chapter. Tap , then tap a chapter. (Some books don’t define chapter markers.)
Go to a specific time. Drag the playhead, located underneath the book cover. Where
you started listening during this session is marked with a small circle on the timeline. Tap
the mark to jump to that spot.
Set a sleep timer. Before starting playback, tap , then choose a duration until the
audio automatically stops.
Download an audiobook previously purchased from the iBooks Store.You can
download an audiobook again from the Purchased list in the iBooks Store anytime, free of
charge.
DRAFT
197
!
APPLE CONFIDENTIAL
Organize books
View books by title or by cover. Tap
or
.
View only audiobooks or PDFs. Tap the name of the current collection (at the top of the
screen), then choose PDFs or Audiobooks.
Organize your books with collections. Tap Select, then select some books and tap
Move.
Create or edit collections. Tap the name of the current collection (at the top of the
screen). Some built-in collections, such as PDFs, can’t be renamed or deleted. You can
sync your collections with your other devices in Settings > iBooks.
Rearrange books. While viewing books by cover, touch and hold a cover, then drag it to
a new location. While viewing books by title, sort the list using the buttons at the top of
the screen. The All Books collection is automatically arranged for you; switch to another
collection if you want to manually arrange your books.
Search for a book. Pull down to reveal the Search field at the top of the screen.
Searching looks for the title and the author’s name.
Remove books. Tap Select, select some books, tap Delete, then choose an option.
DRAFT

198
!
APPLE CONFIDENTIAL
Hide books you haven’t downloaded. If you see
on a cover or next to a title, you can
download the book again without charge. To remove from view the books that aren’t
downloaded, tap the name of the current collection (at the top of the screen), then turn
on Hide iCloud Books.
3D Touch. To see how far along you are in a book and other info, press a book’s
cover. If it’s an audiobook, you’ll see the listening time remaining. See 3D Touch.
Read PDF Files
Add a PDF email attachment to iBooks. Open the email message, touch and hold its
PDF attachment, then tap Copy to iBooks. Or, tap the PDF attachment to open it, tap ,
then tap Copy to iBooks.
Print a PDF document. With the document open, tap , then choose Print. For more
about AirPrint, see AirPrint.
Email a PDF document. With the document open, tap , then choose Email.
Access your entire library in iCloud
You can store your PDF files and other books in iCloud and access them on your other
devices.
Turn on iCloud for iBooks. Turn on Settings > iCloud > iCloud Drive > iBooks.
When you add a PDF file (or a book that doesn’t come from the iBooks Store) to iBooks,
the document is uploaded to iCloud. The document is also added to your other devices
where you’ve turned on iCloud for iBooks and you’re signed in to iCloud with the same
Apple ID.
Note: The books in your Purchased list in the iBooks Store are available anytime and
don’t count against your available iCloud storage space.
DRAFT

199
!
APPLE CONFIDENTIAL
News
News overview
News collects all the stories you want to read, from your favorite sources, based on the
topics that interest you most. You can subscribe to receive premium stories from select
publishers, explore recommended channels, be notified of new stories from favorite
channels, search for specific channels or topics, and save and share your favorite
stories.
Note: You need a Wi-Fi or cellular connection to use News. News isn’t available in all
areas.
Get started with News
The first time you open News, you can personalize it based on your interests.
Add channels and topics. Open News, then add your preferred publications or
channels. (Publications, such as magazines, newspapers, or news-based websites, are
called “channels”). You can also add topics such as Sports and Entertainment. To see
more channels and topics, swipe up. The stories that appear in For You are influenced
by your choices.
Add notifications. Tap Customize Notifications, then choose the publications you'd like
to deliver the most important stories of the day to your Lock screen.
Receive stories by email. To receive an email with the best Apple News stories
selected by Apple’s editors, tap Sign Me Up on the Get News in Your Inbox screen.
Seek out additional channels and topics. After you set up News, tap Explore to browse
suggested channels and topics. Or browse a topic such as Travel, Arts, or Sports by
tapping it. To add a channel or topic to your favorites, tap .
DRAFT

200
!
APPLE CONFIDENTIAL
News subscriptions
Subscribe to channels. With News you can read premium subscription stories from
select publishers. There are three ways to access subscribed stories in News:
Subscribe within News: You can purchase a subscription directly in News with your
iTunes Store account. Tap a story within a channel that offers subscriptions, then
tap Get a Subscription.
Let News unlock your existing subscription from a publisher’s app automatically:
News checks your iTunes Store account for subscriptions purchased in a publisher’s
app. If any subscriptions you've purchased are also available in News, you're
automatically granted access.
Authenticate an existing subscription purchased from the publisher: If you’ve
purchased a subscription directly from the publisher’s website, the publisher may
allow you to log in with your subscription account in News and read their premium
stories in News.
Subscribed channels are automatically added to Favorites.
For You
For You presents the best stories from the publications and topics you add to Favorites.
For You also highlights Top Stories of the day, Trending Stories that are popular with
other News readers, and Featured Stories selected by Apple editors.
Read more stories within a specific section. Tap
next to Top Stories or a topic such
as Technology or Entertainment.
DRAFT

201
!
APPLE CONFIDENTIAL
Play a video in the story list. Tap .
Get newer stories. Pull down to refresh For You with the latest stories.
Quickly love, save, or share a story. Tap , or swipe a story left, then choose Love,
Save, or Share.
Quickly dislike a story, mute a channel, or report a concern about a story. Tap , or
swipe a story right, then choose Dislike, Mute Channel, or Report.
To remove a dislike, tap , or swipe the disliked story right, then tap Remove Dislike.
3D Touch. To access stories and recently viewed channels from the Home screen,
press News, then choose a quick action. See 3D Touch.
Mute a channel. To prevent a channel’s stories from appearing in For You or in a list of
topics, swipe a story right, then tap Mute Channel. To see stories from that channel
again, tap the channel in Favorites, then tap Don’t Mute near the top of the screen.
To unmute a channel that isn’t a favorite, tap Search, search for the channel, tap the
channel in the search results, then tap Don’t Mute near the top of the screen.
3D Touch. Press a channel in Favorites or a story, swipe up, then tap Mute Channel.
See 3D Touch.
DRAFT
202
!
Read stories
APPLE CONFIDENTIAL
Read a story. Tap a story to read it. Web stories delivered through an RSS feed show a
preview. To view an RSS story in full, swipe up. To always view the full story, go to
Settings > News, then turn off Show Story Previews.
3D Touch. Press a story to take a peek at it. Swipe up to see options such as Love,
Save, Share Story, and Mute Channel. Press deeper to pop open the story. See 3D Touch.
Read the next story. When viewing a story, swipe left to read the next story, swipe
right to read the previous story. Swipe from the left edge to return to the list of stories.
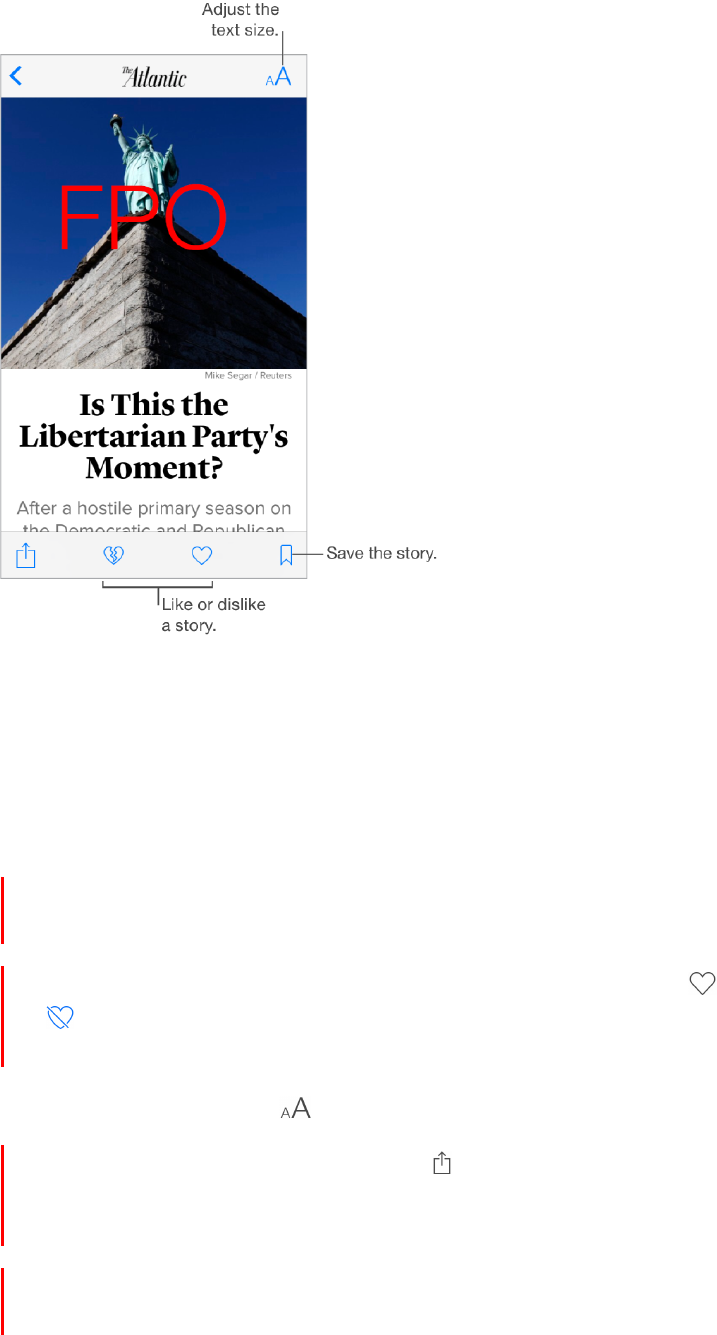
Tell News what you do and don’t love. When viewing a story, tap
to love the story;
tap
to dislike the story. Tap an icon again to return to a neutral setting. News takes
your feedback into account when picking new stories in For You.
Change the text size. Tap , then tap the smaller or larger letter to change the size.
Share stories. When viewing a story, tap , then choose a sharing option such as
Message or Twitter. To share a story in your list of stories, swipe left, tap Share, then
choose a sharing option.
Report a concern. If you believe a story you’re viewing is mislabeled, inappropriate,
offensive, or doesn’t display properly, swipe right, then tap Report.
DRAFT
203
!
Favorites
APPLE CONFIDENTIAL
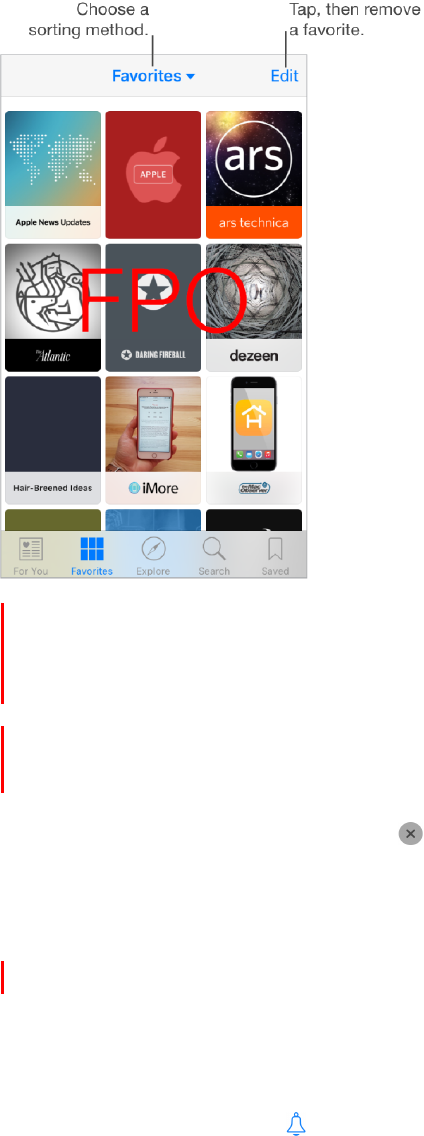
The channels and topics you select when you first open News appear in Favorites.
Favorites also includes channels and topics you add later.
Browse a channel’s stories. Tap a channel or publication to see the most recent
published stories. With some publishers you can also browse sections, such as Politics,
Sports, or Entertainment.
3D Touch. Press to peek at the current stories in the channel or topic. See
3D Touch.
Edit your favorites. Tap Edit, then tap
to delete a channel or topic that you no longer
wish to follow.
3D Touch. Press, swipe up, then tap Remove from Favorites. See 3D Touch.
Dig deeper into a topic. Tap a topic to see recent related stories.
Sort favorites. Tap Favorites at the top of the screen, then choose Sort by Most Recent
or Sort by Most Visited.
Manage notifications. Tap , then turn notifications on or off for your favorite channels.
Search
News keeps track of a wide variety of topics, which makes it easy to find the stories that
interest you.
DRAFT
204
!
APPLE CONFIDENTIAL
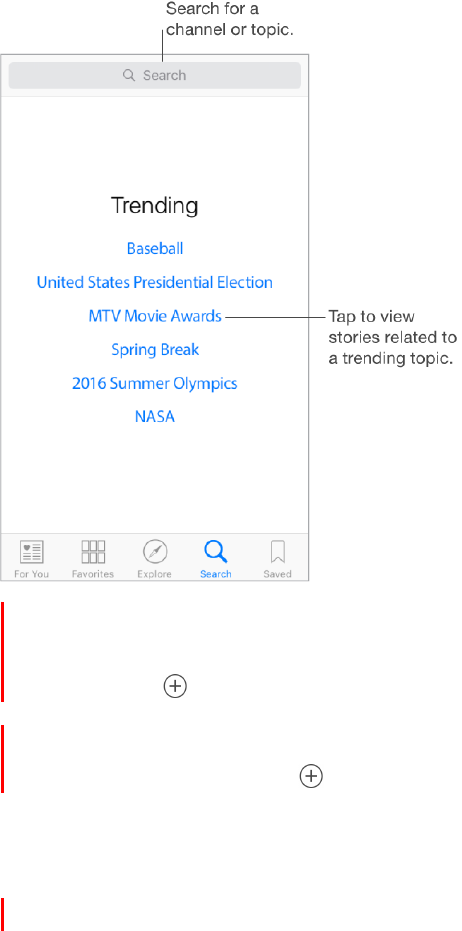
Search for channels and topics. Tap Search, then enter the name of a channel (CNN
or Wired, for example) or a topic (fashion, business, or politics, for example). In the
results list, tap
to add an item to your favorites.
View trending topics. Search offers trending topics to get you started. Tap a topic to
see related stories, then tap
to add a topic to your favorites.
Save stories
In News you can save stories to read later, online or offline.
DRAFT
205
!
APPLE CONFIDENTIAL
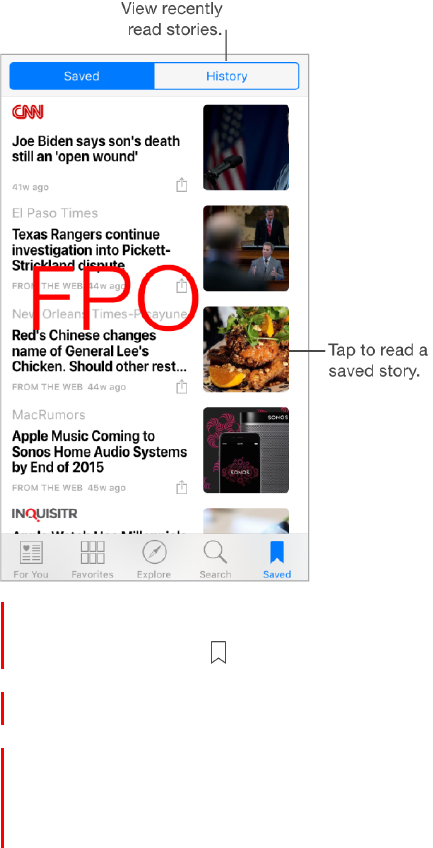
Save a story. When viewing your list of stories, swipe a story left, then tap Save. When
reading a story, tap
to save it. To read a saved story, tap Saved, then tap the story.
Delete a saved story. Tap Saved, then swipe a story left.
Check your reading history. Tap the History tab to see what you’ve read. Swipe a
story left to delete it. To clear your News history or the information used to create
recommendations, tap Clear, then choose one or both options.
DRAFT
206
!
APPLE CONFIDENTIAL
Health
Your health at a glance
The Health app gathers your health and fitness information and provides a clear and
current overview of your health. It collects data from other apps and devices, such as
Apple Watch, all in one place. With the Health app, you can sign up to be an organ
donor, save health records to iPhone, and share your data with family members or
healthcare providers. And, Health can display important contact and medical
information on the iPhone Lock screen for emergency responders.
WARNING: iPhone, Apple Watch, and the Health app are not medical devices. See
Important safety information.
Learn more about the health and fitness categories. Tap a category, such as Activity.
Each category provides an introductory video that explains the importance of this
health aspect and recommended apps to help you get started.
View a summary of your daily progress. Tap Today to see your stats for today. To
view your data from another day, tap a different date on the calendar.
DRAFT

207
!
APPLE CONFIDENTIAL
3D Touch. To quickly view your daily progress from the Home screen, press Health,
then tap Today. See 3D Touch.
Get started
The Health app automatically counts your steps and walking and running distances
(iPhone 5s and later). To gather additional health and fitness data, you can use other
apps (such as nutrition and fitness apps) and devices (such as blood pressure or
glucose monitors) that are compatible with Health.
Install third-party apps. To see recommended apps, tap a category, such as Activity.
Tap a recommended app to download it from the App Store. After you install and set up
the app, watch for a sharing request, where you can choose to share data with the
Health app.
Track your sleep history. If you set up Bedtime in the Clock app, the Health app tracks
your sleep history. To view your sleep history, tap Health Data, then tap Sleep.
Collect data from Apple Watch. After you pair Apple Watch with your iPhone, data is
automatically sent to the Health app. To view your move, exercise, and stand data and
goals, tap Health Data, then tap Activity. To see heart rate data, tap Health Data, tap
Vitals, then tap Heart Rate.
Collect data from another device. Follow the setup instructions for the device. If it’s a
Bluetooth device, you need to pair it with iPhone. See Bluetooth devices.
Manually enter data. Tap Health Data, navigate to the data type, then tap .
DRAFT

208
!
APPLE CONFIDENTIAL
Move your favorite data types to the top of the Today screen. Tap a category (such
as Activity), tap a data type (such as Steps), then turn on Add to Favorites.
Edit data. Tap Show All Data, then tap Edit.
Share health and fitness data
You can control how the Health app shares your health and fitness data with other apps.
For example, if your healthcare provider offers an app that sends your vital signs to your
doctor, you can install the app and allow the Health app to share specific data (such as
blood pressure).
Share data with another app. After you set up the app or device, watch for a sharing
request, where you control whether the Health app shares your data.
Control the sharing of data. Tap Sources to see the apps allowed to read or write data.
You can choose to stop sharing data with a specific app.
Export all your health data. Tap Health Data, tap , tap Export Health Data, then
choose a sharing option. Your data is exported in XML format, a common format for
sharing data between apps.
DRAFT

209
!
APPLE CONFIDENTIAL
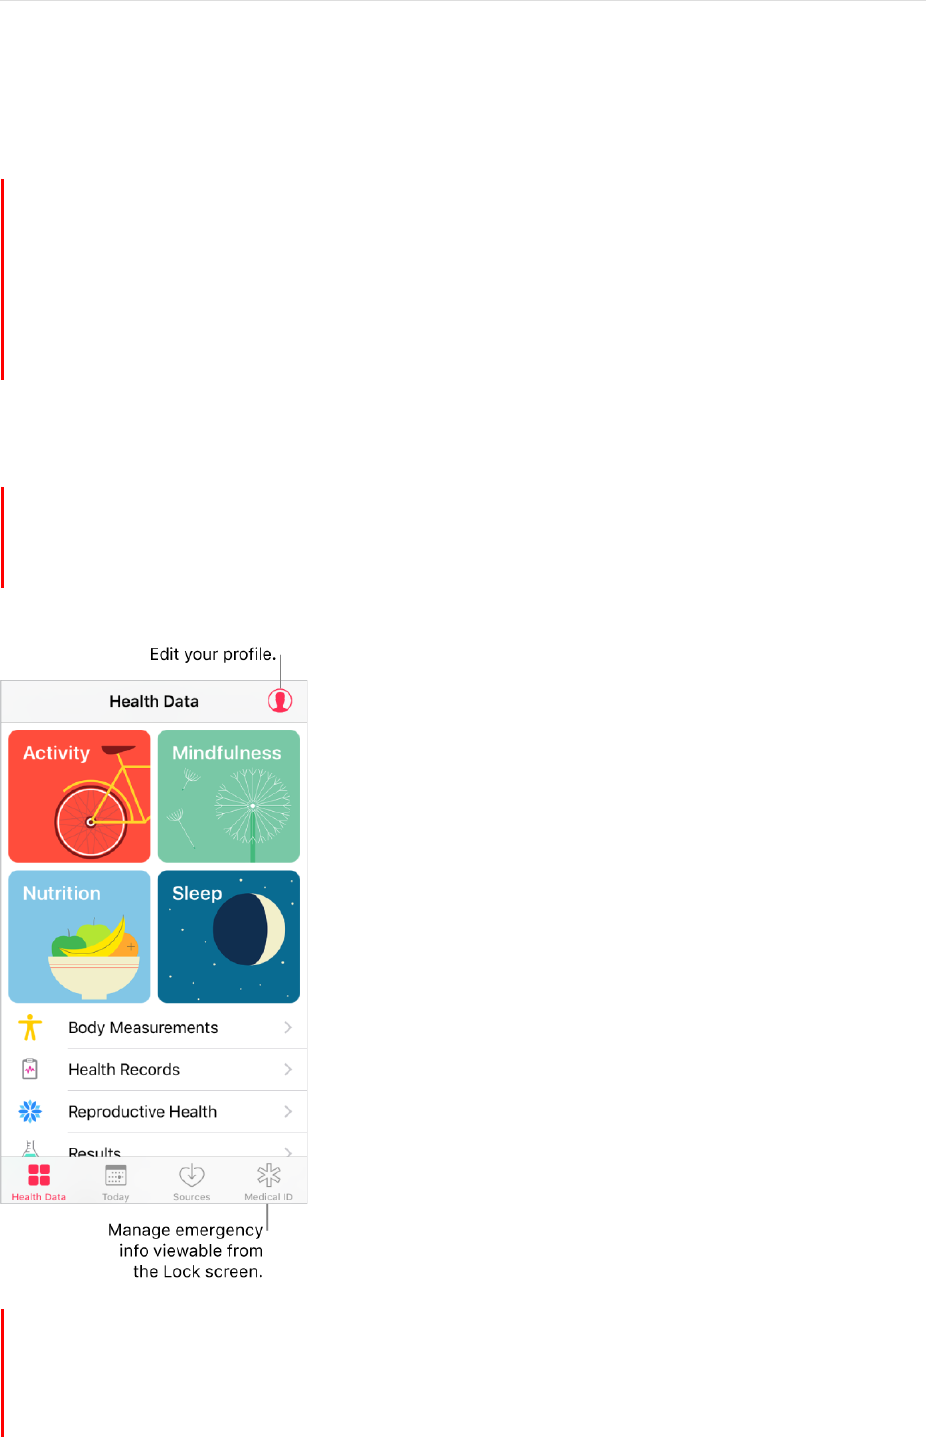
Create a Medical ID
In the Health app, you can create a Medical ID, which contains your critical contact and
medical information, such as medications and allergies. Emergency responders (and
anyone with physical access to your iPhone) can view your Medical ID from the Lock
screen without entering a passcode.
Set up your Medical ID. Tap Medical ID, then tap Create Medical ID.
Review or change your Medical ID. Tap Medical ID. To make changes, tap Edit.
3D Touch. To quickly view your Medical ID from the Home screen, press Health,
then tap Medical ID. See 3D Touch.
View your Medical ID from the Lock screen. Wake iPhone and press the Home button
without using Touch ID. On the passcode screen, tap Emergency, then tap Medical ID.
Prevent viewing from the Lock screen. Tap Medical ID, tap Edit, then turn off Show
When Locked.
Register as an organ, eye, or tissue donor (U.S. only)
A single organ donor can save or heal as many as eight lives. In the Health app, you can
register to be an organ, eye, or tissue donor with Donate Life America. After you
register, your Medical ID indicates that you are registered with Donate Life America.
Register with Donate Life America. Tap Medical ID, scroll down to Organ Donation,
then tap Sign Up with Donate Life.
View or edit your registration information. Tap Medical ID, scroll down to Organ
Donation, and tap Edit.
Add optional donation preferences. While viewing your registration information, scroll
down and tap Edit Donation Preferences. This takes you to your Donate Life America
profile page, where you can opt-in to research and education or specify restrictions on
certain organs.
Remove your registration. While viewing your registration information, scroll down and
tap Remove Me.
Import and view a health record
DRAFT

210
!
APPLE CONFIDENTIAL
A health record typically contains patient information such as medications,
immunizations, lab results, and more. If you receive a health record as a ZIP or XML file,
you can import and store it in the Health app. You can also share it with a family
member or another healthcare provider.
Import a health record. After you receive a health record through a message in Mail or
Messages, a website on Safari, or AirDrop, tap , then tap Add to Health .
View an imported health record. In the Health app, tap Health Data, tap Health
Records, then tap the health record.
Share a health record. While viewing the health record in the Health app, tap , then
choose a sharing option.
DRAFT

211
!
APPLE CONFIDENTIAL
FaceTime
FaceTime at a glance
Use FaceTime to make video or audio calls to other iOS devices or computers that
support FaceTime. The FaceTime camera lets you talk face-to-face; switch to the rear
iSight camera (not available on all models) to share what you see around you.
Note: FaceTime may not be available in all areas.
With a Wi-Fi connection and an Apple ID, you can make and receive FaceTime calls (first
sign in using your Apple ID, or create a new account). You can also make FaceTime calls
over a cellular data connection, which may incur additional charges. To turn off this
feature, go to Settings > Cellular. For more information about cellular usage and settings,
see Cellular data settings.
Set up FaceTime. Make sure FaceTime is turned on in Settings > FaceTime. You can also
specify a phone number, Apple ID, or email address to use with FaceTime and set your
caller ID.
DRAFT
212
!
APPLE CONFIDENTIAL
Make and answer calls
Make a FaceTime call. Make sure FaceTime is turned on in Settings > FaceTime. Tap
FaceTime, then type the name or number you want to call in the entry field at the top. Tap
to make a video call, or tap
to make a FaceTime audio call. Or tap
to open
Contacts
and start your call from there.
3D Touch. To quickly call or send a message to a recent contact, press a contact in
your list of FaceTime calls, then choose a quick action. See 3D Touch.
Leave a message. If no one answers your call, tap Leave a Message. You can also
choose to cancel the call or try calling back.
Want to call again? Tap FaceTime to see your call history on the screen. Tap Audio or
Video to refine your search, then tap a name or number to call again. Tap
to open the
name or number in Contacts.
Delete a call from call history. Tap FaceTime to see your call history on the screen.
Swipe to the left, then tap Delete to delete the name or number from your call history.
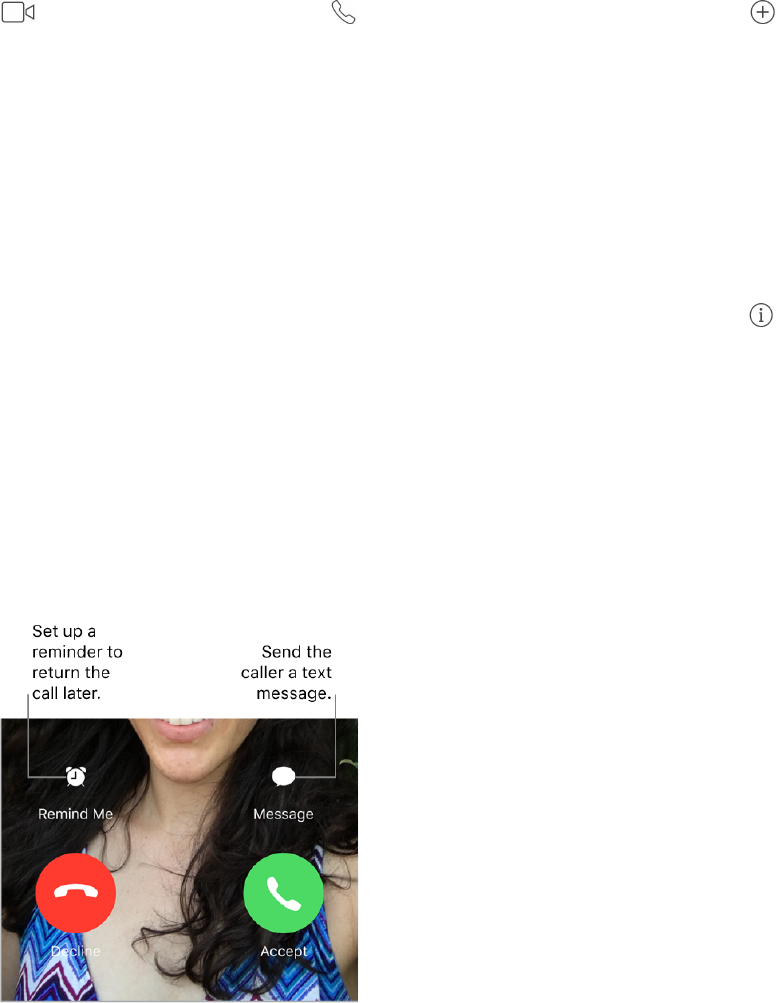
Can’t take a call right now? When a FaceTime call comes in, you can answer, decline, or
choose another option.
Ask Siri. Say something like: “Make a FaceTime call.”
See the whole gang. Rotate iPhone to use FaceTime in landscape orientation. To avoid
unwanted orientation changes, lock iPhone in portrait orientation. See Change the screen
orientation.
Manage calls
Multitask during a call. Press the Home button, then tap an app icon. You can still talk
with your friend, but you can’t see each other. To return to the video, tap the green bar at
the top of the screen.
DRAFT

213
!
APPLE CONFIDENTIAL
Juggle calls. FaceTime calls aren’t forwarded. If another call comes in while you’re on a
FaceTime call, you can either end the first call and answer the incoming call, decline the
incoming call, or reply with a text message. You can use call waiting with FaceTime audio
calls only.
Use call waiting for audio calls. If you’re on a FaceTime audio call and another call
comes in—either a phone call or another FaceTime audio call—you can decline the call,
end the first call and accept the new one, or put the first call on hold and respond to the
new call.
Block unwanted callers. Go to Settings > FaceTime > Blocked > Add New. You won’t
receive voice calls, FaceTime calls, or text messages from blocked callers. For more
information about blocking calls, see the Apple Support article Block calls and block or
filter messages.
Calculator
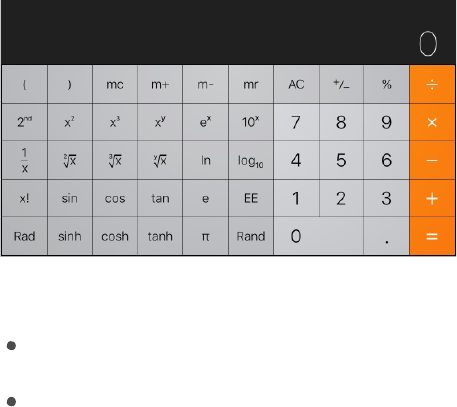
Tap numbers and functions in Calculator, just as you would with a standard calculator.
Tip: To get to Calculator quickly, swipe up from the bottom edge of the screen to
open Control Center.
Clear the calculation results. Tap the All Clear key.
Use the scientific calculator. Rotate iPhone to landscape orientation.
DRAFT
214
!
APPLE CONFIDENTIAL
Ask Siri. Say something like:
“What’s 74 times 9?”
“What’s 18 percent of 225?”
DRAFT
215
!
APPLE CONFIDENTIAL
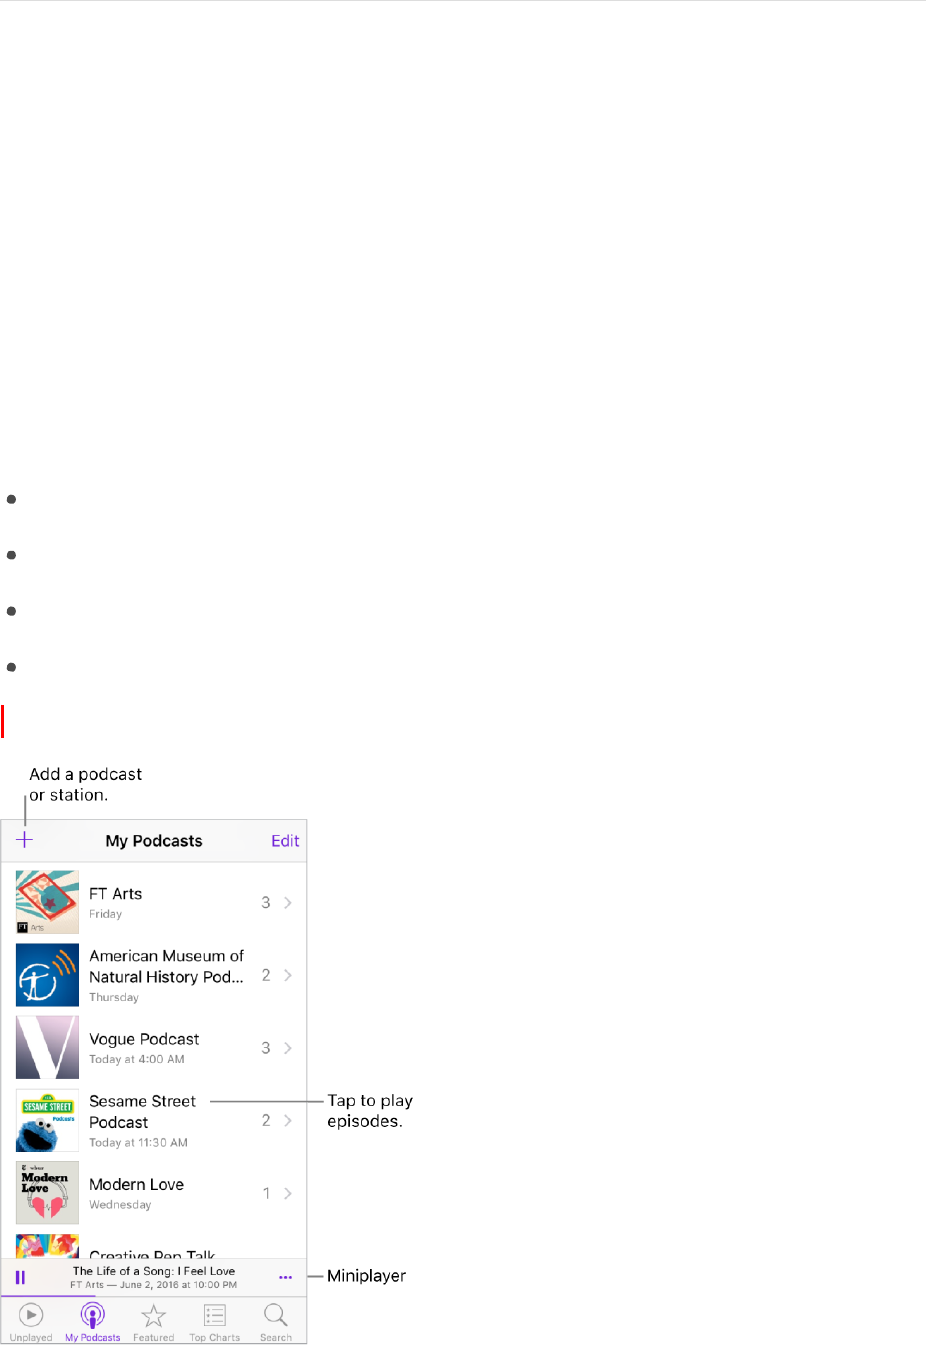
Podcasts
Podcasts at a glance
Open the Podcasts app, then browse, subscribe to, and play your favorite audio or video
podcasts on iPhone.
Podcasts are free shows that you can play like you would a radio or TV show. Some
podcasts are individual episodes; some are series. You can stream them over your Wi-Fi
or cellular Internet connection, or you can download them to your iPhone to play when
you’re offline.
Ask Siri. Say something like:
“Play podcasts”
“Play it twice as fast”
“Skip this episode”
“Play ‘Freakonomics Radio’ podcast”
Change the callout below from “Miniplayer” to “MiniPlayer”
DRAFT

216
!
APPLE CONFIDENTIAL
Get podcasts and episodes
Discover podcasts. Tap Featured or Top Charts at the bottom of the screen.
Search for podcasts and episodes. Tap Search at the bottom of the screen, then start
typing the name of a podcast or episode.
Play an episode. Tap it. An episode that isn’t downloaded is streamed to iPhone.
Download an episode to iPhone. Tap
next to the episode. You can play it later, even
when you’re offline.
Subscribe to a podcast. Get new episodes as they’re released. If you’re browsing
Featured podcasts or Top Charts, tap the podcast, then tap Subscribe. If you’ve already
downloaded episodes, tap My Podcasts, tap a podcast that appears below Not
Subscribed, tap , then turn on Subscribed.
To sync your podcast subscriptions on all your devices, go to Settings > Podcasts, then
turn on Sync Podcasts.To choose how frequently Podcasts checks your subscriptions
for new episodes, go to Settings > Podcasts > Refresh Every, then choose an option.
Change the download settings for a podcast. You can turn off automatic downloads or
specify whether to download all unplayed episodes or only new episodes. Tap My
Podcasts, tap a podcast, tap , tap Download Episodes, then tap an option.
To change the default setting for all podcasts, go to Settings > Podcasts > Download
Episodes.
Limit downloads to Wi-Fi connections. To prevent podcast downloads from using
cellular data, go to Settings > Podcasts, then turn on Only Download on Wi-Fi.
Unsubscribe from a podcast. Tap My Podcasts, tap a podcast, tap , then turn off
Subscribed.
Manage your podcast library
View your podcast library. Tap My Podcasts at the bottom of the screen. Tap a
podcast to see its episodes.
DRAFT

217
!
APPLE CONFIDENTIAL
Find unplayed episodes. To see the unplayed episodes of a podcast in your library, tap
the podcast, then tap Unplayed above the list of episodes. To see the unplayed
episodes of all podcasts in your library, tap Unplayed at the bottom of the screen.
3D Touch. To peek at a list of unplayed episodes, press a podcast title in My
Podcasts. To play the episodes, swipe up, then tap Play. To play unfinished episodes
from the Home screen, press Podcasts, then choose an episode. See 3D Touch.
Search your library. Tap My Podcasts, then drag down the center of the screen to reveal
the Search field.
Download an episode. You see
next to an episode in your podcast library that isn’t
downloaded. To download it, tap
next to the episode, then tap Download Episode or
Save Episode. (To help you find the download more easily when you want to return to it,
Save Episode marks the download as Saved in the list of episodes.)
Remove a download. Tap
next to an episode in your podcast library, then tap
Remove Download.
Get more info about an episode. Tap , then tap View Full Description. Tap any links
to open them in Safari.
Add an episode to Up Next. Tap , then tap Add to Up Next or Play Next.
Browse for more episodes. To see additional episodes of a podcast, tap My Podcasts,
tap the podcast, then tap Feed.
Save multiple episodes at once. Tap My Podcasts, tap a podcast, tap Edit, select
individual episodes, then tap Save. Or, tap Unplayed at the bottom of the screen, tap
Edit, select individual episodes, then tap Save. Saving an episode always causes it to be
DRAFT

218
!
APPLE CONFIDENTIAL
downloaded. (To help you more easily find those downloads that you want to return to,
saved downloads are marked as Saved in the list of episodes.)
Find saved episodes. Tap My Podcasts, tap a podcast, then tap Saved above the list of
episodes.
List oldest episodes first. Tap My Podcasts, tap a podcast, tap , then tap Sort Order.
Share an episode. Tap
next to an episode in your podcast library, tap Share
Episode, then choose a sharing option.
Share a podcast. Tap My Podcasts, tap a podcast, tap , then choose a sharing
option.
Delete episodes and podcasts
Delete an episode. While viewing a list of episodes in your podcast library, swipe an
episode all the way to the left.
Delete multiple episodes. Tap My Podcasts, tap a podcast, tap Edit, select individual
episodes, then tap Delete. Or, tap Unplayed at the bottom of the screen, tap Edit, select
individual episodes, then tap Delete.
Automatically delete played episodes. For all podcasts, go to Settings > Podcasts >
Delete Played Episodes. To turn the option on or off for an individual podcast, tap My
Podcasts, tap a podcast, tap , then tap Delete Played Episodes.
Delete a podcast. Tap My Podcasts, tap Edit, then tap .
Control playback
Use the playback controls on the Now Playing screen to go forward and back in a
podcast, set the speed, reorder the Up Next list, and more.
Show the Now Playing screen. Tap the MiniPlayer near the bottom of the screen. To
hide Now Playing, swipe down the podcast art or tap .
DRAFT

219
!
APPLE CONFIDENTIAL
See podcast info while you listen. Tap the podcast image on the Now Playing screen.
Skip forward or back within the episode. Tap an arrow.
Skip forward or back with greater accuracy. Move your finger toward the top of the
screen as you drag the playhead left or right. When you’re close to the playback controls,
you can scan quickly through the entire episode. When you’re close to the top of the
screen, you can scan one second at a time.
See what’s up next. Tap . Tap a podcast to play it and those that follow. Drag
to
reorder the list.
Set a sleep timer. Before starting playback, tap , then choose how long the podcast
plays before it stops.
Play the podcast on an AirPlay-enabled device. Tap , then choose a device. For
more about AirPlay and other ways to connect, see AirPlay.
Control playback with an Apple headset.
Pause: Press the center button. Press again to resume playback.
Skip to the next episode: Press the center button twice quickly.
Return to the previous episode: Press the center button three times quickly.
Fast-forward: Press the center button twice quickly, then hold.
Rewind: Press the center button three times quickly, then hold.
Reach Siri: Press and hold the center button. See Make requests.
Organize your favorites into stations
Organize your favorite podcasts into custom stations.
DRAFT

220
!
APPLE CONFIDENTIAL
Create a station. Tap My Podcasts, tap , then tap Add Station. Name your station, tap
Save, then add podcasts. To play the podcasts in your station, tap My Podcasts, then tap
next to the station.
3D Touch. To peek at station episodes, press a station. To play them, swipe up, then
tap Play. See 3D Touch.
Change the order of the station list. Tap My Podcasts, tap Edit, then drag
up or
down.
Change the playback order of shows in a station. Tap a station, tap Edit, then drag
up or down.
Delete a station. Tap My Podcasts, tap Edit, then tap .
DRAFT

221
!
APPLE CONFIDENTIAL
Compass
Compass at a glance
Open Compass in the Extras folder to find a direction, see your latitude and longitude,
find level, or match a slope.
3D Touch. To quickly access Compass, tap Extras on the Home screen, press
Compass, then choose the Start Compass quick action. See 3D Touch.
See your location. To see your current location, go to Settings > Privacy > Location
Services, then turn on Location Services and Compass. For more about Location
Services, see Privacy.
See your location in Maps. Tap the coordinates at the bottom of the screen to open
Maps and display your location.
Stay on course. Tap the screen to lock in the current heading, then watch for a red band
to see if you’re off course.
Important: The accuracy of the compass can be affected by magnetic or environmental
interference; even the magnets in the iPhone earbuds can cause a deviation. Use the
digital compass only for basic navigation assistance. Don’t rely on it to determine precise
location, proximity, distance, or direction.
DRAFT
222
!
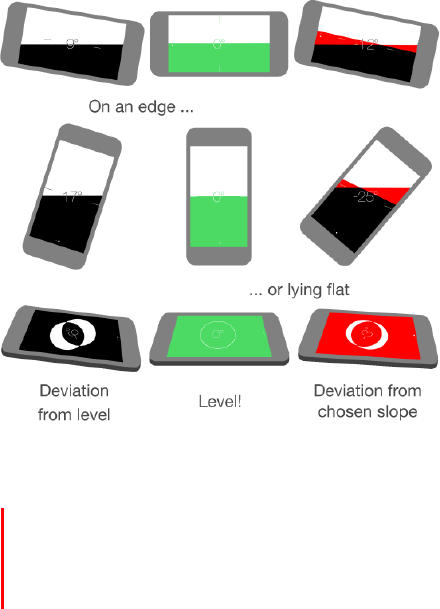
On the level
APPLE CONFIDENTIAL
Show the level. Swipe left on the Compass screen.
Quickly access the level from the Home screen. On iPhone 6s and iPhone 6s Plus,
tap Extras on the Home screen, press Compass, then choose the Start Level quick
action. See 3D Touch.
Hang it straight. Hold iPhone against a picture frame or other object, then rotate them
until you see green. For true level, the deviation is displayed on a black background. If
the background is red (indicating relative slope), tap the screen to change it to black.
Match that slope. Hold iPhone against the surface you want to match, then tap the
screen to capture the slope. The slope you seek is shown in black, with deviation shown
in red. Tap again to return to standard level.
DRAFT
223
!
APPLE CONFIDENTIAL
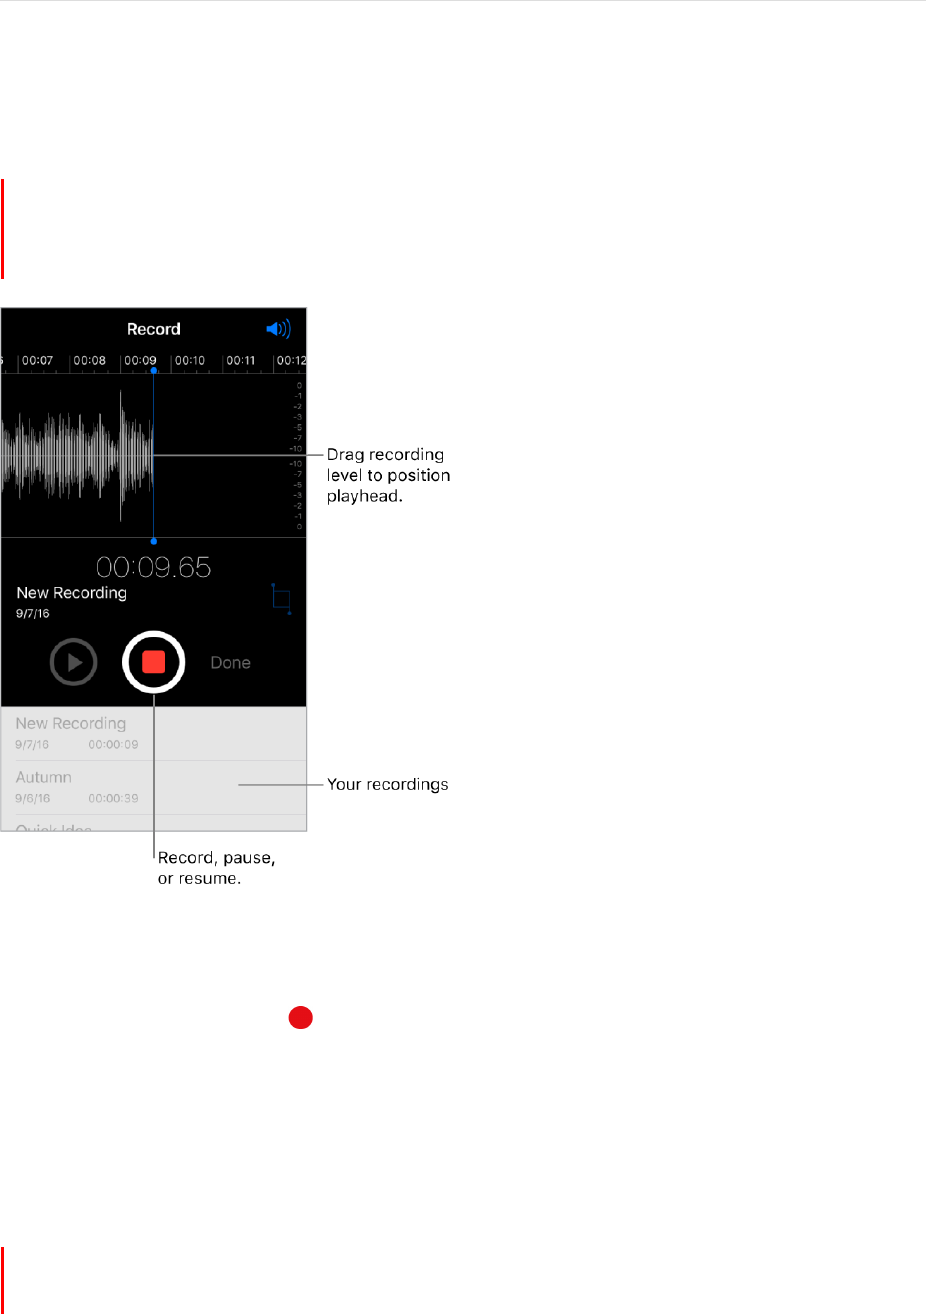
Voice Memos
Voice Memos at a glance
With Voice Memos you can use iPhone as a portable recording device. Use it with the
built-in microphone, an iPhone or Bluetooth headset mic, or a supported external
microphone.
Record
Record a voice memo. Tap
or press the center button on your headset. Tap again to
pause or resume.
Recordings using the built-in microphone are mono, but you can record stereo using an
external stereo microphone that works with the iPhone headset jack (on models other
than 2016 IPHONE and 2016 IPHONE PLUS), or with the Lightning connector. Look for
accessories marked with the
Apple “Made for iPhone” or “Works with iPhone” logo.
3D Touch. To start recording a voice memo from the Home screen, press Voice
Memos, then choose the New Recording quick action. See 3D Touch.
Adjust the recording level. Move the microphone closer to what you’re recording. For
better recording quality, the loudest level should be between –3 dB and 0 dB.
DRAFT
224
!
APPLE CONFIDENTIAL
Preview before saving. Tap
to the left of the Record button. To position the
playhead, drag the recording level display left or right.
Record over a section. Drag the recording level display to position the playhead, then
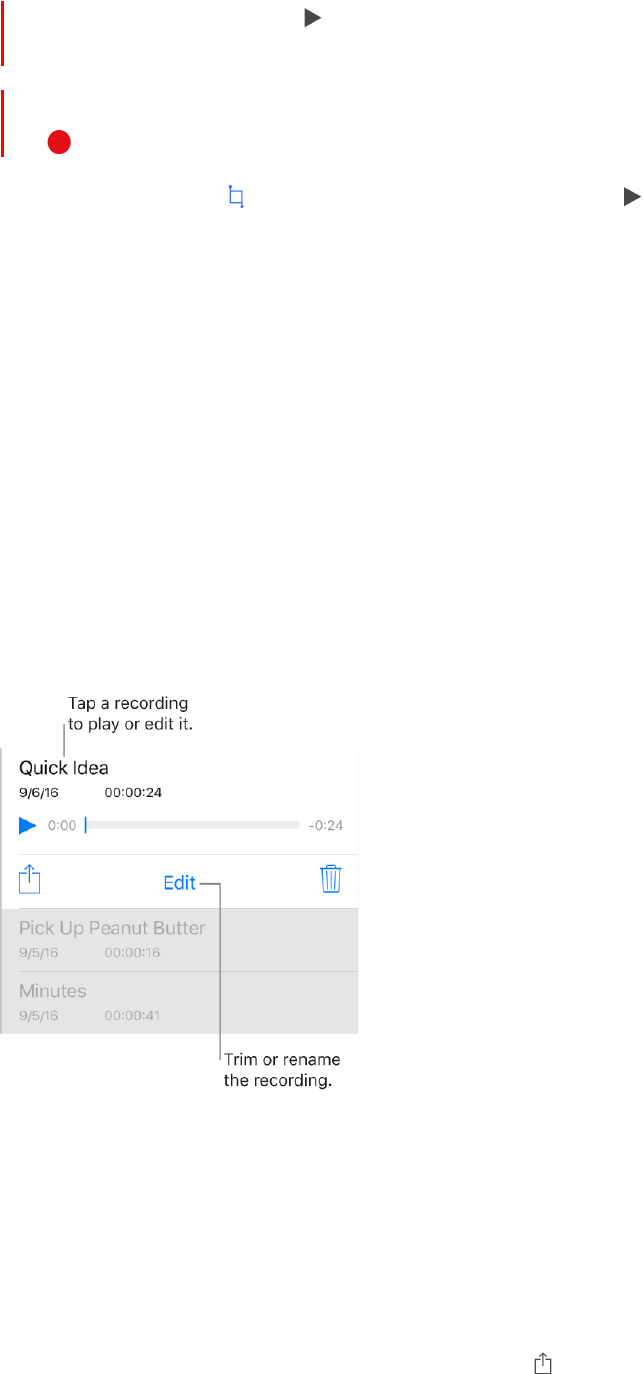
Trim the excess. Tap , then drag the red trim handles. Tap
to check your edit. Adjust
the trim handles if necessary, then tap Trim to remove everything outside the trim
handles.
To remove the sound between the trim handles, tap Delete.
Save the recording. Tap Done.
Mute the start and stop tones. Use the iPhone volume buttons to turn the volume all
the way down.
Multitask. To use another app while you’re recording, press the Home button, then open
the other app. To return to Voice Memos, tap the red bar at the top of the screen.
Play it back
Rename a recording. Tap the name of the recording.
Share and sync recordings
You can share individual voice memos and sync all your voice memos with the iTunes
library on your computer.
Share a voice memo. Tap a saved voice memo, tap , then choose a sharing option or
save the memo to iCloud Drive.
tap
.
DRAFT

225
!
APPLE CONFIDENTIAL
Sync voice memos with iTunes. Connect iPhone to your computer. Open iTunes on
your computer, then select iPhone near the top-left corner. Select Music in the sidebar,
select Sync Music, select “Include voice memos,” then click Apply. Or, if iCloud Music
Library is enabled on iPhone, select “Sync voice memos,” then click Apply.
When you delete a synced voice memo from iTunes, it stays on the device where it was
recorded, but it’s deleted from any other iPhone or iPod touch you synced. If you delete
a synced voice memo on iPhone, it’s copied back to iPhone the next time you sync with
iTunes, but you can’t sync that copy back to iTunes a second time.
Voice memos synced from iPhone to your computer appear in the Music list and in the
Voice Memos playlist in iTunes. Voice memos synced from your computer appear in the
Voice Memos app on iPhone, but not in the Music app.
DRAFT
226
!
APPLE CONFIDENTIAL
Contacts
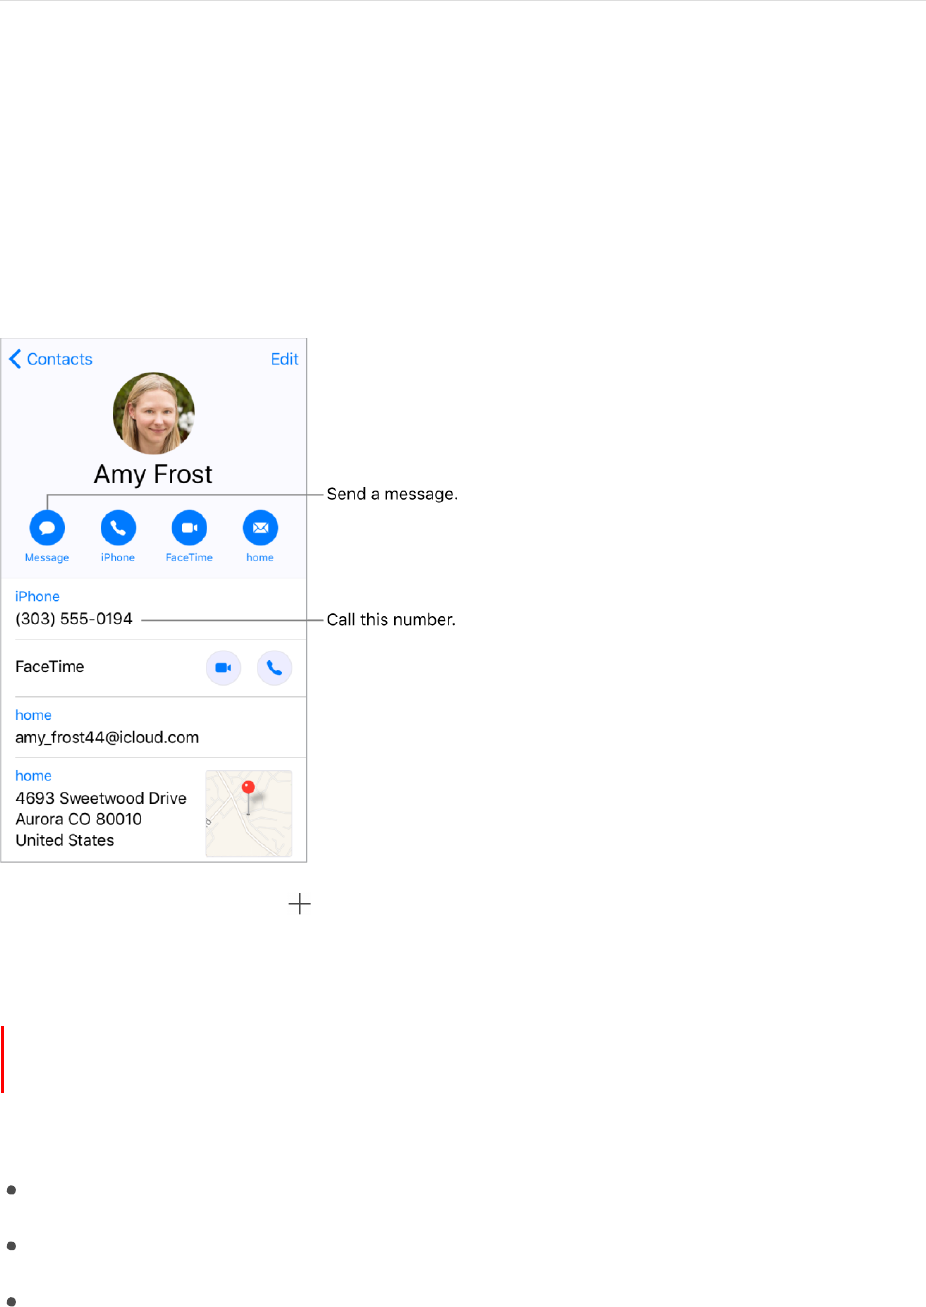
Contacts at a glance
You can find the Contacts app in the Extras folder. Contacts lets you see and edit your
contact lists from personal, business, and other accounts. You can also set up a contact
card with your own information.
Create a new contact. Tap .
iPhone automatically suggests new contacts from Mail. Turn this on or off in Settings >
Contacts > Contacts Found in Mail.
3D Touch. To create a contact from the Home screen, tap Extras, press Contacts,
then choose the Create New Contact quick action. See 3D Touch.
Ask Siri. Say something like:
“What’s my brother’s work address?”
“Sarah Castelblanco is my sister”
“Send a message to my sister”
Find a contact. Tap the search field at the top of the contacts list, then enter your
search. You can also search your contacts using Search (see Search).
DRAFT

227
!
APPLE CONFIDENTIAL
Quickly reach a contact. Tap one of the buttons under your contact’s name to start a
message, call, video or email. To change the default contact method (for a call, for
example), touch and hold the call button, then tap the phone number you’d like to set as
the default.
Change how your contacts are sorted and displayed. Go to Settings > Contacts.
Share a contact. Tap a contact, then tap Share Contact. See Share from apps. Sharing a
contact shares all the info from the contact’s card.
Assign a photo to a contact. Tap a contact, tap Edit, then tap “add photo.” You can take
a photo or add one from the Photos app.
Change a label. If a field has the wrong label, such as Home instead of Work, tap Edit.
Then tap the label and choose one from the list, or tap Add Custom Label to create one
of your own.
Add your friends’ social profiles. While viewing a contact, tap Edit, then tap “add social
profile.” You can add Twitter, Facebook, Flickr, LinkedIn, Myspace, and Sina Weibo
accounts, or create a custom entry.
Delete a contact. Go to the contact’s card, then tap Edit. Scroll down, then tap Delete
Contact.
Set your contact info
Set your My Info card. Go to Settings > Contacts, tap My Info, then select the contact
card with your name and information. If you don’t already have a card with your own
information, open Contacts, then tap .
Edit your My Info card. Tap My Card under Search in Contacts, then tap Edit.
Create or edit your Medical ID. When viewing your My Info card, tap Edit, then scroll
down and tap Create Medical ID or Edit Medical ID.
Add contact accounts
Besides adding contacts individually, you can:
Use your iCloud contacts: Go to Settings > iCloud, then turn on Contacts.
Import your Facebook Friends: Go to Settings > Facebook, then turn on Contacts in
the “Allow These Apps to Use Your Accounts” list. This creates a Facebook group in
Contacts.
Add contacts from another account: Go to Settings > Contacts, then tap Add
Account.
DRAFT

228
!
APPLE CONFIDENTIAL
Access a Microsoft Exchange Global Address List: Go to Settings > Contacts, tap
your Exchange account, then turn on Contacts.
Set up an LDAP or CardDAV account to access business or school directories: Go to
Settings > Contacts > Add Account > Other. Tap Add LDAP account or Add CardDAV
account, then enter the account information.
Sync contacts from your computer: In iTunes on your computer, turn on contact
syncing in the device info pane. For information, see iTunes Help.
Import contacts from a SIM card (GSM): Go to Settings > Contacts > Import SIM
Contacts.
Import contacts from a vCard: Tap a .vcf attachment in an email or message.
Search a directory. Tap Groups, tap the GAL, CardDAV, or LDAP directory you want to
search, then enter your search. To save a person’s info to your contacts, tap Add
Contact.
Show or hide a group. Tap Groups, then select the groups you want to see. This button
appears only if you have more than one source of contacts.
Update your contacts using Twitter, Facebook, and Sina Weibo. Go to Settings >
Twitter, Settings > Facebook, or Settings > Sina Weibo, then tap Update Contacts. This
updates contact photos and social media account names in Contacts.
Use Contacts from within the Phone app
Add a Favorite. Put VIP contacts in your Favorites list for quick dialing. Tap a Contact,
then scroll down and tap Add to Favorites. Calls from these contacts bypass Do Not
Disturb (see Do Not Disturb).
3D Touch. To quickly view favorite contacts, tap Extras, then press Contacts. See
3D Touch.
Save the number you just dialed. In Phone, tap Keypad, enter a number, then tap .
Tap Create New Contact, or tap Add to Existing Contact, then choose a contact.
Add a recent caller to Contacts. In Phone, tap Recents, then tap
next to the number.
Tap Create New Contact, or tap Add to Existing Contact, then choose a contact.
Automate dialing an extension or passcode. If the number you’re calling requires
dialing an extension, iPhone can enter it for you. When editing a contact’s phone number,
tap
to enter pauses in the dialing sequence. Tap Pause to enter a two-second
pause, which is represented by a comma. Tap Wait to stop dialing until you tap Dial
again, which is represented by a semicolon.
DRAFT

229
!
APPLE CONFIDENTIAL
Hide duplicate contacts
When you have contacts from multiple sources, you might have multiple entries for the
same person. To keep redundant contacts from appearing in your All Contacts list,
contacts from different sources with the same name are linked and displayed as a single
unified contact. When you view a unified contact, the title Unified Info appears.
Link contacts. If two entries for the same person aren’t linked automatically, you can
unify them manually. Tap one of the contacts, tap Edit, tap Link Contacts, choose the
other contact entry to link to, then tap Link.
When you link contacts with different first or last names, the names on the individual
cards don’t change, but only one name appears on the unified card. To choose which
name appears on the unified card, tap one of the linked cards, tap the contact’s name on
that card, then tap Use This Name For Unified Card.
Note: When you link contacts, those contacts aren’t merged. If you change or add
information in a unified contact, the changes are copied to each source account where
that information already exists.
DRAFT

230
!
APPLE CONFIDENTIAL
iCloud Drive
iCloud Drive at a glance
iCloud Drive stores your documents—including your presentations, spreadsheets, and
images—in iCloud, so you can access them from any of your devices set up with iCloud.
iCloud Drive allows your apps to share documents so you can work on the same file
across multiple apps.
You can use iCloud Drive on devices with iOS 8 or later, Mac computers with OS X
v10.10 or later, PCs with iCloud for Windows 5 or later, or on iCloud.com. To access
iCloud Drive, you must be signed in to iCloud with your Apple ID. Storage limits are
subject to your iCloud storage plan.
Set up iCloud Drive
Set up iCloud Drive. Go to Settings > iCloud > iCloud Drive, then turn on iCloud Drive
and follow the onscreen instructions. If you’re asked to upgrade to iCloud Drive, see the
Apple Support Article iCloud Drive FAQ.
Choose which apps use iCloud Drive. Go to Settings > iCloud > iCloud Drive, then
turn iCloud Drive on or off for the apps that support it.
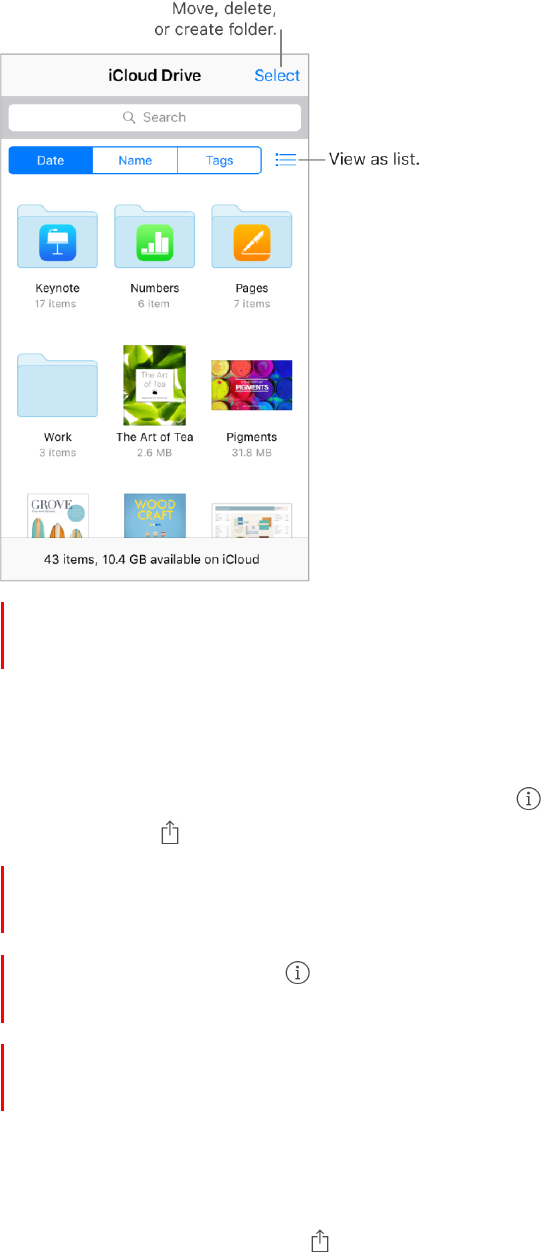
Use the iCloud Drive app
Typically you access documents in Cloud Drive using the app that created them. For
example, with Keynote, you can access all of your presentation documents directly in
iCloud Drive. If you want to see all of the documents in iCloud Drive at once, use the
iCloud Drive app.
DRAFT
231
!
APPLE CONFIDENTIAL
3D Touch. To access a recent file or search iCloud Drive from the Home screen,
press iCloud Drive, then choose a quick action. See 3D Touch
Open a document. Tap a document’s icon to open it in the app that created the file. If
you don’t have the app installed, a preview of it opens in Quick Look.
Open a copy of a document in another app. Tap
next to the document you want to
open. Then tap
and choose a sharing action.
3D Touch. Press a document’s icon to see a preview, then swipe up for options. Or,
press deeper to open it. See 3D Touch.
Rename a document. Tap
next to the document you want to rename. Then tap the
name to edit it.
Move or delete a document. Tap Select, select the documents and folders you want,
then tap either Move or Delete.
Create a new folder. Tap Select, then tap New Folder.
Save a copy of a document to iCloud Drive. When you’re viewing a document, such as
a photo using Quick Look, tap , then tap Save to iCloud Drive.
DRAFT
232
!
APPLE CONFIDENTIAL
Home
Home at a glance
Home provides a secure way to control and automate HomeKit-enabled accessories,
such as lights, locks, thermostats, window shades, smart plugs, cameras, and more.
With Home, you can control any “Works with Apple HomeKit” accessory using iPhone.
After you set up your home and its rooms, you can control your accessories individually,
or use scenes to control multiple accessories with one command. For example, you
might create a scene called “going to bed” that turns off the lights around the house,
but dims the lights in the room “master bedroom” to 30%, then locks the front door and
lowers the thermostat.
If you have an Apple TV, or an iPad that you leave at home, you can schedule scenes to
run automatically run at certain times, or when you activate a particular accessory (such
as unlocking the front door). Also, by using Location Services as a trigger, you can have
scenes automatically activated when you leave or arrive at a location. Finally, you, and
others you invite, can securely control your home while you’re away.
DRAFT

233
!
APPLE CONFIDENTIAL
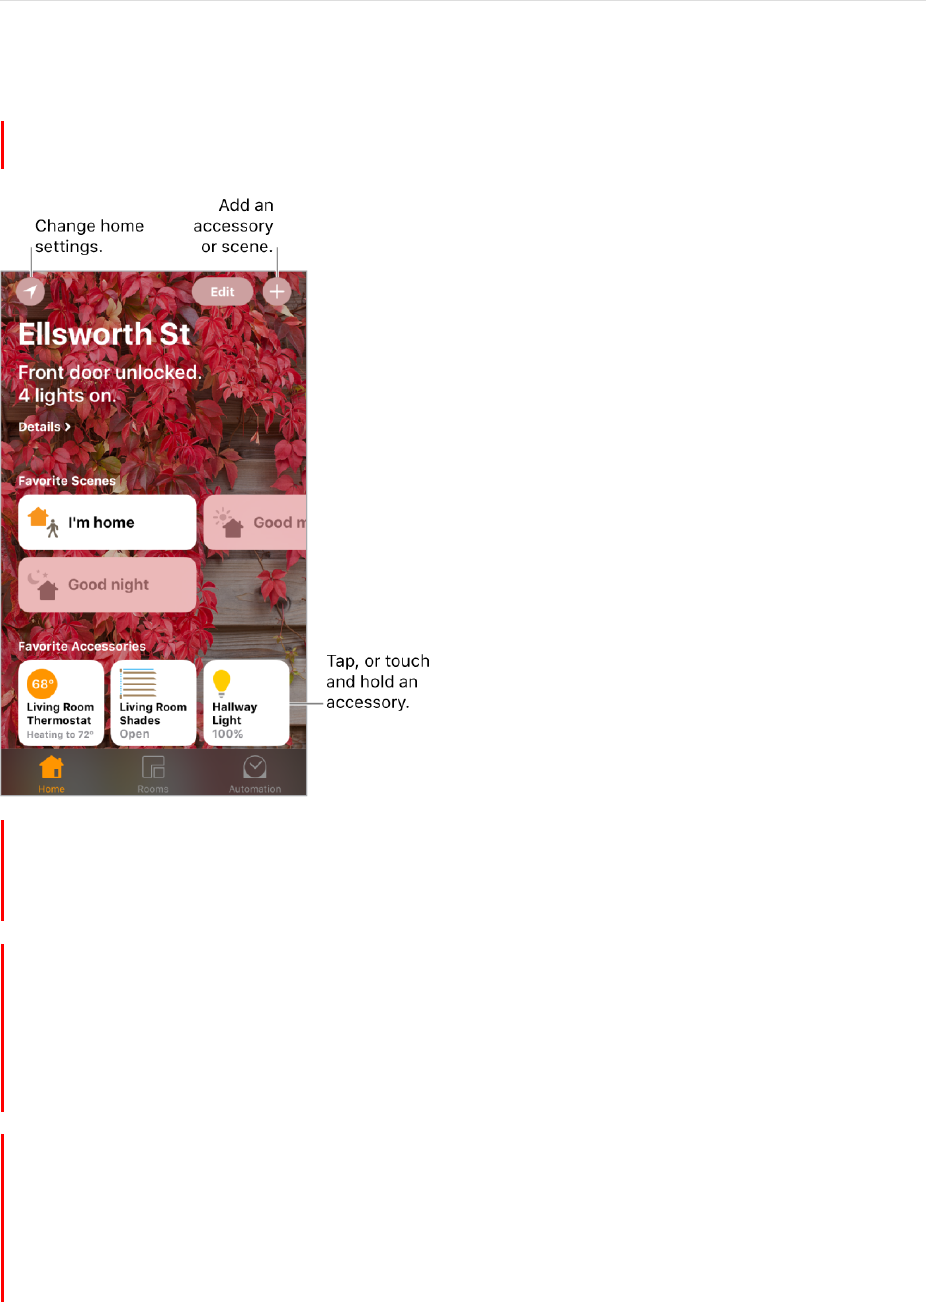
Add and control accessories
The first time you open the Home app, the setup assistant helps you create a home,
where you can add accessories and define rooms. If you already created a home using
another HomeKit-enabled app, you’ll skip this step.
Add an accessory to your home. To add an accessory to Home, make sure the
accessory is turned on, tap , tap “Add Accessory,” then follow the onscreen
instructions. You’ll need to scan or enter the 8-digit HomeKit setup code found on the
accessory itself (or its box or documentation). You can assign the accessory to a room,
as well as give it a name. The name defines how it’s shown in the Home app, and also
how you control it using Siri.
Control an accessory. Tap an accessory’s button to quickly turn it on or off, or touch
and hold the button until controls appear. The available controls depend on the type of
accessory it is. For example, with some lightbulbs can adjust the brightness change
colors. You can also control accessories using Control Center.
Assign an accessory to a room. Tap Rooms, tap
and choose the room the
accessory is currently assigned to. (If it’s not already assigned, look in Default Room.)
Touch and hold the accessory’s button until its controls appear, then tap Details. Tap
Location to assign it to a room.
Rename or edit an accessory. Touch and hold the accessory’s button until its controls
appear, then tap Details.
Edit a room. Tap , tap Room Settings, then choose the room to edit. You can change
the room’s name, wallpaper, or delete the room.
Make an accessory a favorite. Touch and hold an accessory’s button until its control
appear, then tap Details. Then turn on “Included in Favorites.” You can access your
favorite accessories from the Home tab or Control Center.
Rearrange your favorites. Tap Edit, then drag the buttons into the arrangement you
want.
Add more homes. Tap , then tap Add Home. After you add another home, tap
to
choose the one you want to view or control.
Create and use scenes
Scenes allow you to control multiple accessories at once. For example, you might define
a “Reading” scene that adjusts the lights, then closes the drapes, and then adjusts the
thermostat. Home has some typical scenes already defined for you, but you’ll need to
edit them before they’ll work.
DRAFT

234
!
APPLE CONFIDENTIAL
Make a scene. Tap , enter a name for the scene (such as “Dinner Party”), then tap
Add Accessories. Select the accessories you want this scene to control, then tap Done.
Next, set each accessory to change it to the state you want it to be when the scene is
run. For example, you can set up the scene so that when y ou turn on lights in the
bedroom, the lights in the kitchen are turned off.
Run a scene. Tap a scene to run it. If you don’t see the scene you want to run, look in a
different room.
Change a scene.Touch and hold a scene, then tap Details.
Make a scene a favorite. Touch and hold a scene, tap Details, then tap Show in
Favorites. Favorite scenes appear on the Home tab and are handy for scenes that aren’t
automated.
Automations
You can control an accessory or run a scene automatically based on the time of day,
your location, a sensor being activated, or the action of an accessory. To use
automations you need to have an Apple TV (4th generation or later), or an iPad that you
leave at home, either of which can act as a hub that performs the automations you
define.
If you have an Apple TV using the same iCloud account as your iPhone, it will be paired
automatically and enabled for automation. To set up iPad for automation, see the Home
chapter of iPad User Guide.
Create an automation. Tap the Automation tab, tap Create New Automation, then
choose one of the automation triggers described below.
When arriving or leaving a location. Tap My Location Changes, then set a geofence
and if you want the trigger to occur when you arrive or leave the location. You can also
set this automation to only occur after sunset, which is useful for turning on lights only
when they’re needed.
At a time of day. Tap A Time of Day Occurs, then choose when you want this
automation to run. If you choose Sunset or Sunrise, the time will vary as the season
changes.
When an accessory changes. Tap An Accessory is Controlled, select an accessory,
then tap Next and follow the onscreen instructions. You might use this, for example, to
run a scene when you unlock the front door.
A sensor detects something. Tap A Sensor Detects Something, select an accessory,
then tap Next and follow the onscreen instructions. You might use this, for example, to
turn on lights in a stairway when motion is detected nearby.
DRAFT

235
!
APPLE CONFIDENTIAL
Disable an automation. In the Automations tab, tap the automation, then turn off
Enable This Automation.
Share control with others
You can invite others to control the accessories in your home. The people you invite
need an iCloud account. They’ll be able to control and see the status of your
accessories.
Give others control. Tap the Home tab, then tap . Tap Invite, then choose from your
Contacts list or enter mail addresses.
Control your home from afar
To allow control of your home when you’re away andiPhoneis not connected to your
home Wi-Fi network, commands can be securely relayed via iCloud to an Apple TV
(4th generation or later) or iPad that is in your home. The Apple TV or iPad can also act
as a hub, running your automated scenes and actions as they are scheduled or
triggered.
Allow remote access. Go to Settings > Home, then turn on Use iCloud. Make sure
you’re signed in with the same iCloud account on all the devices.
Control your home using Siri
You can use Siri to control your accessories and scenes. Here are some of the things
you might be able to say to Siri, depending on your accessories, how you’ve named
them, and the scenes you’ve created:
“Turn off the lights” or “Turn on the lights”
“Dim the lights” or “Set brightness to 55%”
“Is the hallway light on?”
“Set the temperature to 68 degrees”
“Did
I
lock the front door?”
If you set up rooms, scenes, or more than one home, you can say things like:
“I’m home” or “I’m leaving”
“Turn down the kitchen lights”
“Turn on the fan in the office”
DRAFT

236
!
APPLE CONFIDENTIAL
“Set my reading scene”
“Turn off the lights in the Chicago house”
DRAFT

237
!
APPLE CONFIDENTIAL
Sharing
Share from apps
In many apps, you can tap Share or
to choose how to share your information. The
choices vary depending on the app you’re using. Additional options may appear if you’ve
downloaded apps with sharing options. For more information, see App extensions.
Use Twitter, Facebook, Flickr, Vimeo or other third-party apps with sharing options.
Sign in to your account in Settings. The third-party sharing buttons take you to the
appropriate setting if you’re not yet signed in.
Customize the way you share, view, and organize your information. Tap the More
button, then touch and drag
to move items to new positions.
Share files with AirDrop
AirDrop lets you share your photos, videos, websites, locations, and other items
wirelessly with other nearby devices (iOS 7 or later). With iOS 8 (or later), you can share
with Mac computers with OS X v10.10 (or later). AirDrop transfers information using Wi-
Fi and Bluetooth—both must be turned on. To use AirDrop, you need to be signed in to
iCloud using your Apple ID. Transfers are encrypted for security.
Share an item using AirDrop. Tap , then tap the name of a nearby AirDrop user.
DRAFT

238
!
APPLE CONFIDENTIAL
Receive AirDrop items from others. Swipe up from the bottom edge of the screen to
open Control Center. Tap AirDrop, then choose to receive items from Contacts Only or
from Everyone. You can accept or decline each request as it arrives.
For more information, see the Apple Support article Share content with AirDrop from
your iPhone, iPad, or iPod touch.
Family Sharing
With Family Sharing, up to six family members can share their iTunes Store, App Store,
and iBooks Store purchases, a family calendar, and family photos, all without sharing
accounts. For information about a family subscription to Apple Music, see Access music.
Family Sharing requires you to sign in to iCloud with your Apple ID. You will also be
asked to confirm the Apple ID you use for the iTunes Store, App Store, and
iBooks Store. Family Sharing is available on devices with iOS 8 or later, Mac computers
with OS X v10.10 or later, and PCs with iCloud for Windows 5. You can be part of only
one family group at a time.
Set up Family Sharing. Go to Settings > iCloud > Set Up Family Sharing. Follow the
onscreen instructions to set up Family Sharing as the family organizer. The family
organizer invites family members to join the family group and agrees to pay for any
iTunes Store, App Store, and iBooks Store purchases those family members initiate while
part of the family group.
Create an Apple ID for a child. Go to Settings > iCloud > Family, scroll to the bottom of
the screen, then tap Create an Apple ID for a child.
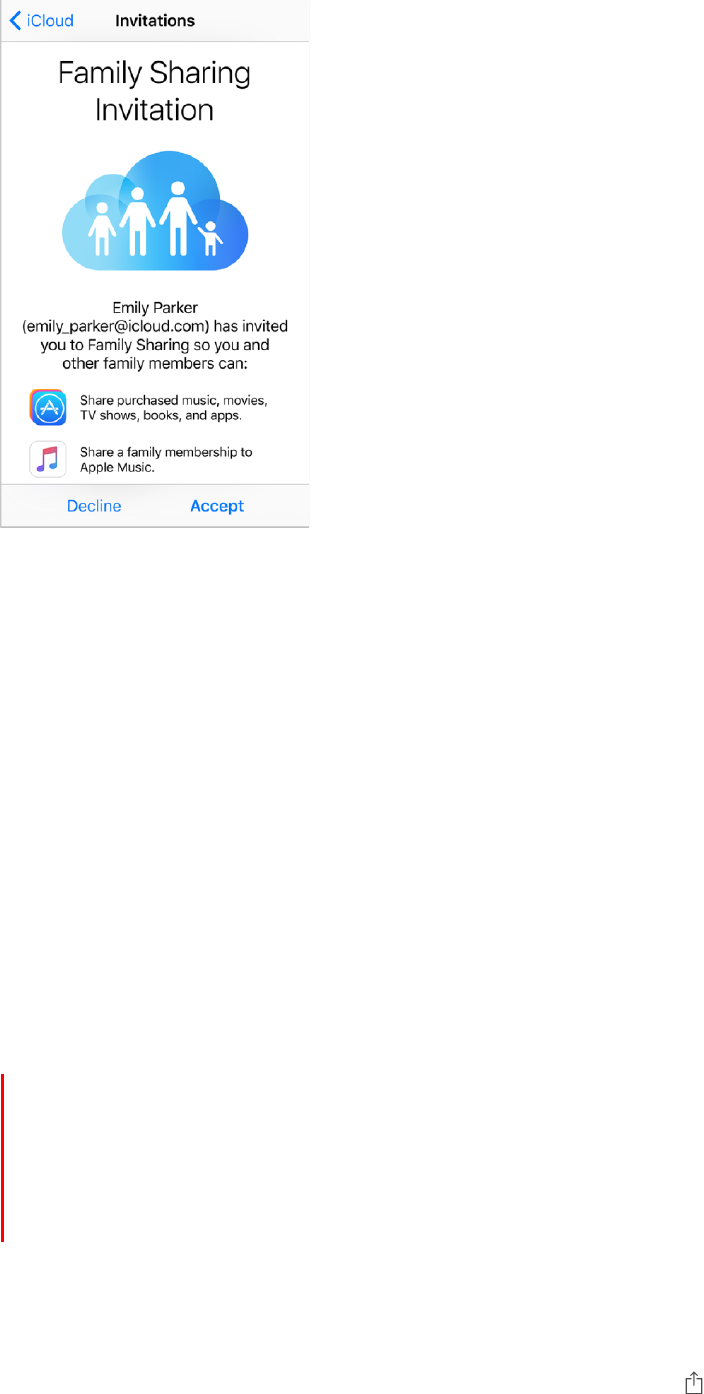
Accept an invitation to Family Sharing. Tap Accept in your invitation. Or, if you are
near the organizer during the setup process, you can enter the Apple ID and password
you use for iCloud on her device.
DRAFT
239
!
APPLE CONFIDENTIAL
Access shared purchases. Open iTunes Store, App Store, or iBooks Store, tap
Purchased, then choose a family member from the menu that appears.
When a family member initiates a purchase, it is billed directly to the family organizer’s
account. Once purchased, the item is added to the initiating family member’s account
and is shared with the rest of the family. If Family Sharing is ever disabled, purchased
items remain with the person who chose to purchase them, even if they were paid for by
the family organizer.
Turn on Ask to Buy. The family organizer can require young family members to request
approval for purchases or free downloads. Go to Settings > iCloud > Family, then tap the
person’s name.
Note: Age restrictions for Ask to Buy vary by area. In the United States, the family
organizer can enable Ask to Buy for any family member under age 18; for children under
age 13, it’s enabled by default.
Hide your iTunes Store, App Store, and iBooks Store purchases. To hide all your
purchases from family members, tap Settings > iCloud > Family > [your name], then
turn off Share My Purchases. On your computer, you can also hide specific purchases
so they aren’t available to other family members. For more information, see the Apple
Support article Hide and unhide purchases in iTunes or iBooks on your Mac or PC.
Share photos or videos with family members. When you set up Family Sharing, a
shared album called Family is automatically created in the Photos app on all family
members’ devices. To share a photo or video with family members, open the Photos app,
then view a photo or video or select multiple photos or videos. Tap , tap iCloud Photo
Sharing, add comments, then share to your shared family album. See iCloud Photo
Sharing.
DRAFT

240
!
APPLE CONFIDENTIAL
Add an event to the family calendar. When you set up Family Sharing, a shared
calendar called Family is automatically created in the Calendar app on all family
members’ devices. To add a family event, open the Calendar app, create an event, then
choose to add the event to the family calendar. See Share iCloud calendars.
Set up a family reminder. When you set up Family Sharing, a shared list is automatically
created in the Reminders app on all family members’ devices. To add a reminder to the
family list, open the Reminders app, tap the family list, then add a reminder to the list.
See Reminders at a glance.
Share your location with family members. Family members can share their location by
tapping Settings > iCloud > Share My Location (under Advanced). To find a family
member’s location, use the Find My Friends app. Or, use the Messages app (iOS 8 or
later). For more information about using Messages to share or view locations, see Share
photos, videos, and audio.
Keep track of your family’s devices. If family members enabled Share My Location in
iCloud, you can help them locate missing devices. Open Find iPhone on your device or at
iCloud.com. For more information, see Family Sharing.
Leave Family Sharing. Go to Settings > iCloud > Family, then tap Leave Family Sharing.
If you are the organizer, go to Settings > iCloud > Family, tap your name, then tap Stop
Family Sharing. For more information, see the Apple Support article Leave Family
Sharing.
DRAFT

241
!
APPLE CONFIDENTIAL
iPhone and other devices
AirPlay
Use AirPlay to stream music, photos, and video wirelessly to Apple TV and other AirPlay-
enabled devices. If you don’t see your AirPlay-enabled devices when you tap , make
sure everything is on the same Wi-Fi network.
Display the AirPlay controls. Swipe up from the bottom edge of the screen to open
Control Center, then tap .
Stream content. Tap , then choose the device you want to stream to.
Switch back to iPhone. Tap , then choose iPhone.
Mirror the iPhone screen on a TV. Tap , choose an Apple TV, then tap Mirroring. A
blue bar appears at the top of the iPhone screen when AirPlay mirroring is turned on.
You can also connect iPhone to a TV, projector, or other external display using the
appropriate Apple cable or adapter. For information, go to the About Apple Digital AV
Adapters website.
AirPrint
Use AirPrint to print wirelessly to an AirPrint-enabled printer from apps such as Mail,
Photos, and Safari. Many apps available on the App Store also support AirPrint.
iPhone and the printer must be on the same Wi-Fi network. For more information about
AirPrint, see About AirPrint.
Print a document. Tap
or
(depending on the app you’re using).
See the status of a print job. Double-click the Home button, then tap Print Center. The
badge on the icon shows how many documents are in the queue.
Cancel a job. Select it in Print Center, then tap Cancel Printing.
Apple Watch
Use the Apple Watch app (not available in all areas) to learn more about Apple Watch,
and to pair your Apple Watch with iPhone. Just tap the Apple Watch app, and follow the
onscreen instructions.
DRAFT

242
!
APPLE CONFIDENTIAL
Use your Apple headset
The EarPods that come with your iPhone feature a microphone, volume buttons, and the
center button.
Use the center button to answer and end calls, control audio and video playback, and
use Siri, even when iPhone is locked.
Control audio
Pause a song or video: Press the center button. Press again to resume playback.
Skip to the next song: Press the center button twice quickly.
Return to the previous song: Press the center button three times quickly. (Works
only while audio is playing.)
Fast-forward: Press the center button twice quickly and hold.
Rewind: Press the center button three times quickly and hold.
Manage calls
Answer an incoming call: Press the center button.
End the current call: Press the center button.
Decline an incoming call: Press and hold the center button for about two seconds,
then let go. Two low beeps confirm you declined the call.
Switch to an incoming or on-hold call, and put the current call on hold: Press the
center button. Press again to switch back to the first call.
DRAFT

243
!
APPLE CONFIDENTIAL
Switch to an incoming or on-hold call, and end the current call: Press and hold the
center button for about two seconds, then let go. Two low beeps confirm you ended
the first call.
Activate Siri
Ask Siri: Press and hold the center button until you hear a beep. Let go, then make
your request. See Make requests.
Bluetooth devices
You can use Bluetooth devices such as wireless speakers, car kits, and an Apple
Wireless Keyboard with iPhone. For supported Bluetooth profiles, see the Supported
Bluetooth profiles website.
WARNING: For important information about avoiding hearing loss and avoiding
distractions that could lead to dangerous situations, see Important safety information.
Note: The use of certain accessories with iPhone may affect wireless performance. Not
all iPod and iPad accessories are fully compatible with iPhone. Turning on Airplane Mode
may eliminate audio interference between iPhone and an accessory. Reorienting or
relocating iPhone and the connected accessory may improve wireless performance.
Turn Bluetooth on or off. Go to Settings > Bluetooth. You can also turn Bluetooth
on
or off in Control Center.
Connect to a Bluetooth device. Go to Settings > Bluetooth, tap the device in the
Devices list, then follow the onscreen instructions. See the documentation that came
with the device for information about Bluetooth pairing. For information about Apple
Wireless Keyboard, see Use an Apple Wireless Keyboard.
iPhone must be within about 33 feet (10 meters) of the Bluetooth device.
Switch audio output between a connected Bluetooth device and a iPhone. Open
Control Center, swipe left, tap , then choose your output. Audio output returns to
iPhone if the Bluetooth device moves out of range.
DRAFT