AzureWave Technologies NU706 802.11b/g/n Wireless USB Mini card User Manual usermanual smartbook2
AzureWave Technologies, Inc. 802.11b/g/n Wireless USB Mini card usermanual smartbook2
Contents
UserMan Part1_20100827

H
E N G L I S H
E S P A Ñ O L
F R A N Ç A I S
D E U T S C H

Package Contents
Before you set up your computer, please ensure that your
product package includes the following items.
•Efika MX Smartbook
•User Manual
•AC Adapter & Power Cord
First Use Instructions
Before you use your Efika MX Smartbook for the first time, please read the safety chapter
included in this user manual.
Software Information
The default username and password on the
provided OS installation is as follows.
Username: oem
Password: oem
For additional documentation about your operating
system, please visit www.efikamx.info
Safety Precautions
The following safety precautions will increase the life of the Smartbook. Please follow all
precautions and instructions. Except as described in this manual, refer all servicing to qualified
personnel. Do not use damaged power cords, accessories, or other peripherals. Do not use
strong solvents such as thinners, benzene, or other chemicals on or near the surface.
IMPORTANT: Disconnect the AC power and remove the battery pack(s) before cleaning. Wipe
the Smartbook using a clean cellulose sponge or chamois cloth dampened with a solution of
nonabrasive detergent and a few drops of warm water and remove any extra moisture with a dry
cloth.
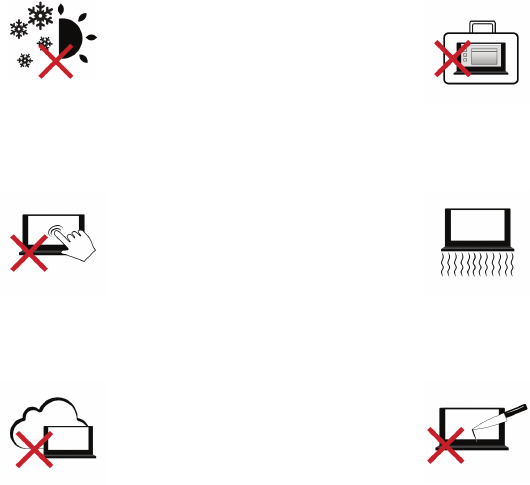
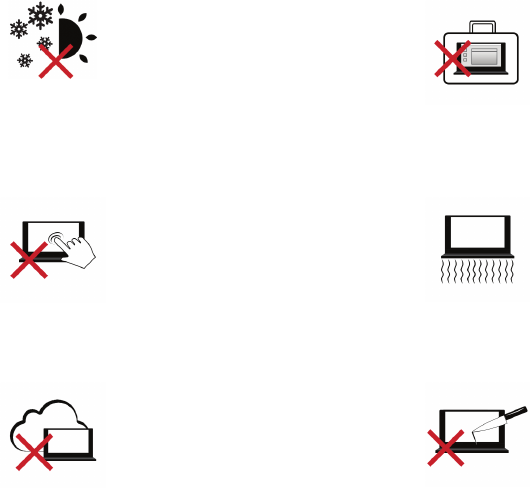
SAFE TEMP: This Smartbook
should only be used in
environments with ambient
temperatures between 10°C
(50°F) and 30°C (86°F).
DO NOT carry or cover a
Smartbook that is powered ON
with any materials that will reduce
air circulation such as a carrying
bag.
DO NOT press or touch the
display panel. Do not place
together with small items that
may scratch or enter the
Smartbook.
DO NOT leave the Smartbook on
your lap or any part of the body in
order to prevent discomfort or
injury from heat exposure.
DO NOT expose to dirty or dusty
environments. DO NOT operate
during a gas leak. DO NOT use
cut or damaged connection
cables.
DO NOT place or drop objects on
top and do not shove any foreign
objects into the Smartbook. Do
not block air vents.
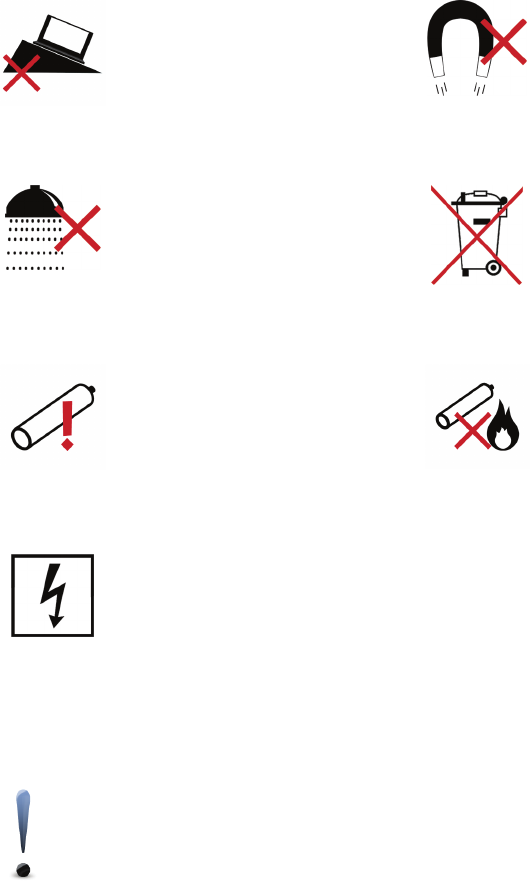
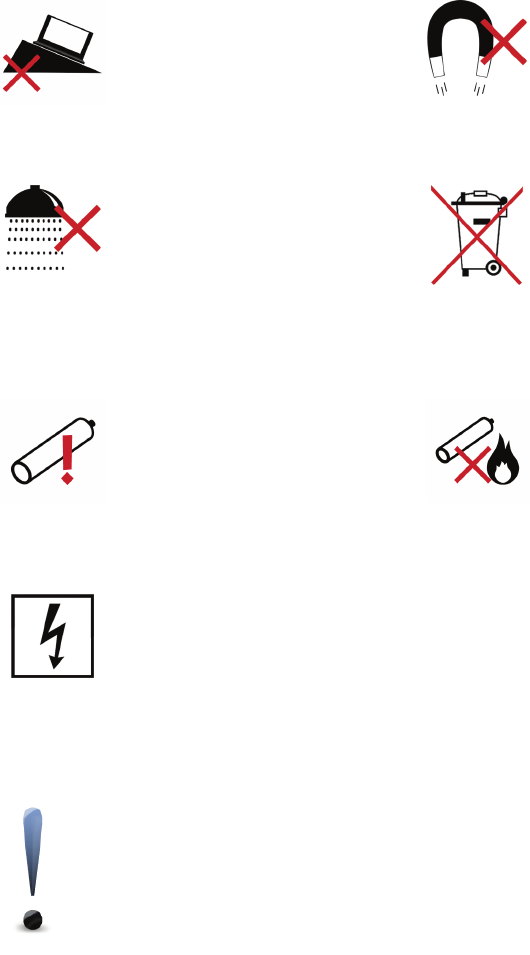
DO NOT place this device on
uneven or unstable work
surfaces. Seek servicing if the
casing has been damaged.
DO NOT expose to strong
magnetic or electrical fields. The
electromagnetic field may cause
the computer to malfunction.
DO NOT expose to or use near
liquids, rain, or moisture.
DO NOT throw the Smartbook
in municipal waste. Check local
regulations for disposal of
electronic products.
CAUTION! Danger of explosion if
battery is incorrectly replaced.
Replace only with the same or
equivalent type recommended by
the manufacturer.
Battery safety warnings:
•DO NOT throw the
battery in fire.
•DO NOT disassemble the
battery.
•DO NOT short circuit the
contacts.
•DO NOT handle
damaged or leaking
batteries.
INPUT RATING: Refer to the
rating label on the bottom of the
Smartbook and be sure that your
power adapter complies with the
rating.
WARNING: To avoid bodily injury, DO NOT attempt to troubleshoot your Smartbook if
any of the above conditions have damaged it, the battery, or the battery charger.
Instead, unplug your Smartbook and contact a qualified computer technician.
Transportation Precautions
To prepare the Smartbook for transport, you should turn it OFF and disconnect all external
peripherals to prevent damage to the connectors. Close the display panel and check that it is
latched securely in the closed position to protect the keyboard and display panel.
IMPORTANT: The Smartbook’s surface is easily dulled if not properly cared for. Be careful not
to rub or scrape the Smartbook surfaces.
Cover Your Smartbook
Purchase a carrying bag to protect the Smartbook from dirt, water, shock, and
scratches.
Charge Your Batteries
If you intend to use battery power, be sure to fully charge your battery pack and any optional
battery packs before going on long trips. Remember that the power adapter charges the battery
pack as long as it is plugged into the computer and an AC power source. Be aware that it takes
much longer to charge the battery pack when the Smartbook is in use.
Airplane Precautions
Contact your airline if you want to use the Smartbook on an airplane. Most airlines will have
restrictions for using electronic devices. Most airlines will allow electronic use only between and
not during takeoffs and landings.
IMPORTANT: There are three main types of airport security devices: X-ray machines (used on
items placed on conveyor belts), magnetic detectors (used on people walking through security
checks), and magnetic wands (hand-held devices used on people or individual items). You can
send your Smartbook and storage devices through airport X-ray machines. However, it is
recommended that you do not send your Smartbook or diskettes through airport magnetic
detectors or expose them to magnetic wands.
Preparing your Smartbook
Please the read the following quick instructions for using your Smartbook.
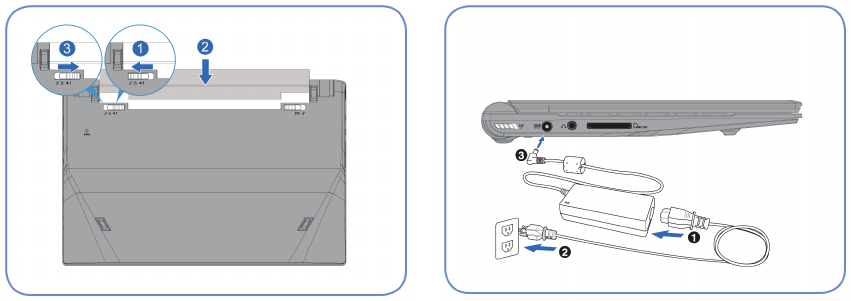
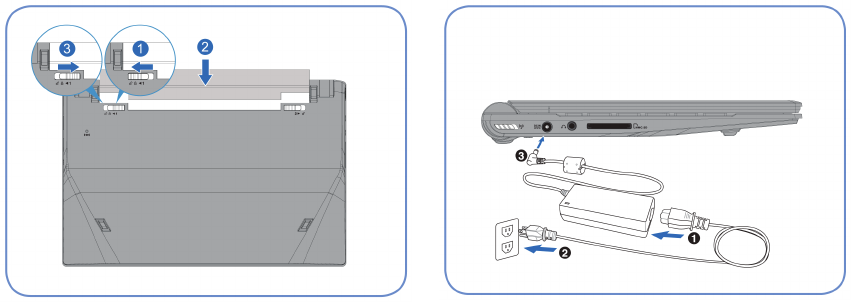
1. Install the battery pack 2. Connect the AC Power Adapter
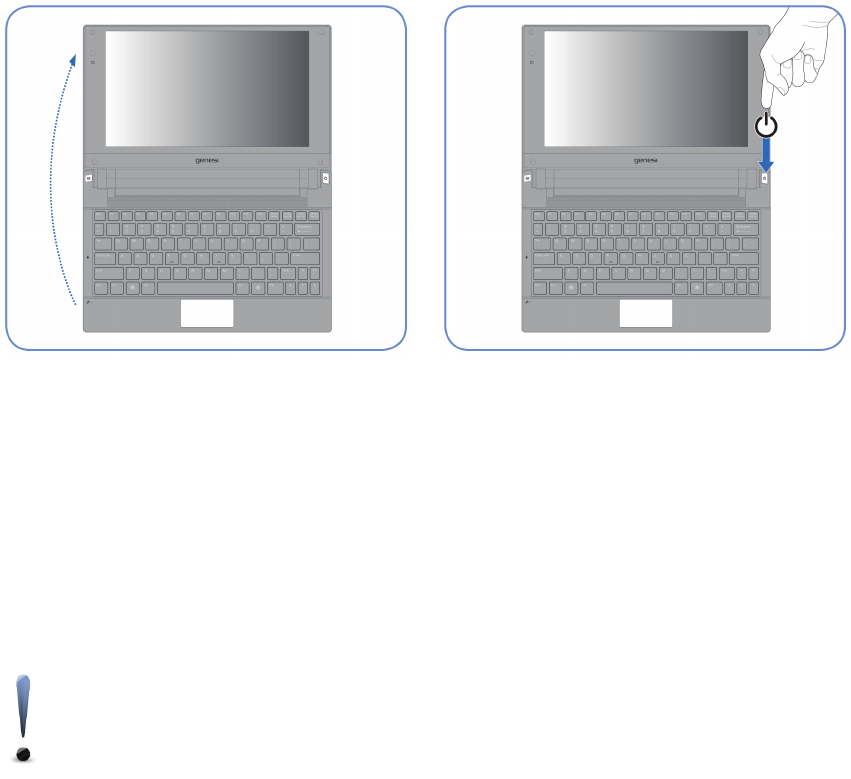
3. Open the Display Panel 4. Turn ON the Smartbook
IMPORTANT: When opening, do not force the
display panel down to the table or else the
hinges may break! Never lift the Smartbook by
the display panel!
The power switch turns the Smartbook ON and
OFF or puts the Smartbook into sleep or
hibernation modes.
NOTE: If your computer is brought directly from a cold location to a warm one,
moisture may condense inside the computer. In such a case, wait at least one
hour before turning on the computer.
Top Side
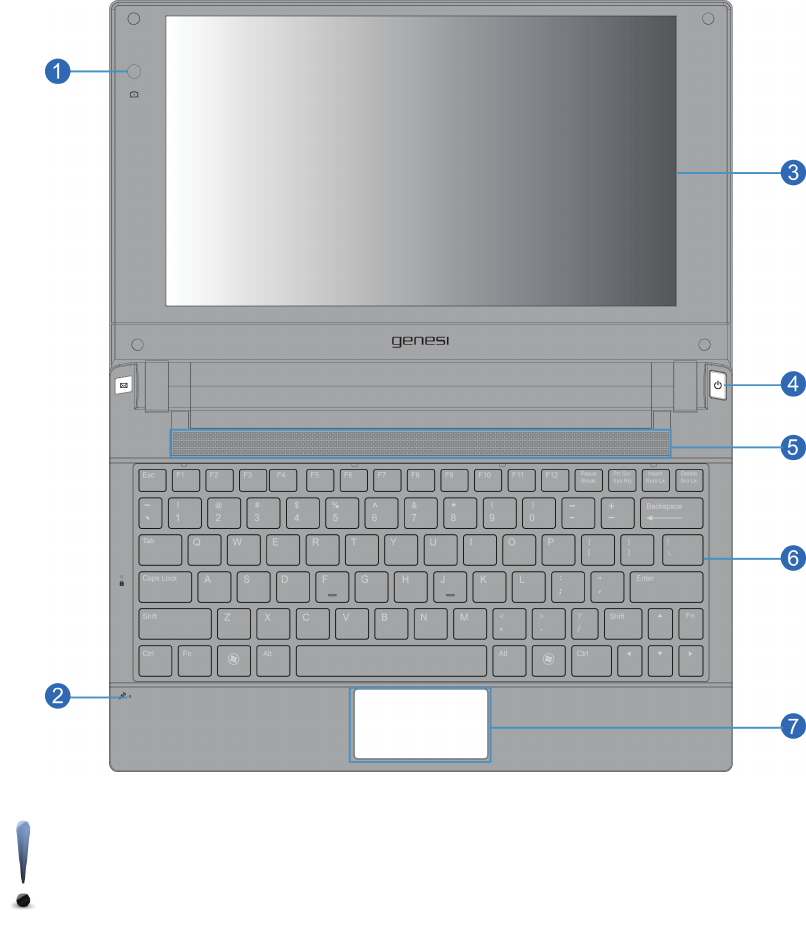
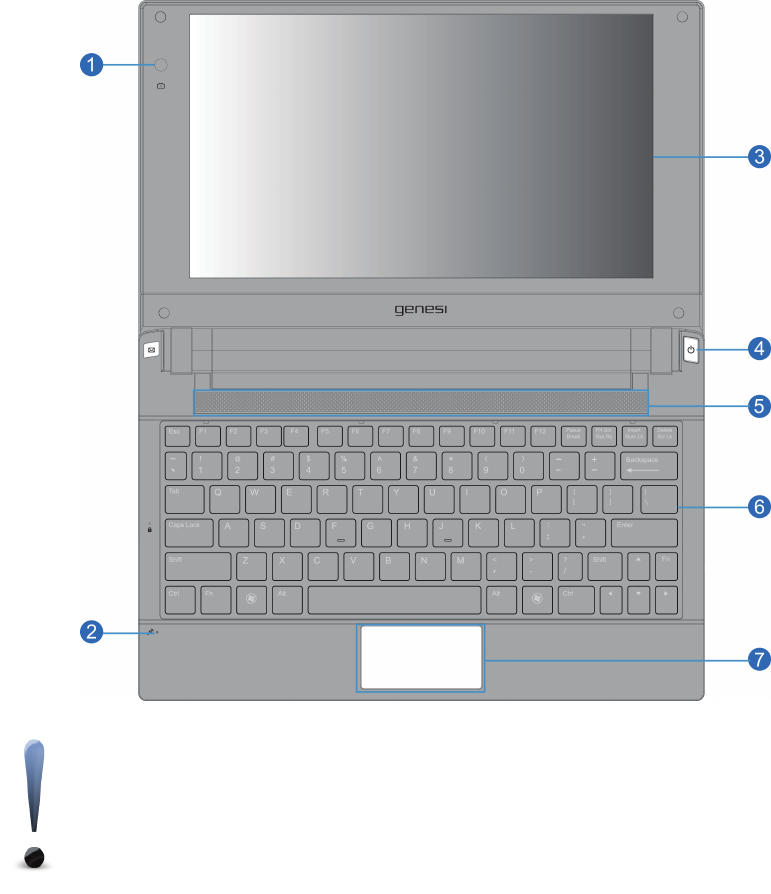
Refer to the diagram below to identify the components on this side of the Smartbook.
NOTE: The keyboard will be different for each territory.
IMPORTANT: Selected models may feature display panels that do not fully open to a
180-degree angle, with such models do not attempt to force the display panel beyond
its limit as it may cause damage to the device.

1Camera
The built-in camera allows picture taking.
2Microphone (Built-in)
The built-in mono microphone can be used for video
conferencing, voice narrations, or simple audio recordings.
3Display Panel
The Smartbook uses an ultra-clear flat panel which provides
excellent viewing like that of desktop monitors without any
harmful radiation or flickering, so it is easier on the eyes. Use
a soft cloth without chemical liquids (use plain water if
necessary) to clean the display panel. WARNING: The
display panel is fragile. Do not bend or press the panel.
4Power Switch
The power switch turns the Smartbook ON and OFF or puts
the Smartbook into sleep or hibernation modes. Actual
behavior of the power switch can be customized in your
operating system.
5Audio Speakers
The built-in stereo speaker system allows you to hear audio
without additional attachments. The multimedia sound system
features an integrated digital audio controller that produces
rich, vibrant sound (results can be improved with external
stereo headphones or speakers). Audio features are software
controlled.
6Keyboard
The keyboard provides keys with comfortable travel (depth at
which the keys can be depressed) and a palm rest for both
hands.
7Touchpad and Buttons
The touchpad with its buttons is a pointing device that
provides the same functions as a desktop mouse.
Right Side
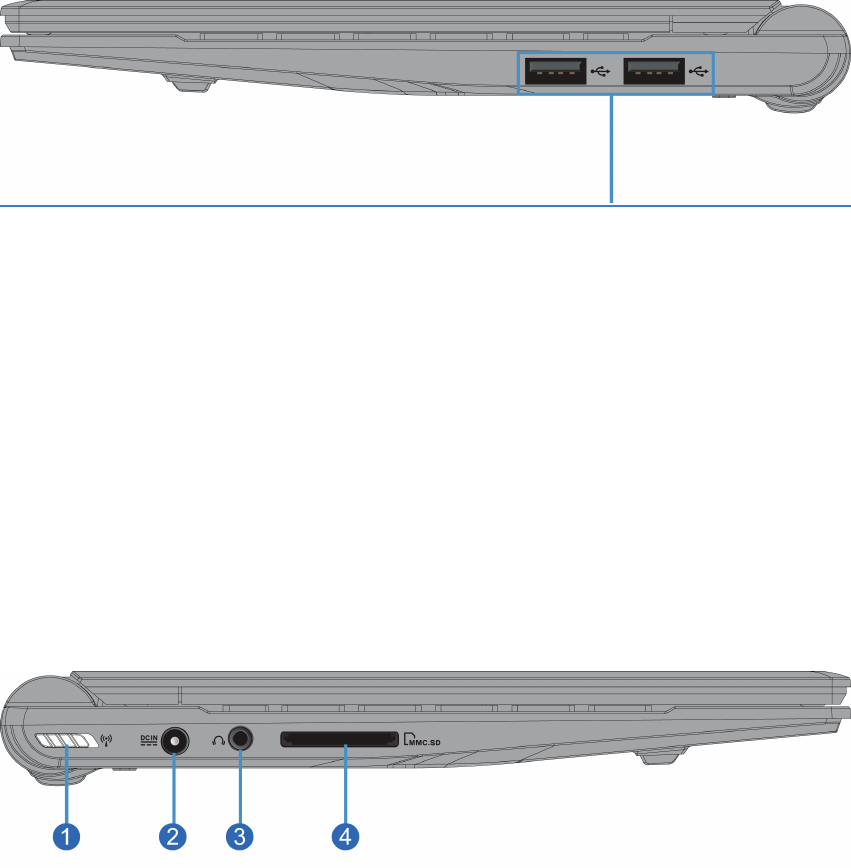
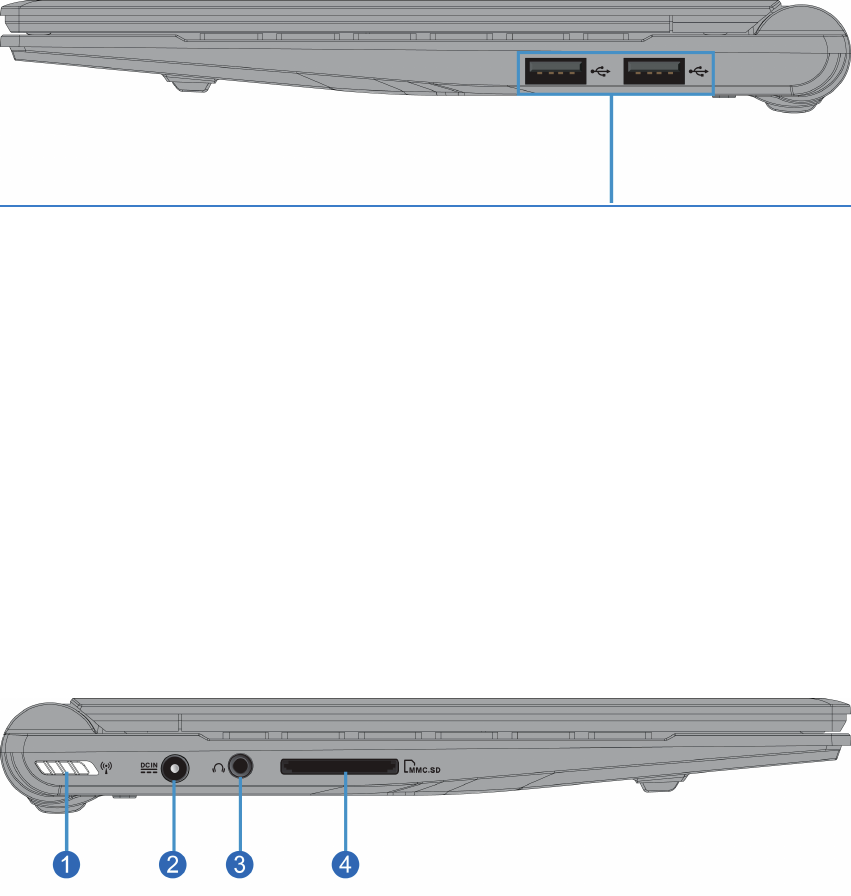
Refer to the diagram below to identify the components on this side of the Smartbook.
USB Ports (2.0/1.1)
The USB (Universal Serial Bus) ports are compatible with USB 2.0 or USB 1.1 devices such as
keyboards, pointing devices, cameras, hard disk drives, printers, and scanners connected in a
series up to 12Mbits/sec (USB 1.1) and 480Mbits/sec (USB 2.0). USB allows many devices to
run simultaneously on a single computer, with some peripherals acting as additional plug-in
sites or hubs. USB supports hot-swapping of devices so that most peripherals can be connected
or disconnected without restarting the computer.
Left Side
Refer to the diagram below to identify the components on this side of the Smartbook.

1Wireless Switch
Wireless Models Only: Toggles the internal wireless LAN or Bluetooth (on selected
models) ON or OFF with an on-screen display. When enabled, the corresponding
wireless indicator will light. You may need to configure your operating system software to
use the wireless LAN or Bluetooth.
2Power (DC) Input
The supplied power adapter converts AC power to DC power for use with this jack.
Power supplied through this jack supplies power to the Smartbook and charges the
internal battery pack. To prevent damage to the Smartbook and battery pack, always use
the supplied power adapter.
CAUTION: The adapter may become warm to hot when in use. Be sure not to cover the
adapter and keep it away from your body.
3Dual Headphone / Microphone Jack
The dual headphone / microphone jack (1/8 inch) auto detects either an audio output or
microphone input which can be used to connect the Smartbook’s audio out signal to
amplified speakers or headphones, or to receive audio input via a microphone. Using
headphones with this jack automatically disables the built-in speakers.
4Flash Memory Card Reader
This Smartbook has a built-in high-speed memory card reader that can conveniently
read from and write to many flash memory cards used in devices such as digital
cameras, MP3 players, mobile phones, and PDAs.

H
E N G L I S H
E S P A Ñ O L
F R A N Ç A I S
D E U T S C H

Contenido de la caja
Antes de conectar su computadora, por favor asegúrese de que su caja del producto incluya los
siguientes elementos:
•Computadora Efika MX Smartbook
•Manual de usuario
•Adaptador y cable de corriente
Instrucciones para el primer uso
Antes de utilizar su computadora Efika MX Smartbook por primera vez, por favor lea el
capítulo acerca de la seguridad en éste manual de usuario.
Información acerca del software
El nombre de usuario y contraseña por defecto en
la instalación proporcionada del sistema operativo
es la siguiente:
Usuario: oem
Contraseña: oem
Para obtener documentación adicional acerca de su
sistema operativo, por favor visite www.efikamx.info
Precauciones de seguridad
Las siguientes precauciones técnicas incrementarán la vida de su computadora Efika MX
Smartbook. Por favor siga todas las precauciones e instrucciones. Excepto cuando se describa
en éste manual, requiera todo servicio técnico a personal cualificado. No utilice cables de
corriente, accesorios u otros periféricos dañados. No use disolventes fuertes como aguarrás,
bencina o productos químicos similares sobre ni cerca del dispositivo.
¡IMPORTANTE! Desconcecte el cable de corriente del enchufe antes de limpiar el dispositivo.
Utilice una esponja de celulosa limpia o paño, humedecido con una solución detergente no
abrasiva, y algunas gotas de agua tibia, y elimine cualquier humedad adicional con un paño
seco.
TEMPERATURA DE
FUNCIONAMIENTO: El dispositivo
debe utilizarse únicamente en
entornos con una temperatura
ambiente entre 10 y 30 grados
Celsius (50 y 86 grados Fahrenheit).
NO ACARREE NI CUBRA un
dispositivo en funcionamiento con
cualquier material
que reduzca la circulación de aire,
como una maleta.
NO EMPUJE NI APRIETE la
pantalla. No ponga cenca elementos
pequeños que puedan rayarla o
introducirse dentro del dispositivo.
NO DEJE el dispositivo sobre sus
piernas ni cualquier otra parte del
cuerpo, para evitar incomodidad o
lesiones por la exposición al calor.
NO EXPONGA el dispositivo a
entornos sucios o polvorientos. NO
UTILICE el dispositivo durante un
escape de gas.
NO FUERCE ningún objeto ajeno
adentro del dispositivo. NO PONGA
O TIRE objetos encima del
dispositivo.
NO PONGA éste dispositivo sobre
superficies de trabajo irregulares o
inestables. Busque servicio técnico si
la caja se ha dañado.
NO EXPONGA el dispositivo a
fuertes campos magnéticos o
eléctricos.
NO EXPONGA NI ACERQUE el
dispositivo a líquidos, lluvia o
humedad. NO UTILICE el dispositivo
durante una tormenta eléctrica
NO TIRE el dispositivo en un
cubo de basura municipal.
Compruebe las regulaciones
locales acerca del deshecho de
productos electrónicos.
PRECAUCIÓN: Existe peligro de
explosión si la batería se substituye
incorrectamente. Substituya
únicamente con el mismo tipo, o
equivalente,
recomendado por el fabricante.
Advertencias de seguridad sobre
la batería:
•NO LA TIRE al fuego.
•NO LA DESMONTE.
•NO LA
CORTOCIRCUITE.
•NO LA MANIPULE si
está dañana o tiene
fugas.
POTENCIA REQUERIDA:
Compruebe la etiqueta de potencia
requerida bajo el
dispositivo, y asegúrese de que su
adaptador de corriente la cumple.
ATENCIÓN: Para evitar lesiones corporales, NO INTENTE reparar si cualquiera
de las condiciones anteriores han dañado el dispositivo, la pantalla, o el
cargador de la batería. En esos casos, desconecte el dispositivo y póngase
en contacto con un técnico de computadoras cualificado.
Precauciones de transporte
Para preparar el dispositivo para su transporte, debe APAGARLO y desconectar todos los
periféricos externos, para evitar daños en los conectores. Cierre la pantalla y compruebe que
se ha asegurado el pestillo en su posición, para proteger el teclado y el panel.
¡IMPORTANTE!: La superficie del dispositivo se desgasta con facilidad si no
se cuida. Tenga cuidado con rozar o arañar la superficie.
Proteja su dispositivo
Adquiera una maleta de transporte para proteger el dispositivo de suciedad, golpes y arañazos.
Cargue su batería
Si pretende utilizar la corriente de la batería, asegúrese de cargar completamente la principal y
cualquier otra opcional que tenga, antes de salir a un viaje largo. Recuerde que la batería se
carga mientras el cargador esté conectado al dispositivo y un enchufe. Tenga en cuenta que la
batería tarda mucho mas en cargarse cuando el dispositivo está en fucionamiento.
Precauciones en vuelo
Póngase en contacto con la línea aérea si desea utilizar el dispositivo dentro del avión. La
mayoría de las líneas aéreas imponen restricciones al uso de dispositivos electrónicos. La
mayoría de líneas aéreas solo permiten su uso tras el despegue y antes del aterrizaje, y no
durante ellos.
¡IMPORTANTE! Existen tres tipos principales de dispositivos de seguridad en los aeropuertos:
Las máquinas de rayos X (utilizadas sobre los bultos en la cinta transportadora), detectores
magnéticos fijos (utilizados sobre las personas al pasar controles de seguridad), y los
detectores magnéticos portátiles (utilizados sobre las personas o bultos individuales). Puede
pasar su dispositivo y discos a través de las máquinas de rayos X. Sin embargo, se recomienda
que no los pase a través de detectores magnéticos fijos o portátiles.
Preparando su Efika MX Smartbook
Éstas son únicamente instrucciones breves para el uso de su Efika MX Smartbook.
1. Instale la batería 2. Conecte el cargador de la batería
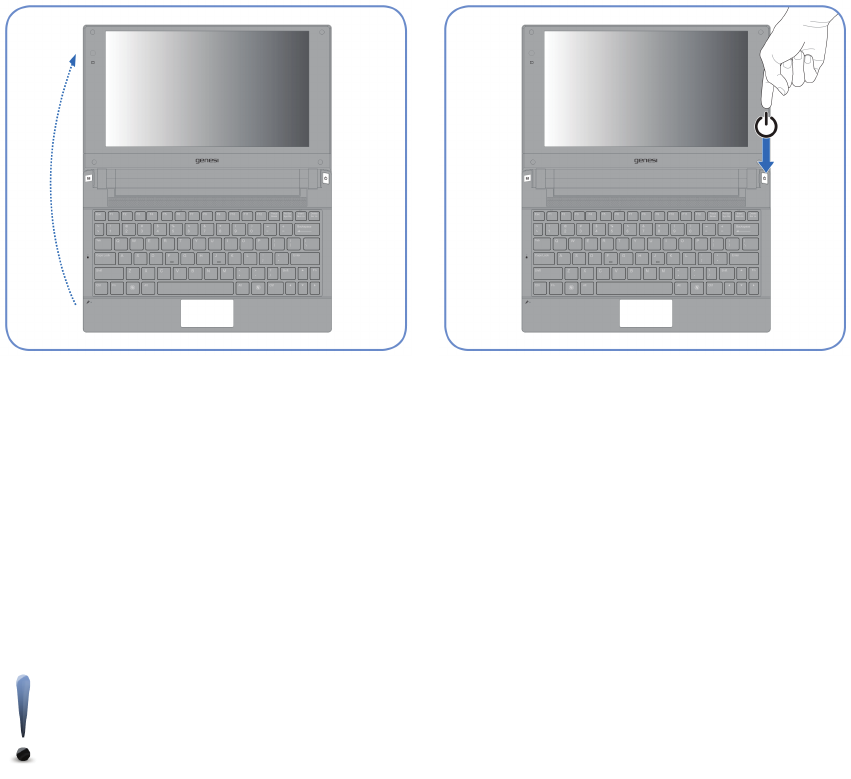
3. Abra la pantalla 4. Encienda el Efika MX Smartbook
¡IMPORTANTE! Cuando abra la pantalla, no la
fuerce hasta dejarla plana sobre la mesa, o las
bisagras se romperán. Nunca levante el Efika
MX Smartbook por la pantalla.
El botón de encendido pone en
funcionamiento el Efika MX Smartbook, y
también lo apaga y lo pone en modo
suspendido o hibernado.
NOTA: Si su Efika MK Smartbook pasa directamente de un lugar frío a otro
caliente, puede condesnsarse humedad en su interior. En ese caso, espere al
menos una hora antes de ponerlo en funcionamiento.
Vista superior
Véase el diagrama a continuación para identificar los componentes en la parte superior del
Efika MX Smartbook.
NOTA: El teclado es diferente para cada región.
¡IMPORTANTE! Ciertos modelos pueden incorporar pantallas que no se abren
completamente hasta los 180 grados. En ese caso, no intente forzar la
pantalla mas allá de su máxima apertura, ya que puede causar daños al
dispositivo.

1Cámara
La cámara incorporada permite tomar fotografías.
2Micrófono
El micrófono monofónico incorporado puede usarse para videoconferencia,
narración, o grabaciones de sonido sencillas.
3Pantalla
El Efika MX Smartbook utiliza una pantalla ultrabrillante, que proporciona una
visión excelente, como la de los monitores de sobremesa, sin ninguna radiación
dañina ni parpadeo, así que es mas agradable a la vista. Para limpiarla, utilice un
paño suave sin químicos (simplemente agua, si es necesario). ATENCIÓN: La
pantalla es frágil. No la doble ni apriete.
4Botón de encendido
El botón de encendido pone en funcionamiento el Efika MX Smartbook, y también
lo apaga y lo pone en modo suspendido o hibernado. El comportamiento del botón
de encendido puede cambiarse desde el panel de control, en las opciones de
corriente.
5Altavoces
Los altavoces stereo incorporados permiten la escucha de sonido sin accesorios
adicionales. El sistema de sonido multimedia incorpora un controlador de sonido
digital integrado que produce un sonido rico y vibrante (los resultados mejoran con
altavoces o auriculares stereo externos). Las capacidades de sonido son
cotroladas por el software.
6Teclado
El teclado tiene teclas con un cómodo recorrido (profundidad hasta la cual pueden
pulsarse), y apoyo para ambas manos.
7Panel táctil y botones
El panel táctil con sus botones es un dispositivo apuntador que proporciona las
mismas funciones que un ratón.
Vista derecha
Véase el diagrama a continuación para identificar los componentes en éste lado del Efika MX
Smartbook.
Puertos USB (2.0/1.1)
Los puertos USB (bus serie universal) son compatibles con dispositivos tanto 2.0 como 1.1, ya
sean teclados, dispositivos apuntadores, cámaras, discos duros, impresoras y scanners,
conectados en serie hasta una velocidad de 12 Mbit/s (USB 1.1) ó 480 Mbit/s (USB 2.0). La
conexión USB permite el funcionamiento simultáneo de muchos dispositivos en un único
ordenador, con algunos de ellos actuando como concentradores adicionales. La conexión USB
soporta la desconexión en caliente de dispositivos, de modo que la mayoría de ellos pueden
ser conectados y desconectados sin reiniciar el ordenador.
Vista izquierda
Véase el diagrama a continuacuón para identificar los componentes en éste lado del Efika MX
Smartbook.

1Interruptor de red inalámbrica
En los modelos con capacidad de red inalámbrica únicamente: Activa y desactiva la red
Wi-Fi o Bluetooth, con un aviso en pantalla. Cuando se activa, se enciende el
correspondiente testigo indicador.
2Entrada de corriente
El cargador de batería proporcionado convierte la corriente alterna en contínua, que se
introduce en éste conector. La corriente a través de él alimenta el dispositivo y también
carga la batería. Para prevenir daños al dispositivo o la batería, utilice siempre el
cargador proporcionado.
ATENCIÓN: El cargador puede calentarse durante su uso. Asegúrese de no cubrirlo, y
de mantenerlo alejado de su cuerpo.
3Conector dual para auriculares o micrófono
El conector dual para auriculares o micrófono (1/8") detecta automáticamente si se
conectan unos auriculares o un micrófono, de modo que permite la salida de sonido por
un amplificador y altavoces externos, como la entrada de sonido de un micrófono. Al
conectar los auriculares, se desactivan automáticamente los altavoces incorporados.
4Lector de tarjetas de memoria
El Efika MX Smartbook incorpora un lector de tarjetas de memoria de alta velocidad, que
puede utilizarse cómodamente para leer y escribir en tarjetas utilizadas por dispositivos
como cámaras digiales, reproductores de música, teléfonos móviles y agendas digitales.