BUFFALO 09101731-0 Wireless LAN Card User Manual WLI CF S11G
BUFFALO INC. Wireless LAN Card WLI CF S11G
BUFFALO >
Contents
Users Manual Part 2
■Overview Chapter 3
Capter 3Windows
Me/98Settings
This chapter describes how to make the
settings for connecting your Windows Me/98
computer to a wireless LAN.
3.1 Making the Wireless LAN Card Available
Step 1 Before installing the wireless LAN card ............ 34p
Step 2 Installing the wireless LAN card .........................40p
Step 3 Installing the wireless LAN card
drivers ................................................................... 43p
Step 4 Confirming that the installed wireless
LAN card is normally operating ..........................47p
3.2 Preparing for Connecting to the Network
Step 5 Confirming "TCP/IP" and "Client for
Microsoft Networks" ............................................ 49p
Step 6 Adding "File and printer sharing for
Microsoft Networks" ............................................56p
Step 7 Checking the computer name and
workgroup name .................................................. 57p
Step 8 Installing Client Manager ....................................58p
3.3 Connecting to the Network
Step 9 -a Communicating via AirStation ........................... 62p
Step 9 -b Communicating with wireless LAN
computers ............................................................ 64p
Step 10 Making your computer shared ........................... 66p
Step 11 Starting communication ...................................... 67p
WLI-CF-S11G.book 31 ページ 2002年3月1日 金曜日 午後6時16分
WLI-CF-S11G User’s Manual32
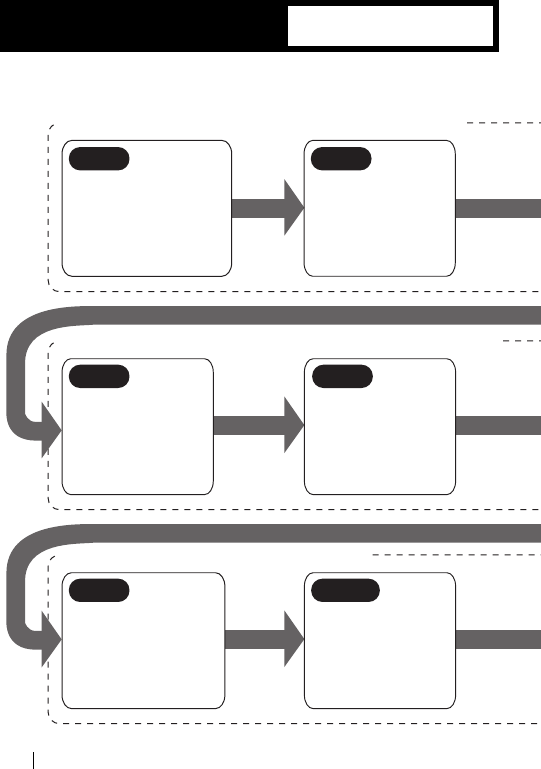
Follow the procedure in the illustration below to connect your Windows Me/
98 computer to a wireless LAN.
WindowsMe/98
Operation Flow
Making the wireless LAN card available
Preparing for connecting to the network
Connecting to the network
Check the configuration
of the drives on your
Windows computer and
confirm that its PC card
driver operates normally.
Install the wireless
LAN card in the
Windows comput-
er.
Make the settings for
access to the net-
work.
a...AirStation
b...Wireless LAN
computers
Make the wireless
LAN computer
shared.
Confirm that the
"TCP/IP" and
"Client for Micro-
soft Networks" are
installed.
Add "File and print-
er sharing for Mi-
crosoft Networks."
Step 1 Step 2
Step 9 -a, b Step 10
Step 5 Step 6
(from page 62)
(from page 34)
(from page 49)
WLI-CF-S11G.book 32 ページ 2002年3月1日 金曜日 午後6時16分
3
Windows Me/98 Settings
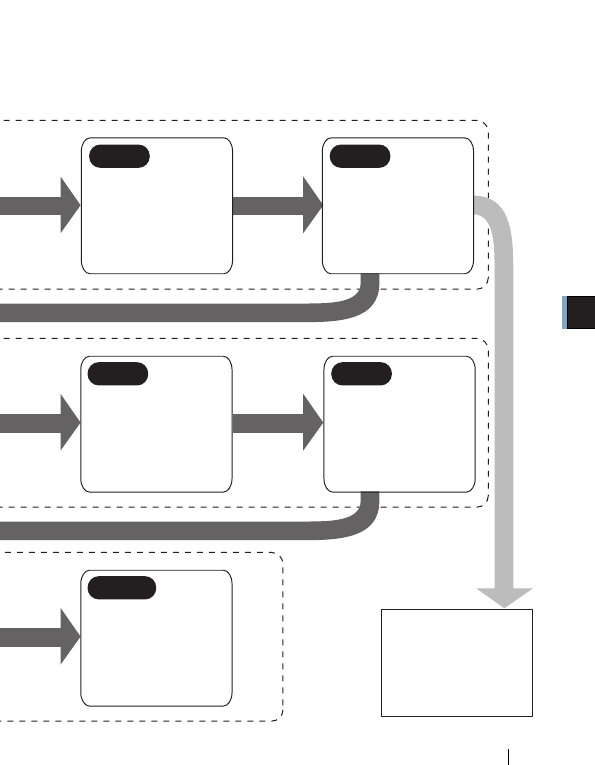
WLI-CF-S11G User’s Manual 33
Install the wireless
LAN card drivers in
the Windows comput-
er.
Confirm that the in-
stalled wireless LAN
card operates nor-
mally.
Communicate with
other computers on
the network.
Check the computer
name and workgroup
name.
Install Client Manager
for communicating
with other wireless
LAN computers.
To make the AirSta-
tion settings, refer
to the AirStation
manual.
Step 3 Step 4
Step 11
Step 7 Step 8
WLI-CF-S11G.book 33 ページ 2002年3月1日 金曜日 午後6時16分
WLI-CF-S11G User’s Manual34
3.1 Making the Wireless LAN Card Available
Install the wireless LAN card to connect your Windows Me/98 computer to
a wireless LAN.
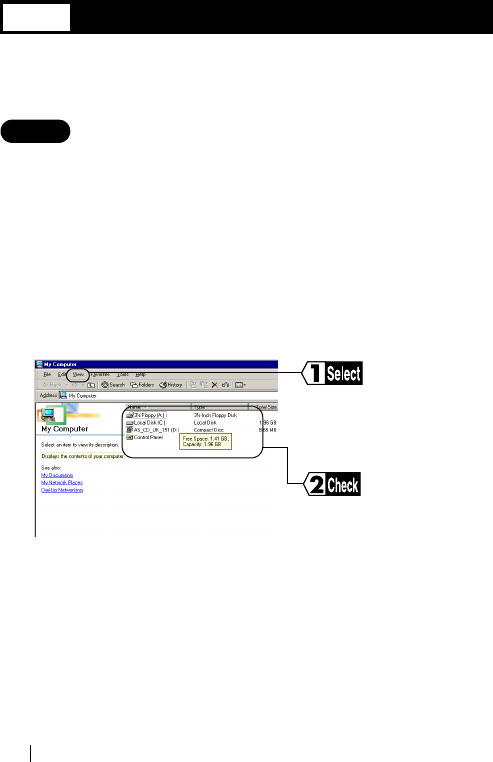
Step 1 Before installing the wireless LAN card
Checking the configuration of your drives
Follow the procedure below to check the configuration of the drivers on
your Windows computer in which the wireless LAN card will be installed.
The following procedure uses Windows Me for example.
1Turn on the computer to boot Windows.
2Double-click [My Computer] on Desktop.
3
These displayed drive names will be necessary in the subse-
quent procedures. Be sure to take note of these drive names in
the table on the upper right of the next page.
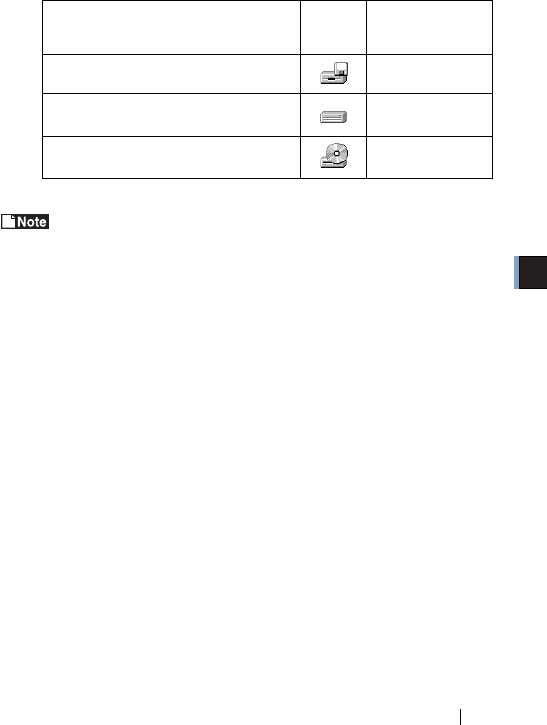
Check the drive names
listed in the window.
Select [View]-[Detail].
WLI-CF-S11G.book 34 ページ 2002年3月1日 金曜日 午後6時16分
3
Windows Me/98 Settings
WLI-CF-S11G User’s Manual 35
Drive names on your computer
If your computer has only one PC card slot
If the CD-ROM drive is connected via the PC card to a computer with
only one PC card slot, the CD-ROM drive and this wireless LAN card
cannot be used at the same time. Execute the following steps before
installing the PC card driver.
1 Connect the CD-ROM drive to the computer.
2 Insert the "AirStation Driver CD" into the CD-ROM drive.
3 Create a new folder (directory) on the hard disk, and copy all files
from the CD-ROM to that folder.
When you are prompted for the "AirStation Drier CD" during
installation, specify the folder to which the files were copied in the
above Step 3.
⇒ Continued on next page
Drive Type Icon Drive Name
(e.g.)
3.5" FDD (A:)
HDD (local disk) (C:)
CD-ROM (D:)
WLI-CF-S11G.book 35 ページ 2002年3月1日 金曜日 午後6時16分
WLI-CF-S11G User’s Manual36
Checking the PC card driver
Follow the procedure below to verify that the PC card driver on the computer in
which the wireless LAN card will be installed is operating normally.
1Right-click [My Computer] on Desktop.
Click [Properties].
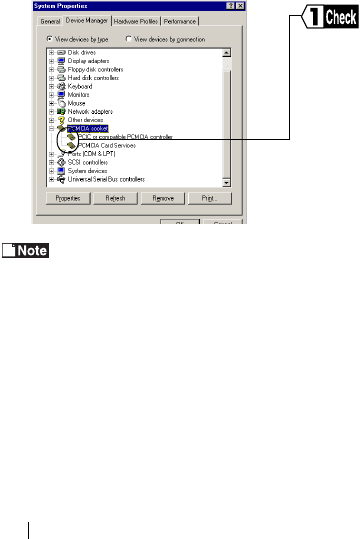
2Click the [Device Manager] tab.
3Click the "+" mark on the left of [PCMCIA socket].
4
The displayed PCMCIA socket name varies with the computer
model.
Confirm that the "x" mark is not
indicated for the icon under
[PCMCIA socket].
WLI-CF-S11G.book 36 ページ 2002年3月1日 金曜日 午後6時16分
3
Windows Me/98 Settings
WLI-CF-S11G User’s Manual 37
If such an error mark as "!" or "x" is not indicated, the PC card driver is
operating normally.
If the icon displayed under [PCMCIA socket] appears with
the ! or x mark, refer to the manual included in the computer
and activate the PC card driver.
Checking the browser settings (only for using the
AirStation)
When you use the AirStation, invalidate the dial-up settings and proxy
settings under the browser settings.
The following procedure uses Internet Explorer 5.0 or later for example.
1Select [Start]-[Settings]-[Control Panel].
2Double-click [Internet Options].
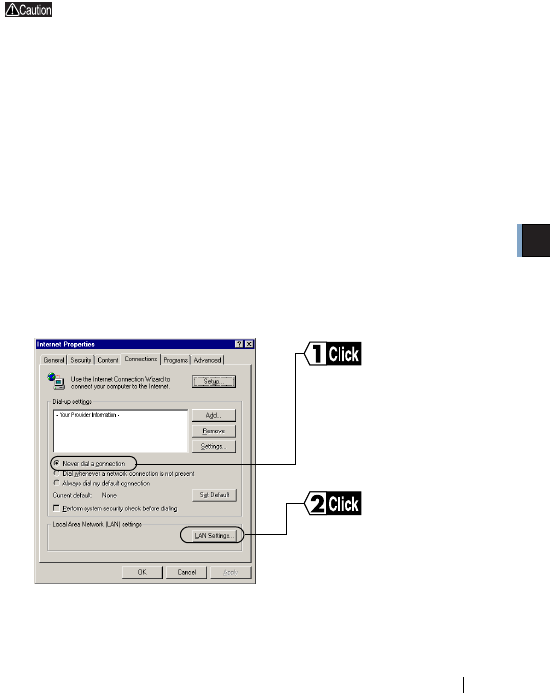
3Double-click the [Connections] tab.
4
⇒ Continued on next page
When the provider information
is listed in the [Dial-up
settings] area, click the
○
mark on the left side of [Never
dial a connection] below the
area to put a dot mark.
Click [LAN settings] in the
"Local Area Network (LAN)
settings" area.
WLI-CF-S11G.book 37 ページ 2002年3月1日 金曜日 午後6時16分
WLI-CF-S11G User’s Manual38
5Confirm the items with a checkmark.
For memorandum, put a checkmark for the same items below.
□ Automatically detect settings
□ Use automatic configuration script
□ Use a proxy server
□ Bypass proxy server for local addresses
6Upon completion of confirming the items with the checkmark,
remove the checkmark from all the items.
Checking the network adapter
Confirm the current settings of the network function.
1Select [Start]-[Settings]-[Control Panel].
2Double-click [System].
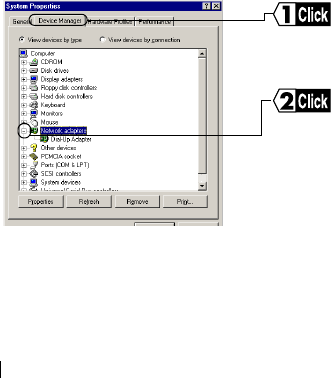
3
With [View devices by type]
selected, click the "+" mark
on the left side of [Network
adapters]. The current
adapters are listed.
Click [Device Manager].
WLI-CF-S11G.book 38 ページ 2002年3月1日 金曜日 午後6時16分
3
Windows Me/98 Settings
WLI-CF-S11G User’s Manual 39
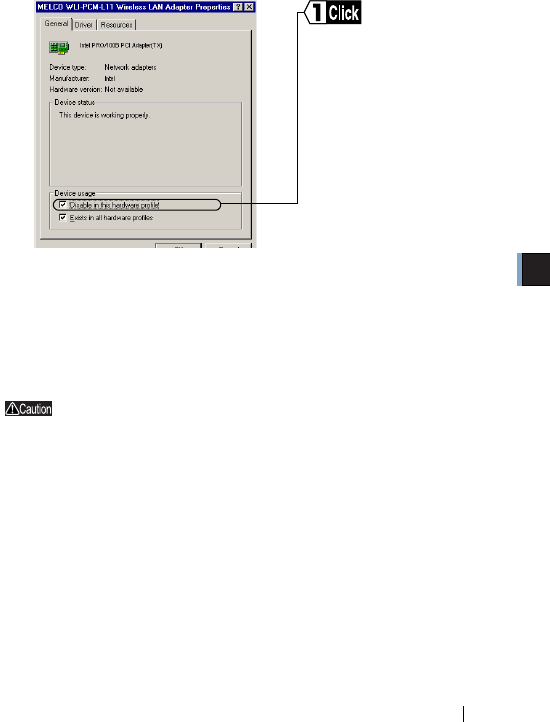
4Disable a LAN board or card if any name.
If there is no LAN board or card name listed, proceed to Step 5.
5If any name beginning with "AOL" is found under [Device
Manager]-[Network adapters], disable it in the same manner as
Step 4.
6Click [OK] to close the [Device Manager].
If you have disabled any driver in Steps 4 and/or 5, restart
the computer.
Put a checkmark for
"Disable in this hardware
profile."
WLI-CF-S11G.book 39 ページ 2002年3月1日 金曜日 午後6時16分

WLI-CF-S11G User’s Manual40
Step 2 Installing the wireless LAN card
The wireless LAN card can be installed/removed in/from the computer
which is in the ON state.
If your computer is equipped with a power management
function that automatically cuts power supply to the
computer when it is left idle for a certain period, turn the
function off. The wireless LAN card may be disabled if the
power management function starts.
Refer to the manual provided with the computer for details
on the power management function.
Precautions for installation/removal
• Be sure to handle the computer and its peripherals in such a
way as described in the manual of each unit.
• Completely remove any dust from the connectors.
• Never touch the connector portion of the wireless LAN card.
• Use great care for the connector location of the wireless LAN
card when installing the card in the computer. The connector
may be damaged if it is forced.
• The wireless LAN card can be inserted and removed with the
computer turned on (Hot Swap feature). However, you
should set the wireless LAN card in a safely removable state
on Windows before removing it. See "When removing the
wireless LAN card" on page 42.
WLI-CF-S11G.book 40 ページ 2002年3月1日 金曜日 午後6時16分
3
Windows Me/98 Settings
WLI-CF-S11G User’s Manual 41
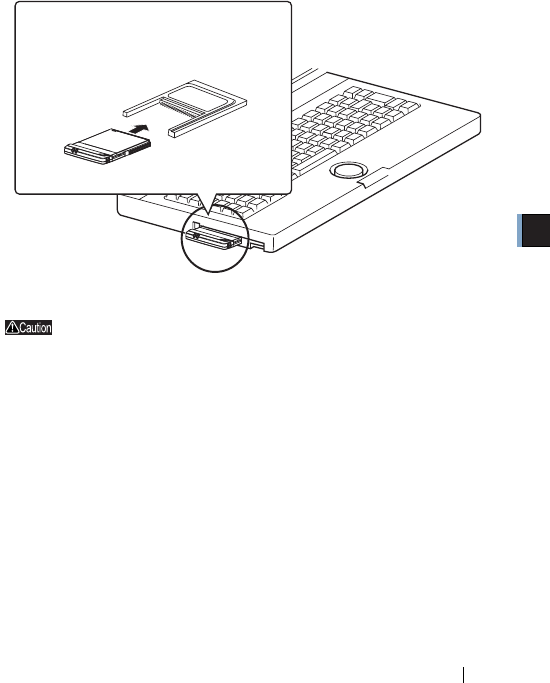
Installing the wireless LAN card in a notebook computer
Follow the instructions in the illustration below when installing the wireless
LAN card in a notebook computer.
When your computer is equipped with two card slots
As this wireless LAN card has a protruding section for the
built-in antenna, the upper slot may be blocked when the
lower one is occupied with this card.
Place this wireless LAN card in the upper slot.
When inserting the wireless LAN card into
the PC card slot on your computer, attach
the BUFFALO's PC card adapter WLI-CF-
OP available separately.
WLI-CF-S11G.book 41 ページ 2002年3月1日 金曜日 午後6時16分
WLI-CF-S11G User’s Manual42
When removing the wireless LAN card
Follow the procedure below to remove the wireless LAN card when
the computer is running. The following procedure uses Windows ME
for example.
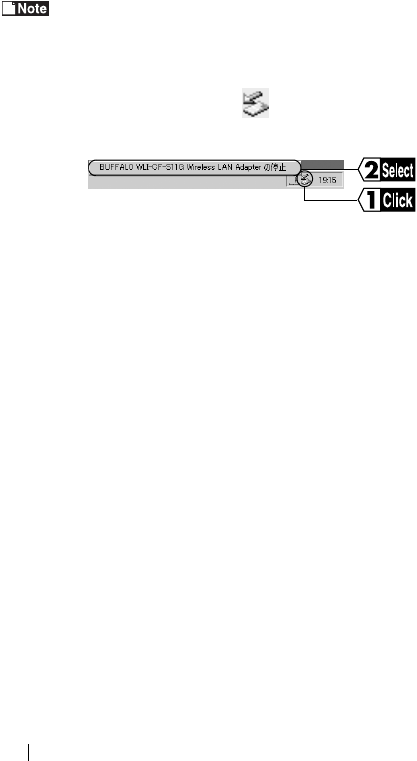
1 Click the removal icon in the task tray, and select "Stop
BUFFALO WLI-CF-S11G Wireless LAN Adapter."
※ The removal icon may be [ ] on Windows 98.
※ The message displayed when you click the icon varies with the
Windows version.
※ If you cannot find the icon, see the Windows Help.
2 When the message "The 'BUFFALO WLI-CF-S11G Wireless LAN
Adapter' device can now be safely removed from the system." is
displayed, click [OK].
※ The message to be displayed varies with the Windows version.
3 Remove the wireless LAN card from the computer.
WLI-CF-S11G.book 42 ページ 2002年3月1日 金曜日 午後6時16分
3
Windows Me/98 Settings
WLI-CF-S11G User’s Manual 43
Step 3 Installing the wireless LAN card drivers
Please check the configuration of the drives on your
computer (page 34) before installing the drivers.
In addition, confirm that the PC card driver is normally
operating on your computer (page 36).
The procedure for installing the wireless LAN card drivers varies with
Windows Me/98. Use the procedure applicable to your computer as shown
below.
Windows ME user:
See <<Windows ME>> below.
Windows 98 user:
See <<Windows 98>> on page 45.
Turn on the computer.
《WindowsMe》
1The installed wireless LAN card is recognized and the [Add New
Hardware Wizard] window appears.
If the Wizard window does not appear, see "The
wireless LAN card installation window does not
appear." on page 96 in Chapter 5.
2Insert the "AirStation Driver CD" into the CD-ROM drive.
⇒ Continued on next page
WLI-CF-S11G.book 43 ページ 2002年3月1日 金曜日 午後6時16分

WLI-CF-S11G User’s Manual44
When you insert the "AirStation Driver CD" into the CD-
ROM drive, the Simple Installation Wizard window may
automatically appear. In this case, click [Cancel], and
then [Abort], closing the window.
31. Select [Automatic Search for a better driver (recommended)].
2. Click [Next].
If the "Copying Files..." window appears, take the
following steps before proceeding to Step 4.
1. "D:\CFS11G" (when the CD-ROM drive is "D:").
2. Click [OK].
4When the message "Windows has finished installing the new
hardware device." appears, click the [Finish] button.
5Eject the "AirStation Driver CD" from the CD-ROM drive.
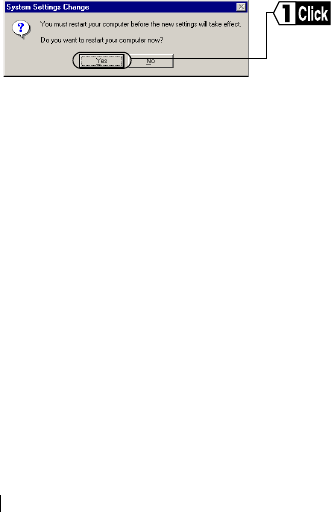
6
When the message "Do you want to restart your computer now?"
appears, click [Yes].
The computer restarts.
71. Enter your "User name" and "Password."
2. Click [OK].
The above window may not appear, but it is not a problem.
The password field may be left empty.
When you enter a password for the first time, the entered character
string will be registered as your password.
WLI-CF-S11G.book 44 ページ 2002年3月1日 金曜日 午後6時16分
3
Windows Me/98 Settings
WLI-CF-S11G User’s Manual 45
Since the password is case-sensitive, use great care when you enter the
password.
When you click [Cancel], you cannot connect to the network. Be sure
to click [OK].
Now you have completed the installation of the wireless LAN card
drivers.
《Windows98》
1The installed wireless LAN card is recognized and the [Add New
Hardware Wizard] window appears.
Click [Next].
If the Wizard window does not appear, see "The
wireless LAN card installation window does not
appear." on page 96 in Chapter 5.
21.
Select [Search your best driver for your device (recommended)].
2. Click [Next].
3Insert the "AirStation Driver CD" into the CD-ROM drive.
When you insert the "AirStation Driver CD" into the CD-
ROM drive, the Simple Installation Wizard window may
automatically appear. In this case, click [Cancel], and
then [Abort], closing the window.
Proceed to " Confirming that the installed wireless LAN card
is normally operating" on page 47.
Step 1
Step 4
WLI-CF-S11G.book 45 ページ 2002年3月1日 金曜日 午後6時16分

WLI-CF-S11G User’s Manual46
41. Select "Specify location..."
2. Enter "D:\CFS11G" (when the CD-ROM drive is "D:").
3. Click [Next].
51. Confirm that "BUFFALO WLI-CF-S11G Wireless LAN Adapter"
is displayed.
2. Click [Next].
6When the message " Please insert the disk labeled 'Windows 98
CD-ROM', and then click OK. " appears, take the following steps
before proceeding to Step 6.
1Insert the Windows 98 CD-ROM into the CD-ROM drive.
Click [OK].
2Enter "D:\WIN98" to the "Copy files from" field (when the CD-
ROM drive is "D:").
Click [OK].
7Click [Finish]
8When the message "Do you want to restart your computer now?"
appears, click [Yes].
The computer restarts.
9Enter your "User name" and "Password."
Click [OK].
The above window may not appear, but it is not a problem.
The password field may be left empty.
WLI-CF-S11G.book 46 ページ 2002年3月1日 金曜日 午後6時16分

3
Windows Me/98 Settings
WLI-CF-S11G User’s Manual 47
When you enter a password for the first time, the entered character
string will be registered as your password.
Since the password is case-sensitive, use great care when you enter the
password.
When you click [Cancel], you cannot connect to the network. Be sure
to click [OK].
Now you have completed the installation of the wireless LAN card drivers.
Step 4
Confirming that the installed wireless
LAN card is normally operating
Upon completion of the installation of the wireless LAN card drivers,
confirm that the installed wireless LAN card is normally operating by using
the procedure below.
1Right-click [My Computer] on Desktop.
Click [Properties].
2Click the [Device Manager] tab.
3Confirm that "BUFFALO WLI-CF-S11G Wireless LAN Adapter" is
displayed under [Network adapters] without any error mark ("x" or
"!") indicated.
When "BUFFALO WLI-CF-S11G Wireless LAN Adapter" is displayed
without any error mark ("x" or "!"), your wireless LAN card is normally
operating.
Proceed to " Confirming that the installed wireless LAN card
is normally operating" on page 47.
Step 1
Step 4
Step 1
Step 4
WLI-CF-S11G.book 47 ページ 2002年3月1日 金曜日 午後6時16分

WLI-CF-S11G User’s Manual48
If no driver name is listed or an error mark ("x" or "!") is
indicated
Your installed wireless LAN card is not normally operating in this case.
See "I want to uninstall the wireless LAN card" on page 100 in Chapter 5,
and then uninstall and re-install the wireless LAN cad drivers.
To make the AirStation settings
Refer to the AirStation manual to make the AirStation settings.
WLI-CF-S11G.book 48 ページ 2002年3月1日 金曜日 午後6時16分
3
Windows Me/98 Settings
WLI-CF-S11G User’s Manual 49
3.2 Preparing for Connecting to the Network
Upon completion of confirming that the installed wireless LAN card is
normally operating, prepare for connecting to the network.
This section describes how to make the settings in the following operating
environment. Use the settings on the computer to be connected to the
network for reference.
•OS……………… WindowsMe
•Protocol………… TCP/IP
• Client…………… Microsoft Network Client
• Service………… File and printer sharing for Microsoft Networks
For detailed information, refer to the manual provided with Windows Me/
98 and Help file.
Step 5 Confirming "TCP/IP" and "Client for
Microsoft Networks"
For example, the procedure below applies to the Windows Me computer.
1Start your computer.
2Select [Start]-[Settings]-[Control Panel].
3Double-click [Network].
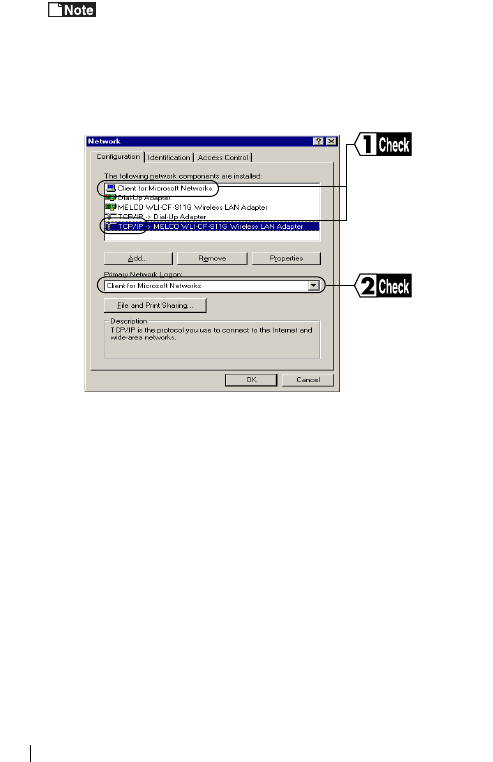
4Confirm that "TCP/IP" and "Client for Microsoft Networks" are
displayed in the [The following network components are
installed:] field of the [Configuration] window.
WLI-CF-S11G.book 49 ページ 2002年3月1日 金曜日 午後6時16分
WLI-CF-S11G User’s Manual50
When "TCP/IP" is not displayed, see Caution on page 53 to add
the TCP/IP.
When "Client for Microsoft Networks" is not displayed, see
Caution on page 54 to add Microsoft Network Client.
⇒ Continued on next page
《When only the wireless LAN card is installed》
Confirm that
"TCP/IP" and
"Client for Microsoft
Networks" are listed.
Confirm that
"Client for Microsoft
Networks"
is displayed.
WLI-CF-S11G.book 50 ページ 2002年3月1日 金曜日 午後6時16分
3
Windows Me/98 Settings
WLI-CF-S11G User’s Manual 51
The following appears in the "The following network components are
installed:" field. However, this does not imply any problem.
"TCP/IP->BUFFALO WLI-CF-S11G Wireless LAN Adapter"
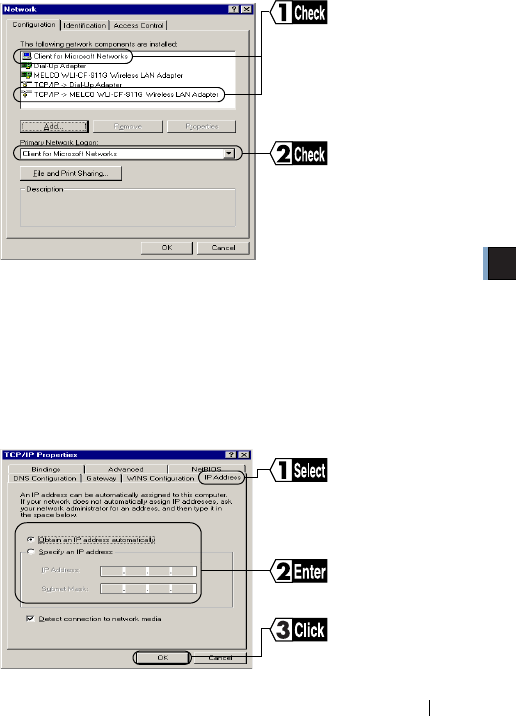
51. Select "TCP/IP."
2. Click [Properties].
6
《When dial-up adapters and/or other LAN boards are installed》
Confirm that "TCP/IP" and
"Client for Microsoft
Networks"are listed.
Confirm that "Client for
Microsoft Networks" is
displayed.
Click the "IP Address" tab.
Enter the IP address.
Click [OK].
WLI-CF-S11G.book 51 ページ 2002年3月1日 金曜日 午後6時16分
WLI-CF-S11G User’s Manual52
• When a DHCP server exists within the network (e.g., when the
DHCP server function of the AirStation is used), select [Obtain IP
Address Automatically].
• To manually set the IP address, select [Specify an IP address].
Inquire the IP address and Subnet mask from your network
administrator.
• For the IP address setting, see "I don't know how to assign the IP
address" on page 113 in Chapter 5.
7When the window in Step 5 appears again, click [OK] to close the
"Network" window.
8
9Windows Me will restart.
Now you have completed the TCP/IP settings on the computer which will
use a wireless LAN.
Click [Yes].
WLI-CF-S11G.book 52 ページ 2002年3月1日 金曜日 午後6時16分
3
Windows Me/98 Settings
WLI-CF-S11G User’s Manual 53
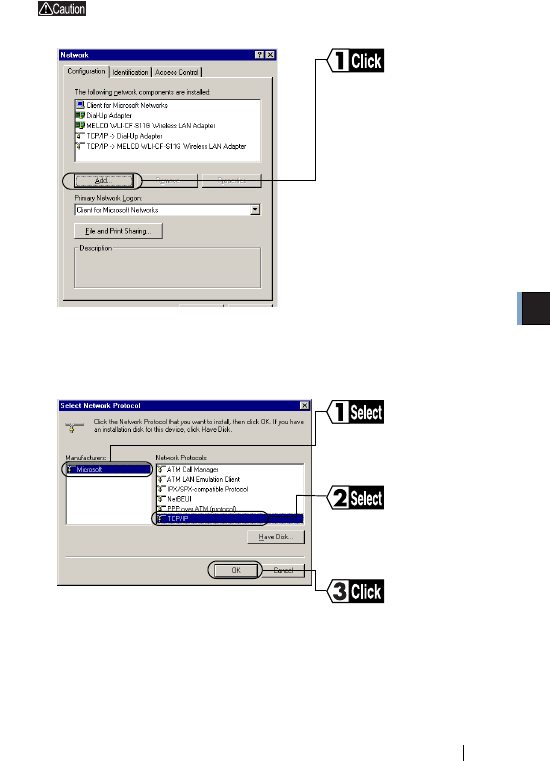
If "TCP/IP" is not displayed, use the procedure below to
add the TCP/IP.
1
21. Select [Protocol].
2. Click [Add].
3
Click [Add].
Select "Microsoft" for
[Manufacturers].
Click [OK].
Select "TCP/IP" for
[Network Protocols].
WLI-CF-S11G.book 53 ページ 2002年3月1日 金曜日 午後6時16分
WLI-CF-S11G User’s Manual54
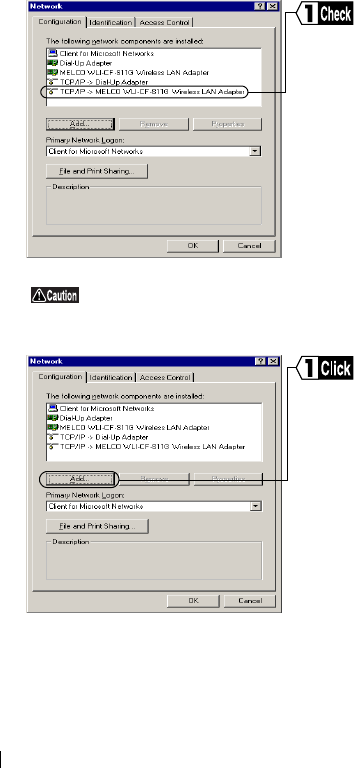
4
When "Client for Microsoft Networks" is not
displayed, use the procedure below to add the
Microsoft Network Client.
1
Confirm that the TCP/IP
has been added.
Click [Add].
WLI-CF-S11G.book 54 ページ 2002年3月1日 金曜日 午後6時16分
3
Windows Me/98 Settings
WLI-CF-S11G User’s Manual 55
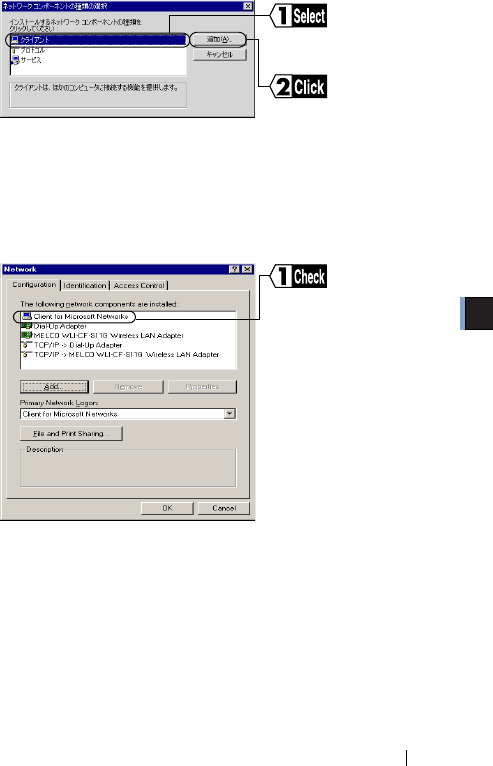
2
31. Select "Microsoft" for [Manufacturers].
2. Select "Client for Microsoft Networks" for [Network Clients].
3. Click [OK].
4
Select [Client].
Click [Add].
Confirm that the
Microsoft Network Client
has been added.
WLI-CF-S11G.book 55 ページ 2002年3月1日 金曜日 午後6時16分
WLI-CF-S11G User’s Manual56
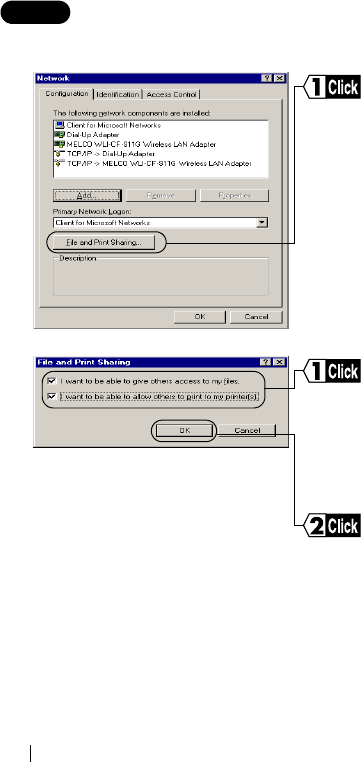
Step 6 Adding "File and printer sharing for
Microsoft Networks"
1
2
Click [File and Print
Sharing].
Click the checkbox to put a
checkmark for both "I want to
be able to give others access
to my files." and "I want to be
able to allow others to print to
my printer(s)."
Click [OK].
WLI-CF-S11G.book 56 ページ 2002年3月1日 金曜日 午後6時16分
3
Windows Me/98 Settings
WLI-CF-S11G User’s Manual 57
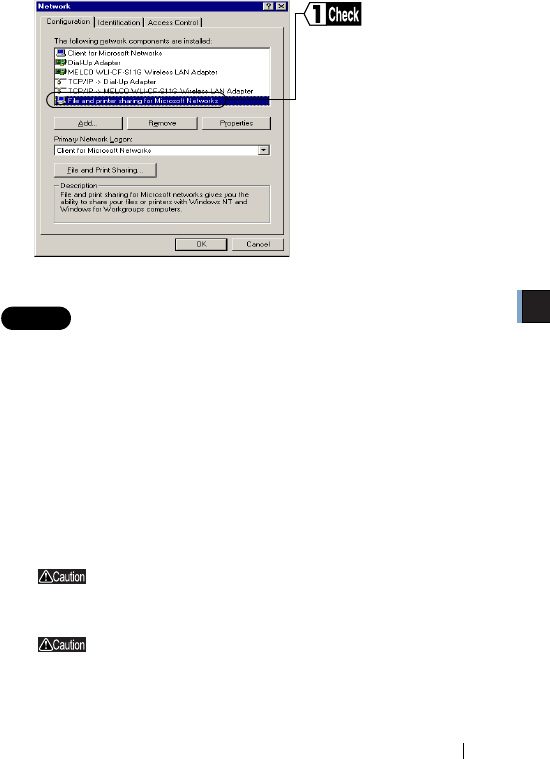
3
Step 7 Checking the computer name and
workgroup name
1Click the [Identification] tab.
Check the [Computer name],[Workgroup],and [Computer Description].
Click [OK].
It is recommended to use alphanumeric characters for the [Computer
name] and [Workgroup].
If a specific character such as a period (.) is included, the
computer may fail in connecting to the network.
The same workgroup name must be assigned to all the
computers included in the network.
⇒ Continued on next page
Confirm that "File and printer
sharing for Microsoft
Networks" has been added.
WLI-CF-S11G.book 57 ページ 2002年3月1日 金曜日 午後6時16分

WLI-CF-S11G User’s Manual58
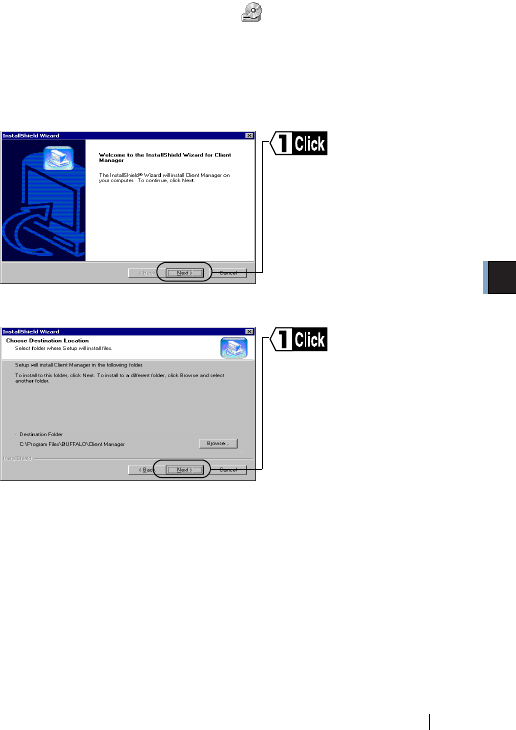
Step 8 Installing Client Manager
"Client Manager" is a tool for communicating with wireless LAN computers
directly or via AirStation. It is necessary to install Client Manager in all
wireless LAN computers.
Use the procedure below to install Client Manager.
1Insert the "AirStation Driver CD" into the CD-ROM drive.
When you insert the "AirStation Driver CD" into the CD-ROM
drive, the Simple Installation Wizard window may
automatically appear. In this case, proceed to Step 4.
WLI-CF-S11G.book 58 ページ 2002年3月1日 金曜日 午後6時16分
3
Windows Me/98 Settings
WLI-CF-S11G User’s Manual 59
2Double-click [My Computer] on Desktop.
3Double-click the CD-ROM icon()
41. Select [Install the Client Manager].
2. Click [Next].
5
6
⇒ Continued on next page
Click [Next].
Click [Next].
WLI-CF-S11G.book 59 ページ 2002年3月1日 金曜日 午後6時16分
WLI-CF-S11G User’s Manual60
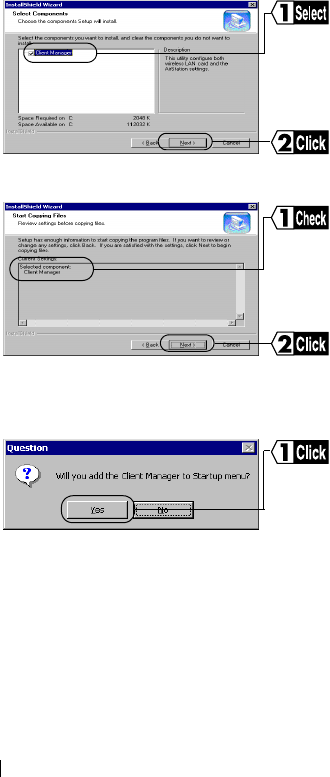
7
8
9
Click [No] when you do not wish to add Client Manager to the
Startup menu.
Click [Next].
Select "Client Manager"
Click [Next].
Copying the files required for
the installation will start.
Reconfirm the component to
be installed.
Click [Yes].
Client Manager will be
registered in the Startup
menu.
WLI-CF-S11G.book 60 ページ 2002年3月1日 金曜日 午後6時16分
3
Windows Me/98 Settings
WLI-CF-S11G User’s Manual 61
10
Now you have completed the Client Manager installation process.
To uninstall Client Manager
1Select [Start]-[Settings]-[Control Panel].
2Double-click "Add/Remove Programs."
3Select "Client Manager" and click [Add/Remove].
4Select "Remove" and click [Next].
5When the message "Do you want to completely remove the
selected application and all of its components? " appears, click
[OK].
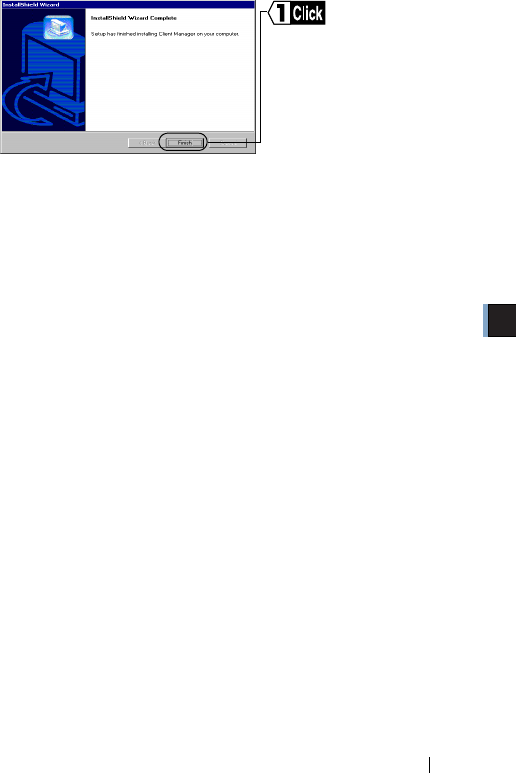
6When the "InstallShield Wizard Complete" window opens, click
[Finish].
Click [Finish].
WLI-CF-S11G.book 61 ページ 2002年3月1日 金曜日 午後6時16分
WLI-CF-S11G User’s Manual62
3.3 Connecting to the Network
Upon completion of computer settings, you can connect your computer to
the network. There are two methods for connecting the computer to the
network as shown below.
•Communicating via AirStation -a
•Communicating with wireless LAN computers -b
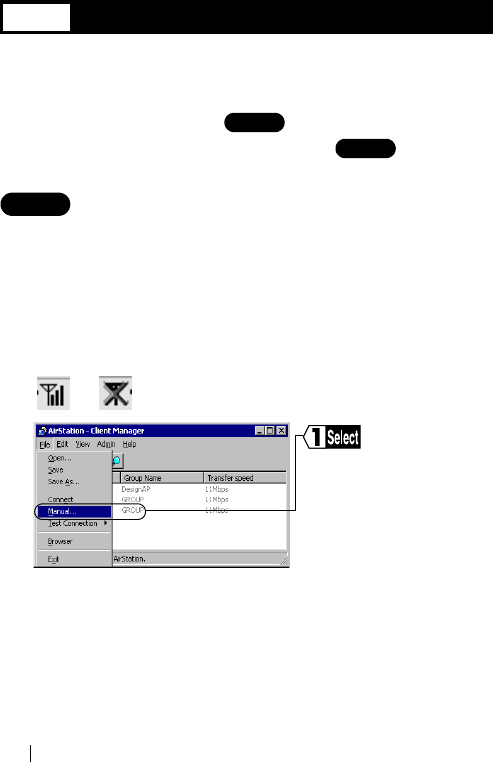
Step 9 -a Communicating via AirStation
To make communications using the AirStation, set the ESS-ID using Client
Manager.
1Select [Start]-[Programs]-[AirStation Utility]-[Client Manager].
If the icon below appears in the task tray in the lower right on the
screen, you can double-click that icon to start Client Manager.
or
2
Step 1
Step 9
Step 1
Step 9
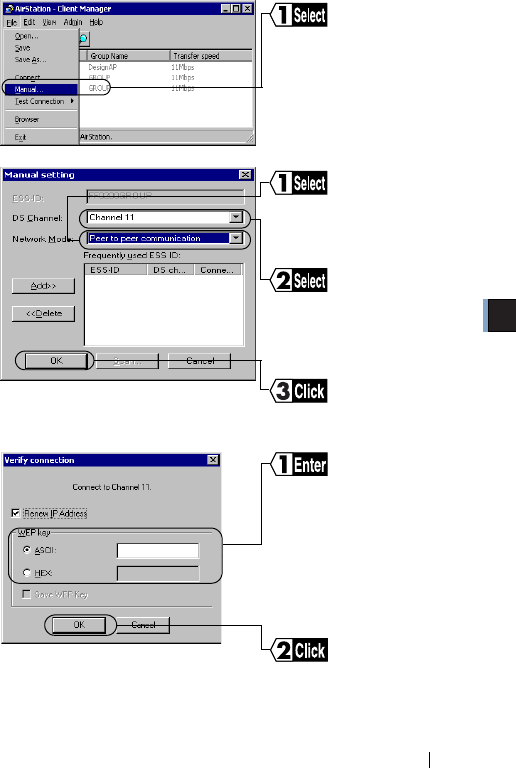
Select [File]-[Manual].
WLI-CF-S11G.book 62 ページ 2002年3月1日 金曜日 午後6時16分
3
Windows Me/98 Settings
WLI-CF-S11G User’s Manual 63
31. Select "11Mbps Communication over AirStation" in the
"Network Mode" field.
2. Enter the AirStation ESS-ID to the "ESS-ID" field.
3. Click [OK].
The initial setting of the AirStation ESS-ID shows the last six digits of
the MAC address of the AirStation plus "GROUP" (upper-case).
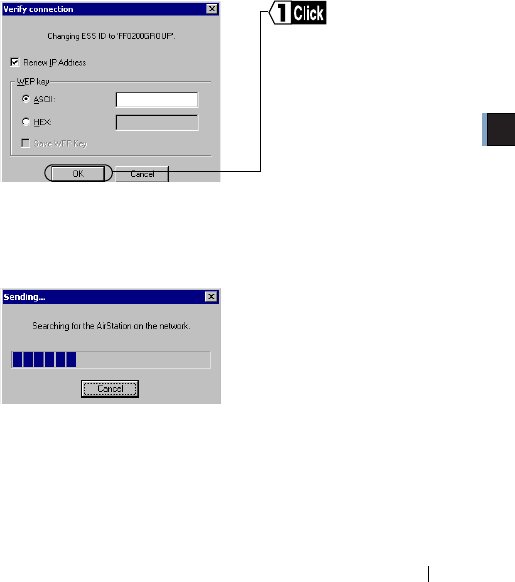
4
Enter an "WEP Key" if encryption with WEP is used in the network. If
the AirStation is used in the initial state, no encryption is set. Leave the
area empty in this case.
5
⇒ Continued on next page
Click [OK].
Ai
r
St
a
ti
on re
t
r
i
eva
l
w
ill
b
e
started.
WLI-CF-S11G.book 63 ページ 2002年3月1日 金曜日 午後6時16分
WLI-CF-S11G User’s Manual64
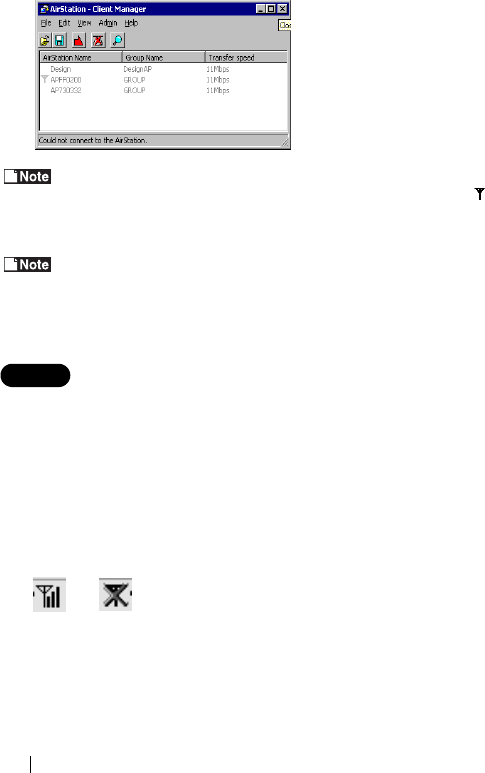
6
When the access to the AirStation is successful, the AirStation
indication turns from gray to black so that the antenna mark()
appears.
After the computer has succeeded in connecting to the AirStation, a
slower data rate such as "2Mbps" may be displayed in the "Transfer
speed" column. In this case, the correct data rate will appear when
the practical communication starts.
Step 9 -b Communicating with wireless
LAN computers
When communicating with wireless LAN computers, manually set a radio
channel using Client Manager.
1Select [Start]-[Programs]-[AirStation Utility]-[Client Manager].
If the icon below appears in the task tray in the lower right on the
screen, you can double-click that icon to start Client Manager.
or
When this window appears,
the access to the AirStation
is successful.
WLI-CF-S11G.book 64 ページ 2002年3月1日 金曜日 午後6時16分
3
Windows Me/98 Settings
WLI-CF-S11G User’s Manual 65
2
3
4
Now you have completed the radio channel configuration procedure.
Select [File]-[Manual].
Select the same channel as
the other computers that
you wish to communicate
Click [OK].
Select "Peer to peer
communication" in the
"Network Mode" field.
Click [OK].
Enter an "WEP Key" if
encryption with WEP is used
in the network. If the initial
settings are used, no
encryption is set. Leave the
area empty in this case.
WLI-CF-S11G.book 65 ページ 2002年3月1日 金曜日 午後6時16分
WLI-CF-S11G User’s Manual66
Step 10 Making your computer shared
Upon completion of wireless LAN channel configuration, make the settings
for sharing the drives and folders in your computer so that any computer on
the network can use them.
The example here describes the procedure for sharing [My Document] in
Windows Me.
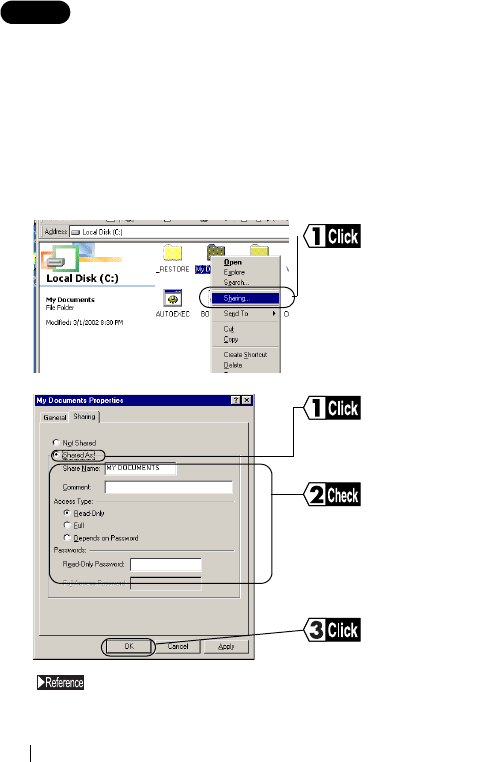
1Double-click [My Computer] on Desktop, and then the C: drive
ion.
2
3
For details on "Share Name," "Comment," "Access Type," and
"Passwords," see "Setting window for sharing in Windows Me/
98" on page 123 in Chapter 6.
Right-click [My Documents],
and select [Sharing] from
the menu.
Click[Shared As].
Click [OK].
Check or change, if
necessary, "Share Name,"
"Comment," "Access Type,"
and "Passwords."
WLI-CF-S11G.book 66 ページ 2002年3月1日 金曜日 午後6時16分
3
Windows Me/98 Settings
WLI-CF-S11G User’s Manual 67
4Upon completion of sharing setting, the [My Documents] icon
changes as shown below.
Now you have completed the setting for sharing [My Documents].
Step 11 Starting communication
Upon completion of setting for sharing the drives and folders, you can
access a computer on the network.
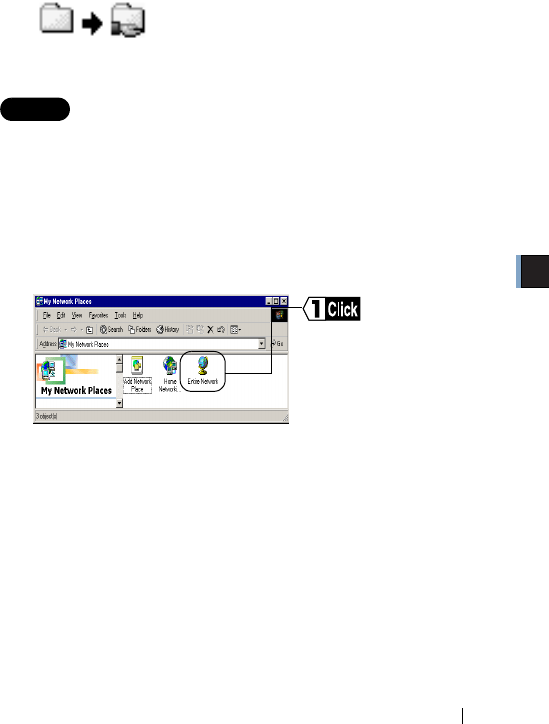
1Double-click [My Network] on Desktop.
In Windows 98, double-click the [Network Computer] icon, and
proceed to Step 4.
2
⇒ Continued on next page
Double-click
[Entire Network].
WLI-CF-S11G.book 67 ページ 2002年3月1日 金曜日 午後6時16分
WLI-CF-S11G User’s Manual68
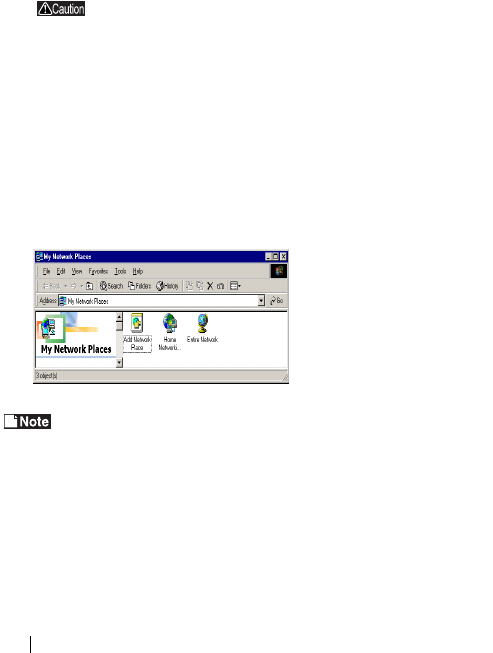
3Double-click the workgroup name icon.
All computers connected on the network are listed.
When your target computer is not listed, see "Other computers
are not listed (during communication without the AirStation)" on
page 106 in Chapter 5.
4Double-click the icon of your target computer.
5Double-click your target folder.
6All available folders and files in the selected folder are listed so
that you can open, create, or update a file in them.
All available folders and files in the selected folder are listed so that
you can open, create, or update a file in them.
WLI-CF-S11G.book 68 ページ 2002年3月1日 金曜日 午後6時16分