Belkin F5D7231P High-Speed Mode Wireless G Router w/ Print Server User Manual P74606 F5D7231 4P man indd
Belkin International, Inc. High-Speed Mode Wireless G Router w/ Print Server P74606 F5D7231 4P man indd
Belkin >
Contents
Users Manual Part 10
118
Using your Router with AOL Broadband
Using your Router with AOL Broadband
119
section
2
1
3
4
5
6
7
8
9
10
11
12
13
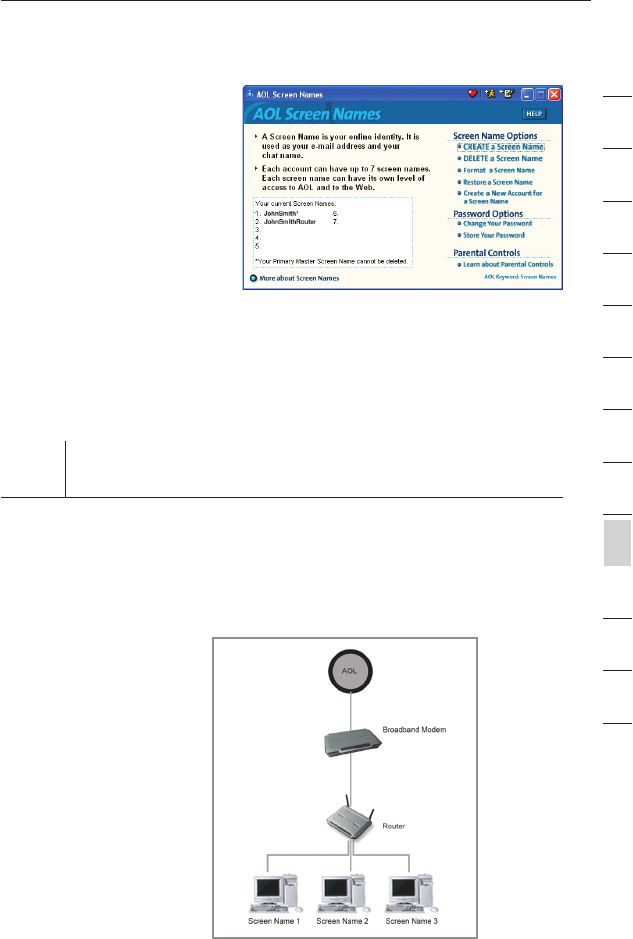
11. The “AOL Screen
Names” window
appears. This window
will include all the
accounts you have
created to this point.
12. Repeat steps 1-11 for
each computer that
will be using AOL and
that will be connected
to your Belkin Router.
When you are finished
adding screen names,
go to Step 2.
Step 2 Configure your computers with the new AOL screen names
you just created
This step consists of installing the AOL software on each computer
and configuring it to use one of the screen names you created in
Step 1. Remember that each computer MUST use a different screen
name. For help installing and configuring the AOL software, contact
AOL’s technical support department.
Network Configuration
120
Troubleshooting
Troubleshooting
121
section
2
1
3
4
5
6
7
8
9
10
11
12
13
Problem:
Installation CD does not automatically start
Solution:
If the CD-ROM does not start the Easy Install Wizard automatically,
it could be that the computer is running other applications that are
interfering with the CD drive.
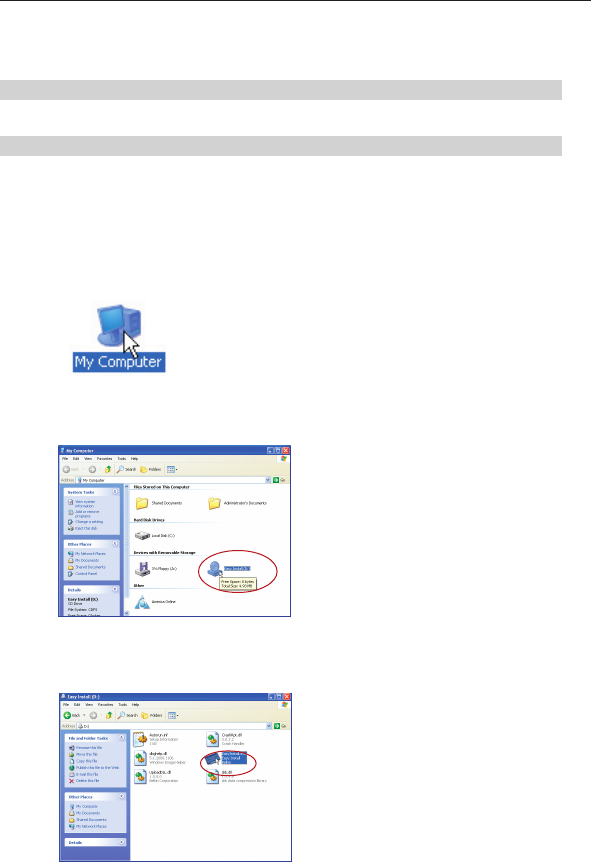
1. If the Easy Install Wizard screen does not appear within 15-20
seconds, open up your CD-ROM drive by double clicking on the
“My Computer” icon that is located on your desktop.
2. Next, double-click on the CD-ROM drive that the Easy Installation
CD has been placed in to start the installation.
3. Easy Install should start within a few seconds If, instead, a window
appears showing the files on the CD, double-click on the icon
labeled “EasyInstall.exe”.
4. If the Easy Install Wizard is still does not start, reference the
section titled “Manually Configuring Network Settings” (page 89 of
this manual for alternative setup method).

120
Troubleshooting
Troubleshooting
121
section
2
1
3
4
5
6
7
8
9
10
11
12
13
Problem:
Easy Install cannot find my Router
Solution:
If the Easy Install Wizard is not able to find the Router during the
installation process please check the following items:
1. If the Easy Install Wizard is not able to find the Router during
the installation process, there may be 3rd party firewall software
installed on the computer attempting to access the Internet.
Examples of third party firewall software are ZoneAlarm,
BlackICE PC Protection, McAfee Personal Firewall, and Norton
Personal Firewall.
If you do have firewall software installed on your computer,
please make sure that you properly configure it. You can
determine if the firewall software is preventing Internet access
by temporarily turning it off. If, while the firewall is disabled,
Internet access works properly, you will need to change the
firewall settings to function properly when it is turned on.
Please refer to the instructions provided by the publisher of your
firewall software for instructions on configuring the firewall to
allow Internet access.
2. Unplug power to the Router for 10 seconds, and then plug the
power back into the router. Ensure that the router’s Power light
is on; it should be solid green. If not, check to make sure that
the AC adapter is connected to the router and plugged into a
wall outlet.
3. Ensure that you have a cable (use the cable included with the
router) connected between (1) the network (Ethernet) port on the
back of the computer and (2) one of the LAN ports, labeled “1”
through “4”, on the back of the router.
Note: the computer should NOT be connected to the port
labeled “Internet/WAN” on the back of the router.
4. Try shutting down and restarting your computer, then re-running
the Easy Install.
If the Easy Install Wizard is still unable to find the Router,
reference the section titled “Manually Configuring Network
Settings” for installation steps.

122
Troubleshooting
Troubleshooting
123
section
2
1
3
4
5
6
7
8
9
10
11
12
13
Problem:
Easy Install cannot connect my Router to the Internet
Solution:
If the Easy Install Wizard is not able to connect the Router to the
Internet, please check the following items:
1. Use the troubleshooting suggestions within the Easy
Install Wizard. If the troubleshooting screen does not open
automatically, click on the “Troubleshoot” button in the lower
right-hand corner of the Easy Install Wizard window.
2. If your ISP requires a user name and password, make sure that
you have typed in your user name and password correctly. Some
user names require that the ISP’s domain may be at the end of
the name. Example: “myname@myisp.com”. The “@myisp.com”
part of the user name may need to be typed as well as your
user name.
If you continue to have no Internet connection, reference the
section titled “Manually Configuring Network Settings” (page 89
of this manual for alternative setup method).
Problem:
ˆ• The Easy Install Wizard completed installation, but my web
browser doesn’t work
• I am unable to connect to the Internet. The Routers “WAN” light
on my Router is off, and the “Connected” light is blinking
Solution:
If you cannot connect to the Internet, and the “WAN” light is off,
and the “Connected” light is blinking, the problem may be that your
modem and router are not connected properly.
1. Make sure the network cable between the modem and the
Router is connected. We strongly recommend using the cable
that was supplied with your Cable or DSL modem for this
purpose. The cable should be connected at one end to the
Router’s “Internet/WAN” port, and at the other end to the
network port on your modem.

122
Troubleshooting
Troubleshooting
123
section
2
1
3
4
5
6
7
8
9
10
11
12
13
2. Unplug the Cable or DSL modem from its power source for 3
minutes. After 3 minutes plug the modem back into its power
source. This may force the modem to properly recognize
the router.
3. Unplug the power to your Router, wait 10 seconds, and then
reconnect the power. This will cause the router to re-attempt
communication with the modem.
If the “WAN” light on the Router is not lit after completing these
steps, please contact Belkin Technical Support.
4. Try shutting down and restarting your computer.
Problem:
• The Easy Install Wizard completed installation, but my web
browser doesn’t work
• I am unable to connect to the Internet. The Routers “WAN” light
on my Router is on, and the “Connected” light is blinking
Solution:
If you cannot connect to the Internet, the “WAN” light is on, and
the “Connected” light is blinking, the problem may be that your
connection type may not match the ISP’s connection.
• If you have a “static IP address” connection, your ISP must
assign you the IP address, subnet mask, and gateway address.
Please refer to the section entitled “Alternate Setup Method” for
details on changing this setting.
• If you have a “PPPoE” connection, your ISP will assign you a
user name and password and sometimes a service name. Make
sure the Router connection type is configured to PPPoE and the
settings are entered properly. Please refer to your Router’s User
Guide section entitled “Alternate Setup Method” for details on
changing this setting.

124
Troubleshooting
Troubleshooting
125
section
2
1
3
4
5
6
7
8
9
10
11
12
13
• You may need to configure your Router to meet the specific
requirements of your ISP. To search our Knowledge Base for
ISP-specific issues, go to: http://web.belkin.com/support and
type in “ISP”
If you are still unable to access the Internet after verifying these
settings, please contact Belkin Technical Support.
Problem:
• The Easy Install Wizard completed, but my web browser
doesn’t work
• I am unable to connect to the Internet. The “WAN” light on my
router is blinking, and the “Connected” light is solid
Solution:
If the “WAN” light is blinking, and the “Connected” light is solid,
but you are unable to access the Internet, there may be 3rd party
firewall software installed on the computer attempting to access the
Internet. Examples of third party firewall software are ZoneAlarm,
BlackICE PC Protection, McAfee Personal Firewall, and Norton
Personal Firewall.
If you do have firewall software installed on your computer, please
make sure that you properly configure it. You can determine if
the firewall software is preventing Internet access by temporarily
turning it off. If, while the firewall is disabled, Internet access works
properly, you will need to change the firewall settings to function
properly when it is turned on.
Please refer to the instructions provided by the publisher of your
firewall software for instructions on configuring the firewall to allow
Internet access.
If you are still unable to access the Internet after disabling any
Firewall software, please contact Belkin Technical Support.
124
Troubleshooting
Troubleshooting
125
section
2
1
3
4
5
6
7
8
9
10
11
12
13
Problem:
I can’t connect to the Internet wirelessly
Solution:
If you are unable to connect to the Internet from a wireless
computer, please check the following items:
1. Look at the lights on your Router. If you’re using a Belkin
Router, the lights should be as follows:
• The “Power” light should be on.
• The “Connected” light should be on, and not blinking.
• The “WAN” light should be either on or blinking.
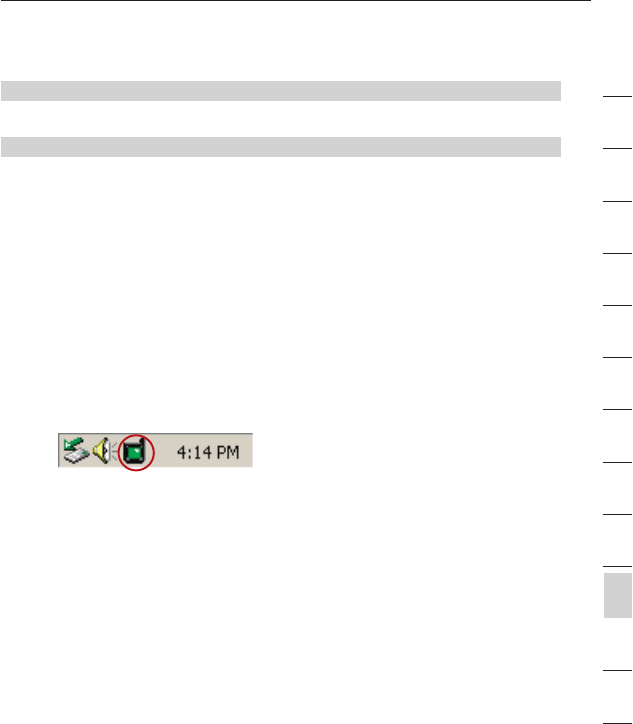
2. Open your wireless utility software by clicking on the icon in the
system tray at the bottom right-hand corner of the screen. If
you’re using a Belkin wireless card, the tray icon should look like
this (the icon may be red or green):
3. The exact window that opens will vary depending on the model
of wireless card you have; however, any of the utilities should
have a list of “Available Networks” – those wireless networks it
can connect to.
Does the name of your wireless network appear in the results?
Yes, my network name is listed – go to the troubleshooting solution
titled “ I can’t connect to the Internet wirelessly, but my network
name is listed”
No, my network name is not listed - go to the troubleshooting solution
titled “ I can’t connect to the Internet wirelessly, and my network
name is not listed”

126
Troubleshooting
Troubleshooting
127
section
2
1
3
4
5
6
7
8
9
10
11
12
13
Problem:
I can’t connect to the Internet wirelessly, but my network name
is listed
Solution:
If the name of your network is listed in the “Available Networks” list,
please follow the steps below to connect wirelessly:
1. Click on the correct network name in the “Available
Networks” list.
2. If the network has security (encryption) enabled, you will need to
enter the network key. For more information regarding security,
see the page entitled: Setting up wireless security
3. Within a few seconds, the tray icon in the lower left-hand
corner of your screen should turn green, indication a successful
connection to the network.
Problem:
I can’t connect to the Internet wirelessly, and my network name is
not listed
Solution
If the correct network name is not listed under “Available
Networks” in the wireless utility, please attempt the following
troubleshooting steps:
1. Temporarily move computer, if possible, five to ten feet from
the Router. Close the wireless utility, and re-open it. If the
correct network name now appears under “Available Networks”,
you may have a range or interference problem. Please see the
suggestions discussed in the section titled “Placement of your
Wireless Networking Hardware” of this user manual.

126
Troubleshooting
Troubleshooting
127
section
2
1
3
4
5
6
7
8
9
10
11
12
13
2. Using a computer that is connected to the Router via a network
cable (as opposed to wirelessly), ensure that “Broadcast SSID”
is enabled. This setting is found on the Router’s wireless
“Channel and SSID” configuration page.
If you are still unable to access the Internet after completing
these steps, please contact Belkin Technical Support.
Problem:
My wireless network performance is inconsistent
Data transfer is sometimes slow
Signal strength is poor
Difficulty establishing and/or maintaining a Virtual Private Network
(VPN) connection
Solution:
Wireless Technology is radio-based, which means connectivity
and the throughput performance between devices decreases when
the distance between devices increases. Other factors that will
cause signal degradation (metal is generally the worst culprit) are
obstructions such as walls and metal appliances. As a result, the
typical indoor range of your wireless devices will be between 100
to 200 feet. Note also that connection speed may decrease as you
move further from the Router or Access Point.
In order to determine if wireless issues are related to range, we
suggest temporarily moving the computer, if possible, five to ten
feet from the router.
Changing the wireless channel - Depending on local wireless
traffic and interference, switching the wireless channel of your
network can improve performance and reliability. The default
channel the router is shipped with is channel 11, you may choose
from several other channels depending on your region; see page
47 - “changing the wireless channel” for instructions on how to
choose other channels.
Limiting the wireless transmit rate - Limiting the wireless
transmit rate can help improve the maximum wireless range, and
connection stability. Most wireless cards have the ability to limit
the transmission rate. To change this property, go to the Windows
Control Panel, open the Network Connections and double-click on

128
Troubleshooting
Troubleshooting
129
section
2
1
3
4
5
6
7
8
9
10
11
12
13
your wireless card’s connection. In the properties dialog, select
the configure button on the General tab (Windows 98 users will have
to select the wireless card in the list box and then click properties),
then choose the advanced tab and select the Rate property.
Wireless client cards are usually set to automatically adjust the
wireless transmit rate for you, but doing so can cause periodic
disconnects when the wireless signal is too weak; as a rule, slower
transmission rates are more stable. Experiment with different
connection rates until you find the best one for your environment;
note that all available transmission rates should be acceptable
for browsing the Internet. For more assistance, see your wireless
card’s user manual.
Problem:
How do I extend the range of my wireless network
Solution:
Belkin recommends using one of the following products to extend
wireless network coverage throughout large homes or offices:
• Wireless Access Point: A wireless access point can effectively
double the coverage area of your wireless network. An Access
Point is typically placed in the area not currently covered by
your wireless router, and connected to the router using either an
Ethernet cable, or through your home’s power lines using two
Powerline Ethernet Adapters.
• For 802.11g (54g) wireless networks, Belkin offers a Wireless
Range Extender/Access Point that can be connected wirelessly
to a Belkin 802.11g Wireless Router, without requiring an
Ethernet cable or Powerline Ethernet Adapters.
These Belkin products are available at your local retailer, or can be
ordered from Belkin directly.
For network/range extension information, please visit:
www.belkin.com/networking to find out more about:
802.11g Wireless Range Extender/Access Point (F5D7130)
Powerline Ethernet Adapter (F5D4070)
Powerline USB Adapter (F5D4050)

128
Troubleshooting
Troubleshooting
129
section
2
1
3
4
5
6
7
8
9
10
11
12
13
Problem:
I am having difficulty setting up Wired Equivalent Privacy (WEP)
security on a Belkin Router or Belkin Access Point
Solution
1. Log into your Wireless Router or Access Point.
Open your web browser and type in IP address of the Wireless
Router or Access Point. (The Router default is 192.168.2.1, the
802.11g Access Point is 192.168.2.254 ). Log into your router
by clicking on the “Login” button in the top right-hand corner
of the screen. You will be asked to enter your password. If you
never set a password, leave the password field blank and click
“Submit”.
Click the “Wireless” tab on the left of your screen. Select
the “Encryption” or “Security” tab to get to the security
settings page.
2. Select “128-bit WEP” from the drop-down menu.
3. After selecting your WEP encryption mode, you can type in
your hex WEP key manually, or you can type in a passphrase
in the “Passphrase” field and click “Generate” to create a WEP
key from the passphrase. Click “Apply Changes” to finish. You
must now set all of your clients to match these settings. A hex
(hexadecimal) key is a mixture of numbers and letters from A-F
and 0-9. For 128-bit WEP, you need to enter 26 hex keys.
For example:
C3030FAF4BB2C3D44BC3D4E7E4 = 128-bit key
4. Click “Apply Changes” to finish. Encryption in the Wireless
Router is now set. Each of your computers on your wireless
network will now need to be configured with the same
security settings.

130
Troubleshooting
Troubleshooting
131
section
2
1
3
4
5
6
7
8
9
10
11
12
13
WARNING: If you are configuring the Wireless Router or Access
Point from a computer with a wireless client, you will need to ensure
that security is turned on for this wireless client. If this is not done,
you will lose your wireless connection.
Note to Mac users: Original Apple Airport® products support 64-
bit encryption only. Apple Airport 2 products can support 64-bit or
128-bit encryption. Please check your Apple Airport product to see
which version you are using. If you cannot configure your network
with 128-bit encryption, try 64-bit encryption.
Problem:
I am having difficulty setting up Wired Equivalent Privacy (WEP)
security on a Belkin client card
Solution:
The client card must use the same key as the Wireless Router or
Access Point. For instance, if your Wireless Router or Access Point
uses the key 00112233445566778899AABBCC, then the client card
must be set to the exact same key.
1. Double-click the Signal Indicator icon to bring up the Wireless
Network screen. The Advanced button will allow you to view and
configure more options of your card.
2. The “Advanced” button will allow you to view and configure more
options of the card.
3. Once the advanced button is clicked the Belkin Wireless LAN
Utility will appear. This Utility will allow you to manage all the
advanced features of the Belkin wireless card.
4. Under the “Wireless Network Properties” tab, select a
network name from the “Available networks” list and click the
“Properties” button
5. Under “Data Encryption” select “WEP”
6. Ensure the check box “The key is provided for me automatically”
at the bottom is unchecked. If you are using this computer to
connect to a corporate network, please consult your network
administrator if this box needs to be checked.
7. Type you WEP key in the “Network key’ box.

130
Troubleshooting
Troubleshooting
131
section
2
1
3
4
5
6
7
8
9
10
11
12
13
Important: A WEP key is a mixture of numbers and letters from
A-F and 0-9. For 128-bit WEP, you need to enter 26 keys. This
Network key needs to match the key you assign to your Wireless
Router or Access Point.
For example:
C3030FAF4BB2C3D44BC3D4E7E4 = 128-bit key
8. Click “OK”, and then “Apply” to save the settings.
For non-Belkin wireless client cards please consult the manufacturer
for that wireless client card’s user manual
Problem:
Do Belkin products support WPA?
Solution
Note: To use WPA security, all your clients must be upgraded
to drivers and software that support it. At the time of this FAQ
publication, a security patch download is available, for free,
from Microsoft. This patch works only with the Windows XP
operating system.
Download the patch here:
http://www.microsoft.com/downloads/details.aspx?FamilyID=009d8
425-ce2b-47a4-abec-274845dc9e91&displaylang=en
You also need to download the latest driver for your Belkin Wireless
802.11g Desktop or Notebook Network Card from the Belkin
support site. Other operating systems are not supported at this
time. Microsoft’s patch only supports devices with WPA-enabled
drivers such as Belkin 802.11g products
Download the latest driver at http://web.belkin.com/support
for the following products:
F5D7000, F5D7001, F5D7010, F5D7011, F5D7230-4,
F5D7231-4, F5D7130, F5D7231-4P, F5D7235-4

132
Troubleshooting
Troubleshooting
133
section
2
1
3
4
5
6
7
8
9
10
11
12
13
Problem:
I am having difficulty setting up Wi-Fi Protected Access (WPA)
security on a Belkin Wireless Router or Belkin Access Point for a
home network.
Solution:
1. From the “Security Mode” drop-down menu, select “WPA-PSK
(no server)”.
2. For Encryption Technique, select “TKIP” or “AES”. This setting
will have to be identical on the clients that you set up.
3. Enter your pre-shared key. This can be from 8 to 63 characters
and can be letters, numbers, or symbols or spaces. This same
key must be used on all of the clients that you set up. For
example, your PSK might be something like: “Smith family
network key”.
4. Click “Apply Changes” to finish. You must now set all clients to
match these settings.

132
Troubleshooting
Troubleshooting
133
section
2
1
3
4
5
6
7
8
9
10
11
12
13
Problem:
I am having difficulty setting up Wi-Fi Protected Access (WPA)
security on a Belkin Wireless Router or Belkin Access Point for
a business.
Solution:
If your network uses a radius server to distribute keys to the clients,
use this setting. This is typically used in a business environment.
1. From the “Security Mode” drop-down menu, select “WPA
(with server)”
2. For Encryption Technique, select “TKIP” or “AES”. This setting
will have to be identical on the clients that you set up.
3. Enter the IP address of the radius server into the “Radius
Server” fields.
4. Enter the radius key into the “Radius Key” field
5. Enter the key interval. Key interval is how often the keys are
distributed (in packets).
6. Click “Apply Changes” to finish. You must now set all clients to
match these settings.

134
Troubleshooting
Troubleshooting
135
section
2
1
3
4
5
6
7
8
9
10
11
12
13
Problem:
I am having difficulty setting up Wi-Fi Protected Access (WPA)
security on a wireless Belkin client card for a home network.
Solution:
Clients must use the same key that the Wireless Router or Access
Point uses. For instance if the key is “Smith Family Network Key” in
the Wireless Router or Access point, the clients must also use that
same key.
Double-click the Signal Indicator icon to bring up the Wireless
Network screen. The Advanced button will allow you to view and
configure more options of your card.
The “Advanced” button will allow you to view and configure more
options of the card.
Once the advanced button is clicked the Belkin Wireless LAN Utility
will appear. This Utility will allow you to manage all the advanced
features of the Belkin wireless card.
Under the “Wireless Network Properties” tab, select a network name
from the “Available networks” list and click the “Properties” button
Under “Network Authentication” select “WPA-PSK (no server)
Type your WPA key in the “Network key” box
Important: WPA-PSK is a mixture of numbers and letters from A-
Z and 0-9. For WPA-PSK you can enter 8 to 63 characters. This
Network key needs to match the key you assign to your Wireless
Router or Access Point.
Click “OK, then “Apply” to save the settings

134
Troubleshooting
Troubleshooting
135
section
2
1
3
4
5
6
7
8
9
10
11
12
13
Problem:
I am having difficulty setting up Wi-Fi Protected Access (WPA)
security on a Belkin wireless client card for a business.
Solution:
Double-click the Signal Indicator icon to bring up the Wireless
Network screen. The Advanced button will allow you to view and
configure more options of your card.
The “Advanced” button will allow you to view and configure more
options of the card.
Once the advanced button is clicked the Belkin Wireless LAN Utility
will appear. This Utility will allow you to manage all the advanced
features of the Belkin wireless card.
Under the “Wireless Network Properties” tab, select a network
name from the “Available networks” list and click the
“Properties” button
Under “Network Authentication” select WPA
In the “ Authentication” tab, select the settings that are indicated by
your network administrator.
Click “OK, then “Apply” to save the settings

136
Troubleshooting
Troubleshooting
137
section
2
1
3
4
5
6
7
8
9
10
11
12
13
Problem:
I am having difficulty setting up Wi-Fi Protected Access (WPA)
security on a non-Belkin client card for a home network.
Solution:
For non-Belkin WPA Wireless Desktop and Wireless Notebook
Network Cards that are not equipped with WPA-enabled software, a
file from Microsoft called “Windows XP Support Patch for Wireless
Protected Access” is available for free download:
www.microsoft.com/downloads/details.aspx?FamilyID=009d8425-
ce2b-47a4-abcc-2748dc9e91diplaylang=en
Note: The file that Microsoft has made available works only with
Windows XP. Other operating systems are not supported at this
time. You also need to ensure that the wireless card manufacturer
supports WPA and that you have downloaded and installed the
latest driver from their support site.
Supported Operating Systems:
• Windows XP Professional
• Windows XP Home Edition
Enabling WPA-PSK (no server)
1. Under Windows XP, click “Start > Control Panel > Network
Connections”.
2. Right-click on “Wireless Networks” tab will display the following
screen. Ensure the “Use Windows to configure my wireless
network settings” check box is checked.
3. Under the Wireless Networks tab, click the “Configure” button,
and you will see the following screen.
4. For a home or small business user, select “WPA-PSK” under
“Network Administration”.
Note: Select WPA (with radius server) if you are using this
computer to connect to a corporate network that supports an
authentication server such as a radius server, please consult
your network administrator for further information.

136
Troubleshooting
Troubleshooting
137
section
2
1
3
4
5
6
7
8
9
10
11
12
13
5. Select “TKIP” or “AES” under “Date Encryption”. This setting will
have to be identical to the Wireless Router or Access Point that
you set up.
6. Type in your encryption key in the “Network Key” box.
Important: Enter your Pre-Shared key. This can be from 8 to 63
characters and can be letters, numbers, or symbols. This same
key must be used on all of the clients that you set up.
7. Click “OK” to apply settings.
Problem:
I can’t print from one of the computers on my network. What do I do?
Solution:
For the PC to be able to print to the networked printer (printer on the print
server), the printer’s software and drivers must be installed on the PC.
Every manufacturer ships its printer with a driver and, usually, printing
software. Be sure that you have installed the printer drivers and software
on each PC from which you plan to print. In some cases, while installing the
drivers and software for your printer, you may be required to connect the
PC directly to the printer in order to complete the installation. This varies
according to manufacturer.
Problem:
I keep getting the error message, “Cannot find the Router” when running the
Print Server Wizard. What do I do?
Solution:
If the Print Server Wizard is not able to find the Print Server in the Router,
this means the computer does not have a valid connection to the Router. The
most common causes of this issue are:
1. Wired computers (those not connected wirelessly): Check the
cable between the computer and the Router. Make sure the light
on the front of the Router that corresponds with the port on the
back of the Router is lit. (If the computer is plugged into port 4,
make sure the light for port 4 is lit).

138
Troubleshooting
Troubleshooting
139
section
2
1
3
4
5
6
7
8
9
10
11
12
13
2. Both wired and wireless computers: Make sure that the
network card’s TCP/IP settings are set to obtain an IP address
automatically. See the Router’s manual for tips on checking
and changing your settings. If the IP address assigned to the
computer’s network card are different than the Router’s settings,
this will cause a problem.
3. Wireless Computers: Be sure that the wireless computer is
connected to your network. Your network has a network name
(also called SSID). The default name of the Belkin Router is
“belkin54g”. It may be possible that there are multiple wireless
networks in your area. To confirm that you are connected to
your own network, and not a neighboring one, use your wireless
networking utility to scan for wireless networks. If more than one
network is found, choose your network from the list and connect
to it.
4. Wireless Computers: If you are using wireless security such as
WEP encryption, WPA security, or MAC address filtering, make
sure that your computer is configured for the correct security
settings. If you are using MAC address filtering on the Router,
make sure that the computer’s MAC address is entered in the
“Allow List”.
What’s the difference between 802.11b, 802.11g and 802.11a?
Currently there are three levels of wireless networking standards,
which transmit data at very different maximum speeds. Each is based
on the designation 802.11x, so named by the IEEE, the board that is
responsible for certifying networking standards. The most common
wireless networking standard, 802.11b, transmits information at
11Mbps; 802.11a and 802.11g work at 54Mbps. See the following
chart for more detailed information.

138
Troubleshooting
Troubleshooting
139
section
2
1
3
4
5
6
7
8
9
10
11
12
13
Wireless Comparison
Wireless
Technology
802.11b 802.11g 802.11a
Speed 11Mbps 54Mbps 54Mbps
Frequency Common
household
devices such as
cordless phones
and microwave
ovens. May
interfere with
the 2.4GHz
unlicensed band
Common
household
devices such as
cordless phones
and microwave
ovens. May
interfere with
the 2.4GHz
unlicensed band
5GHz -
uncrowded band
Compatibility Compatible with
802.11g
Compatible with
802.11b
Incompatible
with 802.11b or
802.11g
Range Depends on
interference -
typically 50-300
ft. indoors
Depends on
interference -
typically 50–300
ft. indoors
Less interference
- range is
typically 50-100
feet
Adoption Mature - widely
adopted
Expected to
continue to grow
in popularity
Slow adoption
for consumers -
more popular in
business
Price Inexpensive More expensive Most expensive
Technical Support
You can find technical support information at http://www.belkin.com/
networking or www.belkin.com through the tech support area. If you
want to contact technical support by phone, please call:
US: 877-736-5771 or
310-898-1100 ext.2263
Europe: 00 800 223 55 460
Australia: 1800 666 040

140
USB Print Server FAQs Information
141
section
2
1
3
4
5
6
7
8
9
10
11
12
13
Q: Does the print server work with Mac OS?
A: No. Printing is only supported for Windows 98SE, Me, 2000, and XP.
Q: What printers work with the Router’s print server functionality?
A: For the latest printer compatibility list, check http://web.belkin.com/
support/printserver/list.asp
Q: Does the Print Server support multifunction printers (i.e.,
those that fax, copy, and scan)?
A: While it may be possible to print to your multifunction printer using
the Print Server, the scanning functions, as well as any other bidirectional
functions, will not work.
Q: Will I still be able to get messages from the printer such as
low paper, low toner, etc., when using the Print Server?
A: No. The print server is not bidirectional. Messages from the printer cannot
be displayed on the PC.
Q: Why do I have to install the printer’s drivers and software on
my PC first?
A: For the PC to be able to print to the networked printer (printer on the
print server), the printer’s software and drivers must be installed on the
PC. Every manufacturer ships its printer with a driver and, usually, printing
software. Be sure that you have installed the printer drivers and software on
each PC from which you plan to print. In some cases, while installing the
drivers and software for your printer, you may be required to connect the
PC directly to the printer in order to complete the installation. This varies
according to manufacturer.

140
USB Print Server FAQs Information
141
section
2
1
3
4
5
6
7
8
9
10
11
12
13
Caution: Exposure to Radio Frequency Radiation.
The radiated output power of this device is far below the FCC radio frequency
exposure limits. Nevertheless, the device shall be used in such manner that
the potential for human contact during normal operation is minimized.
When connecting an external antenna to the device, the antenna shall be
placed in such a manner to minimize the potential for human contact during
normal operation. In order to avoid the possibility of exceeding the FCC radio
frequency exposure limits, human proximity to the antenna shall not be less
than 20cm (8 inches) during normal operation.
Federal Communications Commission Notice
This equipment has been tested and found to comply with the limits for a
Class B digital device, pursuant to Part 15 of the FCC Rules. These limits are
designed to provide reasonable protection against harmful interference in a
residential installation.
This equipment generates, uses, and can radiate radio frequency energy.
If not installed and used in accordance with the instructions, it may cause
harmful interference to radio or television reception, which can be determined
by turning the equipment off and on, the user is encouraged to try and
correct the interference by one or more of the following measures:
FCC Statement
DECLARATION OF CONFORMITY WITH FCC RULES FOR
ELECTROMAGNETIC COMPATIBILITY
We, Belkin Corporation, of 501 West Walnut Street,
Compton, CA 90220, declare under our sole
responsibility that the product,
F5D7231-4P
to which this declaration relates,
complies with Part 15 of the FCC Rules. Operation is
subject to the following two conditions: (1) this device
may not cause harmful interference, and (2) this device
must accept any interference received, including
interference that may cause undesired operation.

142
Information
Information
143
section
2
1
3
4
5
6
7
8
9
10
11
12
13
• Reorient or relocate the receiving antenna.
• Increase the distance between the equipment and the receiver.
• Connect the equipment to an outlet on a circuit different from that
to which the receiver is connected.
• Consult the dealer or an experienced radio/TV
technician for help.
Modifications
The FCC requires the user to be notified that any changes or modifications to
this device that are not expressly approved by Belkin Corporation may void
the users authority to operate the equipment.
"Belkin declare that F5D7231-4P is limited in CH1~CH11 by specified firmware
controlled in USA."
This transmitter must not be co-located or operating in conjunction with any other
antenna or transmitter.
INFORMATION TO USER:
The users manual or instruction manual for an intentional or unintentional radiator shall
caution the user that changes or modifications not expressly approved by the party
responsible for compliance could void the user's authority to operate the equipment.

Information
143
Information
143
section
2
1
3
4
5
6
7
8
9
10
11
12
13
Canada-Industry Canada (IC)
The wireless radio of this device complies with RSS 139 & RSS 210 Industry
Canada. This Class B digital complies with Canadian ICES-003.
Cet appareil numérique de la classe B conforme á la norme NMB-003 du Canada.
Europe-European Union Notice
Radio products with the CE 0682 or CE alert marking
comply with the R&TTE Directive (1995/5/EC) issued by the
Commission of the European Community.
Compliance with this directive implies conformity to the following European
Norms (in brackets are the equivalent international standards).
• EN 60950 (IEC60950) – Product Safety
• EN 300 328 Technical requirement for radio equipment
• ETS 300 826 General EMC requirements for radio equipment.
To determine the type of transmitter, check the identification label
on your Belkin product.
Products with the CE marking comply with the EMC Directive (89/336/EEC)
and the Low Voltage Directive (72/23/EEC) issued by the Commission of the
European Community. Compliance with these directives implies conformity
to the following European Norms (in brackets are the equivalent international
standards).
• EN 55022 (CISPR 22) – Electromagnetic Interference
• EN 55024 (IEC61000-4-2,3,4,5,6,8,11) – Electromagnetic Immunity
• EN 61000-3-2 (IEC610000-3-2) – Power Line Harmonics
• EN 61000-3-3 (IEC610000) – Power Line Flicker
• EN 60950 (IEC60950) – Product Safety
Products that contain the radio transmitter are labeled with CE 0682
or CE alert marking and may also carry the CE logo.
IC Statement
To prevent radio interference to the licenced service, this device is intended to be
operated indoors and away from windows to provide maximum shielding Equipment
(or its transmit antenna) that is installed outdoors is subject to licensing
"This device has been designed to operate with an antenna having a maximum gain
of 1 dB. Antenna having a higher gain is strictly prohibited per regulations of Industry
Canada. The required antenna impedance is 50 ohms."

142
Information
Information
144
section
2
1
3
4
5
6
7
8
9
10
11
12
13
Belkin Corporation Limited Lifetime Product Warranty
Belkin Corporation warrants this product against defects in materials and
workmanship for its lifetime. If a defect is discovered, Belkin will, at its
option, repair or replace the product at no charge provided it is returned
during the warranty period, with transportation charges prepaid, to the
authorized Belkin dealer from whom you purchased the product. Proof of
purchase may be required.
This warranty does not apply if the product has been damaged by accident,
abuse, misuse, or misapplication; if the product has been modified without
the written permission of Belkin; or if any Belkin serial number has been
removed or defaced.
THE WARRANTY AND REMEDIES SET FORTH ABOVE ARE EXCLUSIVE
IN LIEU OF ALL OTHERS, WHETHER ORAL OR WRITTEN, EXPRESSED
OR IMPLIED. BELKIN SPECIFICALLY DISCLAIMS ANY AND ALL IMPLIED
WARRANTIES, INCLUDING, WITHOUT LIMITATION, WARRANTIES OF
MERCHANTABILITY AND FITNESS FOR A PARTICULAR PURPOSE.
No Belkin dealer, agent, or employee is authorized to make any modification,
extension, or addition to this warranty.
BELKIN IS NOT RESPONSIBLE FOR SPECIAL, INCIDENTAL, OR
CONSEQUENTIAL DAMAGES RESULTING FROM ANY BREACH OF
WARRANTY, OR UNDER ANY OTHER LEGAL THEORY, INCLUDING BUT
NOT LIMITED TO, LOST PROFITS, DOWNTIME, GOODWILL, DAMAGE TO
OR REPROGRAMMING OR REPRODUCING ANY PROGRAM OR DATA
STORED IN, OR USED WITH, BELKIN PRODUCTS.
Some states do not allow the exclusion or limitation of incidental or
consequential damages or exclusions of implied warranties, so the above
limitations of exclusions may not apply to you. This warranty gives you
specific legal rights, and you may also have other rights that vary from state
to state.

Belkin, Ltd.
7 Bowen Crescent • West Gosford
NSW 2250 • Australia
Tel: +61 (0) 2 4372 8600
Fax: +61 (0) 2 4372 8603
Belkin Components B.V.
Starparc Building • Boeing Avenue 333
1119 PH Schiphol-Rijk • The Netherlands
Tel: +31 (0) 20 654 7300
Fax: +31 (0) 20 654 7349
Belkin Tech Support
US: 877.736.5771
310.898.1100 ext. 2263
Europe: 00 800 223 55 460
Australia: 1800 666 040
Belkin Corporation
501 West Walnut Street
Compton • CA • 90220 • USA
Tel: 310.898.1100
Fax: 310.898.1111
Belkin Components, Ltd.
Express Business Park • Shipton Way
Rushden • NN10 6GL • United Kingdom
Tel: +44 (0) 1933 35 2000
Fax: +44 (0) 1933 31 2000
© 2004 Belkin Corporation. All rights reserved. All trade names are registered trademarks
of respective manufacturers listed. The 125 HSM logo, 54g logo and 54g are trademarks of
Broadcom Corporation in the U.S. and other countries. Apple, AirPort, Mac, Mac OS, and
AppleTalk are trademarks of Apple Computer, Inc., registered in the U.S. and other countries.
P74606
High-Speed Mode
Wireless G Router
with Built-In USB
Print Server