Belkin F5D7231P High-Speed Mode Wireless G Router w/ Print Server User Manual P74606 F5D7231 4P man indd
Belkin International, Inc. High-Speed Mode Wireless G Router w/ Print Server P74606 F5D7231 4P man indd
Belkin >
Contents
Users Manual Part 2
18
Connecting and Configuring Your Router
Connecting and Configuring Your Router
19
section
2
1
3
4
5
6
7
8
9
10
11
12
13
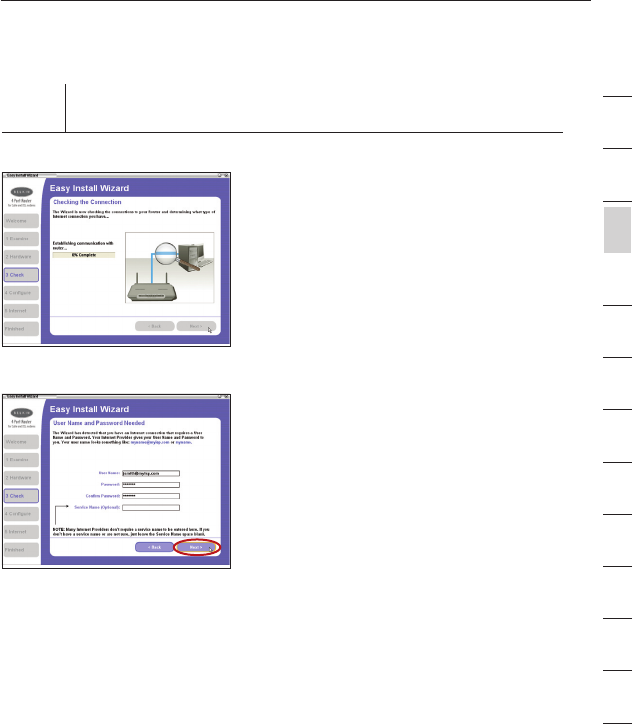
Step 3 Checking the Connection
3.1 Once you have completed
connecting the Router, the Wizard
will check the connection to the
Router and then go on to determine
what type of Internet connection
you have.
3.2 User Name and Password Needed
If you have a connection type that
requires a user name and a password,
the Wizard will ask you to type in
your user name and password. If your
connection type does not require a
user name and password, you will not
see this screen.
Your user name and password is
provided to you by your Internet
Service Provider. If you have to type
in a user name and password to
connect to the Internet, then type that
same user name and password in
here. Your user name looks something
like “jsmith@myisp.com” or simply
“jsmith”. The service name is optional
and is very rarely required by your ISP.
If you don’t know your service name,
leave this blank. When you have
entered your information, click “Next”
to move on.
20
Connecting and Configuring Your Router
Connecting and Configuring Your Router
21
section
2
1
3
4
5
6
7
8
9
10
11
12
13
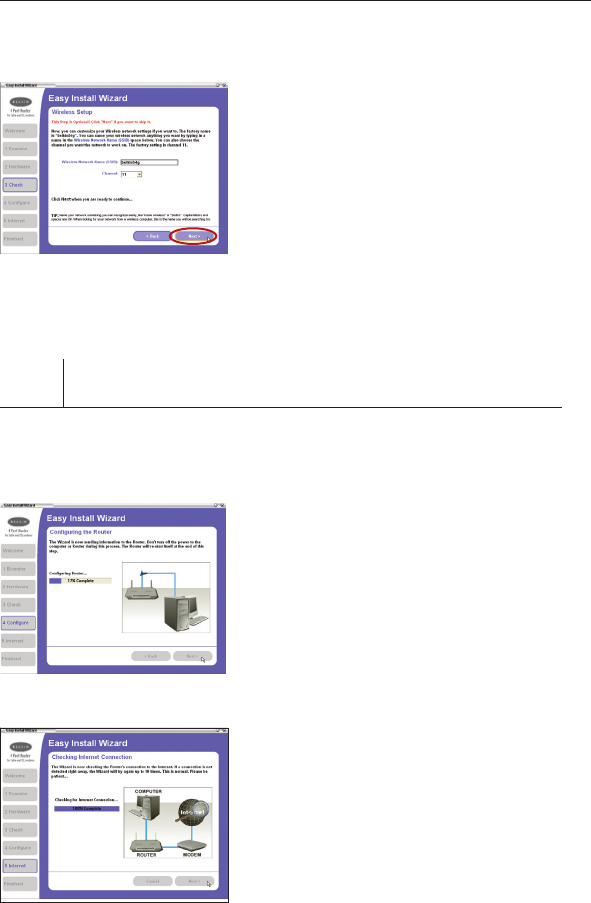
3.3 Wireless Setup
This Step Is Optional. Click “Next” if
you want to skip it.
Using this step, you can customize
your wireless network settings if
you want to. Follow the steps on
the screen to complete this step.
Click “Next” to continue.
Step 4 Configuring the Router
The Wizard will now transfer all of the configuration information to the
Router. This will take approximately one minute. During this time, do
not turn off the Router or computer. The Router will restart itself at the
end of this step.
4.1 Checking Internet
The Wizard will now check for an
Internet connection. This can take
a few minutes. The Wizard may not
detect a connection right away. If
not, it will retry a number of times.
The “Connected” light on the front
panel of the Router will flash during
this time. Please be patient through
this process.

20
Connecting and Configuring Your Router
Connecting and Configuring Your Router
21
section
2
1
3
4
5
6
7
8
9
10
11
12
13
4.2 Finished
When the Internet connection
is complete, the Wizard will tell
you that you are finished. The
“Connected” LED on the front of
the Router will be solid GREEN,
indicating that the Router is now
connected to the Internet.
Your Router is now connected to the Internet. Now you can begin
surfing the Internet by opening your browser and going to your favorite
web page.
Congratulations! You have finished installing your new Belkin Router.
You are ready to set up the other computers in your home. You can
also add computers to your Router any time you want.
22
Configuring and Using the USB Print Server
Configuring and Using the USB Print Server
23
section
2
1
3
4
5
6
7
8
9
10
11
12
13
Connecting your printer to the Router’s print server
Please closely follow the directions to set up your printer.
Before you start
Install the printer’s drivers and software on each computer from which you
plan to print. This enables the PC to print to the networked printer (printer
that is attached to your USB Print Server). Every manufacturer ships its
printer with a driver and, usually, printing software. In some cases, while
installing the drivers and software for your printer, you may be required to
connect the PC directly to the printer in order to complete the installation.
This varies according to manufacturer. You must also install the Belkin Printer
Port on each of the computers you want to print from. This may be done
using the Printer Server Setup Wizard, or can be done manually.
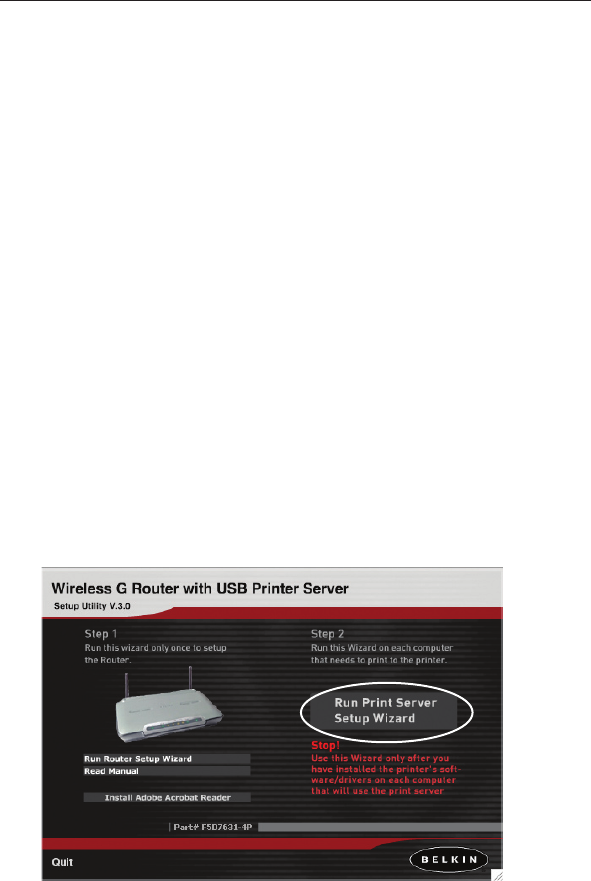
Start
1. Insert the CD into your CD-ROM drive. Within 15 seconds, you
should see the installation menu on the screen. If the menu
does not appear within 15 seconds, select your CD-ROM drive
and view the contents of the drive. Double-click on the file
named “Start.exe”.
2. From the menu, click on “Run Print Server Setup Wizard”. This
will open the Print Server Setup Wizard menu.
22
Configuring and Using the USB Print Server
Configuring and Using the USB Print Server
23
section
2
1
3
4
5
6
7
8
9
10
11
12
13
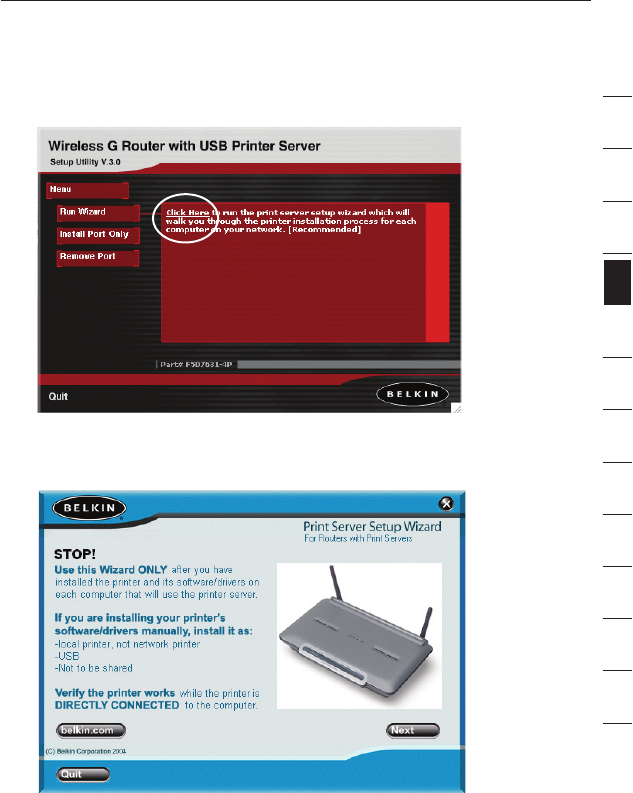
3. On the Wizard menu, drag your mouse over the “Run Wizard”
button and click the words “Click Here” to start the Wizard.
4. The first screen of the Wizard appears. Be sure that you have
installed your printer’s drivers and software on the PCs from
which you plan to print. Click “Next”.
24
Configuring and Using the USB Print Server
Configuring and Using the USB Print Server
25
section
2
1
3
4
5
6
7
8
9
10
11
12
13
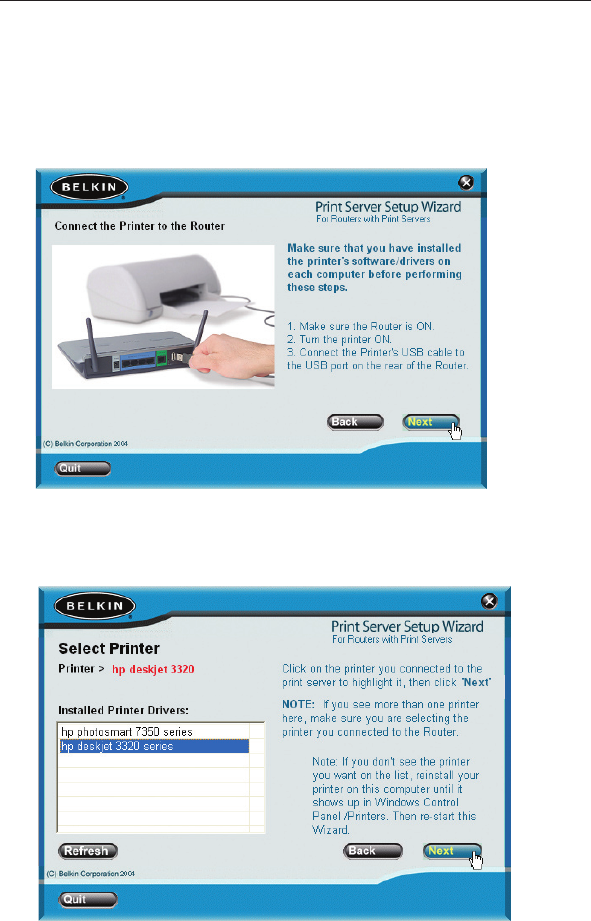
5. Next, make sure the Router is ON. Make sure the printer is ON.
Plug in the USB cable that is connected to the printer to the USB
port on the rear of the Router. The USB port on the Router is
color-coded purple. Click “Next”.
6. The Wizard will scan for and locate the Print Server in the Router.
Next, a list of the printers installed on the computer will appear.
Click once on the name of the printer that is connected to the
Router to highlight it. Click “Next”.
24
Configuring and Using the USB Print Server
Configuring and Using the USB Print Server
25
section
2
1
3
4
5
6
7
8
9
10
11
12
13
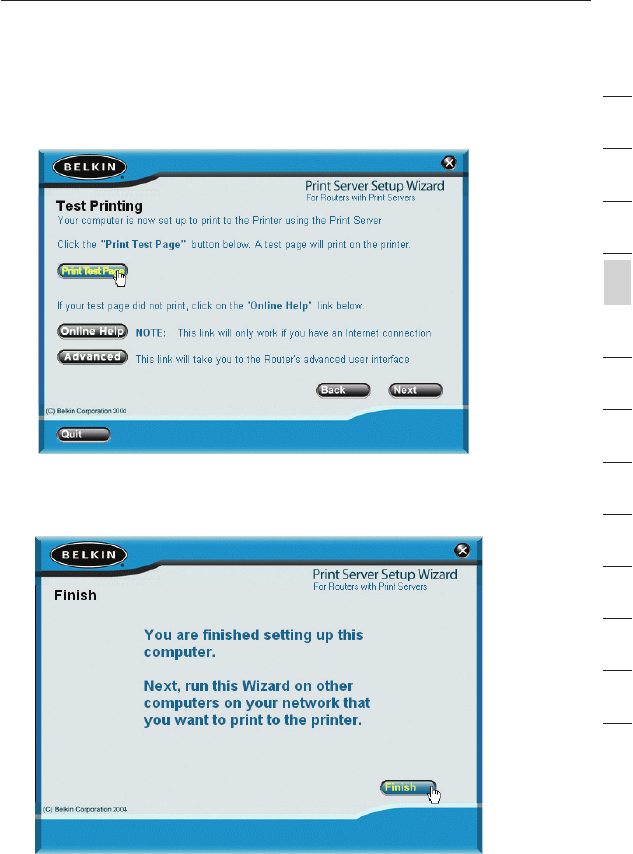
7. The next screen that appears will allow you to test print. Click
on the “Print Test Page” button. When your test page is finished
printing, click “Next”.
8. You are now finished setting up your computer to print to the
Print Server. Next, run this Wizard on the other computers on
your network from which you wish to print to this printer.
26
Configuring and Using the USB Print Server
Configuring and Using the USB Print Server
27
section
2
1
3
4
5
6
7
8
9
10
11
12
13
Manually installing the print server port
Advanced users can manually install the Belkin Printer Port without using the
Wizard. To do this, from the Installer menu, click “Install Printer Port Only” to
skip the Wizard. Belkin has also included a standalone installer on the CD.
From the CD, double-click on the file called “instportA.exe”.
Configuring Computers to Print to the Print Server
1. Install Printer Port Software on each computer by running
“instportA.exe” from the CD or by using the Wizard.
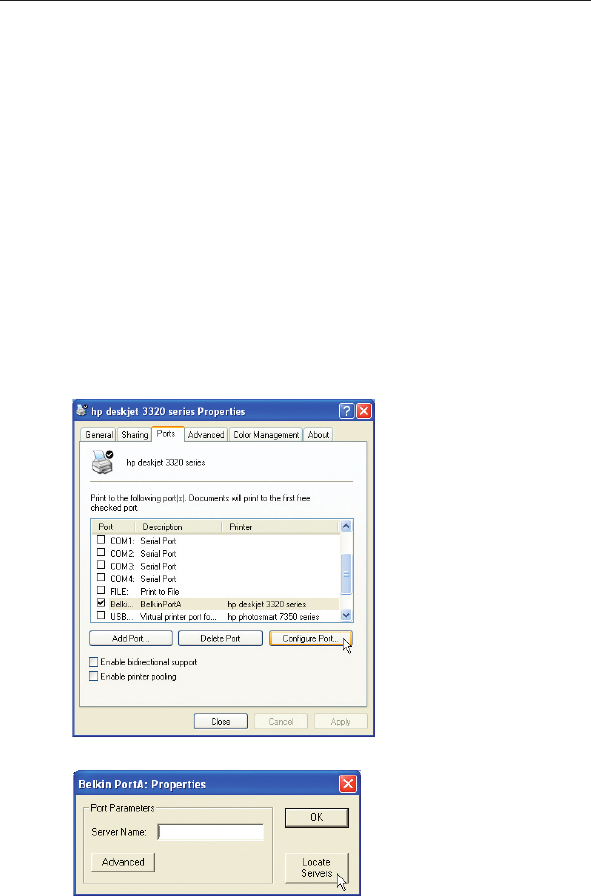
2. Configure the Belkin Port Monitor on each computer’s printer
driver to point to the Router’s Print Server as follows:
a. In Windows, select the printer’s properties for the printer
connected to the Print Server and select the “Port” tab,
select the Belkin port, and click “Configure Port...”
b. On the “Belkin PortA: Properties” window, click “Locate Servers”.

26
Configuring and Using the USB Print Server
Configuring and Using the USB Print Server
27
section
2
1
3
4
5
6
7
8
9
10
11
12
13
c. On the “Available Servers” window, your Router’s print server
name will appear. Select the Print Server. Click “OK” to close.
d. On the “Belkin Port A: Properties” window, the name of the
Print Server will appear. Click “OK” to close.
e. On the Ports tab, uncheck the box next to “Enable bidirectional
support” if currently checked. Click “Apply”.
f. Click “Close” to close the window.
28
Configuring and Using the USB Print Server
Configuring and Using the USB Print Server
29
section
2
1
3
4
5
6
7
8
9
10
11
12
13
Uninstalling the print server port
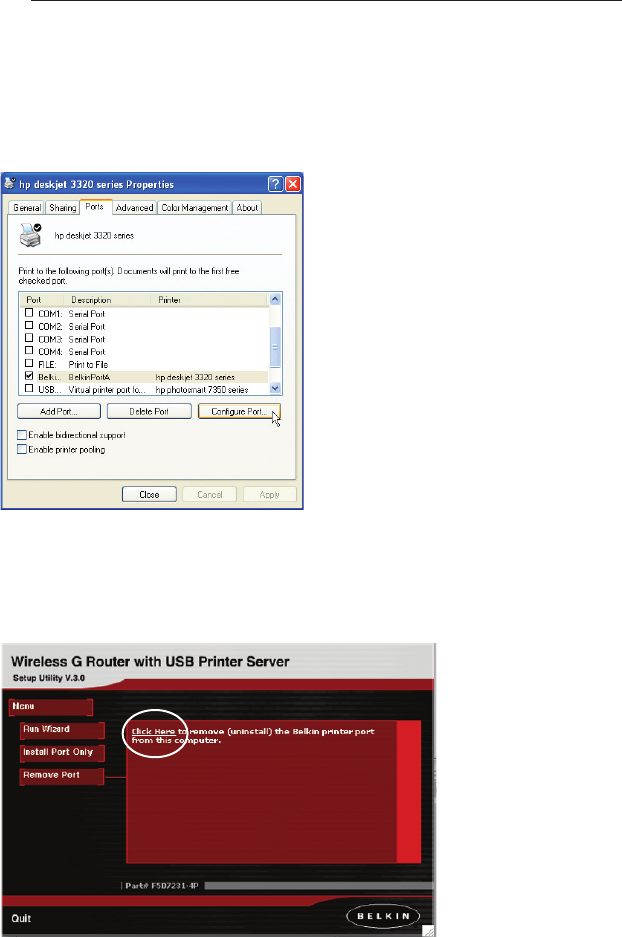
1. In Windows, select the printer’s properties for the printer connected to
the Print Server and select the “Port” tab, select the Belkin port, and click
“Configure Port...”.
2. Select a different port from the list of available ports. You must select a
different port before you can remove the Belkin port.
3. From the Installer menu, click “Remove Printer Port” to uninstall the
printer port. Belkin has also provided an uninstaller application that will
remove the Belkin printer port from the PC. From the CD, double-click on
the file called “rmvportA.exe”. This will remove the printer port.