Belkin F5D7231P High-Speed Mode Wireless G Router w/ Print Server User Manual P74606 F5D7231 4P man indd
Belkin International, Inc. High-Speed Mode Wireless G Router w/ Print Server P74606 F5D7231 4P man indd
Belkin >
Contents
Users Manual Part 7
80
Using the Web-Based Advanced User Interface
Using the Web-Based Advanced User Interface
81
section
2
1
3
4
5
6
7
8
9
10
11
12
13
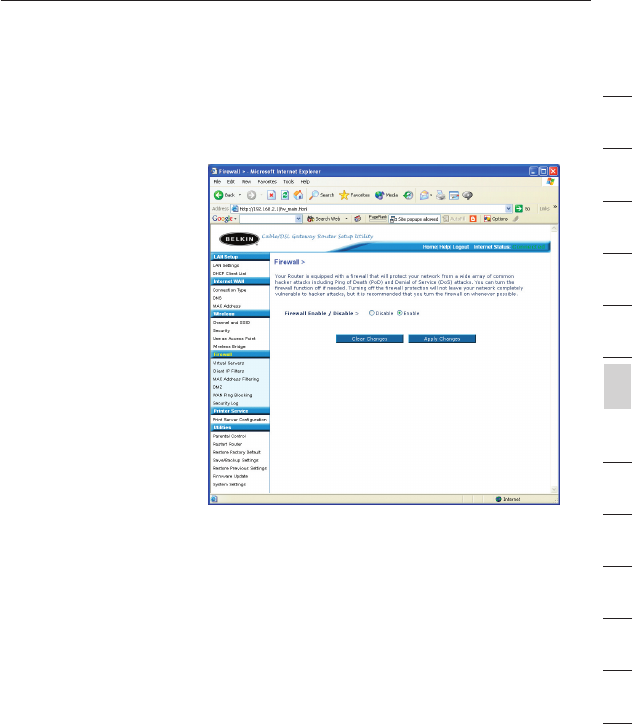
Configuring the Firewall
Your Router is equipped with a firewall that will protect your network
from a wide array of common hacker attacks including:
• IP Spoofing
• SYN flood
• Land Attack
• UDP flooding
• Ping of Death (PoD)
• Tear Drop Attack
• Denial of Service (DoS)
• ICMP defect
• IP with zero length
• RIP defect
• Smurf Attack
• Fragment flooding
• TCP Null Scan
The firewall also masks common ports that are frequently used to
attack networks. These ports appear to be “Stealth”, meaning that for
all intents and purposes, they do not exist to a would-be hacker. You
can turn the firewall function off if needed, however, it is recommended
that you leave the firewall enabled. Disabling the firewall protection will
not leave your network completely vulnerable to hacker attacks, but it
is recommended that you leave the firewall enabled.
82
Using the Web-Based Advanced User Interface
Using the Web-Based Advanced User Interface
83
section
2
1
3
4
5
6
7
8
9
10
11
12
13
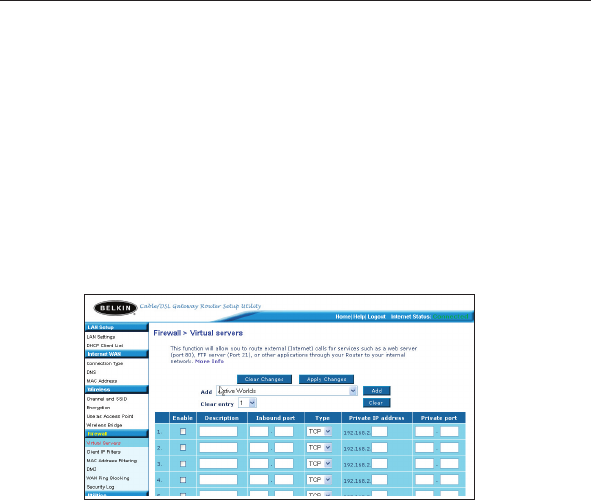
Configuring Internal Forwarding Settings
The Virtual Servers function will allow you to route external (Internet)
calls for services such as a web server (port 80), FTP server (Port 21),
or other applications through your Router to your internal network.
Since your internal computers are protected by a firewall, computers
outside your network (over the Internet) cannot get to them because
they cannot be “seen.” A list of common applications has been
provided in case you need to configure the Virtual Server function for
a specific application. If your application is not listed, you will need to
contact the application vendor to find out which port settings you need.
Choosing an Application
Select your application from the drop-down list. Click “Add”. The
settings will be transferred to the next available space in the screen.
Click “Apply Changes” to save the setting for that application. To
remove an application, select the number of the row that you want to
remove then click “Clear”.
Manually Entering Settings into the Virtual Server
To manually enter settings, enter the IP address in the space provided
for the internal (server) machine, the port(s) required to pass, select the
port type (TCP or UDP), and click “Apply Changes”. Each inbound port
entry has two fields with 5 characters maximum per field that allows a
start and end port range, e.g. [xxxxx]-[xxxxx]. For each entry, you can
enter a single port value by filling in the two fields with the same value
(e.g. [7500]-[7500] or a wide range of ports (e.g. [7500]-[9000]). If you
need multiple single port value or mixture of ranges and a single value,
you must use multiple entries up to the maximum of 20 entries (e.g.
1. [7500]-[7500], 2. [8023]-[8023], 3. [9000]-[9000]). You can only pass
one port per internal IP address. Opening ports in your firewall can
pose a security risk. You can enable and disable settings very quickly.
It is recommended that you disable the settings when you are not using
a specific application.

82
Using the Web-Based Advanced User Interface
Using the Web-Based Advanced User Interface
83
section
2
1
3
4
5
6
7
8
9
10
11
12
13
Setting Client IP Filters
The Router can be configured to restrict access to the Internet, e-mail,
or other network services at specific days and times. Restriction can be
set for a single computer, a range of computers, or multiple computers.
To restrict Internet access to a single computer for example, enter the
IP address of the computer you wish to restrict access to in the IP
fields (1). Next, enter “80” in both the port fields (2). Select “Both” (3).
Select “Block” (4). You can also select “Always” to block access all
of the time. Select the day to start on top (5), the time to start on
top (6), the day to end on the bottom (7), and the time to stop (8) on
the bottom. Select “Enable” (9). Click “Apply Changes”. The computer
at the IP address you specified will now be blocked from Internet
access at the times you specified. Note: Be sure you have selected the
correct time zone under “Utilities> System Settings> Time Zone”.
(1) (2)
(3) (4) (7) (8) (9)
(5) (6)
84
Using the Web-Based Advanced User Interface
Using the Web-Based Advanced User Interface
85
section
2
1
3
4
5
6
7
8
9
10
11
12
13
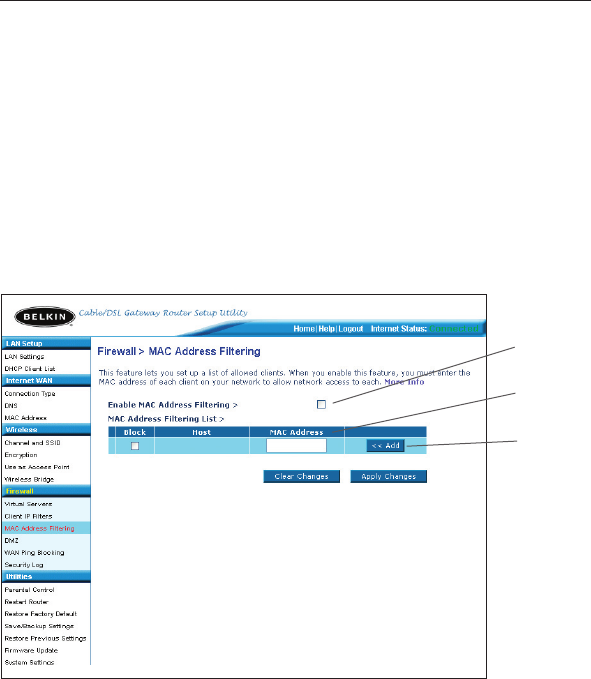
Setting MAC Address Filtering
The MAC address filter is a powerful security feature that allows you
to specify which computers are allowed on the network. Any computer
attempting to access the network that is not specified in the filter list
will be denied access. When you enable this feature, you must enter
the MAC address of each client (computer) on your network to allow
network access to each. The “Block” feature lets you turn on and off
access to the network easily for any computer without having to add
and remove the computer’s MAC address from the list.
To enable this feature, select “Enable MAC Address Filtering” (1).
Next, enter the MAC address of each computer on your network by
clicking in the space provided (2) and entering the MAC address of
the computer you want to add to the list. Click “Add” (3), then “Apply
Changes” to save the settings. To delete a MAC address from the list,
simply click “Delete” next to the MAC address you wish to delete. Click
“Apply Changes” to save the settings.
Note: You will not be able to delete the MAC address of the computer
you are using to access the Router’s administrative functions (the
computer you are using now).
(1)
(2)
(3)
84
Using the Web-Based Advanced User Interface
Using the Web-Based Advanced User Interface
85
section
2
1
3
4
5
6
7
8
9
10
11
12
13
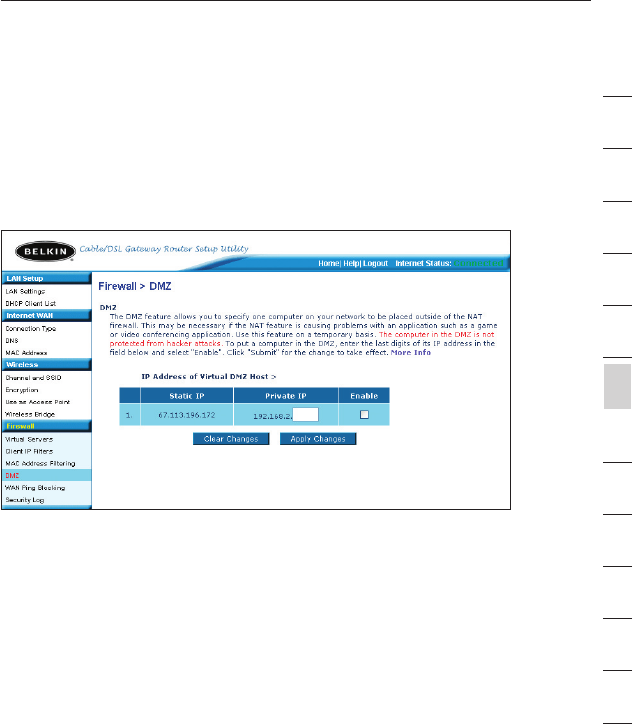
Enabling the Demilitarized Zone (DMZ)
The DMZ feature allows you to specify one computer on your network
to be placed outside of the firewall. This may be necessary if the
firewall is causing problems with an application such as a game or
video conferencing application. Use this feature on a temporary basis.
The computer in the DMZ is NOT protected from hacker attacks.
To put a computer in the DMZ, enter the last digits of its IP address in
the IP field and select “Enable”. Click “Apply Changes” for the change
to take effect. If you are using multiple static WAN IP addresses, it is
possible to select which WAN IP address the DMZ host will be directed
to. Type in the WAN IP address you wish the DMZ host to direct to,
enter the last two digits of the IP address of the DMZ host computer,
select “Enable” and click “Apply Changes”.
86
Using the Web-Based Advanced User Interface
Using the Web-Based Advanced User Interface
87
section
2
1
3
4
5
6
7
8
9
10
11
12
13
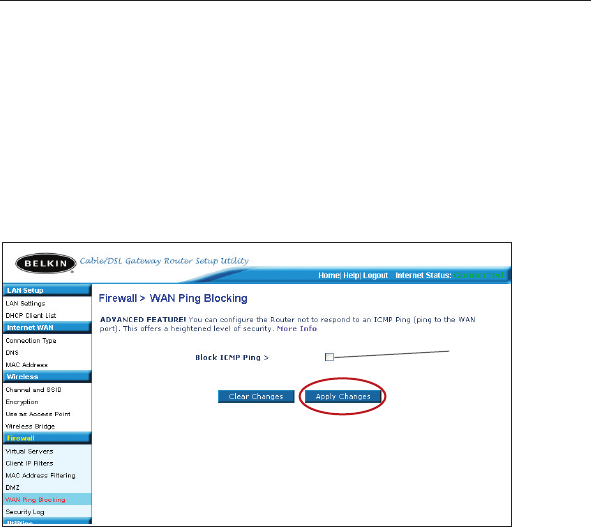
Blocking an ICMP Ping
Computer hackers use what is known as “pinging” to find potential
victims on the Internet. By pinging a specific IP address and receiving
a response from the IP address, a hacker can determine that something
of interest might be there. The Router can be set up so it will not
respond to an ICMP ping from the outside. This heightens the level of
security of your Router.
To turn off the ping response, select “Block ICMP Ping” (1) and click
“Apply Changes”. The Router will not respond to an ICMP ping.
(1)
86
Using the Web-Based Advanced User Interface
Using the Web-Based Advanced User Interface
87
section
2
1
3
4
5
6
7
8
9
10
11
12
13
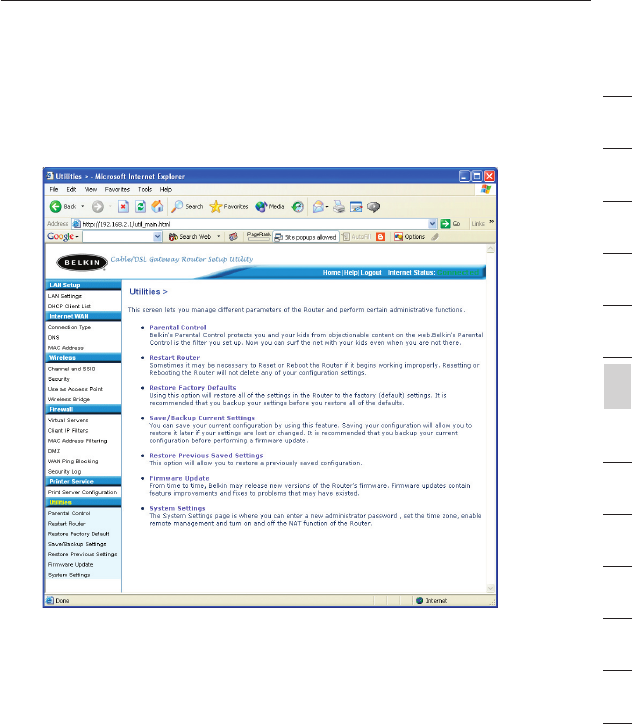
Utilities Tab
This screen lets you manage different parameters of the Router and
perform certain administrative functions.
Parental Control
See separate Parental Control User Manual from Belkin.
88
Using the Web-Based Advanced User Interface
Using the Web-Based Advanced User Interface
89
section
2
1
3
4
5
6
7
8
9
10
11
12
13
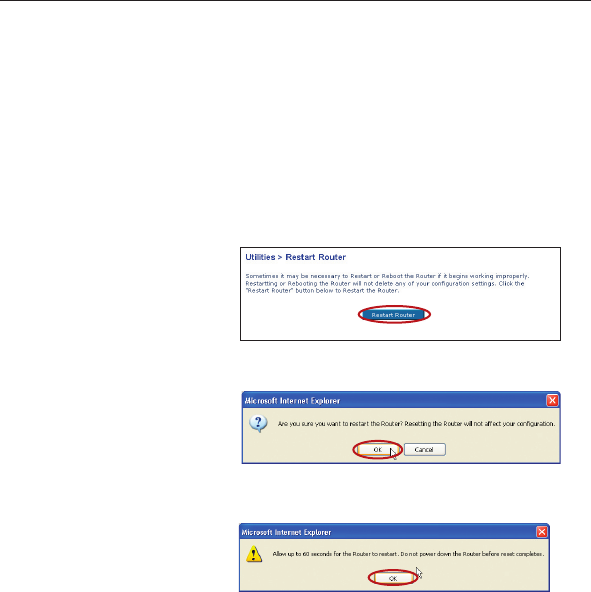
Restarting the Router
Sometimes it may be necessary to restart or reboot the Router if it
begins working improperly. Restarting or rebooting the Router will
NOT delete any of your configuration settings.
Restarting the Router to Restore Normal Operation
1. Click the “Restart
Router” button.
2. The following message
will appear. Click “OK”.
3. The following message
will appear. Restarting
the Router can take
up to 60 seconds. It is
important not to turn off
the power to the Router
during the restart.
4. A 60-second countdown will appear on the screen. When the
countdown reaches zero, the Router will be restarted. The Router
home page should appear automatically. If not, type in the
Router’s address (default = 192.168.2.1) into the navigation bar of
your browser.