Broadcom BRCM1051 802.11g/Draft 802.11n WLAN + BT PCI-E User Manual Manual 3

Broadcom Corporation 802.11g/Draft 802.11n WLAN + BT PCI-E Manual 3

Host user manual 3 of 5
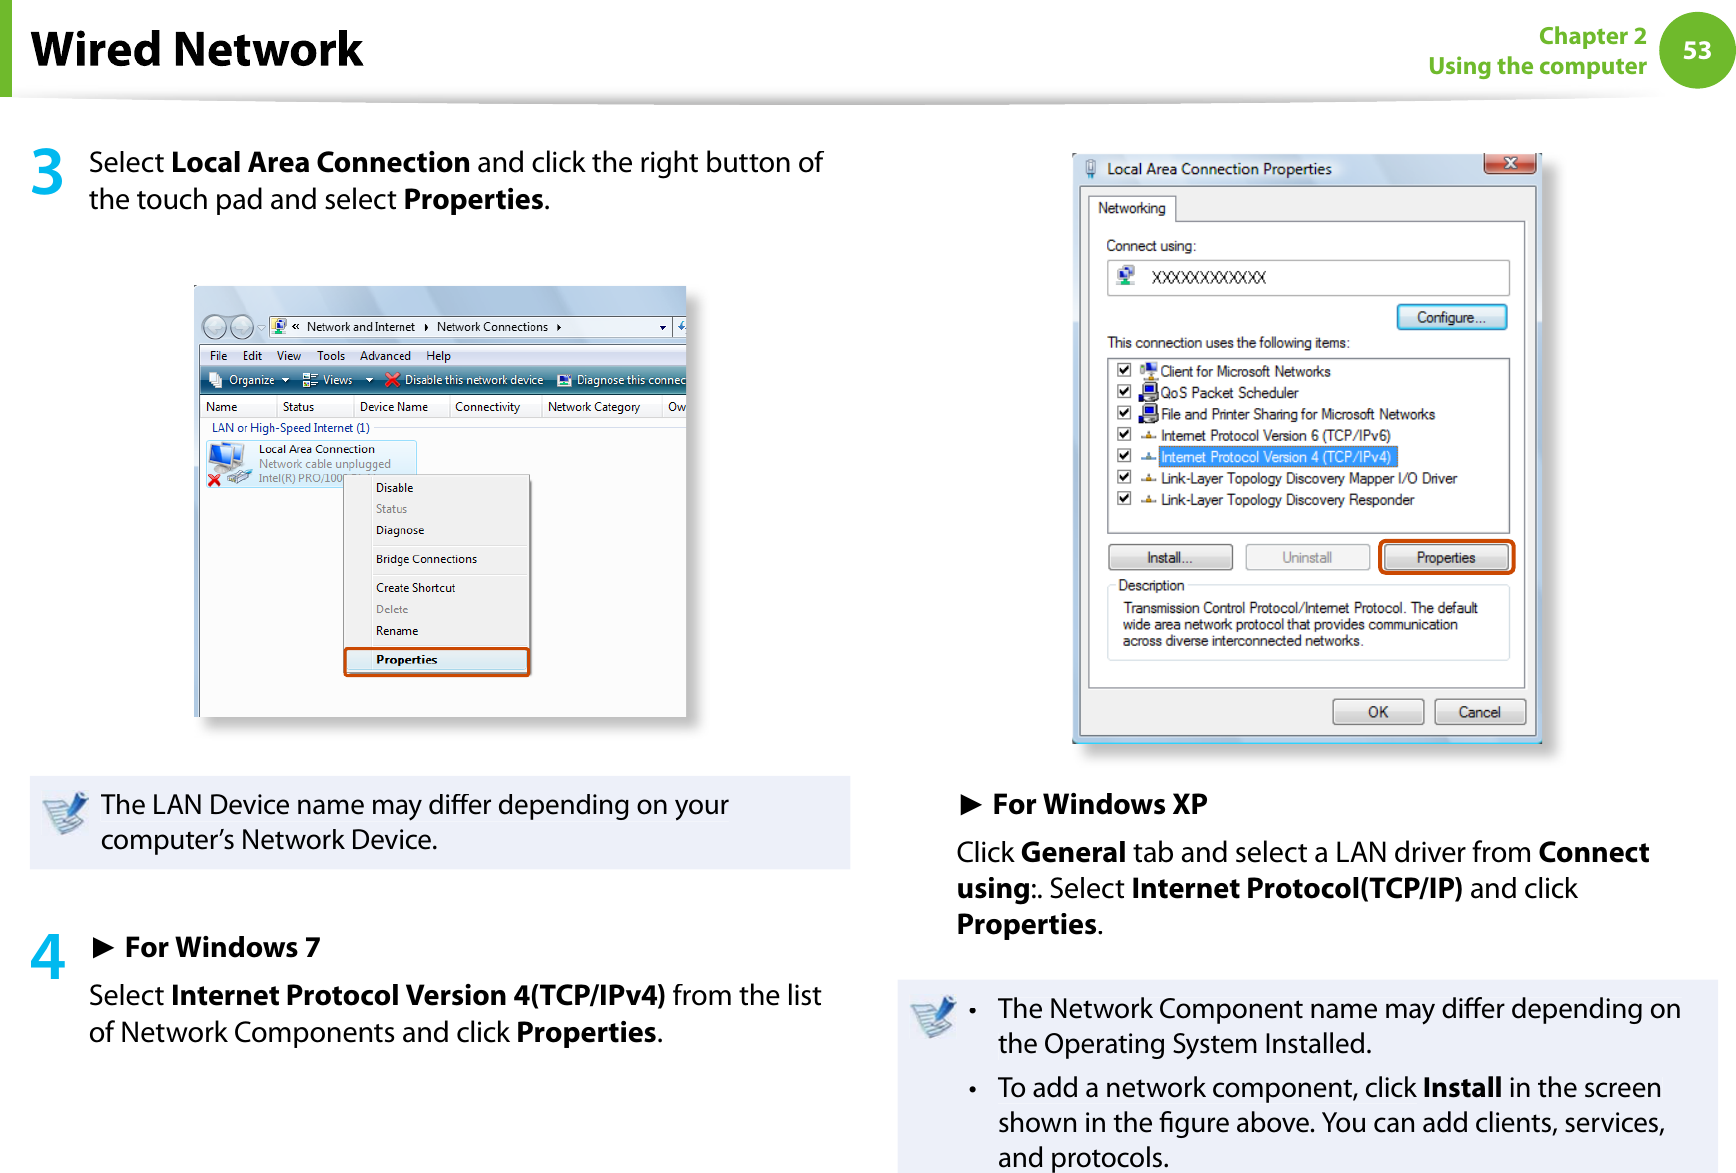
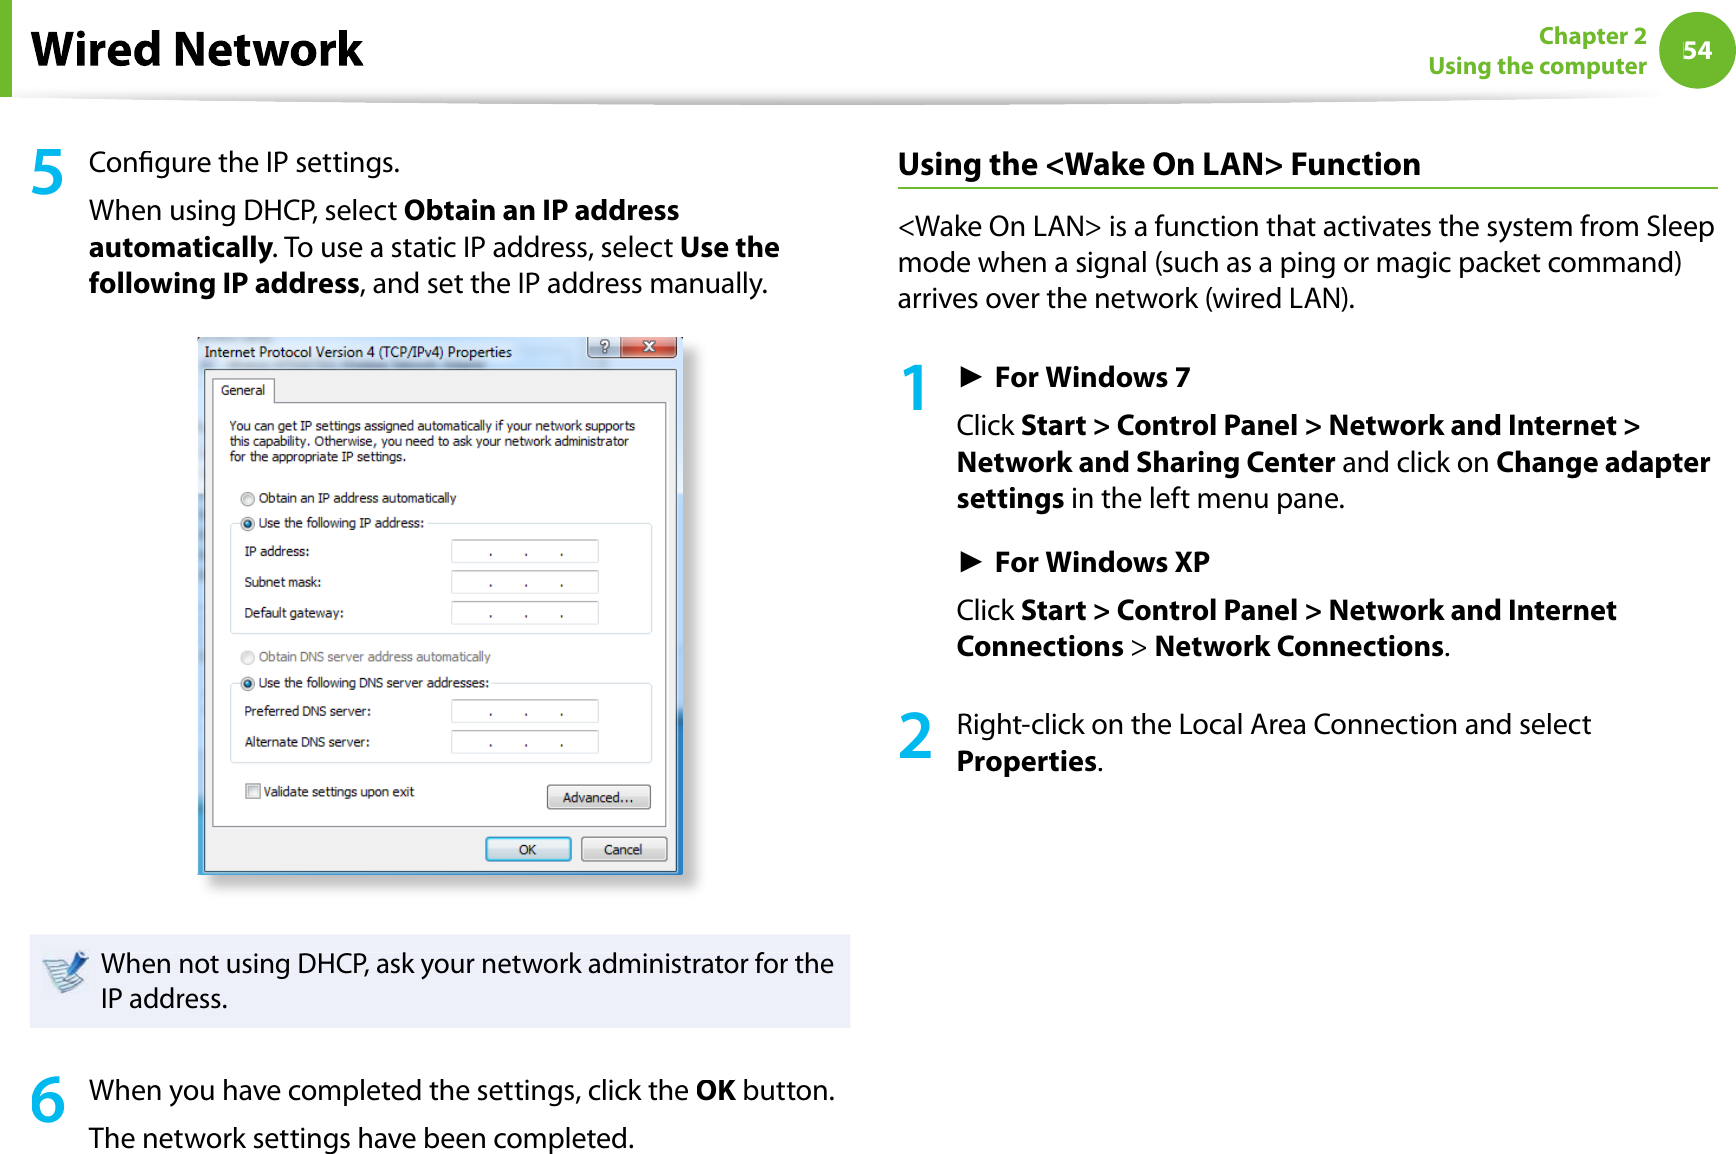
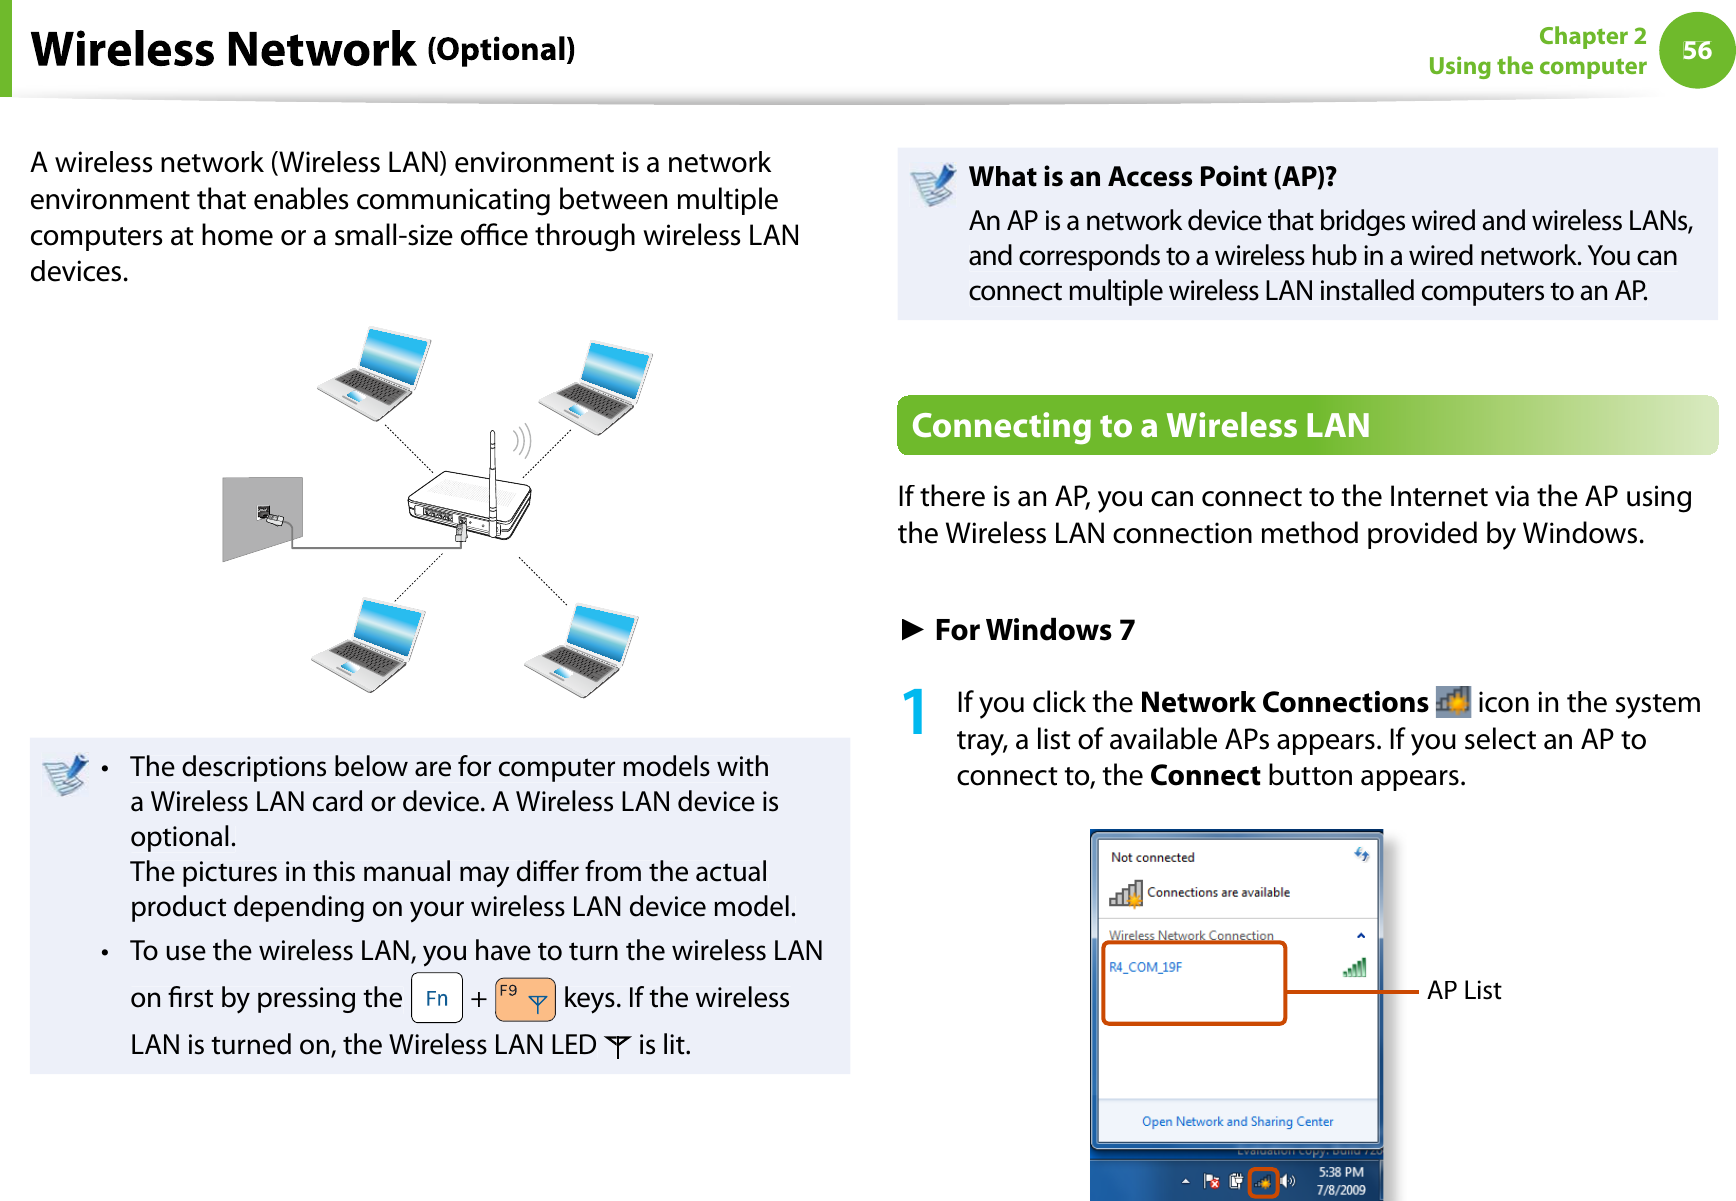
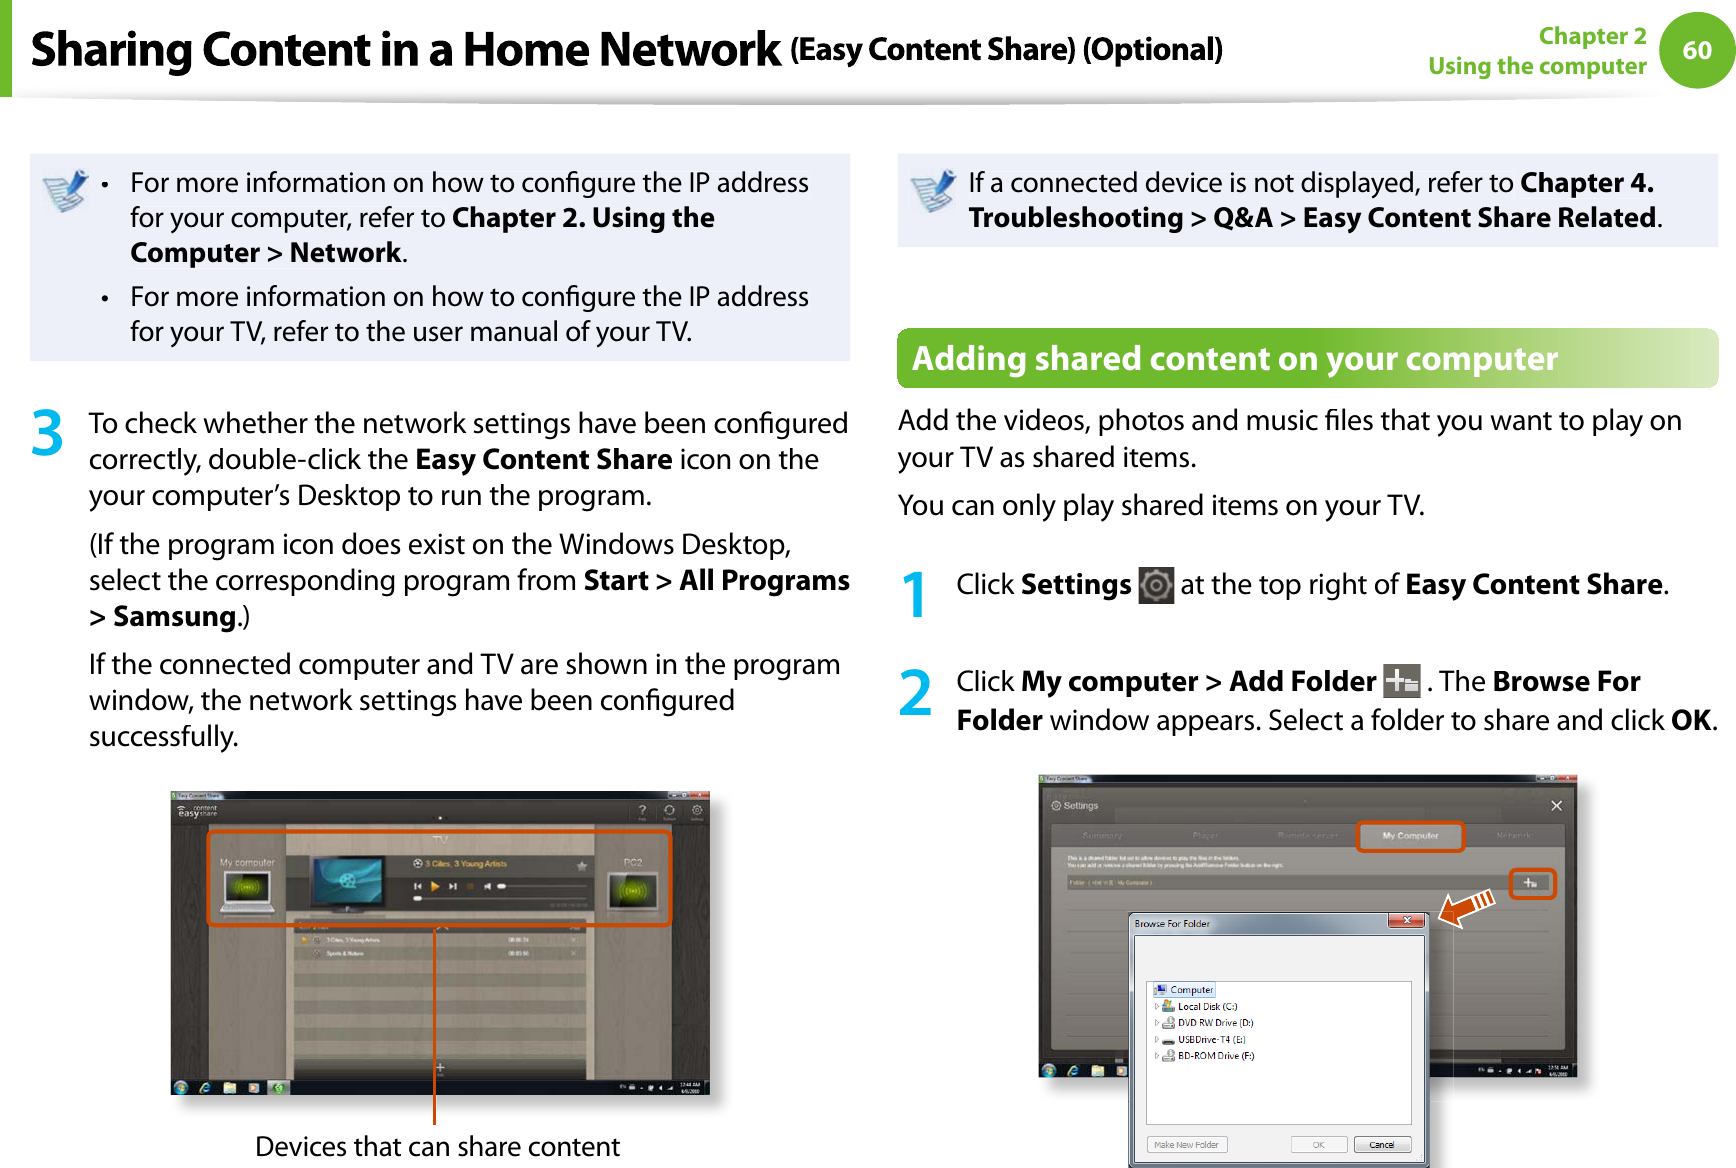
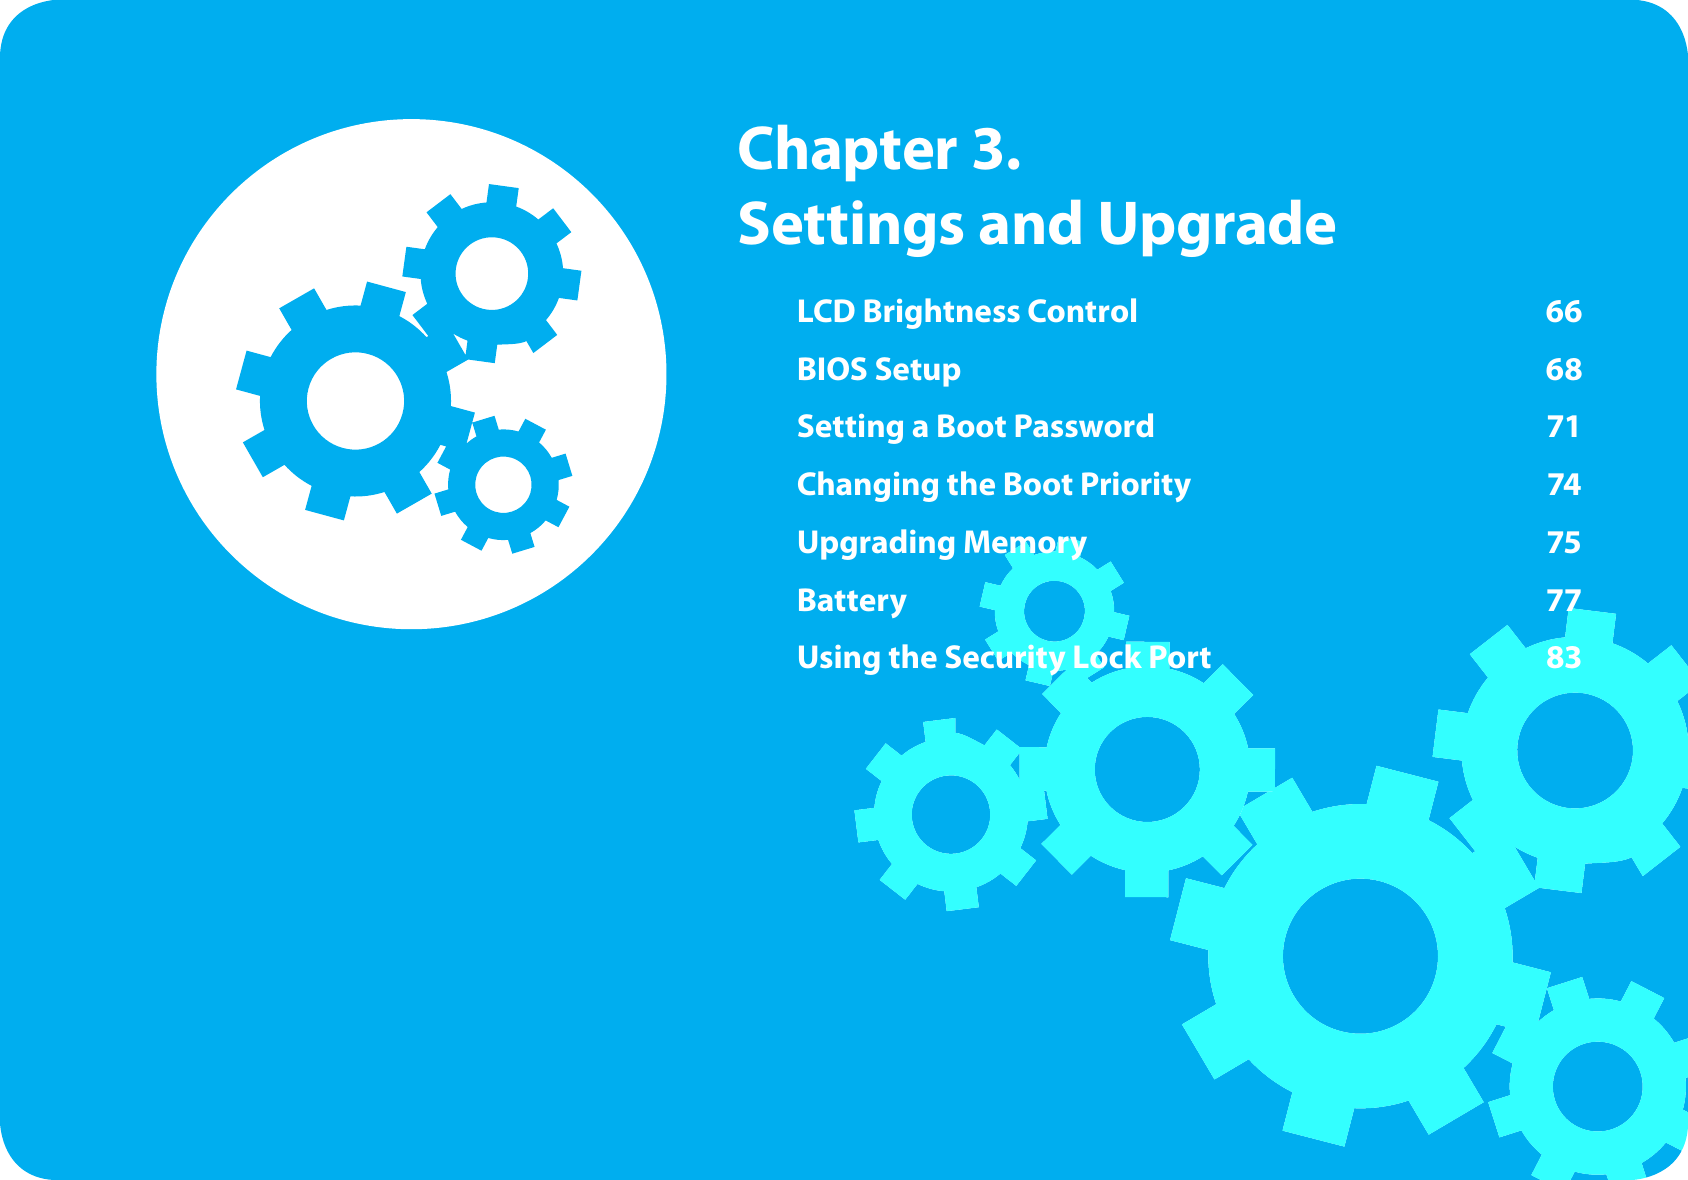
51Chapter 2Using the computerƔMusic : Select to listen to music.WOW HD technology has been used.ƔMovie : Select to watch a movie.TruSurround XT technology has been used.ƔWhen using a Headphone plugged in the Headphonejack : Some of the setting details under each menu willchange.CS Headphone technology has been used.ŹFor Windows XP1Click Control Panel > Sound, Voice and Audio Device >Sound and Audio Devices.2Click the audio tab, select SRS Premium Sound inPlay >Default Device (D):, and then click theOK button at theKbottom.In this case, although you can change the volume in the SRSMixer, you can also change the volume in the Master Volumeof the Realtek HD Audio Output Mixer.Therefore, when SRS is selected, you can set the MasterVolume of the Realtek HD Audio Output Mixer to themaximum value and then set the actual volume using theSRS Mixer.This operation may not be required depending on the typeof SRS driver.3Click on Control Panel > Sound, Voice and Audio Device >SRS Control Panel.Select theEnable checkbox and select a mode.ƔWOW XT (Music) : Select to listen to music.ƔTruSurround XT (Movie/Video) : Select to watch a movie.The SRS function is only supported for a computer’s built-tin speakers or headphones.It is recommended unchecking the SRS option beforetrecording, and checking it before playing sound. This is toprevent sound distortion due to the double application of the SRS eect when a user plays the recorded le by usingstereo mix.
52Chapter 2Using the computerA wired network is a network environment used for a companynetwork or broadband internet connection at home.Since these descriptions are written on the basis of thetlatest operating system, Windows 7, some of the contentand the gures of the descriptions may dier dependingon the operating system. Since the procedures for otherWindows operating systems are similar, use the computerreferring to these descriptions.The gures used for the description are of a representativetmodel. Therefore the gures may dier from the real ones.1Connect a LAN cable to the computer’s LAN port.2Ź For Windows 7Click Start > Control Panel > Network and Internet >Network and Sharing Center and click on Change adaptersettings in the left menu pane.Ź For Windows XPClick Start > Control Panel > Network and InternetConnections > Network Connection.
53Chapter 2Using the computer3Select Local Area Connection and click the right button of the touch pad and select Properties.The LAN Device name may dier depending on yourcomputer’s Network Device.4Ź For Windows 7Select Internet Protocol Version 4(TCP/IPv4) from the listof Network Components and click Properties.Ź For Windows XPClick General tab and select a LAN driver fromConnectusing:. Select Internet Protocol(TCP/IP) and click Properties.The Network Component name may dier depending ontthe Operating System Installed.To add a network component, click tInstall in the screenshown in the gure above. You can add clients, services,and protocols.
54Chapter 2Using the computer5Congure the IP settings.When using DHCP, select Obtain an IP addressautomatically. To use a static IP address, select Use thefollowing IP address, and set the IP address manually.When not using DHCP, ask your network administrator for theIP address.6When you have completed the settings, click theOK button.KThe network settings have been completed.Using the <Wake On LAN> Function<Wake On LAN> is a function that activates the system from Sleepmode when a signal (such as a ping or magic packet command)arrives over the network (wired LAN).1ŹFor Windows 7Click Start > Control Panel > Network and Internet >Network and Sharing Center and click on Change adaptersettings in the left menu pane.ŹFor Windows XPClick Start > Control Panel > Network and InternetConnections>NetworkConnections.2Right-click on the Local Area Connection and selectProperties.
55Chapter 2Using the computer3Click Congure> Power Management tab. Select Allowthis device to bring the computer out of standby, thenyyclick OK. Restart the system.-If the system wake up from Sleep mode even though thereis no received signal, use the system after disabling the<Wake On LAN> function.-The LAN LED may not be turned o if System is shutdownwithout disabling the WOL <Wake on LAN> option.-Connecting a wired LAN while using a wireless LAN may notactivate the <Wake On LAN> function. Set the Wireless LANtoDisable to use the <Wake On LAN> function.-<Wake On LAN> feature may not work while using Hybridpower saving feature.ForWindows 7,77Wake On LAN is not supportedPing.Other features for referenceWhen connected to a 100Mbps/1Gbps wired LAN and thecomputer exits Sleep/hibernation mode, a message appearsinforming you of a connection to a 10Mbps/100Mbpswired LAN. This happens because when the computer exitsstandby/hibernate mode, restoring the network takes about3 seconds. When the network is restored, it operates at100Mbps/1Gbps.When system is running on battery, some time it takes about20sec after inserting LAN cable to be able to connect tointernet. This symptom happen as a result of power savingfeature to reduce battery consumption.When system is running on battery, the Wired LAN speedis decreased automatically to reduce battery consumption.In such case, a 1Gbps /100Mbps LAN would function at100Mbps/10Mbps speed.
56Chapter 2Using the computerA wireless network (Wireless LAN) environment is a network environment that enables communicating between multiplecomputers at home or a small-size oce through wireless LANdevices.The descriptions below are for computer models withta Wireless LAN card or device. A Wireless LAN device isoptional.The pictures in this manual may dier from the actualproduct depending on your wireless LAN device model.To use the wireless LAN, you have to turn the wireless LANton rst by pressing the  + keys. If the wirelessLAN is turned on, the Wireless LAN LED  is lit.What is an Access Point (AP)?An AP is a network device that bridges wired and wireless LANs,and corresponds to a wireless hub in a wired network. You canconnect multiple wireless LAN installed computers to an AP.Connecting to a Wireless LANIf there is an AP, you can connect to the Internet via the AP usingthe Wireless LAN connection method provided by Windows.Ź For Windows 71If you click the Network Connections icon in the systemtray, a list of available APs appears. If you select an AP toconnect to, theConnect button appears.AP List
57Chapter 2Using the computer2Click Connect.If a network key is set for the AP, enter the network key andthen click Connect.For the network key, please ask your network administrator.3When Connected to the AP is displayed, click theClosebutton.You can access the network.Ź For Windows XP1Click theWireless Network Connection icon  from theTaskbar using the right button of the touch pad. Then, click View Available Wireless Networks.2Select an AP to be connected and click Connect.If a network key is set in the AP, the network key inputwindow will appear. Enter the network key in the inputwindow and click OK.For a network key, contact the network administrator.
58Chapter 2Using the computer3Once Connected to AP is displayed, you can use a wirelessnetwork.Checking the network connection statusMove the mouse pointer over theWireless Network Connectionicon on the taskbar, and the connection status is displayed.Windows 7Windows XP
59Chapter 2Using the computerEasy Content Share is a DLNA application that allows you to playphotos, videos and music les on your TV.These descriptions are for Windows 7 and for supportedtmodels only.The Digital Living Network Alliance (DLNA) aligns industrytleaders in the CE, mobile, and PC industries through digitalinteroperability, and DLNA-certied devices allow users toplay videos, photos and music les stored on a computeron a TV.To play content using DLNA technology, both yourtcomputer and TV must be DLNA certied.For information on whether a product supports DLNA,refer to the respective user manuals.To play videos, photos and music les stored on a computer,congure the settings in the order as shown below.1.Conguring the network settings for your computer andTV2.Adding shared content on your computer3.Playing content on your TV using your computerConguring the network settings for your computer and TVTo share content, all shared devices must be connected to thesame access point.Congure the network settings by following the steps below.1Connect your computer and TV to an access point througha wired or wireless LAN connection, as shown in the gurebelow.[Network connection diagram]2Congure the IP address settings for your computer and TV.You must check theObtain an IP address automatically(DHCP) checkbox.
60Chapter 2Using the computerFor more information on how to congure the IP addresstfor your computer, refer to Chapter 2. Using theComputer > Network.For more information on how to congure the IP addresstfor your TV, refer to the user manual of your TV.3To check whether the network settings have been conguredcorrectly, double-click theEasy Content Share icon on theyour computer’s Desktop to run the program.(If the program icon does exist on the Windows Desktop,select the corresponding program from Start > All Programs> Samsung.)If the connected computer and TV are shown in the programwindow, the network settings have been conguredsuccessfully.Devices that can share contentIf a connected device is not displayed, refer to Chapter 4.Troubleshooting > Q&A > Easy Content Share Related.Adding shared content on your computerAdd the videos, photos and music les that you want to play onyour TV as shared items.You can only play shared items on your TV.1Click Settings at the top right of Easy Content Share.2Click My computer > Add Folder. TheBrowse ForFolder window appears. Select a folder to share and click OK.
61Chapter 2Using the computer3The selected folder is added to the shared list.Playing content on your TV using your computerAfter you have set photos, videos and music les as shared items,you can play them on your TV using your computer.1InEasy Content Share, select the TV you want to use to playcontent.PlaylistAdd content to playPlay control panel2Select the item you want to play in the playlist, and then click Play .3The selected le is played on the TV.Using the Play Control panel, you can control the item beingplayed on the TV.4To stop playing, click Stop .Easy Content Share does not support subtitles due to DLNAconstraints.To use subtitles, refer toChapter 4. Troubleshooting > Q&A> Easy Content Share Related.
62Chapter 2Using the computerAdding a video, photo or music le to the playlist1Click Add Content in the Playlist screen. The sharedcontent list is displayed.2In the shared content list, check the checkbox in front of theitem you want to add to the playlist, and then click Add toplaylist.Add the selecteditem to the playlistShared content listReturn to theplaylist screen3Click Return to playlist screen .In the playlist screen, you can nd that the selected item hasbeen added to the playlist.Playing the content stored on a computer when Easy Content Share is not installedYou can also play the videos, photos and music les stored on acomputer when Easy Content Share is not installed on your TV by using Windows Media Player.As described in the steps below, congure the content sharingsettings to play content on your TV.The computer containing the shared content (when EasyContent Share is not installed) must be connected to thesame access point to which the computer whereEasyContent Share is installed and the TV is connected to.ŹFor Windows Media Player 121Click Start > All Programs > Windows Media Player.2Click Stream and check theAutomatically allow devices toplay my media... menu item.
63Chapter 2Using the computer3Click Start > All Programs > Accessories > WindowsExplorer.4Right-click the folder to share. From the menu displayed,point to Include in library.Click Videos, Photos orMusic in the displayed sub menu,according to the type of content contained in the selectedfolder.If the selected folder contains two or more types of content,you must click each corresponding menu item (Videos,Photos orMusic) to register each type of content.ŹFor Windows Media Player 111Click Start > All Programs > Windows Media Player.2Click Library > Media Sharing.TheMedia Sharing window is displayed. Check theSharemy media checkbox and then click OK.3In theMedia Sharing window, click Settings.... TheMediaSharing - Default Settings window is displayed. Check theAllow new devices and computers automatically (notrecommended) checkbox.
64Chapter 2Using the computerA popup window is displayed. Click Yes. Then click OK in theKMedia Sharing- Default Settings window and in theMediaSharing window.After the registration has been nished, you can nd theadded folder is listed in the shared content list of EasyContent Share.For a shared content item, the name of the computer wherethe item is stored is displayed next to it, allowing you toidentify the computer. This is useful when multiple computersare providing content.A folder added as ashared itemThe name of the PC wherethe content is storedContent sharing is only available withWindows MediaPlayer 11 orlater.If your Windows Media Player is earlier than WindowsMedia Player 11, download and installWindows MediaPlayer 11 orlater from the Microsoft website.
LCD Brightness Control 66BIOS Setup 68Setting a Boot Password 71Changing the Boot Priority 74Upgrading Memory 75Battery 77Using the Security Lock Port 83Chapter 3.  Settings and Upgrade
66Chapter 3Settings and UpgradeYou can adjust the LCD brightness in 8 levels.The screen brightness is automatically set to the brightestlevel (brightness level 8) when AC power is connected and thebrightness is automatically set dimmer when the computerruns on battery power to extend the battery use time.Controlling the Brightness Using the KeyboardAdjust the LCD brightness by pressing the  + key or the + key.The LCD brightness can change up to 8 levels and the brightnessincreases by 1 level when pressing the  + key once.Maintaining the changed LCD brightness even aftertturning the computer on againTo maintain the LCD brightness set by using the brightnesscontrol keys or through the Power Options, follow theprocedures below.Ź For Windows 71.Click Control Panel > Hardware and Sound > PowerOptions.2.Click Change the settings of the currently conguredmode.3.Adjust the display brightness adjustment menu bar andclick theSave the changes button.Ź For Windows XP1.Turn the computer on and press theF2 key when theSAMSUNG logo appears on the screen to enter the BIOSSetup.2.Select the Boot menu and set theBrightness ModeControl item to User Control.3.Press theF10 key to save the settings and exit Setup.Saving battery power consumptiontDecreases the LCD brightness when the computeris running on battery power to save battery powerconsumption.
67Chapter 3Settings and UpgradeLCD bad pixels principle of laptop computertSamsung observes the specications regarding strictquality and reliability of LCD. But in spite of that, it isinevitable that there might be a small number of badpixels. A large number of bad pixels can cause problems inappearance, but a small number of pixels doesn’t aect thecomputer performance.Therefore Samsung observes and manages the followingdot principles:- Bright dot : 2 or less- Black dot  : 4 or less- Combination of Bright and Dark : 4 or lessInstructions for Cleaning the LCDClean the LCD panel with a soft cloth lightly moistened withcomputer cleansing detergent moving in one direction.Cleaning the LCD panel with excessive force can damage theLCD.
68Chapter 3Settings and UpgradeThe BIOS Setup enables you to congure your computer hardwareaccording to your needs.Use the BIOS setup to dene a boot password, change thetbooting priority, or add a new device.Since incorrect settings may cause your system totmalfunction or crash, take care when conguring the BIOS.The functions of the BIOS setup are subject to change fortproduct function enhancement purposes.The BIOS Setup menus and items may dier depending ontyour computer model.Entering the BIOS Setup1Turn the computer on.2When the booting screen (SAMSUNG logo) appears, press theF2 key to enter the BIOS Setup.Press theF12 key while the booting screen(SAMSUNG logo)appears, the system will try to boot from the network.3After a moment, the BIOS setup screen appears.The items in the BIOS setup may dier depending on theproduct.
69Chapter 3Settings and UpgradeThe BIOS Setup ScreenThe BIOS Setup menus and items may dier depending onyour computer model.Setup MenuSetup ItemsHelpHelp for theselecteditem appearsautomatically.Setup MenuDescriptionMain Used to change the basic system andenvironment settings.AdvancedUsed to congure advanced functions on yourcomputer for devices and chipsets.Security Used to congure security functions, includingpasswords.Boot Used to set the boot priority and other bootoptions.Exit Used to exit the Setup either saving thechanges or not.
70Chapter 3Settings and UpgradeSystem Setup KeysIn the Setup, you have to use the keyboard.F1 Press to view the Setup Help.Up & Down Keys Press to move up and down.F5/F6 Press to change the item value.F9 Press to load the default Setupsettings.ESC Press to return to a higher levelmenu or to move to theExit menu.Left & Right Keys Press to move to another menu.Enter Press to select an item or to enter asub menu.F10 Press to save the changes and exitSetup.The keyboard image may dier from the actual keyboard.
71Chapter 3Settings and UpgradeWhen setting a password, you have to enter a password to use thecomputer or enter the BIOS Setup.By conguring a password, you can restrict system access toauthorized users only and protect data and les saved on thecomputer.Do not lose or forget your password.tIf you have forgotten your password, contact a Samsungtservice center. In this case, a service fee will be charged.Setting a Supervisor PasswordA Supervisor Password is required to turn the computer on or tostart the System Setup.When setting a Supervisor Password, users other than a supervisorcannot use the computer.1Select theSecurity menu in the BIOS Setup.2In theSet Supervisor Password item, press <Enter>.3Enter a password, press <Enter>, re-enter the password forconrmation, and press <Enter> again.The password can be up to 8 alphanumeric characters.Special characters are not allowed.4The supervisor password has been set.The supervisor password is required to turn the computer onor to enter the BIOS Setup.For some models, if the password entered message appearsin the Setup Notice window, the settings are not completeuntil the <Enter>key is pressed.
72Chapter 3Settings and UpgradeSetting aUser PasswordUsers can start the system with a user password, but cannot enterthe System Setup. By doing this, you can prevent other users fromentering Setup.Before conguring a user password, a supervisor password musthave been congured. Deactivating the supervisor password alsodeactivates the user password.In theSet User Password item, press <Enter> and complete theprocedures from Step 3 of Setting a Supervisor Password.Setting Up a Boot PasswordTo setup a boot password, the administrator password (SetSupervisor Password) should be set in advance.Set thePassword on boot item to Enabled.Once a boot password is set, you have to enter a password to bootup the computer.Setting up a Hard Disk Drive Password (Optional)A supervisor password must be set using the Set SupervisorPassword menu.If you set a password for a hard disk drive, it cannot be accessedfrom another computer.Press <Enter> in theSet HDD Password item and dene apassword as described in Step 3 of the Setting up the SupervisorPassword.The hard disk drive password setting function is nottprovided for some models.Changing the hard disk drive passwordtFor security purposes, you can only change a hard disk drive password after restarting the computer by pressingthe computerPower button.If you cannot change the hard disk drive password or theHDD Password Frozen message appears when enteringthe BIOS Setup and then selecting Security > HDDPassword, press thePower button to turn the computeron again.
73Chapter 3Settings and UpgradeDeactivating the Password1Press <Enter> on the password to be deactivated. Forexample, to deactivate a supervisor password in theSetSupervisor Password item, press <Enter>.2In theEnter Current Password item, enter the currentlycongured password and press <Enter>.3Leave theEnter New Password item eld empty, and press<Enter>.4Leave theConrm New Password eld empty, and press<Enter>.The password is deactivated.For some models the password is only canceled if the<Enter> key is pressed in theSetup Notice window.
74Chapter 3Settings and UpgradeThis computer is congured to boot from an external-type ODDrst. As an example, the procedures to change the highest bootpriority device to the hard disk drive are described below.The screen images in this document may dier from actualproduct.1Select theBoot menu in the BIOS Setup.2Press <Enter> on theBoot Device Priority item.

Navigation menu