Broadcom BRCM1051 802.11g/Draft 802.11n WLAN + BT PCI-E User Manual Manual 3
Broadcom Corporation 802.11g/Draft 802.11n WLAN + BT PCI-E Manual 3
Broadcom >
Contents
- 1. User manual
- 2. OEM installation guide
- 3. Host user manual 1 of 5
- 4. Host user manual 2 of 5
- 5. Host user manual 3 of 5
- 6. Host user manual 4 of 5
- 7. Host user manual 5 of 5
- 8. User Manual
- 9. OEM installation Guide
- 10. Akashi User Manual
- 11. Gucci Users Manual
- 12. User manual 1 of 3
- 13. User manual 2 of 3
- 14. User manual 3 of 3
- 15. Host useer manual
Host user manual 3 of 5
51
Chapter 2
Using the computer
Ɣ
Mus
i
c
:
Se
l
ect to
l
isten to music
.
WOW HD tec
h
no
l
og
y
h
as
b
een use
d.
Ɣ
Mov
i
e
:
Se
l
ect to watc
h
a movie
.
TruSurroun
d
XT tec
h
no
l
og
y
h
as
b
een use
d.
Ɣ
W
h
en using a Hea
d
p
h
one p
l
ugge
d
in t
h
e Hea
d
p
h
one
jac
k
: Some o
f
the setting details under each menu will
c
h
ange
.
CS Hea
d
p
h
one tec
h
no
l
og
y
h
as
b
een use
d.
Ź
For Win
d
ows X
P
1
C
l
ic
k
Contro
l
Pane
l
> Soun
d
, Voice an
d
Au
d
io Device >
Soun
d
an
d
Au
d
io Device
s
.
2
C
l
ic
k
t
h
e au
d
io ta
b
, se
l
ect SRS Premium Soun
d
i
nP
l
ay >
De
f
ault Device (D)
:
, an
d
t
h
en c
l
ic
k
t
h
e
OK
button at the
K
b
ottom.
In t
h
is case, a
l
t
h
oug
h
you can c
h
ange t
h
e vo
l
ume in t
h
e SRS
Mixer, you can a
l
so c
h
ange t
h
e vo
l
ume in t
h
e Master Vo
l
ume
o
f
the Rea
l
te
k
HD Au
d
io Outpu
t
M
i
xer
.
There
f
ore, when SRS is selected, you can set the Master
Volume o
f
the Rea
l
te
k
HD Au
d
io Outpu
t
Mixer to t
h
e
maximum va
l
ue an
d
t
h
en set t
h
e actua
l
vo
l
ume using t
h
e
S
R
S
Mixer
.
T
h
is operation may not
b
e require
d
d
epen
d
ing on t
h
e type
o
f
SRS driver
.
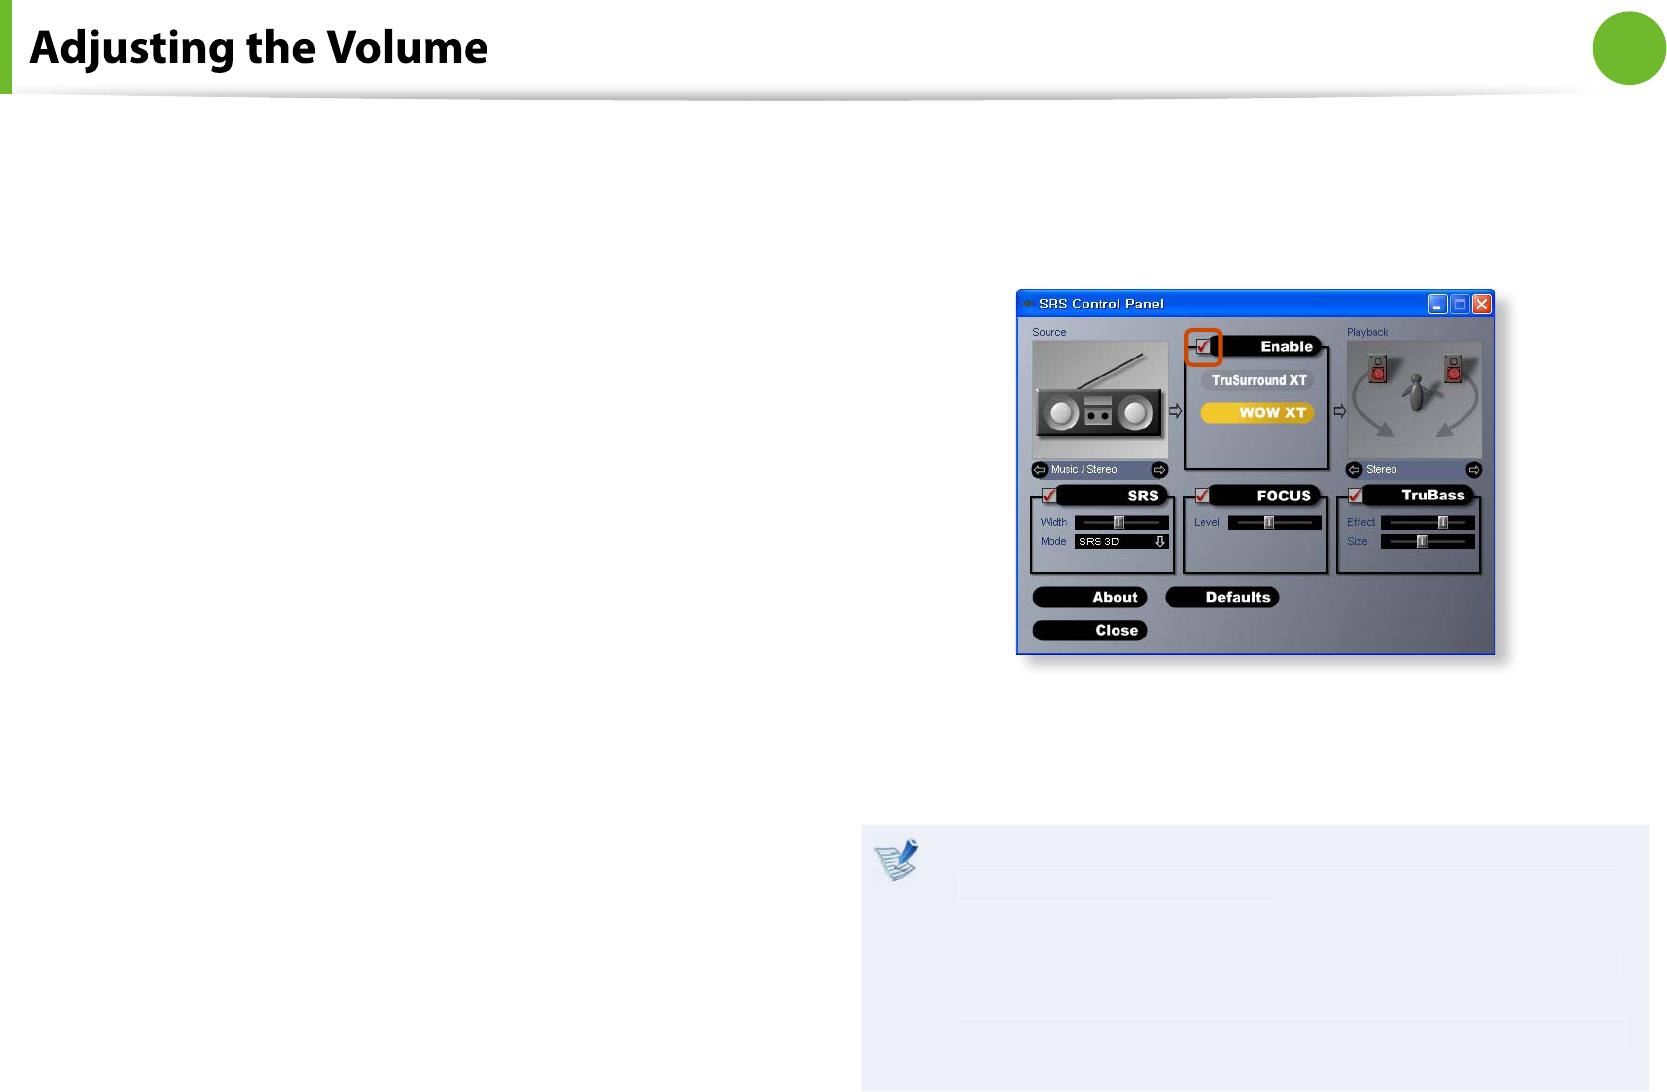
3C
l
ic
k
on Contro
l
Pane
l
> Soun
d
, Voice an
d
Au
d
io Device >
SRS Contro
l
Pane
l
.
Se
l
ect t
h
eEna
ble
c
h
ec
kb
ox an
d
se
l
ect a mo
d
e
.
Ɣ
WOW XT (Mus
i
c)
:
Se
l
ect to
l
isten to music
.
Ɣ
TruSurroun
d
XT (Movie/Vi
d
eo)
:
Se
l
ect to watc
h
a movie
.
The SRS
f
unction is only supported
f
or a computer’s built
-
t
in spea
k
ers or
h
ea
d
p
h
ones
.
It is recommended unchecking the SRS option be
f
ore
t
recording, and checking it be
f
ore playing sound. This is to
prevent sound distortion due to the double application o
f
the SRS e
ect when a user plays the recorded
le by using
stereo m
i
x
.
5
2
Chapter 2
Using the computer
A wired network is a network environment used
f
or a company
networ
k
or
b
roa
db
an
d
internet connection at
h
ome
.
Since these descriptions are written on the basis o
f
the
t
latest operating system, Windows 7, some o
f
the content
and the
gures o
f
the descriptions may di
er depending
on the operating system. Since the procedures
f
or other
Win
d
ows operating systems are simi
l
ar, use t
h
e computer
re
f
erring to these descriptions
.
The
gures used
f
or the description are o
f
a representative
t
model. There
f
ore the
gures may di
er
f
rom the real ones
.
1Connect a LAN ca
bl
e to t
h
e computer’s LAN port
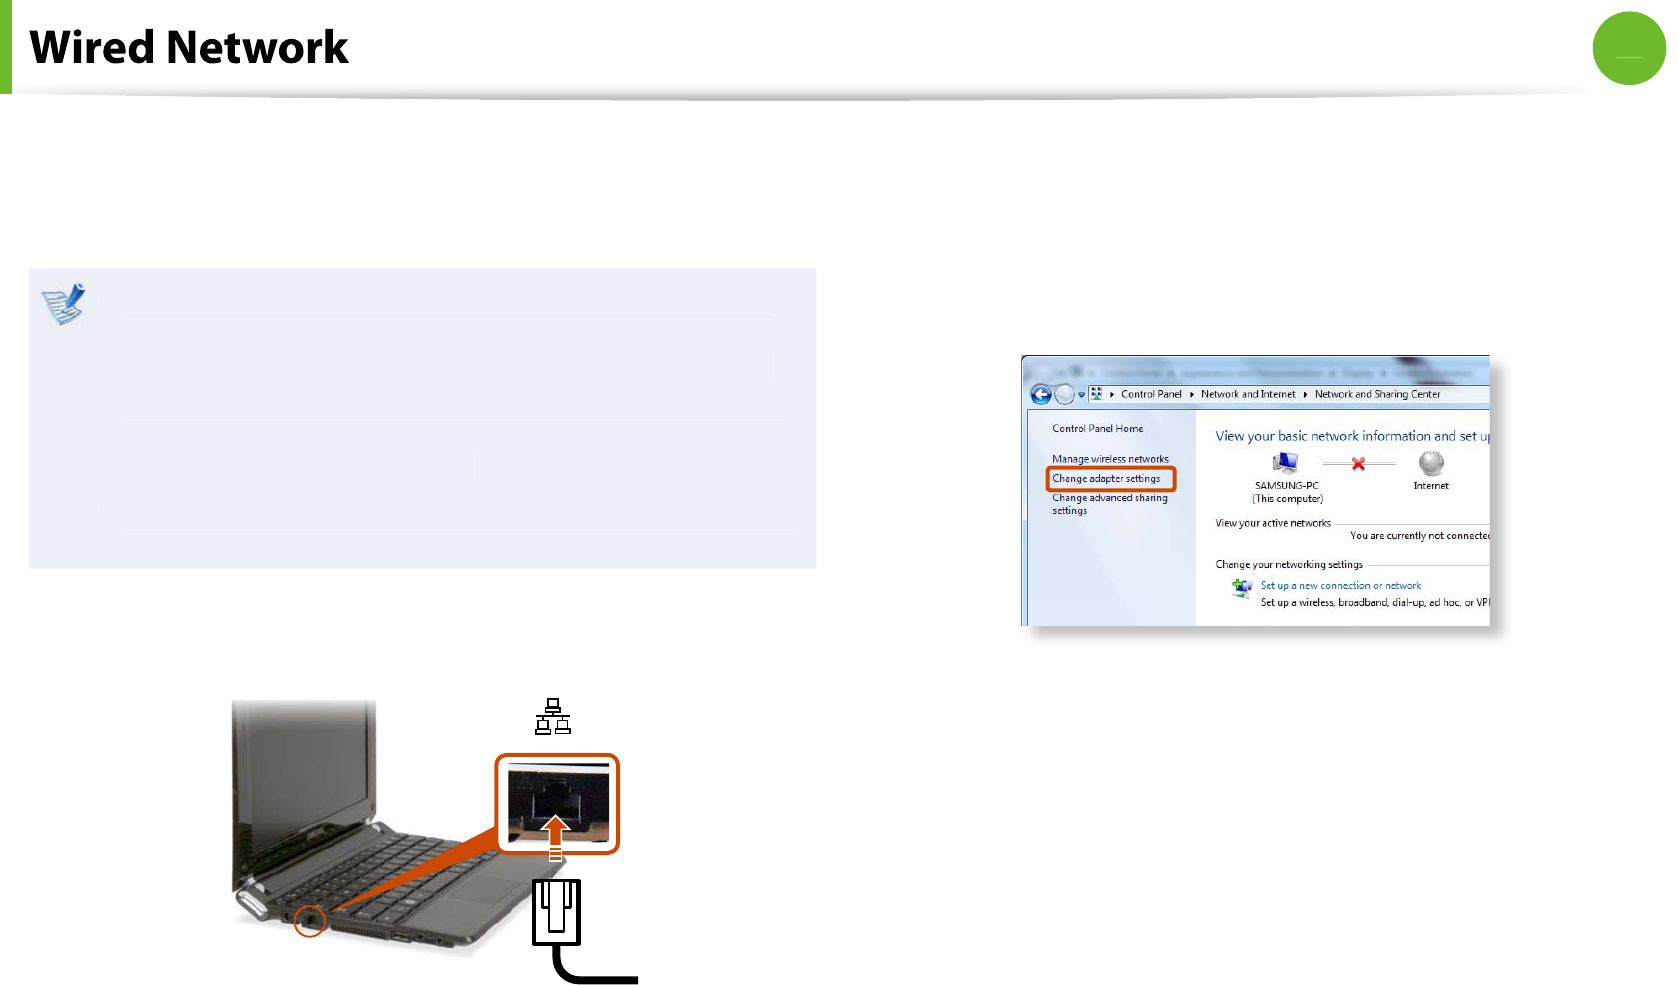
.
2
Ź
For Win
d
ows
7
C
l
ic
k
Start > Contro
l
Pane
l
> Networ
k
an
d
Internet >
Networ
k
an
d
S
h
aring Cente
r
an
d
c
l
ic
k
on C
h
ange a
d
apter
sett
i
ng
s
in the le
f
t menu pane
.
Ź
For Win
d
ows X
P
C
l
ic
k
Start > Contro
l
Pane
l
> Networ
k
an
d
Internet
Connections > Networ
k
Connectio
n
.
53
Chapter 2
Using the computer
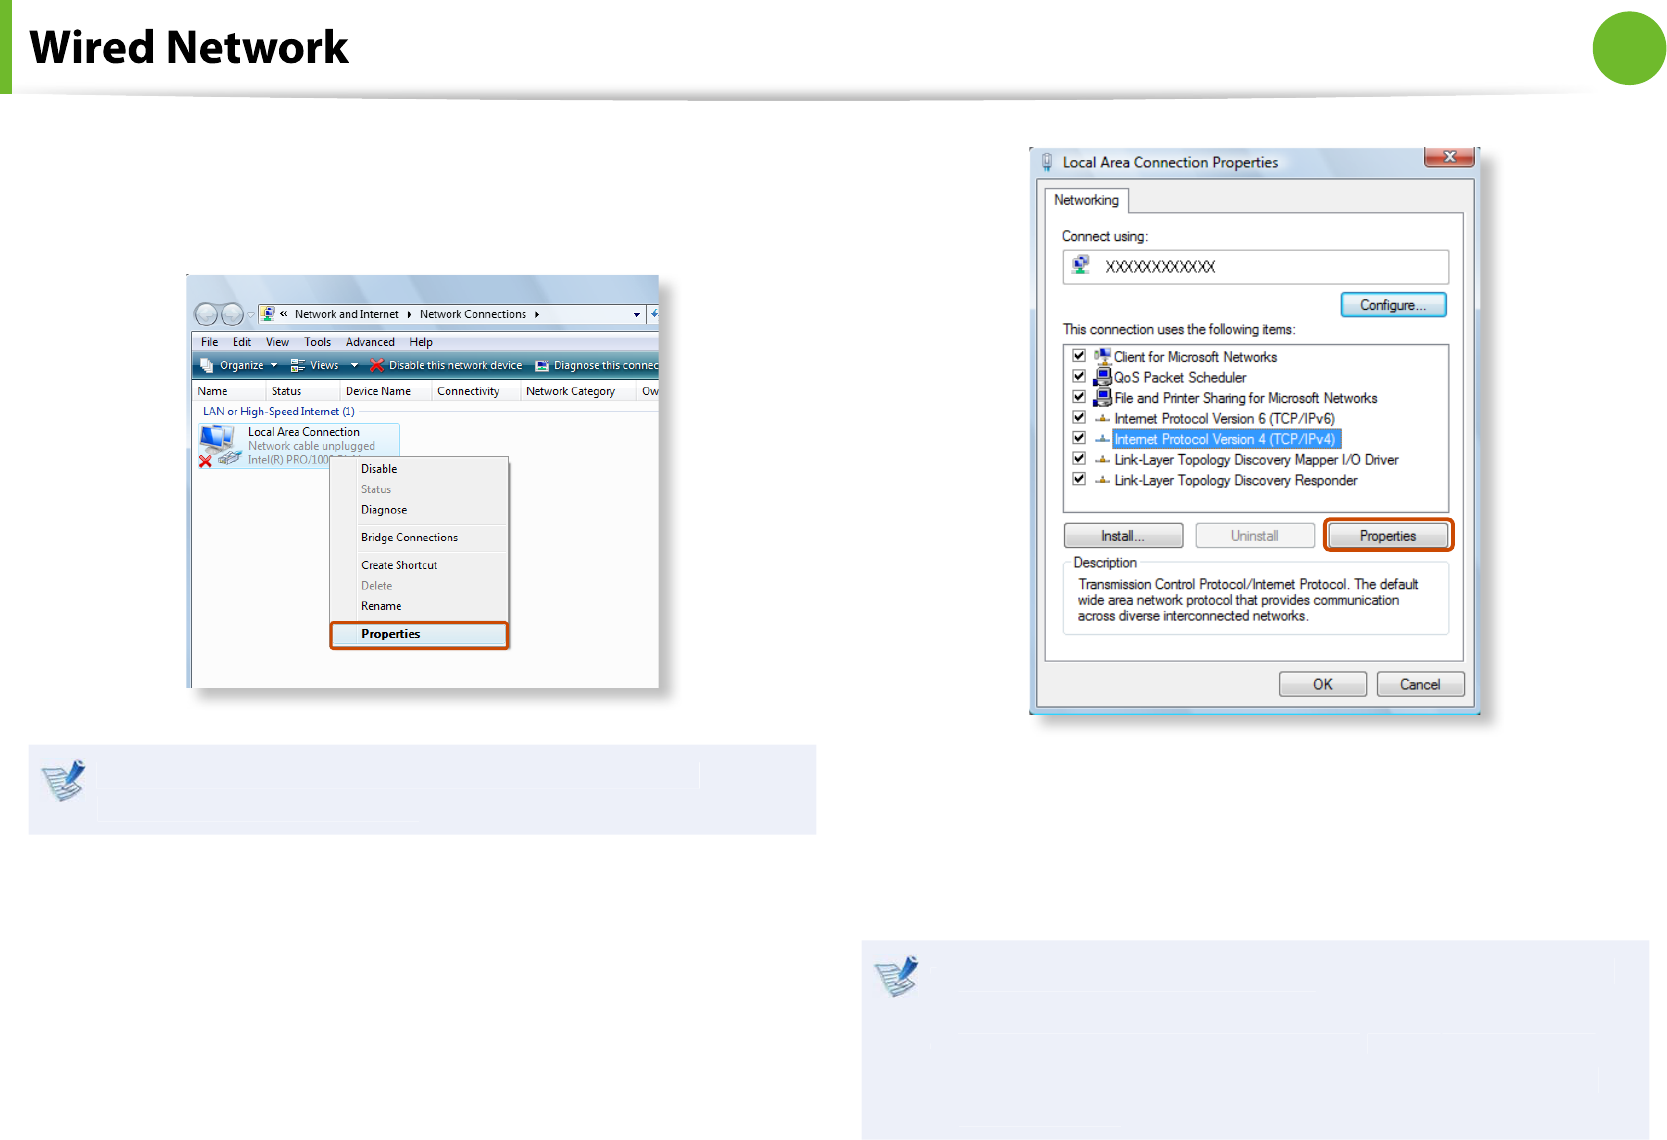
3
Se
l
ect Loca
l
Area Connectio
n
and click the right button o
f
t
h
e touc
h
pa
d
an
d
se
l
ect Propert
i
e
s
.
The LAN Device name may dier depending on your
computer’s Networ
k
Device
.
4
Ź
For Win
d
ows
7
Se
l
ect Internet Protoco
l
Version 4(TCP/IPv4
)
f
rom the list
o
f
Network Components and clic
k
Propert
i
e
s
.
Ź
For Win
d
ows X
P
C
l
ic
k
Genera
l
tab and select a LAN driver
f
rom
C
onnect
us
i
n
g
:. Se
l
ect Internet Protoco
l
(TCP/IP
)
an
d
c
l
ic
k
Propert
i
e
s
.
The Network Component name may di
er depending on
t
t
h
e Operating System Insta
ll
e
d.
To a
dd
a networ
k
component, c
l
ic
k
t
Insta
ll
in t
h
e screen
s
hown in the
gure above. You can add clients, services,
an
d
protoco
l
s
.
54
Chapter 2
Using the computer
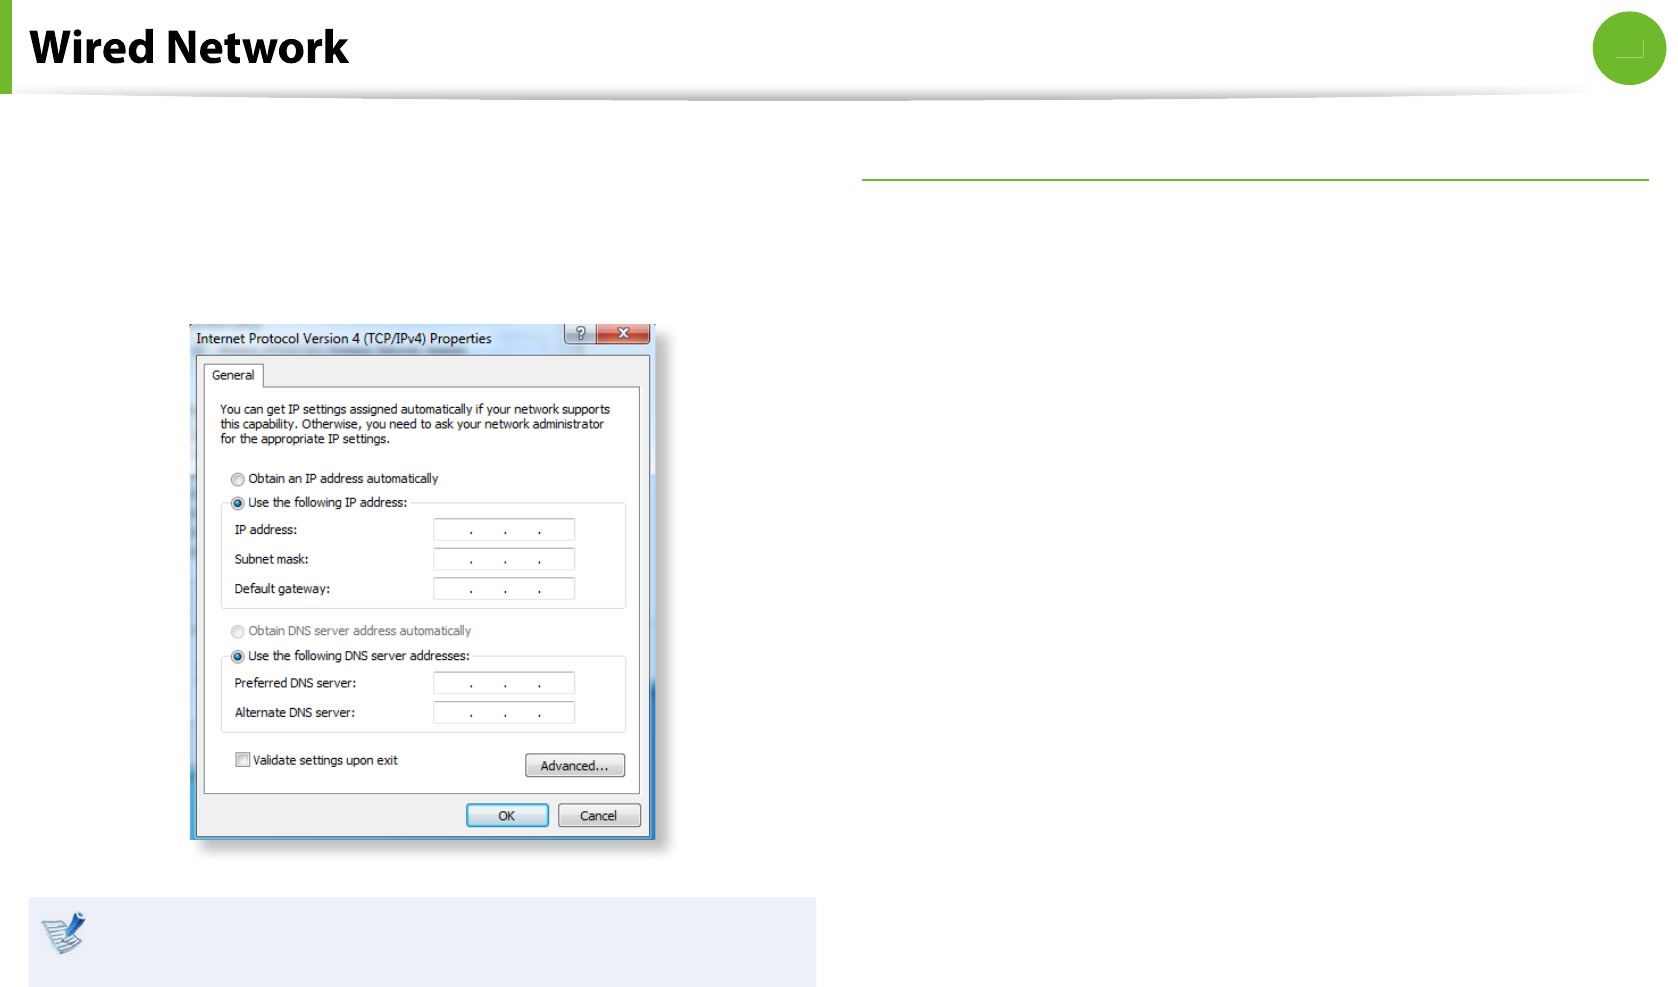
5
Con
gure the IP settings
.
W
h
en using DHCP, se
l
ect O
b
tain an IP a
dd
ress
automatica
lly
. To use a static IP a
dd
ress, se
l
ect Use t
h
e
f
ollowing IP addres
s
, an
d
set t
h
e IP a
dd
ress manua
ll
y
.
When not using DHCP, ask your network administrator
f
or the
IP address
.
6
W
h
en you
h
ave comp
l
ete
d
t
h
e settings, c
l
ic
k
t
h
e
OK
button.
K
T
h
e networ
k
settings
h
ave
b
een comp
l
ete
d.
Using t
h
e <Wa
k
e On LAN> Functio
n
<Wake On LAN> is a
f
unction that activates the system
f
rom Sleep
mo
d
e w
h
en a signa
l
(suc
h
as a ping or magic pac
k
et comman
d
)
arrives over t
h
e networ
k
(wire
d
LAN)
.
1
Ź
For Win
d
ows
7
C
l
ic
k
Start > Contro
l
Pane
l
> Networ
k
an
d
Internet >
Networ
k
an
d
S
h
aring Cente
r
an
d
c
l
ic
k
on C
h
ange a
d
apter
sett
i
ng
s
in the le
f
t menu pane
.
Ź
For Win
d
ows X
P
C
l
ic
k
Start > Contro
l
Pane
l
> Networ
k
an
d
Interne
t
Connect
i
ons
>
N
etwor
k
Connect
i
on
s
.
2Rig
h
t-c
l
ic
k
on t
h
e Loca
l
Area Connection an
d
se
l
ect
Propert
i
e
s
.

55
Chapter 2
Using the computer
3
C
l
ic
k
Con
gur
e
>
P
ower Managemen
t
ta
b
. Se
l
ect A
ll
ow
this device to bring the computer out of standby
,
t
h
en
y
y
c
l
ic
k
OK
. Restart t
h
e system
.
-
I
f
the system wake up
f
rom Sleep mode even though there
is no received signal, use the system a
f
ter disabling the
<Wake On LAN>
f
unction
.
-
The LAN LED may not be turned o
i
f
System is shutdown
wit
h
out
d
isa
bl
ing t
h
e WOL <Wa
k
e on LAN> option
.
-
Connecting a wire
d
LAN w
h
i
l
e using a wire
l
ess LAN may not
activate the <Wake On LAN>
f
unction. Set the Wireless LAN
t
oDisa
ble
to use the <Wake On LAN>
f
unction
.
-
<Wake On LAN>
f
eature may not work while using Hybrid
power saving
f
eature
.
F
or
Windows 7
,
7
7
Wa
k
e On LA
N
is not supporte
d
P
i
n
g
.
Other features for reference
W
h
en connecte
d
to a 100M
b
ps/1G
b
ps wire
d
LAN an
d
t
h
e
computer exits S
l
eep/
h
i
b
ernation mo
d
e, a message appears
informing you of a connection to a 10Mbps/100Mbps
wire
d
LAN. T
h
is
h
appens
b
ecause w
h
en t
h
e computer exits
stan
db
y/
h
i
b
ernate mo
d
e, restoring t
h
e networ
k
ta
k
es a
b
out
3 secon
d
s. W
h
en t
h
e networ
k
is restore
d
, it operates at
100M
b
ps/1G
b
ps
.
W
h
en system is running on
b
attery, some time it ta
k
es a
b
out
20sec a
f
ter inserting LAN cable to be able to connect to
internet. This symptom happen as a result o
f
power saving
f
eature to reduce battery consumption
.
W
h
en system is running on
b
attery, t
h
e Wire
d
LAN spee
d
is
d
ecrease
d
automatica
ll
y to re
d
uce
b
attery consumption.
In such case, a 1Gbps /100Mbps LAN would
f
unction at
100M
b
ps/10M
b
ps spee
d.
5
6
Chapter 2
Using the computer
A wire
l
ess networ
k
(Wire
l
ess LAN) environment is a networ
k
environment t
h
at ena
bl
es communicating
b
etween mu
l
tip
l
e
computers at home or a small-size o
ce through wireless LAN
d
evices
.
The descriptions below are
f
or computer models with
t
a Wire
l
ess LAN car
d
or
d
evice. A Wire
l
ess LAN
d
evice is
optiona
l.
The pictures in this manual may di
er
f
rom the actual
pro
d
uct
d
epen
d
ing on your wire
l
ess LAN
d
evice mo
d
e
l.
To use t
h
e wire
l
ess LAN, you
h
ave to turn t
h
e wire
l
ess LAN
t
on
rst by pressing the
+
keys. I
f
the wireless
LAN is turne
d
on, t
h
e Wire
l
ess LAN LED is
l
it
.
W
h
at is an Access Point
(
AP
)?
An AP is a networ
k
d
evice t
h
at
b
ri
d
ges wire
d
an
d
wire
l
ess LANs,
an
d
correspon
d
s to a wire
l
ess
h
u
b
in a wire
d
networ
k
. You can
connect mu
l
tip
l
e wire
l
ess LAN insta
ll
e
d
computers to an AP
.
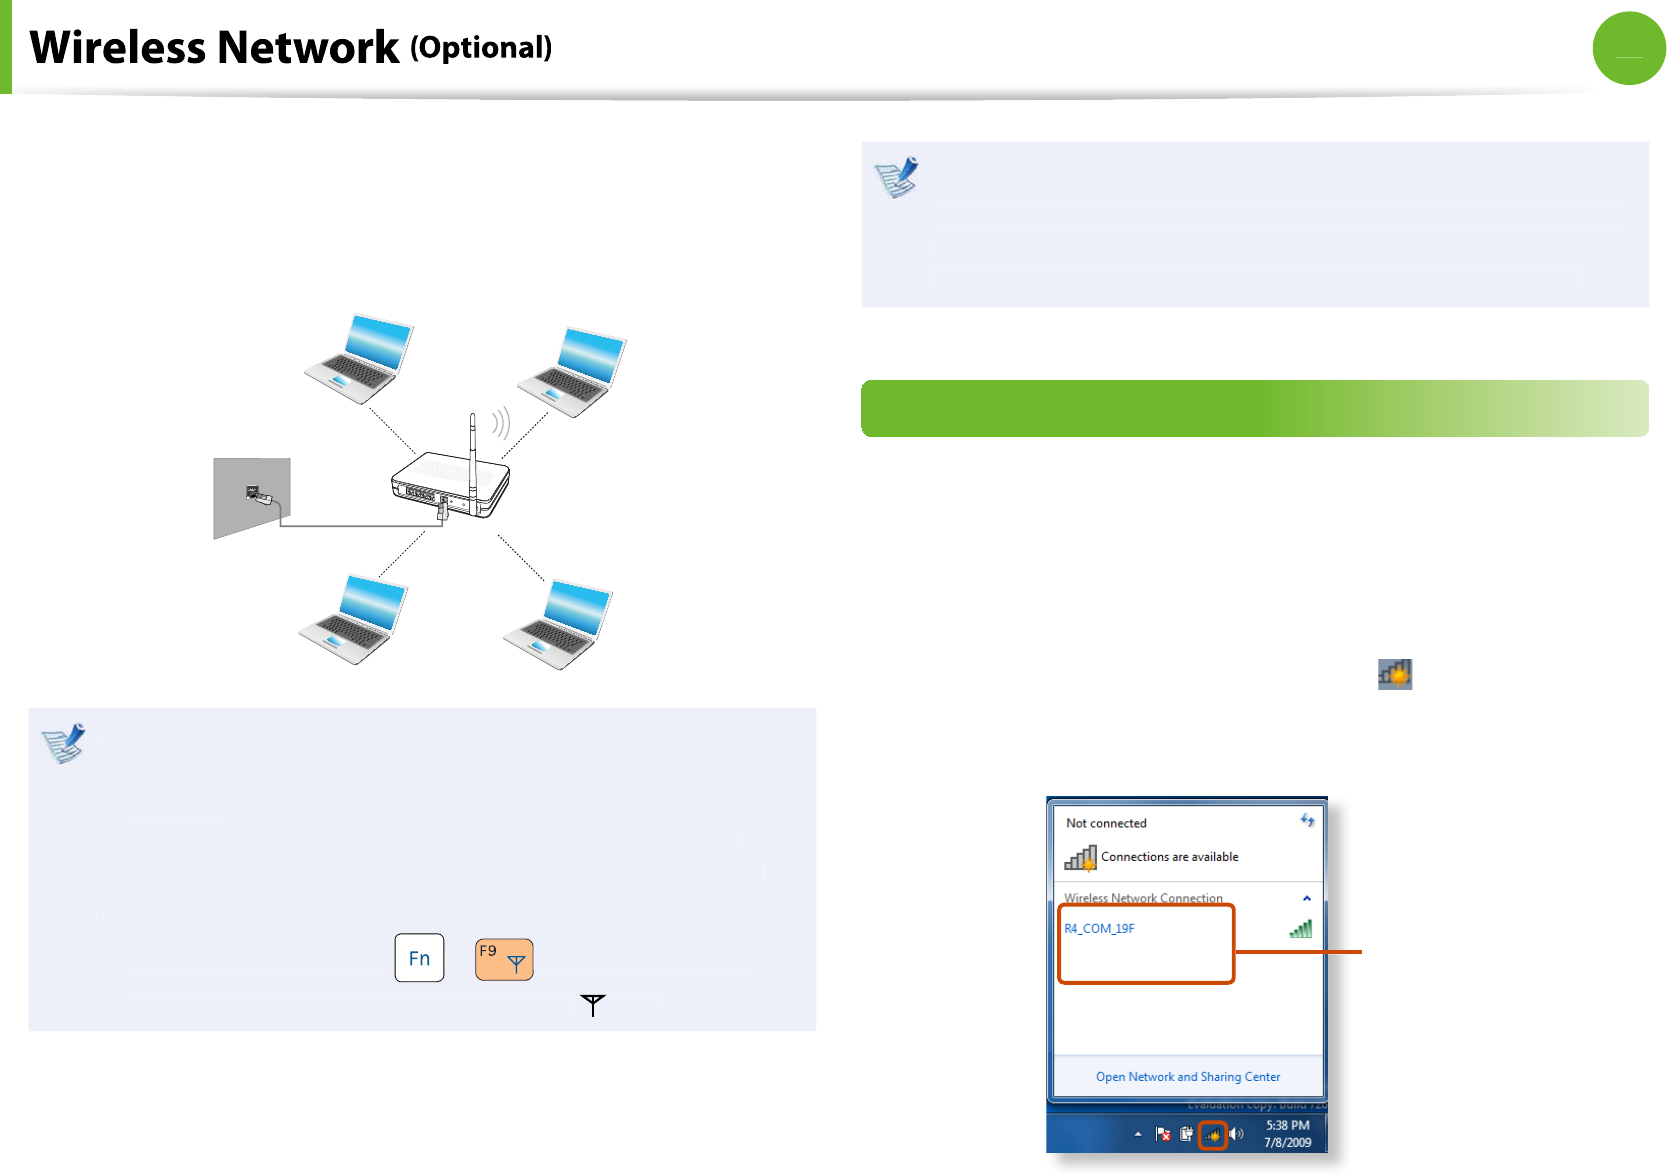
Connecting to a Wireless LAN
I
f
there is an AP, you can connect to the Internet via the AP using
t
h
e Wire
l
ess LAN connection met
h
o
d
provi
d
e
d
b
y Win
d
ows
.
Ź
For Win
d
ows
7
1I
f
you click the Networ
k
Connection
s
icon in t
h
e system
tray, a list o
f
available APs appears. I
f
you select an AP to
connect to, t
h
e
C
onnec
t
b
utton appears
.
A
P
Lis
t
57
Chapter 2
Using the computer
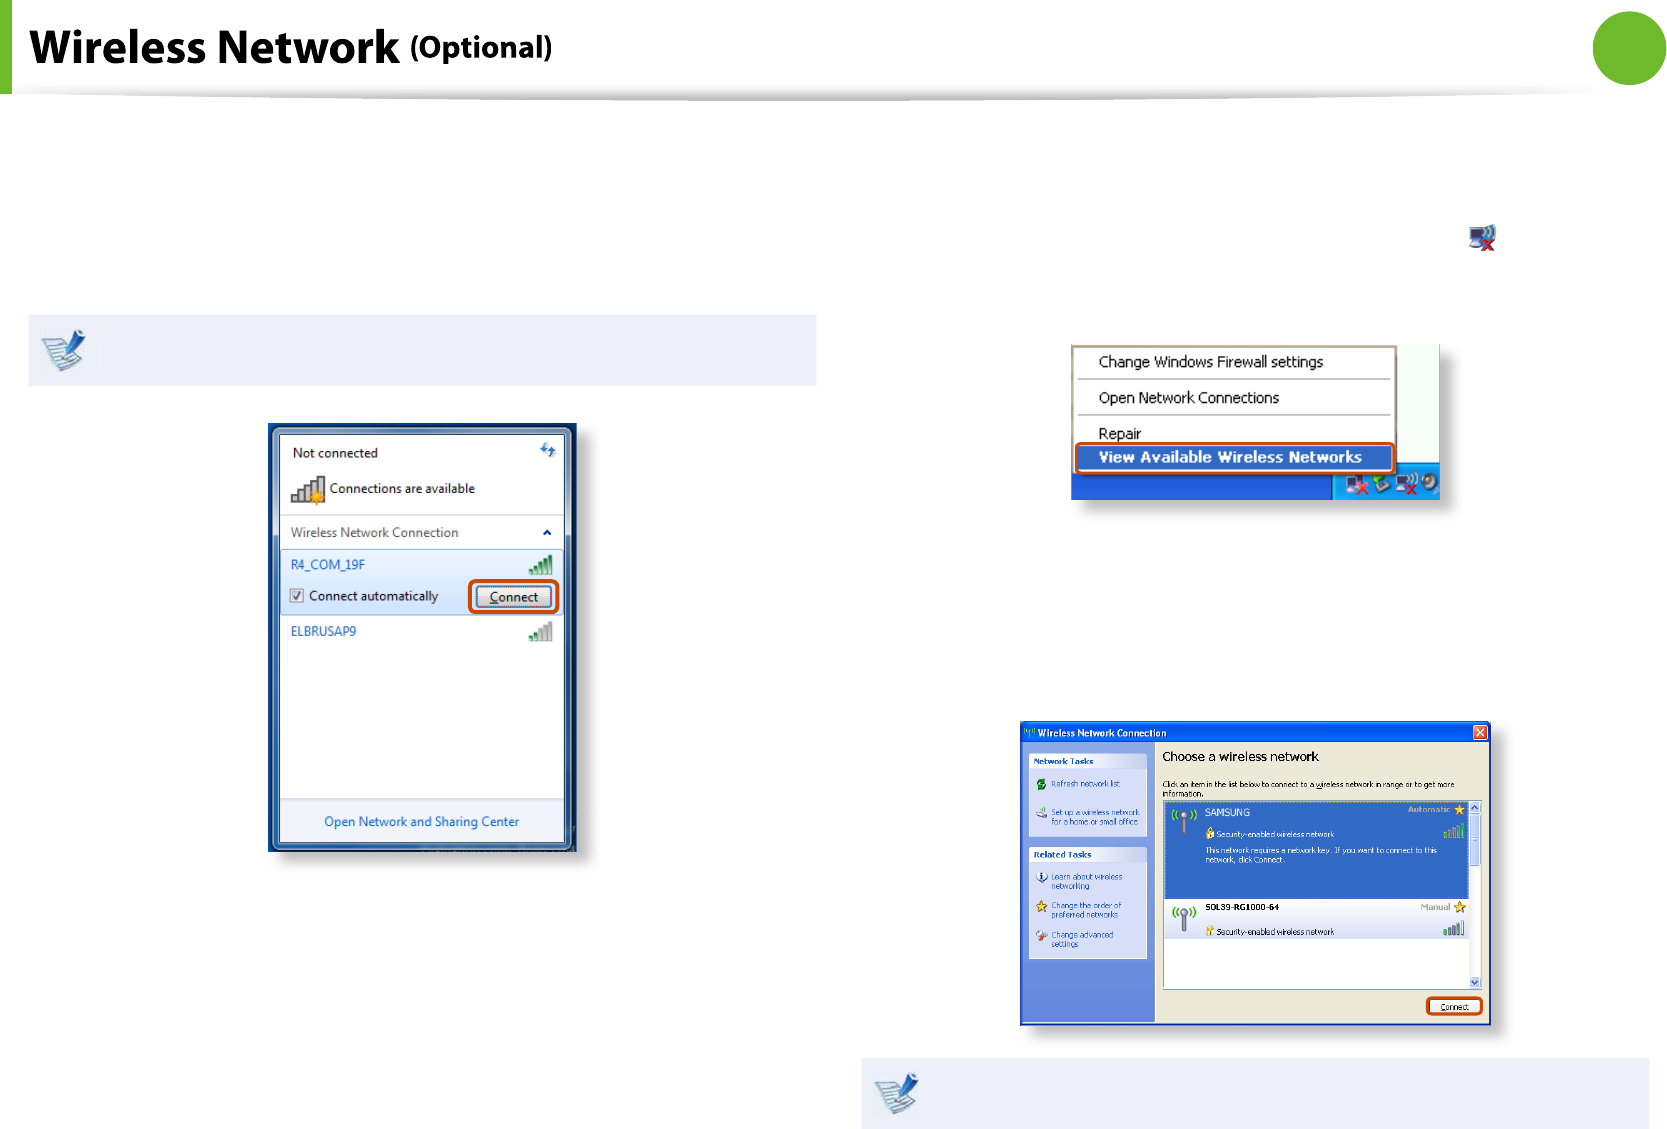
2
C
l
ic
k
C
onnec
t
.
I
f
a network key is set
f
or the AP, enter the network key and
t
h
en c
l
ic
k
C
onnec
t
.
For t
h
e networ
k
k
ey, p
l
ease as
k
your networ
k
a
d
ministrator
.
3
W
h
en Connecte
d
to t
h
e AP is
d
isp
l
aye
d
, c
l
ic
k
t
h
eC
l
os
e
b
utton
.
You can access t
h
e networ
k.
Ź
For Windows X
P
1C
l
ic
k
t
h
eWire
l
ess Networ
k
Connectio
n
i
con
f
rom the
T
askbar using the right button o
f
the touch pad. Then, clic
k
View Avai
l
a
bl
e Wire
l
ess Networ
ks
.
2
Se
l
ect an AP to
b
e connecte
d
an
d
c
l
ic
k
C
onnec
t
.
I
f
a network key is set in the AP, the network key input
win
d
ow wi
ll
appear. Enter t
h
e networ
k
k
ey in t
h
e input
win
d
ow an
d
c
l
ic
k
OK
.
For a networ
k
k
ey, contact t
h
e networ
k
a
d
ministrator
.
5
8
Chapter 2
Using the computer
3
O
nce Connecte
d
to A
P
is
d
isp
l
aye
d
, you can use a wire
l
ess
networ
k.
C
h
ec
k
ing t
h
e networ
k
connection statu
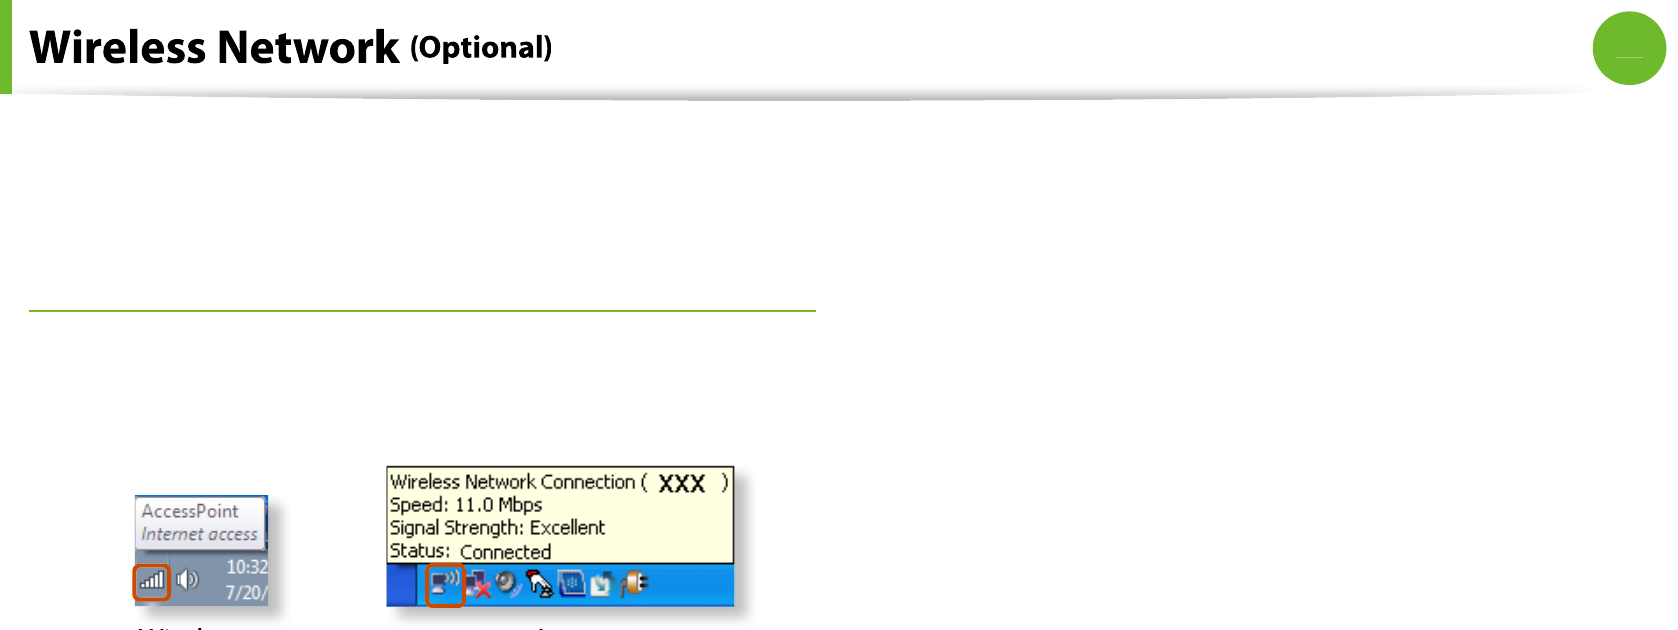
s
Move t
h
e mouse pointer over t
h
eWire
l
ess Networ
k
Connectio
n
icon on t
h
e tas
kb
ar, an
d
t
h
e connection status is
d
isp
l
aye
d.
Wi
n
d
ows
7
Win
d
ows X
P
59
Chapter 2
Using the computer
Easy Content S
h
ar
e
is a DLNA app
l
ication t
h
at a
ll
ows you to p
l
ay
photos, videos and music
les on your TV
.
These descriptions are
f
or Windows 7 and
f
or supported
t
mo
d
e
l
s on
l
y.
T
h
e Digita
l
Living Networ
k
A
ll
iance (DLNA) a
l
igns in
d
ustry
t
l
ea
d
ers in t
h
e CE, mo
b
i
l
e, an
d
PC in
d
ustries t
h
roug
h
d
igita
l
interoperability, and DLNA-certi
ed devices allow users to
play videos, photos and music
les stored on a computer
on a
TV
.
To p
l
ay content using DLNA tec
h
no
l
ogy,
b
ot
h
your
t
computer and TV must be DLNA certied
.
For in
f
ormation on whether a product supports DLNA,
re
f
er to the respective user manuals
.
To play videos, photos and music
les stored on a computer,
con
gure the settings in the order as shown below
.
1.
Con
guring the network settings
f
or your computer and
TV
2.
A
dd
ing s
h
are
d
content on your compute
r
3.
P
l
aying content on your TV using your compute
r
Conguring the network settings for your
computer and TV
To s
h
are content, a
ll
s
h
are
d
d
evices must
b
e connecte
d
to t
h
e
same access po
i
nt
.
C
on
gure the network settings by
f
ollowing the steps below
.
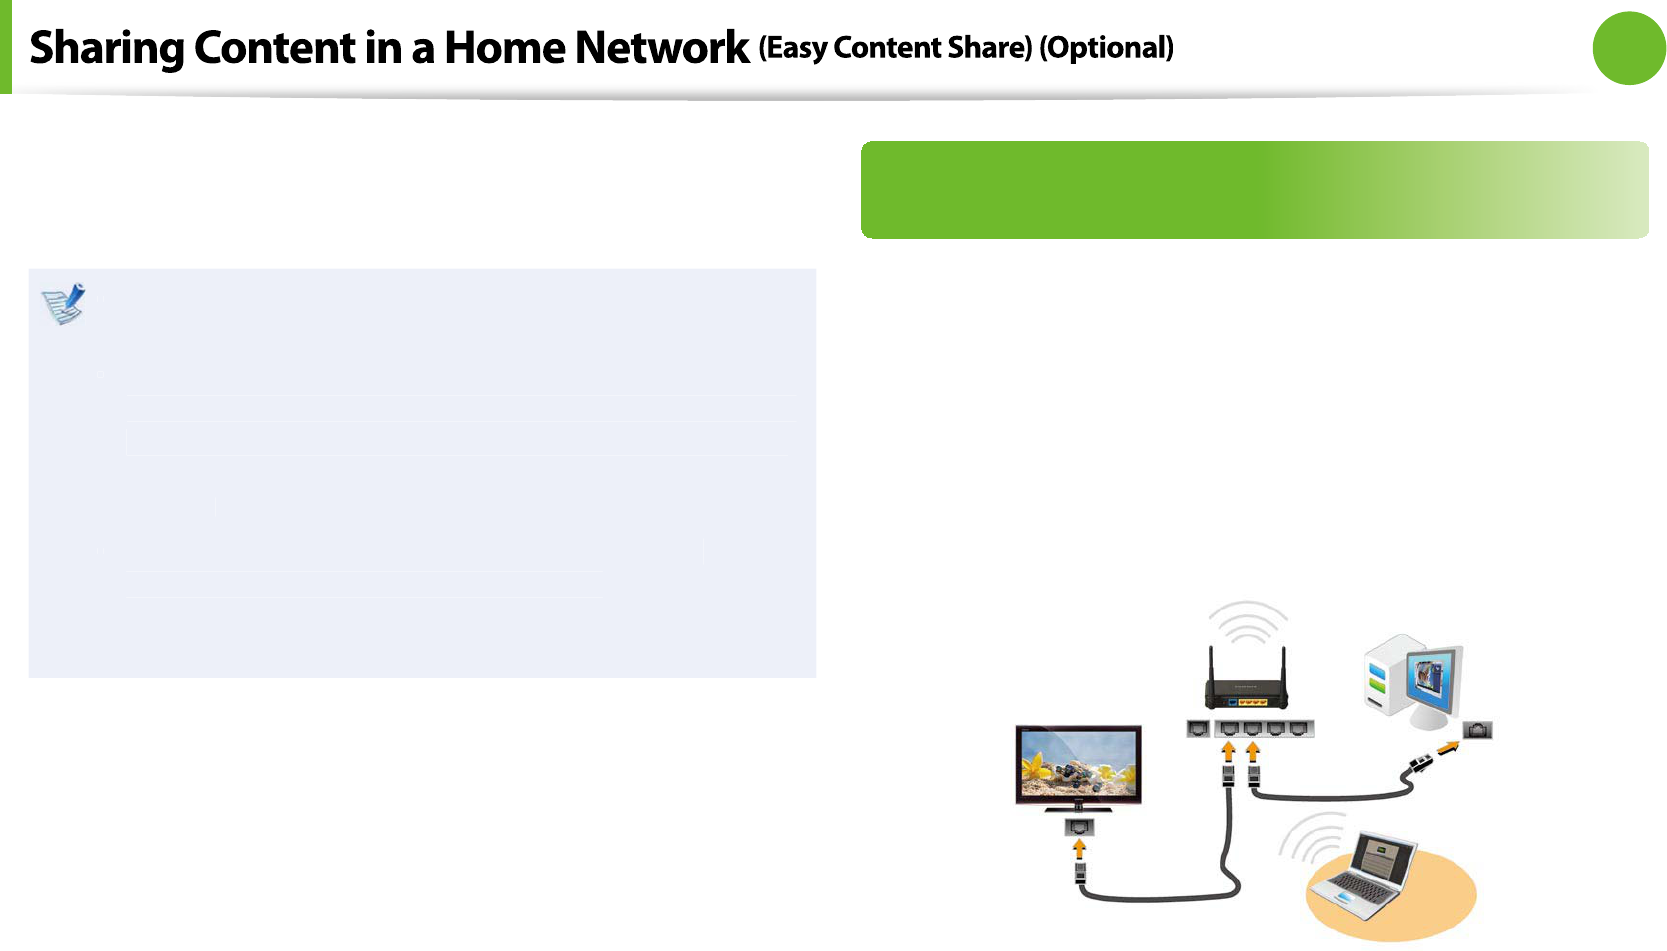
1Connect your computer an
d
TV to an access point t
h
roug
h
a wired or wireless LAN connection, as shown in the
gure
b
e
l
ow
.
[Networ
k
connection
d
iagram
]
2
Con
gure the IP address settings
f
or your computer and TV
.
You must c
h
ec
k
t
h
eO
b
tain an IP a
dd
ress automatica
lly
(DHCP) c
h
ec
kb
ox
.
6
0
Chapter 2
Using the computer
For more in
f
ormation on how to con
gure the IP address
t
f
or your computer, re
f
er to C
h
apter 2. Using t
h
e
Computer > Networ
k
.
For more in
f
ormation on how to con
gure the IP address
t
f
or your TV, re
f
er to the user manual o
f
your TV
.
3
To check whether the network settings have been con
gured
correct
l
y,
d
ou
bl
e-c
l
ic
k
t
h
eEasy Content S
h
ar
e
icon on t
h
e
your computer’s Des
k
top to run t
h
e program
.
(I
f
the program icon does exist on the Windows Desktop,
select the corresponding program
f
rom Start > A
ll
Programs
>
S
amsun
g
.
)
I
f
the connected computer and TV are shown in the program
window, the network settings have been con
gured
success
f
ully
.
Devices t
h
at can s
h
are conten
t
I
f
a connected device is not displayed, re
f
er to C
h
apter 4.
Trou
bl
es
h
ooting > Q&A > Easy Content S
h
are Re
l
ate
d
.
Adding shared content on your computer
Add the videos, photos and music
les that you want to play on
your TV as s
h
are
d
items
.
You can on
l
y p
l
ay s
h
are
d
items on your TV
.
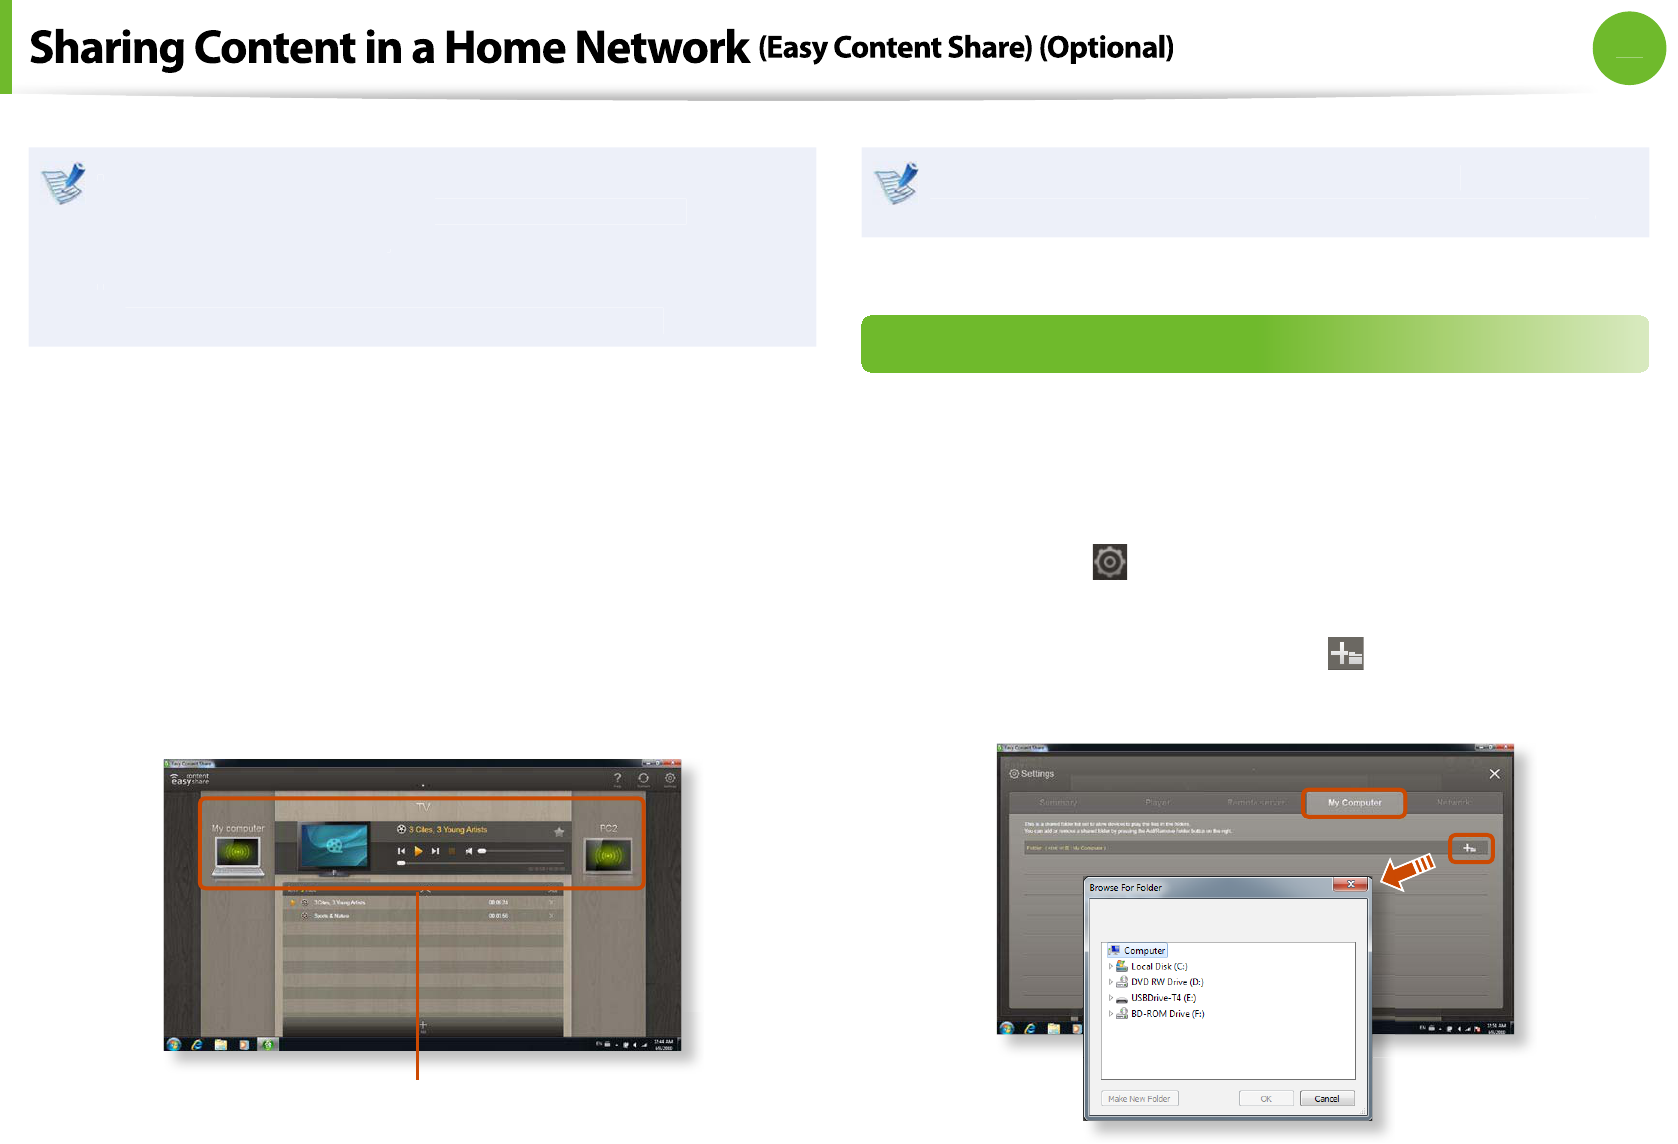
1C
l
ic
k
Sett
i
ng
s
at the top right o
f
Easy Content S
h
ar
e
.
2C
l
ic
k
My computer > A
dd
Fo
ld
e
r
. T
h
e
B
rowse For
Fo
ld
e
r
window appears. Select a
f
older to share and clic
k
OK
.
61
Chapter 2
Using the computer
3
The selected
f
older is added to the shared list
.
P
l
aying content on your TV using your compute
r
A
f
ter you have set photos, videos and music
les as shared items,
you can p
l
ay t
h
em on your TV using your computer
.
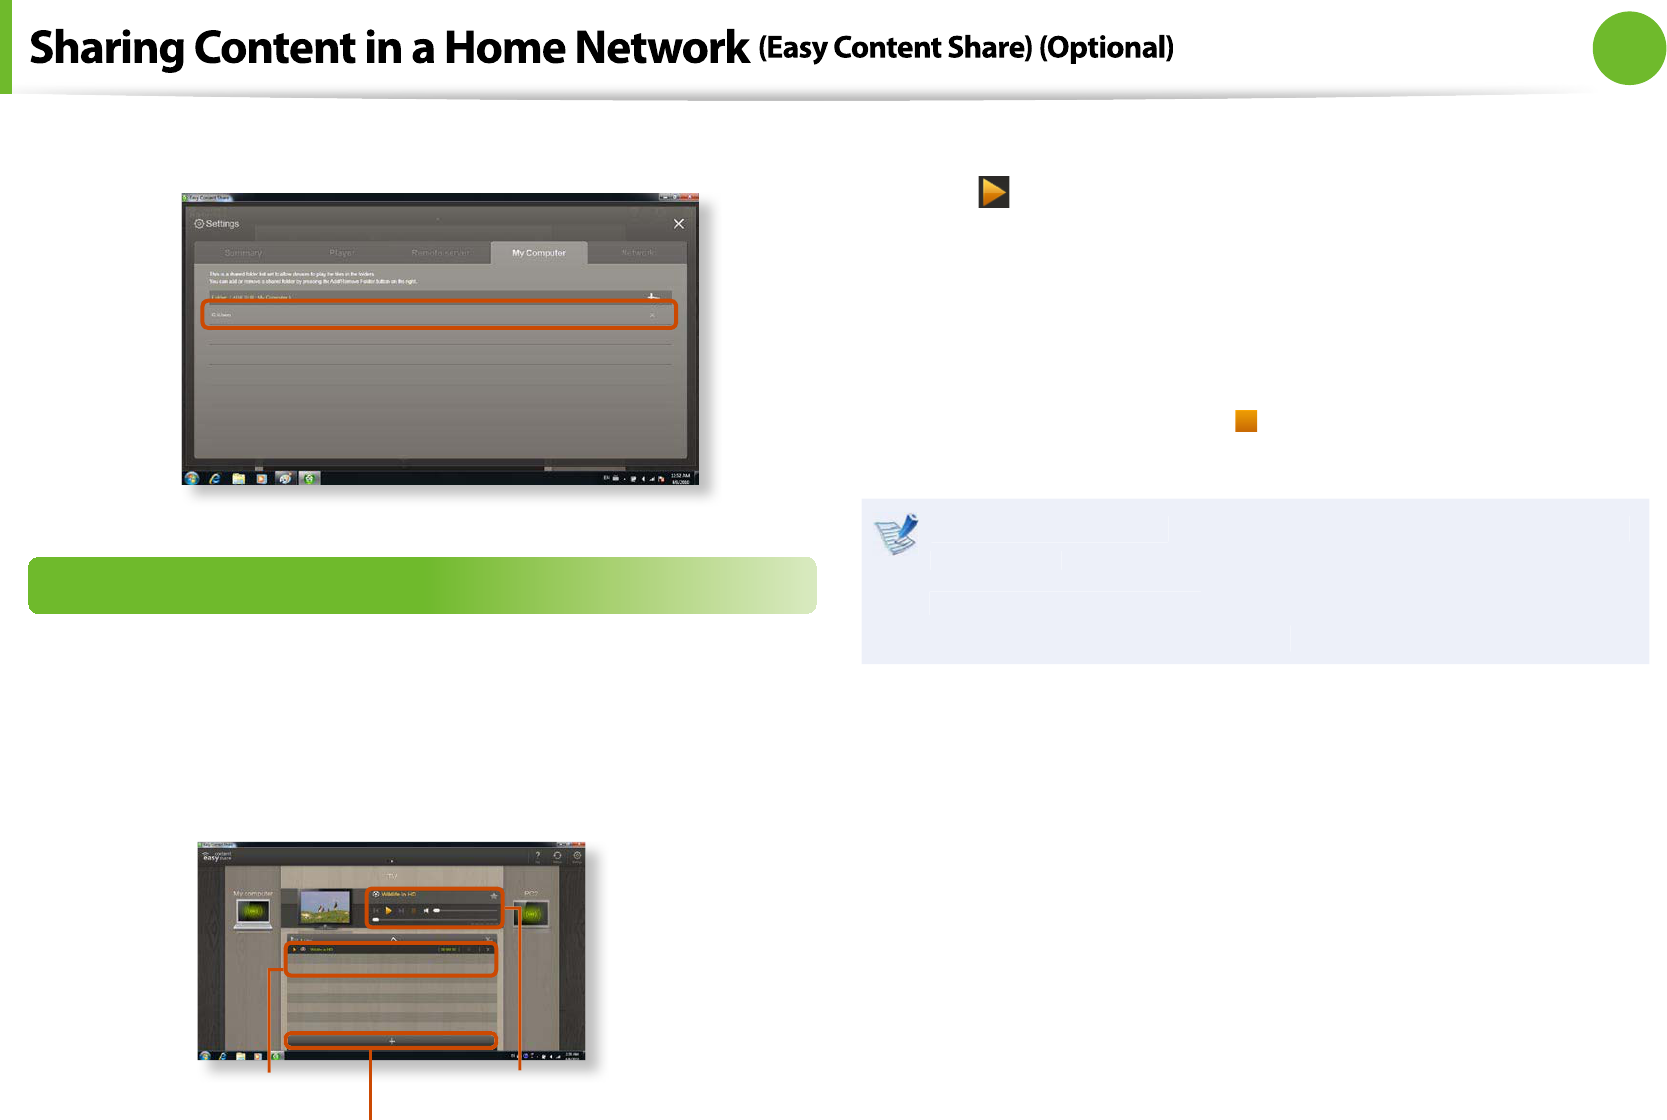
1
I
nEasy Content S
h
ar
e
, se
l
ect t
h
e TV you want to use to p
l
ay
con
t
en
t.
P
l
ay
l
is
t
A
dd
content to p
l
a
y
P
l
ay contro
l
pane
l
2
Se
l
ect t
h
e item you want to p
l
ay in t
h
e p
l
ay
l
ist, an
d
t
h
en c
l
ic
k
P
l
a
y
.
3The selected
le is played on the TV
.
Using t
h
e P
l
ay Contro
l
pane
l
, you can contro
l
t
h
e item
b
eing
p
l
aye
d
on t
h
e TV
.
4
To stop p
l
aying, c
l
ic
k
S
to
p
.
Easy Content S
h
ar
e
d
oes not support su
b
tit
l
es
d
ue to DLNA
constra
i
nts.
To use subtitles, refer to
C
h
apter 4. Trou
bl
es
h
ooting > Q&A
> Eas
y
Content S
h
are Re
l
ate
d
.
6
2
Chapter 2
Using the computer
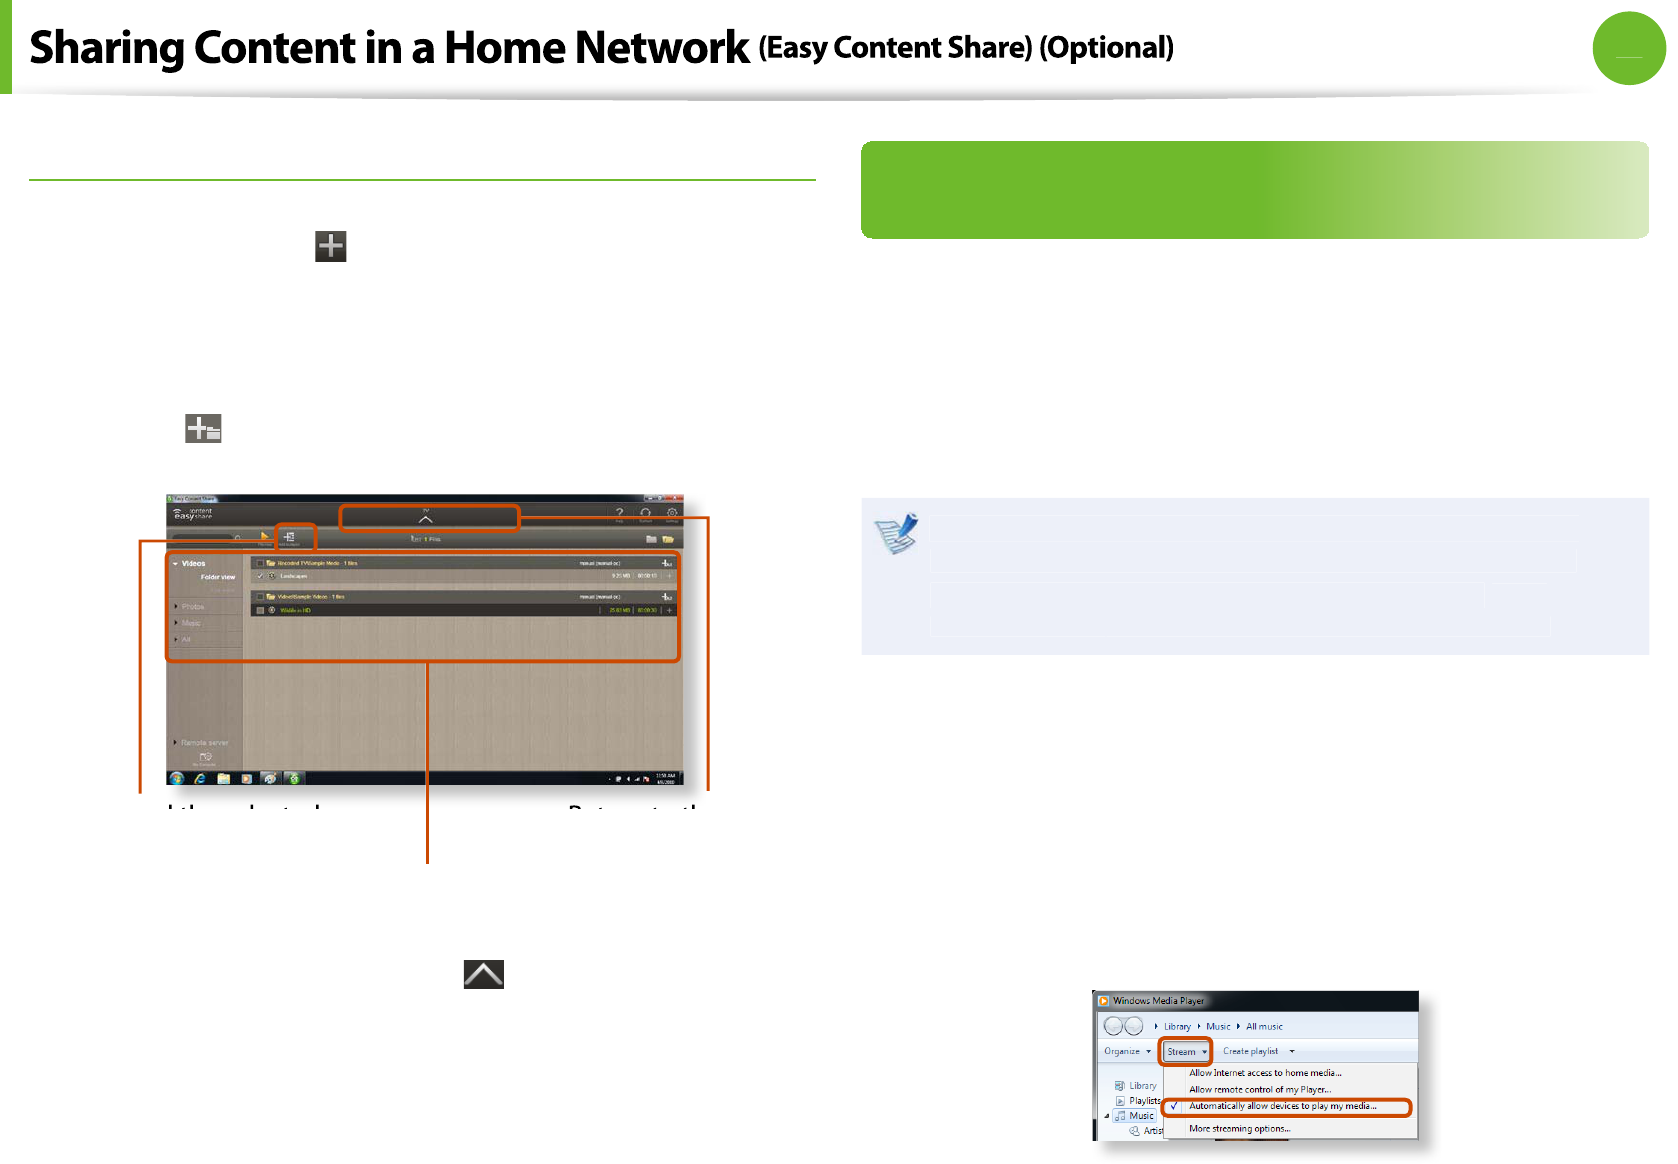
Adding a video, photo or music
le to the playlis
t
1C
l
ic
k
A
dd
Conten
t
in t
h
e P
l
ay
l
ist screen. T
h
e s
h
are
d
content
l
ist is
d
isp
l
aye
d.
2
In the shared content list, check the checkbox in
f
ront o
f
the
item you want to a
dd
to t
h
e p
l
ay
l
ist, an
d
t
h
en c
l
ic
k
A
dd
to
p
l
ay
l
is
t
.
Add the selected
item to t
h
e p
l
ay
l
is
t
Shared content lis
t
Return to the
p
l
ay
l
ist scree
n
3
C
l
ic
k
Return to p
l
ay
l
ist scree
n
.
In the playlist screen, you can
nd that the selected item has
b
een a
dd
e
d
to t
h
e p
l
ay
l
ist
.
Playing the content stored on a computer when
Easy Content Share is not installed
You can also play the videos, photos and music
les stored on a
computer w
h
en Easy Content S
h
ar
e
is not insta
ll
e
d
on your T
V
b
y using Win
d
ows Me
d
ia P
l
aye
r
.
As described in the steps below, con
gure the content sharing
settings to p
l
ay content on your TV
.
The computer containing the shared content (when Easy
Content S
h
are is not insta
ll
e
d
) must
b
e connecte
d
to t
h
e
same access point to w
h
ic
h
t
h
e computer w
h
ere
E
asy
Content S
h
ar
e
is insta
ll
e
d
an
d
t
h
e TV is connecte
d
to
.
Ź
For Win
d
ows Me
d
ia P
l
ayer 1
2
1C
l
ic
k
Start > A
ll
Programs > Win
d
ows Me
d
ia P
l
aye
r
.
2
Cl
i
ck
St
r
eam
a
n
d
check
the
Automatica
ll
y a
ll
ow
d
evices to
p
l
ay my me
d
ia..
.
menu
i
tem
.
63
Chapter 2
Using the computer
3
C
l
ic
k
Start > A
ll
Programs > Accessories > Win
d
ows
Exp
l
ore
r
.
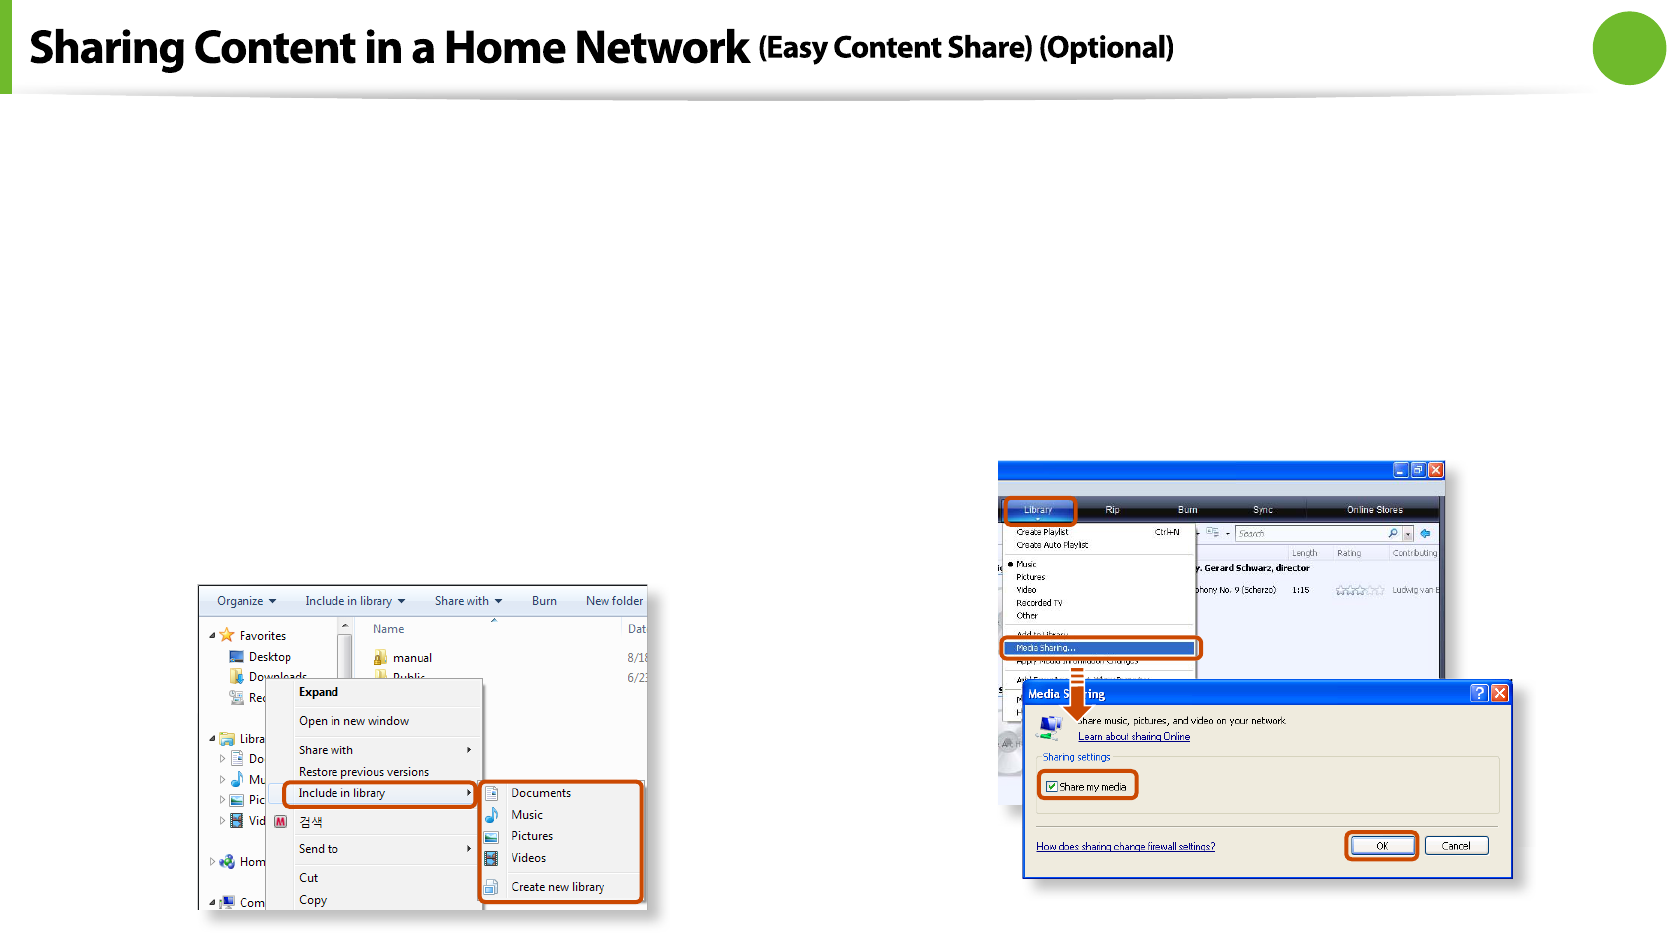
4
Right-click the
f
older to share. From the menu displayed,
point to Inc
l
u
d
e in
l
i
b
rary
.
C
l
ic
k
Vi
d
eos, P
h
oto
s
or
Mus
ic
in t
h
e
d
isp
l
aye
d
su
b
menu,
according to the type o
f
content contained in the selected
f
older
.
I
f
the selected
f
older contains two or more types o
f
content,
you must c
l
ic
k
eac
h
correspon
d
ing menu item
(
Vi
d
eos,
P
h
oto
s
or
Mus
ic
) to register each type o
f
content
.
Ź
For Windows Media Player 1
1
1C
l
ic
k
Start > A
ll
Programs > Win
d
ows Me
d
ia P
l
aye
r
.
2
C
l
ic
k
Li
b
rary > Me
d
ia S
h
arin
g
.
T
h
eMe
d
ia S
h
arin
g
win
d
ow is
d
isp
l
aye
d
. C
h
ec
k
t
h
eS
h
are
my me
d
i
a
c
h
ec
kb
ox an
d
t
h
en c
l
ic
k
OK
.
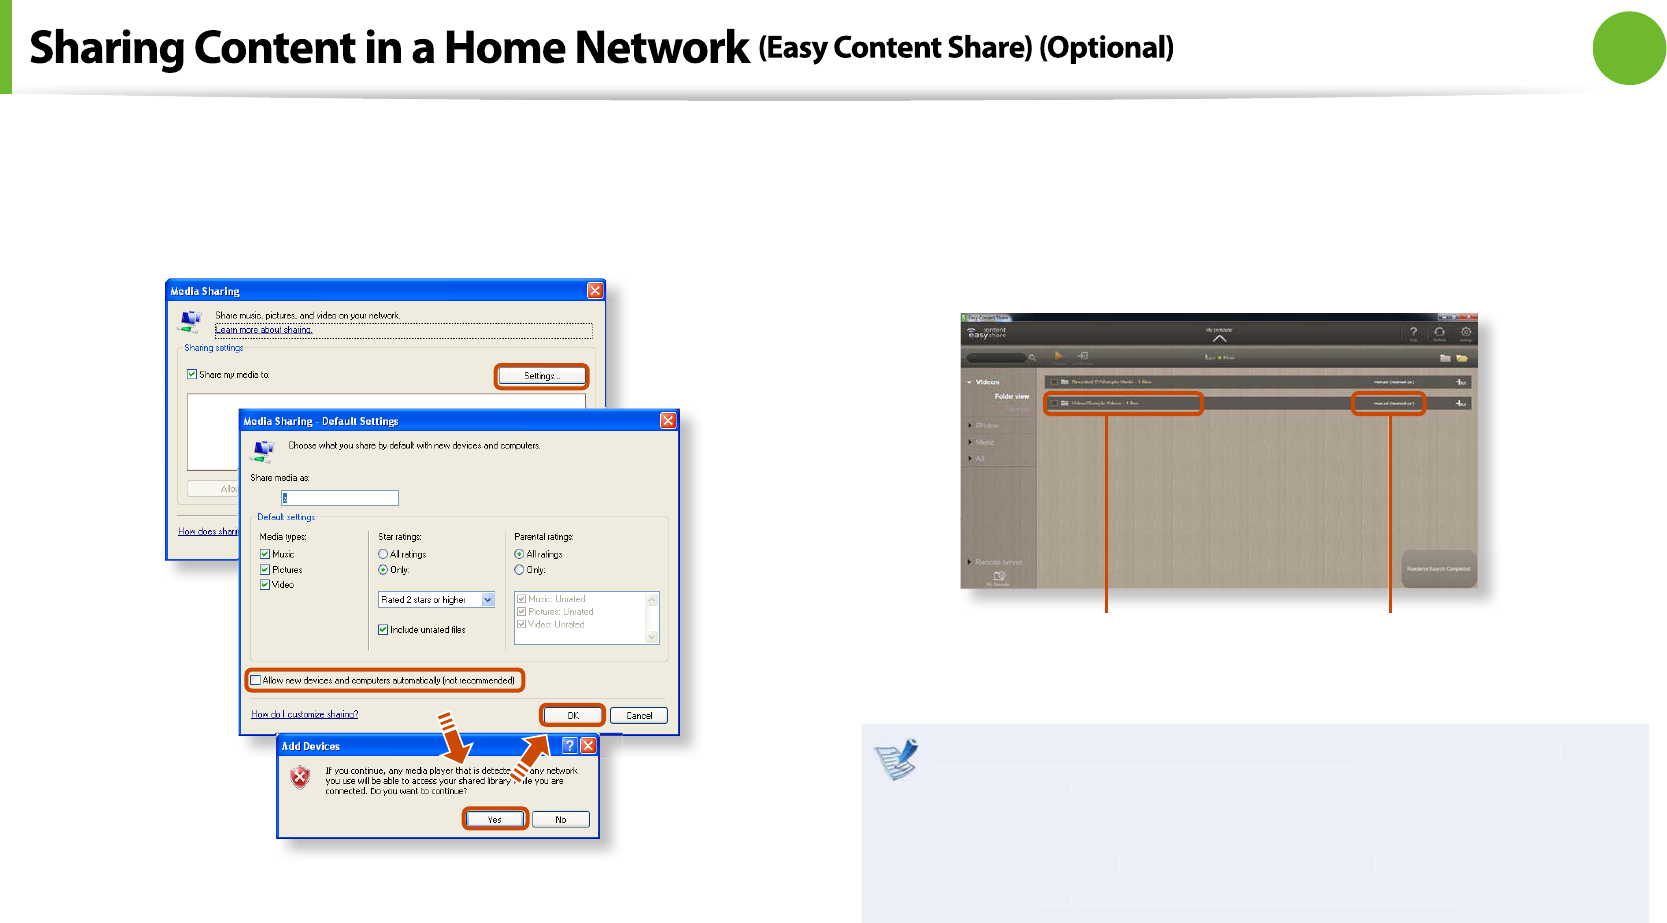
3In t
h
eMe
d
ia S
h
arin
g
win
d
ow, c
l
ic
k
Sett
i
ngs..
.
. T
h
eMe
d
ia
Sharing - De
f
ault Setting
s
win
d
ow is
d
isp
l
aye
d
. C
h
ec
k
t
h
e
A
ll
ow new
d
evices an
d
computers automatica
ll
y (not
recommen
d
e
d)
c
h
ec
kb
ox
.
64
Chapter 2
Using the computer
A popup win
d
ow is
d
isp
l
aye
d
. C
l
ic
k
Y
e
s
. T
h
en c
l
ic
k
OK
in the
K
Media Sharing- De
f
ault Setting
s
win
d
ow an
d
in t
h
eMe
d
ia
S
h
arin
g
win
d
ow
.
A
f
ter the registration has been
nished, you can
nd the
added
f
older is listed in the shared content list o
f
E
asy
Content S
h
ar
e
.
For a shared content item, the name o
f
the computer where
t
h
e item is store
d
is
d
isp
l
aye
d
next to it, a
ll
owing you to
identi
f
y the computer. This is use
f
ul when multiple computers
are provi
d
ing content
.
A
f
older added as a
sha
r
ed
i
tem
The name o
f
the PC where
t
h
e content is store
d
Content s
h
aring is on
l
y avai
l
a
bl
e wit
h
Win
d
ows Me
d
ia
P
l
ayer 1
1
or
l
ate
r
.
I
f
your Win
d
ows Me
d
ia P
l
aye
r
is ear
l
ier t
h
an Win
d
ows
Me
d
ia P
l
ayer 1
1
,
d
own
l
oa
d
an
d
insta
ll
Win
d
ows Me
d
ia
P
l
ayer 1
1
or
l
ate
r
f
rom the Microso
f
t website
.

LCD Brightness Control 66
BIOS Setup 68
Setting a Boot Password 71
Changing the Boot Priority 74
Upgrading Memory 75
Battery 77
Using the Security Lock Port 83
Chapter 3.
Settings and Upgrade
66
Chapter 3
Settings and Upgrade
You can a
d
just t
h
e LCD
b
rig
h
tness in 8
l
eve
l
s
.
The screen brightness is automatically set to the brightest
l
eve
l
(
b
rig
h
tness
l
eve
l
8) w
h
en AC power is connecte
d
an
d
t
h
e
b
rig
h
tness is automatica
ll
y set
d
immer w
h
en t
h
e computer
runs on
b
attery power to exten
d
t
h
e
b
attery use time
.
Controlling the Brightness Using the Keyboard
A
d
just t
h
e LCD
b
rig
h
tness
b
y pressing t
h
e
+
k
ey or t
h
e
+
k
ey
.
T
h
e LCD
b
rig
h
tness can c
h
ange up to 8
l
eve
l
s an
d
t
h
e
b
rig
h
tness
increases
b
y 1
l
eve
l
w
h
en pressing t
h
e
+
k
ey once
.
Maintaining the changed LCD brightness even a
f
ter
t
turning t
h
e computer on agai
n
To maintain t
h
e LCD
b
rig
h
tness set
b
y using t
h
e
b
rig
h
tness
control keys or through the Power Options,
f
ollow the
proce
d
ures
b
e
l
ow
.
Ź
For Win
d
ows
7
1
.
C
l
ic
k
Contro
l
Pane
l
> Har
d
ware an
d
Soun
d
> Power
Opt
i
on
s
.
2
.
C
l
ic
k
C
h
ange t
h
e setting
s
o
f
the currently con
gured
mo
d
e
.
3
.
A
d
just t
h
e
d
isp
l
ay
b
rig
h
tness a
d
justment menu
b
ar an
d
c
l
ic
k
t
h
e
S
ave t
h
e c
h
ange
s
b
utton
.
Ź
For Win
d
ows X
P
1
.
Turn t
h
e computer on an
d
press t
h
e
F2
k
ey w
h
en t
h
e
SAMSUNG
l
ogo appears on t
h
e screen to enter t
h
e BIOS
S
etup
.
2
.
Se
l
ect t
h
e Boot menu an
d
set t
h
eBrig
h
tness Mo
d
e
Contro
l
i
tem to User Contro
l
.
3
.
Press t
h
e
F
1
0
k
ey to save t
h
e settings an
d
exit Setup
.
Saving
b
attery power consumptio
n
t
Decreases t
h
e LCD
b
rig
h
tness w
h
en t
h
e computer
is running on
b
attery power to save
b
attery power
consumpt
i
on
.

67
Chapter 3
Settings and Upgrade
LCD bad pixels principle o
f
laptop compute
r
t
Samsung observes the speci
cations regarding strict
quality and reliability o
f
LCD. But in spite o
f
that, it is
inevitable that there might be a small number o
f
bad
pixels. A large number o
f
bad pixels can cause problems in
appearance, but a small number o
f
pixels doesn’t a
ect the
computer per
f
ormance
.
T
here
f
ore Samsung observes and manages the
f
ollowing
d
ot princip
l
es
:
- Brig
h
t
d
ot : 2 or
l
es
s
- B
l
ac
k
d
ot : 4 or
l
es
s
- Combination o
f
Bri
g
ht and Dark : 4 or les
s
Instructions
f
or Cleaning the LC
D
Clean the LCD panel with a so
f
t cloth lightly moistened with
computer c
l
eansing
d
etergent moving in one
d
irection.
Cleaning the LCD panel with excessive
f
orce can damage the
L
C
D
.
6
8
Chapter 3
Settings and Upgrade
The BIOS Setup enables you to con
gure your computer hardware
accor
d
ing to your nee
d
s
.
Use the BIOS setup to de
ne a boot password, change the
t
b
ooting priority, or a
dd
a new
d
evice
.
S
ince incorrect settings may cause your system to
t
mal
f
unction or crash, take care when con
guring the BIOS
.
The
f
unctions o
f
the BIOS setup are subject to change
f
or
t
product
f
unction enhancement purposes
.
The BIOS Setup menus and items may di
er depending on
t
your computer mo
d
e
l.
Entering the BIOS Setup
1Turn t
h
e computer on
.
2W
h
en t
h
e
b
ooting screen (SAMSUNG
l
ogo) appears, press t
h
e
F2
k
ey to enter t
h
e BIOS Setup
.
Press t
h
e
F
1
2
k
ey w
h
i
l
e t
h
e
b
ooting screen(SAMSUNG
l
ogo)
appears, the system will try to boot
f
rom the network
.
3A
f
ter a moment, the BIOS setup screen appears.
The items in the BIOS setup may di
er depending on the
pro
d
uct
.
69
Chapter 3
Settings and Upgrade
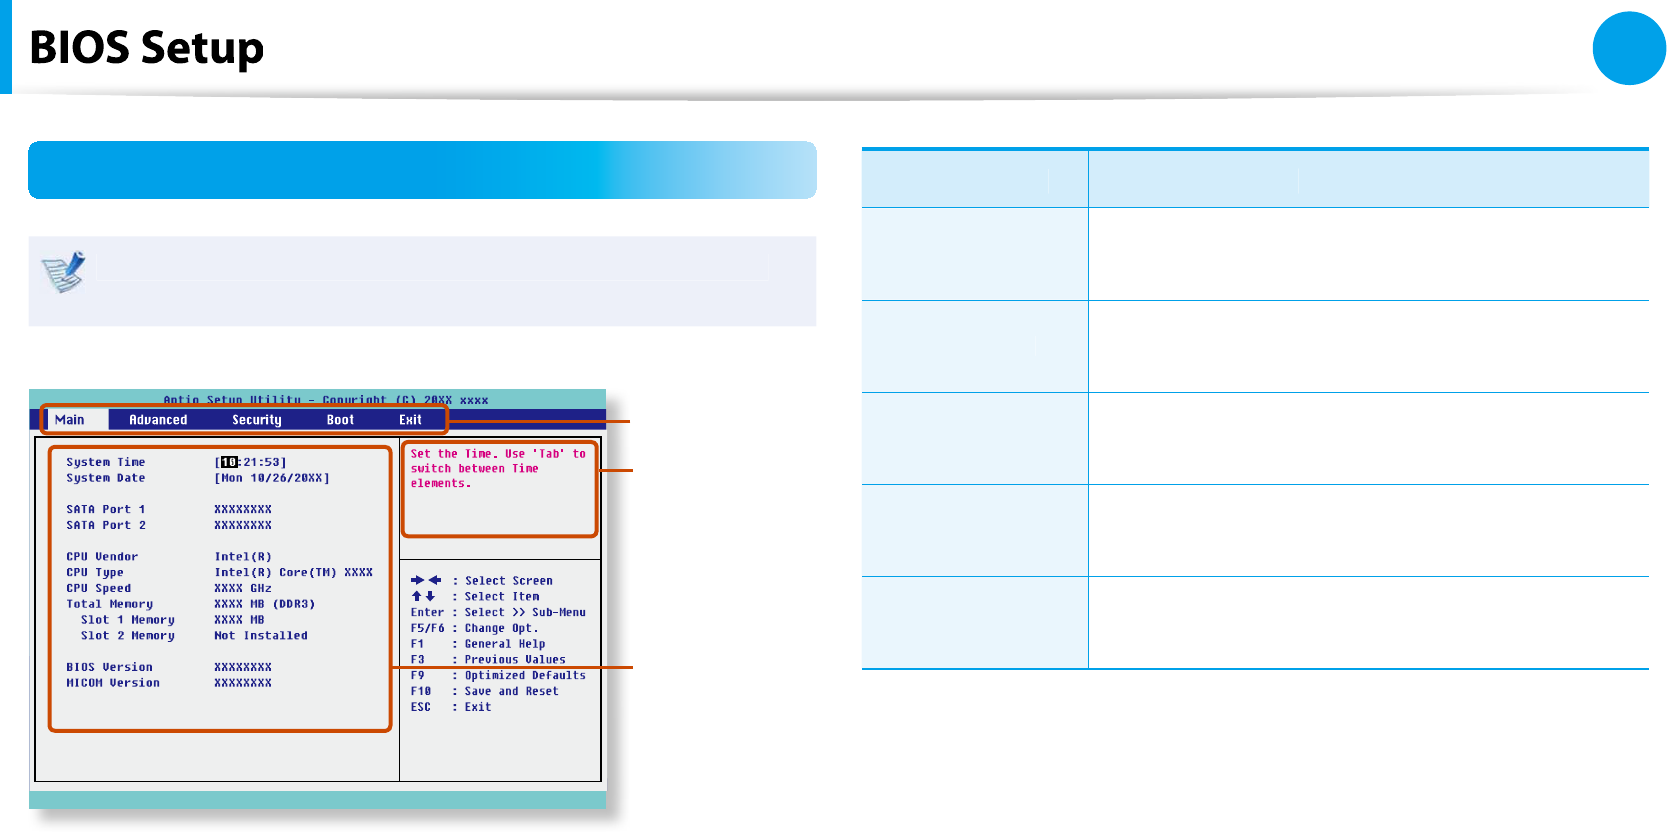
The BIOS Setup Screen
The BIOS Setup menus and items may dier depending on
your computer mo
d
e
l.
S
etup Men
u
S
etup Item
s
He
lp
Help
f
or the
se
l
ecte
d
i
tem appears
automatica
ll
y
.
S
etup Men
u
Descr
i
pt
i
on
Main Use
d
to c
h
ange t
h
e
b
asic system an
d
env
i
ronment sett
i
ngs
.
A
d
vance
d
Used to con
gure advanced
f
unctions on your
computer
f
or devices and chipsets
.
Security Used to con
gure security
f
unctions, including
passwor
d
s
.
Boot Use
d
to set t
h
e
b
oot priority an
d
ot
h
er
b
oot
opt
i
ons
.
Exit Use
d
to exit t
h
e Setup eit
h
er saving t
h
e
c
h
anges or not
.
7
0
Chapter 3
Settings and Upgrade
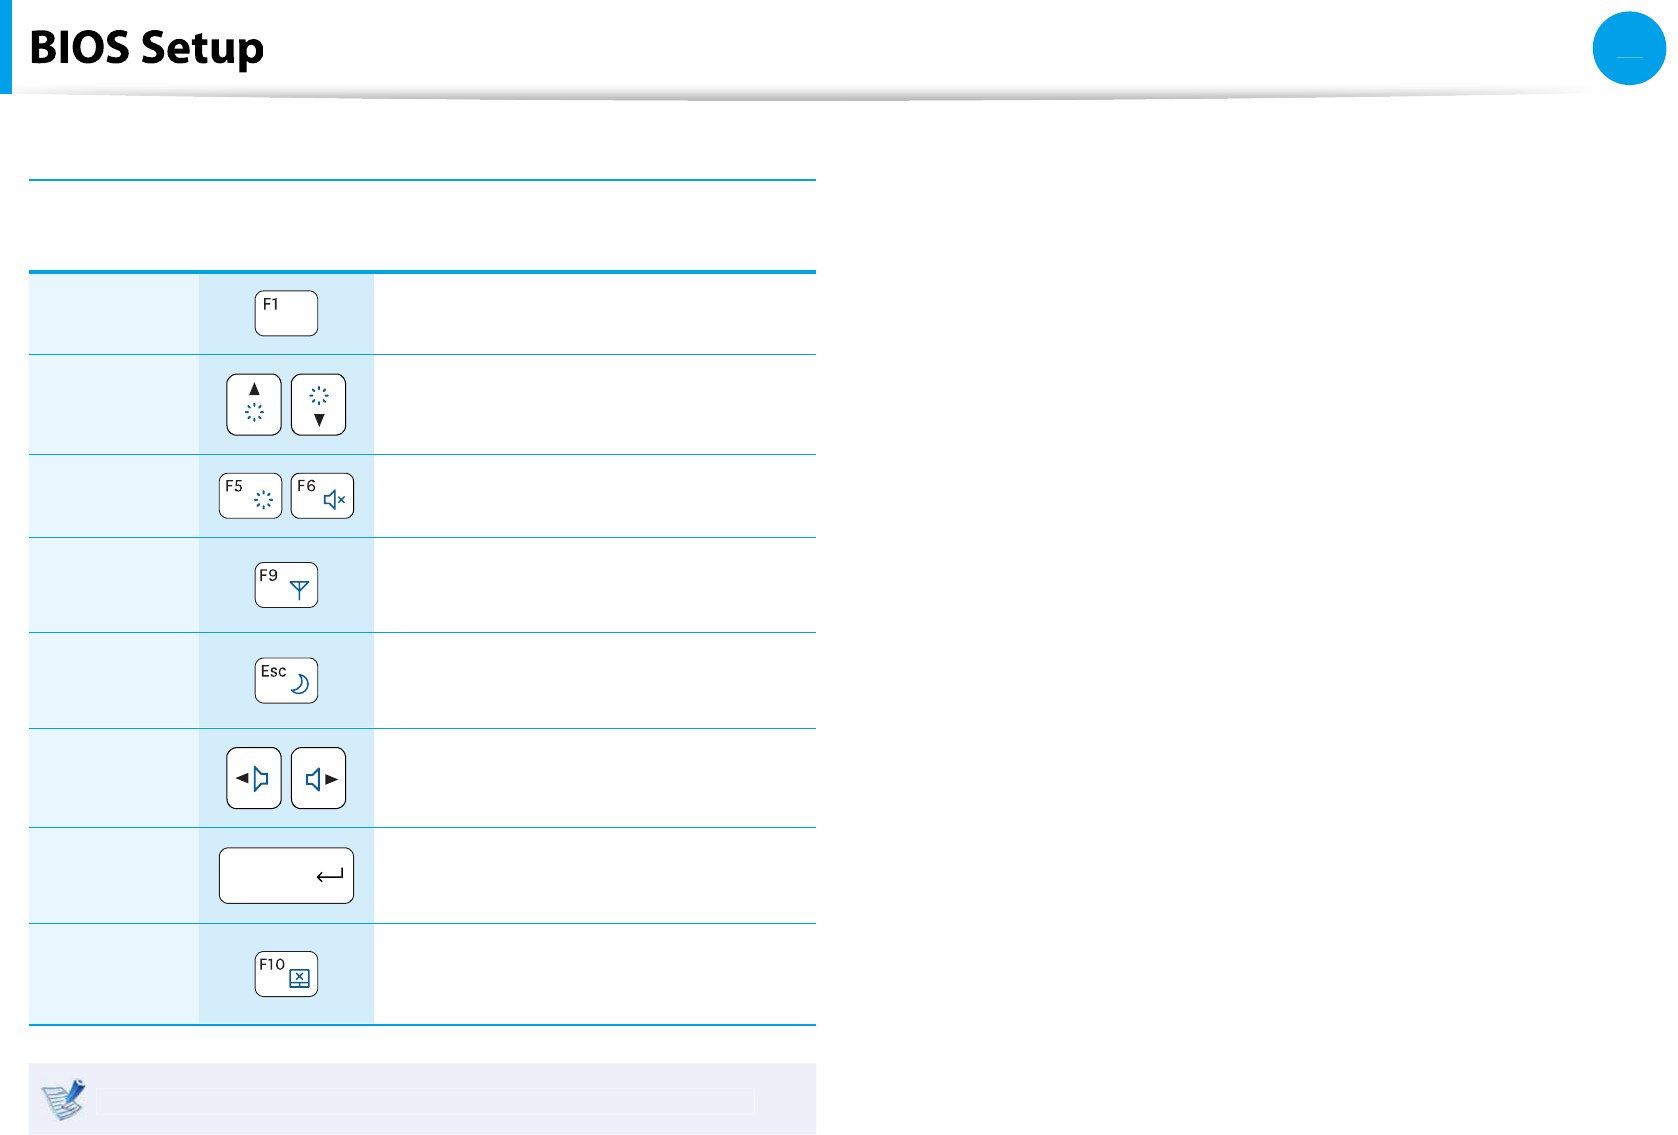
S
ystem
S
etup Key
s
In t
h
e Setup,
y
ou
h
ave to use t
h
e
k
e
yb
oar
d.
F1 Press to view t
h
e Setup He
l
p
.
Up & Down
Keys Press to move up an
d
d
own
.
F5/F6 Press to c
h
ange t
h
e item va
l
ue
.
F9 Press to load the de
f
ault Setup
sett
i
ngs
.
ESC Press to return to a
h
ig
h
er
l
eve
l
menu or to move to t
h
eEx
it
men
u
.
Left & Right
Keys Press to move to anot
h
er menu
.
Enter Press to se
l
ect an item or to enter a
su
b
menu
.
F10 Press to save t
h
e c
h
anges an
d
exit
S
etup
.
The keyboard image may dier from the actual keyboard.
71
Chapter 3
Settings and Upgrade
W
h
en setting a passwor
d
, you
h
ave to enter a passwor
d
to use t
h
e
computer or enter t
h
e BIOS Setup.
By con
guring a password, you can restrict system access to
authorized users only and protect data and
les saved on the
compu
t
er
.
Do not lose or
f
orget your password.
t
I
f
you have
f
orgotten your password, contact a Samsung
t
service center. In this case, a service
f
ee will be charged
.
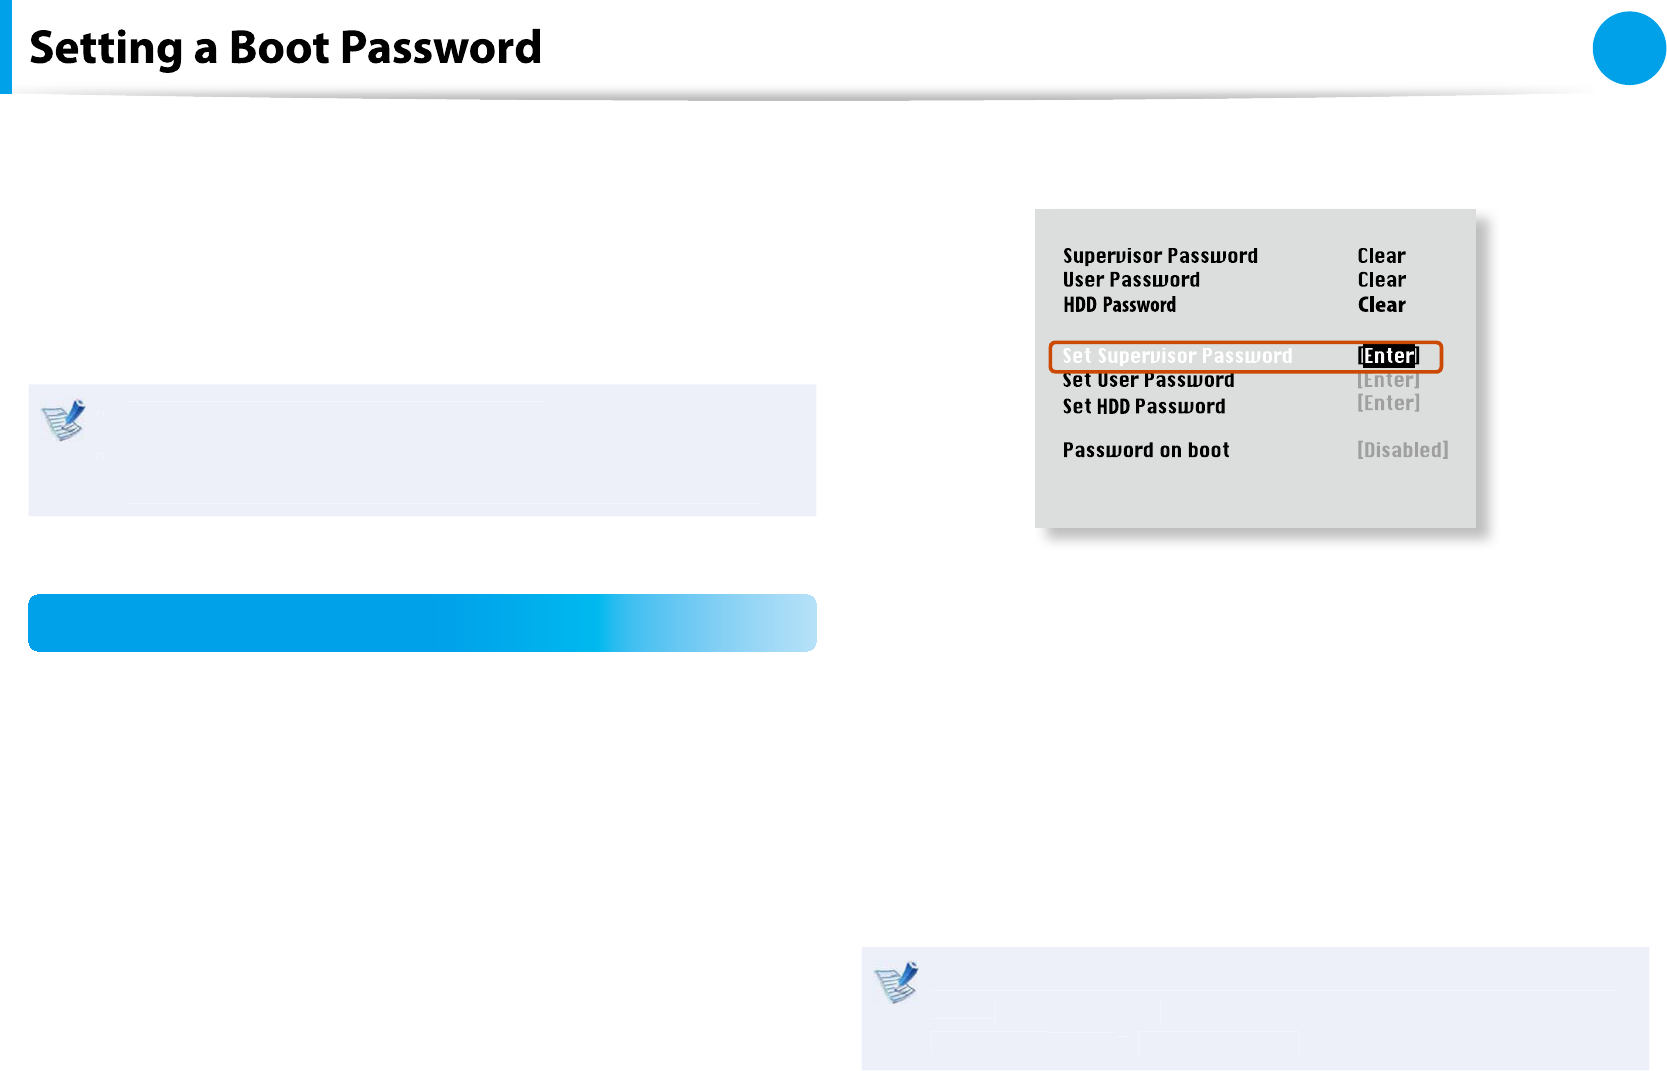
Setting a Supervisor Password
A Supervisor Passwor
d
is require
d
to turn t
h
e computer on or to
start t
h
e System Setup
.
W
h
en setting a Supervisor Passwor
d
, users ot
h
er t
h
an a supervisor
cannot use t
h
e computer
.
1
Se
l
ect t
h
eSecur
i
t
y
menu in t
h
e BIOS Setup
.
2
In t
h
eSet Supervisor Passwor
d
i
tem, press
<
E
nte
r
>.
3Enter a passwor
d
, press
<
E
nte
r
>, re-enter the password
f
or
con
rmation, and press
<
E
nte
r
> aga
i
n
.
Th
e passwor
d
can
b
e up to 8 a
l
p
h
anumeric c
h
aracters.
Specia
l
c
h
aracters are not a
ll
owe
d.
4
T
h
e supervisor passwor
d
h
as
b
een set.
Th
e supervisor passwor
d
is require
d
to turn t
h
e computer on
or to enter t
h
e BIOS Setup
.
For some models, i
f
the password entered message appears
in t
he
Setup Not
i
c
e
win
d
ow, t
h
e settings are not comp
l
ete
unti
l
t
h
e
<
E
nte
r
>
k
ey is presse
d.

7
2
Chapter 3
Settings and Upgrade
Sett
i
n
g
a
Use
r P
ass
w
o
r
d
Users can start t
h
e system wit
h
a user passwor
d
,
b
ut cannot enter
the System Setup. By doing this, you can prevent other users
f
rom
entering
S
etup
.
Be
f
ore con
guring a user password, a supervisor passwor
d
mus
t
have been con
gured. Deactivating the supervisor password also
d
eactivates t
h
e user passwor
d.
In t
h
eSet User Passwor
d
i
tem, press
<
E
nte
r
>
an
d
comp
l
ete t
h
e
procedures
f
rom Step 3 o
f
Setting a Supervisor Password
.
Setting Up a Boot Passwor
d
To setup a
b
oot passwor
d
, t
h
e a
d
ministrator passwor
d
(
S
et
Supervisor Passwor
d
) s
h
ou
ld
b
e set in a
d
vance
.
Set t
h
ePasswor
d
on
b
oo
t
i
tem to Ena
bl
e
d
.
Once a
b
oot passwor
d
is set, you
h
ave to enter a passwor
d
to
b
oot
up t
h
e computer
.
Setting up a Hard Disk Drive Password
(Optional)
A supervisor passwor
d
must
b
e set using t
h
e Set Supervisor
Passwor
d
menu
.
I
f
you set a password
f
or a hard disk drive, it cannot be accessed
f
rom another computer
.
P
ress
<
E
nte
r
> in t
h
eSet HDD Passwor
d
item and de
ne a
password as described in Step 3 o
f
the Setting up the Supervisor
Passwor
d.
The hard disk drive password setting
f
unction is not
t
provided
f
or some models
.
C
h
anging t
h
e
h
ar
d
d
is
k
d
rive passwor
d
t
For security purposes, you can on
l
y c
h
ange a
h
ar
d
d
is
k
drive password a
f
ter restarting the computer by pressing
t
h
e computer
P
owe
r
b
utton
.
I
f
you cannot change the hard disk drive password or the
H
DD Passwor
d
Froze
n
message appears w
h
en entering
t
h
e BIOS Setup an
d
t
h
en se
l
ecting Secur
i
ty > HDD
P
asswor
d
, press t
h
e
P
owe
r
b
utton to turn t
h
e computer
on aga
i
n
.

73
Chapter 3
Settings and Upgrade
Deactivating the Password
1
P
ress
<
E
nte
r
> on t
h
e passwor
d
to
b
e
d
eactivate
d
. For
examp
l
e, to
d
eactivate a supervisor passwor
d
in t
h
e
S
et
Supervisor Passwor
d
i
tem, press
<
E
nte
r
>.
2
In t
h
eEnter Current Passwor
d
item, enter t
h
e current
l
y
con
gured password and press
<
Ente
r
>.
3
Leave t
h
eEnter New Passwor
d
item
eld empty, and press
<
E
nte
r
>.
4
Leave t
h
eCon
rm New Passwor
d
eld empty, and press
<
E
nte
r
>.
T
h
e passwor
d
is
d
eactivate
d.
For some models the password is only canceled i
f
the
<
E
nte
r
>
k
ey is presse
d
in t
h
eSetup Not
i
c
e
win
d
ow
.

74
Chapter 3
Settings and Upgrade
This computer is con
gured to boot
f
rom an external-type ODD
rst. As an example, the procedures to change the highest boot
priority
d
evice to t
h
e
h
ar
d
d
is
k
d
rive are
d
escri
b
e
d
b
e
l
ow
.
The screen images in this document may dier from actual
pro
d
uct
.
1Se
l
ect t
h
e
B
oo
t
menu in t
h
e BIOS Setup
.
2
P
ress
<
E
nte
r
> on t
h
eBoot Dev
i
ce Pr
i
or
i
t
y
i
tem
.