Broadcom BRCM1051 802.11g/Draft 802.11n WLAN + BT PCI-E User Manual Manual 4
Broadcom Corporation 802.11g/Draft 802.11n WLAN + BT PCI-E Manual 4
Broadcom >
Contents
- 1. User manual
- 2. OEM installation guide
- 3. Host user manual 1 of 5
- 4. Host user manual 2 of 5
- 5. Host user manual 3 of 5
- 6. Host user manual 4 of 5
- 7. Host user manual 5 of 5
- 8. User Manual
- 9. OEM installation Guide
- 10. Akashi User Manual
- 11. Gucci Users Manual
- 12. User manual 1 of 3
- 13. User manual 2 of 3
- 14. User manual 3 of 3
- 15. Host useer manual
Host user manual 4 of 5

81
Chapter 3
Settings and Upgrade
Usage Mode o
f
Samsung Battery Manage
r
t
-
T
h
e maximum
b
attery mo
d
e optimizes t
h
e system
operation spee
d
to increase t
h
e
b
attery run time, so t
h
e
program execution time may get
l
onger
.
-
I
f
you change the power settings, the properties in
P
ower
Opt
i
on
s
win
d
ow wi
ll
a
l
so
b
e c
h
ange
d.
-
Comp
l
ete, insta
ll
Samsung Battery Manager using t
h
e
System So
f
tware Medi
a
in or
d
er to use t
h
e genera
l
mo
d
e
.
Extending the Battery Li
f
e (Optional
)
The Battery Li
f
e Extender is a battery power management
program that enables extending the battery li
f
e. Users can change
t
h
e settings
d
epen
d
ing on t
h
eir requirements
.
The Battery Life Extender is optional and may not be supplied
d
epen
d
ing on t
h
e mo
d
e
l.
1
C
l
ic
k
Start > All Programs > Samsung > Battery Li
f
e
Extender > Battery Li
f
e Extende
r
.
2
When the
f
ollowing screen appears, select a mode and clic
k
t
h
e
OK
button. You can use the battery in the selected mode.
K
Battery Norma
l
Mo
de
Battery Li
f
e
Extension Mo
de
(Battery Li
f
e Extension Mode
)
Battery Norma
l
Mode
This mode maintains 100% o
f
the battery
c
h
arge w
h
en using t
h
e computer on AC power.
In t
h
is case, a
l
t
h
oug
h
t
h
e
b
attery use time
increases, the battery li
f
e is reduced
.
Battery Li
f
e
Extension Mo
de
This mode maintains 80% o
f
the battery charge
w
h
en using t
h
e computer on AC power. In t
h
is
case, a
l
t
h
oug
h
t
h
e
b
attery use time
d
ecreases,
the battery li
f
e is extended.
Press t
h
e
F2
k
ey w
h
en t
h
e Samsung
l
ogo appears in t
h
e
b
ooting sequence to enter t
h
e BIOS Setup, se
l
ect A
d
vance
d
> Battery Li
f
e Cycle Extensio
n
, an
d
set it to En
able
.
T
he
n
you can use the battery li
f
e cycle extension mode.
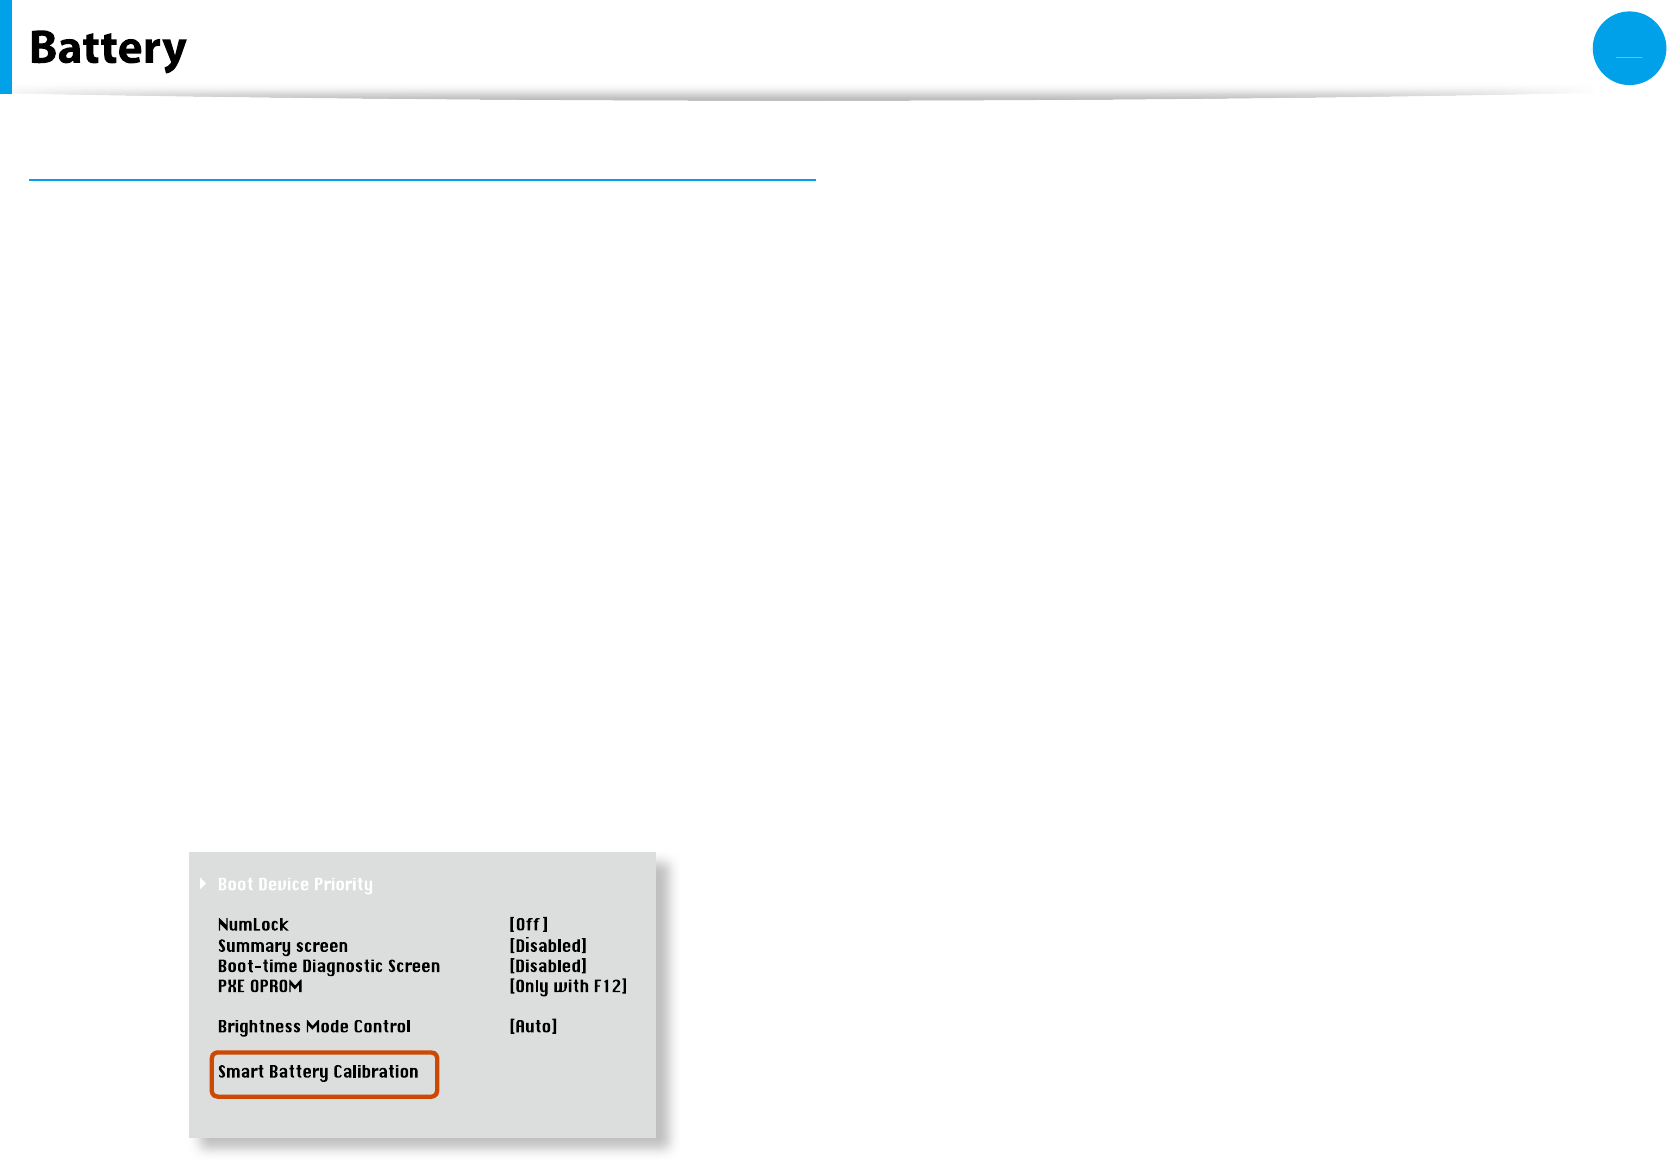
82
Chapter 3
Settings and Upgrade
Using t
h
e Battery Ca
l
i
b
ration Functio
n
When charging/discharging the battery repeatedly
f
or a short time
only, the battery usage time may be reduced by the di
erence
b
etween t
h
e actua
l
b
attery c
h
arge an
d
t
h
e remaining c
h
arge
d
isp
l
ay
.
In t
h
is case, t
h
e actua
l
b
attery c
h
arge an
d
t
h
e remaining c
h
arge
d
isp
l
ay wi
ll
b
e t
h
e same
b
y
d
isc
h
arging t
h
e
b
attery comp
l
ete
l
y
using the Batter
y
Calibration
f
unction, and then recharging it
a
g
a
i
n
.
1Disconnect the AC power adapter a
f
ter turning o
the
compu
t
er
.
2
Restart your computer an
d
press t
h
e
F2
b
utton w
h
en t
h
e
Samsung
l
ogo appears, to start t
h
e BIOS Setup
.
3
Move to t
h
eBoot > Smart Battery Ca
l
i
b
ratio
n
i
tem us
i
ng
t
h
e
d
irection
k
eys an
d
press
<
E
nte
r
>.
4Highlight Ye
s
in the Battery Calibration Con
rmatio
n
win
d
ow an
d
press
<
E
nte
r
>.
The Battery Calibration
f
unction is activated and the battery
is
f
orce
f
ully discharged. To stop the operation, press the
<
E
s
c
>
b
utton
.
T
h
is operation requires 3~5
h
ours
d
epen
d
ing on t
h
e
b
attery
capacity an
d
t
h
e remaining
b
attery c
h
arge
.
83
Chapter 3
Settings and Upgrade
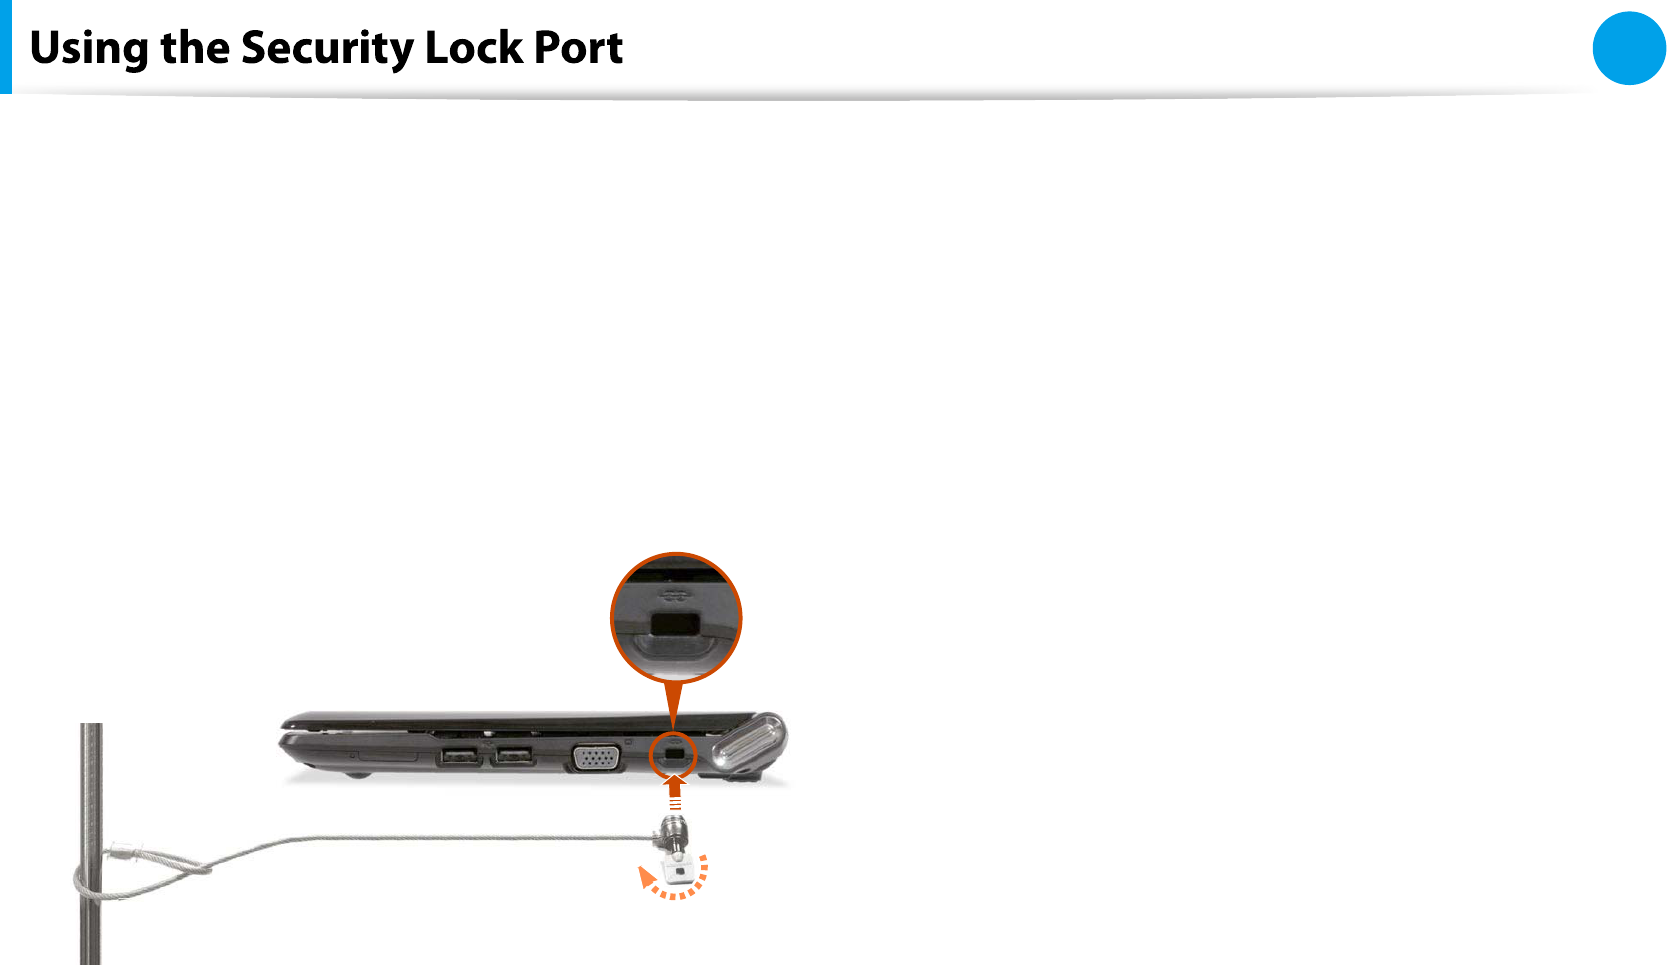
You can connect a Kensington lock to the Security Lock port to
prevent your computer
f
rom being stolen when you have to use
t
h
e computer in a pu
bl
ic p
l
ace
.
To use this
f
eature, you have to purchase the Kensington loc
k
additionally. To use the Kensington lock, re
f
er to the product
manua
l.
Tie the Kensington lock cable to a
xed object and install the
other end o
f
the cable to the Security Lock port
.

Chapter 4.
Troubleshooting
Computer Backup/Restoration
(Samsung Recovery Solution /
For supported models only) 85
Browse Q&A 96
Q & A 98
Display Related 98
Sound Related 100
Wireless Network (WLAN) Related 102
Game and Program Related 102
Bluetooth (Optional) 104
Easy Content Share Related 106
85
Chapter 4
Troubleshooting
Computer Backup/Restoration
Samsung Recovery So
l
ution is a program t
h
at ena
bl
es restoring
or backing up the hard disk drive
f
or when a problem occurs with
t
h
e computer
.
Samsung Recovery So
l
ution may not
b
e provi
d
e
d
or t
h
e
t
version may di
er depending on the model. In addition,
some
f
unctions may not be provided or may di
er
d
epen
d
ing on t
h
e version
.
For more in
f
ormation on using Samsung Recovery
Solution, please re
f
er to the online help o
f
the program
.
The screen images in this document may di
er
f
rom actual
t
pro
d
uct
.
I
f
your computer does not have an internal ODD, you need
t
an externa
l
ODD connecte
d
to your computer to use t
h
e
Bac
k
up Function or Restore Function using DVDs
.
The System So
f
tware
f
unction may not be provided
t
d
epen
d
ing on t
h
e program version
.
Samsung Recovery Solution Functions
Bac
k
up/Restore Function
s
Backup Function
Backs up drive C or required folders and les.
Comp
l
ete Bac
k
u
p
t
Bac
k
s up
d
rive C
.
Data Bac
k
u
p
t
Backs up important
f
olders and
les
.
A problem
occurs
VIRUS
Restore Function
Restores major Windows les, drive C, or
folders and les to the previous state.
Bas
i
c Restor
e
t
Restores onl
y
major Windows
les in a short
ti
m
e.
Complete Restor
e
t
Restores
d
rive C to t
h
e previous, norma
l
s
t
a
t
e
.
Data Restoret
Restores important
les or
f
olders to the
previous
l
y
b
ac
k
e
d
up state
.

86
Chapter 4
Troubleshooting
System So
f
tware Function
s
Samsung Recovery Solution provides system so
f
tware so that
you can reinstall or copy the device drivers and system so
f
tware
necessary
f
or normal operations onto a separate storage device
.
Restore Funct
i
o
n
Not on
l
y can you use Samsung Recovery So
l
ution w
h
en Win
d
ows
is running,
b
ut a
l
so w
h
en you are una
bl
e to
b
oot up into Win
d
ows.
Let’s
l
earn
h
ow to use Samsung Recovery So
l
ution
.
Optional
f
unctions such as Initial State Image, Initial Status Backup,
an
d
Partitioning are on
l
y avai
l
a
bl
e in some mo
d
e
l
s
.
Partition Setup & Initia
l
Status Bac
k
u
p
I
f
you turn your computer on
f
or the
rst time, the Initial Status
Backup
f
unction is per
f
ormed a
f
ter registering Windows. This
f
unction saves an image o
f
the Initial Status o
f
the C drive to a
secure
l
ocation so t
h
at users can restore t
h
e computer to t
h
e
Initial Status using the Complete Restore
f
unction. An Initial Status
Backup is only per
f
ormed once immediately a
f
ter the computer is
purc
h
ase
d.
1
I
f
you turn the power on
f
or the
rst time, the Register
Windows screen appears. I
f
you register Windows according
to t
h
e instructions on t
h
e screen, t
h
e computer wi
ll
b
e
restarte
d.
2A
f
ter the computer has been restarted, the
P
art
i
t
i
on Setu
p
s
c
reen
appears
.
To resize t
h
e C an
d
D
d
rives, a
d
just t
h
e partition size using
t
h
e s
l
i
d
e
b
ar an
d
t
h
e c
l
ic
k
N
ex
t
.
The Partition Setup function is only available when the
computer is turned on
f
or the
rst time and will not
be available a
f
terwards. Once you have completed the
partitioning, it cannot be resized. Partition the disk care
f
ull
y.
3T
h
eInitia
l
Status Bac
k
u
p
s
c
reen
appears
.
T
o continue the Initial Status Backup, clic
k
R
estart No
w
. The
computer wi
ll
restart
.
4The Initial Status Backup is per
f
ormed to backup the initial
status o
f
the C drive to a secure location. This backup image
is used
f
or the Complete Restore
f
unction that restores your
computer to t
h
e initia
l
status
.
5W
h
en t
h
e Initia
l
Status Bac
k
up is comp
l
ete, restart Win
d
ows
.
Computer Backup/Restoration
87
Chapter 4
Troubleshooting
Restoring t
h
e compute
r
Restore is a
f
unction that enables restoring the computer to a
save
d
point w
h
en t
h
e computer was purc
h
ase
d
or a user-save
d
po
i
nt
.
The Restore
f
unction provides the Basic Restore and Complete
R
estore options
.
1
– W
h
en Win
d
ows is running
:
C
l
ic
k
Start > A
ll
Programs > Samsung > Samsung
Recovery Solution > Samsung Recovery Solutio
n
.
– W
h
en Win
d
ows
d
oes not start
:
Turn t
h
e computer on an
d
press t
h
e
F4
k
ey w
h
en t
h
e
b
oot
screen (SAMSUNG logo) appears. A
f
ter a moment, the
computer
b
oots up in Restoration mo
d
e an
d
t
h
e Samsung
Recovery So
l
ution screen appears
.
For computers supporting the touch screen
f
unction, the
touch screen
f
unction does not work during Restore Mode. In
t
h
is case, p
l
ease use t
h
e touc
h
pa
d
or mouse
.
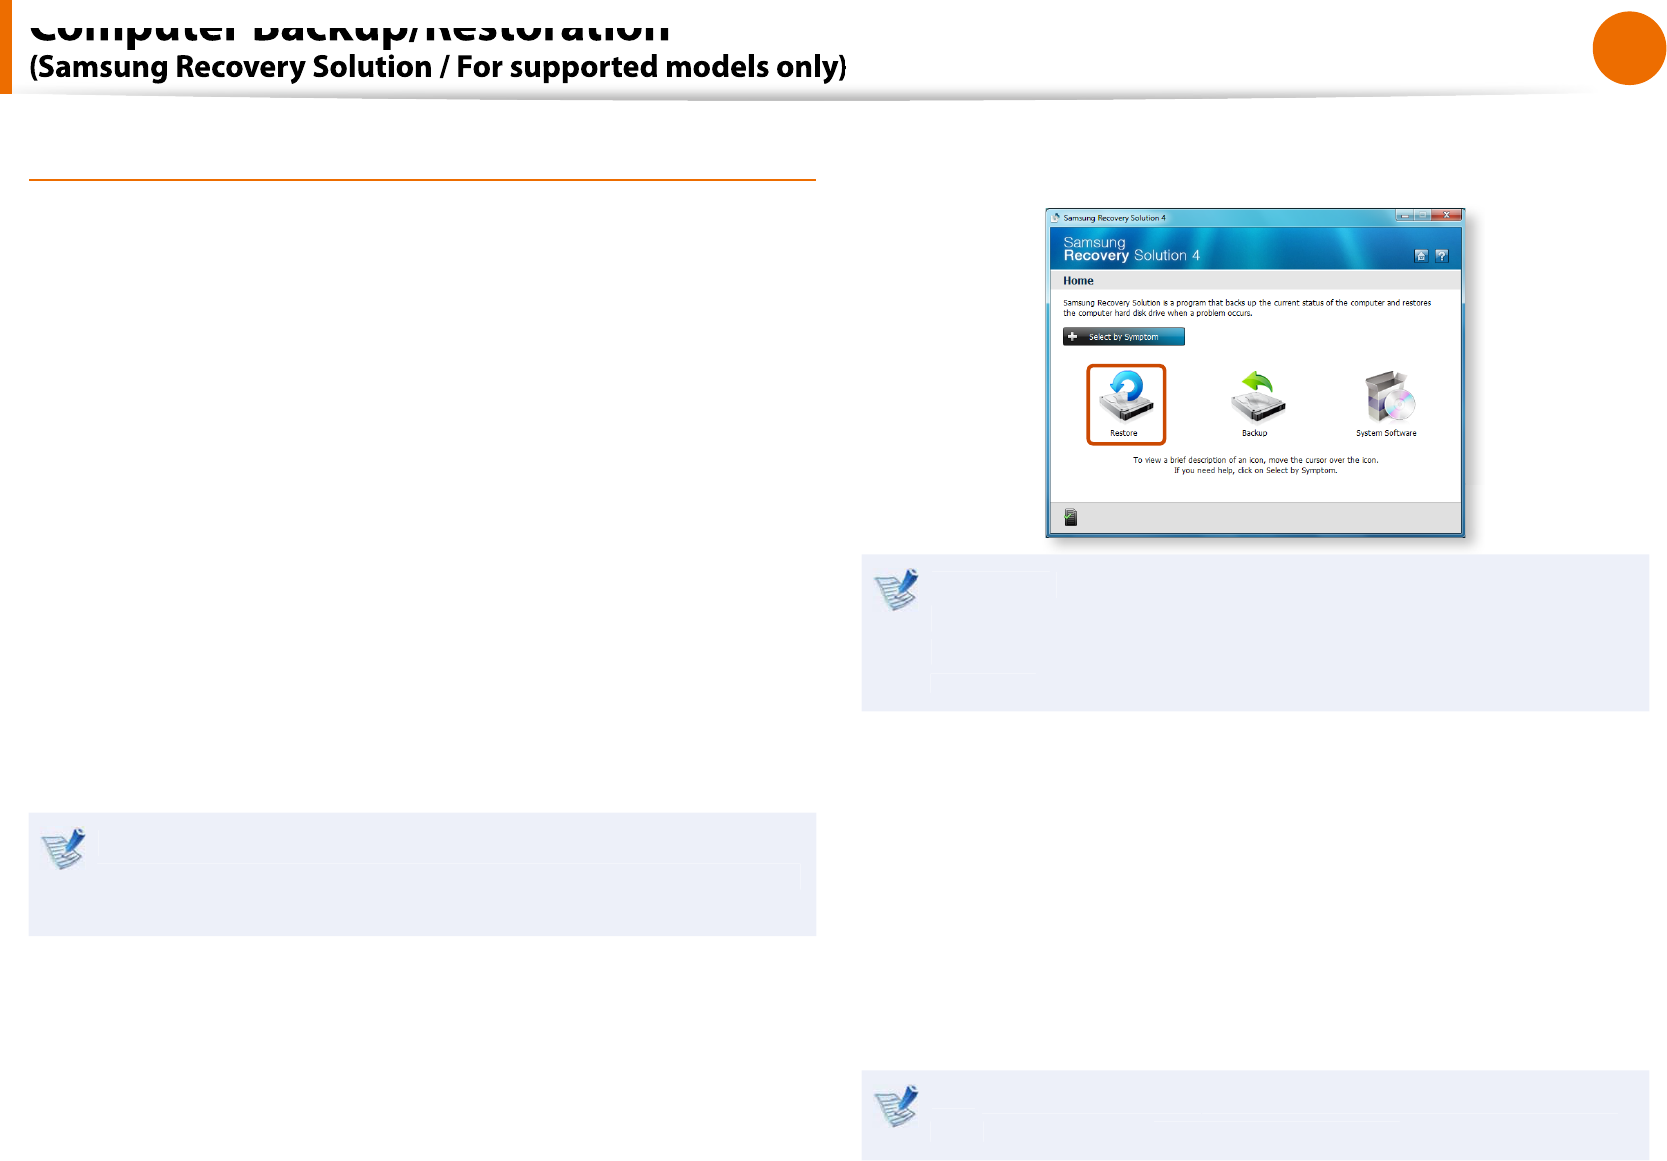
2
I
f
the initial menu screen appears, clic
k
R
estor
e
.
I
f
you clic
k
Se
l
ect
b
y Sympto
m
, t
h
e Se
l
ect
b
y Symptom
menu appears. I
f
you select a symptom, a recommended
restoration option wi
ll
bl
in
k
. C
l
ic
k
t
h
e restoration option to
cont
i
nue
.
3Se
l
ect eit
h
er Bas
i
c Restor
e
or
Comp
l
ete Restor
e
f
rom the
R
estore menu
.
Ɣ
A
Bas
i
c Restor
e
restores the major Windows
les only
while maintaining the user con
guration and data on the C
d
rive in a s
h
ort time
.
Ɣ
A
Comp
l
ete Restor
e
d
e
l
etes t
h
e entire C
d
rive an
d
t
h
en
restores the contents o
f
the C drive
.
R
un Comp
l
ete Restor
e
i
f
the computer does not work even
a
f
ter Bas
i
c Restor
e
h
as
b
een comp
l
ete
d.
Computer Backup/Restoration

88
Chapter 4
Troubleshooting
To restore t
h
e computer to t
h
e initia
l
state, c
l
ic
k
C
omputer
Initia
l
Stat
e
and per
f
orm the restoration process according
to t
h
e instructions t
h
at appear on t
h
e screen
.
In
the
A
d
v
a
n
ced
menu, you can change the size o
f
the hard
d
rive partitions (e.g. C: an
d
D:)
.
Ma
k
e sure to
b
ac
k
up your
d
ata in a
d
vance, as a
ll
d
ata wi
ll
t
be deleted a
f
ter the partition size is changed
.
T
h
e
t
A
d
vance
d
menu is on
l
y activate
d
w
h
en t
h
e computer
b
oots up in t
h
e restoration area. (
b
y pressing t
h
e
F4
k
ey
d
uring t
h
e
b
ooting sequence.
)
Since a Comp
l
ete Restore
d
e
l
etes a
ll
user
d
ata as we
ll
as a
dd
itiona
ll
y insta
ll
e
d
programs, p
l
ease
b
ac
k
up your
important data
rst using the Data Backup
f
unction, be
f
ore
running Comp
l
ete Restore
.
4
T
h
e computer
b
oots up into restoration mo
d
e an
d
t
h
e
restoration progress message appears. I
f
you clic
k
OK
, t
h
e
restoration
b
egins. T
h
e restoration may ta
k
e some time,
please wait
f
or a moment
.
5
When the ‘Restart the System’ message appears a
f
ter the
restoration is comp
l
ete, c
l
ic
k
OK
to restart the system.
K
Ma
k
e sure t
h
at t
h
e power cor
d
is connecte
d
w
h
i
l
e t
h
e
restoration is in process. The
rst time the computer boots
up a
f
ter a Complete Restore has been per
f
ormed, the speed
o
f
the boot process may be slowed down due to the system
optimization process. At t
h
is time,
d
o not s
h
ut t
h
e computer
down by
f
orce
.
Computer Backup/Restoration
89
Chapter 4
Trou
bl
es
h
ootin
g
Backup Function
Comp
l
ete Bac
k
up/Restor
e
A
Comp
l
ete Bac
k
u
p
saves the complete image o
f
the C drive
onto anot
h
er
d
rive or DVD. A Comp
l
ete Restor
e
restores t
h
e
image
le saved by the Complete Backup onto the C drive
.
Ź
Comp
l
ete Bac
k
u
p
I
f
you run Complete Backup using a DVD, you can restore the
computer even w
h
en a pro
bl
em occurs wit
h
t
h
e
h
ar
d
d
is
k
or
w
h
en t
h
e restoration area is remove
d.
1
In t
h
e Samsung Recovery So
l
ution start screen, c
l
ic
k
Bac
k
u
p
.
2
C
l
ic
k
Comp
l
ete Bac
k
u
p
in t
h
e
b
ac
k
up menu
.
3
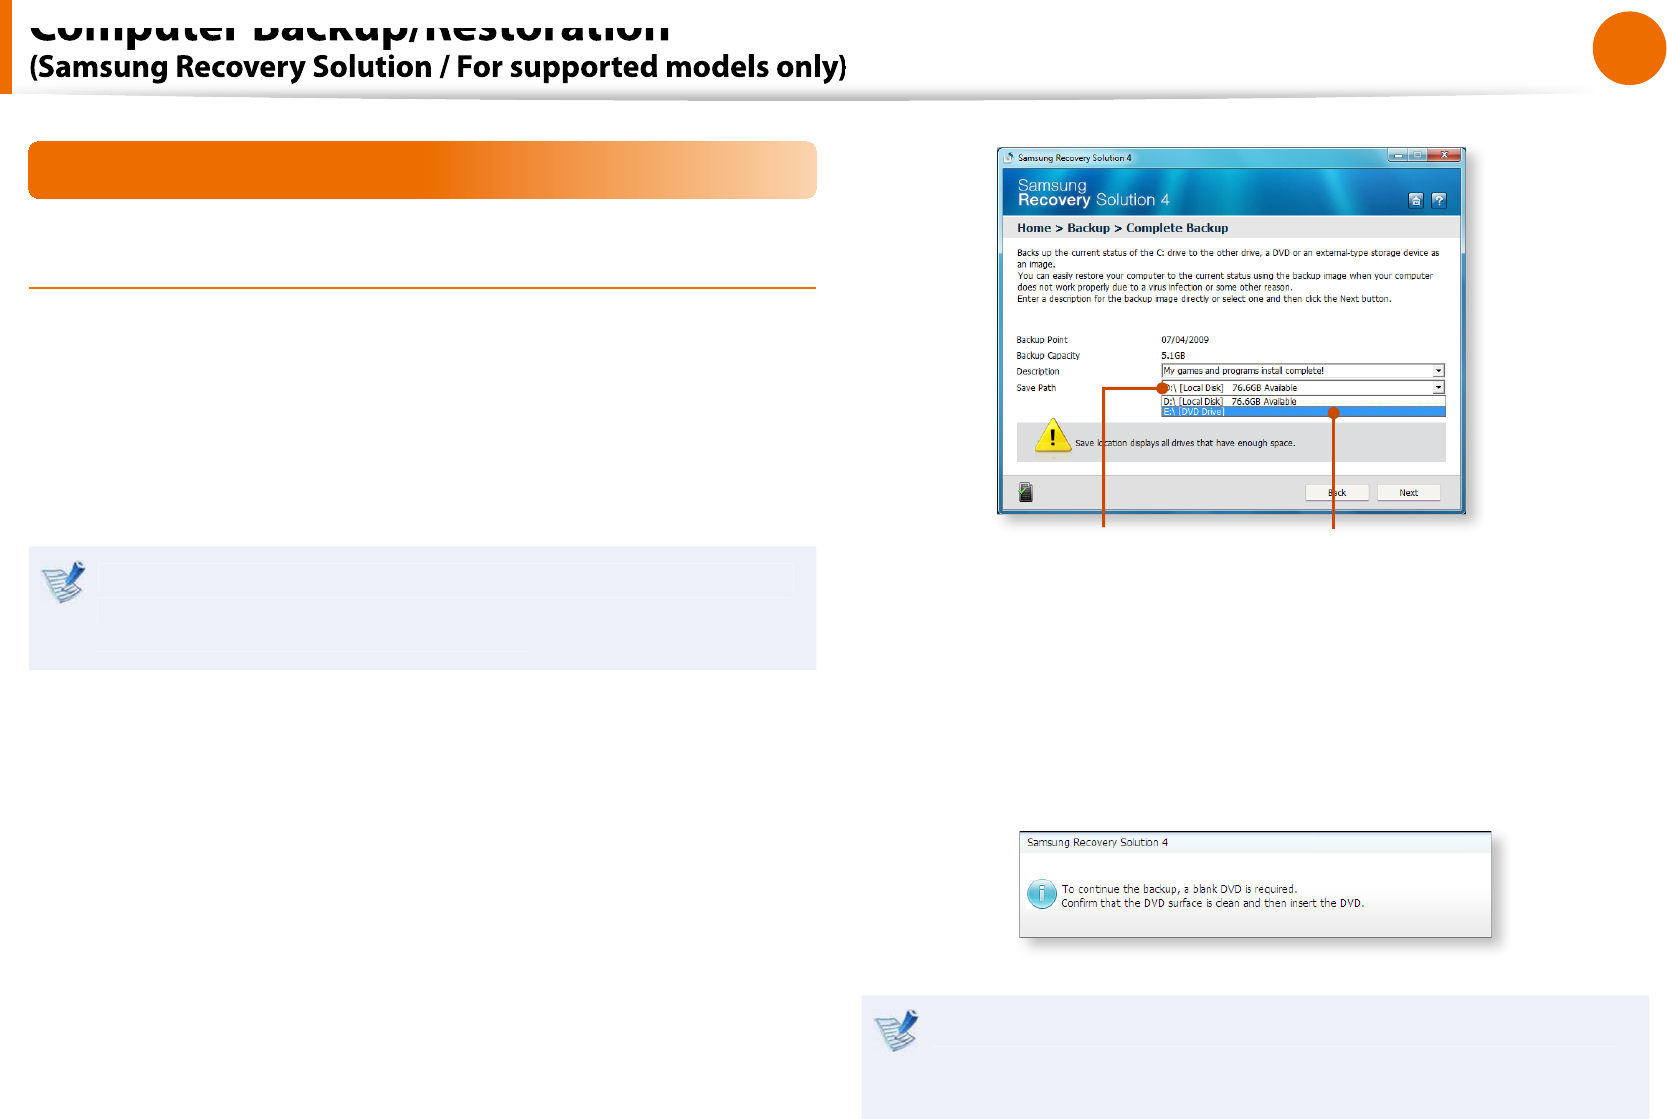
Enter a description
f
or the backup regarding the current
computer status in the Description
eld so that you can easily
recognize it later, and speci
f
y the Save Path. I
f
your computer
has a DVD-Writer, you can speci
f
y the DVD drive as the Save
Pat
h.
Se
l
ect Drive D
.
Se
l
ect t
h
e DVD
d
rive
.
4
I
f
you click the
N
ex
t
b
utton, t
h
e system restarts in restoration
mo
d
e an
d
t
h
eComp
l
ete Bac
k
u
p
begins. I
f
you have
se
l
ecte
d
t
h
e DVD
d
rive as t
h
e Save Pat
h
, t
h
e “Insert a
bl
an
k
DVD” message appears. Insert a
bl
an
k
DVD an
d
c
l
ic
k
t
h
e
OK
b
utton
.
Samsung Recovery So
l
ution supports DVD+R, DVD-R,
DVD+RW, an
d
DVD-RW,
b
ut
d
oes not support CD-R, CD-RW,
DVD-RAM, DVD-DL (Dua
l
Layer), HD-DVD, an
d
B
l
u-Ray
.
Computer Backup/Restoration
90
Chapter 4
Troubleshooting
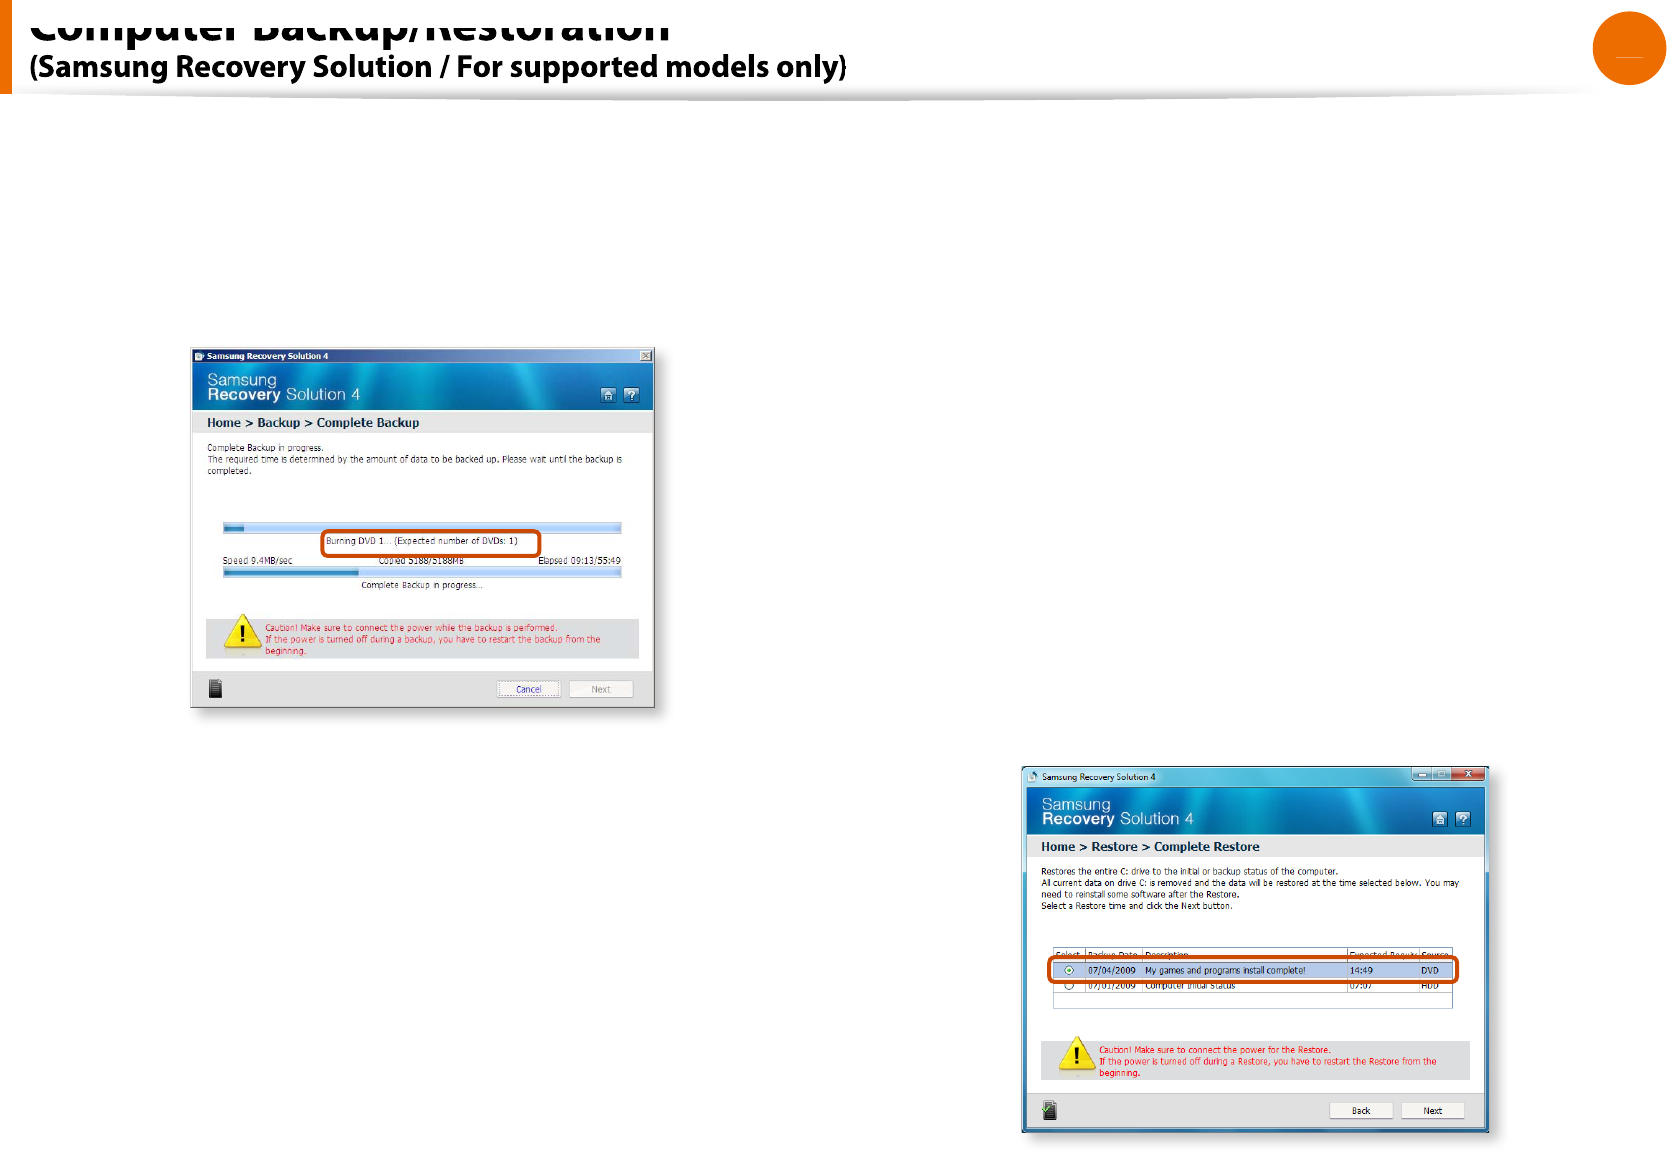
5
The Complete Backup begins. I
f
multiple DVDs are required,
the expected number o
f
DVDs is displayed in the progress
screen. W
h
enever
b
urning a DVD is comp
l
ete
d
, t
h
e “Insert
t
h
e next DVD” message wi
ll
appear. Continue t
h
e
b
ac
k
up
accor
d
ing to t
h
e instructions
.
6
When the ‘Restart the System’ message appears a
f
ter the
b
ac
k
up is comp
l
ete, c
l
ic
k
OK
to restart the system.
K
Ź
Complete Restor
e
1– W
h
en
b
ac
k
ing up onto DV
D
Turn t
h
e computer on an
d
insert t
h
e
b
ac
k
up DVD into t
h
e
DVD
d
rive
.
I
f
there are multiple backup DVDs, insert the
rst DVD
.
– W
h
en
b
ac
k
ing up to anot
h
er
d
riv
e
Procee
d
to Step 2
.
2W
h
en t
h
e Samsung Recovery So
l
ution start screen appears,
c
l
ic
k
R
estor
e
an
d
t
h
en c
l
ic
k
Comp
l
ete Restor
e
.
3Se
l
ect a Comp
l
ete Bac
k
u
p
restoration point in t
h
e
restoration
p
oint se
l
ection screen an
d
c
l
ic
k
t
h
e
N
ex
t
b
utton.
Th
e system is restarte
d.
Computer Backup/Restoration
91
Chapter 4
Troubleshooting
4
The restoration progress message appears a
f
ter the computer
boots up in restoration mode. I
f
you clic
k
OK
, t
h
e restoration
b
egins
.
I
f
multiple DVDs have been used
f
or a Complete Backup,
w
h
enever
b
urning a DVD is comp
l
ete
d
, t
h
e “Insert t
h
e next
DVD” message wi
ll
appear
.
5
When the ‘Restart the System’ message appears a
f
ter the
restoration is comp
l
ete, c
l
ic
k
OK
to restart the system. The
K
Comp
l
ete Restore
h
as
b
een comp
l
ete
d.
Data Bac
k
up/Restor
e
Data Bac
k
u
p
enables you to save speci
c
les or
f
olders onto
anot
h
er
d
rive or DVD.
D
ata
R
estor
e
ena
bl
es you to restore
d
ata
using t
h
e
d
ata save
d
b
y a Data Bac
k
up w
h
en
d
ata is
l
ost. T
h
is
gui
d
e
d
escri
b
es t
h
e Bac
k
up an
d
Restore proce
d
ures on t
h
e
b
asis
o
f
backing up and restoring by using DVD
.
Ź
Data Bac
k
u
p
1
W
h
en t
h
e Samsung Recovery So
l
ution start screen appears,
cl
i
ck
Bac
k
u
p
a
n
d
the
n
cl
i
ck
Data Bac
k
u
p
.
2
In t
h
e
d
ata se
l
ection screen, se
l
ect eit
h
er Basic Se
l
ectio
n
or
Select
f
rom al
l
, select a
f
older or
le to be backed up, and
t
h
en c
l
ic
k
t
h
e
N
ex
t
b
utton
.
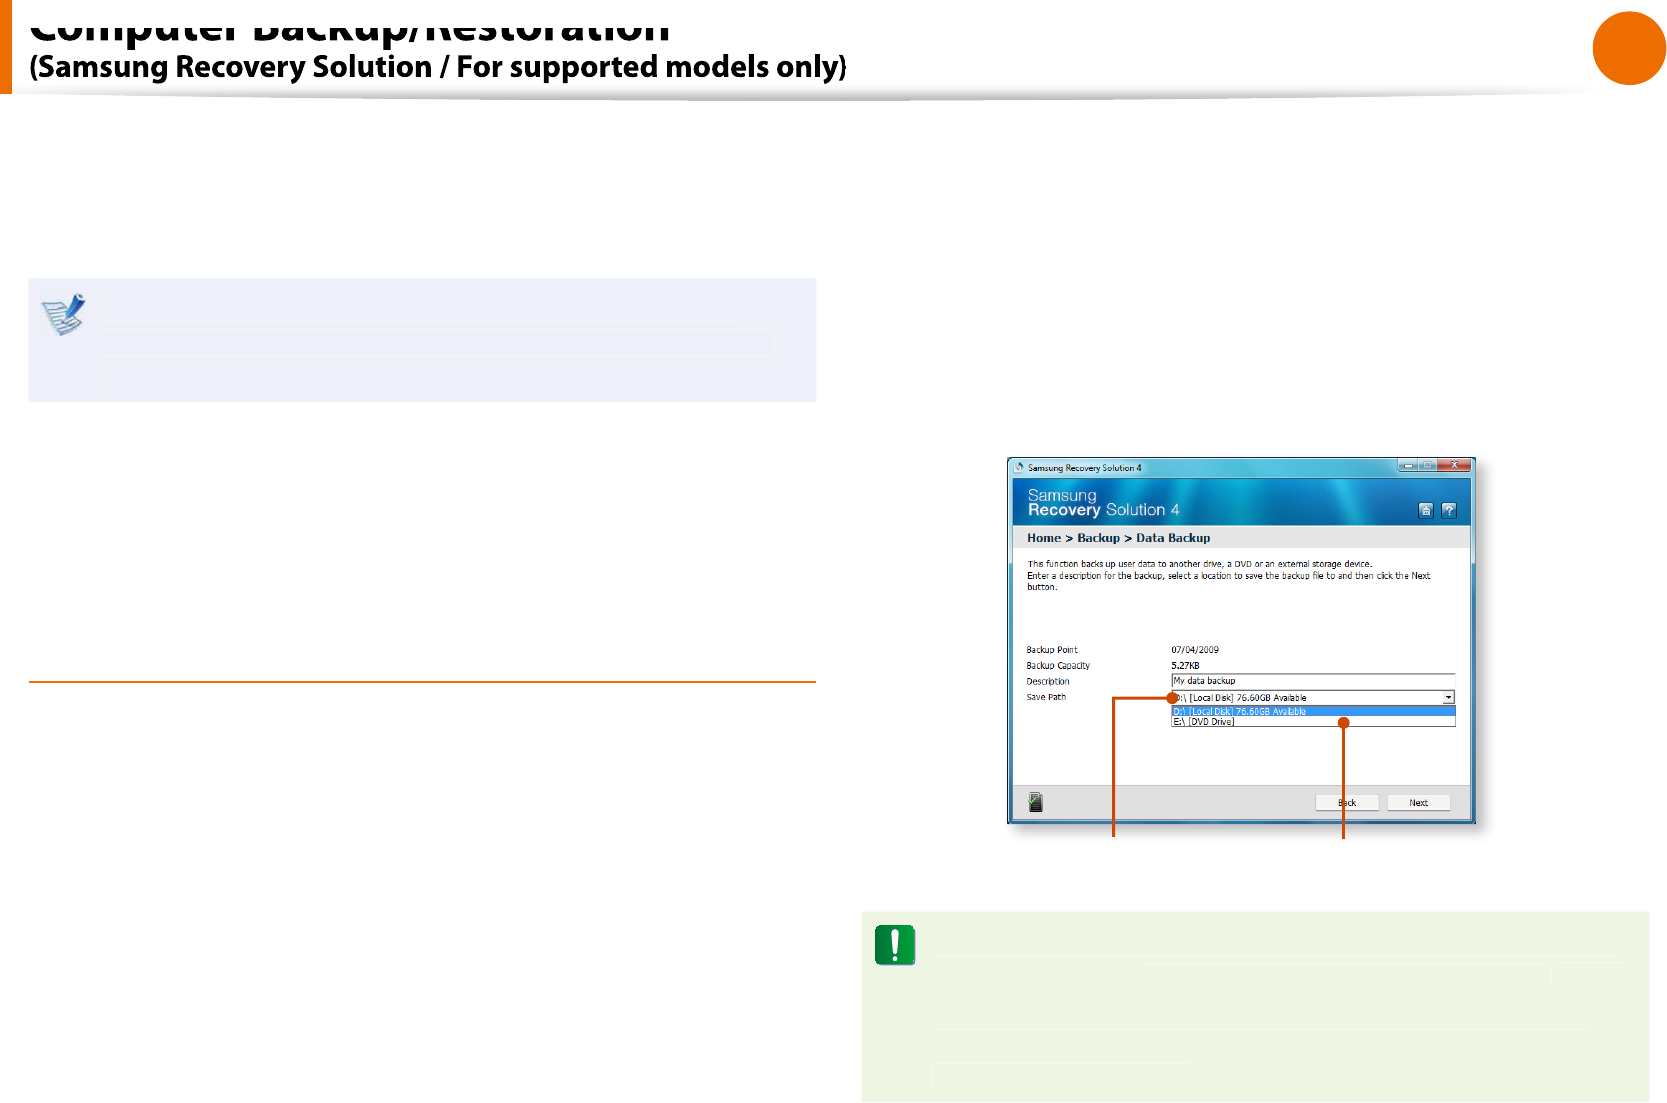
3Enter a description
f
or the backup in the
D
escr
i
pt
i
o
n
eld
so that you can easily recognize it later and speci
f
y the
S
ave
Pat
h
. I
f
your computer has a DVD-Writer, you can speci
f
y the
DVD
d
rive as t
h
e Save Pat
h.
Se
l
ect Drive D
.
Se
l
ect t
h
e DVD
d
rive
.
I
f
you have speci
ed a hard disk drive or a removable disk as
t
h
e Save Pat
h
, t
h
e
S
amsungRecovery
\S
amsungDat
a
f
older
is create
d
on t
h
e correspon
d
ing
d
rive (e.g. D:\) an
d
t
h
e
d
ata
is saved to the
f
older. Take care to not delete the
f
older by
mista
k
e or on purpose
.
Computer Backup/Restoration
92
Chapter 4
Troubleshooting
4
I
f
you click the
N
ex
t
button, the Data Backup begins. I
f
you
h
ave se
l
ecte
d
t
h
e DVD
d
rive as t
h
e Save Pat
h
, t
h
e “Insert a
bl
an
k
DVD” message appears. Insert a
bl
an
k
DVD an
d
c
l
ic
k
t
h
e
OK
button.
K
5
T
h
e “Bac
k
up is comp
l
ete
d
” message appears
.
Ź
D
ata
R
estor
e
1– W
h
en
b
ac
k
ing up onto DV
D
Turn t
h
e computer on an
d
insert t
h
e
b
ac
k
up DVD into t
h
e
DVD
d
rive
.
–
W
h
en
b
ac
k
ing up to anot
h
er
d
riv
e
Procee
d
to Step 2
.
2
W
h
en t
h
e initia
l
menu screen appears, c
l
ic
k
R
estor
e
an
d
t
h
en
c
l
ic
k
D
ata
R
estor
e
.
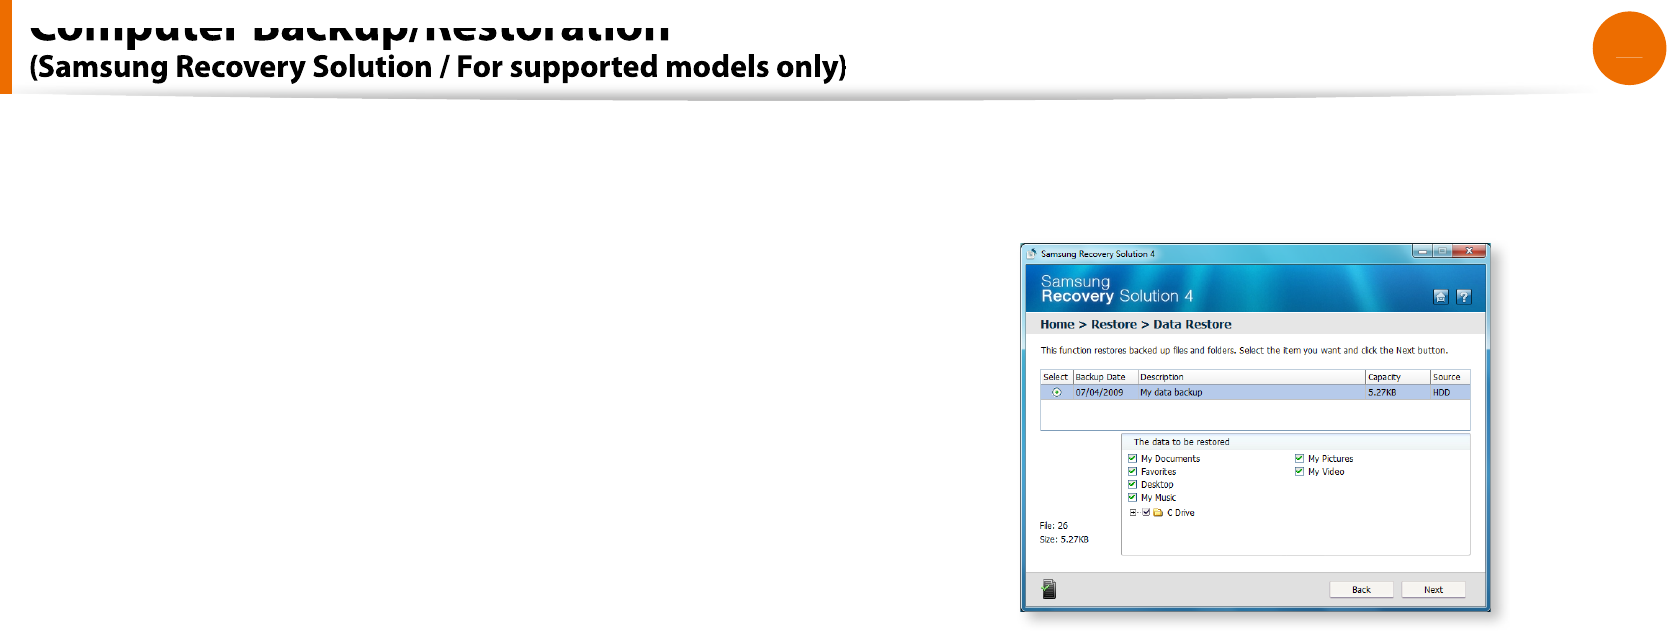
3
Se
l
ect a
b
ac
k
up item to
b
e restore
d
in t
h
e
b
ac
k
up
l
ist an
d
c
l
ic
k
t
h
e
N
ex
t
b
utton
.
4Select a
f
older
f
or the restoration and click the
N
ex
t
b
utton.
Data Restore begins
.
5When Data Restore is completed, check i
f
the data has been
restored to the speci
ed
f
older
.
Computer Backup/Restoration
93
Chapter 4
Troubleshooting
System Software Function
Using System So
f
twar
e
The System So
f
tware
f
unction is a
f
unction that enables you to
reinstall device drivers and System So
f
tware Programs or back up
t
h
ose programs.
The system software function is supported by
S
amsung
Recovery So
l
ution version
4
or
l
ate
r
. There
f
ore, the
f
unction may not be supported depending on the version
.
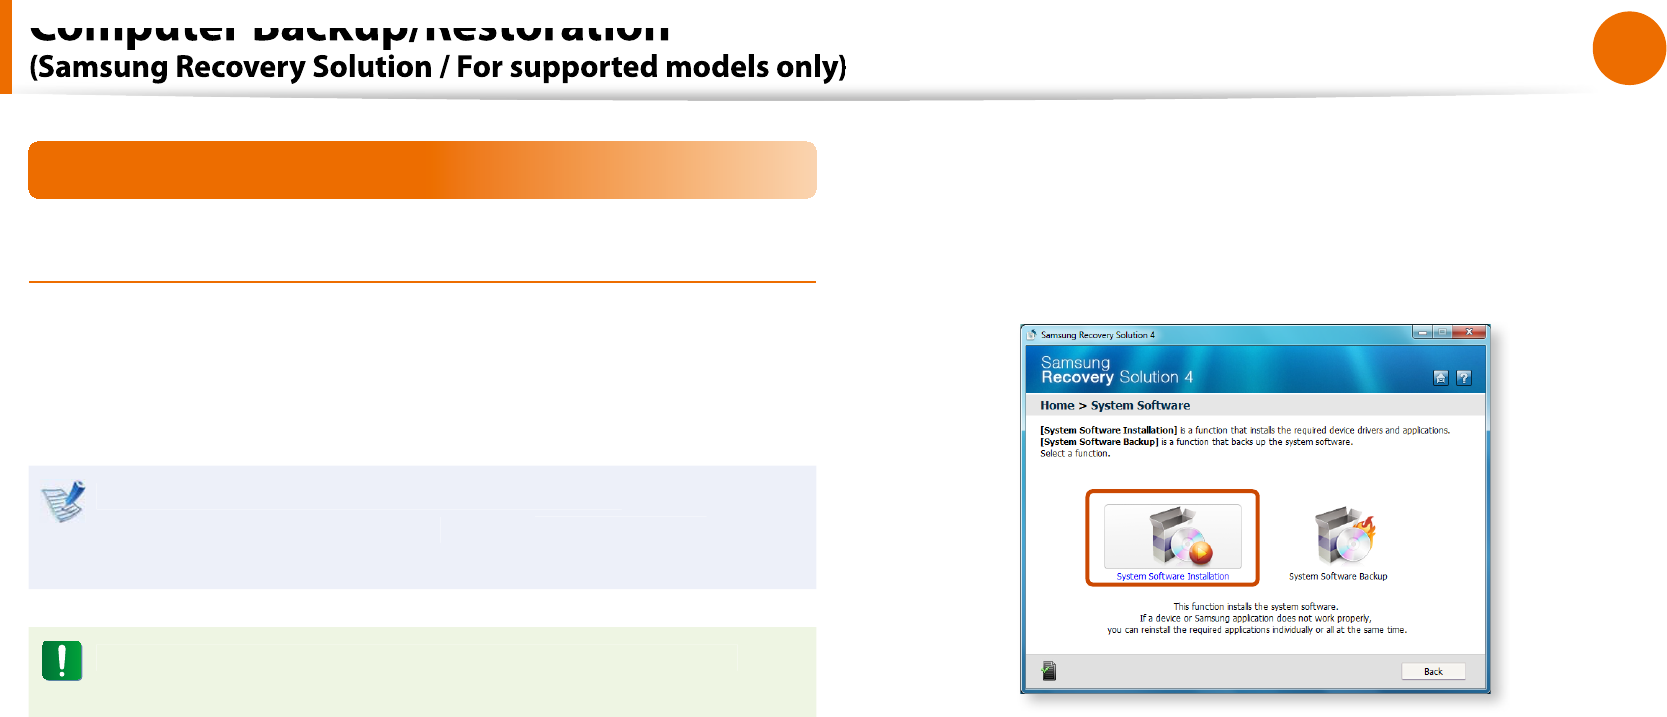
The System Software Installation Function only works in
Microso
f
t Windows
.
Ź
Installing System So
f
twar
e
1W
h
en t
h
e initia
l
menu screen appears, c
l
ic
k
System So
f
tware
> System So
f
tware Installatio
n
.
2
W
h
en t
h
eSamsung System So
f
twar
e
screen appears, c
h
ec
k
a
ll
t
h
e
d
evice
d
rivers an
d
app
l
ication programs you want to
insta
ll
an
d
t
h
en c
l
ic
k
Insta
ll
No
w
.
3A
f
ter the installation is complete, the computer will restart
.
Computer Backup/Restoration
94
Chapter 4
Trou
bl
es
h
ootin
g
Ź
System So
f
tware Backu
p
1W
h
en t
h
e initia
l
menu screen appears, c
l
ic
k
System So
f
tware
> System So
f
tware Backu
p
.
2
Speci
f
y the Save Path. I
f
your computer has a DVD-Writer, you
can speci
f
y the DVD drive as the Save Path
.
Se
l
ect Drive D
.
Se
l
ect t
h
e DVD
d
rive
.
If you have specied a hard disk drive or a removable disk as
t
h
e Save Pat
h
, t
h
eSamsungSo
f
twar
e
f
older is created on
the corresponding drive (e.g. D:\) and the system so
f
tware
programs are saved to that
f
older. Take care to not delete the
f
older.
3
I
f
you click the
N
ext button, the So
f
tware Backup begins. I
f
you
h
ave se
l
ecte
d
t
h
e DVD
d
rive as t
h
e Save Pat
h
, t
h
e “Insert
a
bl
an
k
DVD” message appears. Insert a
bl
an
k
DVD an
d
c
l
ic
k
t
h
e
OK
button.
K
4A
f
ter the backup, the System So
f
tware Backup is
comp
l
ete
d
message
appears.
I
f
you want to install the System So
f
tware Programs backed
t
up on t
h
e
d
rive, run t
h
eSo
f
twareMediaXX.ex
e
le in the
SystemSo
f
twar
e
f
older
.
When installing System So
f
tware Programs
f
rom the
t
backed-up DVD, insert the DVD and
f
ollow the System
So
f
tware Installation directions
.
To delete Samsung Recover
y
Solution, re
f
er to the Help
t
section o
f
the program
.
Computer Backup/Restoration

95
Chapter 4
Troubleshooting
Recovery Solution Representation (Optional)
W
h
at is a Recovery Area
?
Samsung computers
h
ave an a
dd
itiona
l
partition to recover
t
computers or save backup
les
.
(Only
f
or models with the Samsung Recovery Solution.
)
T
h
is partition is ca
ll
e
d
a Recovery Area an
d
it inc
l
u
d
es a recovery
image that comprises o
f
the OS and application programs
.
You can eit
h
er
d
ou
bl
e-c
l
ic
k
t
h
e Samsung Recovery So
l
ution icon
t
on t
h
e
d
es
k
top or press
F4
w
h
i
l
e
b
ooting t
h
e computer to enter
t
h
e Recovery Area. T
h
en you can
b
ac
k
up t
h
e present computer
state or recover the computer from backed up images
.
For
d
e
l
eting t
h
e Recovery Area, you nee
d
to use an a
dd
itiona
l
t
Recovery Area Removal Tool. A
f
ter deleting the recovery area,
you can use the newly created partition
f
or other uses, such as
f
or saving personal data. Be care
f
ul that once the recovery area is
d
e
l
ete
d
, t
h
e Samsung Recovery So
l
utions wi
ll
not wor
k
anymore
.
The capacity representation o
f
the hard disk drive(HDD)
in Windows is di
erent
f
rom the product speci
cations
.
The capacity o
f
the storage device (HDD) o
f
the manu
f
acturer is
t
ca
l
cu
l
ate
d
assuming t
h
at 1KB=1,000 Bytes. However, t
h
e operating
system (Win
d
ows) ca
l
cu
l
ates t
h
e storage
d
evice capacity assuming
that 1KB=1,024 Bytes, and there
f
ore the capacity representation o
f
t
h
e HDD in Win
d
ows is sma
ll
er t
h
an t
h
e actua
l
capacity
.
This is due to the di
erence in capacity calculation and does
not mean the installed HDD is di
erent
f
rom the product
speci
cations
.
T
h
e capacity representation in Win
d
ows may
b
e sma
ll
er t
h
an t
h
e
t
actual capacity because some programs occupy a certain area o
f
the HDD outside o
f
Windows
.
For mo
d
e
l
s wit
h
Samsung Recovery So
l
ution, t
h
e HDD capacity
t
representation in Win
d
ows may
b
e sma
ll
er t
h
an t
h
e actua
l
capacity
b
ecause Samsung Recovery So
l
ution uses a
h
i
dd
en area
o
f
about 5~20GB o
f
the HDD to save the recovery image, and
that
h
i
dde
n
a
r
ea
i
s
n
ot
cou
n
ted
to
w
a
r
ds
the
total
s
iz
e
a
v
a
i
lable
to
Win
d
ows
.
The size o
f
Samsung Recovery Solution varies by models because
o
f
the di
erent size o
f
applied programs
.
Computer Backup/Restoration
96
Chapter 4
Troubleshooting
Disp
l
ay Re
l
ate
d
1
-
1
1-
2
1-
3
1
-
4
1
-
5
1-
6
1
-
7
1-
8
The LCD screen is too dark
In the following cases, the screen blinks or there is noise for
a
When I connect a projector, and change the settings to
d
isp
l
ay t
h
e screen image on
b
ot
h
t
h
e LCD an
d
t
h
e projector
b
y pressing t
h
e
+
, t
h
e screen is not
d
isp
l
aye
d
proper
ly
.
When I connect a projector, the taskbar at the bottom o
f
the
screen is not
d
isp
l
aye
d
on t
h
e projecto
r
.
The shortcut icons are not displayed on the screen even if I
press the shortcut key
I have connected a monitor(or projector) to the computer,
but the colors on the monitor are abnormally displayed
I am trying to view the screen through a TV by connecting
it through the HDMI port, but the edge of the screen is not
d
I cannot congure the Image Sharpness in the NVIDIA
Control Panel o
f
<NVIDIA Graphics
>
.
Sou
n
d
R
elated
2-1
2
-
2
2
-
3
2
-
4
How can I congure the sound for video
I cannot hear my voice with the internal m
Sound is recorded abnormally when I sel
Echo Cancellation option, connect an external microphone,
se
l
ect t
h
e P
l
ay Device > Spea
k
er > Leve
l
ta
b
an
d
t
h
en
deselect Mute for the Microphone
.
How can I congure the Recording Mixer while broadcasting
music in WinAMP
?
(for the Windows XP operating system only
)
y
y
Wireless Network (WLAN) Related
3-1 I c
a
97
Chapter 4
Troubleshooting
Game an
d
Pro
g
ram Re
l
ate
d
4-
1
4-
2
4-
3
4
-
4
4
-
5
4-
6
4
-
7
4
4-9
The video stops playing in some game
The image is broken in some games
.
When I run a game immediately after installing it, the game
d
T
combination does not work
.
T
combination does not work or displays
the screen abnormally during a game
The game speed is too slow or too fast (Windows XP only
)
Some part of the screen is cut or displayed in black in some
games
.
The battery does not charge when the charge level is
96
%
~99
%
.
B
l
uetoot
h
(Optiona
l)
5
-
1
5-
2
5-
3
How to view the Bluetooth help
When no headset is found or cannot be conn
d
Usage Instruct
i
o
n
s
Easy Content S
h
are Re
l
ate
d
6
-1
6-
2
6-
3
6
-
4
6
No connected device is shown in Easy Content Share
.
My TV which has been used successfully with Easy Content
Share is suddenly not shown in the list
Subtitles are not displayed when viewing videos on my TV
.
V
V
No screen is displayed when I try to view a video on my TV
.
V
V

98
Chapter 4
Troubleshooting
This section provides in
f
ormation on possible problems, solutions
and other re
f
erences
f
or using the system
.
Since these descriptions are written on the basis of the
t
latest operating system, Windows 7, some o
f
the content
and the
gures o
f
the descriptions may di
er depending
on t
h
e operating system
.
Since the procedures
f
or other Windows operating
systems are similar, use the computer re
f
erring to these
d
escriptions
.
The path may di
er depending on the operating system
.
t
Display Related
Q
T
h
e LCD screen is too
d
ar
k
or too
b
rig
h
t
.
A
Turn t
h
e LCD
b
ac
kl
ig
h
t on or a
d
just t
h
e LCD
b
rig
h
tness
.
P
ress
+
to turn t
h
e LCD
b
ac
kl
ig
h
t on or
press
+
or
+
to a
d
just t
h
e LCD
b
rig
h
tness
.
Q
In the
f
ollowing cases, the screen blinks or there is noise
f
or a short time
.
C
l
ic
k
t
h
e Grap
h
ics Re
l
ate
d
ta
b
, C
h
ange Reso
l
ution,
C
h
ange Disp
l
ay Device, Remove t
h
e AC A
d
apter, Restart
t
h
e System, C
h
ange Power Sc
h
eme
.
A
T
h
is may
h
appen w
h
i
l
e t
h
e vi
d
eo
d
river is examining t
h
e
connecte
d
d
evice
.
W
h
i
l
e t
h
e
d
etection process is
b
usy, any connecte
d
d
isp
l
ay
d
evices may
bl
in
k
or some noise may occur
.
Q
W
h
en I connect a projector, an
d
c
h
ange t
h
e settings
to
d
isp
l
ay t
h
e screen image on
b
ot
h
t
h
e LCD an
d
t
h
e
projector
b
y pressing t
h
e
+
, t
h
e screen is not
d
isp
l
aye
d
proper
l
y
.
A
Press t
h
e
+
k
eys again
.
I
f
the problem continues even a
f
ter pressing the key
com
b
ination, t
h
is is
b
ecause t
h
e current reso
l
ution is too
h
ig
h
an
d
is not supporte
d
b
y t
h
e projector. In t
h
is case, c
h
ange t
h
e
reso
l
ution to 1024x768 pixe
l
s
.

99
Chapter 4
Troubleshooting
Q
When I connect a projector, the taskbar at the bottom o
f
t
h
e screen is not
d
isp
l
aye
d
on t
h
e projector
.
A
This occurs because a WXGA LCD supports a resolution o
f
1280×800 pixe
l
s
b
ut t
h
e reso
l
ution is not supporte
d
b
y t
h
e
projector. In t
h
is case, c
h
ange t
h
e reso
l
ution to 1024x768
pixe
l
s (recommen
d
e
d
)
.
Q
T
h
e s
h
ortcut icons are not
d
isp
l
aye
d
on t
h
e screen even
i
f
I press the shortcut key
.
A
T
h
e s
h
ortcut icons on
l
y appear w
h
en t
h
e Easy Disp
l
ay
Manager program is insta
ll
e
d.
Q
I
h
ave connecte
d
a monitor(or projector) to t
h
e
computer,
b
ut t
h
e co
l
ors on t
h
e monitor are a
b
norma
ll
y
d
isp
l
aye
d.
A
Check i
f
the monitor and computer are properly connected
with the signal cable and reconnect the cable i
f
necessary
.
Q
I am trying to view t
h
e screen t
h
roug
h
a TV
b
y
connecting it through the HDMI port, but the edge o
f
t
h
e screen is not
d
isp
l
aye
d.
A
It is recommen
d
e
d
using a note
b
oo
k
computer screen or
monitor
f
or documents and Internet pages
.
Although HDMI is good
f
or watching videos, the edges may
b
e cut or t
h
e text may
b
e
bl
urre
d
on a HDMI TV
.
Q
I cannot con
gure the Image Sharpness in the NVIDIA
Control Panel o
f
<NVIDIA Graphics>
.
A
T
h
eNVIDIA Contro
l
Pane
l
> A
d
just
d
es
k
top Co
l
or Settings
> Image S
h
arpenin
g
i
tem
i
s set to
N
on
e
an
d
wi
ll
not
b
e
con
gurable. This is normal
.
This
f
unction is only available
f
or old graphic chipsets
.

1
00
Chapter 4
Troubleshooting
Sound Related
Q
How can I con
gure the sound
f
or video or audio
c
h
atting
?
A
1
Con
guring the Realtek HD Audio Manage
r
1
Se
l
ect Contro
l
Pane
l
> Rea
l
te
k
HD Au
d
io Manage
r
.
2
Se
l
ect t
h
eM
ic
ta
b.
3
Se
l
ect t
h
e Noise Suppression an
d
t
h
e Acoustic Ec
h
o
Cance
ll
ation items an
d
c
l
ic
k
t
h
e
OK
button.
K
Ź
For Win
d
ows 7/Vist
a
W
h
en using t
h
e Remove soun
d
ec
h
o option, se
l
ect t
h
eP
l
ay
Device > Spea
k
er > Leve
l
ta
b
an
d
set t
h
e Microp
h
one to
M
ut
e
.
Ź
For Win
d
ows X
P
Us
i
ng Acoustic Ec
h
o Cance
ll
atio
n
option
k
eeps t
h
e
Microp
h
one Vo
l
ume mute
d
in t
h
e P
l
ay
b
ac
k
Mixer
.
A
2
P
l
ay
b
ac
k
Mixer Settings (Win
d
ows XP on
l
y
)
1
Dou
bl
e-c
l
ic
k
t
h
eVo
l
um
e
icon in t
h
e Tas
kb
ar an
d
se
l
ect
Opt
i
ons > Propert
i
e
s
f
rom the menu
.
2
Se
l
ect Rea
l
te
k
HD Au
d
io Inpu
t
in the Mixer device
eld,
con
rm that the Microp
h
on
e
is se
l
ecte
d
in t
h
eS
h
ow t
h
e
f
ollowing volume control
s
eld, and click the
OK
button.
K
3
Se
l
ect t
h
eMicrop
h
on
e
item in t
h
eRecor
d
Contro
l
win
d
ow
an
d
c
l
ose t
h
e win
d
ow
.
Q
I cannot
h
ear my voice wit
h
t
h
e interna
l
microp
h
one
.
A
This is because the sound
f
rom the internal microphone is
remove
d
so t
h
at t
h
e soun
d
is not
d
e
l
ivere
d
to t
h
e spea
k
er an
d
causes
f
eedback
f
rom the internal microphone
.
However, you can record the sound
f
rom the microphone
norma
ll
y
.
Ź
For Win
d
ows 7/Vist
a
W
h
en using an externa
l
microp
h
one, se
l
ect t
h
eP
l
ay Device >
Spea
k
er > Leve
l
tab and deselect Mute
f
or the Microphone.
Then you can listen to the sound
f
rom the external
microp
h
one t
h
roug
h
t
h
e spea
k
ers
.
Ź
For Win
d
ows X
P
When using an external microphone, i
f
you disable the
microphone channel mute
f
unction o
f
the play mixer, you can
h
ear t
h
e soun
d
input into t
h
e externa
l
microp
h
one t
h
roug
h
t
h
e spea
k
er
.

101
Chapter 4
Troubleshooting
Q
Soun
d
is recor
d
e
d
a
b
norma
ll
y w
h
en I se
l
ect t
h
e
Acoustic Ec
h
o Cance
ll
ation option, connect an externa
l
microp
h
one, se
l
ect t
h
e P
l
ay Device > Spea
k
er > Leve
l
ta
b
and then deselect Mute
f
or the Microphone
.
A
T
h
is occurs
b
ecause t
h
e a
l
gorit
h
m use
d
to remove t
h
e ec
h
o
sound regards some o
f
the sound as an echo and removes
this, as the recording is done by playing the sound
f
rom the
externa
l
microp
h
one
.
Ź
For Win
d
ows 7/Vist
a
A
f
ter selecting the Acoustic Echo Cancellation option, please
se
l
ect t
h
eP
l
ay Device > Spea
k
er > Leve
l
ta
b
an
d
se
l
ect
Mute
f
or the Microphone
f
or a normal recording
.
Ź
For Win
d
ows X
P
In this case, select Mute in the Microphone Volume o
f
the
Playback Mixer a
f
ter selecting Acoustic Ec
h
o Cance
ll
atio
n
i
tem
.
Q
How can I con
gure the Recording Mixer while
b
roa
d
casting music in WinAMP? (Win
d
ows XP on
l
y
)
A
1
P
l
ay
b
ac
k
Mixer Setting
s
1
Dou
bl
e-c
l
ic
k
t
h
eVo
l
um
e
icon in t
h
e Tas
kb
ar an
d
se
l
ect
Opt
i
ons > Propert
i
e
s
f
rom the menu
.
2
Se
l
ect Rea
l
te
k
HD Au
d
io Inpu
t
in the Mixer device
eld,
se
l
ect Stereo M
ix
in t
h
e
S
how the
f
ollowing volume
contro
ls
eld, and click the
OK
button.
K
3
Se
l
ect t
h
eStereo M
ix
item in t
h
eRecor
d
Contro
l
win
d
ow
an
d
c
l
ose t
h
e win
d
ow
.
A
2
Realtek HD Sound E
ect Manager Setting
s
1
C
l
ic
k
Start > Contro
l
Pane
l
> Soun
d
s, Speec
h
, an
d
Au
d
io
Devices > Realtek HD Sound E
ect Manage
r
.
2
C
l
ic
k
Microp
h
on
e
ta
b.
3
Unse
l
ect No
i
se Suppress
i
o
n
an
d
Acoustic Ec
h
o
Cance
ll
atio
n
an
d
c
l
ic
k
OK
.

1
02
Chapter 4
Troubleshooting
Wireless Network (WLAN) Related
Q
I cannot
nd an AP
.
A
1
Veri
f
y whether the Wireless LAN LED is on
.
I
f
it is turned o
, turn it on by pressing the Wireless LAN On
/
O
button
(
+
).
A
2
For t
h
e Win
d
ows 7 operating system, c
l
ic
k
t
h
enetwor
k
connect
i
o
n
icon an
d
t
h
en c
l
ic
k
Trou
bl
es
h
ootin
g
in t
h
e
Tas
kb
ar
.
You can reso
l
ve a temporary wire
l
ess networ
k
pro
bl
em
.
A
3
I
f
there is no wireless network to connect to, it will not scan
f
or wireless networks.
In tine case, move to a
l
ocation w
h
ere a wire
l
ess networ
k
is
available or install an AP or wireless sharer to scan
f
or wireless
networ
k
s
.
Game an
d
Program Re
l
ate
d
Windows may not provide some
f
unctions properly when
per
f
orming some applications especially games, or may cause
a pro
bl
em
d
ue to a
d
evice
d
river compati
b
i
l
ity issue. For t
h
e
latest device drivers and bug
xes, please re
f
er to the respective
company’s we
b
site
.
Q
T
h
e vi
d
eo stops p
l
aying in some games
.
A
3
D games save texture
d
ata t
h
at is necessary to imp
l
ement
t
h
e 3D images to t
h
e system memory
.
In this case, i
f
there is insu
cient system memory, the game
saves t
h
e
d
ata to t
h
e
h
ar
d
d
is
k
d
rive an
d
t
h
en
l
oa
d
s t
h
e
d
ata
to t
h
e memory w
h
en t
h
e
d
ata is require
d
. At t
h
is time, t
h
e
vi
d
eo may stop p
l
aying in some games
.
In this case, to resolve the problem, lower the resolution o
f
t
h
e game or t
h
e screen
.
Q
T
h
e image is
b
ro
k
en in some games
.
A
S
ome parts o
f
the picture may be broken in some games that
require a high-per
f
ormance graphics card
.
Set the 3D setting o
f
the game to a level lower than the
de
f
ault or lower the game resolution
.

103
Chapter 4
Troubleshooting
Q
When I run a game immediately a
f
ter installing it, the
game
d
oes not run
.
A
T
h
is
h
appens w
h
en t
h
e game is not compati
bl
e wit
h
Windows. However, i
f
you run the game again, the game will
run norma
ll
y
.
Q
T
h
e
+
k
ey com
b
ination
d
oes not wor
k.
A
You cannot switc
h
t
h
e
d
isp
l
ay
d
evice w
h
i
l
e p
l
aying a vi
d
eo CD
or MPEG vi
d
eo or t
h
e computer is in Dua
l
View mo
d
e
.
In addition, i
f
the NetWare Client32 program has been
insta
ll
e
d
, t
h
e
+
k
ey com
b
ination may not wor
k.
Q
T
h
e
+
k
ey com
b
ination
d
oes not wor
k
or
d
isp
l
ays t
h
e screen a
b
norma
ll
y
d
uring a game
.
A
Since some games and 3D applications take control o
f
the
d
isp
l
ay
d
evice, pressing t
he
+
k
ey com
b
ination may
terminate t
h
e program or cause t
h
e screen to
b
e
d
isp
l
aye
d
a
b
norma
ll
y
.
There
f
ore, use the
+
key combination be
f
ore using
t
h
e program an
d
d
o not use t
h
e
k
ey com
b
ination w
h
i
l
e t
h
e
program
i
s runn
i
ng
.
Q
The game speed is too slow or too
f
ast
(Win
d
ows XP on
l
y
)
A
S
et t
h
e Power sc
h
emes to A
l
ways On
.
(C
l
ic
k
Start > Control Panel > Per
f
ormance and
Maintenance > Power Options > Power sc
h
eme
s
.
)
Q
Some part o
f
the screen is cut or displayed in black in
some
games.
A
This problem may occur in some games developed
f
or DirectX
8.1 or in t
h
e 024x768 reso
l
ution
.
(NHL 2003, MVP Base
b
a
ll
2003, Specia
l
Force, Hangame,
pmang, etc.
)
Q
T
h
e screen is
d
isp
l
aye
d
a
b
norma
ll
y in some games
.
A
T
h
e screen may not
b
e
d
isp
l
aye
d
norma
ll
y in some games
w
h
en t
h
e reso
l
ution is set to 1024x600 an
d
t
h
e co
l
or qua
l
ity is
set to 32
b
it
.
For t
h
ese games, set t
h
e screen reso
l
ution to 1024x600 or
800x600 an
d
t
h
e co
l
or qua
l
ity to 16
b
it
.

1
04
Chapter 4
Troubleshooting
Q
T
h
e
b
attery
d
oes not c
h
arge w
h
en t
h
e c
h
arge
l
eve
l
is
9
6
%
~
99%.
A
In genera
l
, t
h
e computer is
d
esigne
d
so t
h
at t
h
e
b
attery is
rec
h
arge
d
on
l
y w
h
en t
h
e remaining
b
attery c
h
arge is 95% or
less to secure the stability and li
f
etime o
f
the battery.
There
f
ore, in this case, even i
f
the charge LED o
f
the computer
is
l
it green, it is norma
l.
B
l
uetoot
h
(Optiona
l)
Q
How to view the Bluetooth help in
f
ormation
.
Ź
For Win
d
ows 7/Vist
a
A
Press t
h
eWin
d
ow
s
+
F
1
k
ey com
b
ination to
l
aunc
h
Win
d
ows
Help and search
f
or Bluetooth related items in the Help
sect
i
on
.
Ź
For Win
d
ows X
P
A
Dou
bl
e-c
l
ic
k
t
h
eMy B
l
uetoot
h
Environmen
t
s
h
ortcut icon
on t
h
e Des
k
top to
l
aunc
h
t
h
e program, an
d
t
h
en press t
h
e
F1
key to view the help in
f
ormation
.
Q
When no headset is
f
ound or cannot be connecte
d
A
1
I
f
the headset is already connected to another device, you
will not be able to
nd the headset and cannot connect to
the headset even i
f
the headset is
f
ound. Disconnect the
connection to t
h
e ot
h
er
d
evice an
d
t
h
en start t
h
e searc
h
aga
i
n
.
A
2
I
f
the headset is connected to a power adapter, you cannot
ma
k
e a B
l
uetoot
h
connection
.
Disconnect t
h
e power a
d
apter an
d
t
h
en retry
.

105
Chapter 4
Troubleshooting
A
3
A Bluetooth headset provides two operating modes, On/O
mo
d
e an
d
Pairing mo
d
e. To connect t
h
e
h
ea
d
set to anot
h
er
B
l
uetoot
h
d
evice suc
h
as a PC or mo
b
i
l
e p
h
one, t
h
e
h
ea
d
set
s
h
ou
ld
b
e in Pairing mo
d
e
.
Ɣ
Entering Pairing mo
de
For more in
f
ormation about entering Pairing mode, re
f
er
to the user manual o
f
the headset. In this section, we will
d
escri
b
e t
h
e genera
l
met
h
o
d
to enter Pairing mo
d
e
.
-
Power
b
utton type
h
ea
d
sets
(
h
ea
d
sets t
h
at are turne
d
on
b
y pressing t
h
e power
b
utton
)
I
f
you press and hold the power button
f
or 1~3 seconds, the
power is turned on. I
f
you do not release the button even
a
f
ter the power is turned on, the headset enters Pairing mode
.
-
On/O
switch type headsets
(headsets that are turned on or o
by sliding the power
switc
h
to t
h
e correspon
d
ing position.
)
Turn t
h
e
h
ea
d
set on
by
s
l
i
d
ing t
h
e power switc
h
to t
h
e on
position w
h
i
l
e
h
o
ld
ing
d
own t
h
e Ca
ll
b
utton
.
The headset is turned on in Pairing mode. Check i
f
the
h
ea
d
set is in Pairing mo
d
e t
h
roug
h
t
h
e
h
ea
d
set LED
.
A
f
ter switching to Pairing mode, search
f
or the headset in the
B
l
uetoot
h
d
evice win
d
ow on t
h
e computer
.
In general, Pairing mode automatically turns to On/O
mode
a
f
ter a predetermined period o
f
time. In this case, you have to
turn the headset o
and then on and make the headset enter
Pairing mo
d
e again to connect to t
h
e computer
.
Usage Instruct
i
on
s
Generall
y
, Bluetooth devices deliever stable per
f
ormance while
t
connected within a 3m(10
f
t.) distance
.
For B
l
uetoot
h
to operate smoot
hl
y, use t
h
e computer in an open
t
environment wit
h
no wa
ll
s or o
b
stac
l
es in t
h
e way an
d
h
aving
l
ow
radio inter
f
erence
.
Y
ou can connect to only one Bluetooth device at a time
f
or
t
a p
h
one connection,
d
ata syncing, e
l
ectronic
b
usiness car
d
exchange, FAX transmission/reception, sound related
f
unctions,
and serial port
f
unctions
.
It is recommen
d
e
d
using on
l
y one B
l
uetoot
h
d
evice at a time as
t
connecting mu
l
tip
l
e B
l
uetoot
h
or ot
h
er wire
l
ess
d
evices at t
h
e
same time may s
l
ow or
d
esta
b
i
l
ize t
h
e B
l
uetoot
h
connection
.
Data communications via B
l
uetoot
h
may
b
e poor w
h
en t
h
e CPU
t
load is at
f
ull capacity or there are insu
cient system resources
.
The Bluetooth
f
unction o
f
a Bluetooth PDA, mobile phone, mouse
t
or keyboard may be turned o
. To use them in connection with a
Samsung computer supporting Bluetooth, you must check i
f
the
Bluetooth
f
unction o
f
the device to connect to is turned on
.
For the procedures on turning on the Bluetooth
f
unction o
f
a
device, re
f
er to the relevant device manual
.
T
h
e services provi
d
e
d
b
y B
l
uetoot
h
d
evices may vary
d
epen
d
ing
t
on t
h
eir capa
b
i
l
ities. For t
h
e services provi
d
e
d
b
y t
h
e B
l
uetoot
h
device, re
f
er to the device manual
.
1
06
Chapter 4
Troubleshooting
Easy Content Share Related
Q
No connecte
d
d
evice is s
h
own in Easy Content S
h
are
.
I
f
no connected device is shown, check the
f
ollowing
.
A1
C
h
ec
k
w
h
et
h
er your TV supports
D
LN
A
. For more in
f
ormation
on this, re
f
er to the User Manual o
f
your TV
.
A2
C
h
ec
k
w
h
et
h
er a
ll
d
evices connecte
d
to t
h
e access point are
turne
d
on
.
A3
C
h
ec
k
w
h
et
h
er your PC an
d
TV are connecte
d
to t
h
e access
point correct
l
y
.
A4
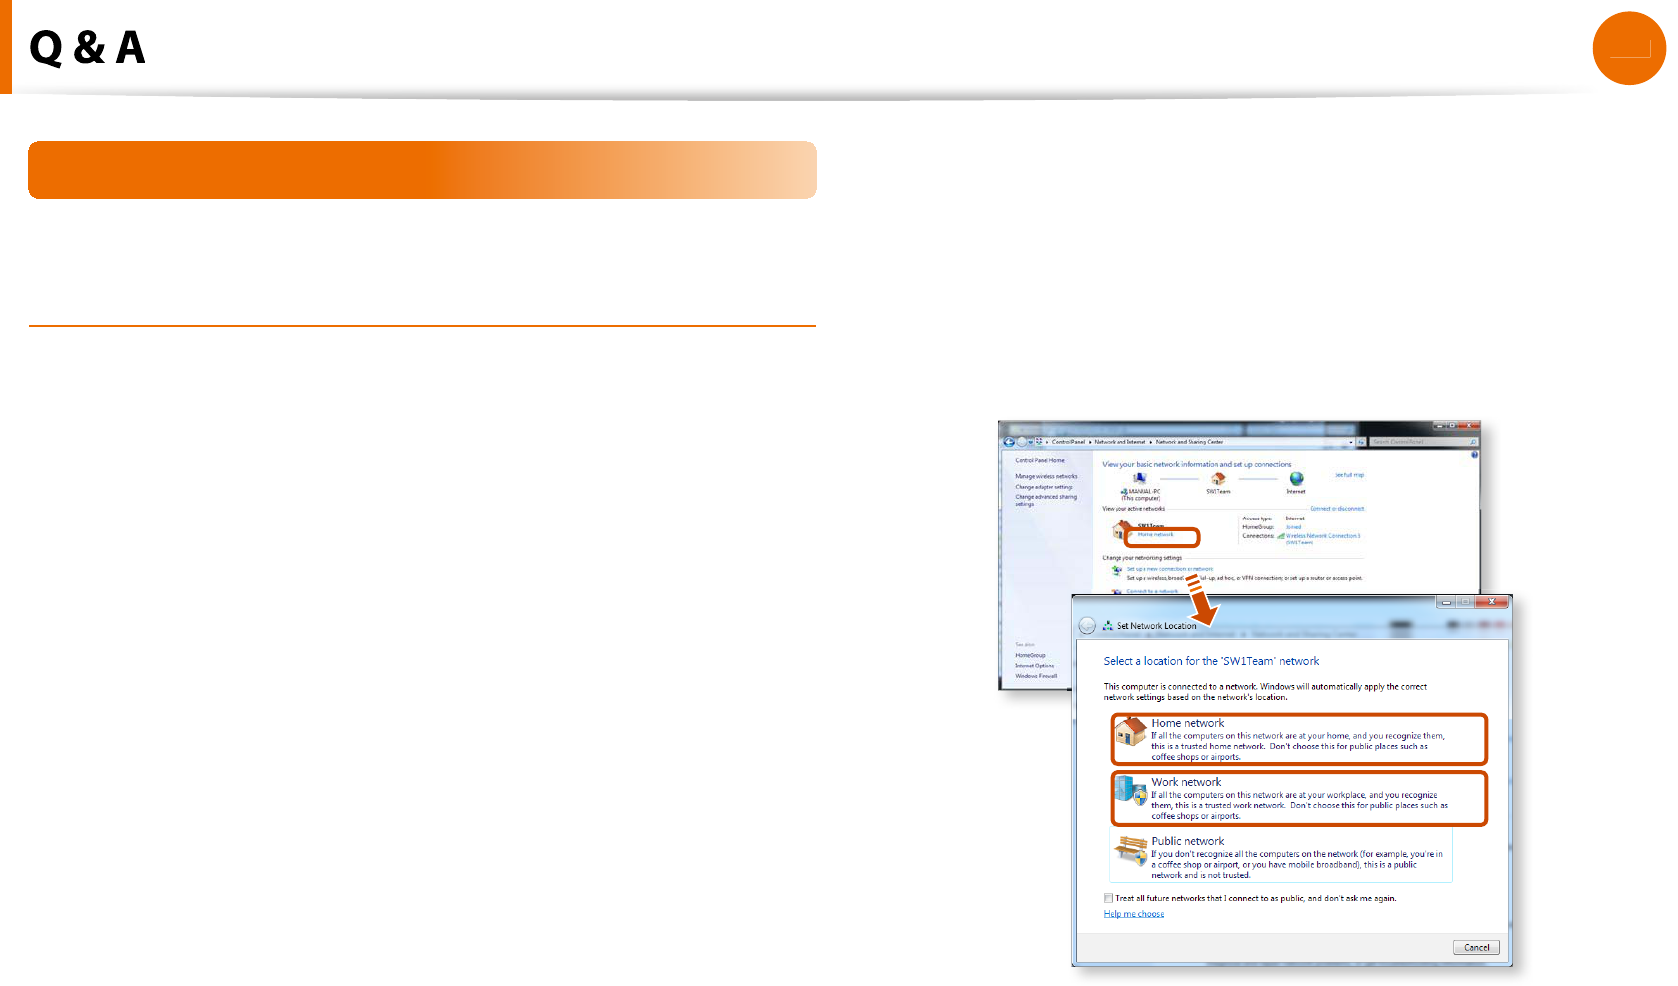
Check whether the network location o
f
your PC is set to
Home network
or
k
Wor
k
networ
k
.
I
f
not, clic
k
Contro
l
Pane
l
> A
ll
Contro
l
Pane
l
Items >
Networ
k
an
d
S
h
aring Center > Pu
bl
ic Networ
k
.
C
h
ange t
h
e networ
k
l
ocation to
Home network
or
k
Wor
k
networ
k
.
107
Chapter 4
Troubleshooting
A5
T
h
is pro
bl
em may occur
d
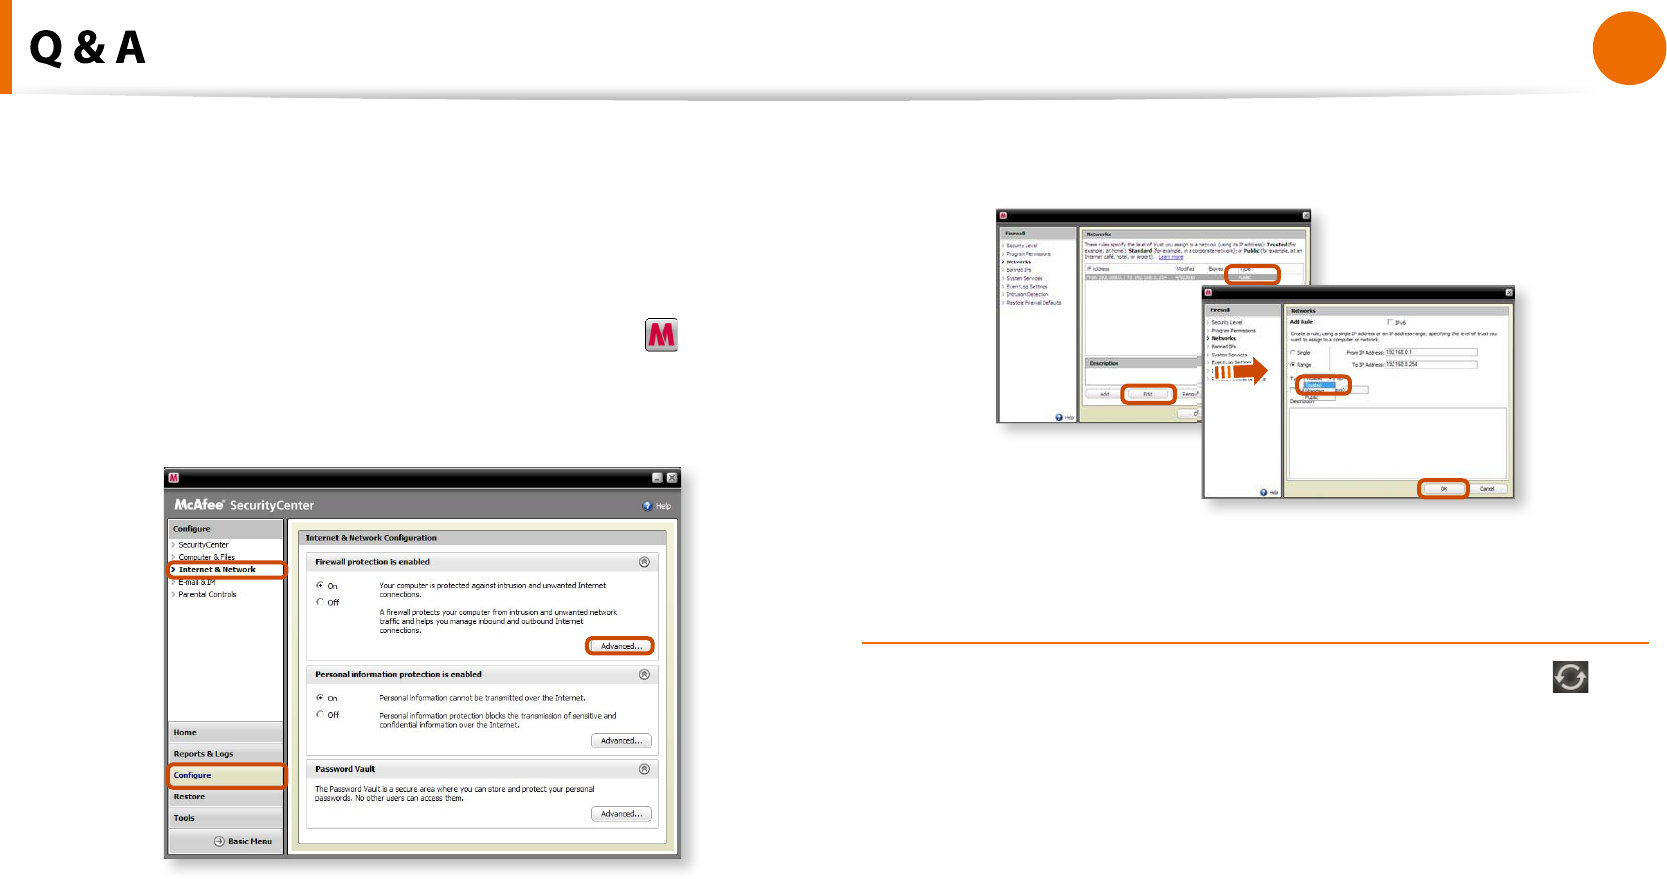
ue to a vaccine program. (T
h
is is
on
l
y app
l
ica
bl
e to mo
d
e
l
s w
h
ere McA
f
ee Security Cente
r
i
s
insta
ll
e
d
)
.
In this case, change the settings by
f
ollowing the steps below
.
1
Dou
bl
e-c
l
ic
k
t
h
eMcA
f
ee Security Cente
r
i
con to
l
aunc
h
i
t
.
C
l
ic
k
Con
gure > Internet & Network > Advance
d
.
2
Se
l
ect t
h
e Networ
k
menu item. In t
h
e Networ
k
pane to t
h
e
right o
f
the window, check whether the Type is set to Truste
d
.
I
f
it is not set to Truste
d
, c
h
ange it to Truste
d
by per
f
orming
t
h
ese operations
:
C
l
ic
k
E
d
i
t
> C
h
ange t
h
e type to Truste
d
> C
l
ic
k
OK
.
Q
My TV which has been used success
f
ully with Easy
Content S
h
are is su
dd
en
l
y not s
h
own in t
h
e
l
ist
.
A1
T
h
is is
b
ecause t
h
e networ
k
is unsta
bl
e. C
l
ic
k
Re
f
res
h
t
o
update the list o
f
devices connected to the access point
.
A
2
This problem may occur due to a vaccine program. (This is
only applicable to models where McA
f
ee Security Center is
insta
ll
e
d
)
.
Q.
Re
f
er to answer
A5
f
or the question Q. No connecte
d
d
evices are s
h
own in Easy Content S
h
ar
e
.

108
Chapter 4
Troubleshooting
Q
Su
b
tit
l
es are not
d
isp
l
aye
d
w
h
en viewing vi
d
eos on my
TV.
A
Easy Content S
h
ar
e
d
oes not support su
b
tit
l
es
d
ue to DLNA
constraints. To enjoy vi
d
eos wit
h
su
b
tit
l
es, you s
h
ou
ld
insta
ll
Samsung TV’s
b
un
dl
e
d
DLNA S/W (app
l
ica
bl
e to Samsung TVs
on
l
y)
.
1
Insta
ll
t
h
e DLNA S/W
b
un
dl
e
d
wit
h
your Samsung TV on your
compu
t
er
.
2
Share the
les you want to play using the Samsung TV’s
b
un
dl
e
d
DLNA S/W
.
(For more in
f
ormation on how to use Samsung TV’s bundled
DLNA S/W, re
f
er to the User Manual o
f
your TV.
)
3
R
un Easy Content S
h
ar
e
. I
f
the Samsung TV’s bundled DLNA
S/W you installed is listed in the remote server list o
f
E
asy
Content S
h
ar
e
, the sharing settings have been con
gured
success
f
ully
.
4
In Easy Content Share, add the shared content o
f
the Samsung
TV’s
b
un
dl
e
d
DLNA S/W to t
h
e p
l
ay
l
ist. Now you can enjoy
su
b
tit
l
es
.
Q
No screen is
d
isp
l
aye
d
w
h
en I try to view a vi
d
eo on my
TV.
A
I
f
the
f
ormat o
f
the video is not supported by your TV, no
screen wi
ll
b
e output
.
T
h
e same symptom a
l
so occurs w
h
en ot
h
er p
l
ay
b
ac
k
d
evices
except
f
or your TV do not support the video
f
ormat
.
Q
Do only the PC and TV have the DLNA
f
unction
?
A
Some cell phones, printers, photo
f
rames and re
f
rigerators,
etc. support the DLNA
f
unction
.
Devices supporting the DLNA
f
unction can share
les with
eac
h
ot
h
er. Depen
d
ing on eac
h
pro
d
uct, a pro
d
uct may on
l
y
support sharing photos or music
les. For detailed in
f
ormation
on the DLNA
f
unctions, re
f
er the user manual o
f
each product
.

Chapter 5.
Appendix
Important Safety Information 110
Replacement Parts and Accessories 112
Regulatory Compliance Statements 114
WEEE SYMBOL INFORMATION 128
Product Specications 129
Glossary 131
Index 135

11
0
Chapter 5
Appendix
Sa
f
ety Instruction
s
Your system is
d
esigne
d
an
d
teste
d
to meet t
h
e
l
atest stan
d
ar
d
s
f
or sa
f
ety o
f
in
f
ormation technology equipment. However, to
ensure sa
f
e use o
f
this product, it is important that the sa
f
ety
instructions mar
k
e
d
on t
h
e pro
d
uct an
d
in t
h
e
d
ocumentation are
f
ollowed
.
Always
f
ollow these instructions to help guard against
persona
l
injury an
d
d
amage to your system
.
Sett
i
ng Up your Syste
m
Read and
f
ollow all instructions marked on the product and in
t
the documentation be
f
ore you operate your system. Retain all
sa
f
ety and operating instructions
f
or
f
uture use
.
Do not use t
h
is pro
d
uct near water or a
h
eat source suc
h
as a
t
ra
d
iator
.
Set up the system on a stable work sur
f
ace
.
t
The product should be operated only with the type o
f
power
t
source in
d
icate
d
on t
h
e rating
l
a
b
e
l.
Ensure t
h
at t
h
e e
l
ectrica
l
out
l
et you are using to power your
t
equipment is easily accessible in case o
f
re or short circuit
.
I
f
your computer has a voltage selector switch, make sure that
t
the switch is in the proper position
f
or your area
.
Openings in the computer case are provided
f
or ventilation.
t
Do not
bl
oc
k
or cover t
h
ese openings. Ma
k
e sure you provi
d
e
a
d
equate space, at
l
east 6 inc
h
es (15 cm), aroun
d
t
h
e system
f
or ventilation when you set up your work area. Never insert
objects o
f
any kind into the computer ventilation openings
.
Ensure that the
f
an vents on the bottom o
f
the casing are clear
t
at all times. Do not place the computer on a so
f
t sur
f
ace, doing
so wi
ll
bl
oc
k
t
h
e
b
ottom vents
.
I
f
you use an extension cord with this system, make sure
t
t
h
at t
h
e tota
l
power rating on t
h
e pro
d
ucts p
l
ugge
d
into t
h
e
extension cor
d
d
oes not excee
d
t
h
e extension cor
d
power
rat
i
ng
.
ff