Broadcom BRCM1051 802.11g/Draft 802.11n WLAN + BT PCI-E User Manual Manual 2
Broadcom Corporation 802.11g/Draft 802.11n WLAN + BT PCI-E Manual 2
Broadcom >
Contents
- 1. User manual
- 2. OEM installation guide
- 3. Host user manual 1 of 5
- 4. Host user manual 2 of 5
- 5. Host user manual 3 of 5
- 6. Host user manual 4 of 5
- 7. Host user manual 5 of 5
- 8. User Manual
- 9. OEM installation Guide
- 10. Akashi User Manual
- 11. Gucci Users Manual
- 12. User manual 1 of 3
- 13. User manual 2 of 3
- 14. User manual 3 of 3
- 15. Host useer manual
Host user manual 2 of 5
21
Chapter 1
Getting Started
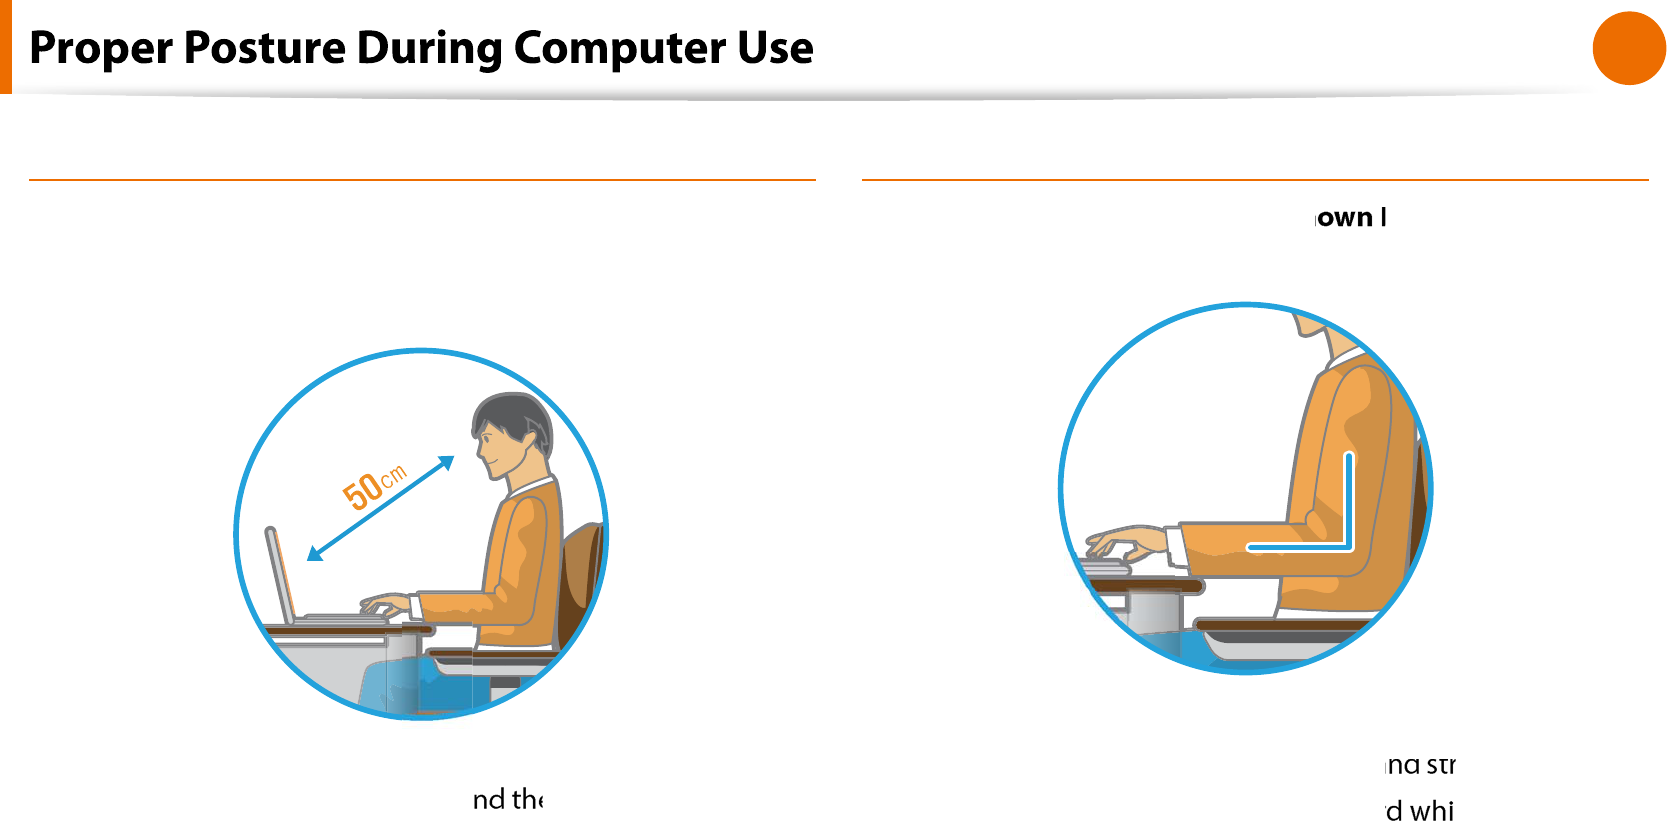
Eye Pos
i
t
i
o
n
Keep the monitor or LCD away
f
rom your eyes by at least
5
0
cm
.
Adjust the height of the monitor and the LCD screen so that its
t
top height is equal to or lower than your eyes.
Avoi
d
setting t
h
e monitor an
d
LCD excessive
l
y
b
rig
h
t
.
t
Keep t
h
e monitor an
d
LCD screen c
l
ean
.
t
I
f
you wear glasses, clean them be
f
ore using the computer
.
t
W
h
en entering contents printe
d
on a paper into t
h
e computer,
t
use a static paper holder so that the height o
f
the paper is
almost equal to that o
f
the monitor
.
Han
d
Positio
n
Keep your arm at a right angle as shown by the gure.
Keep the line from your elbow to your hand straight.
t
Do not place your palm over the keyboard while typing.
t
Do not hold the mouse with excessive
f
orce
.
t
Do not press t
h
e
k
ey
b
oar
d
, touc
h
pa
d
or mouse wit
h
excessive
t
f
orce
.
It is recommen
d
e
d
connecting an externa
l
k
ey
b
oar
d
an
d
t
mouse when using the computer
f
or long periods o
f
time
.

22
Chapter 1
Getting Started
Vo
l
ume Contro
l
(Hea
d
p
h
ones an
d
Spea
k
ers
)
Check your volume
rst to listen to music
.
C
h
ec
k
your
vo
l
ume
!
Check i
f
the volume is too loud be
f
ore using headphones
.
t
It is not recommended using headphones
f
or long periods o
f
t
t
i
me
.
Any deviation
f
rom the equalizer de
f
ault setting could cause
t
h
earing impairment
.
The de
f
ault setting can be changed through so
f
tware and
t
d
river up
d
ates wit
h
out your intervention. P
l
ease c
h
ec
k
t
h
e
equalizer de
f
ault setting be
f
ore
rst usage
.
Use Time (Brea
k
Time
)
Take a break
f
or 10 minutes or more a
f
ter a 50-minute period
t
when working
f
or more than one hour
.
I
ll
uminatio
n
Do not use t
h
e computer in
d
ar
k
l
ocations. T
h
e i
ll
umination
t
level
f
or computer use must be as bright so
f
or reading a book
.
In
d
irect i
ll
umination is recommen
d
e
d
. Use a curtain to prevent
t
re
ection on the LCD screen
.
Operation Con
d
itio
n
Do not use t
h
e computer in
h
ot an
d
h
umi
d
l
ocations
.
t
Use the computer within the allowed temperature and
t
humidity range speci
ed in the User Guide
.
23
Chapter 1
Getting Started
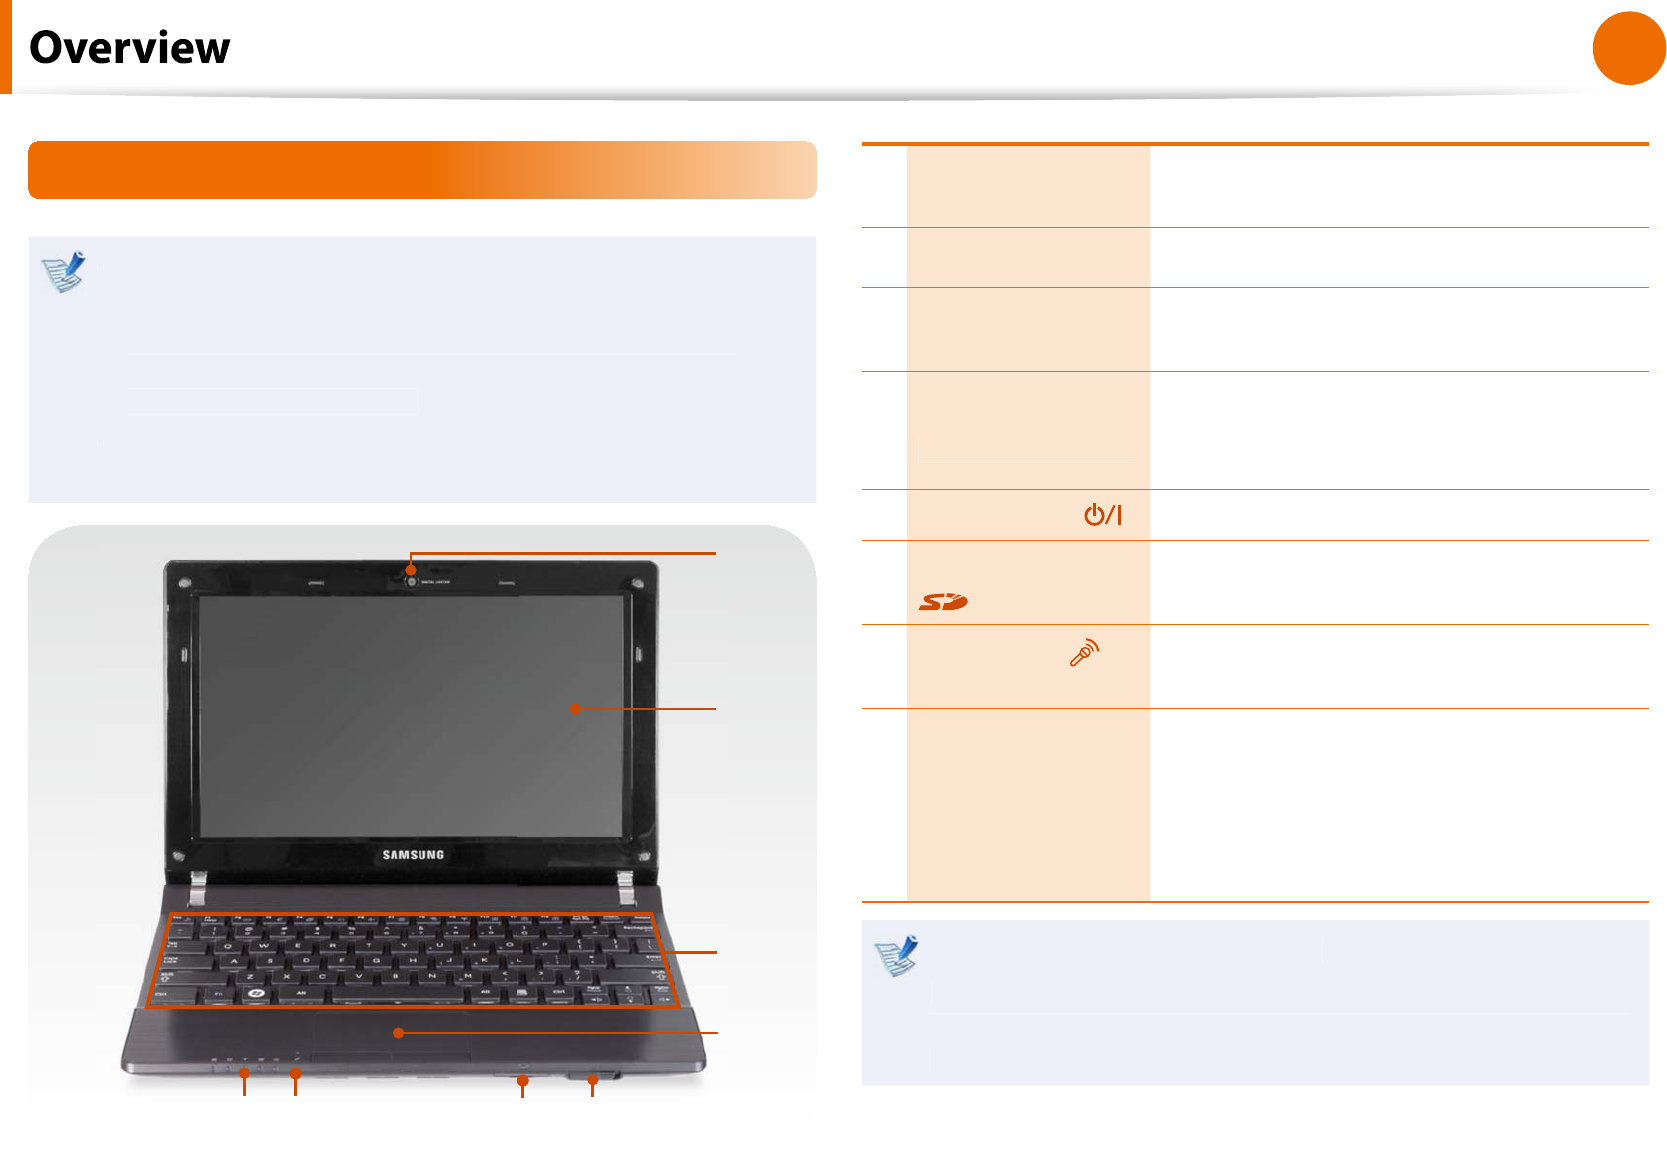
Front View
The pictures used
f
or the cover and the main body in the
t
User Manual are those o
f
the representative model o
f
each
series. There
f
ore the colors and appearance o
f
the pictures
may di
er
f
rom the actual appearance o
f
the product
d
epen
d
ing on t
h
e mo
d
e
l.
The actual color and appearance o
f
the computer may
t
di
er
f
rom the pictures used in this guide
.
1
2
3
4
5
7
86
1Camera Lens
(Optional)
Using t
h
is
l
ens, you can ta
k
e sti
ll
pictures
an
d
recor
d
vi
d
eo
.
2LCD T
h
e screen images are
d
isp
l
aye
d
h
ere
.
3Keyboard A
d
evice to enter
d
ata
b
y pressing t
h
e
k
eys
.
4Touchpad/
Touc
h
pa
d
Button
s
T
h
e touc
h
pa
d
an
d
touc
h
pa
d
b
uttons
provide
f
unctions similar to the mouse
b
a
ll
an
d
b
uttons
.
5Power Switch Turns the computer on or o
.
6Multi Card Slot
(Optional)
A car
d
s
l
ot t
h
at supports SD Car
d
, SDHC
an
d
MMC
.
7Microphone
(Optional) You can use t
h
e
b
ui
l
t-in microp
h
one
.
8Status In
d
icator
s
Shows the operating status o
f
the
compu
t
er
.
T
h
e correspon
d
ing operating LED is
l
it when the corresponding
f
unction
opera
t
es
.
Using t
h
e camera
l
ens, we
b
ca
m
Using t
h
e Cy
b
er
l
in
k
YouCam program (optiona
l
), you can
ta
k
e pictures or recor
d
vi
d
eo
b
y using t
h
e computer’s
b
ui
l
t-in
camera by adding the balloon talk or
f
rame e
ect
.
24
Chapter 1
Getting Started
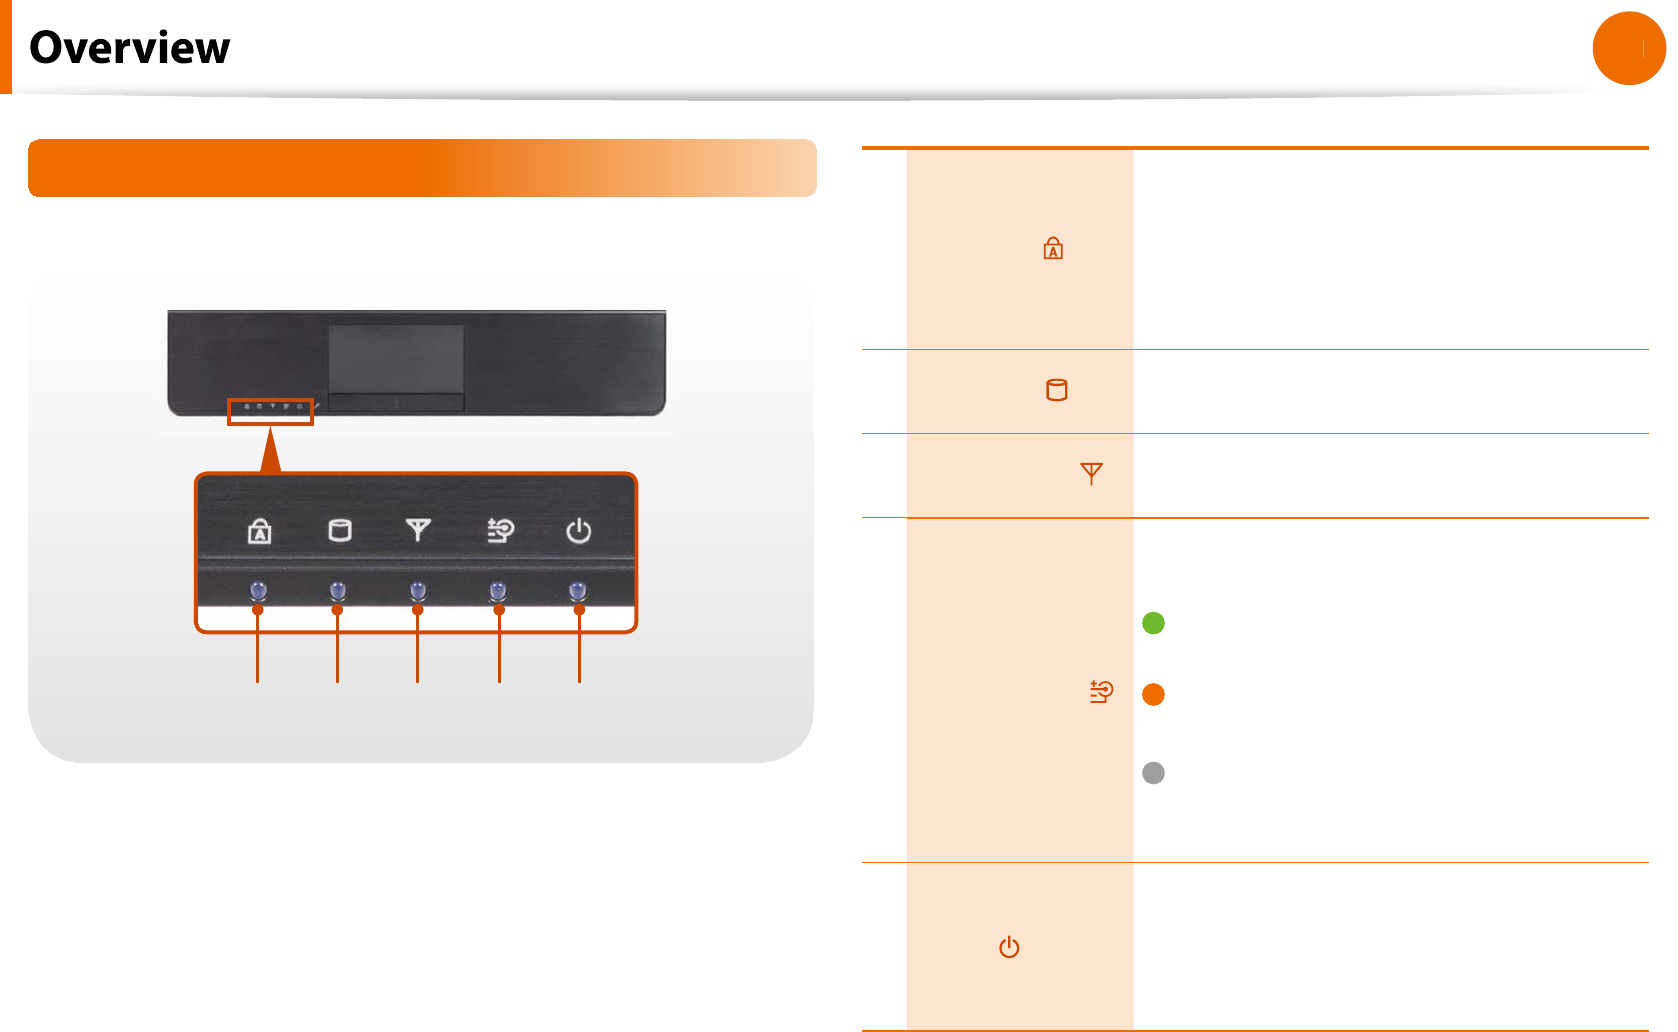
Status Indicators
12345
1Caps Lock
T
h
is turns on w
h
en t
h
e Caps Loc
k
k
ey is
presse
d
a
ll
owing capita
l
l
etters to
b
e type
d
without holding the Shi
f
t button down
.
On
: Upper-case a
l
p
h
a
b
etic inpu
t
O
: Lower-case a
l
p
h
a
b
etic inpu
t
2HDD/ODD T
h
is turns on w
h
en t
h
e
h
ar
d
d
is
k
is or ODD
b
eing accesse
d.
3Wireless LAN T
h
is turns on w
h
en t
h
e wire
l
ess LAN is
operat
i
ng
.
4Charge Status
T
h
is s
h
ows t
h
e power source an
d
t
h
e
b
attery c
h
arge status
.
G
reen: When the battery is
f
ully
c
h
arge
d
or t
h
e
b
attery is not insta
ll
e
d.
O
range: W
h
en t
h
e
b
attery is
b
eing
c
h
arge
d.
O
:W
h
en t
h
e computer is running on
b
attery power wit
h
out
b
eing connecte
d
to AC a
d
apter
.
5Power
T
h
is s
h
ows t
h
e computer operating status
.
On
:
W
h
en t
h
e computer is operating
.
B
l
in
k
s
:
W
h
en t
h
e computer is in S
l
eep
mo
d
e
.
25
Chapter 1
Getting Started
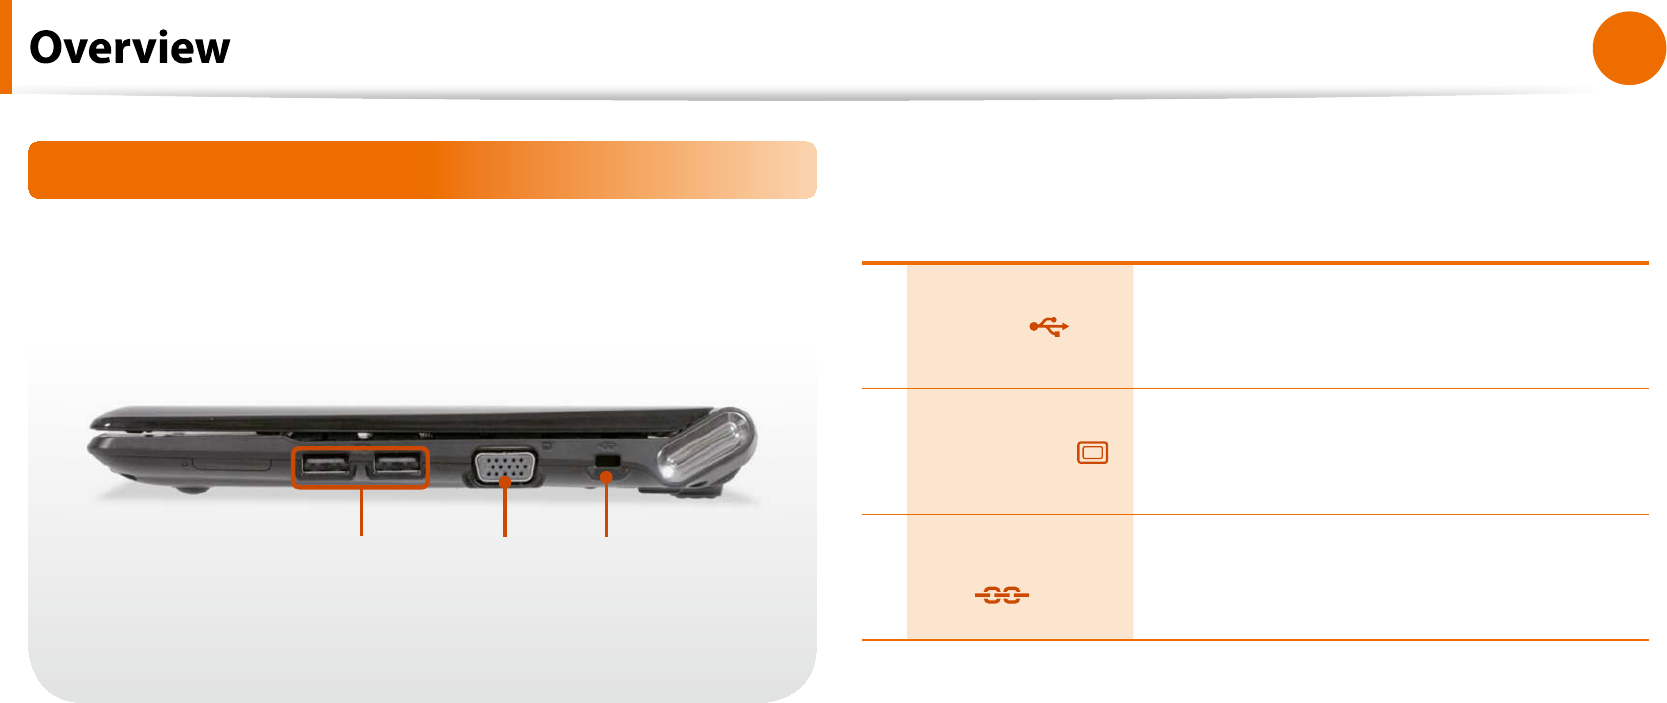
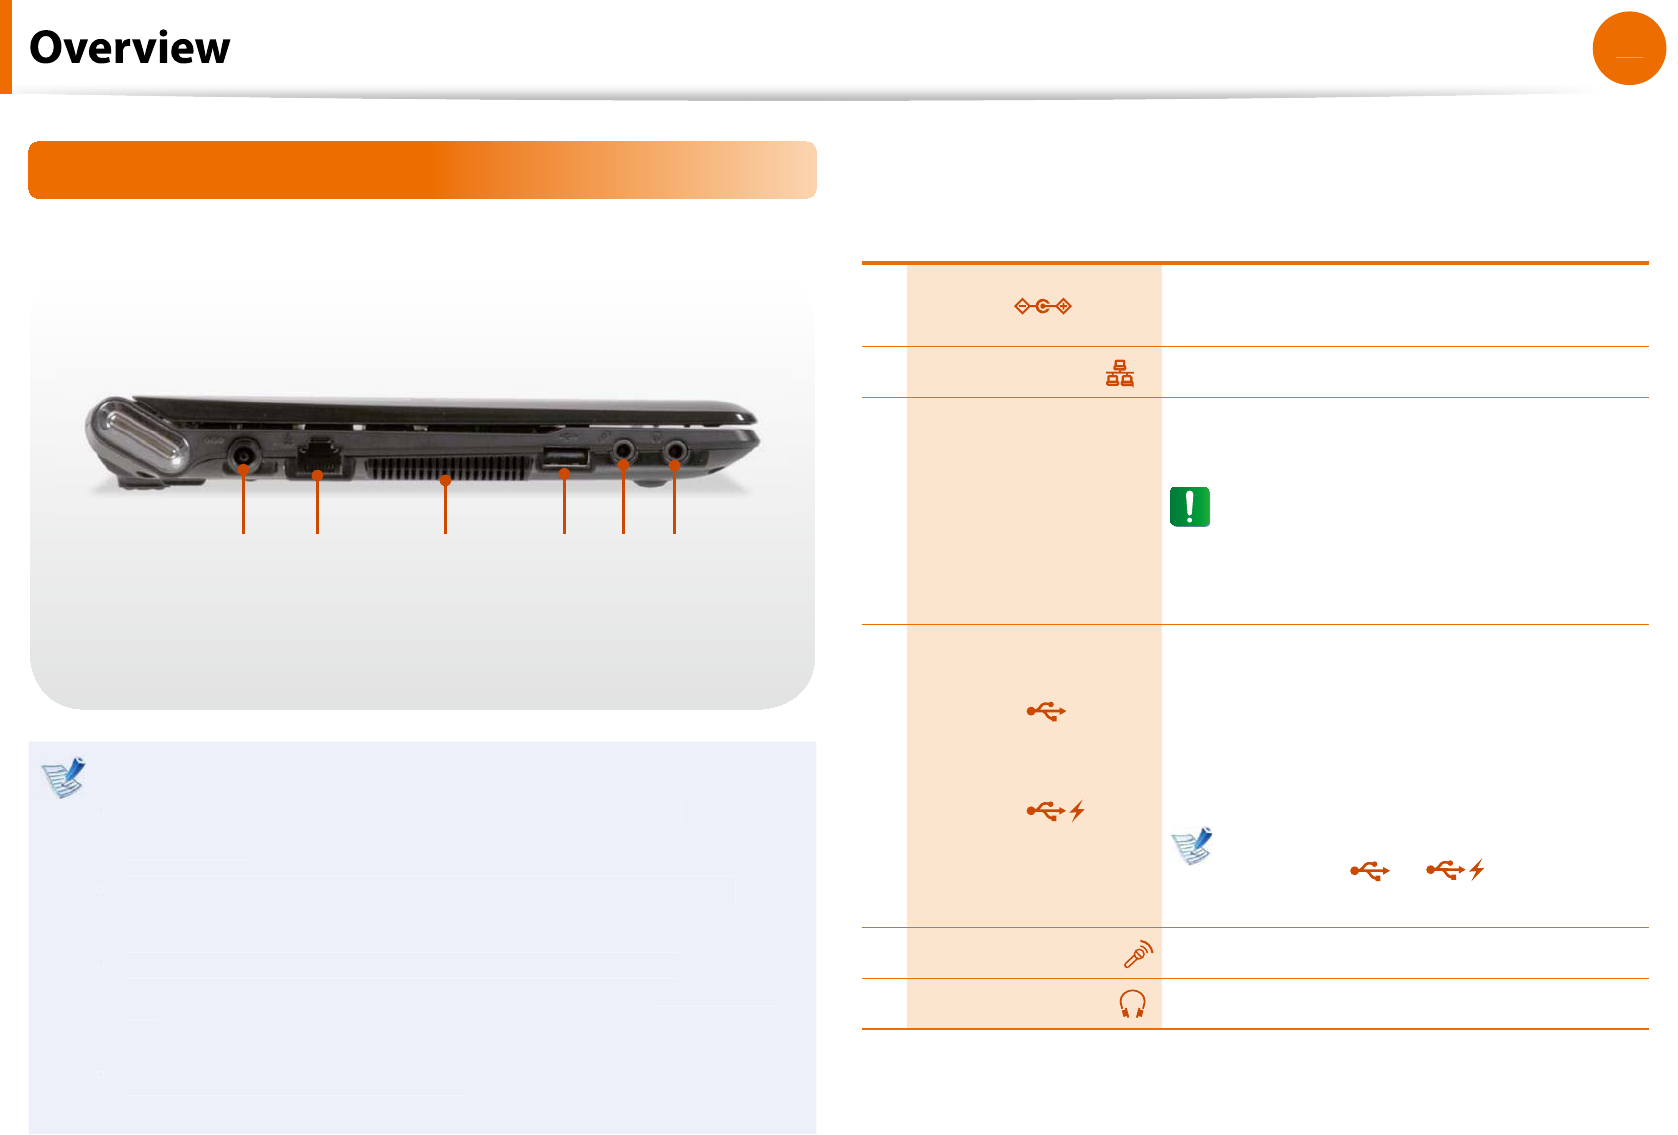
Right View
123
1USB Port
You can connect USB
d
evices to t
h
e USB
port suc
h
as a
k
ey
b
oar
d
/mouse,
d
igita
l
camera, e
t
c
.
2Monitor Port
A port use
d
to connect a monitor, T
V
or projector supporting a 15pin D-
S
UB
i
nter
f
ace
.
3Security Lock
Port
You can connect a Kensington
l
oc
k
to t
h
e
Security Loc
k
Port to prevent t
h
e computer
f
rom being stolen
.
26
Chapter 1
Getting Started
Left View
21345 6
W
h
at is a c
h
argea
bl
e USB port
?
USB device accessing and charging
f
unctions are
t
supporte
d.
The USB charging
f
unction is supported regardless o
f
t
whether the power is turned on or o
.
To use a USB port as a c
h
argea
bl
e USB port, c
l
ic
k
t
S
tart >
A
ll
Programs > Samsung > C
h
argea
bl
e US
B
an
d
turn it
On
.
C
h
arging a
d
evice t
h
roug
h
a c
h
argea
bl
e USB port may ta
k
e
t
l
onger t
h
an genera
l
c
h
arging
.
1D
C
Jack
A jac
k
to connect t
h
e AC a
d
apter t
h
at
s
upp
l
ies power to t
h
e computer.
2Wired LAN Port Connect t
h
e Et
h
ernet ca
bl
e to t
h
is port
.
3Fan Vents
The internal heat o
f
the computer is
emitte
d
t
h
roug
h
t
h
ese
h
o
l
es
.
I
f
the vents are blocked the
computer may overheat
.
Avoi
d
bl
oc
k
ing t
h
e vents as t
h
is may
b
e
d
angerous
.
4
USB Port
or
Chargeable
USB Port
(Optional)
USB ports to w
h
ic
h
you can connect USB
d
evices as we
ll
as a c
h
argea
bl
e USB port
are provi
d
e
d.
Using a c
h
argea
bl
e USB port, you can
access or c
h
arge a USB
d
evice
.
T
h
e port can
b
e
d
istinguis
h
e
d
b
y
the
gure
(
or
) printe
d
on
the port o
f
the product
.
5Microphone Jack A jac
k
use
d
to connect t
h
e microp
h
one
.
6Headphone Jack A jac
k
use
d
to connect t
h
e
h
ea
d
p
h
ones
.
27
Chapter 1
Getting Started
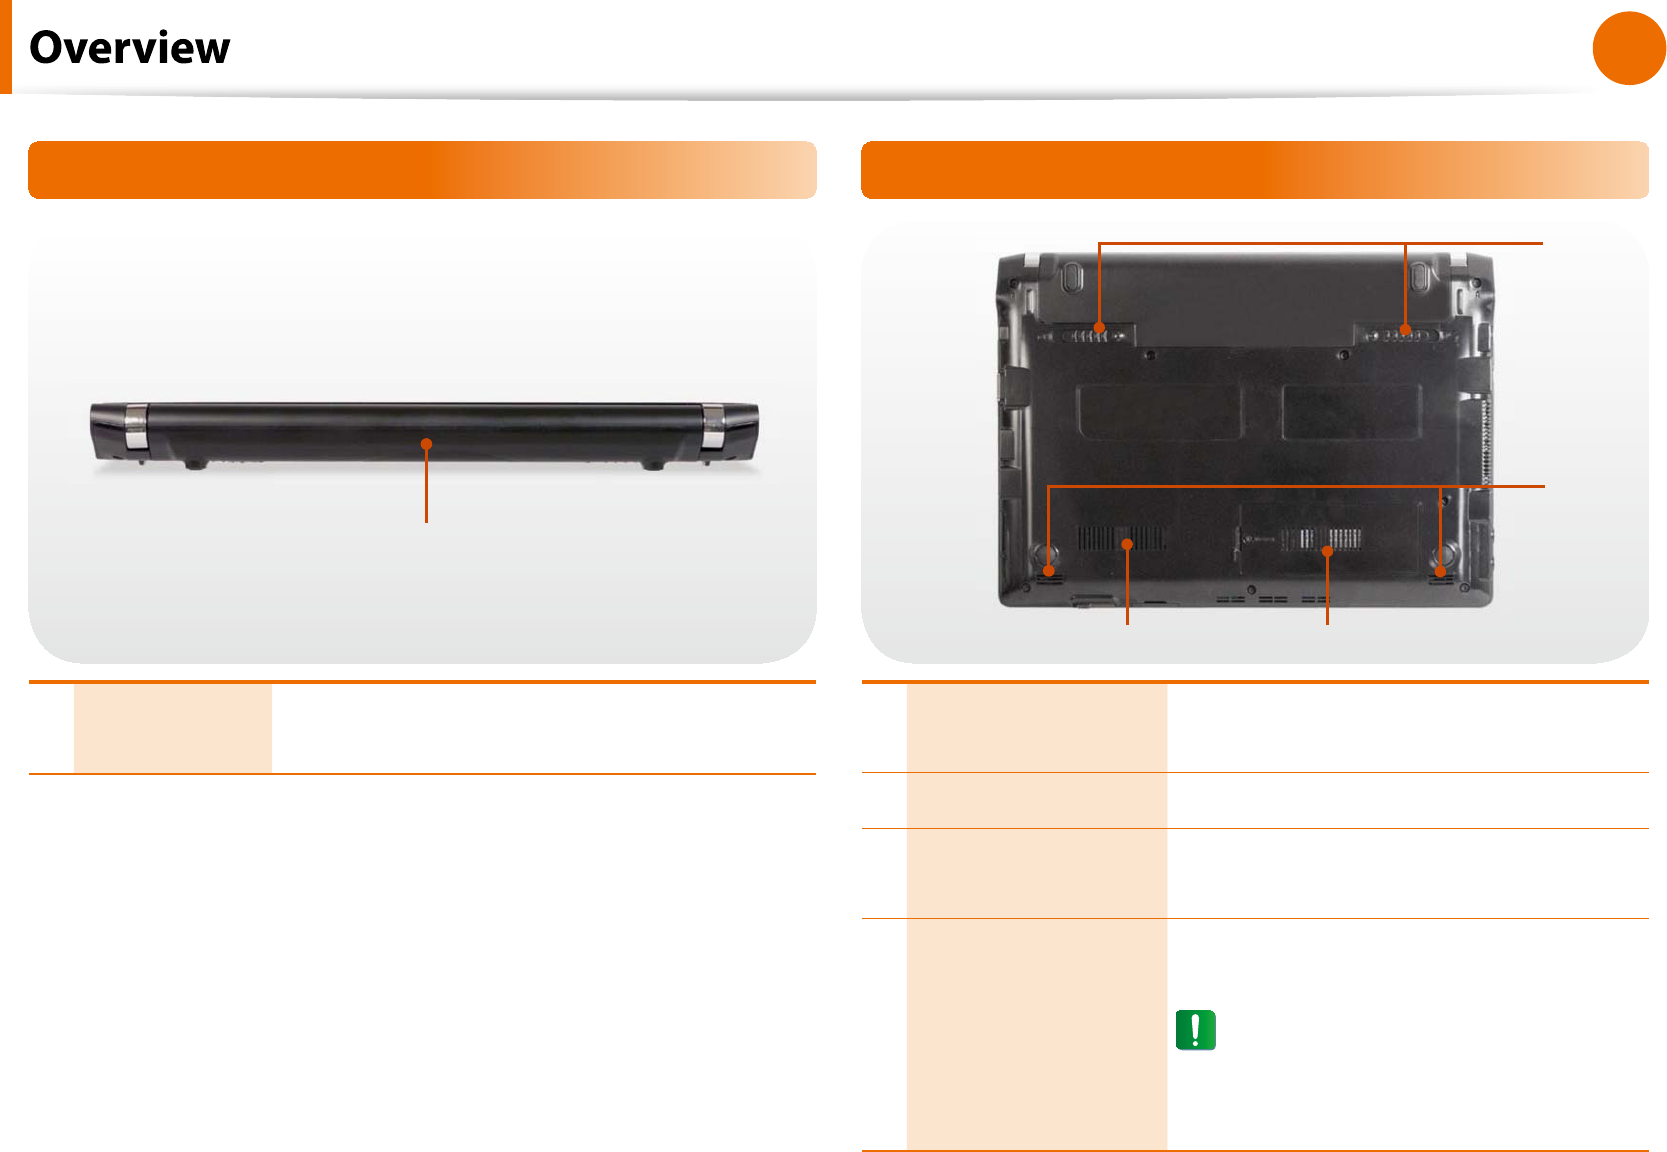
Back View
1
1Battery T
h
is is a Lit
h
ium-Ion rec
h
argea
bl
e
b
attery t
h
at
supp
l
ies power to t
h
e computer
.
Bottom View
1
4
3
2
1Battery Latches T
h
e
l
atc
h
use
d
to remove or insta
ll
t
h
e
b
attery
.
2Speaker A
d
evice use
d
to generate soun
d.
3Memory
Compartment Cover
T
h
e main memory is insta
ll
e
d
insi
d
e t
h
e
c
o
v
er.
4Fan Vents
The internal heat o
f
the computer is
emitte
d
t
h
roug
h
t
h
ese
h
o
l
es
.
I
f
the vents are blocked the
computer may over
h
eat.
Avoi
d
bl
oc
k
ing t
h
e vents as t
h
is may
b
e
d
angerous
.
28
Chapter 1
Getting Started
1Insta
ll
t
h
e
b
atter
y
an
d
connect t
h
eAC a
d
apte
r
.
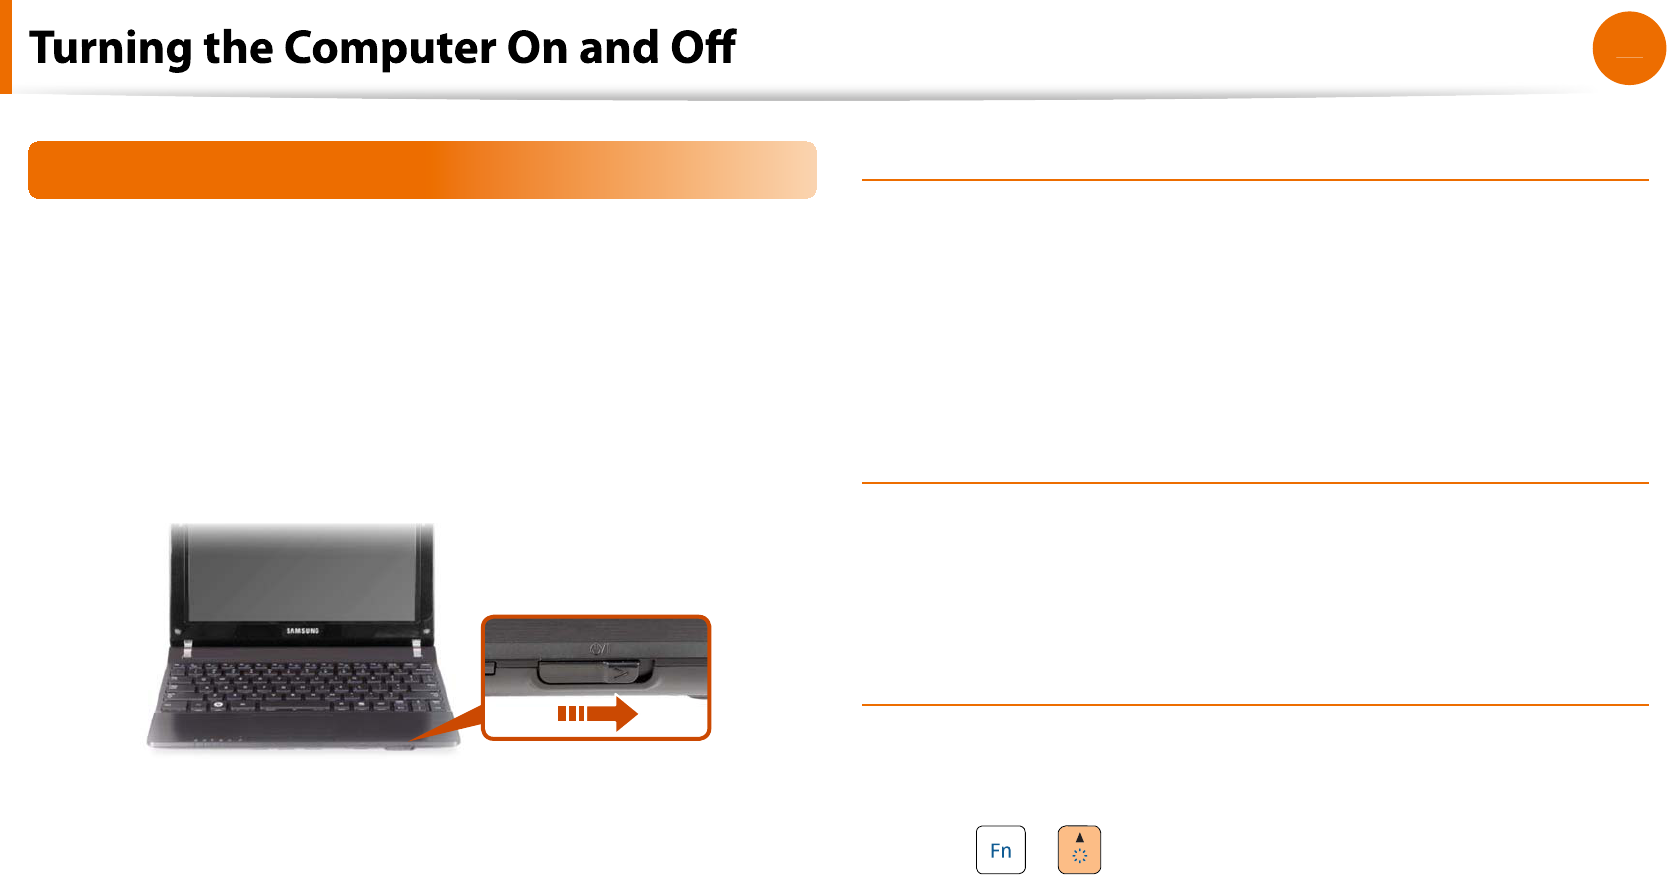
2
Li
f
t the LCD panel up
.
3
S
l
i
d
e t
h
ePower Switc
h
to turn t
h
e computer on
.
A
b
out Win
d
ows Activatio
n
When you turn the computer on
f
or the
rst time, the Windows
act
i
vat
i
on screen appears
.
Fo
ll
ow t
h
e activation proce
d
ures accor
d
ing to t
h
e instructions on
t
h
e screen to use t
h
e computer
.
Entering S
l
eep mo
de
W
h
en t
h
e computer is turne
d
on, press t
h
e computer’s power
button once brie
y
.
A
d
justing t
h
e screen
b
rig
h
tnes
s
W
h
en t
h
e computer runs on
b
attery power, t
h
e LCD
b
rig
h
tness is
automatica
ll
y set to
l
ow
.
Press t
h
e
+
k
ey com
b
ination to increase t
h
e screen
b
rig
h
tness
.
Turning the computer on
29
Chapter 1
Getting Started
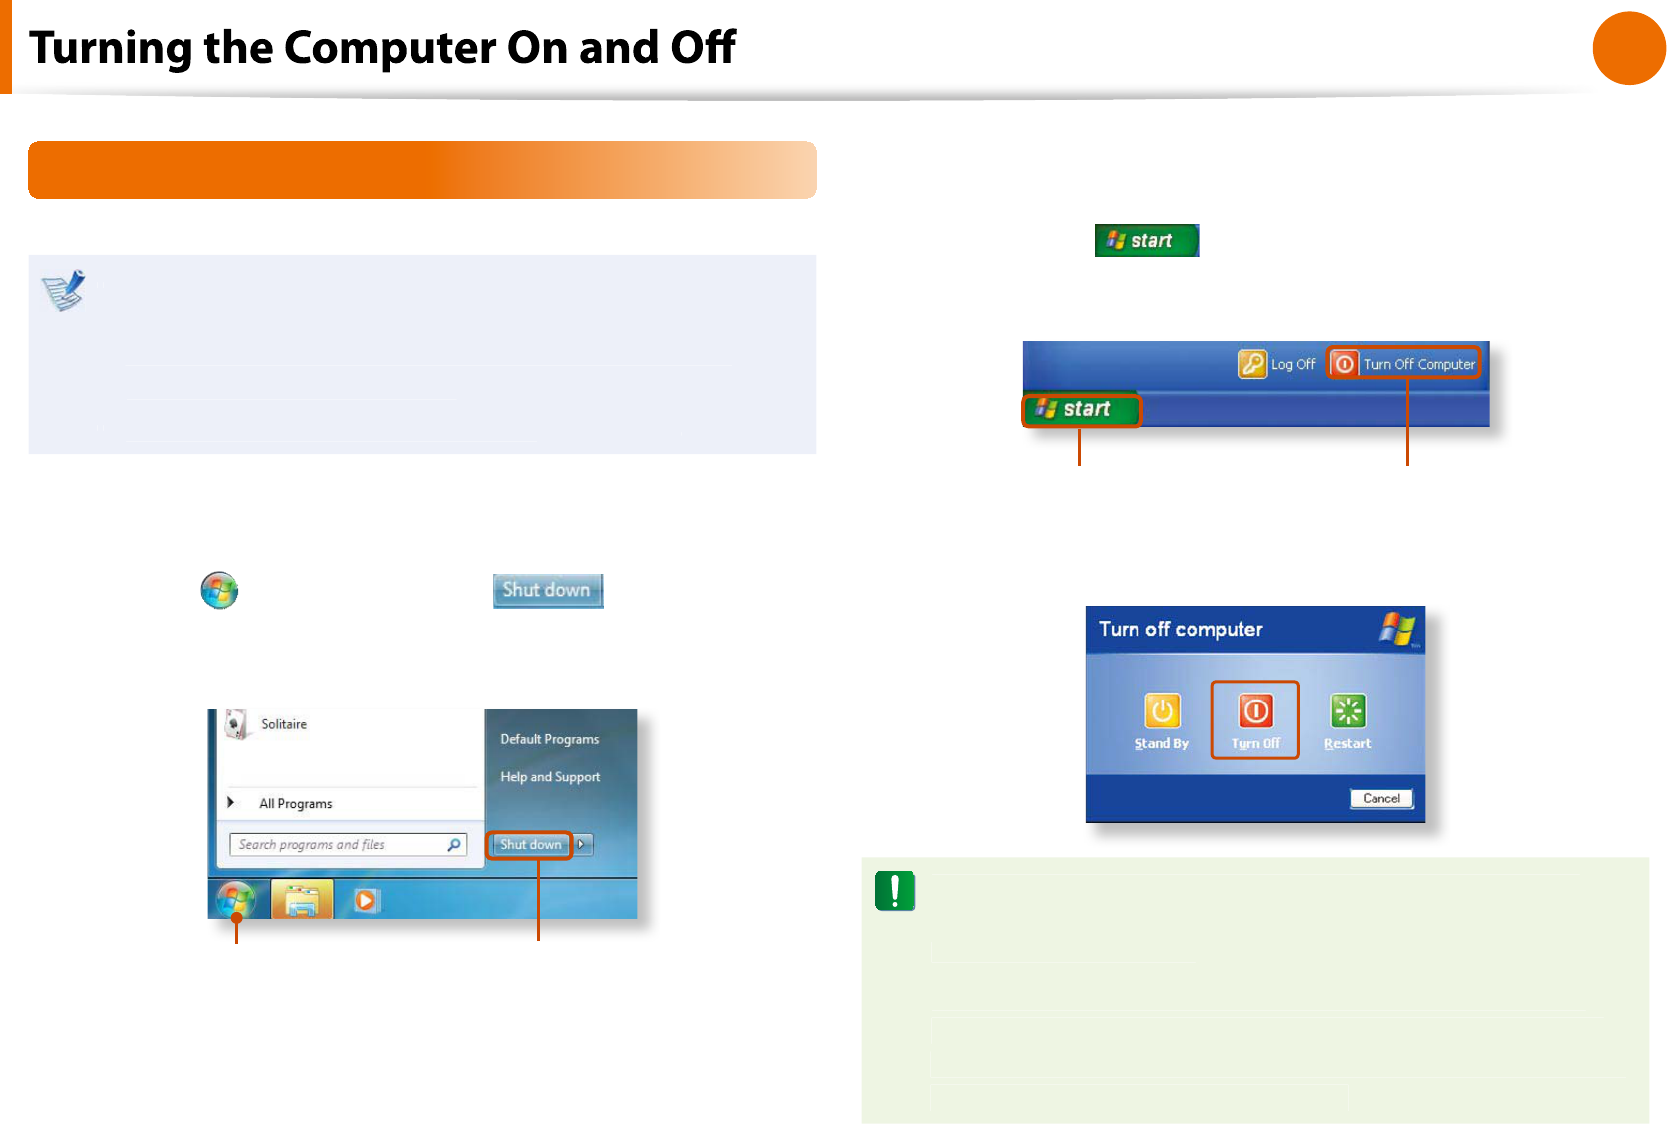
Turning the computer o
Since the procedures to turn the computer o
may di
er
t
d
epen
d
ing on t
h
e insta
ll
e
d
operating system, p
l
ease turn
the computer o
according to the procedures
f
or the
purc
h
ase
d
operating system
.
Save all your data be
f
ore clicking on
t
S
h
ut
d
ow
n
.
Ź
For Win
d
ows
7
C
l
ic
k
S
tart
>
S
h
ut
d
own mo
de
to s
h
ut
d
own t
h
e
compu
t
er
.
12
Ź
For Windows X
P
1C
l
ic
k
t
h
e
S
tar
t
b
utton on t
h
e tas
kb
ar
.
C
l
ic
k
Turn O
Compute
r
.
1 2
2
C
l
ic
k
Turn O
.
I
f
the system cannot be shut down due to a system error,
turn it o
by pressing and holding the Power Button
f
or a
minimum o
f
4 seconds
.
Please note that turning the computer o
by this method
may cause a system problem. Therea
f
ter, when turning the
computer
b
ac
k
on, t
h
e
d
is
k
c
h
ec
k
ing program may
l
aunc
h
to
check
f
or and correct any disk errors
.
30
Chapter 1
Getting Started
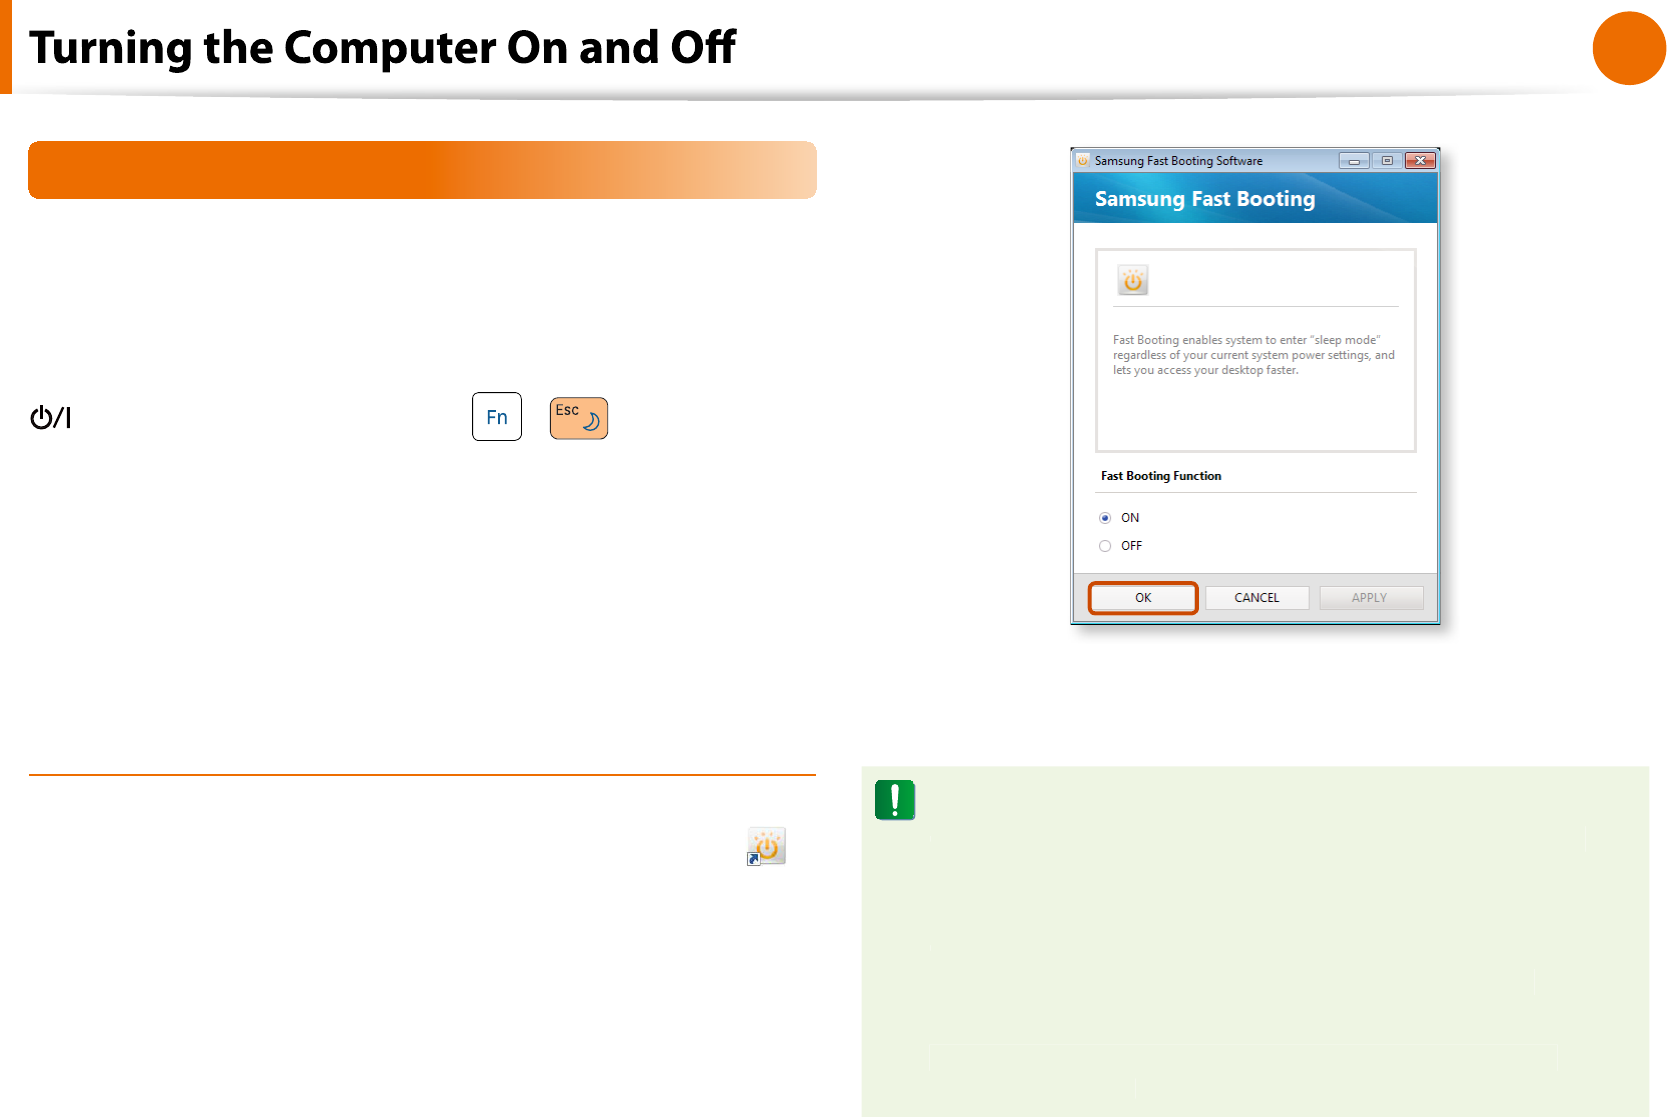
Samsun
g
Fast Boot
i
n
g
I
f
you are using the system very o
f
ten while on the move, use
F
ast
Boot
i
n
g
to re
d
uce t
h
e
b
ooting time
.
Wit
h
Fast Booting active, t
h
e system wi
ll
switc
h
to
h
y
b
ri
d
power
saving mode i
f
you close the LCD panel, slide the Power Switc
h
into t
h
e on position, or press t
h
e
+
k
ey.
In
h
y
b
ri
d
saving mo
d
e, t
h
e
d
ata you are wor
k
ing on wi
ll
b
e save
d
to memory and the HDD, in the event o
f
a sudden power
f
ailure,
ensuring the sa
f
ety o
f
your data
.
However, as unexpecte
d
acci
d
ents can a
l
ways occur, it is
recommended backing up any important data be
f
orehand
.
Us
i
ng Fast Boot
i
n
g
1
From your
d
es
k
top,
d
ou
bl
e-c
l
ic
k
t
h
e
F
ast Boot
i
n
g
i
con
.
(I
f
the program icon does exist on the Windows Desktop,
select the corresponding program
f
rom Start > A
ll
Programs
>
S
amsun
g
.
)
2
Se
l
ect
ON
or
O
F
F
d
epen
d
ing on your requirements, an
d
c
l
ic
k
OK
.
3The Fast Booting
f
unction will be turned on or o
according
to your se
l
ection
.
While the Fast Booting
f
unction is enable
d
You cannot c
h
ange some power options in t
h
e Contro
l
t
Panel. To change these,
rst disable the Fast Booting
fu
n
ct
i
o
n
.
T
h
e existing power saving mo
d
e an
d
maximum power
t
saving mode
f
unctions have been replaced by this
f
unction
.
The LCD may icker once if the Fast Booting function is
turne
d
ON or OFF
.

Keyboard 32
Touchpad 36
External-type CD drive (To be purchased) 40
Multi Card Slot (Optional) 42
Connecting an External Display Device (Optional) 45
Connecting an External Digital Device 47
Adjusting the Volume 48
Wired Network 52
Wireless Network (Optional) 56
Sharing Content in a Home Network
(Easy Content Share) (Optional) 59
Chapter 2.
Using the computer

32
Chapter 2
Using the computer
Shortcut key
f
unctions and procedures are discussed in the
f
ollowing sections
.
The keyboard image may di
er
f
rom the actual keyboard
.
t
The keyboard may di
er depending on your country. The
f
ollowing mainly describes the shortcut keys
.
t
S
h
ortcut Key
s
You can use the
f
ollowing
f
unctions by pressing the keys below with the
Fn
k
ey
.
+
Shortcut Keys Name Function
+
REST
(Sleep Mode) Switc
h
es to S
l
eep mo
d
e. To wa
k
e t
h
e computer up, press t
h
e Power
b
utton
.
Gauge S
h
ows t
h
e remaining
b
attery c
h
arge
.
You can only use this
f
unction when the Easy Display Manager program is installed
.
Euro Enters t
h
e Euro monetary unit sym
b
o
l.
T
h
is
k
ey may not
b
e provi
d
e
d
d
epen
d
ing on t
h
e
k
ey
b
oar
d
type
.
CRT/LCD Switc
h
es t
h
e screen output to t
h
e LCD or externa
l
monitor w
h
en an externa
l
monitor (or TV) is
connecte
d
to t
h
e computer
.

33
Chapter 2
Using the computer
S
h
ortcut Key
s
Name Function
+
Backlight Turns the LCD backlight on or o
.
Mute Mutes or cance
l
s mute
.
S
amsung
S
upport
Center
System
d
iagnosis, recovery an
d
Internet consu
l
tation program, Samsung Support Center, wi
ll
b
e
l
aunc
h
e
d
. (Optiona
l)
For some mo
d
e
l
s, Samsung Mag
i
c Docto
r
is
l
aunc
h
e
d.
Easy Spee
d
Up
Manager
You can select operation mode when you need maximum system per
f
ormance or low-noise
/
l
ow power consumption wit
h
one-c
l
ic
k.
Si
l
ent
:
t
Low-noise an
d
l
ow power consumption mo
de
Norma
l
:
t
Norma
l
Mo
de
Spee
d:
t
Maximum per
f
ormance mode. The system operates in its maximum per
f
ormance,
and system resources are allocated to the currently active program with priority
f
or maximum
per
f
ormance
.
Spee
d
Boot
:
t
Quic
k
b
ooting mo
d
e. T
h
is mo
d
e ena
bl
es quic
k
b
ooting w
h
en t
h
e
b
ooting
process
h
as s
l
owe
d
d
own
b
ecause mu
l
tip
l
e programs
h
ave
b
een insta
ll
e
d
. You can
b
oot up
th
e computer more quic
kl
y
b
y setting t
h
e time to execute t
h
e S/W in t
h
eA
d
vance
d
men
u
.
I
f
you don’t want
f
an noise turning ON and OFF in the Silent mode, select the
t
A
d
vance
d
men
u> Fan Si
l
ent Mo
d
e > Lo
w
in t
h
e BIOS Setup.
The
f
an keeps turning ON and works in Low noise mode
.
You can only use this
f
unction when the
t
Easy Spee
d
Up Manage
r
program is insta
ll
e
d.
34
Chapter 2
Using the computer
Shortcut Keys Name Function
+
Wire
l
ess networ
k
Turns on or o
wireless network device in a model equipped with wireless network device
.
Touchpad Turns the Touchpad
f
unction on or o
.
When using an external mouse only, you can turn the Touchpad o
.
Num Lock Turns the numeric keyboard on or o
.
Scroll Lock I
f
you turn the Scroll Lock on, you can scroll the screen up or down without changing the cursor
l
ocation in some app
l
ications
.
35
Chapter 2
Using the computer
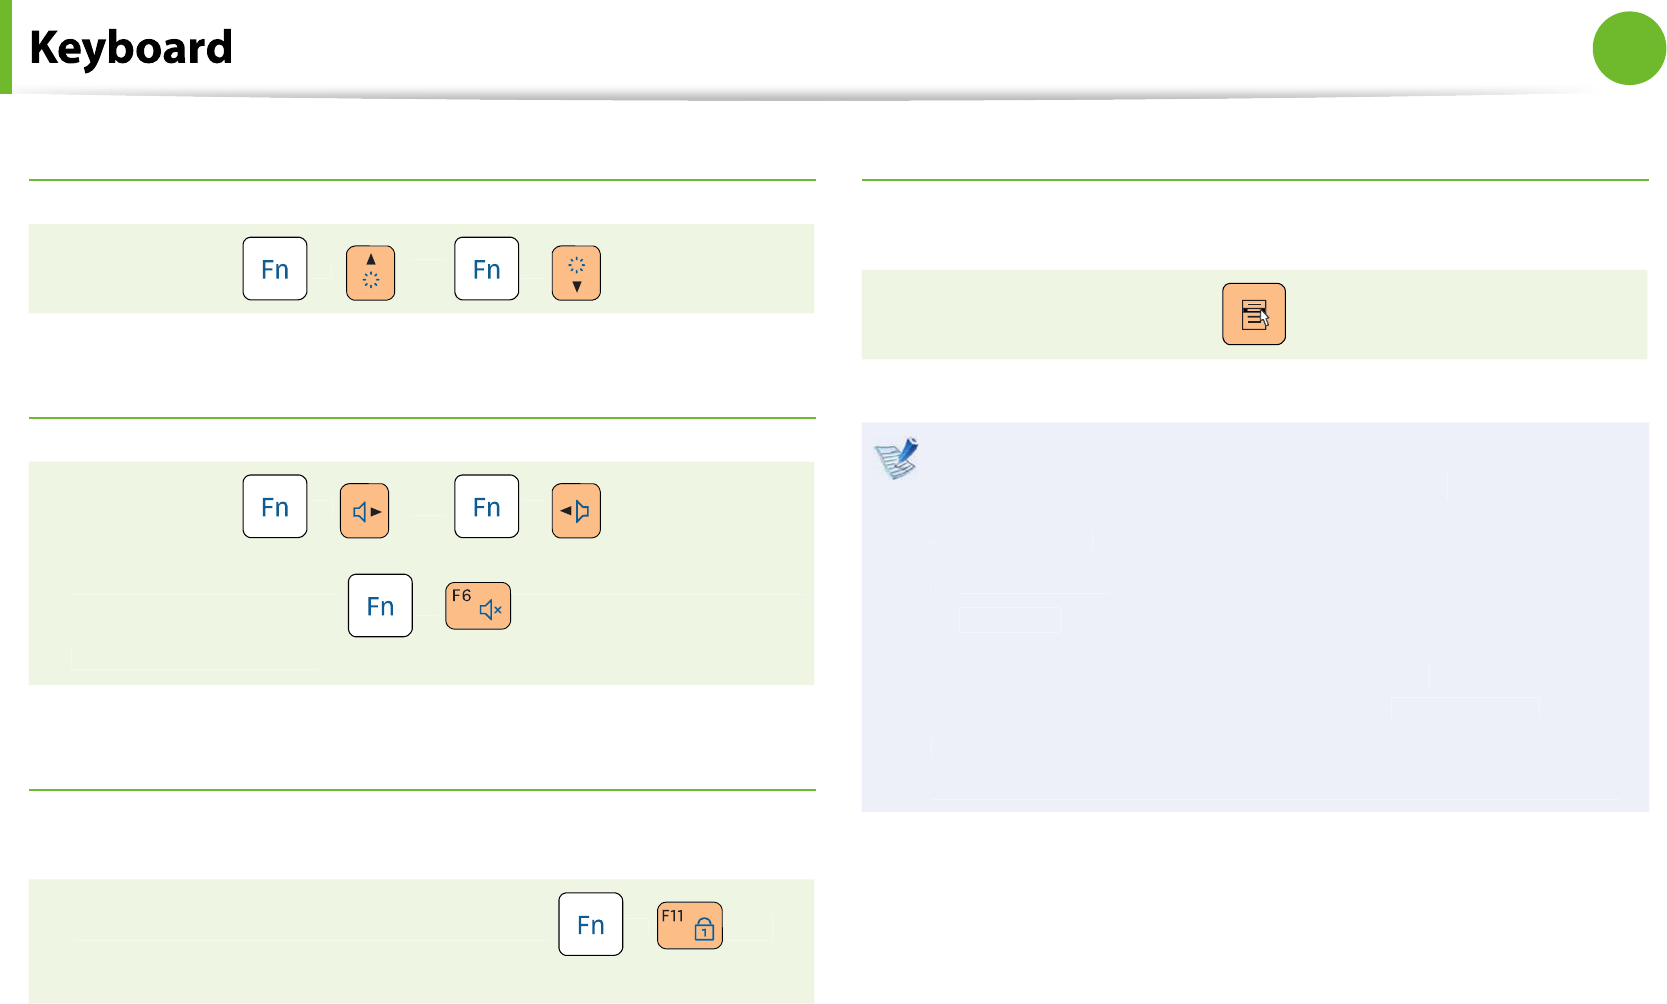
Screen Brig
h
tness Contro
l
+
O
r
+
Vo
l
ume Contro
l
+
O
r
+
A
l
ternative
l
y, press t
h
e
+
k
ey com
b
ination to turn
the volume on or o
.
Numer
i
c Ke
y
T
h
e num
b
ers are printe
d
in
bl
ue on t
h
e numeric
k
eys
.
I
f
Num Lock is turned on by pressing the
+
k
ey
com
b
ination, you can use t
h
e numeric
k
eys to enter
d
igits
.
Ot
h
er Function Key
s
Per
f
orms the right-click mouse
f
unction (touchpad)
.
When the shortcut key
f
unction does not work properly,
you have to install the
f
ollowing program
.
Wino
d
ws
7
t
: Easy Disp
l
ay Manage
r
Win
d
ows X
P
t
: Easy Disp
l
ay Manager, Easy Spee
d
Up
M
anager
W
h
en t
h
e programs are not insta
ll
e
d
, se
l
ect
S
amsung
Recovery Solution > System So
f
twar
e
to insta
ll
t
h
e
programs.
(Only
f
or models supplied with Samsung Recovery Solution.
)
36
Chapter 2
Using the computer
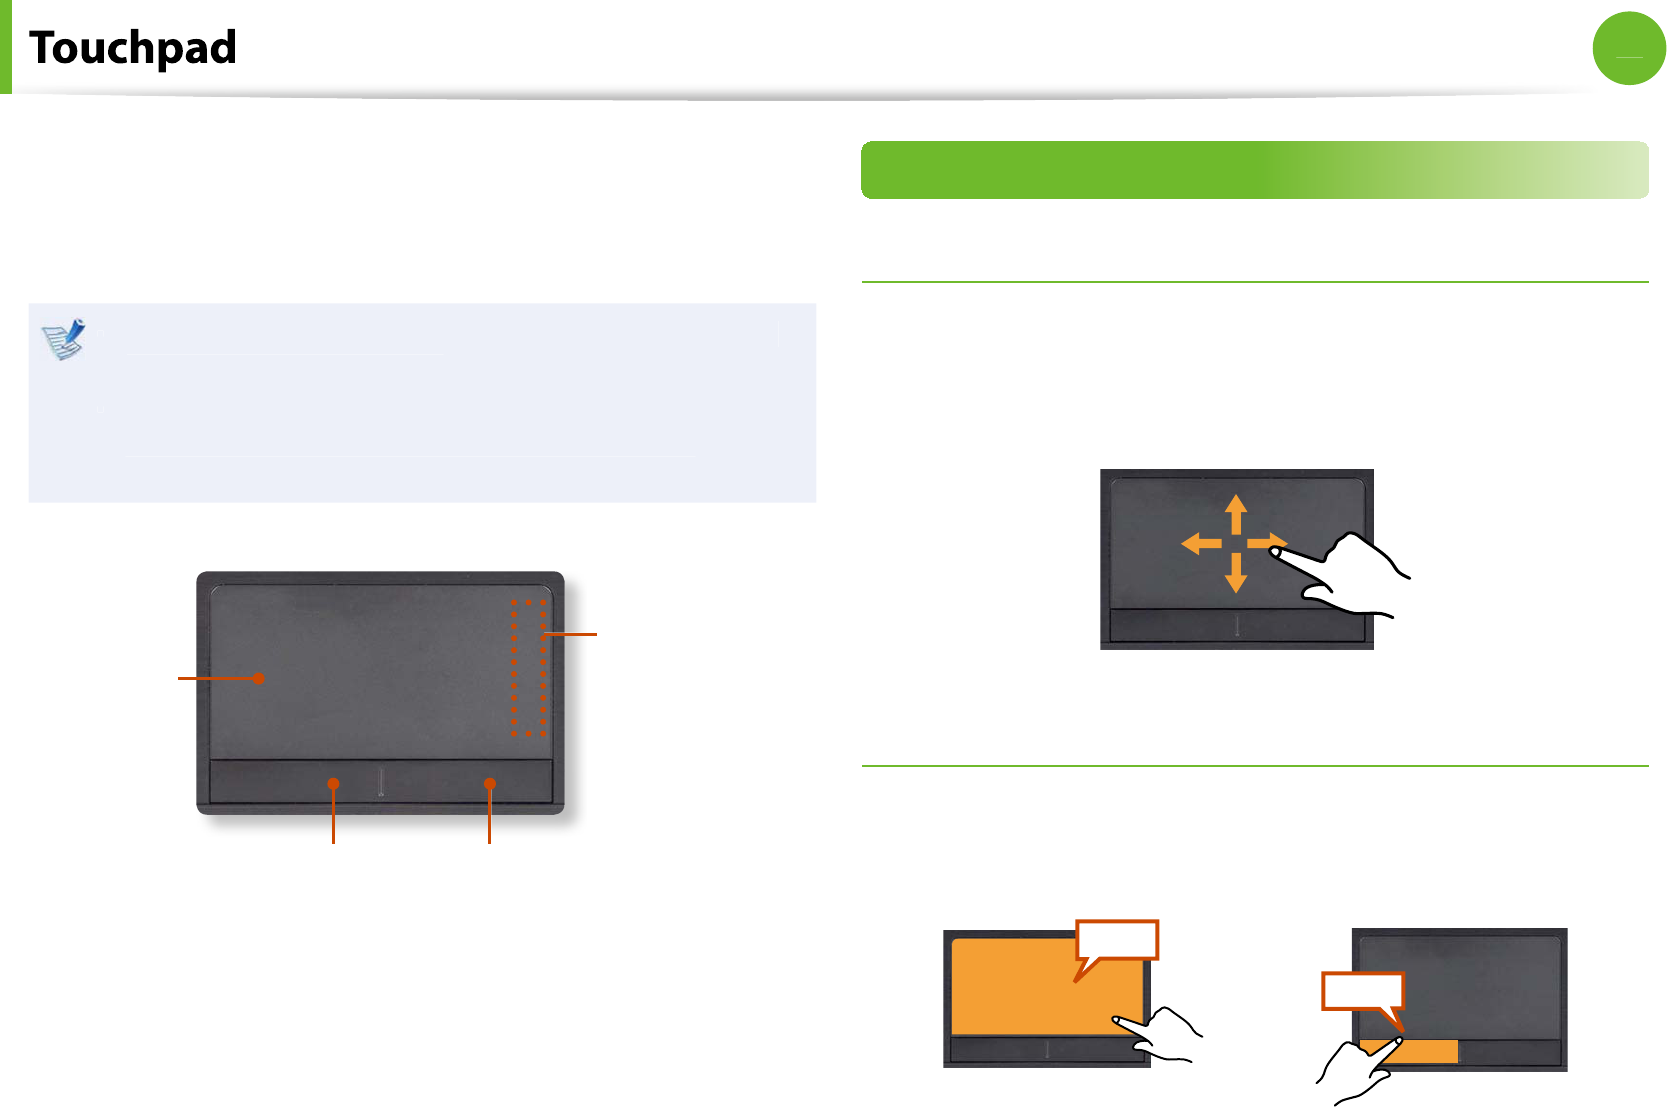
The touchpad provides the same
f
unction as a mouse and the le
f
t
and right buttons o
f
the touchpad plays the role o
f
the le
f
t and
right buttons o
f
a mouse
.
Use the Touchpad with your
ngers. Using a sharp object
t
may
d
amage t
h
e Touc
h
pa
d.
I
f
you touch the Touchpad or press the Touchpad buttons
t
w
h
i
l
e
b
ooting up, t
h
e Win
d
ows
b
oot time may
b
e
exten
d
e
d.
Touc
h
pa
d
Use
to
move t
h
e
cu
rsor.
Touchpad Le
f
t Butto
n
You can se
l
ect or run a
program using t
h
is
b
utton
.
Scro
ll
Are
a
Plays the role o
f
the mouse wheel.
You can scro
ll
up
an
d
d
own using
the Scroll Area
.
Touc
h
pa
d
Rig
h
t Butto
n
Plays the role o
f
the right
mouse
b
utton
.
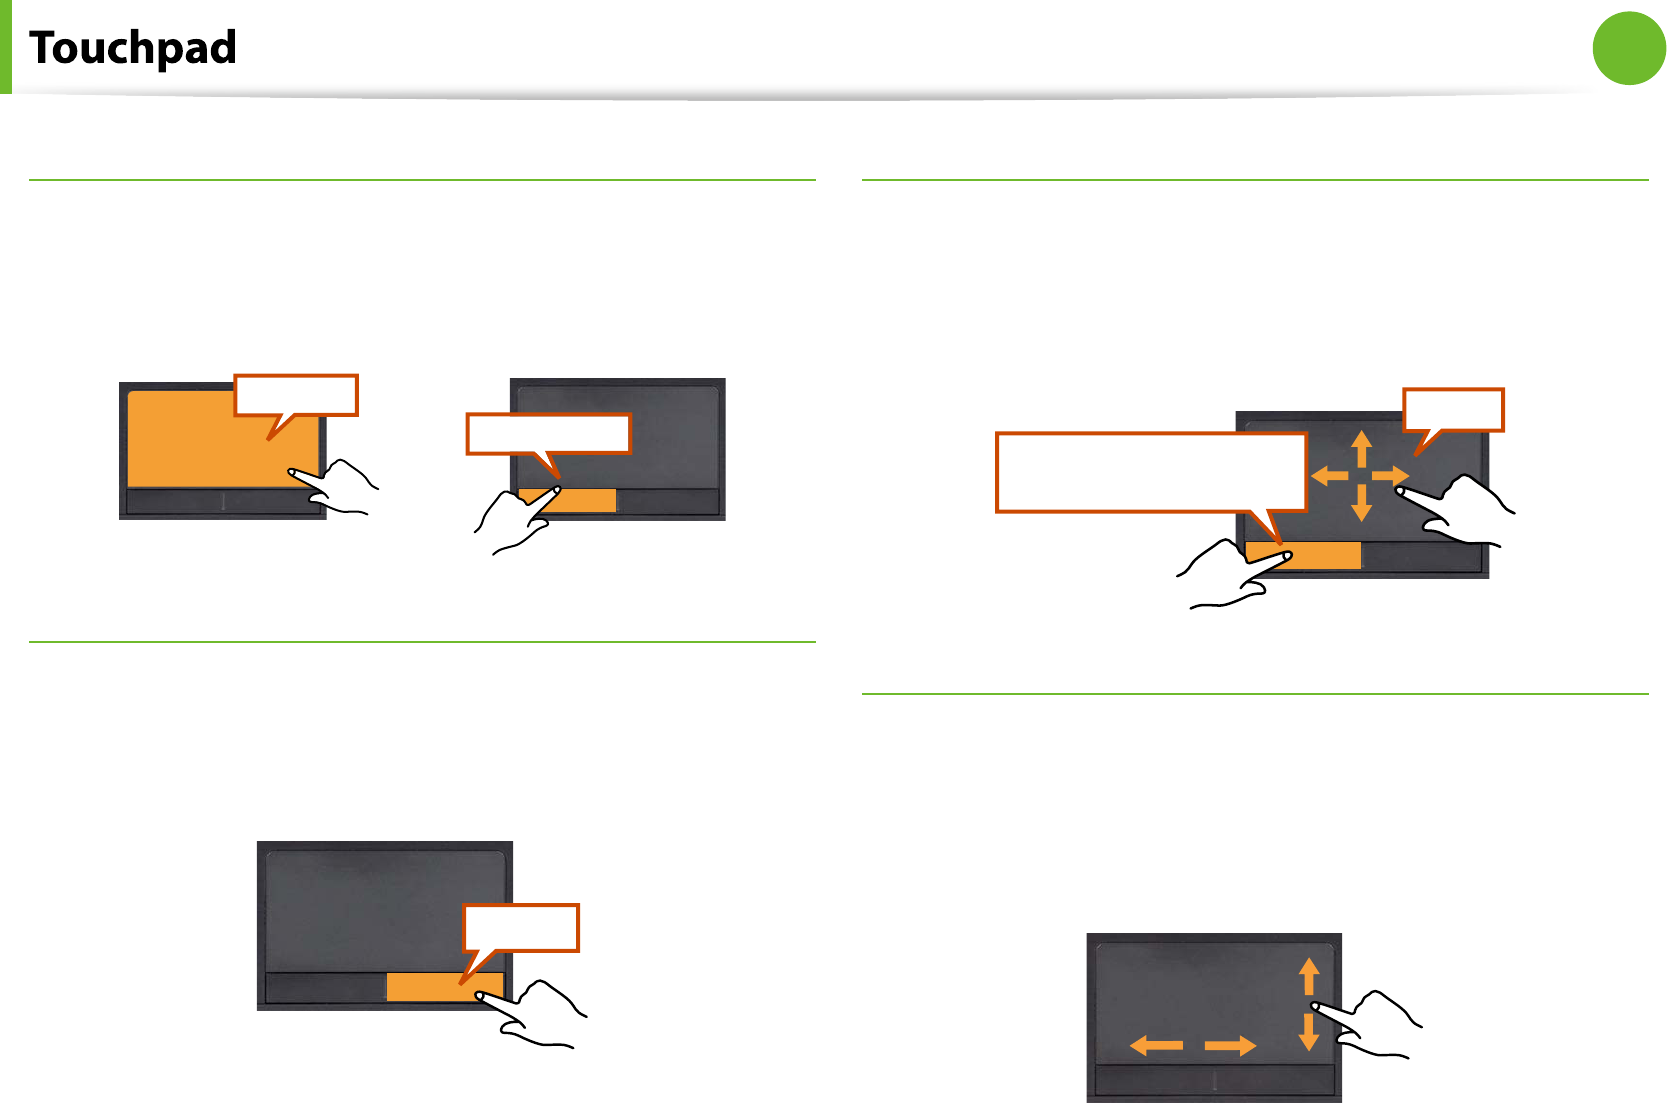
Basic Touchpad Functions
Moving t
h
e cursor on t
h
e scree
n
Place your
nger on the touchpad slightly and move your
nger
.
The mouse cursor will move accordingly. Move your
nger in the
d
irection you wis
h
to move t
h
e cursor
.
C
l
ic
k
Functio
n
Place a
nger on the touchpad and click on an item once.
Alternatively, press the le
f
t button once quickly and release it
.
Tap
Click
or
37
Chapter 2
Using the computer
Dou
bl
e-C
l
ic
k
Functio
n
Put
y
our
nger on the touchpad and quickl
y
tap twice with
y
our
nger on an item you want
.
Alternatively, press the le
f
t touchpad button twice quickly
.
ClickClick
TapTap
or
Rig
h
t Button Functio
n
T
h
is correspon
d
s to c
l
ic
k
ing t
h
e rig
h
t mouse
b
utton
.
Press t
h
e rig
h
t touc
h
pa
d
b
utton once. T
h
e correspon
d
ing pop-up
men
u
appears.
Click
Drag Funct
i
o
n
Dragging re
f
ers to moving an item to another place a
f
ter selecting
it.
Press and hold down the le
f
t touchpad button over an item you
want to drag and move the item to the new location
.
Holding down the left
touchpad button
Move
Touc
h
pa
d
Scro
ll
Functio
n
The touchpad scroll area provides the mouse wheel
f
unction (scroll
f
unction)
.
Place your
nger on the touchpad’s right edge
f
or vertical scrolling
or the bottom edge
f
or horizontal scrolling and then move your
nger along the edge to scroll the screen vertically or horizontally
.
38
Chapter 2
Using the computer
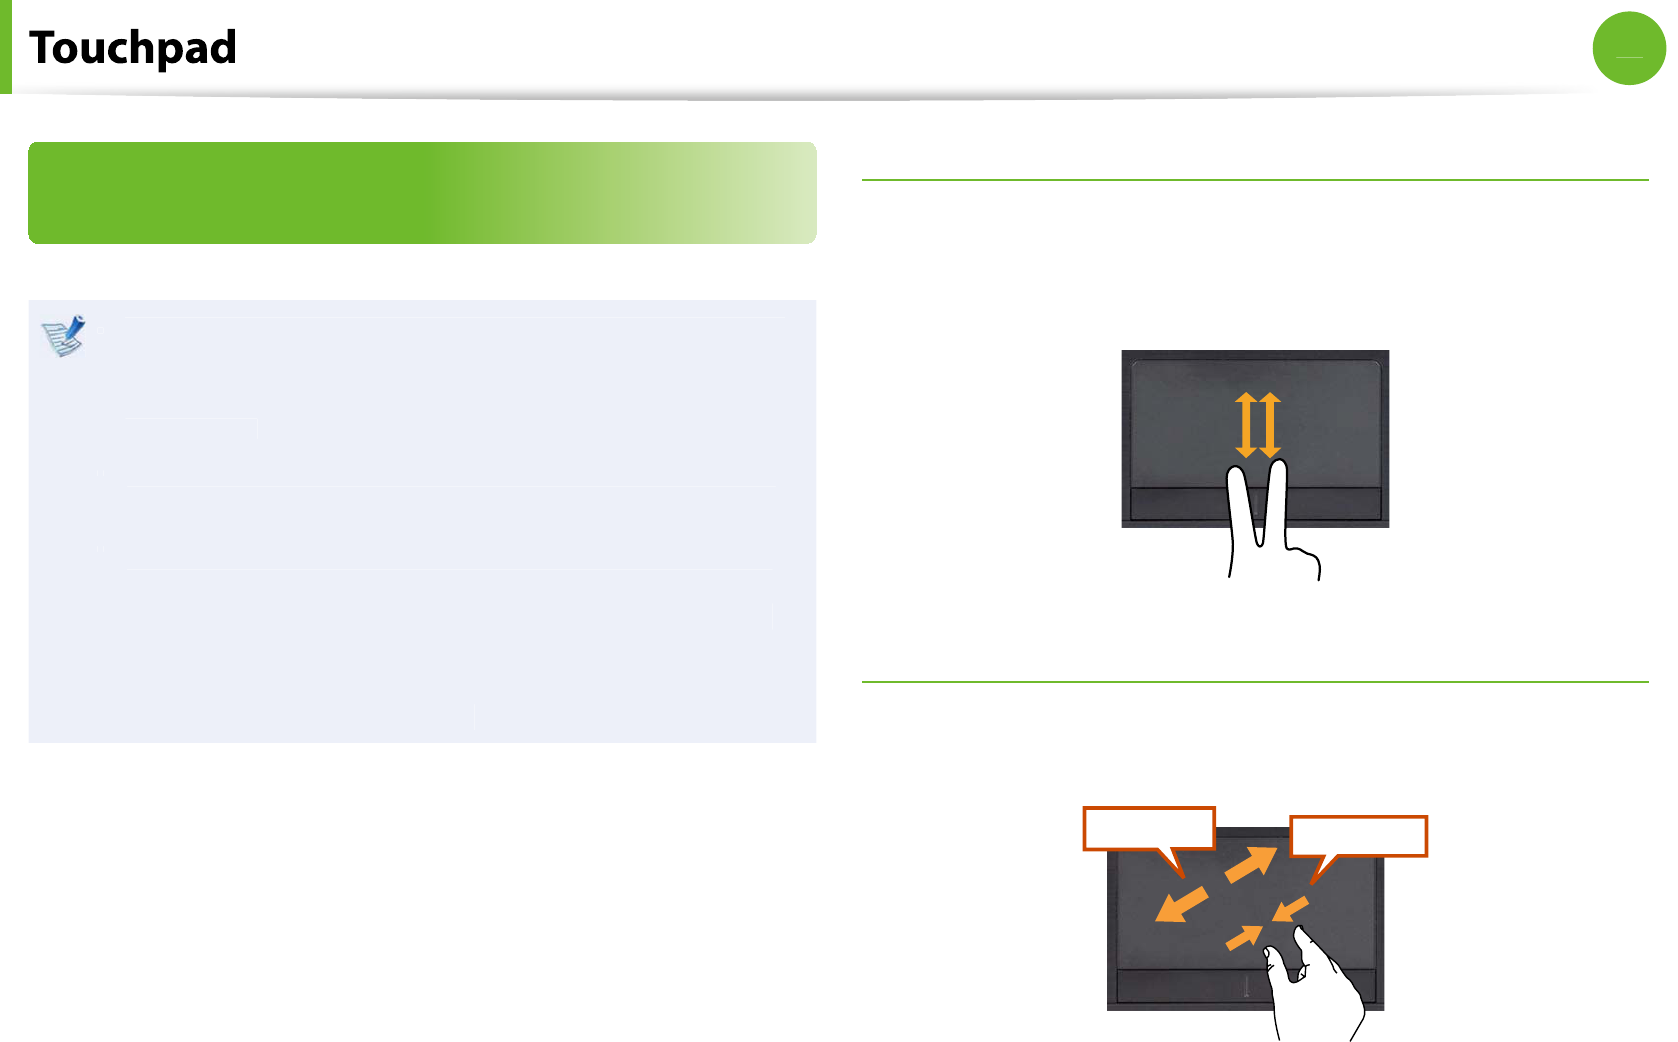
The Gesture Function of the Touchpad
(Optional)
The Touchpad Gesture
f
unction may not be provided and
t
the version o
f
the
f
unction may di
er depending on the
model. Some usage procedures may di
er depending on
t
h
e version
.
For detailed usage procedures, re
f
er to the description in
t
t
h
e Touc
h
pa
d
Settings win
d
ow
.
Since these descriptions are written on the basis o
f
the
t
latest operating system, Windows 7, some o
f
the content
and the
gures o
f
the descriptions may di
er depending
on the operating system. Since the procedures
f
or other
Win
d
ows operating systems are simi
l
ar, use t
h
e computer
re
f
erring to these descriptions
.
Using the Touchpad, you can use the
f
ollowing additional Gesture
f
unctions
.
Scroll
f
unctio
n
t
Zoom
f
unction
s
t
Rotation
f
unction
t
Move
f
unctio
n
t
T
h
eScro
ll
Functio
n
This
f
unction is the same as the scroll area o
f
the Touchpad
.
I
f
you place two
ngers over the Touchpad and move them up or
d
own, t
h
e screen is scro
ll
e
d
up or
d
own
.
Zoom Funct
i
on
s
I
f
you place two
ngers over the Touchpad together or apart, the
current image or text is zoome
d
in or out
.
Zoom-out
Zoom-in
or
39
Chapter 2
Using the computer
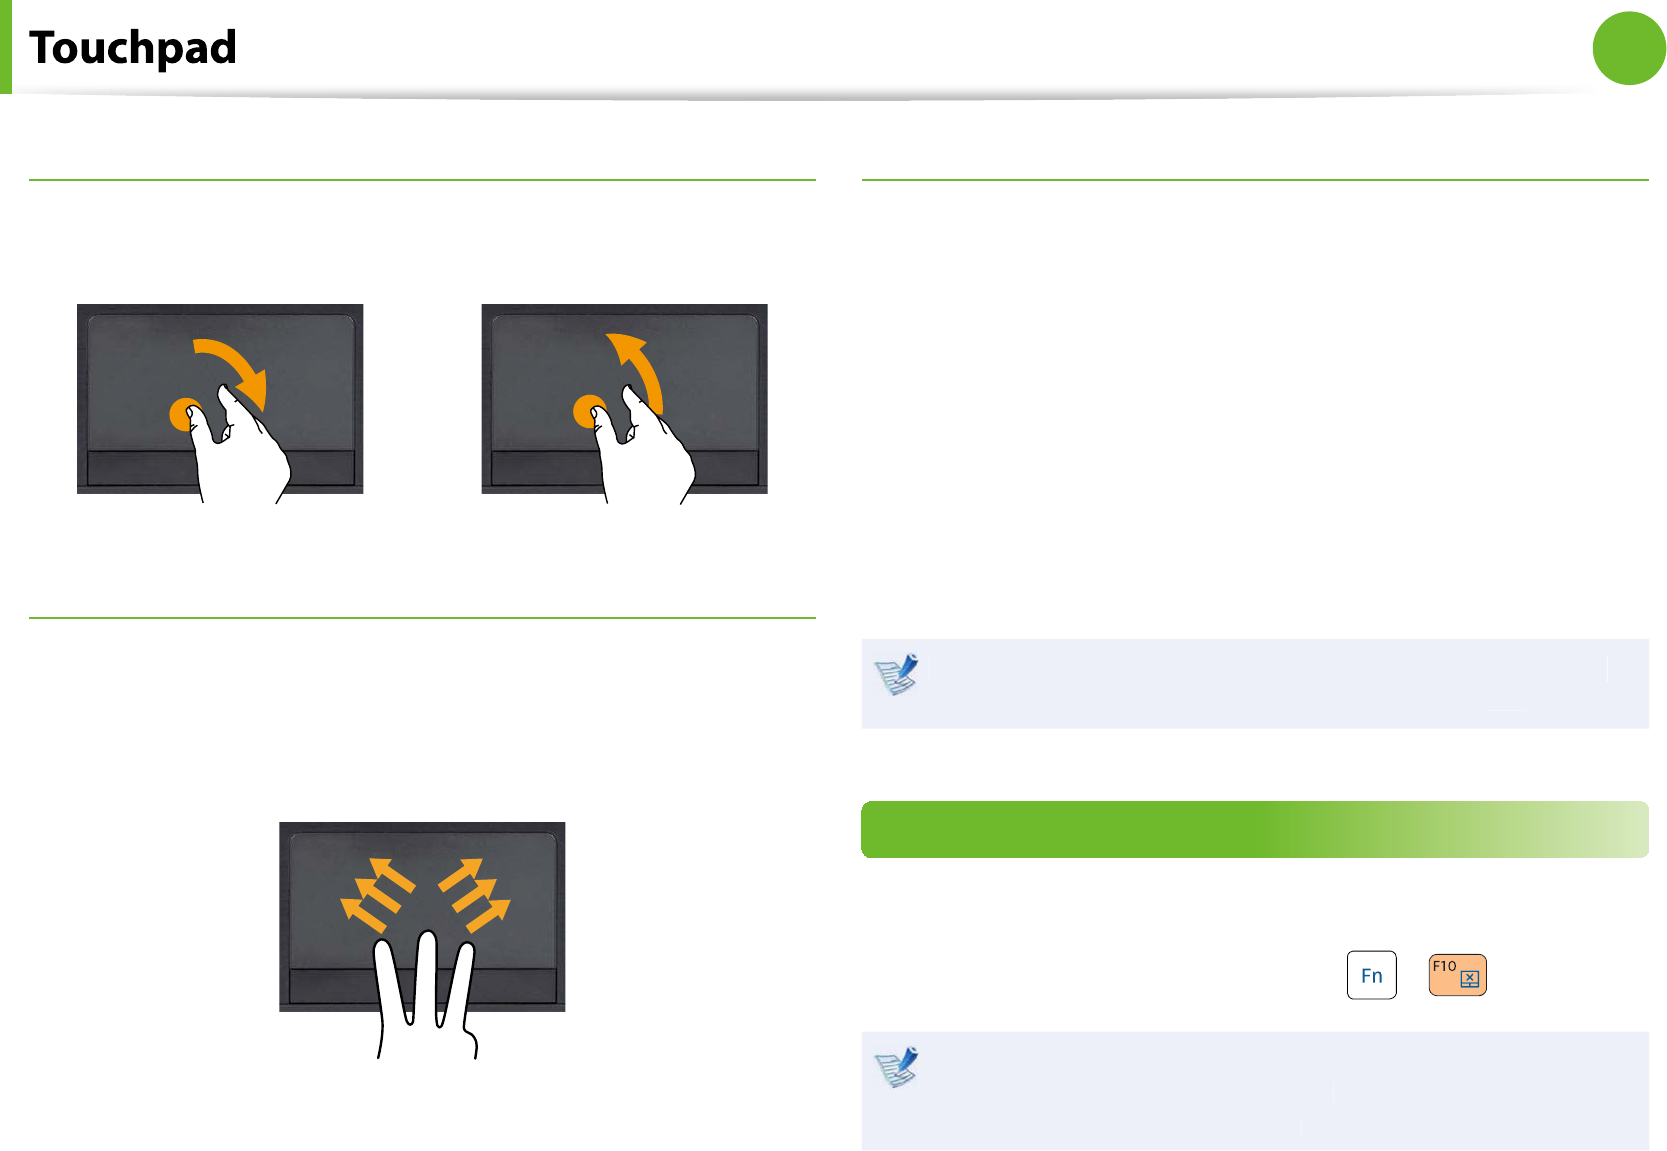
Rotation
f
unctio
n
Place two
ngers over the touchpad and move the
ngers as
f
ollows to rotate the photo or image
.
or
Move
f
unctio
n
You can move to t
h
e previous or next page w
h
en you are
l
oo
k
ing
at a photo or sur
ng the Internet
.
For example, i
f
you lightly brush three
ngers to the le
f
t while you
are
l
oo
k
ing at a we
b
site, you wi
ll
return to t
h
e previous page
.
Con
guring the Gesture Functio
n
I
f
the Gesture
f
unction is not activated,
y
ou can activate it
according to the
f
ollowing procedures
.
1C
l
ic
k
t
h
eStart > Contro
l
Pane
l
> Har
d
ware an
d
Soun
d
>
Mouse > Dev
i
ce Sett
i
ng
s
ta
b
>
S
ett
i
ng
s
b
utton
.
A
l
ternative
l
y, c
l
ic
k
t
h
eStart > Contro
l
Pane
l
> Har
d
ware
an
d
Soun
d
> Mouse > ELAN > Option
s
b
utton
.
2
T
h
e Touc
h
pa
d
Settings win
d
ow appears. C
l
ic
k
over t
h
e
correspon
d
ing item to se
l
ect t
h
e item in t
h
e
S
e
l
ect an ite
m
an
d
c
l
ic
k
OK
.
To cancel the Gesture function, unselect the corresponding
item in t
h
e Touc
h
pa
d
Settings win
d
ow an
d
c
l
ic
k
OK
.
Touchpad On/O Function
I
f
you want to use the mouse only without using the touchpad,
you can turn the touchpad o
.
To lock the touchpad
f
unction, press the
+
k
eys
.
You can set t
h
e touc
h
pa
d
an
d
touc
h
pa
d
b
utton settings in
t
h
e ta
b
s t
h
at appear w
h
en c
l
ic
k
ing Start > Contro
l
Pane
l
>
Har
d
ware an
d
Soun
d
> Mous
e
.
4
0
Chapter 2
Using the computer
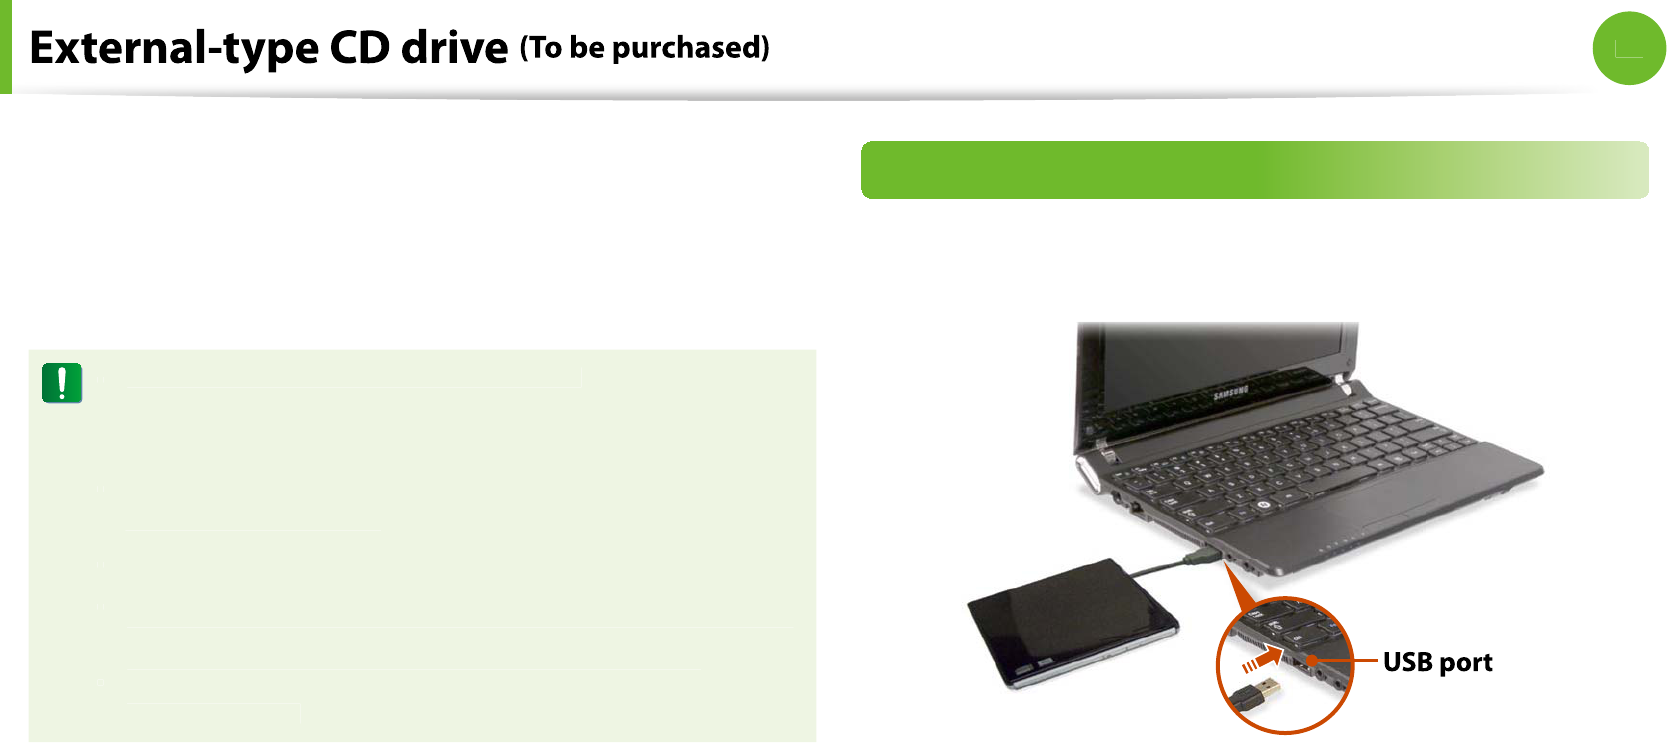
T
h
is computer supports an externa
l
USB CD-ROM
d
rive (can
b
e
a
dd
itiona
ll
y purc
h
ase
d
)
.
Check i
f
the inter
f
ace type o
f
the external CD-ROM drive is a USB
type. For detailed speci
cations, re
f
er to the catalog
.
D
o
n
ot
in
se
r
t
a
c
r
acked
o
r
sc
r
atched
C
D
.
t
Ot
h
erwise, t
h
e CD may
b
rea
k
an
d
d
amage t
h
e optica
l
d
is
k
d
rive w
h
en t
h
e CD rotates at a
h
ig
h
spee
d.
When you clean a CD or DVD title, wipe with a so
f
t cloth
t
f
rom inside to outside
.
Do not eject a CD w
h
en t
h
e CD operating LED is on
.
t
The
gures used
f
or the description are o
f
a representative
t
model. There
f
ore the
gures may di
er
f
rom the real ones
.
Using a CD that is not in the shape o
f
a circle is not
t
recommen
d
e
d.
Connectin
g
t
h
e CD Driv
e
C
onnect t
h
e CD
d
rive to t
h
eU
S
B por
t
.
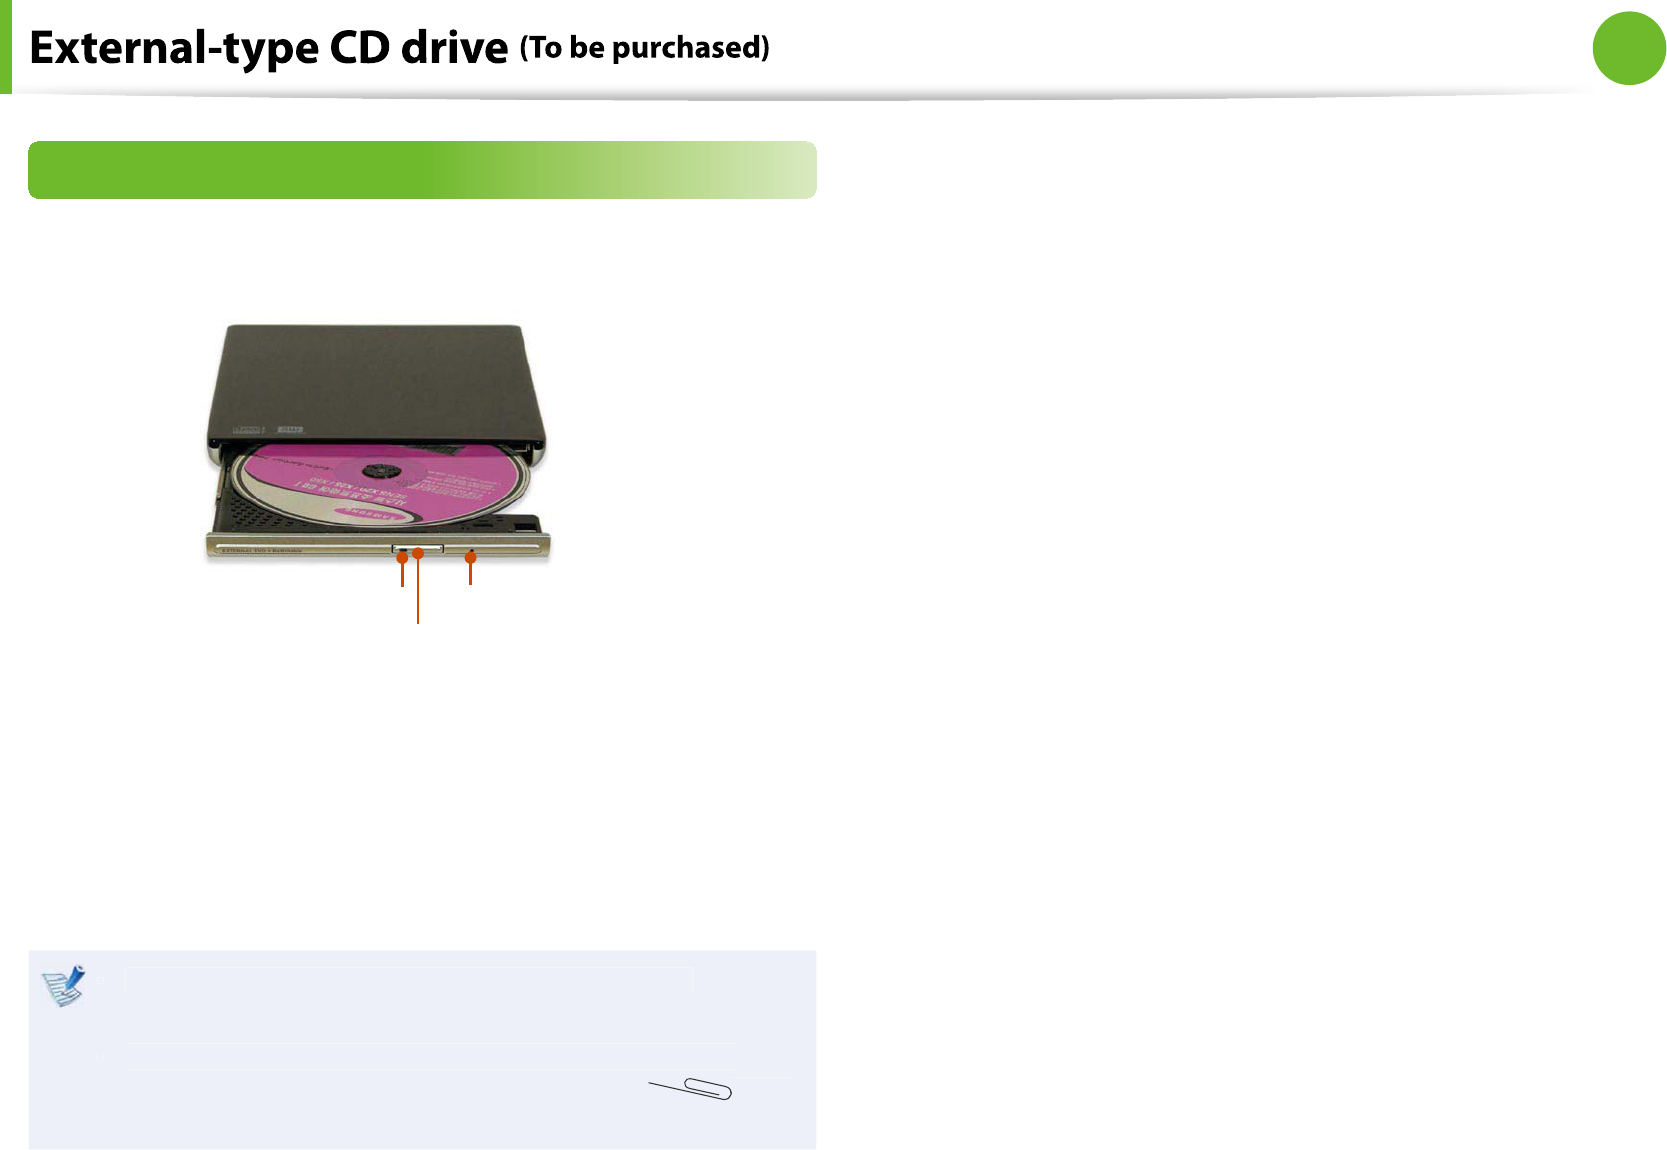
41
Chapter 2
Using the computer
Inserting and Ejecting a CD
1
Press t
h
eE
j
ec
t
button o
f
the CD drive
.
Status
In
d
i
cator
E
j
ect Butto
n
Emergency Ho
l
e
2
W
h
en t
h
e CD tray opens, insert a CD or DVD an
d
pus
h
t
h
e
tray in unti
l
it c
l
ic
k
s
.
3
Pus
h
t
h
e CD tray inwar
d
unti
l
it c
l
ic
k
s
.
T
h
e CD
d
rive status in
d
icator is turne
d
on
.
A CD drive’s reading and writing speed may di
er
t
depending on the condition and type o
f
the media
.
To eject a CD w
h
en t
h
e CD
d
rive
d
oes not wor
k
or t
h
e
t
computer is o
, place the end o
f
a paper clip
(
)
into
t
h
e Emergency Ho
l
e unti
l
t
h
e CD tray is ejecte
d.
4
2
Chapter 2
Using the computer
Using t
h
e mu
l
ti car
d
s
l
ot, you can rea
d
an
d
write
d
ata to a SD car
d
,
SDHC car
d
, MMC car
d.
You can use a car
d
as a remova
bl
e
d
is
k
an
d
convenient
l
y
exc
h
ange
d
ata wit
h
d
igita
l
d
evices suc
h
as a
d
igita
l
camera,
d
igita
l
camcor
d
er, MP3, etc.
.
Supporte
d
Car
d
s : SD Car
d
, SDHC car
d
, MM
C
t
You
h
ave to a
dd
itiona
ll
y purc
h
ase a mu
l
ti car
d
wit
h
t
h
e
t
necessary capacity
d
epen
d
ing on your requirements
.
You can use a mu
l
ti car
d
just
l
i
k
e any
d
ata storage
d
evice. A
t
copyright protection
f
unction is not supported
.
Since you can
l
ose a car
d
w
h
en moving t
h
e computer,
t
k
eep t
h
e car
d
separate
l
y
.
The
gures used
f
or the description are o
f
a representative
t
model. There
f
ore the
gures may di
er
f
rom the real ones
.
I
f
a slot protection dummy card is inserted into your
t
computer, remove the dummy card be
f
ore using the
compu
t
er
.
T
h
ese
d
escriptions are written
b
ase
d
on Win
d
ows 7, t
h
e
t
latest operating system. Therefore, some descriptions and
gures may di
er
f
rom your operating system. But as the
usage is simi
l
ar to ot
h
er Win
d
ows operating systems, you
can use these descriptions
f
or re
f
erence
.
Usin
g
t
h
e car
d
1Insert a car
d
into t
h
e s
l
ot accor
d
ing to t
h
e
d
irections printe
d
on t
h
e s
l
ot
.
Example) SD
C
2T
h
e car
d
d
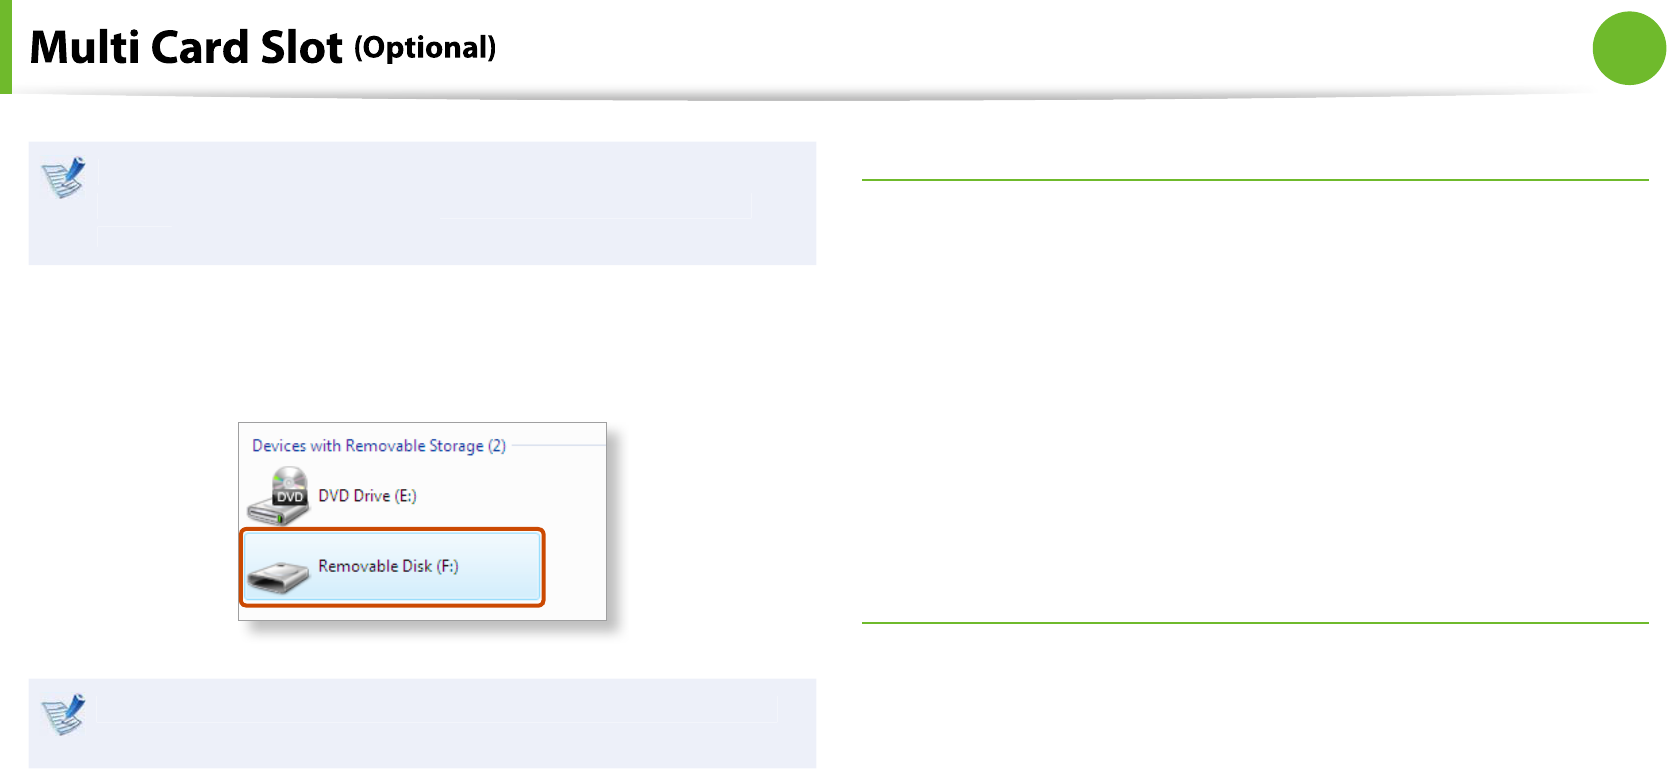
rive appears. C
l
ic
k
Open
f
older and view
le
s
.
I
f
the window does not appear, clic
k
S
tart >
C
ompute
r
.
43
Chapter 2
Using the computer
I
f
a window asking to scan and change appears, clic
k
Continue Wit
h
out Scannin
g
. T
h
is wi
ll
procee
d
to Step 2
a
b
ove
.
3
You can save, move an
d
d
e
l
ete
d
ata
b
y
d
ou
bl
e-c
l
ic
k
ing t
h
e
correspon
d
ing
d
rive
.
The device name of the card drive may dier depending on
your computer mo
d
e
l.
You can only use the card a
f
ter
f
ormatting it
.
Using a Mini SD an
d
RS-MM
C
Since t
h
e a
b
ove car
d
s are too sma
ll
, you cannot insert t
h
e car
d
s
into t
h
e s
l
ot
d
irect
l
y
.
Insert the card into the dedicated adapter (available
f
rom most
e
l
ectronic retai
l
ers) an
d
t
h
en insert t
h
e a
d
apter into t
h
e mu
l
ti car
d
s
l
ot
.
However,
d
epen
d
ing on t
h
e a
d
apter’s
b
o
d
y materia
l
, some
RS-MMC car
d
s may not
b
e recognize
d
proper
l
y. Samsung
recommen
d
t
h
at you c
h
ec
k
t
h
e car
d
is recognize
d
correct
l
y prior
to purc
h
asing
.
To remove a memory car
d
Take hold o
f
the end o
f
the card and remove the card
.

44
Chapter 2
Using the computer
T
o
f
ormat a memory car
d
When using the memory card
f
or the
rst time, you must
f
ormat
the card be
f
ore using it
.
Formatting a card deletes all data saved on the card. I
f
the
card includes data, backup the data be
f
ore
f
ormatting it
.
1C
l
ic
k
S
tart >
C
ompute
r
.
2
Rig
h
t-c
l
ic
k
over a car
d
d
rive wit
h
t
h
e touc
h
pa
d
an
d
se
l
ect
F
orma
t
.
3
C
l
ic
k
S
tar
t
to the
f
ormatting
.
To use a car
d
to exc
h
ange
d
ata wit
h
a
d
igita
l
d
evice suc
h
t
as a digital camera,
f
ormatting the data using the digital
d
evice is recommen
d
e
d.
When you try to use a card, which is
f
ormatted in the
t
computer, in anot
h
er
d
igita
l
d
evice, you may
h
ave to
f
ormat the card again in the device
.
You cannot
f
ormat, write or delete data
f
rom a SD, or SDHC
t
car
d
wit
h
a write protection ta
b
w
h
en it is in t
h
e Loc
k
pos
i
t
i
on
.
Inserting an
d
removing a memory car
d
repeate
dl
y may
t
d
amage t
h
e memory car
d.
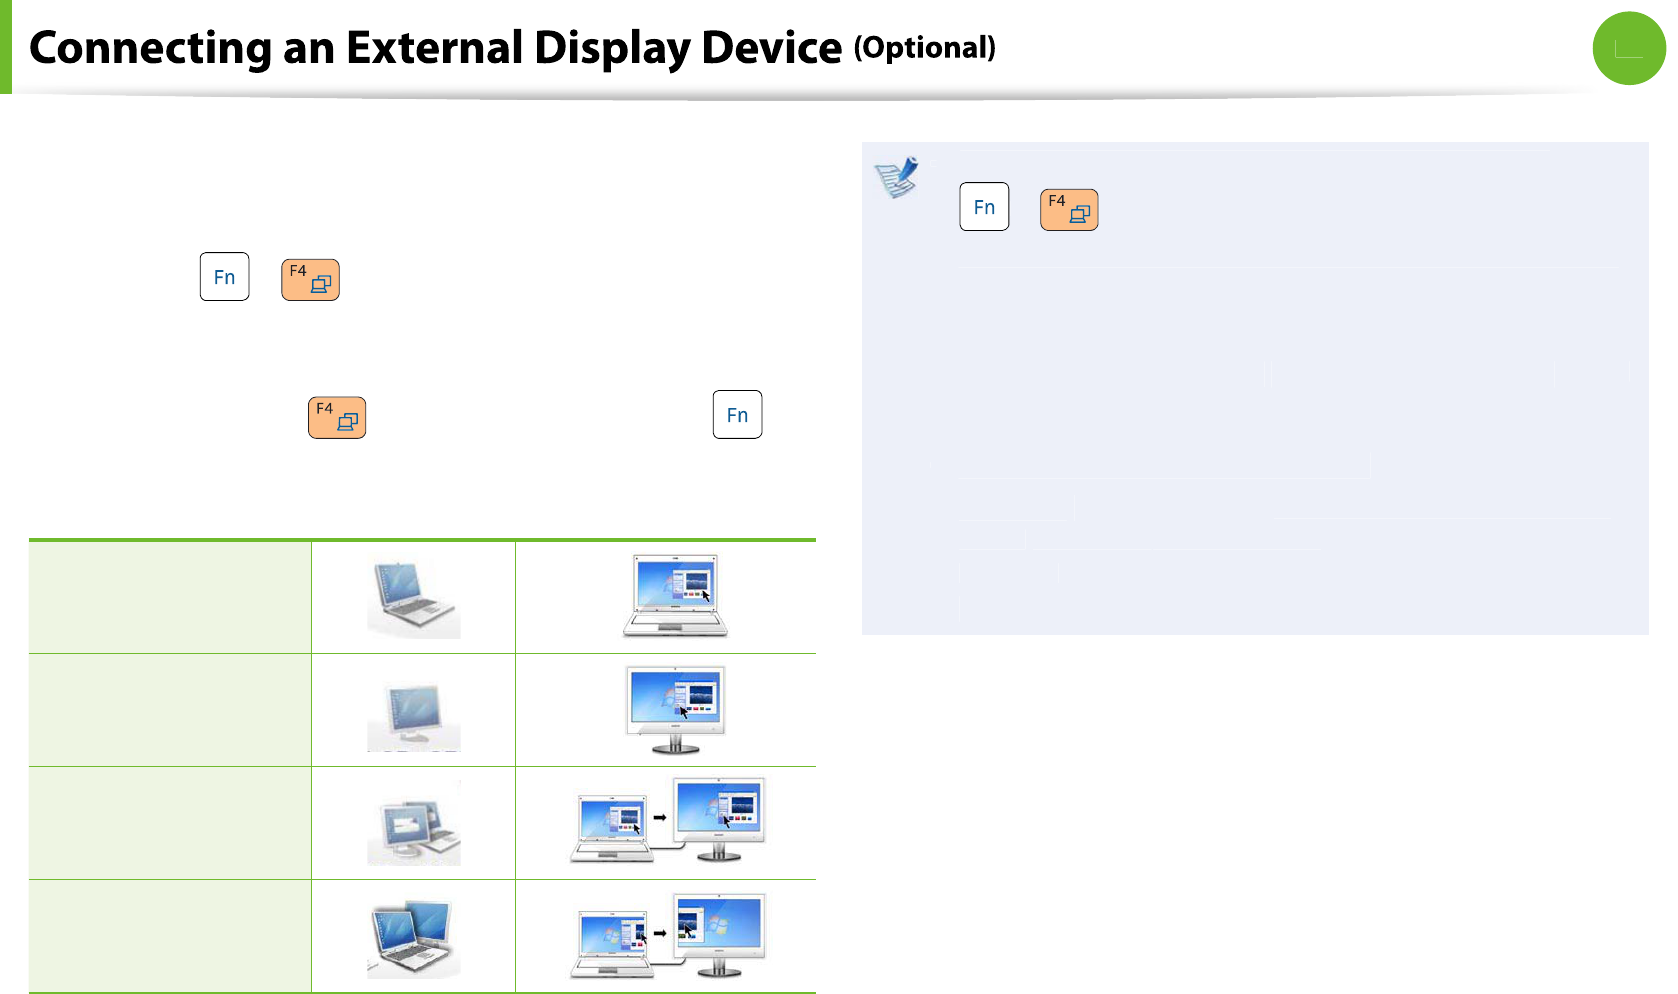
45
Chapter 2
Using the computer
I
f
you connect an external display device such as a monitor, TV,
projector, etc., you can view the picture on the wider screen o
f
the
externa
l
d
evice w
h
en you give a presentation or watc
h
a vi
d
eo or
mov
i
e
.
T
h
e computer provi
d
es an ana
l
og monitor port (RGB) an
d
a
d
igita
l
vi
d
eo/au
d
io port (HDMI)
.
T
h
e visua
l
qua
l
ity is s
h
arper w
h
en a
d
isp
l
ay
d
evice is connecte
d
t
h
roug
h
t
h
e HDMI port rat
h
er t
h
an t
h
e ana
l
og monitor port (RGB)
port. There
f
ore, when multiple ports are supported, connect a
d
isp
l
ay
d
evice to a port t
h
at provi
d
es t
h
e
b
etter visua
l
qua
l
ity
.
Be
f
ore you start, check the port and cable o
f
the external
t
d
isp
l
ay
d
evice an
d
t
h
en connect t
h
e
d
isp
l
ay
d
evice to t
h
e
compu
t
er
.
Due to restrictions o
f
the operating system the DualView
t
f
unction is not supported
f
or Windows 7 Starter
.
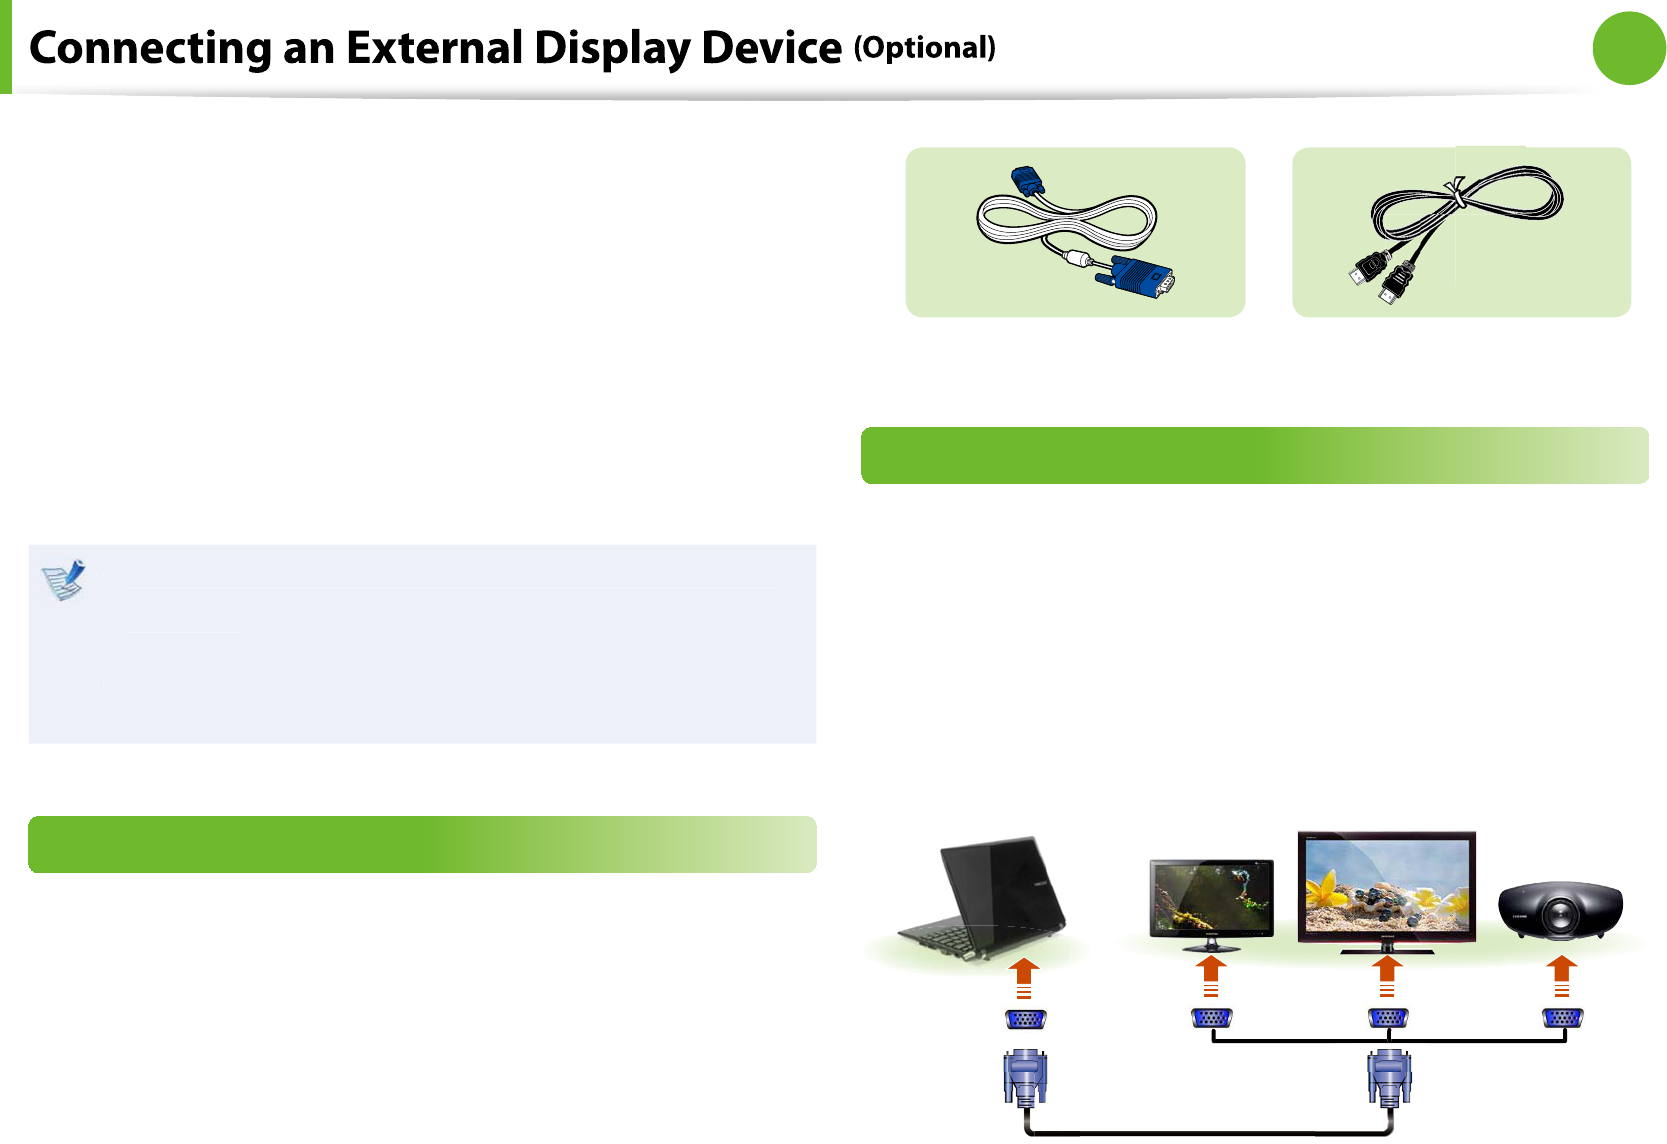
About the connection cable
Users s
h
ou
ld
a
dd
itiona
ll
y purc
h
ase t
h
e necessary connection
ca
bl
es
.
Ana
l
og Monitor (RGB) Ca
ble
HDMI Ca
ble
Connecting to t
h
e monitor por
t
You can experience a wi
d
er screen
b
y connecting t
h
e computer to
a monitor, TV or projector wit
h
a monitor port
.
You can give
b
etter presentations
b
y connecting t
h
e computer to
a pro
j
ector
.
1Connect the RGB port o
f
the computer and the port o
f
the
monitor or TV wit
h
t
h
e monitor ca
bl
e (15 pin)
.
Externa
l
Mon
i
to
r
TV
P
rojecto
r
4
6
Chapter 2
Using the computer
2
Connect the power cord o
f
the connected monitor, TV or
projector an
d
turn t
h
e power on
.
3
Press t
h
e
+
k
ey com
b
ination once. T
h
en t
h
e Easy
Disp
l
ay Manager screen appears w
h
ere you can se
l
ect a
d
isp
l
ay
d
evice
.
Since pressing t
h
e
k
ey w
h
i
l
e
h
o
ld
ing
d
own t
h
e
k
ey
changes the selection, select a display device
.
LCD
CRT
LCD + CRT Clone
LCD + CRT DualView
I
f
you cannot select a display device by pressing the
t
+
k
ey com
b
ination, you
h
ave to insta
ll
t
h
e
f
ollowing programs depending on your Windows version
.
-
Win
d
ows 7
/
X
P
: Easy Disp
l
ay Manage
r
Install the programs by downloading them
f
rom the
we
b
site or using t
h
e Insta
ll
System So
f
tware men
u
o
f
the
Samsung Recovery So
l
ution
.
A
l
ternative
l
y, to set up
d
ua
l
view
:
t
Open t
h
eDisp
l
ay Setting
s
win
d
ow in t
h
e Contro
l
Pane
l
,
s
e
l
ect Mon
i
tor
2
an
d
se
l
ect t
h
eExpand to
t to this
m
on
i
to
r
c
h
ec
kb
ox to set
d
ua
l
view. For more
d
etai
l
e
d
in
f
ormation, re
f
er to the Windows online help
.
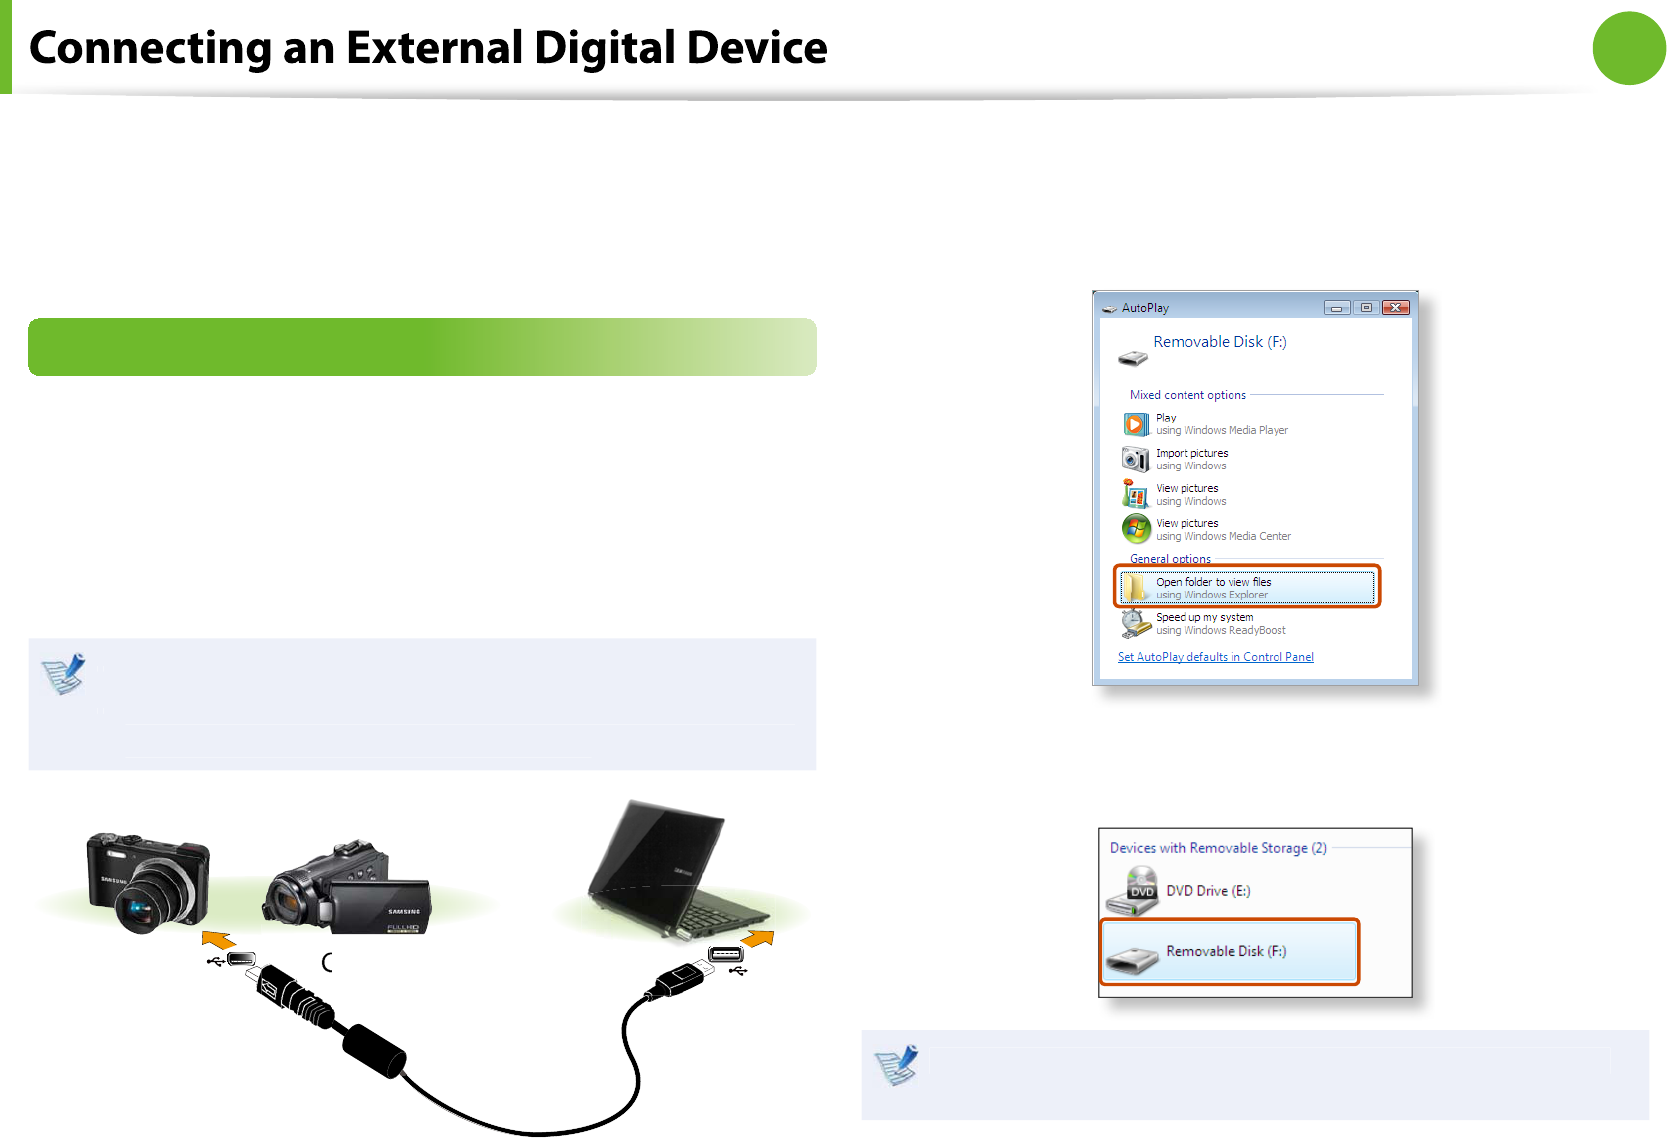
47
Chapter 2
Using the computer
You can save a
le stored on a device onto the computer by
connecting a
d
igita
l
d
evice suc
h
as a camera, camcor
d
er or mo
b
i
l
e
phone to the computer and using the
le management
f
unctions
.
Connecting and using a camera or camcorder
I
f
a digital device such as a camera or camcorder is connected with
t
h
e computer, it is recognize
d
as a remova
bl
e
d
is
k
so t
h
at you can
copy or move the
les on the device
.
1
Connect the USB port o
f
the notebook computer and the USB
port o
f
the digital device such as a camera using the USB cable
.
Bot
h
t
h
e computer an
d
t
h
e
d
igita
l
d
evice must
b
e turne
d
on.
t
You
h
ave to a
dd
itiona
ll
y purc
h
ase t
h
e USB ca
bl
e necessary
t
to connect t
h
e computer an
d
t
h
e
d
evice
.
C
amer
a
C
amcor
d
e
r
2
T
h
e
A
uto ru
n
win
d
ow appears. C
l
ic
k
Open
f
older and view
le
s
.
I
f
the window does not appear, clic
k
S
tart >
C
ompute
r
.
3Dou
bl
e-c
l
ic
k
t
h
e correspon
d
ing
d
rive. You can t
h
en save,
move or
d
e
l
ete
d
ata
.
The device name of the card drive may dier depending on
t
h
e mo
d
e
l.
4
8
Chapter 2
Using the computer
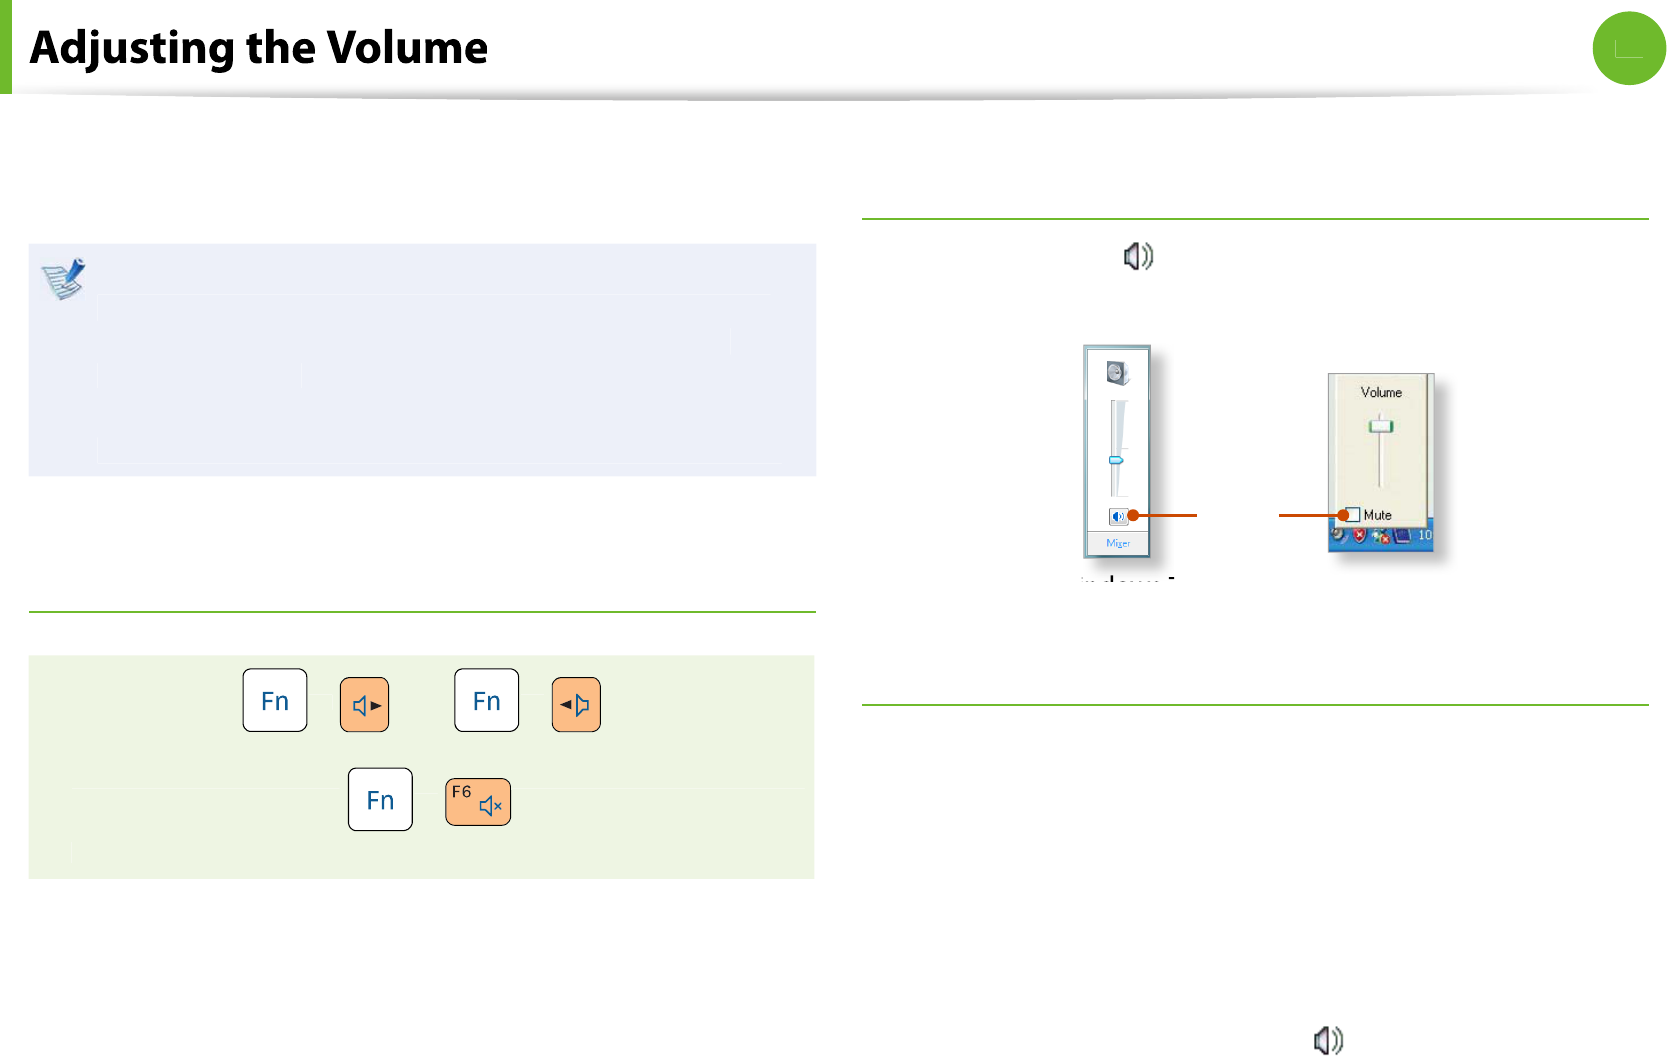
You can adjust the volume using the keyboard and the volume
contro
l
program
.
Since these descriptions are written on the basis o
f
the latest
operating system, Windows 7, some o
f
the content and the
gures o
f
the descriptions may di
er depending on the
operat
i
ng system
.
Since the procedures
f
or other Windows operating systems
are similar, use the computer re
f
erring to these descriptions
.
A
d
justing t
h
e Vo
l
ume using t
h
e Key
b
oar
d
+
O
r
+
A
l
ternative
l
y, press t
h
e
+
k
ey com
b
ination to turn
the volume on or o
.
A
d
justing t
h
e Vo
l
ume using t
h
e Vo
l
ume A
d
justment
P
rogra
m
Cl
ic
k
t
h
e Vo
l
ume icon on t
h
e tas
kb
ar an
d
s
l
i
d
e t
h
e vo
l
ume
contro
l
b
ar to a
d
just t
h
e vo
l
ume
.
M
ut
e
Win
d
ows X
P
Windows 7
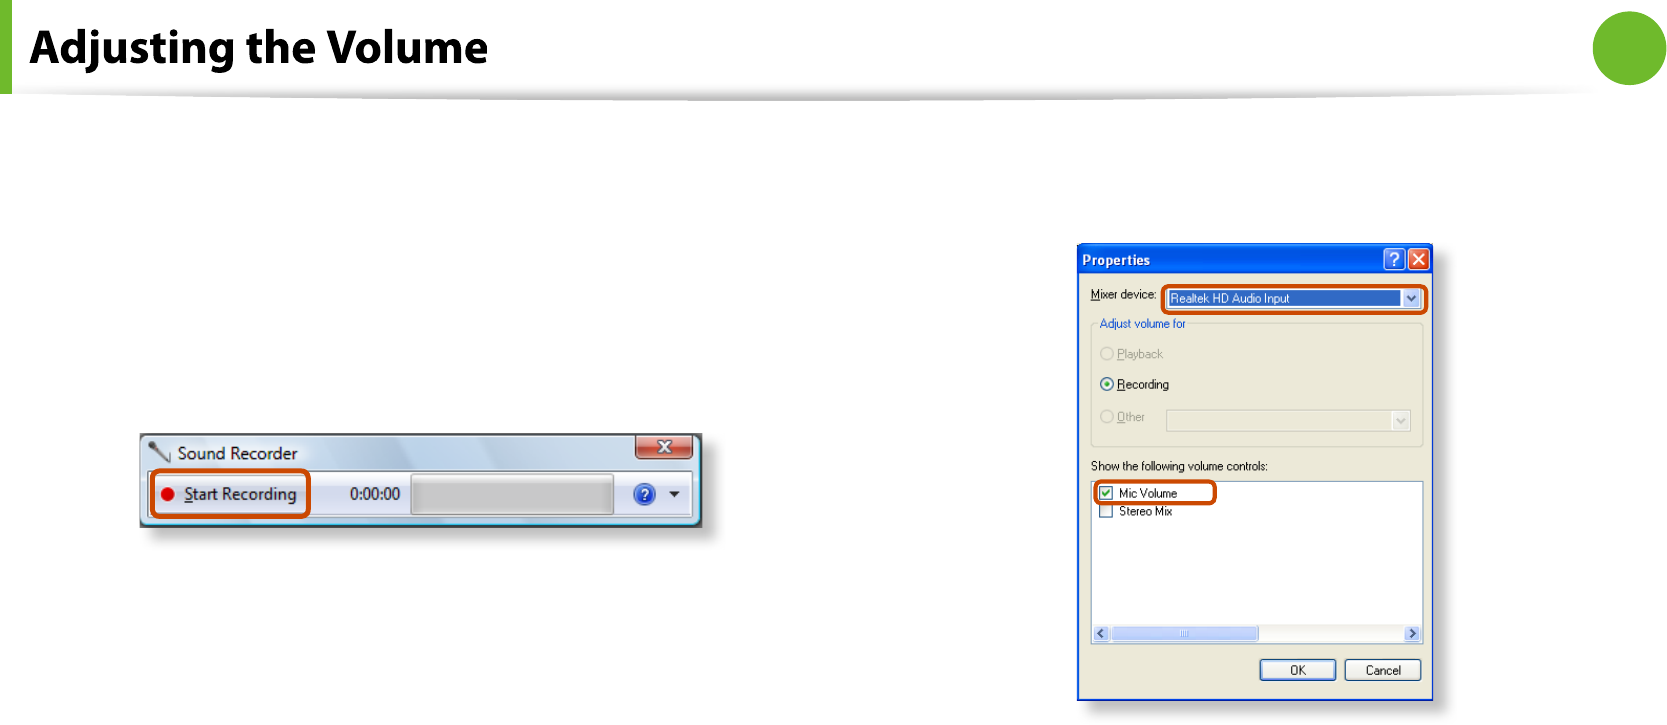
Using t
h
e Soun
d
Recor
d
e
r
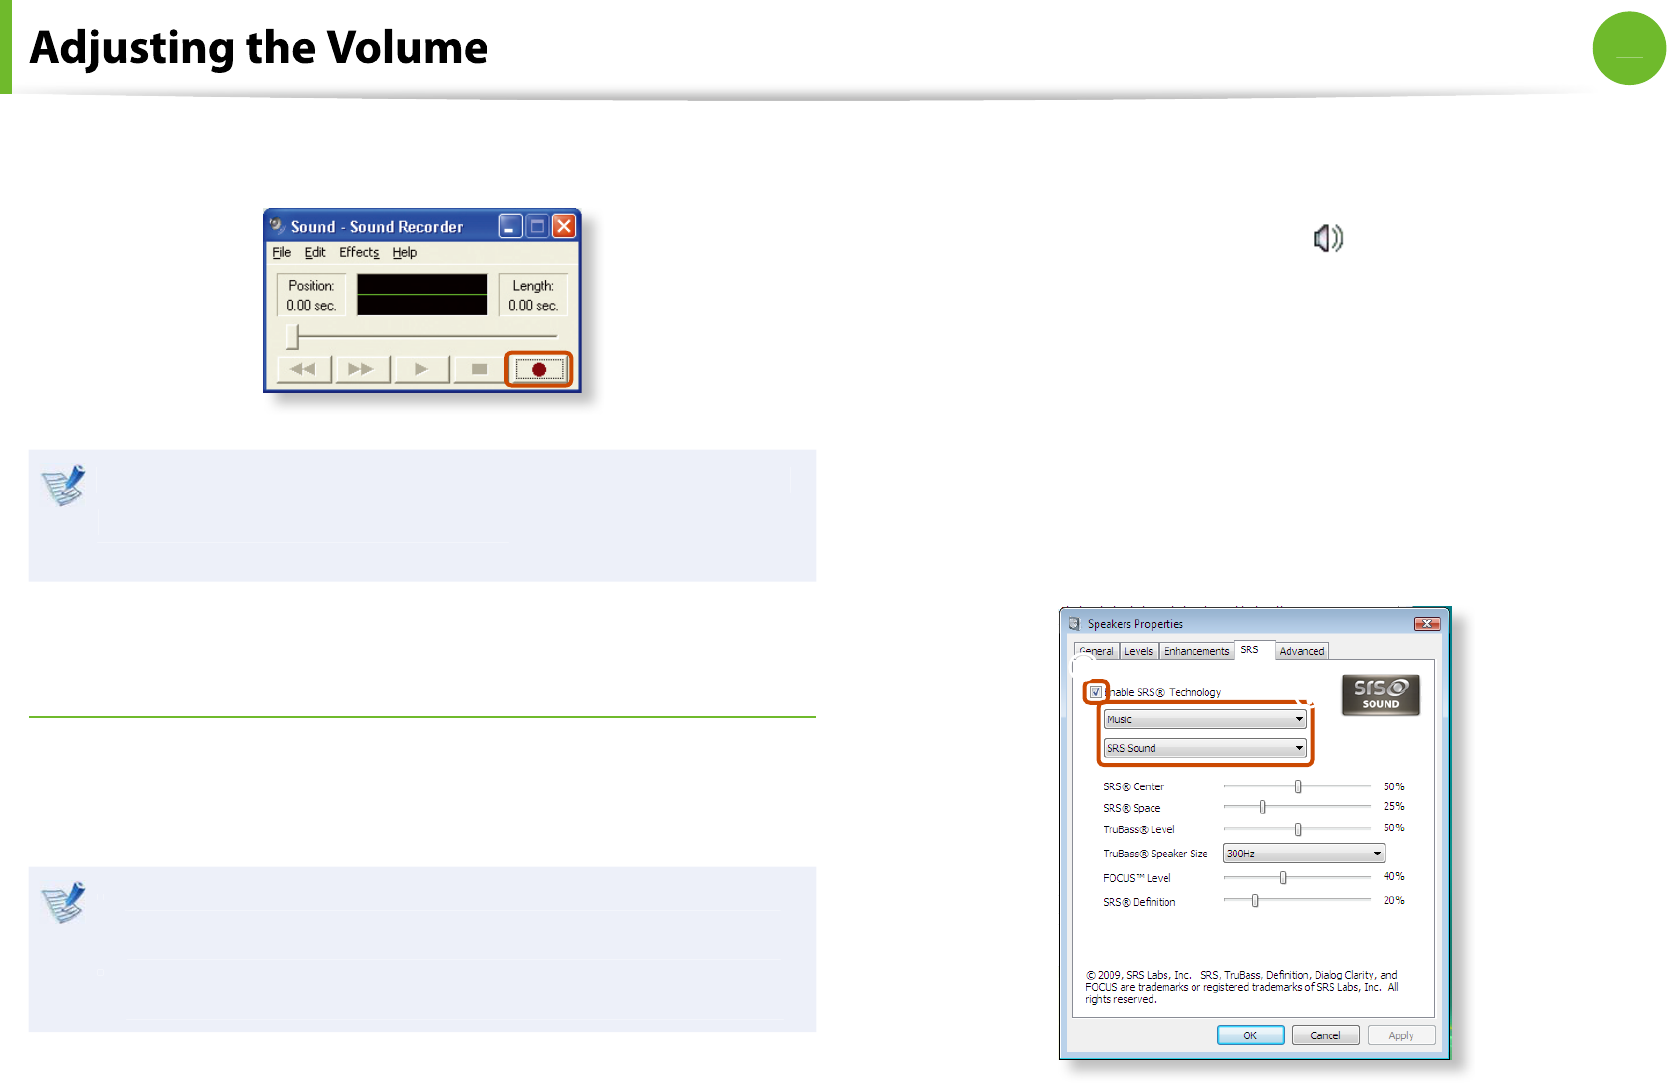
T
h
e proce
d
ures to recor
d
soun
d
using t
h
e Win
d
ows Recor
d
er are
d
escri
b
e
d
b
e
l
ow
.
Ź
For Win
d
ows
7
1Connect a microp
h
one to t
h
e microp
h
one jac
k.
You can a
l
so use t
h
e interna
l
MIC
.
2Rig
h
t-c
l
ic
k
over t
h
eVo
l
um
e
i
con on t
h
e tas
kb
ar an
d
se
l
ect
Recor
d
ing Devic
e
.
49
Chapter 2
Using the computer
3
Check i
f
the microphone is set as the de
f
ault recording
d
evice
.
I
f
this is the case, it is already set as the de
f
ault device. I
f
not,
rig
h
t-c
l
ic
k
over t
h
e microp
h
one an
d
se
l
ect Set de
f
aul
t
.
4
C
l
ic
k
Start > A
ll
Programs > Accessories > Soun
d
Recor
d
e
r
an
d
c
l
ic
k
Start recor
d
in
g
to start a recor
d
ing
.
Ź
For Win
d
ows X
P
1
Connect a microp
h
one to t
h
e microp
h
one jac
k.
You can a
l
so use t
h
e interna
l
MIC
.
2
C
l
ic
k
Start > Contro
l
Pane
l
> Soun
d
s, S
p
eec
h
, an
d
Au
d
io
Devices > Soun
d
s an
d
Au
d
io Device
s
.
3
C
l
ic
k
A
d
vance
d
f
rom Volume and then, clic
k
Opt
i
ons >
Propert
i
e
s
.
4
Select Realtek HD Audio inpu
t
f
rom the mixer device to
se
l
ect Recor
d
in
g
f
rom Adjust Volume
f
o
r
.
5Se
l
ect Mic Vo
l
um
e
f
rom Show the
f
ollowing volume
contro
ls
an
d
c
l
ic
k
O
K
.
6
W
h
en Recor
d
ing Contro
l
win
d
ow appears, c
h
ec
k
t
h
eSe
l
ec
t
c
h
ec
kb
ox
.
Increase t
h
erecor
d
in
g
vo
l
ume to increase t
h
e recor
d
ing
sensitivity an
d
c
l
ose t
h
e win
d
ow
.
7
C
l
ic
k
Start > A
ll
Programs > Accessories > Entertainment
> Soun
d
Recor
d
e
r
.
5
0
Chapter 2
Using the computer
8
C
l
ic
k
t
h
eRecor
d
button to per
f
orm recording
.
The default recording duration of Windows XP is 60 seconds.
Download a dedicated recordin
g
pro
g
ram
f
rom the Internet
to record audio data
f
or a long time
.
Us
i
ng
S
R
S
The SRS
f
unction enables you to experience more stereophonic
soun
d
using stereo spea
k
ers
.
The software programs provider may vary, depending on
t
your computer mo
d
e
l.
In addition, some pictures may di
er
f
rom actual product
t
depending on the computer model and so
f
tware version
.
Ź
For Windows
7
1Rig
h
t-c
l
ic
k
over t
h
eVo
l
um
e
i
con in t
h
e Tas
kb
ar an
d
se
l
ect
P
l
ay
b
ac
k
Devices (P
)
.
2Se
l
ect Spea
k
er
s
in t
h
e
Playback
tab and click
k
Propert
i
e
s
.
3Se
l
ect t
h
e
S
R
S
ta
b
in t
h
eSpea
k
er Propertie
s
win
d
ow. Se
l
ect
a mode and click the Use checkbox on the le
f
t
.
C
l
ic
k
OK
. You wi
ll
b
e a
bl
e to experience a more stereop
h
onic
soun
d
in t
h
e se
l
ecte
d
mo
d
e
.
n
l