Cambium Networks XS35004 XS-3500 Wireless LAN Array User Manual xirrus
Xirrus, Inc. XS-3500 Wireless LAN Array xirrus
Contents
- 1. Users Manual Part 1
- 2. Users Manual Part 2
- 3. Users Manual Part 3
- 4. Users Manual Part 4
- 5. Users Manual Part 5
Users Manual Part 4

Wireless LAN Array
Configuring the Xirrus Array 119
Procedure for Configuring Radius Servers
1. Radius Server Mode: Choose Internal if you want to use the XS-3900’s
internal RADIUS server, or choose External to use an external RADIUS
server.
2. Primary IP Address: If you are using an external RADIUS server, enter
the primary server’s IP address.
3. Primary Port Number: If you are using an external RADIUS server, enter
the primary port number.
4. Secondary IP Address (optional): If desired, enter the secondary
RADIUS server’s IP address.
If the primary RADIUS server becomes off-line, the Array will “failover”
to the secondary RADIUS server (defined here).
5. Secondary Port Number: If desired, enter the secondary port number.
6. Timeout: Define the maximum idle time (in seconds) before the RADIUS
session times out. The default is 600 seconds.
7. Primary Shared Secret / Verify Secret: If you are using RADIUS, enter
the primary shared secret, then re-enter the primary shared secret to
verify that you typed it correctly.
8. Secondary Shared Secret / Verify Secret: If you are using RADIUS, enter
the secondary shared secret, then re-enter the secondary shared secret to
verify that you typed it correctly.
9. Click on the Apply button to apply the new settings to this session.
10. Click on the Save button to save your changes (otherwise your new
settings will not take effect).
Wireless LAN Array
120 Configuring the Xirrus Array
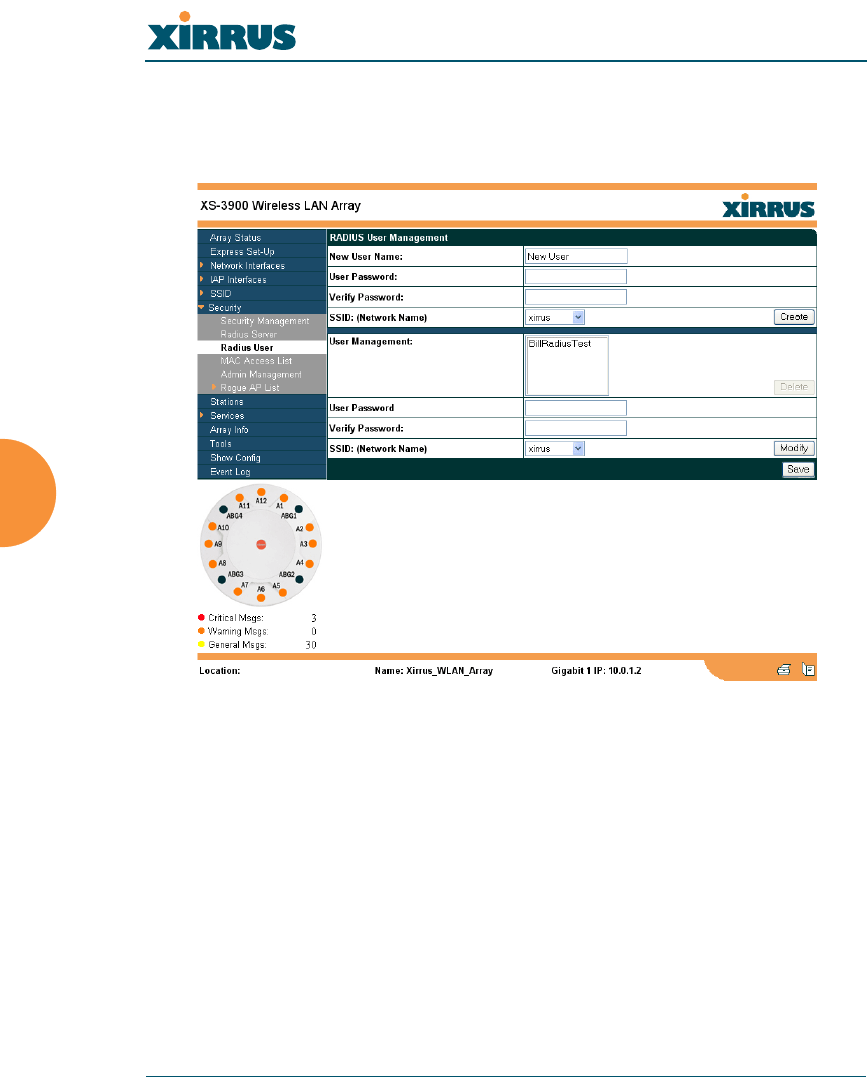
Radius User
This page allows you to manage local RADIUS user accounts (create, modify and
delete). When finished, click on the Save button to save your changes.
Figure 79. WMI: Radius User Page

Wireless LAN Array
Configuring the Xirrus Array 121
Procedure for Configuring Radius Users
1. New User Name: Enter a new RADIUS user name.
2. User Password: Enter a password for this user.
3. Verify Password: Re-enter the user password to verify that you typed it
correctly.
4. SSID (Network Name): Choose an SSID from the pull-down list (this will
be the only SSID a user can associate to).
5. Click on the Create User button to add this user to the list.
Editing Radius Users
6. User Management: If you want to edit an existing RADIUS user account,
select the user from the list. You must now enter the user password and
select an SSID.
a. User Password: Enter the password of the user account you want to
edit.
b. Verify Password: Re-enter the password to verify that you typed it
correctly.
c. SSID (Network Name): Choose an SSID from the pull-down list.
When you have finished making your edits, click on the Modify button to
apply the changes.
7. Alternatively, you can delete users by selecting the user from the list and
clicking on the Delete button.
8. Click on the Save button to save your changes (otherwise your new
settings will not take effect).
Wireless LAN Array
122 Configuring the Xirrus Array
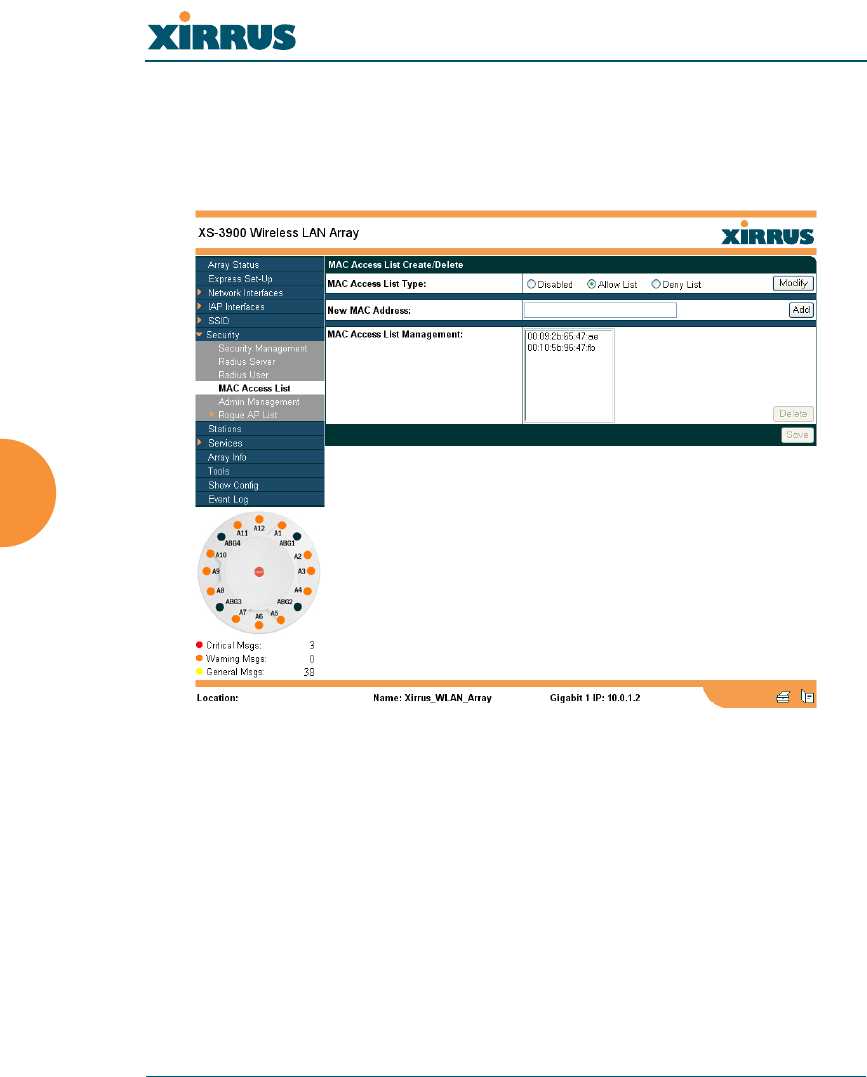
MAC Access List
This page allows you to create new MAC access lists, delete existing lists, and
add/remove MAC addresses. When finished, click on the Save button to save
your changes.
Figure 80. WMI: MAC Access List Page

Wireless LAN Array
Configuring the Xirrus Array 123
Procedure for Configuring MAC Access Lists
1. MAC Access List Type: Select the MAC Access List type—either
Disabled, Allow List or Deny List, then click on the Modify button to
apply your changes.
zAllow List: Only allows these MAC addresses to associate to the
Array.
zDeny List: Allows all MAC addresses except the addresses
defined in this list.
2. New MAC Address: If you want to add a MAC address to the ACL, enter
the new MAC address here, then click on the Add button. The MAC
address is added to the ACL.
3. MAC Access List Management: You can delete a MAC Access List by
selecting the list you want to delete then clicking on the Delete button.
4. Click on the Save button to save your changes (otherwise your new
settings will not take effect).
#In addition to these lists, other authentication methods (for example,
RADIUS) are still enforced for users.
Wireless LAN Array
124 Configuring the Xirrus Array
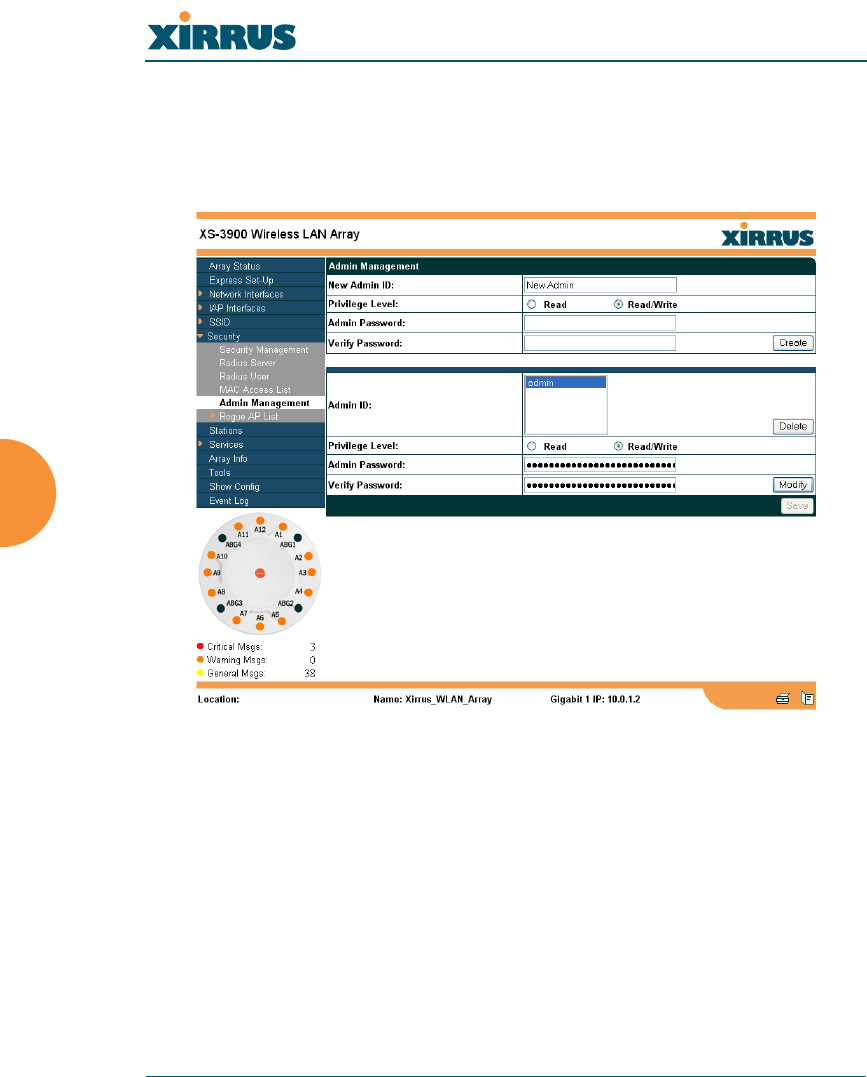
Admin Management
This page allows you to manage network administrator accounts (create, modify
and delete). It also allows you to limit account access to a read only status. When
finished, click on the Save button to save your changes.
Figure 81. WMI: Admin Management Page

Wireless LAN Array
Configuring the Xirrus Array 125
Procedure for Creating Network Administrator Accounts
1. New Admin ID: Enter a meaningful description for this new network
administrator ID.
2. Privilege Level: Choose Read to restrict this administrator ID to read
only status, or choose Read/Write if you want to give this administrator
ID full read/write privileges. In the read only mode, administrators
cannot save changes to configurations.
3. Admin Password: Enter a password for this ID.
4. Verify Password: Re-enter the password in this field to verify that you
typed the password correctly. If you do not re-enter the correct password,
an error message is displayed).
5. Click on the Create button to add this administrator ID to the list.
Editing Network Administrator Accounts
6. Admin ID: Choose the administrator ID you want to edit or delete from
the list. If you are deleting the selecting administrator ID, click on the
Delete button, otherwise go to Step 7.
7. Privilege Level: Choose Read to restrict the selected administrator ID to
read only status, or choose Read/Write if you want to give this
administrator ID full privileges.
8. Admin Password: Enter the password for the selected administrator ID.
9. Verify Password: Re-enter the password in the right field (this field must
match the Admin Password field).
10. Click on the Modify button to apply the new settings to this session.
11. Click on the Save button to save your changes (otherwise your new
settings will not take effect).
Wireless LAN Array
126 Configuring the Xirrus Array
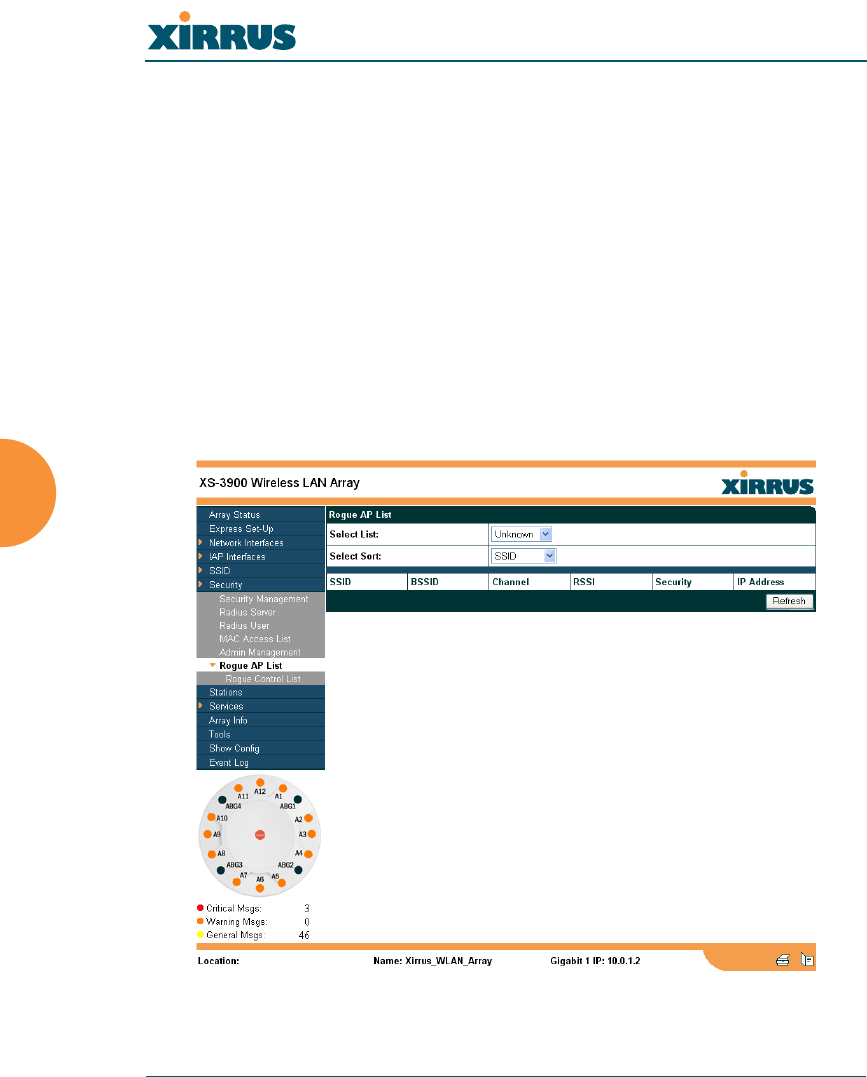
Rogue AP List
This page displays rogue APs, according to the list you select (either Unknown,
Known or Approved). In addition, you can sort the results based on the following
parameters:
zSSID
zBSSID
zChannel
zRSSI
zSecure
zIP Address
You can refresh the list at any time by clicking on the Refresh button.
Figure 82. WMI: Rogue AP List Page
Wireless LAN Array
Configuring the Xirrus Array 127
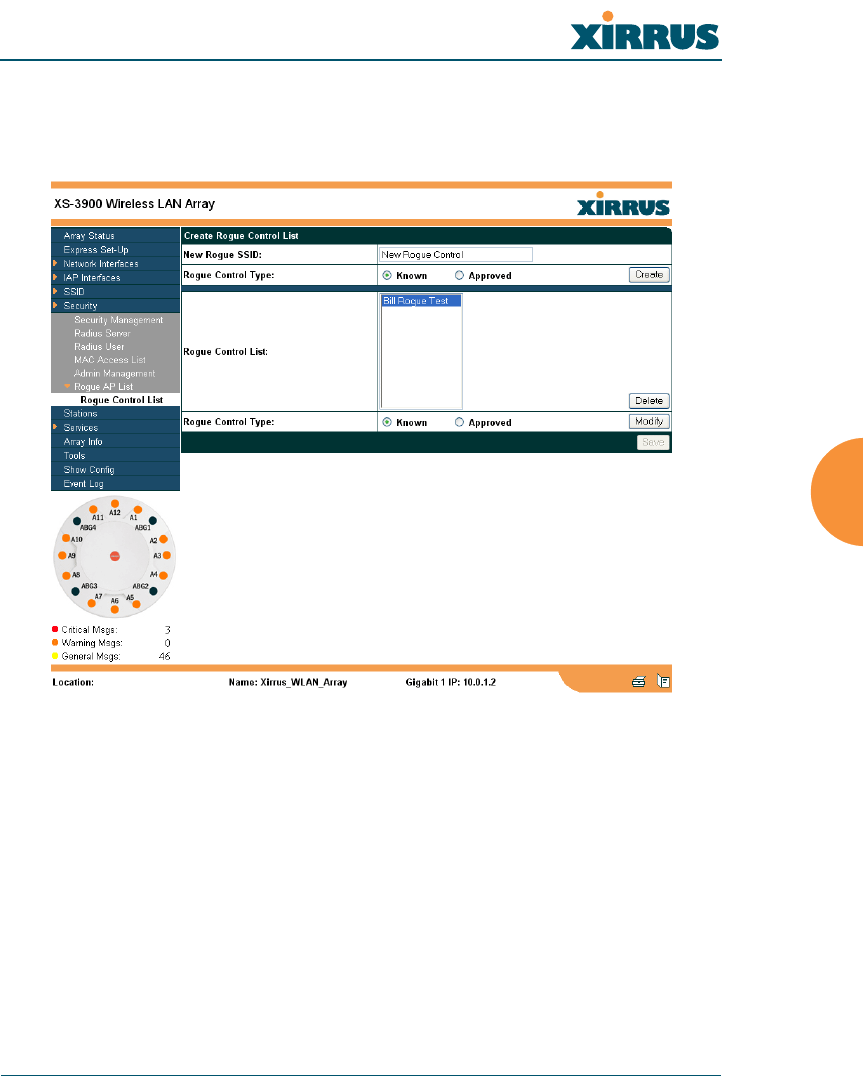
Rogue Control List
This page allows you to set up a control list for rogue APs, based on a type that
you define. When finished, click on the Save button to save your changes.
Figure 83. WMI: Rogue Control List Page

Wireless LAN Array
128 Configuring the Xirrus Array
Procedure for Establishing Rogue AP Control
1. New Rogue SSID: Enter the SSID for the new rogue AP.
2. Rogue Control Type: Define the type, either Known or Approved.
3. Click on the Create button to add this rogue AP to the Rogue Control
List.
4. Rogue Control List: If you want to edit the control type for a rogue AP,
select the rogue from the list.
a. After selecting the rogue, redefine whether this rogue is Known,
Approved or Unknown, then click on the Modify button to apply
your change.
5. Alternatively, if you want to delete the selected rogue AP from the list,
click on the Delete button.
6. Click on the Save button to save your changes (otherwise your new
settings will not take effect).
Wireless LAN Array
Configuring the Xirrus Array 129
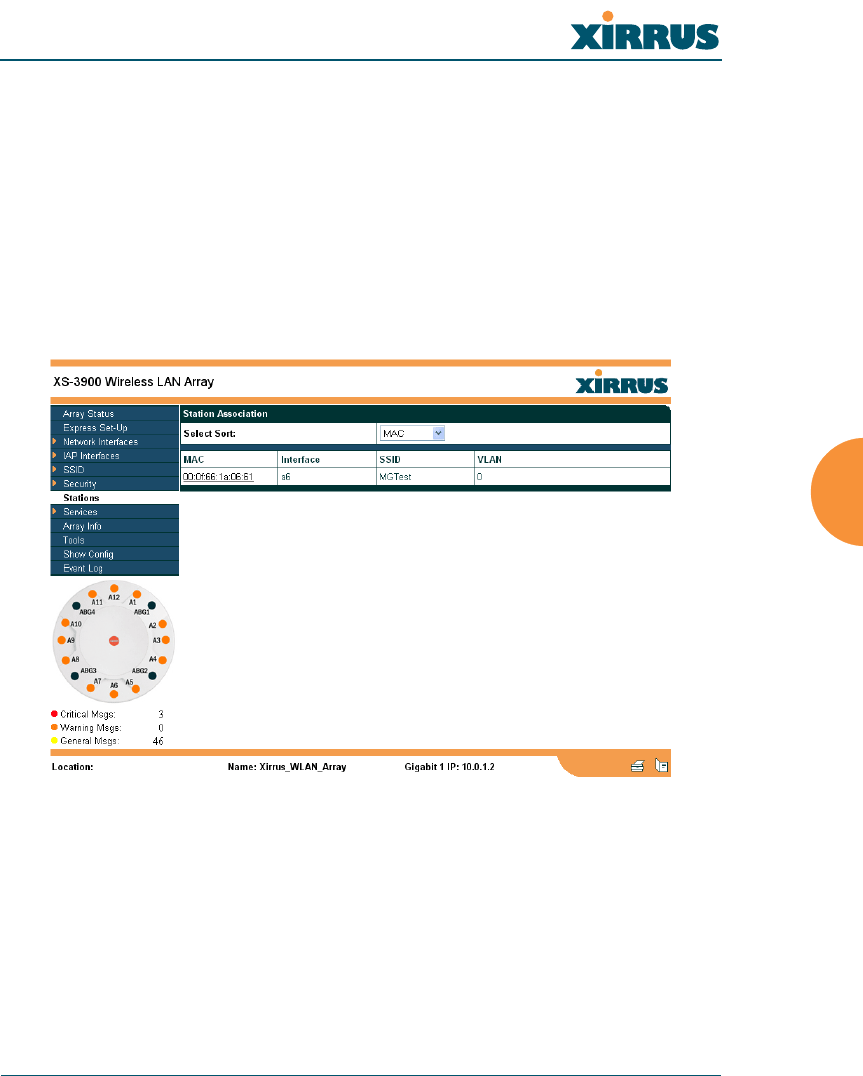
Stations
This page displays stations (clients) that are currently associated with the Array.
You can sort the results based on the following parameters:
zMAC
zIP Address
zInterface
zSSID
zVLAN
Figure 84. WMI: Stations Page

Wireless LAN Array
130 Configuring the Xirrus Array
Services
This is a status only page that allows you to review the current status of syslog
and SNMP services. There are no configuration options available on this page, but
if you are experiencing issues with network services, you may want to print this
page for your records.
Figure 85. WMI: Services Page
Wireless LAN Array
Configuring the Xirrus Array 131
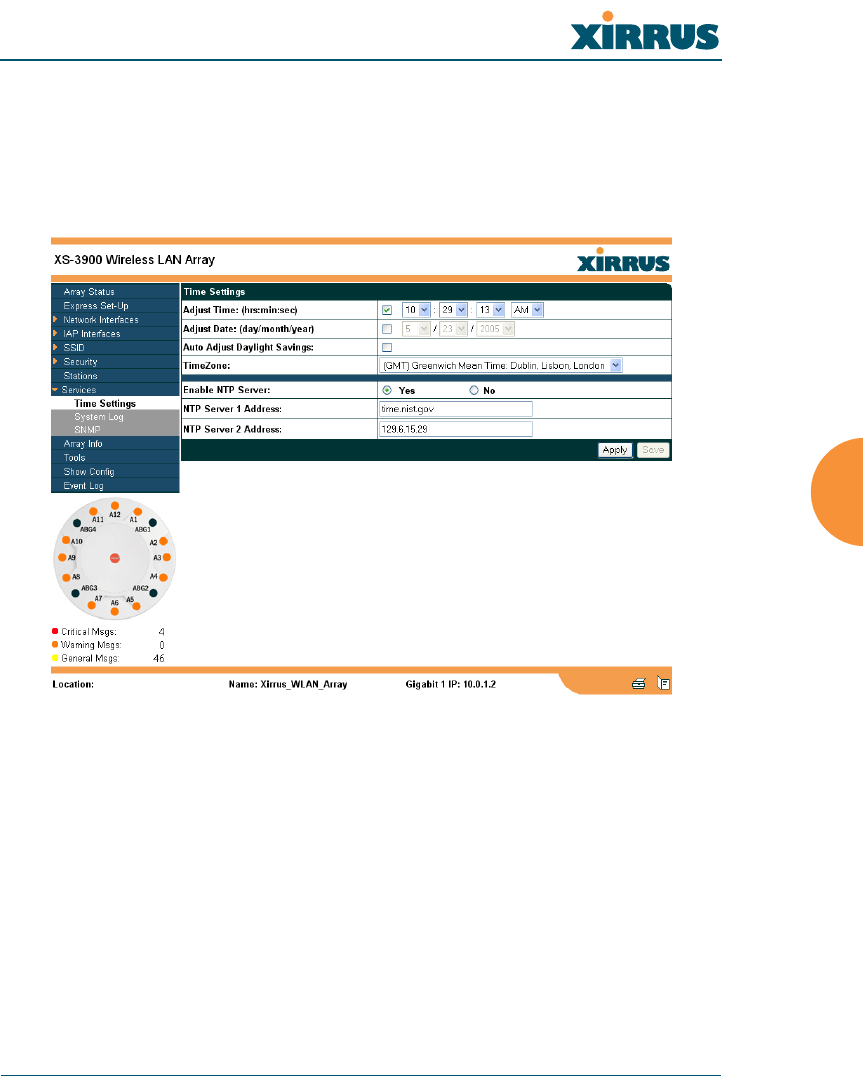
Time Settings
This page allows you to manage the Array’s time settings, including
synchronizing the Array’s clock with a universal clock from an NTP (Network
Time Protocol) server. Synchronizing the Array’s clock with an NTP server
ensures that syslog time-stamping is maintained across all units.
Figure 86. WMI: Time Settings Page

Wireless LAN Array
132 Configuring the Xirrus Array
Procedure for Managing the Time Settings
Manual Time
1. Adjust Time: Check this box to allow manual adjustment of the time in
hours, minutes and seconds (hrs:min:sec).
2. Adjust Date: Check this box to allow manual adjustment of the date
(day/month/year).
3. Auto Adjust Daylight Savings: Check this box if you want the system to
automatically adjust the time for daylight savings.
4. Time Zone: Select the time zone you want to use (normally your local
time zone) from the pull-down list.
Using an NTP Server
5. Enable NTP Server: Check this box if you want to use an NTP (Network
Time Protocol) server to synchronize the Array’s clock. Without an NTP
server assigned (no universal clock), each Array will use its own internal
clock and stamp times accordingly, which may result in discrepancies.
When this box is checked, the NTP Server 1 Address and NTP 2 Server 2
Address fields become active. If you don’t want to use an NTP server,
leave this box unchecked (default), otherwise enter the IP address or DNS
name of the NTP server(s).
6. NTP Server 1 Address: Enter the IP address or DNS name of the primary
NTP server.
7. NTP Server 2 Address: Enter the IP address or DNS name of the
secondary NTP server.
8. Click on the Apply button to apply the new settings to this session.
9. Click on the Save button to save your changes (otherwise your new
settings will not take effect).
Wireless LAN Array
Configuring the Xirrus Array 133
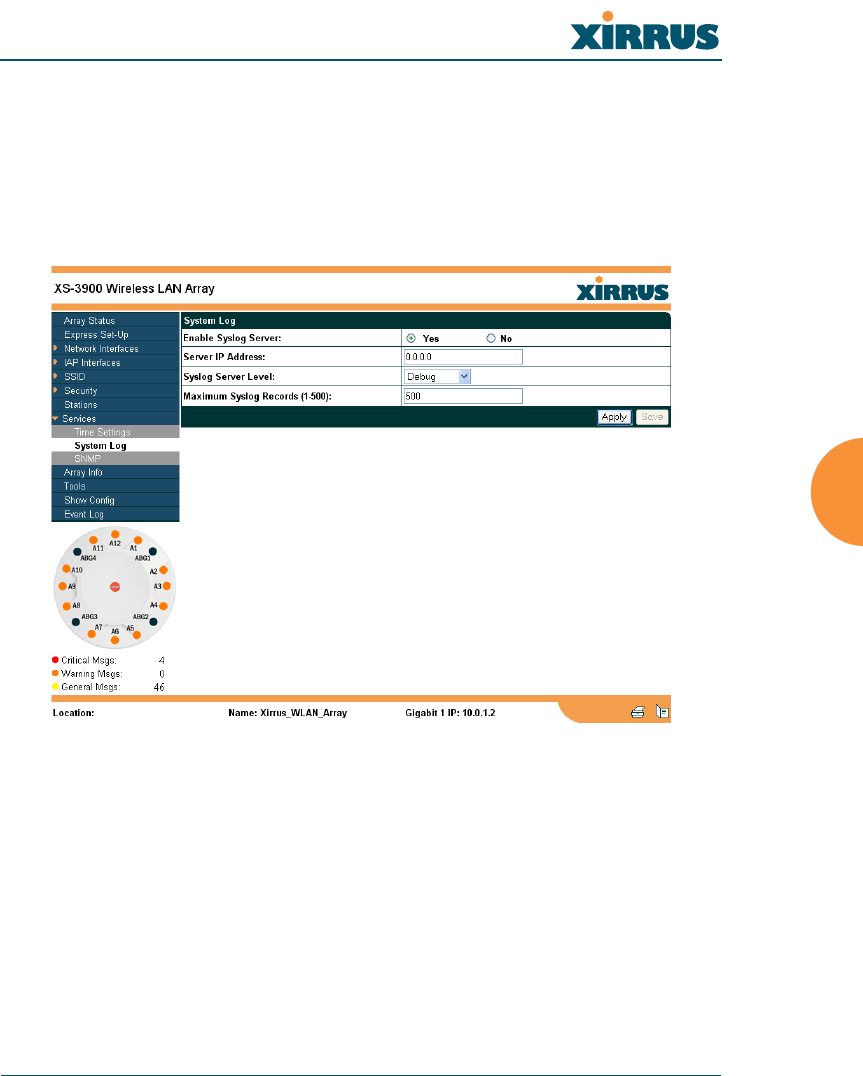
System Log
This page allows you to enable or disable the Syslog server, define the server’s IP
address, and set the level for Syslog reporting—the Syslog service will send
Syslog messages to the defined Syslog server. When finished, click on the Apply
button to apply the new settings to this session, then click on the Save button to
save your changes.
Figure 87. WMI: System Log Page
Wireless LAN Array
134 Configuring the Xirrus Array
Procedure for Configuring Syslog
1. Enable Syslog Server: Choose Yes to enable Syslog functionality, or
choose No to disable this feature.
2. Server IP Address: If you enabled Syslog, enter the IP address of the
Syslog server.
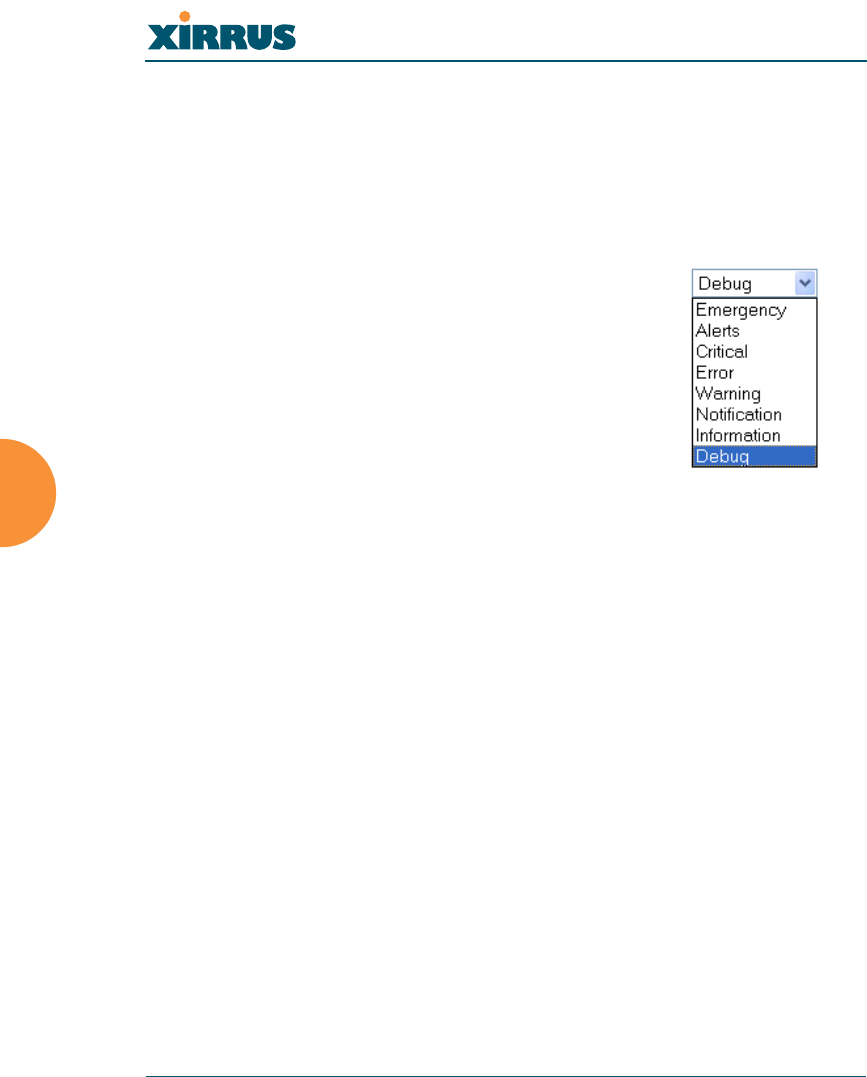
3. Syslog Server Level: Choose the level of Syslog
reporting from the pull-down list. Levels
include:
zEmergency
zAlerts
zCritical
zError
zWarning
zNotification
zInformation
zDebug
The default level is Debug.
4. Maximum Syslog Records: Enter a value in this field to define how many
syslog records are processed (up to a maximum of 500).
5. Click on the Apply button to apply the new settings to this session.
6. Click on the Save button to save your changes (otherwise your new
settings will not take effect).
Wireless LAN Array
Configuring the Xirrus Array 135
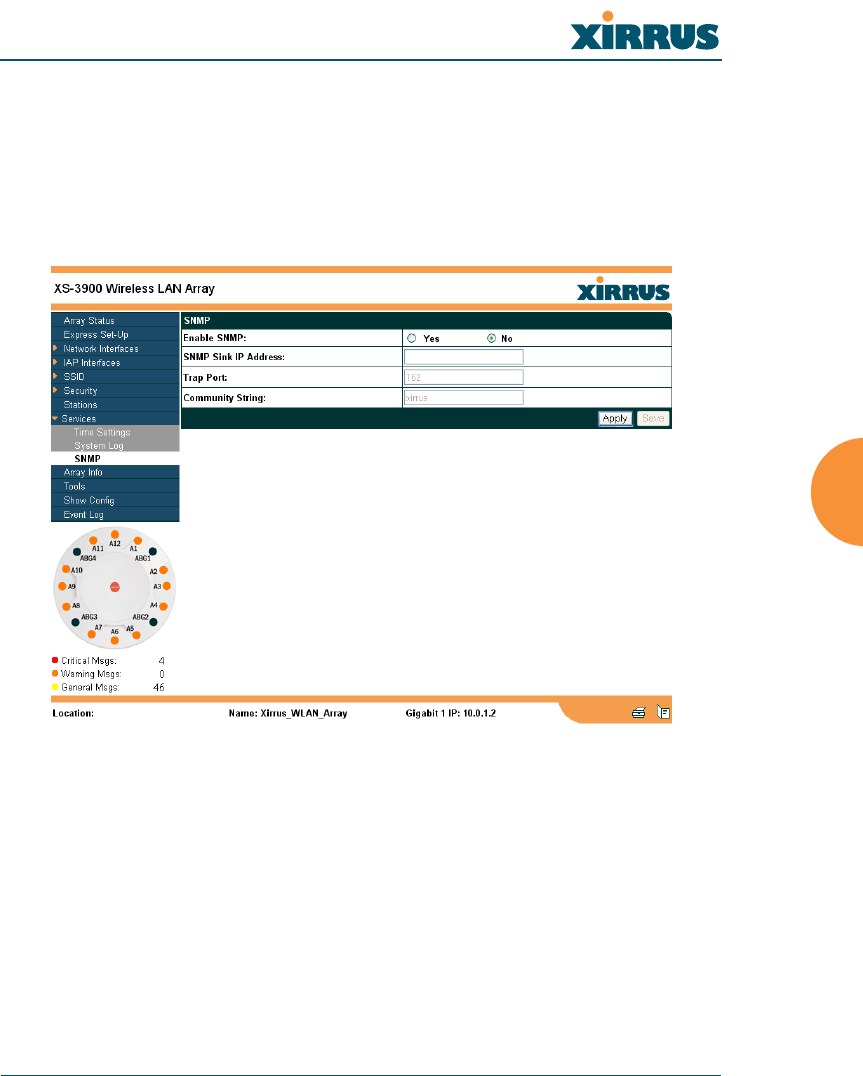
SNMP
This page allows you to enable or disable SNMP and define the SNMP
parameters. SNMP allows remote management of the Array by the Xirrus
Management System (XM-3300), or other SNMP-based management system.
When finished, click on the Apply button to apply the new settings to this
session, then click on the Save button to save your changes.
Figure 88. WMI: SNMP Page

Wireless LAN Array
136 Configuring the Xirrus Array
Procedure for Configuring SNMP
1. Enable SNMP: Choose Yes to enable SNMP functionality, or choose No
to disable this feature.
2. SNMP Link IP Address: Enter the IP address of the SNMP link.
3. Trap P o r t : Enter the trap port.
4. Community String: Enter the community string.
5. Click on the Apply button to apply the new settings to this session.
6. Click on the Save button to save your changes (otherwise your new
settings will not take effect).
Wireless LAN Array
Configuring the Xirrus Array 137
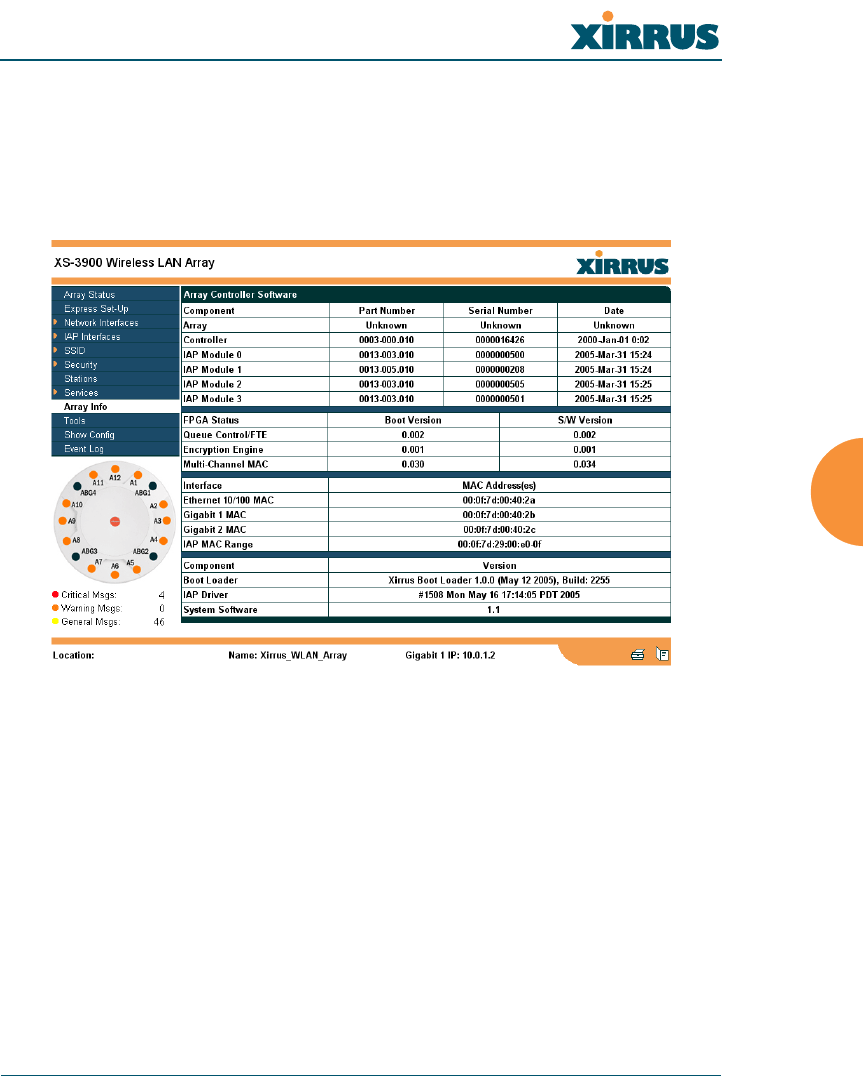
Array Info
This is a status only page that allows you to review the current status of the
Array. There are no configuration options available on this page, but if you are
experiencing issues with network services, you may want to print this page for
your records.
Figure 89. WMI: Array Info Page

Wireless LAN Array
138 Configuring the Xirrus Array
Tools
This page allows you to reset the system’s configuration parameters to their
factory default values, reboot the system, and ping other IP addresses for
diagnostic purposes.
Figure 90. WMI: Tools Page

Wireless LAN Array
Configuring the Xirrus Array 139
Procedure for Configuring System Tools
1. System Configuration Reset: Click on the Reset button to reset the
system’s current configuration settings to the factory default values—all
previous configuration settings will be lost.
2. System Reboot: Click on the Reboot button to reboot the system—you
must reboot the Array.
3. Software Upgrade: Enter the filename and directory location (or click on
the Browse button to locate the software upgrade file), then click on the
Upload button to upload the new file to the Array.
4. Config Update: This field allows you to define the path to a configuration
file (one that you previously saved—see next step). Click on the Browse
button if you need to browse for the location of the file, then click on the
Upload button to update your configuration settings.
5. Config Download: Click on this link to save the Array’s current
configuration settings to a file (that you can upload at a later date). The
system will prompt you for a destination for the file.
6. System Tools: Choose Trace Route or Ping.
7. IP Address: Enter the IP address of the target device.
8. Timeout: Enter a value (in seconds) before the action times out.
9. Click on the Execute button to perform the test. Results are displayed in
the Output frame.
Wireless LAN Array
140 Configuring the Xirrus Array
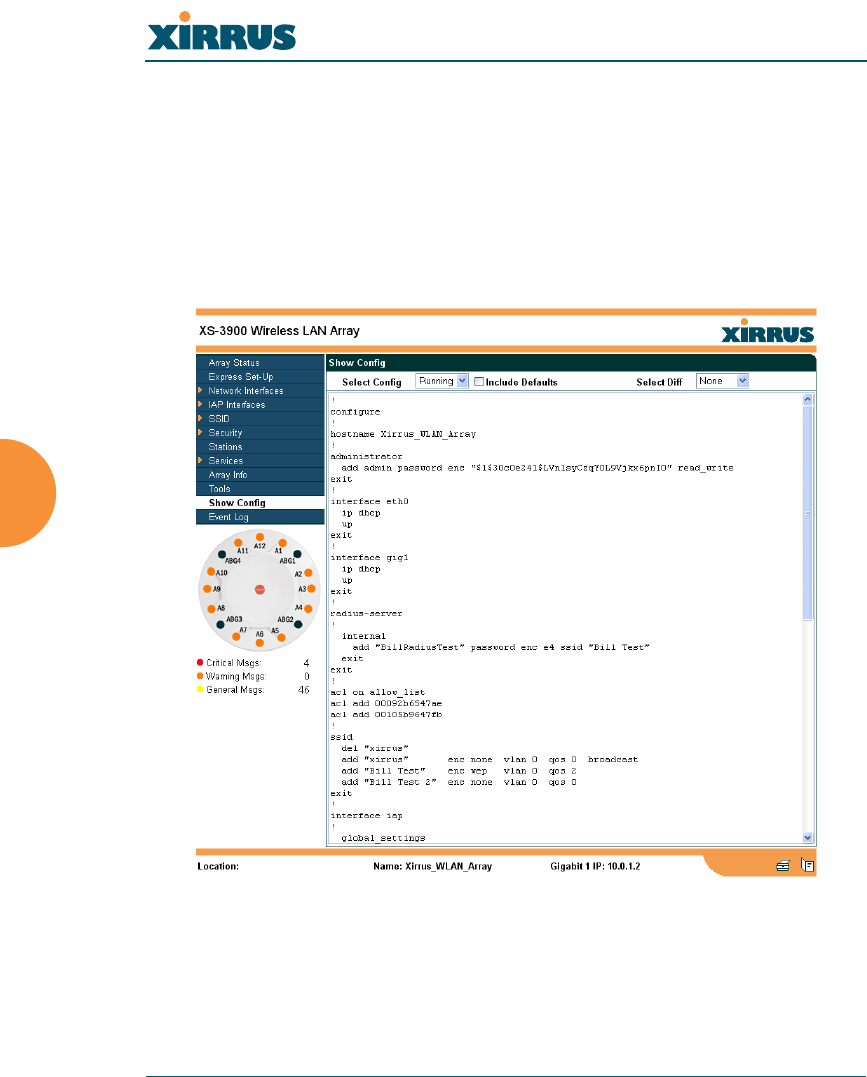
Show Config
This page allows you to display the configuration settings for the Array, based on
the following sort options:
zRunning—Displays the current configuration (the one running now).
zSaved—Displays the saved configuration from this session.
zStartup—Displays the configuration at start up.
zFactory—Displays the configuration established at the factory.
Figure 91. WMI: Show Config Page

Wireless LAN Array
Configuring the Xirrus Array 141
If you want to see just the differences between the Running, Saved, Startup, and
Factory configurations, you can do this by choosing a configuration from the
Select Config pull-down menu then selecting an alternative configuration from
the Select Diff pull-down menu.
You also have the option of including the default configuration settings. To do
this, choose your configuration then click in the Include Defaults check box.
Wireless LAN Array
142 Configuring the Xirrus Array
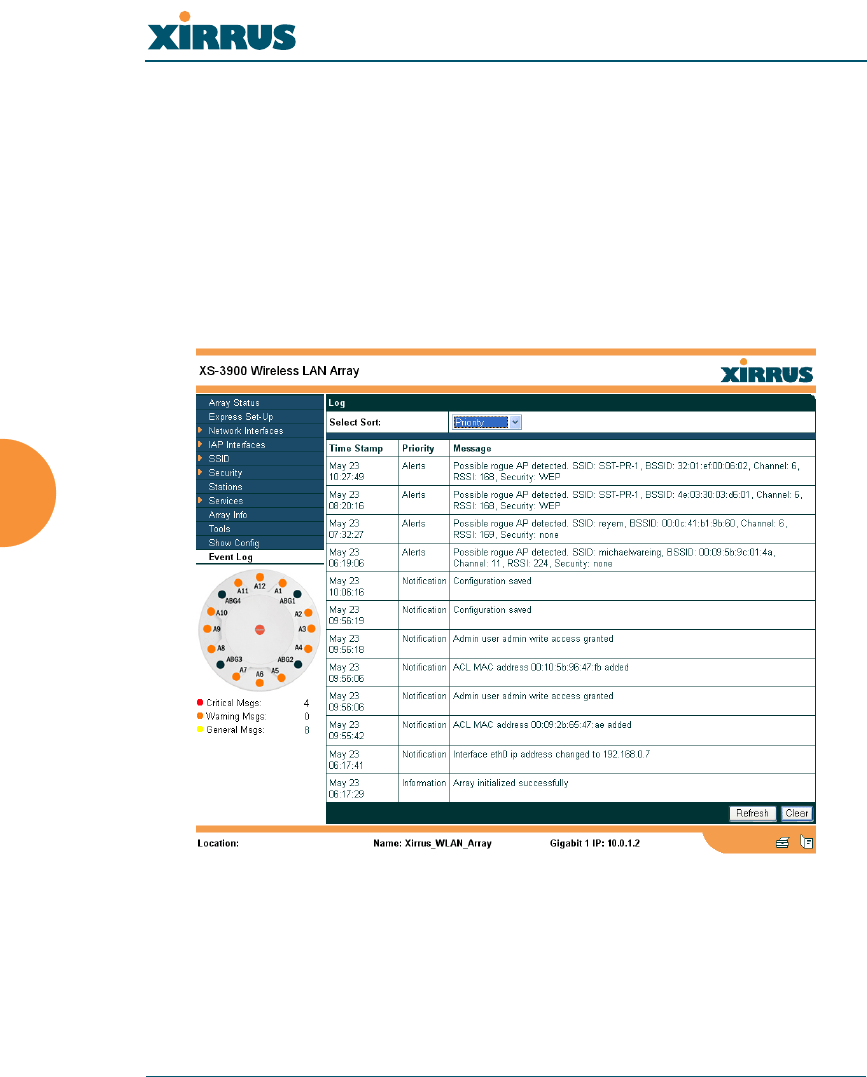
Event Log
This is a status only page that allows you to review the event log, where system
alerts and messages are displayed. Although there are no configuration options
available on this page, you do have the choice of deciding how the event
messages are sorted (Time Stamp, Priority, or Message).
zTime Stamp—sorts the list based on the time the event occurred.
zPriority—sorts the list based on the priority assigned to the message.
zMessage—sorts the list based on the message category.
Figure 92. WMI: Event Log Page
Click on the Refresh button to refresh the messages, or click on the Clear button
to delete all messages. If you are experiencing problems with your network you
may want to print this page for your records.
Wireless LAN Array
The Command Line Interface 143
The Command Line Interface
This chapter covers configuration and management tasks using the product’s
Command Line Interface (CLI), and includes a procedure for establishing a Telnet
connection to the Xirrus Array. Section headings for this chapter include:
z“Establishing a Secure Shell (SSH) Connection” on page 143
z“Basic Commands” on page 144
z“Command Modes” on page 145
z“Selecting Interfaces” on page 148
z“Commands” on page 149
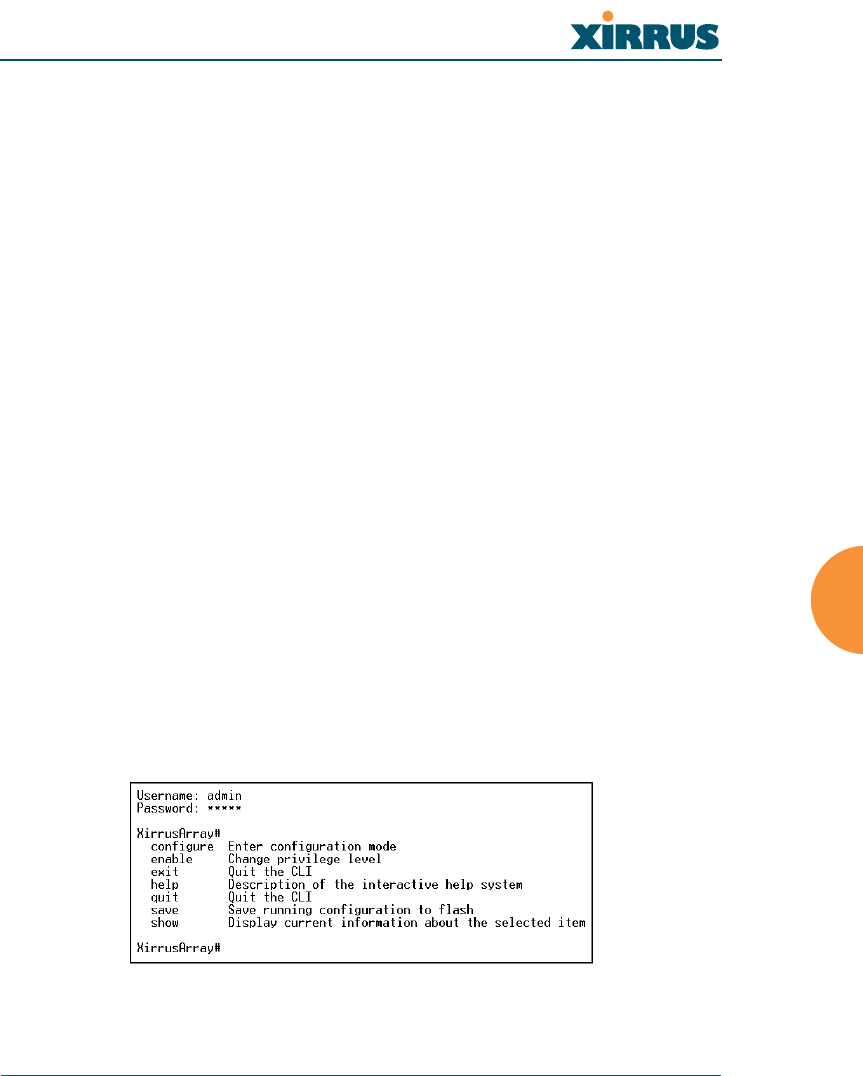
Establishing a Secure Shell (SSH) Connection
Use this procedure to initialize the system and log in to the Command Line
Interface (CLI) via a Secure Shell (SSH) utility, such as PuTTY.
1. Start your SSH session and communicate with the XS-3900 via its default
IP address (10.0.1.1).
When connected to the Array, a login prompt appears on your screen.
The default login user name and password is admin (for both). Login
names and passwords are case-sensitive.
2. Enter admin when prompted for a user name and password. You are
now logged in to the Array’s Command Line Interface.
Figure 93. Command Line Interface

Wireless LAN Array
144 The Command Line Interface
Basic Commands
Help
To get help at any point type help or ? to view the interactive help system.
Tab Key
The Tab key allows auto-completion of commands such that only a few unique
characters need to be entered followed by the Tab key, which will automatically
fill in the rest of the command.
? Key
The ? key displays the list of available commands at any point of typing in the
command line.
Save
You must type save to save the current configuration to flash memory so that
changes are kept when the Array is rebooted.
Show
Displays the current settings and is useful when verifying the current
configuration settings.
End
Returns you to the to top-level configure mode.
Exit
Exits the current command mode level, and enters the next level up.
Quit
Exits the command line interface.
No
Disables an item that is currently enabled; or sets the selected item to the default
value.

Wireless LAN Array
The Command Line Interface 145
Command Modes
Configure Mode
Allows major functional changes to interfaces and Array configuration.
Requires read/write administrator privileges
From the default prompt, type configure then press <ENTER>
Xirrus-Array# configure
Xirrus-Array(config)#
The prompt changes to show the current mode in parentheses.
Admin Mode
Allows you to manage user accounts, including adding accounts, deleting
accounts, and displaying current user account information.
Requires read/write administrator privileges
From the configure mode, type admin then press <ENTER>
Xirrus-Array(config)# admin
Xirrus-Array(config-admin)#
Contact Info Mode
Allows you to display the current contact information for the Array, or modify
the existing contact information.
Requires read/write administrator privileges
From the configure mode, type contact then press <ENTER>
Xirrus-Array(config)# contact
Xirrus-Array(config-contact-info)#
#When inputting commands you need only type as many characters as the
system requires before it recognizes your input.

Wireless LAN Array
146 The Command Line Interface
Date & Time Mode
Allows you to configure the date and time settings used by the Array.
Requires read/write administrator privileges
From the configure mode, type date then press <ENTER>
Xirrus-Array(config)# date
Xirrus-Array(config-date-time)#
DHCP Mode
Allows you to enable, disable and configure the DHCP server.
Requires read/write administrator privileges
From the configure mode, type dhcp then press <ENTER>
Xirrus-Array(config)# dhcp
Xirrus-Array(config-dhcp-server)#
DNS Mode
Allows you to configure the DNS settings.
Requires read/write administrator privileges
From the configure mode, type dns then press <ENTER>
Xirrus-Array(config)# dns
Xirrus-Array(config-dns)#
Radius Mode
Allows you to make configuration changes to the internal RADIUS server.
Requires read/write administrator privileges
From the configure mode, type radius then press <ENTER>
Xirrus-Array(config)# radius
Xirrus-Array(config-radius-server)#

Wireless LAN Array
The Command Line Interface 147
Run Test Mode
Allows you to execute diagnostic run tests (for example, pings and trace routes).
Requires read/write administrator privileges
From the configure mode, type run-tests then press <ENTER>
Xirrus-Array(config)# run-tests
Xirrus-Array(run-test)#
Security Mode
Allows you to set security parameters for the Array.
Requires read/write administrator privileges
From the configure mode, type security then press <ENTER>
Xirrus-Array(config)# security
Xirrus-Array(config-security)#
SNMP Mode
Allows you to enable, disable or configure SNMP.
Requires read/write administrator privileges
From the configure mode, type snmp then press <ENTER>
Xirrus-Array(config)# snmp
Xirrus-Array(config-snmp)#
SSID Mode
Allows you to add, delete and modify SSIDs, or display the current definitions for
a selected SSID.
Requires read/write administrator privileges
From the configure mode, type ssid then press <ENTER>
Xirrus-Array(config)# ssid
Xirrus-Array(config-ssid)#

Wireless LAN Array
148 The Command Line Interface
Syslog Mode
Allows you to enable, disable and configure the Syslog server.
Requires read/write administrator privileges
From the configure mode, type syslog then press <ENTER>
Xirrus-Array(config)# syslog
Xirrus-Array(config-syslog)#
Selecting Interfaces
From the configure mode select the desired interface.
interface {console | iap | gig1 | gig2 | eth0};
console asynchronous serial console port
iap integrated access point interface
gig1 gigabit Ethernet interface
gig2 gigabit Ethernet interface
eth0 10/100 Ethernet interface
Example:
Xirrus-Array(config)# interface iap
Xirrus-Array(config-iap)#

Wireless LAN Array
The Command Line Interface 149
Commands
This section contains detailed information for each CLI command, organized
alphabetically. The following table provides a listing of the commands. Click on
any command in this list to “jump” to that command.
administrator more
acl radius-server
console reboot
contact-info reset
copy run-script
date-time run-tests
dhcp-server save
dir security
dns show
erase snmp
eth0 ssh
ftp syslog
gig1 telnet
gig2
hostname
iap
iap global_settings
iap global_a_settings
iap global_bg_settings
location

Wireless LAN Array
150 The Command Line Interface
administrator
DESCRIPTION
Adds and edits administrator accounts and privileges—available from the
config command mode.
SYNTAX
administrator [add <uid> password [enc] <passwd> {read_only |
read_write} | del <uid> ]
PARAMETERS
add <uid> Add user ID
read_only Read only permissions
read_write Read/write permissions
password Define user password
enc Enter password in encrypted form (must be in
quotes)
DEFAULTS
None.
USAGE GUIDELINES
The show command within the config-admin mode will display all
administrator accounts and privileges.
Wireless LAN Array
The Command Line Interface 151
EXAMPLE
To add a new administrator account:
config-administrator
(config-admin)# add johnk password xtyrk567 read_write
Figure 94. CLI: Adding a New Administrator Account
SEE ALSO
None.

Wireless LAN Array
152 The Command Line Interface
acl
DESCRIPTION
Configures the MAC based Access Control Lists to allow or limit the
association of stations to the Array.
SYNTAX
acl {off | on {allow_list | deny_list} | add <amac> | del <dmac>}
PARAMETERS
on Enable access control list
off Disable access control list
allow_list Enable allow list, where this list is a list of users
to allow association to the array
deny_list Enable deny list, where this list is used to deny
association to the array
add Add MAC address to the list
del Delete MAC address from the list
DEFAULTS
None.
USAGE GUIDELINES
None.
EXAMPLE
To allow association to the array, type:
Xirrus_WLAN_Array(config)# acl on allow_list
Xirrus_WLAN_Array(config)# acl add 00:00:a1:cd:45
SEE ALSO
None.
Wireless LAN Array
The Command Line Interface 153
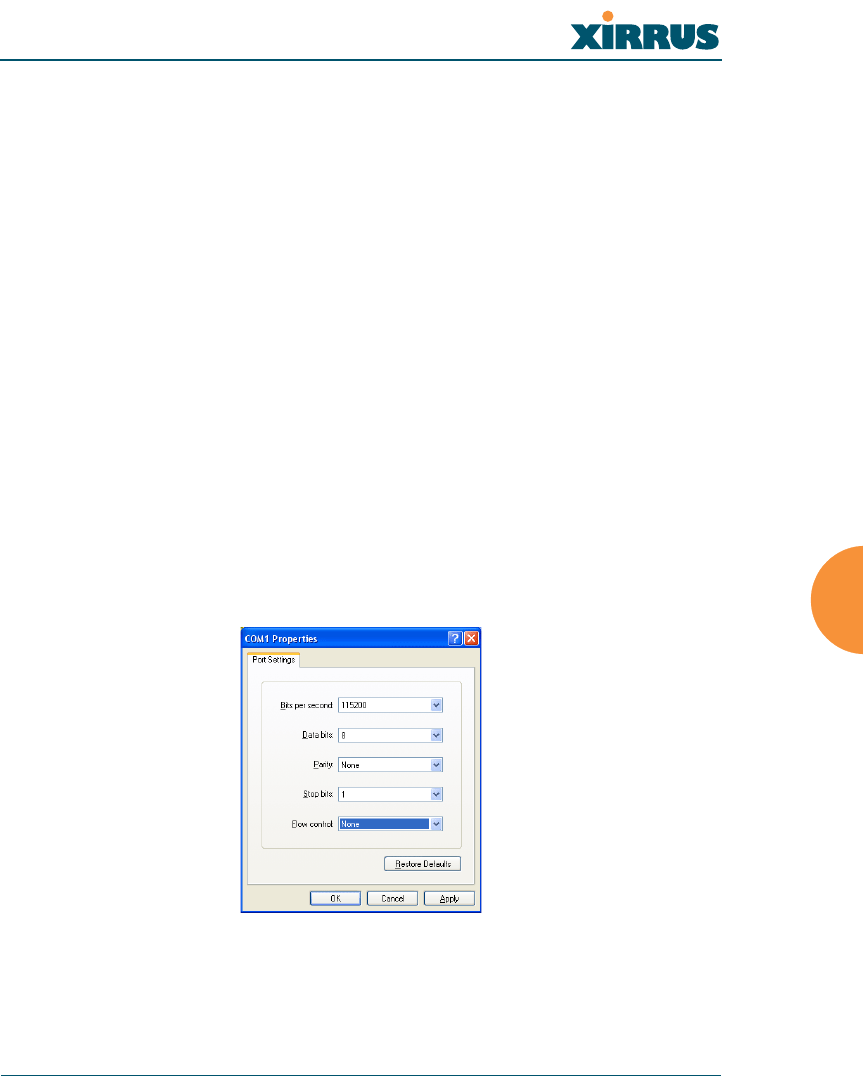
console
DESCRIPTION
Configures the Console Interface (serial port)—available from the config-
interface command mode.
SYNTAX
console { {baud <brate> | bytesize <bsz> | stopbits <sbit> | parity {none |
odd | even} | timeout <idleto>}@}
PARAMETERS
timeout Console inactivity timeout in seconds
baud Async port baud rate 2400 - 115,200 bps
bytesize Async port word size 7 or 8 bits
stopbits Async port number of stop bits 0, 1, or 2
parity Async port number of parity bits
none No parity
odd Odd parity
even Even parity
DEFAULTS
115,200, 8bit, No Parity, 1 Stop bit, No Flow Control.
Figure 95. CLI: Default Serial Port Settings
Wireless LAN Array
154 The Command Line Interface
USAGE GUIDELINES
None.
EXAMPLE
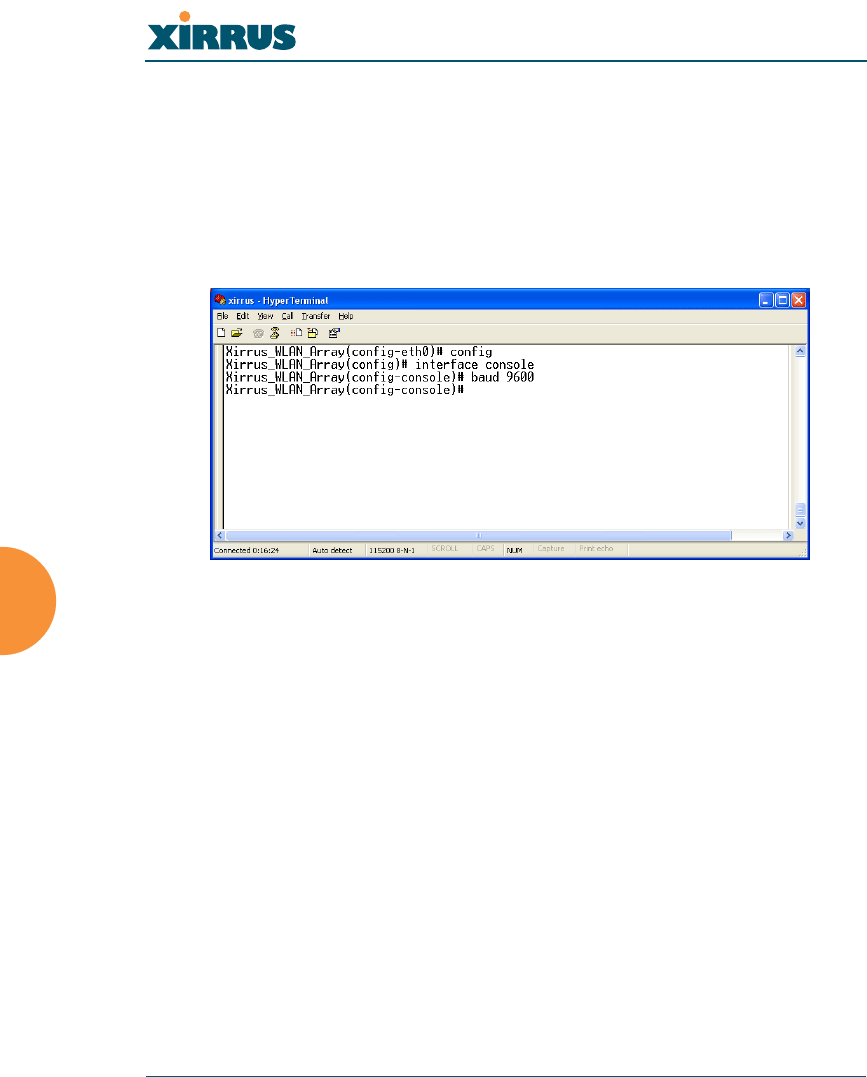
To set the baud rate of the console serial port to 9600 baud:
config-interface console
(config-console)# baud 9600
Figure 96. CLI: Setting the IP Address for the Serial Port
SEE ALSO
None.
Wireless LAN Array
The Command Line Interface 155
contact-info
DESCRIPTION
Sets the contact information for this Array—available from the config
command mode.
SYNTAX
contact-info {name [<conname>] | email [<emailcontact>] | phone
[<contele>]}@
PARAMETERS
contact-info Contact information for assistance on this Array
name Contact name (must be within quotes)
email Contact email address (must be within quotes)
phone Contact telephone number (must be within quotes)
DEFAULTS
None.
USAGE GUIDELINES
None.
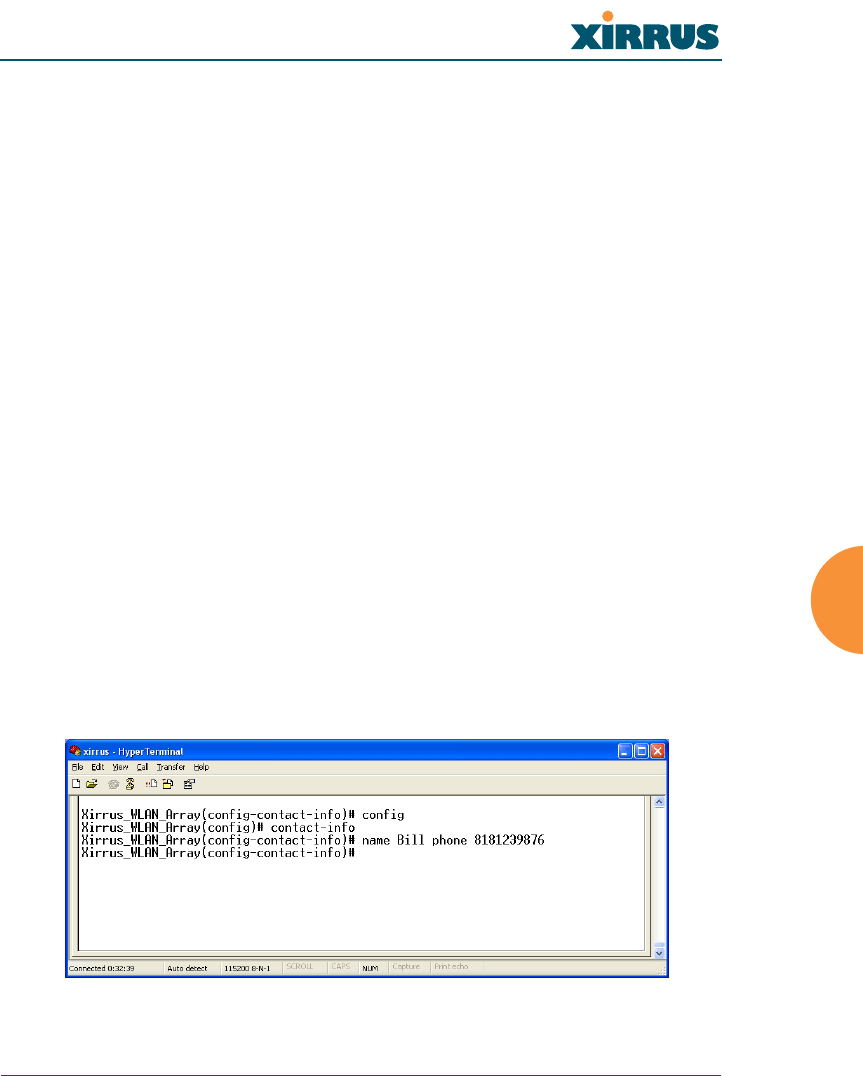
EXAMPLE
To add new contact information (name and telephone number):
config-contact-info
(config-contact-info)# name Bill phone 8181239876
Figure 97. CLI: Adding a New Administrator Account

Wireless LAN Array
156 The Command Line Interface
SEE ALSO
None.
copy
DESCRIPTION
Creates a copy of the specified file on the Flash file system.
SYNTAX
copy <sourcefile> <destinationfile>
PARAMETERS
sourcefile The existing source file name
destinationfile The new destination file name
DEFAULTS
None.
USAGE GUIDELINES
None.
EXAMPLE
To create a backup of the current system image file, type:
Xirrus_WLAN_Array(config)# copy XS-39-1.1.0 XS-39-1.1.BAK
SEE ALSO
dir
delete

Wireless LAN Array
The Command Line Interface 157
date-time
DESCRIPTION
Set the date/time for the Array—available from the config command
mode, using the format hh:mm mm/dd/yyyy.
SYNTAX
date-time <date/time>
PARAMETERS
dst_adjust Adjust daylight savings
no Disable daylight savings
ntp Configure the NTP server
set Set the date and time for the Array
timezone Configure the time zone
DEFAULTS
None.
USAGE GUIDELINES
You access the date-time command mode from the config mode.
Wireless LAN Array
158 The Command Line Interface
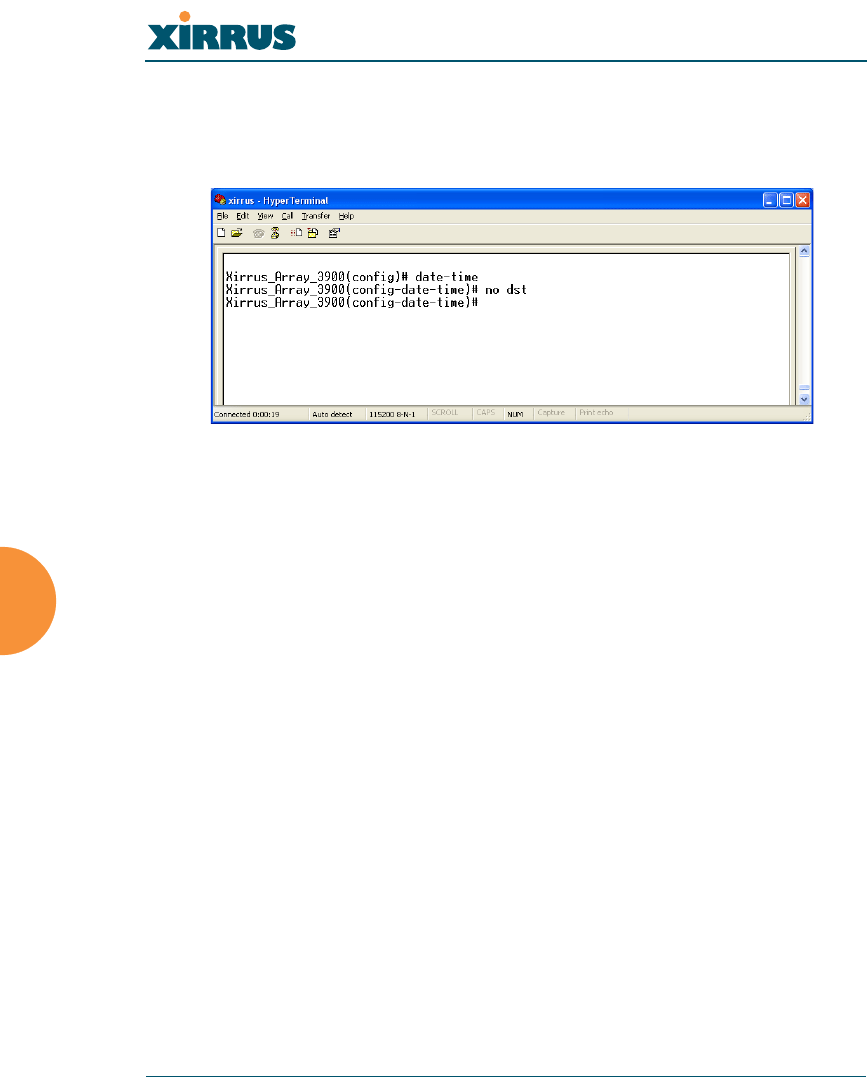
EXAMPLE
To disable daylight savings, type:
(config-date-time)# no dst
Figure 98. CLI: Disabling Daylight Savings
SEE ALSO
None.
dhcp-server
DESCRIPTION
Configures the local DHCP server settings—available from the Config->
dhcp-server command mode.
SYNTAX
dhcp {on | off | {start-ip-range <sipr> | end-ip-range <eipr> | default-
lease <defl> | max-lease <maxl>}@}

Wireless LAN Array
The Command Line Interface 159
PARAMETERS
on Enable the DHCP server
off Disable the DHCP server
start-ip-range Starting IP address for the lease pool
end-ip-range Ending IP address for the lease pool
default-lease Default lease period (in minutes), if one is not
requested
max-lease Maximum lease period allowed
show Display the current DHCP server settings
DEFAULTS
Default lease time 300
Maximum lease time 300
USAGE GUIDELINES
None.
EXAMPLE
To set the IP address range for the local DHCP server and enable the server,
type:
Xirrus_WLAN_Array(config)# dhcp-server
Xirrus_WLAN_Array(config-dhcp-server)# start-ip-range 192.168.1.100
end-ip-range 192.168.1.200
Xirrus_WLAN_Array(config-dhcp-server)# show
DHCP Server Settings Summary
----------------------------
State disabled
Address range start 192.168.1.100
Address range end 192.168.1.200
Default lease time 300
Maximum lease time 300
SEE ALSO
None.

Wireless LAN Array
160 The Command Line Interface
dir
DESCRIPTION
Lists the contents of the local Flash file system directory.
SYNTAX
dir
PARAMETERS
None.
DEFAULTS
None.
USAGE GUIDELINES
None.
EXAMPLE
To list the local Flash file system directory contents, type:
Xirrus_WLAN_Array(config)# dir
The following will appear:
.
..
lastboot
xs37-1.0.37.bin
SEE ALSO
Delete
Copy

Wireless LAN Array
The Command Line Interface 161
dns
DESCRIPTION
Used to configure the DNS settings—available from the Config-> dns
command mode.
SYNTAX
dns { domain [<dom>] | server1 [<srv1>] | server2 [<srv2>] | server3
[<srv3>]}
PARAMETERS
domain Enter your domain name
(Example: www.mydomain.com)
server1 Enter the first DNS server IP address
server2 Enter the second DNS server IP address
server3 Enter the third DNS server IP address
DEFAULTS
None.
USAGE GUIDELINES
Server1, Server2, and Server3 IP addresses must be entered using the
standard A.B.C.D notation.
EXAMPLE
To configure the first DNS server, type:
Xirrus_WLAN_Array(config)# dnsy
Xirrus_WLAN_Array(config-dns)# server1 10.10.10.1
SEE ALSO
None.

Wireless LAN Array
162 The Command Line Interface
erase
DESCRIPTION
Erases the specified file from the Flash file system.
SYNTAX
Erase <filename>
PARAMETERS
filename existing file to delete.
DEFAULTS
None.
USAGE GUIDELINES
None.
EXAMPLE
To erase the file old-configuration, type:
Xirrus_WLAN_Array(config)# erase old-configuration
SEE ALSO
dir
copy

Wireless LAN Array
The Command Line Interface 163
eth0
DESCRIPTION
Configures the 10/100 Ethernet Interface Settings—available from the
config-interface command mode.
SYNTAX
eth0 {[no] autoneg [on | off] | defaults | duplex {half | full} | speed
<spdsel> | mtu <mtusz> | down | up | ip {dhcp | {addr <statip> | mask
<ipmask> | gateway <gway>}@}}
PARAMETERS
half Half duplex
full Full duplex
mtu Set the maximum MTU size allowed (64-17940)
defaults Reset the interface to default values
duplex Half or full duplex mode
speed 10M or 100M operations
down Shut this interface down
up Bring this interface up
ip Set IP address (A.B.C.D)
dhcp IP address, mask and gateway are obtained
through DHCP
addr <IP Address> Static IP address (A.B.C.D)
gateway <IP Address> Gateway IP address (A.B.C.D)
mask <mask> IP mask (A.B.C.D)
autoneg Autonegotiation on or off
on Enable autonegotiation
off Disable autonegotiation
DEFAULTS
None.
USAGE GUIDELINES
None.

Wireless LAN Array
164 The Command Line Interface
EXAMPLE
To set the IP address of the 10/100 Ethernet interfaces:
config-interface eth0
(config-eth0)# ip addr 192.168.39.186 mask 255.255.255.0
Figure 99. CLI: Setting the IP Address for the Fast Ethernet Interface
SEE ALSO
config-interface gig1
config-interface gig2

Wireless LAN Array
The Command Line Interface 165
ftp
DESCRIPTION
Opens an ftp connection to a remote system.
SYNTAX
ftp <ip-address>
PARAMETERS
<ip-address> IP address of remote ftp host (in A.B.C.D format)
DEFAULTS
None.
USAGE GUIDELINES
Once an ftp connection is established, the following commands are
available from the ftp prompt:
EXAMPLE
None.
SEE ALSO
None.
binary delete ls recv
bye dir mkdir rename
cd disconnect open rmdir
cdup get put send
chmod hash pwd size
close help quit ?

Wireless LAN Array
166 The Command Line Interface
gig1
DESCRIPTION
Configures the Gigabit 1 Ethernet Interface Settings—available from the
config-interface command mode.
SYNTAX
gig1 {[no] autoneg [on | off]; | [no] management [on | off] | down | up |
defaults | duplex {half | full} | speed <spdsel> | mtu <mtusz> | ip {dhcp
| {addr <statip> | mask <ipmask> | gateway <gway>}@}}
PARAMETERS
half Half duplex
full Full duplex
mtu Set the maximum MTU size allowed
defaults Reset the interface to default values
duplex Half or full duplex mode
speed <speed> 100M or 1000M operation
down Shut this interface down
up Bring this interface up
ip Set the IP address
dhcp IP address, mask and gateway are obtained
through DHCP
addr <IP Address> Static IP address (A.B.C.D)
gateway <IP Address> Gateway IP address (A.B.C.D)
mask <mask> IP mask (A.B.C.D)
management Enable or disable management via interface
no Managed elsewhere
on Enable management
off Disable management
autoneg Autonegotiation on or off
no Disable selected feature
on Enable autonegotiation
off Disable autonegotiation
Wireless LAN Array
The Command Line Interface 167
DEFAULTS
None.
USAGE GUIDELINES
Setting the Gigabit1 interface parameters will automatically set the Gigabit2
parameters to the same values.
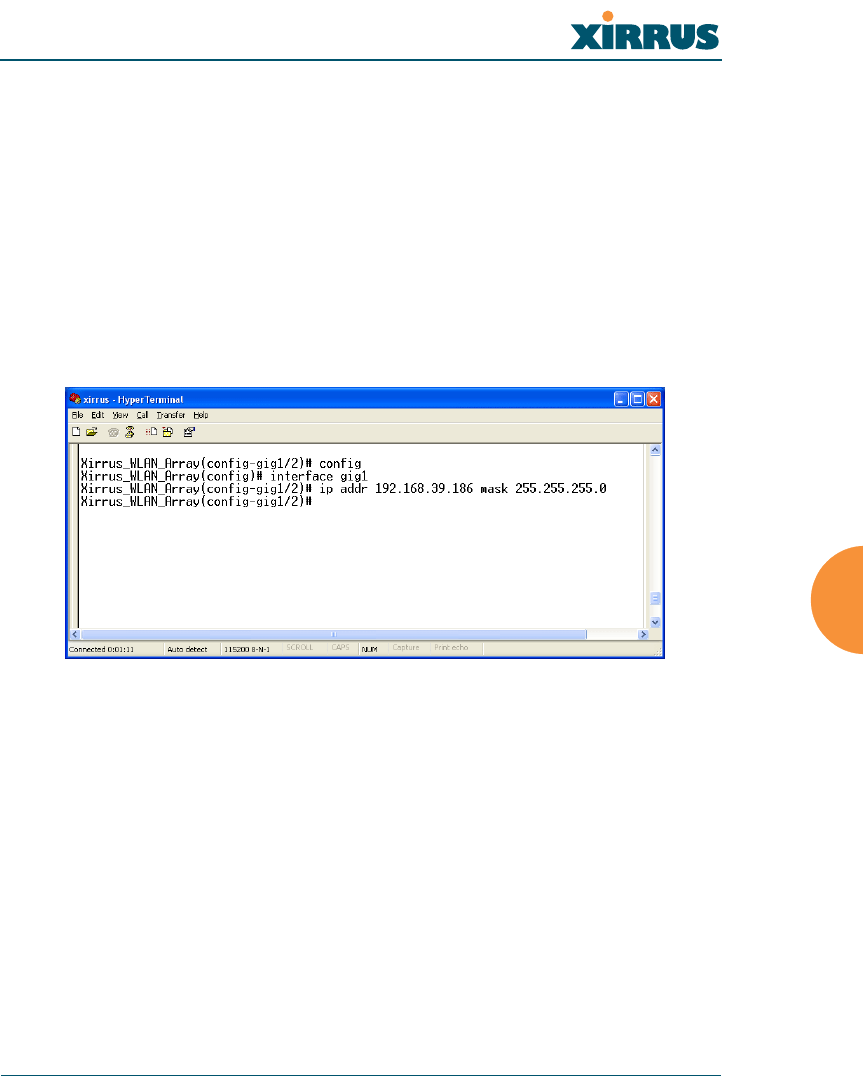
EXAMPLE
To set the IP address of the gigabit Ethernet interfaces:
config-interface gig1
(config-gig1/2)# ip addr 192.168.39.186 mask 255.255.255.0
Figure 100. CLI: Setting the IP Address for the Gigabit 1 Interface
SEE ALSO
config-interface gig2
config-interface eth0

Wireless LAN Array
168 The Command Line Interface
gig2
DESCRIPTION
Configures the Gigabit 2 Ethernet Interface Settings—available from the
config-interface command mode.
SYNTAX
gig2 {[no] autoneg [on | off]; | [no] management [on | off] | down | up |
defaults | duplex {half | full} | speed <spdsel> | mtu <mtusz> |
ip {dhcp | {addr <statip> | mask <ipmask> | gateway <gway>}@}}
PARAMETERS
half Half duplex
full Full duplex
mtu Set the maximum MTU size allowed
defaults Reset the interface to the default values
duplex Half or full duplex mode
speed <speed> 100M or 1000M operation
down Shut this interface down
up Bring this interface up
ip Set the IP address
dhcp IP address, mask and gateway are obtained
through DHCP
addr <IP Address> Static IP address (A.B.C.D)
gateway <IP Address> Gateway IP address (A.B.C.D)
mask <mask> IP mask (A.B.C.D)
management Enable or disable management via interface
no Managed elsewhere
on Enable management
off Disable management
autoneg Autonegotiation on or off
no Disable selected feature
on Enable autonegotiation
off Disable autonegotiation
DEFAULTS
None.