Compal Electronics POCKETPCE740W Wireless PDA User Manual 9012419 COVER
Compal Electronics Inc Wireless PDA 9012419 COVER
Contents
Manual Ch 7

2-18
Toshiba Pocket PC e740 User’s Guide
Learning to use your device is easy. This chapter describes the basic con-
cepts of using and customizing your device.
Device Buttons and the Stylus
Your device has hardware buttons that control actions and scroll functions,
and a stylus for selecting items and entering information.
On the device, the stylus replaces the mouse.
•Tap. Touch the screen once with the stylus to open items and select
options.
•Drag. Hold the stylus on the screen and drag across the screen to
select text and images. Drag in a list to select multiple items.
•Tap and hold. Tap and hold the stylus on an item to see a list of
actions available for that item. On the pop-up menu that appears, tap
the action you want to perform.
2-19
Chapter 2: Basic Skills
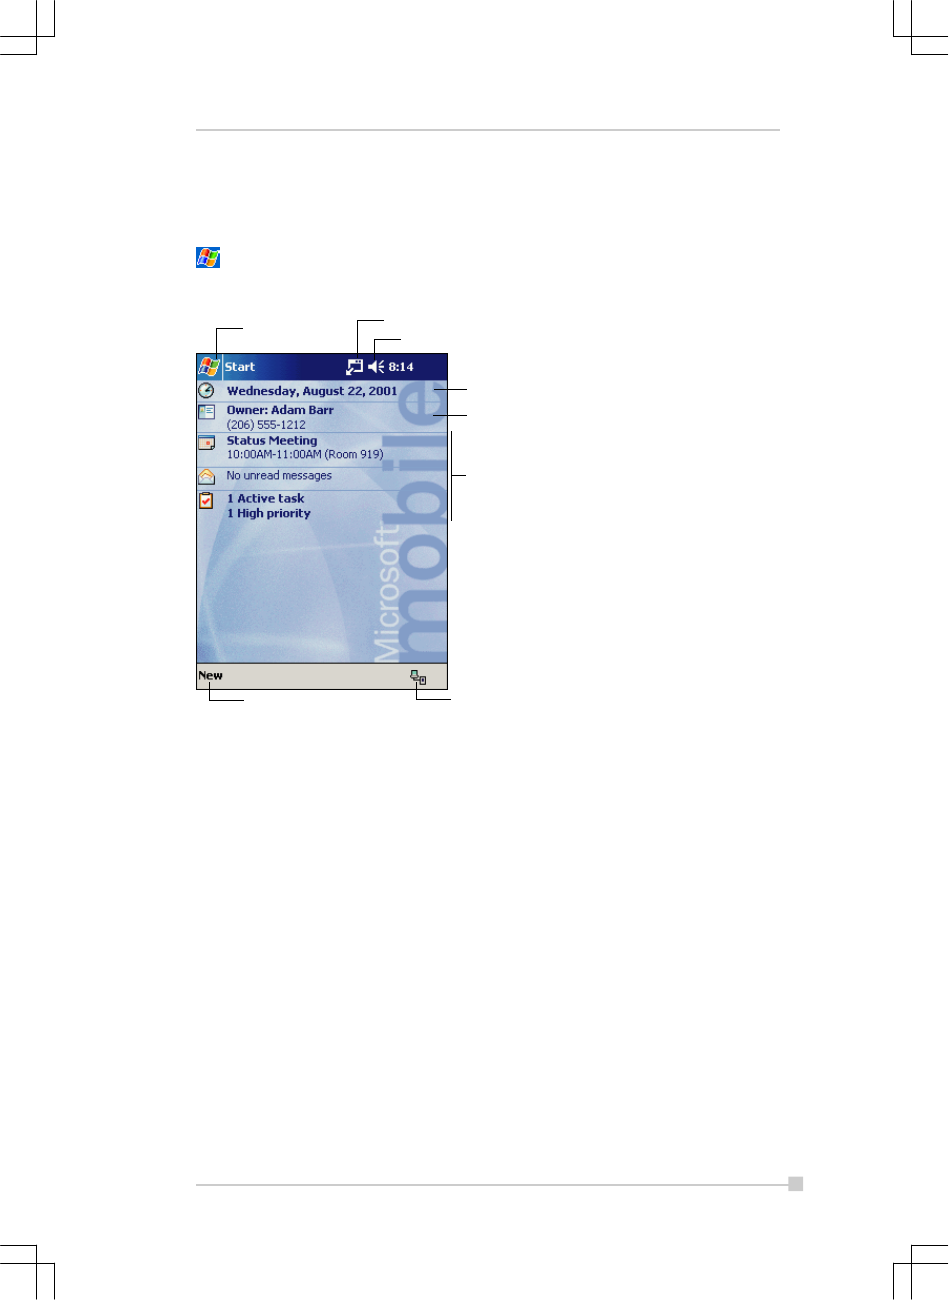
Today Screen
When you turn on your device for the first time each day (or after 4 hours of
inactivity), you’ll see the Today screen. You can also display it by tapping
and then Today. On the Today screen, you can see at a glance impor-
tant information for the day.
Following are some of the status icons you may see.
Tap to switch
to a program. Tap to change volume or mute all sounds.
Tap to viewnotification messages.
Tap to change date and time.
Tap to open an item.
Your day at a glance.
Tap to viewconnection status.
Tap to create a newitem.
2-20
Toshiba Pocket PC e740 User’s Guide
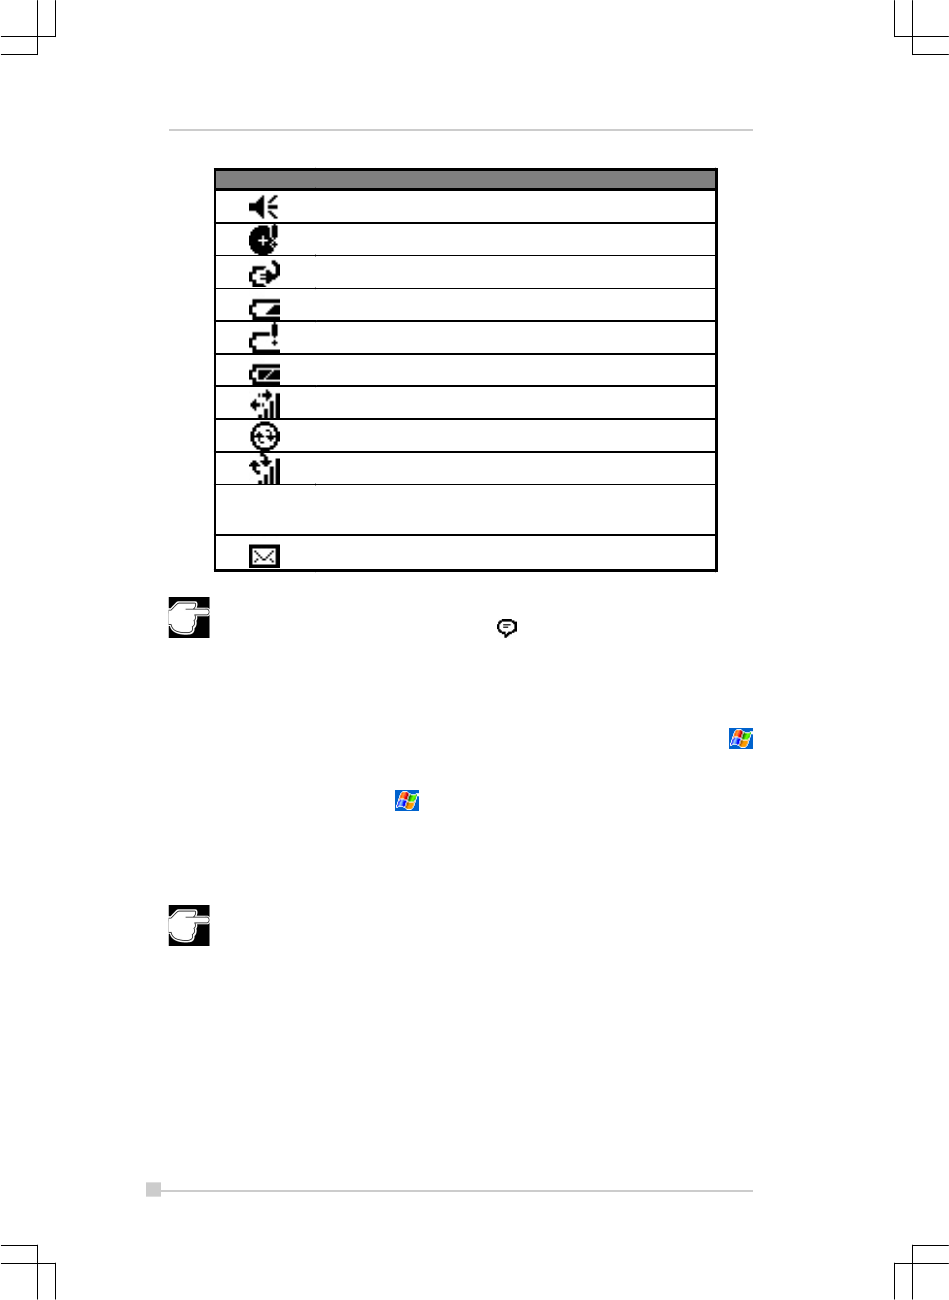
If more notification icons need to be displayed than there is room to
display them, the Notification icon, , will display. Tap the icon to
view all notification icons.
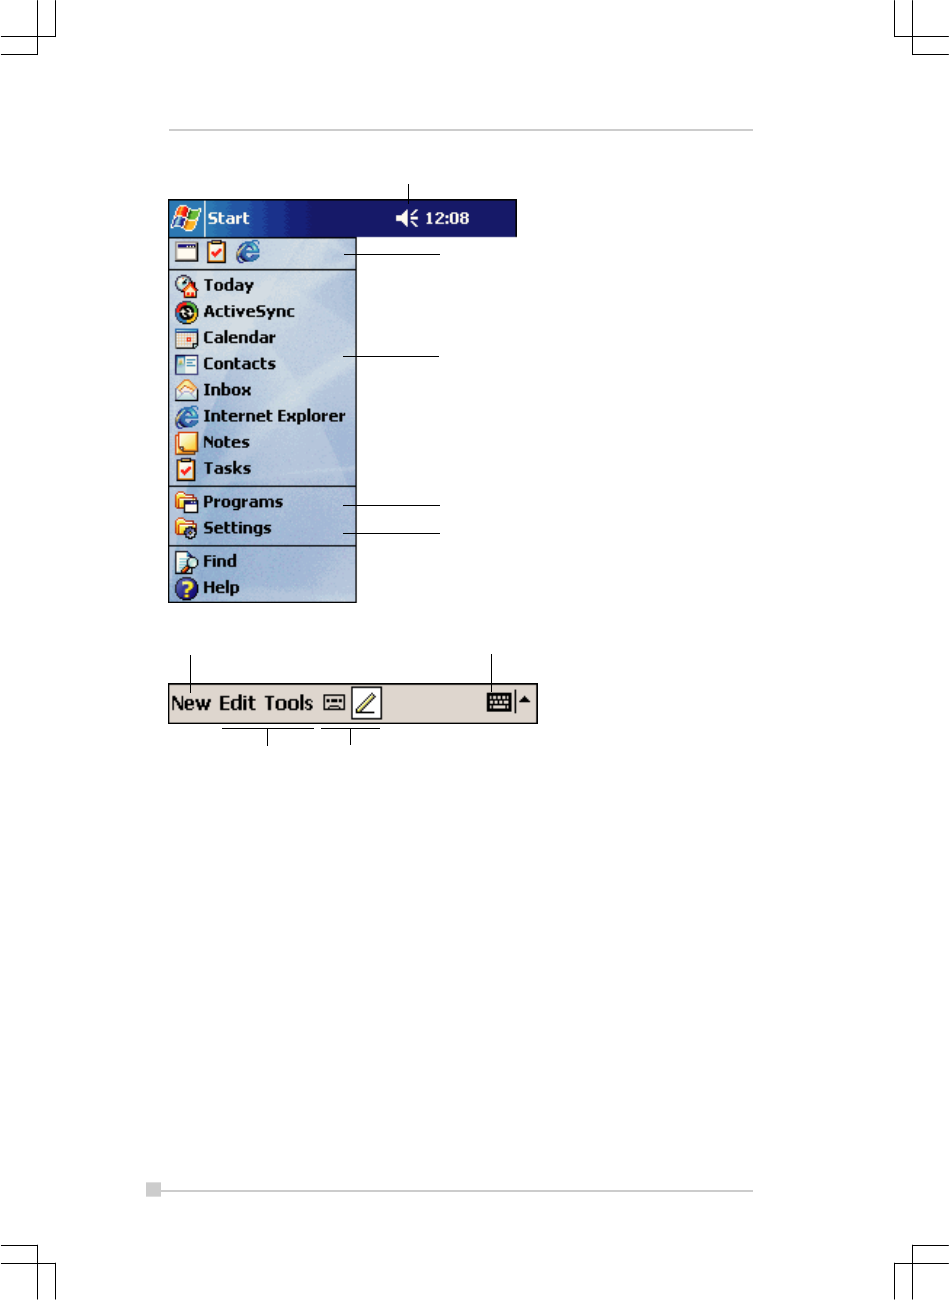
Programs
You can switch from one program to another by selecting it from the
menu. (You can customize which programs you see on this menu. For
information, see “Adjusting Settings,” later in this chapter.) To access some
programs, you’ll need to tap , Programs, and then the program name.
You can also switch to some programs by pressing a program button. Your
device has one or more program buttons located on the front or side of the
device. The icons on the buttons identify the programs they switch to.
Some programs have abbreviated labels for check boxes and
drop-down menus. To see the full spelling of an abbreviated
label, tap and hold the stylus on the label. Drag the stylus off the
label so that the command is not carried out.
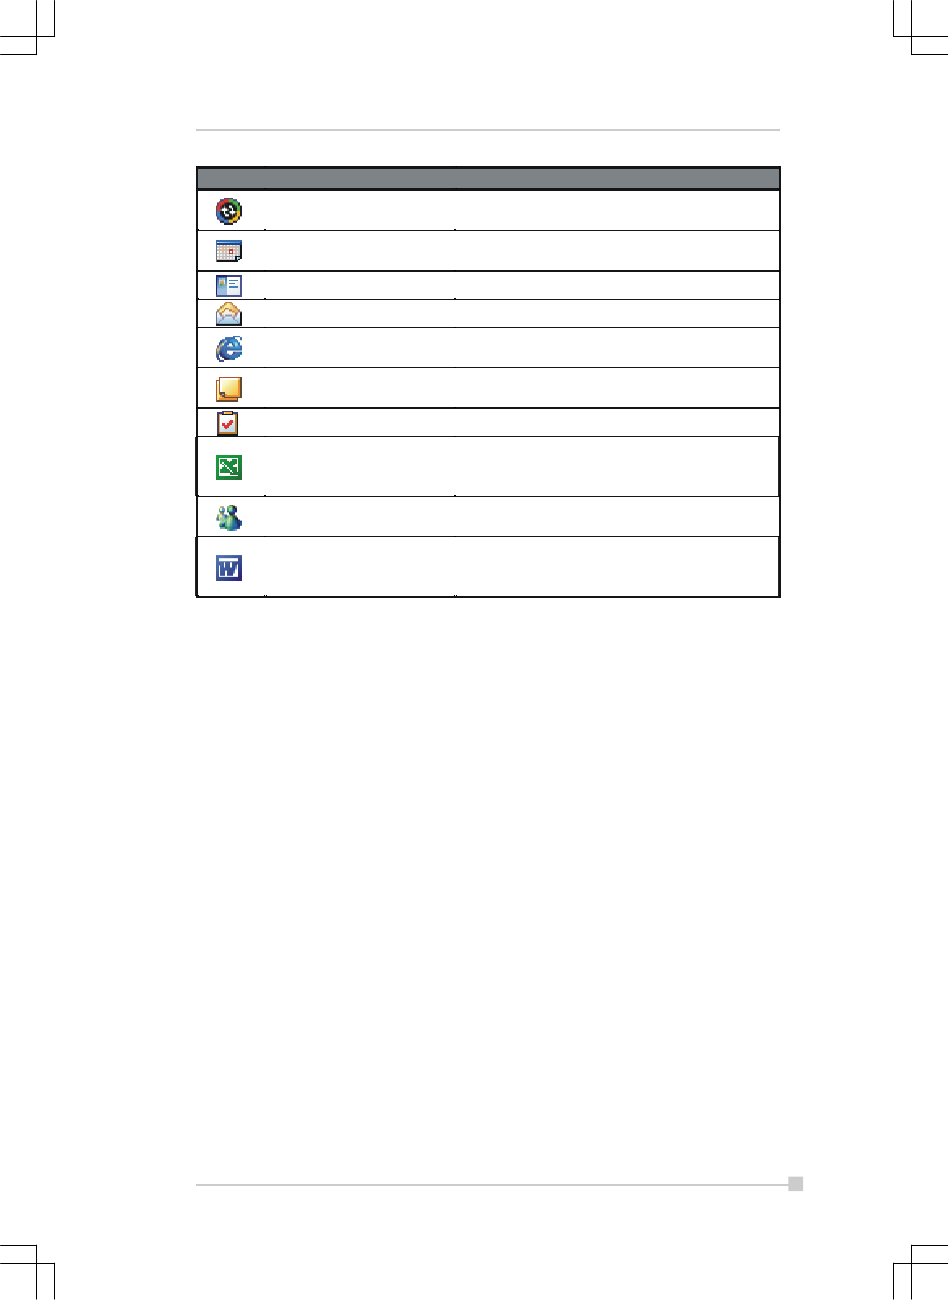
The following table contains a partial list of programs that are on your de-
vice. Look on the Toshiba Pocket PC Companion CD for additional pro-
grams that you can install onto your device.
Status Icon Meaning
Turns all sounds on and off
Backup battery is low
Main batteries are charging
Main batteries are low
Main batteries are very low
Main batteries are full
Connection is active
Synchronization is beginning or ending
Synchronization is occurring
Notification that one or more instant messages were
received
Notification that one or more e-mail messages were received
2-21
Chapter 2: Basic Skills
Navigation Bar and Command Bar
The navigation bar is located at the top of the screen. It displays the active
program and current time, and allows you to switch to programs and close
screens.
Use the command bar at the bottom of the screen to perform tasks in
programs. The command bar includes menu names, buttons, and the In-
put Panel button. To create a new item in the current program, tap New .
To see the name of a button, tap and hold the stylus on the button. Drag
the stylus off the button so that the command is not carried out.
Icon Program Description
ActiveSync Synchronize information between your
device and desktop computer.
Calendar Keep track of your appointments and create
meeting requests.
Contacts Keep track of your friends and colleagues.
Inbox Send and receive e-mail messages.
Pocket Internet Explorer Browse Web and WAP sites, and download
new programs and files from the Internet.
Notes Create handwritten or typed notes, drawings,
and recordings.
Tasks Keep track of your tasks.
Pocket Excel Create new workbooks or view and edit
Excel workbooks created on your desktop
computer.
MSN Messenger Send and receive instant messages with your
MSN Messenger contacts.
Pocket Word Create new documents or view and edit
Word documents created on your desktop
computer.
2-22
Toshiba Pocket PC e740 User’s Guide
Tap to change volume to mute the device.
Tap to quickly select a program
you have recently used.
Tap to see additional programs.
Tap to select a program.
Tap to customize the device.
Input panel button.
Newbutton.
Menu names. Buttons.
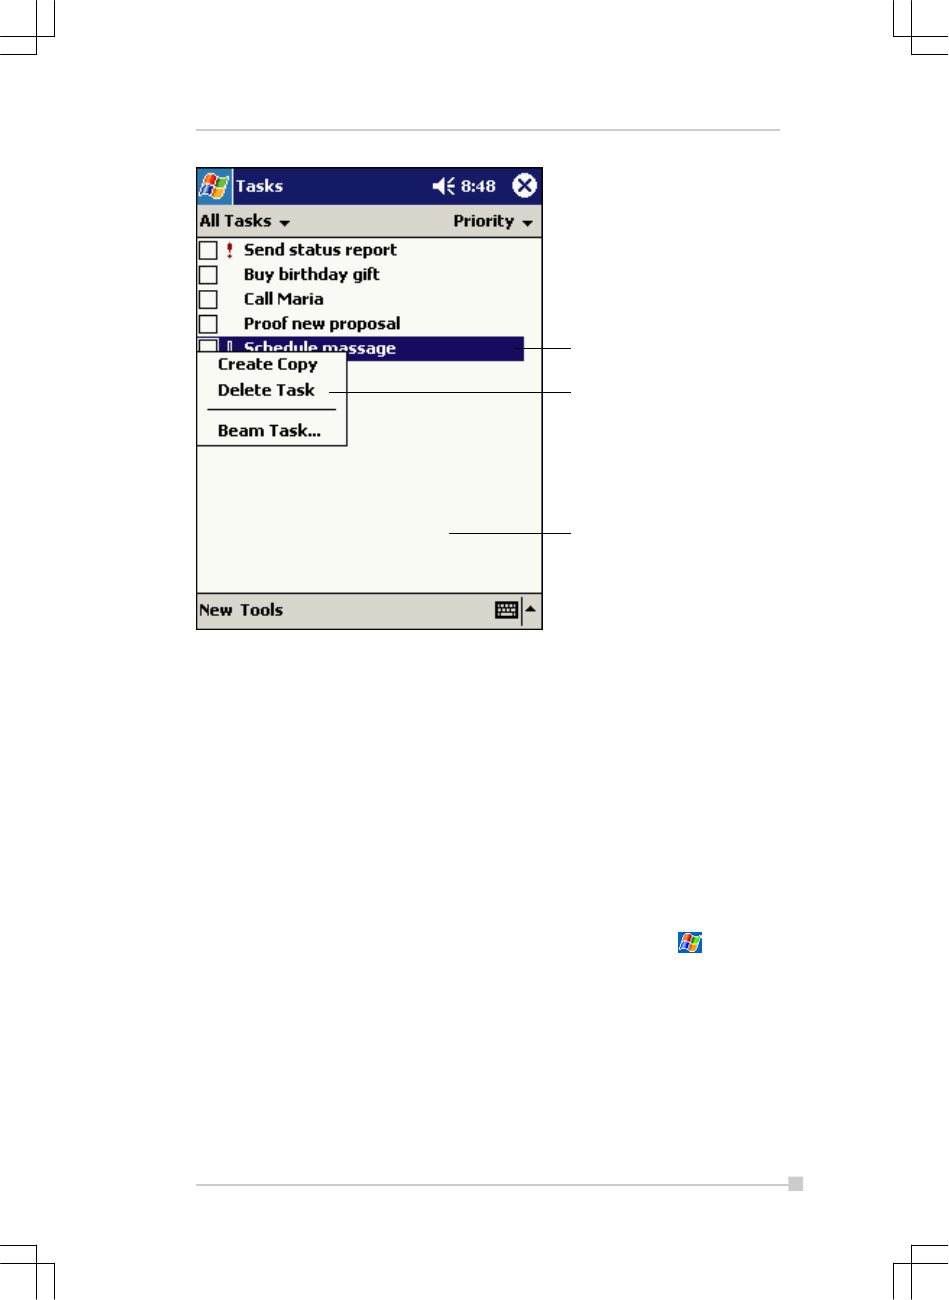
Pop-up Menus
With pop-up menus, you can quickly choose an action for an item. For
example, you can use the pop-up menu in the contact list to quickly delete
a contact, make a copy of a contact, or send an e-mail message to a
contact. The actions in the pop-up menus vary from program to program.
To access a pop-up menu, tap and hold the stylus on the item name that
you want to perform the action on. When the menu appears, lift the stylus,
and tap the action you want to perform. Or tap anywhere outside the menu
to close the menu without performing an action.
2-23
Chapter 2: Basic Skills
Tap and hold to display
the pop-up menu.
Lift the stylus and tap
the action you want.
Tap outside the menu
to close it without performing
an action.
Notifications
Your device reminds you in a variety of ways when you have something to
do. For example, if you’ve set up an appointment in Calendar, a task with a
due date in Tasks, or an alarm in Clock, you’ll be notified in any of the
following ways:
• A message box appears on the screen.
• A sound, which you can specify, is played.
• A light flashes on your device.
• The device vibrates.
To choose reminder types and sounds for your device, tap and then
Settings. In the Personal tab, tap Sounds & Notifications. The options
you choose here apply throughout the device.
2-24
Toshiba Pocket PC e740 User’s Guide
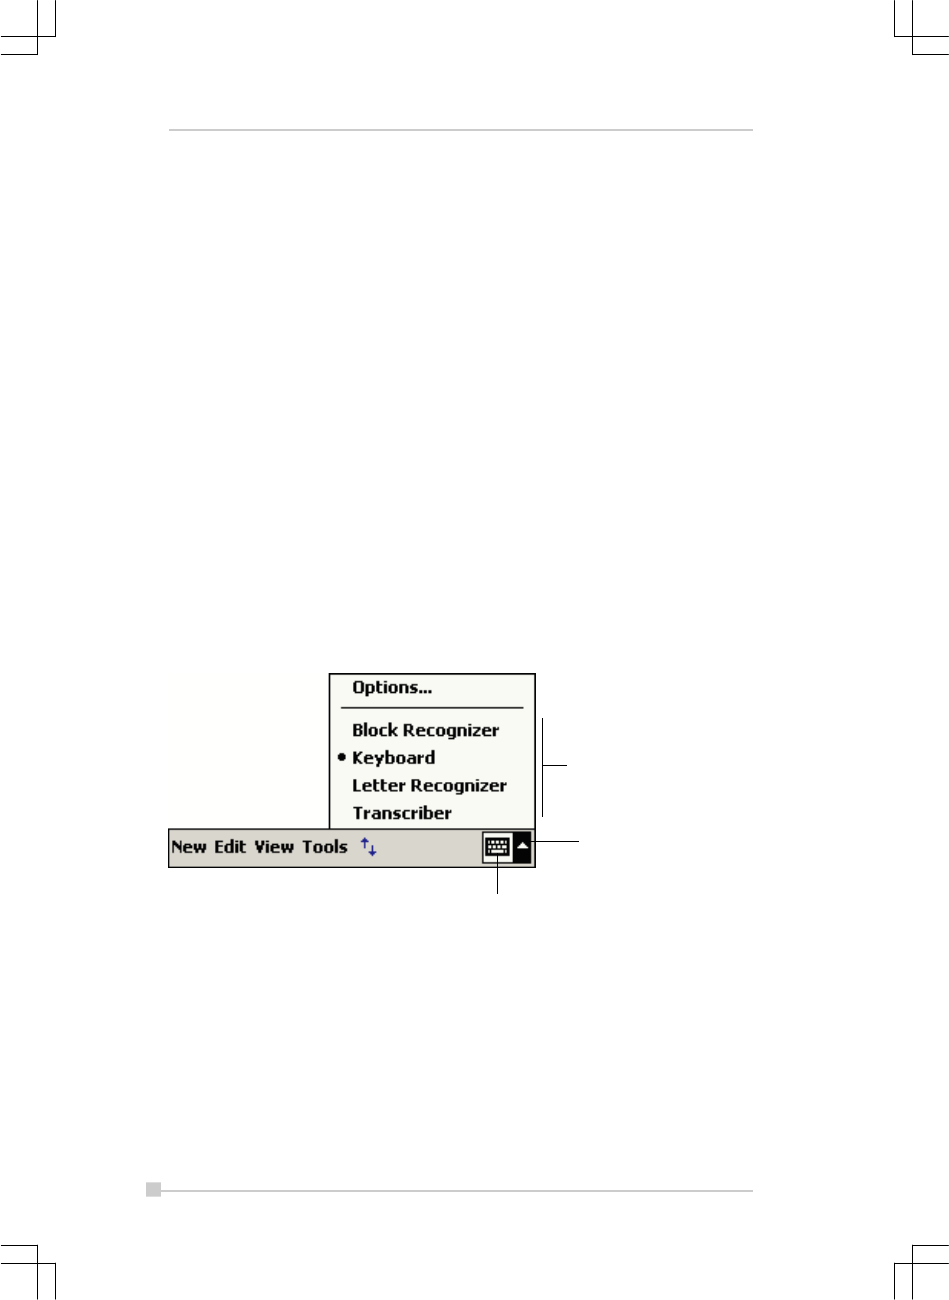
Input Panel button.
Tap to see your choices.
Select an input method.
Enter Information on Your Toshiba Pocket PC
You have several options for entering new information:
• Use the input panel to enter typed text, either by using the soft key-
board or other input method.
• Write directly on the screen.
• Draw pictures on the screen.
• Speak into your device microphone to record a message.
• Use Microsoft® ActiveSync® to synchronize or copy information from
your desktop computer to your device. For more information on
ActiveSync, see ActiveSync Help on your desktop computer.
Entering Text Using the Input Panel
Use the input panel to enter information in any program on your device.
You can either type using the soft keyboard or write using Letter Recog-
nizer, Block Recognizer, or Transcriber. In either case, the characters
appear as typed text on the screen.
To show or hide the input panel, tap the Input Panel button. Tap the arrow
next to the Input Panel button to see your choices.
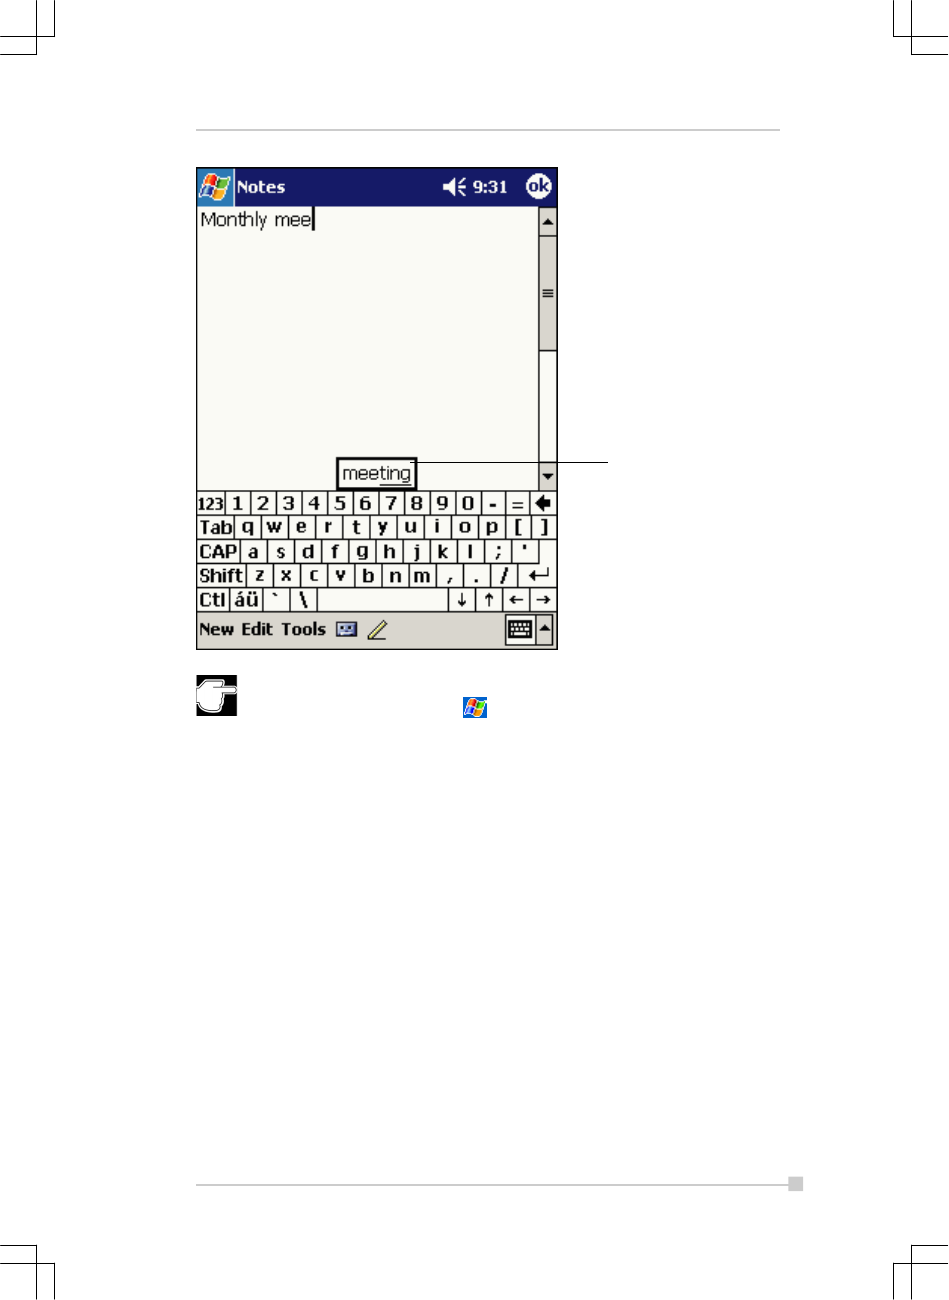
When you use the input panel, your device anticipates the word you are
typing or writing and displays it above the input panel. When you tap the
displayed word, it is inserted into your text at the insertion point. The more
you use your device, the more words it learns to anticipate.
2-25
Chapter 2: Basic Skills
Tap here if this is the right
word.
To change word suggestion options, such as the number of words
suggested at one time, tap , Settings , Personal tab, Input ,
and then the Word Completion tab.
To type with the soft keyboard:
1. Tap the arrow next to the Input Panel button and then Keyboard .
2. On the soft keyboard that is displayed, tap the keys with your stylus.
To use Letter Recognizer:
With Letter Recognizer you can write letters using the stylus just as you
would on paper.
1. Tap the arrow next to the Input Panel button and then Letter Recog-
nizer.
2. Write a letter in the box.
When you write a letter, it is converted to typed text that appears on the
screen. For specific instructions on using Letter Recognizer, with Letter
Recognizer open, tap the question mark next to the writing area.

2-26
Toshiba Pocket PC e740 User’s Guide
To use Block Recognizer:
With Block Recognizer you can input character strokes using the stylus
that are similar to those used on other devices.
1.Tap the arrow next to the Input Panel button and then Block Recog-
nizer.
2. Write a letter in the box.
When you write a letter, it is converted to typed text that appears on the
screen. For specific instructions on using Block Recognizer, with Block
Recognizer open, tap the question mark next to the writing area.
To use Transcriber:
With Transcriber you can write anywhere on the screen using the stylus
just as you would on paper. Unlike Letter Recognizer and Block Recog-
nizer, you can write a sentence or more of information. Then, pause and let
Transcriber change the written characters to typed characters.
1. Tap the arrow next to the Input Panel button and then Transcriber.
2. Write anywhere on the screen.
For specific instructions on using Transcriber, with Transcriber open, tap
the question mark in the lower right hand corner of the screen.
To select typed text:
If you want to edit or format typed text, you must select it first.
•Drag the stylus across the text you want to select.
You can cut, copy, and paste text by tapping and holding the selected
words and then tapping an editing command on the pop-up menu, or by
tapping the command on the Edit menu.
2-27
Chapter 2: Basic Skills
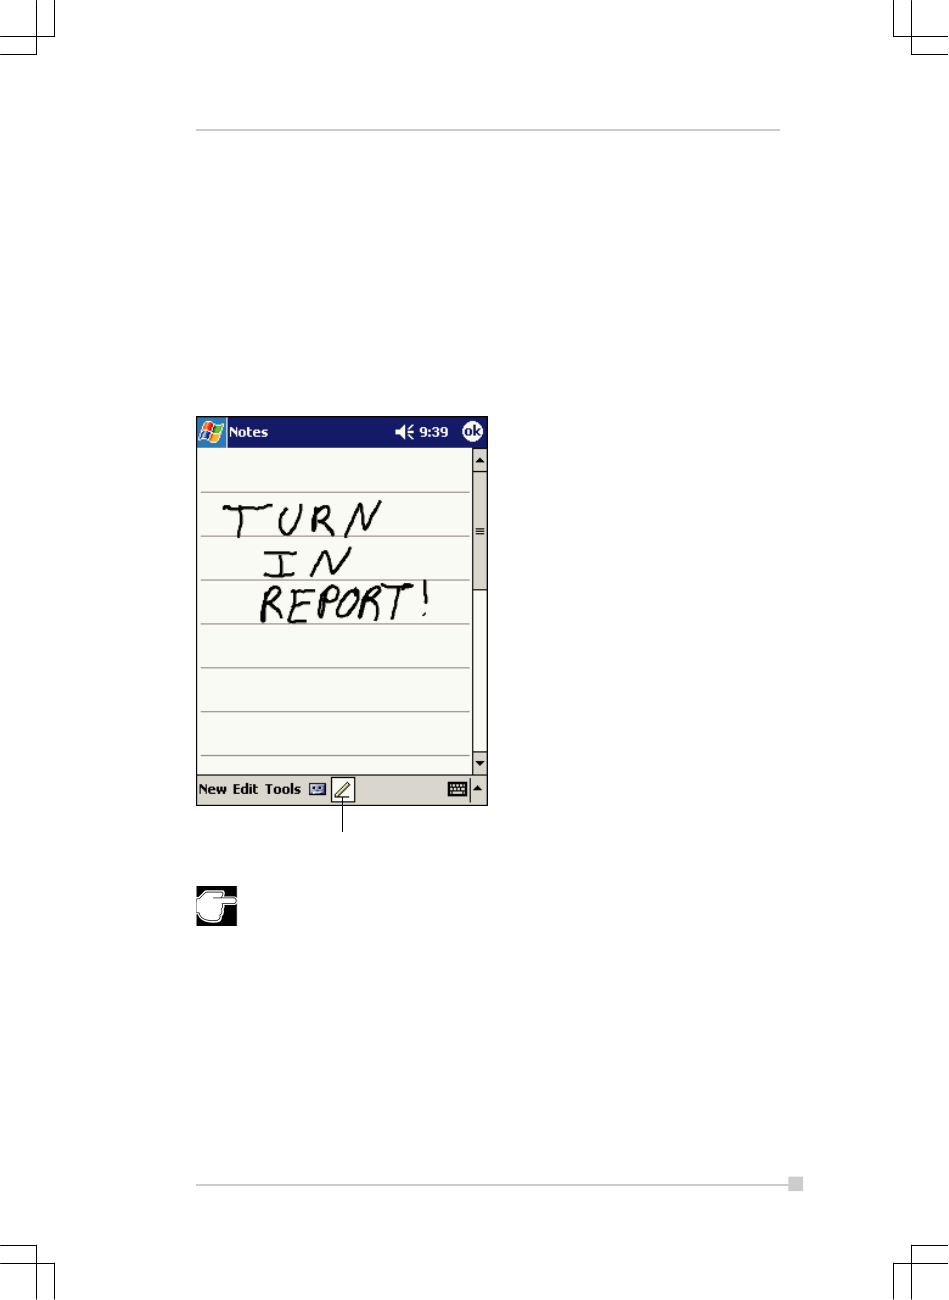
Tap the Pen button and use your stylus like a pen.
Writing on the Screen
In any program that accepts writing, such as the Notes program, and in
the Notes tab in Calendar, Contacts, and Tasks, you can use your stylus
to write directly on the screen. Write the way you do on paper. You can edit
and format what you’ve written and convert the information to text at a later
time.
To write on the screen:
•Tap the Pen button to switch to writing mode. This action displays lines
on the screen to help you write.
Some programs that accept writing may not have the Pen button.
See the documentation for that program to find out how to switch to
writing mode.
2-28
Toshiba Pocket PC e740 User’s Guide
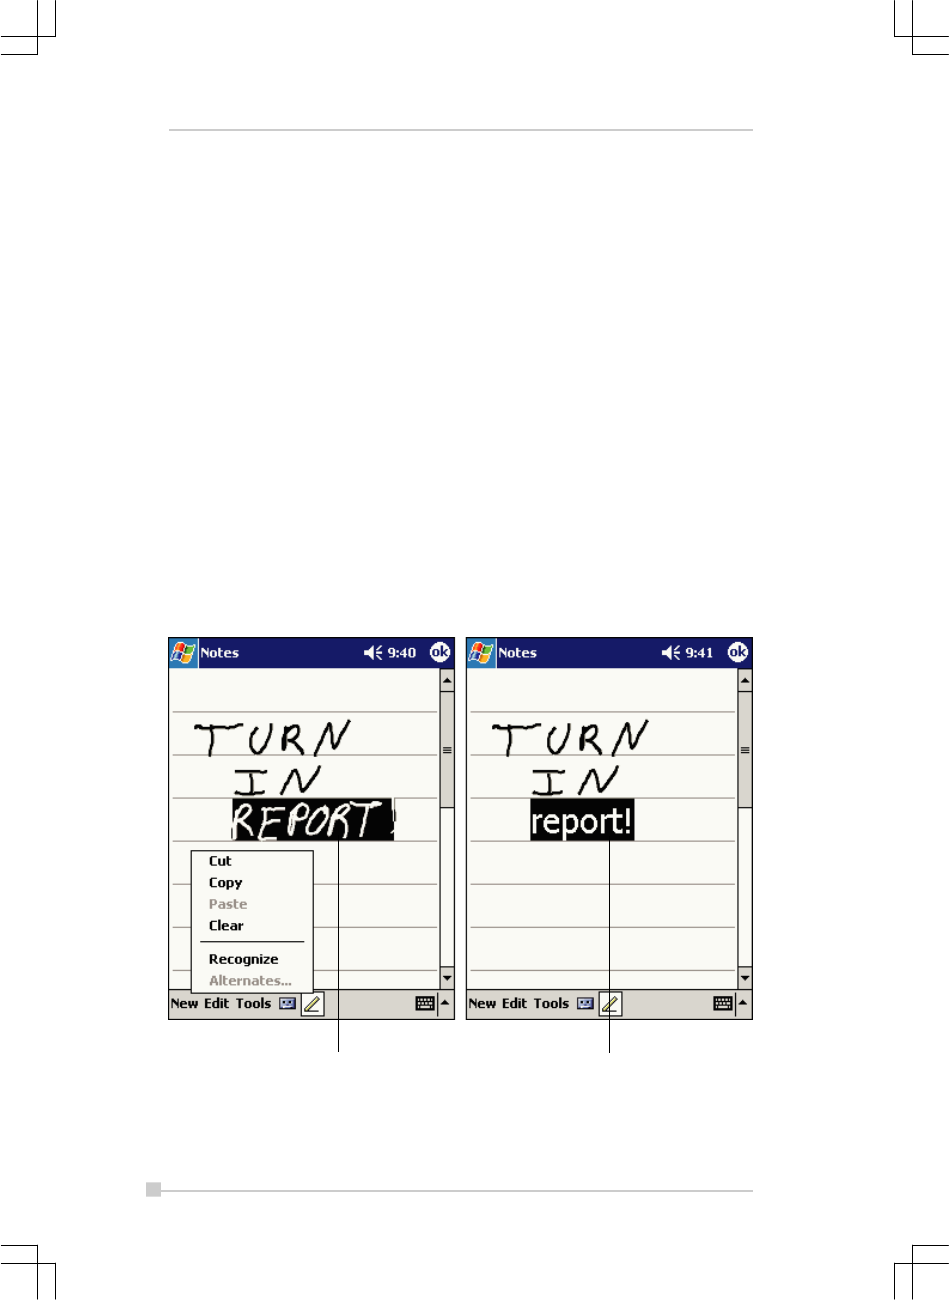
The writing is turned into
text.
Select the text you want to convert
and tap Recognize on the pop-up menu.
To select writing:
If you want to edit or format writing, you must select it first.
1. Tap and hold the stylus next to the text you want to select until the
insertion point appears.
2. Without lifting, drag the stylus across the text you want to select.
If you accidentally write on the screen, tap Tools, then Undo and try again.
You can also select text by tapping the Pen button to deselect it and then
dragging the stylus across the screen.
You can cut, copy, and paste written text in the same way you work with
typed text: tap and hold the selected words and then tap an editing com-
mand on the pop-up menu, or tap the command on the Edit menu.
To convert writing to text:
•Tap Tools and then Recognize.
If you want to convert only certain words, select them before tapping Rec-
ognize on the Tools menu (or tap and hold the selected words and then
tap Recognize on the pop-up menu). If a word is not recognized, it is left
as writing.
2-29
Chapter 2: Basic Skills
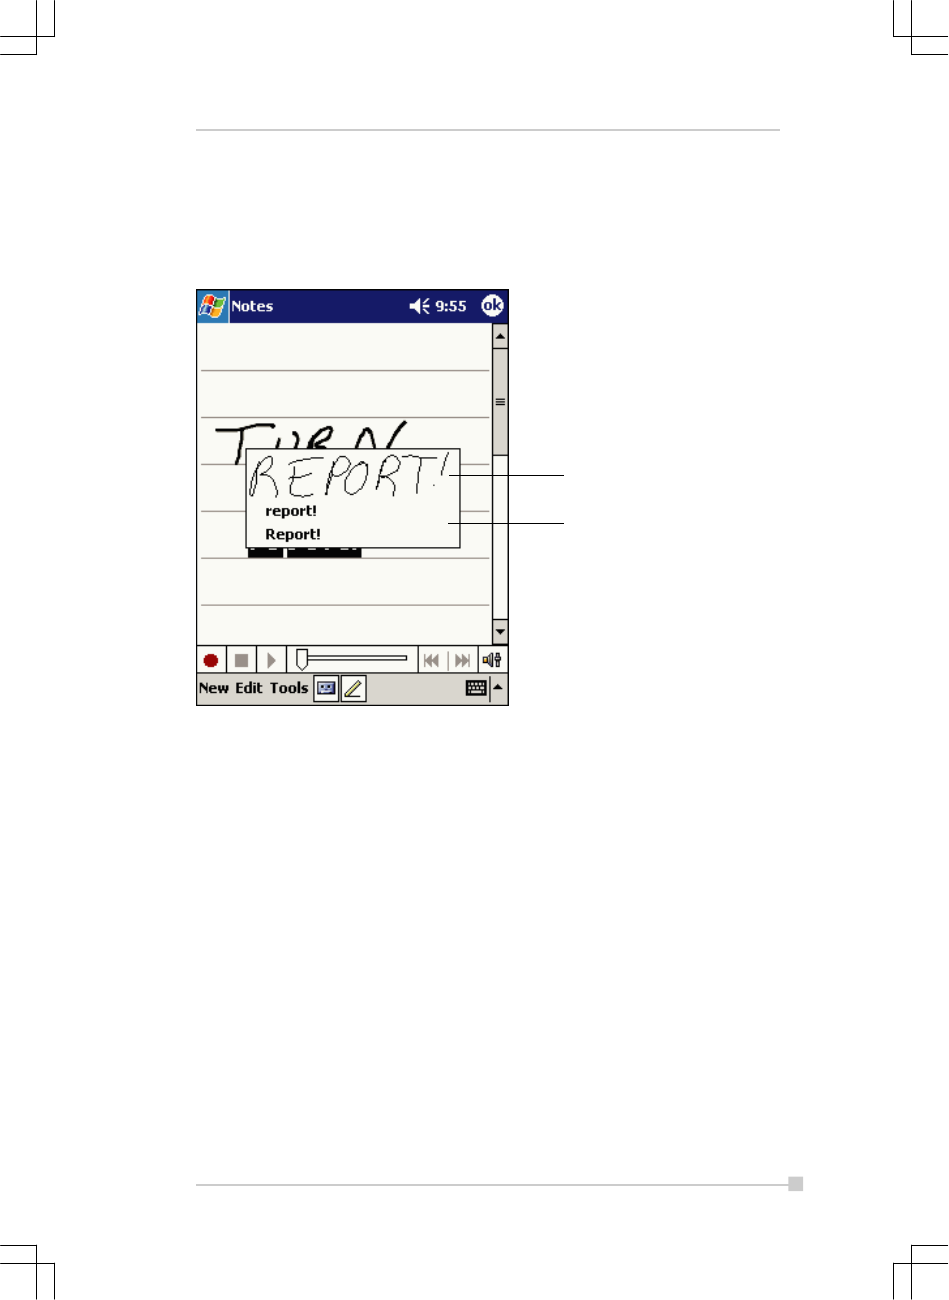
Tap to return to your original writing.
Or, tap the word you want to use.
If the conversion is incorrect, you can select different words from a list of
alternates or return to the original writing. To do so, tap and hold the incor-
rect word (tap one word at a time). On the pop-up menu, tap Alternates. A
menu with a list of alternate words appears. Tap the word you want to use,
or tap the writing at the top of the menu to return to the original writing.
Tips for getting good recognition:
•Write neatly.
•Write on the lines and draw descenders below the line. Write the cross
of the “t” and apostrophes below the top line so that they are not con-
fused with the word above. Write periods and commas above the line.
•For better recognition, try increasing the zoom level to 300% using the
Tools menu.
•Write the letters of a word closely and leave big gaps between words
so that the device can easily tell where words begin and end.
•Hyphenated words, foreign words that use special characters such as
accents, and some punctuation cannot be converted.
•If you add writing to a word to change it (such as changing a “3” to an
“8”) after you attempt to recognize the word, the writing you add will
not be included if you attempt to recognize the writing again.
2-30
Toshiba Pocket PC e740 User’s Guide
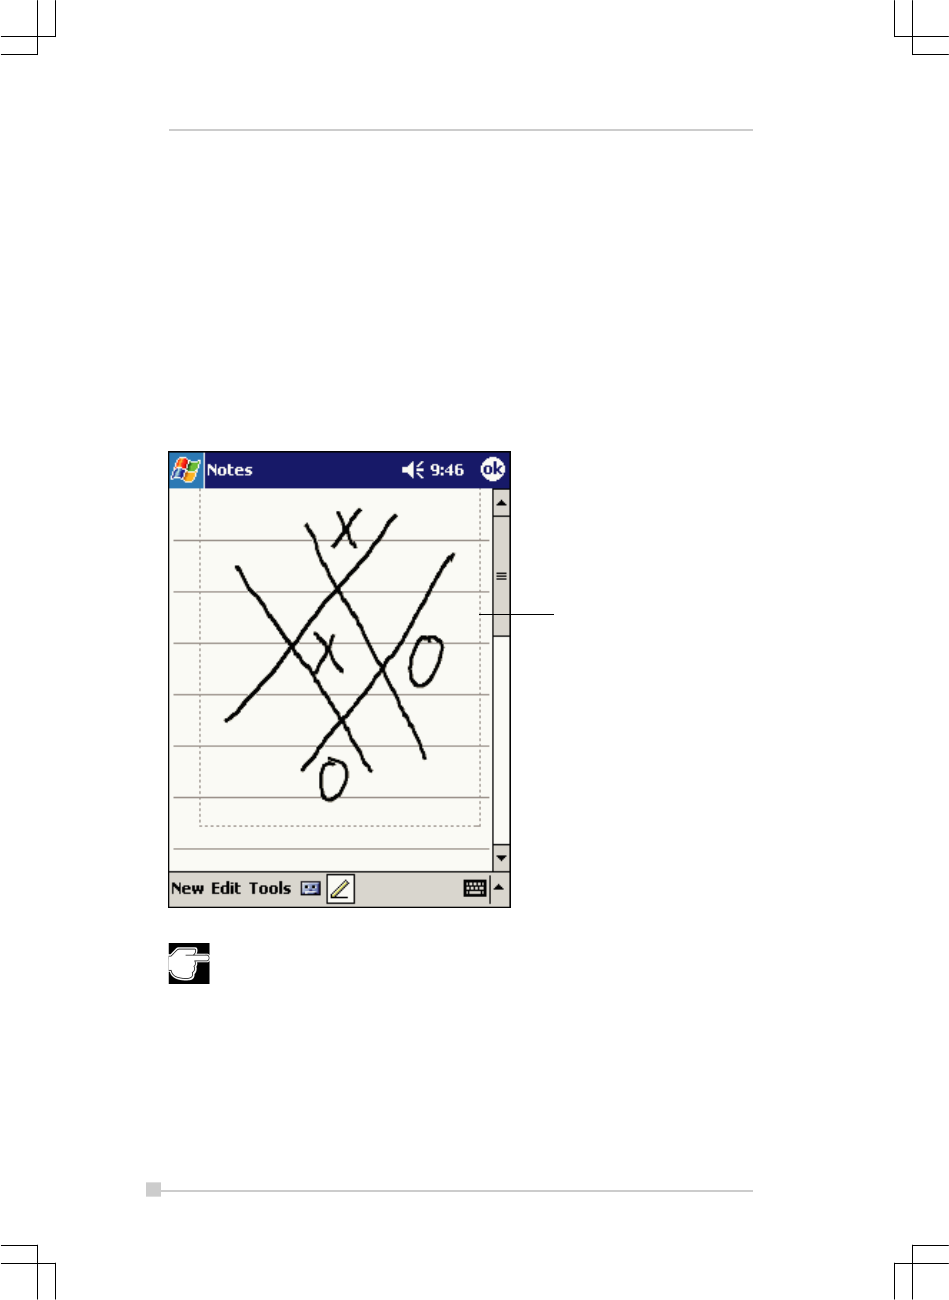
The drawing box indicates the
boundaries of the drawing.
Drawing on the Screen
You can draw on the screen in the same way that you write on the screen.
The difference between writing and drawing on the screen is how you
select items and how they can be edited. For example, selected drawings
can be resized, while writing cannot.
To create a drawing:
• Cross three ruled lines on your first stroke. A drawing box appears.
Subsequent strokes in or touching the drawing box become part of the
drawing. Drawings that do not cross three ruled lines will be treated as
writing.
You may want to change the zoom level so that you can more easily
work on or view your drawing. Tap Tools and then a zoom level.

2-31
Chapter 2: Basic Skills
To select a drawing:
If you want to edit or format a drawing, you must select it first.
• Tap and hold the stylus on the drawing until the selection handle ap-
pears. To select multiple drawings, deselect the Pen button and then
drag to select the drawings you want.
You can cut, copy, and paste selected drawings by tapping and holding the
selected drawing and then tapping an editing command on the pop-up
menu, or by tapping the command on the Edit menu. To resize a drawing,
make sure the Pen button is not selected, and drag a selection handle.

2-32
Toshiba Pocket PC e740 User’s Guide
Indicates an embedded recording.
Tap to show or hide the Recording toolbar.
Tap to begin recording.
Recording a Message
In any program where you can write or draw on the screen, you can also
quickly capture thoughts, reminders, and phone numbers by recording a
message. In Calendar, Tasks, and Contacts, you can include a recording
in the Notes tab. In the Notes program, you can either create a stand-
alone recording or include a recording in a written note. If you want to
include the recording in a note, open the note first. In the Inbox program,
you can add a recording to an e-mail message.
To create a recording:
1. Hold your device’s microphone near your mouth or other source of
sound.
2. Press and hold the Record hardware button on your device until you
hear a beep.
3. While holding down the Record button, make your recording.
4. To stop recording, release the Record button. Two beeps will sound.
The new recording appears in the note list or as an embedded icon.
You can also make a recording by tapping the Record button on the
Recording toolbar.
To play a recording, tap it in the list or tap its icon in the note.
2-33
Chapter 2: Basic Skills
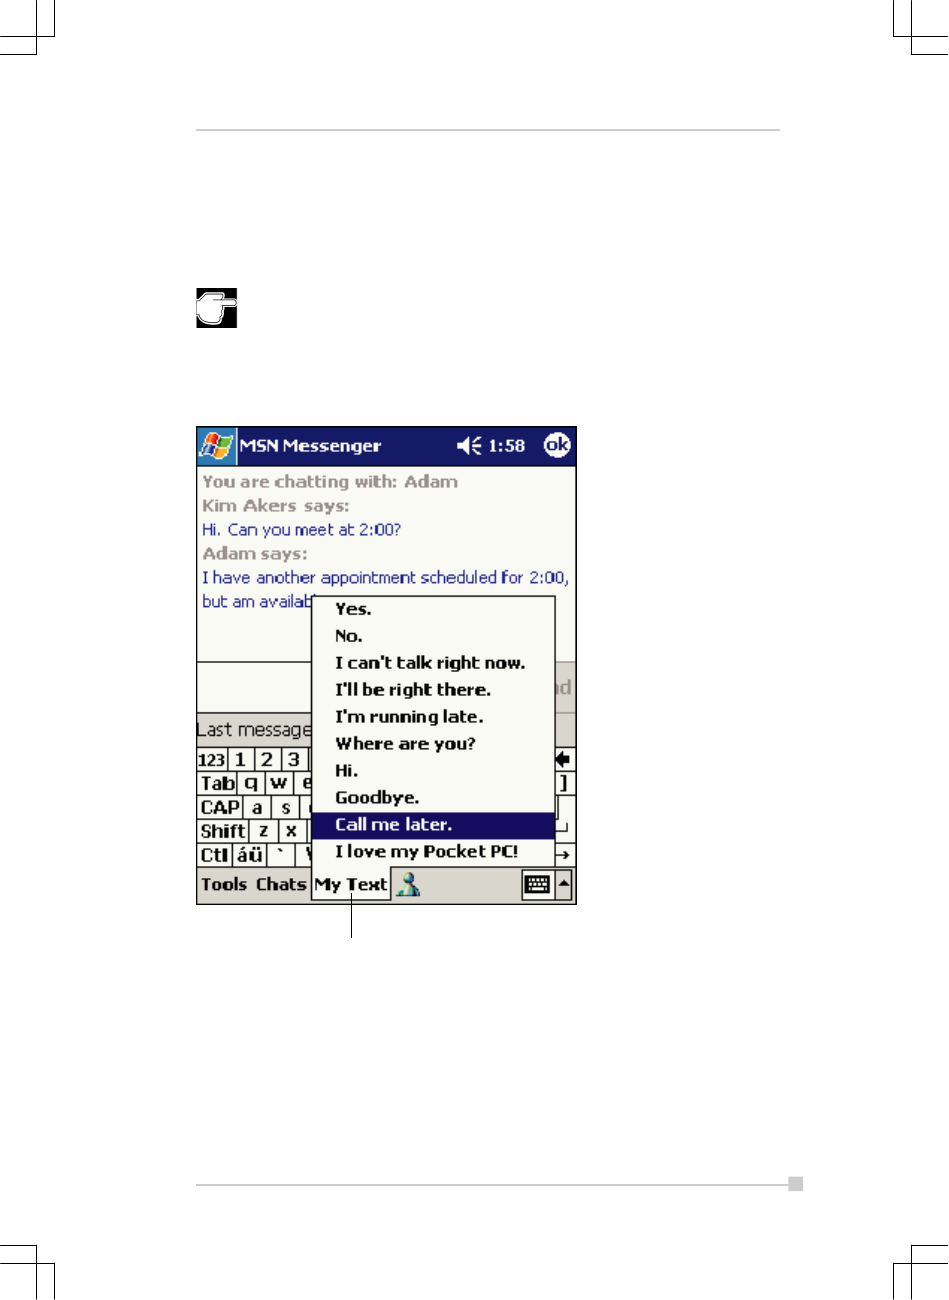
Tap to select a prewritten message.
Using My Text
When using Inbox or MSN Messenger, use My Text to quickly insert preset
or frequently used messages into the text entry area. To insert a message,
tap My Text and tap a message.
You can add text after inserting a My Text message before sending
it.
To edit a My Text message, in the Tools menu, tap Edit and then tap My
Text Messages . Select the message you wish to edit and make desired
changes.
2-34
Toshiba Pocket PC e740 User’s Guide
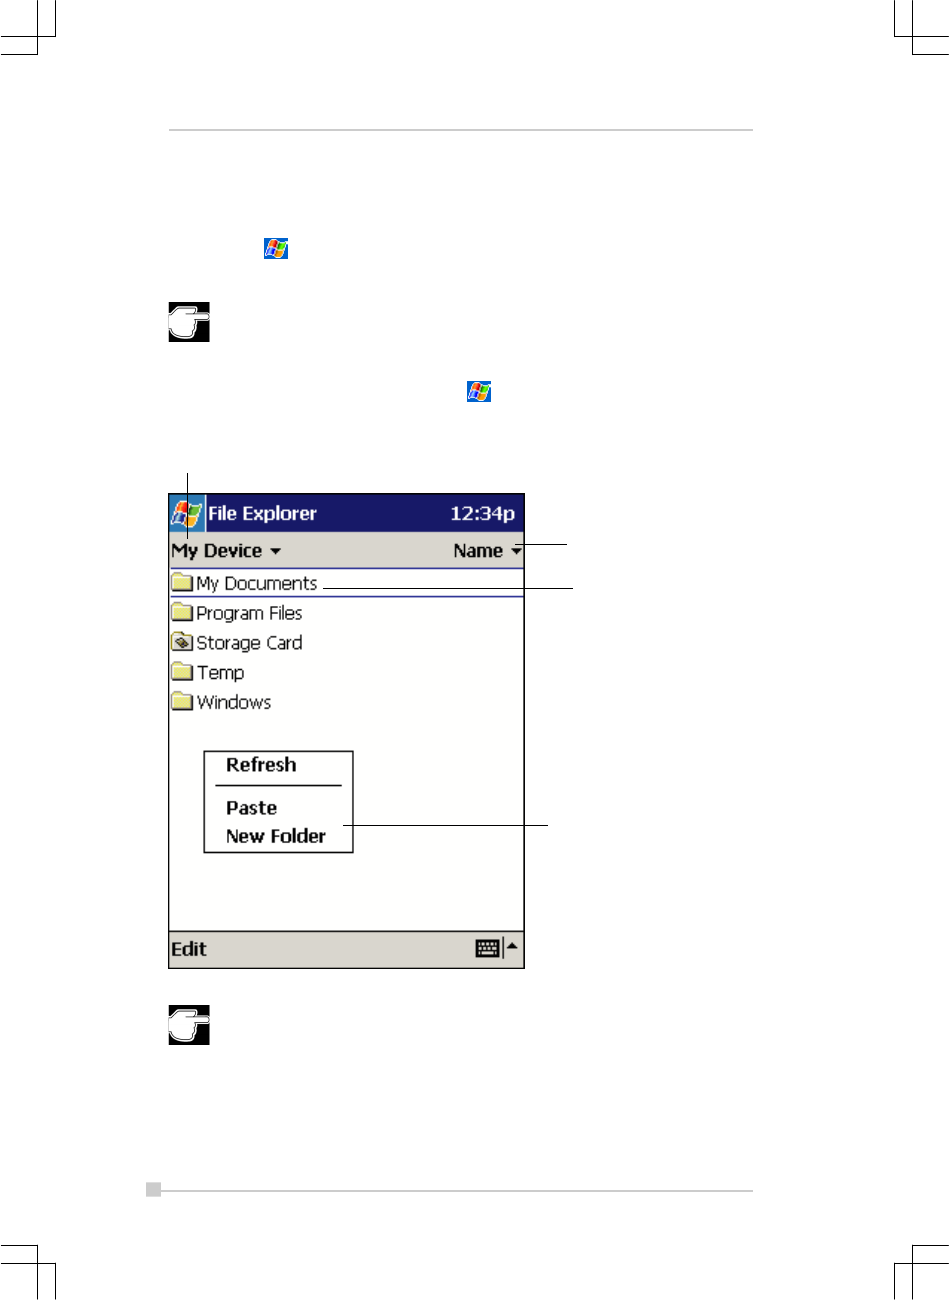
Tap to change folders.
Select the sort order for the list.
Tap the folder name to open it.
Tap and hold to create a new folder.
Find and Organize Information
The Find feature on your device helps you quickly locate information.
•On the menu, tap Find. Enter the text you want to find, select a
data type, and then tap Go to start the search.
To quickly find information that is taking up storage space on your
device, select Larger than 64 KB in Type.
You can also use the File Explorer to find files on your device and to orga-
nize these files into folders. On the menu, tap Programs, and then
File Explorer.
You can move files in File Explorer by tapping and holding the item
you want to move, and then tapping Cut or Copy and Paste on
the pop-up menu.

2-35
Chapter 2: Basic Skills
Customize Your Toshiba Pocket PC
You can customize your device by adjusting device settings and installing
additional software.
Adjusting Settings
You can adjust device settings to suit the way you work. To see available
options, tap , Settings, then the Personal or System tab located at
the bottom of the screen.
You might want to adjust the following:
• Clock, to change the time or to set alarms
• Menus, to customize what appears on the menu, and to enable a
pop-up menu from the New button
• Owner Information, to enter your contact information
• Password, to limit access to your device
• Power, to maximize battery life
• Today, to customize the look and the information that is displayed on
the Today screen
Adding or Removing Programs
Programs added to your device at the factory are stored in ROM (read-
only memory). You cannot remove this software, and you’ll never acciden-
tally lose ROM contents. ROM programs can be updated using special
installation programs with a *.xip extension. All other programs and data
files added to your device after factory installation are stored in RAM (ran-
dom access memory).
You can install any program created for your device, as long as your de-
vice has enough memory. The most popular place to find software for your
device is on the Toshiba Pocket PC Web site (http://www.microsoft.com/
mobile/pocketpc).

2-36
Toshiba Pocket PC e740 User’s Guide
To add programs using ActiveSync
You’ll need to install the appropriate software for your device on your desk-
top computer before installing it on your device.
1. Determine your device and processor type so that you know which
version of the software to install.
Tap and then Settings. On the System tab, tap About. In the
Version tab, make a note of the information in Processor.
2. Download the program to your desktop computer (or insert the CD or
disk that contains the program into your desktop computer). You may
see a single *.xip, *.exe,, or *.zip file, a Setup.exe file, or several ver-
sions of files for different device types and processors. Be sure to
select the program designed for the Toshiba Pocket PC and your de-
vice processor type.
3. Read any installation instructions, Read Me files, or documentation
that comes with the program.
Many programs provide special installation instructions.
4. Connect your device and desktop computer.
5. Double-click the *.exe file.
•If the file is an installer, the installation wizard will begin. Follow
the directions on the screen.
Once the software has been installed on your desktop computer,
the installer will automatically transfer the software to your device.
•If the file is not an installer, you will see an error message stating
that the program is valid but it is designed for a different type of
computer. You will need to move this file to your device. If you
cannot find any installation instructions for the program in the
Read Me file or documentation, use ActiveSync Explore to copy
the program file to the Program Files folder on your device. For
more information on copying files using ActiveSync, see
ActiveSync Help.
Once installation is complete, tap , Programs, and then the program
icon to switch to it.

2-37
Chapter 2: Basic Skills
To add a program directly from the Internet
1. Determine your device and processor type so that you know which
version of the software to install.
Tap and then Settings. On the System tab, tap About. In the Ver-
sion tab, make a note of the information in Processor.
2. Download the program to your device straight from the Internet using
Pocket Internet Explorer. You may see a single *.xip, *.exe or *.zip file,
a Setup.exe file, or several versions of files for different device types
and processors. Be sure to select the program designed for the Toshiba
Pocket PC and your device processor type.
3. Read any installation instructions, Read Me files, or documentation
that comes with the program. Many programs provide special installa-
tion instructions.
4. Tap the file, such as a *.xip or *.exe file. The installation wizard will
begin. Follow the directions on the screen.
To add a program to the Start menu
Tap , Settings, Menus , the Start Menu tab, and then the check box for
the program. If you do not see the program listed, you can either use File
Explorer on the device to move the program to the Start Menu folder, or
use ActiveSync on the desktop computer to create a shortcut to the pro-
gram and place the shortcut in the Start Menu folder.
•Using File Explorer on the device:Tap , Programs, File Explorer,
and locate the program (tap the folder list, labeled My Documents by
default, and then My Device to see a list of all folders on the device).
Tap and hold the program and tap Cut on the pop-up menu. Open the
Start Menu folder located in the Windows folder, tap and hold a blank
area of the window, and tap Paste on the pop-up menu. The program
will now appear on the menu. For more information on using File Ex-
plorer, see “Find and Organize Information,” earlier in this chapter.
•Using ActiveSync on the desktop computer:Use the Explorer in
ActiveSync to explore your device files and locate the program. Right-
click the program, and then click Create Shortcut. Move the shortcut
to the Start Menu folder in the Windows folder. The shortcut now ap-
pears on the menu. For more information, see ActiveSync Help.

2-38
Toshiba Pocket PC e740 User’s Guide
To remove programs
•Tap and then Settings. On the System tab, tap Remove Pro-
grams .
If the program does not appear in the list of installed programs, use File
Explorer on your device to locate the program, tap and hold the program,
and then tap Delete on the pop-up menu.

Chapter 3:
Microsoft ActiveSync
Using Microsoft® ActiveSync® ,you can synchronize the information on
your desktop computer with the information on your device. Synchroniza-
tion compares the data on your device with your desktop computer and
updates both computers with the most recent information. For example:
•Keep Pocket Outlook data up-to-date by synchronizing your device
with Microsoft Outlook data on your desktop computer.
•Synchronize Microsoft Word and Microsoft Excel files between your
device and desktop computer.
Your files are automatically converted to the correct format.
By default, ActiveSync does not automatically synchronize all types
of information. Use ActiveSync options to turn synchronization on
and off for specific information types.
With ActiveSync, you can also:
•Back up and restore your device data.
•Copy (rather than synchronize) files between your device and desktop
computer.
•Control when synchronization occurs by selecting a synchronization
mode. For example, you can synchronize continually while connected
to your desktop computer or only when you choose the synchronize
command.
•Select which information types are synchronized and control how much
data is synchronized. For example, you can choose how many weeks
of past appointments you want synchronized.
Before you begin synchronization, install ActiveSync on your desktop com-
puter from the Toshiba Pocket PC Companion CD. For more information
on installing ActiveSync, see your Quick Start card. ActiveSync is already
installed on your device.
3-2
Toshiba Pocket PC e740 User’s Guide
After installation is complete, the ActiveSync Setup Wizard helps you con-
nect your device to your desktop computer, set up a partnership so you
can synchronize information between your device and your desktop com-
puter, and customize your synchronization settings. Your first synchroniza-
tion process will automatically begin when you finish using the wizard.
After your first synchronization, take a look at Calendar, Contacts, and
Tasks on your device. You’ll notice that information you’ve stored in Microsoft
Outlook on your desktop computer has been copied to your device, and
you didn’t have to type a word. Disconnect your device from your computer
and you’re ready to go!
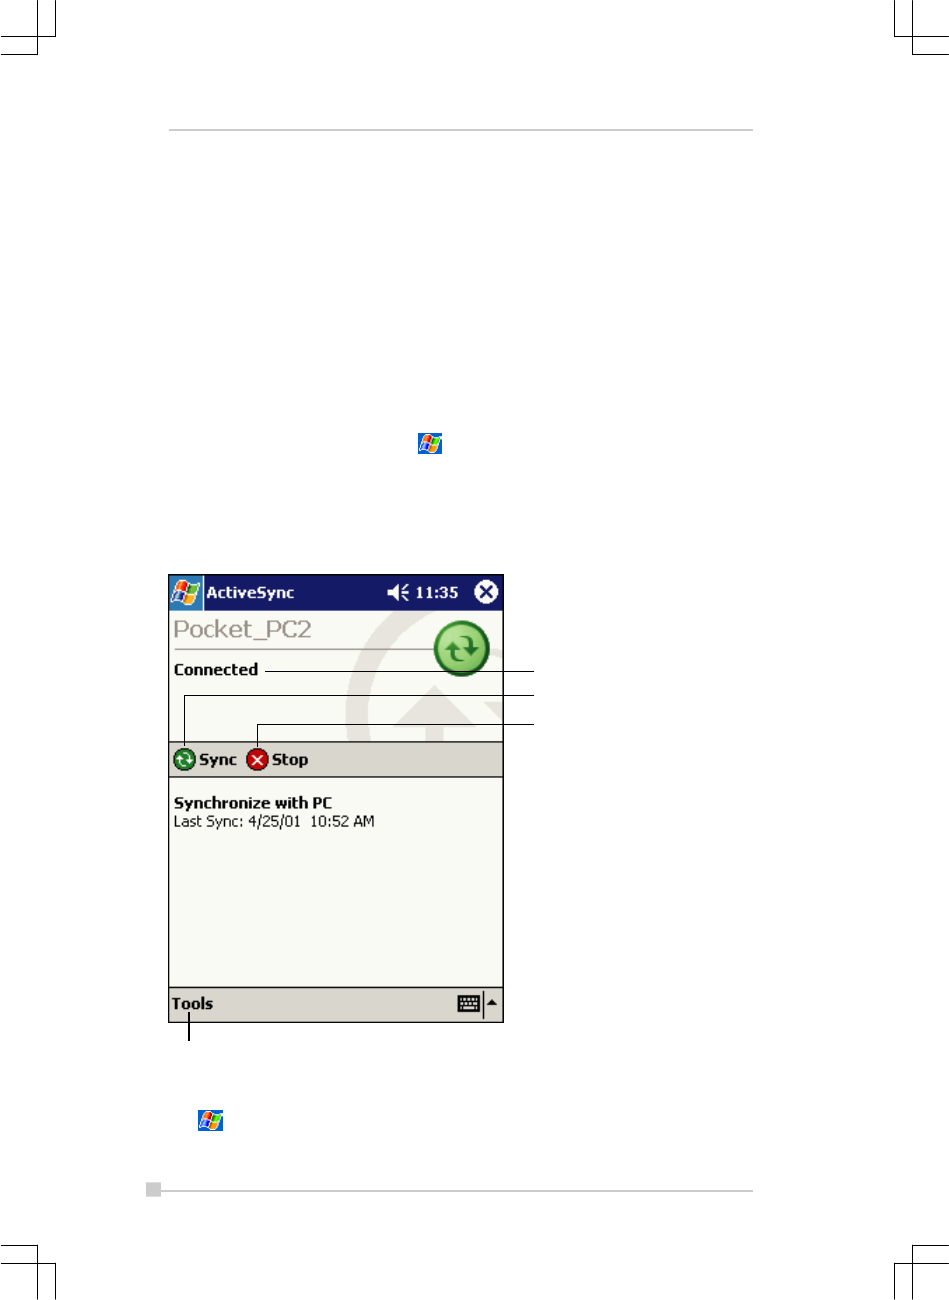
Once you have set up ActiveSync and completed the first synchronization
process, you can initiate synchronization from your device. To switch to
ActiveSync on your device, tap , and then tap ActiveSync. Note that if
you have a wireless LAN card, you can synchronize remotely from your
device.
For information about using ActiveSync on your desktop computer, start
ActiveSync on your desktop computer, and then see ActiveSync Help.
For more information about ActiveSync on your device, switch to ActiveSync,
tap , and then tap Help.
View connection status.
Tap to connect and synchronize.
Tap tp stop synchronization.
Tap to synchronize via IR or
change synchronization settings.

Chapter 4:
Microsoft Pocket Outlook
Microsoft® Pocket Outlook includes Calendar, Contacts, Tasks, Inbox, and
Notes. You can use these programs individually or together. For example,
e-mail addresses stored in Contacts can be used to address e-mail mes-
sages in Inbox.
Using ActiveSync® you can synchronize information in Microsoft Outlook
or Microsoft Exchange on your desktop computer with your device. You
can also synchronize this information directly with a Microsoft Exchange
server. Each time you synchronize, ActiveSync compares the changes you
made on your device and desktop computer or server and updates both
computers with the latest information. For information on using ActiveSync,
see ActiveSync Help on the desktop computer.
You can switch to any of these programs by tapping them on the menu.
4-2
Toshiba Pocket PC e740 User’s Guide
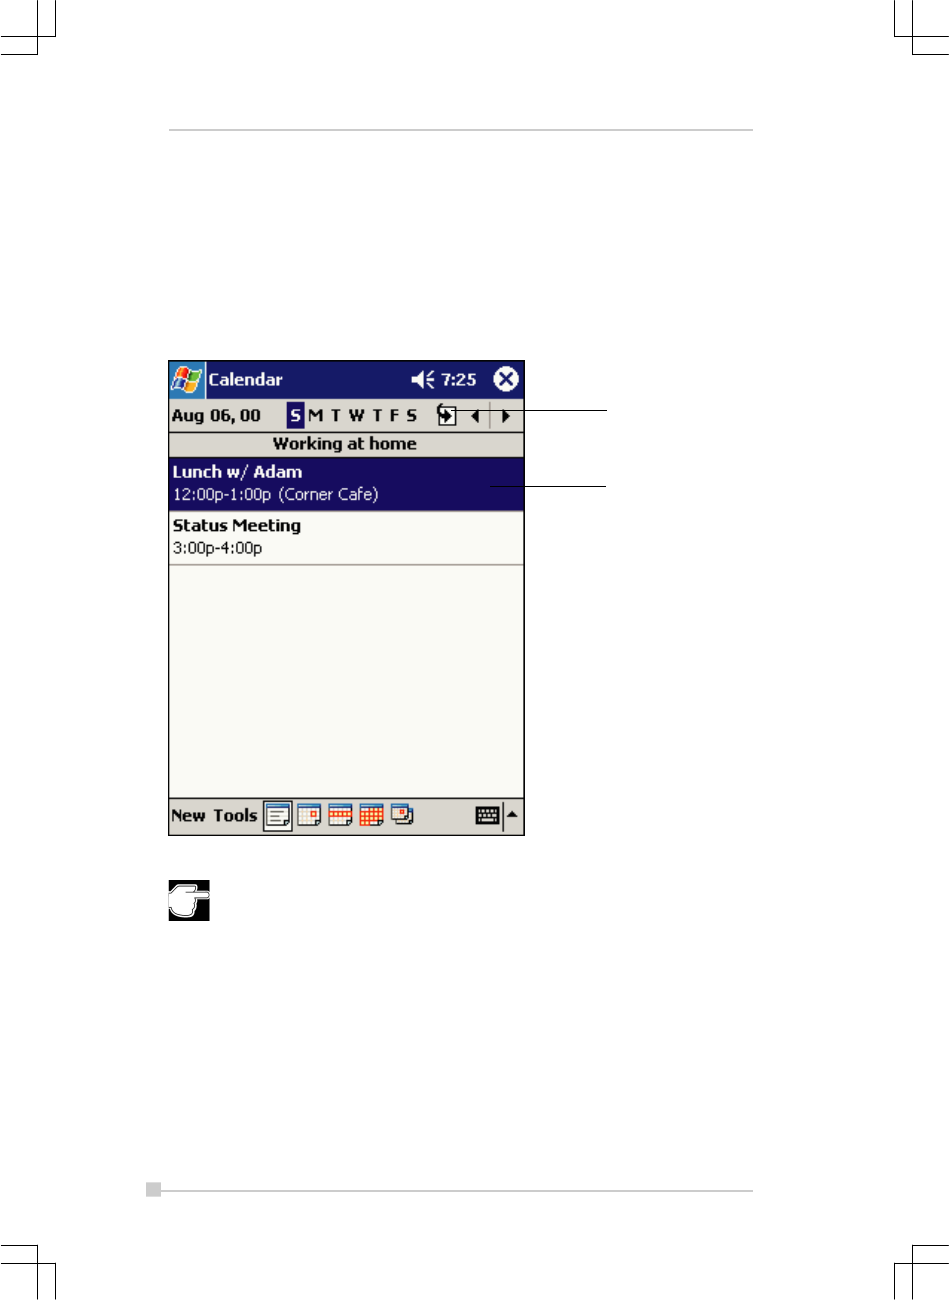
Calendar: Scheduling Appointments and
Meetings
Use Calendar to schedule appointments, including meetings and other
events. You can check your appointments in one of several views (Agenda,
Day, Week, Month, and Year) and easily switch views by using the View
menu.
You can customize the Calendar display, such as changing the first
day of the week, by tapping Options on the Tools menu.
Tap to go to today.
Tap to display or edit the
appointment details.
4-3
Chapter 4: Microsoft Pocket Outlook
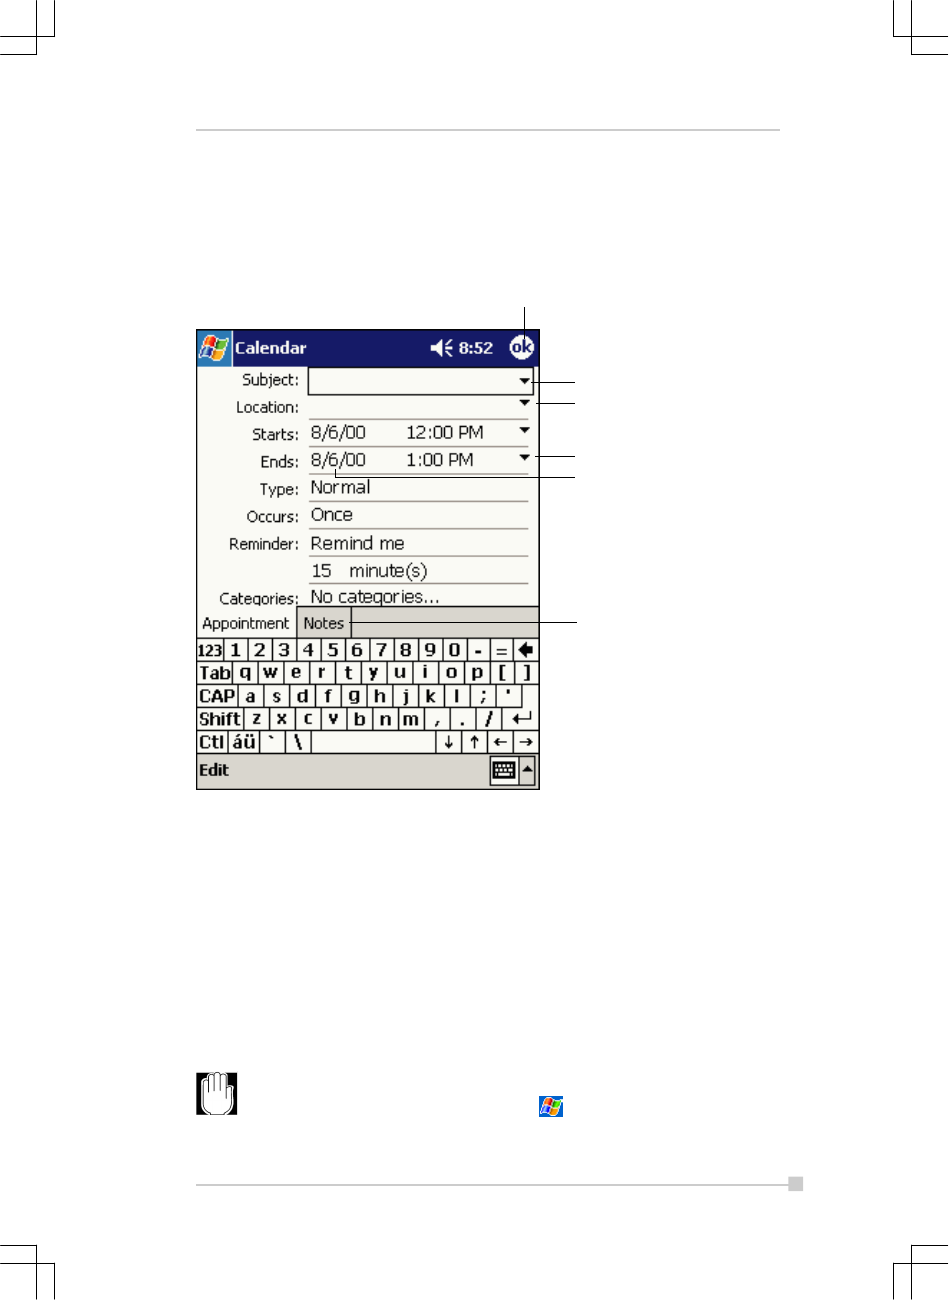
To create an appointment:
1. If you are in Day or Week view, tap the desired date and time for the
appointment.
2. Tap New.
3. Using the input panel, enter a description and a location. Tap first to
select the field.
4. If needed, tap the date and time to change them.
5. Enter other desired information. You will need to hide the input panel
to see all available fields.
6. To add notes, tap the Notes tab. You can enter text, draw, or create a
recording. For more information on creating notes, see “Notes: Cap-
turing Thoughts and Ideas,” later in this chapter.
7. When finished, tap OK to return to the calendar.
If you select Remind me in an appointment, your device will remind
you according to the options set in , Settings, Personal tab,
Sounds & Reminders.
Tap to return to the calendar ( the
appointment is saved autom atically ).
Tap to choose from predefined text.
Tap to choose from previously
entered locations.
Tap to select a time.
Tap to select a date.
Notes is a good place for maps
and directions.
4-4
Toshiba Pocket PC e740 User’s Guide
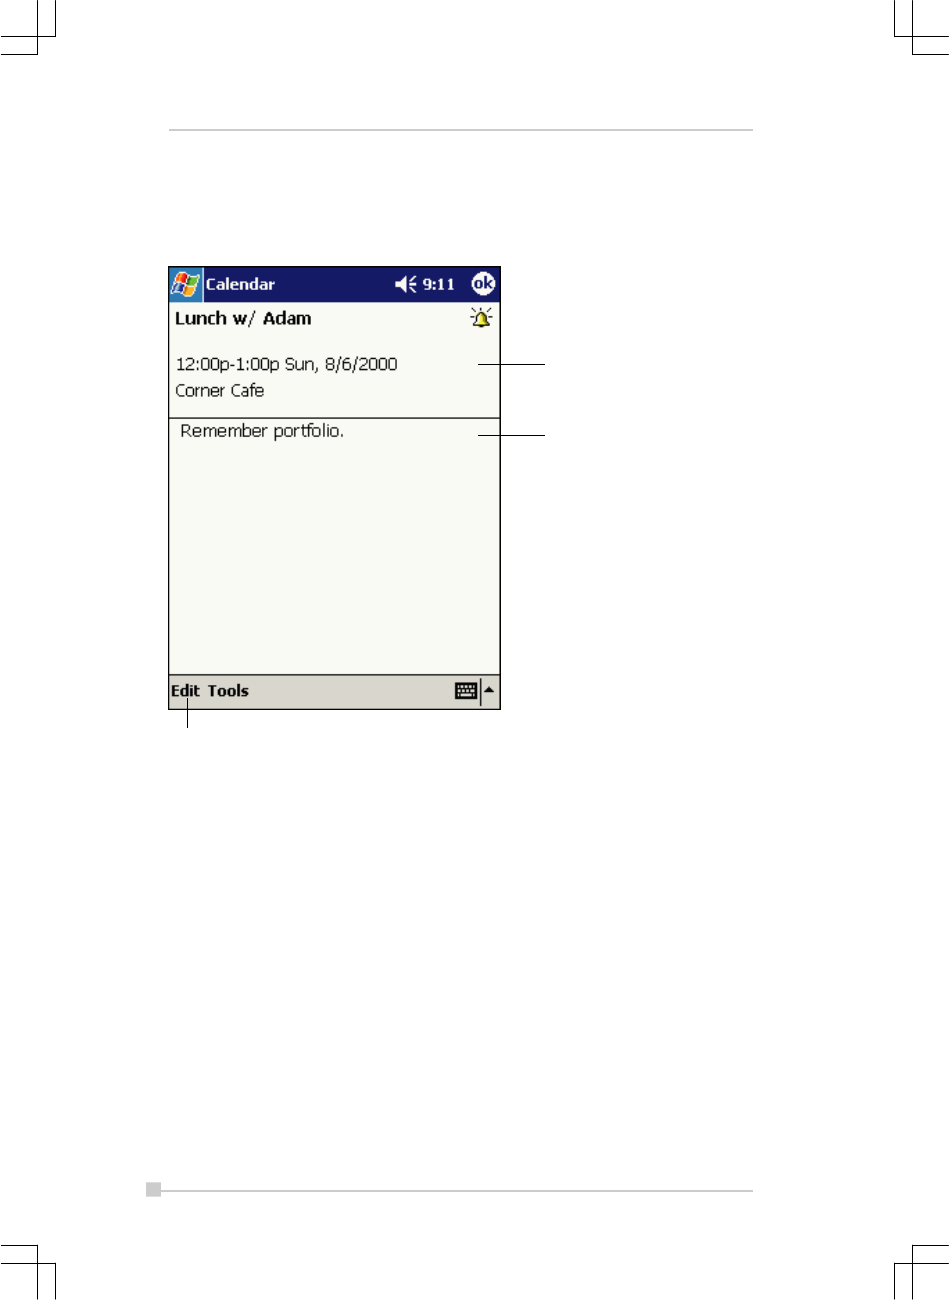
Using the Summary Screen
When you tap an appointment in Calendar, a summary screen is displayed.
To change the appointment, tap Edit.
Creating Meeting Requests
You can use Calendar to set up meetings with users of Outlook or Pocket
Outlook. The meeting request will be created automatically and sent either
when you synchronize Inbox or when you connect to your e-mail server.
Indicate how you want meeting requests sent by tapping Tools and then
Options. If you send and receive e-mail messages through ActiveSync, se-
lect ActiveSync.
To schedule a meeting:
1. Create an appointment.
2. In the appointment details, hide the input panel, and then tap Attendees.
3. From the list of e-mail addresses you’ve entered in Contacts, select
the meeting attendees.
The meeting notice is created automatically and placed in the Outbox folder.
For more information on sending and receiving meeting requests, see
Calendar Help and Inbox Help on the device.
View appointment details.
View.
Tap to change appointment.

4-5
Chapter 4: Microsoft Pocket Outlook
Contacts: Tracking Friends and Colleagues
Contacts maintains a list of your friends and colleagues so that you can
easily find the information you’re looking for, whether you’re at home or on
the road. Using the device infrared (IR) port, you can quickly share Con-
tacts information with other device users.
To change the way information is displayed in the list, tap Tools and
then Options.
Select the category of contacts you want displayed in the list.
Tap and enter of a name to
quickly find it in the list.
Tap and see additional phone
numbers and e-mail addresses.
Tap to display or edit the
contact details.
Tap and hold to display a
pop-up menu of actions.
Tap to create a newcontact.
4-6
Toshiba Pocket PC e740 User’s Guide
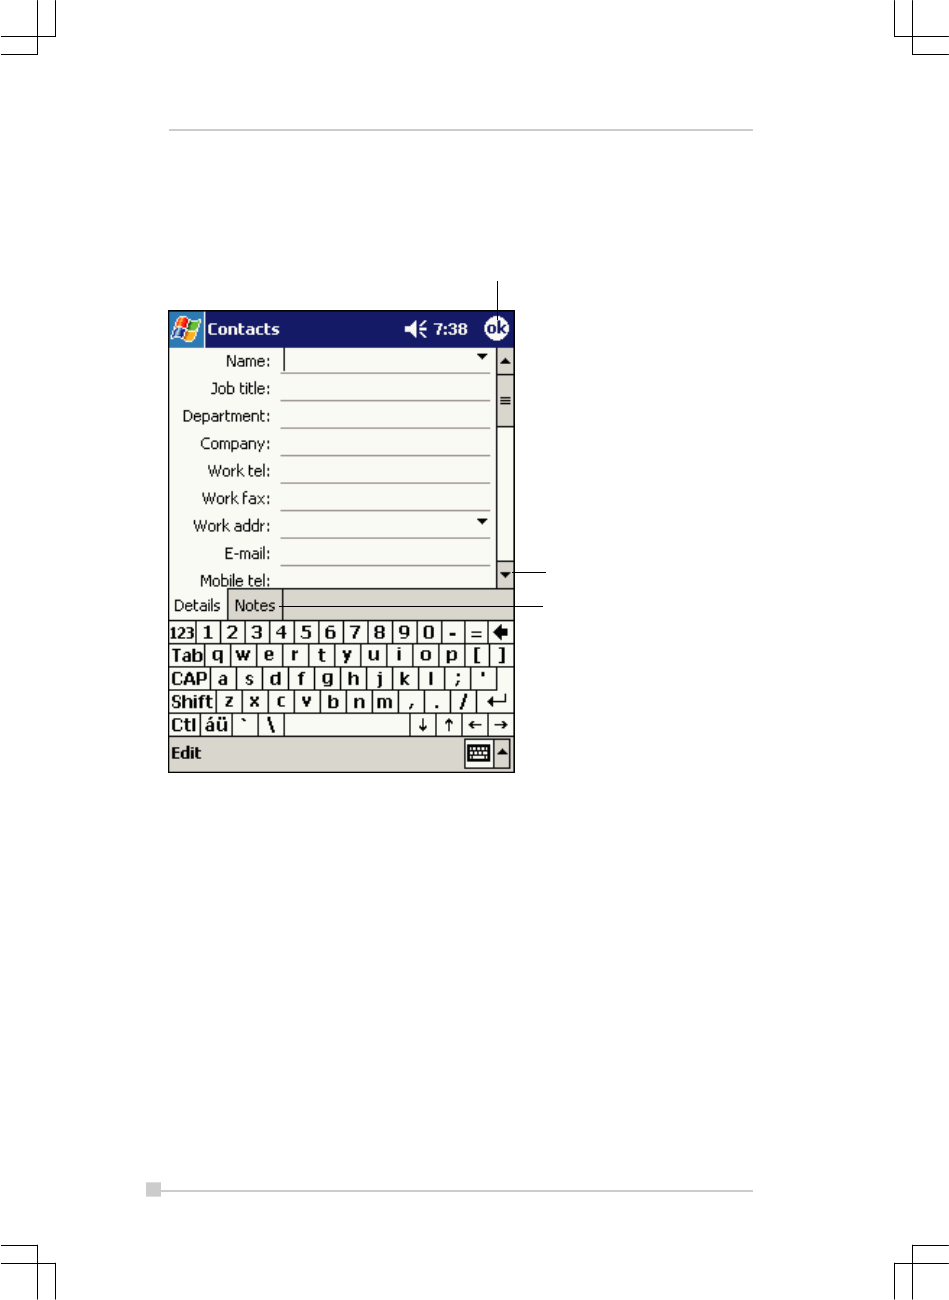
To create a contact:
1. Tap New.
2. Using the input panel, enter a name and other contact information.
You will need to scroll down to see all available fields.
3. To assign the contact to a category, scroll to and tap Categories and
select a category from the list. In the contact list, you can display con-
tacts by category.
4. To add notes, tap the Notes tab. You can enter text, draw, or create a
recording. For more information on creating notes, see “Notes: Cap-
turing Thoughts and Ideas,” later in this chapter.
5. When finished, tap OK to return to the contact list.
Tap to return to the contact list
( the contact is saved autom atically ).
Scroll to see more fields.
Notes is a good place for
maps and directions.

4-7
Chapter 4: Microsoft Pocket Outlook
Finding a contact
There are four ways to find a contact:
•In the contact list, enter a contact name in the box under the naviga-
tion bar. To show all contacts again, clear text from the box or tap the
button to the right of the box.
•In the contact list, tap the category list (labeled All Contacts by de-
fault) and select the type of contact that you want displayed. To show
all contacts again, select All Contacts. To view a contact not as-
signed to a category, select None.
•To view the names of companies your contacts work for, in the contact
list, tap View > By Company. The number of contacts that work for
that company will be displayed to the right of the company name.
•Tap , Find, enter the contact name, select Contacts for the type,
and then tap Go.
4-8
Toshiba Pocket PC e740 User’s Guide
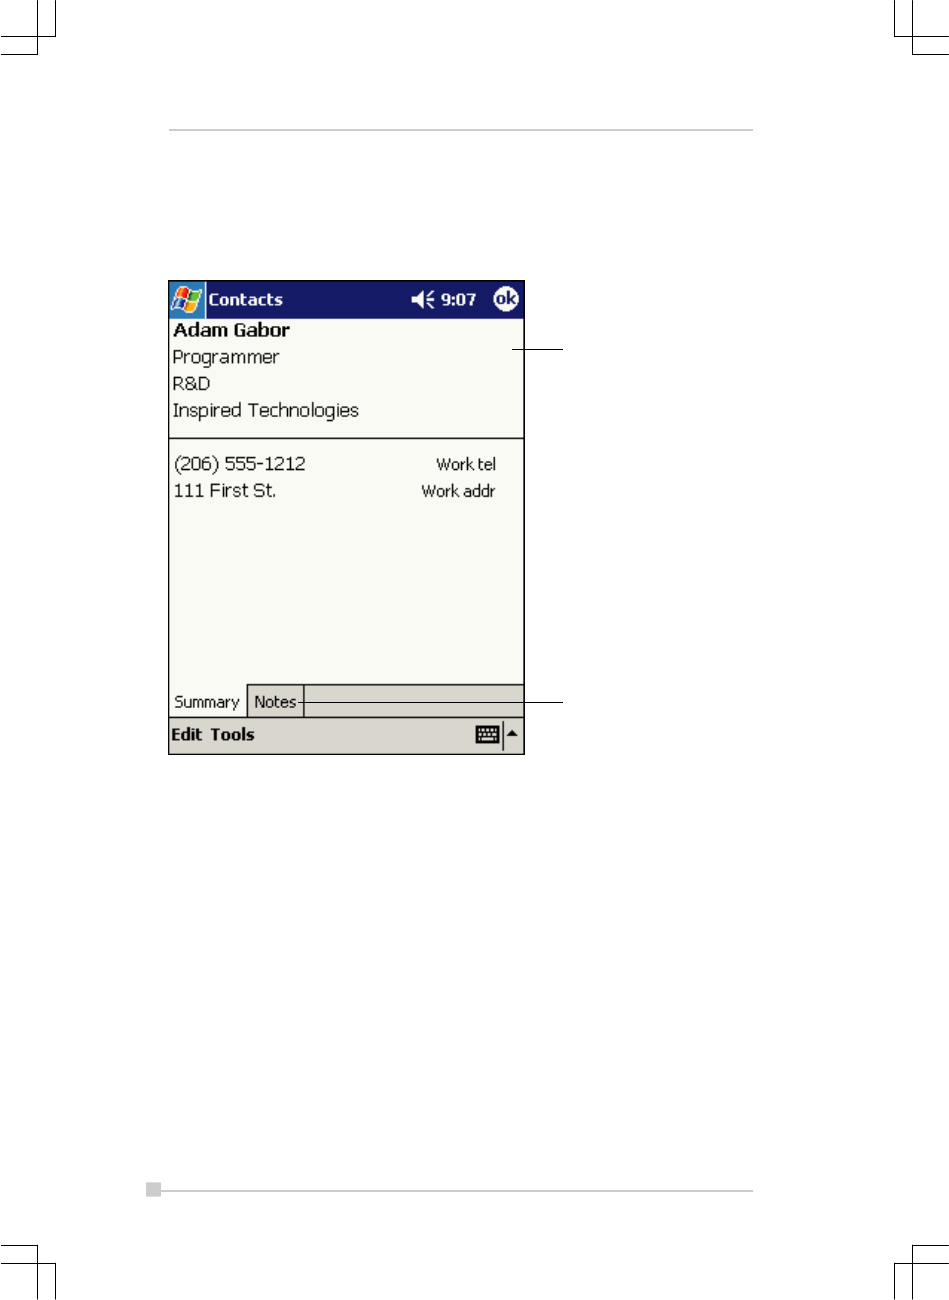
Using the Summary Screen
When you tap a contact in the contact list, a summary screen is displayed.
To change the contact information, tap Edit.
View contact details.
Tap to view notes.
4-9
Chapter 4: Microsoft Pocket Outlook
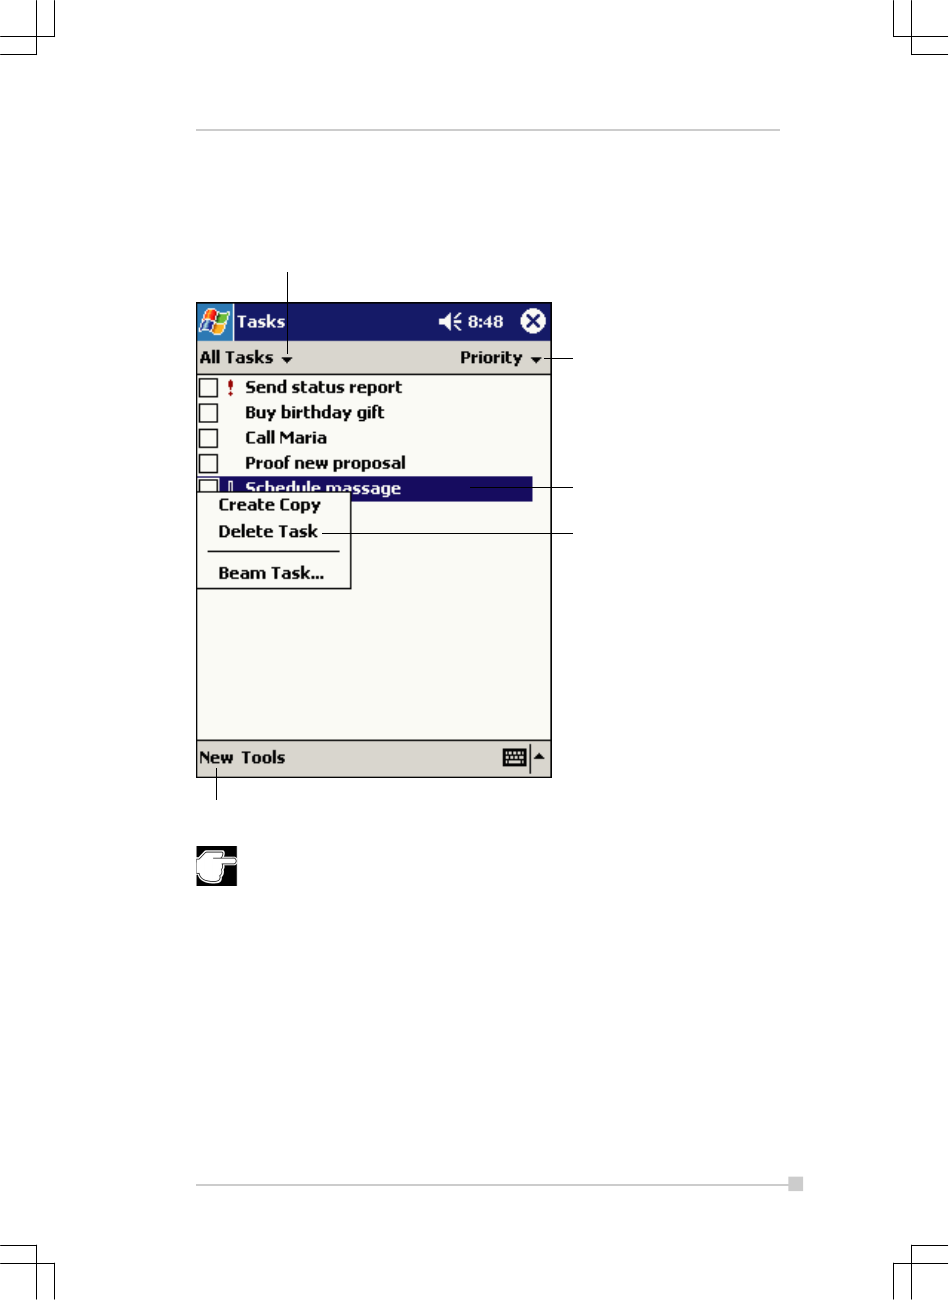
Tasks: Keeping a To Do List
Use Tasks to keep track of what you have to do.
To change the way information is displayed in the list, tap Tools and
then Options.
Select the category of tasks you want displayed in the list.
Select the sort order of the list.
Tap to display or edit the task
details.
Tap and hold to display a pop-up
menu of actions.
Tap to create a new task.
4-10
Toshiba Pocket PC e740 User’s Guide
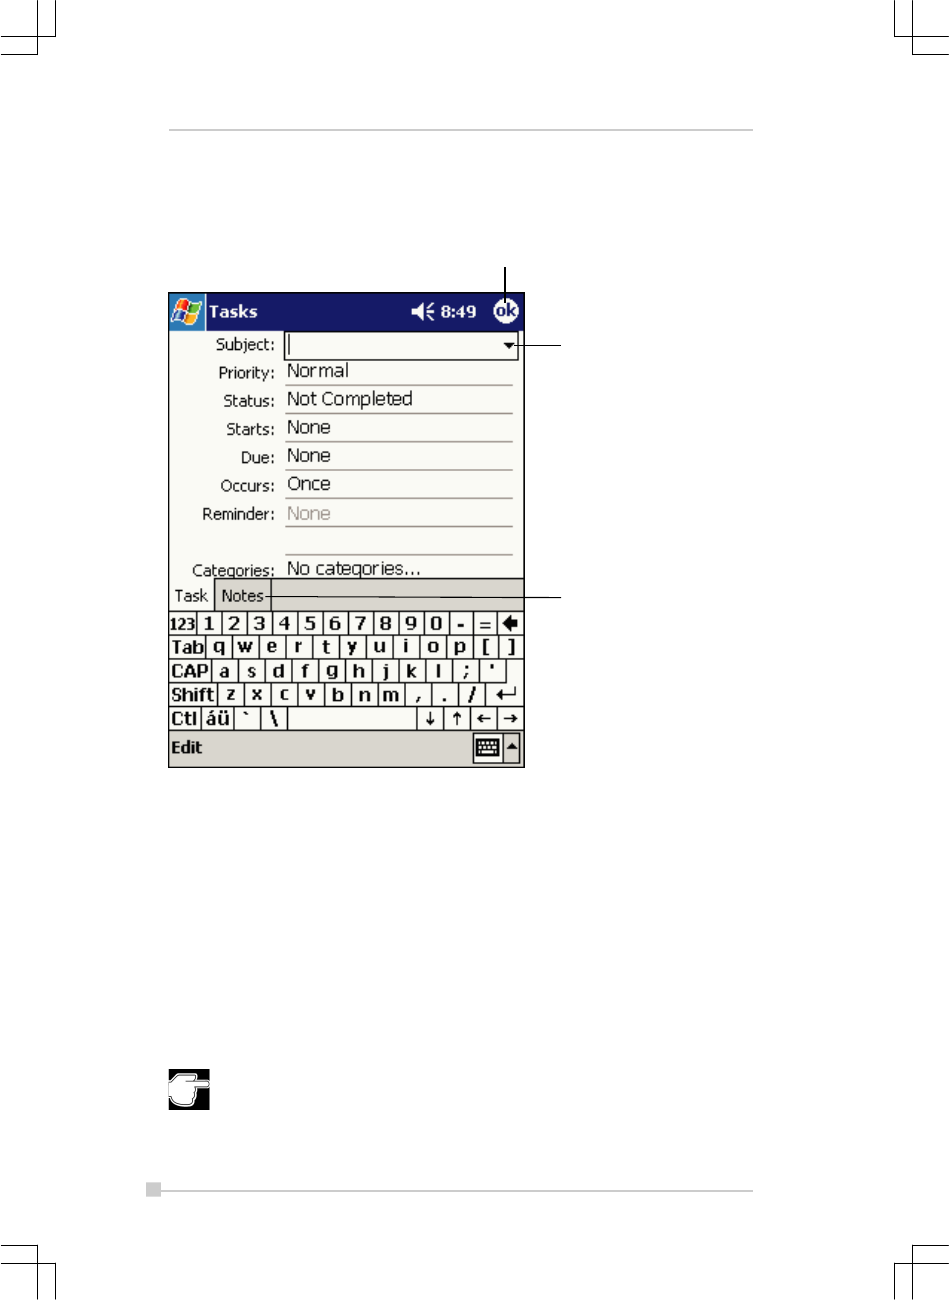
To create a task:
1. Tap New.
2. Using the input panel, enter a description.
3. You can enter a start date and due date or enter other information by
first tapping the field. If the input panel is open, you will need to hide it
to see all available fields.
4. To assign the task to a category, tap Categories and select a cat-
egory from the list. In the task list, you can display tasks by category.
5. To add notes, tap the Notes tab. You can enter text, draw, or create a
recording. For more information on creating notes, see “Notes: Cap-
turing Thoughts and Ideas,” later in this chapter.
6. When finished, tap OK to return to the task list.
To quickly create a task with only a subject, tap Entry Bar on the
Tools menu. Then, tap Tap here to add a new task and enter
your task information.
Tap to return to the task list
( the task is saved autom actically ).
Tap to choose from predefined
subjects.
Notes is a good place for maps
and drawings.
4-11
Chapter 4: Microsoft Pocket Outlook
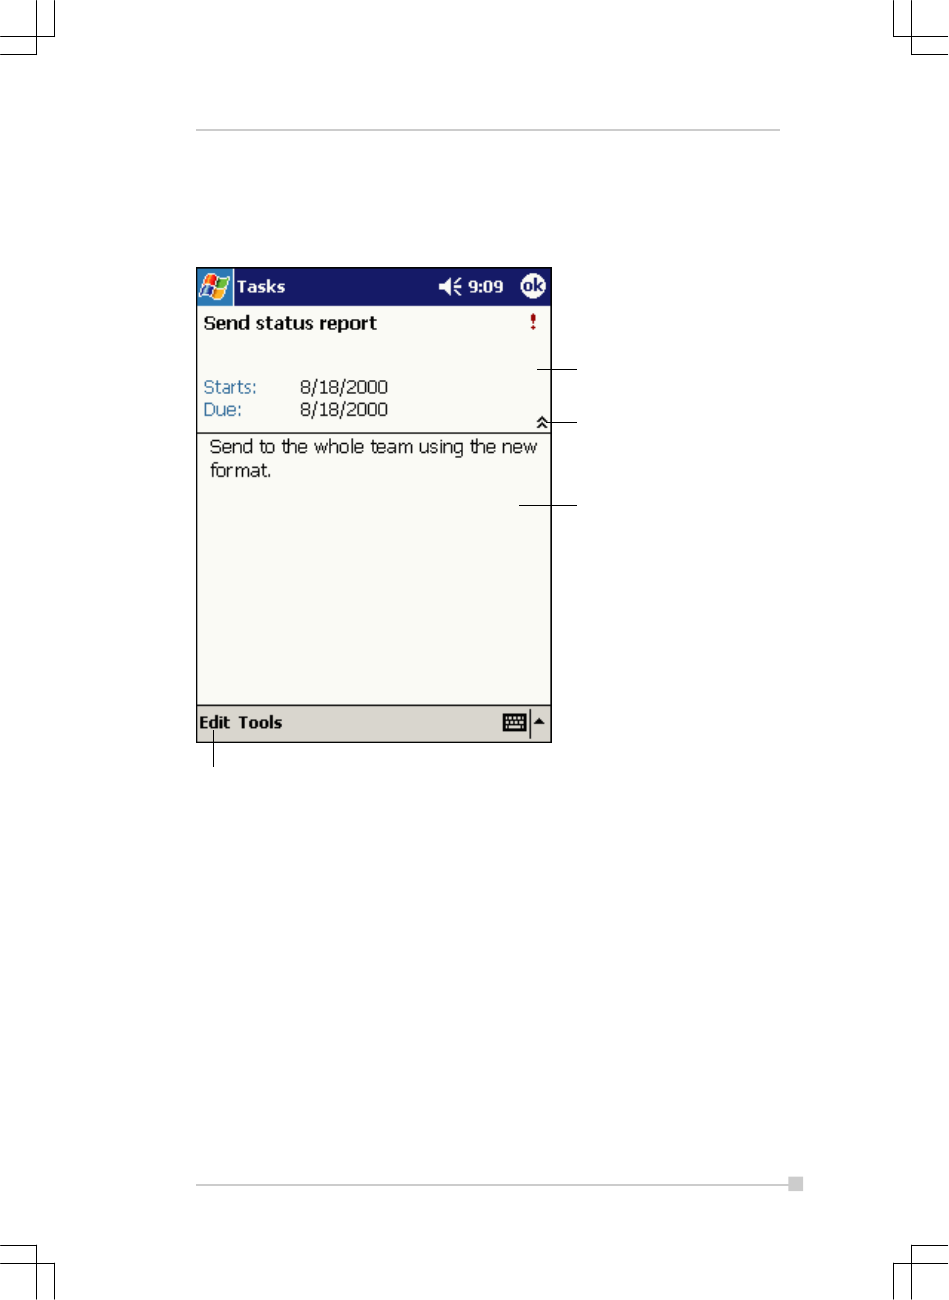
Using the Summary Screen
When you tap a task in the task list, a summary screen is displayed. To
change the task, tap Edit.
View task details.
Tap to show and hide additional
summary information.
View notes.
Tap to change task.
4-12
Toshiba Pocket PC e740 User’s Guide
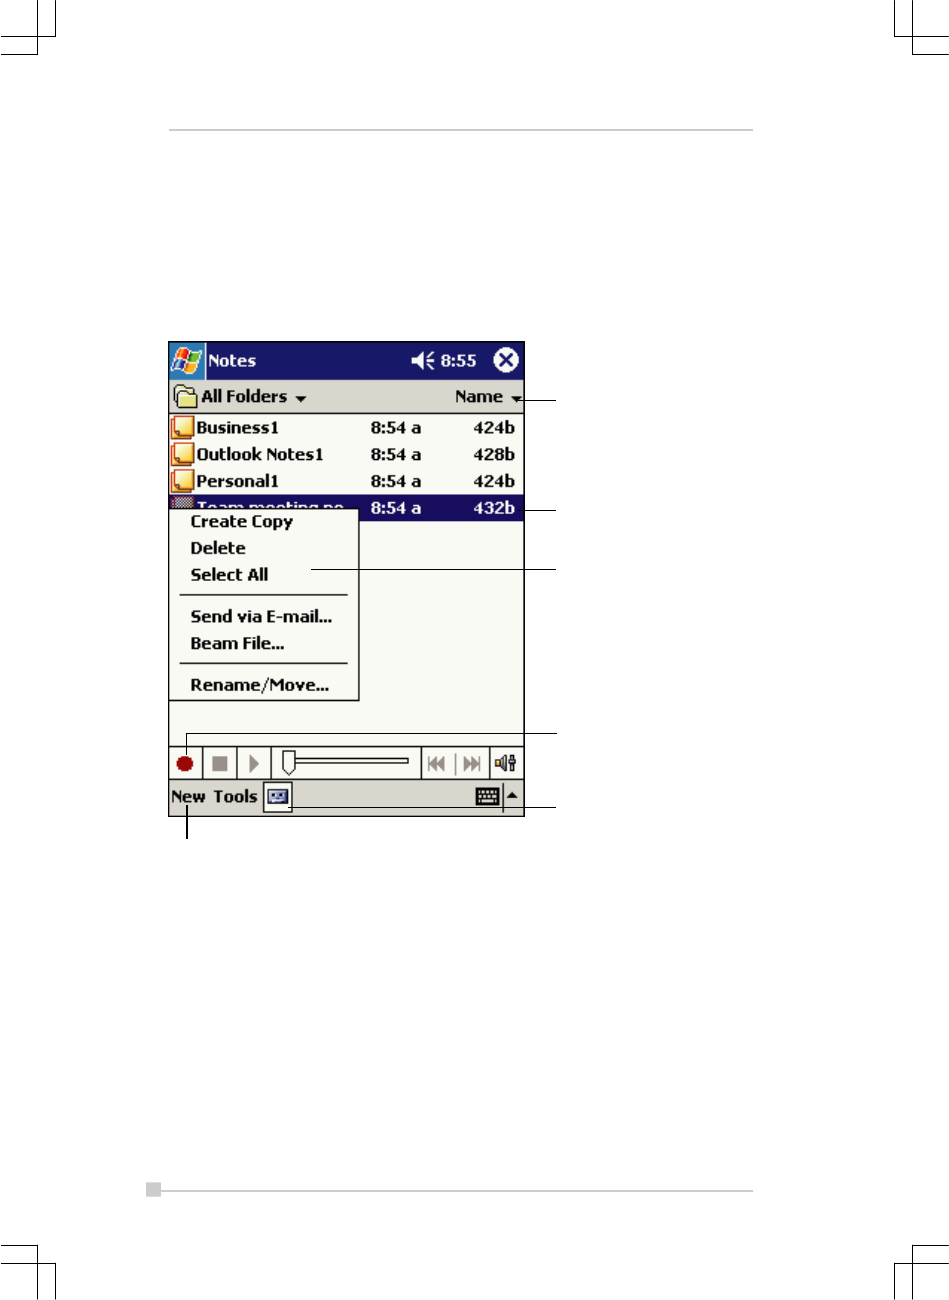
Notes: Capturing Thoughts and Ideas
Quickly capture thoughts, reminders, ideas, drawings, and phone num-
bers with Notes. You can create a written note or a recording. You can also
include a recording in a note. If a note is open when you create the record-
ing, it will be included in the note as an icon. If the note list is displayed, it
will be created as a stand-alone recording.
Tap to create a new item.
Tap to show or hide the Recording
toolbar.
Tap to record.
Tap and hold to display a pop-up
menu of actions.
Tap to open a note or play a
recording.
Tap to change the sort order of
the list.
4-13
Chapter 4: Microsoft Pocket Outlook
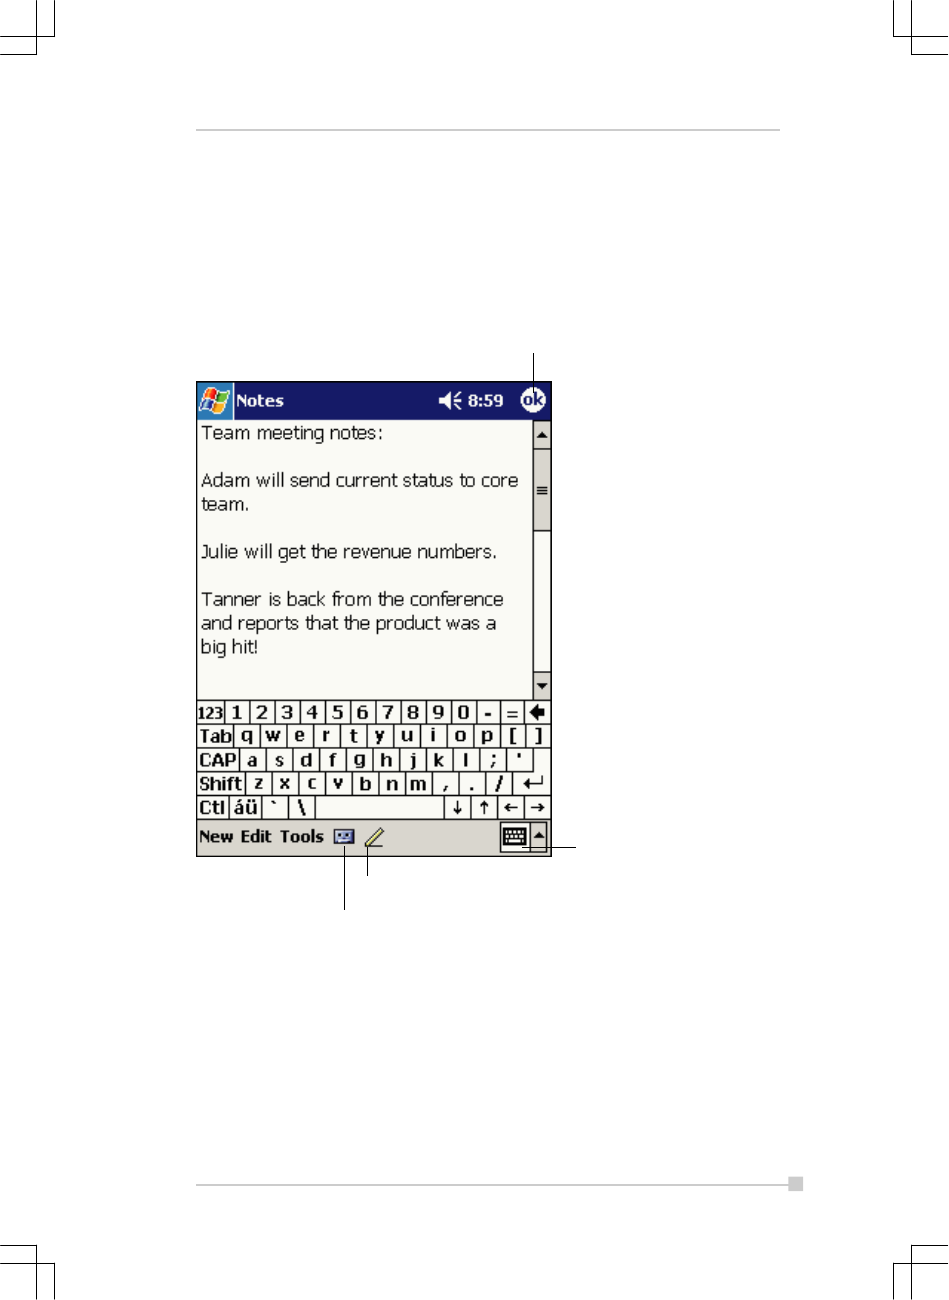
To create a note:
1. Tap New.
2. Create your note by writing, drawing, typing, and recording. For more
information about using the input panel, writing and drawing on the
screen, and creating recordings, see Chapter 2.
Tap to return to the note list
( the note is saved automatically ).
Tap to show or hide the input panel.
Tap to write on the screen.
Tap to add a recording to the note.

4-14
Toshiba Pocket PC e740 User’s Guide
Inbox: Sending and Receiving E-mail Messages
Use Inbox to send and receive e-mail messages in either of these ways:
•Synchronize e-mail messages with Microsoft Exchange or Microsoft
Outlook on your desktop computer.
•Send and receive e-mail messages by connecting directly to an e-mail
server through an Internet Service Provider (ISP) or a network.
Synchronizing E-mail Messages
E-mail messages can be synchronized as part of the general synchroniza-
tion process. You will need to enable Inbox synchronization in ActiveSync.
For information on enabling Inbox synchronization, see ActiveSync Help
on the desktop computer.
During synchronization:
•Messages are copied from the mail folders of Exchange or Outlook on
your desktop computer to the ActiveSync folder in Inbox on your de-
vice. By default, you will receive messages from the past three days
only, the first 100 lines of each message, and file attachments of less
than 100 KB in size.
•E-mail messages in the Outbox folder on your device are transferred
to Exchange or Outlook, and then sent from those programs.
•E-mail messages in subfolders must be selected in ActiveSync on
your desktop computer in order to be transferred.
You can also synchronize e-mail messages with your desktop com-
puter from a remote location. For more information, see Chapter 7.

4-15
Chapter 4: Microsoft Pocket Outlook
Connecting Directly to an E-mail Server
In addition to synchronizing e-mail messages with your desktop computer,
you can send and receive e-mail messages by connecting to an e-mail
server using a modem or network card connected to your device. You’ll
need to set up a remote connection to a network or an ISP, and a connec-
tion to your e-mail server. For more information, see Chapter 7.
When you connect to the e-mail server, new messages are downloaded to
the device Inbox folder, messages in the device Outbox folder are sent,
and messages that have been deleted on the e-mail server are removed
from the device Inbox folder.
Messages that you receive directly from an e-mail server are linked to your
e-mail server rather than your desktop computer. When you delete a mes-
sage on your device, it is also deleted from the e-mail server the next time
you connect based on the settings you selected in ActiveSync.
You can work online or offline. When working online, you read and re-
spond to messages while connected to the e-mail server. Messages are
sent as soon as you tap Send , which saves space on your device.
When working offline, once you’ve downloaded new message headers or
partial messages, you can disconnect from the e-mail server and then
decide which messages to download completely. The next time you con-
nect, Inbox downloads the complete messages you’ve marked for retrieval
and sends the messages you’ve composed.
4-16
Toshiba Pocket PC e740 User’s Guide
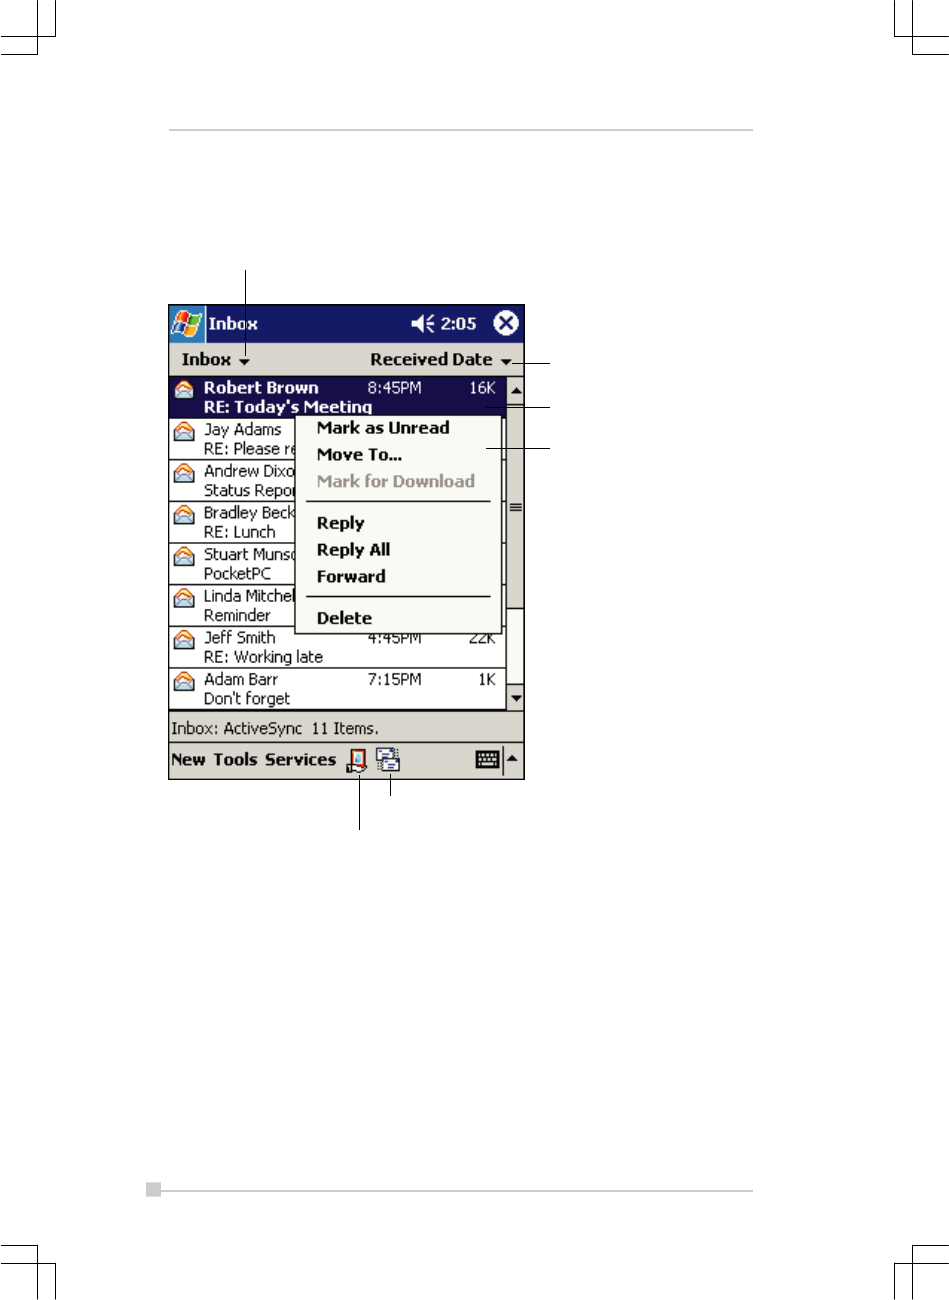
Using the Message List
Messages you receive are displayed in the message list. By default, the
most recently received messages are displayed first in the list.
Select the service and folder you want to display.
Select the sort order for messages.
Tap to open a message.
Tap and hold to display a pop-up
menu or actions.
Tap to connect and to send and receive e-mail.
Tap to connect to the selected service.

4-17
Chapter 4: Microsoft Pocket Outlook
When you receive a message, tap it to open it. Unread messages are
displayed in bold.
When you connect to your e-mail server or synchronize with your desktop
computer, by default, you’ll receive messages from the last five days only,
the first 100 lines of each new message, and file attachments of less than
100 KB in size. The original messages remain on the e-mail server or your
desktop computer.
You can mark the messages that you want to retrieve in full during your
next synchronization or e-mail server connection. In the message list, tap
and hold the message you want to retrieve. On the pop-up menu, tap Mark
for Download. The icons in the Inbox message list give you visual indica-
tions of message status.
You specify your downloading preferences when you set up the service or
select your synchronization options. You can change them at any time:
•Change options for Inbox synchronization using ActiveSync options.
For more information, see ActiveSync Help.
•Change options for direct e-mail server connections in Inbox on your
device. Tap Tools and then tap Options. On the Service tab, tap the
service you want to change. Tap and hold the service and select De-
lete to remove a service.
Tap to return to the message list.
Tap to delete this message.
Tap to view the previous or next
message.
Tap to reply to or forward this message.
4-18
Toshiba Pocket PC e740 User’s Guide
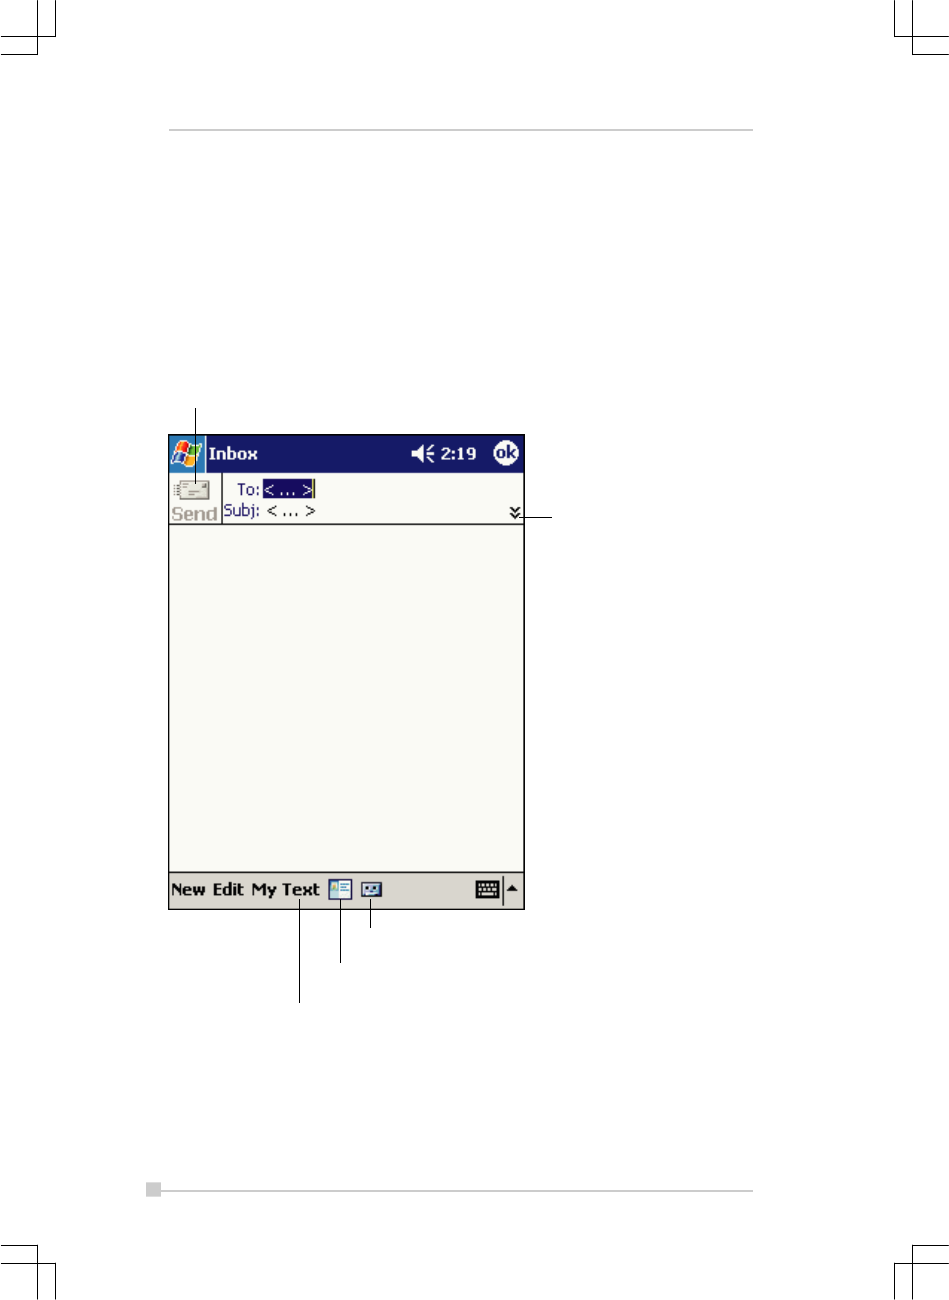
Composing Messages
To compose a message:
1. Tap New.
2. In the To field, enter an e-mail or SMS address of one or more recipi-
ents, separating them with a semicolon, or select a name from the
contact list by tapping the Address Book button. All e-mail addresses
entered in the e-mail fields in Contacts appear in the Address Book.
Tap to send the message.
Tap to show or hide the complete
header.
Tap to show / hide the recording toolbar.
Tap to display the Address Book.
Tap to insert common messages.

4-19
Chapter 4: Microsoft Pocket Outlook
3. Compose your message. To enter preset or frequently used messages,
tap My Text and select a message.
4. Tap Send when you’ve finished the message. If you are working offline,
the message is moved to the Outbox folder and will be sent the next
time you connect.
If you are sending an SMS message and want to know if it was received,
tap Edit, Options, and select Request SMS text message delivery
notification before sending the message.

4-20
Toshiba Pocket PC e740 User’s Guide
Managing E-mail Messages and Folders
By default, messages are displayed in one of five folders for each service
you have created: Inbox, Deleted Items, Drafts, Outbox, and Sent Items.
The Deleted Items folder contains messages that have been deleted on
the device. The behavior of the Deleted and Sent Items folders depends
on the options you have chosen. In the message list, tap Tools and then
Options. On the Message tab, select your options.
If you want to organize messages into additional folders, tap Tools, and
then Manage Folders to create new folders. To move a message to
another folder, in the message list, tap and hold the message and then tap
Move to on the pop-up menu.
Folder behavior with a direct connection to an e-mail server
The behavior of the folders you create depends on whether you are using
ActiveSync, SMS, POP3, or IMAP4.
•If you use ActiveSync, e-mail messages in the Inbox folder in Outlook
will automatically be synchronized with your device. You can select to
synchronize additional folders by designating them for ActiveSync. The
folders you create and the messages you move will then be mirrored
on the server. For example, if you move two messages from the Inbox
folder to a folder named Family, and you have designated Family for
synchronization, the server creates a copy of the Family folder and
copies the messages into that folder. You can then read the messages
while away from your desktop computer.
•If you use SMS, messages are stored in the Inbox folder.
•If you use POP3 and you move e-mail messages to a folder you cre-
ated, the link is broken between the messages on the device and their
copies on the mail server. The next time you connect, the mail server
will see that the messages are missing from the device Inbox and
delete them from the server. This prevents you from having duplicate
copies of a message, but it also means that you will no longer have
access to messages that you move to folders created from anywhere
except the device.
• If you use IMAP4, the folders you create and the e-mail messages you
move are mirrored on the server. Therefore, messages are available
to you anytime you connect to your mail server, whether it is from your
device or desktop computer. This synchronization of folders occurs
whenever you connect to your mail server, create new folders, or re-
name/delete folders when connected.

Chapter 5:
Companion Programs
The companion programs consist of Microsoft® Pocket Word, Microsoft®
Pocket Excel, Microsoft® Money, Windows Media™ Player for Toshiba
Pocket PC, and Microsoft® Reader.
To switch to a companion program on your device, tap Programs on the
menu, and then tap the program name.
Pocket Word
Pocket Word works with Microsoft Word on your desktop computer to give
you easy access to copies of your documents. You can create new docu-
ments on your device, or you can copy documents from your desktop com-
puter to your device. Synchronize documents between your desktop com-
puter and your device so that you have the most up-to-date content in both
locations.
Use Pocket Word to create documents, such as letters, meeting minutes,
and trip reports. To create a new file, tap , Programs, Pocket Word,
and then New. A blank document appears. Or, if you’ve selected a tem-
plate for new documents in the Options dialog box, that template ap-
pears with appropriate text and formatting already provided. You can open
only one document at a time; when you open a second document, you’ll be
asked to save the first. You can save a document you create or edit in a
variety of formats, including Word (.doc), Pocket Word (.psw), Rich Text
Format (.rtf), and Plain Text (.txt).
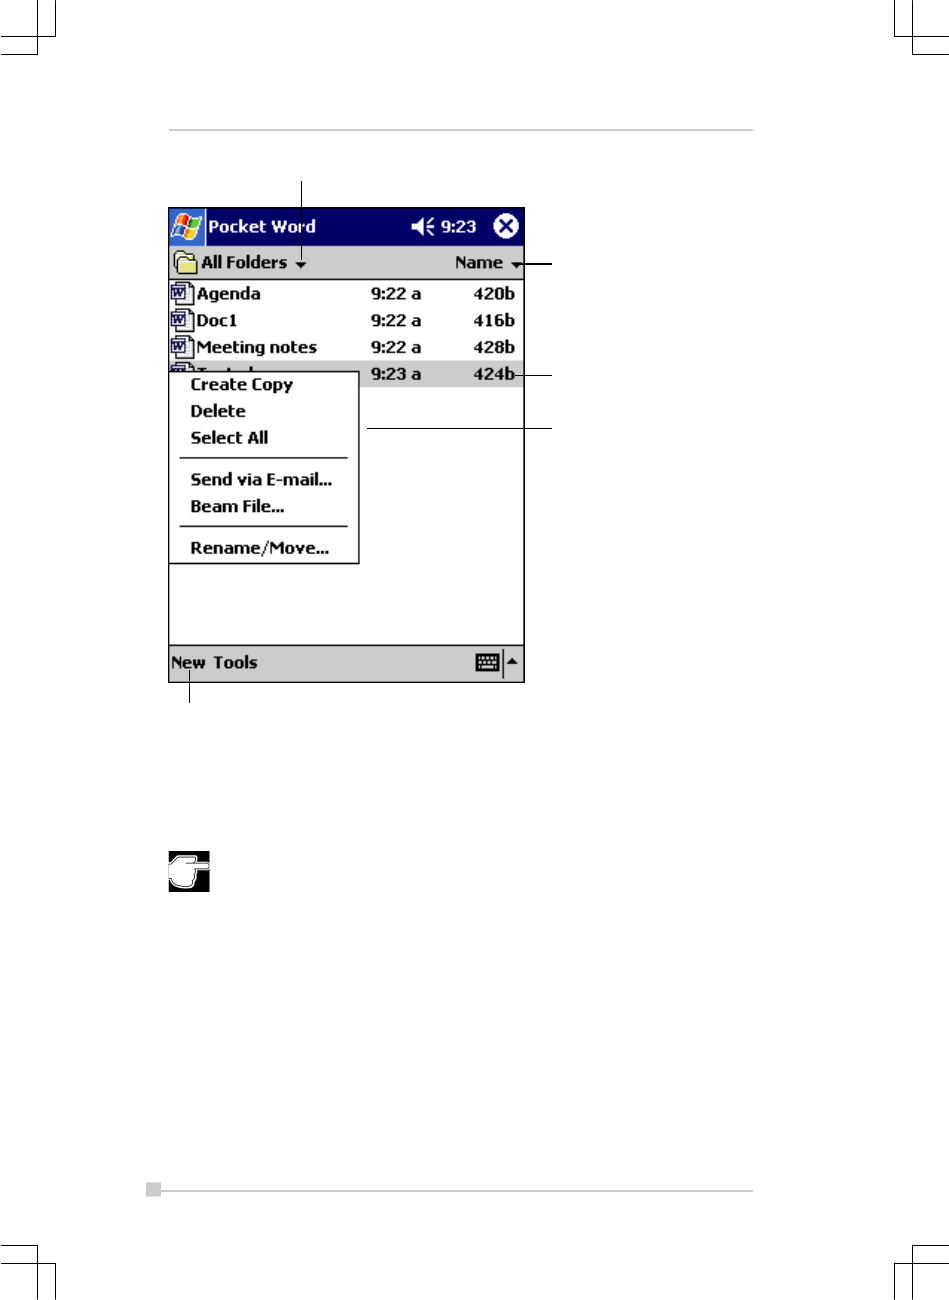
Pocket Word contains a list of the files stored on your device. Tap a file in
the list to open it. To delete, make copies of, and send files, tap and hold a
file in the list. Then, select the appropriate action on the popup menu.
5-2
Toshiba Pocket PC e740 User’s Guide
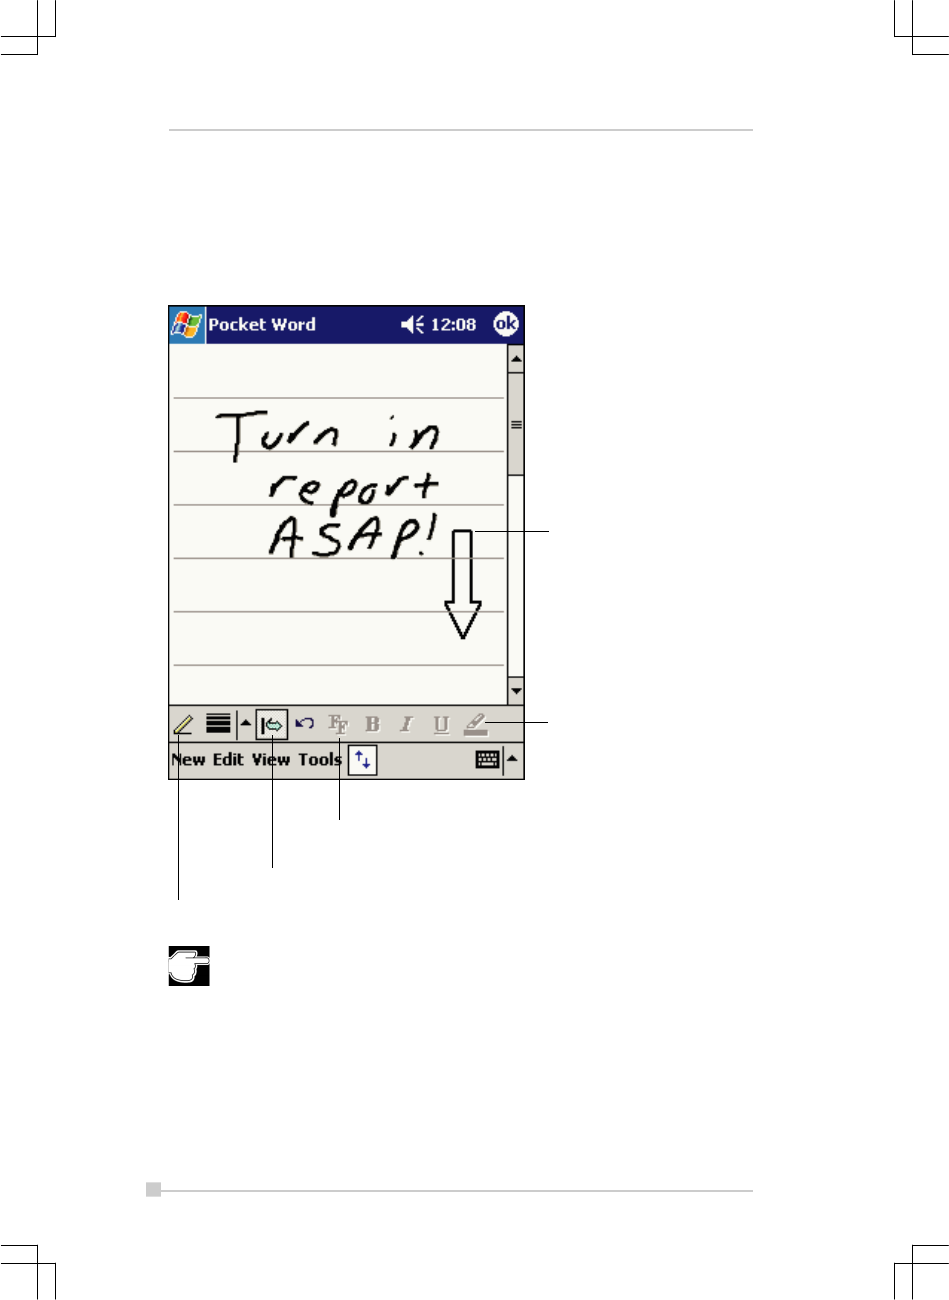
You can enter information in Pocket Word in one of four modes (typing,
writing, drawing, and recording), which are displayed on the View menu.
Each mode has its own toolbar, which you can show and hide by tapping
the Show/Hide Toolbar button on the command bar.
You can change the zoom magnification by tapping View and then
Zoom. Then select the percentage you want. Select a higher per-
centage to enter text and a lower one to see more of your document.
If you’re opening a Word document created on a desktop computer,
select Wrap to Window on the View menu so that you can see the
entire document.
Select the type of folder you want displayed in the list.
Tap to change the sort order of
the list.
Tap to open a document.
Tap and hold an item to see a
pop-up menu of actions.
Tap to create a new document.
5-3
Chapter 5: Companion Programs
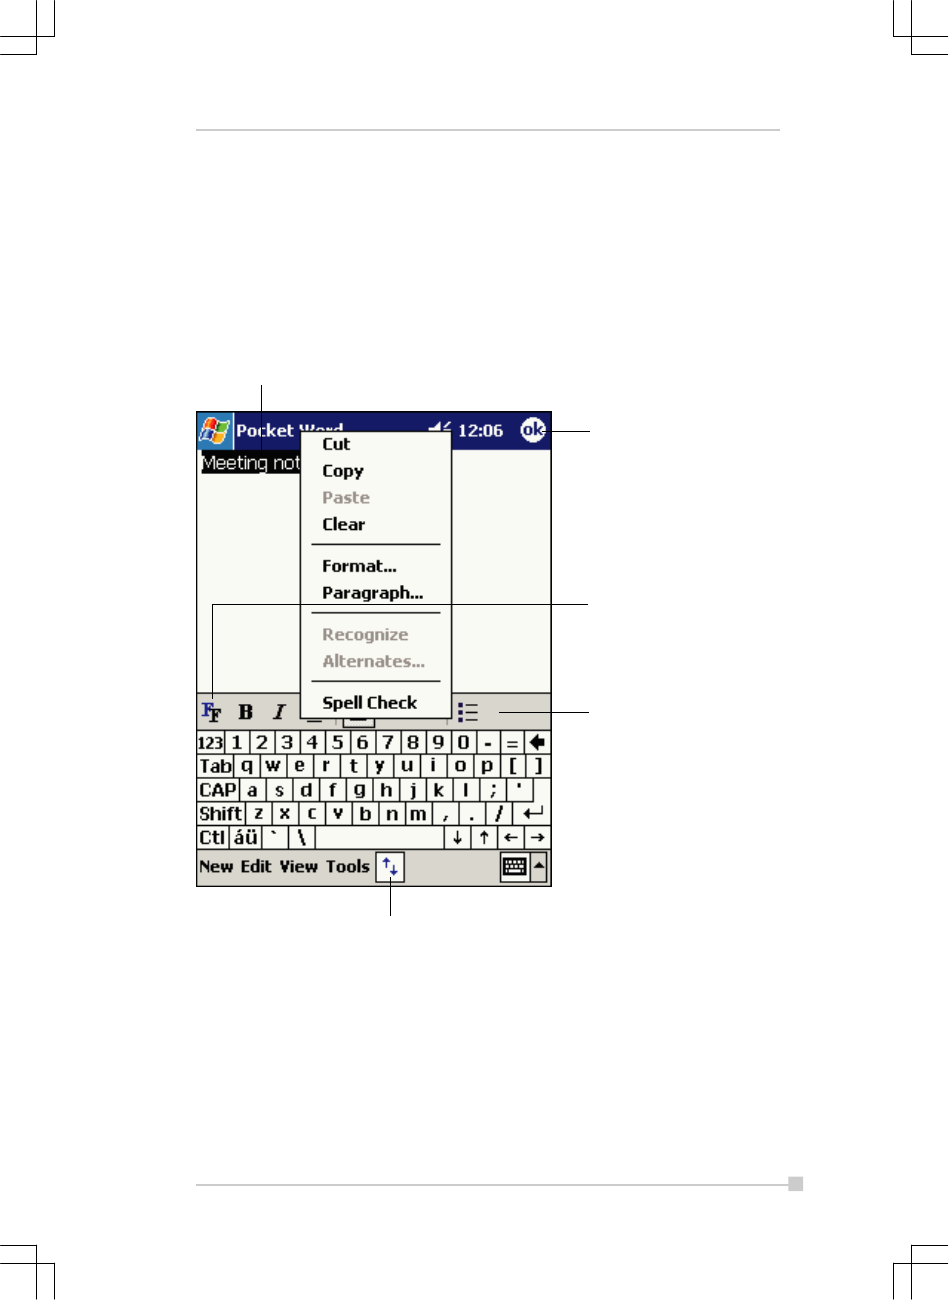
Typing Mode
Using the input panel, enter typed text into the document. For more infor-
mation on entering typed text, see Chapter 2.
To format existing text and to edit text, first select the text. You can select
text as you do in a Word document, using your stylus instead of the mouse
to drag through the text you want to select. You can search a document to
find text by tapping Edit and then Find/Replace.
Tap and hold to see a pop-up menu of actions.
Tap to return to the document
list ( changes are saved
automatically ).
Tap to change fromatting
options.
Tap to format text.
Tap to show or hide the toolbar.
5-4
Toshiba Pocket PC e740 User’s Guide
Writing Mode
In writing mode, use your stylus to write directly on the screen. Ruled lines
are displayed as a guide, and the zoom magnification is greater than in
typing mode to allow you to write more easily. For more information on
writing and selecting writing, see Chapter 2.
If you cross three ruled lines in a single stylus stroke, the writing
becomes a drawing, and can be edited and manipulated as described
in the following section. Written words are converted to graphics
(metafiles) when a Pocket Word document is converted to a Word
document on your desktop computer.
With Space button selected drag
to insert space.
An arrow appears showing the
space direction and size.
Tap to highlight selected text.
Tap to select formatting options,
such as pen weight and line color.
Space button.
Pen button.

5-5
Chapter 5: Companion Programs
Drawing Mode
In drawing mode, use your stylus to draw on the screen. Gridlines appear
as a guide. When you lift your stylus off the screen after the first stroke,
you’ll see a drawing box indicating the boundaries of the drawing. Every
subsequent stroke within or touching the drawing box becomes part of the
drawing. For more information on drawing and selecting drawings, see
Chapter 2.
Recording Mode
In recording mode, embed a recording into your document. Recordings
are saved as .wav files. For more information on recording, see Chapter 2.
For more information on using Pocket Word, tap and then Help.
Select Shape on the pop-up menu to convert objects to proper shapes.
Resize an object by dragging the
selection handles.
Tap to select formatting options,
such as line weight, fill color, and
line color.
Tap an arrow to see your choices.
Pen button.

5-6
Toshiba Pocket PC e740 User’s Guide
Pocket Excel
Pocket Excel works with Microsoft Excel on your desktop computer to give
you easy access to copies of your workbooks. You can create new work-
books on your device, or you can copy workbooks from your desktop com-
puter to your device. Synchronize workbooks between your desktop com-
puter and your device so that you have the most up-to-date content in both
locations.
Use Pocket Excel to create workbooks, such as expense reports and mile-
age logs. To create a new file, tap , Programs, Pocket Excel, and
then New. A blank workbook appears. Or, if you’ve selected a template for
new workbooks in the Options dialog box, that template appears with
appropriate text and formatting already provided. You can open only one
workbook at a time; when you open a second workbook, you’ll be asked to
save the first. You can save a workbook you create or edit in a variety of
formats, including Pocket Excel (.pxl) and Excel (.xls).
Pocket Excel contains a list of the files stored on your device. Tap a file in
the list to open it. To delete, make copies of, and send files, tap and hold a
file in the list. Then select the appropriate action from the pop-up menu.
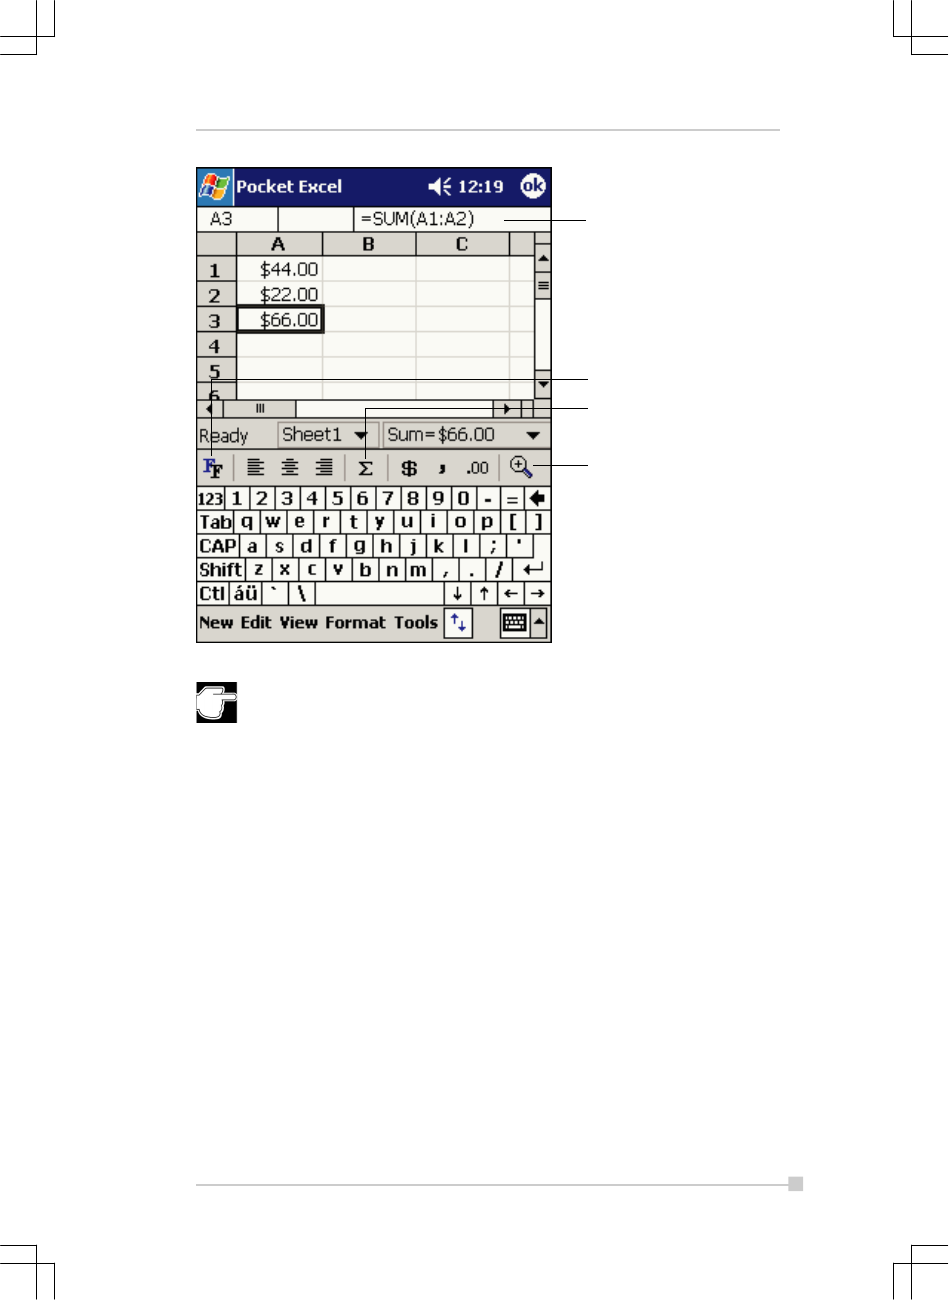
Pocket Excel provides fundamental spreadsheet tools, such as formulas,
functions, sorting, and filtering. To display the toolbar, tap View and then
Toolbar.
5-7
Chapter 5: Companion Programs
If your workbook contains sensitive information, you can protect it
with a password. To do so, open the workbook, tap Edit, and then
Password. Every time you open the workbook, you will need to en-
ter the password, so choose one that is easy for you to remember
but hard for others to guess.
Cell contents appear here as
you enter them.
Format button.
Auto Sum button.
Zoom button.

5-8
Toshiba Pocket PC e740 User’s Guide
Tips for Working in Pocket Excel
Note the following when working in large worksheets in Pocket Excel:
•View in full-screen mode to see as much of your worksheet as pos-
sible. Tap View and then Full Screen. To exit full-screen mode, tap
Restore.
•Show and hide window elements. Tap View and then tap the elements
you want to show or hide.
•Freeze panes on a worksheet. First select the cell where you want to
freeze panes. Tap View and then Freeze Panes. You might want to
freeze the top and leftmost panes in a worksheet to keep row and
column labels visible as you scroll through a sheet.
•Split panes to view different areas of a large worksheet. Tap View
and then Split. Then drag the split bar to where you want it. To re-
move the split, tap View and then Remove Split.
•Show and hide rows and columns. To hide a hidden row or column,
select a cell in the row or column you want to hide. Then tap Format,
then Row or Column, and then Hide. To show a hidden row or col-
umn, tap Tools, then Go To, and then type a reference that is in the
hidden row or column. Then tap Format, then Row or Column, and
then Unhide.
For more information on using Pocket Excel, tap and then Help.
5-9
Chapter 5: Companion Programs
MSN Messenger
MSN® Messenger on your mobile device is an instant messaging program
that lets you:
•See who is online.
•Send and receive instant messages.
•Have instant message conversations with groups of contacts.
To use MSN Messenger, you must have a Microsoft Passport™ account or
a Microsoft Exchange e-mail account. You must have a Passport to use
MSN Messenger Service. If you have a Hotmail® or MSN account, you
already have a Passport. Once you have obtained either a Microsoft Pass-
port or a Microsoft Exchange account, you are ready to set up your ac-
count.
Sign up for a Microsoft Passport account at http://www.passport.com.
Get a free Microsoft Hotmail e-mail address at http://www.hotmail.com.
To switch to MSN Messenger, tap , Programs, and then tap MSN
Messenger.
Setting Up
Before you can connect, you must enter Passport or Exchange account
information.
To set up an account and sign in:
1. In the Tools menu, tap Options .
2. In the Accounts tab, enter your Passport or Exchange account infor-
mation.
3. To sign in, tap the sign-in screen and enter your e-mail address and
password.
If you already use MSN Messenger on your desktop computer, your
contacts will show up on your device without being added again.
5-10
Toshiba Pocket PC e740 User’s Guide
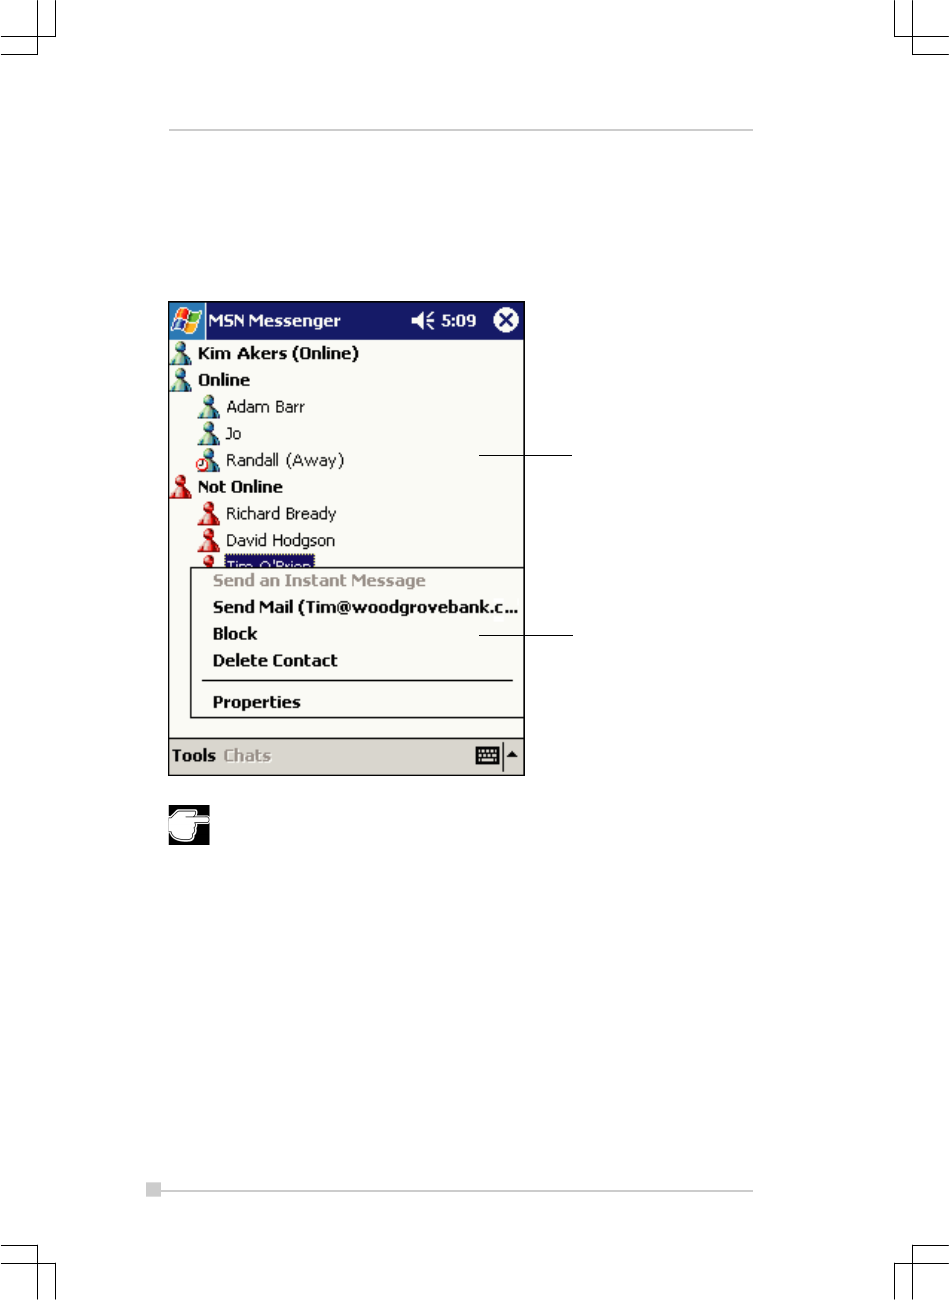
Working with Contacts
The MSN Messenger window shows all of your messenger contacts at a
glance, divided into Online and Not Online categories. From this view, while
connected, you can chat, send ae-mail, block the contact from chatting
with you, or delete contacts from your list using the pop-up menu.
To see others online without being seen, in the Tools menu , tap
My Status and select Appear Offline.
If you block a contact, you will appear offline but will remain on the
blocked contact’s list. To unblock a contact, tap and hold the contact,
then tap Unblock on the pop-up menu.
Tap a contact to start a chat.
Tap and hold to display a pop-
up menu or actions.
5-11
Chapter 5: Companion Programs
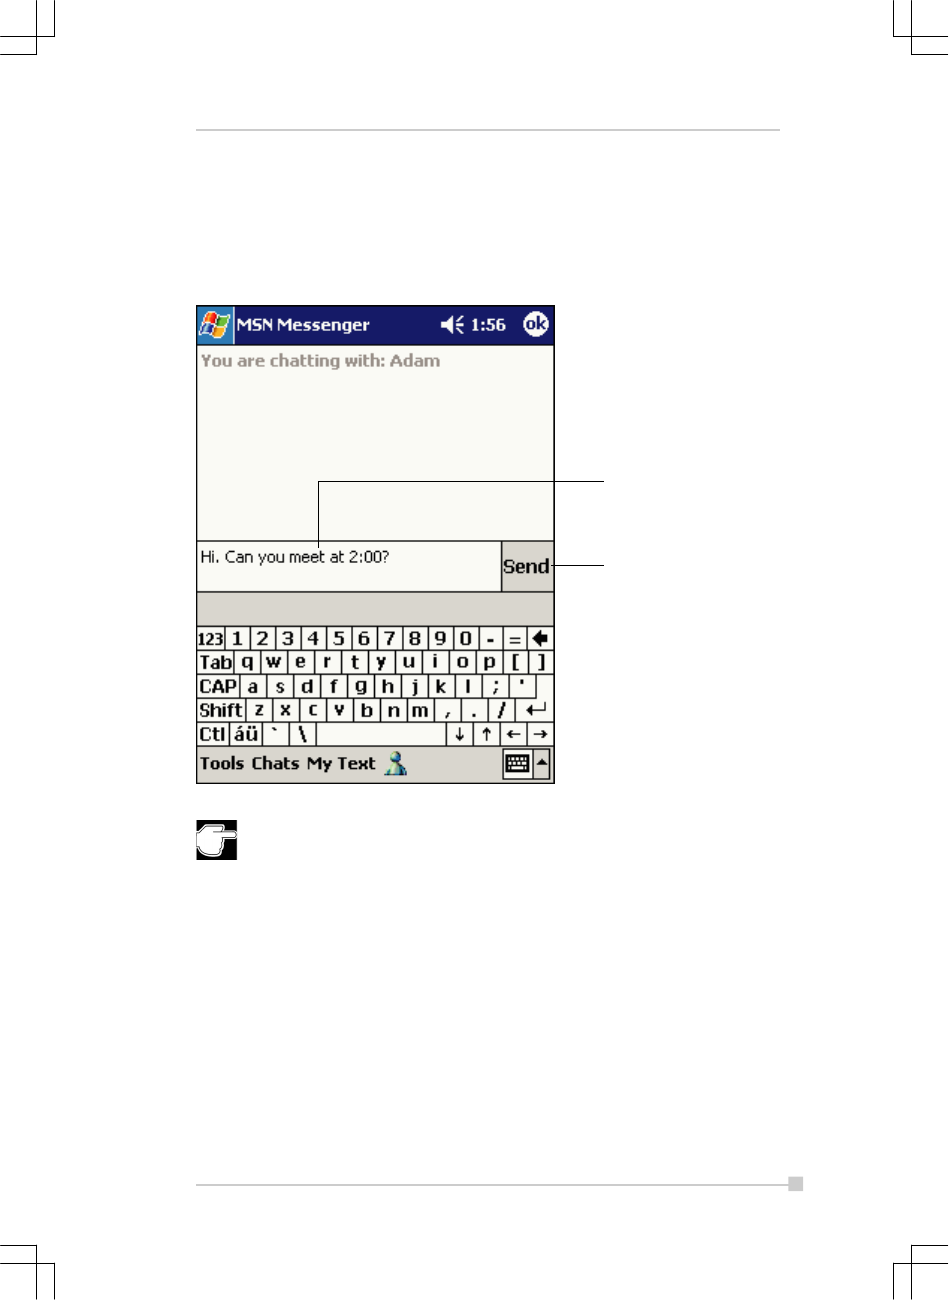
Chatting with Contacts
Tap a contact name to open a chat window. Enter your message in the text
entry area at the bottom of the screen, or tap My Text to enter a preset
message, and tap Send. To invite another contact to a multi-user chat, in
the Tools menu, tap Invite and tap the contact you want to invite.
To switch back to the main window without closing a chat, tap the
Contacts button. To revert back to your chat window, tap Chats and
select the person whom you were chatting with.
Enter message.
Tap to send message.
5-12
Toshiba Pocket PC e740 User’s Guide
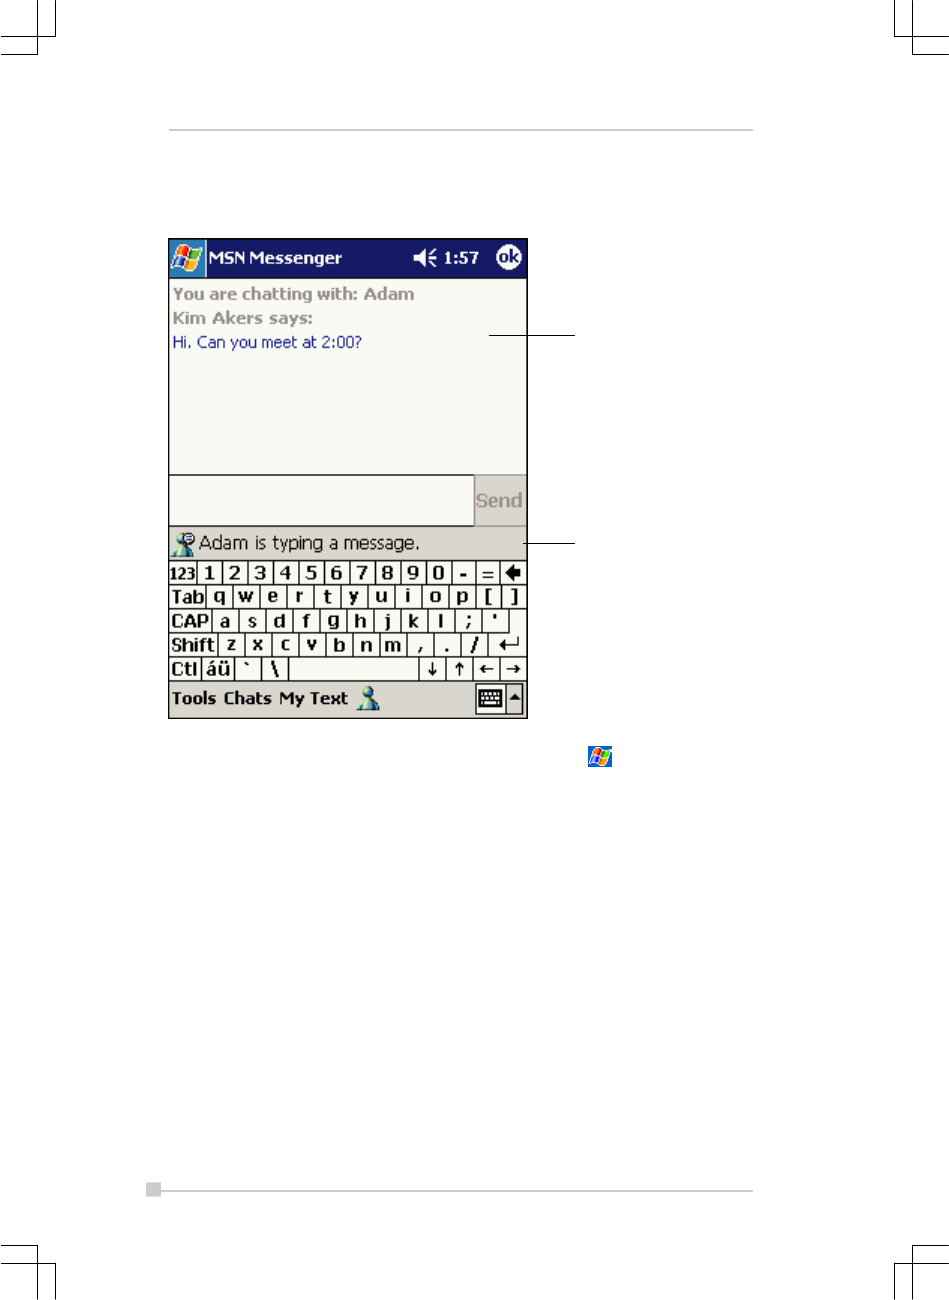
To know if the contact you are chatting with is responding, look for the
message under the text entry area.
For more information on using MSN Messenger, tap and then Help.
View full chat.
View status of the chat.
5-13
Chapter 5: Companion Programs
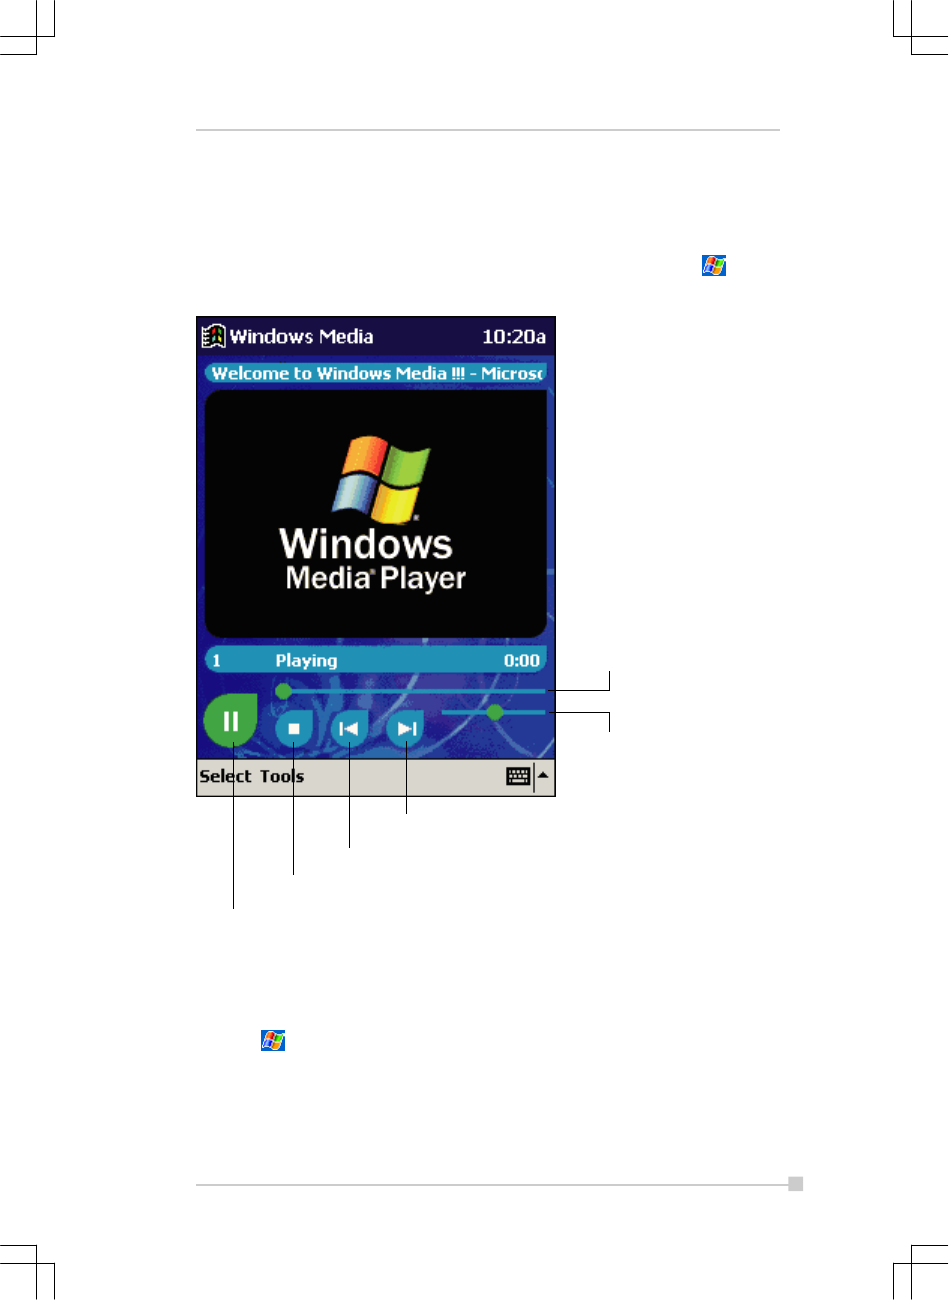
Windows Media Player for Toshiba Pocket PC
Use Microsoft Windows Media Player for Toshiba Pocket PC to play digital
audio and video files that are stored on your device or on a network. To
switch to Windows Media Player for Toshiba Pocket PC, tap , Pro-
grams, and then tap Windows Media.
Use Microsoft Windows Media Player on your desktop computer to copy
digital audio and video files to your Toshiba Pocket PC. You can play Win-
dows Media and MP3 files on your Toshiba Pocket PC.
For more information about using Windows Media Player for Toshiba Pocket
PC, tap , and then tap Help.
Tap to play or pause.
Tap to stop.
Tap to play a previous song.
Tap to skip to the next song.
Tap to adjust volume.
Indicates the progress of the
current track.

5-14
Toshiba Pocket PC e740 User’s Guide
Microsoft Reader
Use Microsoft Reader to read eBooks on your device. Download books to
your desktop computer from your favorite eBook Web site. Then, use
ActiveSync to copy the book files to your activated device. The books ap-
pear in the Reader Library, where you can tap them in the list to open
them.
Each book consists of a cover page, an optional table of contents, and the
pages of the book. You can:
•Page through the book by using the Up/Down control on your device
or by tapping the page number on each page.
•Annotate the book with highlighting, bookmarks, notes, and drawings.
•Search for text and look up definitions for words.
The Guidebook contains all the information you'll need to use the soft-
ware. To open the Guidebook, tap Help on the Reader command bar. Or,
on a book page, tap and hold on the book title, and then tap Help on the
pop-up menu.
To switch to Microsoft Reader, tap , Programs, and then Microsoft
Reader.
Getting Books on Your Device
You can download book files from the Web. Just visit your favorite eBook
retailer and follow the instructions to download the book files.
Sample books and a dictionary are also included in the MSReader folder
in the Extras folder on the Toshiba Pocket PC Companion CD.
Use ActiveSync to download the files from your desktop computer to your
activated device as described in the Read Me file in the MSReader folder.

5-15
Chapter 5: Companion Programs
Using the Library
The Library is your Reader home page; it displays a list of all books stored
on your device or storage card.
To open the Library:
•On the Reader command bar, tap Library.
•On a book page, tap the book title, and then tap Library on the pop-
up menu.
To open a book, tap its title in the Library list.
Tap to select a sort order.
Tap to specify the books you
want to display in the list.
Tap here to navigate to other
parts of the Reader.
Tap to scroll through the Library list.
5-16
Toshiba Pocket PC e740 User’s Guide
Reading a Book
Each book consists of a cover page, an optional table of contents, and the
pages of the book. Navigation options are listed in the bottom portion of
the cover page.
The first time you open a book, you’ll probably want to go to the first page
or to the table of contents, if there is one. Subsequently, whenever you
open the book, you’ll be automatically taken to the last page read.
In addition to the text, each book page includes a page number and book
title.
You can also page through a book by using the Up/Down control on your
device.
Tap to select a navigation option.
Drag to select text and then tap
an option.
Tap arrows to turn the page,
or tap and hold page # to bring up page riffle.

5-17
Chapter 5: Companion Programs
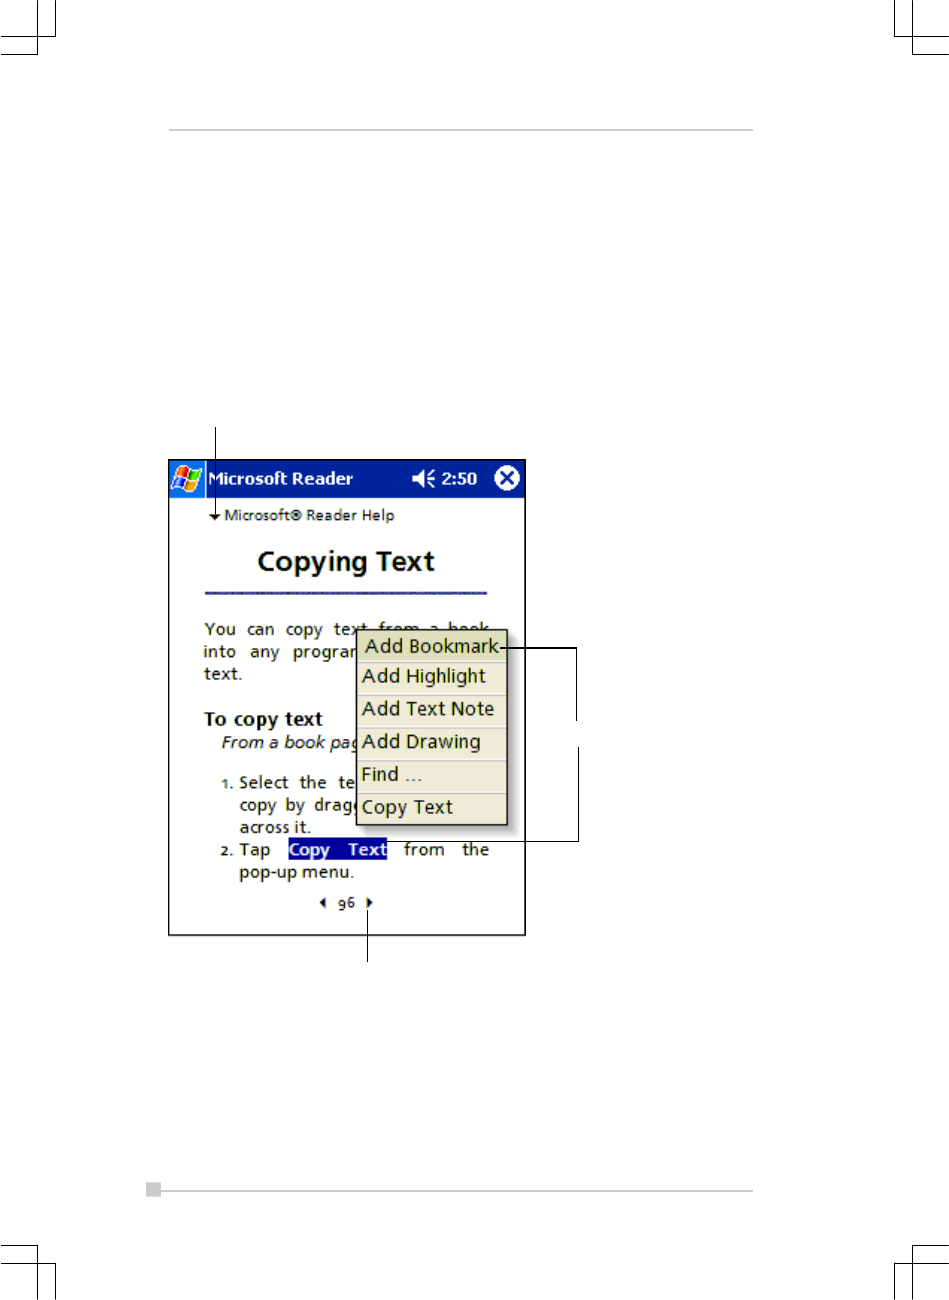
Using Reader Features
Reading a book electronically gives you several options not available with
paper books. These options are available from any book page.
Select text by dragging across the text on the page. Then, tap an option on
the pop-up menu, as described here:
•Search for Text. Find text in a book by tapping Find on the pop-up
menu. Enter the word you want to search for, and tap the desired Find
option. Reader highlights found text on the page. To close Find , tap
outside the box. To return to your original page, tap the title and then
tap Return on the pop-up menu.
•Copy Text. You can copy text from books that support this feature into
any program that accepts text. On a book page, select the text you
want to copy. Then, tap Copy Text on the pop-up menu. The text can
be pasted into the program of your choice.
•Bookmarks. When you add a bookmark to a book, a color-coded book-
mark icon appears in the right margin. You can add multiple book-
marks to a book. Then, from anywhere in the book, tap the bookmark
icon to go to the bookmarked page.
•Highlights. When you highlight text, it appears with a colored back-
ground.
•Notes. When you attach a note to text, you enter the text in a note pad
that appears on top of the book page. A Note icon will display in the
left margin. To show or hide the note, tap the icon.
•Drawings. When you add a drawing, a Drawing icon appears in the
bottom-left corner of the page, and drawing tools appear across the
bottom of the page. Draw by dragging your stylus.
•To see a list of a book’s annotations, including bookmarks, highlights,
text notes, and drawings, tap Annotations Index on the book’s cover
page. You can tap an entry in the list to go to the annotated page.

5-18
Toshiba Pocket PC e740 User’s Guide
Removing a Book
When you finish reading a book, you can delete it to conserve space on
your device. If a copy of the book is stored on your desktop computer, you
can download it again at any time.
To remove a book from your device, tap and hold the title in the Library list,
and then tap Delete on the pop-up menu.

Chapter 6:
Pocket Internet Explorer
Use Microsoft® Pocket Internet Explorer to view Web or WAP pages in
either of these ways:
•During synchronization with your desktop computer, download your
favorite links and mobile favorites that are stored in the Mobile Favor-
ites subfolder in Internet Explorer on the desktop computer.
•Connect to an Internet service provider (ISP) or network and browse
the Web. To do this, you’ll need to create the connection first, as de-
scribed in Chapter 7.
When connected to an ISP or network, you can also download files and
programs from the Internet or intranet.
To switch to Pocket Internet Explorer, tap and then Internet Explorer.
The Mobile Favorites Folder
Only items stored in the Mobile Favorites subfolder in the Favorites folder
in Internet Explorer on your desktop computer will be synchronized with
your device. This folder was created automatically when you installed
ActiveSync.
Favorite Links
During synchronization, the list of favorite links in the Mobile Favorites
folder on your desktop computer is synchronized with Pocket Internet Ex-
plorer on your device. Both computers are updated with changes made to
either list each time you synchronize. Unless you mark the favorite link as
a mobile favorite, only the link will be downloaded to your device, and you
will need to connect to your ISP or network to view the content. For more
information on synchronization, see ActiveSync Help on the desktop com-
puter.

6-2
Toshiba Pocket PC e740 User’s Guide
Mobile Favorites
If you are using Microsoft Internet Explorer 5.0 or later on your desktop
computer, you can download mobile favorites to your device. Synchroniz-
ing mobile favorites downloads Web content to your device so that you
can view pages while you are disconnected from your ISP and desktop
computer.
Use the Internet Explorer plug-in installed with ActiveSync to create mo-
bile favorites quickly.
To create a mobile favorite:
1. In Internet Explorer on your desktop computer, click Tools and then
Create Mobile Favorite.
2. To change the link name, enter a new name in the Name box.
3. Optionally, in Update, select a desired update schedule.
4. Click OK. Internet Explorer downloads the latest version of the page to
your desktop computer.
5. If you want to download the pages that are linked to the mobile favorite
you just created, in Internet Explorer on the desktop computer, right-
click the mobile favorite and then click Properties. In the Download
tab, specify the number of links deep you want to download. To con-
serve device memory, go only one level deep.
6. Synchronize your device and desktop computer. Mobile favorites that
are stored in the Mobile Favorites folder in Internet Explorer are down-
loaded to your device.
If you did not specify an update schedule in step 3, you will need to
manually download content to keep the information updated on your
desktop computer and device. Before synchronizing with your de-
vice, in Internet Explorer on your desktop computer, click Tools and
then Synchronize. You will see the last time content was down-
loaded to the desktop computer, and you can manually download
content if needed.
You can add a button to the Internet Explorer toolbar for creating
mobile favorites. In Internet Explorer on your desktop computer, click
View, Toolbars, and then Customize.

6-3
Chapter 6: Pocket Internet Explorer
To save device memory
Mobile favorites take up storage memory on your device. To minimize the
amount of memory used:
•In the settings for the Favorites information type in ActiveSync op-
tions, turn off pictures and sounds, or stop some mobile favorites from
being downloaded to the device. For more information, see ActiveSync
Help.
•Limit the number of downloaded linked pages. In Internet Explorer on
the desktop computer, right-click the mobile favorite you want to change
and then Properties. In the Download tab, specify 0 or 1 for the
number of linked pages you want to download.
Using AvantGo Channels
AvantGo is a free interactive service that gives you access to personalized
content and thousands of popular Web sites. You subscribe to AvantGo
channels directly from your device. Then, you synchronize your device
and desktop computer, or connect to the Internet to download the content.
For more information, visit the AvantGo Web site.
To sign up for AvantGo:
1. In ActiveSync options on the desktop computer, turn on synchroniza-
tion for the AvantGo information type.
2. In Pocket Internet Explorer on your device, tap the Favorites button to
display your list of favorites.
3. Tap the AvantGo Channels link.
4. Tap the Activate button.
5. Follow the directions on the screen. You will need to synchronize your
device with your desktop computer and then tap the My Channels but-
ton to complete the AvantGo setup.
When synchronization is complete, tap the AvantGo Channels link in your
list of favorites to see a few of the most popular channels. To add or re-
move channels, tap the Add or Remove link.
6-4
Toshiba Pocket PC e740 User’s Guide
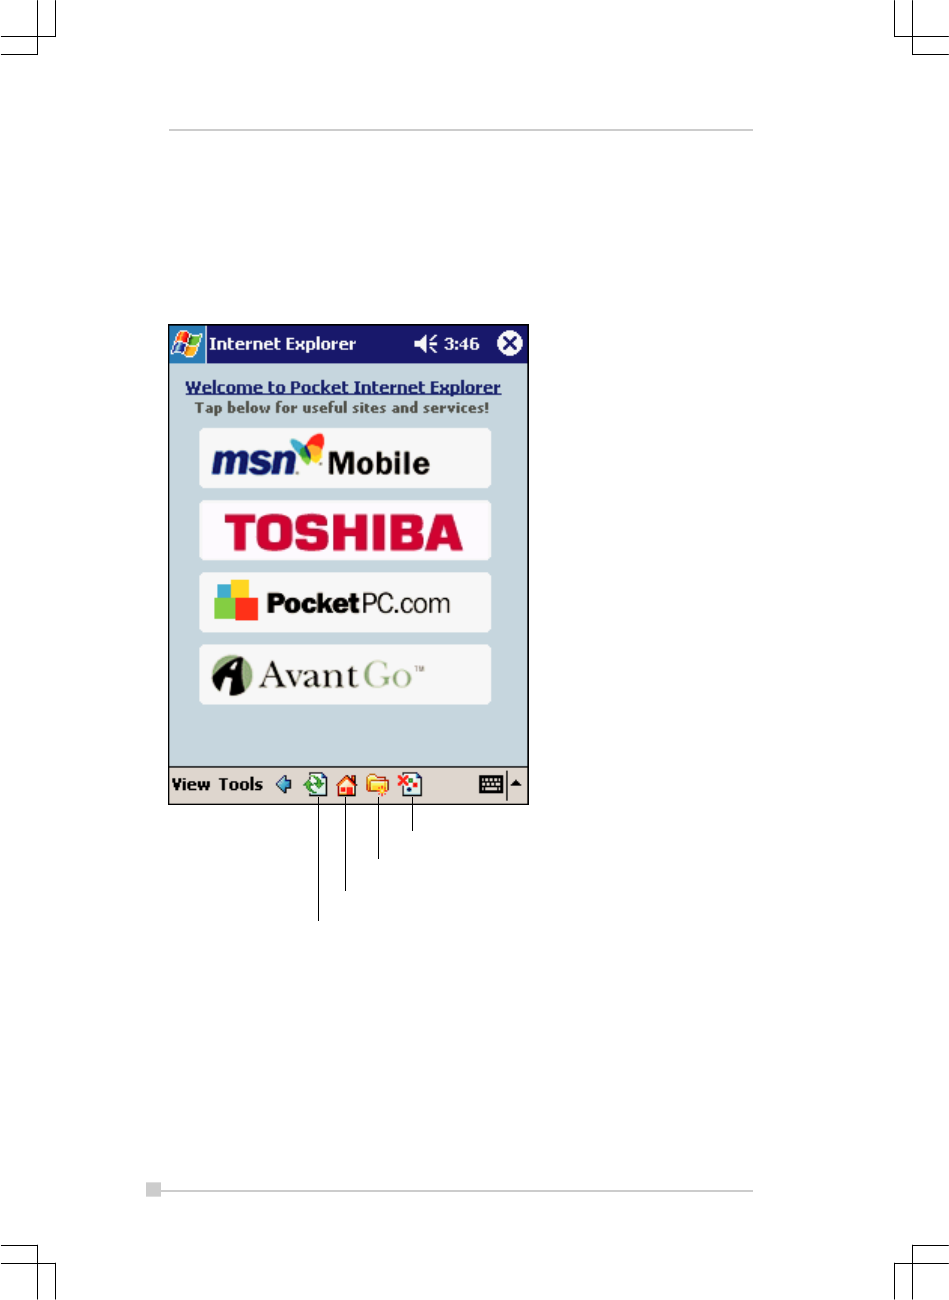
Using Pocket Internet Explorer
You can use Pocket Internet Explorer to browse mobile favorites and chan-
nels that have been downloaded to your device without connecting to the
Internet. You can also connect to the Internet through an ISP or a network
connection and browse the Web.
Hide pictures button.
Favorites button.
Home button.
Refresh button.
6-5
Chapter 6: Pocket Internet Explorer
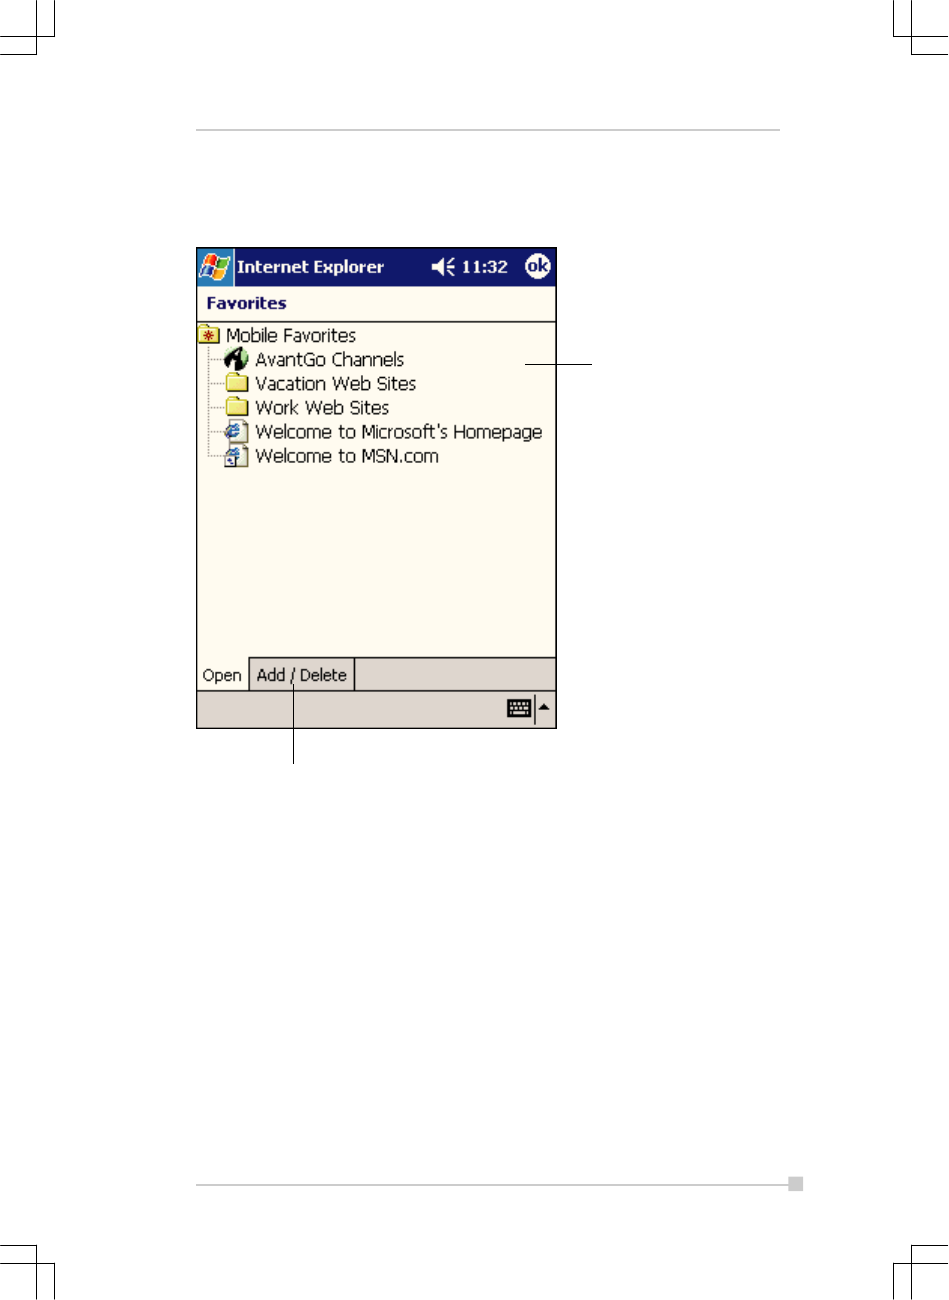
To view mobile favorites and channels:
1. Tap the Favorites button to display your list of favorites.
2. Tap the page you want to view.
You’ll see the page that was downloaded the last time you synchronized
with your desktop computer. If the page is not on your device, the favorite
will be dimmed. You will need to synchronize with your desktop computer
again to download the page to your device, or connect to the Internet to
view the page.
Tap to add or delete a folder or favorite link.
Tap the favorite you want to
view.

6-6
Toshiba Pocket PC e740 User’s Guide
To browse the Internet:
1. Set up a connection to your ISP or corporate network using Connec-
tions, as described in Chapter 7.
2. To connect and start browsing, do one of the following:
•Tap the Favorites button, and then tap the favorite you want to
view.
•Tap View and then Address Bar. In the address bar that ap-
pears at the top of the screen, enter the Web address you want to
visit and then tap Go. Tap the arrow to choose from previously
entered addresses.
To add a favorite link while using the device, go to the page you want
to add, tap and hold on the page, and tap Add to Favorites.

Chapter 7:
Getting Connected
You can use your device to exchange information with other mobile de-
vices as well as your desktop computer, a network, or the Internet. You
have the following connection options:
•Use the infrared (IR) port on your device to send and receive files
between two devices. If this is the method you want to use, see the
following section “Transfer Items Using Infrared.”
•Connect to your Internet service provider (ISP). Once connected, you
can send and receive e-mail messages by using Inbox and view Web
or WAP pages by using Microsoft® Pocket Internet Explorer. The com-
munication software for creating an ISP connection is already installed
on your device. Your service provider will provide software needed to
install other services, such as paging and fax services. If this is the
method you want to use, see “Connect to an Internet Service Pro-
vider” later in this chapter.
•Connect to the network at your company or organization where you
work. Once connected, you can send and receive e-mail messages by
using Inbox, view Web or WAP pages by using Pocket Internet Ex-
plorer, and synchronize with your desktop computer. If this is the method
you want to use, see “Connect to Work” later in this chapter.
•Connect to your desktop computer to synchronize remotely. Once con-
nected, you can synchronize information such as your Pocket Outlook
information. If this is the method you want to use, see ActiveSync Help
on your desktop computer or Connections Help on the device.
Transfer Items Using Infrared
Using infrared (IR), you can send and receive information, such as con-
tacts and appointments, between two devices.
To send information:
1. Switch to the program where you created the item you want to send
and locate the item in the list.
2. Align the IR ports so that they are unobstructed and within a close
range.
3. Tap and hold the item, and tap Beam Item on the pop-up menu.
7-2
Toshiba Pocket PC e740 User’s Guide
You can also send items, but not folders, from File Explorer. Tap and
hold the item you want to send, and then tap Beam File on the pop-
up menu.
To receive information:
1. Align the IR ports so that they are unobstructed and within a close
range.
2. Have the owner of the other device send the information to you. Your
device will automatically receive it.
Connect to the Internet
You can connect to your ISP, and use the connection to send and receive
e-mail messages and view Web or WAP pages.
You can connect to work in one of two ways:
•Create a modem connection. If this is the method you want to use, see
“To create a modem connection to an ISP.”
•Use an Ethernet card and a net tap to connect to the network. If this is
the method you want to use, see “To create an Ethernet connection to
an ISP.”
To create a modem connection to an ISP:
1. Obtain the following information from your ISP: ISP dial-up access tele-
phone number, user name, password, and TCP/IP settings. Some ISPs
require information in front of the user name, such as MSN/username.
2. If your device does not have a built-in modem, install a modem card,
or use or use a NULL modem cable and appropriate adapters to con-
nect an external modem to your device through the serial port.
3. Tap and then Settings. In the Connections tab, tap Connections.
Under The Internet settings, select Internet Settings and tap Modify.
4. In the Modem tab, tap New.
5. Enter a name for the connection, such as “ISP Connection.”
6. In the Select a modem list, select your modem type. If your modem
type does not appear, try reinserting the modem card. If you are using
an external modem that is connected to your device with a cable, se-
lect Hayes Compatible on COM1.
7. You should not need to change any settings in Advanced. Most ISPs
now use a dynamically-assigned address. If the ISP you are connect-
ing to does not use a dynamically-assigned address, tap Advanced
and then the TCP/IP tab, and enter the address. When finished, tap
OK and then Next.

7-3
Chapter 7: Getting Connected
8. Enter the access phone number, and tap Next.
9. Select other desired options, and tap Finish.
10. In the Dialing Locations tab, specify your current location and phone
type (most phone lines are tone). These settings will apply to all con-
nections you create.
To start the connection, simply start using one of the following programs.
Your device will automatically begin connecting. Once connected, you can:
•Send and receive e-mail messages by using Inbox. Before you can
use Inbox, you need to provide the information it needs to communi-
cate with the e-mail server. For specific instructions, see “Connect
Directly to an E-mail Server,” later in this chapter.
•Visit Web and WAP pages by using Pocket Internet Explorer. For more
information, see Chapter 6.
•Send and receive instant messages with MSN Messenger. For more
information, see “MSN Messenger” in Chapter 5.
To create an Ethernet connection to an ISP:
1. You do not need to create a new connection on your device. Instead,
you must purchase and configure an Ethernet card that is compatible
with your device.
2. Obtain the following information from your ISP: user name, password,
and domain name.
3. Insert the Ethernet card into your device. For instructions on inserting
and using the Ethernet card, see the owner’s manual for the card.
4. The first time you insert the card, Network Settings will appear auto-
matically so that you can configure the Ethernet card. Most networks
use DHCP, so you should not have to change these settings unless
your network administrator instructs you to do so. Tap OK. (If it does
not appear or to change settings later, tap and then Settings. In
the Connections tab, tap Network, tap the adapter you want to
change, and then tap Properties.)
5. Connect the Ethernet card to the network by using a network cable.
For information, see your owner's manual.
6. Tap , Settings, Connections tab, and then Connections. From
the My network card connects to list, select Internet.
To start the connection, simply start using one of the programs listed in the
preceding section. Once connected, you can perform the same activities
as listed in the preceding section.