FreeWave Technologies 6231812519 900 MHz Spread Spectrum Device User Manual 10072258rev0 qxp
FreeWave Technologies Inc. 900 MHz Spread Spectrum Device 10072258rev0 qxp
Contents
- 1. manual instruction manual
- 2. users manual
- 3. Users Manual
- 4. Users Manual per CRN30797
Users Manual per CRN30797

Sirius®Wireless
Link and
SAFECONNECTTM
Wireless Bridge
Instruction Manual
THIS MANUAL MUST BE CAREFULLY READ BY ALL INDIVIDUALS WHO HAVE OR WILL
HAVE THE RESPONSIBILITY FOR USING OR SERVICING THE PRODUCT. Like any piece
of complex equipment, this instrument will perform as designed only if it is used and serv-
iced in accordance with the manufacturer’s instructions. OTHERWISE, IT COULD FAIL TO
PERFORM AS DESIGNED AND PERSONS WHO RELY ON THIS PRODUCT FOR THEIR
SAFETY COULD SUSTAIN SEVERE PERSONAL INJURY OR DEATH.
The warranties made by Mine Safety Appliances Company with respect to the product are
voided if the product is not used and serviced in accordance with the instructions in this
manual. Please protect yourself and others by following them. We encourage our cus-
tomers to write or call regarding this equipment prior to use or for any additional infor-
mation relative to use or repairs.
In North America, to contact your nearest stocking location, dial toll-free 1-800-MSA-INST
To contact MSA International, dial 1-412-967-3354
© MINE SAFETY APPLIANCES COMPANY 2006 - All Rights Reserved
This manual is available on the internet at www.msanet.com
Manufactured by
MSA NORTH AMERICA
P.O. Box 427, Pittsburgh, Pennsylvania 15230
(L) Rev 0 10072258
"" WARNING

i
MSA Instrument Warranty
1. Warranty- Seller warrants that this product will be free from
mechanical defect or faulty workmanship for a period of one (1)
year, provided it is maintained and used in accordance with Seller's
instructions and/ or recommendations. This warranty does not
apply to expendable or consumable parts whose normal life
expectancy is less than one (1) year such as, but not limited to,
non-rechargeable batteries, filter, lamps, fuses etc. The Seller shall
be released from all obligations under this warranty in the event
repairs or modifications are made by persons other than its own or
authorized service personnel or if the warranty claim results from
physical abuse or misuse of the product. No agent, employee or
representative of the Seller has any authority to bind the Seller to
any affirmation, representation or warranty concerning the goods
sold under this contract. Seller makes no warranty concerning
components or accessories not manufactured by the Seller, but will
pass onto the Purchaser all warranties of manufacturers of such
components. THIS WARRANTY IS IN LIEU OF ALL OTHER
WARRANTIES, EXPRESSED, IMPLIED OR STATUTORY, AND IS
STRICTLY LIMITED TO THE TERMS HEREOF. SELLER
SPECIFICALLY DISCLAIMS ANY WARRANTY OF
MERCHANTABILITY OR OF FITNESS FOR A PARTICULAR
PURPOSE.
2. Exclusive Remedy- It is expressly agreed that Purchaser's sole
and exclusive remedy for breach of the above warranty, for any
tortious conduct of Seller, or for any other cause of action, shall be
the repair and/ or replacement at Seller's option, of any equipment
or parts thereof, which after examination by Seller is proven to be
defective. Replacement equipment and/ or parts will be provided at
no cost to Purchaser, F.O.B. Seller's Plant. Failure of Seller to
successfully repair any nonconforming product shall not cause the
remedy established hereby to fail of its essential purpose.
3. Exclusion of Consequential Damage- Purchaser specifically
understands and agrees that under no circumstances will seller be
liable to purchaser for economic, special, incidental or
consequential damages or losses of any kind whatsoever, including
but not limited to, loss of anticipated profits and any other loss
caused by reason of non-operation of the goods. This exclusion is
applicable to claims for breach of warranty, tortious conduct or any
other cause of action against seller.

General Warnings
1. Each instrument described in this manual must be installed,
operated and maintained in strict accordance with its labels,
cautions, warnings, instructions, and within the limitations stated.
2. Exposure to some chemicals may degrade the integrity of the
enclosure. Inspect periodically for any sign of attack or
degradation.
3. Use only genuine MSA replacement parts when performing any
maintenance procedures provided in this manual. Failure to do so
may seriously impair instrument performance. Repair or alteration
of the unit, beyond the scope of these maintenance instructions, or
by anyone other than an authorized MSA service technician, could
cause the product to fail to perform as designed, and persons who
rely on this product for their safety could sustain severe personal
injury or death.
4. Ensure the gas sample and instrument are at the same
temperature; otherwise, condensation will form, possibly clogging
or filling the sample line.
5. Avoid static buildup on enclosure. Be sure any static buildup has
been discharged before entering a hazardous area.
6. Do not set the SAFECONNECT Wireless Belt-Bridge as a repeater.
Failure to follow the above can result in serious personal
injury or death.
""WARNING
ii

Table of Contents
Figure 1. Sirius Wireless Link . . . . . . . . . . . . . . . . . . .1
Figure 2. Sirius Unit with Wireless Link in One Boot .1
General Description . . . . . . . . . . . . . . . . . . . . . . . . . . . . . .1
Sirius Wireless Link . . . . . . . . . . . . . . . . . . . . . . . . . . . . . .1
The SAFECONNECT Belt Bridge . . . . . . . . . . . . . . . . . . .2
Figure 3. Sirius Wireless Link Opened for Battery
Replacement . . . . . . . . . . . . . . . . . . . . . . . . . . .2
Figure 4. The SAFECONNECT Belt Bridge . . . . . . . .2
"WARNING . . . . . . . . . . . . . . . . . . . . . . . . . . . . . . .3
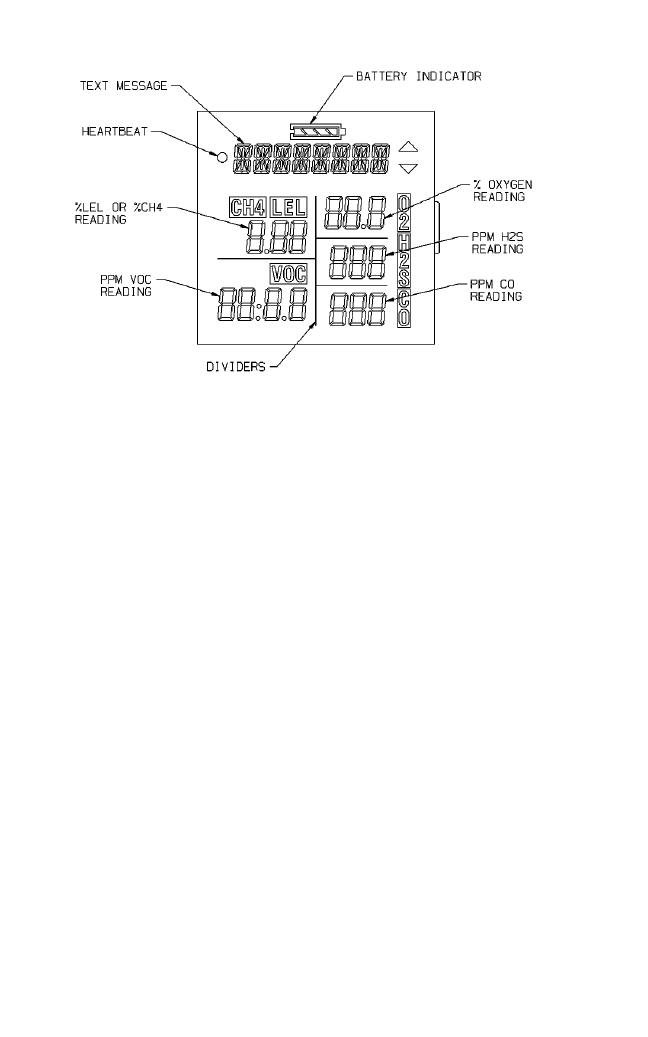
Understanding the Display . . . . . . . . . . . . . . . . . . . . . . .4
Table 1. Power LED Display Logic . . . . . . . . . . . . . .4
Figure 5. Sirius and Belt Bridge with Cradle Cover
and Strap . . . . . . . . . . . . . . . . . . . . . . . . . . . . . .4
Table 2. COMM LED Display Logic . . . . . . . . . . . . . .5
Table 3. GPS LED Display Logic . . . . . . . . . . . . . . .5
Table 4. Hex Rotary Switch Settings . . . . . . . . . . . . .5
Batteries . . . . . . . . . . . . . . . . . . . . . . . . . . . . . . . . . . . . .6
Figure 6. Rotary Switch in Battery Cradle . . . . . . . . .6
Figure 7. Rotary Switch . . . . . . . . . . . . . . . . . . . . . . . .6
Figure 8. Unit with Battery Cover Removed . . . . . . . .6
Table 5. Approximate Runtime Operation
under Typical Operating Conditions . . . . . . . . .7
Radio Information . . . . . . . . . . . . . . . . . . . . . . . . . . . . . .7
FCC Notification . . . . . . . . . . . . . . . . . . . . . . . . . . . . . . .7
Sirius Instrument Compatibility . . . . . . . . . . . . . . . . . . . . .7
Unpacking the Units . . . . . . . . . . . . . . . . . . . . . . . . . . . . .8
Getting Started . . . . . . . . . . . . . . . . . . . . . . . . . . . . . . . . . .8
Figure 9. Heartbeat Segment Poll Indicator . . . . . . . .9
Table 6. Troubleshooting Guidelines . . . . . . . . . . . .10
Table 7. Replacement Parts List . . . . . . . . . . . . . . .11
iii
1
General Description
The Sirius Wireless Link, combined with the SAFECONNECT Wireless
Belt Bridge, provide the following additional features to the Sirius
MultiGas Detector:
• Wireless connectivity
• Interface to the MSA SAFESITE®Multi-Threat Detection System.
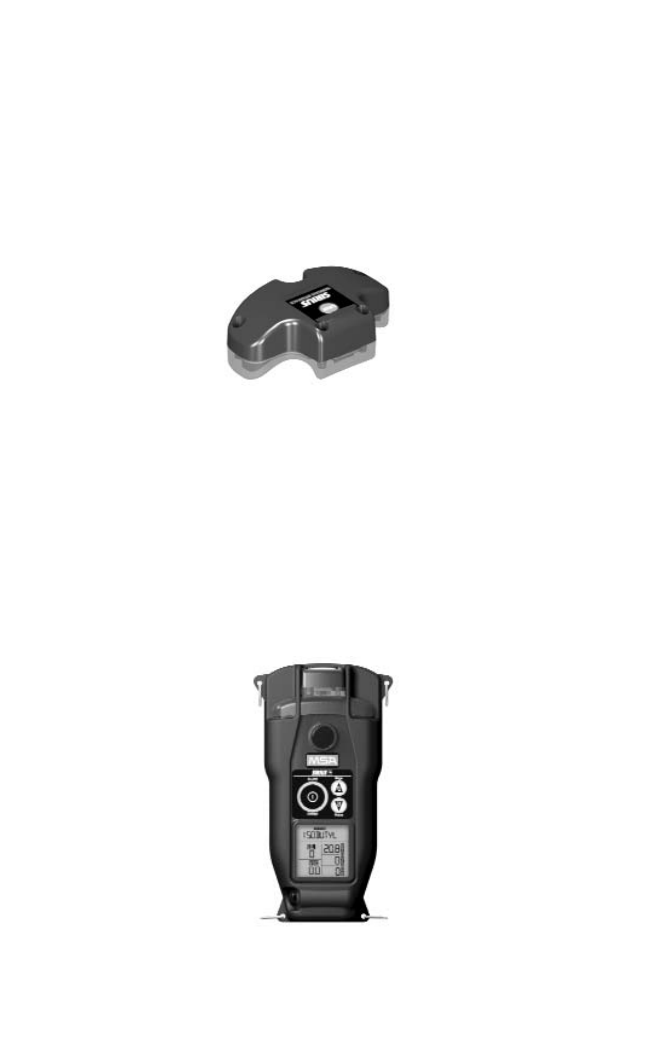
Sirius Wireless Link
The Sirius Wireless Link:
• Interfaces with the Sirius MultiGas Detector via the instrument’s
infrared port
• Is equipped with a Bluetooth device that allows for connectivity to
the SAFECONNECT Belt Bridge
• Is combined with the Sirius MultiGas Detector by installing both
devices in the extended Sirius Wireless rubber boot.
Figure 2. Sirius Unit with Wireless Link in One Boot
Figure 1. Sirius Wireless Link
• Links to the SAFECONNECT Belt Bridge by momentarily pressing
the Link button
• Pressing the Link button for three seconds resets the
Bluetooth link.
• Uses a CR2477 1000 mAH replaceable coin cell battery
• Battery life under typical operation is 18 months.
NOTE: Typical operation would consist of 10 operation hours per
day, five days per week.
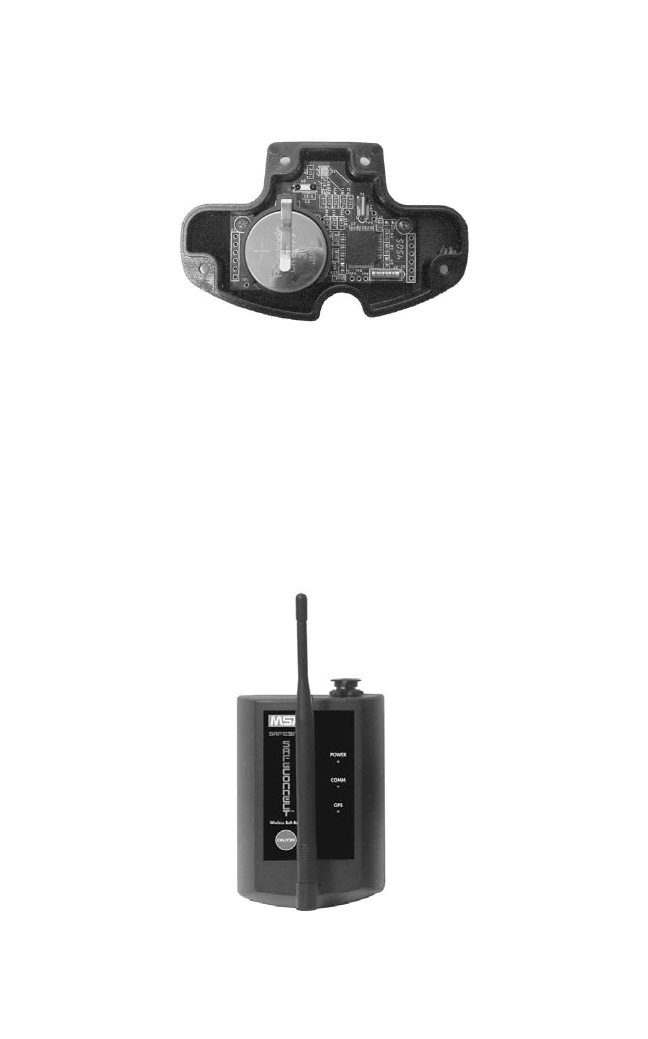
The SAFECONNECT Belt Bridge
Figure 4. The SAFECONNECT Belt Bridge
Figure 3. Sirius Wireless Link Opened for
Battery Replacement
2

The SAFECONNECT Belt Bridge:
• Is equipped with a Bluetooth device that accepts a connection
request from a Sirius Wireless link device within six feet line-of-
sight distance
• Has a radio transceiver that responds to poll requests from the
SAFECOMTM Command Center of the SAFESITE Multi-Threat
Detection System
• Is equipped with a GPS global positioning device
NOTE: The device does not usually detect a signal position
indoors, unless located near a window.
• Is designed to be belt-mounted or carried over the shoulder via the
included case and strap, with the antenna facing away from the
user’s body
Wearing the SAFECONNECT Belt Bridge with the antenna
facing the user will degrade performance and may subject
the user to levels of emissions that exceed those allowed by
the FCC.
• Is equipped with an ON/OFF button
• When the unit is OFF, press the ON/OFF button for
approximately one second until the LEDs turn ON.
• When the unit is ON, press the ON/OFF button for
approximately five seconds until the LEDs turn OFF.
• Is equipped with three multi-color LEDs (TABLES 1 through 3)
• Must be configured with the corresponding network ID and
frequency key to match the SAFESITE System with which it is
intended to operate
• Must be set to a unique address for each device using the hex
rotary switch located behind the batteries. The unit address is a
function of the switch setting (TABLE 4).
""WARNING
3
Understanding the Display
Table 1. Power LED Display Logic
LED DESCRIPTION
Green Both Sirius Wireless Link and SAFECONNECT batteries are good
Yellow Sirius Wireless Link battery is low
(The unit must be linked for this information to be displayed)
Red SAFECONNECT battery is low (highest priority condition)
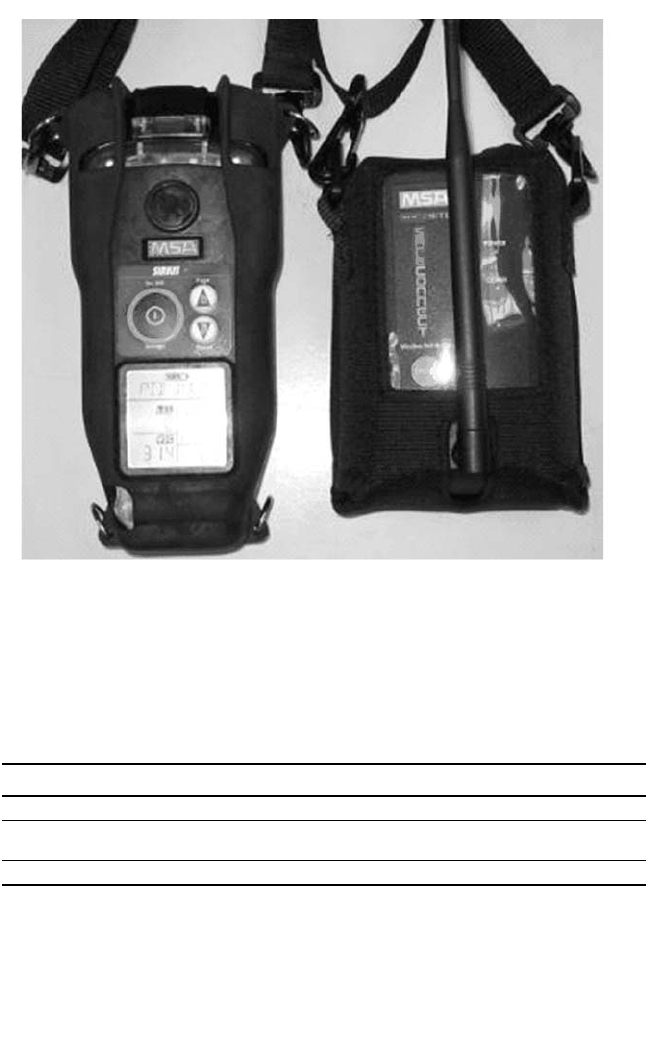
Figure 5. Sirius and Belt Bridge with Cradle Cover and Strap
4

Table 2. COMM LED Display Logic
LED DESCRIPTION
Green All links are established
Yellow Loss of communications to Sirius Wireless Link or Sirius instrument
Red Loss of communications to SAFECOM (highest priority condition)
Table 3. GPS LED Display Logic
Green Sufficient signal for 3D location
Yellow Sufficient signal for 2D location
Red Insufficient signal
OFF No GPS signal, GPS device inoperative
Table 4. Hex Rotary Switch Settings
SWITCH POSITION DEVICE ADDRESS
01
12
23
34
45
56
67
78
89
910
A11
B12
C13
D13
E15
F16
5
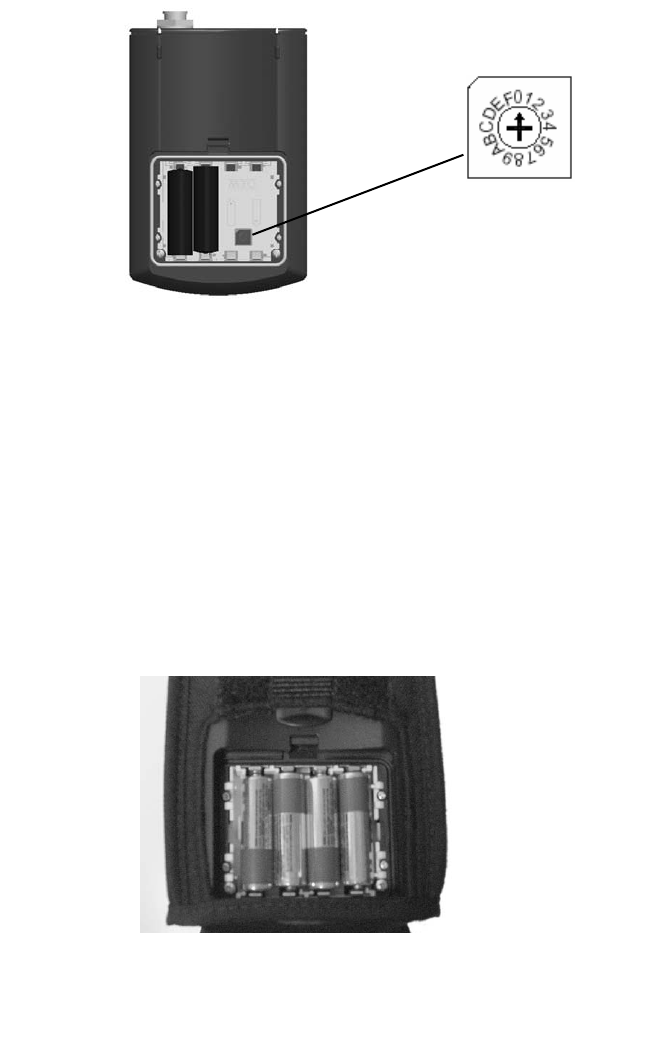
Batteries
The SAFECONNECT Belt Bridge uses four user-replaceable AA
batteries.
• To replace batteries, remove Belt Bridge from carrying case and
then remove battery cradle cover
Figure 8. Unit with Battery Cover Removed
Figure 6.
Rotary Switch in Battery Cradle
6
Figure 7.
Rotary Switch

Table 5. Approximate Runtime Operation
under Typical Operating Conditions
BATTERY TYPE TYPICAL RUN TIME
Rechargeable NIMH 12 Hours
NOTE: Handle and dispose of batteries according to the
manufacturer's recommendations.
NOTE: If you choose to use another battery type, Energizer E2L91
is recommended. With other batteries, the SAFECOM will
read FULL/100% while running and COMM Error without
warning when batteries no longer have useful life.
Radio Information
This device contains transmitter modules FCC ID: KNY-6
231812519 and FCC ID: POOWML-C30XX The device complies
with Part 15 of the FCC rules.
FCC Notification
• This radio complies with part 15 of the FCC rules.
• Operation is subject to the following two conditions:
1) This device may not cause harmful interference.
2) This device must accept any interference received, including
interference that may cause undesired operation.
• The radio has a maximum transmitted output power of 955 mW.
• The device has been tested and meets the FCC SAR
requirements.
Sirius Instrument Compatibility
• The Sirius Wireless Link is designed to operate with any sirius
instrument.
• Operation in direct sunlight may be affected for any instrument with
a date code of that prior to F06.
• Label (P/N 10074834) can be used to add solar immunity to any
Sirius instrument with a date code earlier than F06.
• Install the label according to the instructions provided with
the label.
7

Unpacking the Units
1. Carefully remove components from packing to avoid damaging
sensitive electronic components
2. Search through packing material and inside all containers to
prevent discarding usable or valuable parts.
Getting Started
1. Install the Sirius MultiGas Instrument in the extended rubber boot.
2. Install the Sirius Wireless Link in the provided area at the top of the
instrument.
3. Verify that the SAFECONNECT belt Bridge has a unique device
address to avoid communications conflicts.
By factory default, units are preset in descending order (i.e. 16, 15,
14, 13, etc.) to avoid conflicts with existing systems.
4. Turn ON the Sirius Instrument using the ON/OFF/ACCEPT button
on the unit.
• Wait for the instrument to cycle through the power ON
sequence and diagnostic procedures.
5. Turn ON the SAFECONNECT Wireless Belt Bridge by pressing the
ON/OFF button for approximately one second, until all three LEDs
are green.
6. Observe the power-ON LED sequence; all LEDs are green,
then orange, and then red.
7. Verify that the power LED is green.
• The Comm LED turns orange when a link is established to the
SAFESITE Multi-Threat detection system.
• The Wireless Link and SAFECONNECT Wireless Belt Bridge
must be located within six feet of one another.
8. Press the link button on the Sirius Wireless Link Device.
• The Comm LED on the SAFECONNECT Belt bridge turns
green when the link is established.
• Observe that the Sirius Wireless Link is polling the instrument:
• Sirius Version 1.0 Firmware: Red LEDs flash alternately
• Sirius Version 1.2 Firmware and above: Heartbeat segment
flashes rapidly during poll (FIGURE 8).
8
• Sirius instrument firmware version is displayed on
power-up sequence.
• The GPS LED changes from red, to orange, to green as a
location lock is established and the number of satellites
detected increases; this typically occurs:
• three minutes from initial operation after replacing batteries
• 30 seconds from subsequent starts.
• The system is now operational.
NOTE: Refer to the Sirius MultiGas Detector and the SAFESITE
Multi-Threat Detection System manuals (P/Ns 10048887 &
10057028, respectively) for additional information.
Figure 9. Heartbeat Segment Poll Indicator
9

Table 6. Troubleshooting Guidelines
CONDITION POSSIBLE CAUSE POSSIBLE CORRECTIVE ACTION
Power LED on Low SAFECONNECT Replace Belt Bridge batteries
SAFECONNECT Belt batteries
Bridge is RED
POWER LED on Sirius Wireless Link Replace Wireless Link battery
SAFECONNECT Belt battery is low
Bridge is ORANGE
POWER LED on Failure to press the Press the ON/OFF button until all
SAFECONNECT ON/OFF button for three LEDs turn green
Belt Bridge is OFF a full second
Low batteries Replace batteries
Unit inoperative Return unit to factory for repair
COMM LED on Absence of Bluetooth Momentarily press the LINK button
SAFECONNECT Belt link between Wireless while both devices are within range
Bridge is ORANGE Link and Belt Bridge
Reset Wireless Link by pressing
LINK button for five seconds;
then, attempt to establish link
Replace Wireless Link battery and
attempt to establish LINK
Absence of link between Wireless Link should be seated or
Wireless LINK and mated properly with Sirius
Sirius instrument instrument in boot
At cold temperatures Cycle power on Sirius instrument to
(<0°C) loss of communi- reinitialize communication.
cation can occur Wear Sirius instrument close to body
to keep it warm.
Sirius instrument is OFF Turn instrument ON, wait until
start-up routine is complete, and
attempt to establish LINK
Direct, bright sunlight on Ensure that provided MSA label is
IRDA communication installed at top of Sirius unit and
from Sirius to Sirius providing sunlight shield
Wireless Link can cause
loss of communication
COMM LED on SAFECOM unit is OFF Turn SAFECOM unit ON
SAFECONNECT
Belt Bridge is RED
(Belt Bridge is not
connected to
SAFESITE network)
Incorrect network ID Return unit to factory for proper
and/or frequency key on configuration
Belt Bridge
Belt Bridge out of Belt Bridge will automatically
network range reconnect when it is in network
range
Radio inoperative Return unit to factory for repair
10

11
Table 7. Replacement Parts List
DESCRIPTION MSA PART NO.
Belt Bridge Carrying Case 10070612
Belt Bridge Battery, Lithium, 1.5V AA 655832
Belt Bridge Radio Antenna 10074354
Wireless Link Battery, CR2477, 3 Volt 10070121
Sirius Extended Rubber Boot 10070903
IR Sun Shield
(for instruments with a date code prior to F06) 10074834
Four Rechargeable Batteries and Charger 10072962