Fuji Film 02000002 Wireless LAN Module User Manual 00 LX22 OM 200 EN indb
Fuji Film Corporation Wireless LAN Module 00 LX22 OM 200 EN indb
Contents
[STC]User Manual_Part II
26
The
The
DISP/BACK
DISP/BACK
Button
Button
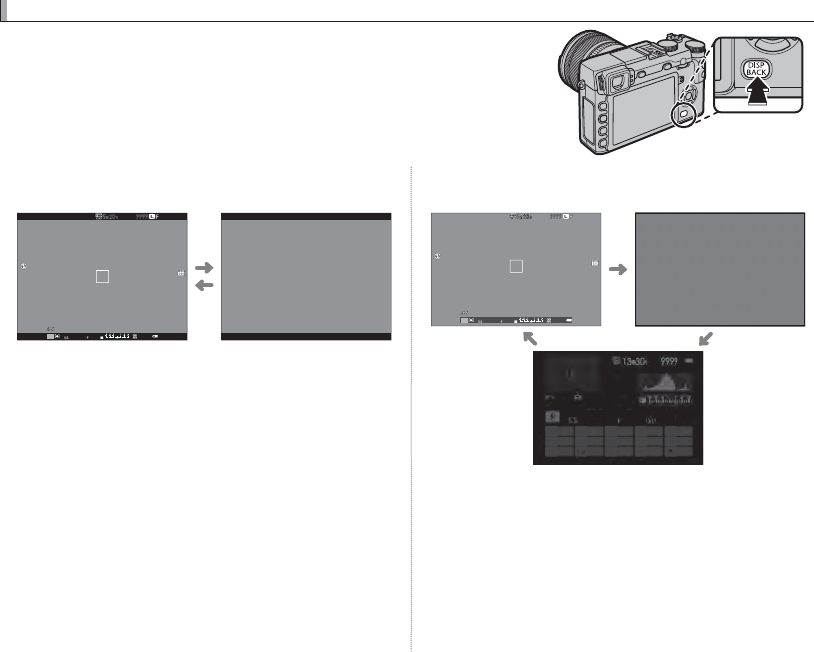
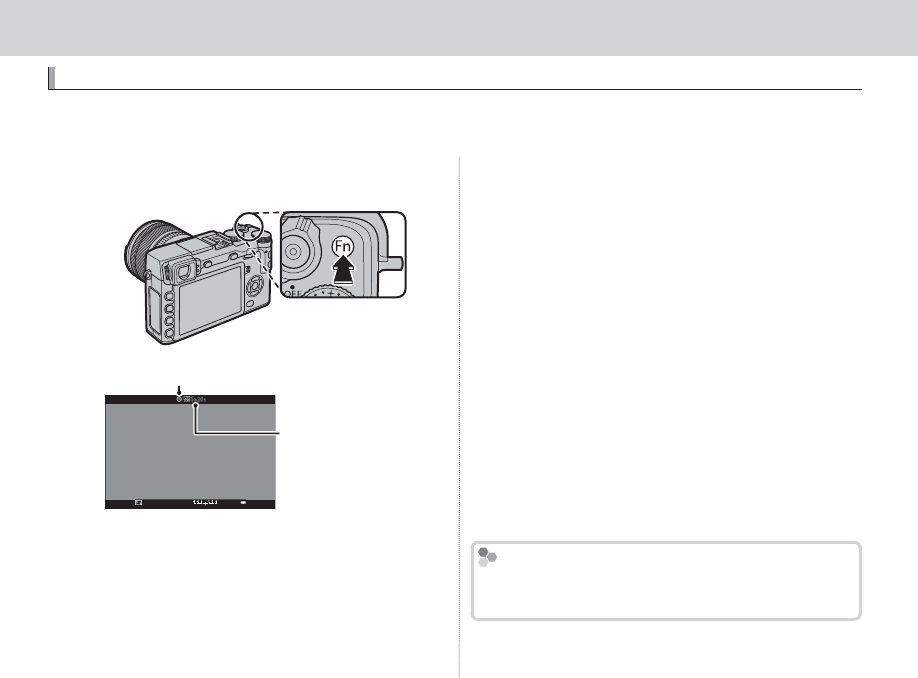
The DISP/BACK button controls the display of indicators in the view-
nder and LCD monitor.
■View nder: Shooting
Standard Information o
P
5.6 4004000
■LCD Monitor: Shooting
Standard Information o
P
5.6 4004000
5.6 400
4000
Info display

27
First Steps
The DISP/BACK Button
■Customizing the Standard Display
To choose the items shown in the standard display:
1
Display standard indicators.
Press the DISP/BACK button until standard indicators are displayed.
2
Select DISP. CUSTOM SETTING.
Select A SCREEN SET-UP> DISP. CUSTOM SETTING in the setup menu.
3
Choose items.
Highlight items and press MENU/OK to select or deselect.
• FRAMING GUIDELINE
• ELECTRONIC LEVEL
• FOCUS FRAME
• AF DISTANCE INDICATOR
• MF DISTANCE INDICATOR
• HISTOGRAM
• SHOOTING MODE
• APERTURE/S-SPEED/ISO
• INFORMATION BACKGROUND
• EXPOSURE COMPENSATION
• FOCUS MODE
• PHOTOMETRY
• SHUTTER TYPE
• FLASH
• CONTINUOS MODE
• DUAL IS MODE
• WHITE BALANCE
• FILM SIMULATION
• DYNAMIC RANGE
• FRAMES REMAINING
• IMAGE SIZE/QUALITY
• MOVIE MODE & REC. TIME
• BATTERY LEVEL
4
Save changes.
Press DISP/BACK to save changes.
5
Exit the menus.
Press DISP/BACK as needed to exit the menus and return to the shooting display.
RSee page 8 for the locations of these items in the displays.

28
The DISP/BACK Button
Virtual Horizon
Virtual Horizon
Selecting ELECTRONIC LEVEL displays a virtual horizon. The camera is level when the two
lines overlap.
RThe virtual horizon may not be displayed if the camera lens is pointed up or down.
P
■View nder/LCD Monitor: Playback
Standard Information o Info display Favorites
12/31/2050 10:00 AM
1/4000
1/4000
+21/3
+21/3
400
400
5.6
5.6
12/31/2050 10:00 AM
NEXT
1/4000 5.6 400 +21/3
12/31/2050 10:00 AM
FAVORITES
Histograms
Histograms
Histograms show the distribution of tones in the im-
age. Brightness is shown by the horizontal axis, the
number of pixels by the vertical axis.
Shadows Highlights
No. of pixels
Pixel brightness
Optimal exposure: Pixels are distrib-
uted in an even curve through-
out the tone range.
Overexposed: Pixels are clustered
on the right side of the graph.
Underexposed: Pixels are clustered
on the left side of the graph.
29
Basic Photography and Playback
Basic Photography and Playback
Basic Photography and Playback
Taking Photographs
Taking Photographs
This section describes how to take pictures using program AE (mode P). See pages 000 – 000 for in-
formation on S, A, and M modes and pages 000 and 000 for information on the options available in
auto mode.
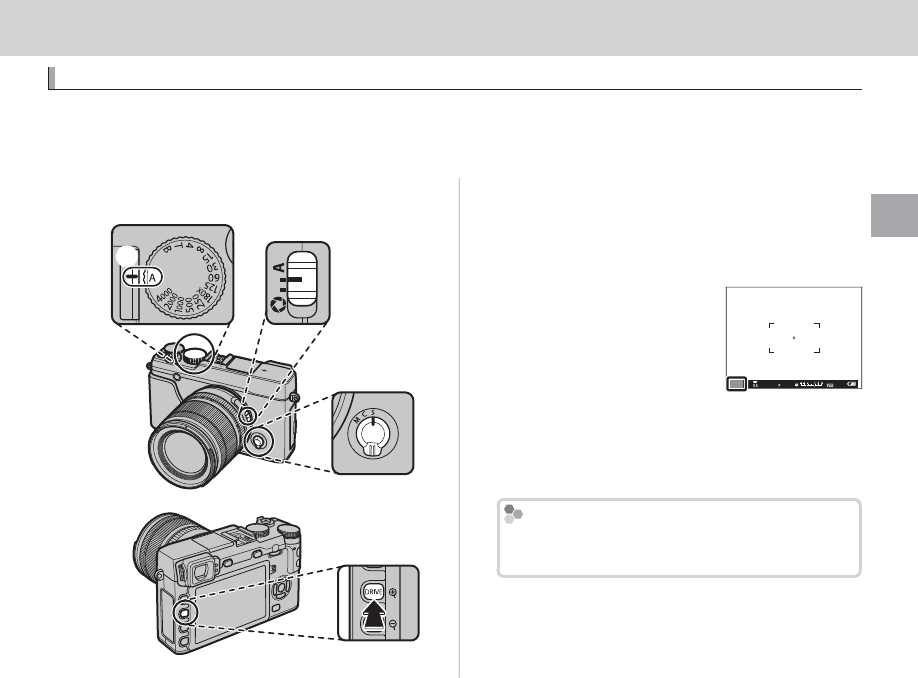
1
Adjust settings for program AE.
C
④
B
A
A
Shutter speed (P 000): Select A (auto)
B
Aperture (P 000): Select A (auto)
C
Focus mode (P 000): Select S (single AF)
D
DRIVE mode (P 000): Select B (still image)
Con rm that P appears in
the display.
QIf AUTO is displayed in red,
press a function button (by
default, Fn2/AUTO) to exit
auto mode (P 000).
RImage stabilization (P 98)
is recommended.
P
4000
5.6 400
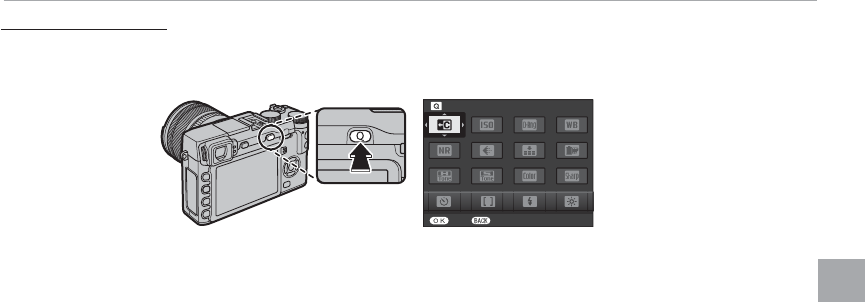
The Q Button
The Q Button
The Q button can be used to view and adjust
camera settings (P 40).
30
Taking Photographs
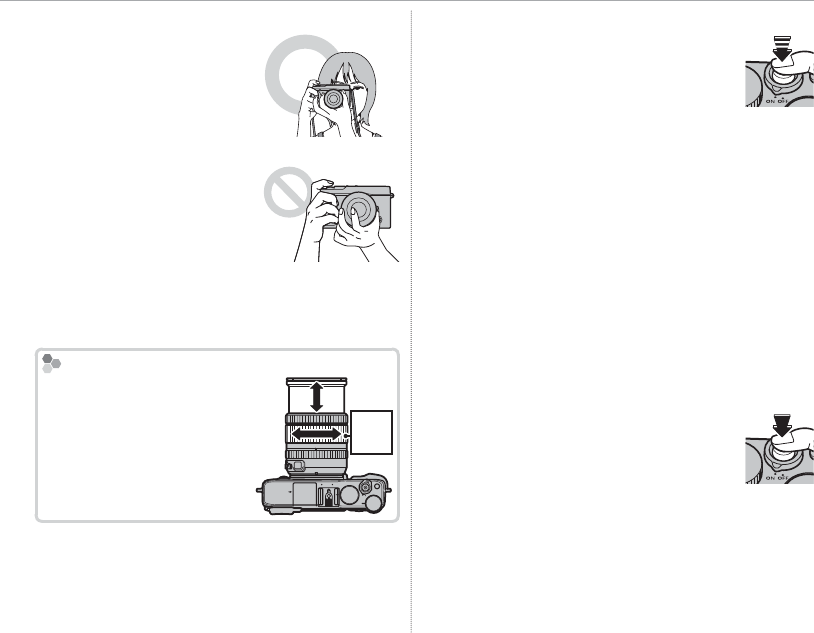
2 Ready the camera.
Hold the camera steady
with both hands and brace
your elbows against your
sides. Shaking or unsteady
hands can blur your shots.
To prevent pictures that
are out of focus or too dark
(underexposed), keep your
ngers and other objects
away from the lens, ash,
and AF-assist illuminator.
3 Frame the picture.
Lenses with Zoom Rings
Lenses with Zoom Rings
Use the zoom ring to frame
the picture in the display.
A
Zoom
ring
4 Focus.
Frame the picture with your sub-
ject in the center of the display and
press the shutter button halfway to
focus.
RIf the subject is poorly lit, the AF-assist illumina-
tor may light (P 000).
If the camera is able to focus, it will beep twice and
the focus indicator and area in focus will glow
green. Focus and exposure will lock while the
shutter button is pressed halfway.
If the camera is unable to focus, the focus frame
will turn red, s will be displayed, and the fo-
cus indicator will blink white.
5 Shoot.
Smoothly press the shutter button
the rest of the way down to take the
picture.
31
Basic Photography and Playback
Viewing Pictures
Viewing Pictures
Viewing Pictures Full Frame
Viewing Pictures Full Frame
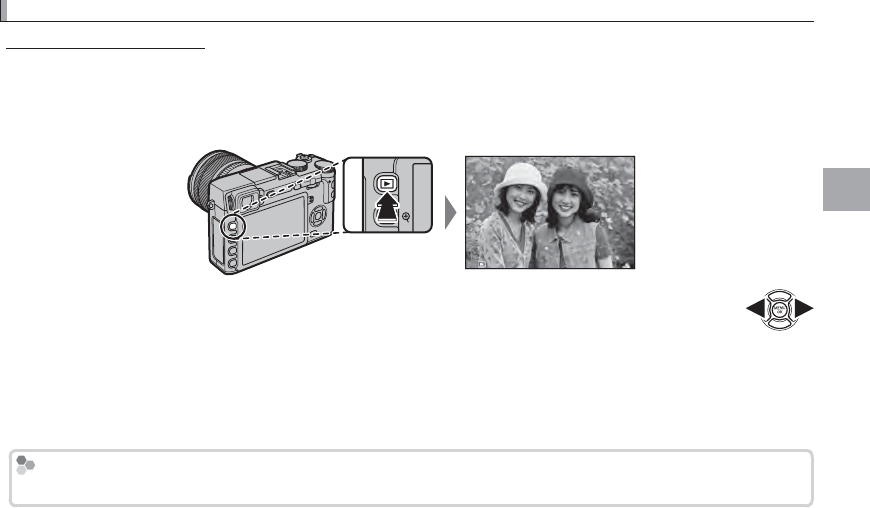
Pictures can be viewed in the view nder or LCD monitor. When taking important pictures, take a test
shot and check the results.
To view pictures full frame, press a.
100-0001
Additional pictures can be viewed by pressing the selector left or right or rotating the com-
mand dial. Press the selector or rotate the dial right to view pictures in the order recorded,
left to view pictures in reverse order. Keep the selector pressed to scroll rapidly to the de-
sired frame.
R Pictures taken using other cameras are marked with a m (“gift image”) icon to warn that they may not display
correctly and that playback zoom may not be available.
Favorites: Rating Pictures
Favorites: Rating Pictures
To rate the current picture, press DISP/BACK and press the selector up and down to select from zero to ve stars.
32
Viewing Pictures
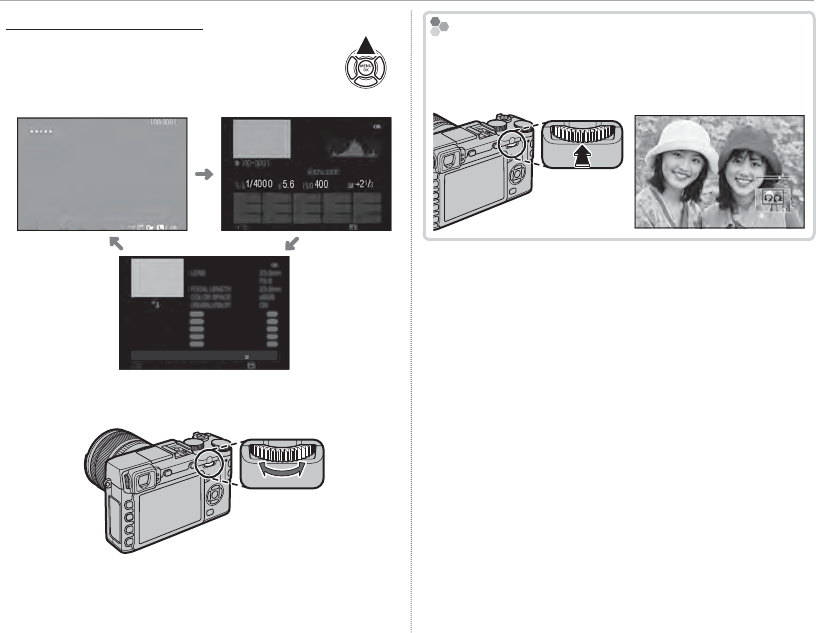
Viewing Photo Information
Viewing Photo Information
The photo information display changes
each time the selector is pressed up.
Basic data Info display 1
12/31/2050 10:00 AM
1/4000
1/4000
+21/3
+21/3
400
400
5.6
5.6
12/31/2050 10:00 AM
NEXT
1/4000 5.6 400 +21/3
1/4000
S.S
5.6
F400 +21/3
ISO
LENS
23.0
mm
F
5.6
FOCAL LENGTH
23.0
mm
COLOR SPACE sRGB
LENS MODULATION OPT.
ON
NEXT
Info display 2
RRotate the command dial to view other images.
Zooming in on the Focus Point
Zooming in on the Focus Point
Press the center of the command dial to zoom in on
the focus point. Press the center of the command
dial again to return to full-frame playback.

33
Basic Photography and Playback
Viewing Pictures
Playback Zoom
Playback Zoom
Press k to zoom in on the current picture, n to zoom out (to view multiple images, press n when
the picture is displayed full frame; P 34). When the picture is zoomed in, the selector can be used to
view areas of the image not currently visible in the display. Press DISP/BACK or MENU/OK to exit zoom.
Zoom indicator
Navigation window shows
portion of image currently
displayed
RThe maximum zoom ratio varies with image size (P 93). Playback zoom is not available with cropped or resized
copies saved at a size of a.
34
Viewing Pictures
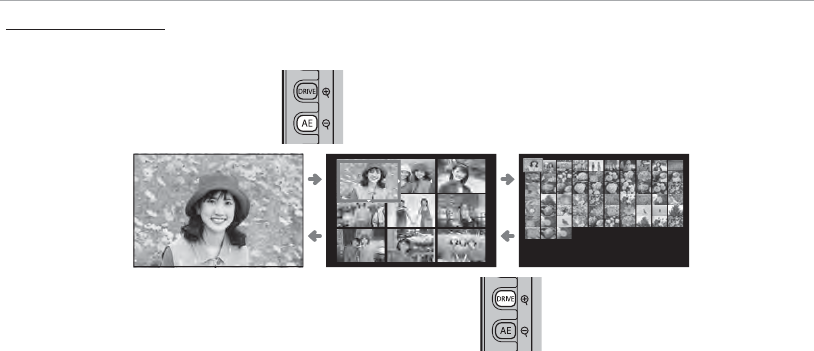
Multi-Frame Playback
Multi-Frame Playback
To change the number of images displayed, press n when a picture is displayed full frame.
Press n to view
more images.
100-0001
100-0001
Press k to view
fewer images.
Use the selector to highlight images and press MENU/OK to view the highlighted image full frame (to
zoom in on the selected image, press k when the picture is displayed full frame; P 33). In the nine-
and hundred-frame displays, press the selector up or down to view more pictures.
35
Basic Photography and Playback
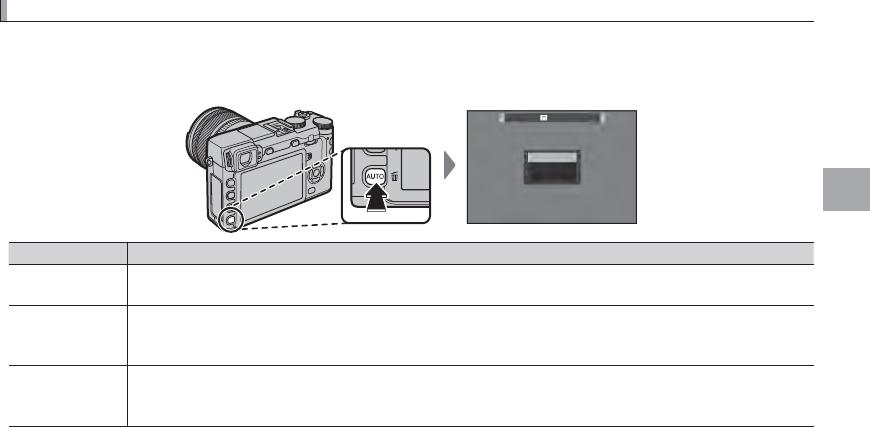
Deleting Pictures
Deleting Pictures
To delete individual pictures, multiple selected pictures, or all pictures, press the b button when a
picture is displayed full frame and choose from the options below. Note that deleted pictures can not
be recovered. Copy important pictures to a computer or other storage device before proceeding.
ERASE
FRAME
SELECTED FRAMES
ALL FRAMES
Option
Option
Description
Description
FRAME
FRAME Press the selector left or right to scroll through pictures and press MENU/OK to delete the current picture
(a confirmation dialog is not displayed).
SELECTED FRAMES
SELECTED FRAMES
Highlight pictures and press MENU/OK to select or deselect (pictures in photobooks or print orders are shown
by S). When the operation is complete, press DISP/BACK to display a con rmation dialog, then highlight OK
and press MENU/OK to delete the selected pictures.
ALL FRAMES
ALL FRAMES
A con rmation dialog will be displayed; highlight OK and press MENU/OK to delete all unprotected pictures.
Pressing DISP/BACK cancels deletion; note that any pictures deleted before the button was pressed can not
be recovered.
RProtected pictures can not be deleted. Remove protection from any pictures you wish to delete (P 101).
RPictures can also be deleted by A ERASE from playback menu.
RIf a message appears stating that the selected images are part of a DPOF print order, press MENU/OK to delete
the pictures.
36
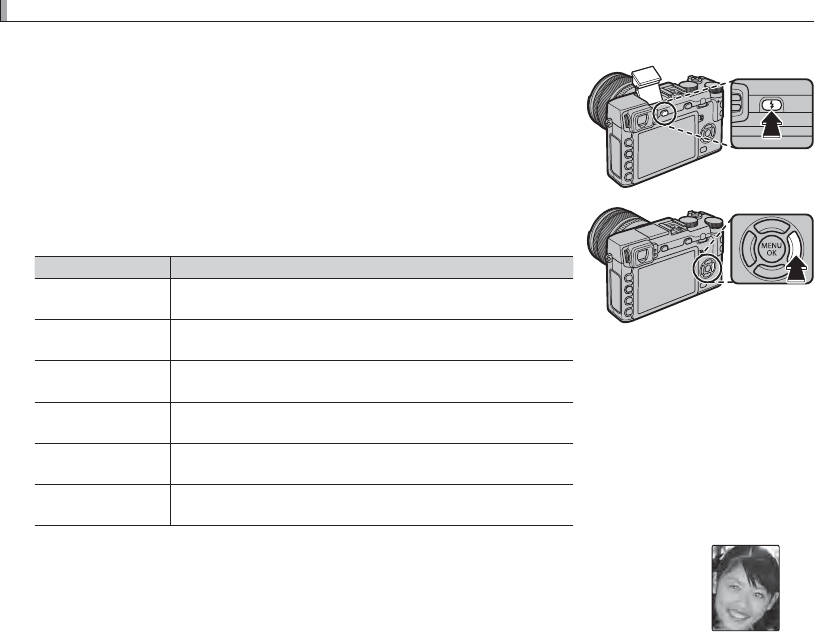
Using the Flash
Using the Flash
Use the built-in ash for additional lighting when shooting at night or indoors under low light.
1
Press the N button to raise the ash.
QThe ash may contact accessories mounted on the hot shoe. If necessary,
remove accessories before raising the ash.
2
Press the function button (Fn5) to display the following options, then
use the selector to highlight an option and press MENU/OK to select.
Mode
Mode
Description
Description
AUTO
AUTO
(AUTO FLASH)
(AUTO FLASH)
/
/
K
K
(RED EYE REDUCTION)
(RED EYE REDUCTION)
*
*
The ash res when required. Recommended in most situa-
tions.
N
N
(FORCED FLASH)
(FORCED FLASH)
/
/
L
L
(FORCED FLASH)
(FORCED FLASH)
*
*
The ash res whenever a picture is taken. Use for backlit sub-
jects or for natural coloration when shooting in bright light.
F
F
(SLOW SYNCHRO)
(SLOW SYNCHRO)
/
/
M
M
(RED EYE & SLOW)
(RED EYE & SLOW)
*
*
Capture both the main subject and the background under low
light (note that brightly lit scenes may be overexposed).
l
l
(2ND CURTAIN SYNC.)
(2ND CURTAIN SYNC.)
/
/
d
d
(2ND CURTAIN SYNC.)
(2ND CURTAIN SYNC.)
*
* The ash res immediately before the shutter closes.
D
D
(COMMANDER)
(COMMANDER) The built-in ash can be used to control optional remote ash
units.
P
P
(SUPPRESSED FLASH)
(SUPPRESSED FLASH) The ash does not re even when the subject is poorly lit. A
tripod is recommended.
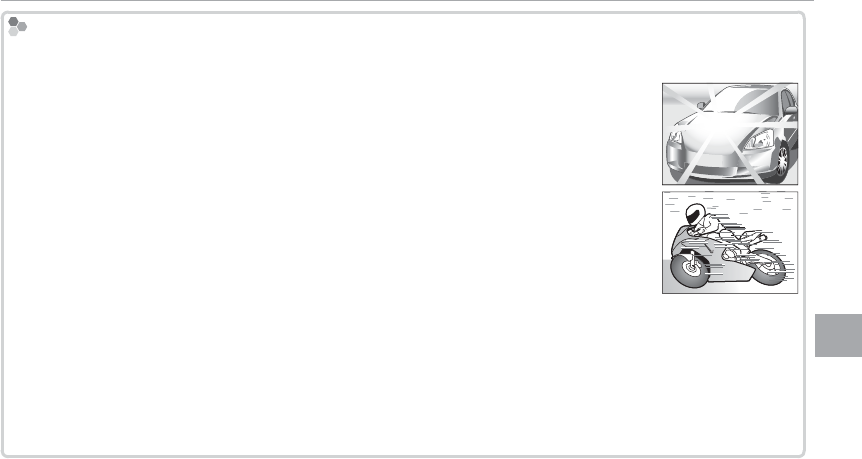
* Red-eye removal is available in these modes when Intelligent Face Detection is active (P 000)
and red-eye removal is on (P 000). Red-eye removal minimizes “red-eye” caused when light from
the ash is re ected from the subject’s retinas as shown in the illustration at right.

37
Basic Photography and Playback
Using the Flash
QDepending on the distance to the subject, some lenses may cast shadows in photos taken with the ash.
RLowering the ash turns the ash o (P) and prevents it ring even when the subject is poorly lit; use of a
tripod is recommended. Lower the ash where ash photography is prohibited or to capture natural lighting
under dim light. We also recommend that you lower the ash when the camera is o .
RIf p is displayed when the shutter button is pressed halfway, the ash will re when the photo is taken.
RExcept in commander mode, the ash may re several times with each shot. Do not move the camera until
shooting is complete.
Flash Sync Speed
Flash Sync Speed
The ash will synchronize with the shutter at shutter speeds of
/
s or slower.
Optional Flash Units
Optional Flash Units
The camera can also be used with optional FUJIFILM shoe-mounted ash units. Do not use third-party ash
units that apply over 300 V to the camera hot shoe.
38
Basic Movie Recording and Playback
Basic Movie Recording and Playback
Recording Movies
Recording Movies
The camera can be used to record short high-de nition movies. Sound is recorded in stereo via the
built-in microphone; do not cover the microphone during recording.
1
Press the function button (Fn7/Fn) to start record-
ing.
Recording indicator
Time remaining
2
Press the button again to end recording. Re-
cording ends automatically when the maximum
length is reached or the memory card is full.
RZoom can be adjusted while recording is in progress.
RSensitivity and frame size and rate can be selected
using the W MOVIE SET-UP option (P 000). Fo-
cus mode is selected using the focus mode selec-
tor (P 68); for continuous focus adjustment, select
C, or choose S and enable Intelligent Face Detec-
tion (P 000, 000). Intelligent Face Detection is not
available in focus mode M.
RDuring recording, exposure compensation can be
adjusted by up to ±2EV.
RThe indicator lamp lights while movies are being
recorded.
Q The microphone may pick up lens noise and other
sounds made by the camera during recording.
QVertical or horizontal streaks may appear in movies
containing very bright subjects. This is normal and
does not indicate a malfunction.
Depth of Field
Depth of Field
Adjust aperture before recording begins. Choose
low f-numbers to soften background details.
39
Basic Movie Recording and Playback
Recording High-De nition (HD) Movies
Using an External Microphone
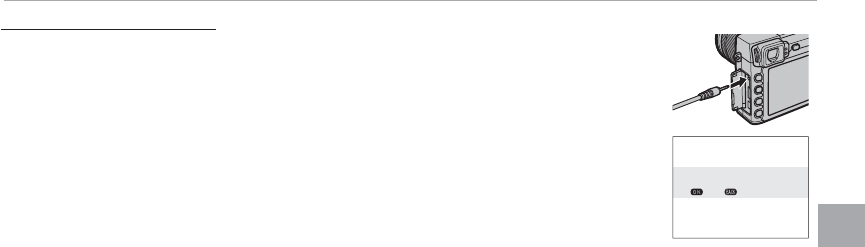
Using an External Microphone
Sound can be recorded with external microphones that connect using jacks 2.5 mm
in diameter; microphones that require bus power can not be used. See the micro-
phone manual for details.
RThe dialog shown at right will be displayed when a microphone is connected to the mi-
crophone/remote release connector. Press MENU/OK and select MIC/REMOTE RELEASE>
m MIC (P 000).
CHECK MIC/REMOTE RELEASE
SETTING
SKIP
SET
40
Viewing Movies
Viewing Movies
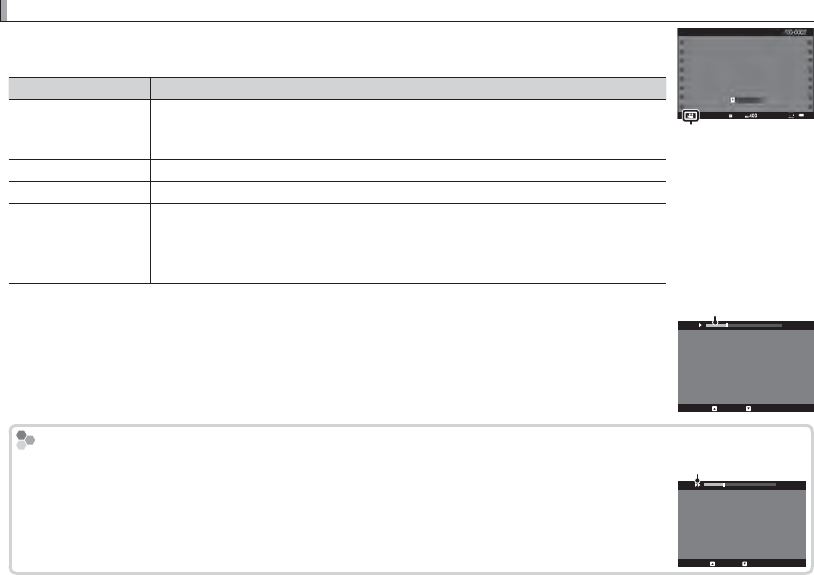
During playback, movies are displayed as shown at right. The following operations
can be performed while a movie is displayed:
Operation
Operation
Description
Description
Start/pause playback
Start/pause playback
Press the selector down to start playback. Press again to pause. While playback is
paused, you can press the selector left or right to rewind or advance one frame
at a time.
End playback
End playback Press the selector up to end playback.
Adjust speed
Adjust speed Press the selector left or right to adjust playback speed during playback.
Adjust volume
Adjust volume
Press MENU/OK to pause playback and display volume controls. Press the selector
up or down to adjust the volume; press MENU/OK again to resume playback. Vol-
ume can also be adjusted using the b SOUND SET-UP > PLAYBACK VOLUME
option in the playback menu (P 107).
12/31/2050 10:00 AM
PLAYPLAY
±0
Movie icon
Progress is shown in the display during playback.
Q Do not cover the speaker during playback.
QSound is not played back if OFF is selected for o SOUND & FLASH (P 000).
Progress bar
STOP PAUSE
29m59s
Playback Speed
Playback Speed
Press the selector left or right to adjust playback speed during playback. Speed is shown by the
number of arrows (M or N).
Arrow
STOP PAUSE
29m59s

41
The Q (Quick Menu) Button
The Q (Quick Menu) Button
The Q (Quick Menu) Button
Using the Q Button
Using the Q Button
Press Q for quick access to selected options.
The Quick Menu Display
The Quick Menu Display
At default settings, the quick menu contains the following items.
SET
SELECT CUSTOM SETTING
BASE
A
Au SELECT CUSTOM SETTING ...................... 84
B
BN ISO ........................................................... 75
C
CU DYNAMIC RANGE ................................... 93
D
DD WHITE BALANCE .................................... 82
E
Eh NOISE REDUCTION ................................. 94
F
FO IMAGE SIZE ............................................. 93
G
GT IMAGE QUALITY ..................................... 93
H
HP FILM SIMULATION ................................. 59
I
Ir HIGHLIGHT TONE ................................... 94
J
Js SHADOW TONE ....................................... 94
K
Kf COLOR ..................................................... 94
L
Lq SHARPNESS ............................................ 94
M
MB SELF-TIMER ............................................ 79
N
NF AF MODE ............................................... 000
O
Op FLASH MODE .......................................... 36
P
PJ EVF/LCD BRIGHTNESS.......................... 108
RhCUSTOM and kCOLOR TEMPERATURE white balance options can not be
accessed using the Q button. Use a function button or the shooting menu.
The quick menu shows the options currently selected for items B—P, which can be changed as
described on page 000. The u SELECT CUSTOM SETTING item (item A) shows the current custom
settings bank:
• q: No custom settings bank selected.
• t — u: Select a bank to view the settings saved using the K EDIT/SAVE CUSTOM SETTING
option in the shooting menu (P 000).
42
Using the Q Button
Viewing and Changing Settings
Viewing and Changing Settings
1
Press Q to display the quick menu during shooting.
2
Use the selector to highlight items and rotate the command dial to change.
3
Press Q to exit when settings are complete.
43
The Q (Quick Menu) Button
Using the Q Button
Editing the Quick Menu
Editing the Quick Menu
To choose the items displayed in the quick menu:
1
Press and hold the Q button during shooting.
SET END
SELECT CUSTOM SETTING
2
The current quick menu will be displayed; use the selector to highlight the item you wish to change
and press MENU/OK. You will be given the following choice of items to assign to the selected position:
• SELECT CUSTOM SETTING
• ISO
• DYNAMIC RANGE
• WHITE BALANCE
• NOISE REDUCTION
• IMAGE SIZE
• IMAGE QUALITY
• FILM SIMULATION
• HIGHLIGHT TONE
• SHADOW TONE
• COLOR
• SHARPNESS
• SELF-TIMER
• FACE DETECTION
• PHOTOMETRY
• AF MODE
• FLASH MODE
• FLASH COMPENSATION
• IS MODE
• MF ASSIST
• MOVIE MODE
• MOVIE ISO
• MIC LEVEL ADJUSTMENT
• SOUND & FLASH
• EVF/LCD BRIGHTNESS
• SHUTTER TYPE
• NONE
RSelect NONE to assign no option to the selected position. When SELECT CUSTOM SETTING is selected,
current settings are shown in the quick menu by the label BASE.
3
Highlight the desired item and press MENU/OK to assign it to the selected position.
RThe quick menu can also be edited using the h BUTTON/DIAL SETTING> EDIT/SAVE QUICK MENU
option in the setup menu (P 000).

44
The Fn (Function) Buttons
The Fn (Function) Buttons
Using the Function Buttons
Using the Function Buttons
The roles played by each of the function buttons can be selected by pressing and holding the button.
The default options are shown below:
Fn1/AE button Fn2/AUTO button Fn3 button Fn4 button
Photometry (P 000) Auto mode on/o (P 000) AF mode (P 000) Film simulation (P 000)
Fn5 button Fn6 button Fn7/Fn button
Flash mode (P 000) Focus-frame selection (P 000) Movie recording (P 000)
45
Using the Function Buttons
The Fn (Function) Buttons
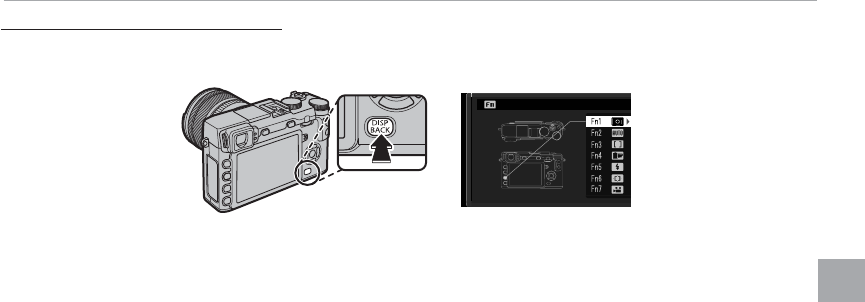
Assigning Roles to the Function Buttons
Assigning Roles to the Function Buttons
To assign roles to the function buttons, press and hold the DISP/BACK button until the menu below is
displayed. Select buttons to choose their roles.
FUNCTION (Fn) SETTING
• PREVIEW DEPTH OF FIELD (P 000)
• ISO (P 000)
• SELF-TIMER (P 000)
• IMAGE SIZE (P 000)
• IMAGE QUALITY (P 000)
• DYNAMIC RANGE (P 000)
• FILM SIMULATION (P 000)
• WHITE BALANCE (P 000)
• PHOTOMETRY (P 000)
• AF MODE (P 000)
• FOCUS AREA (P 000)
• FLASH MODE (P 000)
• FLASH COMPENSATION (P 000)
• SELECT CUSTOM SETTING (P 000)
• MOVIE (P 000)
• FACE DETECTION (P 000)
• RAW (P 000)
• APERTURE SETTING (P 000)
• WIRELESS COMMUNICATION (P 000)
• SHUTTER TYPE (P 000)
• PREVIEW EXP. IN MANUAL MODE
(P 000)
• PREVIEW PIC. EFFECT (P 000)
• COMMAND DIAL SETTING (P 000)
• AUTO MODE ON/OFF (P 000)
• EVF/LCD SETTING (P 000)
• NONE (P 000)
RTo disable the selected button, choose NONE.
RYou can also display options for any of the function buttons by pressing and holding the button.
RThe roles played by the function buttons can also be selected using h BUTTON/DIAL SETTING> FUNCTION
(Fn) SETTING (P 000).
46
More on Photography and Playback
More on Photography and Playback
Mode Selection
Mode Selection
The camera o ers a choice of modes in which you can manually adjust shutter speed and/or aperture
(P, S, A, and M modes; P 000, 000, 000, 000) and auto modes in which settings are automatically ad-
justed for the subject or the selected scene (P 000).
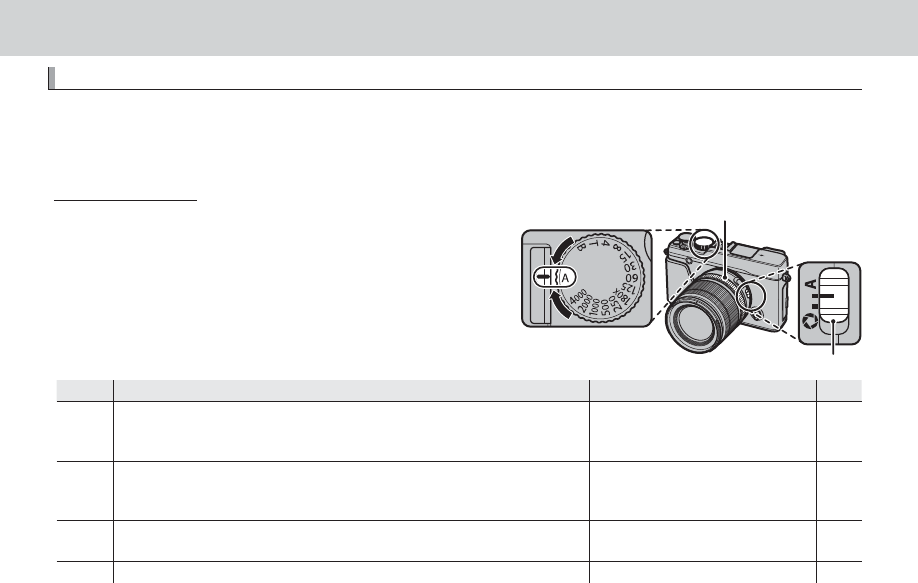
P, S, A, and M Modes
P, S, A, and M Modes
Choose P, S, A, or M mode for manual control over shut-
ter speed and/or aperture. The role of the command dial
varies with the mode selected.
Aperture mode switch
Shutter speed dial
Aperture ring
Mode
Mode
Description
Description
Role of command dial
Role of command dial
P
P
P
P
Program AE: The camera adjusts settings automatically, but you can use the
command dial to choose from combinations of shutter speed and aperture
that will produce optimal exposure (program shift).
Program shift
Program shift
000
000
S
S
Shutter-priority auto: You choose the shutter speed using the shutter speed
and command dials and let the camera adjust aperture for optimal expo-
sure.
Shutter speed ne-tuning
Shutter speed ne-tuning
000
000
A
AAperture-priority auto: You choose the aperture using the aperture ring and
let the camera adjust shutter-speed for optimal exposure.
—
—
000
000
M
MManual exposure: You control both shutter speed and aperture.
Shutter speed ne-tuning
Shutter speed ne-tuning
000
000
RFor information on the role of the command dial when the camera is used with lenses not equipped with an
aperture ring, see “Lenses with No Aperture Rings” (P 000).
47
More on Photography and Playback
Mode Selection
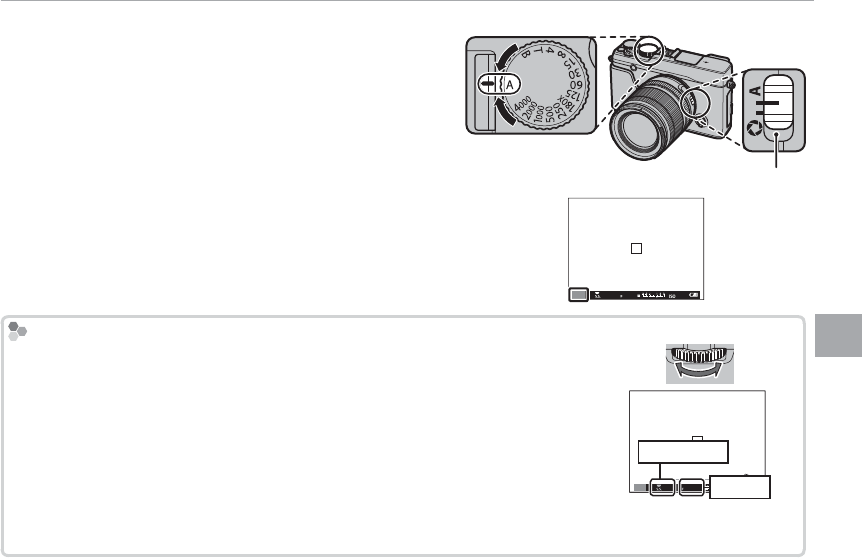
■ Program AE (P)
To allow the camera to adjust both shutter speed and ap-
erture for optimal exposure, set shutter speed and aper-
ture to A. P will appear in the display.
Aperture mode switch
QIf AUTO is displayed in red, press a function button (by default,
Fn2/AUTO) to exit auto mode (P 000).
QIf the subject is outside the metering range of the camera,
the shutter speed and aperture displays will show “– – –”.
P
4000
5.6 400
Program Shift
Program Shift
If desired, you can rotate the command dial to select other combinations of shut-
ter speed and aperture without altering exposure (program shift). The new values
for shutter speed and aperture are shown in yellow. Program shift is not available
if the attached ash supports TTL auto, or if an auto option is selected for U DY-
NAMIC RANGE in the shooting menu (P 93). To cancel program shift, turn the
camera o .
RFor information on the role of the command dial when the camera is used with
lenses not equipped with an aperture ring, see “Lenses with No Aperture Rings”
(P 000).
01 0.5 1.0 1.5 2.0 3.0 5.0 10
M
5.6 400
2000
Shutter speed
Aperture
48
Mode Selection
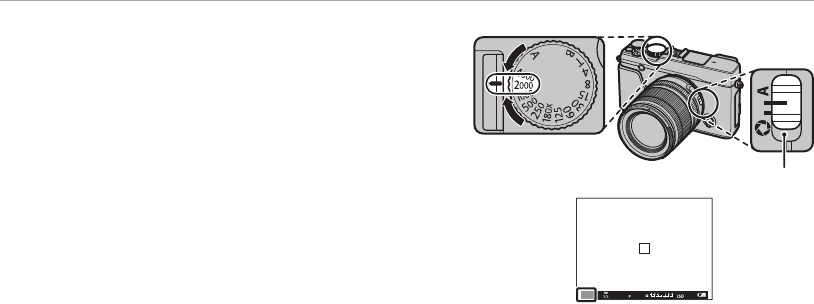
■ Shutter-Priority AE (S)
To adjust shutter speed manually while letting the cam-
era select aperture for optimal exposure, set aperture to
A and use the shutter speed dial. S will appear in the dis-
play.
Aperture mode switch
QIf AUTO is displayed in red, press a function button (by default,
Fn2/AUTO) to exit auto mode (P 000).
5.6 400
S
2000
RAt settings other than 180X, shutter speed can also be adjusted in increments of
/
EV by rotating the command
dial. Shutter speed can be adjusted even while the shutter button is pressed halfway.
RFor information on the role of the command dial when the camera is used with lenses not equipped with an
aperture ring, see “Lenses with No Aperture Rings” (P 000).
QIf the correct exposure can not be achieved at the selected shutter speed, aperture will be displayed in red
when the shutter button is pressed halfway. Adjust shutter speed until the correct exposure is achieved.
QIf the subject is outside the metering range of the camera, the aperture display will show “– – –”.
49
More on Photography and Playback
Mode Selection
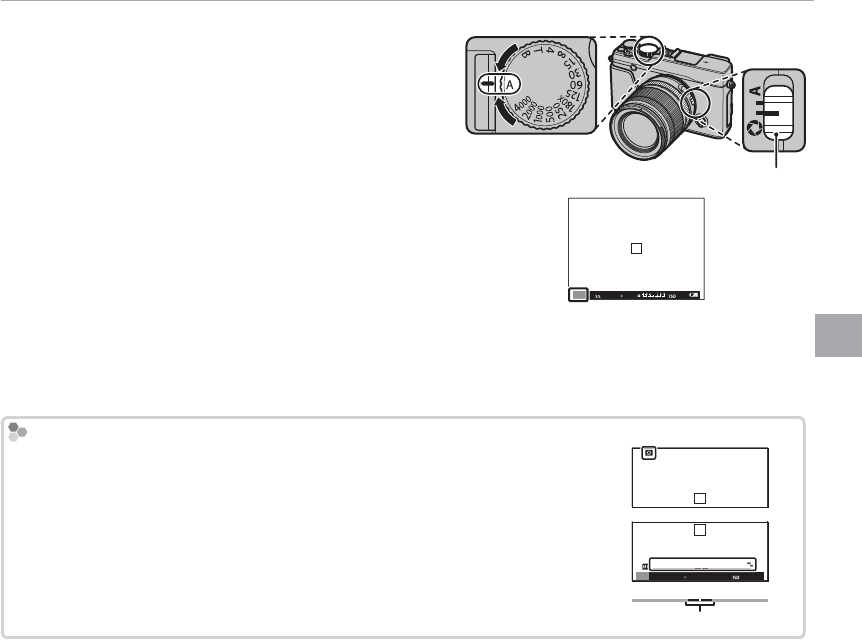
■ Aperture-Priority AE (A)
To adjust aperture manually while letting the camera se-
lect shutter speed for optimal exposure, rotate the shutter
speed dial to A and adjust aperture as desired. A will ap-
pear in the display.
Aperture mode switch
QIf AUTO is displayed in red, press a function button (by default,
Fn2/AUTO) to exit auto mode (P 000).
A
4000
5.6 400
RAperture can be adjusted even while the shutter button is pressed halfway.
QIf the correct exposure can not be achieved at the selected aperture, the shutter speed will be displayed in red
when the shutter button is pressed halfway. Adjust aperture until the correct exposure is achieved.
QIf the subject is outside the metering range of the camera, the shutter speed display will show “– – –”.
Previewing Depth of Field
Previewing Depth of Field
When L PREVIEW DEPTH OF FIELD is assigned to a function button (P 000),
pressing the button stops aperture down to the selected setting, allowing depth
of eld to be previewed in the display.
Depth of eld can also be previewed using the depth-of- eld indicator in the
standard display. Press DISP/BACK to cycle through display modes until standard
indicators are displayed.
A
5.6 400
01 0.5 1.0 1.5 2.0 3.0 5.0 10
5
1.0 1.5 2.0 3.0 5.0
Depth of eld
50
Mode Selection
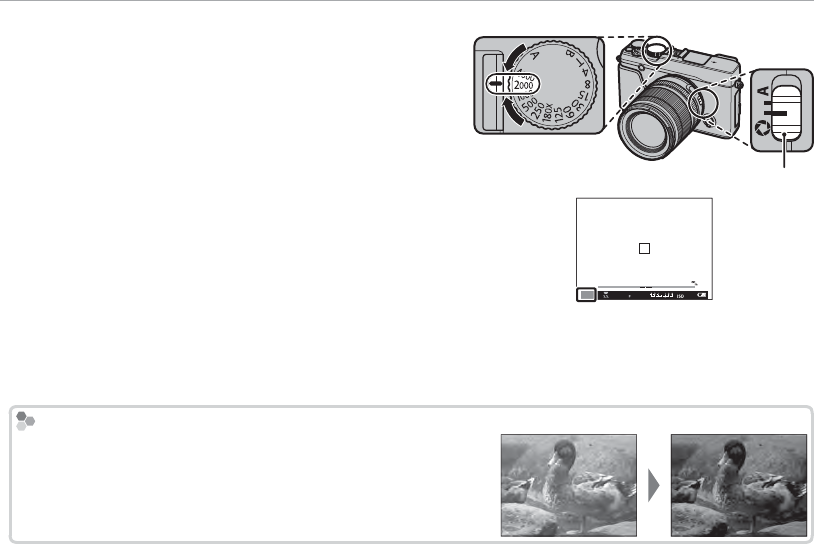
■ Manual Exposure (M)
Exposure can be altered from the value suggested by the
camera by setting both shutter speed and aperture to
values other than A. M will appear in the display.
Aperture mode switch
QIf AUTO is displayed in red, press a function button (by default,
Fn2/AUTO) to exit auto mode (P 000).
RAt settings other than 180X, shutter speed can also be ad-
justed in increments of
/
EV by rotating the command dial.
01 0.5 1.0 1.5 2.0 3.0 5.0 10
M
5.6 400
2000
RThe manual exposure display includes an exposure indicator that shows the amount the picture would be
under- or over-exposed at current settings.
RFor information on the role of the command dial when the camera is used with lenses not equipped with an
aperture ring, see “Lenses with No Aperture Rings” (P 000).
Exposure Preview
Exposure Preview
To preview exposure in the LCD monitor, select ON for A SCREEN
SET-UP> PREVIEW EXP. IN MANUAL MODE. Select OFF when
using the ash or on other occasions on which exposure may
change when the picture is taken.
51
More on Photography and Playback
Mode Selection
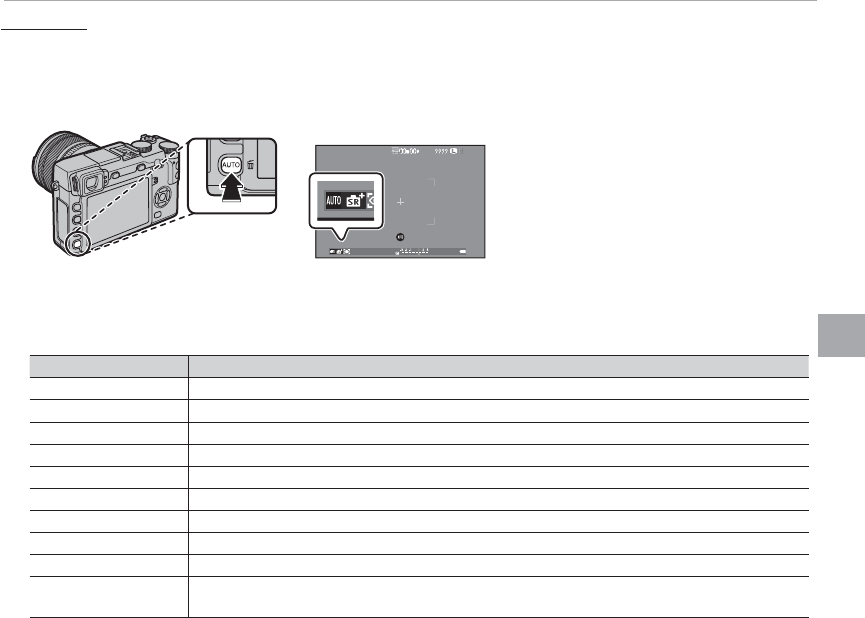
Auto Modes
Auto Modes
Press a function button (by default, Fn2/AUTO) to select an auto mode in which the camera automati-
cally adjusts settings according to the scene or shooting conditions.
1
Press the function button (Fn2/AUTO) to enable auto mode.
QAUTO is displayed in red when auto mode
is selected.
2 Press MENU/OK in shooting mode to display the shooting menu. Press the selector up or down to
highlight A SCENE POSITION and press MENU/OK.
3
Press the selector up or down to highlight the desired option and press MENU/OK to select.
Mode
Mode
Description
Description
S
S
ADVANCED SR AUTO
ADVANCED SR AUTO The camera automatically optimizes settings to suit the scene (P 52).
h
h
PORTRAIT
PORTRAIT Choose for portraits.
Z
Z
PORTRAIT ENHANCER
PORTRAIT ENHANCER Processes portraits to give the subject a smooth, natural-looking complexion.
M
M
LANDSCAPE
LANDSCAPE Choose for daylight shots of buildings and landscapes.
N
N
SPORT
SPORT Choose when photographing moving subjects.
O
O
NIGHT
NIGHT Choose for poorly lit twilight or night scenes.
H
H
NIGHT (TRIPOD)
NIGHT (TRIPOD) Choose this mode for slow shutter speeds when shooting at night.
p
p
FIREWORKS
FIREWORKS Slow shutter speeds are used to capture the expanding burst of light from a rework.
Q
Q
SUNSET
SUNSET Choose this mode to record the vivid colors in sunrises and sunsets.
R
R
SNOW
SNOW Choose for crisp, clear shots that capture the brightness of scenes dominated by shining white
snow.
52
Mode Selection
Mode
Mode
Description
Description
s
s
BEACH
BEACH Choose for crisp, clear shots that capture the brightness of sunlit beaches.
f
f
UNDERWATER
UNDERWATER Reduces the blue cast typically associated with underwater lighting.
U
U
PARTY
PARTY Capture indoor background lighting under low-light conditions.
V
V
FLOWER
FLOWER E ective for taking more vivid shots of owers.
W
W
TEXT
TEXT Take clear pictures of text or drawings in print.
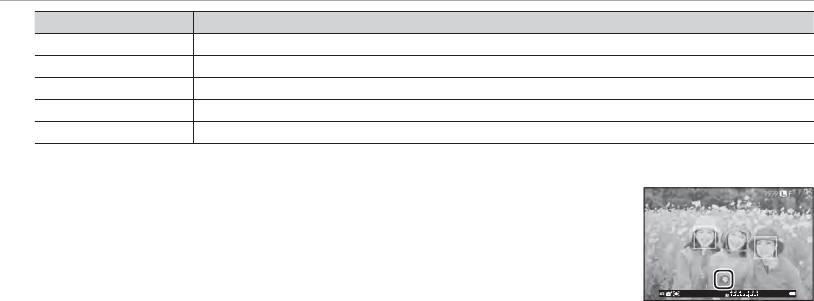
■ SADVANCED SR AUTO
The scene selected by the camera in S ADVANCED SR AUTO mode is shown
by an icon in the display.
a AUTO
c LANDSCAPE
d NIGHT
h NIGHT (TRIPOD)
e MACRO
v SUNSET
x SKY
z SKY & GREENERY
g BACKLIT PORTRAIT
a PORTRAIT&MOTION
u BEACH
w SNOW
y GREENERY
d PORTRAIT
c MOVING OBJECT
b BACKLIT PORTRAIT&MOTION
QThe mode selected may vary with shooting conditions. If the mode and subject do not match, select a scene
manually.
53
More on Photography and Playback
Long Time-Exposures (T/B)
Long Time-Exposures (T/B)
Select a shutter speed of T (time) or B (bulb) for long time-exposures.
RUse of a tripod is recommended to prevent the camera from moving during the exposure.
RTo reduce “noise” (mottling) in long time-exposures, select ON for K LONG EXPOSURE NR in the shooting
menu (P 94). Note that this may increase the time needed to record images after shooting.
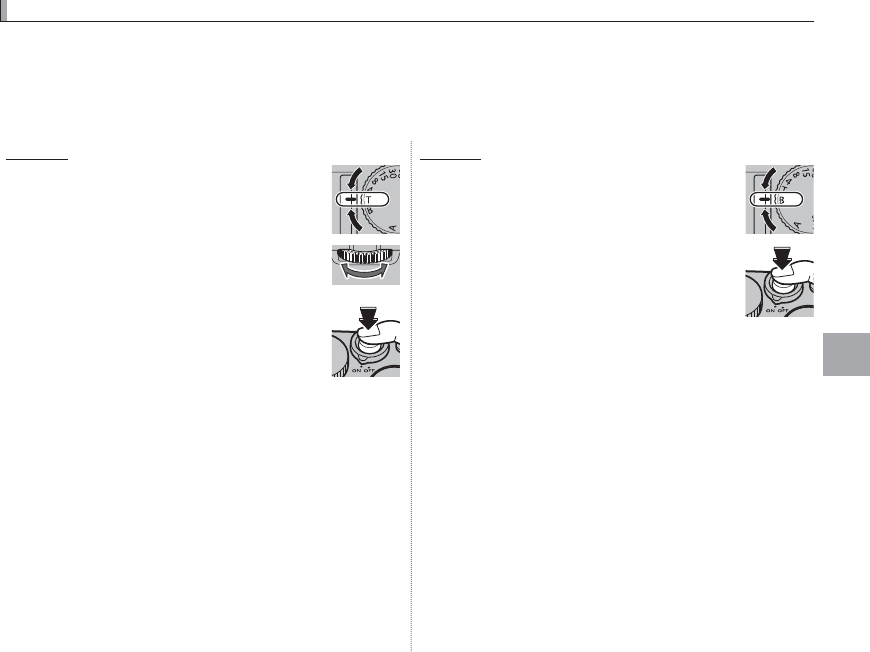
Time (T)
Time (T)
1
Rotate the shutter speed dial to T.
2
Rotate the command dial to choose
the exposure time.
3
Press the shutter button all the way
down to take a picture at the select-
ed shutter speed. A count-down
timer will be displayed while the ex-
posure is in progress.
RFor information on the role of the command dial
when the camera is used with lenses not equipped
with an aperture ring, see “Lenses with No Aperture
Rings” (P 000).
Bulb (B)
Bulb (B)
1
Rotate the shutter speed dial to B.
2
Press the shutter button all the way
down. The shutter will remain open
for up to 60 minutes while the shut-
ter button is pressed; the display
shows the time elapsed since the
exposure started.
RSelecting an aperture of A xes shutter speed at 30 s.
54
Long Time-Exposures (T/B)
Using a Remote Release
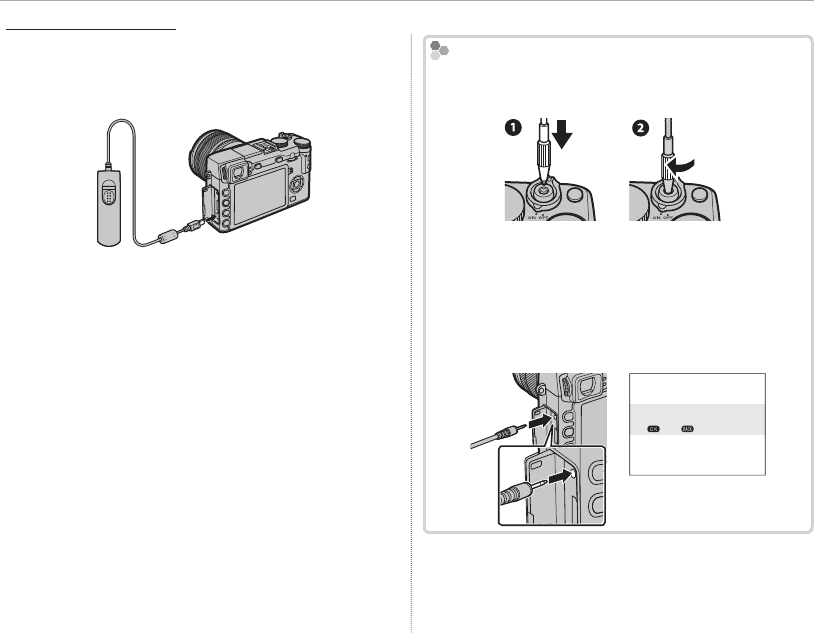
Using a Remote Release
An optional RR-90 remote release can be used for
long time-exposures. See the manual provided
with the RR-90 for more information.
Third-Party Remote Releases
Third-Party Remote Releases
• Third-party remote releases (available from third-
party suppliers) can be connected as shown below.
• Electronic releases from third-party suppliers can
be connected via the microphone/remote release
connector. A con rmation dialog will be displayed
when a third-party release is connected; press
MENU/OK and select n REMOTE for MIC/REMOTE
RELEASE.
CHECK MIC/REMOTE RELEASE
SETTING
SKIP
SET
55
More on Photography and Playback
Exposure Compensation
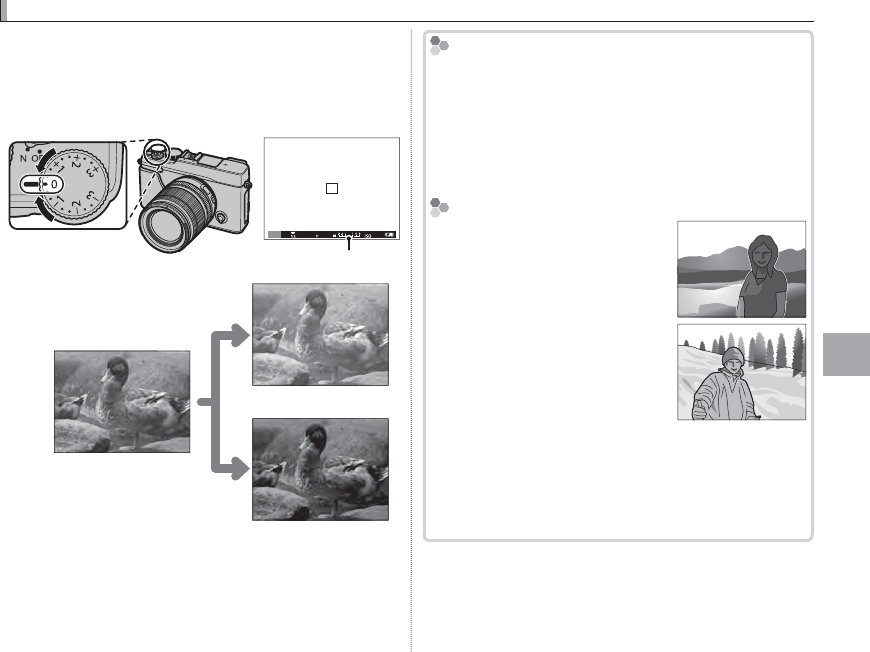
Exposure Compensation
Rotate the exposure compensation dial to adjust
exposure when photographing very bright, very
dark, or high-contrast subjects. The e ect is vis-
ible in the display.
P
4000
5.6 400
Exposure compensation indicator
Choose positive values (+) to
increase exposure
Choose negative values (–) to
reduce exposure
QThe amount of compensation available varies with
the shooting mode.
Exposure Value (EV)
Exposure Value (EV)
The exposure value is determined by the sensitiv-
ity of the image sensor and the amount of light to
which the sensor is exposed. Doubling the amount
increases EV by one, while halving it reduces EV by
one. The amount of light entering the camera can be
controlled by adjusting aperture and shutter speed.
Choosing an Exposure Compensation Value
Choosing an Exposure Compensation Value
• Backlit subjects: Choose values
from +
/
EV to +1
/
EV.
• Highly re ective subjects or very
bright scenes (e.g., snow elds): +1 EV
• Scenes that are mostly sky: +1 EV
• Spotlit subjects (particularly if photographed against dark back-
grounds): –
/
EV
• Subjects with low re ectivity (pine trees or dark-colored foliage):
–
/
EV

56
Focus/Exposure Lock
Focus/Exposure Lock
To compose photographs with o -center subjects:
1
Focus: Position the subject in the focus frame and press the shutter button half-
way to lock focus and exposure. Focus and exposure will remain locked while
the shutter button is pressed halfway (AF/AE lock).
P
RFocus and exposure can also be locked with the AF-L and AE-L buttons, respectively (if AE/AF LOCK is
selected for d AF-LOCK BUTTON in the shooting menu, pressing the AF-L button will lock both focus
and exposure; P 95).
2
Recompose: Keep the shutter button pressed halfway or keep the AF-L or AE-L but-
ton pressed.
RFocus and/or exposure will remain locked while the AF-L or AE-L button is pressed,
whether or not the shutter button is pressed halfway. If AE&AF ON/OFF SWITCH is
selected for v AE/AF-LOCK MODE (P 95), focus and/or exposure lock when the but-
ton is pressed and remain locked until the button is pressed again.
P
3
Shoot: Press the shutter button all the way down.
P
RThe roles of the AE-L and AF-L buttons can be reversed using the h BUTTON/DIAL SETTING > AE-L/AF-L
BUTTON SETTING option in the setup menu.
57
More on Photography and Playback
Focus/Exposure Lock
Autofocus
Autofocus
Although the camera boasts a high-precision autofocus system, it may be unable to focus on the subjects listed
below.
• Very shiny subjects such as mirrors or car bodies.
• Fast-moving subjects.
• Subjects photographed through a window or other re ective object.
• Dark subjects and subjects that absorb rather than re ect light, such as hair or fur.
• Insubstantial subjects, such as smoke or ame.
• Subjects that show little contrast with the background (for example, subjects in clothing that is the same color
as the background).
• Subjects positioned in front of or behind a high-contrast object that is also in the focus frame (for example, a
subject photographed against a backdrop of highly contrasting elements).
58
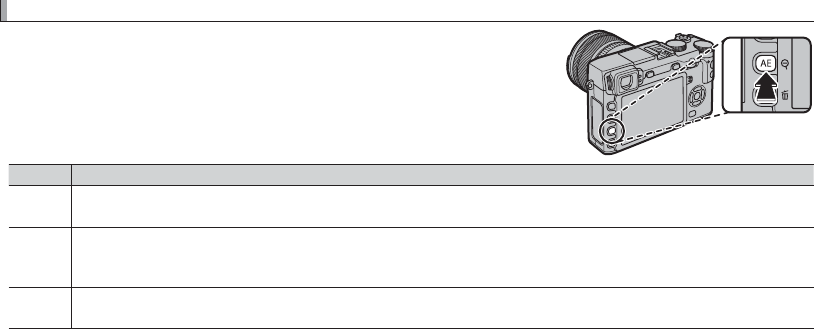
Metering
Metering
To choose how the camera meters exposure, press the function but-
ton (Fn1/AE) to display metering options. Use the selector to high-
light an option and press MENU/OK to select.
QThe selected option will only take e ect when Intelligent Face Detection
is o (P 000).
Mode
Mode
Description
Description
o
o
(MULTI)
(MULTI)
The camera instantly determines exposure based on an analysis of composition, color, and brightness distribution.
Recommended in most situations.
p
p
(SPOT)
(SPOT)
The camera meters lighting conditions in an area at the center of the frame equivalent to 2% of the total. Recom-
mended with backlit subjects and in other cases in which the background is much brighter or darker than the main
subject.
q
q
(AVERAGE)
(AVERAGE)
Exposure is set to the average for the entire frame. Provides consistent exposure across multiple shots with the same
lighting, and is particularly e ective for landscapes and portraits of subjects dressed in black or white.
RMetering options can also be accessed from the shooting menu (P 000).
59
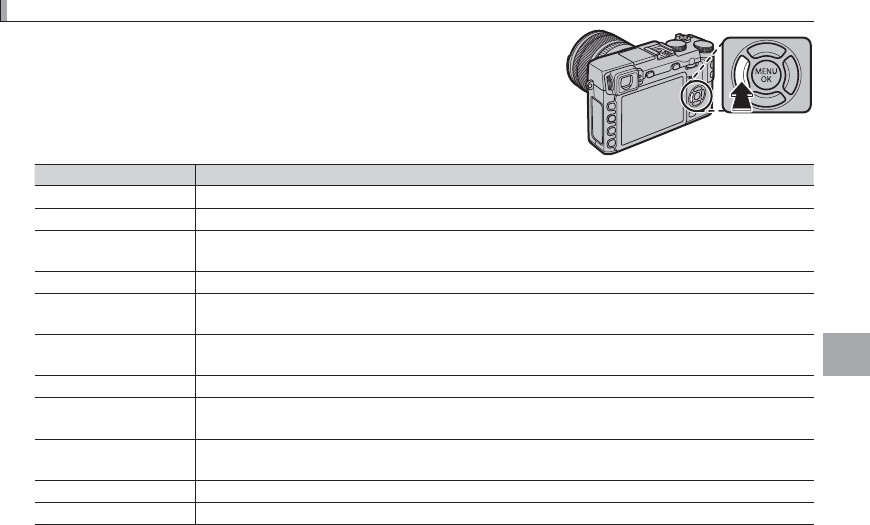
More on Photography and Playback
Film Simulation
Film Simulation
Simulate the e ects of di erent kinds of lm, including black-and-
white (with or without color lters). Press the function button (Fn4)
to display the following options, then use the selector to highlight an
option and press MENU/OK to select.
Option
Option
Description
Description
c
c
(PROVIA/STANDARD)
(PROVIA/STANDARD) Standard color reproduction. Suited to a wide range of subjects, from portraits to landscapes.
>
>
(Velvia/VIVID)
(Velvia/VIVID) A high-contrast palette of saturated colors, suited to nature photos.
e
e
(ASTIA/SOFT)
(ASTIA/SOFT) Enhances the range of hues available for skin tones in portraits while preserving the bright blues
of daylight skies. Recommended for outdoor portrait photography.
i
i
(CLASSIC CHROME)
(CLASSIC CHROME) Soft color and enhanced shadow contrast for a calm look.
g
g
(PRO Neg. Hi)
(PRO Neg. Hi) O ers slightly more contrast than h (PRO Neg. Std). Recommended for outdoor portrait pho-
tography.
h
h
(PRO Neg. Std)
(PRO Neg. Std) A soft-toned palette. The range of hues available for skin tones is enhanced, making this a good
choice for studio portrait photography.
;
;
(MONOCHROME)
(MONOCHROME) Take pictures in standard black and white.
e
e
(MONOCHROME + Ye FILTER)
(MONOCHROME + Ye FILTER) Take black-and-white pictures with slightly increased contrast. This setting also slightly tones
down the brightness of the sky.
d
d
(MONOCHROME + R FILTER)
(MONOCHROME + R FILTER) Take black-and-white pictures with increased contrast. This setting also tones down the bright-
ness of the sky.
f
f
(MONOCHROME + G FILTER)
(MONOCHROME + G FILTER) Soften skin tones in black-and-white portraits.
f
f
(SEPIA)
(SEPIA) Take pictures in sepia.
RFilm simulation options can be combined with tone and sharpness settings (P 94).
RFilm simulation options can also be accessed from the shooting menu (P 000).
60
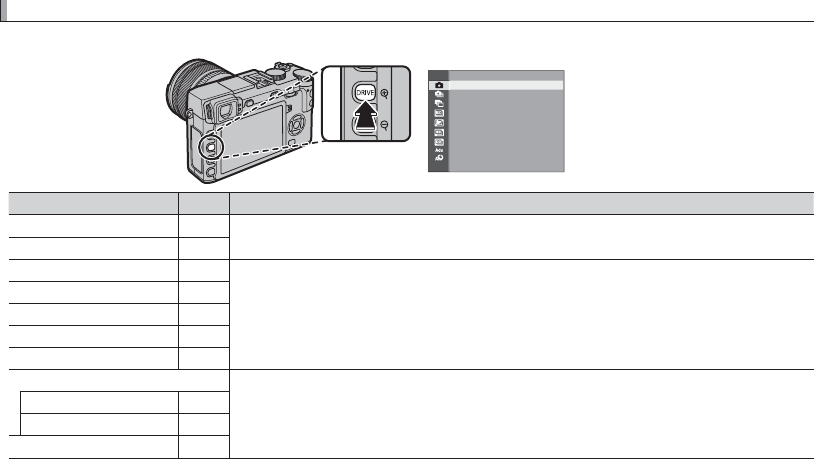
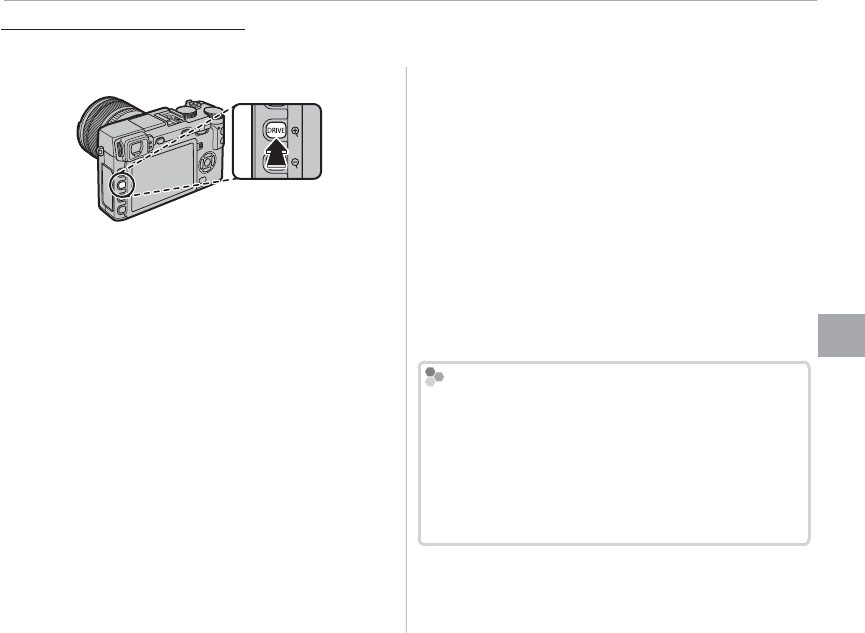
The DRIVE Button
The DRIVE Button
The DRIVE button gives you access to the following options.
STILL IMAGE
Drive mode
Drive mode
P
P
Available in
Available in
B
B
STILL IMAGE
STILL IMAGE
—
—
All shooting modes
All shooting modes
I
I
CONTINUOUS
CONTINUOUS
000
000
O
O
AE BKT
AE BKT
000
000
Modes
Modes
P
P
,
,
S
S
,
,
A
A
, and
, and
M
M
W
W
ISO BKT
ISO BKT
000
000
X
X
FILM SIMULATION BKT
FILM SIMULATION BKT
000
000
H
H
WHITE BALANCE BKT
WHITE BALANCE BKT
000
000
Y
Y
DYNAMIC RANGE BKT
DYNAMIC RANGE BKT
000
000
Adv. MODE
Adv. MODE
All shooting modes
All shooting modes
(but note that camera functions in auto mode when auto mode is selected)
(but note that camera functions in auto mode when auto mode is selected)
u
u
MOTION PANORAMA
MOTION PANORAMA
000
000
j
j
MULTIPLE EXPOSURE
MULTIPLE EXPOSURE
000
000
Y
Y
ADVANCED FILTER
ADVANCED FILTER
000
000
61
More on Photography and Playback
The DRIVE Button
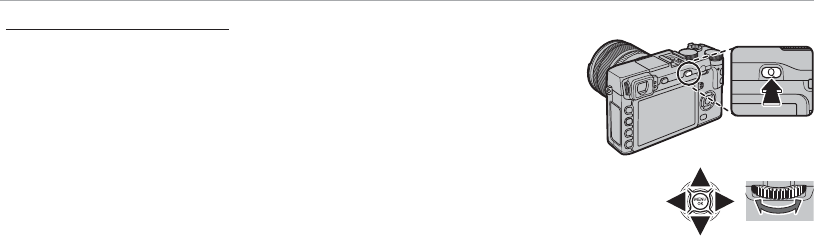
1
Press the DRIVE button to display drive options.
2
Press the selector up or down to highlight I,
then press the selector left or right to choose
a frame rate of J (high) or O (low). Press
MENU/OK to proceed when settings are com-
plete.
3
Press the shutter button halfway to focus.
4
Press the shutter button the rest of the way
down to start shooting. Shooting ends when
the shutter button is released, the maximum
number of pictures has been taken, or the
memory card is full.
RFrame rate varies with the subject, shutter speed,
sensitivity, and focus mode and may slow as more
shots are taken.
RThe ash turns o automatically; the previously-se-
lected ash mode is restored when burst shooting
is disabled.
RAdditional time may be required to record pictures
when shooting ends.
RIf le numbering reaches 999 before shooting is
complete, the remaining pictures will be recorded
to a new folder (P 000).
RIn some drive modes, shooting may not begin if the
space available on the memory card is insu cient.
Focus and Exposure
Focus and Exposure
To vary focus and exposure with each shot, select fo-
cus mode C; in other modes, focus and exposure are
determined by the rst shot in each series.
QSelecting J in focus mode C restricts the choice of focus
frames (P 000).
QExposure and focus tracking performance may vary with
aperture, sensitivity, and shooting conditions.
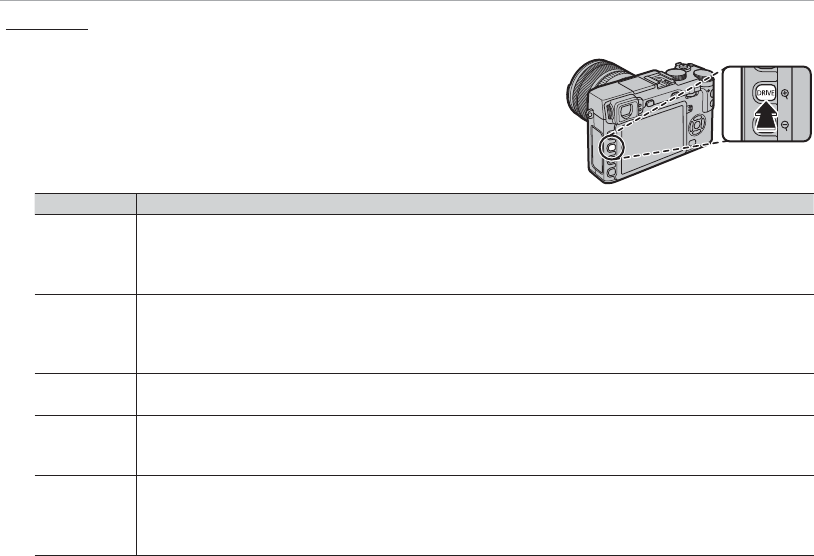
Continuous Shooting (Burst Mode)
Continuous Shooting (Burst Mode)
Capture motion in a series of pictures.
62
The DRIVE Button
Bracketing
Bracketing
Automatically vary settings over a series of pictures.
1
Press the DRIVE button to display drive options and press the se-
lector up or down to highlight one of the following:
Option
Option
Description
Description
AE BKT
AE BKT
Press the selector left or right to highlight a bracketing amount. Each time the shutter button is pressed,
the camera will take three shots: one using the metered value for exposure, the second overexposed by
the selected amount, and the third underexposed by the same amount (regardless of the amount selected,
exposure will not exceed the limits of the exposure metering system).
ISO BKT
ISO BKT
Press the selector left or right to highlight a bracketing amount. Each time the shutter is released, the cam-
era will take a picture at the current sensitivity (P 75) and process it to create two additional copies, one with
sensitivity raised and the other with sensitivity lowered by the selected amount (regardless of the amount
selected, sensitivity will not exceed ISO 6400 or fall below ISO 200).
FILM SIMULATION
FILM SIMULATION
BKT
BKT
Each time the shutter is released, the camera takes one shot and processes it to create copies with the lm
simulation settings selected for X FILM SIMULATION BKT in the shooting menu (P 96).
WHITE BALANCE
WHITE BALANCE
BKT
BKT
Press the selector left or right to choose the bracketing amount. Each time the shutter button is pressed,
the camera takes three shots: one at the current white balanced setting, one with ne-tuning increased by
the selected amount, and another with ne-tuning decreased by the selected amount.
DYNAMIC RANGE
DYNAMIC RANGE
BKT
BKT
Each time the shutter button is pressed, the camera takes three shots with di erent dynamic ranges (P 93):
100% for the rst, 200% for the second, and 400% for the third. While dynamic range bracketing is in e ect,
sensitivity will be restricted to a minimum of ISO 800; the sensitivity previously in e ect is restored when
bracketing ends.
2 Press MENU/OK to select the highlighted option.
3 Take photographs.
63
More on Photography and Playback
The DRIVE Button
1
Press the DRIVE button to display drive options.
Press the selector up or down to highlight Adv.,
then press the selector left or right to highlight
r MOTION PANORAMA and press MENU/OK.
2
To select the size of the angle through which
you will pan the camera while shooting, press
the selector left. Highlight a size and press
MENU/OK.
3
Press the selector right to view a choice of pan
directions. Highlight a pan direction and press
MENU/OK.
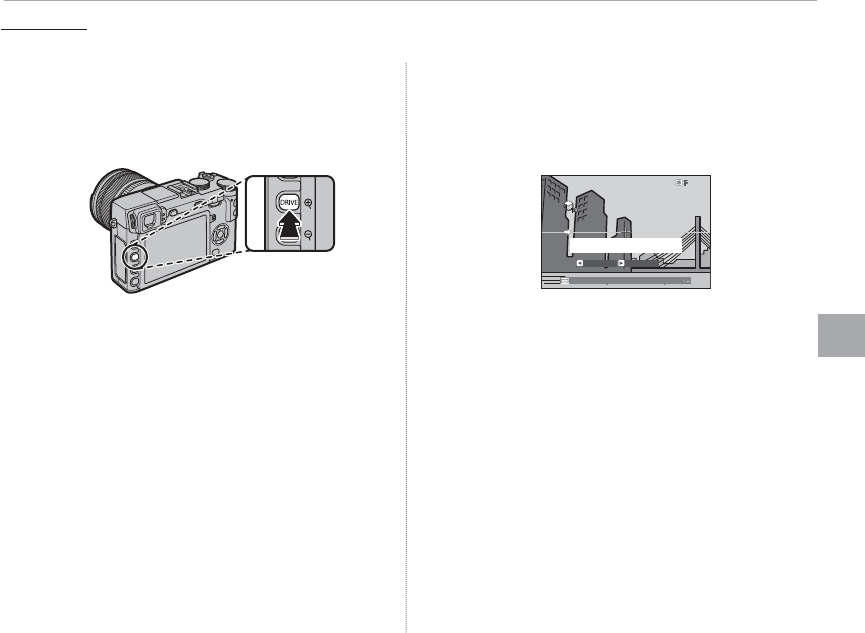
4
Press the shutter button all the way down to
start recording. There is no need to keep the
shutter button pressed during recording.
5
Pan the camera in the direction shown by the
arrow. Shooting ends automatically when the
camera is panned to the end of the guides
and the panorama is complete.
8002.030
Sweep camera along yellow
line in direction of y
ANGLE DIRECTION
RShooting ends if the shutter button is pressed all
the way down during shooting. No panorama
may be recorded if the shutter button is pressed
before the panorama is complete.
Panoramas
Panoramas
Follow an on-screen guide to create a panorama.

64
The DRIVE Button
QPanoramas are created from multiple frames; expo-
sure for the entire panorama is determined by the
rst frame. The camera may in some cases record an
greater or lesser angle than selected or be unable to
stitch the frames together perfectly. The last part of
the panorama may not be recorded if shooting ends
before the panorama is complete.
QShooting may be interrupted if the camera is panned
too quickly or too slowly. Panning the camera in a
direction other than that shown cancels shooting.
QThe desired results may not be achieved with mov-
ing subjects, subjects close to the camera, unvary-
ing subjects such as the sky or a eld of grass, sub-
jects that are in constant motion, such as waves and
waterfalls, or subjects that undergo marked chang-
es in brightness. Panoramas may be blurred if the
subject is poorly lit.
For Best Results
For Best Results
For best results, use a lens with a focal length of
35 mm or less (50 mm or less in 35 mm format). Prop
your elbows against your sides and move the cam-
era slowly in a small circle at a steady speed, keeping
the camera parallel or at right angles to the horizon
and being careful only to pan in the direction shown
by the guides. Use a tripod for best results. If the
desired results are not achieved, try panning at a dif-
ferent speed.
65
More on Photography and Playback
The DRIVE Button
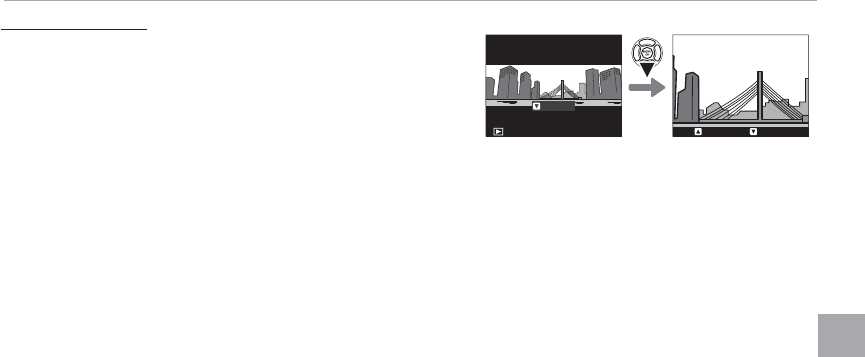
Viewing Panoramas
Viewing Panoramas
To zoom in on a panorama in full-frame playback, press the
k button and use the k and n buttons to zoom in and
out. Alternatively, you can play the panorama back using
the selector. Press the selector down to start playback and
press again to pause. While playback is paused, you can
scroll the panorama manually by pressing the selector left or right; vertical panoramas will scroll verti-
cally, horizontal panoramas horizontally. To exit to full-frame playback, press the selector up.
PLAY
STOP PAUSE