Fuji Film 02000002 Wireless LAN Module User Manual 00 LX11 OM 200 EN 01 indb
Fuji Film Corporation Wireless LAN Module 00 LX11 OM 200 EN 01 indb
Contents
User manual 2
22
1
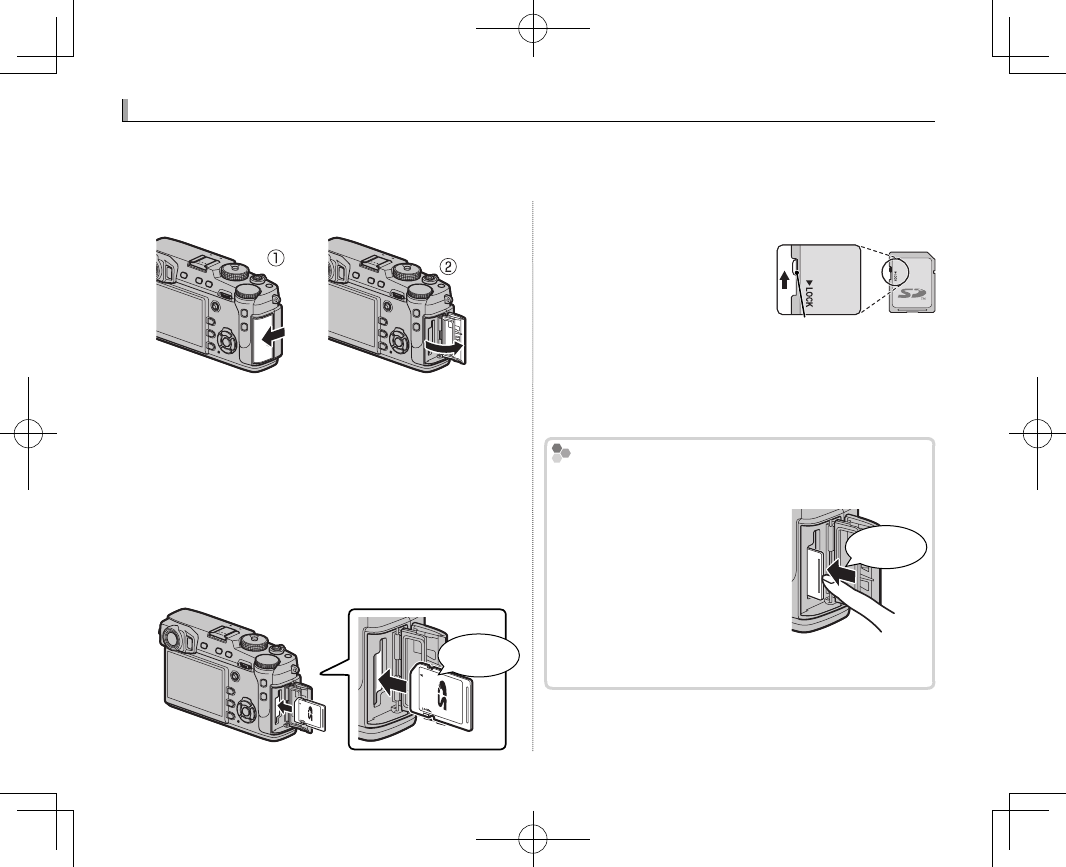
Open the memory card slot cover.
QDo not open the memory card slot cover when
the camera is on. Failure to observe this precau-
tion could damage image les or memory cards.
2 Insert a memory card.
Holding the memory card in the orientation
shown, slide it in until it clicks into place at the
back of the rst slot (if you are using two cards,
insert the second card into second slot).
Click!
Q Be sure card is in the correct orientation; do not
insert at an angle or use force.
Q SD/SDHC/SDXC memo-
ry cards can be locked,
making it impossible to
format the card or to
record or delete images.
Before inserting a memory card, slide the write-
protect switch to the unlocked position.
3
Close the memory card slot cover.
Removing Memory Cards
Removing Memory Cards
Before removing memory cards, turn the camera o
and open the memory card slot cover.
To remove a memory card,
press it in and release it slowly.
The card can then be removed
by hand. When a memory card
is removed, the card could be
ejected too quickly. Use your
nger to hold it and gently re-
lease the card.
Write-protect switch
Inserting Memory Cards
Inserting Memory Cards
The camera has no internal memory; instead, pictures are stored on optional SD, SDHC, and SDXC
memory cards (sold separately). The camera can be used with two cards, one in each of its two slots.
Movies are recorded only to the card in the rst slot, which supports UHS-II.
Press center
of card
23
First Steps
Inserting Memory Cards
Using Two Cards
Using Two Cards
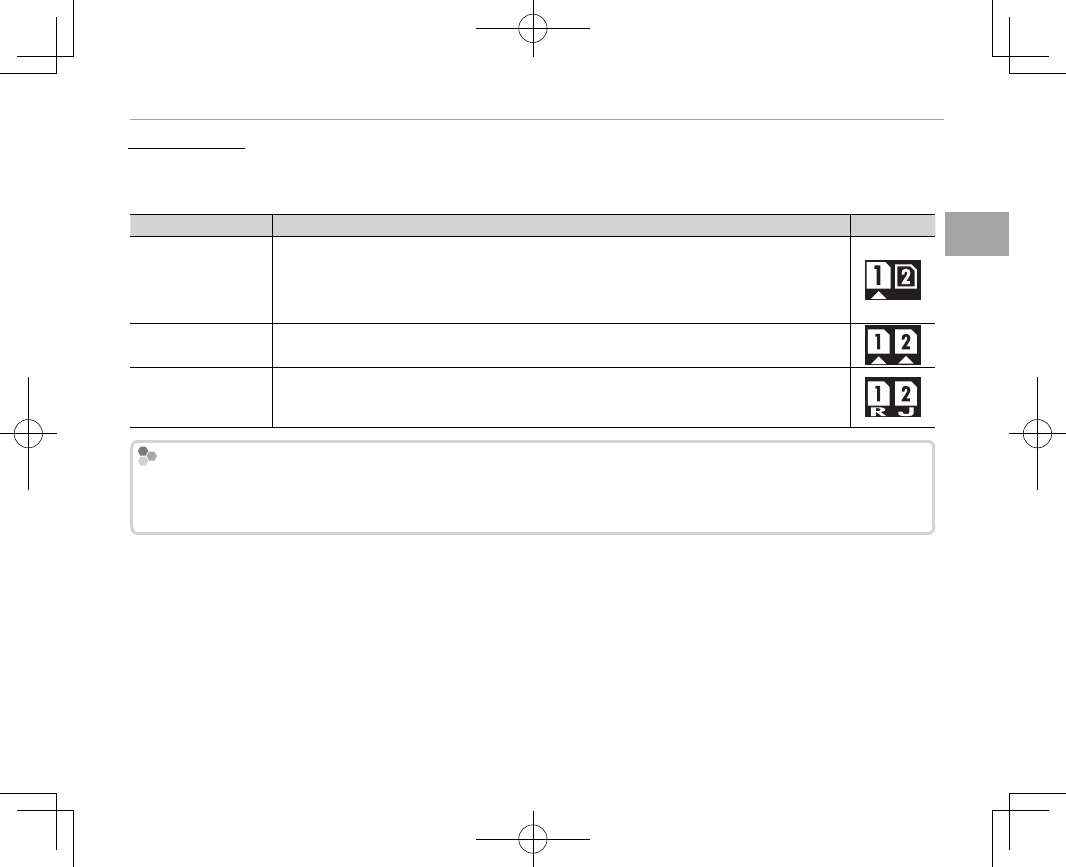
At default settings, the card in the second slot is used only if the card in the rst slot is full (SEQUENTIAL).
This can be changed using D SAVE DATA SETTING> CARD SLOT SETTING (STILL IMAGE) (P 116).
Option
Option
Description
Description
Display
Display
SEQUENTIAL
SEQUENTIAL
(default)
(default)
The card in the second slot is used only when the card in the rst slot is full.
RIf the second slot is selected for D SAVE DATA SETTING> SWITCH SLOT (SEQUEN-
TIAL), recording will start on the card in the second slot and switch to the rst slot when
the card in the second slot is full.
BACKUP
BACKUP Each picture is recorded twice, once to each card.
RAW/JPEG
RAW/JPEG
As for
SEQUENTIAL
SEQUENTIAL, except that the RAW copy of pictures taken with RAW + FINE or NOR-
MAL + RAW selected for H IMAGE QUALITY SETTING> IMAGE QUALITY will be saved to
the card in the rst slot and the JPEG copy to the card in the second slot.
Movies
Movies
Regardless of the option selected for CARD SLOT SETTING (STILL IMAGE), movies will be recorded to the card
in the rst slot; if SEQUENTIAL is selected, movies will be recorded to the card in the rst slot even after record-
ing has moved on to the card in the second slot.

24
Inserting Memory Cards
■ Compatible Memory Cards
FUJIFILM and SanDisk SD, SDHC, and SDXC memory cards have been approved for use in the cam-
era; UHS-II cards can be used in the rst slot. A complete list of approved memory cards is available
at http://www.fujifilm.com/support/digital_cameras/compatibility/. Operation is not guaranteed with
other cards. The camera can not be used with xD-Picture Cards or MultiMediaCard (MMC) devices.
Q
Q
Memory Cards
Memory Cards
• Do not turn the camera o or remove the memory card while the memory card is being formatted or data are
being recorded to or deleted from the card. Failure to observe this precaution could damage the card.
• Format memory cards before rst use, and be sure to reformat all memory cards after using them in a computer
or other device. For more information on formatting memory cards, see page 107.
• Memory cards are small and can be swallowed; keep out of reach of children. If a child swallows a memory card,
seek medical assistance immediately.
• miniSD or microSD adapters that are larger or smaller than the standard dimensions of an SD/SDHC/SDXC card
may not eject normally; if the card does not eject, take the camera to an authorized service representative. Do
not forcibly remove the card.
• Do not a x labels to memory cards. Peeling labels can cause camera malfunction.
• Movie recording may be interrupted with some types of SD/SDHC/SDXC memory card. Use a UHS speed class 1
card or better for movies and burst photography.
• Formatting a memory card in the camera creates a folder in which pictures are stored. Do not rename or delete
this folder or use a computer or other device to edit, delete, or rename image les. Always use the camera to
delete pictures; before editing or renaming les, copy them to a computer and edit or rename the copies, not
the originals. Renaming the les on the camera can cause problems during playback.
25
First Steps
Turning the Camera on and O
Turning the Camera on and O
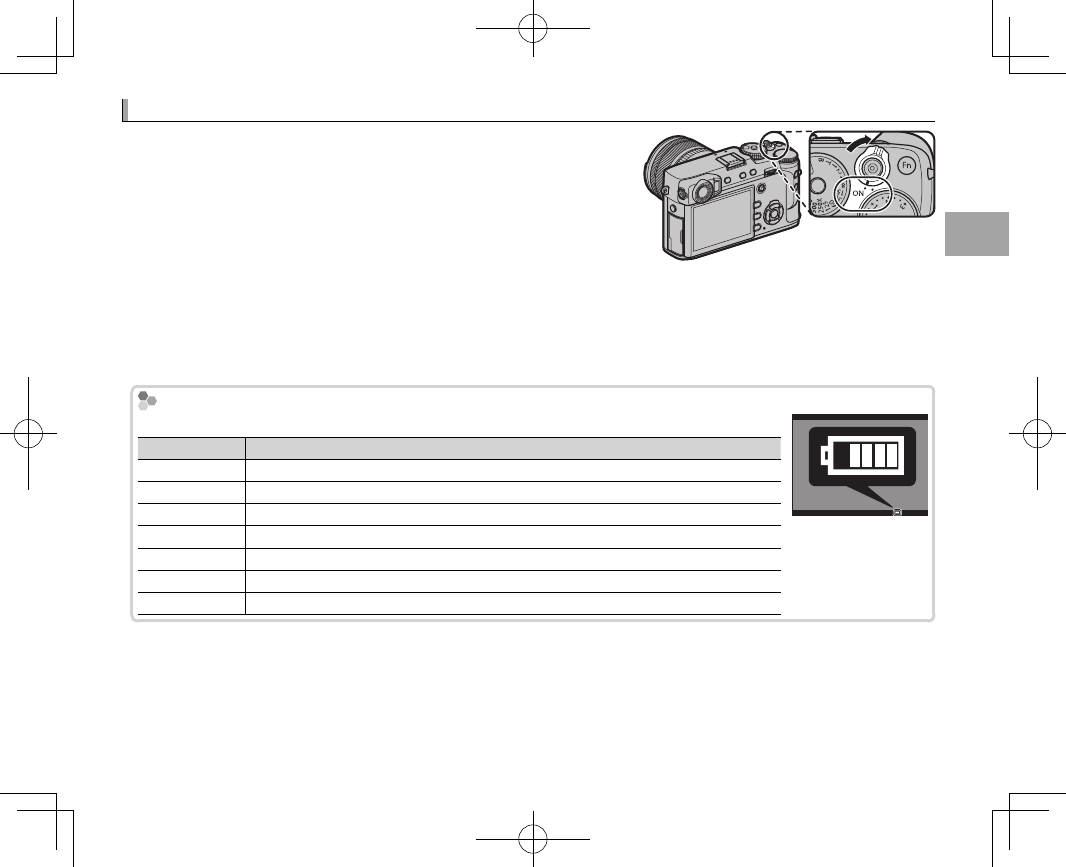
Rotate the ON/OFF switch to ON to turn the camera on. Select OFF
to turn the camera o .
RPress the a button to start playback. Press the shutter button half-
way to return to shooting mode.
RThe camera will turn o automatically if no operations are per-
formed for the length of time selected for D POWER MANAGE-
MENT> AUTO POWER OFF (P 114). To reactivate the camera after it has turned o automatically, press the
shutter button halfway or turn the ON/OFF switch to OFF and then back to ON.
QFingerprints and other marks on the lens or view nder can a ect pictures or the view through the view nder.
Keep the lens and view nder clean.
Battery Level
Battery Level
After turning the camera on, check the battery level in the display.
Indicator
Indicator
Description
Description
eBattery partially discharged.
fBattery about 80% full.
gBattery about 60% full.
hBattery about 40% full.
iBattery about 20% full.
i (red) Low battery. Charge as soon as possible.
j (blinks red) Battery exhausted. Turn camera o and recharge battery
26
Basic Setup
Basic Setup
A language-selection dialog is displayed the rst time the camera is turned on.
1
Choose a language.
Highlight a language and press MENU/OK.
RPress DISP/BACK to skip the current step. Any steps you skip will be displayed the next time the
camera is turned on.
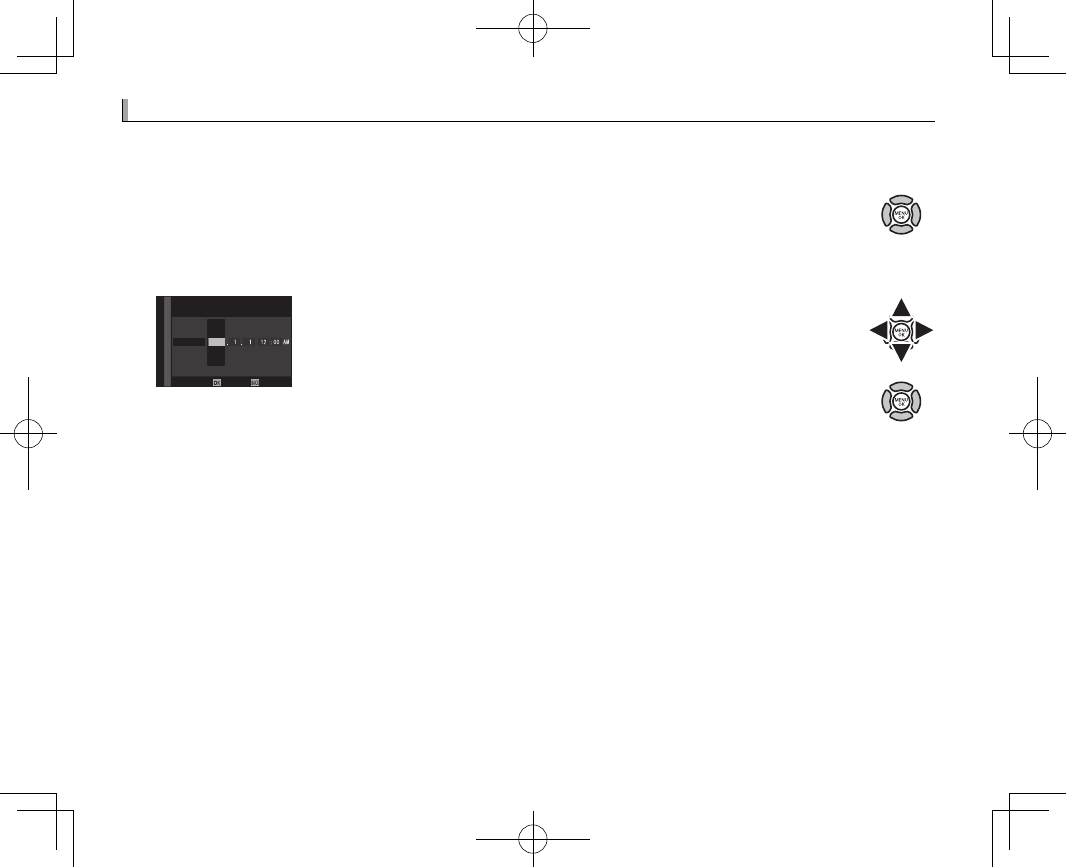
2
Set the date and time.
DATE/TIME NOT SET
NOSET
YY.MM.DD
AM
2017
2018
2015
2014
2016
Press the selector left or right to highlight the year, month, day, hour,
or minute and press up or down to change. To change the order in
which the year, month, and day are displayed, highlight the date for-
mat and press the selector up or down. Press MENU/OK to exit to shoot-
ing mode when settings are complete.
RIf the battery is removed for an extended period, the camera clock will be reset and the language-selection
dialog will be displayed when the camera is turned on.

27
First Steps
Basic Setup
Changing Basic Settings
Changing Basic Settings
To change the language or reset the clock:
1
Display the desired option.
Display the setup menu and select D USER SETTING> a to change the language or
DATE/TIME to reset the clock (P 106).
2
Adjust settings.
To choose a language, highlight the desired option and press MENU/OK. To set the clock, press the
selector left or right to highlight the year, month, day, hour, or minute and press up or down to
change, then press MENU/OK once the clock has been set to your satisfaction.
28
Display Settings
Display Settings
The camera is equipped with a hybrid optical/electronic view nder (OVF/EVF) and an LCD monitor
(LCD).
Choosing a Display
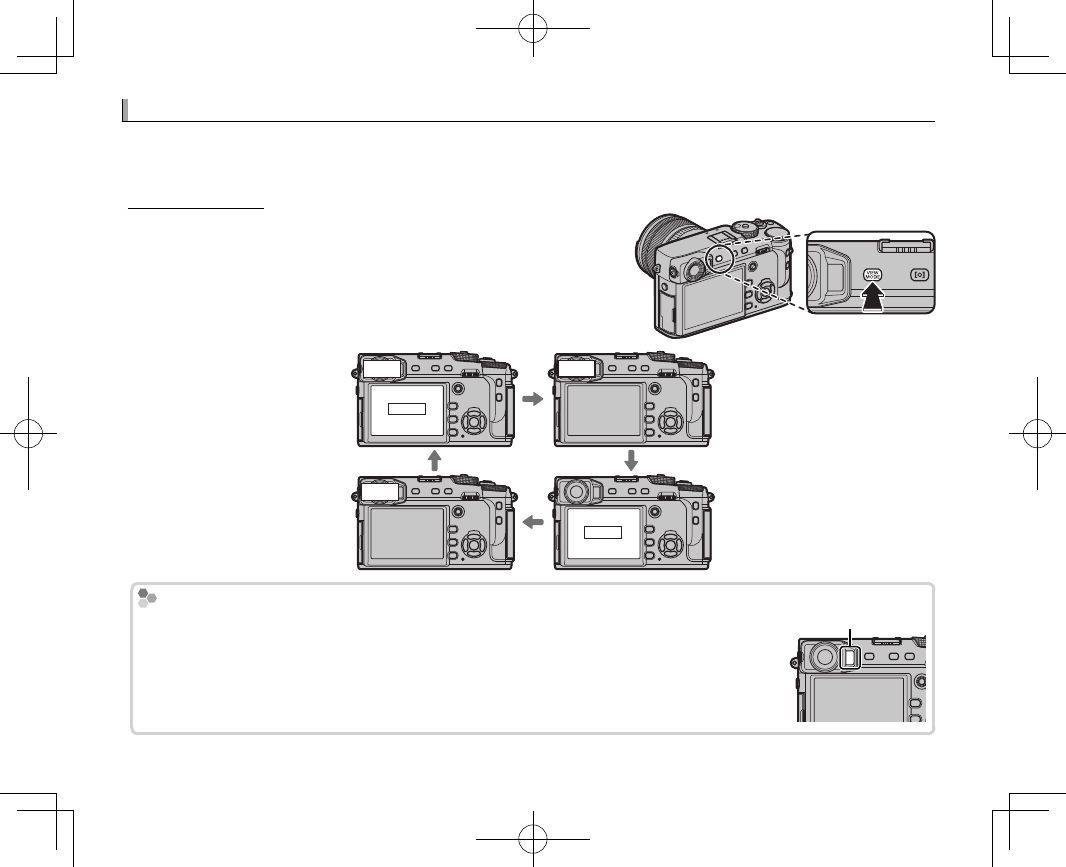
Choosing a Display
Press the VIEW MODE button to cycle through displays as shown
below.
E
E
EYE SENSOR
EYE SENSOR: Automatic display
selection using eye sensor LCD
VIEW
FINDER VIEW
FINDER
VIEWFINDER ONLY: View nder only
VIEWFINDER ONLY+ E: View nder
only; eye sensor turns display on
or o
VIEW
FINDER
LCD LCD ONLY: LCD monitor only
The Eye Sensor
The Eye Sensor
The eye sensor turns the view nder on when you put your eye to the view nder and turns
it o when you take your eye away (note that the eye sensor may respond to objects other
than your eye or to light shining directly on the sensor). If automatic display selection is
enabled, the LCD monitor will turn on when the view nder turns o .
Eye sensor
29
First Steps
Display Settings
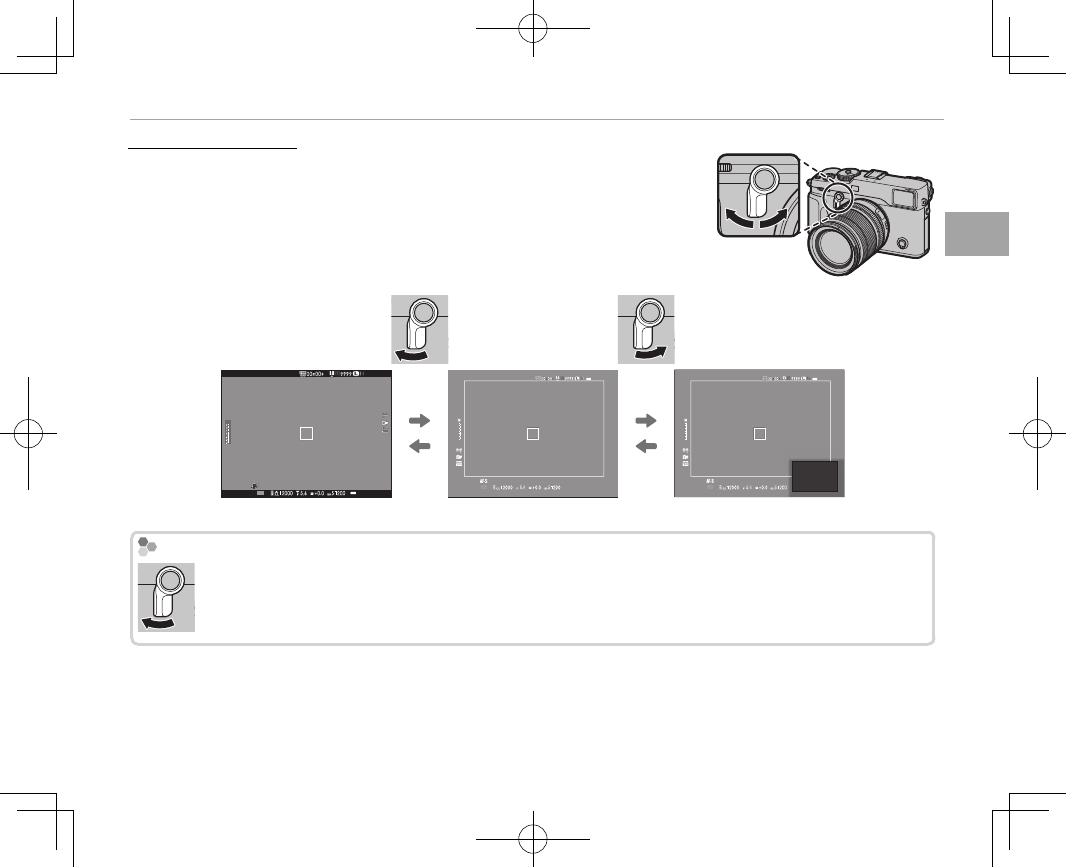
The View nder Selector
The View nder Selector
Use the view nder selector to switch between the electronic view nder
(EVF), the optical view nder (OVF), and a dual optical view nder/elec-
tronic range nder (ERF) display.
P
3
2
1
0
-1
-2
-3
P
3
2
1
0
-1
-2
-3
P
EVF OVF ERF (dual display)
The OVF Display
The OVF Display
Keep the selector pressed up to choose the optical view nder display zoom ratio.
30
Display Settings
The Hybrid (EVF/OVF/ERF) View nder
The Hybrid (EVF/OVF/ERF) View nder
The features of the di erent displays are described below.
Display
Display
Description
Description
OVF
OVF
The optical display is sharp and free of blur so that your subject’s expression is always visible. In addition, the
OVF shows the area just outside the frame, making it easier to compose shots on the y. Because the view nder
window is a slight distance from the lens, the area visible in photographs may however di er slightly from the
display in the view nder due to parallax.
EVF
EVF The live view display gives you a preview of the nal picture (including depth of eld, focus, exposure, and white
balance) with exactly the same frame coverage.
ERF
ERF
(dual display)
(dual display)
As for the optical view nder but with a focus preview. A magni ed view of an area of the frame including the
current focus position is shown at the bottom right corner of the display.
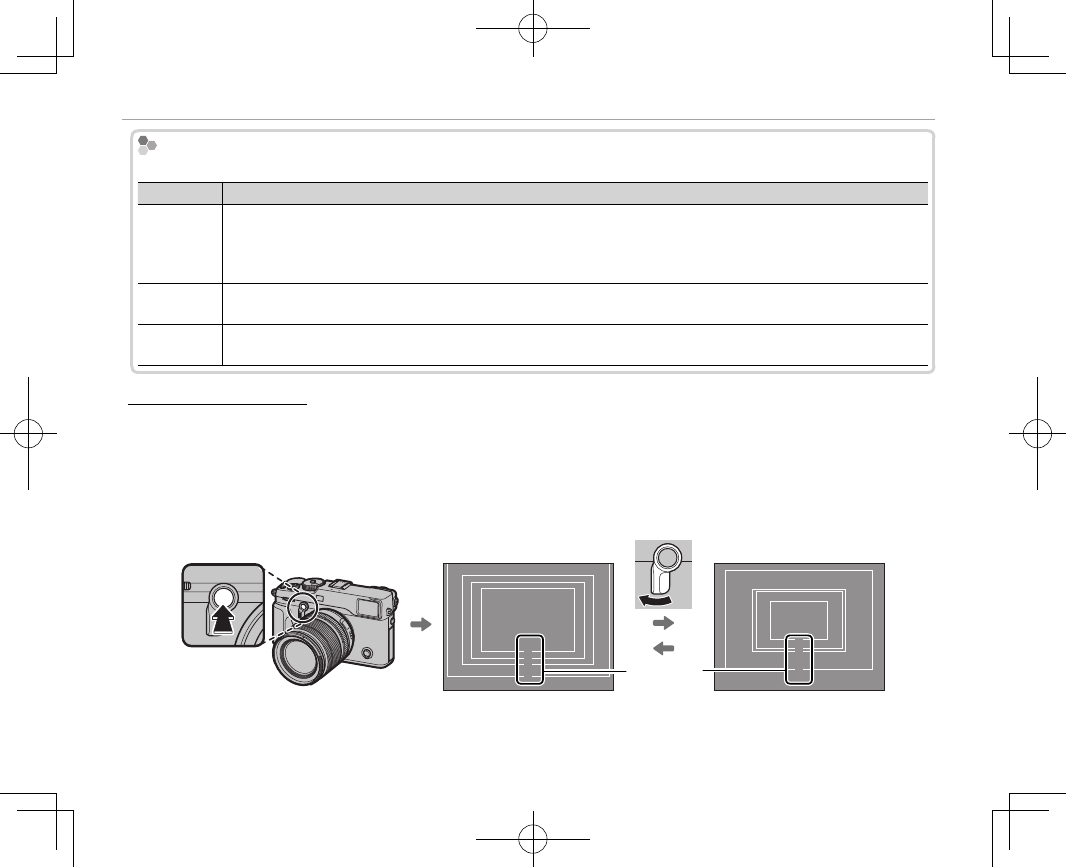
Bright Frame Simulation
Bright Frame Simulation
The angle of view covered by the bright frame in the OVF display varies with the focal length of the
lens. Pressing a function button (by default, Fn2) displays a bright frame simulation that shows the area
covered by the bright frame at di erent focal lengths.
RKeep the view nder selector pressed up to toggle between the bright frames for maximum and minimum
aperture.
33
27
23
18 Focal
length
90
60
56
35
Wide (0.36 ×) Tele (0.6 ×)
31
First Steps
Display Settings
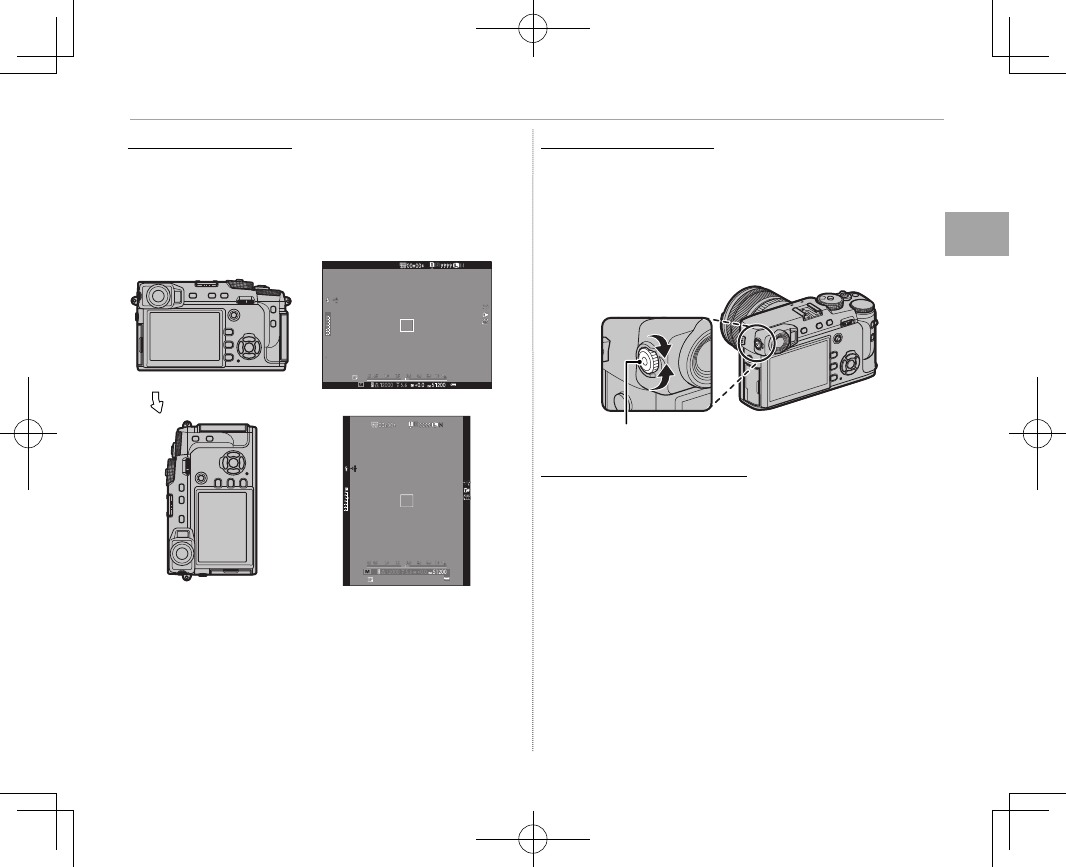
The View nder Display
The View nder Display
When ON is selected for D SCREEN SETTING>
EVF AUTOROTATE DISPLAYS
(P 110)
, the indi-
cators in the view nder automatically rotate to
match camera orientation.
Orientation changed from “wide” to “tall”
QThe display in the LCD monitor is una ected.
Focusing the View nder
Focusing the View nder
The camera is equipped with diopter adjustment
in the range –4 to +2 m–1 to accommodate indi-
vidual di erences in vision. Rotate the diopter
adjustment control until the view nder display is
in sharp focus.
Diopter adjustment control
Adjusting Display Brightness
Adjusting Display Brightness
The brightness and hue of the view nder and LCD
monitor can be adjusted using the options under
D SCREEN SETTING
. Choose EVF BRIGHTNESS
or EVF COLOR to adjust view nder brightness or
hue (P 110), LCD BRIGHTNESS or LCD COLOR to
do the same for the LCD monitor (P 110).
32
The
The
DISP/BACK
DISP/BACK
Button
Button
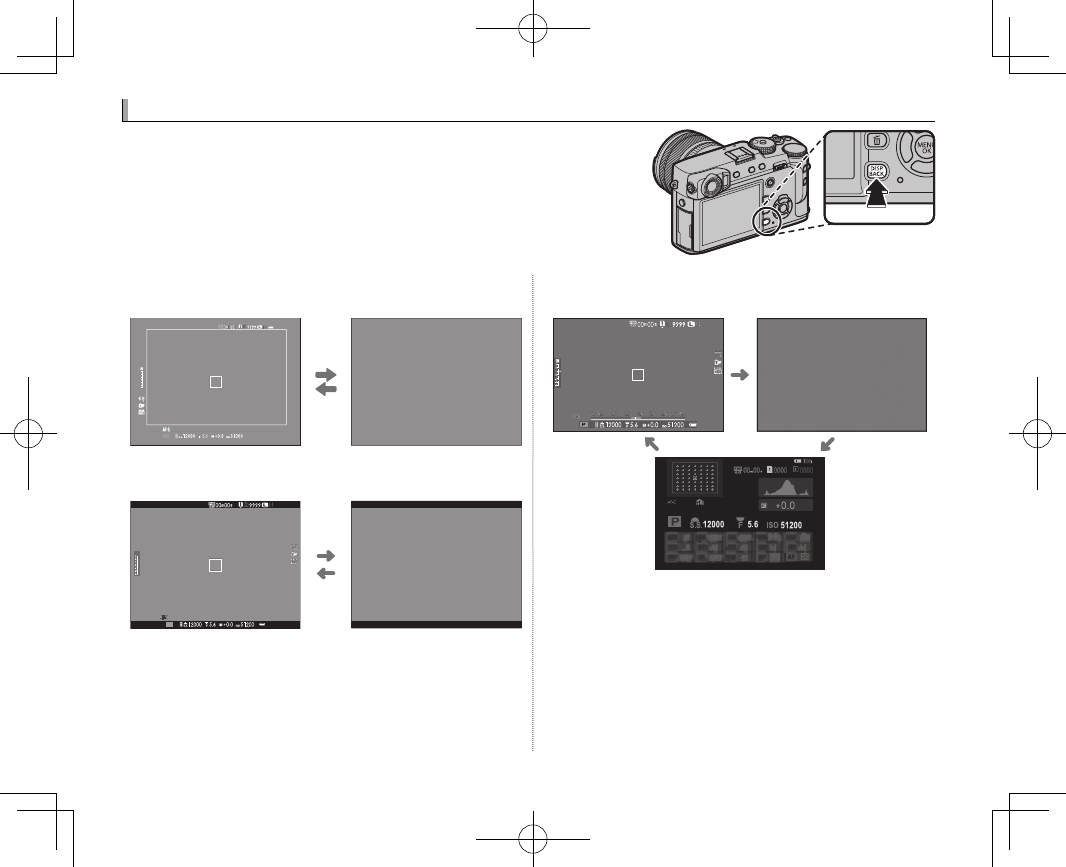
The DISP/BACK button controls the display of indicators in the
view nder and LCD monitor.
■Shooting: Optical View nder
Standard Information o
3
2
1
0
-1
-2
-3
P
■Shooting: Electronic View nder
Standard Information o
P
■ LCD Monitor: Shooting
Standard Information o
Info display
33
First Steps
The DISP/BACK Button
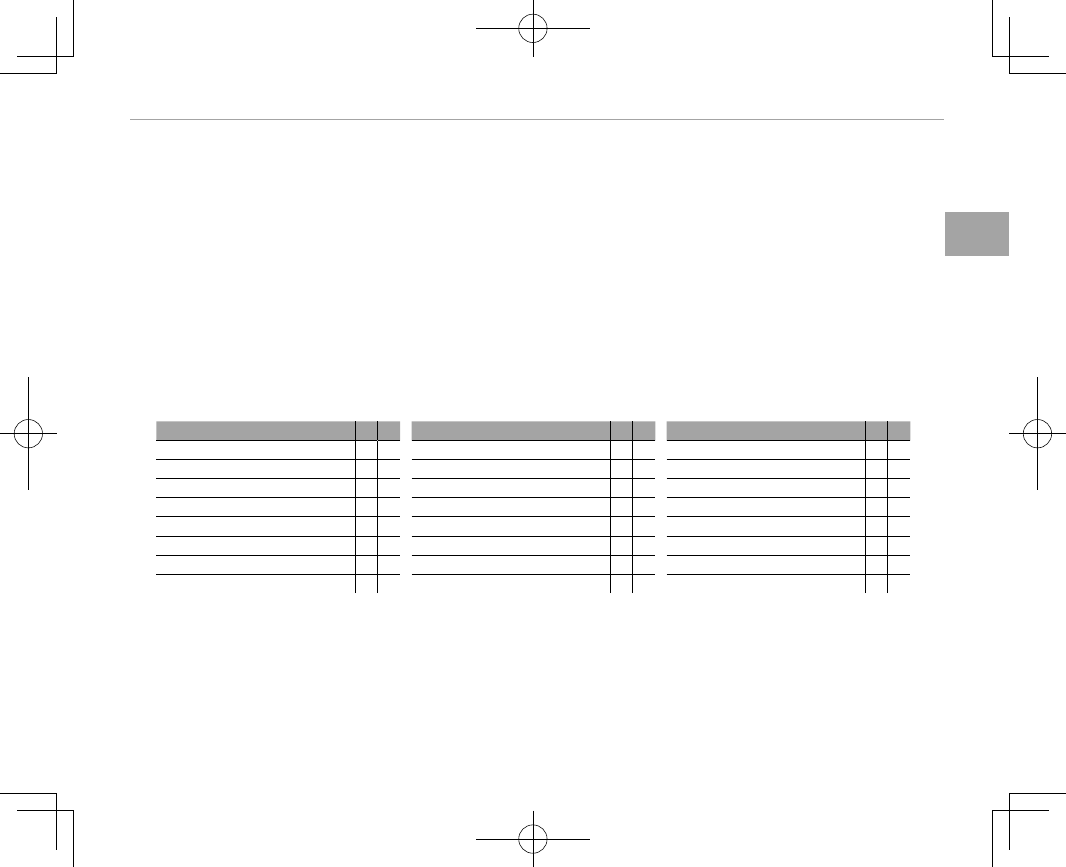
■ Customizing the Standard Display
To choose the items shown in the standard display:
1
Display standard indicators.
Press the DISP/BACK button until standard indicators are displayed.
2
Select DISP. CUSTOM SETTING.
Select D SCREEN SET-UP> DISP. CUSTOM SETTING (P 111) in the setup menu.
3
Choose a display.
Highlight OVF or EVF/LCD and press MENU/OK.
4
Choose items.
Highlight items and press MENU/OK to select or deselect.
Option
Option
OVF
OVF
EVF
EVF
Option
Option
OVF
OVF
EVF
EVF
Option
Option
OVF
OVF
EVF
EVF
FRAMING GUIDELINE
ww
INFORMATION BACKGROUND —RDUAL IS MODE RR
ELECTRONIC LEVEL
ww
Expo. Comp. (Digit)
ww
WHITE BALANCE RR
FOCUS FRAME RR Expo. Comp. (Scale) RR FILM SIMULATION RR
AF DISTANCE INDICATOR
ww
FOCUS MODE RR DYNAMIC RANGE RR
MF DISTANCE INDICATOR RR PHOTOMETRY RR FRAMES REMAINING RR
HISTOGRAM
ww
SHUTTER TYPE RR IMAGE SIZE/QUALITY RR
SHOOTING MODE RR FLASH RR MOVIE MODE & REC. TIME
w
R
APERTURE/S-SPEED/ISO RR CONTINUOS MODE RR BATTERY LEVEL RR
5
Save changes.
Press DISP/BACK to save changes.
6
Exit the menus.
Press DISP/BACK as needed to exit the menus and return to the shooting display.
RSee page 8 for the locations of these items in the displays.

34
The DISP/BACK Button
Virtual Horizon
Virtual Horizon
Selecting ELECTRONIC LEVEL displays a virtual horizon. The camera is level when the two
lines overlap.
RThe virtual horizon may not be displayed if the camera lens is pointed up or down.
■View nder/LCD Monitor: Playback
Standard Information o Info display Favorites
12/31/2050 10:00 AM
102/31/2050 10:00 AM
12/31/2050 10:00 AM
FAVORITES
Histograms
Histograms
Histograms show the distribution of tones in the im-
age. Brightness is shown by the horizontal axis, the
number of pixels by the vertical axis.
Shadows Highlights
No. of pixels
Pixel brightness
Optimal exposure: Pixels are distrib-
uted in an even curve through-
out the tone range.
Overexposed: Pixels are clustered
on the right side of the graph.
Underexposed: Pixels are clustered
on the left side of the graph.
35
Basic Photography and Playback
Basic Photography and Playback
Basic Photography and Playback
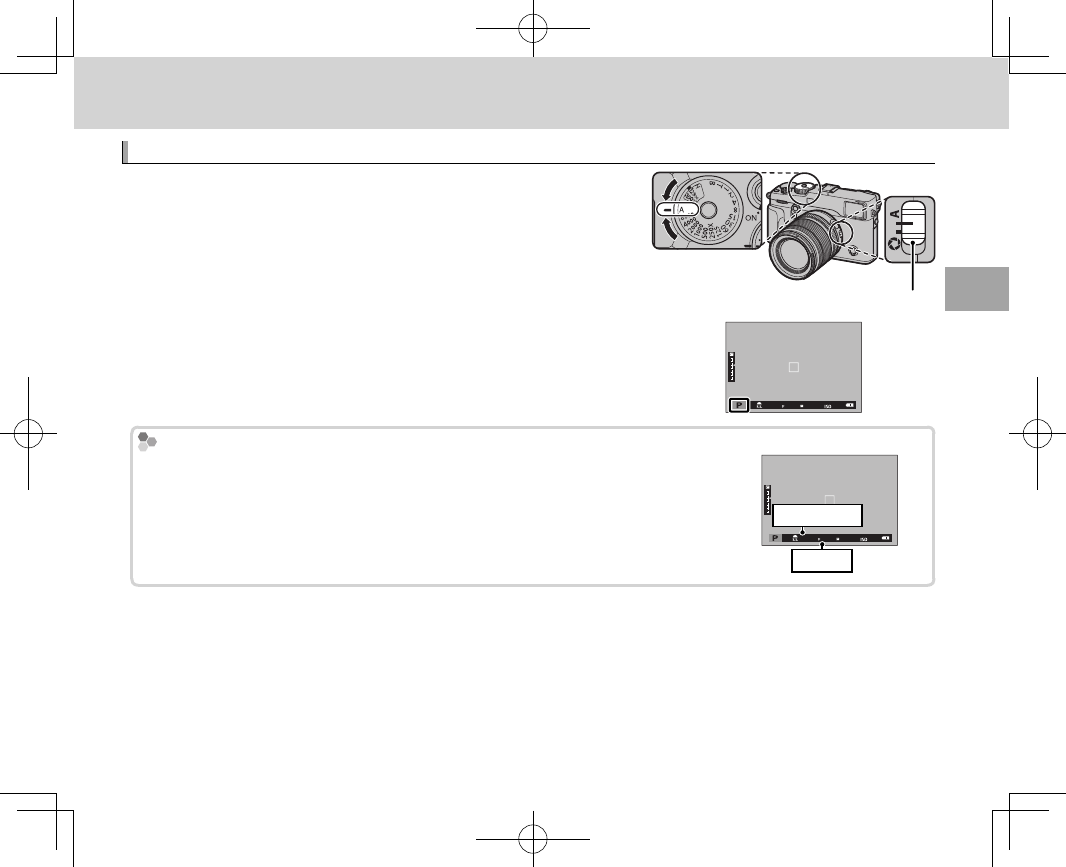
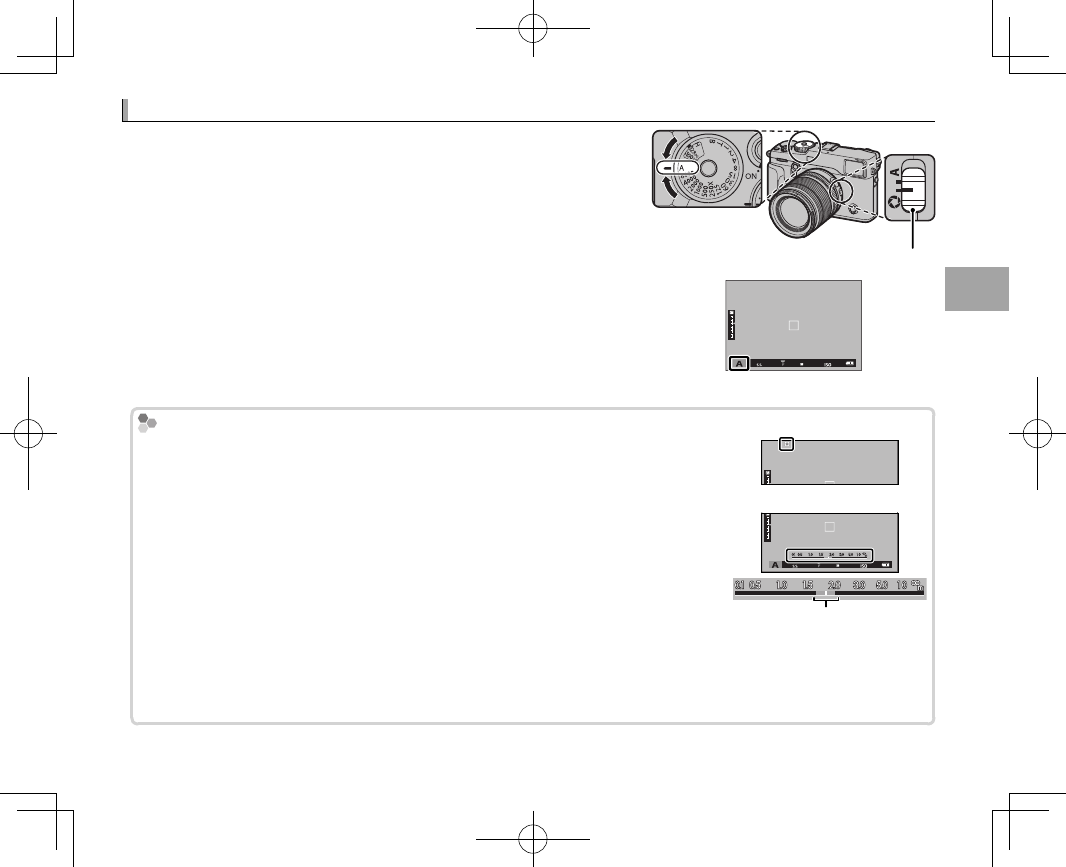
Program AE (P)
Program AE (P)
To allow the camera to adjust both shutter speed and aperture
for optimal exposure, set shutter speed and aperture to A. P will
appear in the display.
QIf the subject is outside the metering range of the camera, the shutter
speed and aperture displays will show “– – –”. Aperture mode switch
Program Shift
Program Shift
If desired, you can rotate the front or rear command dial to select other combi-
nations of shutter speed and aperture without altering exposure (program shift).
Program shift is not available if the attached ash supports TTL auto, or if an auto
option is selected for H IMAGE QUALITY SETTING> DYNAMIC RANGE (P 89).
To cancel program shift, turn the camera o .
Shutter speed
Aperture
36
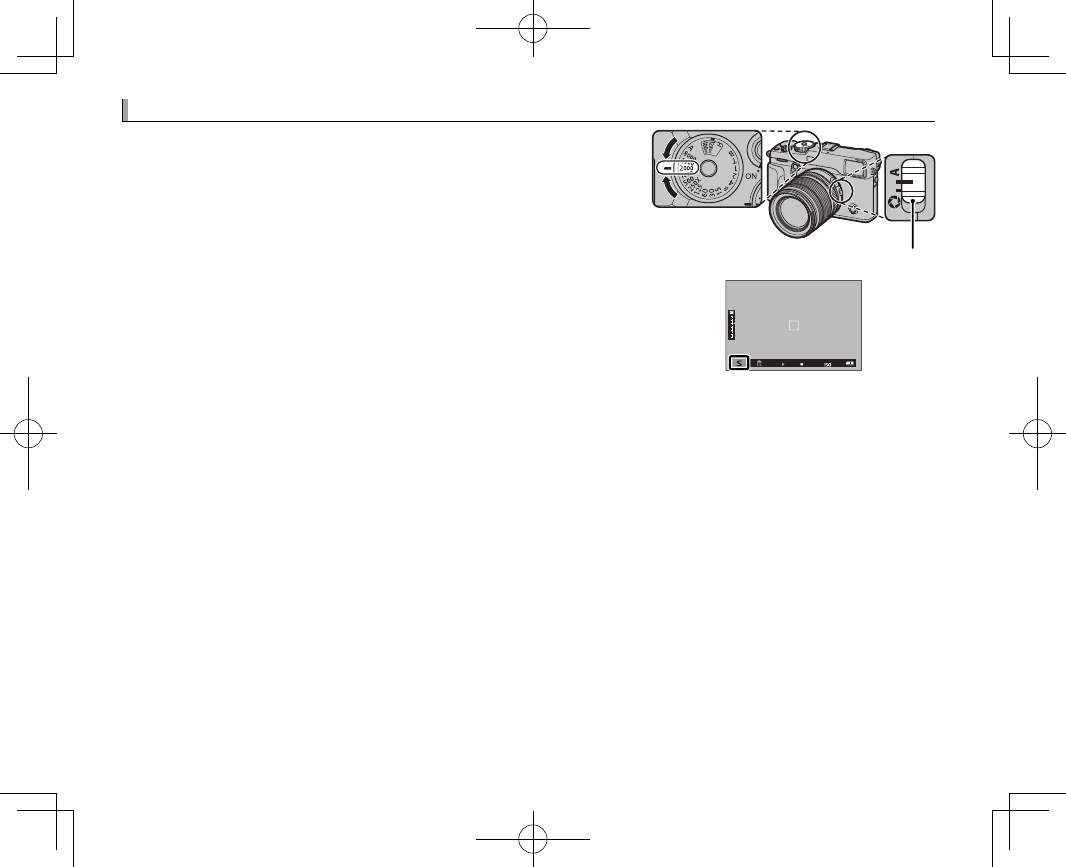
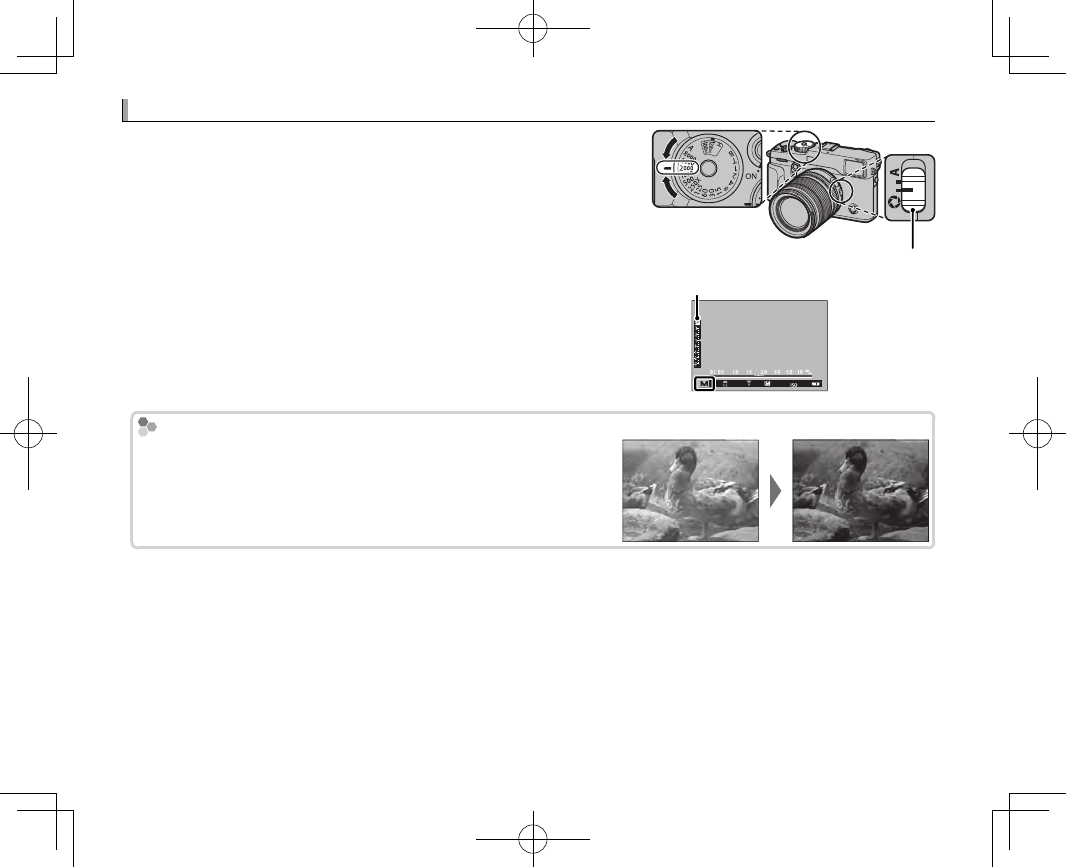
Shutter-Priority AE (S)
Shutter-Priority AE (S)
To adjust shutter speed manually while letting the camera se-
lect aperture for optimal exposure, set aperture to A and use the
shutter speed dial (if A is currently selected for shutter speed,
press the dial lock release while rotating the shutter speed dial).
S will appear in the display.
RShutter speed can also be adjusted in increments of
/
EV by rotating
the front command dial. Shutter speed can be adjusted even while
the shutter button is pressed halfway.
QIf the correct exposure can not be achieved at the selected shutter
speed, aperture will be displayed in red when the shutter button is
pressed halfway. Adjust shutter speed until the correct exposure is
achieved.
QIf the subject is outside the metering range of the camera, the aper-
ture display will show “– – –”.
Aperture mode switch
37
Basic Photography and Playback
Aperture-Priority AE (A)
Aperture-Priority AE (A)
To adjust aperture manually while letting the camera select shut-
ter speed for optimal exposure, rotate the shutter speed dial to A
and adjust aperture as desired. A will appear in the display.
RAperture can be adjusted even while the shutter button is pressed
halfway.
QIf the correct exposure can not be achieved at the selected aper-
ture, the shutter speed will be displayed in red when the shutter but-
ton is pressed halfway. Adjust aperture until the correct exposure is
achieved.
QIf the subject is outside the metering range of the camera, the shutter
speed display will show “– – –”.
Aperture mode switch
Previewing Depth of Field
Previewing Depth of Field
When L PREVIEW DEPTH OF FIELD is assigned to a function button (P 51),
pressing the button stops aperture down to the selected setting, allowing depth
of eld to be previewed in the display.
Depth of eld can also be previewed using the depth-of- eld indicator in the stan-
dard display (P 33). Press DISP/BACK to cycle through display modes until standard
indicators are displayed.
RUse the G AF/MF SETTING> DEPTH-OF-FIELD SCALE option (P 94) to
choose how depth of eld is displayed. Choose FILM FORMAT BASIS to
help you make practical assessments of depth of eld for pictures that will be
viewed as prints and the like, PIXEL BASIS to help you assess depth of eld for
pictures that will be viewed at high resolutions on computers or other elec-
tronic displays.
Depth of eld
38
Manual Exposure (M)
Manual Exposure (M)
Exposure can be altered from the value suggested by the camera
by setting both shutter speed and aperture to values other than
A (if A is currently selected for shutter speed, press the dial lock
release while rotating the shutter speed dial). M will appear in
the display.
RShutter speed can also be adjusted in increments of
/
EV by rotating
the front command dial.
Aperture mode switch
Exposure indicator
㹋
Exposure Preview
Exposure Preview
To preview exposure in the LCD monitor, select an option other
than OFF for D SCREEN SETTING> PREVIEW EXP./WB IN MAN-
UAL MODE ( P 110). Select OFF when using the ash or on other oc-
casions on which exposure may change when the picture is taken.
39
Basic Photography and Playback
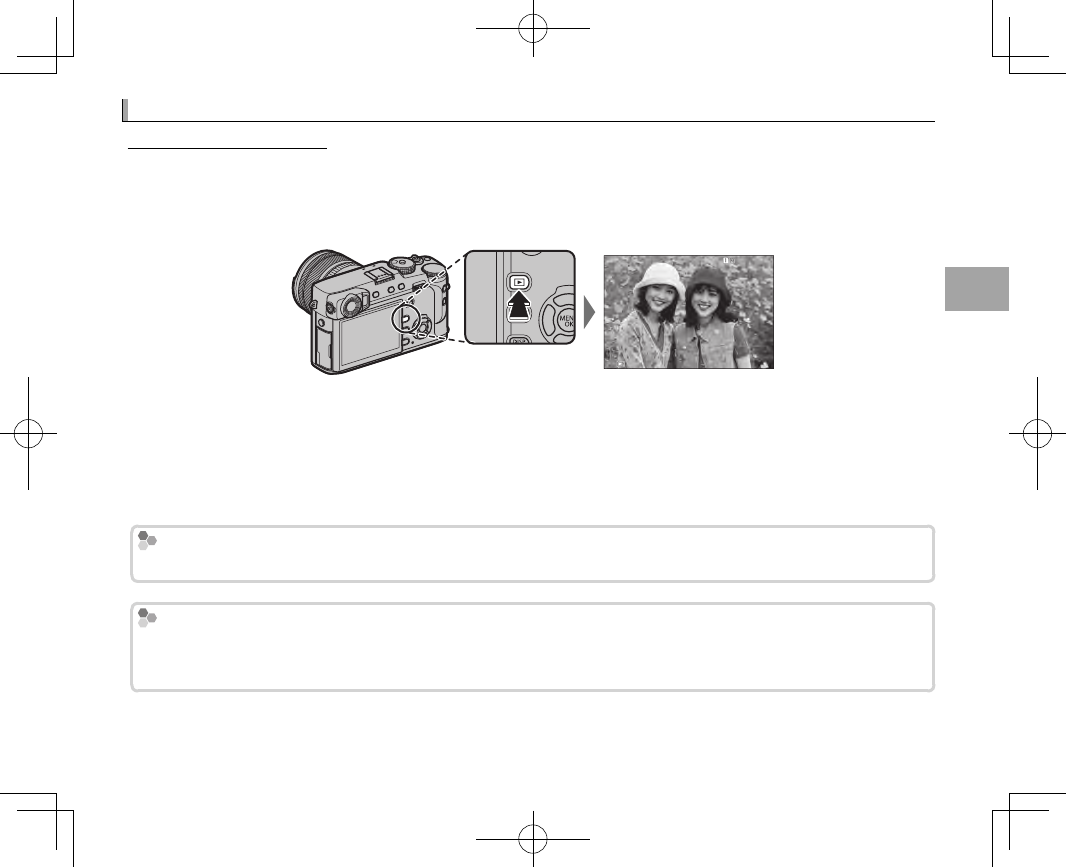
Viewing Pictures
Viewing Pictures
Viewing Pictures Full Frame
Viewing Pictures Full Frame
Pictures can be viewed in the view nder or LCD monitor. When taking important pictures, take a test
shot and check the results.
To view pictures full frame, press a.
100-0001
Additional pictures can be viewed by pressing the selector left or right or rotating the front command
dial. Press the selector or rotate the dial right to view pictures in the order recorded, left to view pic-
tures in reverse order. Keep the selector pressed to scroll rapidly to the desired frame.
R Pictures taken using other cameras are marked with a m (“gift image”) icon to warn that they may not display
correctly and that playback zoom may not be available.
Favorites: Rating Pictures
Favorites: Rating Pictures
To rate the current picture, press DISP/BACK and press the selector up and down to select from zero to ve stars.
Two Memory Cards
Two Memory Cards
If two memory cards are inserted, you can press and hold the a button to choose a card for playback.
RYou can also select a card using the C PLAYBACK MENU> SWITCH SLOT option (P 102).
40
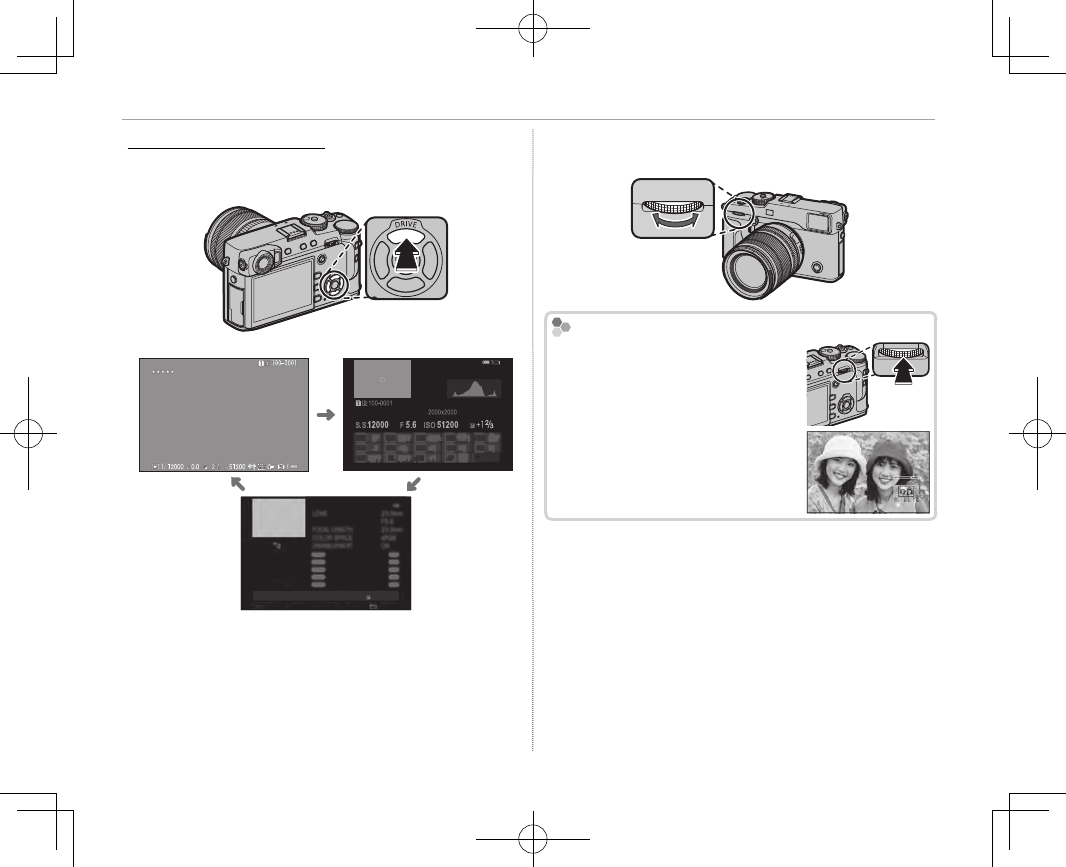
Viewing Pictures
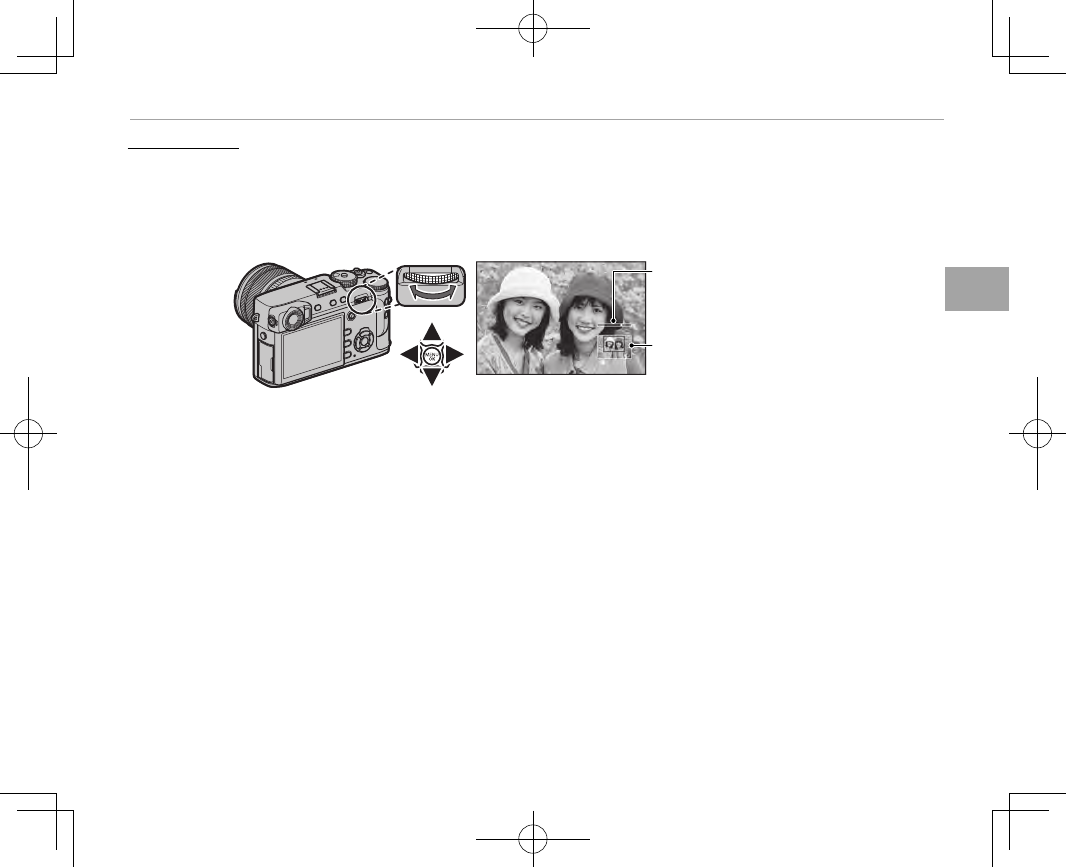
Viewing Photo Information
Viewing Photo Information
The photo information display changes each
time the selector is pressed up.
Basic data Info display 1
12/31/2050 10:00 AM
102/31/2050 10:00 AM
1/4000
S.S
5.6
F400 +21/3
ISO
LENS
23.0
mm
F
5.6
FOCAL LENGTH
23.0
mm
COLOR SPACE sRGB
LENS MODULATION OPT.
ON
NEXT
Info display 2
RRotate the front command dial to view other im-
ages.
Zooming in on the Focus Point
Zooming in on the Focus Point
Press the center of the rear com-
mand dial to zoom in on the focus
point. Press again to return to full-
frame playback.
41
Basic Photography and Playback
Viewing Pictures
Playback Zoom
Playback Zoom
Rotate the rear command dial right to zoom in on the current picture, left to zoom out (to view mul-
tiple images, rotate the dial left when the picture is displayed full frame; P 42). When the picture is
zoomed in, the selector can be used to view areas of the image not currently visible in the display. To
exit zoom, press DISP/BACK, MENU/OK, or the center of the rear command dial.
Zoom indicator
Navigation window shows
portion of image currently
displayed
RThe maximum zoom ratio varies with image size (P 88). Playback zoom is not available with cropped or resized
copies saved at a size of a (P 102, 103).
42
Viewing Pictures
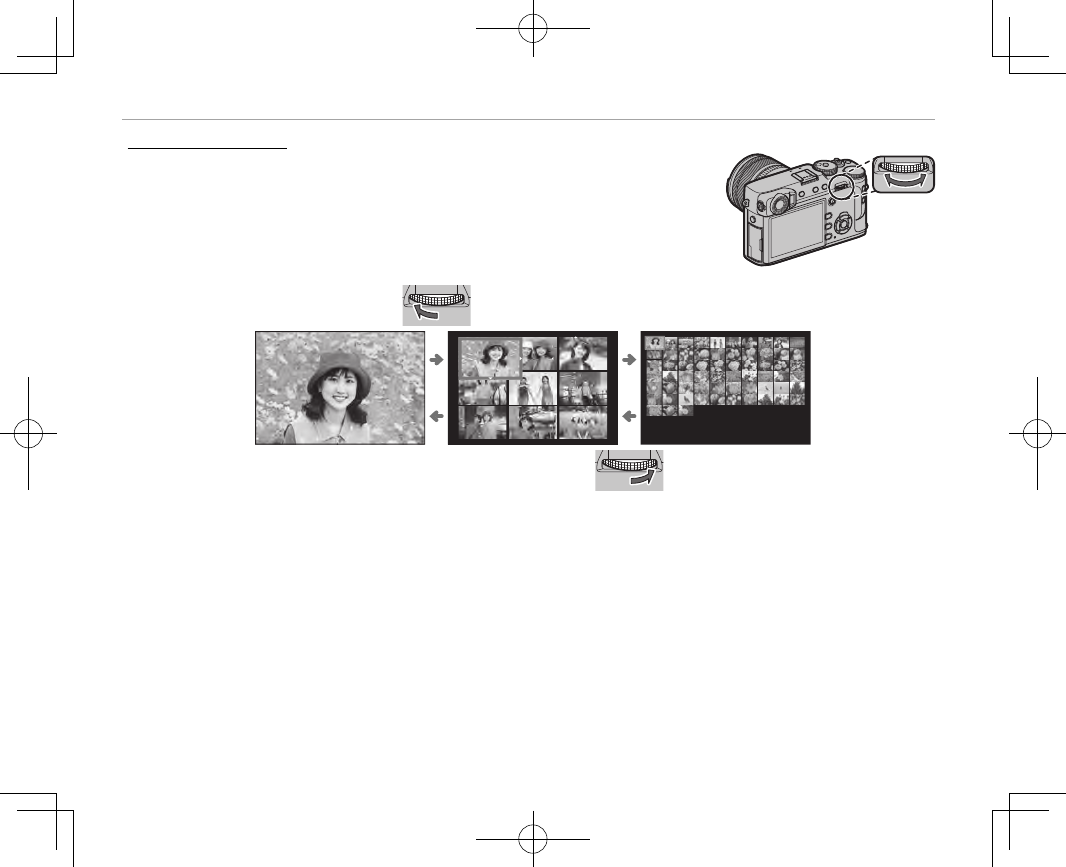
Multi-Frame Playback
Multi-Frame Playback
To change the number of images displayed, rotate the rear command dial
left when a picture is displayed full frame.
Rotate left to view more images.
100-0001
100-0001
Rotate right to view fewer images.
Use the selector to highlight images and press MENU/OK to view the highlighted image full frame (to
zoom in on the selected image, rotate the rear command dial right when the picture is displayed full
frame; P 41). In the nine- and hundred-frame displays, press the selector up or down to view more
pictures.

43
Basic Photography and Playback
Deleting Pictures
Deleting Pictures
To delete individual pictures, multiple selected pictures, or all pictures, press the b button when a
picture is displayed full frame and choose from the options below. Note that deleted pictures can not
be recovered. Copy important pictures to a computer or other storage device before proceeding.
ERASE
FRAME
SELECTED FRAMES
ALL FRAMES
Option
Option
Description
Description
FRAME
FRAME Press the selector left or right to scroll through pictures and press MENU/OK to delete the current picture
(a confirmation dialog is not displayed).
SELECTED FRAMES
SELECTED FRAMES
Highlight pictures and press MENU/OK to select or deselect (pictures in photobooks or print orders are shown
by S). When the operation is complete, press DISP/BACK to display a con rmation dialog, then highlight OK
and press MENU/OK to delete the selected pictures.
ALL FRAMES
ALL FRAMES
A con rmation dialog will be displayed; highlight OK and press MENU/OK to delete all unprotected pictures.
Pressing DISP/BACK cancels deletion; note that any pictures deleted before the button was pressed can not
be recovered.
RProtected pictures can not be deleted. Remove protection from any pictures you wish to delete (P 103).
RPictures can also be deleted from the menus using the C PLAY BACK MENU> ERASE option (P 102).
RIf a message appears stating that the selected images are part of a DPOF print order, press MENU/OK to delete
the pictures.

44
Basic Movie Recording and Playback
Basic Movie Recording and Playback
Recording Movies
Recording Movies
The camera can be used to record short high-de nition movies. Sound is recorded in stereo via the
built-in microphone; do not cover the microphone during recording.
QMovies are recorded to the card in the rst slot. Be sure a card is inserted in the rst slot before proceeding.
1
Press the movie-record (Fn1) button to start re-
cording.
Recording indicator
Time remaining
2
Press the button again to end recording. Re-
cording ends automatically when the maximum
length is reached or the memory card is full.
RZoom can be adjusted while recording is in progress.
RFrame size and rate can be selected using W MOVIE
SETTING> MOVIE MODE (P 99). Focus mode is se-
lected using the focus mode selector (P 63); for con-
tinuous focus adjustment, select C, or choose S and
enable Intelligent Face Detection (P 92). Intelligent
Face Detection is not available in focus mode M.
RDuring recording, exposure compensation can be
adjusted by up to ±2EV.
RThe indicator lamp lights while movies are being
recorded.
45
Basic Movie Recording and Playback
Recording Movies
QIf the lens is equipped with an aperture mode
switch, select the aperture mode before beginning
recording. If an option other than A is selected,
shutter speed and aperture can be adjusted while
recording is in progress.
Q The microphone may pick up lens noise and other
sounds made by the camera during recording.
QVertical or horizontal streaks may appear in movies
containing very bright subjects. This is normal and
does not indicate a malfunction.
Depth of Field
Depth of Field
Adjust aperture before recording begins. Choose
low f-numbers to soften background details.
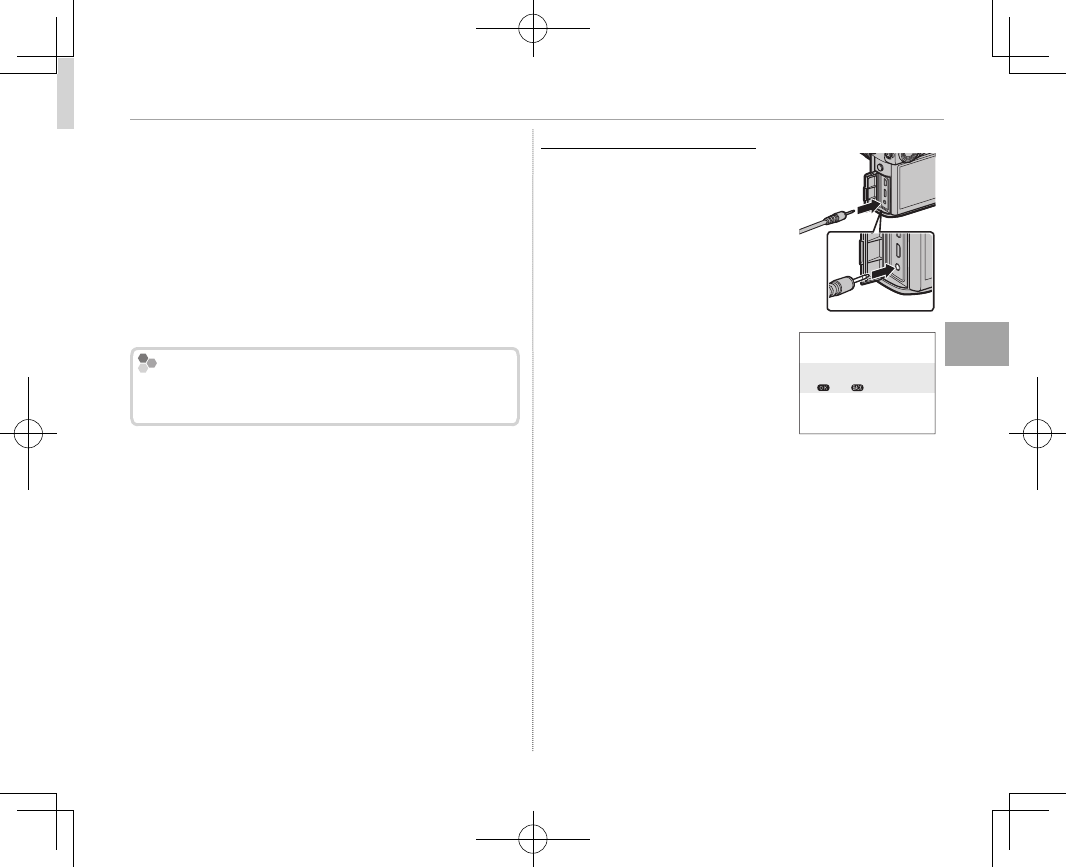
Using an External Microphone
Using an External Microphone
Sound can be recorded with
external microphones that con-
nect using jacks 2.5 mm in diam-
eter; microphones that require
bus power can not be used. See
the microphone manual for de-
tails.
RThe dialog shown at right will be
displayed when a microphone is
connected to the microphone/
remote release connector. Press
MENU/OK and select MIC/RE-
MOTE RELEASE> m MIC.
CHECK MIC/REMOTE RELEASE
SETTING
SKIP
SET
46
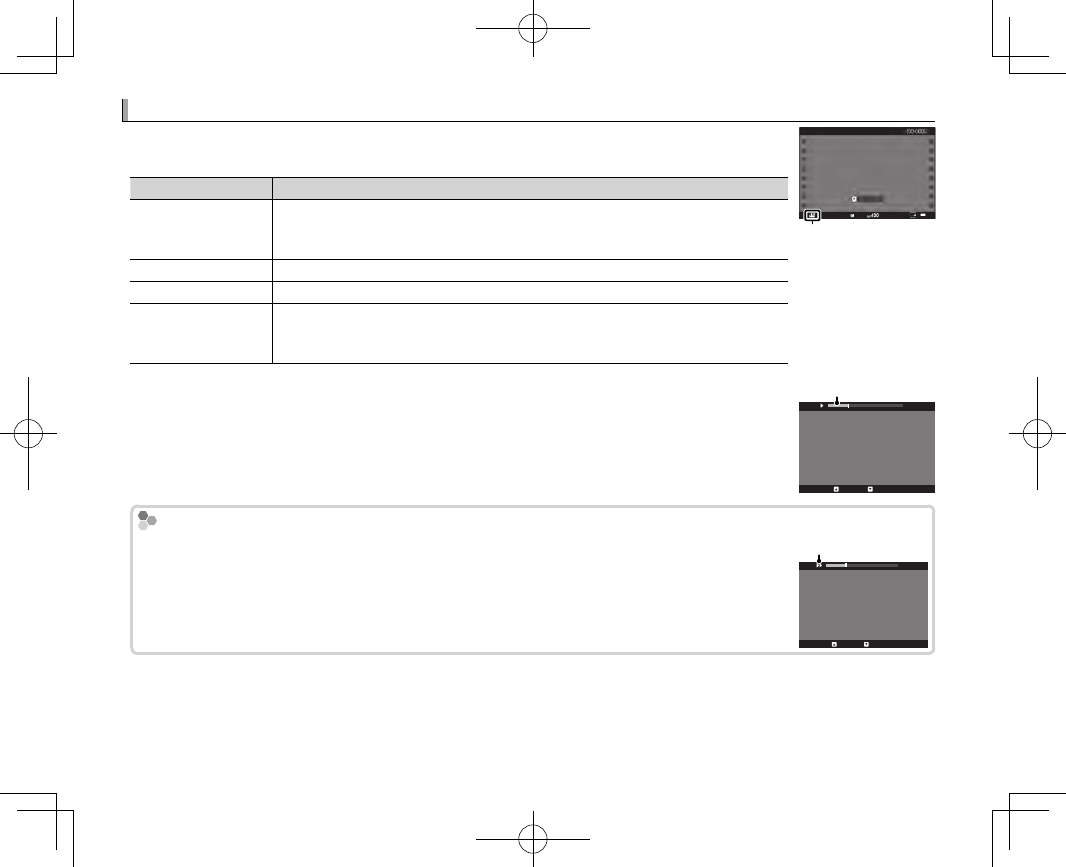
Viewing Movies
Viewing Movies
During playback, movies are displayed as shown at right. The following operations
can be performed while a movie is displayed:
Operation
Operation
Description
Description
Start/pause playback
Start/pause playback
Press the selector down to start playback. Press again to pause. While playback is
paused, you can press the selector left or right to rewind or advance one frame
at a time.
End playback
End playback Press the selector up to end playback.
Adjust speed
Adjust speed Press the selector left or right to adjust playback speed during playback.
Adjust volume
Adjust volume
Press MENU/OK to pause playback and display volume controls. Press the selector up
or down to adjust the volume; press MENU/OK again to resume playback. Volume
can also be adjusted using D SOUND SETTING> PLAYBACK VOLUME (P 109).
12/31/2050 10:00 AM
PLAYPLAY
±0
Movie icon
Progress is shown in the display during playback.
Q Do not cover the speaker during playback.
Progress bar
STOP PAUSE
29m59s
Playback Speed
Playback Speed
Press the selector left or right to adjust playback speed during playback. Speed is shown by the
number of arrows (M or N).
Arrow
STOP PAUSE
29m59s
47
The Q (Quick Menu) Button
The Q (Quick Menu) Button
The Q (Quick Menu) Button
Using the Q Button
Using the Q Button
Press Q for quick access to selected options.
The Quick Menu Display
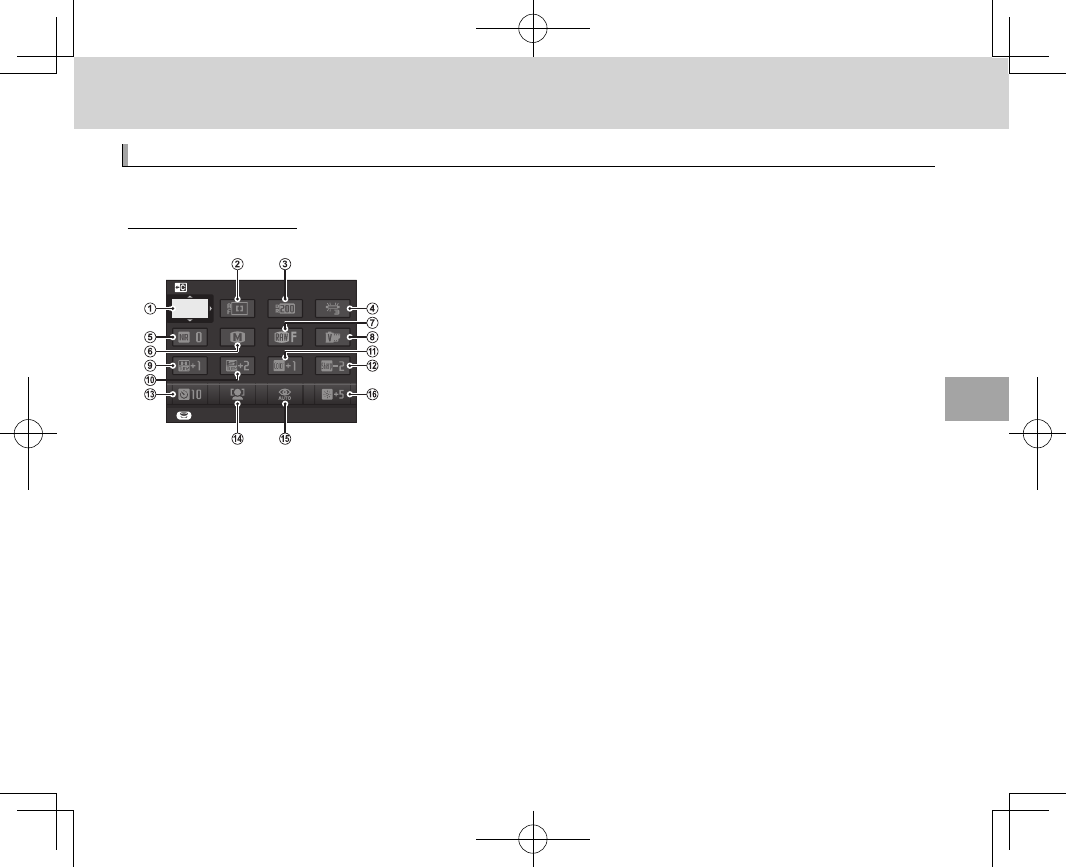
The Quick Menu Display
At default settings, the quick menu contains the following items.
SET
SELECT CUSTOM SETTING
BASE
A
SELECT CUSTOM SETTING
B
AF MODE
C
DYNAMIC RANGE
D
WHITE BALANCE
E
NOISE REDUCTION
F
IMAGE SIZE
G
IMAGE QUALITY
H
FILM SIMULATION
I
HIGHLIGHT TONE
J
SHADOW TONE
K
COLOR
L
SHARPNESS
M
SELF-TIMER
N
FACE/EYE DETECTION SETTING
O
FLASH MODE
P
EVF/LCD BRIGHTNESS
The quick menu shows the options currently selected for items B—P, which can be changed as
described on page 49. The H IMAGE QUALITY SETTING> SELECT CUSTOM SETTING item (item A)
shows the current custom settings bank:
• q: No custom settings bank selected.
• t — u: Select a bank to view the settings saved using the H IMAGE QUALITY SETTING> EDIT/
SAVE CUSTOM SETTING option (P 82).
• r — s: The current custom settings bank.
48
Using the Q Button
Viewing and Changing Settings
Viewing and Changing Settings
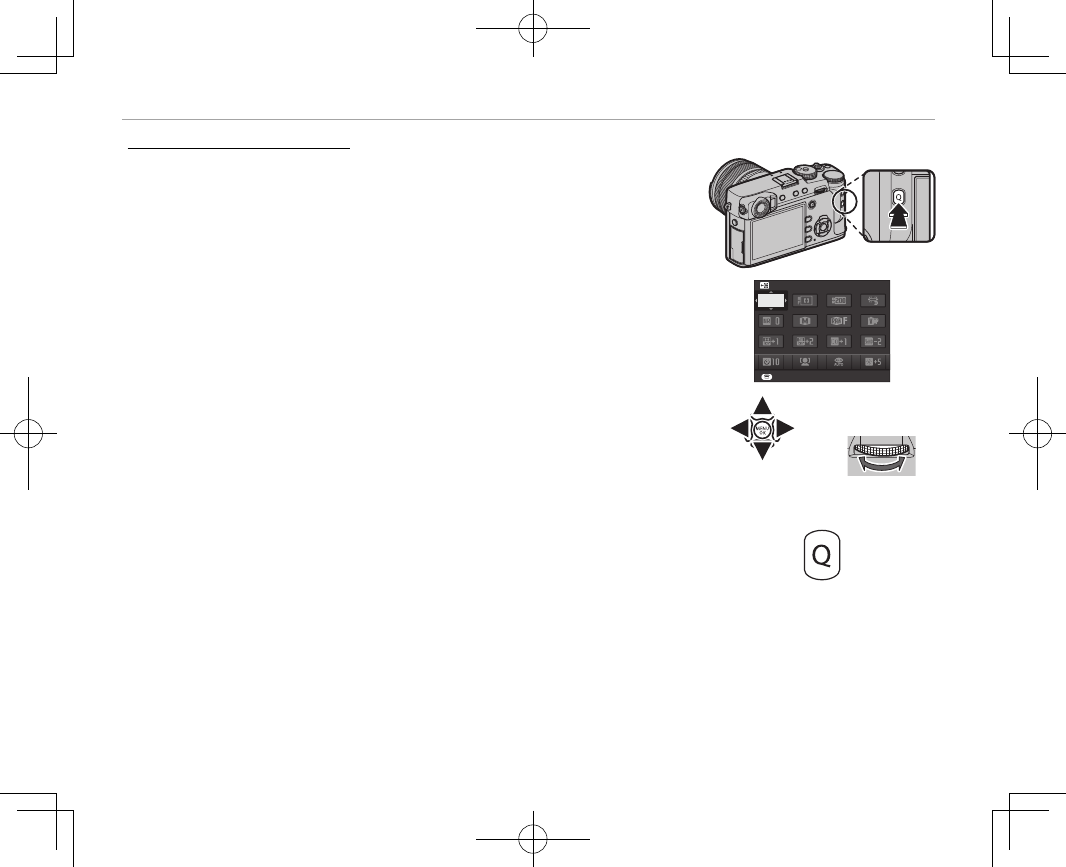
1
Press Q to display the quick menu during shooting.
SET
SELECT CUSTOM SETTING
BASE
2
Use the selector to highlight items and rotate the rear command dial
to change.
RChanges are not saved to the current settings bank (P 47). Settings that
di er from those in the current settings bank (t — u) are shown in
red.
3
Press Q to exit when settings are complete.
49
The Q (Quick Menu) Button
Using the Q Button
Editing the Quick Menu
Editing the Quick Menu
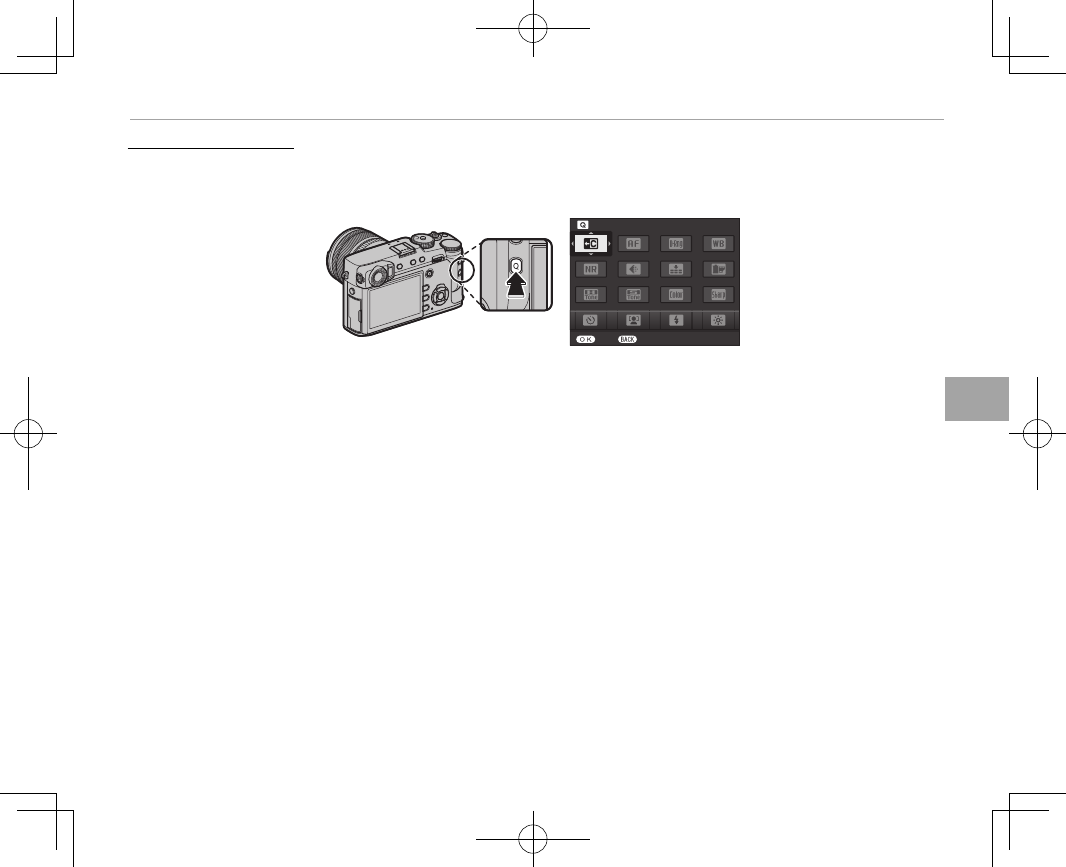
To choose the items displayed in the quick menu:
1
Press and hold the Q button during shooting.
SET END
SELECT CUSTOM SETTING
2
The current quick menu will be displayed; use the selector to highlight the item you wish to change
and press MENU/OK. You will be given the following choice of items to assign to the selected position:
• SELECT CUSTOM SETTING *
• DYNAMIC RANGE *
• WHITE BALANCE *
• NOISE REDUCTION *
• IMAGE SIZE
• IMAGE QUALITY
• FILM SIMULATION *
• GRAIN EFFECT *
• HIGHLIGHT TONE *
• SHADOW TONE *
• COLOR *
• SHARPNESS *
• SELF-TIMER
• FACE/EYE DETECTION SETTING
• PHOTOMETRY
• AF MODE
• FLASH MODE
• FLASH COMPENSATION
• MF ASSIST
• MOVIE MODE
• MIC LEVEL ADJUSTMENT
• EVF/LCD BRIGHTNESS
• EVF/LCD COLOR
• SHUTTER TYPE
• NONE
* Stored in custom settings bank.
RSelect NONE to assign no option to the selected position. When SELECT CUSTOM SETTING is selected,
current settings are shown in the quick menu by the label BASE.
3
Highlight the desired item and press MENU/OK to assign it to the selected position.
RThe quick menu can also be edited using D BUTTON/DIAL SETTING> EDIT/SAVE QUICK MENU (P 112).