HYUNDAI MOBIS ATC41A8AN DIGITAL CAR AVN SYSTEM User Manual 3
HYUNDAI MOBIS CO., LTD. DIGITAL CAR AVN SYSTEM 3
Contents
User manual -3

3-6 I Bluetooth
Bluetooth Phone
Phone Status Icons
Shows the current phone status in the
right top of the display.
Icons Description
You can use Bluetooth phones
when a Bluetooth Hands-free
connection is established.
You can use Bluetooth audio
features when a Bluetooth
audio connection is estab-
lished.
You can use Bluetooth phones
and audio features when both
Bluetooth Hands-free and audio
connections are established.
Call signal strength indicator
Battery level of the Bluetooth
devices connected
Downloading Call History list
Downloading Contacts
In a Bluetooth phone call
Microphone muted
i
Information
• The battery level icon and the call signal
strength indicator may not be supported in
some Bluetooth devices.
•The battery level may differ from the actual
level remaining.
Bluetooth Phone I 3-7
03
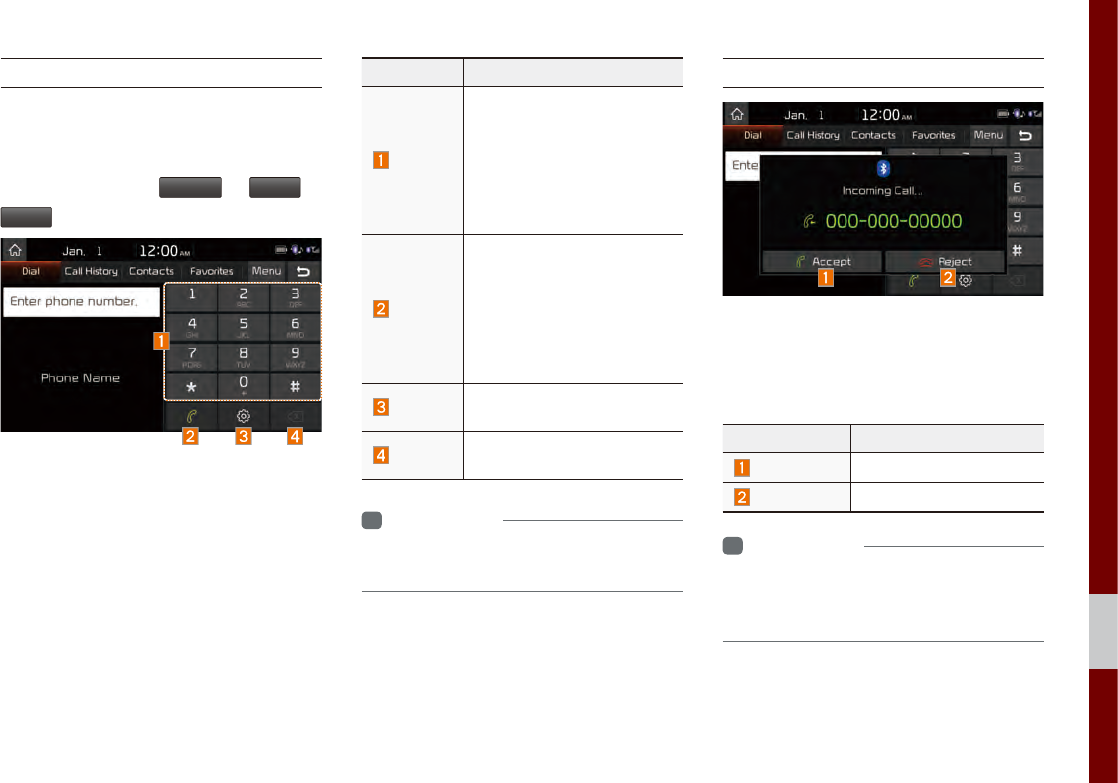
Dial
Dials a call after the Bluetooth devices are
connected.
You can also select
All Menus
▶
Phone
▶
Dial
.
Name Description
Keypad
Use the keypad to enter
the phone number that you
want to call. Press and hold
the last number of a speed
dial to dial a number that
you added to the Speed
Dial list in the phone
Call
Makes a call after you dial
a number and select CALL.
If the number is listed in
Dialed Calls, you can select
the number and press
CALL to automatically dial
that number again.
Settings Moves to a screen of
Bluetooth Connection.
Delete Deletes the numbers that
you entered.
i
Information
• Some types of mobile phones may not
support the Speed Dial function.
Accept/Reject Call
If there is an incoming call after you made
a Bluetooth connection, a popup message
will appear.
Name Description
Accept Answers the call.
Reject Ignores the call.
i
Information
• In some mobile phones, the caller's number
may not be displayed, and the Reject feature
may not be supported.
3-8 I Bluetooth
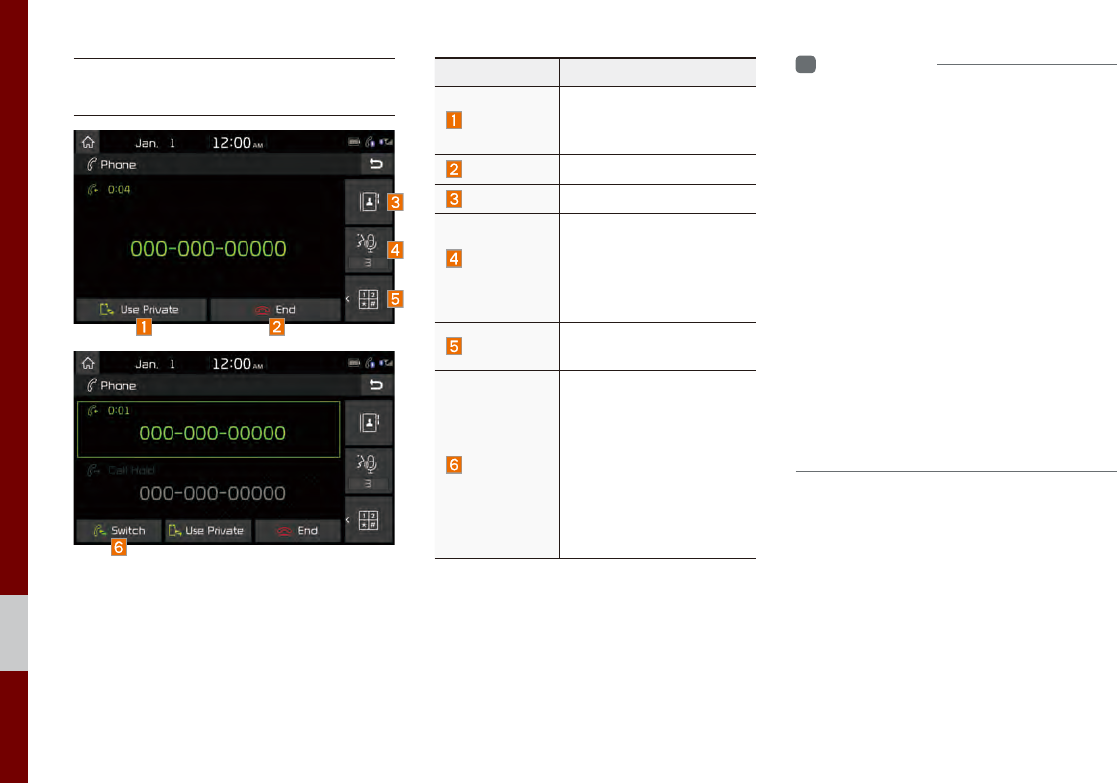
Using the Menu During
a Phone Call
When making a call, you can use the fol-
lowing menu items.
Name Description
Use Private
Switches a voice call
from the car Hands-free
to the mobile phone.
End Ends a call.
Contacts Displays the Contacts list.
Outgoing
Volume
Displays the Mic Volume
settings. You can adjust
the in-call volume that
the other party hears
(level 1 - 5).
Keypad Moves to a screen for
entering ARS numbers.
Switch
Switches to a call on
hold, if any. You can also
switch calls by select-
ing the number in the
Information Display. The
Switch function switches
the current call to a wait-
ing call in order to answer
a new incoming call.
i
Information
• If the caller's number is listed in Contacts, the
caller's name will be displayed. Otherwise,
only the number will be displayed. In some
mobile phones, the phone number may not
be displayed.
• In some Bluetooth devices, the Use Private
feature may not be supported.
• In some Bluetooth devices, the Switch feature
may not be supported.
• During a phone call on a Bluetooth Hands-
free, you cannot access other modes, such as
Radio and Settings.
• Depending on handset types, the in-call
volume the other party hears may differ. If the
other party hears your voice too low or too
loud, adjust the mic volume.
Bluetooth Phone I 3-9
03
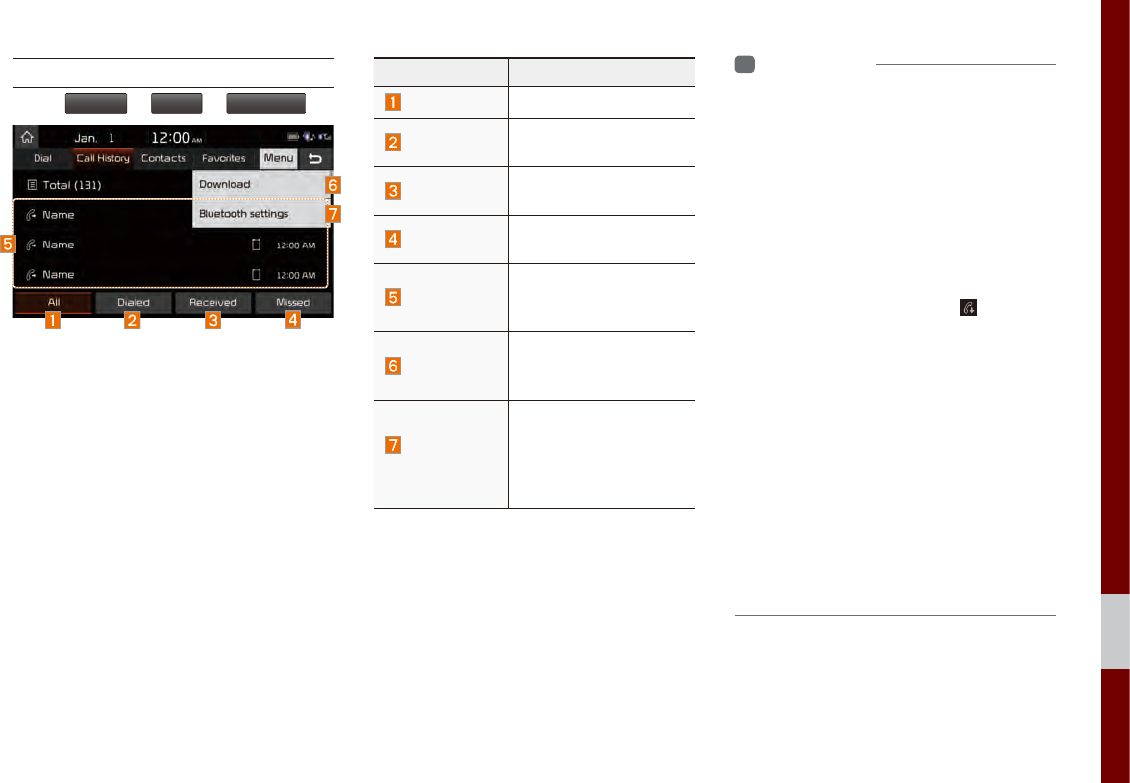
Call History
Select
All Menus
▶
Phone
▶
Call History
.
Name Description
All Lists the all call history.
Dialed Lists the calls that you
made.
Received Lists the calls that you
have received.
Missed Lists the calls you
missed.
Call History
Displays all of your call
history. Select from the
list to dial the number.
Download
Downloads the call
history information from
your mobile phone.
Bluetooth
Settings
Provides the Bluetooth
Connection/Auto
Connection Priority/
Bluetooth System
Information.
i
Information
• In some mobile phones, call records may not
be added to your Call History.
• Calls from restricted ID's are not added to
your Call History Information.
• Up to 50 calls can be added in each Dialed
Calls/Received Calls/Missed Calls list.
• The durations of each dialed/received call are
not displayed in your car's Call History list.
• While the call history download is in progress,
the status bar displays an icon ( ).
• If the call history download is turned off on the
Bluetooth device, the call history download
will fail.
• Some devices require a device authentication
for downloading your call history. If download
fails, check if the Bluetooth Settings or display
status are normal.
• Some devices do not support call history
download. Check if your Bluetooth device
supports download feature. For details regarding
Bluetooth-supported devices and their functional
compatibility, visit http://www. kia.com
3-10 I Bluetooth
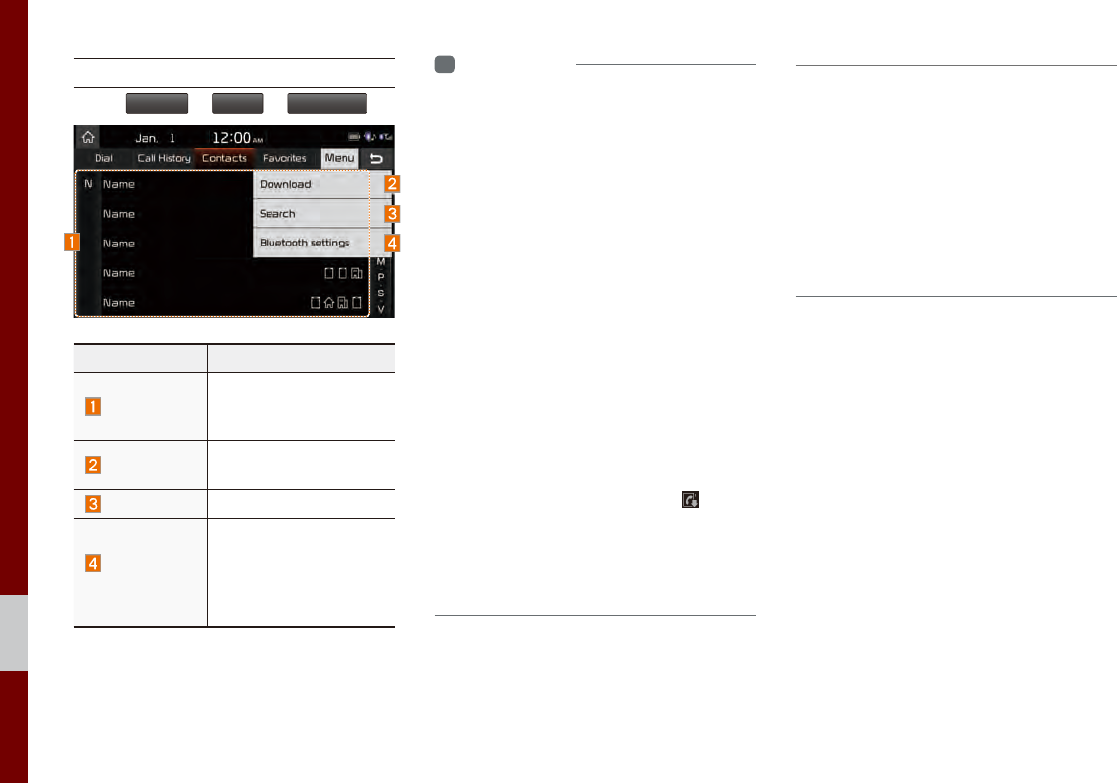
Contacts
Select
All Menus
▶
Phone
▶
Contacts
.
Name Description
Contacts List
The list of Contacts.
Select from the list to
dial the number.
Download Downloads contacts
from your mobile phone.
Search Searches Contacts.
Bluetooth
Settings
Provides the Bluetooth
Connection/Auto
Connection Priority/
Bluetooth System
Information.
i
Information
• Up to 5000 phone numbers can be
downloaded from a single, paired Bluetooth
device.
• You cannot edit or delete downloaded phone
numbers from your car.
• Contacts can be viewed only when the
Bluetooth device is connected.
• Even if the Bluetooth device is disconnected,
the downloaded data will remain. (Note that
deleting a paired phone will also delete all
downloaded Contacts and Call History data)
• Downloaded phone numbers may be lost
depending on the condition of the head unit.
Keep your important data in a safe place.
• Contacts from both the SIM card and your
mobile phone are downloaded at the same
time by default.
• The status bar displays a ( ) while
downloading contacts.
• The download will not be available if the
contacts download function is turned off on
your Bluetooth device.
• Some devices require a device authentication
for downloading your contacts. If download
fails, check your phone screen and confirm
the download if necessary.
• Some devices do not support contacts
download feature. Check if your Bluetooth
device supports contacts download. For
Bluetooth supporting devices details and
compatibility, visit http://www.kia.com
Bluetooth Phone I 3-11
03
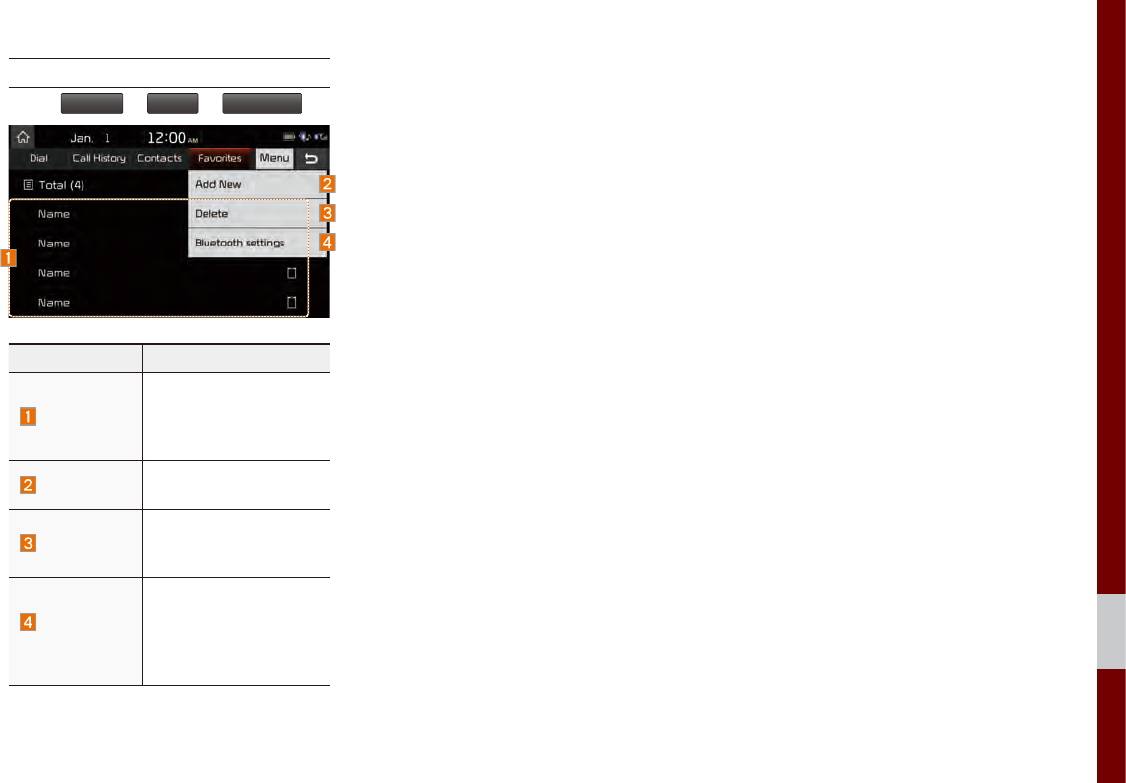
Favorites
Select
All Menus
▶
Phone
▶
Favorites
.
Name Description
Favorites
Lists the phone num-
bers saved as Favorites.
Select from the list to
dial the number.
Add New Adds a new number to
Favorites.
Delete
Deletes numbers
that you select from
Favorites.
Bluetooth
Settings
Provides the Bluetooth
Connection/Auto
Connection Priority/
Bluetooth System
Information.

MEMO

The 911 Connect feature may not operate in the following situations
About UVO eServices
Before using UVO eServices
Connecting Bluetooth
Pair a device from Bluetooth-enabled phone
Connecting to smartphone via USB
911 Connect
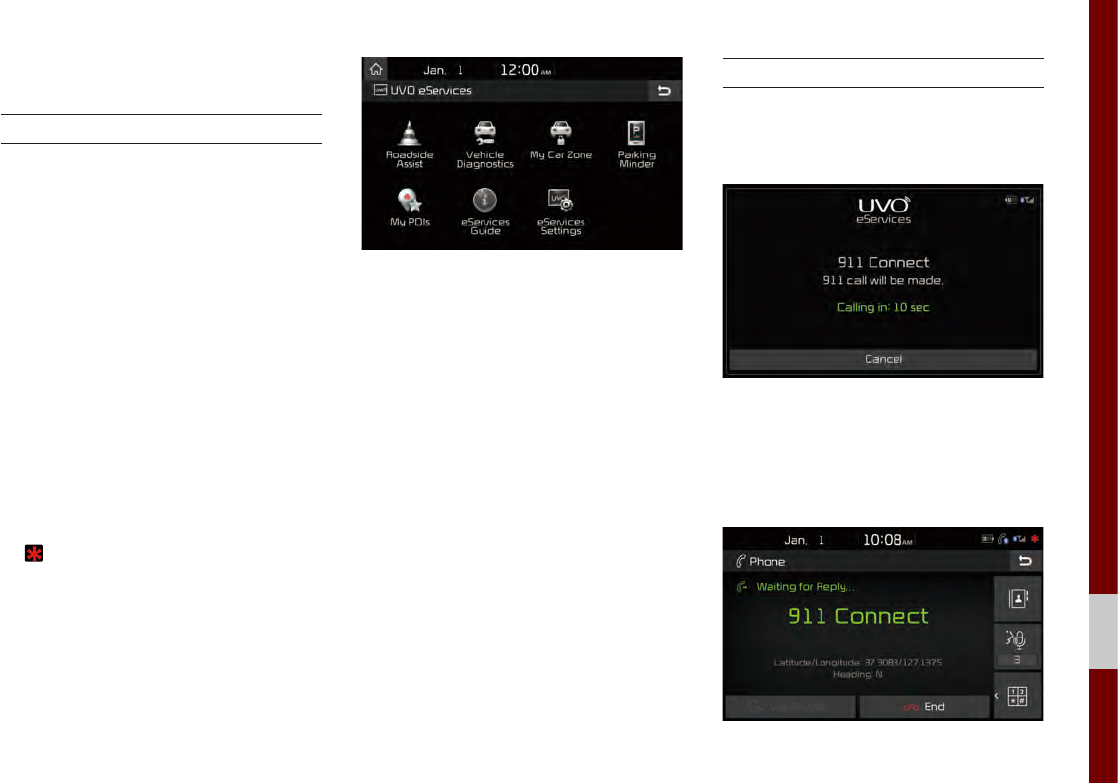
Roadside Assist
Vehicle Diagnostics
My Car Zone
Parking Minder
My POIs
eServices Guide
part.4 UVO eServices

4-2 I UVO eServices
UVO eServices
The 911 Connect feature may not
operate in the following situations
When the vehicle ignition is not turned on.
When the phone Bluetooth® feature is set to off.
When the phone Bluetooth® cannot be connected or becomes
disconnected.
When there are no phones paired with the vehicle.
When cellular service is unavailable.
When the power turns off due to phone power (battery) issues.
When a Bluetooth® device without phone feature support has
been connected, such as an MP3 device.
When the system is booting.
When the system power supply is unstable.
When the attempted call is blocked due to user operations.
When the 9-1-1 call is unstable due to phone or other commu-
nication network issues.
When the call feature is not operating due to phone settings set
by the user.
When the phone cannot be controlled via Bluetooth® due to
phone specifications or characteristics.

Using UVO eServices and Precautions I 4-3
04
Using UVO eServices and Precautions
Download the UVO eServices App and install it on your smartphone.
The app can be downloaded from your smartphone’s app store.
For using UVO eServices call features such as 911 Connect,
Roadside Assist and eServices Guide, a smartphone must be
connected with the vehicle via Bluetooth. Pair and connect your
smartphone with the vehicle. For information on connecting
your Bluetooth device, refer to the smartphone user’s manual
and instructions on the Phone Help screen on your radio. Up to
five Bluetooth devices can be paired to the vehicle and only
one device can be connected at a time.
For using data communication of Vehicle Diagnostics, Parking
Minder, and My Car Zone, smartphone must be connected with
the vehicle via USB cable.
※
The use of genuine cable is recommended. (The use of
other products may result in abnormal or non-proper operation.)
Login and activate the UVO eServices App on your smartphone.
Some UVO eServices features will only be available when your
smartphone is connected with the vehicle via USB and the
UVO eServices App is running.
UVO eServices may not operate properly with incompatible
smartphones. To view the list of compatible smartphones,
please visit MyUVO.com
Communication between the vehicle and smartphone app may
temporarily disconnect depending on the phone state.
If the feature is not operating properly, you may need to reset
the UVO eServices App or the smartphone and try again
according to the following steps.
1. Try feature again in the Head Unit
2. Restart smartphone app
3. Re-connect Bluetooth and USB cable
4. Reset smartphone
5. Delete Device and pair again
Some services use the customer’s mobile phone data plan for
data communication. Therefore, the features will function in
accordance with the cellular plan.
Use of the most up-to-date app version is recommended.
For smartphone related inquiries, please visit MyUVO.com.
4-4 I UVO eServices
About UVO eServices
UVO eServices provides the following features through Bluetooth
and/or USB connection to your smartphone.
Name Connection Description
911
Connect BT & USB
If an airbag deploys, your vehicle
automatically initiates a call to 9-1-1
and sends your vehicle’s location
information to the 9-1-1 operator.
Roadside
Assist BT & USB If a diagnostic issue exists, you can
connect with a Roadside Assist.
Vehicle
Diagnostics USB
Informs you if there is a diagnostic
issue found in your vehicle. If an
issue is found, you can contact a
call center through Roadside Assist
or reserve an appointment with
your preferred Kia dealer through
Schedule Service.
My Car
Zone USB
Keeps track of predefined triggered
alerts such as Speed Alert and
Curfew Limit Alert from the My Car
Zone feature.
Parking
Minder USB
Saves the location of your parked
vehicle on your UVO eServices
smartphone app.
You can check where your vehicle is
parked through the UVO eServices
App on your smartphone.
Name Connection Description
My POIs USB
Downloads Points of Interest to your
multimedia system from Google
Maps and MyUVO.com
eServices
Guide BT & USB Receive guidance on how to use
UVO eServices.
i
Information
• 24-hour Roadside Assistance is a
service plan provided by Kia Motors
America, Inc. Certain limitations apply. Coverage details are available
in the Kia Warranty and Consumer Information Manual. For access
to Enhanced Roadside Assistance, a conn
ected mobile phone via
Bluetooth within the cellular service coverage area is required.
To use UVO eServices, the following conditions must be met.
1. The UVO eServices smartphone app must be installed and
you must log in using your MyUVO account credentials.
2. The smartphone must be connected via Bluetooth and USB
cable to the vehicle.
3. Once this is complete, eServices must be activated.
Pair a device from Bluetooth-enabled phone I 4-5
04
Before using UVO
eServices
Installing the UVO eServices App on your
smartphone
1. Download and install the UVO eSer-
vices App on your smartphone.
The app can be downloaded from the
Apple App Store or Google Play.
2. Register your vehicle and account at
MyUVO.com
Note: MyUVO.com is accessible from
your phone’s browser.
3. Start the UVO eServices App on your
smartphone and log in.
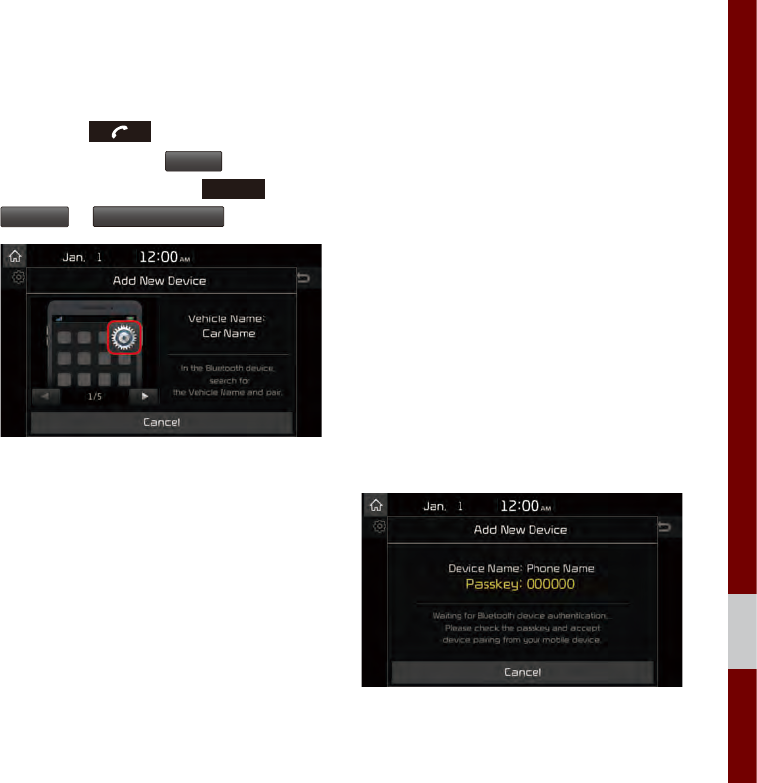
Connecting Bluetooth
Press the key on the steering
wheel or select the
Phone
icon on the
Home screen. Press
SETUP
key▶
Bluetooth
▶
Bluetooth Connection
.
Pair a device from
Bluetooth-enabled phone
1. Turn on the Bluetooth feature on your
smartphone’s Bluetooth Settings screen.
2. Search Bluetooth devices on your
smartphone.
3. Select the Vehicle Name on the phone
that matches the name shown on the
screen.
4. Verify the passkey shown on the touch-
screen.
If the phone supports SSP, check the
passkey on your Bluetooth® device and
confirm the authentication.
4-6 I UVO eServices
Connecting to
smartphone via USB
1. Connect your smartphone with the vehi-
cle via USB cable.
NOTICE
• For smartphone related inquiries, please visit
MyUVO.com.
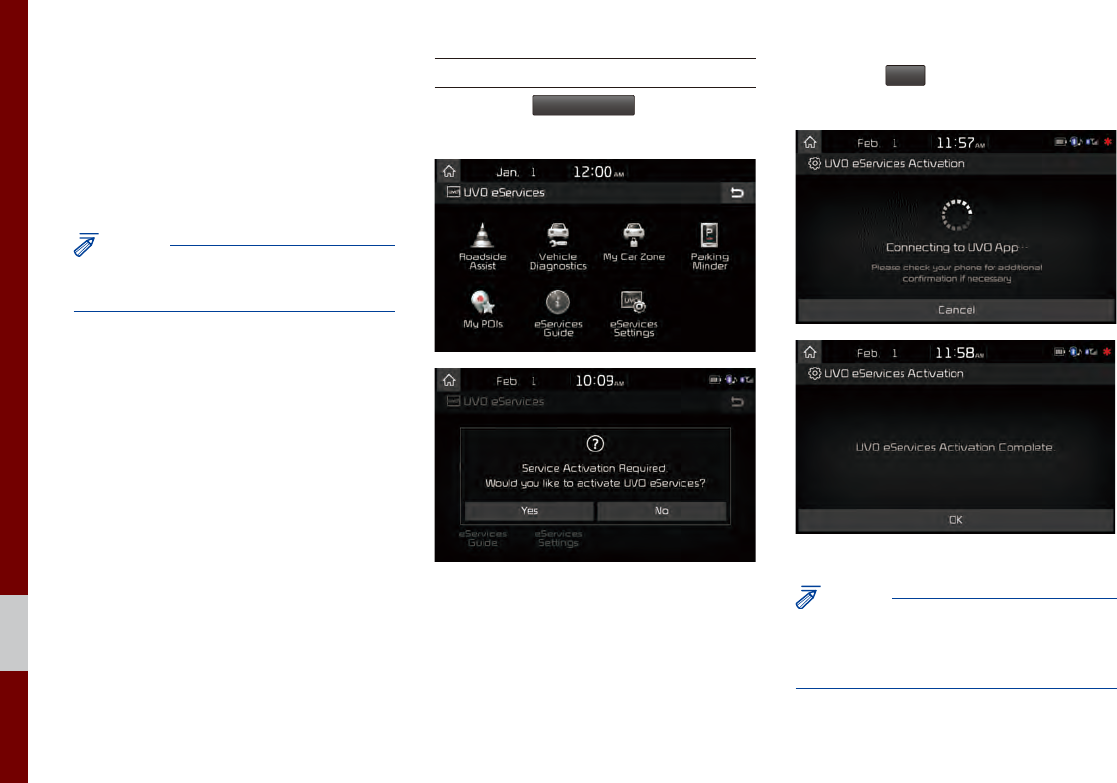
Activating UVO eServices
Select the
UVO eServices
icon from All
Menus on the Home screen.
Press the
Yes
button, then the UVO
eServices activation process will begin.
NOTICE
•Before activating UVO eServices, ensure
your phone is connected to the vehicle via
USB cable.
911 Connect I 4-7
04
911 Connect
911 Connect
If an airbag deploys, your vehicle automat-
ically initiates a call to 9-1-1 and sends
your vehicle’s location information to the
9-1-1 operator.
The 911 Connect feature is available only
when the mobile phone is connected via
Bluetooth.
By default, this feature is turned off. To turn
it on, you must turn it on in the eServices
Settings menu. By enabling this feature,
you are agreeing to the 911 Connect
terms of use.
A ( ) icon is displayed at the top of the
touch screen as shown below when phone
is connected to UVO eServices system via
Bluetooth and the 911 connect feature is
turned on.
Initiating a 911 Call
If an airbag deploys, the following screen
is displayed and a call is automatically
placed to 9-1-1 after 10 seconds.
Once a call is connected with a 9-1-1
operator, it is possible to request emer-
gency services to be dispatched to your
location.
4-8 I UVO eServices
The 9-1-1 operator may request informa-
tion on the current location of your vehicle.
When the 9-1-1 operator requests your
vehicle location, “Sending Location” is
displayed on the screen and the vehicle
location is automatically sent to the 9-1-1
operator.
When the 9-1-1 operator attempts to talk
to the driver again, the call time is dis-
played and allows the driver to speak with
the 9-1-1 operator.
Roadside Assist
Roadside Assist
If there is any issues in the vehicle, you
can connect with a Roadside Assist agent.
The Roadside Assist feature can be used
only when your phone is connected via
Bluetooth.
Select the
UVO eServices
icon from All Menus
on the Home screen ▶
Roadside Assist
.
Vehicle Diagnostics I 4-9
04
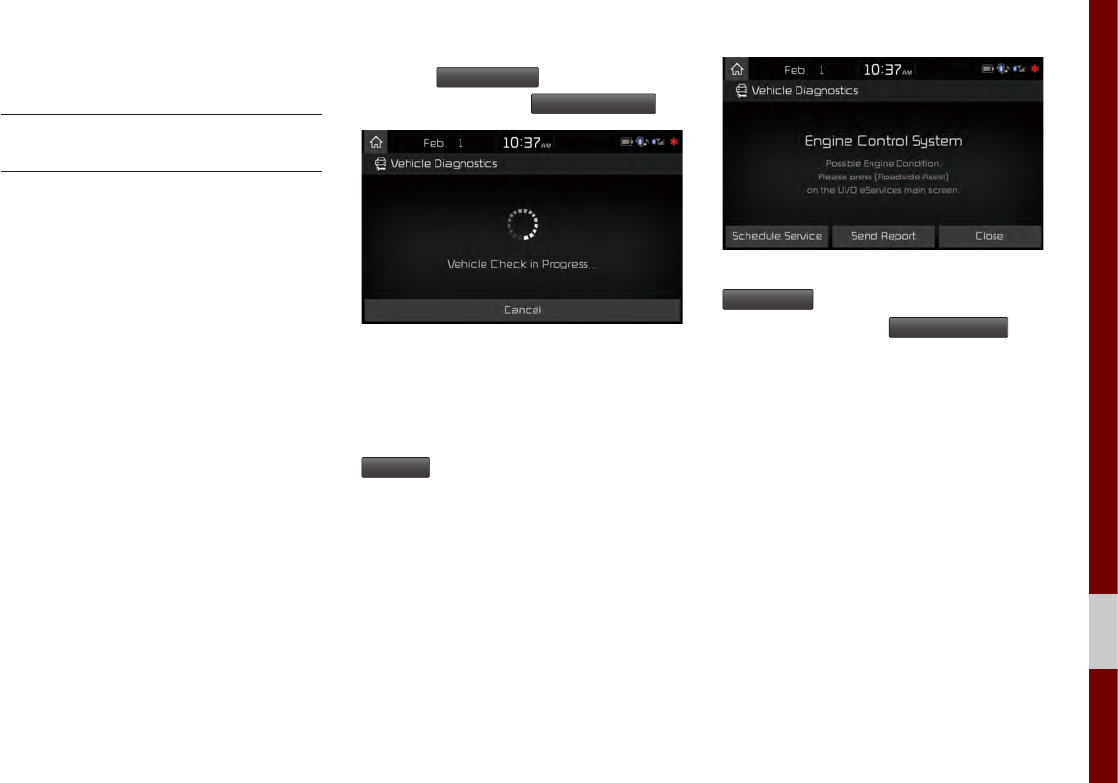
Vehicle Diagnostics
Conducting Vehicle
Diagnostics
Vehicle Diagnostics is available only when
the ignition is turned on and the vehicle is
parked.
It also requires that UVO eServices is
activated, and the Phone is connected
via USB cable before starting Vehicle
Diagnostics.
Select the
UVO eServices
icon from All Menus
on the Home screen ▶
Vehicle Diagnostics
.
The Vehicle Diagnostics process will begin.
When a diagnostics check is in progress,
keep the vehicle in park with the ignition
on. To cancel diagnostics, press the
Cancel
button on the touch screen or
any hardkey.
If diagnostic issues are found, press the
Send Report
button to send to your MyUVO
account or press the
Schedule Service
but-
ton to schedule an appointment with your
preferred or nearby Kia dealer.
4-10 I UVO eServices
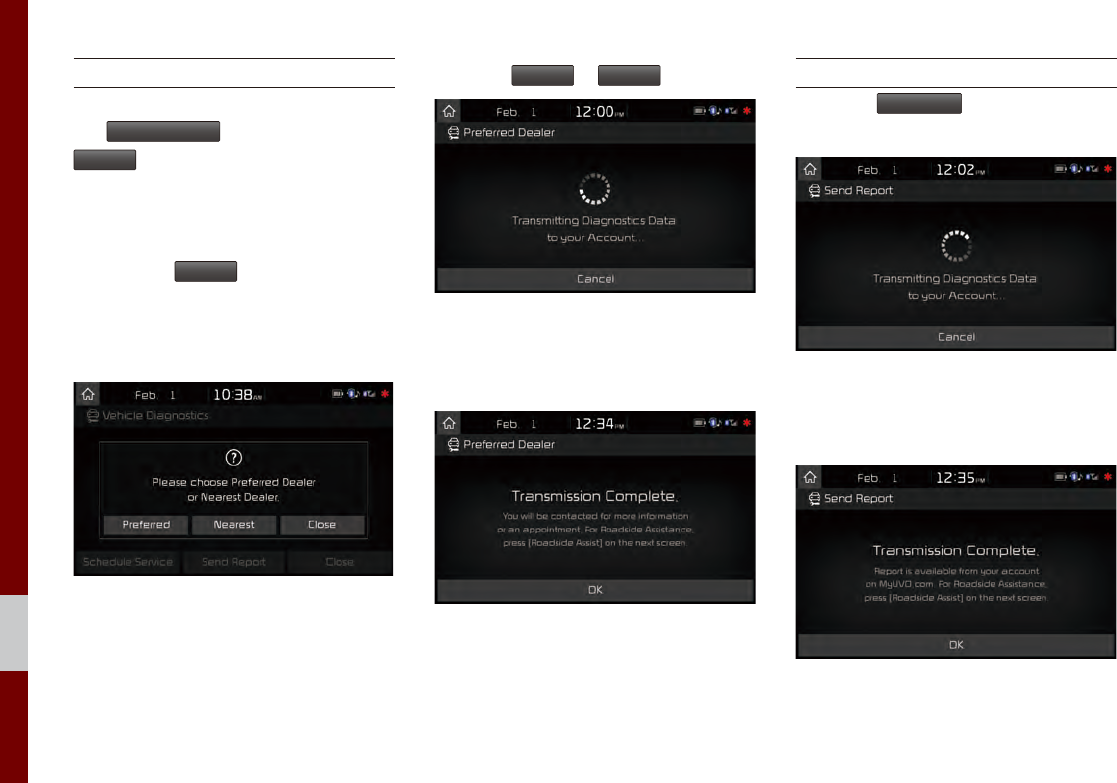
Schedule Service
When scheduling an appointment using
the
Schedule Service
button, pressing the
Preferred
button will allow you to request an
appointment with your preferred Kia dealer
and send your vehicle’s diagnostics infor-
mation.
Pressing the
Nearest
button will allow you
to request an appointment with the near-
est Kia dealer and send your vehicle’s
diagnostics information.
Press the
Preferred
or
Nearest
button.
Request an appointment with Preferred or
Nearest Kia Dealer and send your vehi-
cle’s diagnostics data.
Send Report
Press the
Send Report
in the vehicle diag-
nostics result screen.
Vehicle Diagnostics Data is transmitted to
your account and you can see the report
on MyUVO.com
Vehicle Diagnostics I 4-11
04
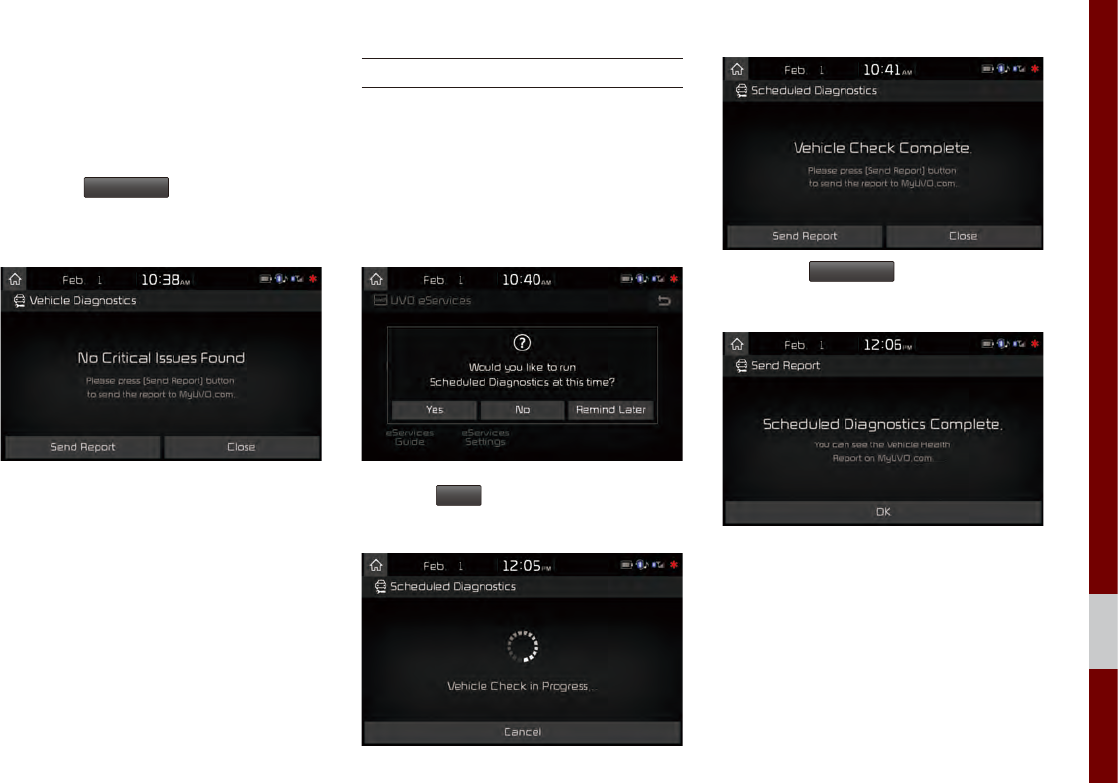
Even if diagnostic issues are not found
after Vehicle Diagnostics, it is recom-
mended that you send the diagnostic
results to your MyUVO account.
Press the
Send Report
button to send the
diagnostics results to your MyUVO
account.
Scheduled Diagnostics
If you have set up Scheduled Diagnostics
on your UVO eServices App, a vehicle
diagnostics check will automatically start
on the day you selected.
On the date of the Scheduled Diagnostics,
the following window will be displayed.
Press the
Yes
button on the touch screen
to proceed with diagnostics.
Press the
Send Report
button to see the
Vehicle Health Report on MyUVO.com.
4-12 I UVO eServices
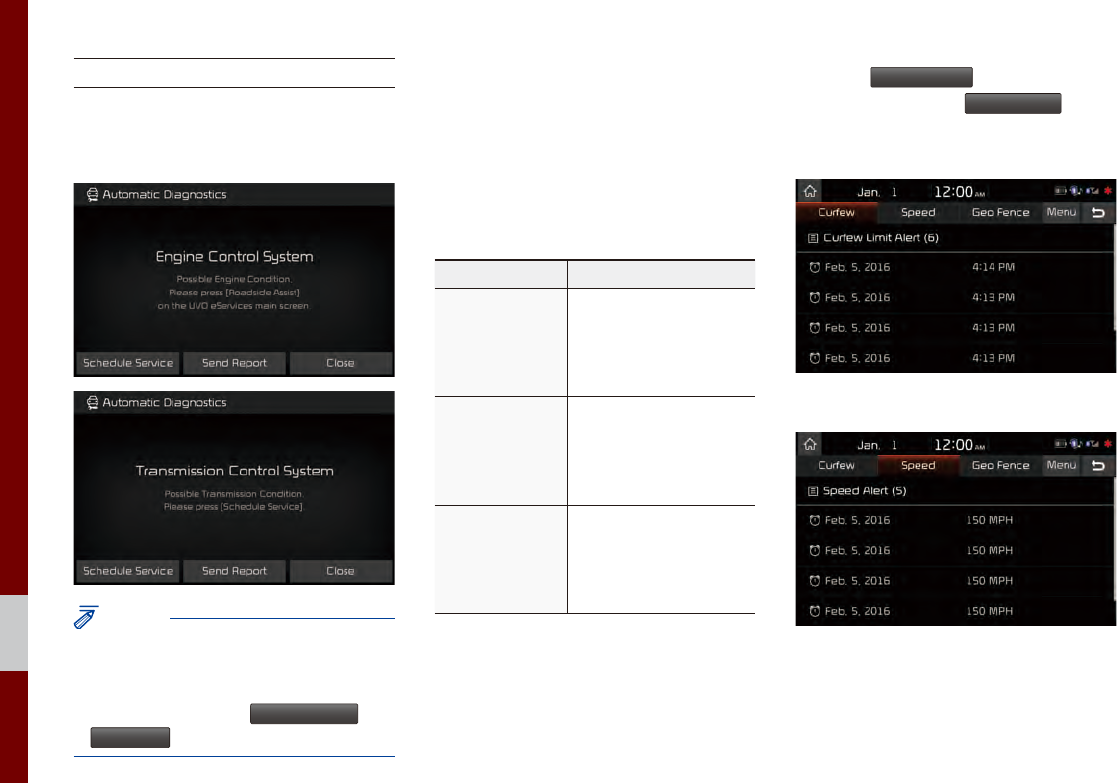
Automatic Diagnostics
If a critical diagnostics issue with your
vehicle’s powertrain is detected, Automatic
Diagnostics will be notified.
NOTICE
• The screen messages differ based on the
vehicle diagnostics severity. Ensure your
phone is connected to the system via USB
cable before using
Schedule Service
and
Send Report
.
My Car Zone
My Car Zone is a feature that provides
alerts and driving history for Curfew Limit
Alerts, Speed Alerts, and Geo Fence
Alerts set by the user.
Name Description
Curfew Limit
Alert
Curfew Limit Alerts are
alerts that are triggered
when a driver is driving
within a predefined time
range.
Speed Alert
Speed Alerts are alerts
that are triggered when
a driver exceeds the
predefined maximum
speed.
Geo Fence
Alert
Geo Fence Alerts are
alerts that are triggered
when a driver enters
into a predefined geo-
graphical location.
My Car Zone features are supported only
when UVO eServices has been activated.
Select the
UVO eServices
icon from All Menus
on the Home screen ▶
My Car Zone
.
Curfew Limit Alerts History
Speed Alerts History
My Car Zone I 4-13
04
Geo Fence Alerts History
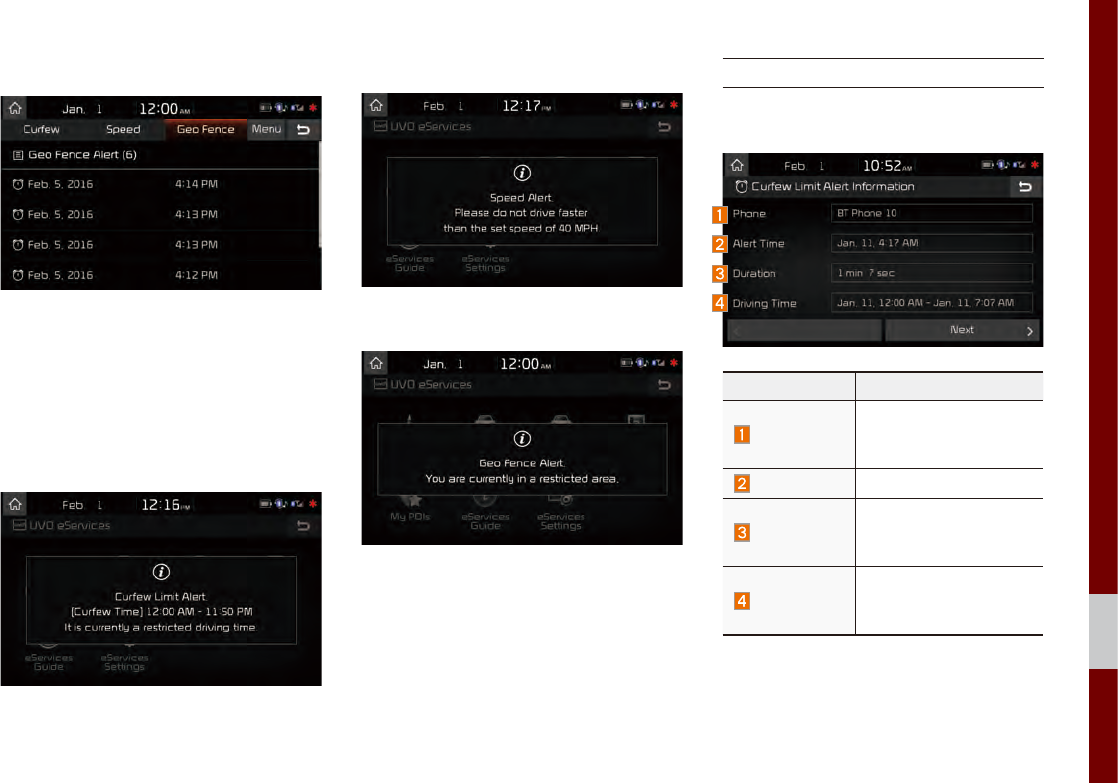
When a driver does not keep the pre-de-
fined driving conditions, popup is displayed
with voice guidance and save alerts in the
My Car Zone history.
Curfew Limit Alert
Speed Alert
Geo Fence Alert
Curfew Limit Alert
You can check the Curfew Limit Alert his-
tory for a list of past triggered curfew alerts.
Name Description
Phone
Name of phone con-
nected upon triggered
curfew limit
Alert Time Initial alert time
Duration
Total duration of driving
while curfew limit was
triggered
Driving Time
Total driving time from
turning ignition on until
turning ignition off
4-14 I UVO eServices
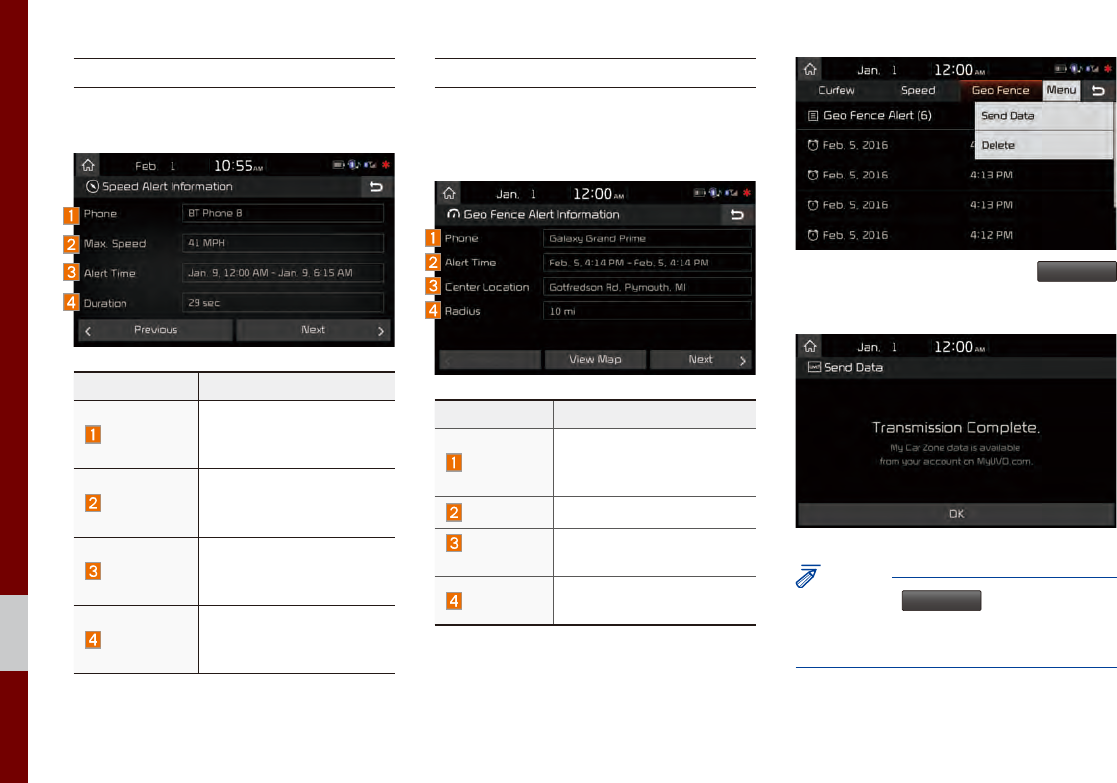
Speed Alert
You can check the Speed Alert history for
triggered speed limit alerts of the vehicle.
Name Description
Phone
Name of phone con-
nected upon triggered
speed limit alert
Max. Speed
Maximum vehicle speed
upon triggered speed
limit alert
Alert Time
Time from first triggered
alert until last triggered
alert
Duration
Total triggered alert time
from turning ignition on
to turning ignition off
Geo Fence Alert
You can check the Geo Fence Alert his-
tory for triggered Geo Fence alerts of the
vehicle.
Name Description
Phone
Name of phone con-
nected upon triggered
geo fence alert
Alert Time Initial alert time
Center
Location
Radius from set center
location address
Radius Radius from set geo
fence address
To check My Car Zone alert history from
your smartphone, you must first send the
alert history to your MyUVO account.
From the Menu tab, Press the
Send Data
button on the touch screen.
NOTICE
• Before using
Send Data
, ensure your phone
is connected to the UVO eSevices system via
USB cable.
My POIs I 4-15
04
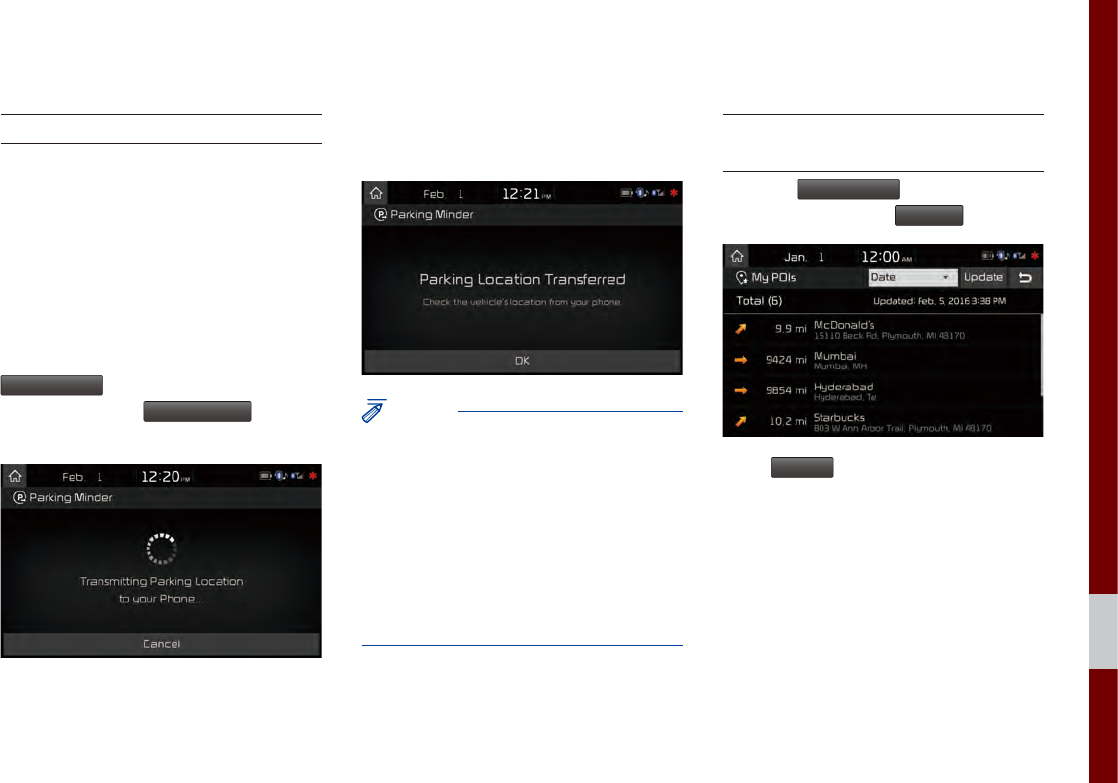
Parking Minder
Sending Parking Location
The location where your vehicle is currently
parked can be sent to your smartphone.
Ensure that your smartphone is connected
via USB and the UVO eServices App is
running before using this feature.
After parking the vehicle, select the
UVO eServices
icon from All Menus on the
Home screen ▶
Parking Minder
to send
the vehicle’s location to your smartphone.
Once the parking location has been sent,
you can view your vehicle’s location from
the UVO eServices App on your smart-
phone.
NOTICE
• When the parking location is being sent, do
not drive the vehicle. Ensure that you have
logged into the UVO eServices App, and your
phone is connected to the multimedia system
via USB cable.
• When ignition is turned off while the phone is
connected via USB, Parking Minder can be
transferred automatically if the option is set up
in UVO eService Settings
My POIs
Sending Points of Interest
to Your Navigation System
Select the
UVO eServices
icon from All Menus
on the Home screen ▶
My POIs
.
Press
Update
button on the touch screen.
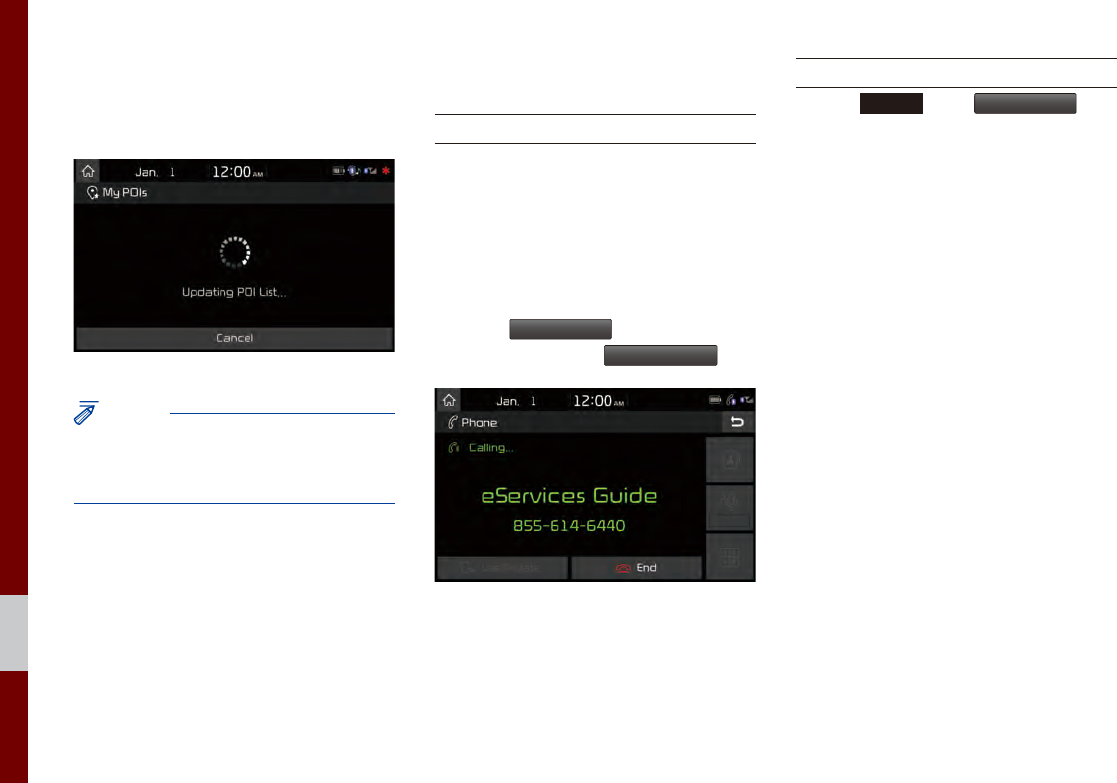
4-16 I UVO eServices
UVO eServices system will attempt to
download the POIs from MyUVO via your
smartphone.
NOTICE
• Ensure that you have logged in to the UVO
eServices App, and your phone is connected
to the UVO eServices system via USB cable.
Once the POIs have been downloaded,
select a POI from the list to see more
details.
eServices Guide
eServices Guide
eServices Guide provides guidance on
how to use UVO eServices.
This feature is only available when the
mobile phone is connected via Bluetooth.
Select the
UVO eServices
icon from All Menus
on the Home screen ▶
eServices Guide
.
UVO eServices Settings
Refer to
SETUP
key ▶
UVO eServices
.

Basic Features
Quick Menu
Destination Search
Route Search
Navigation Settings
Troubleshooting
part.5 Navigation