HYUNDAI MOBIS ATC41A8AN DIGITAL CAR AVN SYSTEM User Manual 7
HYUNDAI MOBIS CO., LTD. DIGITAL CAR AVN SYSTEM 7
Contents
User manual -7
Climate Mode I 8-3
08
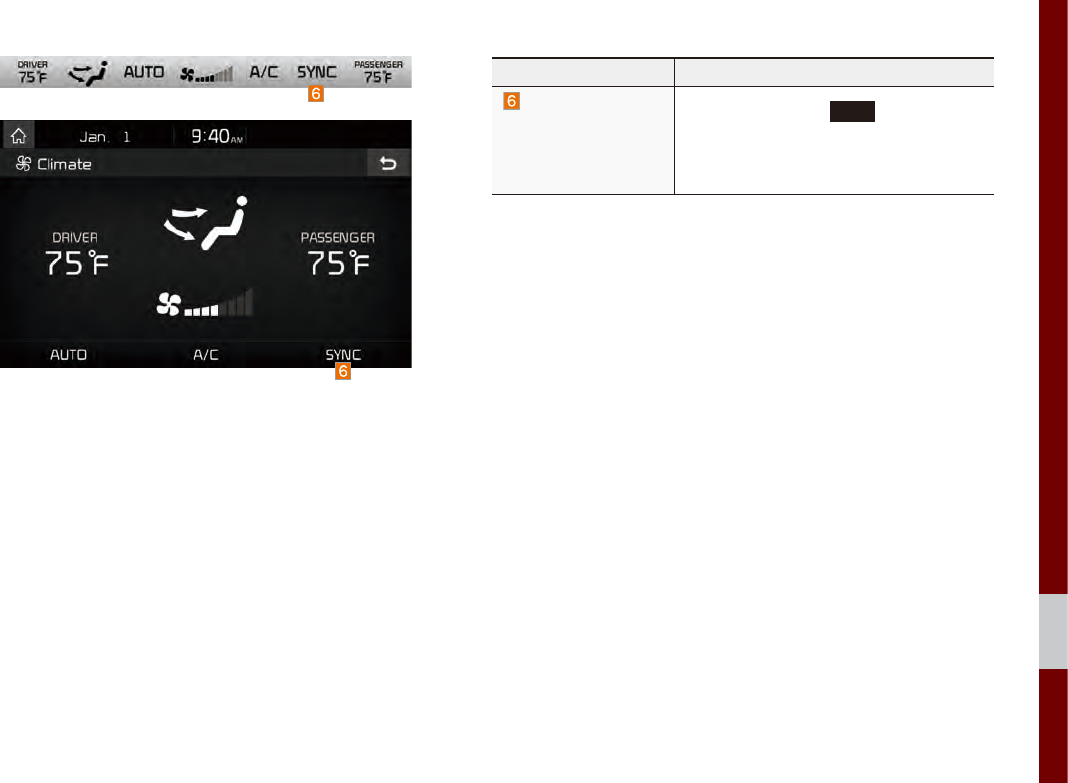
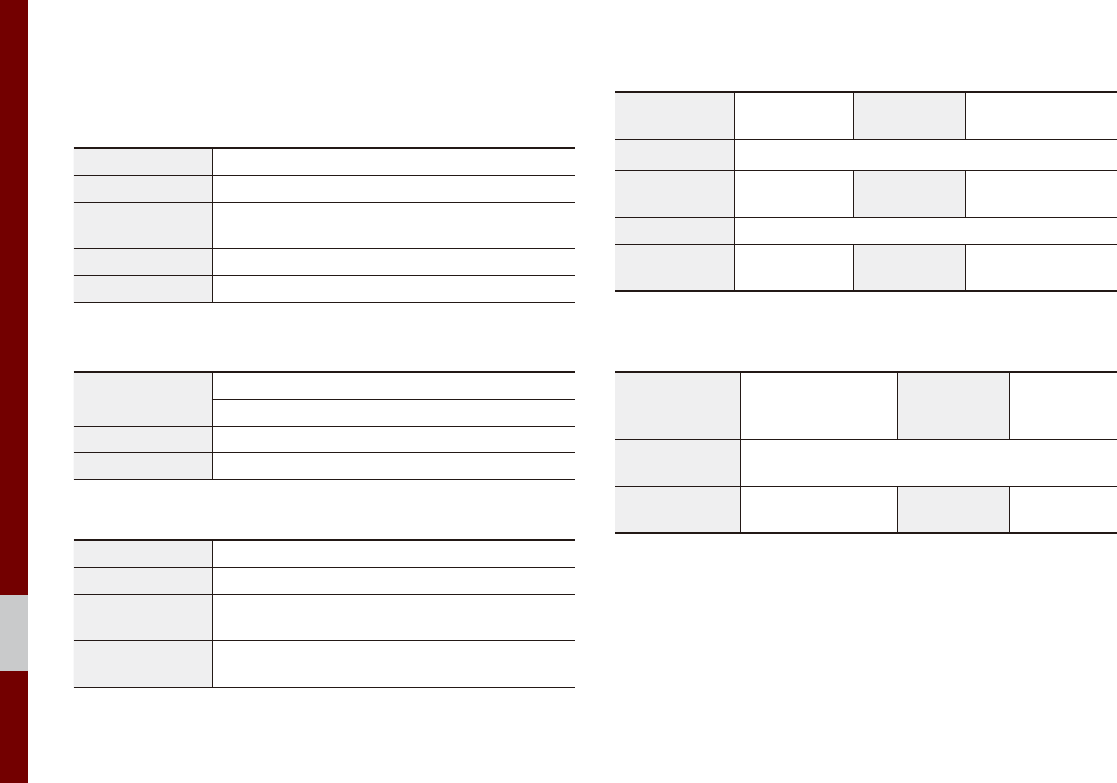
Name Description
Simultaneous tem-
perature settings
for the driver's seat
and the passenger
seats (SYNC)
Displayed when the
SYNC
key is pressed
and the temperatures of the driver's seat
and the passenger seats can be config-
ured at the same time.
8-4 I Other Features
Camera
WARNING
- Backing Up & Using Camera
• Never rely solely on the rear view camera
when backing up. Prior to entering your
vehicle always do a visual check of the area
behind your vehicle, and before backing up be
aware of your surroundings and supplement
the rear view camera by looking over your
shoulders and checking your rear view mir-
rors. Due to the difficulty of ensuring that the
area behind you remains clear, always back
up slowly and stop immediately if you even
suspect that a person, and especially a child,
might be behind you.
i
Information
• The camera screen shown while the system
boots up does not display any text or buttons.
• While the device boots up, shift the gear to "R"
to activate the rear detection cameras. Shift
the gear to another position to deactivate the
rear detection camera.
Steering-linked camera
•This device is connected to a rear
detection camera to see behind the car
for safe reversing.
• The Rear View Camera turns on auto-
matically if you shift the gear to R when
the power is on or the engine has started.
NOTICE
• A wide-angle lens is installed as the rear
detection camera to get a wider view, so
there may be some difference between the
actual distance and the distance that appears.
on-screen. For safety, make sure to view
the back, right, and left sides of the car for
yourself.
• The color of the parking guidelines displayed
in the picture may differ from the actual screen.
• When booted up, blinking may occur when
you switch to a UI screen.
• If
Back-up Warning Priority
is set in the Sound
Settings, the audio volume is lowered when
your car is driving backward.
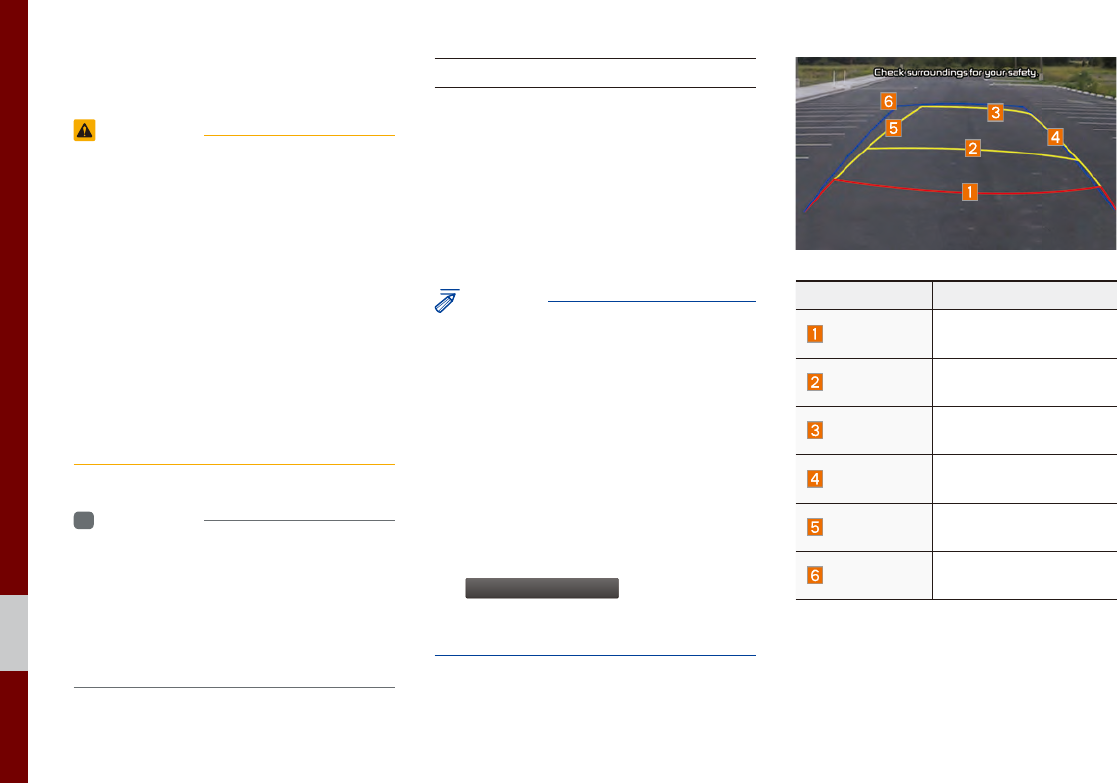
Name Description
Red Line About 0.5 m from the
rear bumper
Yellow Line 1 About 1 m from the
rear bumper
Yellow Line 2 About 3 m from the
rear bumper
Yellow Line 3 Trajectory of the wheel
on the driver’s side
Yellow Line 4 Trajectory of the wheel
on the passenger side
Blue Line Neutral steering trajec-
tory
As you reverse your car and monitor the
area behind your car, the steering-linked
driving trajectory and the neutral driving
trajectory are both displayed.
Camera I 8-5
08
SVM (Surround View Monitor)
With the power on, the SVM is connected
to the SVM camera to see the front, rear,
and back of the car when driving at low
speeds (15km/h or less). It is optional.
•The SVM-camera front detection mode
will be activated when driving at low
speeds (15km/h or less). When the car
drives over 15km/h, the SVM camera
screen is disabled.
• When the key is pressed and the
gear is in a position other than P or R
while the engine is running, the SVM
camera automatically starts when the
car accelerates.
•Shift gears to P or R and turn off the
key to disable the front detection
camera screen.
•The rear detection mode of the SVM
camera is activated with the gear is
positioned to R.
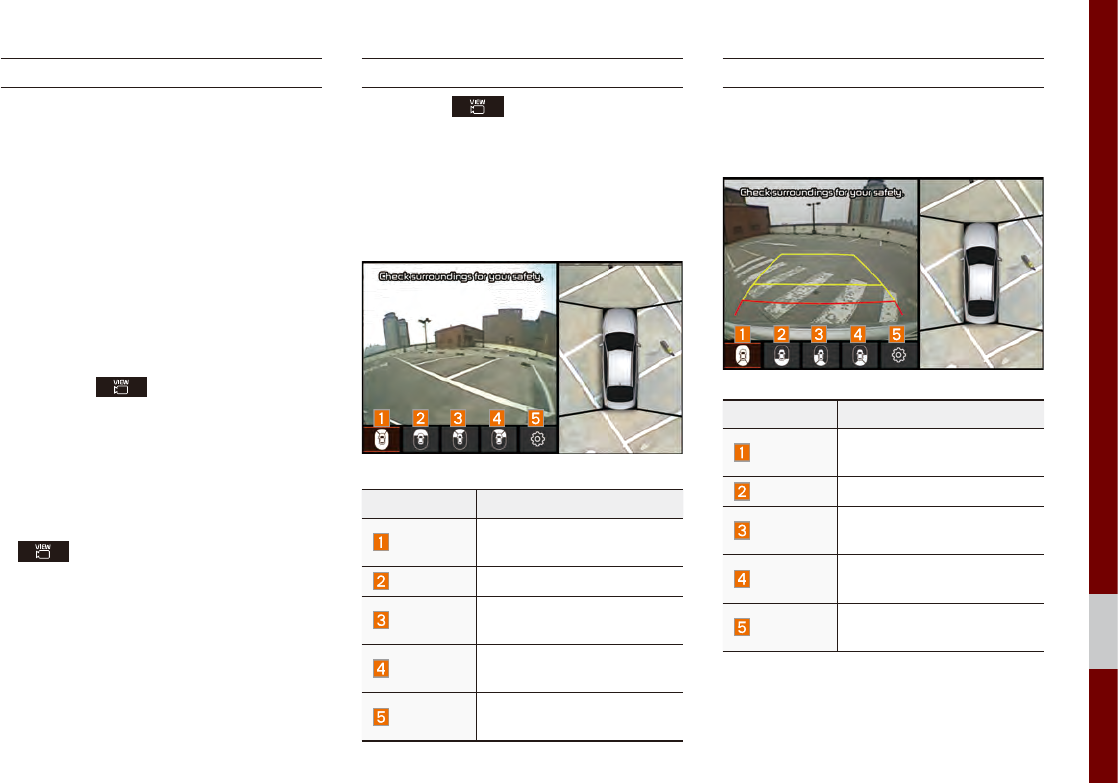
Front SVM
Select the key after starting the
engine.
If the gear is in a position other than P or
R, it automatically switches to the front
detection SVM camera mode when the
car accelerates.
Name Description
SVM Displays all of the images
around the car.
Front Displays the front image.
Front left Displays the front-left
image.
Front right Displays the front-right
image.
Settings Displays the Parking
Guidance Settings screen.
Rear SVM
If the gear is positioned to R, the rear SVM
camera is automatically switched to the
operational mode.
Name Description
SVM Displays all of the images
around the car.
Rear Displays the rear image.
Rear left Displays the rear-left
image.
Rear right Displays the rear-right
image.
Settings Displays the Parking
Guidance Settings screen.
8-6 I Other Features
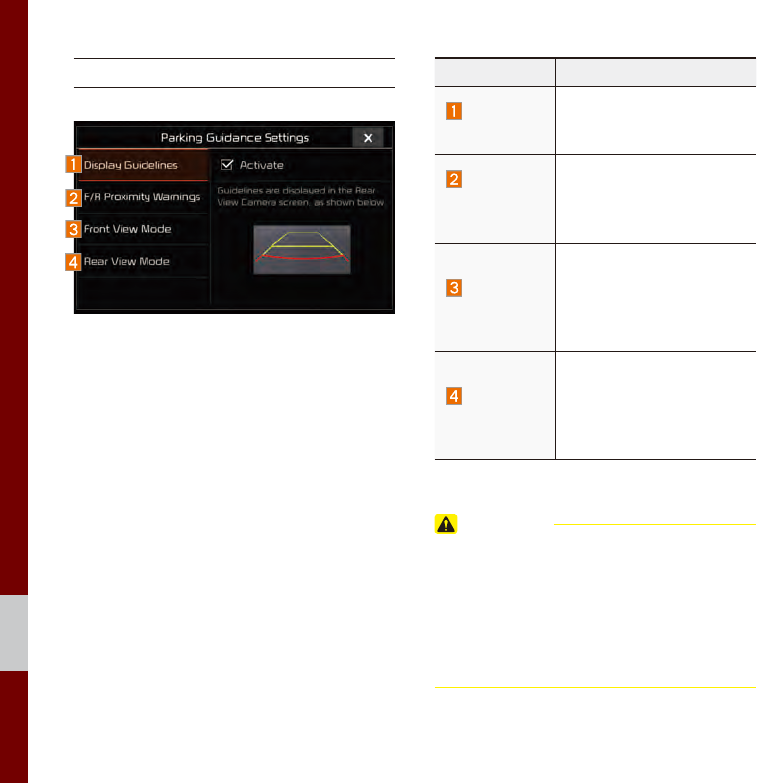
Parking Guidance Settings
Name Description
Display
Guidelines
Guidelines are displayed
in the Rear View Camera
screen, as shown below.
F/R
Proximity
Warnings
Provides a warning when
an object is in close prox-
imity to the front or rear of
the vehicle.
Front View
Mode
Displaying the front SVM,
select the basic display
mode of the camera
screen. (SVM, Front left,
Front right, and Front.)
Rear View
Mode
Displaying the rear SVM,
select the basic display
mode of the camera
screen. (SVM, Rear left,
Rear right, and Rear.)
CAUTION
• A wide-angle lens is installed for the front
detection camera to get a wider view, so
there may be some difference between the
actual distance and the distance that appears
onscreen. For safety, make sure to check the
front, right, and left sides for yourself.

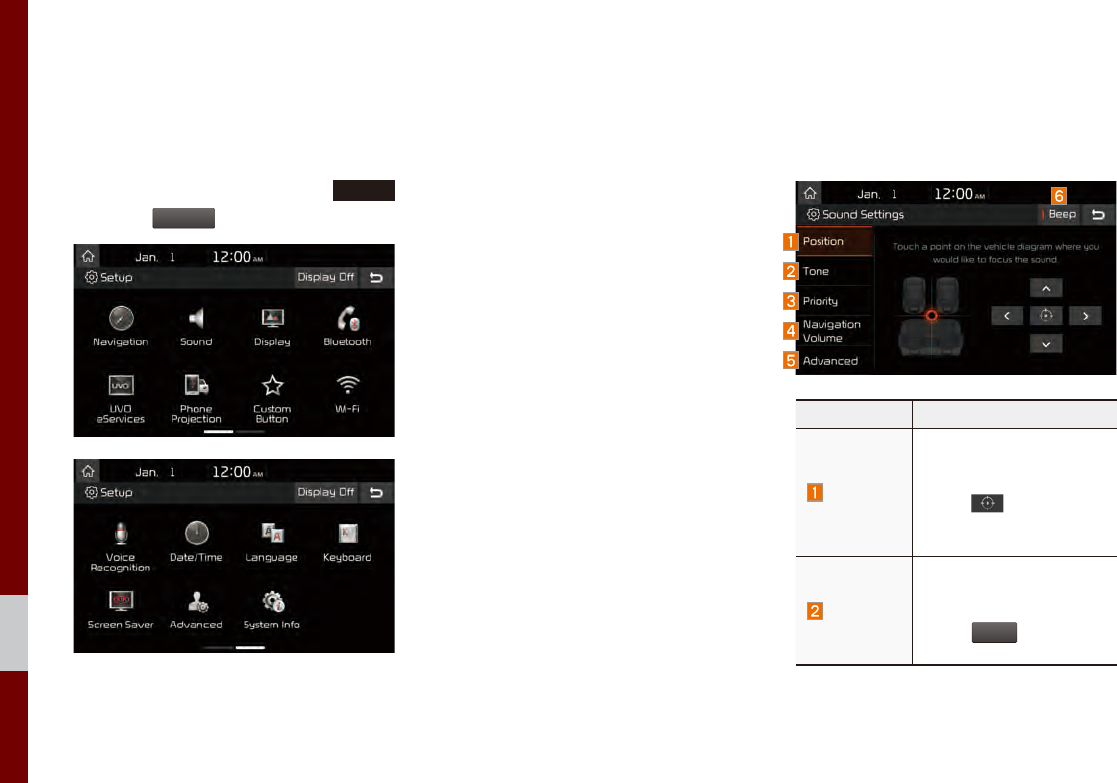
Setup
Navigation Settings
Sound Settings
Display Settings
Bluetooth Settings
UVO eServices Settings
Phone Projection Settings
Custom Button Settings
Wi-Fi Settings
Voice Recognition Settings
Date/Time Settings
Language Settings
Keyboard Settings
Screen Saver Settings
Advanced Settings
System Info
part.9 Setup
9-2 I Setup
Setup
Setup
Setup is the screen to control Audio sys-
tem settings.
To enter the screen, press the
SETUP
key or the
Setup
icon in All Menus.
Navigation Settings
For more details, refer to part 5. Navigation
Settings.
Sound Settings
Adjusts the sound effects for the whole
system.
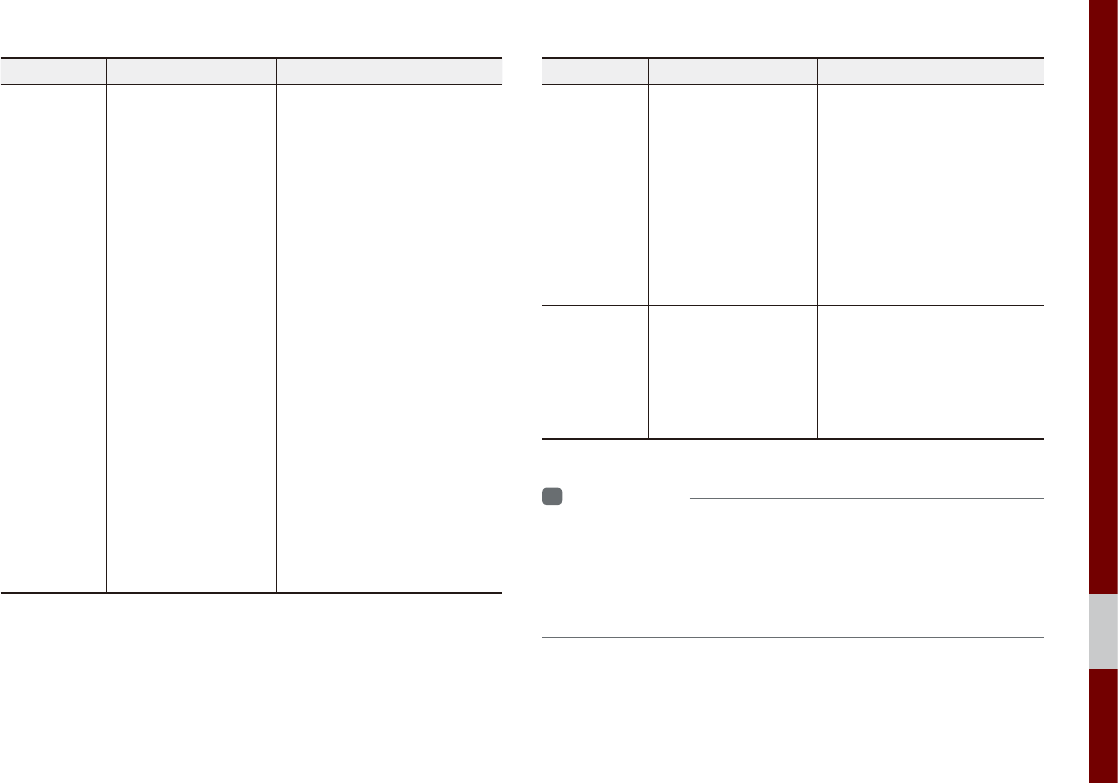
Features Description
Position
Select the Up/Down/Left/
Right button to control
sound positioning.
Select to concentrate
the sound on the center of
vehicle.
Tone
Drag the slide bar to con-
trol Bass/Middle/Treble
settings.
Select
Center
to initialize
the settings.
Setup I 9-3
09
Features Description
Priority
Sets the volume ratio
when reversing the car,
turning on the car’s igni-
tion, etc.
Navigation
Volume
Sets the method of nav-
igation guidance volume
adjustment.
Advanced
Select additional audio
options such as “Speed
Dependent Volume
Control” that automati-
cally controls Audio vol-
ume according to vehicle
speed.
Beep Select to activate a beep
when pressing buttons.
i
Information
• Advanced sound settings may differ according
to selected AMP option.
• The seat shape may differ according to
vehicle model.
Display Settings
Adjusts the level of illumination for the
entire system.
Features Description
Mode
Select any of LCD illu-
mination change modes:
Automatic (changes
the level automatically),
Daylight, and Night.
Illumination
Set the levels of illumina-
tion for day and night.
Select
Default
to initialize
the settings.
Default Resets the display to fac-
tory default settings
Display Off Provides the Display Off
(touch activation) function.
Bluetooth Settings
Changes Bluetooth phone settings.
Press the
SETUP
key ▶ Select
Bluetooth
icon.
9-4 I Setup
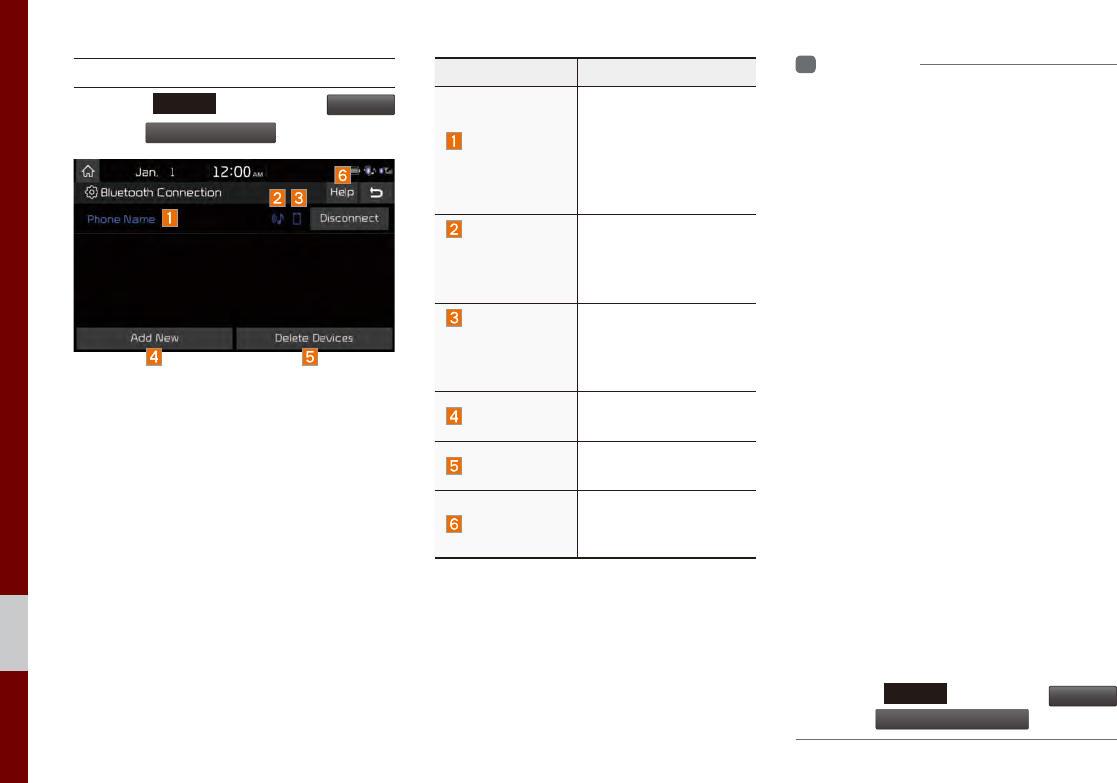
Bluetooth Connection
Press the
SETUP
key ▶ Select
Bluetooth
▶ Select
Bluetooth Connection
.
Features Description
Paired Device
List
Displays the paired
Bluetooth device list.
When selecting from
the list, the device is
connected or discon-
nected.
Bluetooth
Audio
Connection
Status
An icon appears when
you make a Bluetooth
Audio connection.
Bluetooth
Hands-Free
Connection
Status
An icon appears when
you make a Bluetooth
Hands-free connection.
Add New Register a new
Bluetooth device.
Delete Devices Select and delete a
paired device.
Help
Switches to the
Bluetooth Connection
Help screen.
i
Information
• Up to 5 Bluetooth devices can be paired.
• Only one Bluetooth device can be connected
at a time.
• During a Bluetooth device connection, another
device cannot be paired.
• When you delete a paired device, the Call
History and Contacts stored in the head unit
are also deleted.
• Bluetooth Hands-free and Bluetooth Audio
functions are supported.
• Hands-free and audio-supported devices,
such as a Bluetooth smartphone or audio, will
function normally.
• When a Bluetooth device is connected, if
the Bluetooth connection is unexpectedly
disconnected, due to being out of
communication range, the device powering
off, or a Bluetooth communication error, the
Bluetooth device automatically searches for
and connects to nearby Bluetooth devices.
• If the system is not stable, due to a vehicle-
Bluetooth device communication error, restore
the Default Factory Settings.
• For Default Factory Settings, the Bluetooth
Settings are reset to factory settings.
• Press the
SETUP
key ▶ Select
Bluetooth
▶ Select
Default Factory Settings
.
Setup I 9-5
09
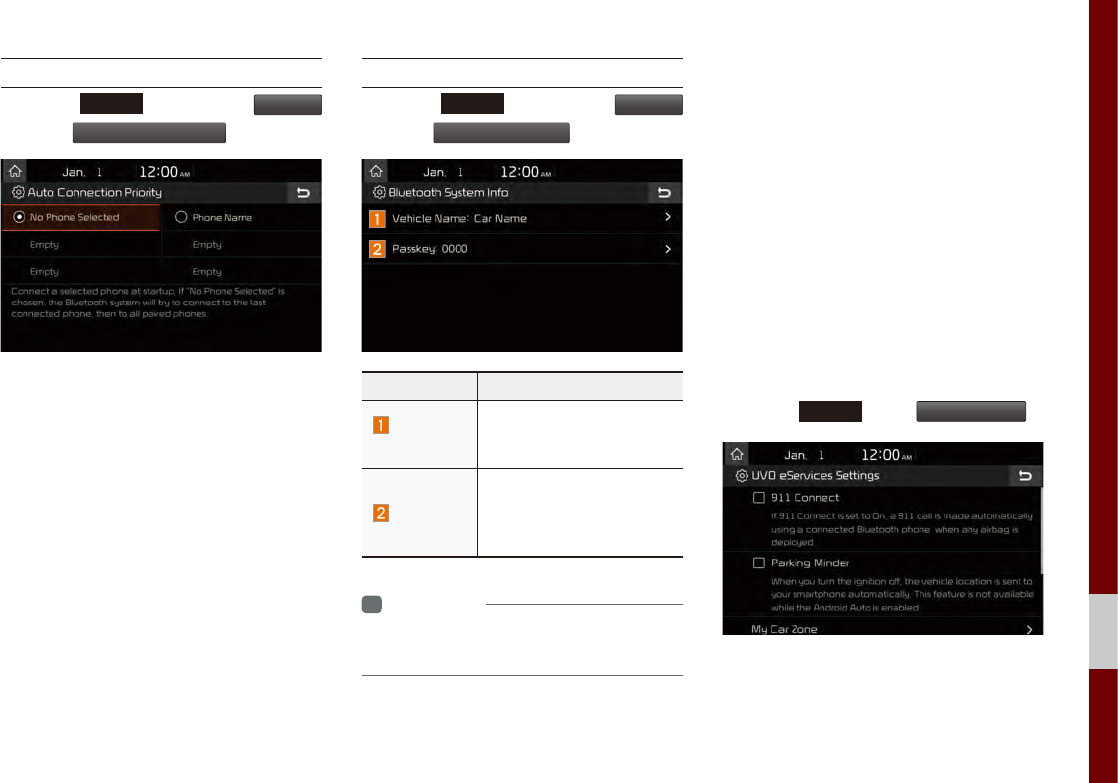
Auto Connection Priority
Press the
SETUP
key ▶ Select
Bluetooth
▶ Select
Auto Connection Priority
.
When the engine is running, the selected
Bluetooth device is automatically con-
nected. If you fail to connect the selected
device, the previously-connected device is
automatically connected, and if it also fails,
then it tries to connect all paired devices
sequentially.
Depending on auto connection priority,
connection to a device may take time.
Bluetooth System Information
Press the
SETUP
key ▶ Select
Bluetooth
▶ Select
Bluetooth System Info
.
Features Description
Vehicle
Name
You can change the
Bluetooth device name of
the vehicle.
Passkey
You can change the pass-
key used for Bluetooth
device authentication. the
initial passkey is 0000.
i
Information
• The vehicle name above is an example.
Check the actual information on the product.
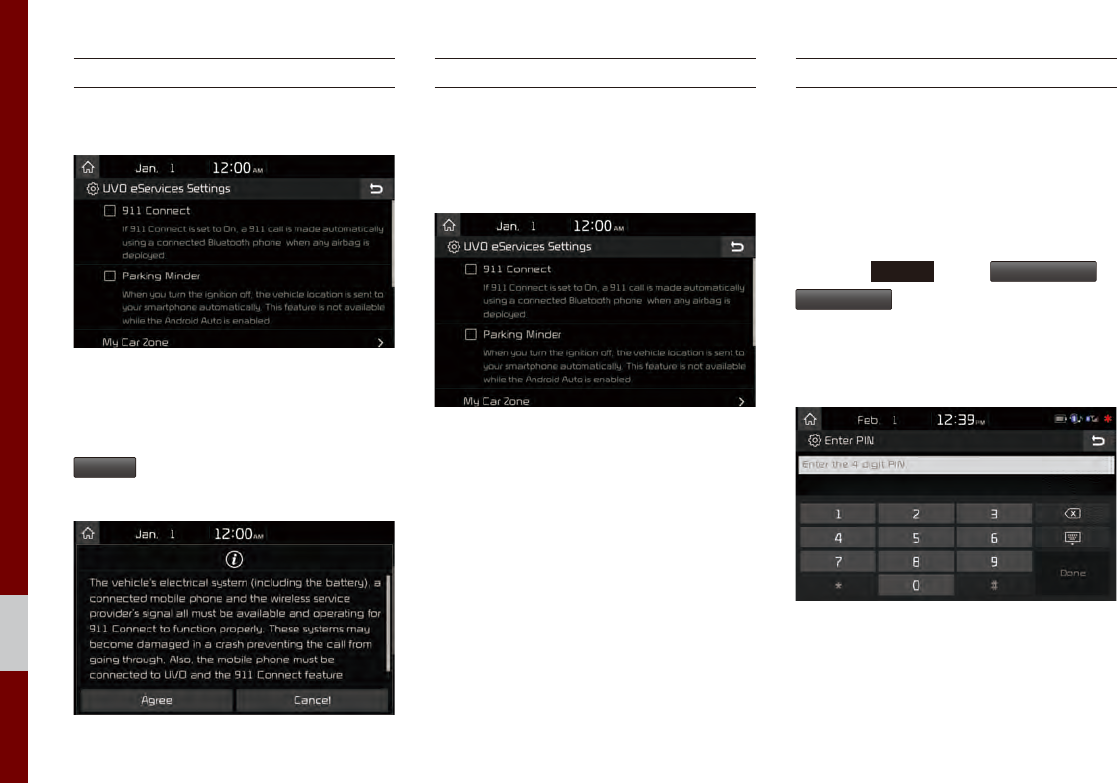
UVO eServices Settings
Within the eServices Settings screen,
UVO eServices related features can be set,
such as activating 911 Connect, Parking
Minder and setting the My Car Zone.
For safety reasons, My Car Zone Settings
cannot be adjusted while driving. Park
the vehicle before making any changes to
your settings.
Press the
SETUP
key ▶
UVO eServices
.
9-6 I Setup
911 Connect
This feature is used to turn on or off the
911 Connect feature.
When enabing this feature, you must first
agree to the 911 Connect tems of use.
After reading the tems of use, press the
Agree
button on the touch screen to
accept.
Parking Minder
If you want to send vehicle location to your
smartphone automatically when you turn
the ignition off, turn the Parking Minder
feature On.
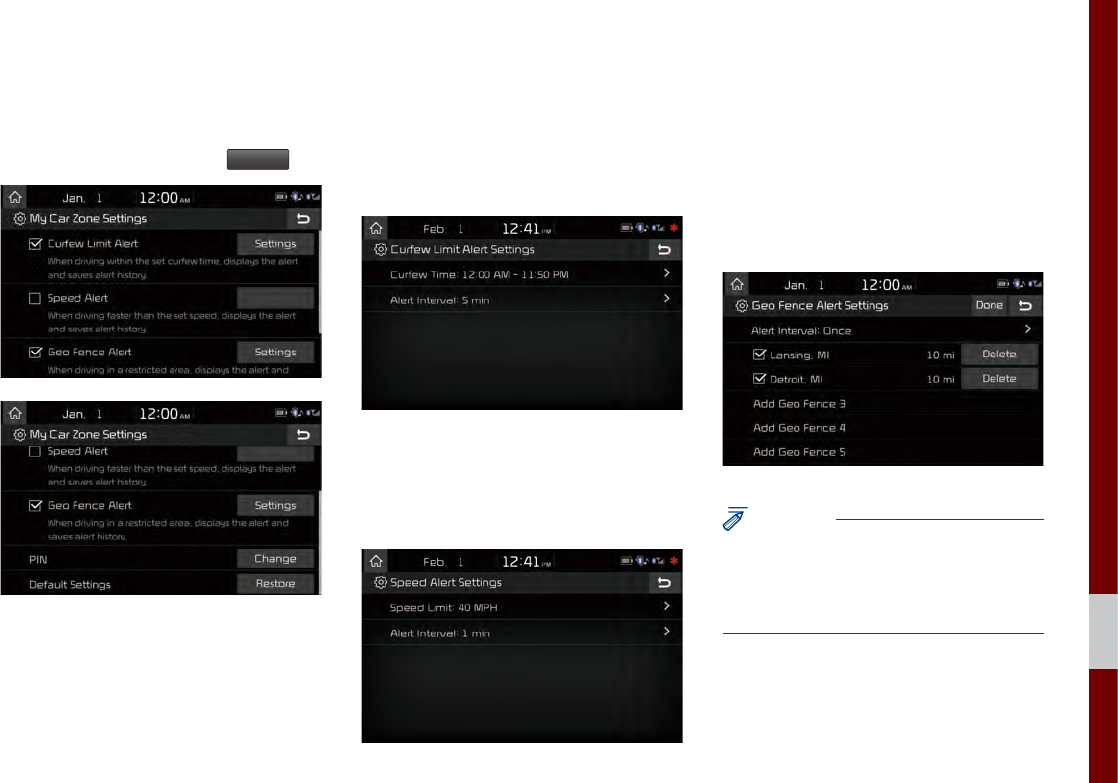
My Car Zone
This feature is used to set My Car Zone
(Curfew Limit, Speed) alert conditions.
My Car Zone Settings is unavailable when
UVO eServices has not been activated.
Press the
SETUP
key ▶
UVO eServices
▶
My Car Zone
.
The PIN must be entered to use My Car
Zone Settings.
Setup I 9-7
09
This screen is used to set Curfew Limit
and Speed Alert features.
Set the alert conditions On ▶
Settings
.
Curfew Limit Alert Settings
Within Curfew Limit Alert Settings, you can
set the Curfew Limit Alert Start and End
Time. You can also set the Alert Interval of
alerts upon Curfew Limit.
Speed Alert Settings
Within Speed Alert Settings, you can set
the vehicle speed limit and Alert Interval of
alerts upon overspeeding.
Geo Fence Alert Settings
Within Geo Fence Alert Settings, you can
set entry-restricted areas. Press Add Geo
Fence and set the center point and radius
of the desired Geo Fence on the Map
screen. You can also set the Alert Interval
of alerts upon Geo Fence alerts.
NOTICE
• Geo Fence Alert cannot be set if there is no
SD card with Maps. At least one Geo Fence
must be added to turn on Geo Fence Alert
Settings.
9-8 I Setup
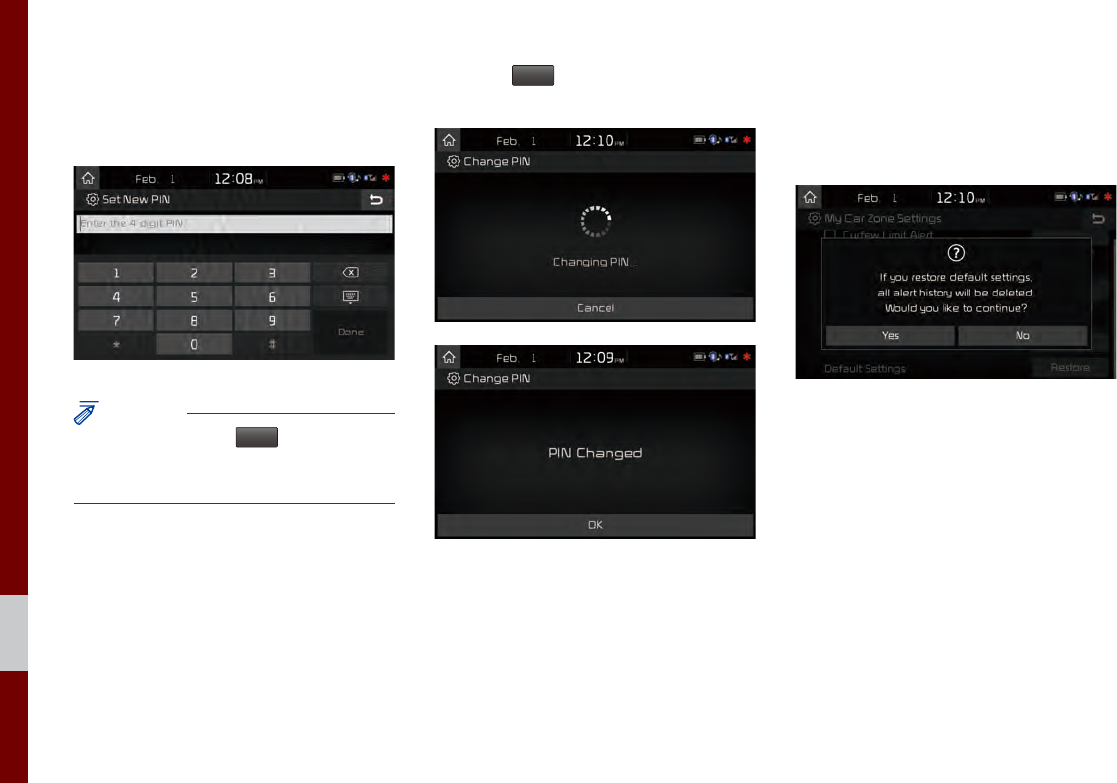
PIN
This feature is used to change the PIN to
enter My Car Zone Settings.
NOTICE
• Before pressing
Done
, ensure your
smartphone is connected to UVO eServices
system via USB cable.
Press the
Done
button to transmit the new
PIN to your My UVO com account.
Restore Factory Settings
This feature is used to restore all My Car
Zone alert history and settings back to
default state.
Setup I 9-9
09
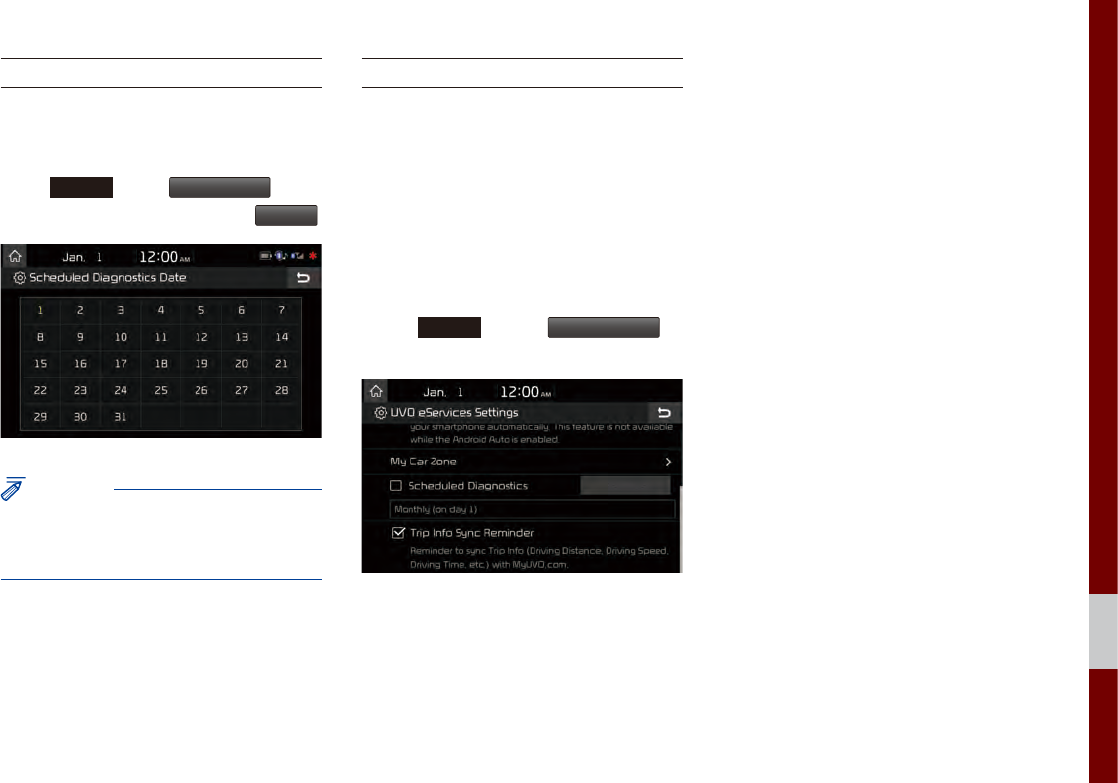
Scheduled Diagnostics
This feature is for setting when scheduled
diagnostics alerts display.
Press
SETUP
key ▶
UVO eServices
▶ Set
the Scheduled Diagnostics On ▶
Settings
.
NOTICE
• For months without the corresponding day,
the last day of the month will automatically be
set as the scheduled diagnostics date.
Trip Info Sync Reminder
Trip Info is a feature used to set whether
system displays alert when trip info(Driv-
ing Distance, Driving Speed, Driving Time,
etc). reaches 90% of memory.
UVO eServices must be activated to use
this feature.
Press
SETUP
key ▶
UVO eServices
▶
Set Trip Info Sync Reminder On.
Phone Projection Settings
For more details, refer to Phone Projection
guide.
9-10 I Setup
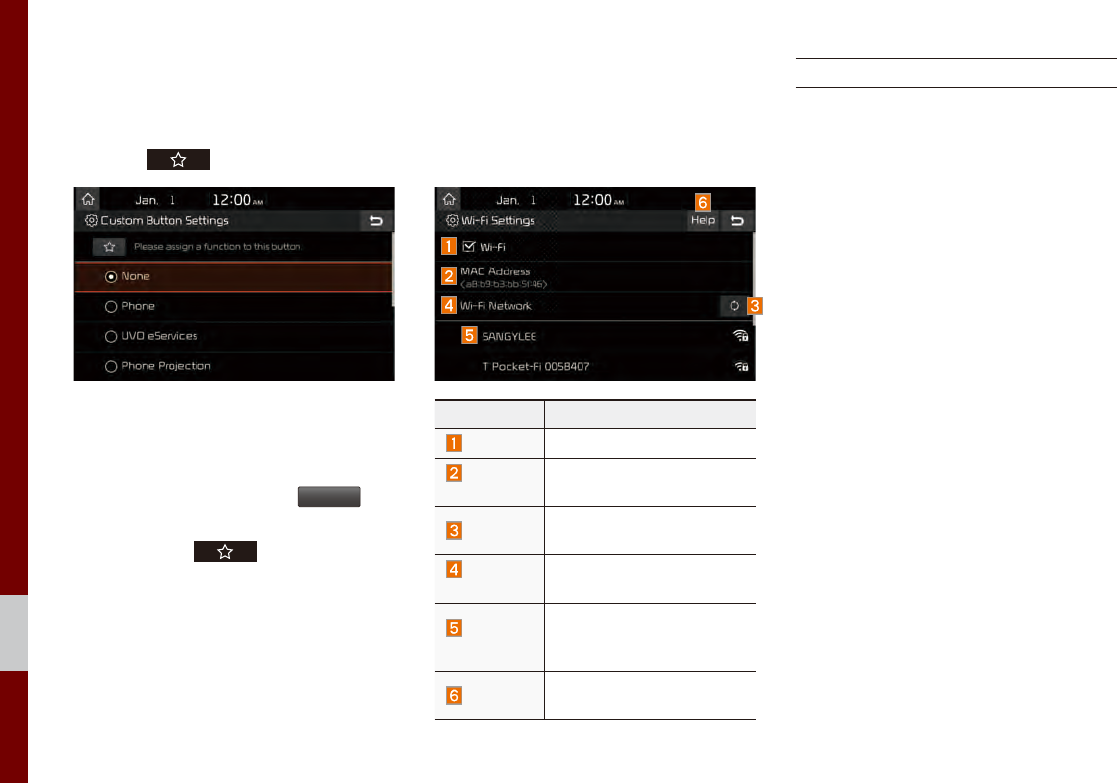
Custom Button Settings
You can choose the feature to be accessed
when the key is pressed.
Setting it to a feature that you frequently
use will allow you to access the feature
quickly and conveniently anytime.
For example, setting it to
My Menu
will
enable you to access the My Menu screen
by pressing the key.
Wi-Fi Settings
You can share a digital-device network
with the vehicle device through Wi-Fi.
Features Description
Wi-Fi Turn on/off Wi-Fi.
MAC
Address Displays the MAC address.
Refresh Searches available net-
works near the vehicle.
Wi-Fi
Network
Displays available network
AP (Access Point) names.
Add Wi-Fi
Network
Enter the network ID/pass-
word to connect to a hidden
network AP (Access Point).
Help Shows the Wi-Fi setup
guide.
How to Connect to a Network
1. In the Wi-Fi settings of a digital device,
activate Internet sharing (hot spot).
2. In the vehicle network list, select the
desired device to connect to. Enter the
password to connect, if any.
Setup I 9-11
09
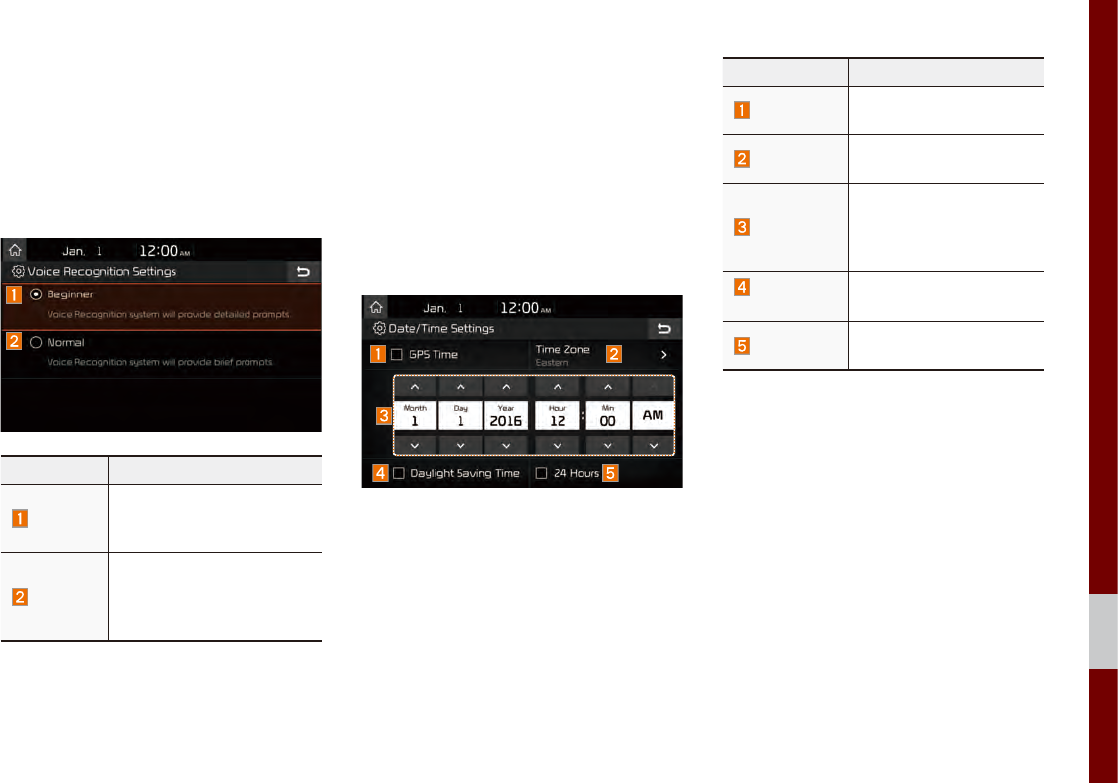
Voice Recognition
Settings
Configure how to make a call with
Voice Recognition Guidance and Voice
Recognition.
Features Description
Beginner
For beginners, the voice
recognition system pro-
vides voice prompts.
Normal
For normal users, the
voice recognition system
provides simple and short
voice guidances.
Date/Time Settings
Configure the settings for time and date.
Using the arrow buttons, you can change
the values. Date/Time settings do not
automatically change when crossing into
different time zones. The time must be
changed manually on this screen.
Features Description
GPS Time The time display is set
in GPS Time.
Time Zone Displays the time zone
selected by users.
Direct entry
If you tap any value, you
can directly enter the
number in the following
screen.
Daylight
Saving Time
The daylight saving time
(DST) is applied.
24 Hours The time display is set
in 24-hour format.
9-12 I Setup
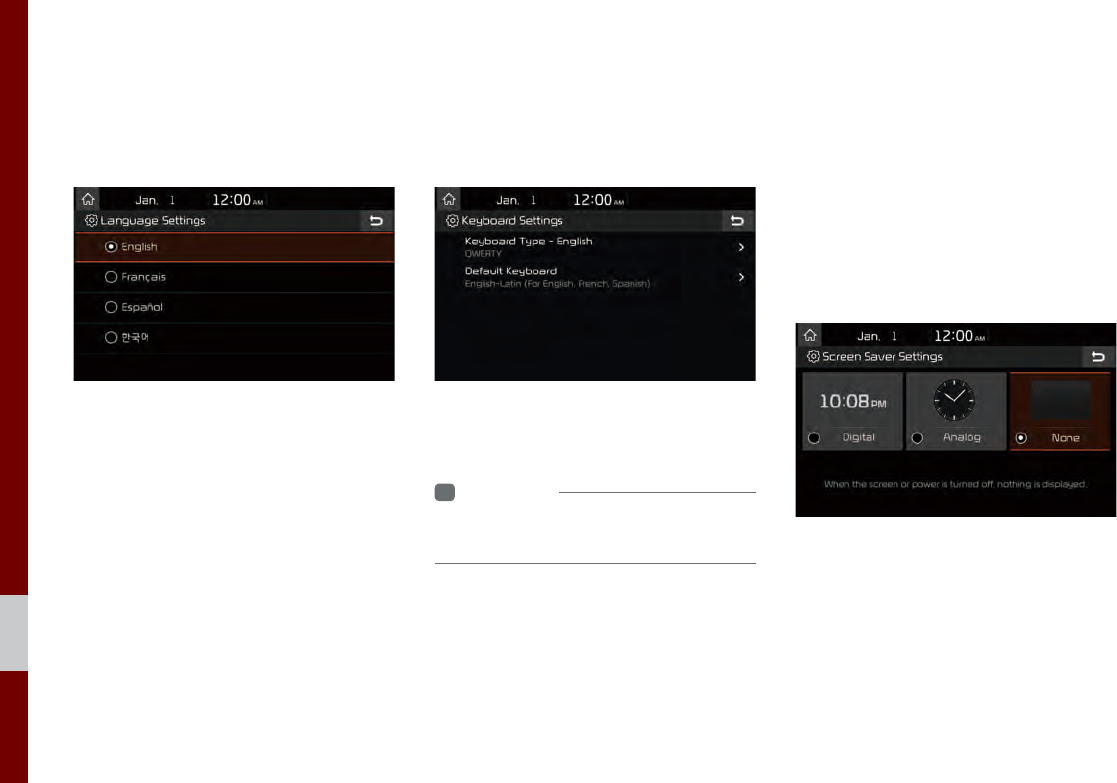
Language Settings
You can configure the displayed system
language.
When the language is changed, the sys-
tem language is automatically changed.
Unique data including MP3 file name is
not changed and voice recognition does
not support some languages.
Keyboard Settings
You can configure the keyboard layout for
each language.
You can configure ABCD or QWERTY
keyboards for the system.
i
Information
• Configured keyboard layouts are applied
to all input modes.
Screen Saver Settings
You can select any of the following screen
formats to be displayed when the screen
or power is turned off (Press and hold the
Power button).
• Digital clock and date
• Analog clock and date
• None
Setup I 9-13
09
Advanced Settings
Sets alerts per function if desired by the
user.
Features Description
Media
Change
Notifications
Sets whether to display
media information at the
top of the screen as the
next item is played when
not on the media screen.
Steering
Wheel Mode
Button
Sets the media to be
played when the steer-
ing wheel or rear seat (if
provided)
MODE
but-
ton is pressed.
Return to
Map: Set
Time
Sets the time after which
the screen will return to
the map screen from the
broadcast/music play-
back screen.
System Info
You can view software version.
Features Description
SW Info
System version informa-
tion and update details are
available. Select the
Update
button to update the system.
Default
When
Default
is selected,
the settings are changed to
factory defaults.
System Update
At the System Info screen, insert the
updated memory (USB or SD card) with
the latest file downloaded, and then select
the
Update
button to begin updating. The
system will then reboot automatically.
i
Information
• This product needs supplemented software
updates and additional functions, which
collectively may take some time to complete,
depending on the amount of data.
CAUTION
• If the power is disconnected or the USB or
SD card is removed during an update, the
data might be damaged. Please wait until the
update is complete while the engine is on.
• When
Default
is selected, it may delete all of
the data and settings so be cautious of your
action.

MEMO

Product Specification
Troubleshooting
FAQ
part.10 Appendix
10-2 I Appendix
Product Specification
TFT-LCD
Screen Size 8 inch (176.4 X 99.36 mm)
Resolution 384000 pixels (Resolution: 800 x 480)
Operating
Method TFT(Thin Film Transistor) Active Matrix
Viewing Angle Left/Right, Top/Bottom: ALL 89°
Internal Lighting LED
Radio
Channels FM: 87.5 MHz ~ 107.9 MHz(Step: 200 kHz)
AM: 530 kHz ~ 1710 kHz(Step: 10 kHz)
Sensitivity FM: Under 10 dBuV/AM: Under 35 dBu EMF
Distortion Factor Within 2 %
Wi-Fi Details
Frequency 2412 ~ 2462 MHz, 5180 ~ 5825 MHz
Specification IEEE802.11 b/g/n/a/ac
Supported
Bandwidth 20 MHz, 40 MHz, 80 MHz
Operating
Temperature -20 ~ +70 °C (-4 ~ +158 °F)
Common
Power Supply DC 14.4 V Operating
Power DC 9 V ~ DC 16 V
Sleep Current 1 mA (Head Unit Only)
Operating
Temperature
-20 ~ +70 °C
(-4 ~ +158 °F)
Storage
Temperature
-30 ~ +80 °C
(-22 ~ +176 °F)
Dimensions 213.6 X 131.5 X 89 mm (Main BOX)
Current
Consumption 2.5 A Weight 2.240 kg
Bluetooth®
Wireless Technology
Frequency
Range 2402 ~ 2480 MHz
Supported
Bluetooth
®
Specification
3.0
Supported
Profile
Handsfree(1.6), A2DP(1.2), AVRCP(1.4),
PBAP(1.0)
Bluetooth
Power Class 2 -6 ~ 4 dBm Number of
Channels 79 channels
Appendix

Appendix I 10-3
10
Troubleshooting
1. Errors which occur during the operation or installation of the
device may be mistaken as a malfunction of the actual device.
2. If you are having problems with the device, try the suggestions
listed below.
3. If the problems persist, contact your Kia dealer.
Problem Possible Cause
There are small red,
blue, or green dots on
the screen
• Because the LCD is manufactured with
technology requiring high point density,
a pixel or lighting deficiency may occur
within 0.01% of total pixels
The sound or image is
not working
•Has the Switch for the vehicle been
turned to [ACC] or [ON]?
• Has the SYSTEM been turned OFF?
The screen is being
displayed but sound is
not working
• Has the volume been set to a low level?
• Has the volume been muted?
When the power is
turned on, the corners
of the screen are dark
•The display appearing somewhat dark
after prolonged periods of use is normal
with LCD panels. It is not a malfunction
•If the screen is very dark, contact your
nearest Kia dealer for assistance
Sound is working from
only one speaker
•Are the positions of Fader or Balance
sound controls adjusted to only one
side?
Problem Possible Cause
Sound does not work in
AUX mode
•Are the audio connector jacks fully
inserted into the AUX terminal?
The external device is
not working
• Is the external device connected with a
standard connector cable?
Upon turning power on,
the most recent mode
screen is not displayed
Within modes that play files by reading
external sources, such as USB, iPod, or
Bluetooth
®
streaming mode, the most
recently played mode screen prior to turn-
ing off power may not properly load
•If the corresponding device is not con-
nected, the mode operated prior to the
most recent mode will operate
•If the previous mode still cannot be
properly played, the mode operated
prior to that will operate

10-4 I Appendix
Problem Possible Cause Countermeasure
The power
does not
turn on
The fuse is discon-
nected
• Replace with a suitable fuse
• If the fuse is disconnected
again, please contact
your point of purchase or
Kia dealer
Device is not properly
connected
• Check to see that the
device has been properly
connected
The system
does not
play
The vehicle battery is
low
• Charge the battery If the
problem persists, contact
your point of purchase or
Kia dealer
Problem Possible Cause Countermeasure
The image
color/tone
quality is
low
• The brightness,
saturation, hue,
and contrast levels
are not set properly
• Properly adjust the bright-
ness, saturation, hue, and
contrast levels through
Display Setup
Sound does
not work
• The volume level
is set to the lowest
level
• The connection is
not proper
• The device is
currently fast-for-
warding, rewinding,
scanning, or play-
ing in slow mode
• Adjust the volume level
• Check to see that the
device has been properly
connected
• The sound will not work
when the device is fast-for-
warding, rewinding, scan-
ning, or playing in slow
mode
The sound
or image
quality is
low
• Vibration is occur-
ring from where
the conversion
switch has been
installed
• Image color/tone
quality is low
• The sound may be
short-circuited and the
image distorted if the
device vibrates
• The device will return to
normal once vibrations stop
Appendix I 10-5
10
Problem Possible Cause Countermeasure
The USB
does not
work
• USB memory is
damaged
• Please use the USB after
formatting it.
• USB memory has
been contaminated
• Remove any foreign sub-
stances on the contact
surface of the USB memory
and multimedia terminal
• A separately pur-
chased USB HUB
is being used
•Directly connect the USB
memory with the multime-
dia terminal on the vehicle
• A USB extension
cable is being
used
• Directly connect the USB
memory with the multime-
dia terminal on the vehicle
• A USB which is
not a Metal Cover
Type USB Memory
is being used
• Use standard USB
Memory
• An HDD type, CF,
SD Memory is
being used
• Use standard USB
Memory
• There are no
music files which
can be played
• Only MP3, WMA file
formats are supported.
Please use only the sup-
ported music file formats
Problem Possible Cause Countermeasure
The iPod is
not recog-
nized even
though it
has been
connected
• There are no titles
which can be
played
• Use iTunes to download
and save MP3 files into the
iPod
• The iPod firmware
version has not
been properly
updated
• Use iTunes to update
the firmware version and
reconnect the iPod with the
device
• The iPod device
does not recog-
nize downloads
• Reset the iPod and recon-
nect with the device
Bluetooth
does not
work or
its limited
functions are
available
• Bluetooth on your
mobile phone is
set to OFF
• Set it to ON
• The Bluetooth
connection is not
made
• Make the connection
active
i
Information
• While operating the device, if an abnormality occurs that cannot be
corrected with the above described measures, press the
RESET
key to
reset the system.
• Press and hold the
RESET
key (more than 1 second). The device power
will turn off and the system will reset.

10-6 I Appendix
FAQ
About Pairing Mobile Phones
Q I cannot pair my mobile phone. What is the cause?
A Check to see that the mobile phone supports Bluetooth® func-
tion. Verify if Bluetooth on the cell phone is set to OFF. If so, set
it to ON. If the cell phone still can’t be registered, try again after
turning Bluetooth off and on, or delete the device registration on
the multimedia system and cell phone and then register the cell
phone again.
Q What is the difference between pairing a mobile phone and con-
necting a mobile phone?
A Pairing occurs through authenticating the head unit and mobile
phone. Mobile phones paired to the head unit can be connected
and disconnected until the paired mobile phone is deleted from
the system. Bluetooth® Handsfree features, such as making/
answering calls or managing contacts, are supported only in
mobile phones connected with the head unit.
Q What is a Passkey?
A A passkey is the password used to authenticate the connection
between the head unit and mobile phone. The passkey only
needs to be entered once when pairing the mobile phone for
the first time.
The initial passkey is 0000. You can change it with
SETUP
▶
Bluetooth
▶
Bluetooth System Info
▶
Passkey
menu options.
Appendix I 10-7
10
About Making/Answering Phone Calls
Q How can I answer a call?
A When there is an incoming call, a notification pop-up will
become displayed. To answer the incoming call, select the
Accept
button on the screen or the key on the steer-
ing
wheel control
.
To reject the call, select the
Reject
button on the screen or
press the key on the steering wheel control.
Q What should I do if I am talking on the Handsfree but want to
switch the call to the mobile phone?
A While on a call, press and hold (more than 0.8 seconds)
the key on the steering
wheel control
or select the
Use Private
button at the bottom of the Phone screen to switch
the call to your mobile phone.
About
Bluetooth
® Wireless Technology/
Head Unit Use Environment
Q What is the range of my wireless connection?
A The wireless connection can be used within 15 yards.
Q How many mobile phones can be paired?
A It is possible to pair up to five mobile phones.
Q Why is call quality sometimes poor?
A
Check the reception sensitivity of the mobile phone when call
quality becomes worsened. The call quality may deteriorate when
the signal strength is low. Call quality may also worsen if metal
objects, such as beverage cans, are placed near the mobile
phone. Check to see if there are metal objects in the vicinity of
the mobile phone. The call sound and quality may differ depend-
ing on the type of mobile phone.

Important Information
Before using your Multimedia system, read and follow all instructions and safety information provided in this end user manual ("User's
Guide"). Not following precautions found in this User's Guide can lead to an accident or other serious consequences.
Keep User's Guide in Vehicle
When kept in the vehicle, the User's Guide will be a ready reference for you and other users unfamiliar with the Multimedia system. Please
make certain that before using the system for the first time, all persons have access to the User's Guide and read its instructions and
safety information carefully.
Warning
Operating certain parts of this system while driving can distract your attention away from the road, and possibly cause an accident or other
serious consequences. Do not change system settings or enter data non-verbally (using your hands) while driving. Stop the vehicle in a
safe and legal manner before attempting these operations. This is important since while setting up or changing some functions as you may
to distract your attention away from the road and remove your hands from the wheel.

10
General Operation
Voice Command Control
Functions within the Multimedia system may be accomplished using only voice commands. Using voice commands while driving allows
you to operate the system without removing your hands from the wheel.
Prolonged Views of Screen
Do not access any function requiring a prolonged view of the screen while you are driving. Pull over in a safe and legal manner before
attempting to access a function of the system requiring prolonged attention. Even occasional short scans to the screen may be hazardous
if your attention has been diverted away from your driving task at a critical time.
Volume Setting
Do not raise the volume excessively. Keep the volume at a level where you can still hear outside traffic and emergency signals while
driving. Driving while unable to hear these sounds could cause an accident.
Navigation Features
Any navigation features included in the system are intended to provide turn by turn instructions to get you to a desired destination. Please
make certain all persons using this system carefully read and follow instructions and safety information fully.

Distraction Hazard
Some navigation features may require manual (non-verbal) setup. Attempting to perform such set-up or insert data while driving can seri-
ously distract your attention and could cause an accident or other serious consequences. Stop the vehicle in a safe and legal manner
before attempting these operations.
Let Your Judgment Prevail
Any navigation features are provided only as an aid. Make your driving decisions based on your observations of local conditions and exist-
ing traffic regulations. Any such feature is not a substitute for your personal judgment. Any route suggestions made by this system should
never replace any local traffic regulations or your personal judgment or knowledge of safe driving practices.
Route Safety
Do not follow the route suggestions if doing so would result in an unsafe or illegal maneuver, if you would be placed in an unsafe situation,
or if you would be directed into an area that you consider unsafe. The driver is ultimately responsible for the safe operation of the vehicle
and therefore, must evaluate whether it is safe to follow the suggested directions.
Potential Map Inaccuracy
Maps used by this system may be inaccurate because of changes in roads, traffic controls or driving conditions. Always use good judg-
ment and common sense when following the suggested routes.

10
Emergency Services
Do not rely on any navigation features included in the system to route you to emergency services. Ask local authorities or an emergency
services operator for these locations. Not all emergency services such as police, fire stations, hospitals and clinics are contained in the
map database for navigation features.
Use of Speech Recognition Functions
Speech recognition software is inherently a statistical process which is subject to errors. It is your responsibility to monitor any
speech recognition functions included in the system and address any errors.

FCC Warning
This equipment has been tested and found to comply with the limits for a Class B digital device, pursuant to part 15 of the FCC Rules.
These limits are designed to provide reasonable protection against harmful interference in a residential installation.
This equipment generates, uses and can radiate radio frequency energy and, if not installed and used in accordance with the instructions,
may cause harmful interference to radio communications. However, there is no guarantee that interference will not occur in a particular
installation. If this equipment does cause harmful interference to radio or television reception, which can be determined by turning the
equipment off and on, the user is encouraged to try to correct the interference by one or more of the following measures:
• Reorient or relocate the receiving antenna.
• Increase the separation between the equipment and receiver.
• Connect the equipment into an outlet on a circuit different from that to which the receiver is connected.
• Consult the dealer or an experienced radio/TV technician for help
This device complies with part 15 of the FCC Rules. Operation is subject to the following two conditions: (1) This device may not cause
harmful interference, and (2) this device must accept any interference received, including interference that may cause undesired operation.
Caution: Any changes or modifications to this device not expressly approved by the party responsible for compliance could void your
authority to operate the equipment.
This equipment complies with FCC radiation exposure limits set forth for an uncontrolled environment.
This equipment should be installed and operated with minimum 20 cm between the radiator and your body. This transmitter must not be
collocated or operating in conjunction with any other antenna or transmitter unless authorized to do so by the FCC.

IC Warning
IC Warning
"This device complies with Industry Canada licence-exempt RSS standard(s)."
Operation is subject to the following conditions: (1) this device may not cause interference, and (2) this device must
accept any interference, including interference that may cause undesired operation of the device.
Le présent appareil est conforme aux CNR d'Industrie Canada applicables aux appareils radio exempts de licence.
L'exploitation est autorisée aux deux conditions suivantes : (1) l'appareil ne doit pas provoquer de brouillage, et (2)
l'appareil doit accepter tout brouillage radioélectrique subi, même si le brouillage est susceptible d'en
compromettre le fonctionnement.